Although WooPayments makes charging your customers as simple as possible, it’s still helpful to be familiar with the various ways in which money can move through your site and your account. This document explains how WooPayments presents information to you about where your money came from and where it’s going.
Overview
↑ Back to topThe Payments > Overview page gives you a brief summary of how money is flowing through your WooPayments account.
The top section shows your account balance. Click the question mark icons to learn more about what each figure means, or consult this document.
If you have added multiple bank accounts to receive payouts in different currencies, a dropdown is shown so you can view your balance in each currency.

Occasionally, the top box may change, such as if you have a dispute nearing its deadline or if there’s another time-sensitive action needed for your account. To keep your store and WooPayments account running smoothly, it is recommended that you attend to any tasks that appear here.

Below that, the Payouts section shows a list of your recent payouts and their amounts.

The Account Details section shows your account’s status. In most cases, your account will say “Connected” and payouts will say “Enabled.” However, if there is some problem with your account (e.g. payouts have been suspended), that will be shown here.

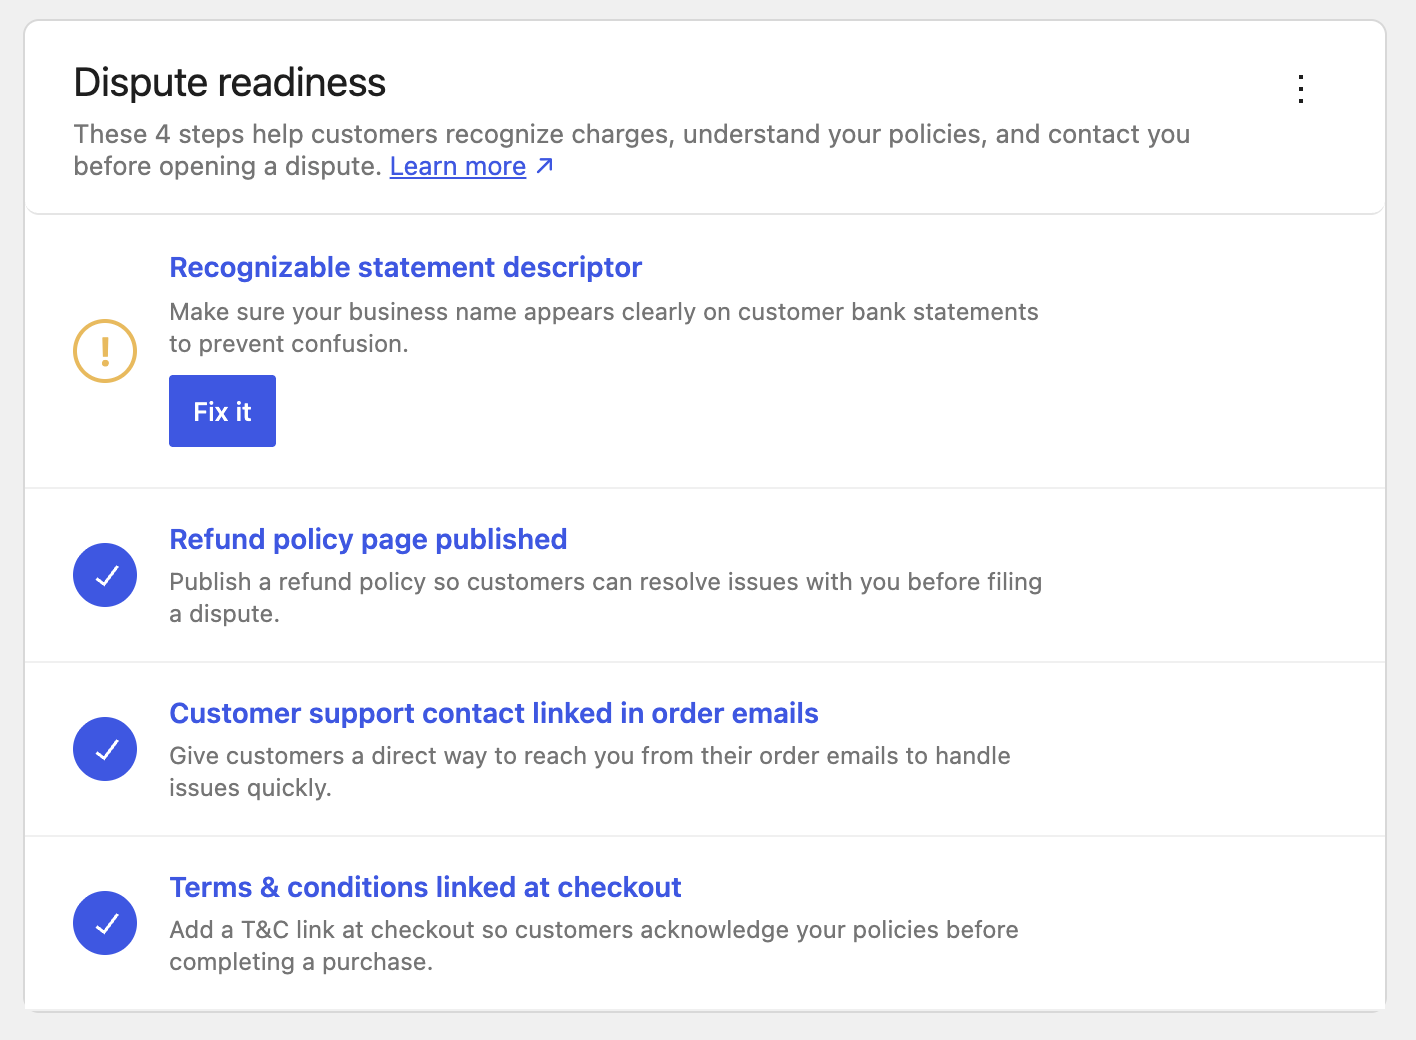
The Dispute Readiness section provides a simple checklist of actions you can take to help prevent disputes. Once all the items are complete, you can dismiss this box.
Finally, the Payments > Overview page will also show a list of messages containing information about your account, tips on using WooPayments, and other such information. Each one can be acted on or dismissed.

Payouts
↑ Back to topPayouts are when some or all of your account balance is sent to your bank account or debit card. Payouts occur automatically by default, but eligible merchants can also request instant payouts.
WooPayments provides all the relevant information about your payouts under the Payments > Payouts menu. On that page, you can:
- View a list containing all past payouts.
- See each payout date, amount, currency, and the account to which it was sent.
- View which transactions are associated with each given payout.

Each payout has a status associated with it. Here are the common ones and what they mean:
- Completed (Paid): The payout was successfully sent to your bank account.
- Completed (Deducted): This is actually a withdrawal due to a negative balance.
- In Transit: The payout is on the way to your bank, but not there yet.
- Pending: The payout has been cleared but has not been submitted to the bank.
- Failed: There was a problem with the payout. It will be retried in 24 hours.
By clicking on any payout, you can open the payout details page, where more information about that particular payout is shown.
Filtering payouts
↑ Back to topIf you wish, you can filter the list of payouts so that it contains only the ones you’re interested in viewing. To do that, follow these steps:
- Click the Show dropdown menu at the top of the list.
- Click Advanced filters.
- Click Add a filter.
- Filter the list by Date, Status, or both.
- When you’ve added the filters you want, click the Filter button.

Exporting payouts
↑ Back to topYou can also export payouts in the form of a CSV file for later use in Microsoft Excel, Google Sheets, Apple’s Numbers, or other spreadsheet editing applications.
To download all your payouts, simply go to Payments > Payouts and click the Export button at the top of the list.

You can also filter the payouts list first and then click Export to download only those payouts you’re interested in.
Bank reference IDs
↑ Back to topA bank reference ID is a unique identifier for a payout that banks may provide to help track down missing or delayed payouts. If a reference ID is available for a given payout, it’ll be shown in the payouts list.

If you suspect a payout is missing from your bank account, you can contact your bank, provide the reference ID, and see if they can help find the funds. It may be best to wait 5 working days before doing this, since internal bank processes may face delays.
Some other things to note about bank reference IDs:
- They are not supported for payout accounts in Japan.
- They are not supported for payouts that occurred before December 2024.
Transactions
↑ Back to topWooPayments provides all the relevant information about your transactions under the Payments > Transactions menu. This page includes information such as the date and time of a transaction, the amount, the fees, the order number, and so on.
To access the transactions list view, go to Payments > Transactions.

NOTE: The Transactions page only shows transaction details for orders paid for with WooPayments. It does not show information for orders paid for using other gateways you might have active on your site.
If the payment was authorized but not captured, those will appear under the Uncaptured tab at the top. For further details on that workflow, see our authorize and capture guide.

Each transaction has a type associated with it. Here are the common ones and what they mean:
- Charge: The customer paid for their order using their credit or debit card.
- Payment: The customer paid using a non-card method, like Bancontact.
- Refund: The customer’s money was sent back to their credit or debit card.
- Payment Refund: The customer’s money was sent back to their non-card method.
- Dispute: The customer disputed the charge, and the dispute funds were deducted from your account pending the bank’s decision.
- Dispute reversal: You won the dispute, and the disputed funds were returned to your account.
By clicking on any transaction, you can open the payment details page, where more information about that particular transaction is shown.
Searching transactions
↑ Back to topIf you need to quickly find a specific transaction or set of transactions, you can use the search bar at the top of the list. You can search by order number, customer name, or billing email.

Filtering transactions
↑ Back to topIf you wish, you can filter the list of transactions so that it contains only the ones you’re interested in viewing. To do so:
- Click the Show dropdown menu at the top of the list.
- Click Advanced filters.
- Click Add a filter.
- Filter as needed by payment method, customer currency, and other factors.
- When you’ve added the filters you want, click the Filter button.

Exporting transactions
↑ Back to topYou can also export transactions in the form of a CSV file for later use in Microsoft Excel, Google Sheets, Apple’s Numbers, or other spreadsheet editing applications.
To download all your transactions, simply go to Payments > Transactions and click the Export button at the top of the list.

You can also filter the transactions list first and then click Export to download only those transactions you’re interested in.
A note on card reader fees
↑ Back to topIf you use a card reader to take in-person payments, the monthly card reader fee is deducted from your WooPayments account balance, not from any specific payment.
For this reason, the card reader fee will show in the transactions list even though it’s not technically a transaction. Here’s what that looks like:

By clicking the card reader fee in the list, you can see more details: which reader the fee was for, it’s status, the number of transactions that month, and the fee amount.
Refunding a payment
↑ Back to topIf a customer contacts you to request a refund, and your refund policy permits it, you can refund their payment from your administrator dashboard via either:
- Editing an order at WooCommerce > Orders
- The transaction details at Payments > Transactions.
NOTE: In certain cases, you may not be able to issue a refund for an order. Mainly, this happens when there’s a dispute on all or part of the charge, or when your account balance has gone negative for some reason.
Via the edit order page
↑ Back to topTo process a refund via the edit order page:
- Go to WooCommerce > Orders.
- Search for the order using the customer name, email, or order number.
- Click the order to open it.
- Scroll down a bit below the items list and click the Refund button.

- In the Qty column, adjust the quantity of each item to be refunded.
- If you want to provide a full refund, ensure that the quantity to be refunded is equal to the quantity that the customer originally purchased, and that any shipping charges are also being refunded (if your policies permit that).

- Optionally enter something in the Reason for refund box.
- Click the Refund via WooPayments button.
Via the transaction details
↑ Back to topTo process a full refund via the transaction details page:
- Go to Payments > Transactions.
- Search for the transaction using the customer name, email, or order number.
- Click the order to open it.
- Select the three dots next to the Payment ID number.

- Click Refund in full.
NOTE: Refunding via the transaction details currently only supports full refunds. Selecting the Partial refund option will direct you to the edit order page, and you can follow the directions for issuing a refund via the edit order page here.
- Optionally identify the reason for the refund.
- Select the Refund transaction button to process the refund.

Refund durations
↑ Back to topRefunds are processed immediately. However, depending on the customer’s bank, it can take anywhere from 5 to 10 business days before they get their money back in their account.
If your customer doesn’t see the refund after 10 business days and the original charge is still visible on their bank statement, they should contact their bank for more information.
Reversals
↑ Back to topIf a refund is sent shortly after the original charge, the refund might be processed as a “reversal.” What this means is that the original charge will simply disappear from the customer’s statement, and a separate credit is not issued.
Thus, if you refund a customer soon after they ordered, but they never see the amount added back to their statement, you can simply ask them to review their statement for the original charge. It should be gone, as if they never transacted with you at all.
Tracing refunds
↑ Back to topWhen you refund a payment, a refund request is submitted to our payment processor. Your customer usually gets the refund in 5-10 business days, depending on their bank.
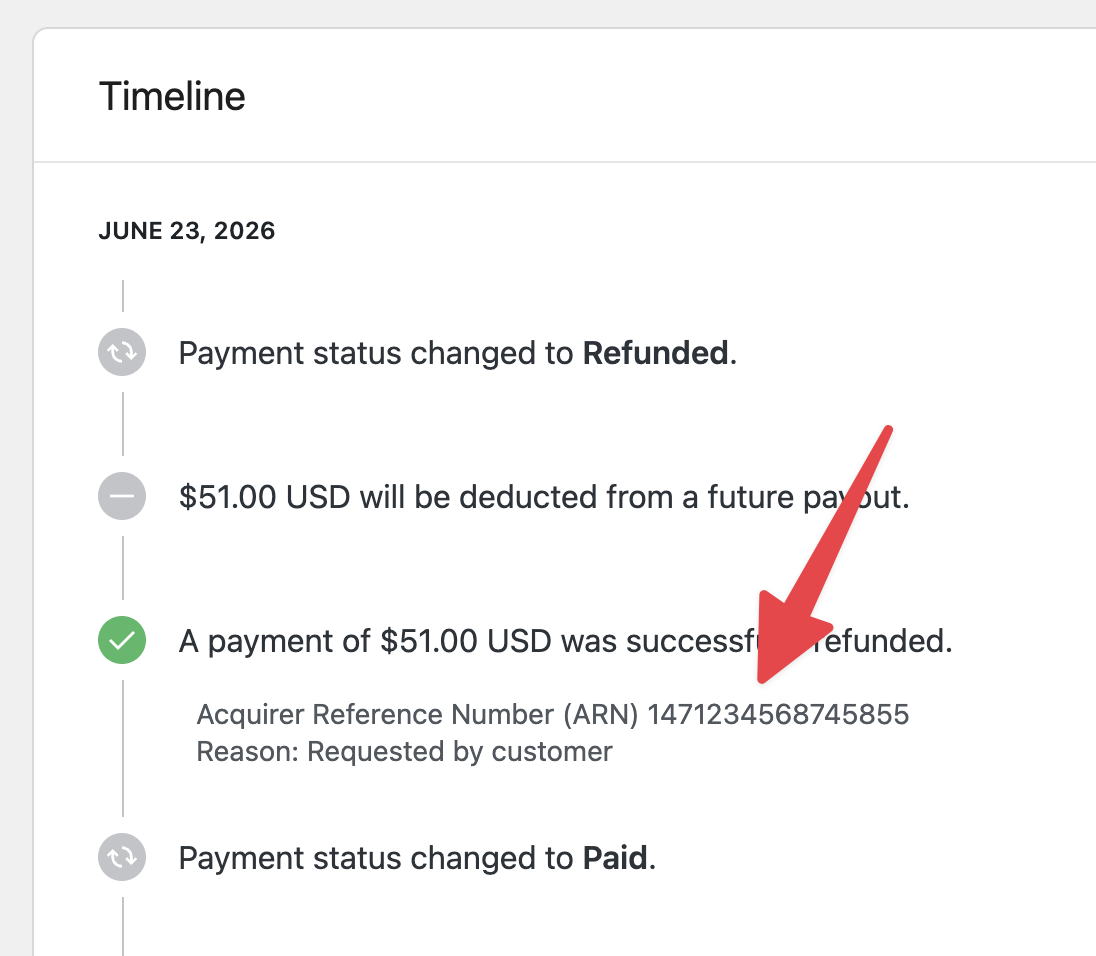
Sometimes customers get anxious and will contact you if they cannot find their refund. If this happens, you may be able to provide them with the Acquirer Reference Number (ARN). Customers can then contact their bank and provide them the ARN, which allows the bank to “trace” the refund in their system.
NOTE: ARNs are available for Visa and Mastercard charges only.
To locate the ARN for a specific payment:
- Go to Payments > Transactions in your WordPress dashboard.
- Find the refunded transaction in the list and click it.
- In the Timeline section, locate the ARN under the entry for the refund.
- Provide the ARN to your customer and instruct them to contact their bank.
Keep in mind that missing refunds could also be due to reversals.
Pending refunds
↑ Back to topPending refunds can happen for two reasons:
- The customer’s bank is still processing the refund, or…
- Your account balance cannot cover the refunded amount.
If you have enough money in your balance to cover the refund, but it’s still pending, that means the refund process is still ongoing at the customer’s bank. All you need to do is wait. Once their bank completes the refund process, that will be indicated in an additional order note.
If your balance does not have enough money to cover the refund, it will stay in the pending status until your balance is large enough to cover it. When your balance is large enough, the refund will be issued automatically and another order note will be added that indicates that the refund has been processed.
Of course, any delays in refunding customers can reflect negatively on your business, so we would strongly suggest avoiding refund delays if at all possible.
Pending refunds that are still pending after 45 days will be cancelled.
Refund failures
↑ Back to topRefunds can sometimes fail if your customer’s bank or card issuer can’t process it for some reason. For example, closed bank accounts or other problems with the customer’s card can cause failed refunds.
If this occurs, WooPayments will add an order note with the reason, as well as change the order’s status to Failed in order to draw your attention to it.

In these cases, you can either work with the customer to correct the issue before trying to the refund again, or you can refund them via some other means.
Preventing refund delays
↑ Back to topIn some cases, you may need a sufficient WooPayments account balance in order to process a refund. If your account balance cannot cover the refund, your balance may go negative or the refund may not succeed at all.
To prevent this, you can use the future refunds or disputes (FROD) balance. In brief, it’s a special bucket of funds inside your WooPayments account that will be drawn from first when your account balance is debited for incoming refunds or disputes.
Proactively adding money to your FROD balance can help prevent delays in refunding your customers, leading to a better experience for them and fewer disputes for you.
NOTE: We also suggest that you add funds to the FROD balance if your account is <6 months old and you take high-value orders (>$500 USD) via BNPL methods. This is a common scenario in which failed refunds can occur. Proactively funding the FROD balance is a good way to avoid this.
Failed payments
↑ Back to topPayment failures (also called “declines”) can happen for a number of reasons. Most often, they occur because the card issuer has declined the charge, or some other system has blocked it. Only rarely do they signify an error with WooPayments.
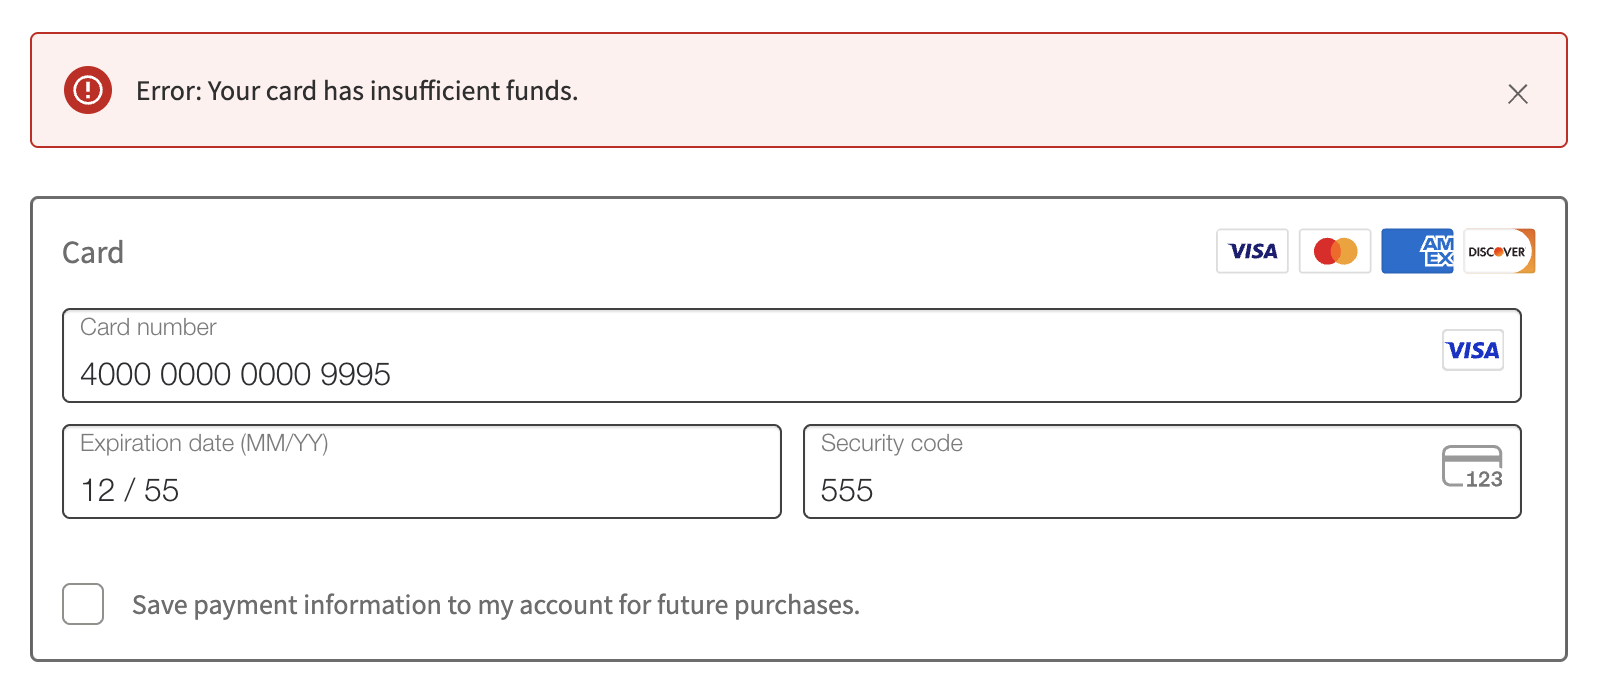
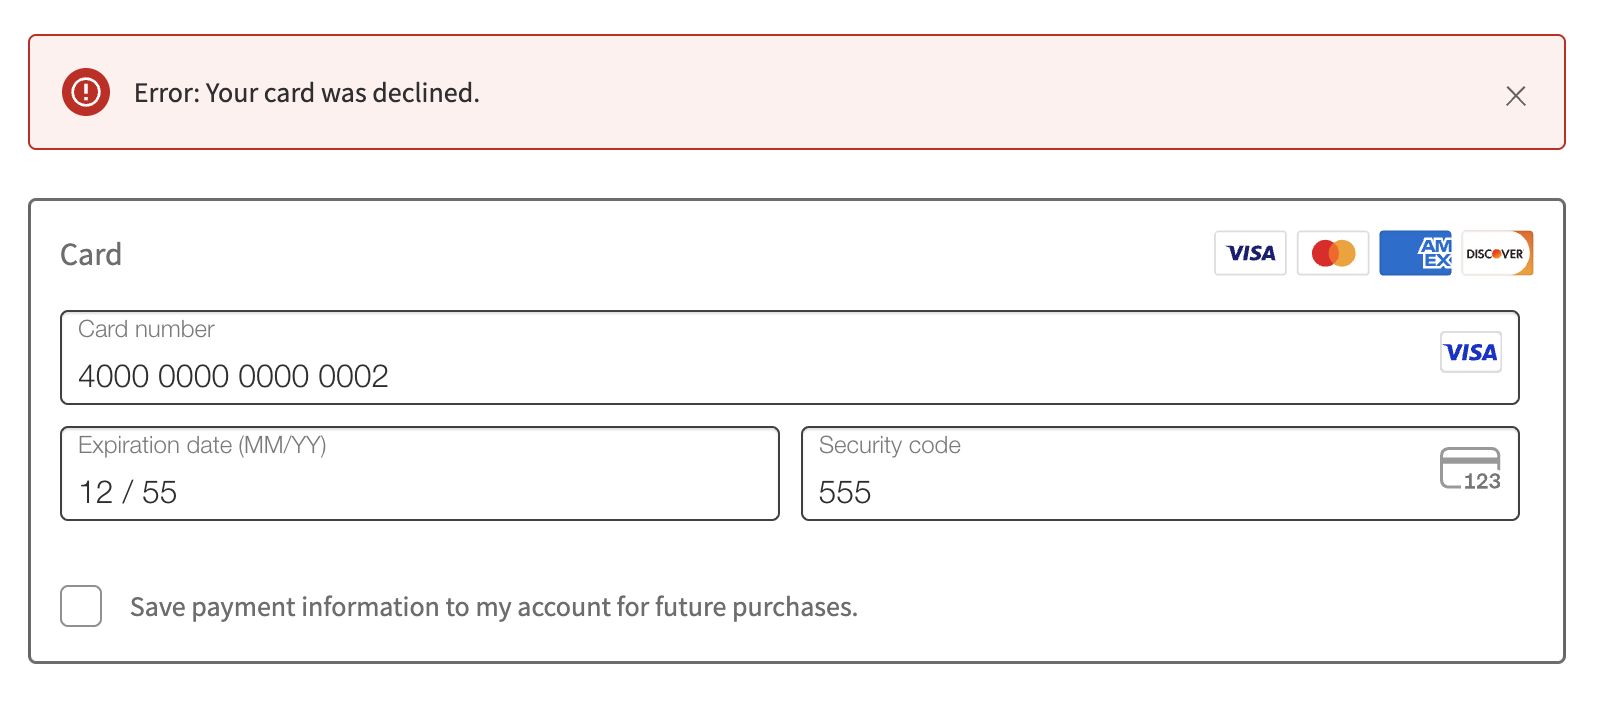
Payment failures/declines will show different error messages to the customer during checkout, depending on the particular issue or type of decline:
- Error: Your card was declined.
- Error: There’s a problem with this payment. Please try again or use a different payment method.
- Error: Your card has insufficient funds.
- Error: Your card has expired.
- etc.
NOTE: When a payment is declined, sometimes the customer will still see that charge appear in their bank’s online interface. This is merely temporary. The declined payment will be removed from their statement within a few days.
Card issuer declines
↑ Back to topCard issuers (e.g. Visa or Mastercard) have sophisticated data models that analyze a large number of factors and either allow or decline a charge in real-time. Issuer declines happen when these automated systems decide to not allow a charge.
Some of the most common card issuer declines are:
- Generic declines. This is by far the most common type of decline. Cardholders should contact their bank and work with them in order to resolve the problem.
- Non-sufficient funds (NSF). If a customer doesn’t have enough funds or credit in their account, the card issuer may decline the transaction.
- Incorrect card data. If a customer enters an incorrect card number, verification code, or expiration date, the card issuer may decline the transaction.
- Fraudulent activity. If a card issuer suspects fraudulent activity on the part of the customer (the cardholder), they may decline the transaction.
Should a charge be declined during checkout, WooPayments will show a decline message to the customer on the checkout page itself:
For security and privacy reasons, card issuers only discuss the specifics of a decline with their cardholder. If the decline error message doesn’t contain an explanation of the issue, you should instruct customers to contact their bank about it.
Blocked payments
↑ Back to topBlocked payments occur when the card issuer has decided to allow the charge, but the charge ends up being rejected by a secondary system later in the process, such as Stripe Radar or WooPayments’ fraud protection settings.
If Stripe Radar blocks a charge, customers will see a generic decline message:
If WooPayments’ fraud protection rules have blocked a transaction, customers will also see a generic error message in order to avoid revealing your specific fraud protection rules. As the merchant, you can see the rule that triggered the block.
Disputes
↑ Back to topA dispute (also called a “chargeback”) occurs when a card owner questions a payment with their bank. You can learn more about preventing disputes and responding to them at those links. This section is simply an overview of how disputes are shown in WooPayments.
WooPayments provides all the relevant information about your disputes under the Payments > Disputes menu. This page includes information such as the amount that was disputed, the dispute status, and deadline for responding to it.

Each dispute has a status associated with it. Here are the common ones and what they mean:
- Won: You won this dispute and recovered the money from the charge.
- Lost: You lost this dispute, the money from the charge, and a dispute fee.
- Needs Response: You have yet to respond or accept the dispute.
- Under Review: The dispute is being decided by the customer’s bank.
By clicking on any given dispute, you can open the transaction details page, where more information about that particular dispute is shown.

From here you can challenge the dispute or accept the dispute. Again, please see the guides linked above for a much more thorough review of this process.
Filtering disputes
↑ Back to topBy default, the disputes list shows only those disputes that still require a response. However, you can change this by using the filters at the top.
First, you can use the Dispute Currency filter to show only disputes in the currency of your choosing. Second, you can use the Show filter to see only disputes needing a response, all dispute, or more advanced filters.

Exporting disputes
↑ Back to topSimilar to payouts and transactions above, you can also export your dispute data in the form of a CSV file for later use in Microsoft Excel, Google Sheets, Apple’s Numbers, or some other spreadsheet editing applications.
To download all your transactions, simply go to Payments > Disputes and click the Export button at the top of the list.

You can also filter the disputes list first and then click Export to download only those disputes you’re interested in.