If you sell physical products on your WooCommerce store, you need to configure shipping zones. Shipping zones are the foundation for most shipping configurations in WooCommerce. How you configure your shipping zones determines the shipping options and rates customers see on the cart and checkout pages.
This page covers three steps to configure shipping zones in WooCommerce:
- Create and configure shipping zones.
- Add shipping methods to shipping zones.
- Manage shipping zones and shipping methods.
You can add as many shipping zones or shipping methods as you need to your shipping settings; there is no limit.
About shipping zones
↑ Back to topA shipping zone is a geographical area to which you ship items. Shipping zones can be as specific as you need. You can set them to specific postal/zip codes, specific geographical regions, entire countries, or continents. Keep the following points in mind about how your customers match with shipping zones and see shipping options:
- Customers only see the methods available for their address and its corresponding shipping zone.
- Shipping zones are assigned based on the first one the customer matches.
- Each customer matches only one shipping zone.
For example, you could create these shipping zones in WooCommerce:
| Zone name | Region | Shipping methods |
|---|---|---|
| Local | California ZIP 90210 | Free Shipping |
| Domestic | All US states | Standard Flat Rate and Priority Flat Rate |
| Europe | Countries in Europe | Flat rate shipping |
Each shipping zone serves a different geographical region and offers different shipping methods depending on the customer’s location.
Add and manage shipping zones
↑ Back to topSetting up shipping in WooCommerce starts with adding shipping zones. This section guides you through the following steps:
- Adding a shipping zone
- Configuring a shipping zone
- Adding shipping methods to a shipping zone
- Sorting shipping zones
- Editing and deleting shipping zones
Prerequisite: Go to WooCommerce > Settings > General and check that your Shipping location(s) setting is configured properly.

When you visit WooCommerce > Settings > Shipping for the first time, you will notice two things:
- A prompt to add a new shipping zone
- A default shipping zone called Rest of the world
The Rest of the world zone applies to customers that do not match any of the shipping zones you add. Adding methods to this zone is optional.
If you use the Rest of the world zone but want to exclude certain regions, add a shipping zone for the region you want to exclude without any shipping methods assigned to it.
Add a new shipping zone
↑ Back to topFollow these steps to add a shipping zone:
- Go to WooCommerce > Settings > Shipping > Shipping zones.
- Click Add zone at the top.
- Enter a descriptive Zone name.
- Select the Zone regions that apply. Regions can consist of countries, states/provinces, or continents.
- Optional: Click Limit to specific zip/postcodes to further narrow which customers match this zone. Enter one code per line.
- Add shipping methods to this zone.
- Click Save changes.

A wildcard can be used to capture all postcodes that share the same beginning, so it is the recommended option for postcodes with non-numeric characters. Examples:
– 902* would capture 90210 and also 90288-1234;
– CB23* would capture CB23 1EX;
– CB2* would capture CB2 3AA and CB23 1EX.
Using wildcards in numeric ranges (e.g., 902*…990*) is not supported.
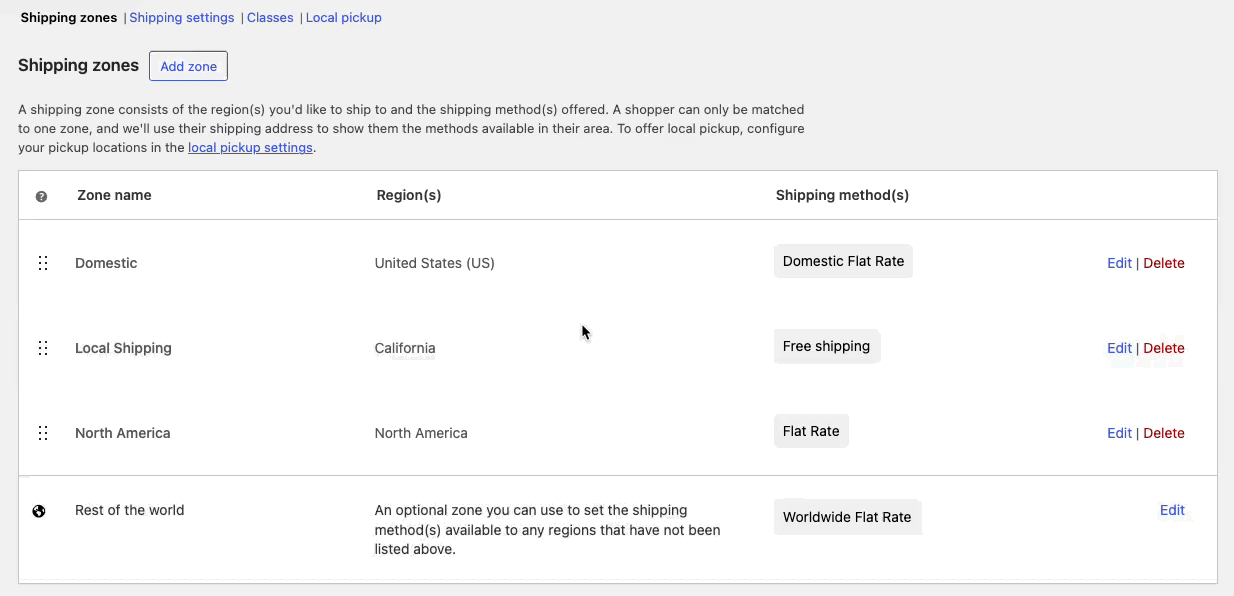
Below is an example of what a completed set of shipping zones looks like:

Sort shipping zones
↑ Back to topSorting shipping zones accurately ensures that your customers see the correct shipping options on the checkout page. Two important points about shipping zones:
- Shipping zones match customers based on their shipping address, and each customer can only match one shipping zone.
- Zones are matched in a hierarchy, from the top of the list to the bottom. WooCommerce chooses the first shipping zone that a customer matches and shows those options on the cart and checkout pages.
To match customers to the correct shipping zone, order your shipping zones from the smallest geographical area to the largest. For example, if you have shipping zones for cities, states/provinces, and countries, order them as follows:
- City
- State/Province
- Country
If your customers are not seeing the correct shipping methods on the cart and checkout pages, the shipping zones are most likely in the wrong order.
To sort shipping zones in the shipping settings:
- Go to WooCommerce > Settings > Shipping > Shipping zones.
- Click and hold the handle on the left side of the shipping zone (next to the name) and drag the zone to the correct position in the list.
- Click Save changes.
Edit and delete shipping zones
↑ Back to topYou can edit and delete shipping zones on the same page where you add them. The Edit and Delete options appear on the right side of the shipping zone list.
Follow these steps to edit or delete a shipping zone:
- Go to WooCommerce > Settings > Shipping > Shipping zones.
- Select Edit or Delete on the right side of the shipping zone.
- Use Edit to revise the name, regions, or shipping methods.
- Use Delete to remove the shipping zone.
- Click Save changes.
Add shipping methods to shipping zones
↑ Back to topAfter creating a shipping zone, the next step is to add shipping methods. Shipping methods are the options customers see on the checkout page. WooCommerce includes three built-in shipping methods: Flat Rate, Free Shipping, and Local Pickup.
Follow these steps to add a shipping method to a zone:
- Go to WooCommerce > Settings > Shipping > Shipping zones.
- Click Edit on the shipping zone where you want to add a shipping method.
- Click Add shipping method at the bottom of the screen.
- Select the shipping method you want to add and click Continue.


For detailed configuration steps for each built-in shipping method, refer to the following guides:
- Configure Local Pickup (legacy/classic checkout)
- Configure Local Pickup (cart and checkout blocks)
- Configure Flat Rate shipping
- Configure Free Shipping
Sort shipping methods and set a default
↑ Back to topSorting shipping methods determines their order in the list of available shipping options customers see on the cart and checkout pages. All shipping methods in the shipping zone that matches a customer appear on those pages.
Follow these steps to sort shipping methods within a shipping zone:
- Go to WooCommerce > Settings > Shipping > Shipping zones and click Edit next to the zone with the shipping methods you want to sort.
- Click and hold the handle on the left side of the shipping method (next to the name) and drag it to the correct position in the list.
- Click Save changes.
The default selected shipping method is the first enabled shipping method in the shipping zone that the customer matches.
Deactivate and remove shipping methods from shipping zones
↑ Back to topYou can deactivate or completely remove shipping methods from a shipping zone. Follow these steps:
- Go to WooCommerce > Settings > Shipping > Shipping zones.
- Click Edit on the shipping zone from which you want to remove a shipping method. Complete one of these actions:
- Toggle the switch under the Enabled column to deactivate the shipping method.
- Click Delete to remove the shipping method.
- Click Save changes.

Customer view of shipping zones and methods
↑ Back to topCustomers see the shipping methods from their matched shipping zone on the cart page after they use the Calculate Shipping link. Below is an example of configured shipping zones and methods, along with how customers see those options on the cart page.

In this example, the following shipping zones and methods are configured:
- In the 90210 zip code in California, Free Shipping is offered.
- In the United States, a Domestic Flat Rate is offered.
- In North America, a second, different Flat Rate is offered.
- For the rest of the world, a third, different Flat Rate is offered.
This is what customers see when they use the Calculate Shipping option on the cart page:
| Californian customer | Non-Californian, U.S. customer | International customer |
|---|---|---|
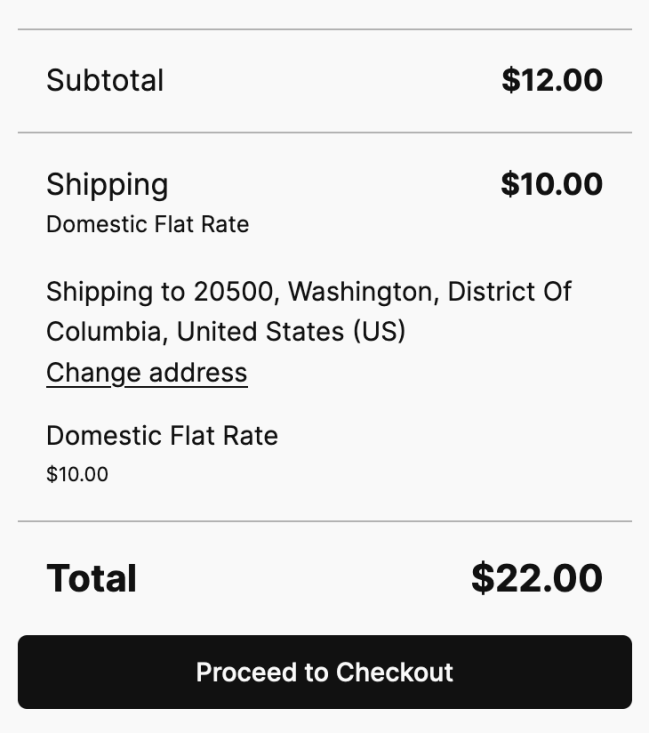 | | 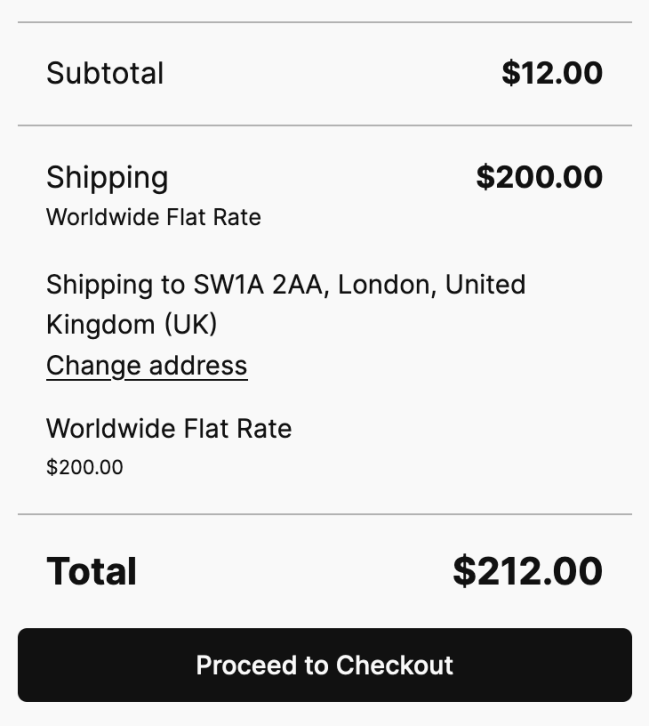 |
Questions and support
↑ Back to topDo you still have questions and need assistance?
This documentation is about the free, core WooCommerce plugin, for which support is provided in our community forums on WordPress.org. By searching this forum, you’ll often find that your question has been asked and answered before.
If you haven’t created a WordPress.org account to use the forums, here’s how.
- If you’re looking to extend the core functionality shown here, we recommend reviewing available extensions in the WooCommerce Marketplace.
- Need ongoing advanced support or a customization built for WooCommerce? Hire a Woo Agency Partner.
- Are you a developer building your own WooCommerce integration or extension? Check our Developer Resources.
If you weren’t able to find the information you need, please use the feedback thumbs below to let us know.