
WooCommerce is translated into several languages and is translation-ready out of the box. All that is needed is a translation file for your language, which is automatically installed for the languages on this list when you change your site’s language.
This document covers how to set up WordPress in your language, contribute translations, manually download translations, create custom translations, and translate text without a localization file.
Set up WordPress in your language
↑ Back to topThe first step to translating WooCommerce is to set your site to the language you want. Follow these steps to configure the default language in WordPress:
- Go to Settings > General in the WordPress admin dashboard.
- Change the Site Language setting to your preferred language.
- Scroll down and click Save Changes. This immediately changes the navigation menu language as well.
- Go to Dashboard > Updates.
- Scroll to the bottom and click Update Translations.
Your store now displays in the selected locale if a language file exists. If it does not, you need to create the language files using the process described below.
Translate WooCommerce into your language
↑ Back to topWooCommerce translation is managed by teams in the WooCommerce Translation Project. Both Stable and development versions of WooCommerce are translated there, and anyone can contribute.
If you want to contribute translated strings to your language or start a new translation, register an account at WordPress.org and begin translating at the GlotPress project on translate.wordpress.org. Contributing to your language’s translation helps all users benefit once it reaches the 90% threshold described below.
WordPress looks for a Stable translation that is at least 90% complete in your language when installing or updating WooCommerce, and then automatically downloads it. If a Stable translation exists but is not at least 90% complete, you can download it manually.
If you are new to translating, check out the translators handbook to get started.
Download translations from translate.wordpress.org manually
↑ Back to topIf your language translation is below 90% completion, you can still download and install it manually. Follow these steps to download and upload a translation file:
- Go to the WooCommerce Translations Project and find your language in the list.
- Click the title to enter the language’s sub-section.
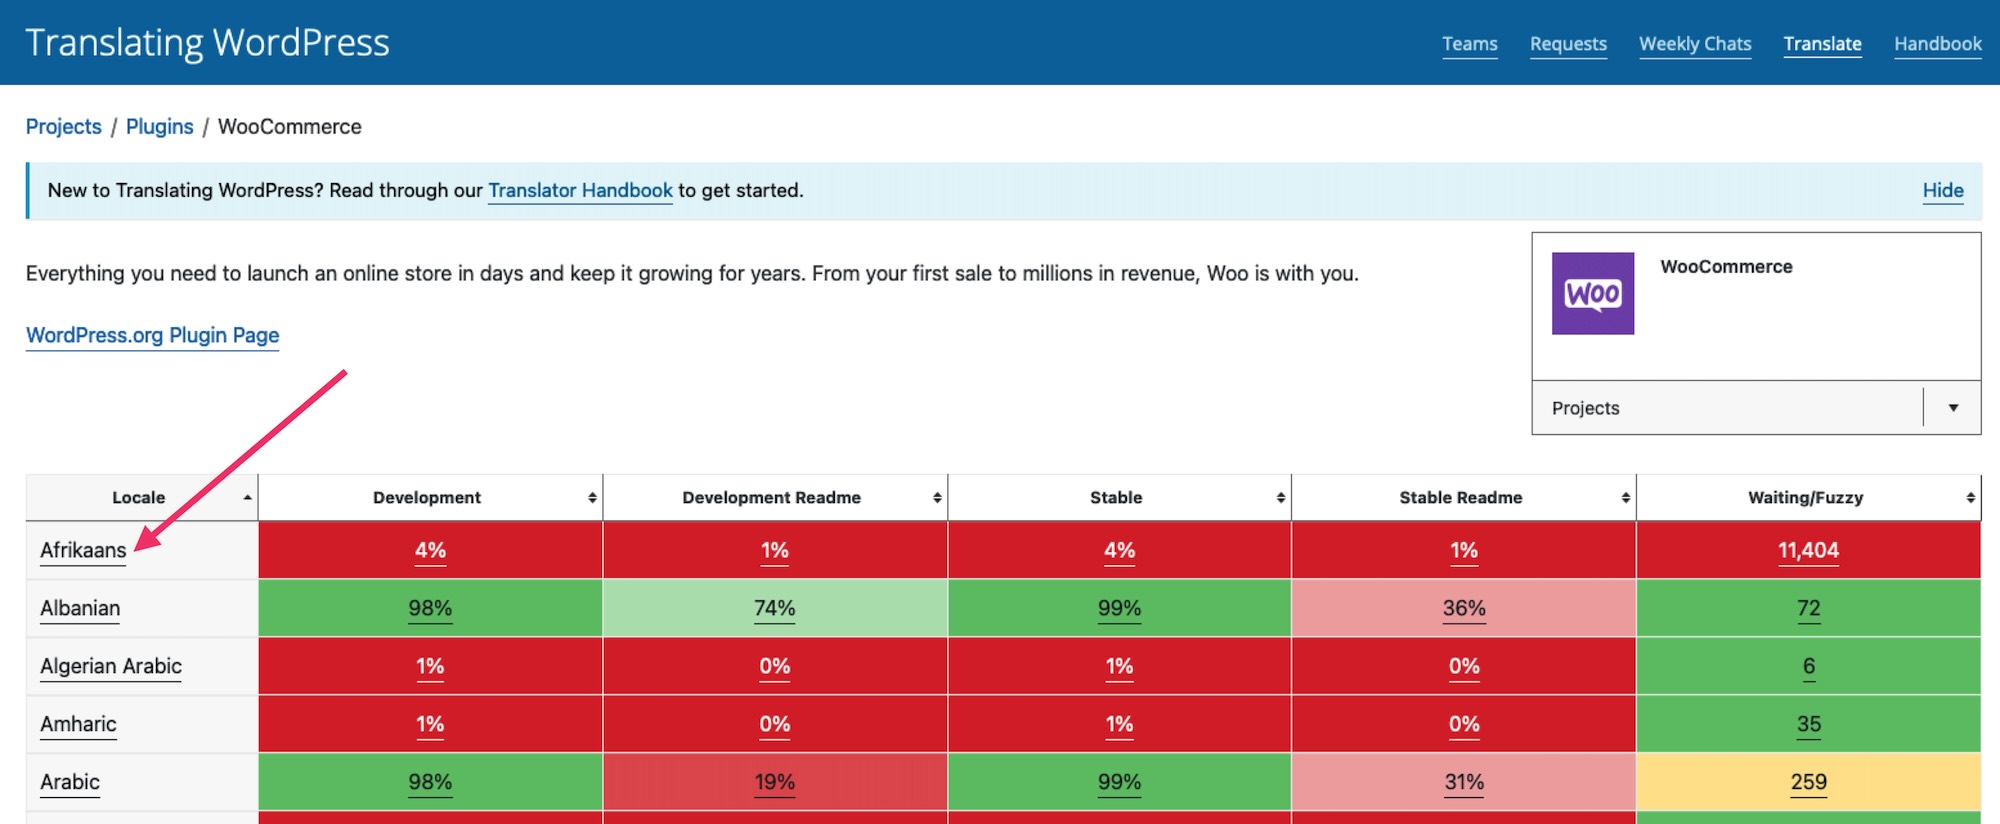
- Click the heading in the Set/Sub Project column to view and download a Stable (latest release) version.

- Scroll to the bottom of that page for export options. Export as a Machine Object Message Catalog (.mo) file for use on your site.

- Rename the file to WooCommerce-YOURLANG.mo (e.g., Great Britain English is en_GB, Afrikaans is af).
- Upload the file to your site’s wp-content/languages/plugins/ folder.
- Once uploaded, the translation is active on your site.
Translate WooCommerce.com extensions
↑ Back to topSeveral WooCommerce.com extensions also offer translated versions. You can find details about extension translations and how to add custom translations in the Translating WooCommerce Extensions guide.
Create custom translations
↑ Back to topWooCommerce includes a language file (.pot file) that contains all of the English text. You can find this file inside the plugin folder at WooCommerce/i18n/languages/. Use one of the methods below to create your own translation from this file.
Create custom translations with Loco Translate
↑ Back to topLoco Translate is a WordPress plugin that provides a browser-based interface for translating plugins. Follow these steps to translate WooCommerce with Loco Translate:
- Install and activate the Loco Translate plugin.
- Go to Loco Translate > Plugins and select WooCommerce.
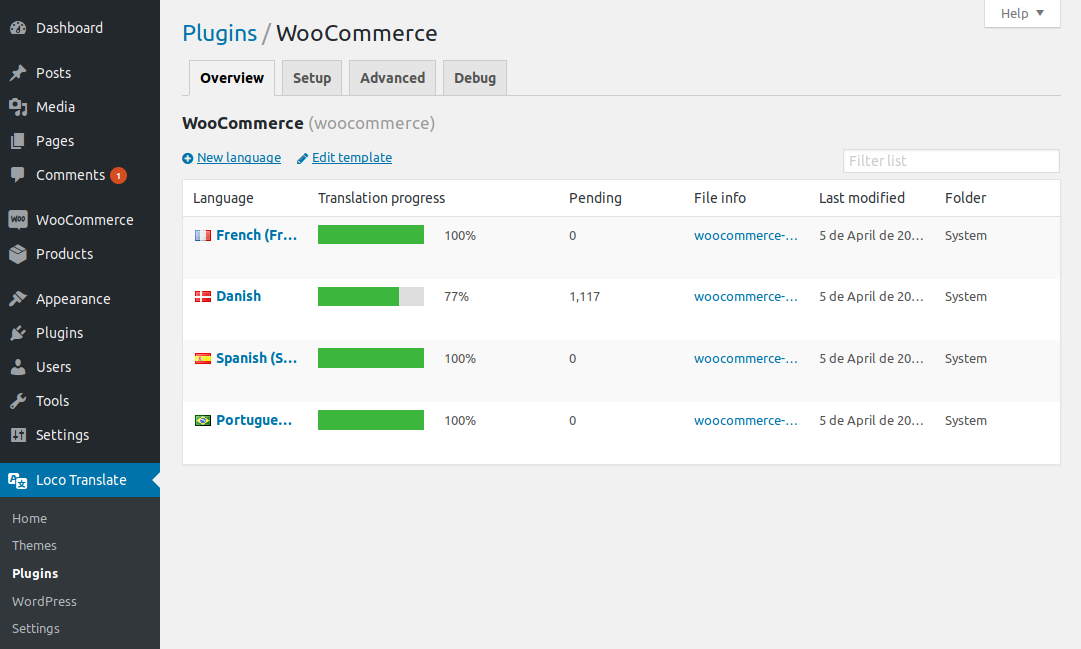
- Click + New Language to add a new language.
- Choose the language from the dropdown.
- Select the folder to store the translation files. The Custom folder is recommended so updates do not overwrite your translations.
- Click Start translating.
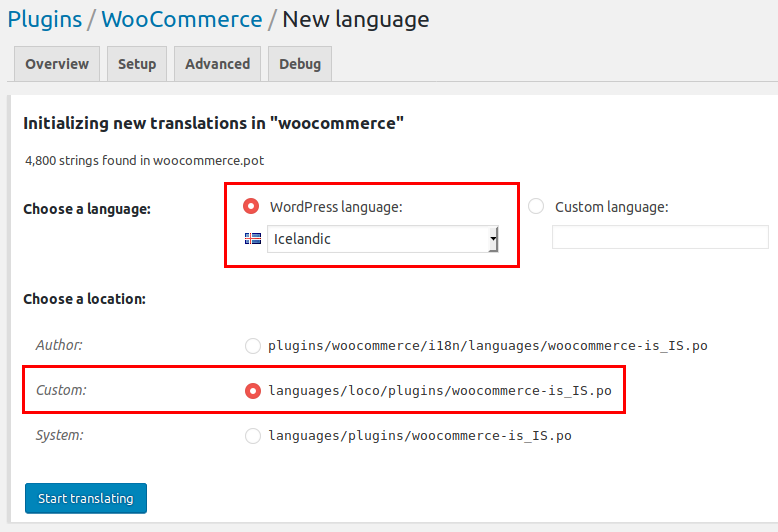
Note #1: Loco Translate offers three different locations for where to create the translation. The best choice for your own translation is Custom, not just to prevent custom translations from being undone by updates, but also because it’s needed for strings in extensions like WooCommerce Subscriptions to be properly translated.
Avoid the Author location since it’s inside the plugin and will be overwritten by extension updates, as well as the System location, which could be overwritten by translations from translate.wordpress.org.
Note #2: If you encounter any technical issues while using Loco Translate, please get in touch with the Loco Translate support team.
- Click Save when you have finished translating.
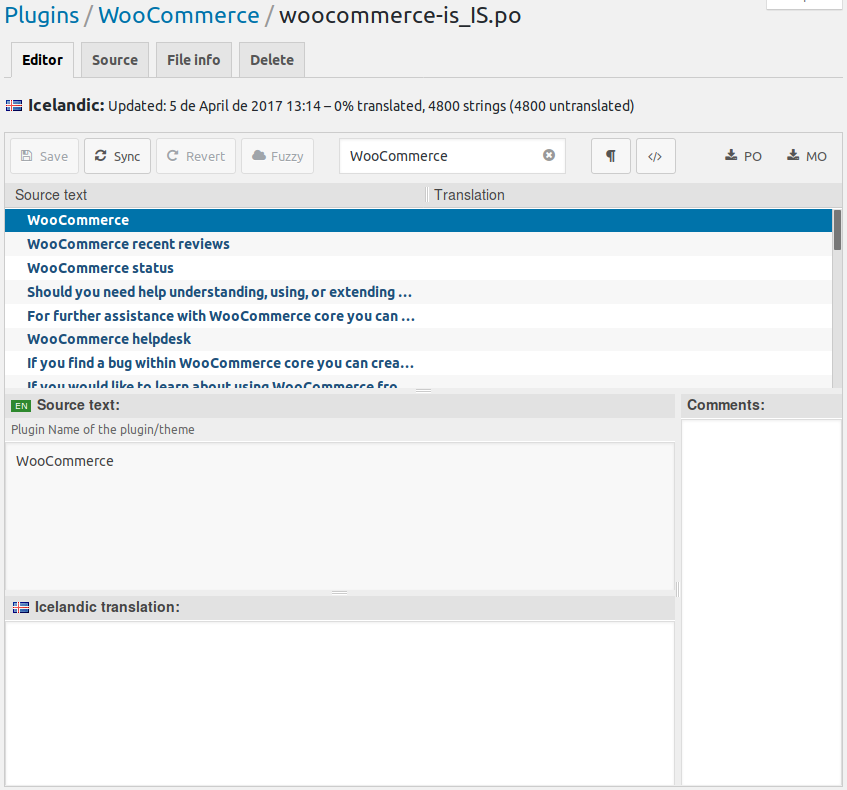
When a new version of WooCommerce is released and updated on your site, you may need to refresh the .po file to look for new strings. Use the “Sync” button to find any new string to start translating.
Create custom translations with PoEdit
↑ Back to topPoEdit is a desktop application that provides a more advanced alternative to Loco Translate. This method is recommended for advanced users or experienced translators.
WooCommerce comes with a POT file that you can import into PoEdit. Follow these steps to get started:
- Open PoEdit and go to File > New catalog from POT file.
- Choose WooCommerce.pot. PoEdit displays the catalog properties window.
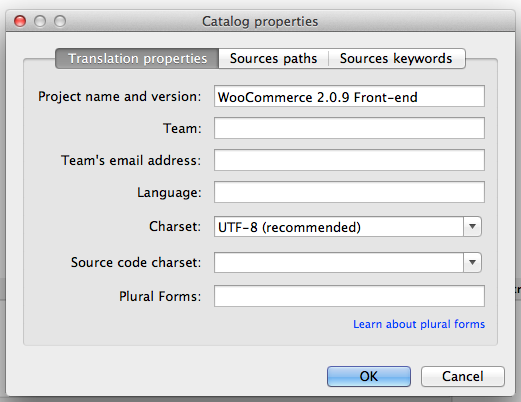
- Enter your name and details so other translators know who you are, and click OK.
- Save your .po file. Name it based on the target language (e.g., a Great Britain English translation is saved as WooCommerce-en_GB.po). The translatable strings are now listed.
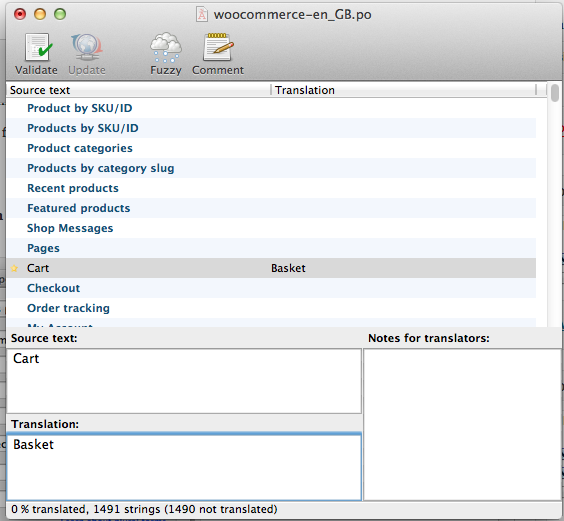
- Translate the strings and click Save. PoEdit generates the .mo file automatically.
- To update your .po file later, open it and go to Catalog > Update from POT file.
- Choose the updated POT file, and PoEdit updates your translation accordingly.
Create custom translations with Webis Multilingual for WooCommerce
↑ Back to topWebis Multilingual for WooCommerce is an extension available in the WooCommerce Marketplace with a monthly subscription. It allows you to translate your store content, strings, and menus directly within the WordPress admin.
Install Webis Multilingual
↑ Back to topFollow these steps to install the Webis Multilingual extension:
- Download the .zip file from your WooCommerce account.
- Go to WordPress Admin > Plugins > Add New, click Upload Plugin, and select the file you downloaded with Choose File.
- Click Install Now and then Activate the extension.
For more details, see Install and activate WooCommerce extensions.
Configure Webis global settings
↑ Back to topGo to WooCommerce > Webis Multilingual and navigate to the Settings tab. The settings page contains the following options:

- Languages — Click Edit languages, select the languages you want to add, and save.
- Language Codes — Customize the language code shown in the URL. For example, the default code for Chinese (Simplified) is “zh_CN,” but you can shorten it to “cn.”
- Language Switcher — Use the Show flags checkbox to show or hide flags in the language switcher.
- Cookie Name — The extension uses a cookie to remember the customer’s language selection. If the site language keeps reverting to the default, browser cookies may be disabled or the page may be cached. Consult your developer to add the cookie name to the Cache-Busting Cookies List. You can also change the cookie name in this field if needed.
Translate strings with Webis
↑ Back to topGo to WooCommerce > Webis Multilingual and navigate to the String Translation tab. Use this section to translate text strings that appear on your storefront.

Follow these steps to scan and translate strings:
- Enable the Scan Strings option at the bottom of the page and click Save Changes.
- Visit the storefront pages where the strings you want to translate appear.
- Return to the String Translation tab, search for the strings, and add translations by clicking the + button.
Important: You may need to refresh the page more than once if it contains many strings. Disable the Scan Strings option after you finish scanning, as leaving it enabled has a significant impact on site performance.
Translate content with Webis
↑ Back to topWebis Multilingual adds translation fields directly below the content areas you already use. The extension currently supports translation for products, categories, attributes, posts, pages, and menus.
To translate a product, open the product edit page and find the Webis Multilingual section. Enter translations for each configured language.

To translate menu items, go to Appearance > Menus. Open a menu item to see the Webis Multilingual fields. You can select a specific language to show the menu item only for that language, or select All languages to display it for every configured language.

Make your translation upgrade safe
↑ Back to topWooCommerce stores translations in wp-content/languages/plugins, like all other plugins. If you want to include a custom translation that is not overwritten by updates, use the directory wp-content/languages/WooCommerce. You can also use a code snippet to load translations from a custom location. See the WooCommerce Developer Documentation for details.
Translate text without a localization file
↑ Back to topIf you only need to change a few words or phrases without editing a .po file, you can use a text replacement plugin. This approach requires no custom code.
Replace default text with Say What
↑ Back to topThe Say What? plugin allows you to replace specific text strings without editing theme or plugin files. When activated, it asks for the following information:
- Original string — The exact text you want to translate. View the plugin source code to find the exact string.
- Text domain — Enter
WooCommerce. - Text you want to display — The replacement text in your language.
Frequently asked questions
↑ Back to topSome strings on the checkout page are not translated
↑ Back to topYou may notice that some strings on the checkout page remain untranslated. For example, the Local pickup shipping method, the Cash on delivery payment method, or the privacy policy message may appear in English while the rest of the page is translated.
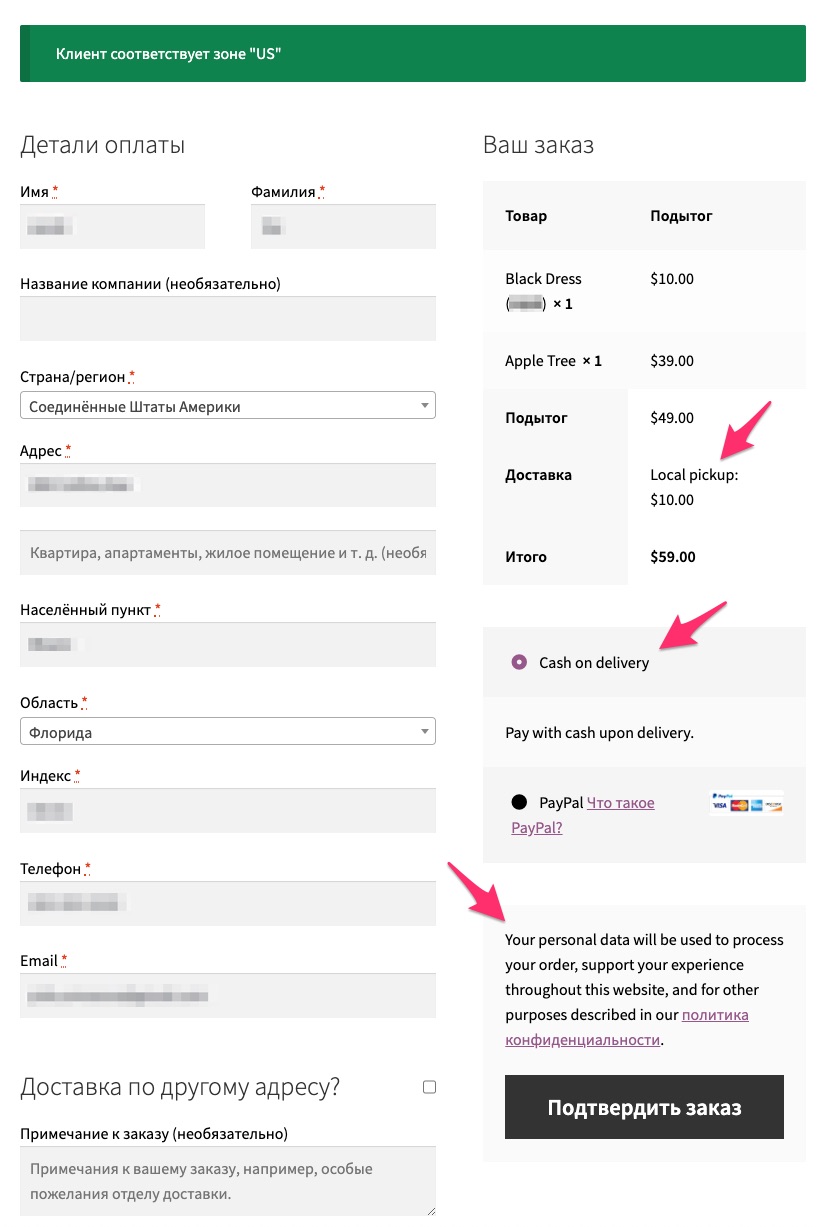
This typically happens when you install WooCommerce with the default language (English) and later change the site language. WooCommerce stores certain strings in the database during the initial setup. When you change the site language afterward, these database entries are not automatically translated.
To fix this, navigate to the WooCommerce settings for each untranslated string and update the text directly. The following examples show how to update the most common untranslated strings.
To translate the Local pickup shipping method name:
- Go to WooCommerce > Settings > Shipping > Shipping zones.
- Select the shipping zone where the Local pickup method is added.
- Open the Local pickup shipping method settings.
- Rename the method with the correct translation.
- Click Save changes.
To translate the Cash on delivery payment method:
- Go to WooCommerce > Settings > Payments.
- Select the Cash on delivery payment method.
- Update the method title, description, and instructions with the translated text.
- Click Save changes.
To translate the privacy policy message:
- Go to WooCommerce > Settings > Accounts & Privacy.
- Scroll down to the Privacy policy section.
- Edit the Registration privacy policy and Checkout privacy policy fields with the correct translation.
- Click Save changes.
Navigate back to the checkout page to confirm the updated translations appear.
Translated strings do not appear on the front end
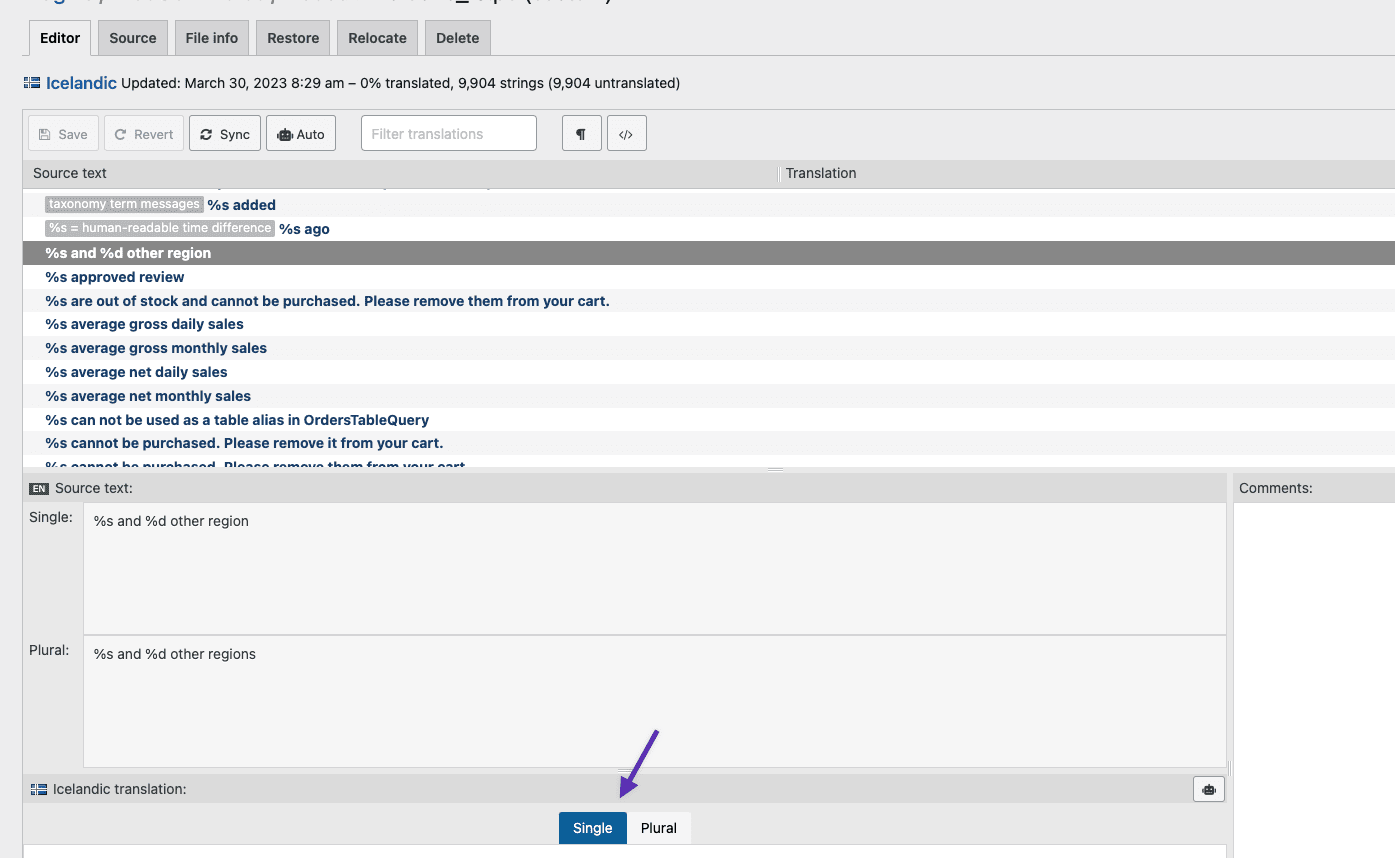
↑ Back to topIf some translated strings do not appear as expected on your WooCommerce site, check whether those strings have both a Single and Plural form in the Source text section.
If the string has both forms, you must translate both for the translation to work correctly. In Loco Translate, use the Single and Plural tabs in the translation section at the bottom of the screen.
Questions and support
↑ Back to topDo you still have questions and need assistance?
This documentation is about the free, core WooCommerce plugin, for which support is provided in our community forums on WordPress.org. By searching this forum, you’ll often find that your question has been asked and answered before.
If you haven’t created a WordPress.org account to use the forums, here’s how.
- If you’re looking to extend the core functionality shown here, we recommend reviewing available extensions in the WooCommerce Marketplace.
- Need ongoing advanced support or a customization built for WooCommerce? Hire a Woo Agency Partner.
- Are you a developer building your own WooCommerce integration or extension? Check our Developer Resources.
If you weren’t able to find the information you need, please use the feedback thumbs below to let us know.