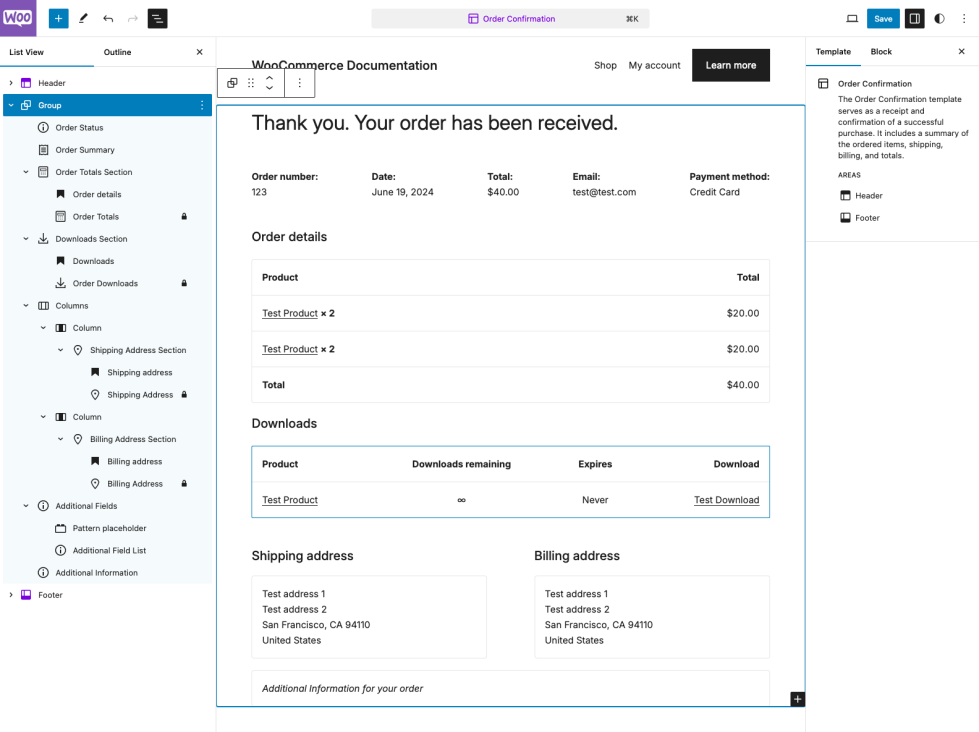
The “Thank you” page your shoppers see after placing their order, otherwise known as the “Order Confirmation page” provides customers with peace of mind by confirming their order details after a purchase. Here we explain the template that WooCommerce uses on block themes to display this page, and outline the structure of the blocks that make up the WooCommerce Order Confirmation template.
This page is only shown after an order is placed. Shoppers can view these details again from the “Orders” section of their account area after they’ve left this page.
Generally, you’ll not need to edit the order confirmation page aside from perhaps making some styling changes to fit your site’s theme. All of the content will be populated dynamically for each order.
Template
↑ Back to topThe order confirmation page can be customized by editing the Order Confirmation template. Aside from the heading blocks which label the different sections of the Order Confirmation page, all of the blocks included in the Order Confirmation template are dynamic so their content fits each order.
When one of the sections of this template does not apply to the current order, it won’t be displayed. For example if a customer didn’t purchase any downloadable products, the “Downloads” section with details about downloadable products won’t be shown.

Blocks
↑ Back to topThe Order Confirmation template uses a variety of dynamic blocks to display the details of your customer’s orders after they’ve been placed. Since the content of these blocks is dynamic and will change based on the current order, settings on these blocks are minimal and the content of the blocks themselves cannot be modified in the editor.
Account Creation
↑ Back to topThe account creation block is automatically shown if Delayed Account Creation is enabled and the current customer is a guest. It allows the customer to create an account using the details they provided during checkout. Account details will be emailed to the customer, and the new account will be linked to the placed order.
The “benefits” content can be customized. A password field may be displayed depending on your settings under Settings > Accounts and Privacy.
Order Status
The Order Status block dynamically displays a message based on the current order status. In most cases, this is “Thank you. Your Order has been received.” The message currently cannot be edited.
The Order Status block has color, typography, and dimension settings for adjusting the display of the block.
Order Summary
↑ Back to topThe Order Summary block gives an order summary displaying the Order number, Date, Total, Customer Email, and Payment Method.
The Order Summary block has color, typography, and dimension settings for adjusting the display of the block. Additionally, it has a border setting which you can use to add a border with your selection of color and thickness to the section.
Order Details Section
↑ Back to topThe Order Details section shows the order details with all line items, product quantities, order totals. The section header can be customized.
Downloads Section
↑ Back to topThe Downloads Section only displays to the shopper if a downloadable product is purchased. Here customers can see available downloads from their order, any download limits or expiration dates, and a link to access the download.
Address information
↑ Back to topThis section has two columns that display the shipping and billing address information entered at checkout. Orders that select local pickup won’t have a shipping address displayed.
Each address section has dimension settings to control the padding and margins around the sections. The billing address and shipping address blocks have settings that allow the border around each block of information to be adjusted. Color and typography settings for each section can be adjusted in the block settings of their parent column.
Additional Fields
↑ Back to topThe Additional Fields block displays information from additional checkout fields from the ‘contact’ and ‘order’ locations.
Additional Information
↑ Back to topThe Additional Fields block displays additional information for the current order provided by compatible extensions or payment gateways. For example when using the built-in BACS payment gateway, your bank details for shoppers to make payment will be displayed here.
Using the legacy Order Confirmation Template
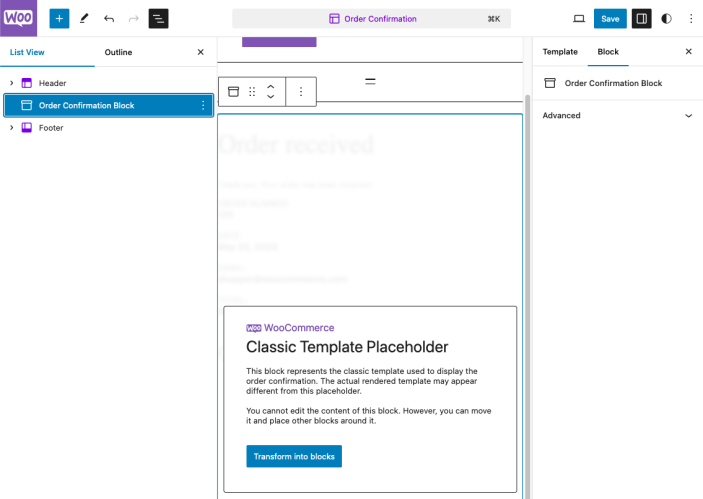
↑ Back to topIf you would prefer to use the classic Order confirmation template instead of the new, customizable block template. You can delete the parent group that holds all the Order Confirmation Blocks, and then insert the “Order Confirmation Block” which acts as a classic template placeholder. Here are steps for how to make the switch.

Note: These steps only apply to Block themes.
- Open the Order Confirmation template in the Site Editor by navigating to Appearance > Editor > Templates > Order Confirmation.
- Open the List View and delete all the special Order Confirmation blocks (Select a range of blocks in the list by holding shift then clicking the final block in the range you’d like to select in the list view.).
- Open the Block Inserter, search for the “Order Confirmation Block” then add it. You’ll see the classic template placeholder notice as shown above.
- Save your changes.
Now your site will display the order confirmation page using the legacy template as it would on a classic theme. Enabling any custom code on that template to be used.
Questions and support
↑ Back to topDo you still have questions and need assistance?
This documentation is about the free, core WooCommerce plugin, for which support is provided in our community forums on WordPress.org. By searching this forum, you’ll often find that your question has been asked and answered before.
If you haven’t created a WordPress.org account to use the forums, here’s how.
- If you’re looking to extend the core functionality shown here, we recommend reviewing available extensions in the WooCommerce Marketplace.
- Need ongoing advanced support or a customization built for WooCommerce? Hire a Woo Agency Partner.
- Are you a developer building your own WooCommerce integration or extension? Check our Developer Resources.
If you weren’t able to find the information you need, please use the feedback thumbs below to let us know.
