
WooCommerce has a variety of built-in emails to help communicate your store’s operations. This guide provides a detailed overview of the email settings in WooCommerce, including:
- The email notifications built into the WooCommerce plugin.
- Settings to set the sender information for your shop’s emails.
- Email Template settings to customize the look of your shop’s emails.
- Settings available to customize or disable individual emails.
- How to configure the Review request email.
- How to review and apply block email template updates.
- Further email customization
Find these settings on your site at: WooCommerce > Settings > Emails.
Email Notifications
↑ Back to topFor each WooCommerce email listed, it’s possible to configure your settings (optional). More detailed instructions below in: Editing Individual Emails.
When Order Withdrawal is enabled, WooCommerce adds two notifications to this list.
- New order — The system sends new order emails to your chosen recipient(s) upon receiving a new order.
- Cancelled order — The system sends cancelled order emails to your chosen recipient(s) when orders are marked cancelled (if they were previously Pending payment, Processing, or On hold).
- Failed order — Two notifications are sent when orders are marked failed (if they were previously pending or on-hold):
- A notification to your chosen recipient(s) with order details.
- A notification to the customer explaining that their order was unsuccessful due to a payment issue, with instructions to try again with a different payment method.
- Order on-hold — The system sends this order notification to customers with their order details when an order is placed on-hold from the Pending, Cancelled or Failed order status.
- Processing order — The system sends this order notification to customers containing order details after payment.
- Completed order — The system sends order complete emails to customers when their orders are marked completed, this usually indicates that their orders are shipped.
- Order withdrawal request — Sends a notification to the configured recipients when a customer submits an Order Withdrawal request.
- Order withdrawal request received — Sends an acknowledgment to the email address entered on the customer’s withdrawal form.
- Review request — When the Customer review request feature and this email are enabled, WooCommerce schedules this message after an order is completed to invite the customer to review eligible products.
- Refunded order — The system sends order refunded emails to customers when their orders are refunded. This email has settings for both partial and full refunds.
- Order Details — You send this email manually from the “Edit Order” screen to share invoice details and a payment link with customers. This email has setting for paid and unpaid orders.
- Customer note — The system sends customer note emails when you add a note marked “Note to Customer” to an order. Learn more about: Order Notes
- Reset password — The system sends customer “reset password” emails when customers reset their passwords.
- Confirm email address — The system sends a one-time, login-gated link that lets a customer confirm their account email and link matching past guest orders. See Customer email confirmation and guest order linking.
- New account — The system sends customer “new account” emails when a customer signs up via checkout or account pages.
Review request email
↑ Back to topThe Review request email invites customers to review products from a completed order. The feature is optional, and both the feature and the email notification are disabled by default.
To configure it:
- Go to WooCommerce > Settings > Advanced > Features, enable Customer review request (beta), then save your changes.
- Go to WooCommerce > Settings > Emails and open Review request.
- Select Enable this email notification.
- Set Delay (days) to a whole number from 1 to 60. The default is 7 days after the order is marked complete.
- Change the subject, email heading, additional content, or email type if needed, then save the email settings.
When an order is marked Completed, WooCommerce schedules the email only if the order has at least one product the customer can still review. The message links to that order’s Review Order page.
WooCommerce cancels the pending message if the order leaves the completed status, is trashed, or is deleted before the scheduled send. It also checks eligibility again before sending. For example, the message is skipped if product reviews are disabled or the customer has already reviewed every eligible item.
Note: WooCommerce is highly extensible, open source software. Extensions commonly add additional emails to WooCommerce. If you see additional information to what’s pictured and mentioned here, it’s been added by an extension, your theme, or custom code.
Email Sender Options
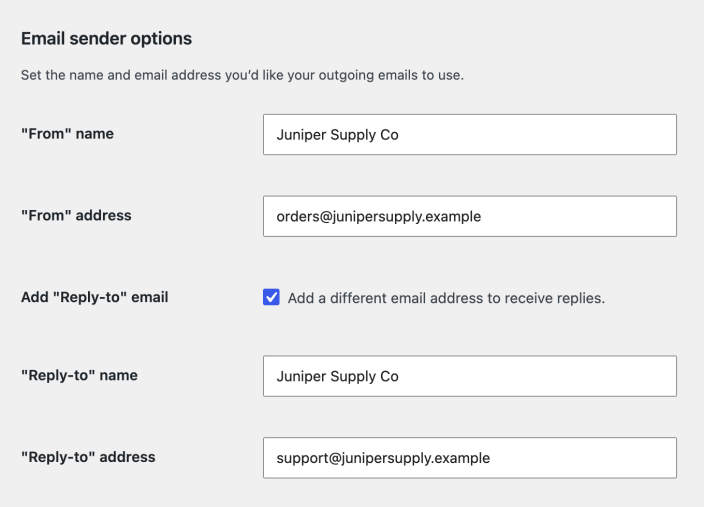
↑ Back to topBeneath the table of email notifications, use the “From” name and “From” address fields to set the sender identity customers see on emails sent by WooCommerce. We recommend using an email address on your site’s domain to help ensure your emails are delivered. See more in our email authentication documentation.
Turn on Add “Reply-to” email when replies should go to a different inbox. This option is off by default. Enter a “Reply-to” name and valid “Reply-to” address. These fields change where replies are delivered, but they do not change the “From” name or address.
When this option is off, replies to customer emails use the “From” name and address. For New order, Cancelled order, and Failed order notifications sent to store recipients, WooCommerce uses the customer’s billing name and email address as the Reply-to details so you can reply directly to the customer. The Order withdrawal request notification also uses the customer’s submitted name and email address as its Reply-to details.
Email Template
↑ Back to topWooCommerce 9.8 introduced updated email settings. You can turn Email improvements on or off at WooCommerce > Settings > Advanced > Features.
When Email improvements is enabled, the Email Template settings let you customize:
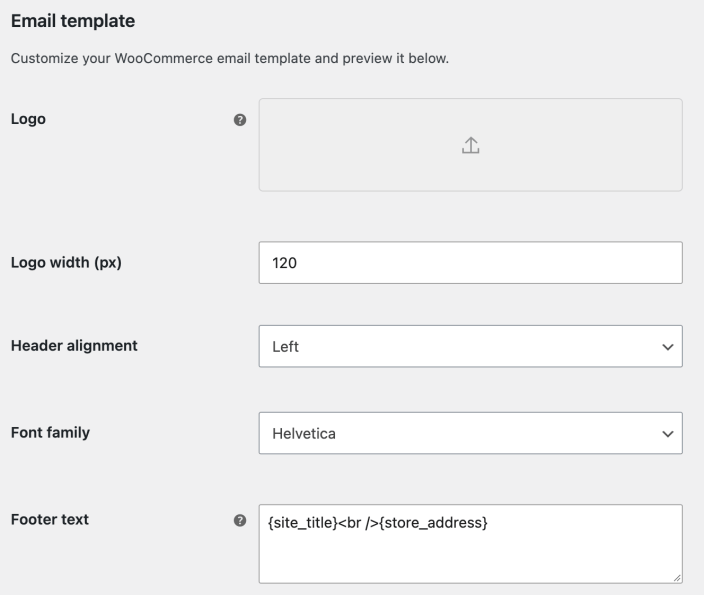
- Logo – Add your store’s logo or header image
- Logo width – Set how wide your logo appears in emails (in pixels)
- Header alignment – Position your logo left, center, or right
- Font family – Choose the text font for your emails
- Footer text – Edit the text that appears at the bottom of your emails
When Email improvements is disabled, you can still add a logo and edit the footer text. Logo width, Header alignment, and Font family remain visible but are unavailable until you enable Email improvements.
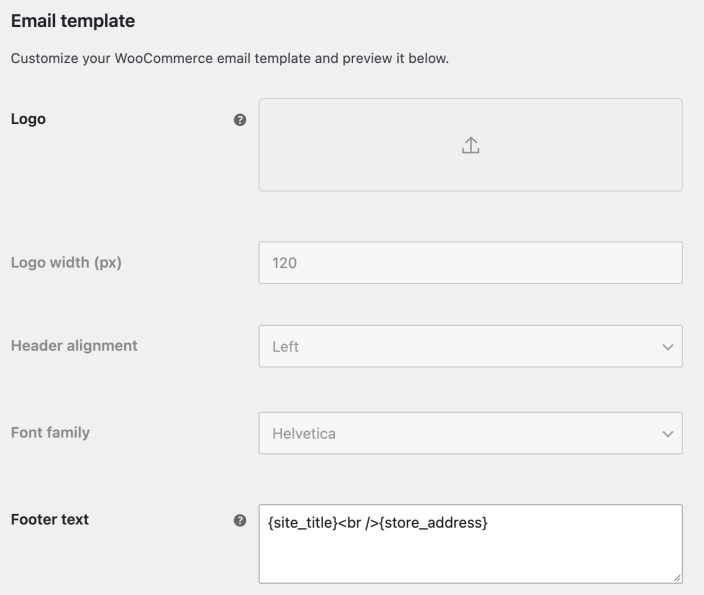
- Logo — Add your store’s logo to the email header.
- Footer text — Enter text to include beneath the main body of your emails. Available placeholders include:
- {site_url} — The URL to your site as set in Settings > General > Site Address (URL)
- {site_title} — The title of your site as set in Settings > General > Site Title
- Unavailable settings — Enable Email improvements to change the logo width, header alignment, or font family.
Color Palette
↑ Back to topUse the Color palette section to match your email design to your store’s theme or choose each color manually.
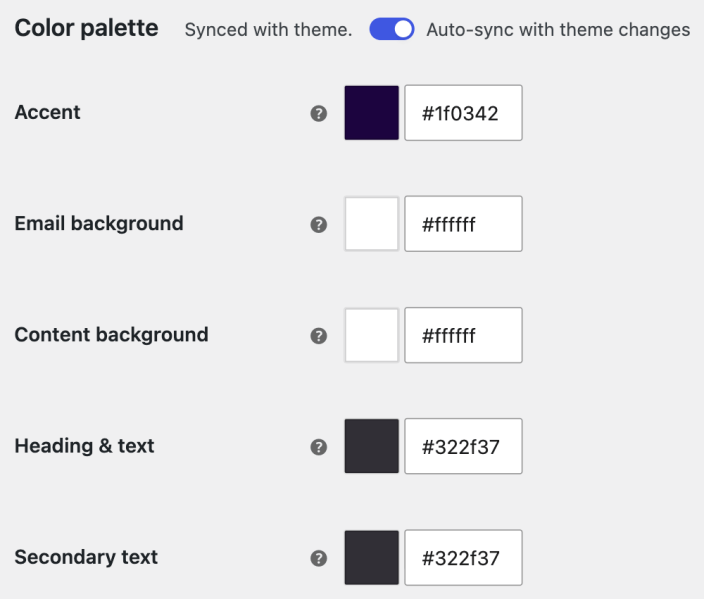
You can customize the color scheme of your store’s emails from here. Choose to either automatically sync with your store’s theme or manually set each color:
- Sync with theme – Match your email template colors with your store’s theme.
- Accent color – Used for buttons and links.
- Email background – The background color of the entire email.
- Content background – The background color of the main content area.
- Heading & text – The color of primary text and headings.
- Secondary text – Used for additional elements like footer content.
Email Preview
↑ Back to topThe Email preview section lets you review a store email before sending it.

You can preview any of your store’s emails in the Email Preview section. Choose a template from the dropdown menu, then select either the desktop or mobile icon to see how it will appear on each device. When Order Withdrawal is enabled, you can preview both withdrawal notifications here.
To test the email, use the “Send a test email” option to send a preview to any email address you choose.
Editing Individual Emails
↑ Back to topFrom the Email Notifications list above, select Manage on the right side of the email you’d like to edit.
When Email improvements is enabled at WooCommerce > Settings > Advanced > Features, you can view and update the following settings:
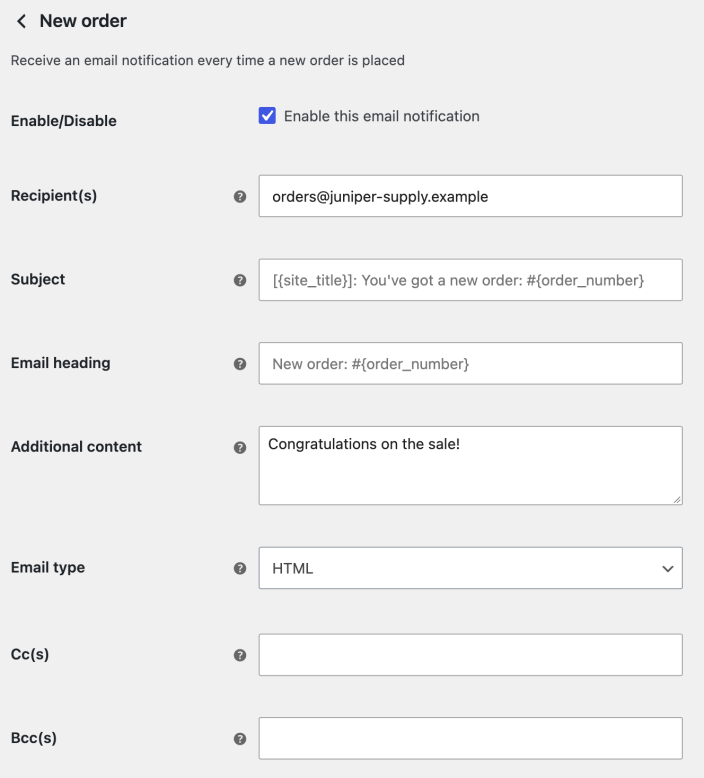
- Enable/Disable — Enable this email notification. (The Order Details email is sent manually and so can’t be disabled)
- Recipient(s) — Enter comma-separated recipients for this email. The default is the site administrator email set in Settings > General. This setting appears on emails sent to shop managers and admins, including Order withdrawal request. The customer withdrawal acknowledgment does not have this field; it goes to the email address entered on the form.
- Subject — This controls the email subject line. Leave blank to use the default subject. Accepts placeholders.
- Email heading — This controls the main heading contained within the email notification. Leave blank to use the default heading. Accepts placeholders.
- The Refunded Order and Order details emails have additional subject and email heading fields to accommodate different possible payment or refund statuses on orders.
- Additional content — Add text to appear below the main email content. Accepts Placeholders.
- Available placeholders are:
- {site_title} — The title of your site as set in Settings > General > Site Title
- {site_address}, {site_url} — The web address to your site as set in Settings > General > Site Address (URL)
- {order_date} — The date the order was placed
- {order_number} — The order number for the relevant order.
- Available placeholders are:
- Email type — Choose which format of email to send. Options include:
- Plain Text — Sends the email without HTML formatting.
- HTML — A version with rich formatting for images, different fonts, and layouts.
- Multipart — Sends both HTML and plain text versions of the content. The recipient’s email client will choose which version to display based on its capabilities and settings
- Cc(s) – Any email address you would like Cc’ed on the email you are editing
- Bcc(s) – Any email address you would like Bcc’ed on the email you are editing
Cc and Bcc fields are hidden for Reset password, New account, and Confirm email address emails. They are also hidden for the experimental Back in stock sign-up verification email. WooCommerce ignores Cc and Bcc values saved before this restriction, so those additional recipients do not receive these emails.
From the email editing screen, you can also preview each template on desktop or mobile and send a test email to the address of your choice.
Individual settings without Email improvements
↑ Back to topWhen Email improvements is disabled, the individual email settings use the legacy design.
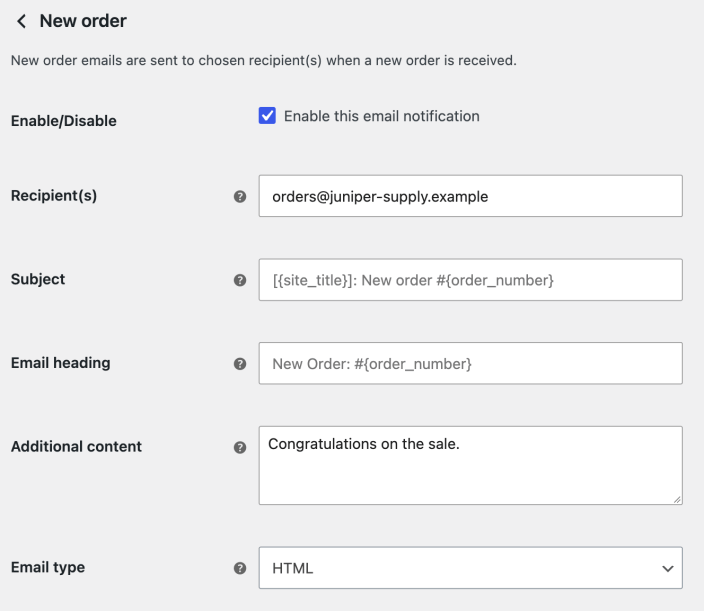
On this screen, you can edit the following settings. Some emails have slightly different options.
- Enable/Disable — Enable this email notification. (The Order Details email is sent manually and so can’t be disabled)
- Recipient(s) — Enter comma-separated recipients for this email. The default is the site administrator email set in Settings > General. This setting appears on emails sent to shop managers and admins, including Order withdrawal request. The customer withdrawal acknowledgment does not have this field; it goes to the email address entered on the form.
- Subject — This controls the email subject line. Leave blank to use the default subject. Accepts placeholders.
- Email heading — This controls the main heading contained within the email notification. Leave blank to use the default heading. Accepts placeholders.
- The Refunded Order and Order details emails have additional subject and email heading fields to accommodate different possible payment or refund statuses on orders.
- Additional content — Add text to appear below the main email content. Accepts Placeholders.
- Available placeholders are:
- {site_title} — The title of your site as set in Settings > General > Site Title
- {site_address}, {site_url} — The web address to your site as set in Settings > General > Site Address (URL)
- {order_date} — The date the order was placed
- {order_number} — The order number for the relevant order.
- Email type — Choose which format of email to send. Options include:
- Plain Text — A stripped-down version of the email without any HTML formatting.
- HTML — A version with rich formatting for images, different fonts, and layouts.
- Multipart — Sends both HTML and plain text versions of the content. The recipient’s email client will choose which version to display based on its capabilities and settings.
Add a video link to a block email
↑ Back to topBlock-based transactional emails can show clickable video thumbnails for public YouTube, VideoPress, Vimeo, TikTok, and Dailymotion links. WooCommerce 11.0 adds support for Vimeo, TikTok, and Dailymotion. This workflow is available when Block Email Editor (alpha) is enabled under WooCommerce > Settings > Advanced > Features.
- Go to WooCommerce > Settings > Emails.
- Open the Actions menu for the email you want to change, then select Edit.
- Add a paragraph where you want the video to appear. Paste a public YouTube, VideoPress, Vimeo, TikTok, or Dailymotion video URL on its own line, then press Enter. The editor converts the URL to the matching provider’s embed block.
- Select Save.
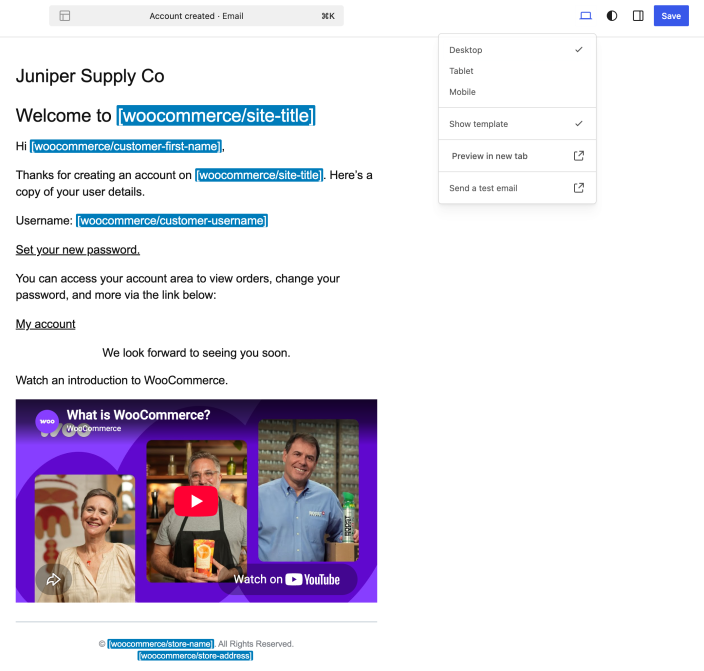
Email clients do not play these videos inline. WooCommerce replaces the player with a thumbnail and play icon. When a recipient selects the thumbnail, the video opens on the provider’s website.
Preview and troubleshoot a video link
↑ Back to top- Open View and select Preview in new tab to check the linked thumbnail. You can also select Send a test email to check it in an email client.
- Use a public video URL. Private, password-protected, region-restricted, or removed videos may not provide a thumbnail.
- WooCommerce requests preview data from the video provider when it renders the email. Confirm that you are allowed to share the video URL and its preview image.
- If WooCommerce cannot recognize the URL or retrieve a thumbnail, the email falls back to a clickable URL.
Review and apply block email template updates
↑ Back to topThis workflow is available when Block Email Editor (alpha) is enabled under WooCommerce > Settings > Advanced > Features. It applies to block-based transactional email templates that you have customized.
Edit email content or its template
↑ Back to topThe email content editor changes the content unique to that notification. To edit the template area that wraps the content, select the template area on the canvas. A toolbar labeled Template appears; select Edit template to open the template editor.
Review an available template update
↑ Back to top- Go to WooCommerce > Settings > Emails. The Updates column shows Review update when WooCommerce has a newer core version of a customized template. Use the Updates filter and choose Update available to show only affected emails.
- Select Review update. The email editor opens the update review. You may also see a Template update available banner while editing an affected email.
- Expand Show changes to read the summary. WooCommerce compares your saved template with the previous and current core versions so it can separate your customizations from the template update.
- If WooCommerce can merge the update without a content conflict, select Apply. Save any unsaved editor changes first.
- If the update overlaps text you changed, select Review changes. For each conflict, choose Keep yours to preserve your text or Use core to use the updated WooCommerce text, then select Apply.
Applying an update changes the saved email template. WooCommerce automatically includes non-conflicting core changes and preserves the customizations you chose to keep. A confirmation notice provides an Undo action immediately after the update is applied.
Further email customization
↑ Back to topFor email changes that require custom development, share the template customization guide with your developer. Customizing a template does not enable Cc or Bcc for emails that do not support those recipients.
Questions and support
↑ Back to topDo you still have questions and need assistance?
This documentation is about the free, core WooCommerce plugin, for which support is provided in our community forums on WordPress.org. By searching this forum, you’ll often find that your question has been asked and answered before.
If you haven’t created a WordPress.org account to use the forums, here’s how.
- If you’re looking to extend the core functionality shown here, we recommend reviewing available extensions in the WooCommerce Marketplace.
- Need ongoing advanced support or a customization built for WooCommerce? Hire a Woo Agency Partner.
- Are you a developer building your own WooCommerce integration or extension? Check our Developer Resources.
If you weren’t able to find the information you need, please use the feedback thumbs below to let us know.