
Are you an amateur photographer looking for ways to monetize your passion? Are you a pro looking for a new way to make some extra cash?
Or, perhaps you’re somewhere in the middle. You’ve sold some beautiful shots to a stock photography site and have a steady flow of shooting and editing, but you’d like to expand your business to make more passive income.
No matter your specific situation, selling your photographs online is a great way to share your work and generate revenue.
But if you’re stuck on how to create an online store to sell photos online, you’re in luck. WordPress and WooCommerce give you the power to bring your vision to life – while leaving you in full creative control.
Today we’ll discuss how to sell photographs online and cover everything from choosing a niche to building your store the right way.
Why you should sell photos on your own site
↑ Back to topThere are a lot of places to sell photos online. You can sell them through stock photo sites, your own website, or on a variety of other online platforms. Each option has its own advantages and disadvantages.
Selling photos on stock sites
Stock photo sites are a great way to reach a large audience of potential buyers. And since the sites are already established, there’s no need for you to invest any time or money in setting up your own website. However, you’ll have less control over how your photos are presented and advertised. And since there’s so much competition, it can be hard to generate interest in your portfolio.
Additionally, stock photo sites typically take a large cut of the profits – as of this writing, iStock’s standard cut is 85%! So, if you do sell a photo, you won’t make as much money as you would if you sold it on your own website.
Selling photos on your own site
Listing photos on your own website gives you a lot more control over the whole process than selling on stock photography sites. You can design your site however you want, advertise your photos however you’d like, and set your own prices. You also don’t have to worry about competition from other photographers selling photos online right next to yours. Plus, building your own site provides the added benefit of giving you access to superior analytics so you can make better decisions about how you promote your business.
On the downside, setting up and maintaining your own website takes more effort. And unless you work to generate your own traffic, you might not sell as many photos.
So, which is the best place to sell photos online? If you’re just starting out, selling photos on stock photo sites might seem like the easier option. But if you’re serious about making money from your photography, eventually you’ll want to sell your photos on your own website.
Before you build anything, however, you need to pick a niche.
Choose a photography niche
↑ Back to topWhen it comes to photography, it pays to focus on a niche. Not only will this help you connect better with your audience, it will also make it easier to sell your photographs online.
Most serious customers will search specific keywords – “art deco architecture pictures,” “pet hamster photos” – not generic terms like “photos for sale.”
Focusing on a niche not only allows you to perfect your craft, but also will better indicate to search engines that your site is a good match for potential customers. It demonstrates expertise in your genre and, if you have dozens of similar photos available, helps ensure that one is a great fit for your particular audience.
Beyond the subject of your photography, it’s a good idea to think about how your photos will be used. Will businesses use them on their website? Will people print and hang them in their homes? Will they use them for their social media profiles?
This helps you narrow your audience further and identify potential search terms to target. Once you have some ideas in mind, do some research on the subject and see what other photographers are doing.
For example, if you love taking pictures of animals, you might consider becoming a pet photographer. This niche is growing in popularity, as more and more pet owners want professional photos of their furry friends.

Or if you’re into nature photography, you could focus on specific animal or plant species indigenous to your area. It may be hard to rank for generic terms like, “plant photographs for sale,” but much easier to rank for, “pictures of Pygmy Date palms.”
Don’t be afraid to get creative with your niche. The more unique it is, the easier it will be to stand out from the crowd.
Remember, be specific about the kind of stock photography you’ll sell – both the subjects you’ll shoot and the way the photos will be used. You can expand beyond a single niche in the future, but starting with a focused approach will help you attract and convert visitors faster.
Consider usage rights and licenses
↑ Back to topBefore you start putting your pictures up for sale, there are a few things you need to know.
First, you need to make sure you have the copyright to the photo. Otherwise, you could be infringing on someone else’s intellectual property.
While it may seem like common sense that the person who took the photo owns the rights, this might not always be the case. For example, if you took the photo during the course of your employment, your employer may own the rights.
Take a minute to learn copyright basics.
Second, if you sell photos online that contain people, you may need to get model release forms.
Finally, make sure you’re familiar with the different ways you can license your photography. For example, there are exclusive and non-exclusive licenses, as well as print and web licenses. Each type has its own advantages and disadvantages, so choose carefully based on your needs. Here’s a brief rundown of the different types of licenses you may find on stock photography websites:
Editorial use license
An editorial use license grants the buyer the right to use the photo for editorial purposes. This could include using the photo in a newspaper article or blog post. It does not allow the buyer to use the photo for commercial purposes like in advertising or on a product.
Commercial use license
A commercial use license allows the buyer to use the photo for any commercial purpose, including advertising and marketing. The buyer does not need to get permission from the photographer before using the photo commercially.
Print license
A print license allows the buyer to print the photo and use it for personal purposes. The buyer does not need to get permission from the photographer before printing the photo. Some sellers choose to get more specific by issuing licenses for the number of copies printed or based on the purpose of the printed work (educational, corporate materials and advertisements, retail books, etc.).
Web license
A web license allows the buyer to use the photo on their website – that’s it. You can choose to offer variations of this license for corporate vs. nonprofit usage or even add stipulations for where and how many times the image can be used on a website. It’s totally up to you!
Exclusive license
An exclusive license means that the buyer is the only person who can use the photo. The photographer cannot sell the same photo to anyone else while the exclusive license is in place.
Royalty-free license
A royalty-free license means that the buyer does not have to pay the photographer every time they use the photo. The buyer only needs to pay for the photo once and can then use it an unlimited number of times.
Royalty-free extended license
A royalty-free extended license allows the buyer to use the photo in ways that are not typically allowed under a regular royalty-free license. For example, the buyer could use the photo on a product or in an advertisement.
Rights-managed license
A rights-managed license means that the buyer must pay the photographer every time they use the photo. The fee depends on how the photo will be used.
Creative commons license
A creative commons license allows the buyer to use the photo for free in certain ways. For example, the buyer could use the photo on their website or in a blog post. However, they might not be able to sell the photo or use it for commercial purposes.
Public domain
A public domain license means that the photo is not protected by copyright and can be used by anyone for any purpose.
When selling photos online, it’s important to be aware of the different licenses that buyers may want. Make sure you’re familiar with the terms of each license so you can offer the ones that are right for you both creatively and financially.
Decide exactly what you want to sell
↑ Back to topBefore you can make a living selling photographs online, you need to think about what you specifically want to sell. Physical prints of your photos? Digital downloads?
Look&Seen, a store built on WooCommerce, offers prints of photographs from renowned photographers.
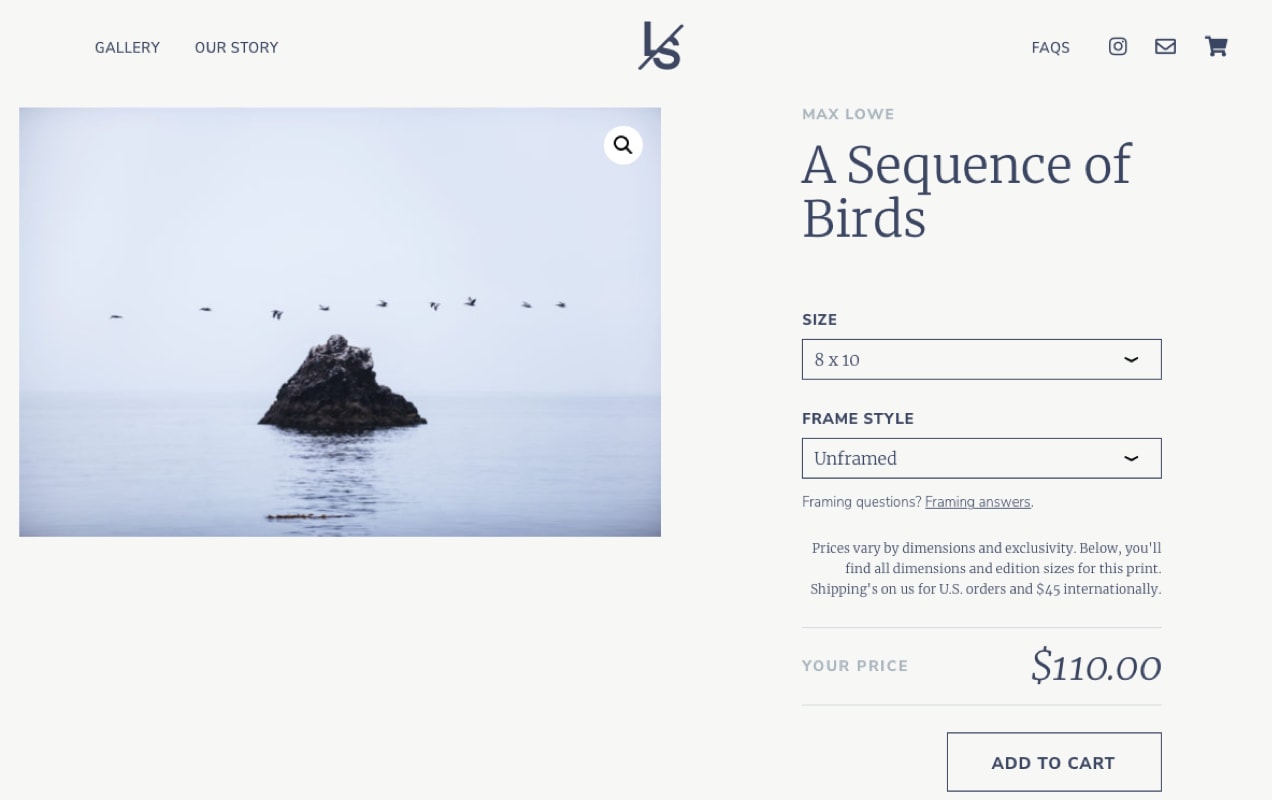
Product pages on the site allow customers to select the size of the print as well as the frame style.
But you may choose to go a different route. Let’s explore each of your options in a bit more detail.
Print on demand
One way to sell photos online is using a print on demand service. These companies print your images to order on one of dozens or hundreds of potential products. Once it’s ready, they ship the mug, calendar, t-shirt, or whatever it may be, directly to your customers. This way, you can sell your photos without having to worry about investing in inventory, purchasing special equipment, or shipping orders. The downside is that you’ll likely make less money per sale, and you won’t have as much control over the quality of the product or the customer experience.
Digital downloads
Another option is to sell digital downloads of your images or stock photography. With this method, buyers can download the high-resolution files and print them on their own or use them online. You’ll still need to set up a payment system and a way to deliver the files, but you’ll make more money per sale this way.
Photography services
This could involve anything from wedding photography to portrait sessions to event or product photography. Your niche will influence your focus here considerably.
With your focus niche in mind, you can make sure you’re offering the right products and services to your target market and sourcing the right tools to make it all happen.
The great news is that you may be able to mix and match the kinds of sales you make. Selling digital downloads of stock photos doesn’t prevent you from also offering products through print on demand companies or pitching photography services for those with custom requests.
Choose an ecommerce platform
↑ Back to topOnce your niche, licensing, products, and services are decided, you’ll need to choose which ecommerce platform will be best for selling your photos online. In your search, consider factors like price, ease of use, content ownership, flexibility, and scalability.
For instance, if you’re selling digital photographs, you’ll need a platform that makes it easy to showcase your work and sell photo downloads. At the same time, you’ll want one that won’t break the bank and that can scale as your business grows.
That’s why WooCommerce is the perfect choice for selling photographs online. Not only is it free to use, but it’s also highly flexible and scalable. Plus, as an artist, you’ll appreciate that it gives you complete control over your design and content. You own your site – it can’t be taken down at the whim of another organization. That’s not the case with most other platforms.,
So if you’re looking for an ecommerce platform that ticks all the boxes, WooCommerce is the way to go.
Check out this breakdown of the real-deal benefits of choosing WooCommerce over other ecommerce platforms:
Price
WooCommerce is free to use and open-source (as is WordPress), while other platforms can cost hundreds or even thousands of dollars per month. Though you will need to purchase a hosting plan and domain name, the costs are very reasonable – about $120-$150 a year for hosting and $12-$20 a year for a domain name.
You can always purchase premium extensions to quickly add special functionality, but you absolutely don’t need to buy anything to create a beautiful, highly-functional site.
Pricing is completely predictable; you pay for the functionality you need, not the number of sales you make.
Ease of use
WooCommerce is designed to be easy to use, even for beginners. Where other platforms can be complicated and time-consuming to set up, you can get started with WordPress and WooCommerce in a matter of minutes.
Plus, if you’re familiar with WordPress already, choosing WooCommerce is really a no-brainer.
Content ownership
With WooCommerce, you own your data. This means you can export your products, customers, and order data at any time. On other platforms, you may be locked into their system and unable to get your data out.
Flexibility
WooCommerce is a highly flexible platform that allows you to mix and match features and functionality to create the perfect combination for your store. Other platforms may not offer the same level of customization.
It integrates seamlessly with major payment providers, like PayPal and Stripe, as well as international options and digital wallets, like Apple Pay and Amazon Pay. This makes it easy to sell your photos to a global audience. And with the WooCommerce Payments extension, you can manage all your transactions directly from your WordPress dashboard, making it even easier to get paid for your work.
Scalability
You might need to adjust settings and features with your hosting provider as your business grows. After all, the last thing you want is for your site’s performance to crash during peak traffic times!
With WooCommerce, you can quickly upgrade your hosting plan and switch providers if the need arises. You’ll also have more control over things like speed, and there’s no limit to the number of products and variations you can have. Learn more about how WooCommerce scales.
Security
When you sell photos online, you’re handling customer data and payments, which means security is always a top priority. WooCommerce takes security seriously, with regular code reviews and a dedicated security team that works to identify and patch any vulnerabilities.
You can also take additional measures to secure your store, like installing a WordPress security plugin or using two-factor authentication.
You can also add a WordPress backup tool so that a copy of your site is saved in case of a security breach or even if you make a simple mistake. With something like Jetpack Backup, your site is saved in real-time, so all you have to do is pick a restore point and your store will be up and running again with a single click. All of your work and customer orders are safe!
Thoroughly convinced? Now let’s walk through how you can build a store so you can quickly start selling your photographs online.
Build your store
↑ Back to topNow that you know why selling photos on your own website is the best option, let’s take a look at how to build an online store.
1. Select a web hosting company and domain name
The first step in building an online store is to choose a domain name and web host. A domain name is what visitors type into their browser to get to your site, like WooCommerce.com. If you don’t already have one, you can usually purchase one from your web hosting company.
Web hosts are what make your site available for people to view – pretty important if you want to sell photos online. They store your site files and serve them to visitors’ computers when they type in your domain name. Though there are several web hosting companies out there, we’ve put together a list of hosting solutions we recommend.
2. Install WordPress
After you’ve chosen your web hosting company and registered your domain name, the next step is to install WordPress. This can usually be done with a single click from your web hosting control panel or cPanel. If not, don’t worry; it’s still pretty easy. Just follow along with the official WordPress.org guides on how to install WordPress with popular hosting plans.
3. Choose a WordPress theme
Now that you have WordPress installed, it’s time to choose a theme. This influences the design and layout of your website. If you’re selling photos, you’ll probably want to choose a theme that’s clean and minimalistic so every image or stock photo can really shine.
It should also include features like a gallery or portfolio to showcase your work, as well as integration with WooCommerce so you can start selling those photos.
Some of the top themes for photographers include:
- Affiche: Designed specifically to showcase prints, you’ll be ahead of the game with this clean, modern theme. It’s block-based and completely responsive, so it’s easy to customize and will look great on every device.
- Frame: Built to help visitors navigate large catalogs of products and categories, this theme is great if you serve multiple niche audiences. Quickly display your most popular images and direct visitors to groups of photos perfect for them.
- Emoly: Take advantage of unique layouts and gallery displays to stand out from cookie-cutter sites. This is perfect for artists with intricate styles and has lots of features to design your own look.
- Hotel: This is a particularly great option if your goal is to book sessions or showcase your work for custom sales. It integrates with WooCommerce Bookings so you can get started quickly.
- Storefront: This is a great free, go-to theme that’s simple to set up and integrates perfectly with WooCommerce. With more than six million downloads, it’s a proven option that checks all the boxes.
If you plan on selling other products in the future, make sure to choose a theme that’s easily customizable and can be adapted as your business grows.
4. Install the WooCommerce plugin
Now that you have WordPress and a theme installed, it’s time to install the WooCommerce plugin so you can start setting up your store.
Log in to your WordPress dashboard, navigate to the Plugins section, and click Add New. Then, search for “WooCommerce” in the plugin repository and install the official WooCommerce plugin.
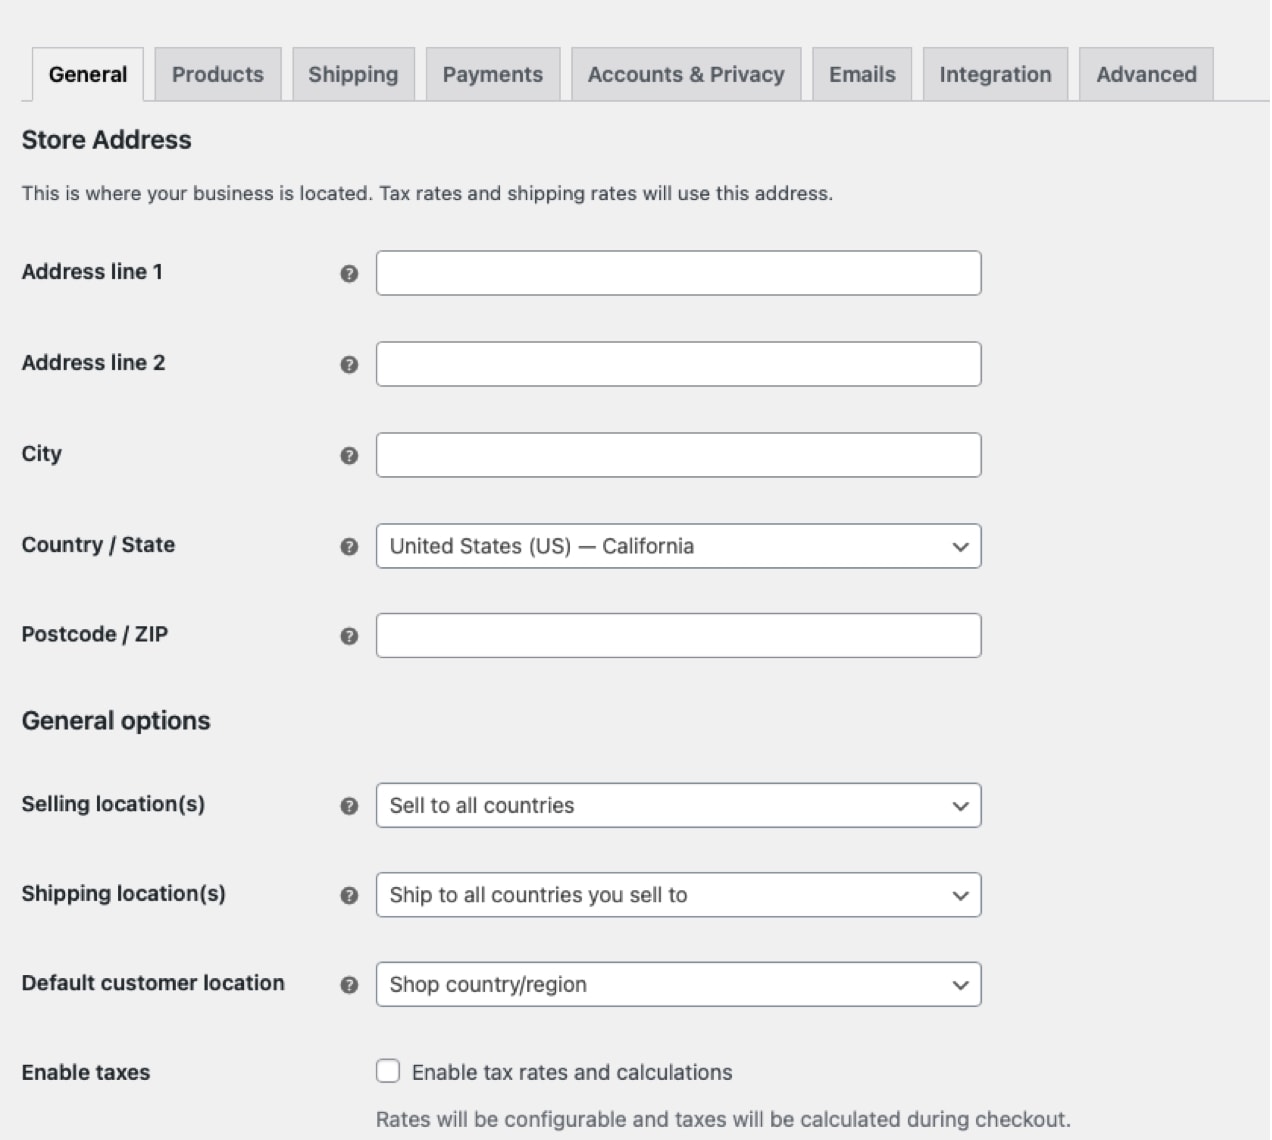
5. Configure your settings
Next up, you need to configure your settings. This includes things like adding your payment methods, shipping options, and tax rates.
You can find all of these settings by logging in to your WordPress dashboard and navigating to WooCommerce → Settings.
Input your store’s address (or general location) and customize the options, including selling locations, shipping locations, and your store’s default region.
You can also click across the top of the screen on each tab to customize specific aspects of your store. Let’s explore those specifics now.
6. Pick payment gateway(s)
One of the most important settings to configure is your payment gateway. This is how you’ll actually get paid when you sell your photos online.
WooCommerce comes with a few different built-in options. For instance, you can set up direct bank transfers, checks, and cash on delivery.
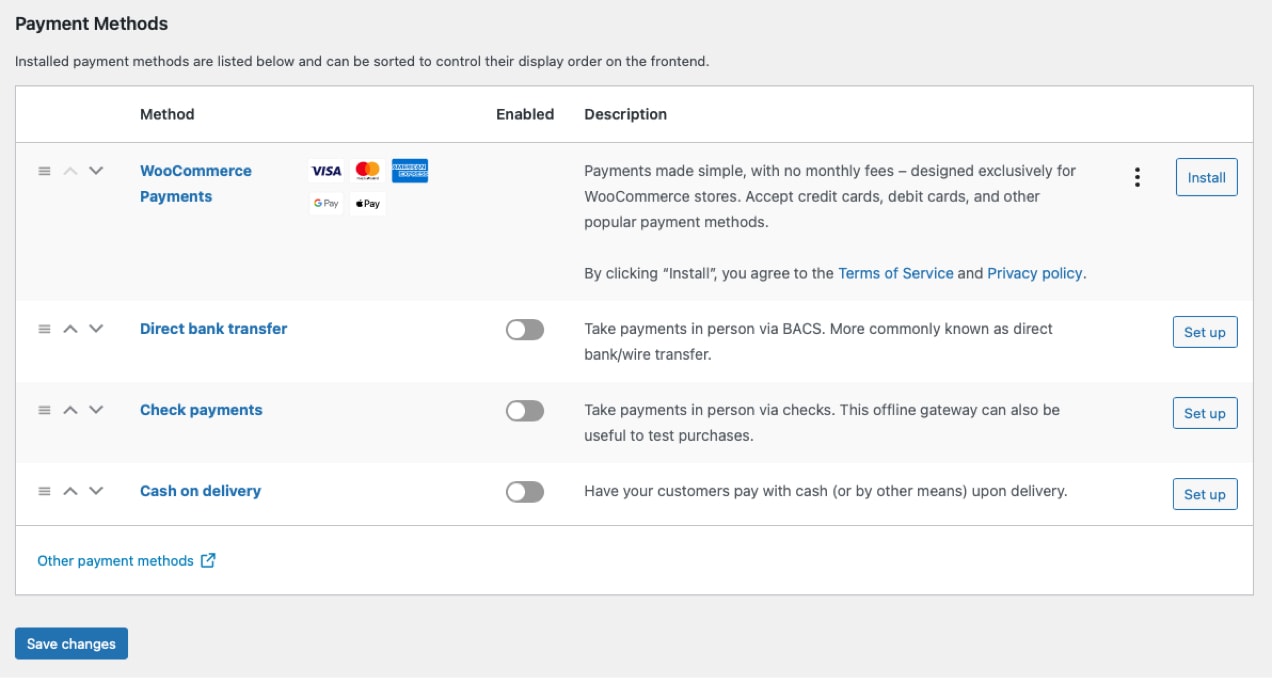
The most relevant option for those selling photographs online, however, is WooCommerce Payments, which allows you to accept payments in more than 135 currencies via credit card, debit card and express pay options like Google Pay and Apple Pay, among others.
Want more options? Check out the full list of payment gateway integrations.
Select the one that works best for your needs including your location, your target audience’s location, and your personal preferences.
7. Set up shipping
If you’re selling physical products yourself instead of just selling photos online, you’ll need to set up shipping. First, select a shipping zone, which allows you to apply a set of rules to those in a specific geographic region. These rules dictate the shipping methods and rates available. To add a shipping zone, all you need to do is go to WooCommerce → Settings, then click on the tab that says Shipping. Click the button that reads Add shipping zone.
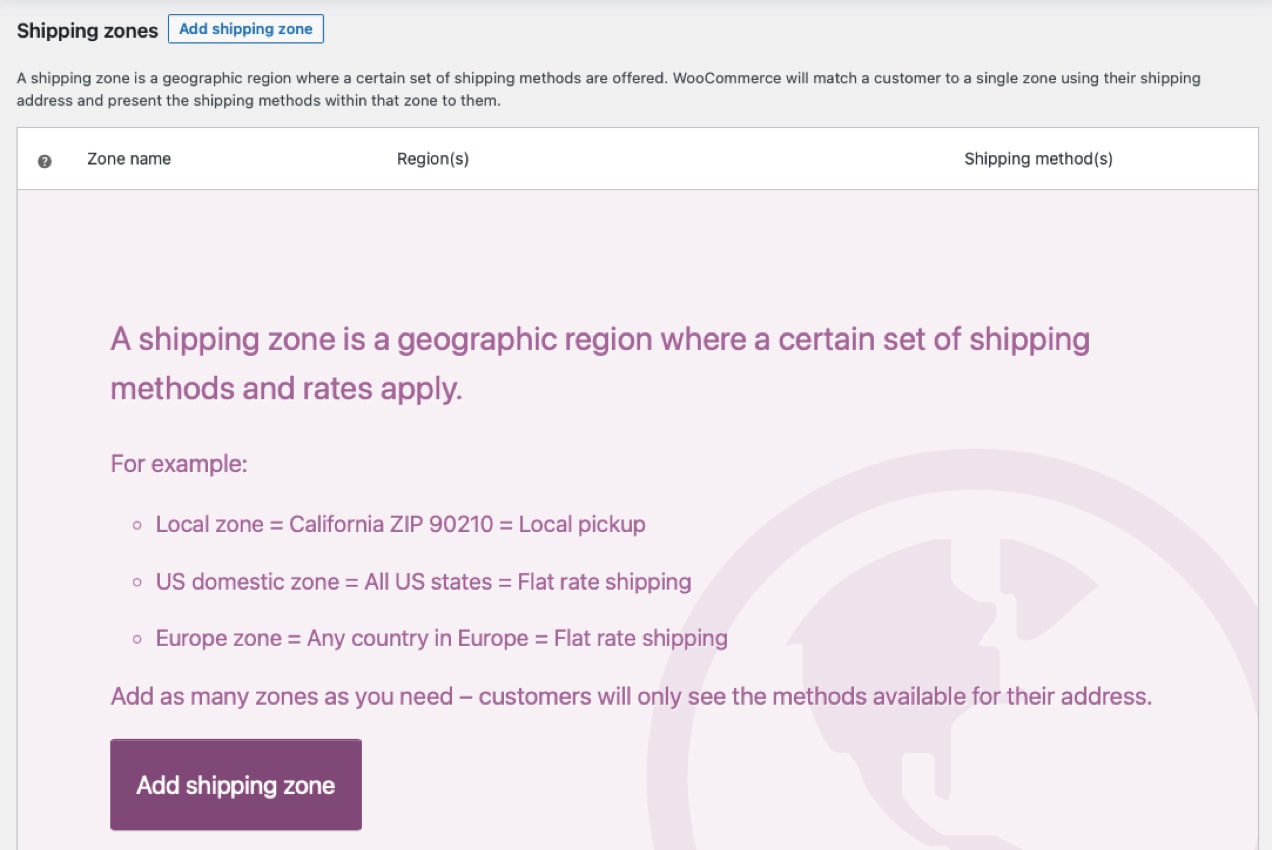
You can add as many shipping zones as you want to meet the needs of your customers.
Now, set up the methods that will be available for each zone. For example, you might offer free shipping to those in your immediate area, and flat rate shipping to all of the other zones. If you want to get even more detailed, you can use the Table Rate Shipping extension to create detailed rules based on weight, cart total, and more.
You may also want to install WooCommerce Shipping, a free extension that simplifies order fulfillment. It allows you to purchase and print shipping labels directly from your dashboard and save up to 90% on rates from USPS and DHL. There are even options for international shipping.
Learn more about ecommerce shipping.
8. Set up taxes
You’ll need to configure your tax settings as well. This includes things like sales tax and VAT.
Just like with shipping and payments, WooCommerce comes with a few different built-in options, as well as plenty of other tax methods available as plugins. WooCommerce Tax is a popular option that automatically calculates taxes based on location at checkout.
9. Add photography products to your store
Now that your store is all set up, it’s time to start adding products so you can sell online. To add a product, simply log in to your WordPress dashboard and navigate to Products → Add New. From here, you can fill in all of the product details, like the name, description, price, and images.
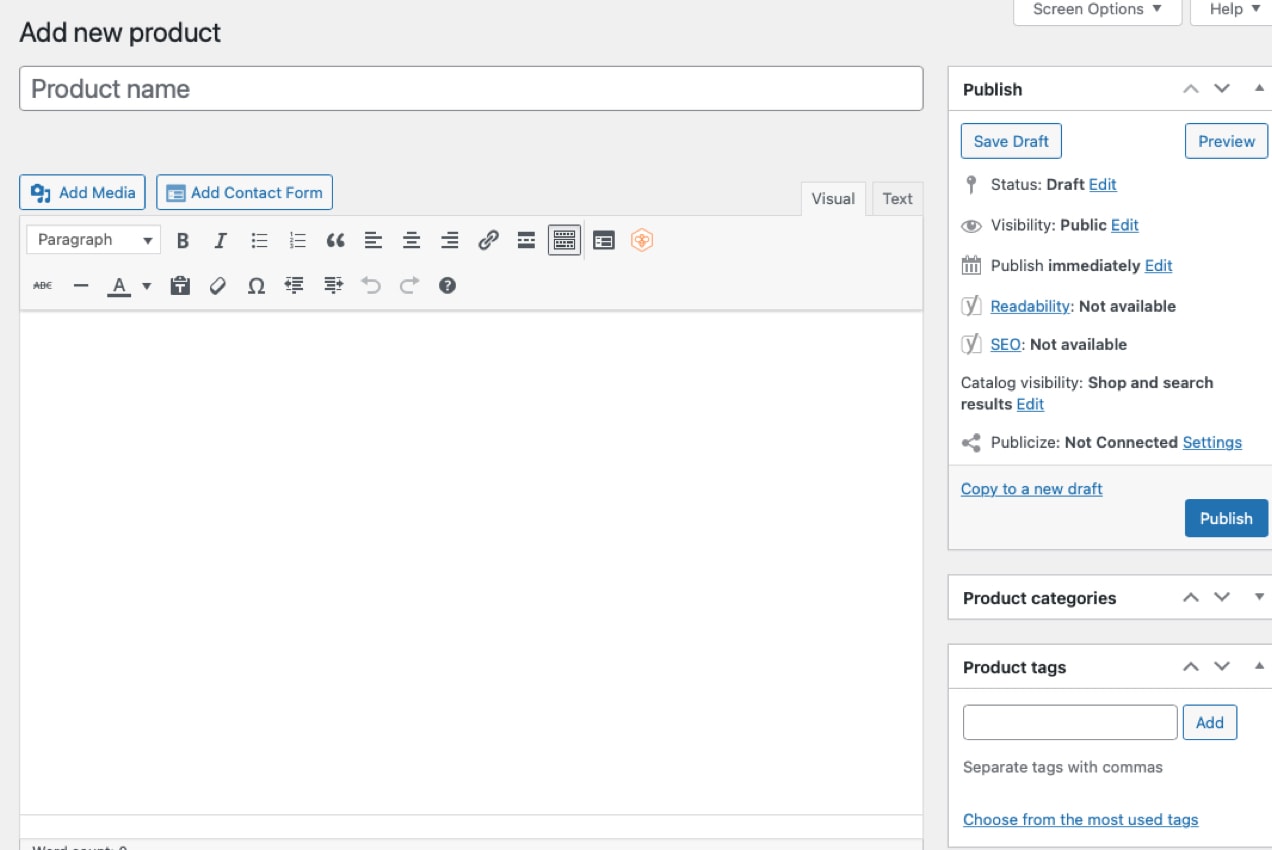
Then, you’ll need to scroll down the page and configure the specifics about your product. If you’re selling just a single type of product or stock photo, you’ll want to use the “Simple product” type. If selling digital downloads of stock photography, be sure to click the box next to Downloadable.
However, you may want to offer multiple license types for the same stock photo. In this case, you’ll want to select “Variable product,” and select Downloadable.
Variable products allow customers to choose from a variety of options. For a shirt, they might select a size and color. For your stock photos, you’ll instead create options for types of license. Each variable can have its own price – so an editorial license can cost less than a commercial one.
For more details about all the available options, along with instructions for editing all settings, read our full documentation.
If you’re going to sell via print on demand, you’ll want to configure your settings so that your products are automatically sent to the printer when an order is placed. Printful and Printify are two popular options.
Install the extension you need, activate it, and connect the print on demand service to your WooCommerce store.
10. Organize and display your photos
When customers arrive on your site, how will they browse your selection? You might want to display a grid of thumbnail images on your store’s homepage, with each image linking to the product page for that stock photo. Or, you might want to showcase a slideshow of featured products.
Some themes come with these types of layouts built in. But you can also use extensions like Product Photo and Video Gallery or Product Gallery Slider to achieve unique photo designs.
Adding filters is a great way to let customers narrow down the results so they can find what they’re looking for more easily. For example, you might add filters for things like print size, print type, and price. Search functionality also helps customers find specifically what they’re looking for. Jetpack Search is one option here, offering advanced features like instant filters and spelling correction.
11. Install additional extensions for more features
There are plenty of extensions available to add functionality to your store – from tax software specific to your region to marketing tools and design functionality. This enables you to truly create a custom site, something you can’t do with stock photography websites.
To find extensions, you can browse the WooCommerce Extension Store. The options you’ll find here have been vetted by the WooCommerce team and come with a generous return policy and great support. Once you’ve found something that you want to use, simply install and activate it on your site.
Here are a few extensions that are great for photographers:
- WooCommerce Memberships: This extension lets you sell access to digital content, create subscription-based products, and more. This could be used to sell things like access to stock photo libraries.
- WooCommerce Photography: This allows you to watermark each stock photo, protect your images, and create galleries, among other things.
- Image Watermark: As the name suggests, this extension lets you watermark images in your store. This is a great way to protect your stock photos from being stolen or used without permission.
- WooCommerce Bookings: This extension lets you sell appointments, rentals, and other time-based bookings. This could be used to schedule in-person photo shoots, print consultations, or other services.
- WooCommerce Product Add-Ons: This extension lets you offer customization options for your products, like frame choices and matting options. On a stock photo product, for example, people could check a box to add a commercial license.
These are just a few examples, but there are plenty of other extensions available for WooCommerce stores.
12. Add pages to your photography store
In order to successfully sell photos online, your WooCommerce store will also need some standard pages like About, Contact, Terms and Conditions, Shipping and Returns, etc.
These pages are important because visitors expect to find them and they can answer questions so you have fewer messages to respond to each day. They also provide content for search engines to learn about your site and take care of compliance and legal requirements for payment and shipping partners.
Beyond that, you may also want to create pages to build trust with your visitors, explain important information, and demonstrate your expertise.
No matter your reason for building additional pages, the WordPress Block Editor simplifies the process. You can use it to drag and drop elements like paragraphs, headings, product grids, images, and more to create a completely custom look. It even includes block patterns for things like testimonials, FAQs, and pricing tables. These are ready to go, allowing you to quickly create full page layouts, then customize them to your brand.
Market your photos
↑ Back to topLaunching your store is a huge accomplishment – congratulations! Now you can turn more of your focus towards attracting the right people and converting them into customers. Marketing your online store is an entirely different discipline, but it’s one you can learn about and improve over time. WooCommerce has dozens of helpful articles to help you learn marketing strategies for your online store. Here are some jumping-off points for inspiration:
1. Social media
Social media is a great way to reach new audiences and promote your products. This is especially true if your customers will primarily be individuals rather than businesses.
Social media is great for stock photography marketing because you’re naturally creating content that people want to follow. As your audience grows, you can share your newest images with thousands of people at a time. Read our article about choosing a social media platform, but you can bet that Instagram and Pinterest will be great options to pursue.
2. Email marketing
Email marketing is another great way to stay in touch with your target audience and lead them from onlooker to customer. Email marketing platforms like MailPoet – designed specifically for WordPress sites – take the guesswork out of creating and sending newsletters, special offers, and other promotional emails. Learn how to create an email marketing strategy.
3. Blogging
Building your store on WordPress gives you an inherent advantage because WordPress was built for blogging! And unique, high-quality content is a cornerstone of being found when people search for you online.
You can share about your latest photography session, provide tips and advice for others who want to learn the trade, or simply write about your latest inspirations. The key is to consistently write content related to your target audience. Your goal is not to create a sales letter, but instead provide helpful or interesting information.
The more you do this, the more likely it is that people will find your site.
Other sites want more fresh, quality content just like you. Partnering to write guest posts on ones with similar audiences is a great way to spread your brand and gain links, which indicate to search engines that you have valuable information – like amazing stock photos – to share.
4. Search engine optimization (SEO)
Search engine optimization (SEO) is the process of improving your site so that you’re found when people are looking for what you have to offer. If you want to sell photos online, it’s an important skill to learn. Much of this has to do with the content on your site (which is why blogging is important), but engines like Google also consider technical elements like accessibility, site speed, and user experience. Finally, search engines look for other indications that vet the quality of your site – like links from others and mentions of your name or brand around the web (which is why writing guest posts can be helpful).
There are hundreds of ranking factors, but to get started on the right path, simply focus on creating a safe, fast, easy-to-navigate site with plenty of high-quality content.
Learn more ecommerce SEO basics for beginners.
5. Paid advertising
Paid advertising is another great way to get the word out to sell photos online. You can run ads on social platforms like Facebook, Instagram, Pinterest and TikTok, or try pay-per-click ads (PPC) on Google. PPC ads are like an express lane to the top of search results, but you’ll have to pay for each click.

The Google for WooCommerce extension is a great way to create and manage product advertisements from within your WooCommerce dashboard and take advantage of free shopping listings.
We’ve barely scratched the surface, so learn more in our guide for Google Search Ads for Beginners.
Sell photographs online
↑ Back to topSo what are the best places to sell photos online? While it depends on the specific needs of your business, creating your own store is almost always a much better option than stock photography websites.
Building an online store enables you to sell your photos and reach new audiences without having to worry about fees that are common with stock photography sites. And with WooCommerce, you can do it all yourself.
Ready to earn money with your photos? Get started today!

About


Thank you for this very informative overview. This is just what I’ve been looking for to “take the plunge” and turn my photography site into an e-commerce store. Your information is much appreciated!
Great to hear, Elise! Best of luck with your new store!