The Custom Order Status Rule feature allows you to automate the transition of order statuses based on predefined conditions. This feature is handy for managing orders efficiently by specifying rules that dictate how and when an order status should change.
Add Order Status Rule
↑ Back to topTo add the custom order status rule, follow the path WooCommerce -> Settings -> Custom Order Status -> Order Status Rules.

Click on the “Add New” button to create a new rule and you will be directed to the “Add Order Status Rule” interface.

For instance, you want to automatically change an order’s status from “Packaging” to a custom status “Ready for Shipment” 60 minutes after the order has been marked as “Packaging,” but only on weekdays and excluding specific holidays.
1. Set Rule Name
↑ Back to topEnter Packaging to Ready for Shipment as the rule name to describe the process the rule automates.

2. Status
↑ Back to topIn this section, users define the transition of order status. You can choose WooCommerce as well as Custom Order Statuses.
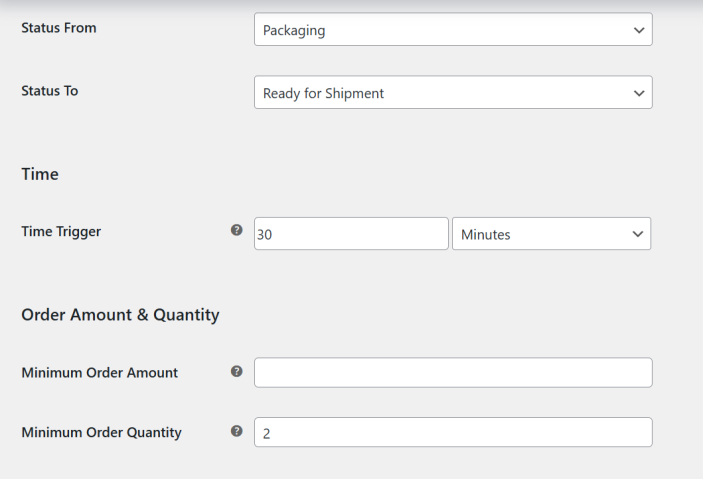
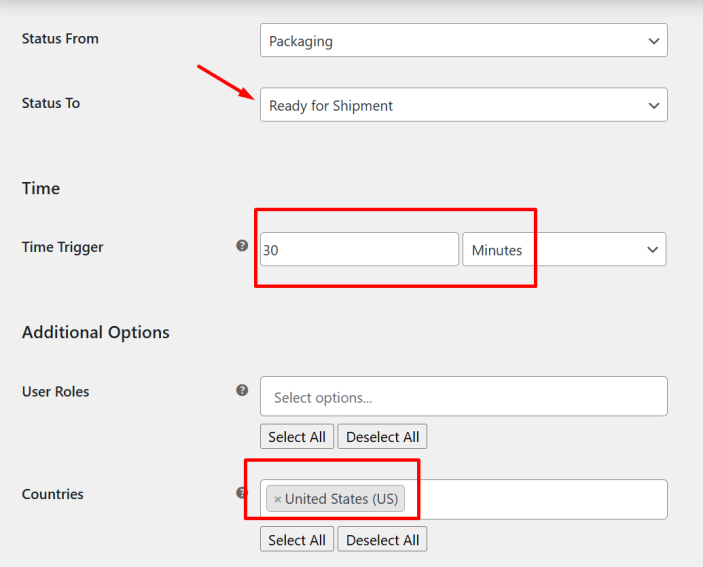
Status From: The current status of the order that triggers the rule.
Status To: Choose the status to which the order will be changed when the rule is applied.
In our example, orders with the Custom Order status “Packaging” are automatically updated to “Ready for Shipment”. This status indicates that the order is packaged and ready to be shipped.

3. Time
↑ Back to topIn this section, you can define when the rule should be applied based on time intervals and exceptions that the system should wait before changing the status.

Time Trigger: Users can set a time trigger to specify when the rule should be applied. You can specify the number of minutes, hours, days, weeks for the trigger. I have set the time to 30 minutes. This means the system will wait 30 minutes after an order is marked as “Packaging” before changing the status to “Ready for Shipment.”

Skip Days: This feature enables users to exclude specific days from the rule’s application. Users can select or deselect days of the week based on their operational requirements. Here, I selected Monday and Tuesday as days to skip since packaging and shipping may not occur on these days.

Skip Dates: Users can also specify dates (e.g., holidays) on which the rule should not apply, offering further customization and adaptability to seasonal fluctuations.

4. Order Payment & Shipping
↑ Back to topUsers can select specific payment gateways and shipping methods for the rule to apply, ensuring compatibility with their store’s payment and shipping preferences.
Payment Gateways to Include: If you want this rule to apply only to orders paid via certain Payment Gateways, select those payment gateways here. In my case, I selected “Direct Bank Transfer”. So this rule will be applied to only if the order is placed with “Direct Bank Transfer” Payment.

Shipping Methods to Include: Select the shipping methods that should be considered for this rule. For example, if this status transition should only apply to orders with Zone 1 – Flat rate shipping, select that option.

Now, the order received using the “Cash on Delivery” payment gateway and the “Zone 1 – Flat Rate” shipping method. The order is currently in the “Packaging” status.

The system will now automatically change the order status from “Packaging” to “Ready for Shipment” 30 minutes after the order is marked as “Packaging.” This will only occur on weekdays and will skip the specified holidays.

5. Products & Categories
↑ Back to topThese settings let you apply the rule to specific products or product categories, so the status change happens only when those items are in the order.
Products
Select one or more products that the rule should apply to.
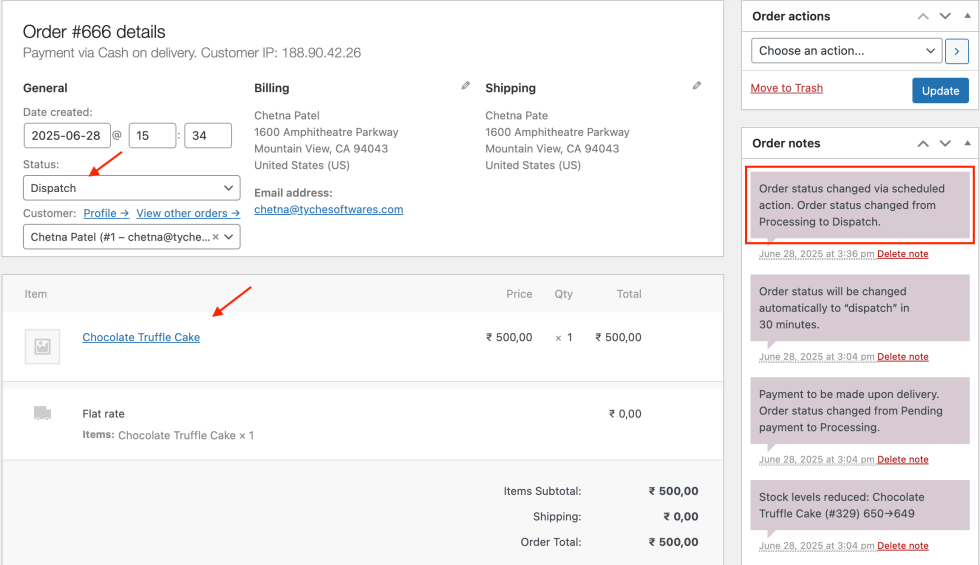
For instance, if you choose Chocolate Truffle Cake, the rule will only be triggered when an order includes that product.
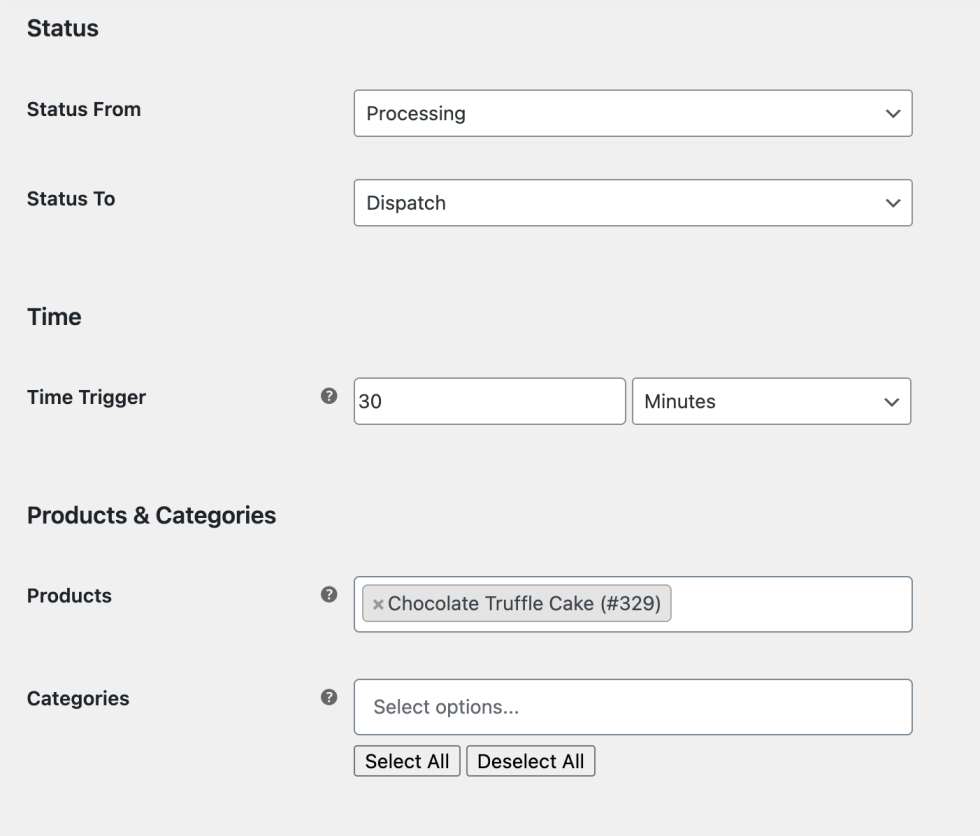
If an order includes the product Chocolate Truffle Cake and its status is set to Processing, the order status will automatically change to Dispatch after the defined time trigger (e.g., 30 minutes).
Categories
Choose one or more product categories to restrict the rule based on product type.
Let’s say you select Appetizers category, only orders that include at least one item from this category will trigger the rule.
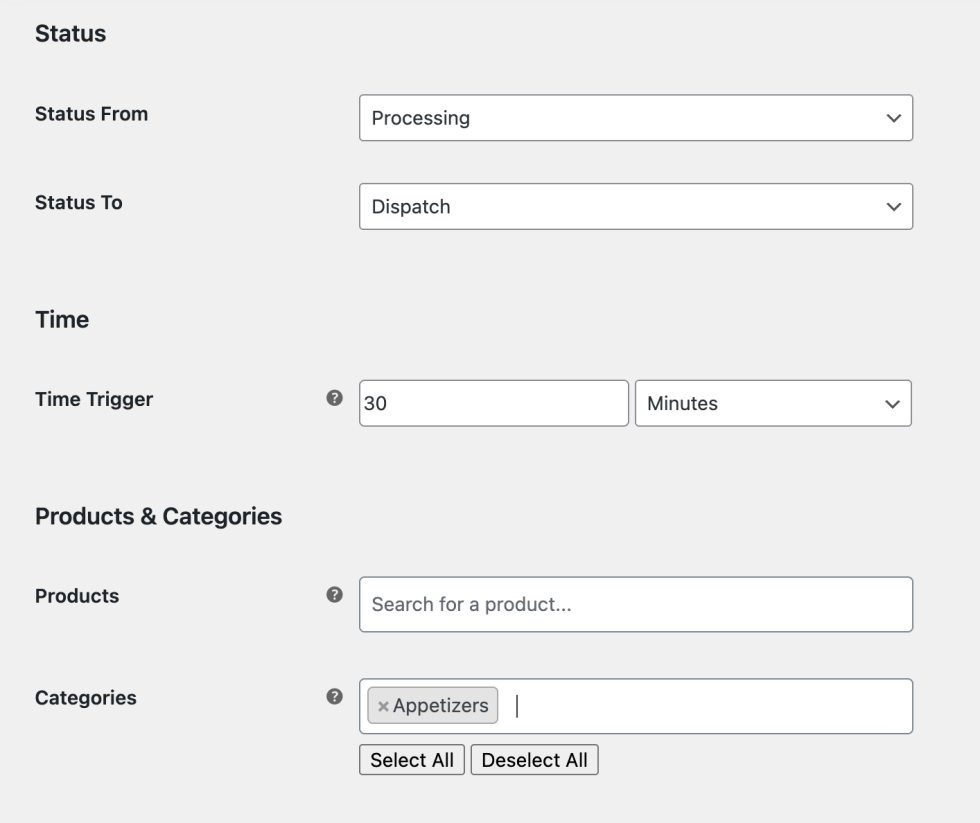
If a customer places an order that includes a product from the Appetizers category and the order is in Processing status, it will automatically update to Dispatch after the time trigger (e.g., 30 minutes).
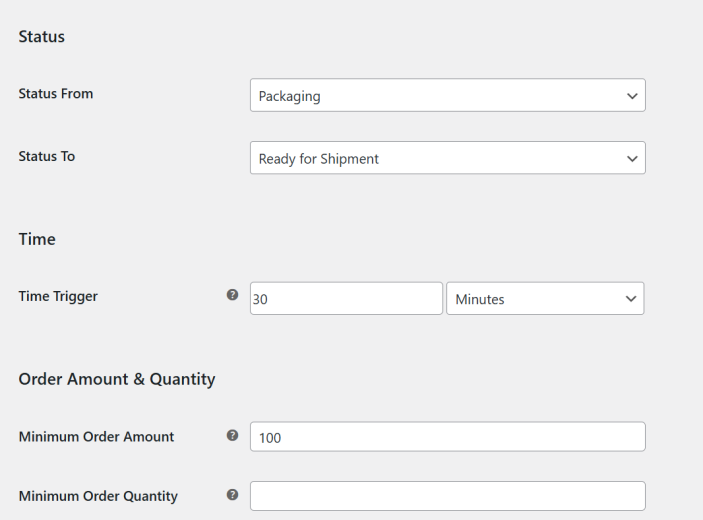
6. Order Amount & Quantity
↑ Back to topThese settings allow you to restrict the rule based on the value or quantity of items in the order.
Minimum Order Amount
Enter a value to set the minimum total (cart subtotal) required to trigger the rule. For example, setting this to 100 means the order total must be ₹100 or more.
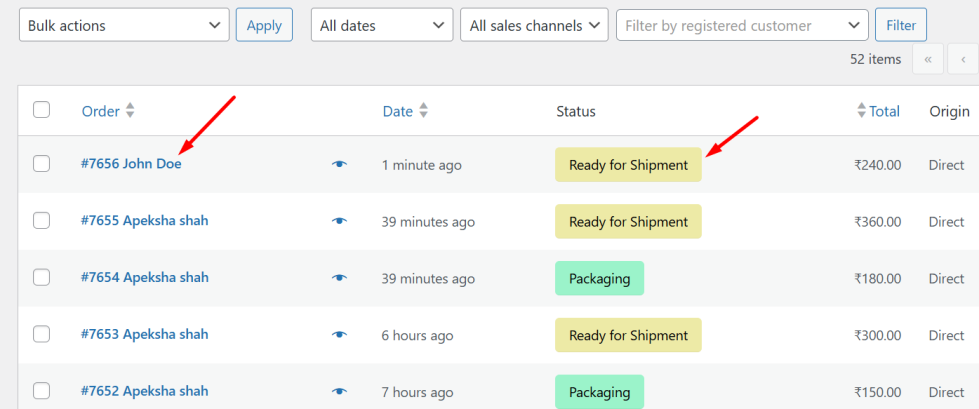
When a customer places an order with a total amount of ₹100 or more, the order will initially be set to the Packaging status. After the specified time trigger (e.g., 30 minutes), the status will be automatically changed to the status Ready for Shipment.
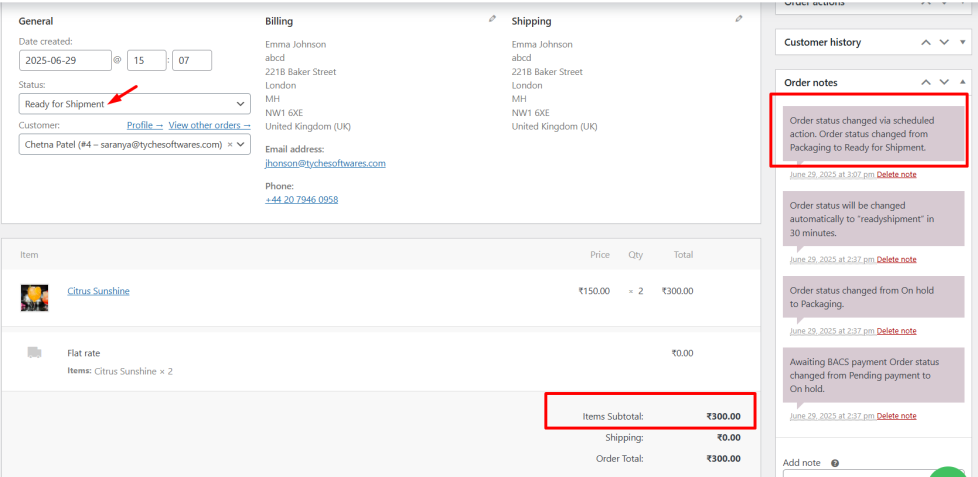
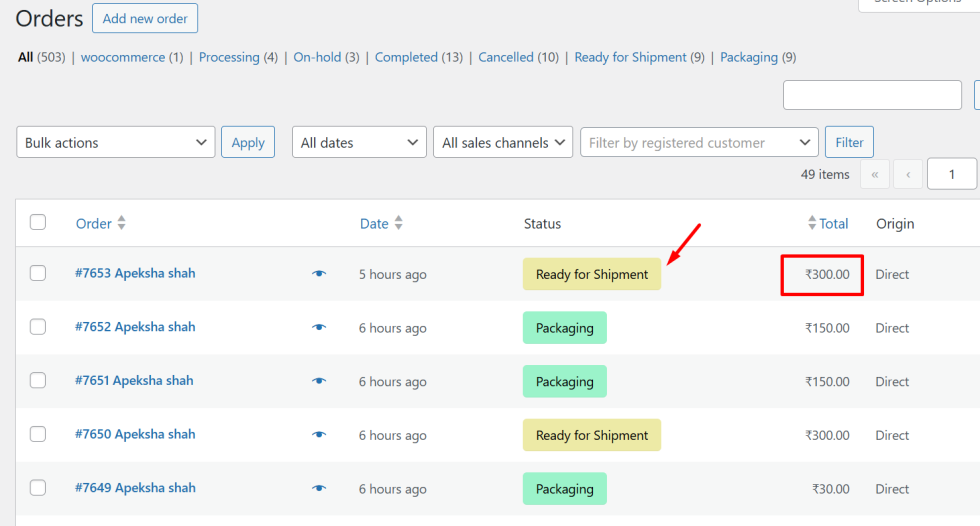
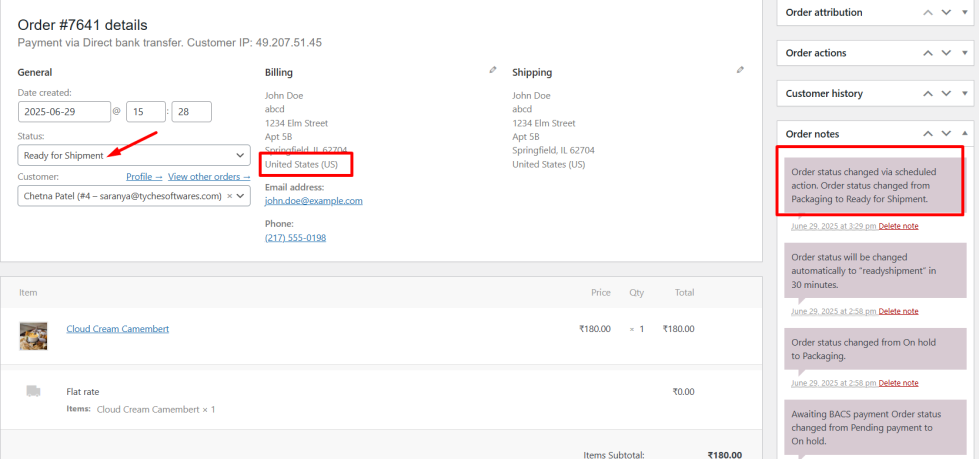
You can view the updated order status, changed from ‘Packaging’ to ‘Ready for Shipment‘, on the View Orders page.
Minimum Order Quantity
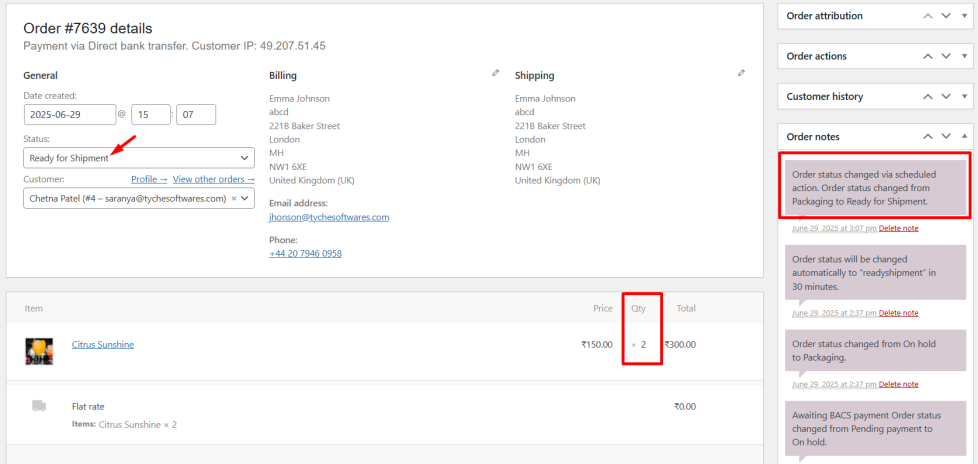
Set the minimum number of items required in the order. If set to 2, the rule will only apply if the order contains 2 or more products.
If the customer places an order with 2 or more items initially, the order will be set to the Packaging status. After 30 minutes (as per the time trigger), the order status will automatically update to Ready for Shipment.
7. Additional Options
↑ Back to topUser Role:
Select one or more user roles to apply the rule only to orders placed by those roles.
For example, if you set the user role to Customer and the time trigger to 30 minutes, the status will update only for orders placed by customers after 30 minutes.

When a logged-in customer places an order, and its status is set to Packaging, the status will automatically change to Ready for Shipment after 30 minutes, as defined by the trigger time.
Countries
Select one or more countries to apply the rule only to orders with matching billing countries. For example, selecting United States means the rule will apply only if the billing country is the United States.
When a customer places an order with the billing country set to India, the order will initially be set to the Packaging status. After the specified time trigger (e.g., 30 minutes), the order status will automatically change to Ready for Shipment.
Save the rule
↑ Back to topAfter you have configured all the settings for your custom order status rule, click the “Save” button. Your new rule will now be listed in the Order Status Rules section. In the Order Status Rules list, you’ll see a toggle switch next to each rule. You can enable or disable the rule at any time by clicking this toggle switch.

The Custom Order Status Rule feature offers flexibility and automation, helping you manage orders more efficiently by defining specific conditions under which order statuses should change. By following the steps outlined in this documentation, you can easily set up and manage these rules to suit your business needs.