Appearance: Product Delivery Date Pro for WooCommerce
↑ Back to topGlobal settings – Calendar theme, Date & Time Formats
↑ Back to topAs we all know, Product Delivery Date Pro for WooCommerce plugin is a one-stop solution to all product delivery requirements, be it for specific dates, recurring weekdays, or even particular time slots. But it is important that the appearance of the delivery calendar, the date and time formats, even the language should be in sync with your store. In order to fulfill this, we have some global level delivery settings, to change the delivery date Calendar theme, Date & Time Formats, Language etc on the front end of your store.
You will find all these settings under Product Delivery Date -> Settings-> Appearance -> Calendar Appearance.
Below are the settings which we will discuss in this post:
1. Language
2. Date Format
3. Time Format
4. Number of months to show in calendar
5. First Day on Calendar
6. Preview Theme & Language


Global Delivery settings
All the above settings are set to a default value when the plugin is installed on your website and later you can change these values as per the business requirements.
Note that after changing the values of these settings, you will need to click on Save Settings button to save all the changes.
Let us understand all the 6 settings one by one with a business example:
1. Language:
You can choose a suitable language for your delivery calendar from the provided 62 languages.
For instance, say you are located in Germany and want to display the delivery date calendar in German language, then you need to select German from the Language dropdown as shown below:

Selecting German as language for delivery calendar
Once you have selected the German in Language option, the delivery date calendar on the front end will be changed to the German language as shown below:

Delivery date calendar displayed in German language
2. Date Format:
There are 16 types of date formats to display on the front end. You can choose the date format as per your requirements. All the delivery dates on the website will be displayed as per the selected date format. Suppose you want to show a delivery date like
28 December, 2024 then select this date format in the Date Format option as shown below:

Selected Date format
This date format will reflect on the delivery date calendar on the front where the date will be displayed as 3rd January 2025 as shown below:

3. Time Format:
There are 2 time formats available – 12 hours and 24 hours. This time format is used to display the delivery time details on the product page. By default, it is set to 12 hours. In order to change display of time format from 12 hours to 24 hours, then select the 24 hours option in the Time Format setting as shown below:

Changing the Time format
As you can see in the below image, after clicking the Delivery Time dropdown, you will notice all the available time slots as per the 24 hours format.

Time format changed to 24 hours format
All the delivery date and time details for the selected product will be displayed on the Cart page, Checkout page, Thank you page, and Email notifications, based on the selected date and time format on the Global Delivery Settings page.
4. Number of months to show in calendar:
This is the number of months you want to show in the delivery calendar which by default is set to 1 as shown below:

Default display of calendar with 1 month
But if you want to display 2 months simultaneously for delivery calendar, then select 2 in the Number of months to show in calendar option as shown below:

Settings added to show 2 months on delivery calendar
This will reflect on the frontend delivery calendar and 2 consecutive months will be displayed as shown below:

Front end delivery calendar showing 2 months simultaneously
5. First Day on Calendar
You can opt to display the desired weekday as the first day of the week on the delivery calendar. By default, this is set to Monday, but if you wish to change this to Sunday, you can do so from the Global Delivery Settings tab as shown below:

Selecting Sunday as the first day on calendar
Thus the selected weekday will show up on the Products page. Hence the delivery calendar on the frontend will display Sunday as the first day of the week as shown below:

Delivery calendar on front end showing Sunday as the first day on the calendar
6. Preview Theme & Language:
↑ Back to topThere are 24 available themes from which you can choose any one theme for your delivery calendar that can match the design of your website. The default selected theme is smoothness as shown in the above screenshots, but you can change that to any theme as per your business requirements.
Let us select the Blitzer from the Preview Theme & Language dropdown as shown below:

Changing the theme to Blitzer
Now this will reflect on the delivery date calendar on the frontend product page as shown below:

Calendar theme changed on the front end
Conclusion
↑ Back to topGlobal Delivery Settings like Language, Date Format, Time Format, Number of months to show in the calendar, First Day on Calendar and Preview Theme & Language in our Product Delivery Date Pro for WooCommerce pluginwill help you to setup the appearance of product delivery functionality based on your business needs.
It’s important to have an attractive and easily understandable outlook on the front page of your products and its deliveries.
Show Delivery Calendar Always Open On Product Page
↑ Back to topIn our previous post, we discussed how to change the appearance of the delivery calendar on the front end from Global Delivery Settings. In this post, we will discuss how to show the delivery calendar always visible on your Product page using our Product Delivery Date Pro for WooCommerce plugin.
We have a feature called Show calendar always visible that comes under the Settings tab of the Product Delivery Date meta box. Enabling this option will show the delivery date calendar always visible on the frontend.
How does this work?
You can enable this feature for all types of delivery methods like Recurring Weekdays and/or Specific Dates, Recurring Weekdays and/or Specific Dates with time slots. When setting up deliveries for products using one of these methods, you can simply tick the Show calendar always visible option as shown below:

Enabling the Show calendar always visible option
Hence the delivery date calendar will always be visible on the Products page on the frontend.
Consider an example of a product – Pet Food Packets which can be delivered on specific dates. Therefore dates 6th, 7th and 8th January 2025 will be enabled on the delivery calendar on the frontend Products page, to allow delivery of Fire Crackers as shown below:

The delivery date calendar visible with added dates enabled
As you can see, the specific dates – 6th, 7th and 8th January, 2025 which were added for delivery, appear enabled on the delivery calendar. Therefore, whenever this feature is enabled, you will find the frontend delivery date calendar visible with only those specific dates enabled for delivery of that product which were added in the backend.
Conclusion
Product Delivery Date Pro for WooCommerce plugin provides a feature called Show calendar always visible which is useful for businesses that want the delivery date calendar always visible with the next available specific delivery dates enabled on the product page.
This saves few clicks of the customer, as the calendar will be always visible and also the date will appear as enabled in the delivery date calendar. Thus provides ease and efficiency to the product delivery process.
Modify delivery field labels on Product page as per your business requirements
↑ Back to topIn our earlier post, we learnt how to modify the appearance of your store using different settings as per your business requirements. Today we will see how to modify delivery field labels on Product page using Product Delivery Date Pro for WooCommerce plugin.
This feature plays a vital role in providing accurate labeling of fields for your store to assist the customers in selecting their appropriate delivery details. For instance, you can have Pick-Up Date and Pick-Up Time for Delivery Date and Delivery Time labels if you allow pickup for your products. Hence providing suitable field labels for selecting the delivery details is necessary and this is possible using the features under Field Labels tab.
To add and modify delivery field labels, go to Product Delivery Date -> Settings -> Appearance -> Field Labels tab. The labels that are set on this page are applied to all the products listed on your store.
There are various fields mentioned on this page which are editable. These are divided into four sections:
1. Labels on Product Page
This section contains 4 fields as shown in the below image.

Filed labels on product page
a. Delivery Date: It lets you set the label for the date when delivery of the product will take place. This will appear on the delivery date calendar field on the Product page.
b. Delivery Time: Similarly this lets you set the label for time when delivery of the product will take place. It will appear on the delivery time field on the Product page.
c. Choose Time Text: This text instructs the customer to select appropriate time slot from the Time Slot dropdown list on the Product page.
d. Delivery Date Placeholder: This field will let you set the placeholder for the delivery date field.
Example:
For better understanding, let us take an instance of Cake Delivery where the date and time need to be selected. The values added for these fields are shown in the above screenshot.
Let us select Valentines Cake product for delivery on 26th July, 2018.
The Delivery Date label is displayed on the Product page as shown below:

Delivery Date field label on Products page
Once the date is selected, you will be asked to select the delivery time for the product. Hence Delivery Time label and Time text appears as shown below:

Time text displayed
2. Labels on order received page and in an email notification
This section deals with labels that appear on the page after an order is placed and in an email confirmation is received.
There are 4 fields under this section as shown in the below image.

Field labels on order received page and in email notification
a. Delivery Date: It lets you set the label for delivery date which will appear on the order received page and email notification.
b. Delivery Time: Similarly this lets you set the label for delivery time which will appear on the order received page and email notification.
c. ICS File Name: The value set in the ICS File Name field is the name of the ICS file of the product delivery event and is sent as an attachment in the email.
d. Delivery Charges: It lets you set the label for the charges that would incur for delivery of the selected product. This Delivery Charges label will appear on the order received page and email notification.
Example:
Considering the same instance of Valentine’s Cake, let us see how the delivery charges label is displayed on the frontend.
After selecting the delivery date and time, you will see a message for Delivery Charges as shown below:

Delivery Charges label displayed
Once the order is placed, these details will appear on the Order Received page as shown below:

Delivery labels shown on Order Received page
These details are sent to the customer as an email confirmation where you will find the delivery date, time and charges labels as shown below:

Email confirmation with all delivery details
3. Labels on Cart and Check-out Page
This section deals with labels that appear on the Cart page and Checkout page.
There are 3 fields under this section which are the same as those of Labels on Order Received page and in an email notification section, as shown in the below image:

Labels on Cart & Check-out Page
a. Delivery Date: It lets you set the label for date when delivery of the product will take place. This Delivery Date label will appear on the cart and checkout page.
b. Delivery Time: Similarly this lets you set the label for time when delivery of the product will take place. This Delivery Time label will appear on the cart and checkout page.
c. Delivery Charges: It lets you set the label for the charges that would incur for delivery of the selected product. This Delivery Charges label will appear on the cart and checkout page.
Example:
Considering the same instance of Valentine’s Cake product, the labels for Delivery Date, Time and Charges will appear on the Cart and Checkout pages as shown below:

Delivery labels shown on Cart page

Delivery labels shown on Checkout page
4. Labels for Estimate Delivery Option
This section deals with labels that appear under the Estimate Delivery section. The labels that are set on this page are applied to all the products listed on your store.
There are 3 fields under the Estimate Delivery option as shown in the below image:

Labels on Estimate Delivery Option
a. Estimate Delivery section heading: It lets you set the label for the Estimate Delivery option and will appear on the frontend product page.
b. Estimate Delivery display in days text: It lets you set the label for displaying estimated delivery details in business days. It will appear on the frontend product page and you can use shortcode {{business.days}} to replace it with the number of business days required for delivery of the product.
c. Estimate Delivery display with specific date text: It lets you set the label for displaying estimated delivery details with a specific date. It will appear on the frontend product page and you can use shortcode {{expected.date}} to replace it with the expected date of delivery for the product.
Example:
Now let us see an instance for the Estimate Delivery Option considering the same product Winter Boots using the above labels for the fields.
When you select the Delivery Option as a Text block and select the Display Delivery details as Business Days in the backend, then the field labels on the Product page will be displayed as shown below:

Estimate Delivery display in days text
Similarly, when you select the Delivery Option as Text block and select the Display Delivery details as Specific Date, then the field labels on Product page will be displayed as shown below:

Estimate Delivery display with specific dates text
Conclusion
The change label options help the customers to easily identify and choose the appropriate delivery date and time for delivering products.
Changing labels is a small, but important part of setting the delivery date calendar and details for the frontend. All the label changes are immediately reflected on the respective pages.
It is very important to change your labels appropriately because that is how the customer gets cues about the product fields. It allows you to set the right messaging tone for your product.
Select Holidays/ Exclude Days / Black-out days for Product Delivery Date Pro
↑ Back to topHow To Setup Holidays/Blackout Dates At The Global Level
↑ Back to topThere are businesses that do not provide delivery of products on specific days like global holidays, festive times or due to several other reasons. This post will guide you to configure and prevent product deliveries on particular dates for all WooCommerce products on the store, using the Product Delivery Date Pro for WooCommerce plugin.
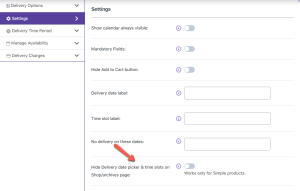
Using this plugin, the site admin can prevent the delivery of products at the Global Level means the settings are applicable to all products on the store. We have an option called No delivery on these dates at the Product Delivery Date -> Settings -> Holidays tab where the site admin can add the dates on which they want to prevent deliveries of all the products.
Let us understand this setting using an instance. Say you are running an apparel business and do not want your customers to select any products on your store for delivery on particular dates.
Admin Experience
↑ Back to topIn order to add the dates on which you want to prevent delivery of all the products on your store, go to
Product Delivery Date -> Settings -> Holidays and add dates from the calendar under No delivery on these dates option as shown below:

Adding delivery dates when delivery cannot take place
As you can see, the dates added when delivery of all products in the store is not available are 1st, 5th, and 12th February 2025 as shown above. This means delivery will not take place on these dates.
After adding these dates on the Product page, click on the Save settings button and the added dates in the No delivery on these dates field will be disabled on the delivery calendar for all products on your store. This ensures that no customers can select the products for delivery on these dates.
Customer Experience
↑ Back to topNow, when you check on the front end, the delivery calendar of all WooCommerce products on your store will show the dates 1st, 5th, and 12th February 2025 disabled, which helps prevent product delivery on these dates.
We will take an instance of 2 products in the store, which shows delivery is prohibited on these added dates. The 2 products –
White Shirt and Denim Jeans are unavailable for delivery on the added dates as shown below:
Product 1: White Shirt

Selected dates disabled for delivery
Product 2: Denim Jeans

Selected dates disabled for delivery
So as you can see, both the products have dates – 1st, 5th, and 12th February 2025 disabled on the delivery calendar because of the settings added under the PDelivery Settings tab.
Conclusion
↑ Back to topThis feature helps businesses to display only available dates for delivery of products, by adding global holidays or festive holidays in No delivery on these dates field under the Product Delivery Date -> Settings -> Holidays tab. This ensures that customers are well aware of the dates when their selected product will not be available for delivery, thus restricting them from opting for delivery on those dates.
A similar option is available at the product level which we will discuss in another post.
How To Setup Holidays/Blackout Dates At The Product Level on Product Delivery Date Pro
↑ Back to topIn our earlier post, we saw how you can add settings to prevent delivery of all your WooCommerce products on specific dates like public holidays or festive times, etc. Today we shall understand how to set holidays/blackout dates at the product level which will be specific to individual products and not all the products of your store.
Using our Product Delivery Date Pro for WooCommerce plugin, the site admin can prevent the delivery of products on his store by using No delivery on these dates option which is present on the Add New / Edit Product page.
Let us understand this setting using an instance. Say you are running a Bakery business and do not prepare and deliver Blueberry Cheese Cake on particular dates. Therefore you need to add this setting in the backend to reflect its details on the frontend delivery calendar.
Admin Experience
↑ Back to topIn order to add the dates on which you want to prevent delivery of Blueberry Cheese Cake, go to Products->Add Product link. On the same Products page, you will find the Product Delivery Date Meta Box, click on the Settings tab and add dates from the calendar under the No delivery on these dates option as shown below:

Adding dates when delivery of Blueberry cheese cake will not take place
As you can see, dates 11th and 12th March 2025 are added when delivery of the Blueberry cheese cake will not take place.
After adding these dates on the Product page, click on the Update button and the added dates in the No delivery on these dates field will be disabled on the delivery calendar for Blueberry Cheese Cake on your store. This ensures that no customers can select this product for delivery on these dates.
Customer Experience
↑ Back to topNow when you check on the front end, the delivery calendar on your store will show dates 11th and 12th March 2025 disabled which helps prevent delivery of Blueberry Cheese Cake on 11th and 12th March 2025 as shown below:

Dates added for preventing delivery is disabled
Conclusion
↑ Back to topThis post explains how you can prevent delivery of specific products on selected dates using the No delivery on these dates option.
The Product Delivery Date Pro for WooCommerce plugin provides an easy way to prevent bookings on certain special days so you can enjoy those days without having to worry about handling your customers on those days.
Set Maximum Deliveries per Day, Date & Time Slot
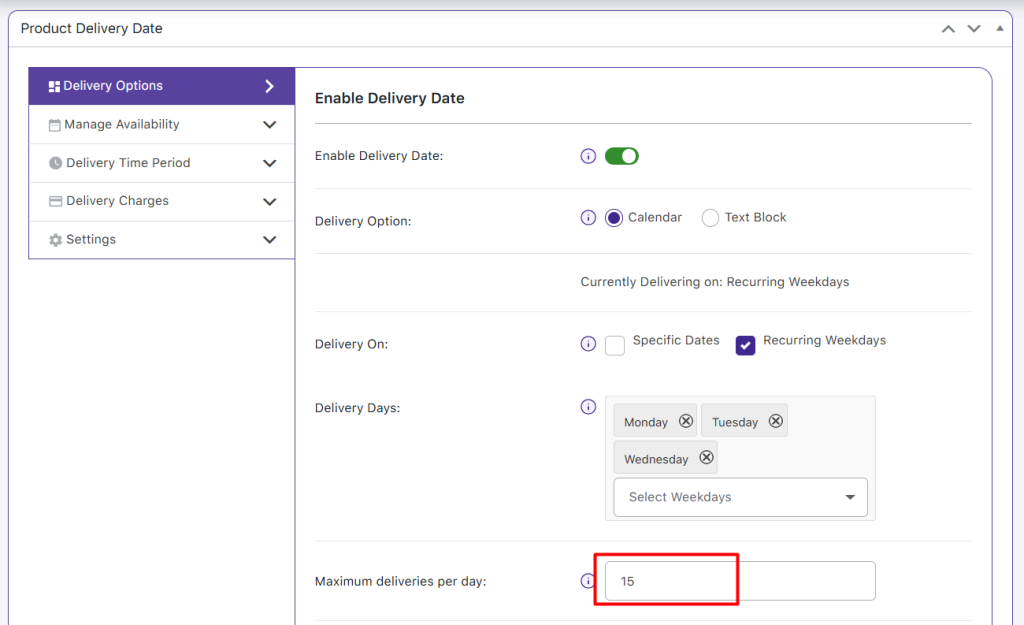
↑ Back to topMany store owners want more control over how many orders they can handle on different days and at different times. With the Product Delivery Date Plugin, you can set individual maximum deliveries for each recurring weekday, each specific date, and each time slot — instead of relying on a single global cap. You still have a global Maximum deliveries per day (Delivery Options) that acts as a fallback when a weekday, date, or slot does not have its own value.
In this guide, we’ll show how to configure per-weekday, per-date, and per-slot limits, how those limits appear on the storefront, and how the lockout behaviour works so you never overbook.
Let us understand this setting for all three product delivery options:
Recurring Weekdays
↑ Back to topLet’s say you run Apex Bags Company, selling different types of bags online. You deliver on weekdays, but the number of deliveries can differ from day to day. First, there is a global maximum deliveries per day set in the Delivery Options tab. This acts as a fallback limit for any weekday that doesn’t have its own maximum. For example, let’s set the global maximum to 15 deliveries per day.
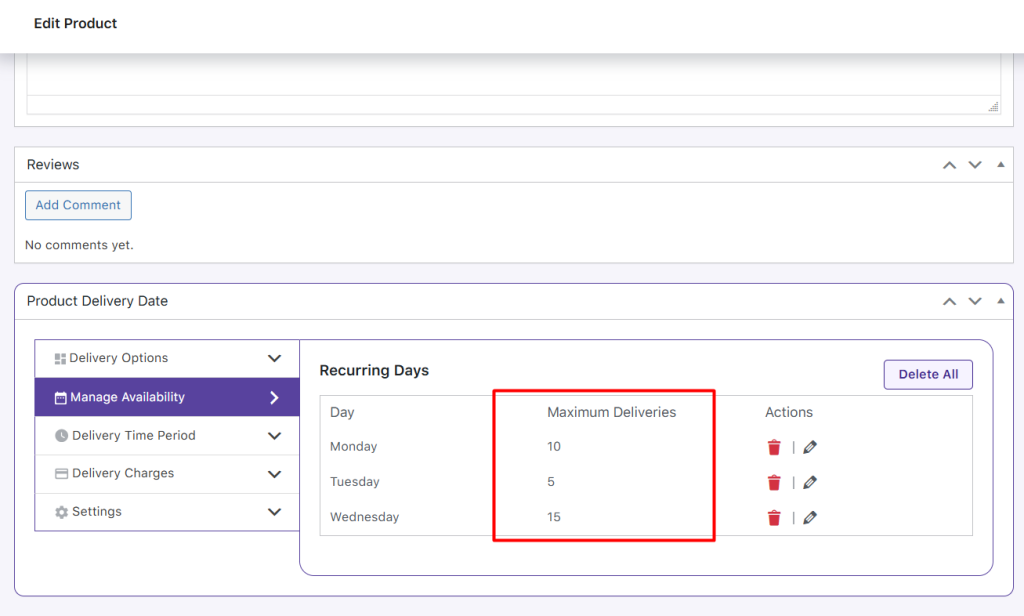
In the Manage Availability tab, you can now set individual maximum deliveries for each weekday. For instance, you may set Monday to 10 deliveries and Tuesday to 5 deliveries, while leaving Wednesday blank so it uses the global fallback of 15.
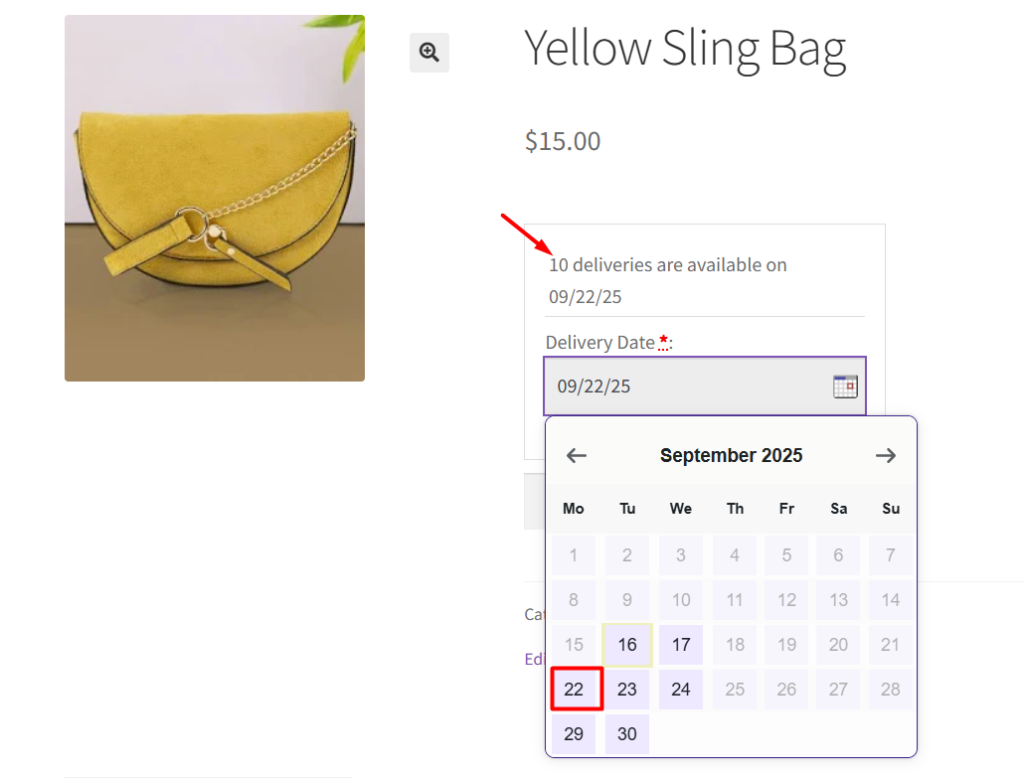
When a customer selects Monday as their delivery date, the product page will show that 10 deliveries are available. After one order is placed, the availability will automatically update to 9.
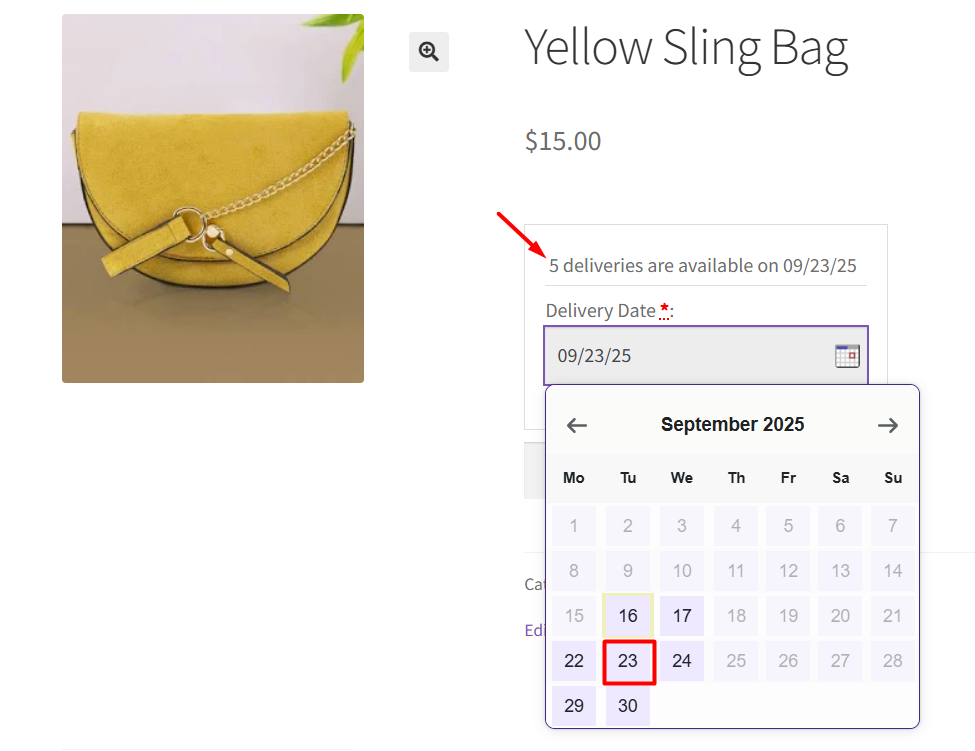
Similarly, if a customer selects Tuesday, they will see 5 deliveries available, which reduces as orders are placed.
For Wednesday, since no individual limit is set, the page will display the global Maximum delivery limit of 15, which will also update automatically as orders come in.
Lockout behaviour: When the number of orders for that weekday reaches its limit, that weekday/date will be shown as unavailable on the calendar for any new customers.
Specific Dates
↑ Back to topLet’s say you run an online store selling Autumn Decor Items like small pumpkins, wreaths, or table centerpieces. These items are only available for delivery on specific dates in October. First, you can set a global Maximum Deliveries per Day in the Delivery Options tab, which acts as a fallback limit for any date that doesn’t have its own maximum. Let’s set this global maximum to 20 deliveries per day.

Next, in the Manage Availability tab, you can set individual maximum deliveries for each specific date. For example, you may set:
- October 5: 5 deliveries
- October 6: 10 deliveries
- October 7: leave blank (so it uses the global fallback of 20 deliveries)
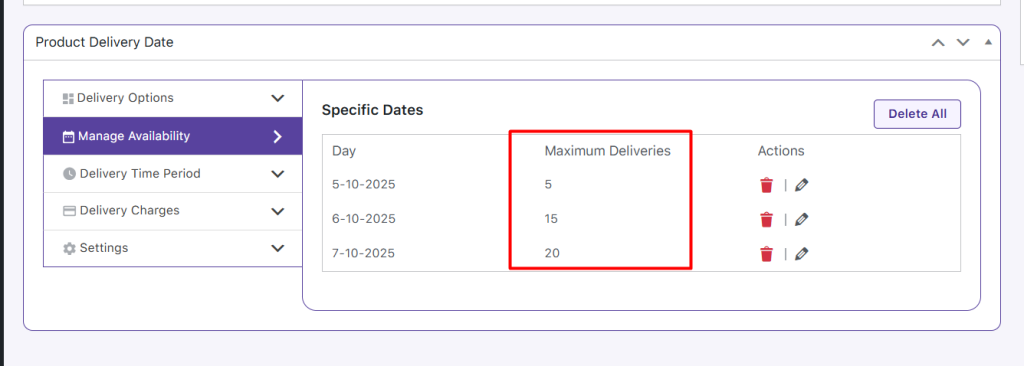
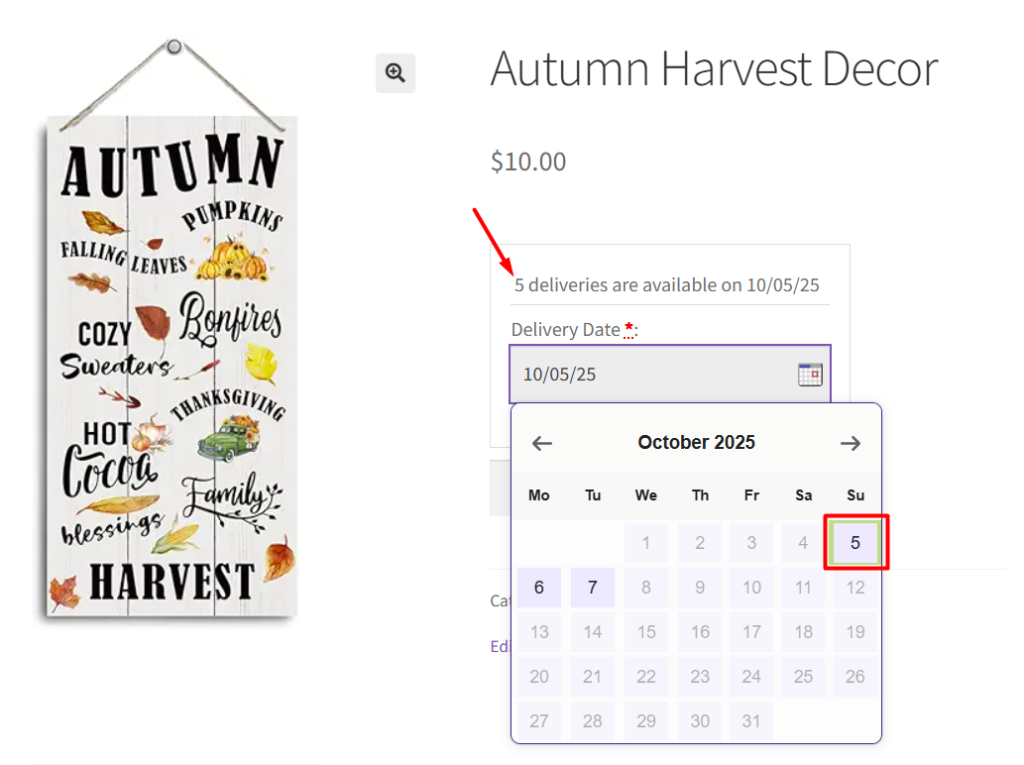
When a customer selects October 5 as the delivery date, the product page will show that 5 deliveries are available. As orders are placed, this number will automatically decrease, for instance, after one order, the availability updates to 4.
Similarly, selecting October 6 will show 10 deliveries, which decreases as orders come in.

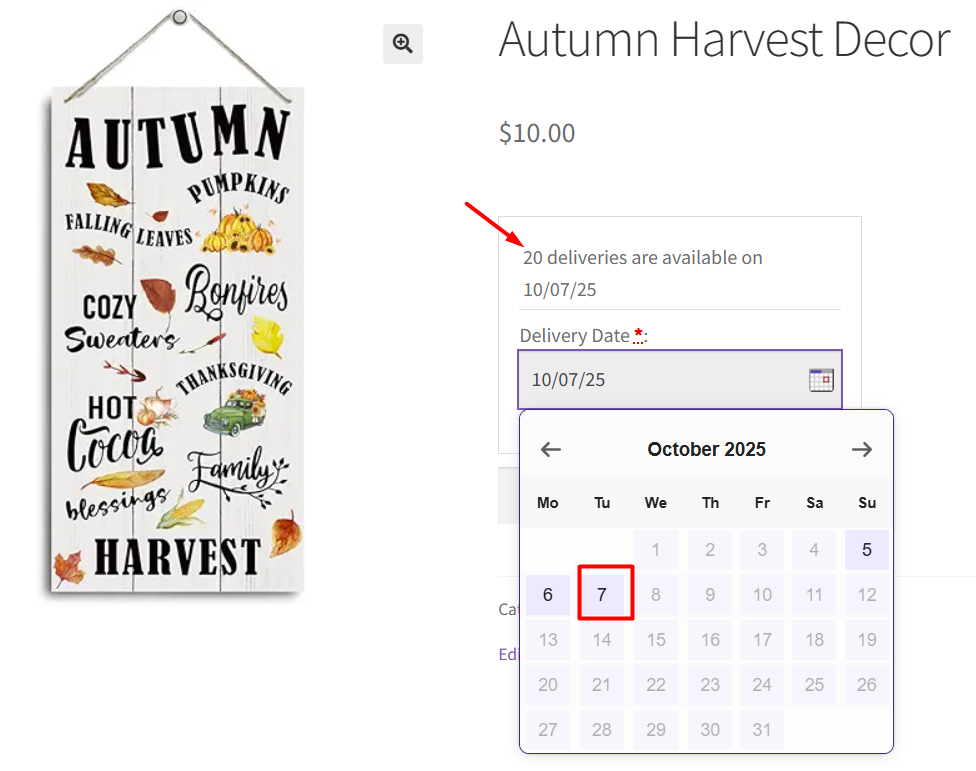
For October 7, since no individual maximum is set, the page will display the global fallback of 20 deliveries, which will also update automatically as orders are placed.
Lockout behaviour: When the number of orders for a specific date reaches its limit, that date will be automatically disabled on the calendar for new customers, preventing overbooking.
Time Slots
↑ Back to topYou’re already familiar with setting time slots for product deliveries. Now you can also add a maximum delivery limit per slot alongside the daily limit.
Let’s take an example of an online Cake Shop that delivers Blueberry Cheesecake at different times of the day. In the Time Slots Availability tab, you can set the following:
- 10:00 – 11:00: 5 deliveries
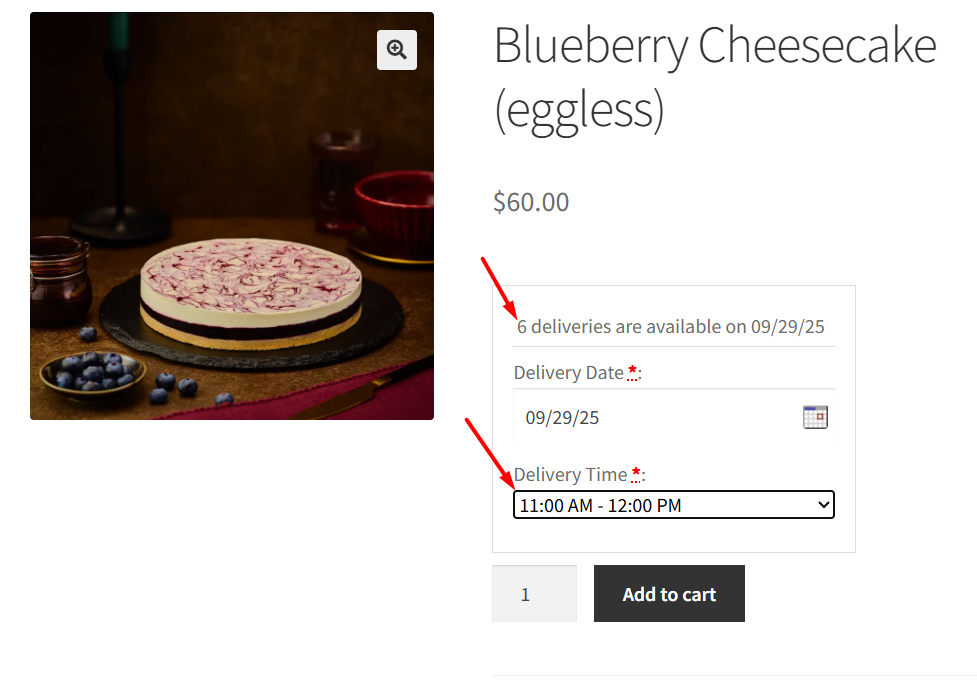
- 11:00 – 12:00: 8 deliveries
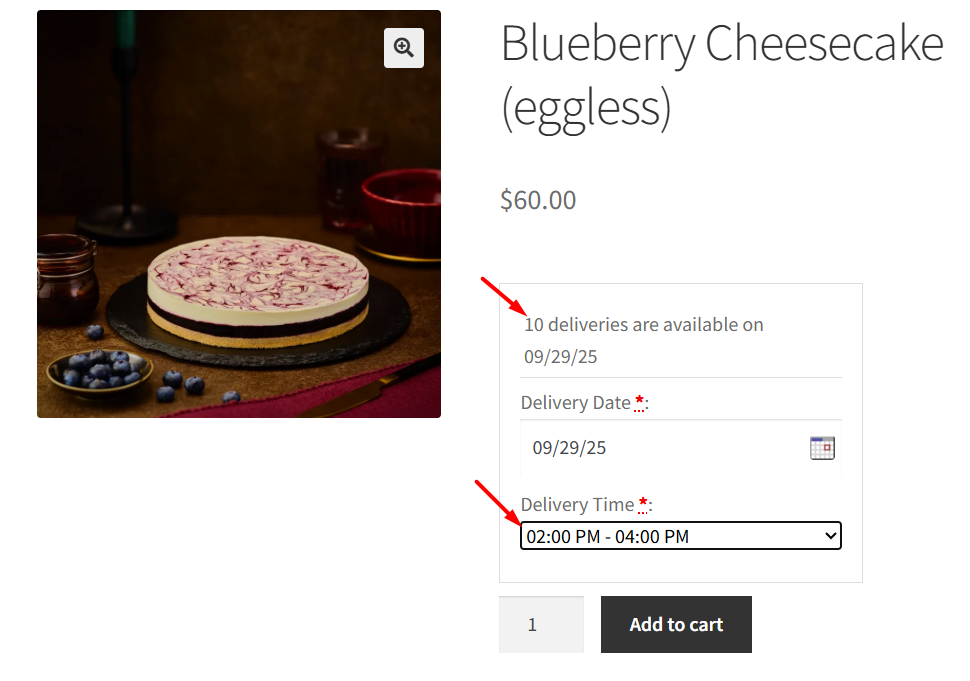
- 14:00 – 16:00: (when left blank, this slot will automatically use the daily or global maximum deliveries).
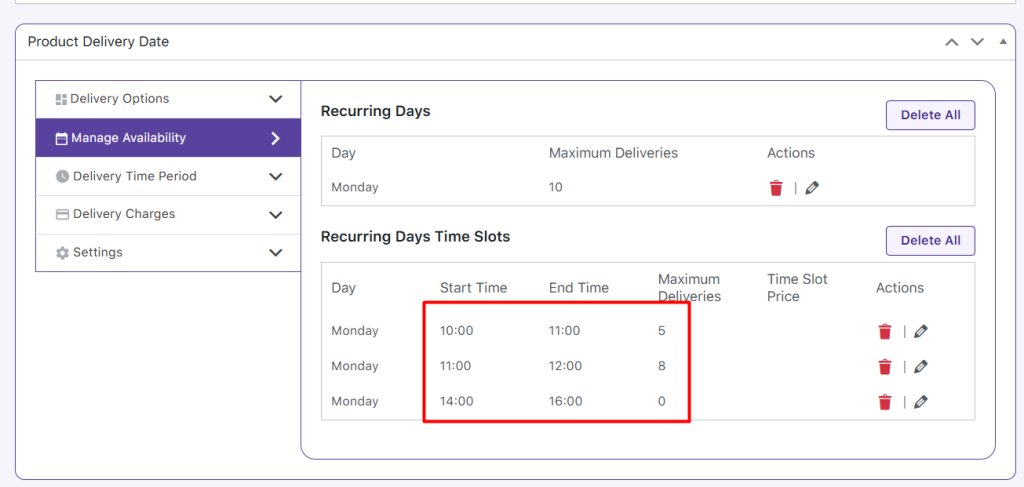
When a customer chooses a time slot, the availability for that slot is displayed. For example, if the limit for 11:00 – 12:00 is 8, and on the product page, when customers select this time slot, they will see 8 available.
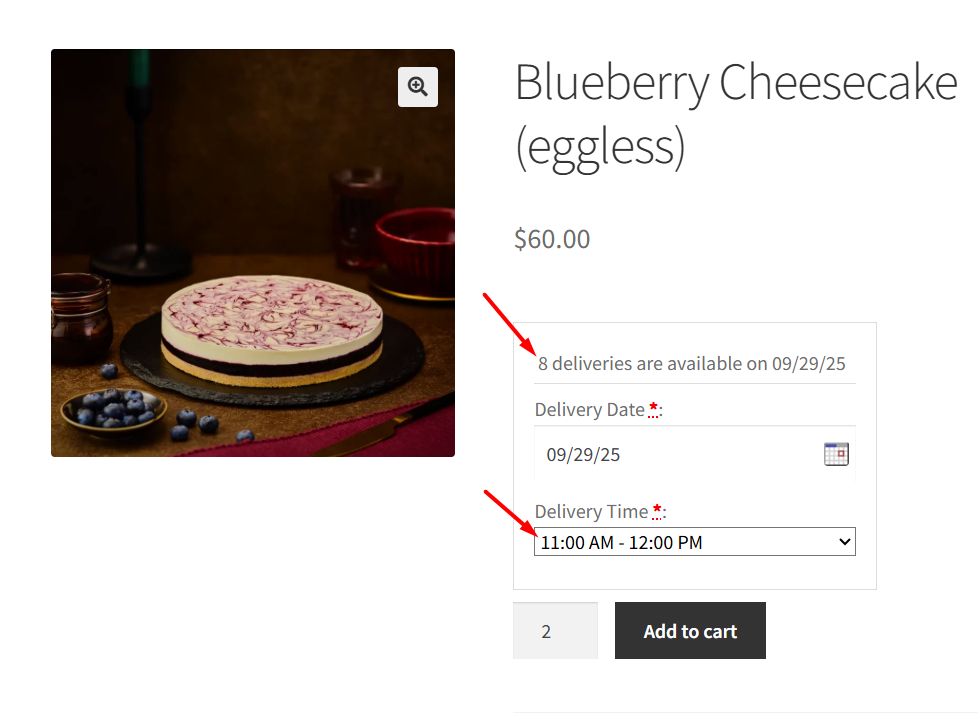
If they place 2 orders of cake in this time slot, the next customer will see 6 available.
Once the maximum deliveries for that time slot are reached, the slot is removed from the calendar.
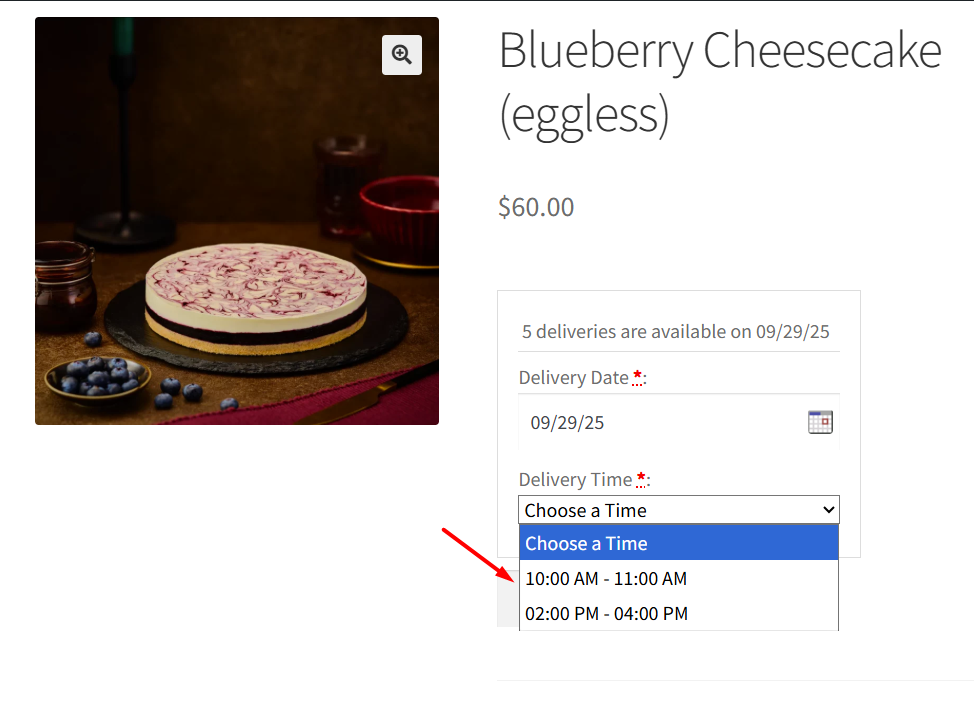
If no limit is set for a slot such as 14:00 – 16:00, the plugin automatically falls back to the daily “Max Deliveries” set for that day, or to the global maximum deliveries if the daily limit is also left blank.
Note: Bulk product setting fallback:
If no per-product “Max Deliveries Per Day” is set and the global Delivery Options field is also blank, the plugin falls back to the Maximum Deliveries value set in the bulk product settings (applies to all products).
Conclusion
↑ Back to topIn this post, we saw how you can set individual maximum deliveries for any recurring weekday, specific date and specific time slot using the new settings in the Product Delivery Date Pro for WooCommerce plugin. This gives you precise control over your delivery capacity and ensures dates or slots automatically lock out when their limits are reached.
Enable Availability Display On The Product Page
↑ Back to topIn our previous post, we learned how to set up maximum deliveries per day/date and time slot. Today we will learn how to enable delivery availability display on a product page based on the maximum deliveries set, using Product Delivery Date Pro for WooCommerce plugin.
Need for this feature?
↑ Back to topSay, for instance, a customer visits your site and selects the WooCommerce product for delivery, and enters all the delivery details. But after selecting all the delivery details, he realized that the delivery date of the product selected by him was not available for delivery. This disappoints the customer and affects the online experience.
So to make the process more convenient for your customers, you should display the availability of the deliveries of selected products for selected dates and times, on the Product page itself. This will let your customers know in advance the quantity and time slots available for delivery, as soon as they select the delivery date and time.
To display the number of deliveries available for a given product on the product page, our Product Delivery Date Pro for WooCommerce pluginprovides a setting named Enable Availability Display on the Product page.
To enable this setting, go to Product Delivery Date -> Settings -> Appearance -> Calendar Appearance and tick the checkbox for Enable Availability Display on the Product page option as shown below:

Enable the setting on Global Delivery Settings
As soon as you enable it, the availability message for product delivery is displayed on the Product page. Let us understand this with an example of all 3 delivery options.
Examples
Recurring Weekdays:
Consider selecting the product Valentine’s Cake where delivery can take place from Monday to Friday and a maximum of 20 deliveries can take place in a day. These settings are added under Delivery Options as shown below:

Delivery days and maximum deliveries added
Therefore when you select a delivery date on the delivery calendar of the Product page, you will see the availability of the total number of deliveries as shown below:

Display of available deliveries for the selected date
Here you can see that a total of 20 deliveries can take place on 10th January 2025 as per the settings added in the backend.
Now when an order is placed on this date for delivery, the total number of available deliveries for 10th January 2025 will change to 19 deliveries as shown below:

Display of available deliveries for the selected date
Specific Dates:
Consider selecting the product Valentine’s Cake where delivery can take place on specific dates – 10th, 11th, 12th, 13th, and 14th February 2025 where a maximum of 20 deliveries can take place in a day. These settings are added under Delivery Options as shown below:

Specific dates and maximum deliveries added
Therefore when you select a delivery date from the specified dates on the delivery calendar of the Product page, you will see the availability of the total number of deliveries as shown below:

Display of available deliveries for a selected specific date
Thus the availability message displayed on selecting the delivery date is 20 deliveries are available on 12/02/2025 because of the maximum availability setting added in the backend.
Time slots:
Consider selecting the product Valentine Cake where delivery can take place from Monday to Friday where a maximum of 20 deliveries can take place in a day. Now add a time slot of 10:00 – 14:00 where a maximum of 10 deliveries can take place. These settings are added under Delivery Options as shown below:


Delivery days, time slots and maximum deliveries are added
Therefore when you select a delivery date and time on the delivery calendar of the Product page, you will see the availability of total number of deliveries available for the selected time slot as shown below:

Display of available deliveries for selected date and time
Thus the availability message displayed on selecting the delivery date and time is 10 deliveries are available on 20/01/2025 because of the maximum availability setting added in the backend.
Similarly, when you add a time slot for these specific dates as shown above, then accordingly the availability message will be displayed. Let us add a time slot of 15:00 – 18:00 for specific dates – 10th, 11th, 12th, 13th, and 14th February 2025 and maximum deliveries for this time slot is set to 10 per time slot as shown below:

Maximum deliveries added for specific dates
So, when a customer selects 14th February 2025 and time slot – 03:00 PM – 06:00 PM, the availability message displayed is 10 deliveries are available on 14/02/2025 as shown below:

Availability message displayed upon date and time selection
Conclusion:
This post explains how the availability feature of the Product Delivery Date Pro for WooCommerce plugin can help customers to know about the total number of deliveries available for their selected date and time.
This provides ease and clarity to the customers about product deliveries right at the start of their online shopping journey, which in turn helps them make appropriate decisions.
Setup Delivery Time Period Delivery Time Period
↑ Back to topFixed Date Range & Deliver All Year Round Option
↑ Back to topIn our previous post, we saw how maximum deliveries can be set for a particular day, time slot, or a specific date. Product Delivery Date Pro for WooCommerce plugin allows you to set up your store to manage all your product deliveries with ease and convenience. Today we will look at a different aspect of product deliveries where you can arrange deliveries as per the Fixed Date Range option and Deliver all year round option.
How does this work?
↑ Back to topThere are 2 options available to set the time period for allowing product deliveries, which are:
- Fixed Date Range
- Deliver all year round
Fixed Date Range
↑ Back to topAs the name suggests, you can set a fixed range of dates when the product will be available for delivery. Let us understand this with an instance. Say you sell jackets, hoodies, woollen etc online and you allow hoodies to be sold only between 1st September to 1st November, which is before Christmas.
Admin Experience:
So in this case, you will create a product – Hoodie Jacket and Enable Delivery Date in the Product Delivery Date Meta box on the Products Page. Select the weekdays when delivery of this product will take place which is set to be from Monday to Friday as shown in the below screenshot:

Recurring weekdays selected
Now go to the Delivery Time Period tab and select Delivery Type as Fixed delivery period by dates. Then you need to add the start date and end date in the Deliveries Start on and Deliveries end on fields respectively, as shown in the below screenshot:


Fixed Date Range selected
As you can see, the fixed date range is set from 1st September 2025 to 1st November 2025 which means when this product is selected on the front end, the only dates enabled for delivery will be from 1st September to 1st November 2025.
Customer Experience:
When a customer selects the Product – Hoodie Jacket, the delivery calendar on the Product page in the front will only show dates enabled from 1st September to 1st November 2025 as shown below:

Delivery calendar showing enabled dates
The above screenshot clearly displays the dates enabled between 1st September to 1st November 2025, as per the date range added in the backend. Also if you note, only the dates of Monday to Friday are enabled and all Saturday and Sunday dates are disabled because of the added recurring weekdays setting.
So now customers can select an appropriate date for delivery of Hoodie Jacket from the enabled dates.
Deliver All Year Round
↑ Back to topThis is similar to the Fixed Date Range option where you need to add settings for time period, when delivery of the product can occur all year round. Thus Deliver all year round option allows you to avail product deliveries anytime in the year. But this is associated with the Number of Dates to Choose feature which allows you to add the number of dates for which the delivery of the product will be available in that year.
Let us understand this better using an instance of a Kid’s Wear business, that sells kids’ clothes online like t-shirts, pants, dresses etc. They allow delivery of products all year round.
Admin Experience:
So in this case, you will create a product – Pink Dress and Enable Delivery Date in the Product Delivery Date Meta box on the Products Page. Select the weekdays when delivery of this product will take place which is from Monday to Saturday, for recurring weekdays as shown in the below screenshot:

Recurring weekdays selected
Now go to the Delivery Time Period tab and select Delivery Type as Deliver all year round. Then you need to add the Number of Dates to choose as shown in the below screenshot:

Fixed Date Range selected
As you can see, the Number of Dates to choose is set to 30 days which means when this product is selected on the front end, then only the dates enabled for delivery will be 30 days from the current date.
Customer Experience:
When a customer selects the Product – Pink Dress, the delivery calendar on the Product page in the front will only show dates enabled for 30 days from 30th December, 2024 (current date) as shown below:

Delivery calendar showing enabled dates
The above screenshot displays the dates enabled between 30th December 2024 (current date) to 1st February 2025 because the number of dates to choose was set to 30 days in the backend. Also if you note, only the dates of Monday to Saturday are enabled and all Sundays are disabled as added in the recurring weekdays setting.
Thus, customers can select an appropriate date for delivery of Pink Dress from the enabled dates.
Conclusion
↑ Back to topThis post explains how a time period can be set for allowing product deliveries using the Product Delivery Date Pro for WooCommerce plugin. Features like Fixed Date Range and Delivery all year round suffice the business requirements because it provide you the ease in setting up your product delivery process.
Minimum Delivery Preparation Time In Hours
↑ Back to topIn our previous post, we saw how you can set the time period for allowing product deliveries using the Fixed Date Range & Deliver all year round option of Product Delivery Date Pro for WooCommerce plugin. Today we will discuss how you can manage product deliveries where minimum delivery preparation time in hours has to be set.
How does this work?
↑ Back to topFirstly let us understand what you mean by Minimum Delivery preparation time. There are businesses like a cake shop which prepares special cakes for events like birthdays, weddings, etc. They start to prepare for cake only after the order is received and not from first, as it is a perishable item. In this case, they require some time for preparations and the amount of time required for this is termed as Minimum Delivery preparation time.
The time has to be added in hours in the backend, so if you need 24 hours for baking the cake, then you should mention 24 hours in the setting. Thus the delivery of the product will be available only after 24 hours from the time the order was placed.
For instance, say a Chocolate Cake order requires 24 hours for preparation. Therefore add these settings in the backend under the Product Delivery Date Meta box of the Products page, under the Delivery in Time Period tab as shown below:

Minimum Delivery preparation time set for 24 hours
Because it takes 24 hours for the preparation of the Chocolate cake, the delivery date enabled on the delivery calendar will show the available dates after 24 hours from the current date as shown below:

Delivery calendar showing date enabled after 24 hours of current date
The current date being 19th July, 2018, the available dates for delivery of Chocolate Cake is enabled from 20th July, 2018 onwards as shown above. This means as per the Minimum Delivery preparation time added in the backend, the delivery date calendar will enable the dates on frontend.
Conclusion
↑ Back to topThis post discusses the need of certain businesses where they have to set Minimum Delivery preparation time option for delivery of their products. We saw how this process works and how easily it can be managed using our Product Delivery Date Pro for WooCommerce plugin.
Same Day and Next Day delivery
↑ Back to topIn our earlier posts, we saw how to set a time period for allowing product deliveries using the Fixed Date Range & Deliver all year round option. We also saw how the minimum delivery preparation time can be set in hours. Today, we will understand how Same-Day and Next-Day deliveries work using the Product Delivery Date Pro for WooCommerce plugin.
How does this work?
Let us discuss both these deliveries separately for better understanding.
Same Day delivery
Admin Experience:
Same Day delivery means the delivery will take place on the same day if the order is placed before the cut-off time, set in the backend.
This cut-off time implies that if a customer places an order before the cut-off time then the delivery of the product can take place on the same day but if the order is received after the cut-off time, then that day will be disabled on the delivery calendar for delivery of that product.
Let us consider an instance of a Gift Shop that sells stuffed toys and allows same-day deliveries. So let’s set up a cut-off time for the Same Day delivery in the backend under the Product Delivery Date Meta box of the Products page in the Delivery in Time Period tab as shown below:

Adding cut-off time for Same day delivery
Here Same same-day delivery cut-off time is set to 16:00 which means after 4 PM, today’s date will be disabled for same-day delivery on the frontend delivery calendar. Note that the cut-off time will be calculated based on the WordPress timezone.
Customer Experience:
Now say a customer selects Teddy Bear for delivery at 3 PM today. This means 30th December 2025 will be enabled on the delivery calendar as shown below:

Delivery calendar showing same-day enabled
According to the settings added in the backend for the cut-off time, same-day delivery is possible because the product is selected for delivery before 4 PM.
Next Day delivery
Admin Experience:
Next-day delivery implies the delivery of the product will take place on the next day if the customer places an order before the added cut-off time. Again for Next Day delivery, cut-off time will be considered and is based on the WordPress timezone.
Let us understand this with an instance of a Wine Shop where delivery of a product – Red Wine, can take place on the next day if the order is placed before the added cut-off time. So similar to the same-day delivery option, let us add Next day delivery cut-off time setting in the backend under the Product Delivery Date Meta box of the Products page in the Delivery in Time Period tab as shown below:

Adding cut-off time for Next day delivery
Here the next-day delivery cut-off time is set to 15:00 which means after 3 PM of the current date, deliveries for the next day will not be enabled.
Customer Experience:
Now say a customer selects Red Wine for delivery after 3 PM, this means 30th December (current day) and 31st December
(next day), 2024 will be disabled on the delivery calendar as shown below:

Next day cut-off time applied on the delivery calendar
This is because the order was placed at 4 PM which was after the cut-off time for next day delivery. Hence delivery cannot take place on the next day, so 30th December (current day) and 31st December (next day), 2024 both were disabled on the delivery calendar.
Conclusion
This post explains how time period can be set for allowing product deliveries using Same Day & Next Day deliveries option of Product Delivery Date Pro for WooCommerce plugin. These features provide ease in setting time period for product delivery process.
Setup Delivery Charges
↑ Back to topIn our previous post, we learned how to set up a Delivery Time period using the Product Delivery Date Pro for WooCommerce plugin where you can add a Fixed Date Range or opt for a Delivery all year round option. After selecting the delivery option for the product, this plugin allows you to add delivery charges as well, and today we shall discuss about how to set up delivery charges for recurring weekdays, specific dates & time slots.
How does this work?
↑ Back to topYou have the provision to add delivery charges for the added delivery option on the Product page. To do so, go to the Product Delivery Date Meta box -> Delivery Charges tab. Here you can add delivery charges for either weekdays or specific dates. Firstly, let us understand how this works for Recurring Weekdays and Specific Dates.
Recurring Weekdays
Admin Experience:
Say you have a product Red Wine which is available for delivery only on Monday, Tuesday and Wednesday with a delivery charge of $10. Let us first add the recurring weekdays when delivery of this product is available. Hence go to Delivery Charges tab and select weekdays from the Select Days dropdown for Monday as shown below:

Adding weekdays in Delivery Charges tab
Now add the delivery charges applicable for Monday in the Delivery Charges field as $10 as shown below:

Adding delivery charges
Click on the Add Delivery Charges button to display the selected weekdays and their delivery charges under the Delivery Charges section. Repeat the same steps for Tuesday and Wednesday.
All these added weekdays and their respective delivery charges will be displayed in the Delivery Charges section as shown below:

Display of delivery charges
Customer Experience:
So now if a customer selects this product to be delivered on 30th July, 2018 which is a Monday, then the Product page on the frontend will show the applicable delivery charges below the delivery date calendar as shown below:

Frontend showing applied delivery charges
As seen in the above screenshot, the total amount payable for the product Red Wine is $500 + $10 (delivery charges) = $510.
Specific Dates
Admin Experience:
Now considering the same product Red Wine, let us add the settings for specific dates and the delivery charges that will be applicable. Say when a customer selects specific dates – 4th, 5th, 6th, and 7th of March, 2025, a delivery charge of $20 is applicable.
So go to Product Delivery Date Meta box -> Delivery Charges tab click on Select Date dropdown and add 4th March 2025 as shown below:
Now add the applicable delivery charge of $20 in the Delivery Charges field as shown below:

Adding delivery charges for a specific date
You need to click on the Add Delivery Charges button to add delivery charges for 4th March 2025. Repeat the same steps for all other specific dates.
Once it is done, you can find all the added specific dates with their delivery charges in the Delivery Charges section as shown below:

All specific dates and its delivery charges added
Customer Experience:
So now if a customer visits the front and selects 4th March 2025 from the delivery calendar on the Product page, the applicable delivery charges will be displayed below the delivery calendar as shown below:

Frontend showing applicable delivery charges for the product
As seen in the above screenshot, the total amount payable for the product Winter Boots is $150 + $20 (delivery charges) = $170.
Time Slots
Admin Experience:
Again consider the same product Winter Boots and add the settings for different time slots and delivery charges which will be applicable. For time slots, delivery charges have to be added on the Product page under the Delivery Options tab of the Product Delivery Date Meta box, when you select a time slot for the product.
Say Red Wine is delivered on Monday and Tuesday and the time slot added is 10 am to 1 pm when the delivery charge of $20 is applicable. Let us add settings for these, under the Delivery Options tab as shown below:

Time slot and its delivery charges added
This shows that Red Wine is delivered on Monday and Tuesday, between 10 am to 1 pm for a delivery charge of $20.
Customer Experience:
On the front, when the customer selects Winter Boots, the delivery calendar will display Monday and Tuesday enabled for delivery as shown below:

Monday and Tuesday enabled on the delivery calendar
Once you select a delivery date, let’s say 27th January 2025 for delivery, the option to select the time slot will appear in the Delivery Time dropdown as shown below:

Added time slot is displayed
After selecting the time slot, the delivery charge applicable for the product will be displayed below the delivery calendar as shown below:

Delivery charges are displayed
This way you can add delivery charges for recurring weekdays, specific dates, and time slots.
Priority:
Here, the most important aspect of the feature is that when delivery charges are set for all 3 delivery options, priority will be given to delivery charges for time slots. As you saw in the above examples, the delivery charge for recurring weekdays was set to $10 for all Mondays, Tuesdays, and Wednesdays, and for the time slot was set to $20 for Mondays and Tuesdays. Therefore on the front end when you select Monday, 27th January 2025, you were asked to select a time slot and accordingly delivery charges of $20 were displayed.
This shows that on a selected delivery date when settings were added for both recurring weekdays and timeslot, the delivery charges of $20 added for the time slot option were considered.
Apply One-Time Delivery Charges for Multiple Products
↑ Back to topMoving ahead, there is another feature of the Product Delivery Date Pro for WooCommerce plugin which allows you to set one time delivery charges for multiple products. This implies that once a delivery charge is added for a delivery date, you will not be allowed to again add a delivery charge for any products delivered on the same date.
This setting is available in Global level settings. So go to Product Delivery Date -> Settings -> Product Page Settings page. There is an option to Apply one-time delivery charges for multiple products, enable this checkbox and click on Save Settings as shown below:

Enabling Apply one-time delivery charges for multiple products option
Say if you add a delivery charge of $15 for Thursday, 6th February 2025, then this will be applicable for all products for delivery on this selected date.
So let’s create a new product Hoodie Jacket and add a delivery charge of $15 for 6th February 2025 in the Delivery Charges tab of the Product Delivery Date Meta box of the product as shown below:

Delivery charges added for Monday and Tuesday
On the front, you will see the delivery charge of $15 is displayed for the product Hoodie Jacket when you select Thursday 6th February 2025 for delivery as shown below:

Delivery charges added for 6th February 2025
Now if you select another product Pink Dress to the same order for delivery on the same day 6th February 2025, then the delivery charge of $15 for the product Pink Dress will not be calculated again as shown on the Cart page below:

Delivery charges are not calculated again for the another product for same delivery date
This implies that even after a delivery charge was added for the product Red Wine, it was not calculated again for that order since the delivery charge of $15 was already applied for product Umbrella. However, if customer individually adds the product Red Wine to the cart, delivery charges will be applicable to that order as shown below:

Delivery charges got added for the order
Conclusion
↑ Back to topThis extensive post explains how delivery charges work with all 3 types of product deliveries and also discusses another feature of Apply one-time delivery charges for multiple products, associated with it. This saves time and lengthiness of the product delivery process where delivery charges are applicable.
Such features and enhancements make Product Delivery Date Pro for WooCommerce plugin highly usable and acceptable by huge masses.
Bulk Product Settings
↑ Back to topIn some of the earlier posts, we had discussed setting up different delivery settings such as weekdays and specific dates then Minimum Preparation time, Same day and Next day cut-off time, Holidays for the individual products. But, what if you want to have common settings across all or a group of products? Will, you set them individually for each product?
The answer to this question is obviously ‘No’. With v3.0, we have introduced a new feature whereby customers can now add the delivery settings for multiple products together from the Bulk Product Settings tab.
In this document, we will see how one can set bulk delivery settings for all the products or for a group of products. Let us understand this in more detail.
How to configure this setting?
You will find this tab under Product Delivery Date -> Settings -> Bulk Product Settings tab.


All delivery settings, which are present on the individual product page, will all be available under the ‘Bulk Product Settings‘ tab except one setting ‘Override existing product settings’, and you can configure them the way you want. On clicking the ‘Products:’ option, a dropdown of all product’s names will be shown. This dropdown will display an ‘All products’ option, as well as options of individual products in your store.
Products categories and tags: This option allows choosing the product categories and product tags for which you can set up the delivery settings in bulk. This will add the delivery settings for the products that are assigned to the selected categories or the product tags.

Suppose you want to set up the delivery settings only for products from a particular product category or for products having specific tags. Then you can simply select that product category/product tags in this option and add the delivery settings as per your requirements. These settings will be added to products from the selected category/tags.
Override existing product settings: In update 3.3.0 of our plugin, we have added a new setting “Override existing product settings” to override the existing Products Settings with the new delivery settings. You can enable this setting if you want to completely override all the existing delivery settings with the new settings. And if you want the new delivery settings to be added along with the existing settings then do not enable this setting.
Let’s understand this using an example:
If the products are set up for delivery for all weekdays with the time slots. Now, if you want to allow the deliveries to be made only on Monday, Wednesday, and Friday for the different time slots. Then, while adding the bulk settings for the products, you need to enable the setting “Override existing product settings” and add the settings that need to be replaced with the existing ones. So only these three weekdays with the new time slots will be available for the delivery.
In a scenario where you might need to allow delivery on weekends along with the weekdays then you can just add the new settings in the Bulk product settings and no need to enable this setting “Override existing product settings” at that time. So the weekends will also be available for the delivery.
You can select the option of your choice and choose the delivery settings as per your requirements.
Where to check the saved settings?
Once you click on the button ‘Save Settings’, all your settings will be saved. When you apply the delivery settings from the Bulk Product Settings tab then the settings will be saved in the individual product’s settings and the settings in the Bulk Products Settings tab will be reverted to the default settings.
To check the saved delivery settings, go to the respective Product Page -> Product Delivery Date meta box. The settings will be displayed under the particular delivery option.

The Bulk settings, when saved, will override the individual Product’s settings. Let us understand this with the help of an example:
The ‘Minimum Delivery Preparation Time (in hours)’ is set to 10 hours for a product named ‘Cake’. After this, if under the Bulk setting tab the ‘Minimum Delivery Preparation Time (in hours):’ is set to 24 hours for ‘All Products’ then, for all the products including ‘Cake’ the Minimum Delivery Preparation Time will be set to 24 hours.
This is applicable to all the delivery settings.
Visit the individual product page if you need to change a particular setting for a particular product after applying the setting in bulk.
Conclusion:
This post explains how to save your valuable time by setting the same delivery settings directly from the Bulk Product Settings tab rather than setting them up individually for all products.
This makes the admin experience of the Product Delivery Date Pro for WooCommerce seamless and quick.
Show Delivery Date and Time on Shop/Archives page
↑ Back to topWith v3.60 of Product Delivery Date Pro for WooCommerce we’ve added a new feature that allows you to display or hide both delivery date and delivery time on the Shop/ Archives page itself! This feature can be configured at both Global Delivery Settings and Bulk Product Settings.
How to configure this setting?
↑ Back to topGlobal Delivery Settings
↑ Back to topYou can go to Product Delivery Date > Settings > Show Delivery Date/Time on Shop/archives page. This is how the setting will appear:

‘Show Delivery Date/Time on Shop/archives page’ setting
If you wish to display the Delivery Date and Time on the Shop page then you can tick the checkbox here. It would display the availability based on the “Maximum deliveries per day” or “Max deliveries per time slot” field from the Product Delivery Date Pro plugin & not from the Stock field of WooCommerce. It is important to note that this feature will work only for Simple Products. Once you have ticked the checkbox, you will get another option that says Enable Availability Display on the Shop/archives page. Here is how it will appear:

‘Enable Availability Display on the Shop/archives page’ setting
If you wish to display the number of stock items that are available to purchase on the shop page, then you can enable this setting by ticking the checkbox. This setting will display how many of the items are available when the page loads and when the customer selects the date or the time slot. Once you have configured your settings, you can click on the ‘Save Settings’ button.
Product level Settings
↑ Back to topTo configure this setting at a product level, you can go to Products > All Products and find your product. For example, we will go with our product Maxi Dress. Scroll down to the Product Delivery Date meta box and go to the Settings option as shown below:
Product Delivery Date metabox
Here, you will find the Hide Delivery date picker & time slots on Shop/archives page option. You can tick the checkbox to hide the delivery date & time slots on your Shop pages.
Bulk Product Settings
↑ Back to topIn order to configure these settings at the bulk product settings level, you can go to Product Delivery Date > Settings > Bulk Product Settings > Settings > Hide Delivery date picker & time slots on Shop/archives page as shown below:

‘Hide Delivery date picker & time slots on Shop/archives page’ setting
If you wish to not display the date picker and time slots of a particular simple product on the Shop/Archives page then you can tick the checkbox and click on the ‘Save Settings’ button. This will only apply to the Product that you have selected to apply these settings to. For example, if you have configured the bulk product settings for a Maxi dress then the availability of the number of maxi dresses will not be displayed to the customer on the Shop page. However, the availability of the other products will be displayed to them.
Frontend View
↑ Back to topLet’s say that your customer has gone on the shop page of your WooCommerce store and they’ve decided to buy a Maxi dress. Here’s how it will appear for them:

Delivery date option on the Shop page
As we can see from the above image, the delivery date has been enabled to be viewed on the Shop page. Once the customer clicks on the calendar option they will be able to see all the delivery dates are available for this item. For example, this maxi dress can be delivered on Weekdays, thus, you will find the delivery dates from Mondays to Fridays available as shown below:

Delivery date selection on the Shop page
Once the customer has selected the delivery date, let’s say 16th June 2021, then they will get the time slot option on the Shop Page as shown below:

Delivery time option on the Shop Page
As we can see hee, the timeslots that are available to the customer on 16th June 2021 are from 3 pm to 6 pm. Finally, when the customer has selected their time slot and added the item to their cart, they will get an option to view the cart as such:

Delivery date and time selected on the Shop Page
Once they click on it, their cart page will appear as such:

Order details on the Cart Page
The selected delivery date and time will also be showcased to them on their Order Page and Order Received Page as shown below:

Order details on the Order Page

Order details on the Thank you page
The above example displays how the customer will be able to pick the delivery date and time slots on the shop page once that setting has been created from either ‘Hide Delivery date picker & time slots on Shop/archives page’ in Bulk Product settings or ‘Show Delivery Date/Time on Shop/archives page’ under Global Delivery settings.
Now, let’s say that you have enabled the ‘Availability Display on the Shop/archives page setting’ under the Global Delivery settings. This would mean that on the Shop page, the customer will be displayed the stock availability. Continuing with the same example, when this setting is enabled, the customer will get the availability of the Maxi dresses as shown below

Maxi dress availability on the Shop page

Maxi dress availability after selecting delivery date and time on the Shop page
Thus with this feature, you can choose to display or hide the delivery date and time as well as the availability of the product on the Shop/Archives page. This feature is extremely useful to provide a smooth buying process for the customer on the Shop Page itself.
Pre-populate delivery details from cart
↑ Back to topThis post will provide details on another key feature of the Product Delivery Date Pro for WooCommerce plugin which allows you to pre-populate delivery details from the cart. This means when a customer comes to the website and adds any product to the cart for a particular date, then that last added delivery date will be pre-populated on the front-end delivery calendar for all other products.
Advantage
↑ Back to topThis functionality is vital for scenarios when there are several items to be ordered for the same day for a particular event or occasion. During such events or celebrations, the setting – Duplicate dates from first product in the cart to other products, works wonders. This is because this setting will allow you to select the date globally for all products if the delivery date is once selected for a product and added to the cart.
Thus you can simply add the delivery date for the 1st product and add it to the cart & can order all other products for the same day, without having to select the delivery date again.
How does this work?
↑ Back to topLet us understand how to duplicate delivery dates automatically to other products after the 1st product is added to the cart on your WooCommerce store for all the product delivery options.
Admin Experience
In order to enable this option, go to Product Delivery Date -> Settings-> Product Page Settings page. Here tick the checkbox for Duplicate dates from first product in the cart to other products option and click the Save Settings button as shown below:

Enable Duplicate dates from first product in the cart to other products option
Enabling the setting Duplicate Dates from First Product In the Cart To Other Products will appear the new setting named
Select products to apply Duplicate Dates. The setting Select products to apply Duplicate Dates has two options. It will allow you either to Select if you want to apply for all product OR Select if you want to apply for particular category product.

Customer Experience
Let us select the product Blue Denims for delivery on 26th February 2025 as shown below:

Selecting delivery date as 26th February 2025
Now add this product to the cart by clicking the Add to Cart button.
Say you visit the store again to select another product for purchase, then the delivery date selected for the previous product will be pre-selected on the product page.
Hence, the delivery date selected for Blue Denims which was 26th February 2025 will be pre-populated on the delivery calendar of the product – Blueberry cheese cake as shown below:

26th February 2025 pre-populated on the delivery calendar
Thus this shows that without clicking the delivery calendar to select a delivery date for Blueberry cheese cake product, the delivery date selected for Blue Denims was pre-selected for this product.
Conclusion
↑ Back to topThe setting Duplicate dates from the first product in the cart to other products of our Product Delivery Date Pro for WooCommerce plugin is applied when you are selling products that are related to each other or are sold for the same events or celebrations etc.
This will save time for the customer as once he adds one product to his cart for selected dates, then the same date will automatically get selected on the front-end delivery calendar of the other product on your website. Thus this feature makes the entire customer experience pleasant and makes the product delivery process convenient, easy, and fast.
Mandatory Selection Of Delivery Date & Time On The Product Page
↑ Back to topNow moving ahead, you can avail one more feature of Product Delivery Date Pro for WooCommerce plugin which is mandatory selection of delivery date and time on the product page. You can restrict the customer to proceed for checkout, if no delivery date and time has been added for the selected product.
How does this work?
↑ Back to topLet us understand how this functionality works for both delivery date and delivery time selection.
Admin Experience – Delivery Date selection
This is a product level setting. Hence first create a product – Winter Boots and add recurring weekdays for delivery from Monday to Friday in the Delivery Options tab of the Product Delivery Date Meta box as shown below:

Adding recurring weekdays
Now you need to enable the option for Mandatory Fields. So go to Product Delivery Date Meta box -> Settings tab, tick the checkbox for Mandatory fields and Update the product as shown below:

Enabling the option for Mandatory Fields
Customer Experience – Delivery Date selection
For all products, you will have to compulsorily select a delivery date from the delivery date calendar before proceeding to add the product to the cart. Thus Delivery Date is marked as a mandatory field which means you will see a red asterisk (*) sign next to it, on the frontend product page.
So go to the product page of Winter Boots, you will see a red asterisk sign next to the Delivery Date field as shown below:

Delivery Date field is marked as mandatory
This means it is compulsory for you to select the delivery date. But say for instance, you miss selecting the delivery date and click the Add to Cart button to proceed, you will get a message saying Delivery Date is a required field as shown below:

Message notifying the Delivery Date field is a required field
Similarly, this functionality can be used for Delivery Time selection too. Let us check how that works.
Admin Experience – Delivery Time selection
Say you create a product – Blueberry Cheese Cake and add the time slot of 10 am to 2 pm to this product for Monday to Friday weekdays as shown below:

Adding recurring weekdays and time slots
Now enable the Mandatory Field option by ticking the checkbox which is under the Settings tab of the Product Delivery Date Meta box and then Update the product as shown below:
Enabling the option for Mandatory Fields
Customer Experience – Delivery Time selection
On the front end, when a delivery date is selected and if a time slot is added for that date, it is compulsory to add the appropriate time slot from the Delivery Time field. This mandatory selection is marked by a red asterisk (*) sign next to the Delivery Time field.
So go to the product – Blueberry Cheese Cake and you will see a red asterisk sign next to the Delivery Date field. Now select a delivery date – 7th August, 2018. There is a time slot added for this date and hence Delivery Time field appears. Since it is marked as a mandatory field, there is a red asterisk sign as shown below:

Delivery Time field is marked as mandatory field
This means it is compulsory for you to select the delivery time before proceeding. But by any chance you skip selecting the delivery time and click the Add to cart button to proceed, you will get a message saying Delivery Time is a required field as shown below:

Message notifying the Delivery Time field is a required field
Conclusion
↑ Back to topThis post explains how mandatory selection of fields work in Product Delivery Date Pro for WooCommerce plugin. The functionality works for both Delivery Date and Time selection. This makes it convenient for the shop owners to restrict the customers from proceeding to checkout without selecting an appropriate delivery date and time for their product.
Export Deliveries To Google Calendar
↑ Back to topUsing the Product Delivery Date Pro for WooCommerce plugin, you can now export deliveries to Google Calendar automatically or manually.
Admins can choose to export product deliveries to their Google calendar automatically once a customer places an order. They can even add delivery details to Google Calendar or any other calendar from the Admin notification email.
Customers can export the product delivery details from the Order received page, Customer notification email, or My Account page.
How does this work?
↑ Back to topFor setting up the Google Calendar sync, go to Product Delivery Date > Settings > Integrations > Google Sync. The default view of this tab is as shown below:

Default view of Google Calendar Sync tab
Here, you will see the page is divided into three sections, as mentioned below:
1. General Settings
2. Customer Add to Calendar button Settings
3. Admin Calendar Sync Settings
Before we get to understand these three sections separately, let us first integrate your WooCommerce shop with Google Calendar:
Integrating into Google Calendar
↑ Back to topThere are three ways to connect our plugin with the Google Calendar. They are as follows:
i. OAuth Sync (Recommended)
ii. Service Account Sync
iii. Sync Manually
Important: *Google Calendar API requires PHP V5.3+ and some PHP extensions.
Method 1: Using OAuth Sync (Recommended)
↑ Back to topWe’ve introduced a simple and secure way to export deliveries to Google Calendar using OAuth integration. You no longer need to deal with service accounts or manually share calendars — just follow the steps below to authorize your Google account.

1. Go to the Google Developers Console. Click on the “Project” dropdown at the top and then select “New Project“.

Enter a project name (e.g., “Deliveries”) and click Create.
2. Inside your new project, go to “APIs & Services > Enabled APIs and services”. Click on “+ Enable APIs and Services” and search for the Google Calendar API. Click on it, then select “Enable”.


3. Go to APIs & Services > OAuth consent screen. You can choose an Internal for the user type and click Create.
You can fill in the “App name”, “Support email” and “Developer contact email. Then, click Save and Continue until the final step and click Create.


4. Go to APIs & Services > Credentials and click on “+ Create Credentials” > OAuth Client ID.

You can choose a Web application as the application type and add the following:
Authorized redirect URIs – Add the callback URL from your plugin (e.g., https://yourstore.com/wp-admin/edit.php?page=woocc)
(Optional) Authorized JavaScript origins if your plugin requires it.

Click Create.

5. Once the client is created, you will see your Client ID and Client Secret. Copy and save these immediately, as you won’t be able to view the secret again later.
Method 2: Using Service Account
↑ Back to topGo to the Google APIs console by clicking https://code.google.com/apis/console/.
Login to your Google account if you are not already logged in. Start by creating a new project using the left side panel. Click on the ‘Home’ option. Name the project ‘Product Deliveries’ (or use another name that fits your needs instead). Click on the ‘Create’ button:

Go to ‘Enabled APIs & services’ from the left side panel. Click on ‘Enable APIs and Services.’

In the search box, find the Google Calendar API and click on it:

Click the ‘Enable’ button:

Once enabled, it will show you an ‘API Enabled’ message:

Now, go to Credentials and click on ‘Create Credentials’.

Choose ‘OAuth client ID’ from the dropdown:

The new page will ask you to create this new ID. Click on ‘Configure Consent Screen’ as shown below:

Choose the User Type based on your needs. You can go with ‘Internal’ as shown here:

Click on the ‘Create’ button. Since the OAuth consent screen is now in the process of being published, on the left hand side panel you will find it’s tab. Continue by naming the App. You can name it to ‘Product Delivery Date’ or a name of your preference. Enter the email ID:

Continue filling the details for ‘Scope’ and ‘Summary’. Under Developer contact information, enter the email address where you would like to receive information about your project if any changes are made. Click on ‘Save and Continue’ as shown here:

Now go to the ‘Credentials’ from the left panel. Find the ‘Create Credentials’ as shown here:

Now choose to create a ‘Service account’ from the dropdown as shown here:

A Service Accounts tab will be created. Give it a name and click on ‘Create and Continue’ as shown here:

Under the ‘Grant this service account’ settings, add the Role of who will receive access to this account. For instance, since you have created the project your role should be of the ‘Owner’. Press Continue to move forward:

After granting the user access, click the ‘Done’ button:

You will find that the service account has been created under the ‘Credentials’ tab. Go to the Actions section, where you will find the pencil icon indicating editing:

Find the ‘Keys’ tab and click on ‘Add Key’. From the dropdown, choose ‘Create new key’.

Select P12 and click on the ‘Create’ option:

A P12 file will be downloaded to your device. Note down the password of this key by copying it. Close the popup once done.

You will see the status of the Key as ‘Active’ shown here:

Now, using your FTP client program, copy this key file to a folder that was mentioned in the instructions of your Product Delivery Date Google Calendar setting page. Find this by going to Product Delivery Date > Settings > Google Calendar Sync and scrolling down to Admin Calendar Sync Settings > Instructions.

For instance, it may show a pathway similar to this: /home/team-sandbox/public_html/priyanka/wp-content/plugins/product-delivery-date/includes/gcal/key/.
After uploading, it will look like this in your FTP server:

This file is required as you will grant access to your Google Calendar account even if you are not online. So this file serves as a proof of your consent to access to your Google calendar account.
Note: This file cannot be uploaded in any other way. If you do not have FTP access, ask the website admin to do it for you.
Now that you have uploaded this file, copy the file name without the .p12 in it. Paste it ‘Key file name’ in the Google Calendar Sync Page of your shop as shown here:

Now, go back to your Google Calendar Cloud page and go to Service Accounts and find the Email Id as shown here:

Copy it and paste it in your ‘Service account email address’ section in the Google Calendar Sync Page of your shop as shown here:

Now you make some change in your Google Calendar. Open your Google Calendar by clicking this link: https://www.google.com/calendar/render
Create a new Calendar by selecting Other Calendars:

Click on ‘Create new calendar’.

Try NOT to use your primary calendar.
Give a name to the new calendar, e.g. Product Delivery. Check that Calendar Time Zone setting matches with time zone setting of your WordPress website. Otherwise, there will be a time shift. Click on ‘Create Calendar’ as shown here:

Once the calendar is created, go to the ‘Share with specific people’ tab. This will let you share your calendar with your WooCommerce shop. Click on ‘Add people’:

Paste the already copied ‘Email address’ setting from the Service account of the Google APIs console you had created earlier. Click on Send.

Ensure to change the permissions from ‘See all event details’ to ‘Make changes to events’ as shown here:

This would mean that your WooCommerce store will be able to make changes to your Google Calendar if new orders are placed instead of simply being able to see the events that have been created in the calendar.
Moving on, go to Calendar Settings and find Integrate calendar. Here you will get the Calendar ID. Copy it:

Paste it in ‘Calendar to be used’ section in the Google Calendar Sync Page of your shop and click on ‘Test Connection’:

Ensure to avoid keeping the Integration Mode as Disabled. Depending on your needs, choose the mode. For instance, you can go with Sync Automatically.
If all the steps have been followed correctly, you will be displayed a message indicating the success of your test connection as shown below:

Since your connection has been established, your product deliveries will be imported to your Google Calendar.
Now let’s understand the 3 different sections present on the Google Calendar Sync page of your WooCommerce Page.
1. General Settings
↑ Back to topHere you can add settings like add Event name, location and description of the event as shown below:

General settings added
As you can see above, the location is set to Mumbai. This text will be used as location of the event in the Calendar.
You can use the placeholders like ADDRESS, FULL_ADDRESS and CITY instead of the text and these placeholders will be replaced by their actual values.
Event summary or name refers to the event’s name on the calendar, whereas Event Description refers to the event’s details.
Here you can add the order details like products, quantity, Delivery date and time, price, address, etc. For both these fields, you can use the placeholders which will then be replaced by their real values.
2. Customer Add to Calendar button settings
↑ Back to topMoving to the next section which is the Add to Calendar button settings, which works mainly for the customers. You can enable the options under this section depending on the requirements, which will display the Add to Calendar button on Order received page, Customer notification email and My account page. You can also opt out to have the events calendar opened in a new tab by enabling the Open Calendar in Same Window option.
Thus customers can add the delivery dates & times to their Google Calendar or any other calendar using these settings.
Enable the check boxes for the respective pages under the Customer Add to Calendar button Settings section in Product Delivery Date -> Settings -> Google Calendar Sync tab, for enabling the Add to Calendar button on these pages.

Customer Add to Calendar button settings
Once this is done, the Add to Calendar button will be displayed on Order received page, Customer notification email and My account page as shown below:
Order received page:

Add To Calendar button on Order received page
Customer notification email:

Add To Calendar button in Customer Notification email
My Account page:

Add To Calendar button on My Account page
On clicking the Add to Calendar button, you will be redirected to the Event Details page as shown below:

Event Details page
Once you have checked all the details, click on the Save button, and this event will be added to the Google Calendar. Now click on the event to see the details as shown below:

Event details displayed on Google Calendar
On clicking the Add to other Calendar button, a .ics file gets downloaded on your device. The .ics file contains complete details of the event, which you can upload to any other calendar.

.ics file gets downloaded
3. Admin Calendar Sync Settings
↑ Back to topThis setting works for the admin; he/she can export delivery dates & times automatically or manually to his google calendar by selecting the appropriate integration mode. When the integration mode is set to Disabled, the google calendar sync will be disabled. Admin can choose this option when he doesn’t want to export delivery details.
Let us understand the other 2 modes of integration: Automatic and Manual.
3.A.Sync Automatically
Follow the below steps to automatically export delivery dates and times to your (admin) Google calendar:
- Select the Sync Automatically Integration Mode.
- Setup the Google calendar sync with the help of the instructions provided by clicking the Show me how link.
- Test the Connection using the Test connection link.

Sync Automatically Integration mode enabled
The events will now be exported automatically to the Google calendar for which Calendar ID is added, once the customer places an order. This is how it will appear on the calendar:

Delivery of Blueberry Cheese cake exported to the calendar
3.B. Sync Manually
Follow the below steps to manually export delivery dates and times to your (admin) Google calendar:
- Select the Sync Manually Integration Mode.
- Enable the check box Show Add to Calendar button in New Order email notification, for adding the Add to Calendar button in New Order email notification.
- Admin can sync the delivery dates & times by clicking on either the Add to Google Calendar button or Add to other Calendar button.

Sync Manually Integration mode enabled
As the Show Add to Calendar button in New Order email notification is enabled, the buttons will be displayed on New order email notification as shown below:

Add to Google Calendar button in Admin notification email
So when a customer clicks on Add to Google Calendar button, he will be redirected to Edit Details page, where the details of the placed order will be added as shown below:

Edit Details page of the event
Once the details are checked, click on Save button to save this event to the Google Calendar as shown below:

Event saved in Google Calendar
Thus the event gets saved for the selected delivery date as shown above. To check the details, click on the event, and its details will appear as shown below:

Details of the saved event
When you click on the Add to other Calendar button, a .ics file gets downloaded on your device which contains complete details of the event and you can then upload that to any other calendar.
.ics file gets downloaded
Conclusion
↑ Back to topThis post explains how the Google Calendar Sync works for exporting product deliveries to the Google calendar once customer places an order. We also saw how the manual and automatic integration works. This is a highly essential feature that proves fruitful in keeping your calendar up to date with the product deliveries.
We saw basic guidelines on how this feature works but more detailed instructions for setting up the export process is also available under the Google Calendar Sync tab of Product Delivery Date Pro for WooCommerce plugin.
Send ICS Files As Attachment In Email Confirmation
↑ Back to topIn our earlier posts, we have discussed how to set delivery dates and charges for recurring weekdays, specific dates, and time slots. After every order is placed, you receive a confirmation email providing all the delivery details. But what if you need the order details as a downloadable file to store it on your computer for future use or to keep a log of it for a quick check? Then, a new feature, Sending delivery information as attachments (ICS files) in email notifications, will serve the purpose.
This feature of the Product Delivery Date Pro for the WooCommerce plugin will allow customers to export deliveries as ICS files after placing the order, which will be sent to them as an attachment in the email confirmation. Customers can also import the file to their personal calendars, such as Outlook, Google Calendar, etc.
How does this work?
↑ Back to topIn order to enable the option, you need to go to Product Delivery Date -> Settings -> Integrations -> Google Calendar Sync page and tick the Send delivery information as attachments (ICS files) in email notifications option as shown below:

Enable the option under Global Delivery Settings page
Now let us place an order for the Red Wine product for delivery on 27th August, 2018. You will see the Order details on the Order Received page as shown below:

Order details for delivery of Red Wine
Once the order is placed, you will receive an email confirmation with the product delivery details and an attachment of the ICS file as shown below:

ICS file attached in the email confirmation
You need to click on this Download link, and the ICS file of that product delivery will be saved to your device.
Conclusion
↑ Back to topThis post explains the simple process of exporting product delivery details on your digital device for future use. It is a simple one-step solution that works wonders for tracking product deliveries.
View Product Deliveries
↑ Back to topEvery online business requires an efficient delivery process for the successful execution of placed orders. In our earlier post, we saw how to set up the Product Delivery Date Pro for WooCommerce plugin to facilitate accuracy and ease for customers in placing orders on your WooCommerce store. Once these orders are placed, there is a feature in the plugin that enables you to view, filter, print, and download CSV files of all the product deliveries.
How does this work?
↑ Back to topFirstly, we need to understand how to view all product deliveries and their details on the admin side. To do so, first navigate to Product Delivery Date -> View Deliveries. You will land on the All Deliveries page, where all the details of product deliveries will be displayed as shown below:

All Deliveries page display
As you can see in the above image, the following are the product delivery details displayed:
- Order ID – It is a unique number of an order.
- Customer Name – Customer’s first and last name entered in the checkout form
- Product Name – Name of product selected by the customer
- Delivery Date – This is the delivery date selected by the customer for delivering the product.
- Delivery Time – This is the delivery time selected by the customer for delivering the product.
- Quantity – Quantity selected for the product when the order was placed.
- Amount – It is the Total amount of the order.
- Order Date – This will show the date when an order was placed.
- Actions – This is the link to view the order details for that particular product delivery.
Here, the View Order option allows you to view the entire order on the Edit Order page. For instance, if you want to view Order #2192, then click on the View Order button for that order, and the following Edit Order page of Order #2192 will be displayed:

Edit Order page displayed after View Order details link
Also, on the same All Deliveries page, you can view the orders in ascending or descending order of Delivery Date by clicking on the arrow next to it as shown below:
Descending order:

Delivery date in descending order
Ascending order:

Delivery date in ascending order
Many other functionalities are available on the All Deliveries page, such as calendar view, filter, CSV, and print options for product deliveries. Let us look at these one by one in detail:
View Product Deliveries in Calendar View
On the All Deliveries page, all the product deliveries are listed in the table. There is a functionality to view all these deliveries in a calendar view for which you need to click on the Calendar View button as shown in the below image:
Calendar view button
So clicking on the Calendar View button will redirect you to a Calendar View page where you can see all the product deliveries based on week, month, and day display. By default, the Week view will be displayed as shown below:

Week view of product delivery events
You can switch to month or day view by clicking the Month or Day button.
All product delivery events will appear in the calendar for all the deliveries placed on your WooCommerce store. Clicking on a particular event will show a Qtip with delivery information like Order ID, Product Name, Customer Name, Delivery Date, and Delivery Time as shown below:

Delivery details on Qtip
Different Filters on All Deliveries Page
Moving on to understanding the different filters enables you to view the product delivery details per your requirements. By clicking on Product Delivery Date -> View Deliveries, all the product deliveries will be listed by default on the All Deliveries page, but you can view these deliveries in different ways by clicking on different filters as shown below:
Different filters available
- All – By default, all product deliveries will be listed as shown above.
- Deliveries From Today Onwards – It displays delivery records of current and future dates.
- Today’s Deliveries – It displays all the delivery records whose deliveries are set for today.
- Tomorrow’s Deliveries—This displays the delivery records of deliveries set for tomorrow or the following day.
Deliveries From Today Onwards:

Delivery records of current and future dates
Today’s Deliveries:

Records whose deliveries are set for today
Tomorrow’s Deliveries:

Records whose deliveries are set for tomorrow
Download CSV of Product Deliveries
You can download data from all or filtered deliveries into a CSV file by clicking the CSV button on the All Deliveries page.

Clicking the CSV button
If you have searched for All records and then you click on the CSV button, a data.csv file of all your product deliveries will be downloaded on your computer. It will be displayed as shown below:

Product deliveries in CSV format
Print Deliveries
The All Deliveries page has a Print button to print all or filtered product deliveries. This is available next to the CSV button, and as you click on the Print button, a print preview of selected product deliveries will be generated in a new window as shown in the below image:

Print preview for printing selected product deliveries
Conclusion
↑ Back to topThe All Deliveries page is a one-stop complete delivery details page that allows you to view all the product deliveries from your WooCommerce store at one glance. On this page, you can view, filter, and sort deliveries in different ways as per your needs.
Also, you can easily print product deliveries or download a CSV file of all the listed deliveries using our Product Delivery Date Pro for WooCommerce plugin.
Free Up Delivery Date & Time for Cancelled, Trashed, Refunded & Failed Orders
↑ Back to topIn our earlier posts, we discussed setting up product deliveries, delivery charges, view product deliveries, etc. But once these orders are placed, what if you need to cancel or trash them for any reason? Then, the functionality of Product Delivery Date Pro for the WooCommerce plugin helps you to free up the delivery date and time for Cancelled, Trashed, Refunded, and Failed Orders.
In today’s scenario, many times, customers change their minds after placing an order, which can lead to the cancellation of product delivery. At such times, the admin will wish to free up the delivery date and time for which an order is canceled so that other customers can avail of that date and time for delivery of their product.
Also, many times, customers request a refund for the product or an order fails due to payment issues. In such cases, too, the admin will free up the delivery date and time for other customers to place an order for those dates.
So let us understand how admin can free up dates and time for further deliveries when order is Cancelled, Trashed, Refunded, or Failed.
How does this work?
↑ Back to topLet us consider an instance where you add settings for a new Product – Cream Hat. The maximum deliveries set for this product are 20 deliveries per day, and can be delivered on all weekdays as shown below:

Settings added for delivery of product
Now, say a customer places an order for the product – Cream Hat for delivery on Monday, 3rd September 2018. Maximum deliveries remaining for this date after the order is placed, will be 19 deliveries for that date as shown below:

19 deliveries left for 3rd September, 2018
After an order is placed, it gets listed on the WooCommerce -> Orders page. The first order in the order list is the one placed on 3rd September 2018 as shown below:

Orders page with the 1st order
Now, say a customer cancels this order and doesn’t want to proceed, so admin will free up the delivery date of this order by cancelling the order from the Edit Order page of that order as shown below:

Cancelling order from Edit Order page
Similarly, you can select Refunded or Failed options from the Status dropdown for refunded or failed orders. You can also move the order to Trash by selecting the Move to Trash option on the Orders page, as shown below:

Move to Trash option
So in any of the above instances where the order is canceled, refunded, failed, or trashed, the delivery date of 3rd September 2018 will get re-allocated, which means maximum deliveries for this date will be increased by 1.
Hence if you go to the Product page on frontend and select the delivery date as 3rd September 2018, you will see that the total available deliveries will now be changed to 20 deliveries instead of 19 as shown below:

Total deliveries changed to 20 deliveries
Like how delivery dates were made available once orders got cancelled, trashed, refunded or failed, similarly delivery time slot can also be made available for the customers,the same way. This is possible only for those products where delivery time slots are added.
Conclusion
↑ Back to topIn this post, we discussed how to easily free up the delivery date & time for further deliveries for Cancelled, Trashed, Refunded and Failed orders using our Product Delivery Date Pro for WooCommerce plugin.
This plugin provides the perfect and easiest solution to free up delivery dates & times to ensure the maximum deliveries possible for the product.
Edit Delivery Date on Cart & Checkout page
↑ Back to topIn any online business, product deliveries have to be carried out efficiently, along with keeping a close check on all placed and executed orders. Our previous post detailed how to view all the product deliveries or look through specific records, or print them for future reference. We will look at a very important functionality of the Product Delivery Date Pro for WooCommerce plugin, which enables your customers to Edit Product Deliveries on the Cart and Checkout Page.
Sometimes, while placing an order, the need arises to change the delivery details before confirming the order. At this juncture, our Edit Deliveries feature has proven fruitful to customers.
How does this work?
↑ Back to topFor better understanding, let us divide this post into 2 parts: Edit Deliveries on the WooCommerce Cart page and Edit Deliveries on the WooCommerce Checkout Page.
Foremost of all, you need to enable the option to edit deliveries, so go to Product Delivery Date -> Settings -> Global Delivery Settings section. Here, tick the Allow Deliveries to be editable option, which will enable editing the deliveries from the Cart and Checkout page. Click on the Save Settings button to save this setting.

Enable Allow Deliveries to be editable option
Edit Deliveries on the WooCommerce Cart page
↑ Back to topWhen you enable the option to Allow Deliveries to be editable, there are two places where this applies on the frontend. One of them is on the Cart page after the customer has selected the desired delivery date from the Product page.
Let us understand this with an instance. Say the customer selects the product Cream Hat to be delivered on 29th August 2018, and you have enabled the edit deliveries settings. So when your customer places the product Cream Hat in the cart, the Edit Deliveries button will appear above the delivery date as shown below:

Delivery details shown on the Cart page
In order to change the delivery date, the customer needs to click on the Edit Deliveries button and select the desired date from the delivery calendar as shown below:

Edit Delivery dates on Cart page
Now say the customer wants to change the delivery date to 31st August, 2018. So select the date from the delivery calendar as shown below and click the Confirm Deliveries button.

Delivery dates changed to 31st August, 2018
Thus the Cart page will now display the new delivery date – 31st August, 2018 for product Cream Hat as shown below:

Changed delivery dates on Cart page
This way, customers can edit the delivery date on the Cart page.
Edit Deliveries on the WooCommerce Checkout page.
↑ Back to topMoving ahead with the same instance as mentioned above, say now the customer wants to edit the delivery date from 31st August 2018 to 29th August 2018 on the Checkout page.
He will notice Edit Deliveries button is available under the Your Order section on the Checkout page as shown below:

Edit Deliveries button on Checkout page
So when the customer clicks on the Edit Deliveries button, he will be able to make changes to the delivery date by selecting 29th August 2018 in the delivery calendar as shown below:

Delivery date changed on Checkout page
Then, he needs to click on the Confirm Deliveries button to save this change. Thus, the delivery date will be changed to 29th August 2018 on the Checkout page as shown below:

Changed date appear under the Your Order section
This way, customers can edit the delivery date on the Checkout page.
Conclusion
↑ Back to topThis post elaborates on the Allow Deliveries to be the editable option of our Product Delivery Date Pro for the WooCommerce plugin. We understood how customers could edit delivery details on the Cart page as well as the Checkout page to accommodate changed deliveries for their orders.
Hence, this feature can help customers to take control of their product deliveries before confirming the order, without having to depend on the site admin. Thus making the whole process easy, fast, and convenient.
Reschedule Product Deliveries
↑ Back to topRescheduling Product Deliveries by Admin
↑ Back to topIn this document, we will learn how the Rescheduling of Product Deliveries by Admin works and what needs to be done in the backend. Once the order is placed and the customer requests to reschedule the delivery date then it can be done from the Edit order page under WooCommerce -> Orders.
For instance, say the customer wishes to change the delivery date of the product named Rakhi – order #1144, so first click on the order under the Orders page as shown below:

Click on order to reschedule the delivery date
Now on the Edit order page for the Rakhi order, you will find the Edit Deliveries option in the details section as shown below:

Click on Edit Delivery link
As you can see, the Rakhi order’s delivery date is 08/08/2025, and the customer wishes to change this to 10/08/2025. This can be done by clicking the Edit Deliveries link and the Rakhi – Edit Deliveries section will appear with the delivery date displayed as 10/08/2025 as shown below:

Rakhi – Edit Deliveries section
Now you need to click on the Delivery Date calendar to change the delivery date to 10/08/2025 as shown below:

Changed delivery date
Click on the Confirm Deliveries button to save this change. The rescheduled date will reflect on the Edit order page as shown below:

Rescheduled date appears on the Edit order page
This shows the delivery date has changed from 8th August 2025 to 10th August 2025. This change is also reflected in the Order Notes section as shown below:

Rescheduled dates appear under Order notes section
Also, an email is sent to the customer notifying him about the rescheduled delivery date and it appears as shown below:

Email notification sent to the customer
Conclusion
↑ Back to topThis help document details the steps undertaken by the Admin to reschedule the delivery date and time for existing orders, thus improving the customer experience while using the Product Delivery Date Pro for WooCommerce plugin.
Rescheduling Product Deliveries by Customers
↑ Back to topThere are times when customers feel the need to reschedule their existing product deliveries due to changes in one’s daily schedule or any emergency. Therefore the feature for Rescheduling product deliveries by customers is especially added in the plugin to cater to such sudden instances.
How does Rescheduling Product Deliveries by Customers work?
We shall focus mainly on the My Account page of the customer where all the confirmed orders are listed. Customers can reschedule the delivery details of their orders using the Allow Deliveries to be reschedulable option under the Product Delivery Date -> Settings -> Settings page. Tick this option and click the Save Settings button which will allow the deliveries to be rescheduled.

Enable Allow Deliveries to be reschedulable option
Once this option is enabled, customers can make changes in the delivery details of any confirmed order on their My Account page. A typical Orders section of a customer’s My Account page appears as below:

Orders section of My Account page
Now say the customer wants to edit the first order, Order #2204 which was placed on 21st August 2018, so he needs to click on the View button next to the Total column and he will be taken to the Order Details page of Order #2204 as shown below:

Order details page showing delivery details
There will be an Edit Deliveries button below the Delivery Date and Time details. Here customer can click on this button to reschedule his delivery details. Let us change the Delivery Date from 13th September 2018 to 18th September 2018 and the Delivery Time from 10.00 AM – 02:00 PM to 03:00 PM – 05:00 PM.
When he clicks on the Edit Deliveries button, the Blueberry Cheese Cake – Edit Deliveries page will be displayed as shown below:

Blueberry Cheese Cake – Edit Deliveries page
So to reschedule the Delivery Date, the customer needs to click on the delivery calendar and select 18th September 2018 as shown below:

Rescheduling the delivery date to 18th September, 2018
Similarly, to reschedule the Delivery Time, the customer needs to click on the drop-down and select the time slot 03:00 PM – 05:00 PM as shown below:

Changing the time slot to 03:00 PM – 05:00 PM
So the changed delivery details will appear as shown below. Click on Confirm Deliveries button and the rescheduled delivery date and time will be saved.

Changed delivery details
Now the rescheduled delivery details will show up on the Orders Details page where the Order updates section will display details of the action performed on this order by the customer as shown below:

Order details displayed with rescheduled delivery details
As you can see above, the Order updates section displays a note that the delivery has been rescheduled from 09/13/18 10:00 AM – 02:00 PM to 09/18/18 03:00 PM – 05:00 PM for Blueberry Cheese Cake.
Also, an email will be sent to the admin notifying him that the customer has rescheduled his delivery details to 09/18/18 03:00 PM – 05:00 PM for Blueberry Cheese Cake as shown below:

Email notification sent to admin
This way customers can reschedule delivery date and time from their My Account page -> Orders section.
Minimum Number of days for Rescheduling Delivery
There is one more setting associated with rescheduling which is the Minimum number of days for rescheduling. Here you as an admin need to enter the minimum number of days from the delivery date, before which customers can reschedule their order deliveries.
So go to Product Delivery Date -> Settings -> Settings page and enable the Minimum number of days for rescheduling option by setting the value to 2 days as shown below:

Enable Minimum number of days for rescheduling option
Therefore if the delivery date is set to 22nd August 2018 then when the customer tries to change the delivery date to 21st August 2018, the Edit Deliveries button will not appear for rescheduling the delivery details as shown below:

Edit Deliveries button does not appear
This is because the admin has set the minimum days to 2 days. But if the delivery date is set for 24th August 2018 and the customer wishes to reschedule delivery details for 21st August 2018, then the Edit Deliveries button will appear for rescheduling the delivery details as shown below:

Edit Deliveries button appears
Conclusion
This post details the steps undertaken for rescheduling delivery dates & times for existing orders. This feature facilitates the customer to actively execute their rescheduled plans and accommodate any sudden changes for their existing deliveries.
Adding Delivery details in the manually created WooCommerce Orders
↑ Back to topWith v3.5.0 of Product Delivery Date Pro plugin, you can now add the delivery details in the manually created WooCommerce Orders. Let’s see how to configure it:
Adding a New WooCommerce Order
↑ Back to topFirst, in order to create a manual order, you can go to WooCommerce > Orders > Add New.

You can fill in the General details of your order such as the Date of when the order was created, the Status of the order, etc. Next, you can fill in the Billing details such as Name, Address, Email, etc.

After this, you can add the items in your manual order by clicking on the ‘Add items’ option.

Click on the ‘Add product(s)’ option and choose your items. For example, let’s say that chose ‘Classic Margherita Pizza’ and ‘Chocolate Pastry’ as shown here:

After selecting them, click on the ‘Add’ button.

Once you have added your products, scroll upwards and on the right-hand side, corner click on the ‘Create’ option.

Adding Delivery details in the manually created Orders
↑ Back to topOnce you have created your order, in it, you will see the ‘Edit Deliveries’ option. Let’s say that you want to edit the delivery date for the item ‘Classic Margherita Pizza’. You can click on the ‘Edit Deliveries’ option to then find the ‘Delivery Date’ setting like this:

Here, you can choose the delivery date for your item. Let’s say that you selected the delivery date as 18th May 2021. After selecting that, you will be able to choose the Delivery Time for this item from the time slots that have been created by you for this particular product.

Since only a 5 PM to 6 PM time slot is available if you want you can choose that slot.

After you are done editing your delivery date and time, your order will appear like this and you should click on the ‘Confirm deliveries’ option.

Here’s how the updated order will appear:

In a similar manner, you can edit the order delivery details of the second product ‘Chocolate Pastry’ too. Once you are done updating the order delivery details, you can click on the ‘Update’ button under the ‘Order actions’ setting.

Please Note: If your delivery date has delivery charges assigned to it, then the plugin will create a new order for you with the changes that you will make while manually creating your order. For example, you have added a delivery charge for the time slot of the delivery of your product Margherita Pizza. This charge is $2. Then after editing the delivery details of your product, it will appear like this:

As you can see, the ‘Related order’ button takes you to that order where the delivery charges are added. We do this so that the total in the main order is not affected. If you don’t want a new order to be created when the order is edited & when delivery charges are there for the date that exceeds the order total, then you can use this filter: prdd_create_new_order_on_date_reschedule. Below is the usage of the filter:
add_filter('prdd_create_new_order_on_date_reschedule', 'prdd_create_new_order_on_date_reschedule_callback');
/**
 * It will not allow creating an order when we reschedule the order by changing its delivery date.
 */
function prdd_create_new_order_on_date_reschedule_callback(){
	return "no";
}
WooCommerce Orders Page
↑ Back to topTo view this order, you can go to WooCommerce > Orders. Your manually added order will appear like this:

To view the full order details you can click on the ‘Preview’ button as shown below:

The edited order delivery details will appear like this:

Lastly, if you wish to configure these settings from the frontend, i.e, rescheduling your customer’s product deliveries from the frontend by the admin, then you can check out our post here.
Auto-populate the first available delivery date on the product page
↑ Back to topMany online businesses prefer to auto-populate the first available delivery dates in their calendars to make the task of delivery date selection easier. With the Product Delivery Date Pro for WooCommerce plugin, you now auto-populate the first available delivery date on the product page from the settings. Let’s have a look.
Go to Product Delivery Date > Settings

Find the Settings sub-option tab.

Scroll down to the ‘Auto-populate first available delivery date’ setting as shown here:

Your last step is to enable it by clicking on the Save Settings button.

Product page with the auto-populate option DISABLED
↑ Back to topWhen the auto-populate first available delivery date setting is disabled, you will not find any date that has been selected on the product page. The product page will look like in the image below.
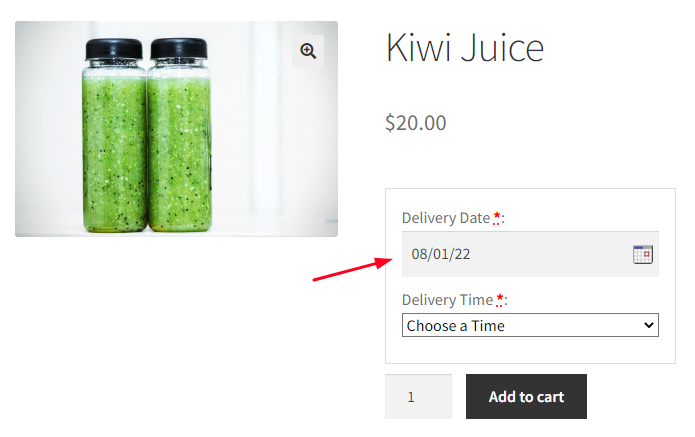
Product page with the auto-populate option ENABLED
↑ Back to topNow let’s enable the auto-populate the first available delivery date settings and see.
For instance, if today’s date is 30th July 2022, the first available delivery date for our product will be 1st August 2022. The auto-populate option enabled product page will look like in the image below.
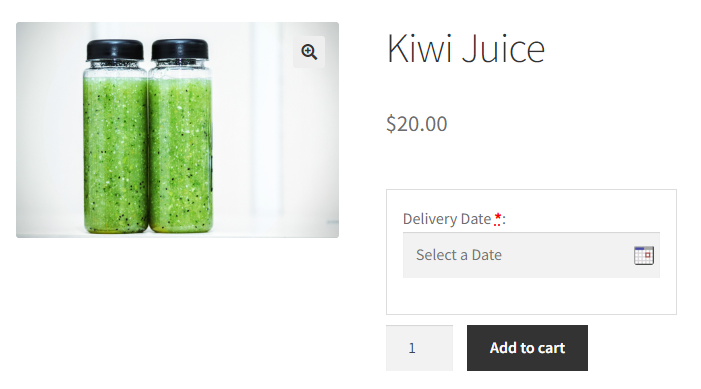
*Please Note: This setting will not work when the ‘Duplicate dates from other product in cart’ setting is enabled.
Improve the shopping experience of your customers with this auto-populate the first available delivery date settings.