NOTE
This product is no longer sold on WooCommerce.com. This document has been left available for existing users, but will no longer be updated.
Installation
↑ Back to top- Download the .zip file from your WooCommerce account.
- Go to: WordPress Admin > Plugins > Add New and Upload Plugin with the file you downloaded with Choose File.
- Install Now and Activate the extension.
More information at: Install and Activate Plugins/Extensions.
Setup & Configuration
↑ Back to topThe next step is to configure the top and bottom content blocks for your order confirmation page.
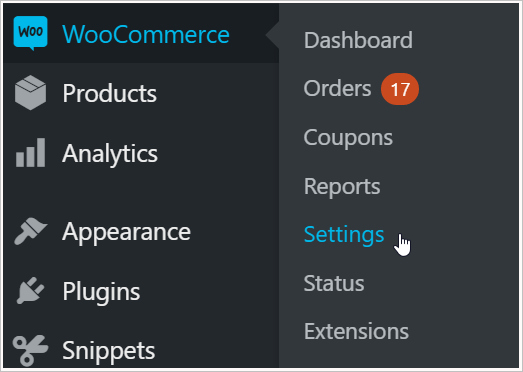
- Open your WordPress dashboard and then go to: WooCommerce > Settings. The General Settings page displays.


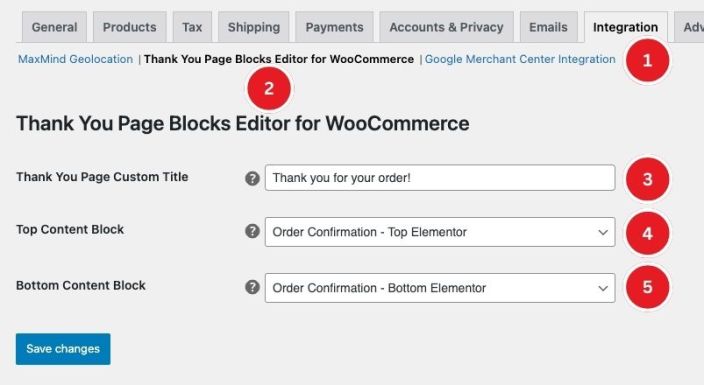
- At the top of the General Settings page, click the Integration tab.
- Click the Thank You Page Blocks Editor for WooCommerce link.
- Add your custom Thank You Page title, you can leave blank and the default title will be displayed.
- Select the Page that contains the content you want to display at the top of the order confirmation page.
- Select the Page that contains the content you want to display at the bottom of the order confirmation page.
Frequently Asked Questions
↑ Back to topIs this extension a page builder?
↑ Back to topNo, this extension assigns content to load at the top and bottom of your order summary. The content comes from your Pages.
How do I design the content blocks for the top and bottom of my thank you page?
↑ Back to topIt’s simple! Just create a page in your WordPress CMS. You can use the text editor, visual editor, Block Builder, or a tool like Elementor to design your content blocks.
How do I know what to add to my order confirmation page?
↑ Back to topGreat question. Remember, simplicity is key. Focus on creating a positive experience for your customers immediately after they complete their purchase. Every business is unique, so avoid cluttering the confirmation page with too many blocks or widgets, as this could confuse your customers. Keep the order confirmation page clear and easy to understand.
We recommend thoroughly testing your order confirmation page to ensure a smooth checkout process. Be mindful that adding too many elements can slow down the page loading time.
Troubleshooting
↑ Back to topI created a page but I don’t see it in the dropdown in the settings section
↑ Back to topThis is expected. The primary purpose of this method is to retrieve and cache a list of pages from the WordPress site. By caching the list for 1 hour, it improves performance by reducing the need to query the database every time the options are needed. If you need to see the new page immediately you will have to clear transients.
You can manually delete the transient from the database to force the plugin to fetch the updated list of pages. You can do this using a plugin like “Transient Manager”.
If you are using a plugin like WP-Rocket then deleting transients is easy. WP Rocket has this documentation on the subject.
- Go to Settings > WP Rocket > Database
- Here, you can find options to clean up and optimize your database, including clearing expired transients.
- Check the option for Transients Cleanup and click on Optimize.
My Visual Site Editor is not supported by this extension, the content loads without styles
↑ Back to topIf this happens you can create a support request and we will declare support for your theme and site builder so styles are enqueued on the order confirmation page.
