
Managing bookings often requires store owners to search bookings, check availability, reschedule appointments, cancel bookings, export booking reports, and identify their best-performing services.
With the Booking & Appointment Plugin’s AI Abilities via the Model Context Protocol (MCP), you can interact with your WooCommerce booking data using natural language through an AI assistant.
Instead of manually navigating through different booking screens, calendars, and reports, you can simply ask questions like:
- Show me all confirmed bookings for tomorrow.
- Export this week’s bookings to Excel.
- Move booking #4821 to next Tuesday.
- Which services generated the highest revenue this month?
- Block appointments for December 25.
Booking & Appointment Plugin for WooCommerce now supports the Model Context Protocol (MCP), allowing you to connect your WooCommerce store with AI assistants such as Claude Desktop and other MCP-compatible AI clients.
This allows you to quickly search, manage, and analyze bookings while continuing to manage your existing WooCommerce store.
Important Note: Using AI with the Booking & Appointment Plugin is completely optional. The plugin does not automatically connect your store to an AI client or enable these AI abilities. You choose whether to enable MCP and connect a supported AI client to your store. If you don’t enable the AI integration, your existing features and workflows continue to work as before.
1. Prerequisites
↑ Back to topBefore configuring the integration, ensure your environment meets the following requirements.
- A WordPress website running WordPress 6.9 or later.
- WooCommerce installed and activated.
- Booking & Appointment Plugin for WooCommerce installed and activated. Ensure you’re using version 8.6.0 or later that supports AI Abilities via MCP.
- An MCP-compatible AI client, such as Claude Desktop. You can also use other AI clients that support custom MCP servers, such as ChatGPT Desktop.
- Node.js installed on your computer. This is required to run the WordPress MCP server which securely connects your AI client to your WordPress website.
- A WordPress Application Password for an Administrator account. This allows the AI client to securely authenticate with your WordPress site.
Note: This guide uses Claude Desktop and ChatGPT Desktop and some other AI clients to demonstrate the setup process. The setup process is similar for other MCP-compatible AI clients, although the configuration screens and available connection options may differ depending on the client.
2. Configure Booking & Appointment Plugin
↑ Back to topBefore your AI client can access booking information and perform booking management tasks, you need to enable MCP support in the Booking & Appointment Plugin.
By default, the MCP integration is disabled. Enabling it allows the Booking & Appointment Plugin to register its AI booking abilities with the WordPress MCP server, making them available to your connected AI client.
- Navigate to: WooCommerce → Booking & Appointment → Settings →Global
- Scroll down to the Advanced Settings tab and Enable the following setting: Enable Booking Abilities API
- Click Save Settings.
3. Generate Authentication Credentials
↑ Back to topTo establish a secure connection between your WordPress store and your AI client, you need to generate the following credential:
- A WordPress Application Password to authenticate the WordPress MCP server.
3.1 Create a WordPress Application Password
↑ Back to topA WordPress Application Password provides a secure way for external applications, such as AI clients, to access your WordPress website without using your main account password.
To create an Application Password:
- Log in to your WordPress Admin Dashboard.
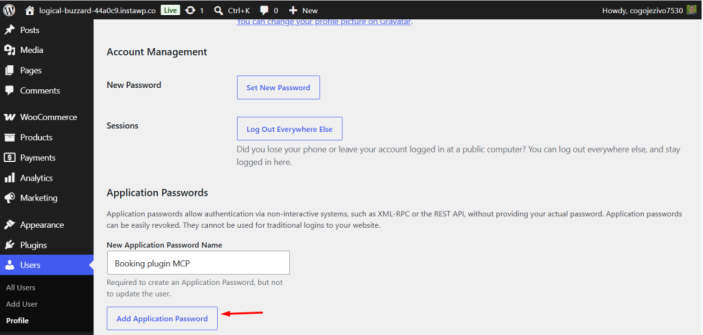
- Navigate to Users → Profile.
- Scroll down to the Application Passwords section.
- In the New Application Password Name field, enter a descriptive name (for example, Booking AI).
- Click Add Application Password.
- Copy the generated password immediately and save it in a secure location. WordPress will not display the complete password again after you leave the page.
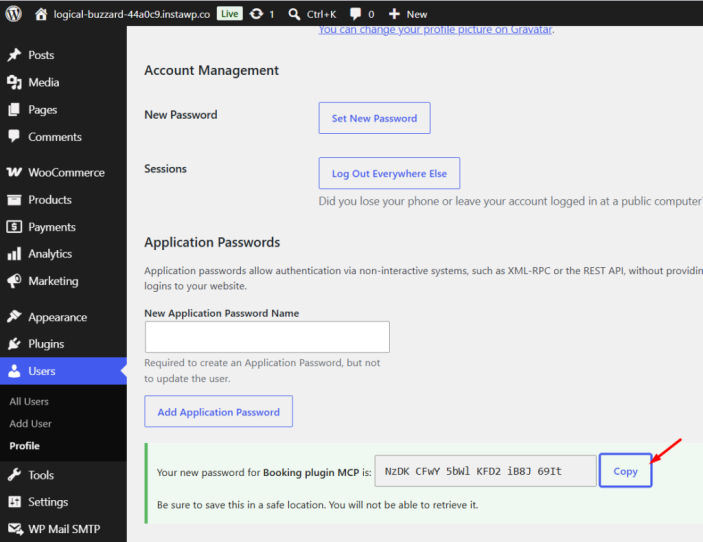
You will need the following information during the AI client configuration:
- WordPress Site URL
- WordPress Username
- Application Password
Note: The WordPress user account used to generate the Application Password should have Administrator privileges so the AI client can access all supported Booking & Appointment Plugin abilities.
4. Connect Booking & Appointment Plugin to an AI Client
↑ Back to topBooking & Appointment Plugin for WooCommerce can be connected to any AI client that supports the Model Context Protocol (MCP).
The setup process may vary depending on the AI client you use.
This documentation includes setup instructions for:
- Claude Desktop
- ChatGPT Desktop
- ZCode
- Cursor
The following sections explain how to configure each AI client.
5. Connect Using Claude Desktop
↑ Back to topIn this section, you’ll configure Claude Desktop to connect to your WordPress store. This allows Claude to securely access the AI abilities provided by Booking & Appointment Plugin for WooCommerce and WooCommerce.
Next, you’ll configure Claude Desktop to connect to your WordPress website.
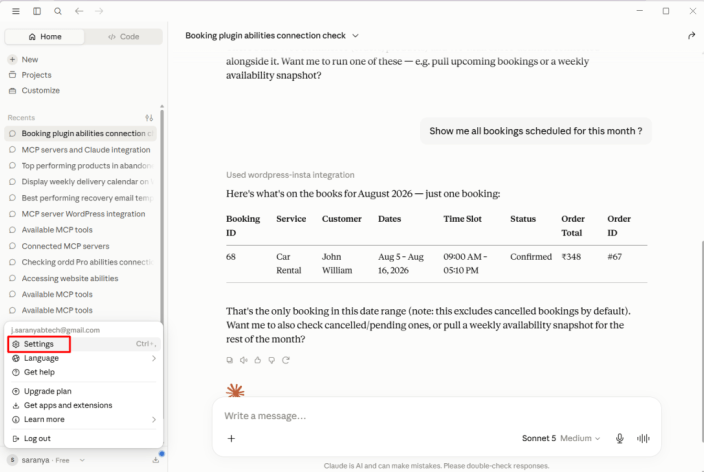
- Open Claude Desktop.
- Click your Profile icon.
- Select Settings.
- Open the Developer tab.
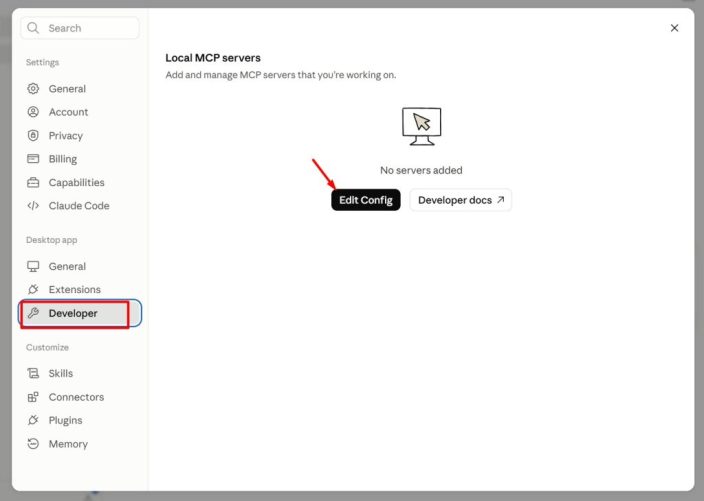
- Click Edit Config. Claude Desktop will open the folder containing the claude_desktop_config.json file.
- Open the claude_desktop_config.json file using your preferred text editor, such as Visual Studio Code, Notepad, or any other code or text editor.
- Add the following WordPress MCP Server configuration inside the configuration file:
"mcpServers": {

   "wordpress-insta": {

      "command": "npx",

      "args": [

        "-y",

        "@automattic/mcp-wordpress-remote@latest"

      ],

      "env": {

        "WP_API_URL": "https://<your-site-url>/wp-json/mcp/mcp-adapter-default-server",

        "WP_API_USERNAME": "<username>",

        "WP_API_PASSWORD": "<Application Password>"

    },

   "woocommerce_mcp": {

     "command": "npx",

     "args": [

       "-y",

       "@automattic/mcp-wordpress-remote@latest"

     ],

     "env": {

       "WP_API_URL": "https://<your-site-url>/wp-json/woocommerce/mcp",

       "CUSTOM_HEADERS": "{\"X-MCP-API-Key\": \"<Consumer_key>:<consumer_secret>\"}"

     }

   }

 },
Note: Your claude_desktop_config.json file may look different depending on your Claude Desktop version and existing settings. If an mcpServers section is already present, add the configuration inside it. Otherwise, create a new mcpServers section before the final closing curly brace (}) of the file.
Replace the following placeholders with your own values:
- WP_API_URL – Enter your WordPress website URL followed by /wp-json/mcp/mcp-adapter-default-server
- WP_API_USERNAME – Enter the username of the WordPress account you used to generate the Application Password.
- WP_API_PASSWORD – The WordPress Application Password you created earlier.
- Save the claude_desktop_config.json file.
- Close the Claude Desktop completely and reopen it.
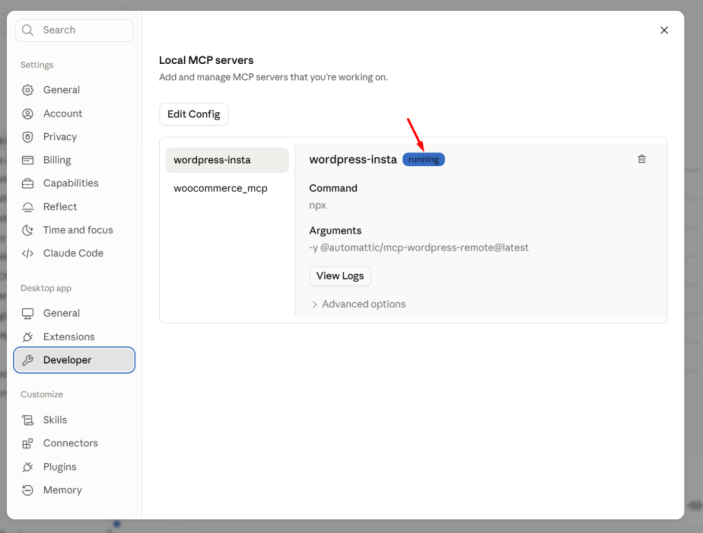
- To verify the MCP server connection, navigate to Settings → Developer → Local MCP Servers. If the configuration is correct, both servers should appear with a Running status.
5.2 Test the Integration
↑ Back to topOnce you’ve completed the setup, verify the integration by running the following example prompts. If your AI client responds with the expected results, you can continue using natural language to manage bookings instead of manually navigating through different booking screens.
These examples demonstrate the AI Booking Abilities available in Booking & Appointment Plugin for WooCommerce.
Smart Booking Search
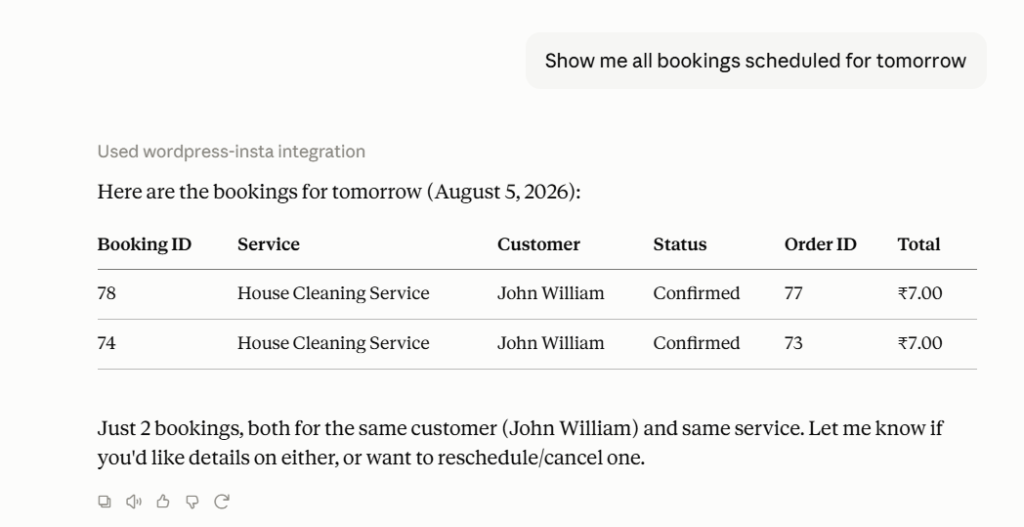
↑ Back to topExample Prompt: Show me all confirmed bookings scheduled for tomorrow.
Expected AI Response: The AI displays all matching bookings, including the booking ID, customer name, booked service, booking date, booking status, assigned resource, and related order information.
Export Bookings
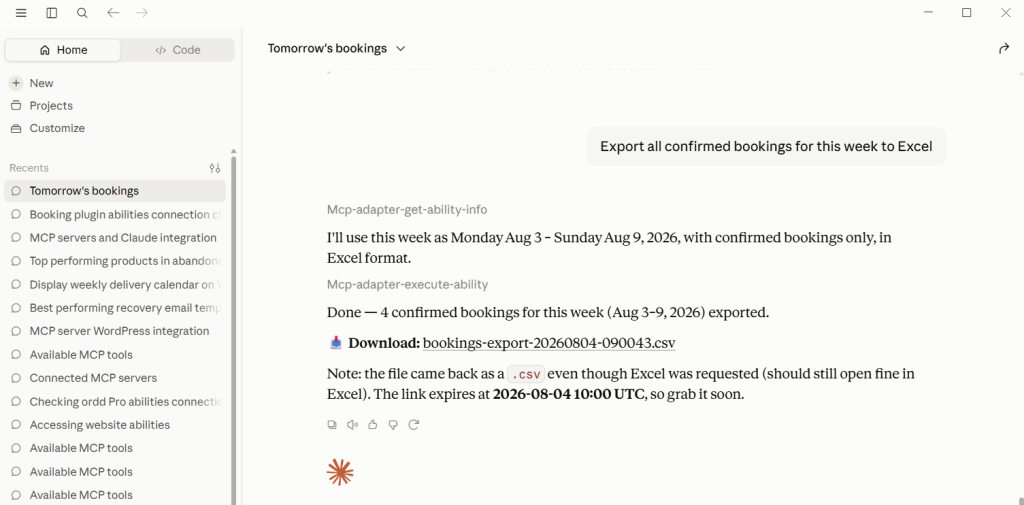
↑ Back to topExample Prompt: Export all confirmed bookings for this week to Excel.
Expected AI Response: The AI generates a CSV file containing the matching bookings and provides a temporary download link.
Manage Booking Capacity
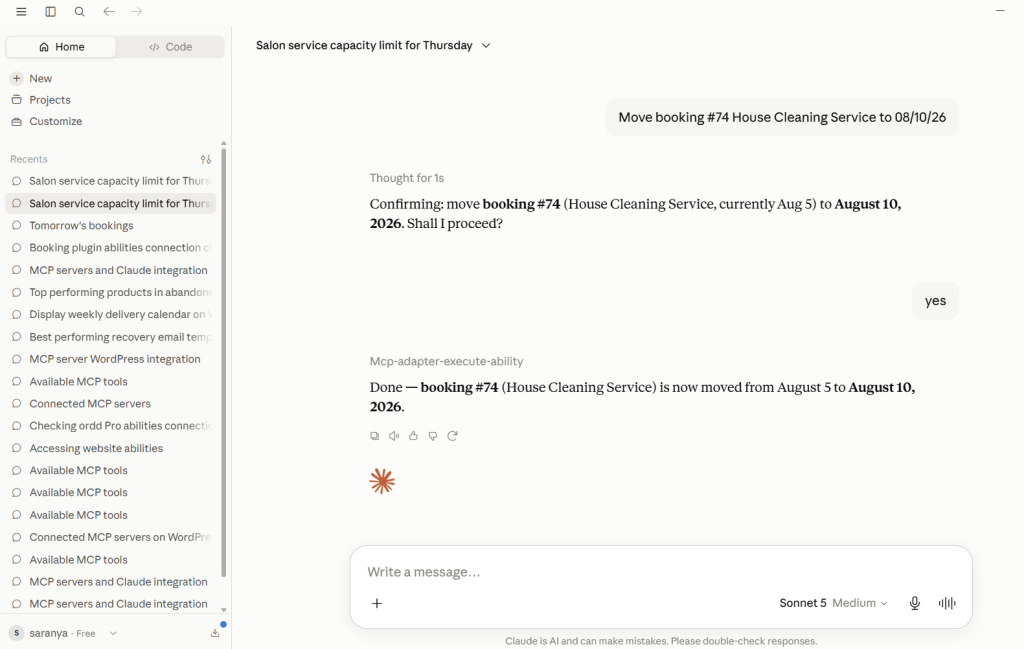
↑ Back to topExample Prompt: Move booking #74 House Cleaning Service to 08/10/26
Expected AI Response: The AI checks whether the requested date is available, updates the booking, and confirms the updated booking details.
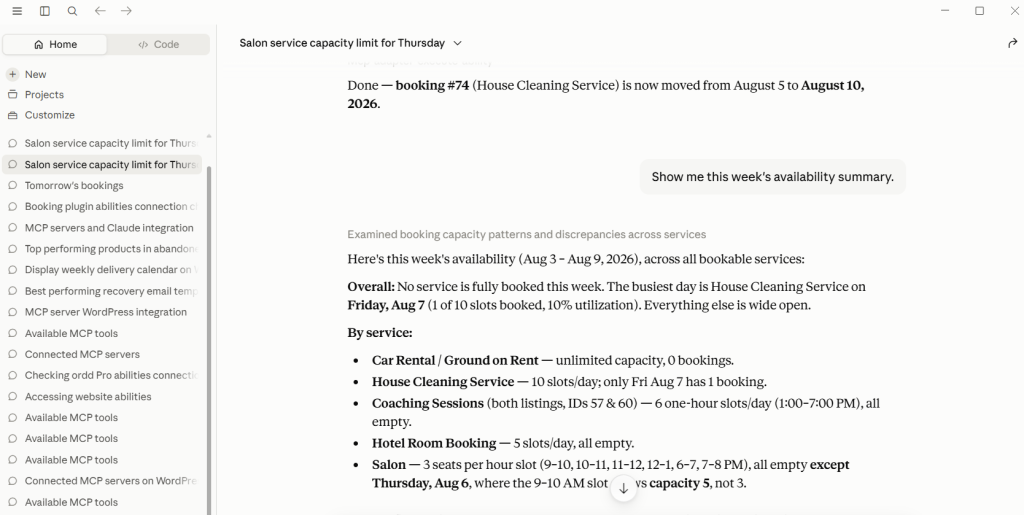
Weekly Availability Snapshot
↑ Back to topExample Prompt: Show me this week’s availability summary.
Expected AI Response
The AI displays the available slots, booked slots, busiest days, and fully booked days for the selected week.
Cancel a Booking
↑ Back to topExample Prompt: Cancel booking #80.
Expected AI Response
The AI cancels the booking and confirms the updated booking status. If requested, it also cancels the associated WooCommerce order.

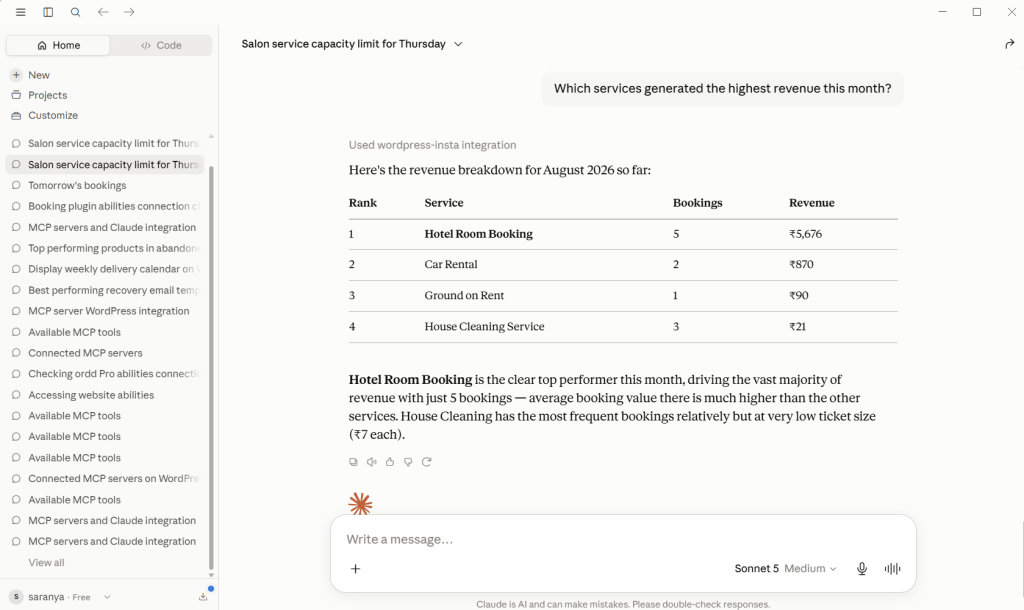
Top Performing Services
↑ Back to topExample Prompt: Which services generated the highest revenue this month?
Expected AI Response
The AI ranks services by booking revenue for the selected period and highlights the top-performing services.
Troubleshooting: The AI Returns a Generic Response Instead of Using Your Store Data
↑ Back to topIf your AI assistant responds with a generic answer even though the MCP server is connected:
- Confirm that the MCP server is running and connected.
- Ask the AI which MCP servers or tools are currently connected or available.
- Once the AI confirms the available MCP server or abilities, try your original prompt again.
- If the issue persists, restart the AI client and verify your MCP server configuration.
Note: If the AI continues to return a generic response instead of your store data, try rephrasing your prompt to explicitly ask it to use the available MCP abilities.
7. Connect Using ChatGPT Desktop
↑ Back to topIf you use ChatGPT Desktop as your AI assistant, you can connect it to your WooCommerce store by adding the WordPress MCP server. Once connected, ChatGPT can securely access the AI abilities provided by the Booking & Appointment Plugin, allowing you to retrieve booking information and perform supported booking management tasks using natural language.
To configure the connection:
- Open ChatGPT Desktop.
- Navigate to Settings → Plugins → MCP Servers.
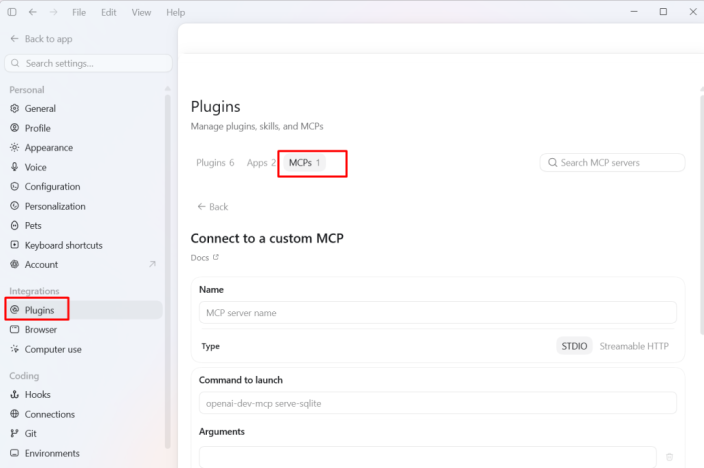
- Click Add Server.
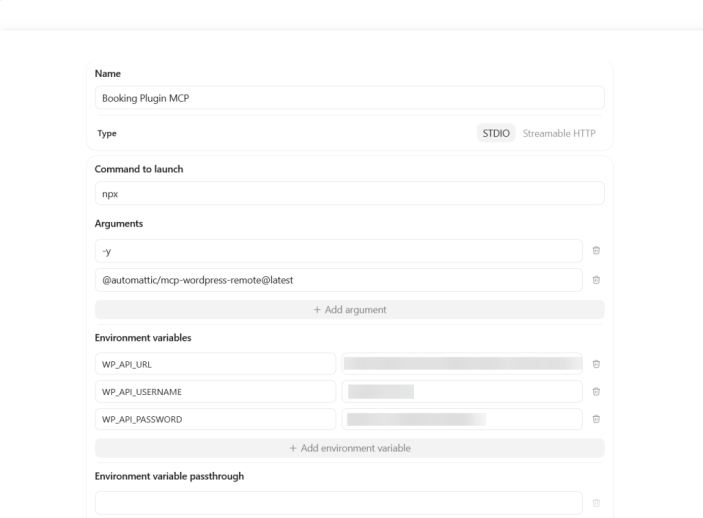
- Configure the server using the following values:
- Name: Booking Plugin MCP
- Type: STDIOCommand: npx
-y
@automattic/mcp-wordpress-remote@latest
5. Under Environment Variables, add the following:
- WP_API_URL – Your WordPress MCP endpoint (for example, https://your-store.com/wp-json/mcp/mcp-adapter-default-server)
- WP_API_USERNAME – Your WordPress username.
- WP_API_PASSWORD – The WordPress Application Password you generated earlier.
6. Save the server configuration.
7. Restart ChatGPT Desktop.
After ChatGPT restarts, open Settings → Plugins → MCP Servers. Under Servers, you should see the Booking & Appointment Plugin server listed.
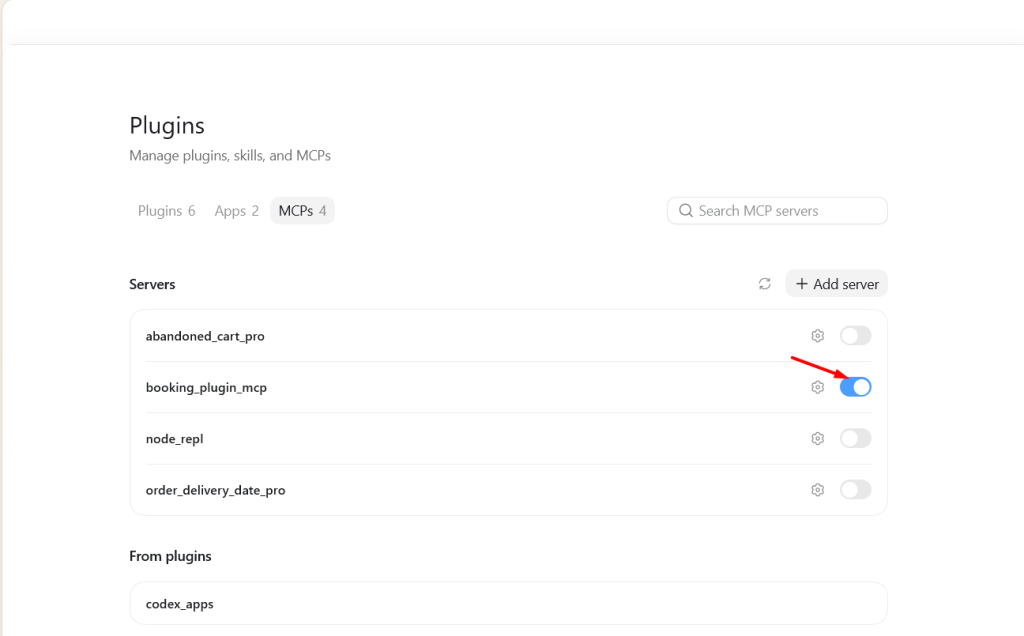
You can now proceed to test the integration to verify the connection.
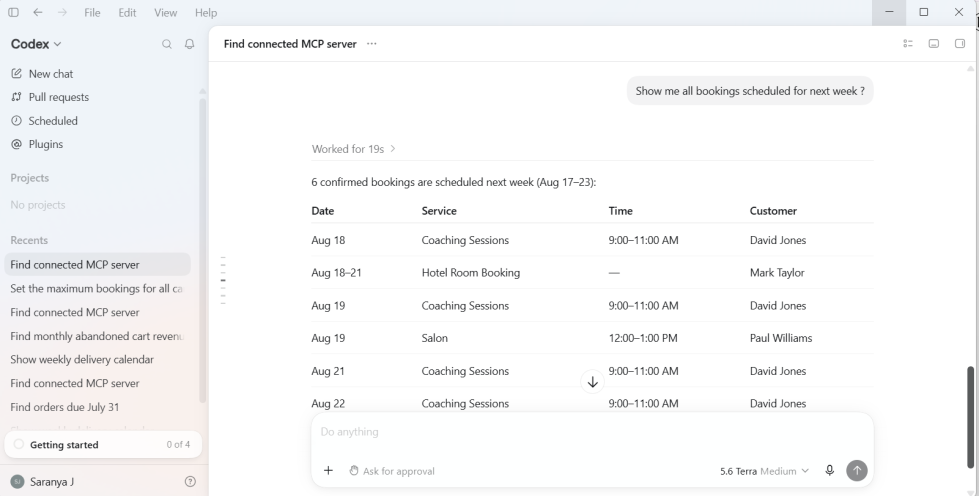
Try one of the example prompts to confirm that the AI can access your store’s booking data and you can get the response immediately.
Example Prompt: Show me all confirmed bookings scheduled for tomorrow.
Expected AI Response
The AI lists all confirmed bookings for tomorrow, including the booking ID, customer name, service, booking date and time, booking status, assigned resource (if applicable), and associated WooCommerce order details.
8. Connect Using ZCode Desktop
↑ Back to topZCode Desktop also supports the Model Context Protocol (MCP), allowing you to connect your WooCommerce store and interact with the AI abilities provided by the Booking & Appointment Plugin using natural language.
Once the connection is configured, ZCode can securely access the booking management abilities registered by the Booking & Appointment Plugin through the WordPress MCP server.
To configure the connection:
- Open ZCode Desktop.
- Navigate to Settings → MCP Servers.
- Click + to add a new MCP Server.
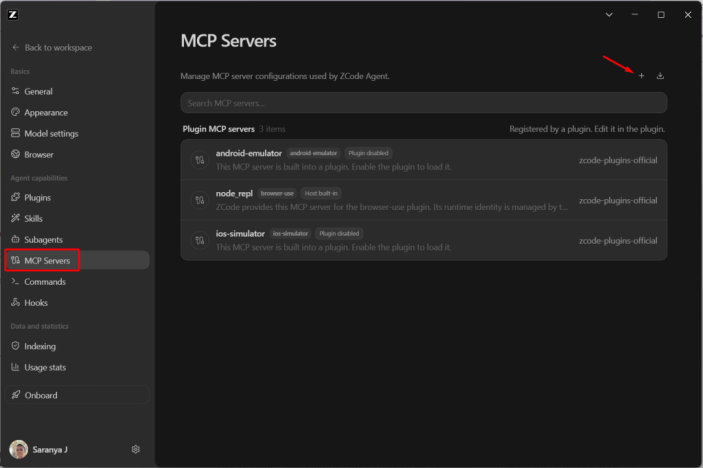
- Configure the server using the following values:
Name: booking-mcp-serverType: STDIOCommand: npx - In the Arguments field, enter:-y@automattic/mcp-wordpress-remote@latest
- Under Environment Variables, add the following values:
WP_API_URL – Your WordPress MCP endpoint (for example, https://your-store.com/wp-json/mcp/mcp-adapter-default-server)
WP_API_USERNAME – Your WordPress username.
WP_API_PASSWORD – The WordPress Application Password you generated earlier. - Save the server configuration.
- Restart ZCode Desktop.After restarting ZCode Desktop, the configured MCP server should appear under Configured MCP Servers with the available WordPress MCP tools.
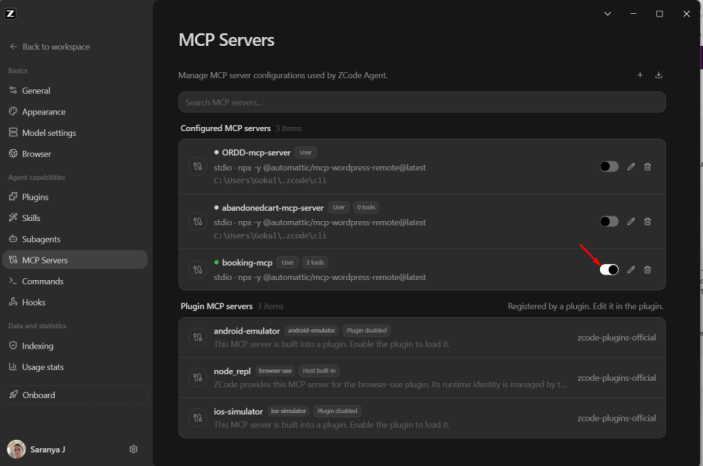
fter restarting ZCode Desktop, the configured MCP server should appear under Configured MCP Servers with the available WordPress MCP tools.
You can now proceed to test the integration.
To confirm that the booking abilities have been registered correctly, start with the following prompt:
Example Prompt: Show me all confirmed bookings scheduled for tomorrow.
Expected AI Response
The AI returns the matching bookings from your WooCommerce store.
9. Connect Using Cursor Desktop
↑ Back to topIf you use Cursor Desktop as your AI assistant, you can connect it to your WooCommerce store by adding the WordPress MCP server. Once connected, Cursor can securely access the AI abilities provided by the Booking & Appointment Plugin, allowing you to retrieve booking information and perform supported booking management tasks using natural language.
To configure the connection:
- Open Cursor Desktop.
- Navigate to Settings → Tools & MCPs.
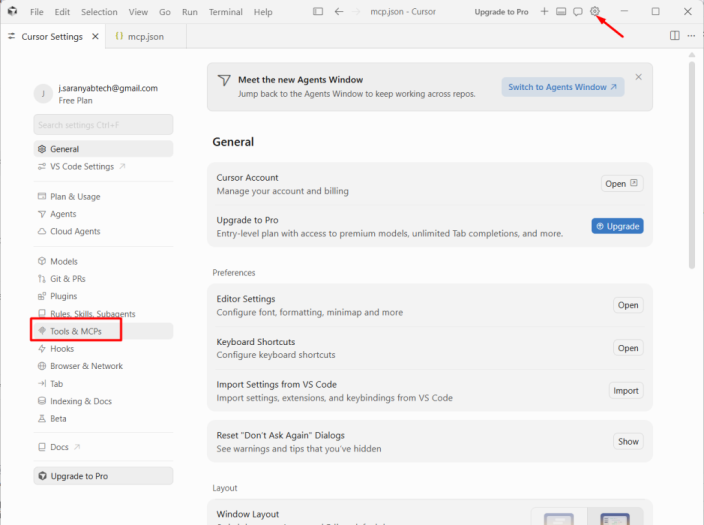
- Under Installed MCP Servers, click + New MCP Server.
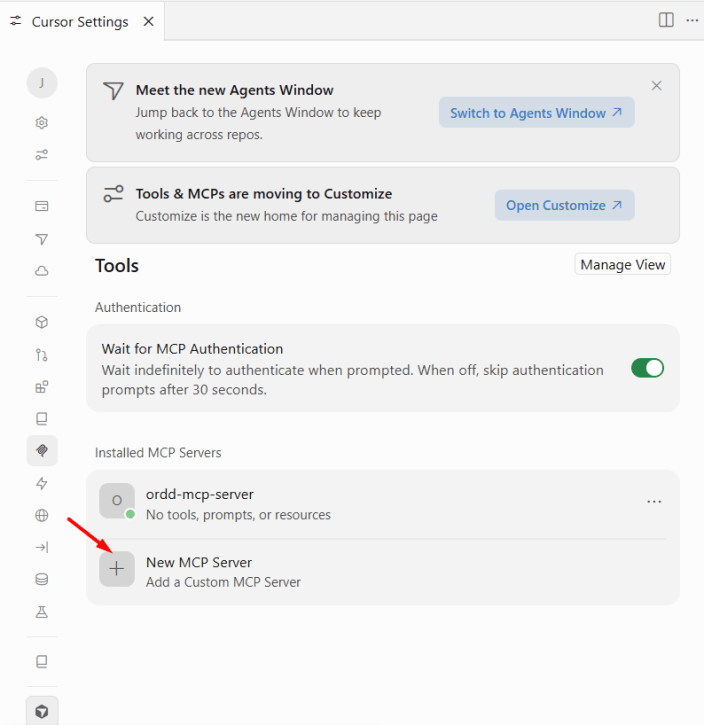
- Cursor opens the mcp.json configuration file. Add the WordPress MCP server configuration.
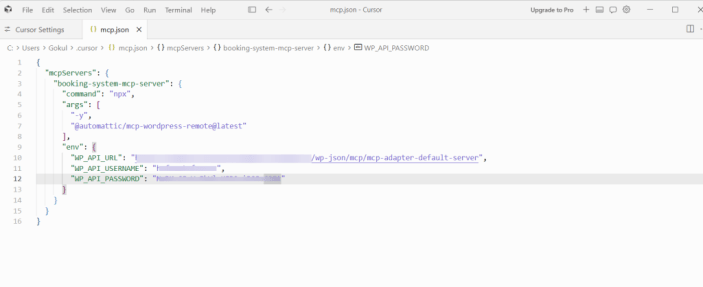
- Replace the following placeholders with your own values:
- WP_API_URL – Your WordPress MCP endpoint (for example,
https://your-store.com/wp-json/mcp/mcp-adapter-default-server) - WP_API_USERNAME – Your WordPress username.
- WP_API_PASSWORD – The WordPress Application Password you generated earlier.
- Save the mcp.json file.
After saving the configuration, the MCP server appears under Installed MCP Servers.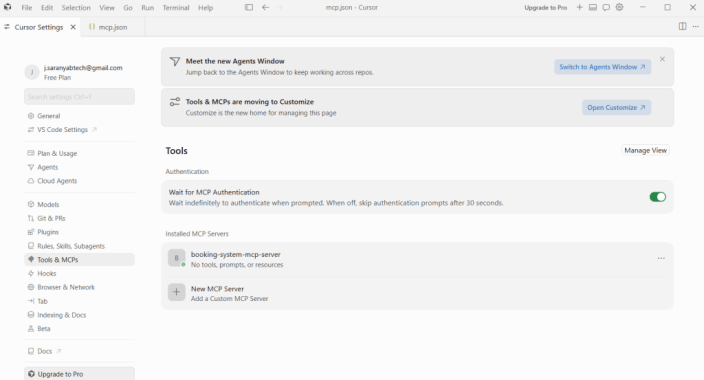
You can now proceed to test the integration.
Example Prompt: Which of my services generated the most booking revenue this month?
Expected AI Response
The AI ranks services by booking revenue for the selected period and displays the total bookings and revenue generated by each service.
Your AI client is now connected to your WordPress store through the WordPress MCP server and can securely access the AI abilities registered by the Booking & Appointment Plugin and WooCommerce. You can now use natural language to search bookings, manage availability, reschedule or cancel bookings, export booking data, and analyze booking performance without manually navigating through multiple booking screens and reports.