Now that your Custom Order Status for WooCommerce Pro plugin is installed & activated, you can start creating custom order statuses from the WooCommerce menu.
To access this section, go to:
WooCommerce → Settings → Custom Order Status → Status Manager
The Status Manager displays a list of all order statuses along with their icons, colors, and other details.

1. Add Custom Order Status
↑ Back to topTo add a new custom order status, click on the Add New Order Status as shown below:

Custom Order Status Tool page
On the Custom Order Status Tool page, you will find the settings as below: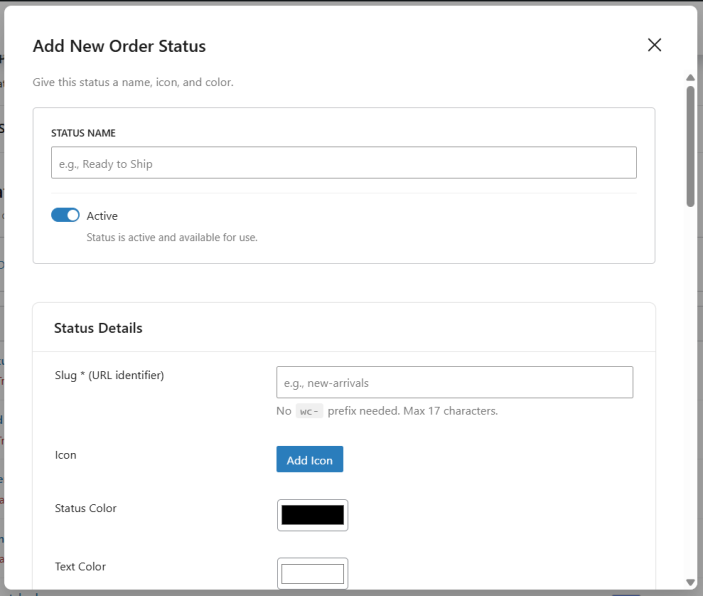


On the Custom Order Status Tool page, you can add a new custom order status, add an icon for representing the order status, and select the appropriate color for distinguishing it from the other order statuses.
Example:
Let’s add a new custom order status named Ready for Dispatch and enter the other details as shown below:

Let us run through each field of the Add Status section:
The label refers to the name given to the status which appears in the Orders list and on all order information. The label given to this status is ‘Ready for Dispatch‘.
1. Slug:
This is added to identify the status, which can be used in the custom code. Typically, it is recommended to add a slug that is a hyphenated version of your status label. Hence have added slug ‘Dispatched’, which will be used as ‘wc-dispatched’.
2. Icon Code:
This allows you to select an appropriate icon for this status, which will be displayed on the Orders page under the Actions column if the “Add custom statuses to admin order list action buttons” setting(found under WooCommerce >> Settings >> Custom Order Status >> General) is enabled.
You can easily select an icon using the built-in Font Awesome icon picker. When clicking on the “Add Icon” button, a popup will appear, allowing you to browse and choose the desired icon visually. This makes it more intuitive to assign icons to custom order statuses.
3. Color:
This color will be used for the status and status icons. The status color selected is blue. This will be displayed under the Status column and Actions column on the Orders page

Display of status icon with the selected color & text color
4. Text Color:
This color is used for the text of the status eg. Ready for Dispatch. The text color of the status selected is white and will be displayed under Status column on the Orders page as shown in the above image.
Once you have entered all the details in the Add Status section, click on Add new custom status button and your new status will be created. This newly created custom order status will be displayed at the bottom of the Status Table as shown below:

Newly added custom order status
As you can see, the newly created custom order status ‘Ready for Dispatch‘ is added to this list at the bottom. It also displays the icon code and colors selected for this status.
Along with this, you also have access to two different settings:
Stock / Inventories Settings

Update stock levels setting
This setting allows you to control how stock levels are adjusted when an order moves to a custom order status.
Let’s say that you have decided to go with the ‘Increase Stock level’ option for the new custom order status ‘Ready for Dispatch‘ as shown here:

Enabling the Update stock levels setting
When an order status changes from Processing to Ready for Dispatch, the stock for the products in that order will be increased. A note will also be added to the order indicating that the stock level has been updated.

Order status being changed and note being added
Please Note: It will increase the stock levels only if the stock level was decreased before changing the order status to the custom order status. This will function similarly to the “Cancel” status.
Just like this, if the option Decrease Stock level is selected, then the order status is changed to the custom order status will decrease the stock level for the products present in that order.
Please Note: It will decrease the stock levels only if the stock level was not decreased before changing the order status to the custom order status. This will function similarly to the “Processing” or “On Hold” statuses.
Make Custom Order Status paid
When the ” Mark as paid ” option is enabled, the orders with custom order statuses will be considered as Paid orders. At present, statuses like Processing and Completed are considered as Paid.

Make custom order status paid setting
For example, if this option is enabled for a custom status “Shipped”, then when an order status changes to Shipped, it will be marked as Paid, and a payment date will be added to the order. You will also see that the order now displays that it has been paid on 04/11/2026, as shown here: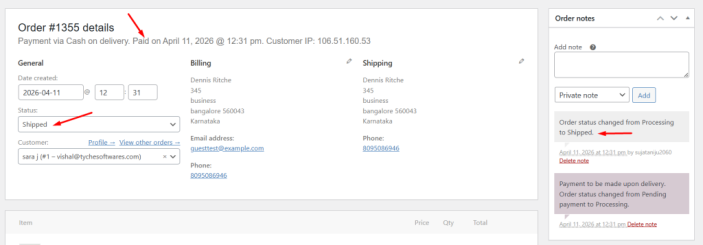
If you scroll below, you will also find that the order is no longer editable now:

Order no longer being editable
User can cancel
Enabling this setting will let your customers cancel the order if a particular custom order status is applied to their order.

User can cancel setting
Let’s say this option is enabled for the custom order status “Awaiting Confirmation”. When a customer’s order is placed, they can see it by going to My Account > Orders Page. In this case, the order number for the order placed is #132. Its status is ‘On hold’ at the moment. Also, the Actions available right now for the customer are simply ‘View’ which means that they can view the details of the order.

Customer’s Account Page
Once the Admin changes the status to a custom order status, in this case, it is changed to ‘Awaiting Confirmation, the customer will get a ‘Cancel’ button:

Cancel option available on the Account page of the customer
The Cancel button is not available for other orders because these orders have not been changed to the custom order status ‘Awaiting Confirmation”’.
Once your customer clicks the Cancel button, the following banner will be notified to them:

Order cancelation banner
This means that they have successfully canceled their order.
Thus, the canceled order will be reflected for the admin under the WooCommerce Orders Page as shown here:

Order canceled on WooCommerce Orders Page
2. Edit Custom Order Status
↑ Back to topOnce a custom order status is created, you can edit it anytime from the Status Table by clicking the Edit button.

This will open the Edit Status page, where you can update details such as:
- Label
- Slug
- Icon
- Colors
Example:
So if you want to edit this newly created order status – Ready for Dispatch, click on the Edit button of this status and you will be taken to the Edit Status section as shown below:

Edit Status section
Now you can edit the details as per the requirements and click Update to save them.
3. Delete Custom Order Status
↑ Back to topAs the name suggests, Delete option will allow you to delete the newly created custom order statuses. There are 2 options under this:
- Delete
- Delete with fallback
Let us discuss these 2 options separately for better understanding.
Delete
Consider the same example of status – Awaiting Confirmation. Say you wish to delete this custom order status forever. So go to the Status Table and under the ‘Awaiting Confirmation’ status, click on the Trash button.

Deleting the custom status order
Once, you clicked on it, this status will get deleted from the Status Table.
Remember, if you choose to delete the custom status, then the orders with the deleted custom status will also get deleted. This means orders that had order status as Awaiting Confirmation will get deleted. If you wish to delete only status but not the orders associated with it, then select the Delete with fallback option instead.
Delete with fallback
This is another option for deleting the custom order status. When you select Delete with fallback option, the status will get deleted and all the orders with the deleted status will change to the fallback status. Here fallback status refers to a status which the admin has added in the settings which takes effect when the custom status is deleted.
Let us consider the above example and understand this option in detail.
Firstly, you need to add the fallback status in the settings which will be considered when the custom status is deleted. Go to WooCommerce -> Settings -> Custom Order Status -> Settings, and add the fallback status as On Hold in the Fallback delete order status field as shown below:

Fallback status selected as Processing
So now when you select Delete with fallback option for Awaiting Confirmation status, all the orders with status Dispatched will change to status On Hold. This will have effect on the Orders page in the backend as well as in the Orders section on the customer’s side.
This is how you can create, edit, and manage custom order statuses in your WooCommerce store.
However, creating statuses is just the first step. To fully automate your order workflow, you can define rules that automatically update order statuses based on specific conditions such as status transitions, time delays, and order-based filters like products, payment methods, or customer details.
Learn how to automate this in Set Custom Order Status Rules.ed on the customer side.