Gravity Forms & Gravity Forms Product Addons
↑ Back to topYour Booking and Appointment Plugin for WooCommerce is now compatible with WooCommerce – Gravity Forms Product Addons and Woocommerce Product Addons.
Additionally, it now supports Grouped Products for multiple-night bookings.
Gravity Forms, known for its versatility and ease of use, is widely used.
Recognizing its popularity, seamless integration with your Booking and Appointment Plugin for WooCommerce has been ensured in the latest release, featuring a refined code base.

Let’s explore leveraging the powerful WooCommerce Gravity Forms Product Add-Ons and the Booking and Appointment Plugin to enhance your booking experience.
A) Admin Settings
↑ Back to topYou need first to create forms based on the documentation available at gravityforms.com and woocommerce.com.
Install Gravity Forms and the WooCommerce – Gravity Forms Product Add-Ons plugins.
Create the forms from the Gravity Forms menu from the admin side:
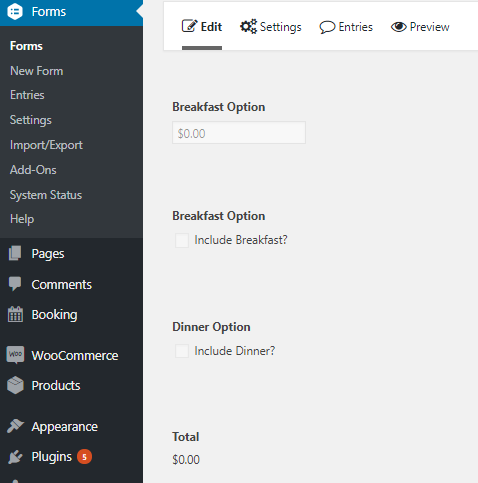
Form created from Gravity Forms menu
From the Add/Edit Products page, set your booking settings.
For instance, go to the Booking meta box and enable the Booking Type as Multiple Nights.
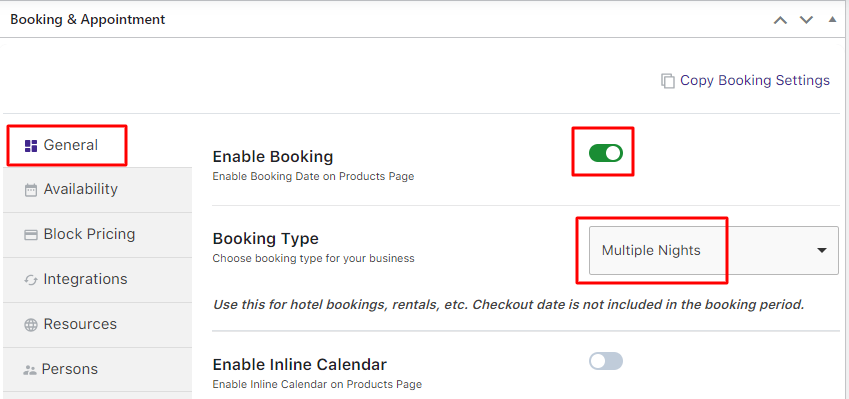
Enabling Multiple Nights booking option
Go to the Availability tab and add the settings to make the product bookable for all Weekdays and restrict maximum bookings for a particular day as shown below:
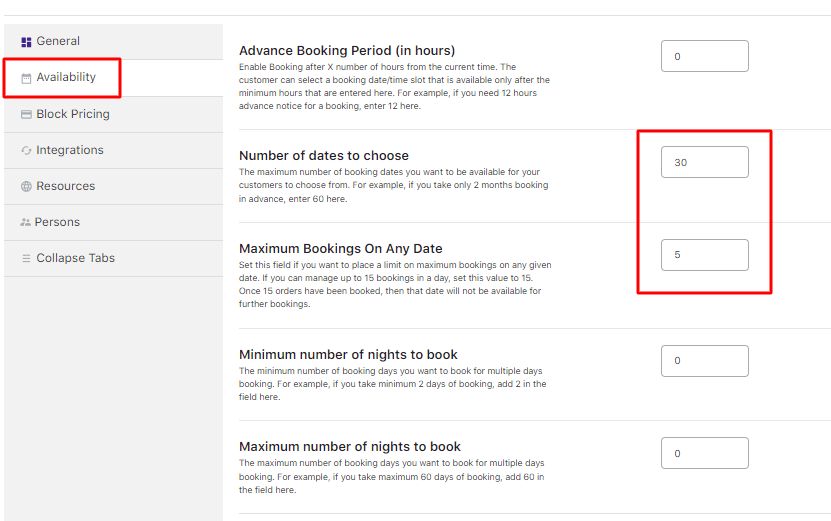
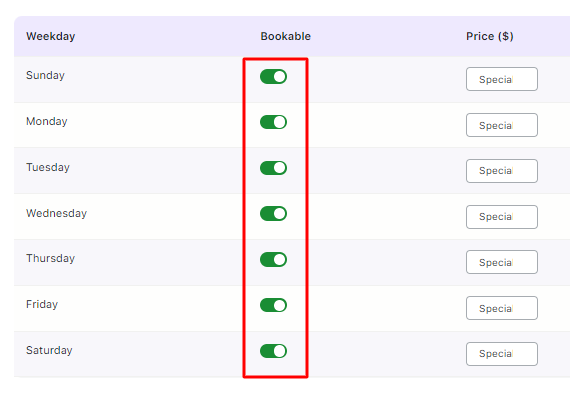
Multiple Nights booking settings added for the product
Select the name of the form that needs to be included in the product from the WooCommerce Gravity Forms Product Add-Ons meta box.
Once the form is selected, you can configure the settings like hiding the WooCommerce price, changing the Subtotal, etc.
You will need to click on the Update button to save the settings.
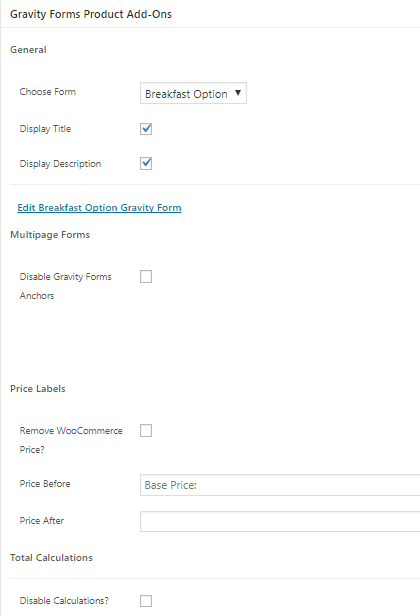
Gravity Forms Product Add-On’s Meta Box
And that’s all you would need to do to set it up.
b) Frontend
↑ Back to topThe Gravity Forms plugin is compatible with all kinds of booking types.
For each booking type, the amount from the Gravity Forms will be added to the booking price.
i) Multiple Nights bookings
For Multiple Nights products, the amount from the Gravity Forms settings will be added for the number of days selected for booking.
For instance, your customer books a hotel room for 2 days from 29th December to 31st December 2017. The Per day stay costs $500/night.
You have a form that helps them add breakfast and lunch for $15 and $20 respectively.
The amount will be: $500* 2 days = $1000.
For breakfast and lunch + $35 will be added.
Thus, the total amount payable would be $1035 for 2 nights stay including breakfast and Dinner as shown below:
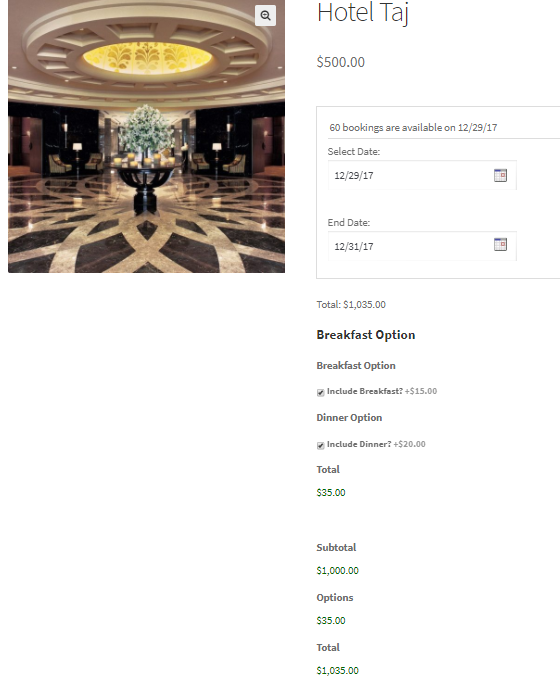
Multiple Nights booking using Gravity Forms
The amount for breakfast and lunch was taken as a one-time payment for the entire stay.
However, if you want to charge the customer for breakfast and lunch on a per-day basis, there is an option to calculate the additional amount.
Go to WooCommerce > Bookings & Appointment > Settings > Global as shown below:

Global Booking Settings page
Go to Additional Chagres -for Multiple Nights Bookings dropdown.
Enable the Charge WooCommerce Gravity Forms Product Addons options on a Per Day Basis option.
Click the Save Settings button as shown below:
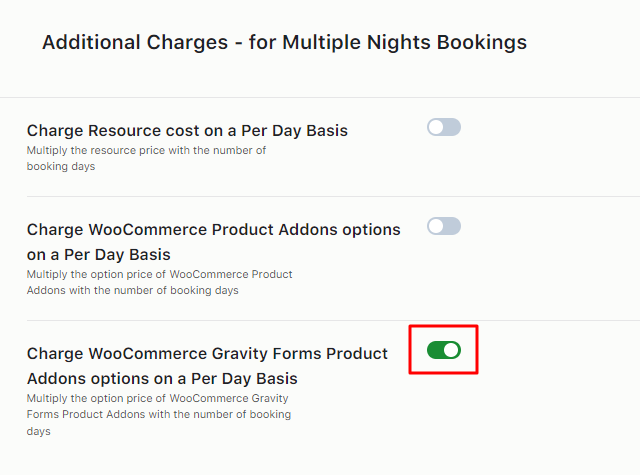
Enabling the option on the Global Booking Settings page
This ensures that the price added to the WooCommerce Gravity Forms Product Addons will be multiplied by the total number of booking days for the Multiple Nights Booking option.
Let’s take the instance of making a booking for Hotel Langkawi for the dates 24th December 2017 to 26th December 2017.
You have selected breakfast and dinner options so your additional amount on top of the actual stay amount will be:
($15 + $20 = $30) x 2 = $70.
Thus, the amount calculated is on a per-day basis.
The total amount payable for the entire stay is $500 for the hotel stay + $70 for 2 days of breakfast and dinner.
The total then becomes $570.

This is how the Gravity Forms plugin works for Multiple-Night bookings.
Similarly, let’s see how it works for Single Day Bookings and Date & Time Bookings as shown below:
ii) Single Day bookings

Gravity Forms with single-day booking setting
Here you can see that the Vineyard Visit is booked for 21st December 2017, in the afternoon.
Hence an additional amount of $20 is charged for the visit on top of the actual amount.
The total amount payable as shown above is $220.
The Gravity Forms – Travelling Fare has been used for this instance.
iii) Date & Time bookings
Let’s see how Date & Time Bookings work with Gravity Forms – Visit Type.
For specific visit types, an additional amount of $15 needs to be paid.
The selected date for visiting the dentist is 22nd December 2017 with a slot of 8 am to 8.30 am.
The First Visit option has been selected hence you will be charged $15 additional to the actual amount.
The calculation will be $20 + $15 =$35.

Gravity Forms with the date and time slot booking setting
Therefore the total amount payable is $35 as shown above.
You can make forms with different options from the Pricing category including all price options.
You can many variations in the forms with the Booking and Appointment Plugin for WooCommerce.

Form structure
Using the Booking and Appointment Plugin for WooCommerce, Gravity Forms, and WooCommerce – Gravity Forms Product Add-Ons plugins, you can easily set up bookings with extra options for WooCommerce products.
WooCommerce Product Addon
↑ Back to topToday, let’s dive into how the WooCommerce Product Addons integrate with the Booking and Appointment Plugin for WooCommerce to enhance your online booking experience.
To get started, you need to create a versatile form that can be used for any product. This form will streamline the booking process and provide your customers with a smooth, intuitive experience.
This is done in 2 ways: using the Global Add-On or Product Add-ons from the Product Meta box.
For instance, the below Travelling Fare form is created by going to the Edit Product Page > Add-ons tab in the Product Meta box.

Form created using Add-ons from Product Meta box
Continue creating a product according to your requirements.
For instance, Enable booking from the General Tab of the Booking meta box.
Select Single Day as your booking type and click the Save Settings button.
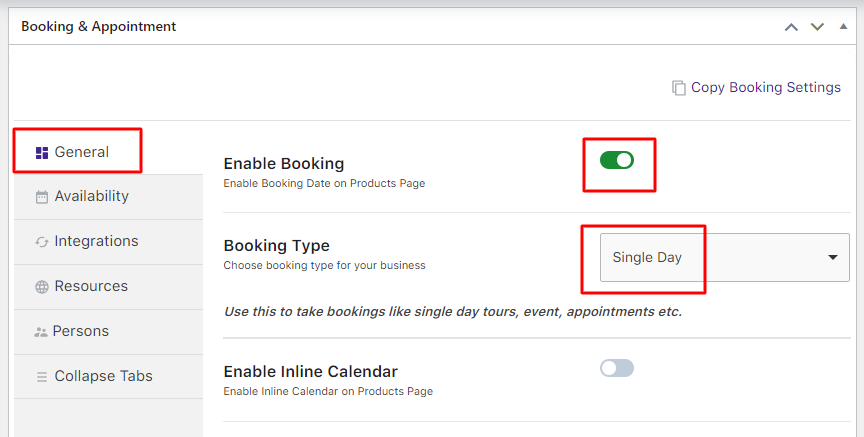
Enabling a Single Day booking option
Go to the Availability tab and enable the booking for all Weekdays as shown below:
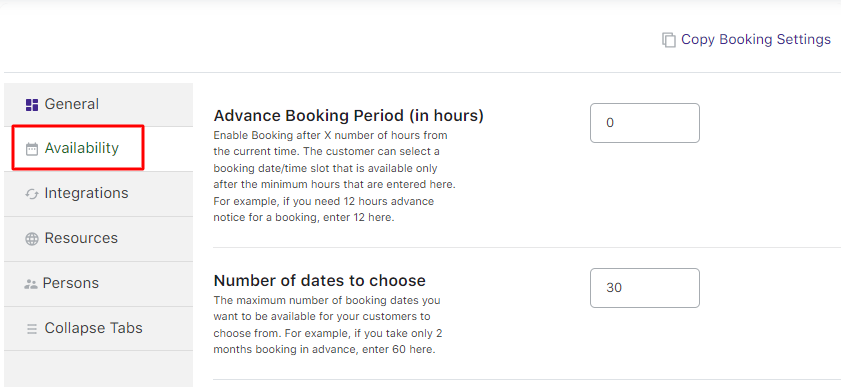
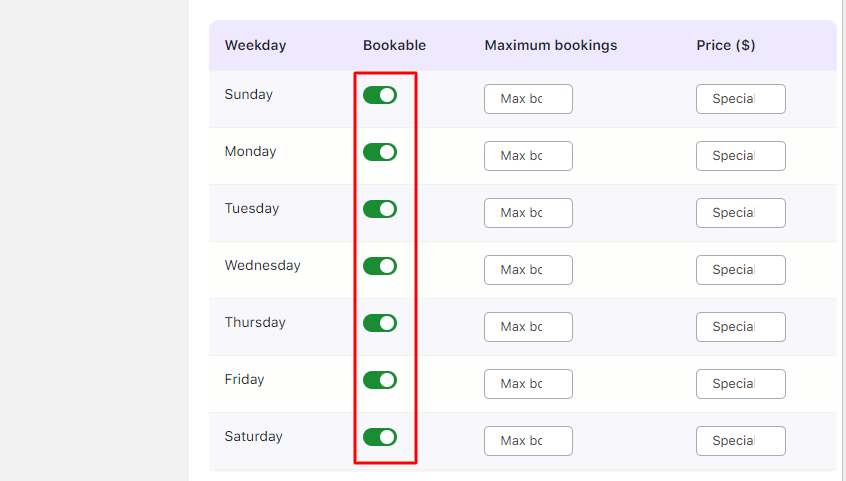
Single Day booking settings added for the product
Publish the product. The created form will be available on the front end when the customer books a visit to Vineyard.
b) Frontend
↑ Back to topThe WooCommerce Product Add-ons works with different booking types such as Single Day booking, Single Day with Time Slot booking, and Multiple Nights booking.
For each booking type, the Product Add-on amount will be added to the booking price.
i) Single Day bookings
In the below instance, the WooCommerce Product Add-Ons Form – Travelling Fare has been used.
Here you can see that the Vineyard Visit is booked for 28th December, 2017 in the afternoon.
Hence, an additional $20 is charged for the visit on top of the actual amount.
So the total amount payable as shown above is $220.

WooCommerce Product Add-on form with single-day booking setting
ii) Date & Time bookings
In the below instance, the Date & Time Booking Type uses the WooCommerce Product Add-Ons Form – Visit Type.
As you can notice, an additional amount must be paid for a specific visit type.
In this case, the customer has selected the date 23rd December 2017 with a slot of 8 am to 8.30 am to visit the dentist.
They have also chosen the Follow Up option.
Hence the customer will be charged $15 additional to the actual amount ($20 + $15 =$35).
Therefore the total amount payable is $35 as shown above.

WooCommerce Product Add-on form with date and time slot booking setting
iii) Multiple Nights booking
For Multiple Nights products, the amount from the WooCommerce Product Add-ons settings will be added for the number of days selected for booking.
So if you book a hotel room for 2 days from 24th December to 26th December 2017, you will have a form that helps you add breakfast and lunch.
If availed, then the calculation will be as follows:
Per day Stay = $250/night.
Breakfast = $20
Lunch = $30
Total amount:
= $250* 2 days
= $500 + $50 for breakfast and lunch
= $550 for 2 days stay
Similarly, this works for other booking types too.

Hotel booking with multiple days booking
Calculating the additional amount for breakfast and lunch on a per-day basis is also possible.
Go to WooCommerce > Bookings & Appointment > Settings > Global as shown below:

Global Booking Settings page
Find the Additional Charges – for Multiple Nights Bookings dropdown.
Enable the option Charge WooCommerce Product Addons options on a Per Day Basis and click the Save Settings:
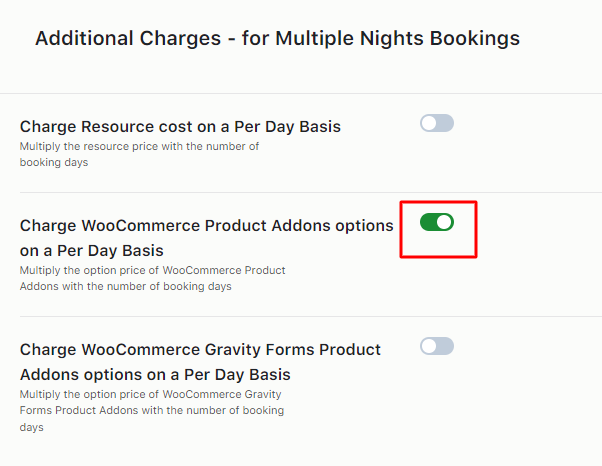
Enabling the option on the Global Booking Settings page
This ensures that the price added to the WooCommerce Product Addons form will be multiplied by the total number of booking days for the Multiple Nights Booking option.
To conclude, you’ve seen how effortlessly you can create a form using the WooCommerce Product Add-Ons after installing it.
Integrating this plugin with the Booking and Appointment Plugin for Woocommerce allows you to offer variations and additional options like meal choices, travel fares, or doctor’s visits with your bookable products, enhancing user experience and boosting your revenue potential.
WordPress Multilingual Plugin – WPML
↑ Back to topIntegrating the Booking and Appointment for WooCommerce Plugin with the WPML plugin can let your booking store offer its services in the language of your customers.
For this, you will need the WPML Multilingual CMS. You will also get the following add-ons with your purchase:
WooCommerce Multilingual
WPML Media
WPML String Translation
To set up WPML, you will require all the plugins as mentioned earlier.
B. WooCommerce Multilingual Set up
D. Syncing Booking Details For Different Languages
A. WPML Setup
↑ Back to topWhile activating each plugin, you will get the following notice showing which plugins will be needed to complete the setup:

Once the plugins are activated, you will need to run the setup.

- Select the language of your existing content
- Select the language in which you want your content to be translated
- Select the language switcher
- Register your site to finish the setup and for future update notifications
You will need to add your website on wpml.org and generate a secret key, to complete the setup:

Generate the key after adding the website URL where you are set WPML.
Paste the secret key on your website.
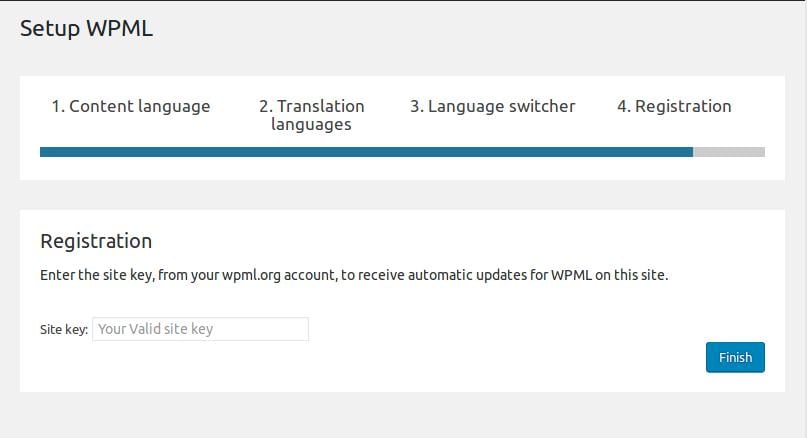
After registering your site, Run the Setup for Media.
The Media translation will duplicate all your existing media files in the selected language.
All the media files for new content will also be duplicated.

B. WooCommerce Multilingual Set up
↑ Back to topTo set up WooCommerce Multilingual, run the WooCommerce Multilingual Setup Wizard from the notice displayed below:

Step 1:

Step 2:

Step 3:

Step 4:

Step 5:

There are a few more steps that you need to perform To make your e-commerce store multilingual follow the other steps that need to be performed from here: Advance setup for WooCommerce Multilingual
C. Translating Plugin Strings
↑ Back to topActivate the plugin you want to translate.
In this case, it will be the Booking and Appointment plugin for WooCommerce.
On activating the plugin, you will find a button asking if you want to scan the translatable strings from the plugin.
On clicking the ‘Scan now’ button, you will be taken to the ‘Theme and Plugins localization’ page.

Note: Under ‘Select how to translate strings in the theme and plugins’ set it to ‘Translate the theme and plugins using WPML’s String Translation and load .mo files as backup.’
As the setting says, it will load the .mo files as a backup.

Now select your plugin and scan the strings.
You can also scan your plugin from the ‘Theme and Plugins localization’ page’s strings in the Plugins section.

1. Translating the strings
Translate the strings of the plugin by clicking on the ‘View strings that need translation’ button.
You can even find all the strings from the String Translation menu page.

You will then be taken to the String Translation page.

Select the string and add the translated string.
Select the ‘Translation is complete’ checkbox, and save the translation.

You can check the translated strings of the plugin (Bookable product) on the product page.
2. Translating WooCommerce products
Go to your WooCommerce Product and select the Duplicate checkbox under the Language meta box:
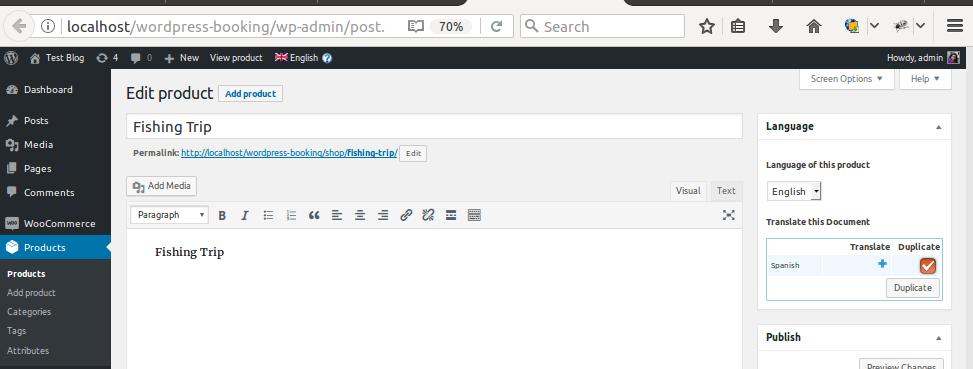
This will generate a duplicate product in the selected language with all the settings from the existing product.
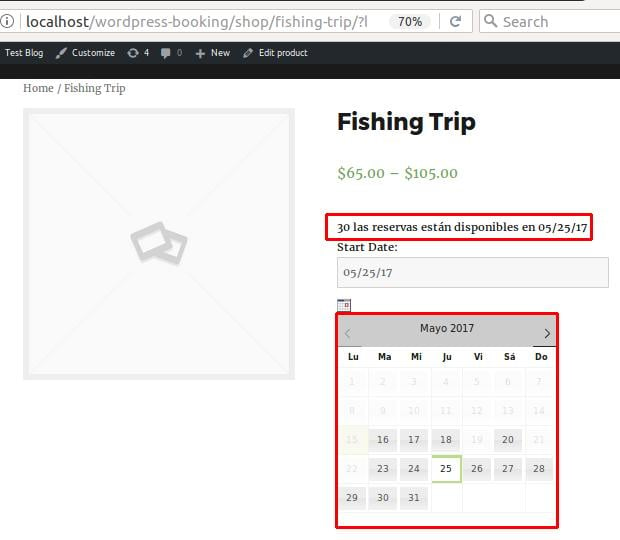
Note: Here the booking calendar also gets translated into the selected language.
You can also check the content setup for each product under the Multilingual Content Setup on the Edit Product page.

D. Syncing Booking Details For Different Languages
↑ Back to topSo far, products have been translated and displayed in different languages on the front end.
It is also important that the selected booking settings for all added products in English get synced for the same products in different languages.
Let’s say that a customer adds bookings for a specific period.
Another customer selects the same product in a different language.
The availability of this product will be displayed considering the booking made by the previous customer.
For instance, a booking for Hotel Country Inn for 10 days from 22nd December 2017 to 1st January 2018 was made.
The total bookings are set to 10 bookings.
This booking is set for the product Hotel Country Inn in the English language as shown below:

Adding booking details for products in the English language
This product has been booked for a maximum number of days and is in English.
Now if a customer selects the same product in the French language for the same specified dates, then the booking calendar will show that these dates are booked as shown below:

The same product in the French language shows as unavailable for booking
As you can see, the same product Hotel Country Inn, when selected in French, shows the dates 22nd December 2017 to 31st December 2017 disabled.
When you mouse hover over the dates, it shows a message Unavailable for booking as Indisponible pour réservation.
Thus this implies that the Bookings of the products are synced with different languages to avoid over-booking hassles.
E. WooCommerce Multi-currency
↑ Back to topFind the settings under WooCommerce > WooCommerce Multilingual menu page > Multi-currency tab.
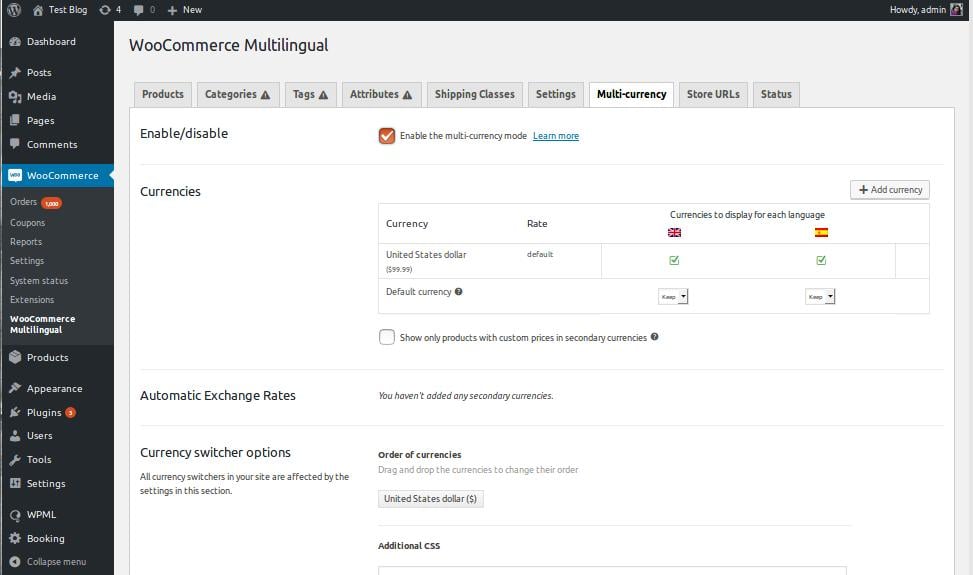
To set Currency, click the Add currency button:

Select your currency and configure other settings:
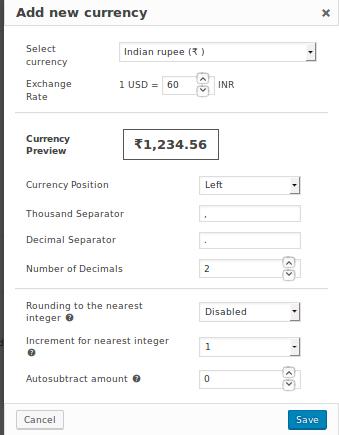
You can let the product calculate the price in another currency automatically.
This means it will take the conversion rate of the selected currency from the global setup.
The other option is setting the conversion rate for each product manually.
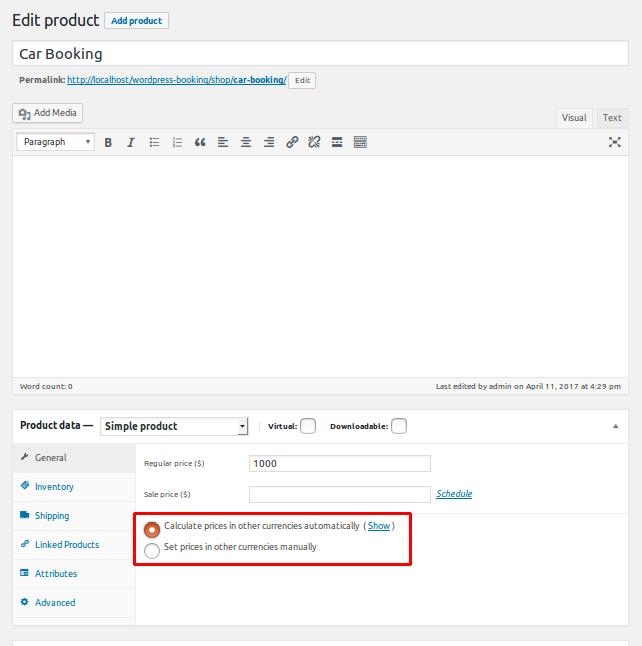
You can see the multi-currency functionality changes on the product page.
WPML Partners
↑ Back to topIn January 2016, the Booking and Appointment for WooCommerce plugin officially became compatible with WPML.
WPML plugins enable your WooCommerce shop to be available in multiple languages. The Booking and Appointment for WooCommerce plugin transforms your WooCommerce shop into a full-fledged Booking platform.
A. Using the WooCommerce Booking and Appointment Plugin with WPML
↑ Back to topInstall and activate WooCommerce Booking and Appointment plugin.
Install and activate the WooCommerce Multilingual, WPML Media, WPML Multilingual CMS, WPML String Translation, and WPML Translation Management plugins from WPML.
Find the “WPML” menu listed on your admin dashboard. Under this menu, find the “String Translations” sub-menu.
In the process of detecting the strings from our WooCommerce Booking andAppointment plugin, you will need to do the following:
Set ‘Translate the theme and plugins using WPML’s String Translation’ under the ‘Select how to translate strings’ in the Theme and plugins. This can be found under the Theme and Plugins localization menu.
Under the Theme and Plugins localization page, select the ‘WooCommerce Booking and Appointment plugin’ from the ‘Strings in the plugins’ listing. Rescan the selected plugins for strings.
The Strings in the plugins will allow you to see all the domains related to the Booking and Appointment plugin under the Strings Translation page.
However, WPML can scan strings from the Booking and Appointment plugin automatically from the .po file available in the plugin.
Under the “String Translations” menu you can search for the strings of the WooCommerce Booking and Appointment plugin by using the filter “Select strings within domain”.
Select the below-mentioned options to view all the strings from our plugin:
admin_texts_book.date-label
admin_texts_book.ics-file-name
admin_texts_book.item-cart-date
admin_texts_book.item-cart-date
admin_texts_book.item-cart-time
admin_texts_book.item-meta-date
admin_texts_book.item-meta-time
admin_texts_book.time-label
admin_texts_book.time-select-option
bkap_block_booking
bkap_block_booking_price
bkap_special_booking_price
woocommerce-booking
woocommerce_booking
You can add translations for each string on the String Translation page. You can assign them to a translator to translate the strings into your desired language.
B. How to translate a bookable product into different languages?
When you create a new product with all its information and booking settings, you will find a “Language” meta box added to the WooCommerce product page from WPML.
Here all the languages you have selected for translations under the WPML > Languages menu will be listed along with two options “Translate” and “Duplicate”.
For translating the product into your desired language, select the Duplicate checkbox next to the languages you want to translate the product to.
Language meta box on Add/Edit Products page:
Note: Do not click the ‘+’ sign to translate the product. It will create the translated product but won’t copy the booking settings to the translated product.
Once the Duplicate checkbox is ticked, a Duplicate button will be displayed.
Clicking on it will reload the product page. the product will be duplicated in all the selected languages Along with the product information & booking settings set in the default language of the WooCommerce product.
Language meta box on the Edit Products page after duplicating the product:
After the products are translated, the Products page will list the languages the product is translated into.
Additionally, you can filter the products by language.
You can check the front end of the product in the translated language by switching to another language using the language switcher. You can set the language switcher position from the WPML -> Languages menu in the admin dashboard.
Frontend Product page in the default (English) language
Frontend Product page in the translated (Spanish) language.
C. How to Edit the Booking settings after the product is translated into other languages?
↑ Back to topUsing this, you can make any changes in the booking settings after the product has been duplicated into other languages.
When changes are made to the product in the default language, they will be copied into the product in other languages.
For instance, if you want to change the Number of days to choose from 30 (default value) to say 60 days after you have duplicated the product in the Spanish language, you would need to change this setting in the product in the default language, which is English.
Making the changes in the product in the English language will make the changes in the products in other languages. In this case, it is Spanish, French, and Dutch.
D. How to use Multiple Currencies with the WooCommerce Booking and Appointment plugin?
↑ Back to topWPML provides a “Manage Currencies” option. It allows you to sell your product in multiple currencies.
You will find it under the WooCommerce Multilingual -> General Options menu.
The WooCommerce Booking and Appointment plugin also works with the different currencies set using this option. The converted price will be displayed according to the user-selected currency on the product page.
WPML – Multiple currencies with WooCommerce Booking and Appointment plugin
Bookings availability with translated products:
If the product is available in different languages, the total availability for a date will be common over all the products in different languages.
Let’s say that there are 20 bookings available for a date. There are 5 orders placed using the Spanish language and 10 orders placed using the English language on 14th February 2016.
In such a case, there will be 5 more bookings available for 14th February 2016, irrespective of the language used to place the order.
To conclude, setting up WPML and WooCommerce Multilingual is quite easy and quick. Benefit from translating your Booking and Appointment plugin to attract more customers!
Lastly, it gives us immense pleasure to share that we’re WPML Partners!
WooCommerce Product Bundles
↑ Back to topDiscover the versatility of the Booking and Appointment Plugin for WooCommerce, now compatible with Bundled Products.. Easily create bundled products to enhance your booking scenarios. Seamlessly offer variations and additional options like meals, travel fares, or doctor’s visits.
A. Adding Bundled Products
↑ Back to topBundled Products are a fantastic way to group related items into a single package, creating product kits that boost your sales and enhance your marketing efforts. Offering these bundles at a discounted price can attract more customers and increase overall sales.
To get started with creating Bundled Products, follow these simple steps:
Install the WooCommerce Product Bundles plugin.
Once activated, you’ll see a new “Product Bundle” option in the Product Type dropdown menu.
This will add a Bundled Products tab in the Product data metabox, allowing you to easily create and customize your product bundles.

The bundled products tab and Product bundle option being added to Product page
B. Admin Side
↑ Back to topLet’s create a Bundled Product Cricket Kit with its child products Cricket Bat, Leather Cricket Ball, and Cricket Helmet which are Simple products.
First, create the simple products Cricket Bat, Leather Cricket Ball, and Cricket Helmet using the Booking type Multiple Nights.
Next, create the Cricket Kit product with the same Booking type – Multiple Nights, as its child products.
Note: All the products in the bundle must have the same booking type settings to run the setup smoothly.
While creating the Cricket Kit, select Product Bundle from the Product Data dropdown.
Click the Bundled Products tab on the left to display the section where you can add child products.
You can add child products by entering the names of the products in the Add a bundled product field as shown below:

Adding Leather Cricket Ball product to Cricket Kit
Similarly, add all 3 child products – Cricket Bat, Leather Cricket Ball, and Cricket Helmet to the Bundled Product Cricket Kit.
All the settings added for each of these products are shown below:
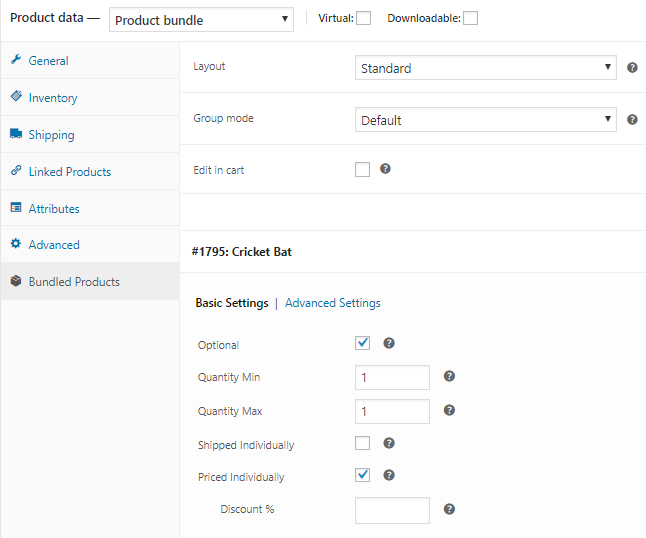
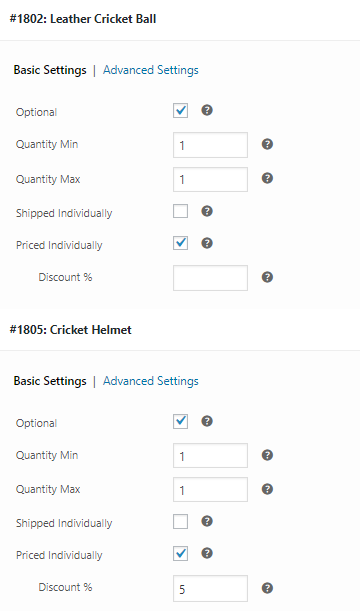
Adding settings to child products
In the above image, the products have been kept as optional to be selected on the front end.
They are also priced individually. This means, their individual prices will be displayed on the front end and added to the total price if the customer selects it.
You can even add a discount to the product shown in the Cricket Helmet product in the above screenshot.
Thus a Bundled product Cricket Bat is ready for your customers.
C. Customer Side
↑ Back to topThis is how your Cricket Kit bundled product will look on the front end when the customer visits your store:

Products displayed on the front end
The 3 related child products of Cricket Kit which were added, are displayed along with their individual prices.
The Cricket Helmet product has a 5% discount on it. Hence it shows a discounted price in the above image.
Let’s select the product Cricket Helmet and booking dates from 29th December to 31st December 2017.
The Add to Cart button gets enabled after adding your dates:

Add booking details to the product
When you click the Add to Cart button, the order is added to your cart.
Clicking the View Cart button will redirect you to the Cart page which will show the booking details as shown below:

Cart page showing booking details
Here you can click on the Proceed to Checkout button.
The Checkout page will give you a preview of the actual order.
Please ensure you check everything and then click on the Place Order button.

Checkout page displaying the renting details
Your order is now placed and you will receive an order confirmation as shown below:

Order confirmation showing all renting details
Once these steps are completed, you can view your bookings in the Booking section on the View Bookings page as shown below:
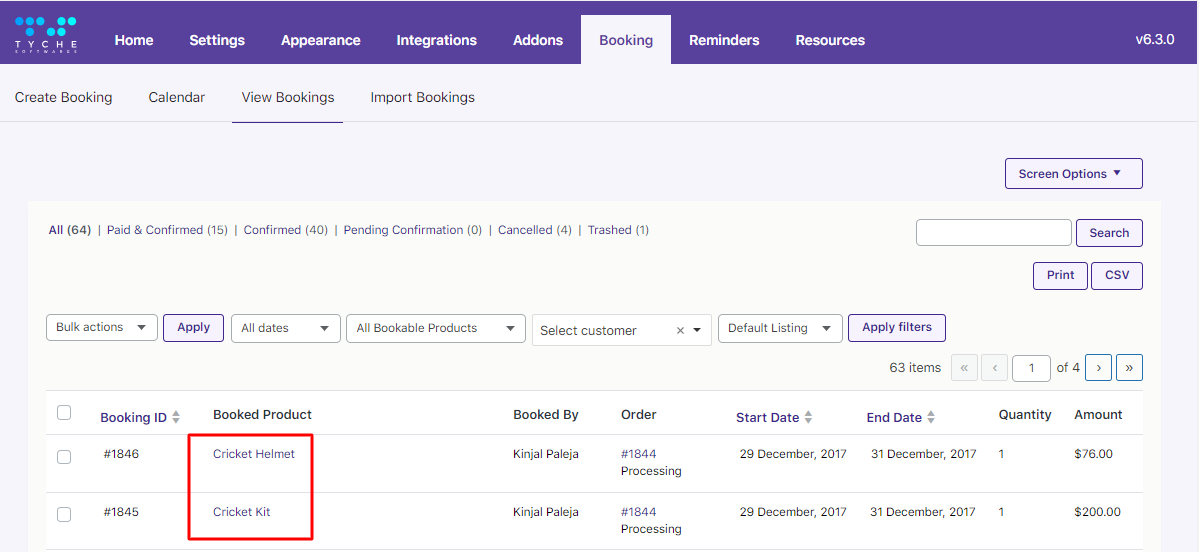
Booked product details are displayed on the View Bookings page
As you can notice, there are 2 bookings created here as 2 products were booked within the same order.
The Cricket Kit is worth $200 and the Cricket Helmet worth $76 were processed separately with 2 booking IDs with a total payable amount of $276.
This post highlighted the key steps to creating a Bundled Product making it an effective way to increase sales and reach a broader audience by selling related items as a package.
Don’t wait—start increasing your sales today. Experience the benefits by trying the Booking and Appointment Plugin for WooCommerce.
WooCommerce Composite Products
↑ Back to topThe versatile Booking and Appointment Plugin for WooCommerce works seamlessly with the Woocommerce Composite Products plugin. In this guide, let’s walk you through the setup process for creating Composite Products with it so that you can enhance your product offerings and boost your sales easily!
A. What are Composite Products?
↑ Back to topComposite Products allow you to group simple or variable products into comprehensive product kits and complex items.
This setup involves configuring multiple components, customizing them to fit your needs, and offering discounts to drive sales.
Like Bundled Products, Composite Products are powerful marketing tools to enhance your sales strategy.
B. Creating a Composite product
↑ Back to topInstall the WooCommerce Composite Products plugin.
Once you activate this plugin, the Product data dropdown will show the Composite product option.
After clicking on it, the Components tab will be added to the Product data metabox on the Products page as shown below:

Composite product and Components option added on Product page
Let’s start by creating 2 products – iBall Mouse and Keyboard which will be components of the Composite product Dell Laptop.
Set the booking type of these two products as Single Day.
Now, create a Composite product – a Dell Laptop.
Select the Composite Product option from the Product Data dropdown. Click on the Components tab to add components to the Dell Laptop product.
After clicking the Components tab, you can select the Composite Layout and Add Components by clicking the Add Component button.

Adding products to Dell Laptop composite product
Add iBall Mouse and Keyboard as the components.
You can keep these products optional to be selected on the front end.
You can price them individually too. It would mean that when they are selected, their individual price will be displayed on the front end and added to the total price.
Additionally, you can add a discount to the product as shown in the below:

iBall Mouse component added with all its details

Keyboard component added with all its details
Click on the Save Configuration button to complete adding child products.
Now, it’s time to make this product bookable by adding the booking settings.
Go to the Booking and Appointment meta box > General settings tab > Enable Booking.
Select the Booking type Single Day and click on the Save Settings button.
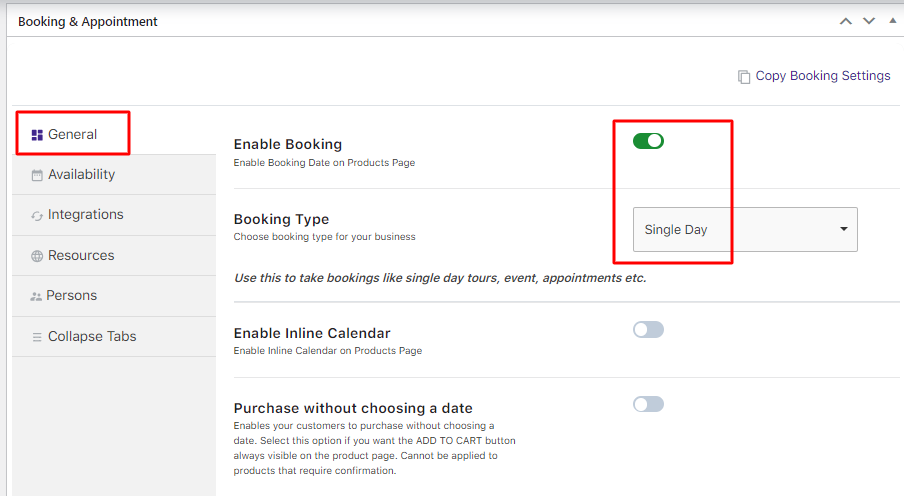
Adding Booking details
Click on the Availability tab and add the settings as shown below.
Click on the Save Settings button once done.
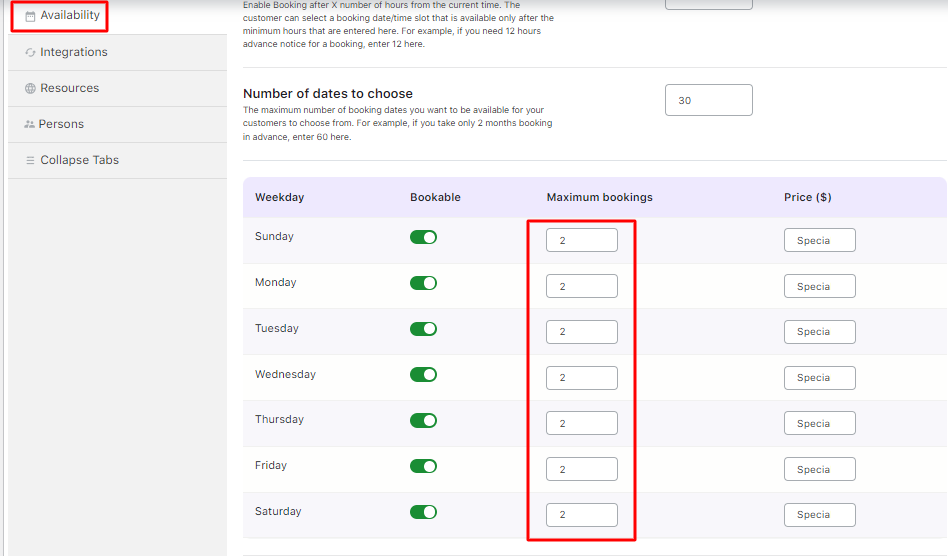
Adding Availability settings
Your Composite product Dell Laptop is ready to go live for your customers!
C. Customer Side
↑ Back to topThis is how your Dell Laptop bundled product will look on the front end when the customer visits your store to book it.


Product displayed on the front end
The 2 component products of the Dell Laptop which were added on the admin side will get displayed along with their individual discounted prices.
Once you have selected components to be booked along with the Dell Laptop, you will have to choose a date for the booking calendar.
Let’s say that the customer selects the date 29th December 2017 as shown below.

Add booking date to the product
The Add to Cart button gets enabled.
When you click this button, the order is added to your cart.
Clicking the View Cart button will redirect you to the Cart page which will show the booking details as shown below:

Cart page showing booking details
Click on the Proceed to Checkout button to go to the Checkout page which gives you a preview of the actual order.
Please ensure you check everything and then click on the Place Order button.

Checkout page displaying the renting details
Your order is now placed and you will receive an order confirmation as shown below:

Order confirmation showing all renting details
To conclude, this post demonstrates how to easily create a Composite Product, combining related components into a single package, much like Bundled Products.
These compatibility features within our plugin help boost your overall revenue. Seize the opportunity and try the Booking and Appointment Plugin for WooCommerce today!
