Features
↑ Back to top- This will be the new plugin, adding the following features:
- Admin creates rules based on criteria like shipping, user roles, payment gateways, taxes, product attributes, categories, tags, cart settings, and locations.
- The latest rule takes precedence in case of conflicts, ensuring seamless management.
- Front-end fees are applied based on admin-defined rules.
- Empty “Select Product,” “Select Category,” and “Select Tag” fields are considered as ALL options.
- Admin-friendly interface for easy rule creation and management.
- Rules are applied in real-time on the front end.
- Scalable and customizable to accommodate growing rule sets.
- Comprehensive documentation and reliable customer support.
- The plugin is regularly updated for stability and compatibility.
Installation Guide
↑ Back to top- Login to your WordPress Admin panel
- Navigate to the WordPress Admin Dashboard > Plugins >Add New.
Getting Started
↑ Back to topAll Conditional Fee Rules
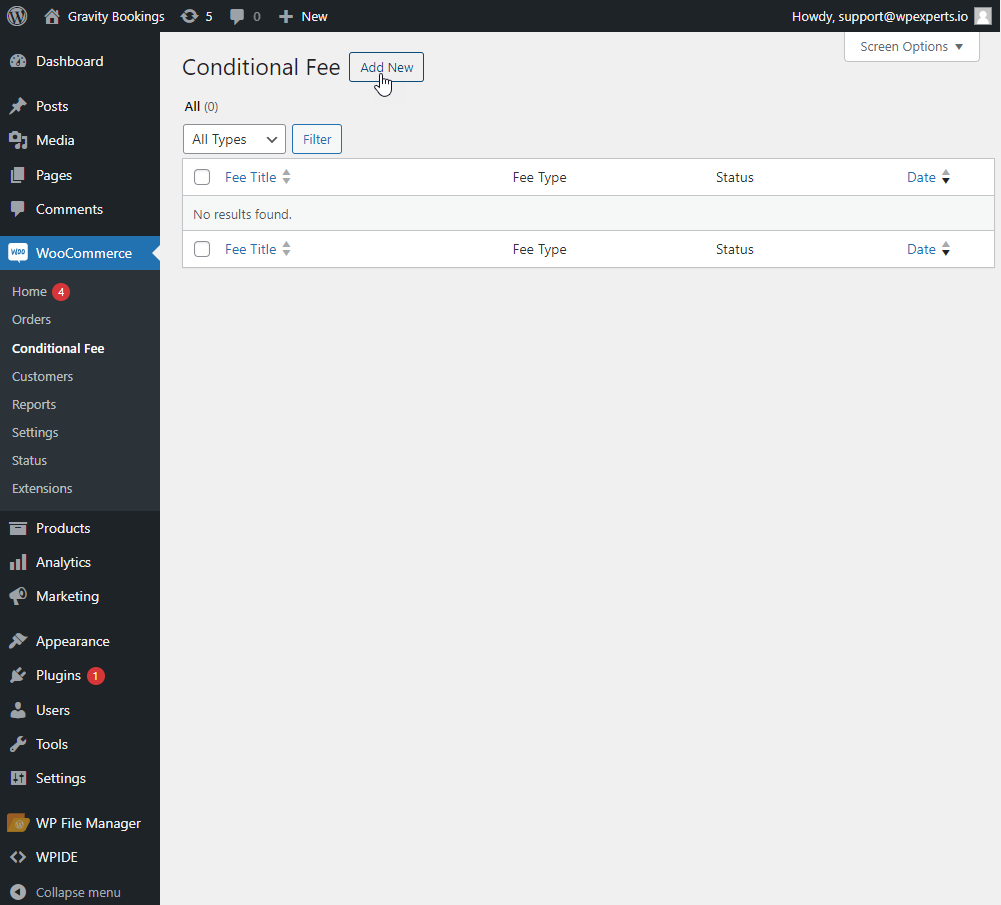
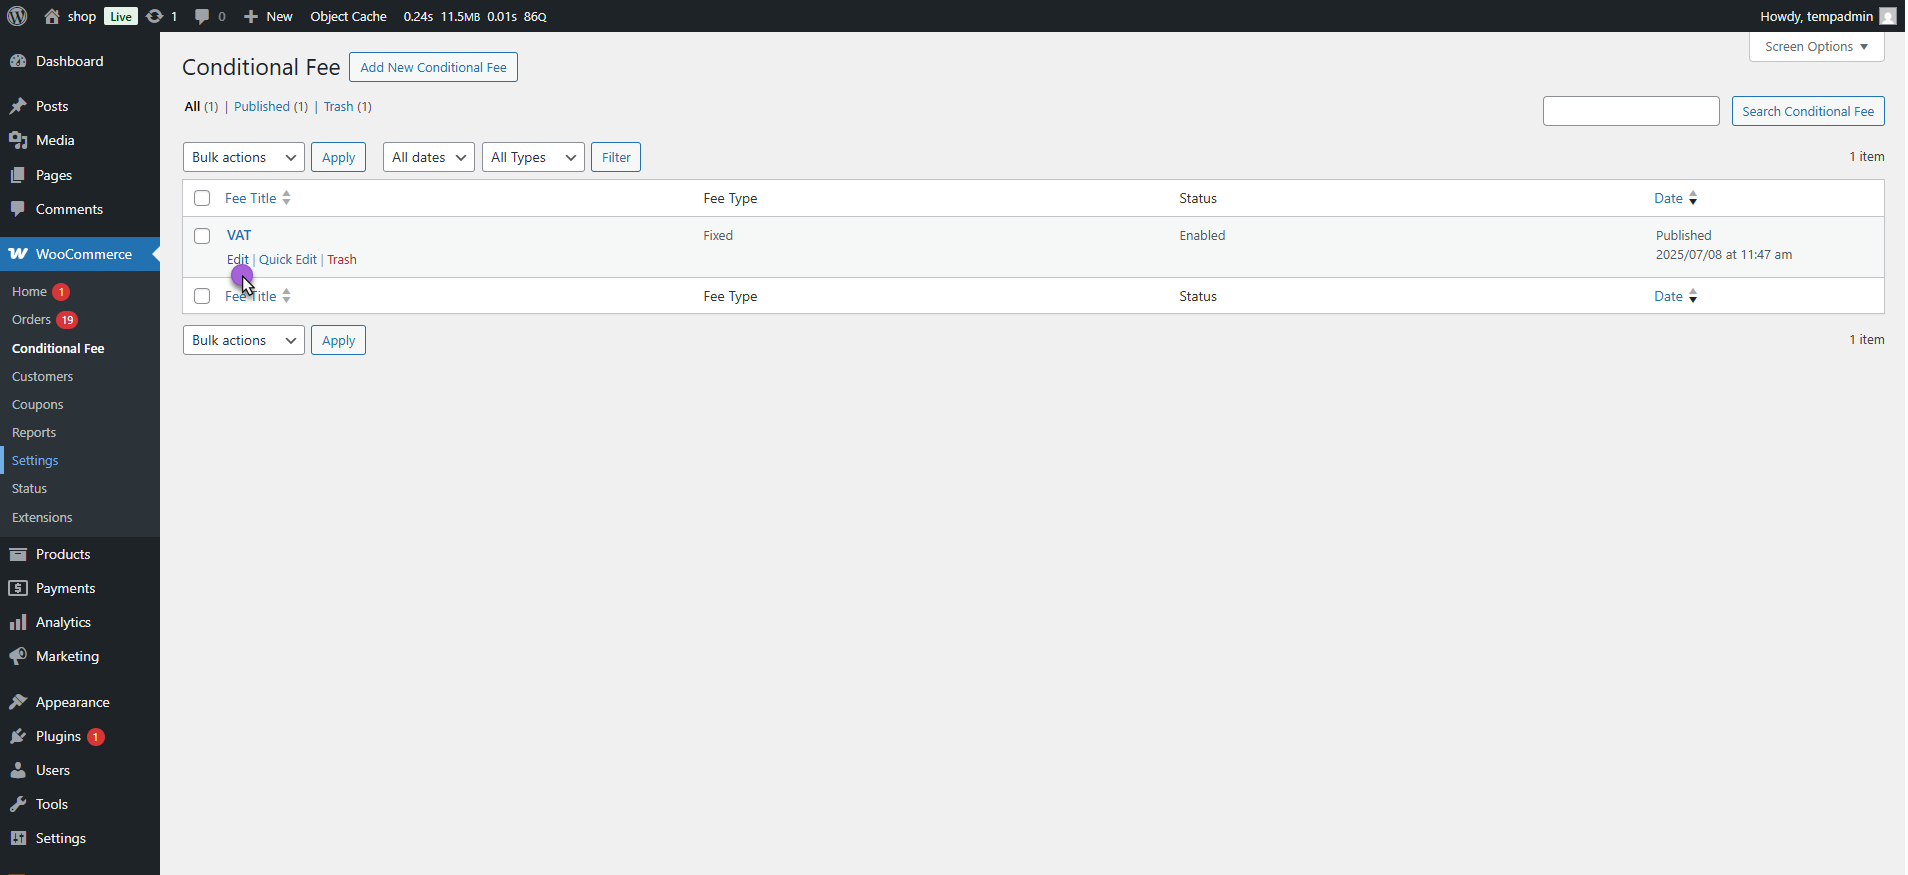
↑ Back to top- Navigate to WordPress Admin Dashboard > wooCommerce > Conditional Fee.
- The Conditional Fee page will appear.
- Admin can create and manage all their rules from the rules listing page.
- All the rules created will be shown on this page.

- Admin can search conditional fees by searching the fee title in the search bar.

- A Date filter to filter the rules according to the published dates.

- From the Bulk Actions dropdown, Admin can edit, delete, enable, and disable the rule.
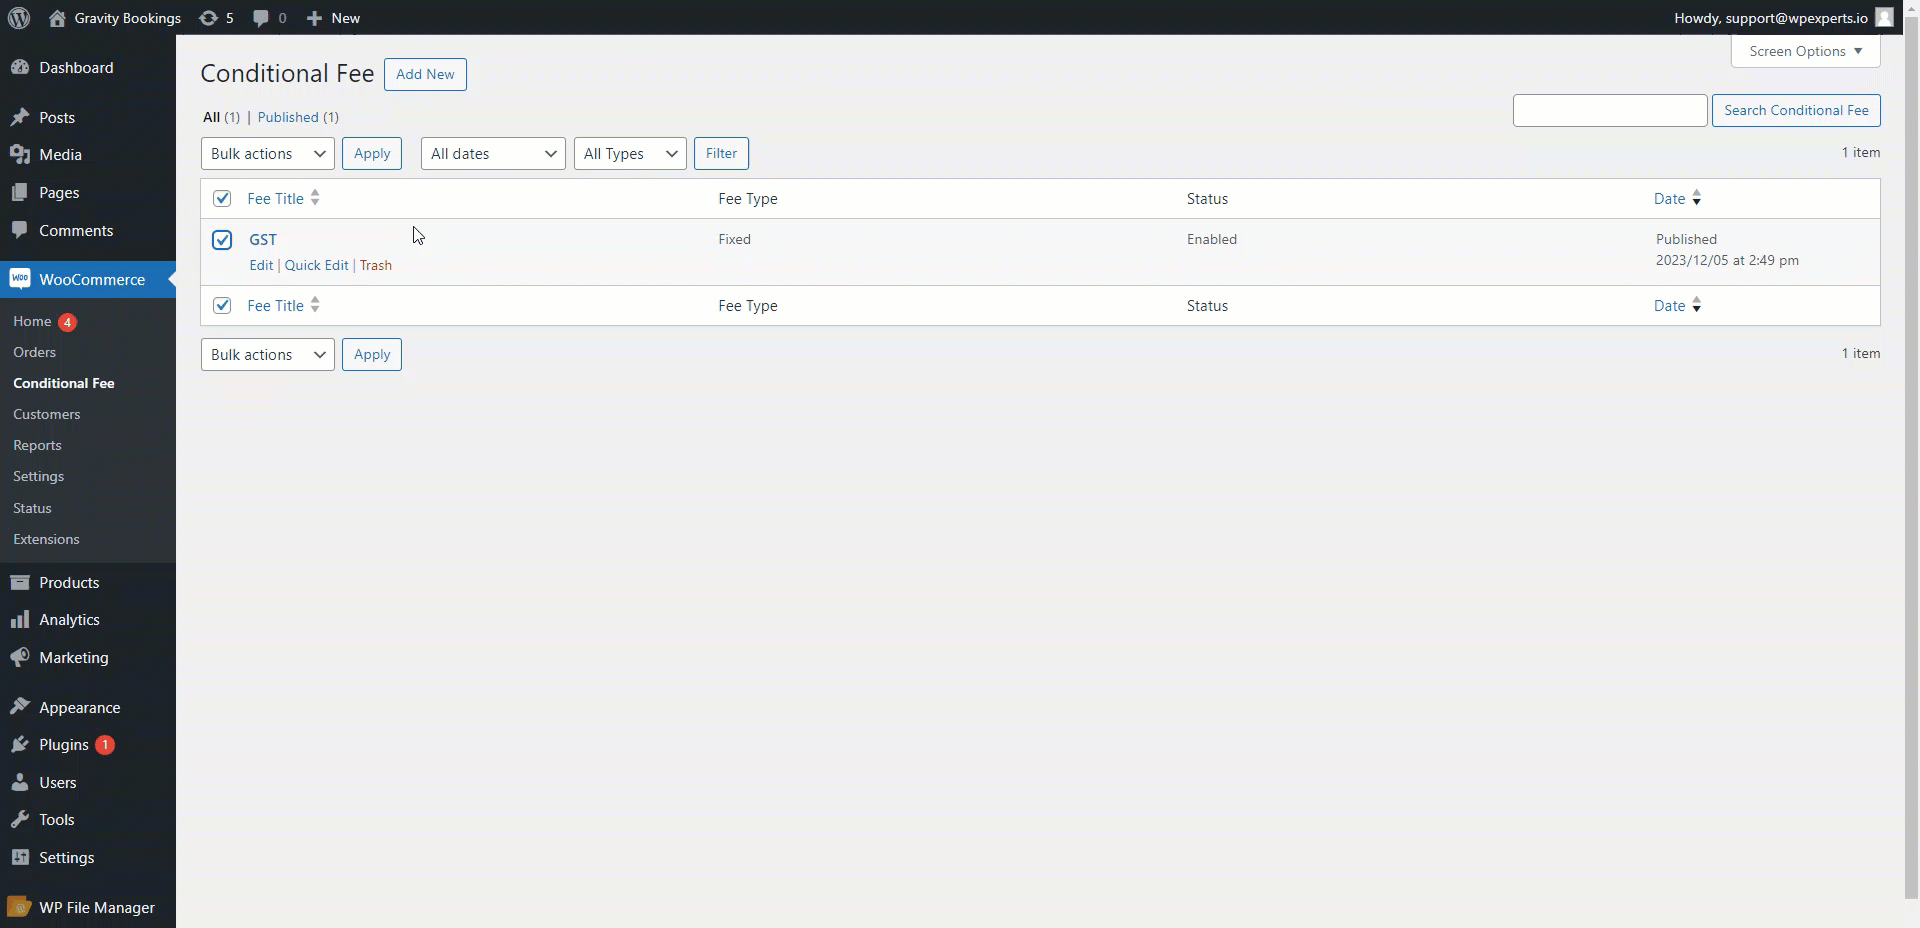
- Admin can filter the Fee Type by the Type filter dropdown.

Conditional Fee Rules
↑ Back to top- Click the Add New button beside the conditional Fee header.
- After clicking Add New, a page will appear. Here, the admin can add a New Conditional Fee Rule.
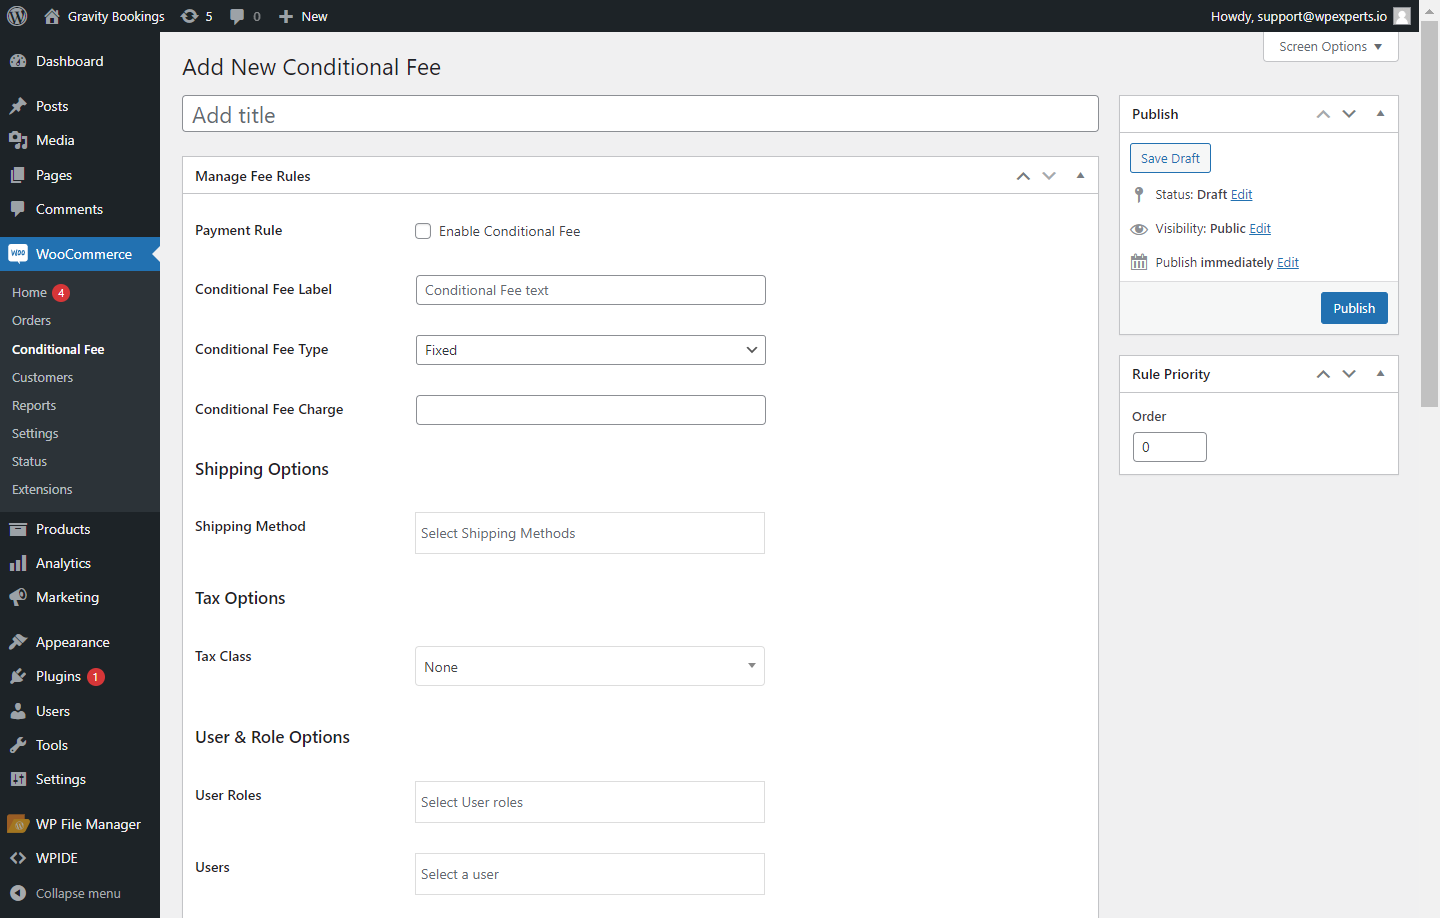
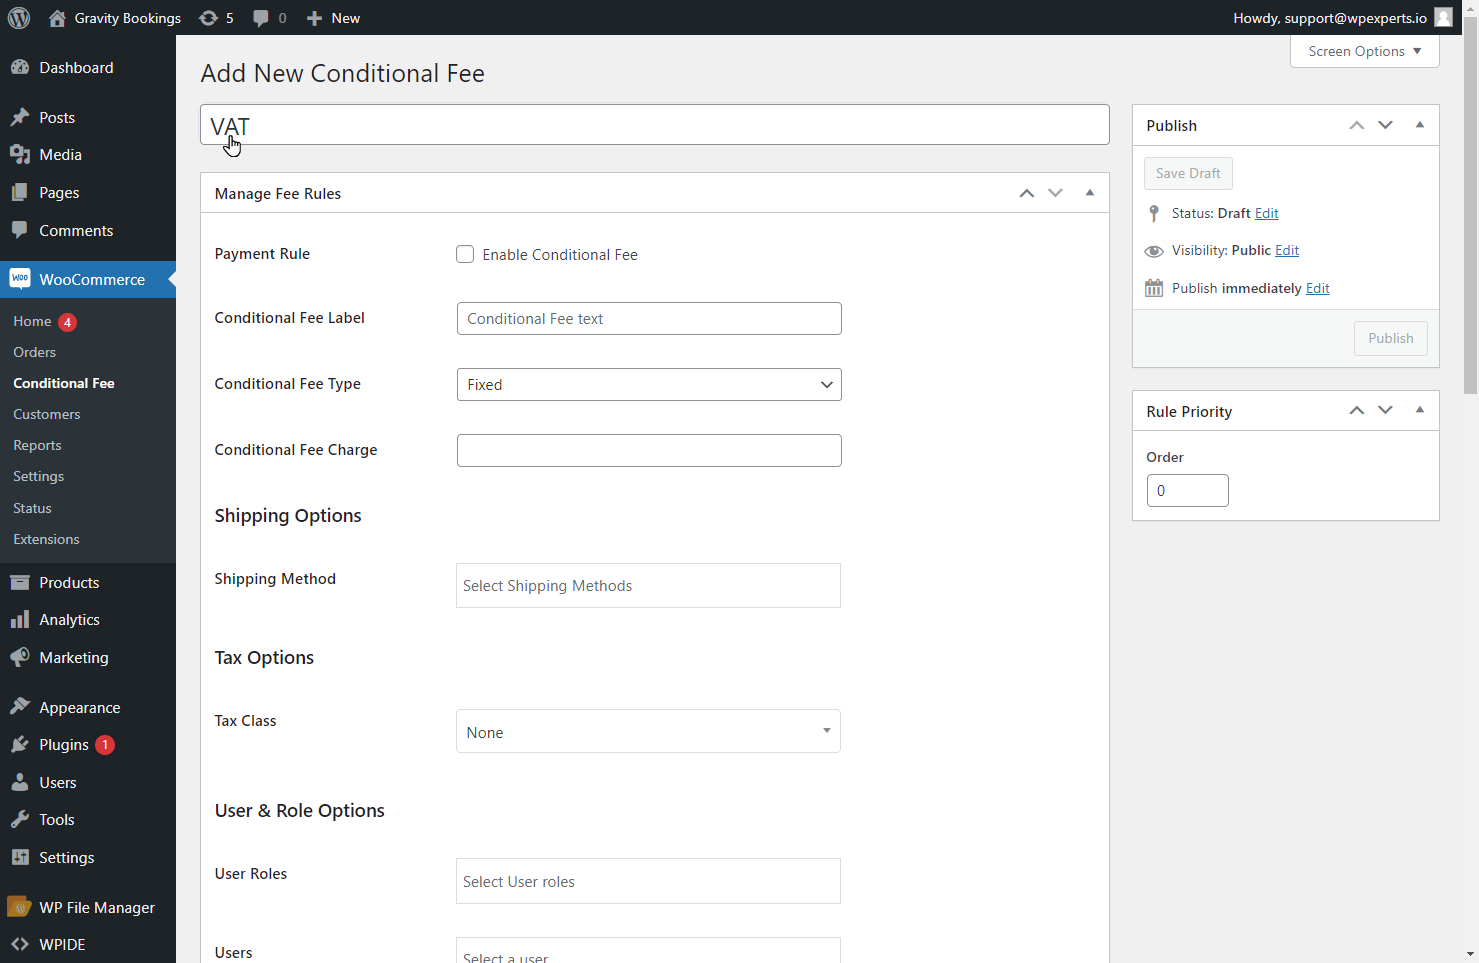
- Add the desired Conditional Fee Title.
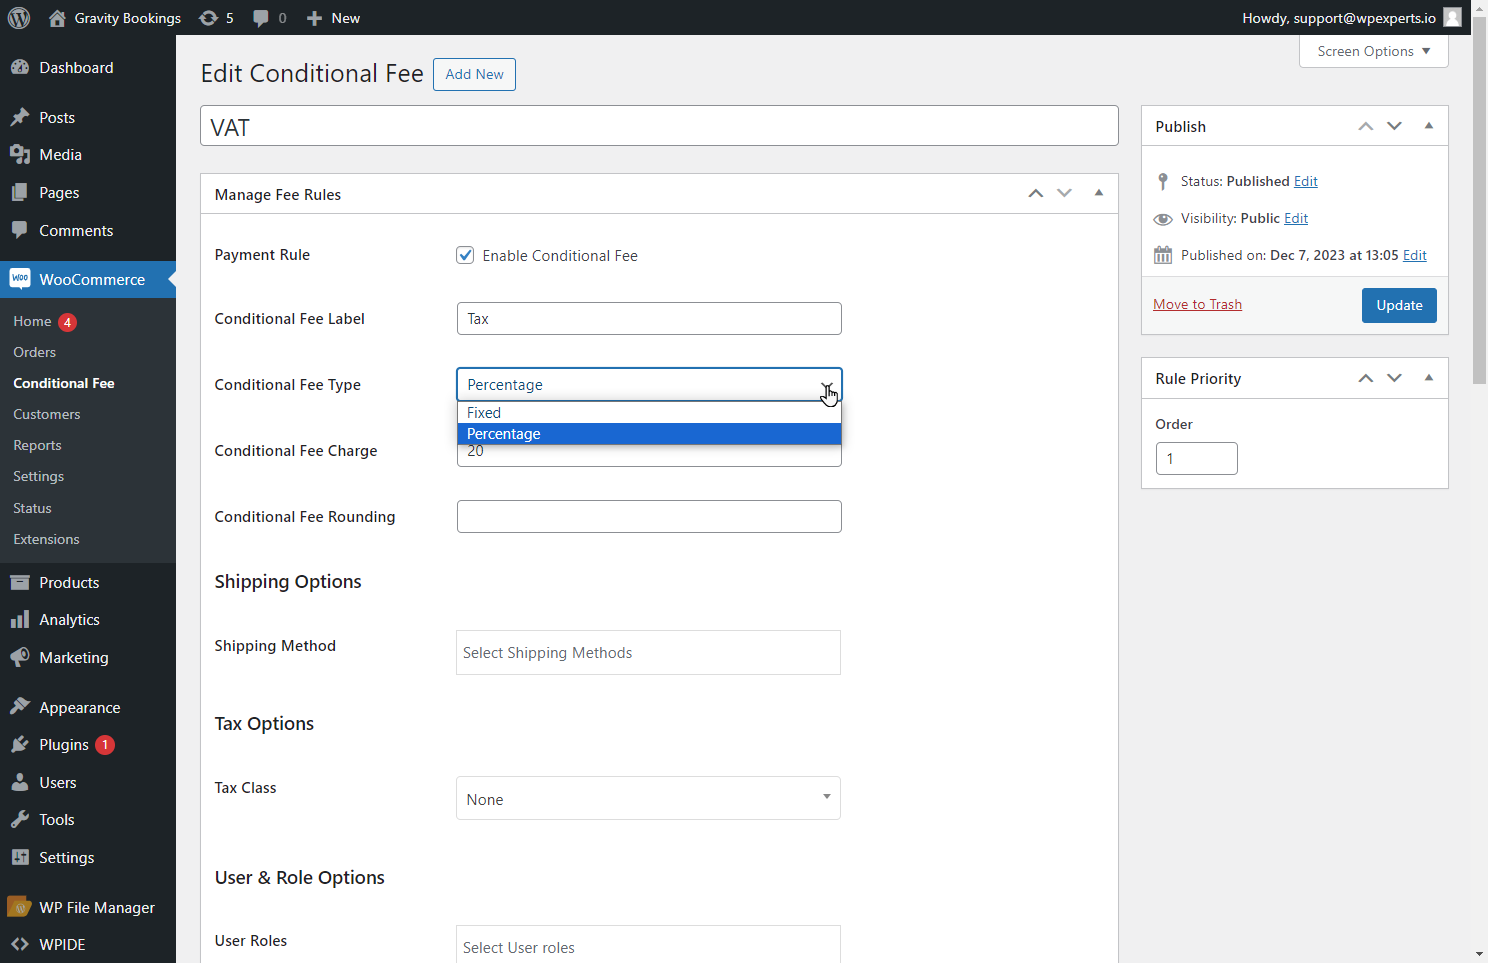
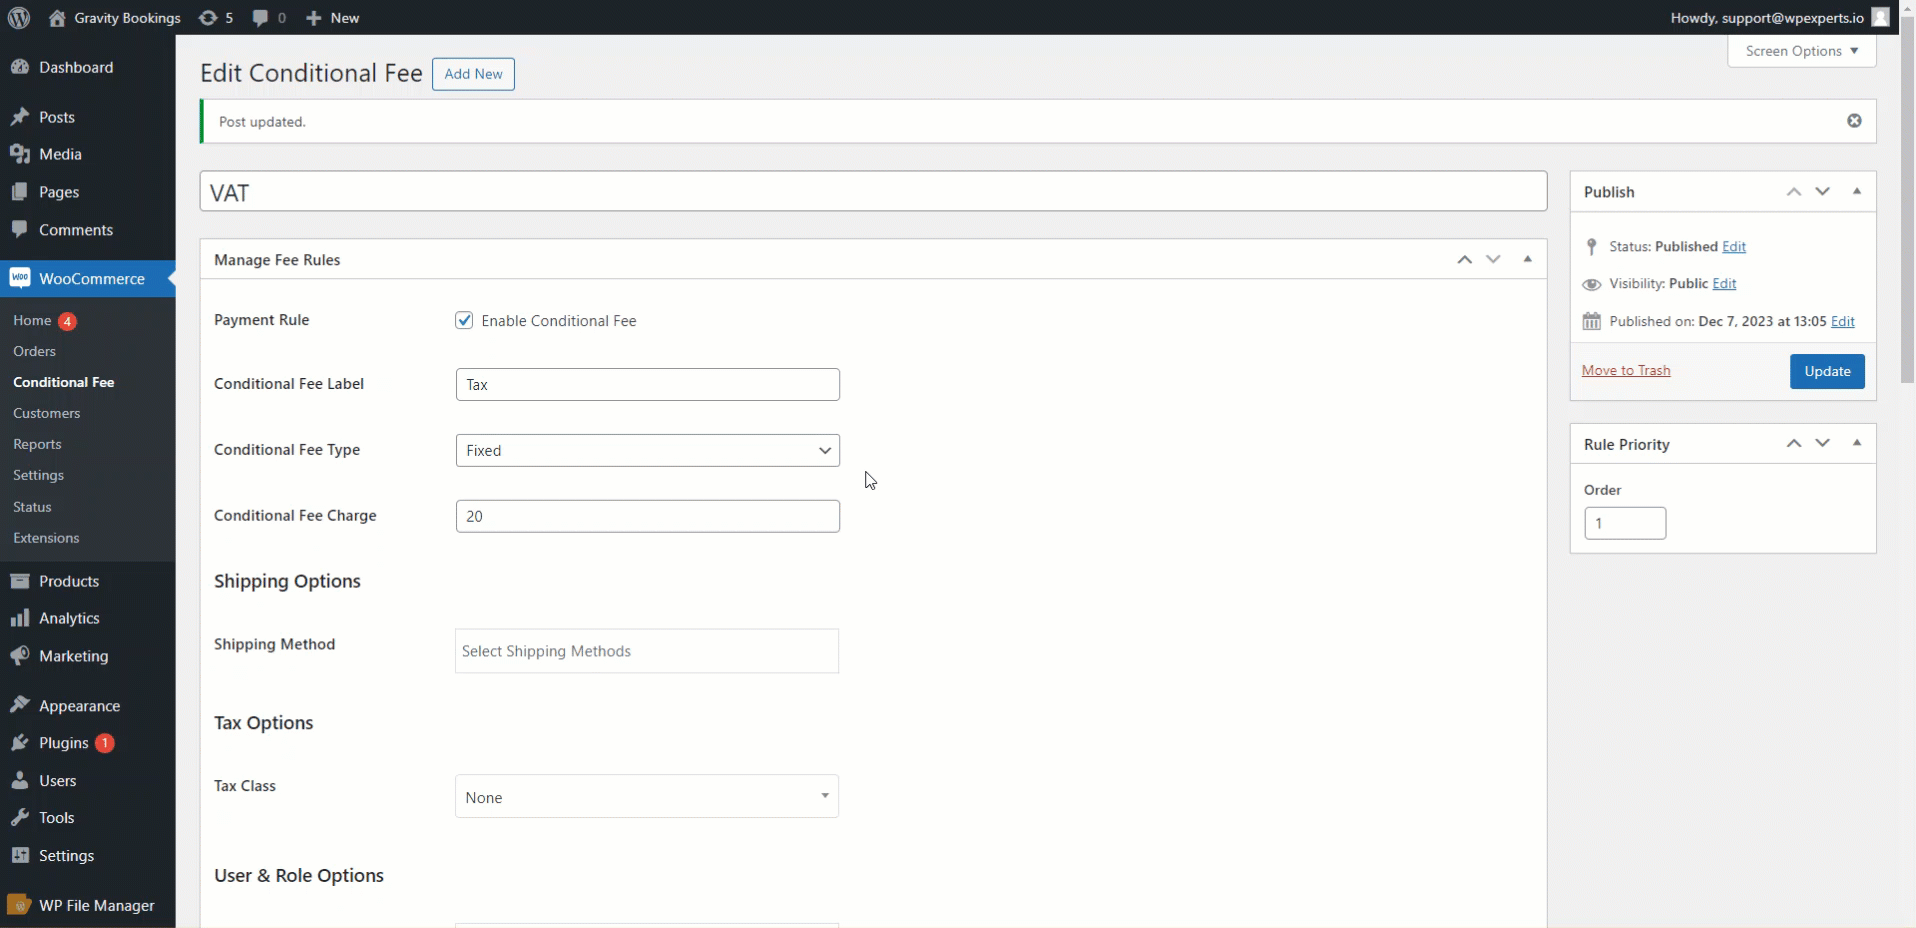
Manage Fee Rules
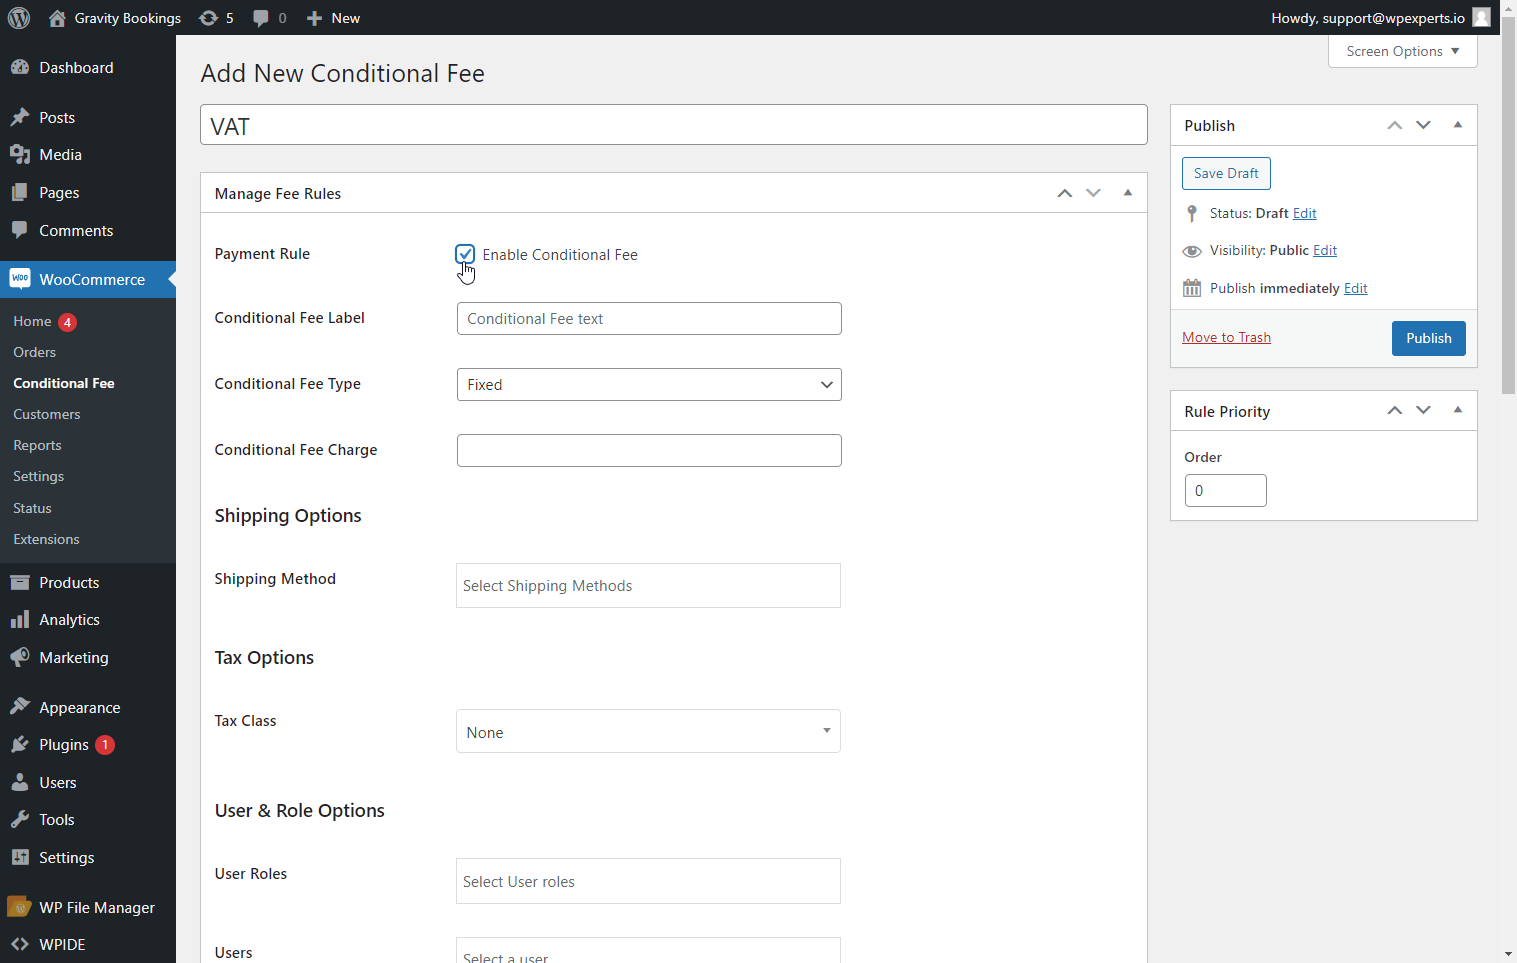
- Now, under the Manage Fee Rules, enable the Payment Rule checkbox.
- Admin can add the Conditional Fee Label; the specified label will be displayed on the cart, checkout, and in order details.

Frontend Impact
- Select the Conditional Fee Type from the dropdown menu.
- There are two options for the admin to select (Fixed and Percentage).
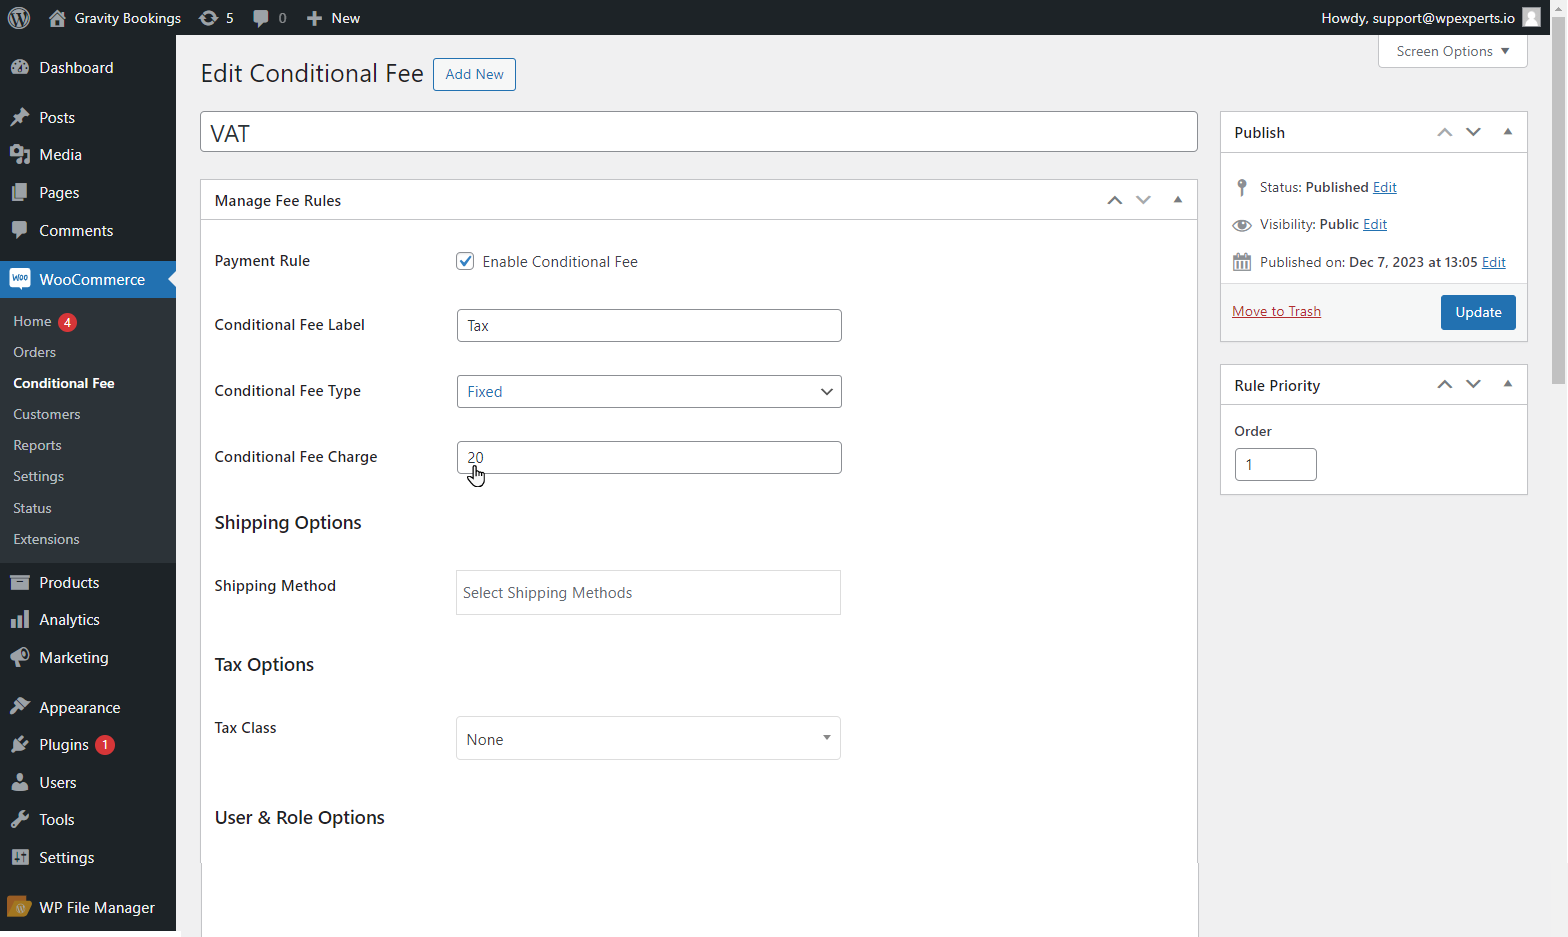
Fixed
- Admin selects Fixed from the Conditional Fee Type dropdown.

- Enter the desired Conditional Fee Charge.
Frontend Impact
Percentage
- Admin selects Percentage from the Conditional Fee Type dropdown.
Please Note: When the percentage is selected, the percentage value will be calculated based on the subtotal value and added to the subtotal.
- The admin can add a Conditional fee charge, which will be a percentage of the subtotal of the products and will be added to the overall subtotal.

- The admin can add the Conditional Fee Rounding that will provide a rounding figure to round off the Conditional fee value. For instance, if the value is set to 1, the fees will be rounded to the nearest whole number, like 1, 2, 3. If set to 2, the rounded fees will be multiples of 2, such as 2, 4, or 6.
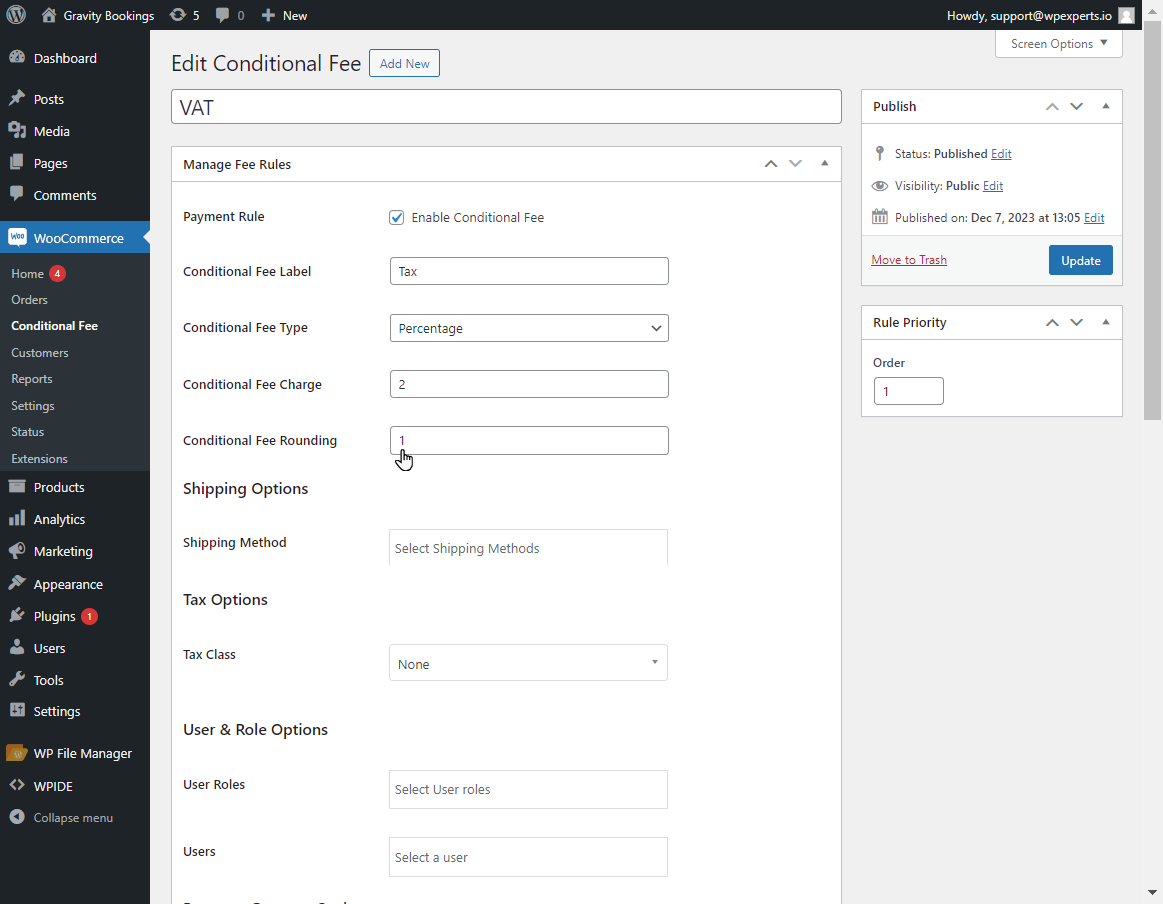
Please Note: The Conditional Fee Rounding field becomes visible when the percentage option is selected from the Conditional Fee Type. If left empty, the Conditional Fee Rounding will be disabled.
Frontend Impact
Disabled
Enabled

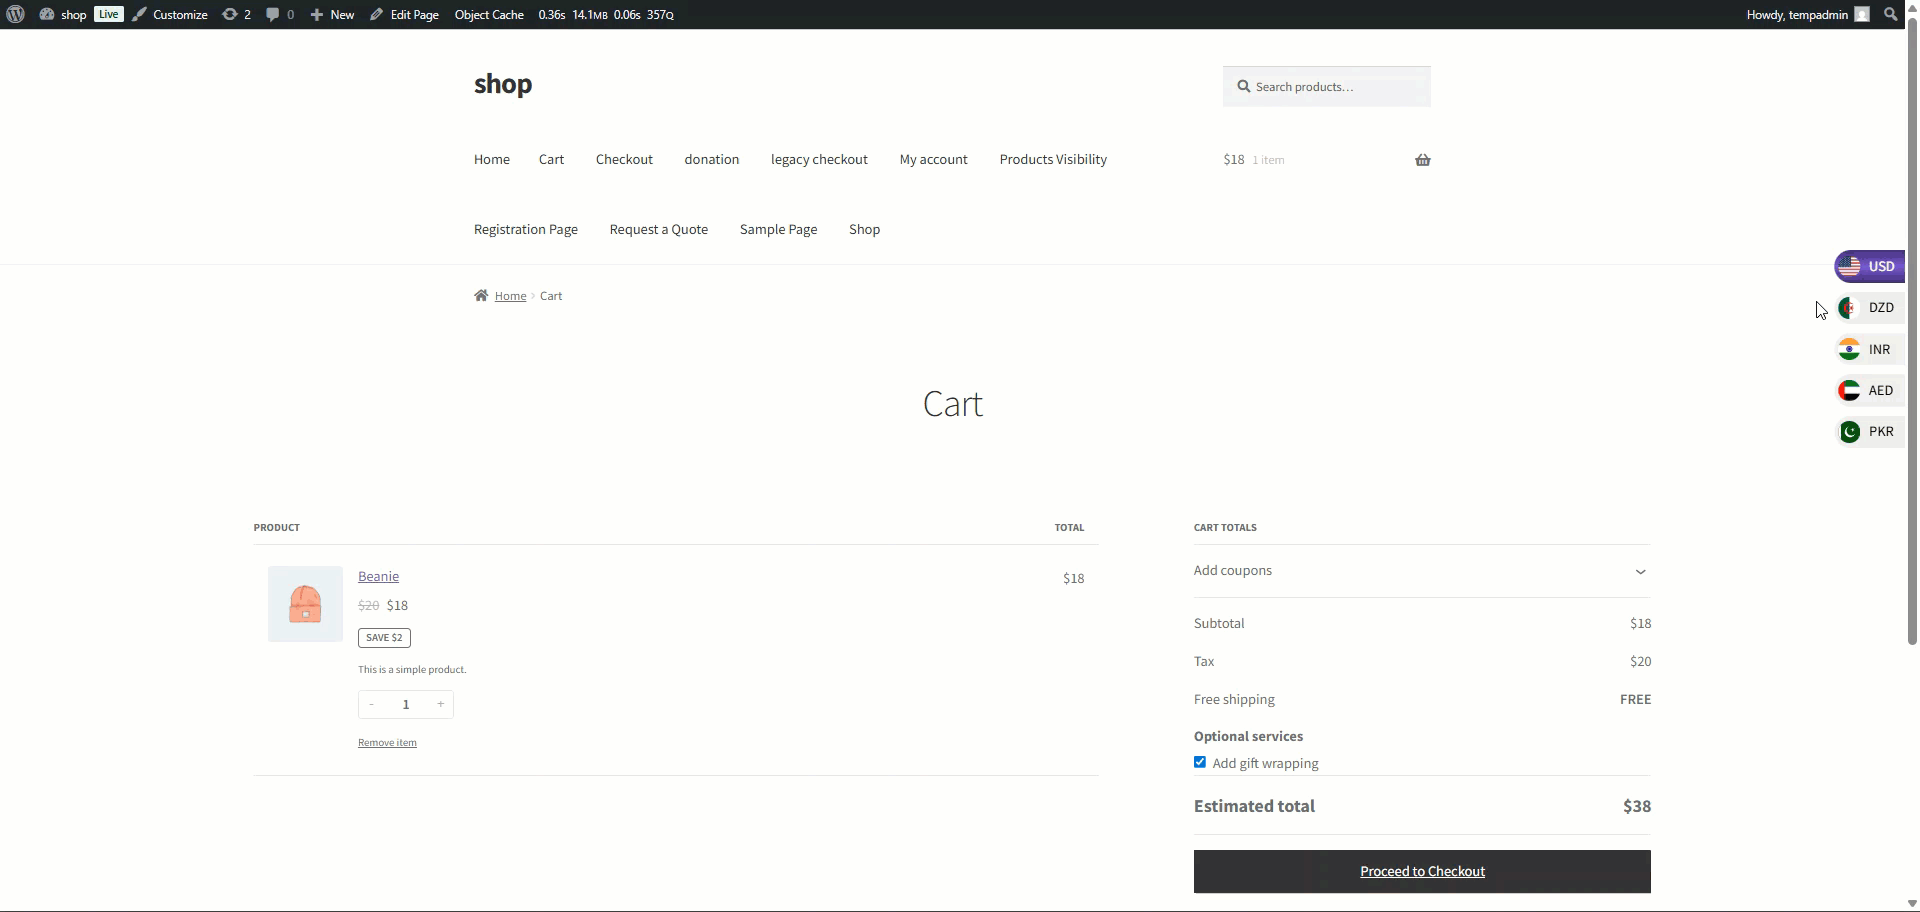
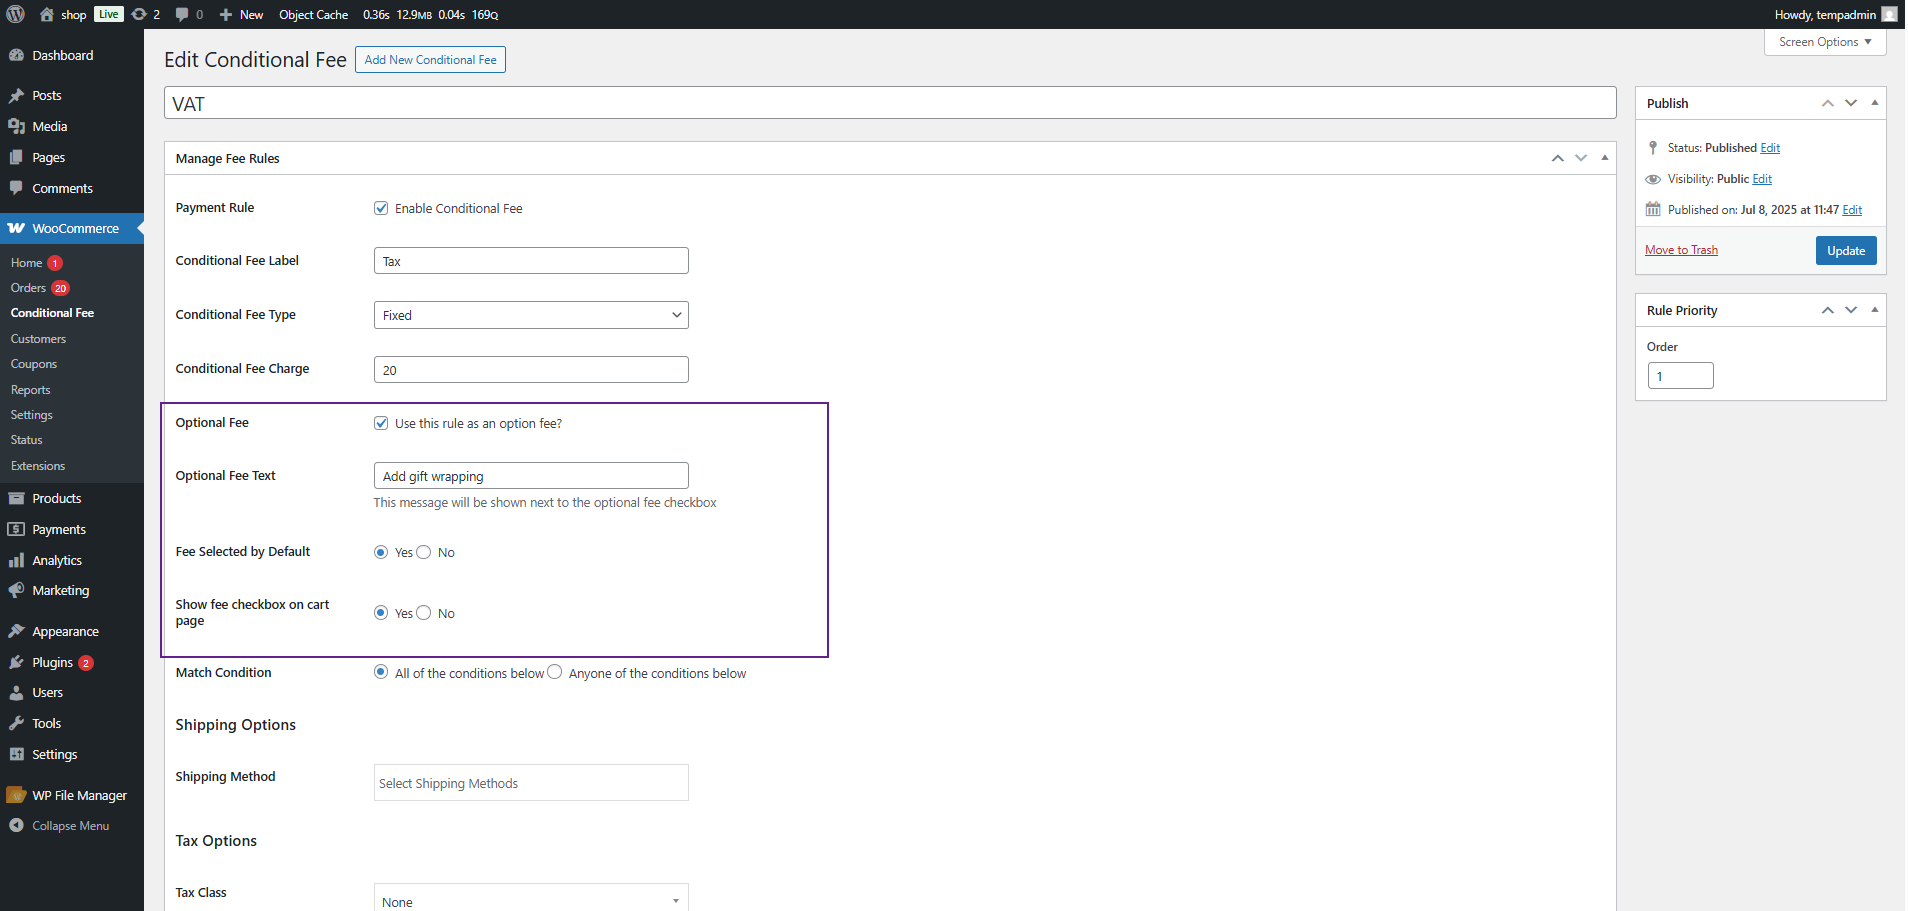
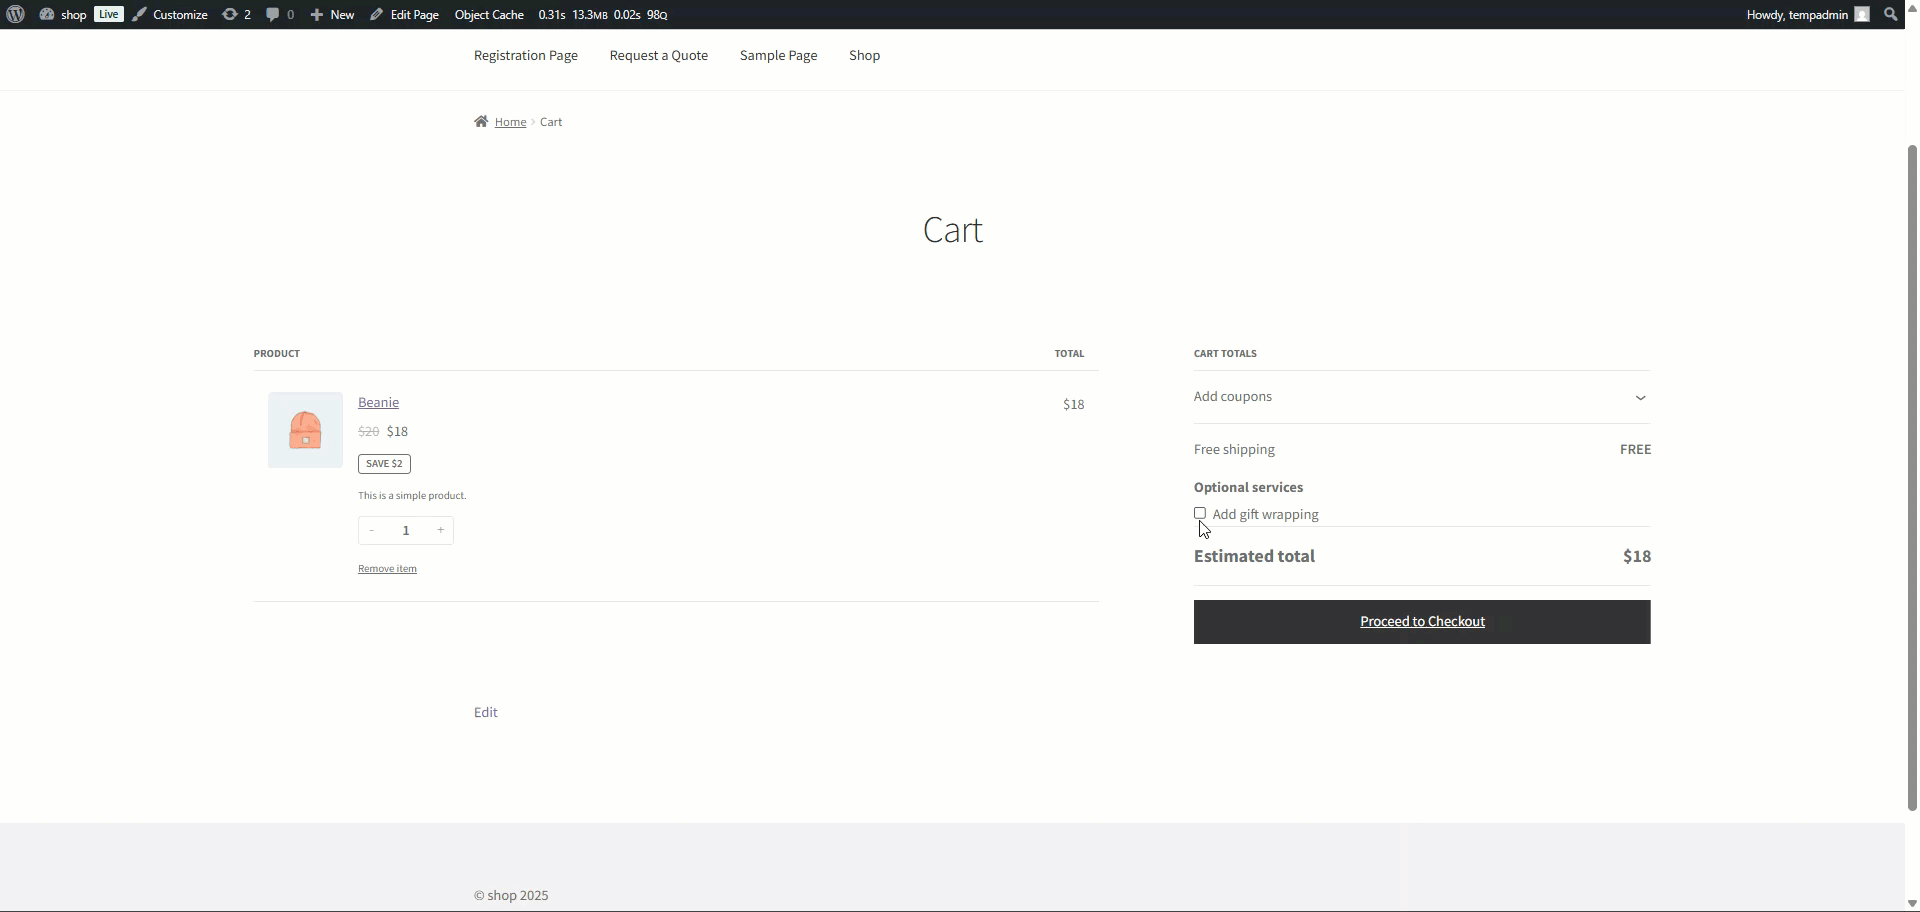
Optional Fee
Optional Fee allows the admin to offer an extra, optional service (like gift wrap) on the Cart or Checkout page, which the customer can choose to add by selecting a checkbox, adding flexibility to upsell services.
- Navigate to: WooCommerce > Conditional Fee
- Create a new Conditional Fee Rule or edit an existing one.
- Check the Optional Fee option.
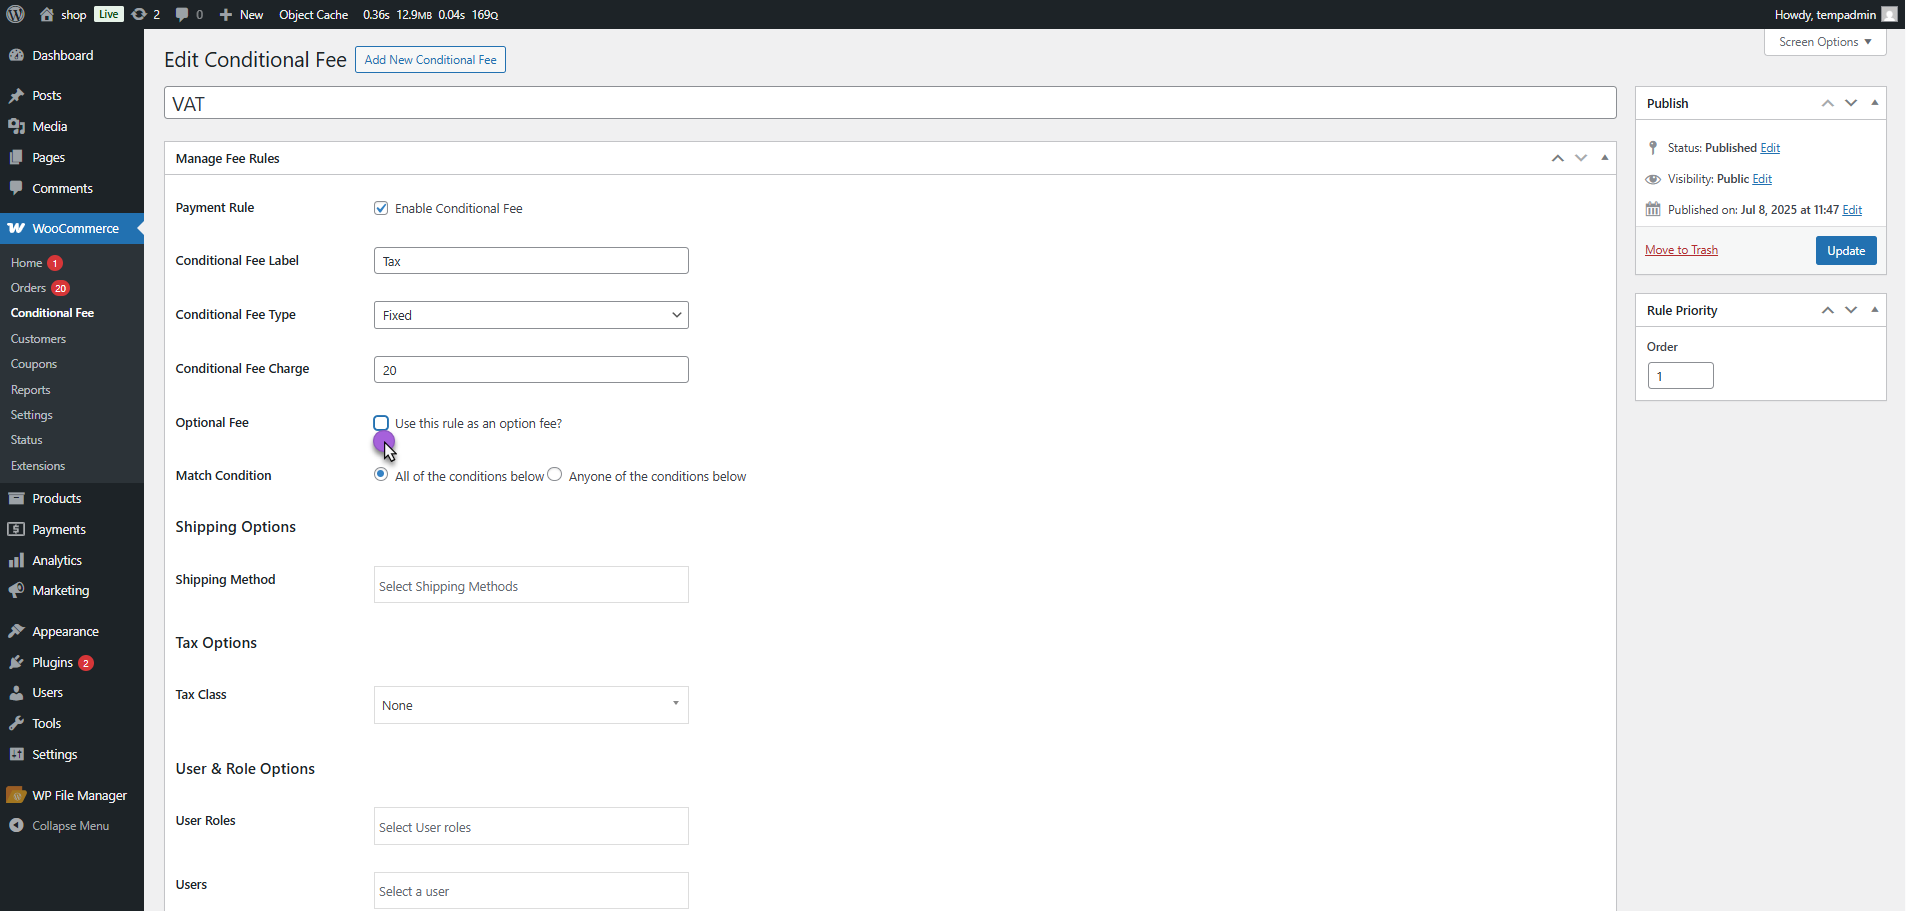
- Once checked, configure the following:
- Optional Fee Text:
Add a label (e.g., “Add gift wrapping for $5”) that appears next to the checkbox. - Fee Selected by Default:
Choose whether the checkbox is pre-selected when the customer lands on the page. - Show Fee Checkbox on Cart Page:
Enable this to display the optional fee checkbox on the cart page (by default, it only appears on the checkout page).
Frontend Impact
- Navigate to the Shop page and add products to the cart.
- Go to the Cart or Checkout page.
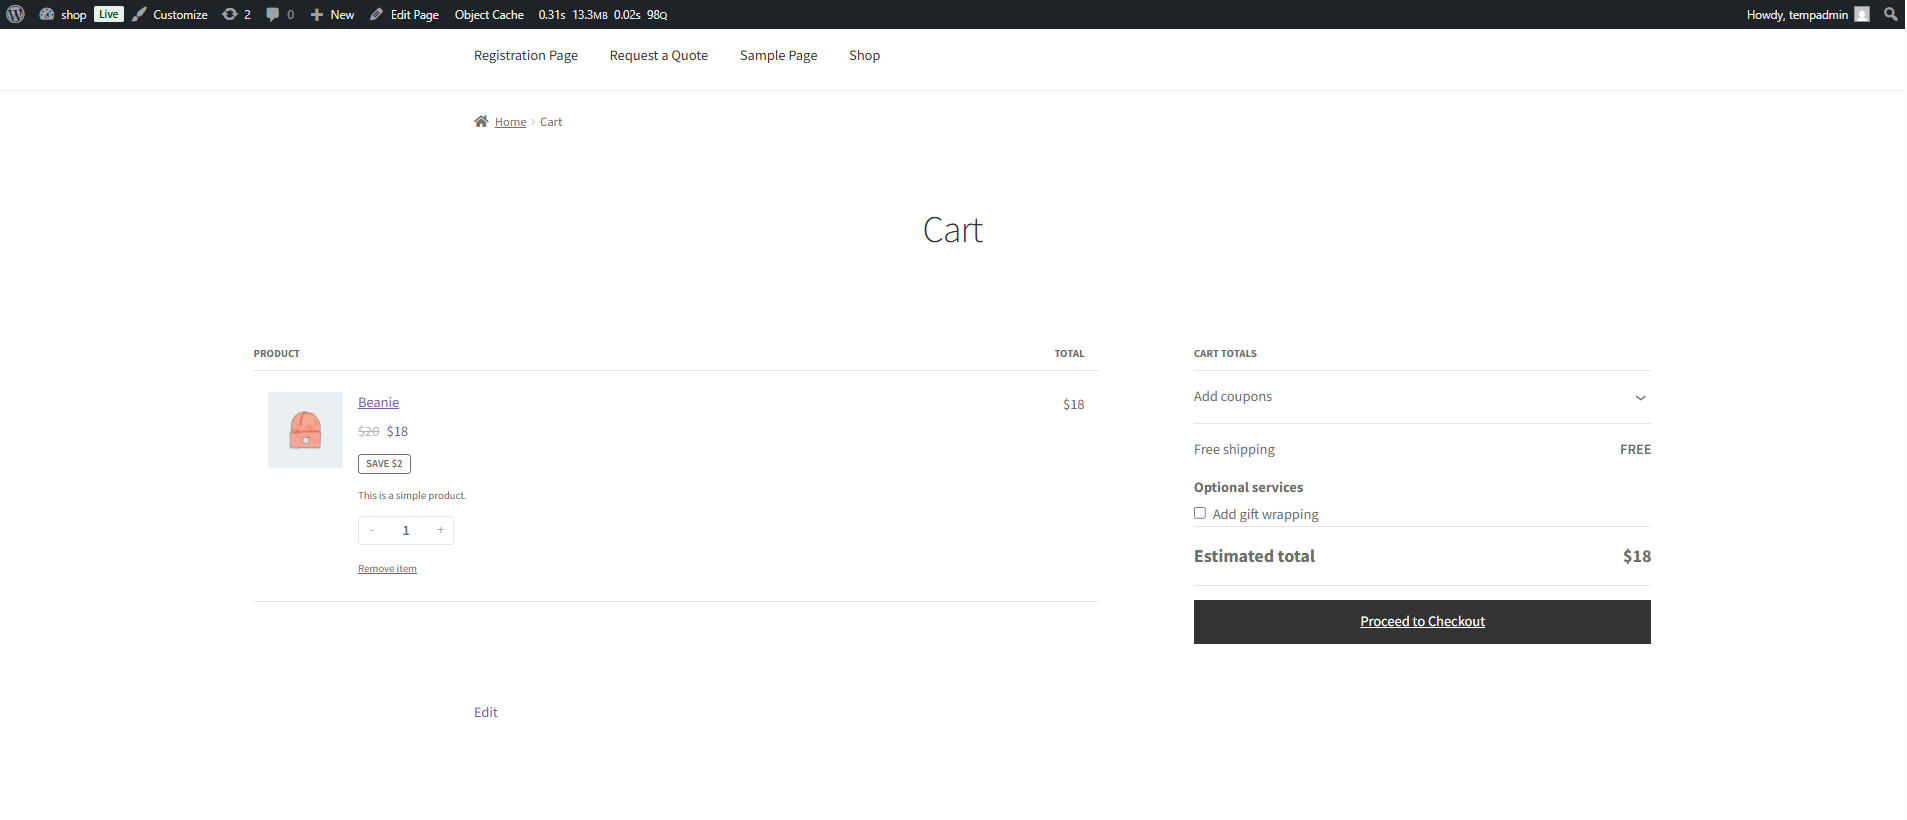
- A checkbox with your custom Optional Fee Text will appear.
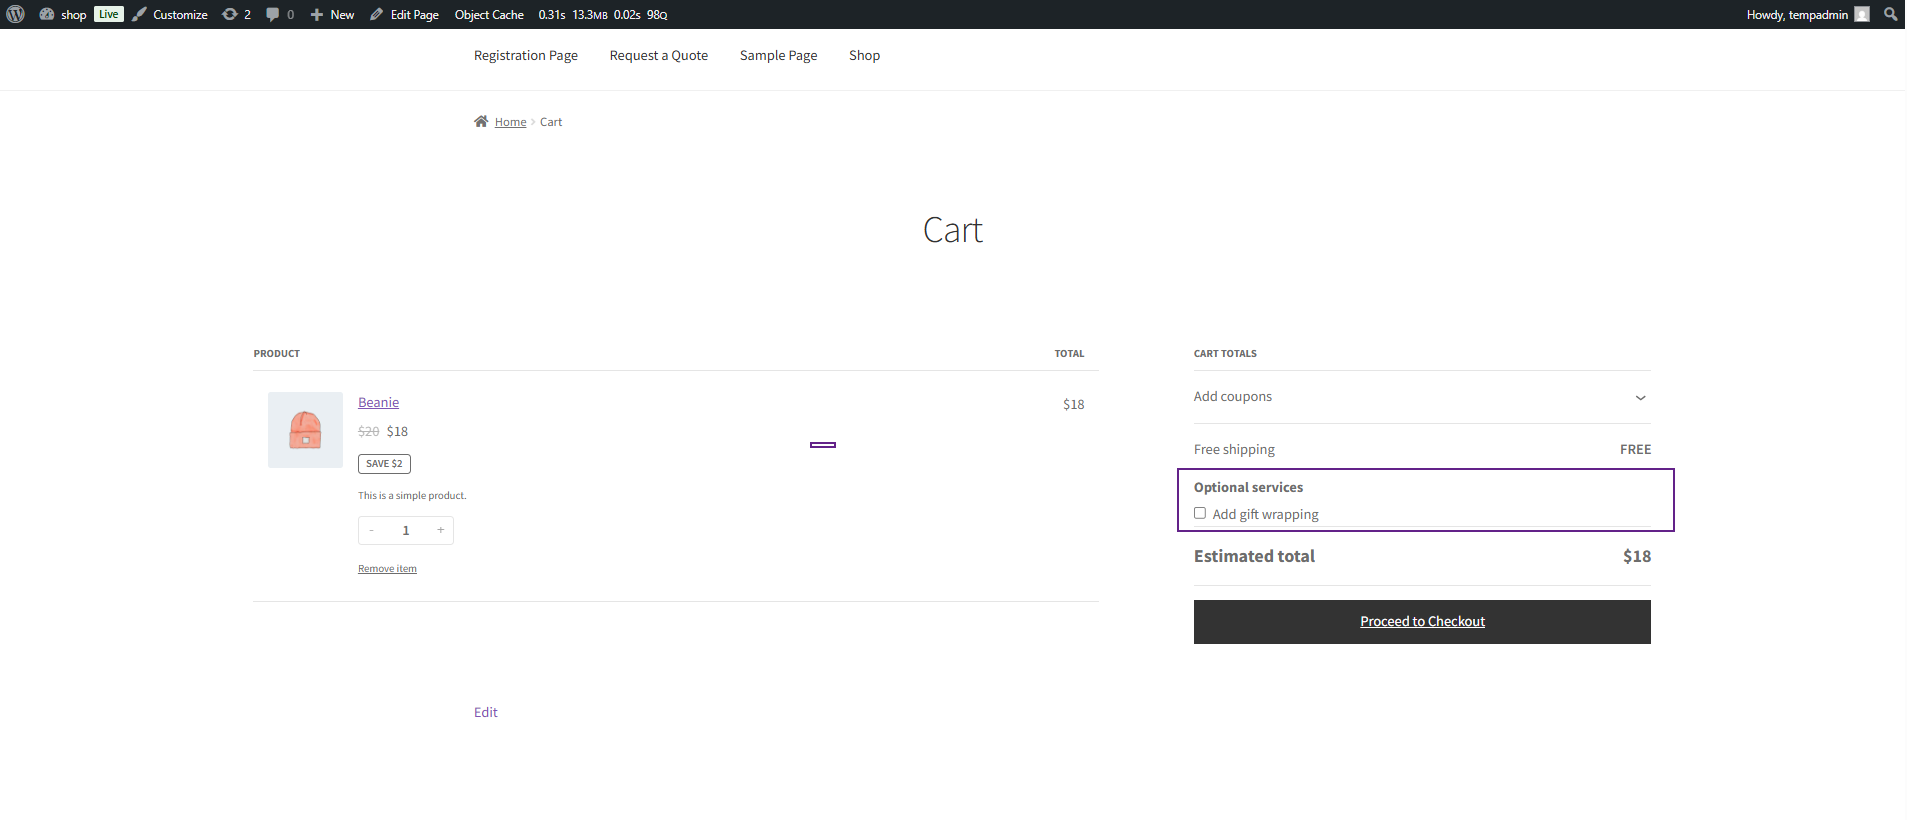
- If the customer checks the box, the fee is applied and reflected in the order total.
Match Fee Condition
Match Fee Condition allows the admin to choose whether the conditional fee should apply only when all set conditions are met or if it should apply when any one of them is fulfilled — giving full control over how and when fees are charged.
- Navigate to: WooCommerce > Conditional Fee
- Create a new Conditional Fee Rule or edit an existing one.
- In the rule editor, locate the Match Condition setting.
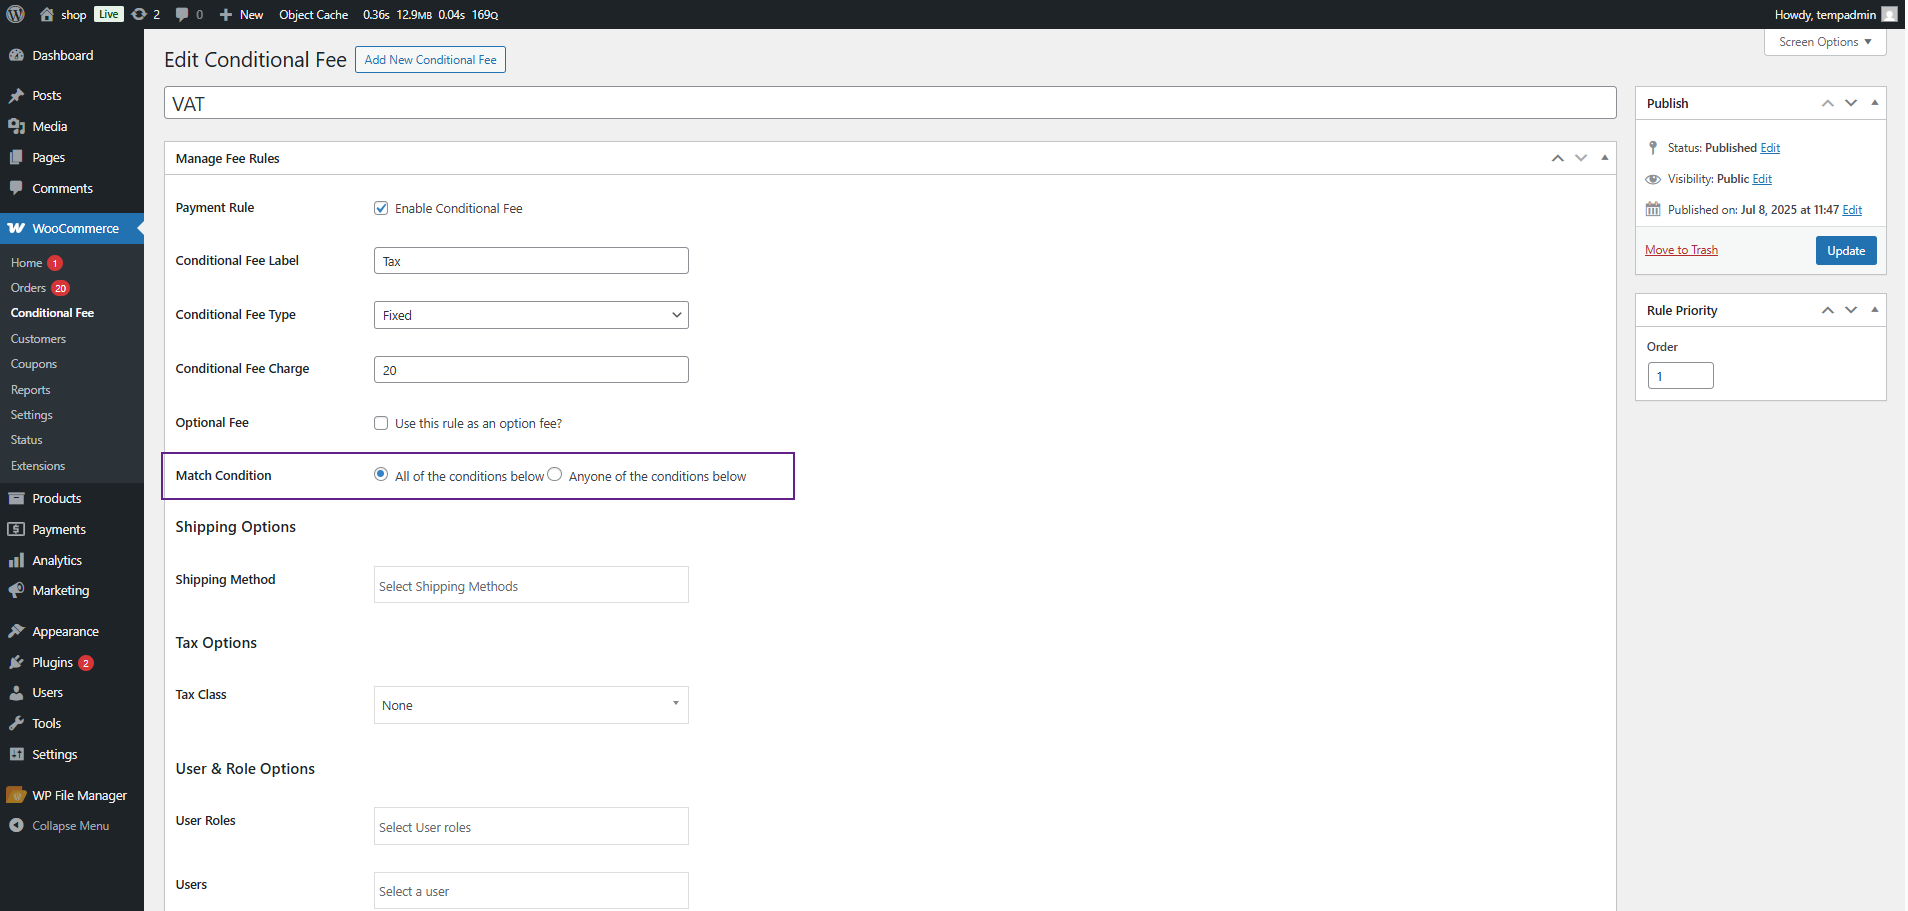
Choose one:
- All of the conditions below — the fee applies only when all conditions are met.
- Any one of the conditions below — the fee applies when at least one condition is met.
- Define the conditions like product categories, user roles, cart total, etc.
- Save the rule.
Frontend Impact
- Navigate to the Shop page and add products to the cart.
- Go to the Cart or Checkout page.
- Customers will not see how the fee was calculated.
- The conditional fee will automatically appear in the cart/checkout if the conditions (AND/OR logic) are met.
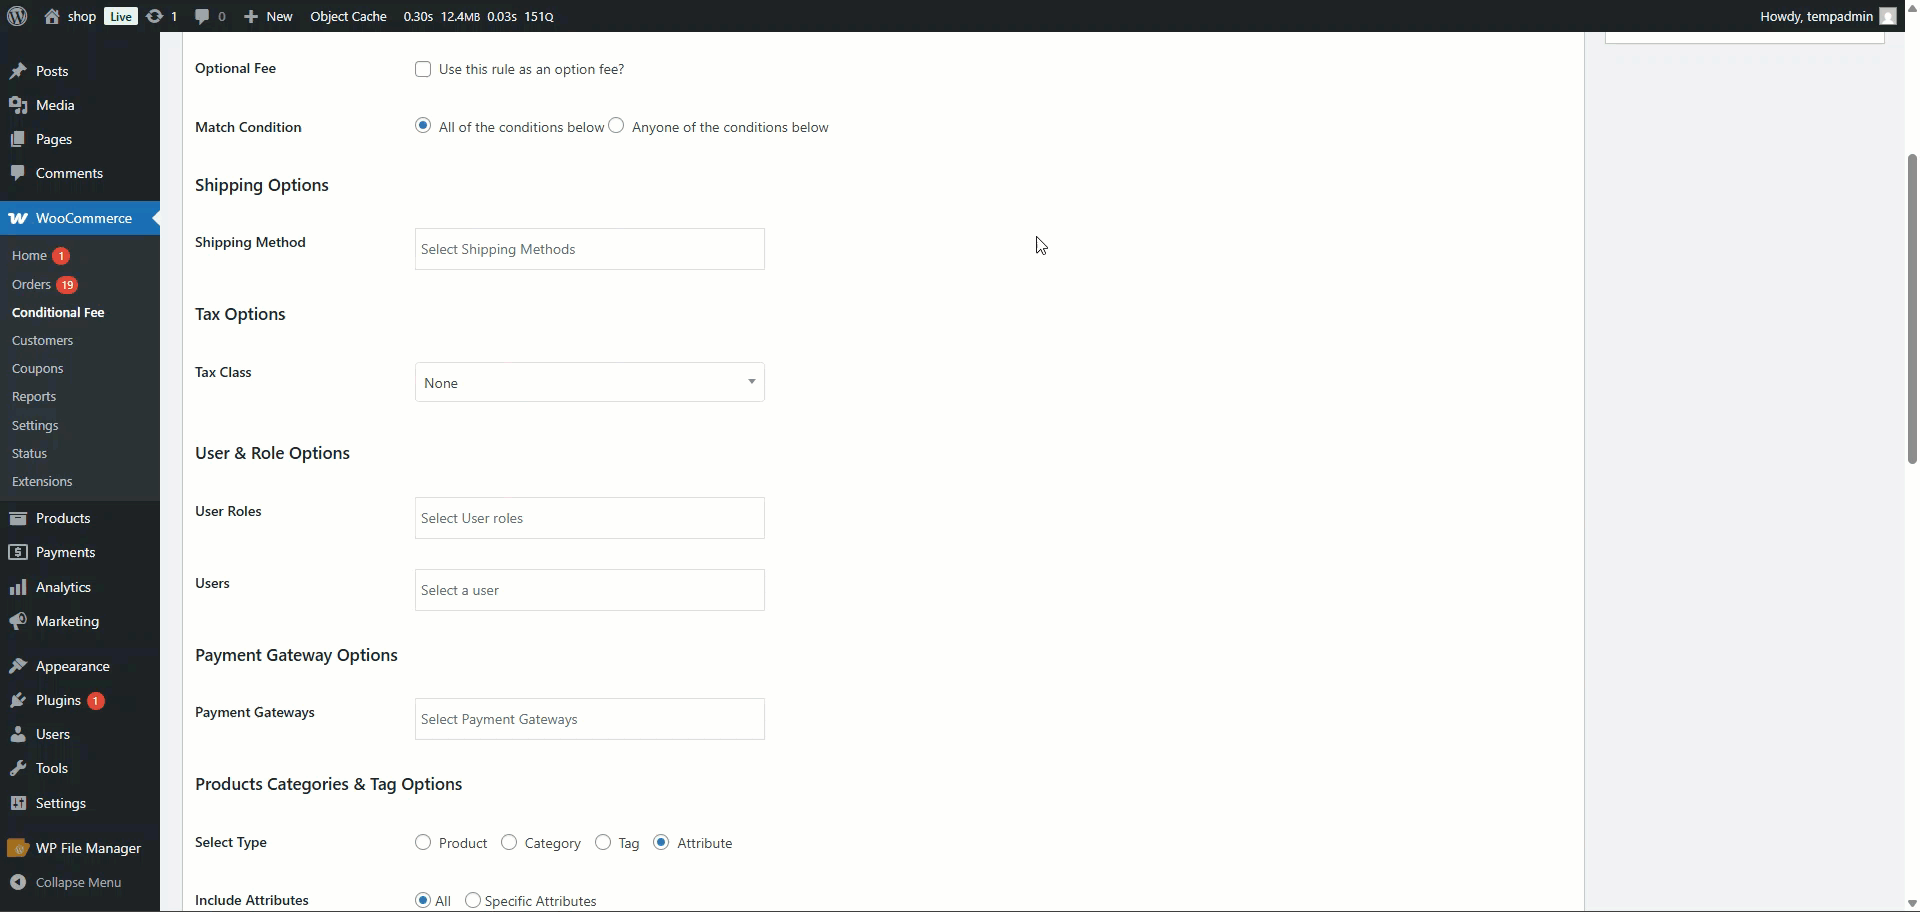
Shipping Options
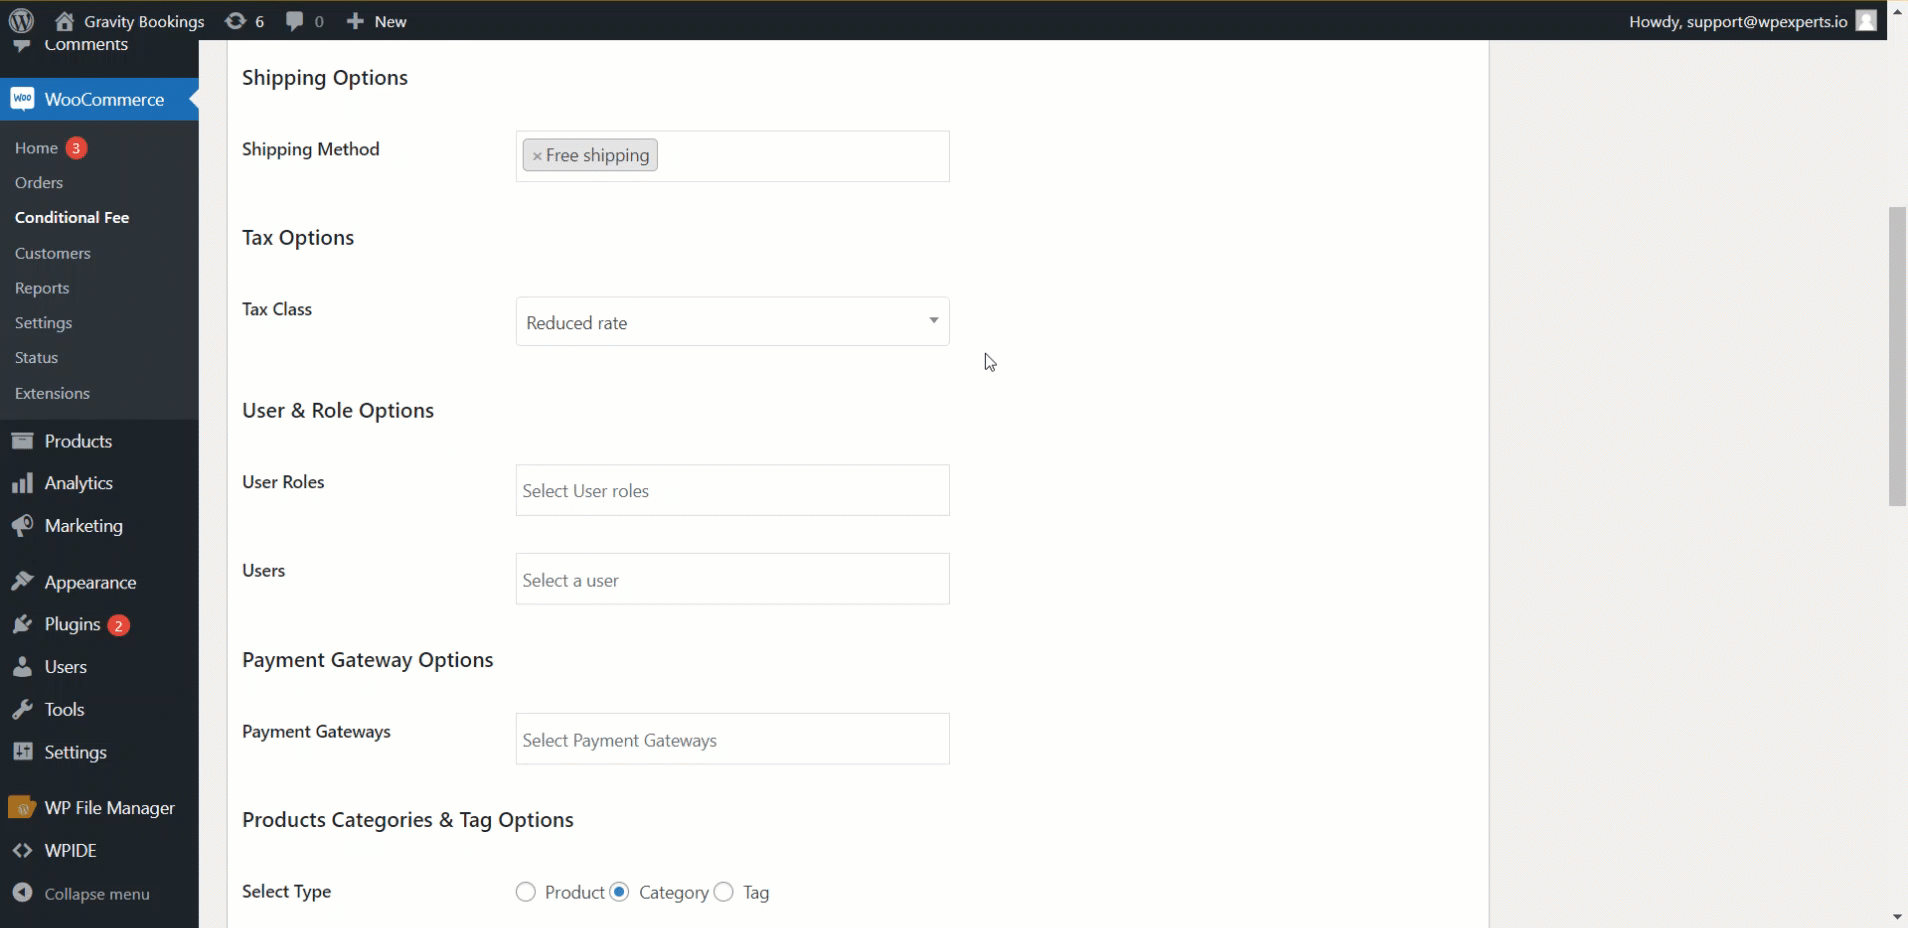
↑ Back to top- Select the Shipping Method under the Shipping Option Label.
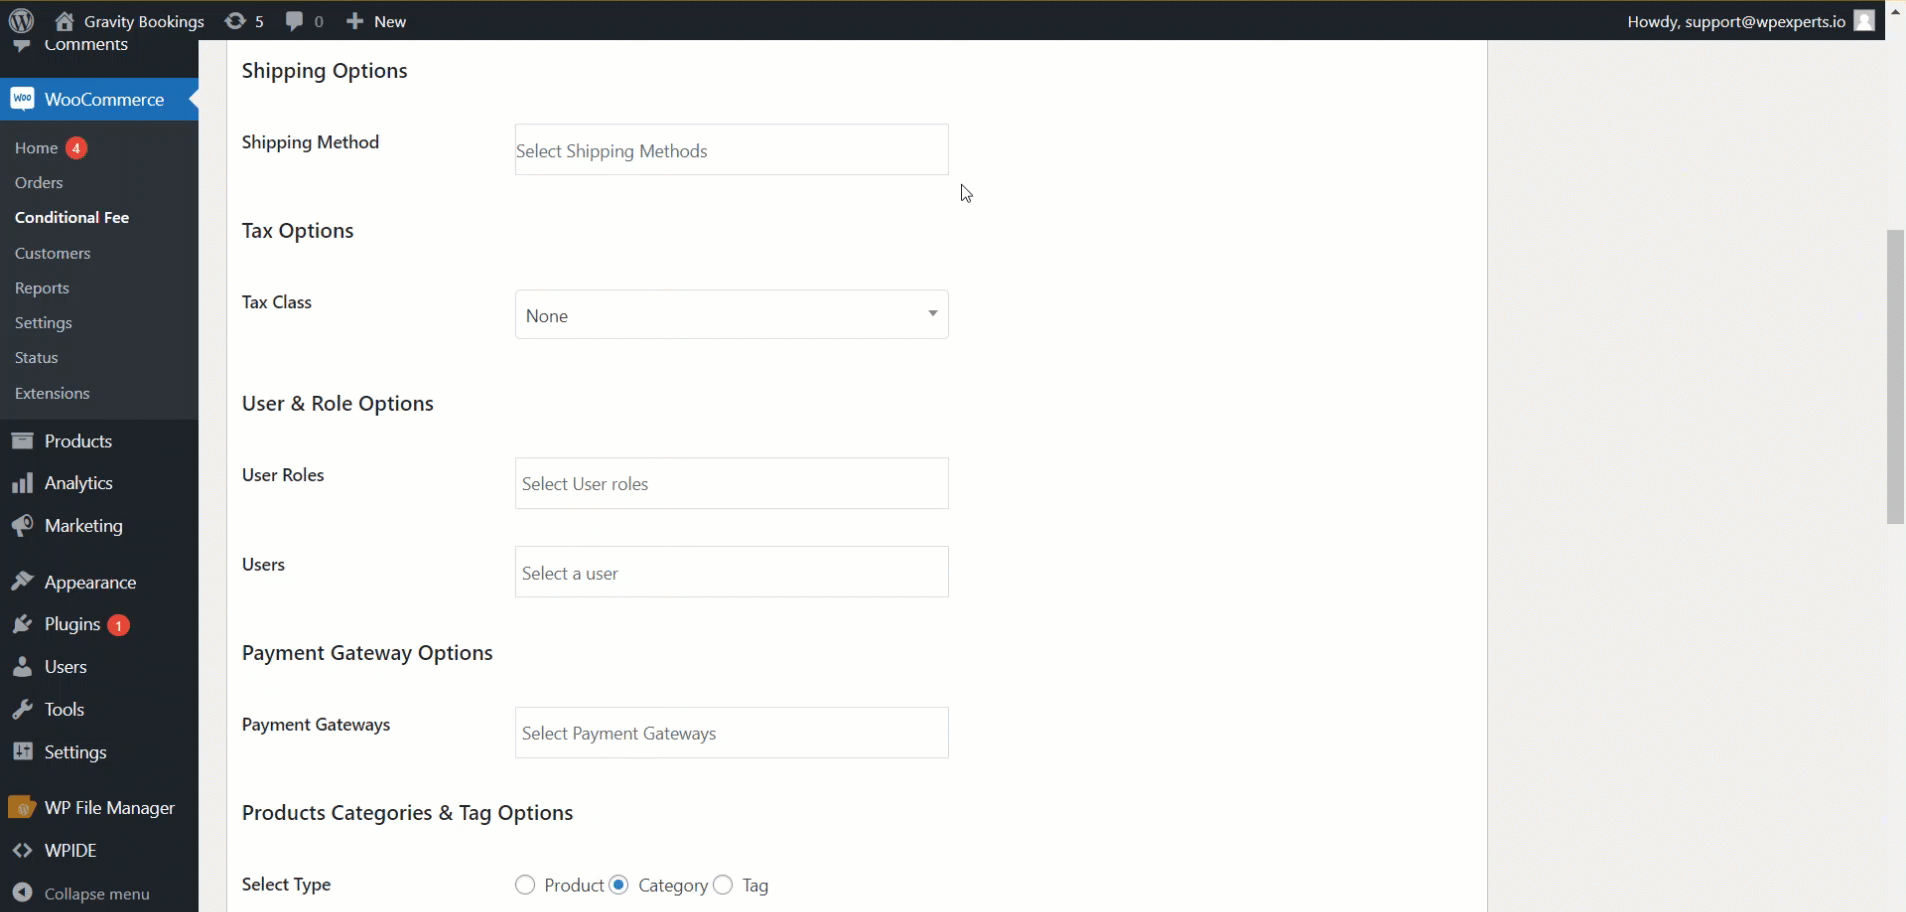
Please Note: If none is selected, the fee will be applied to all shipping methods.
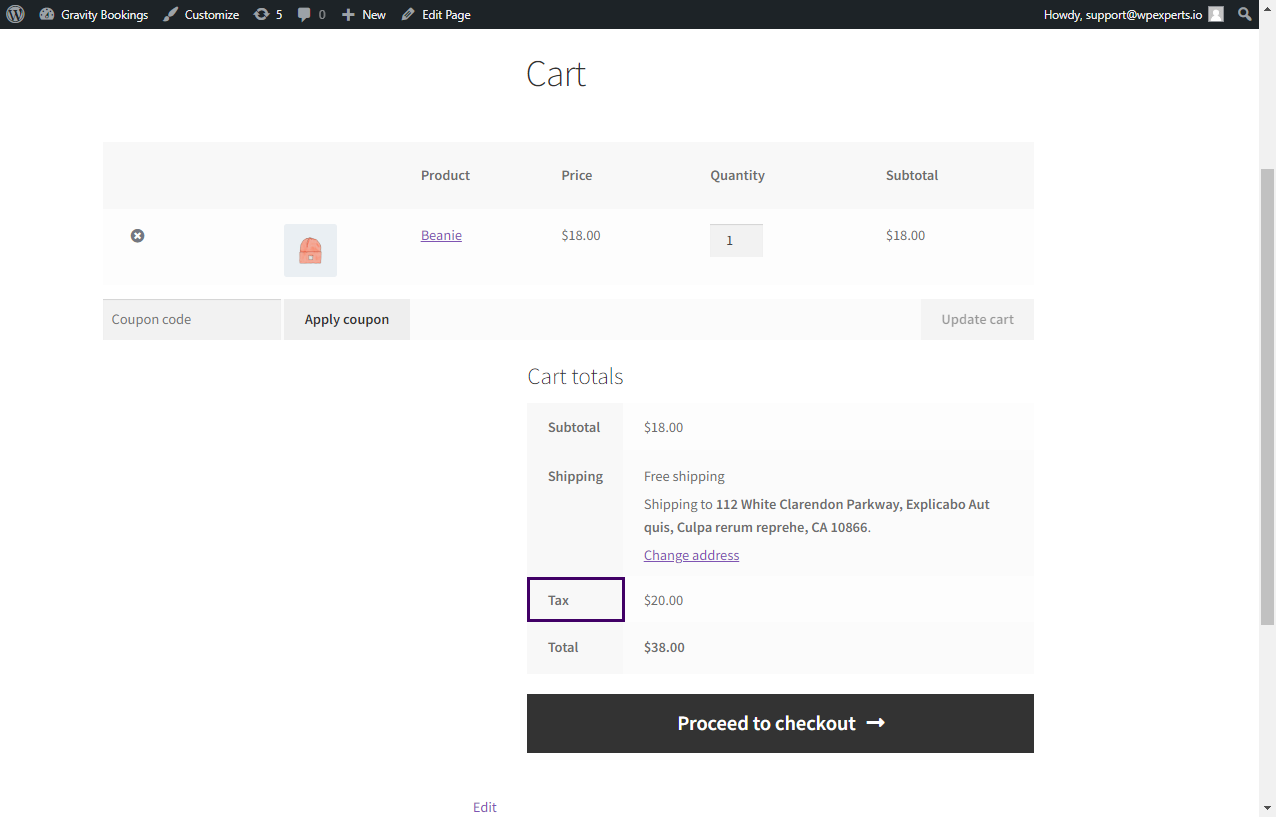
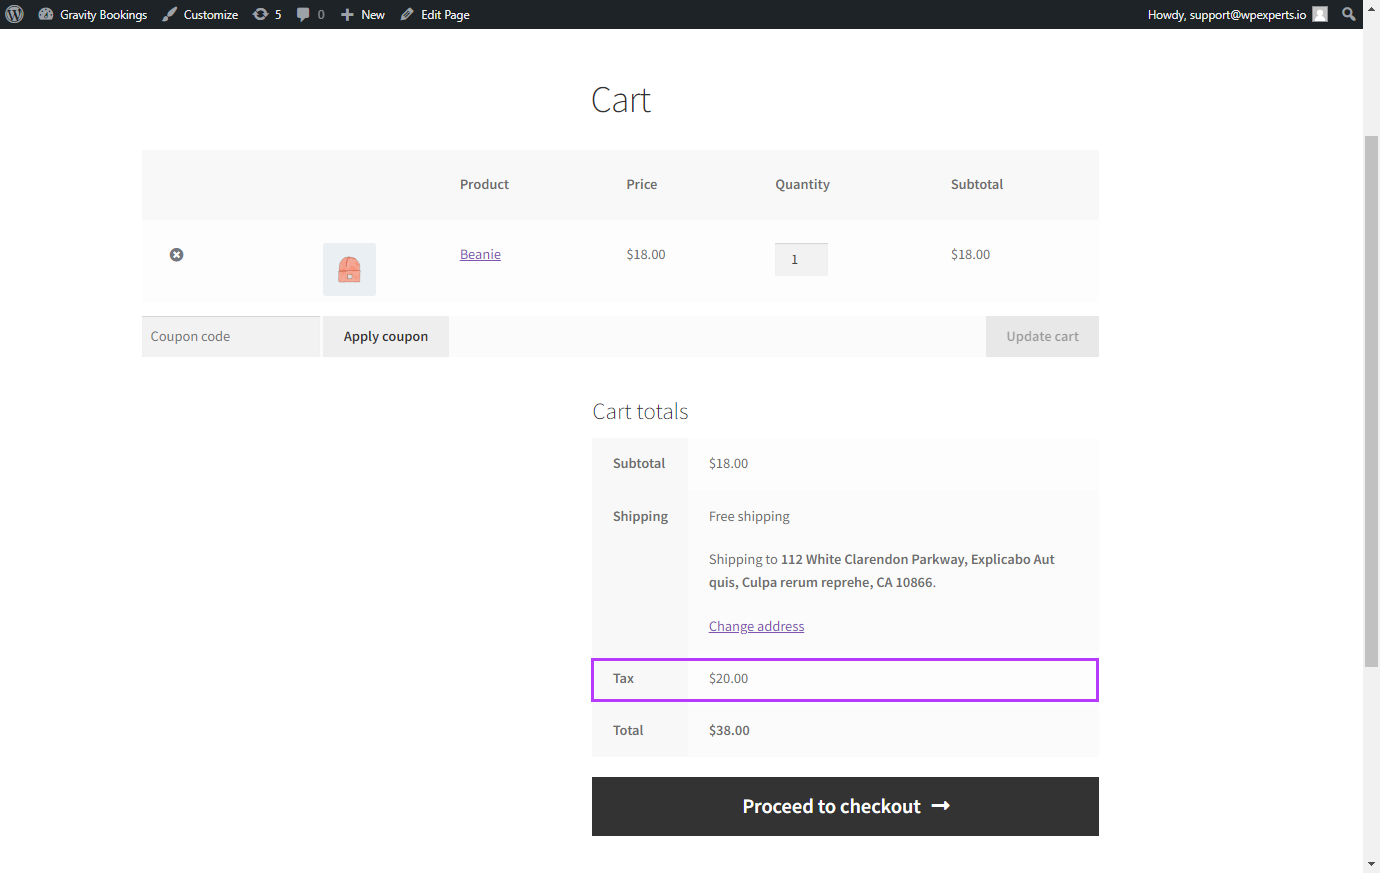
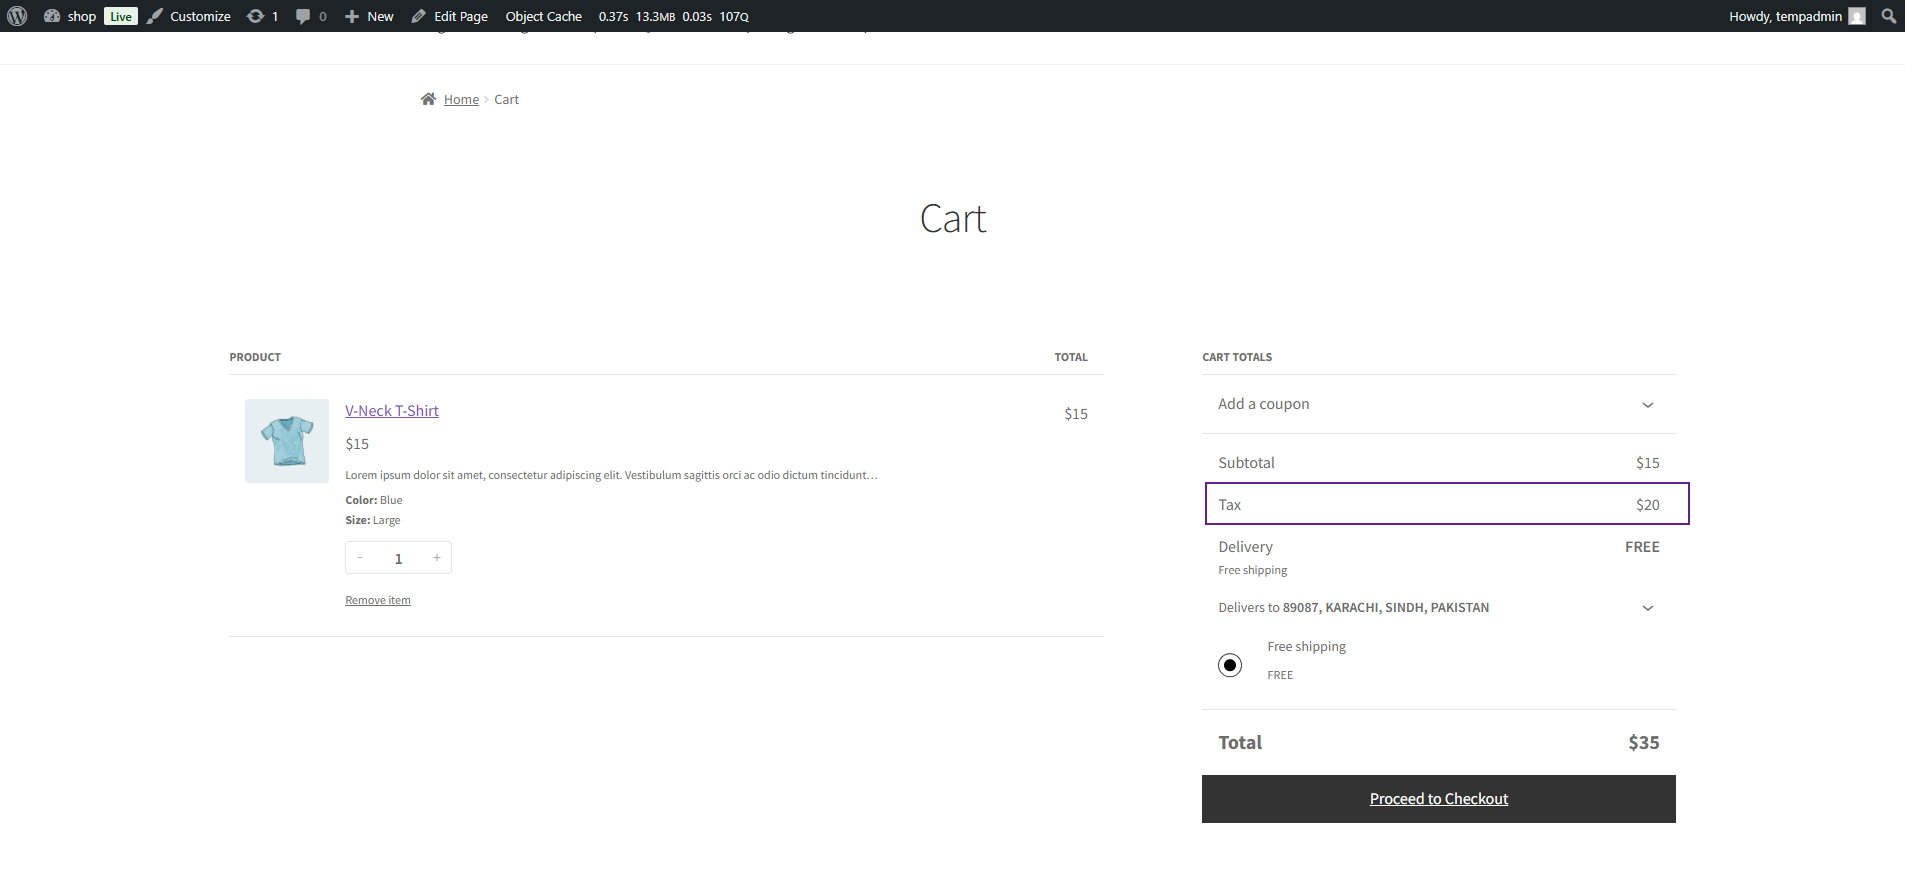
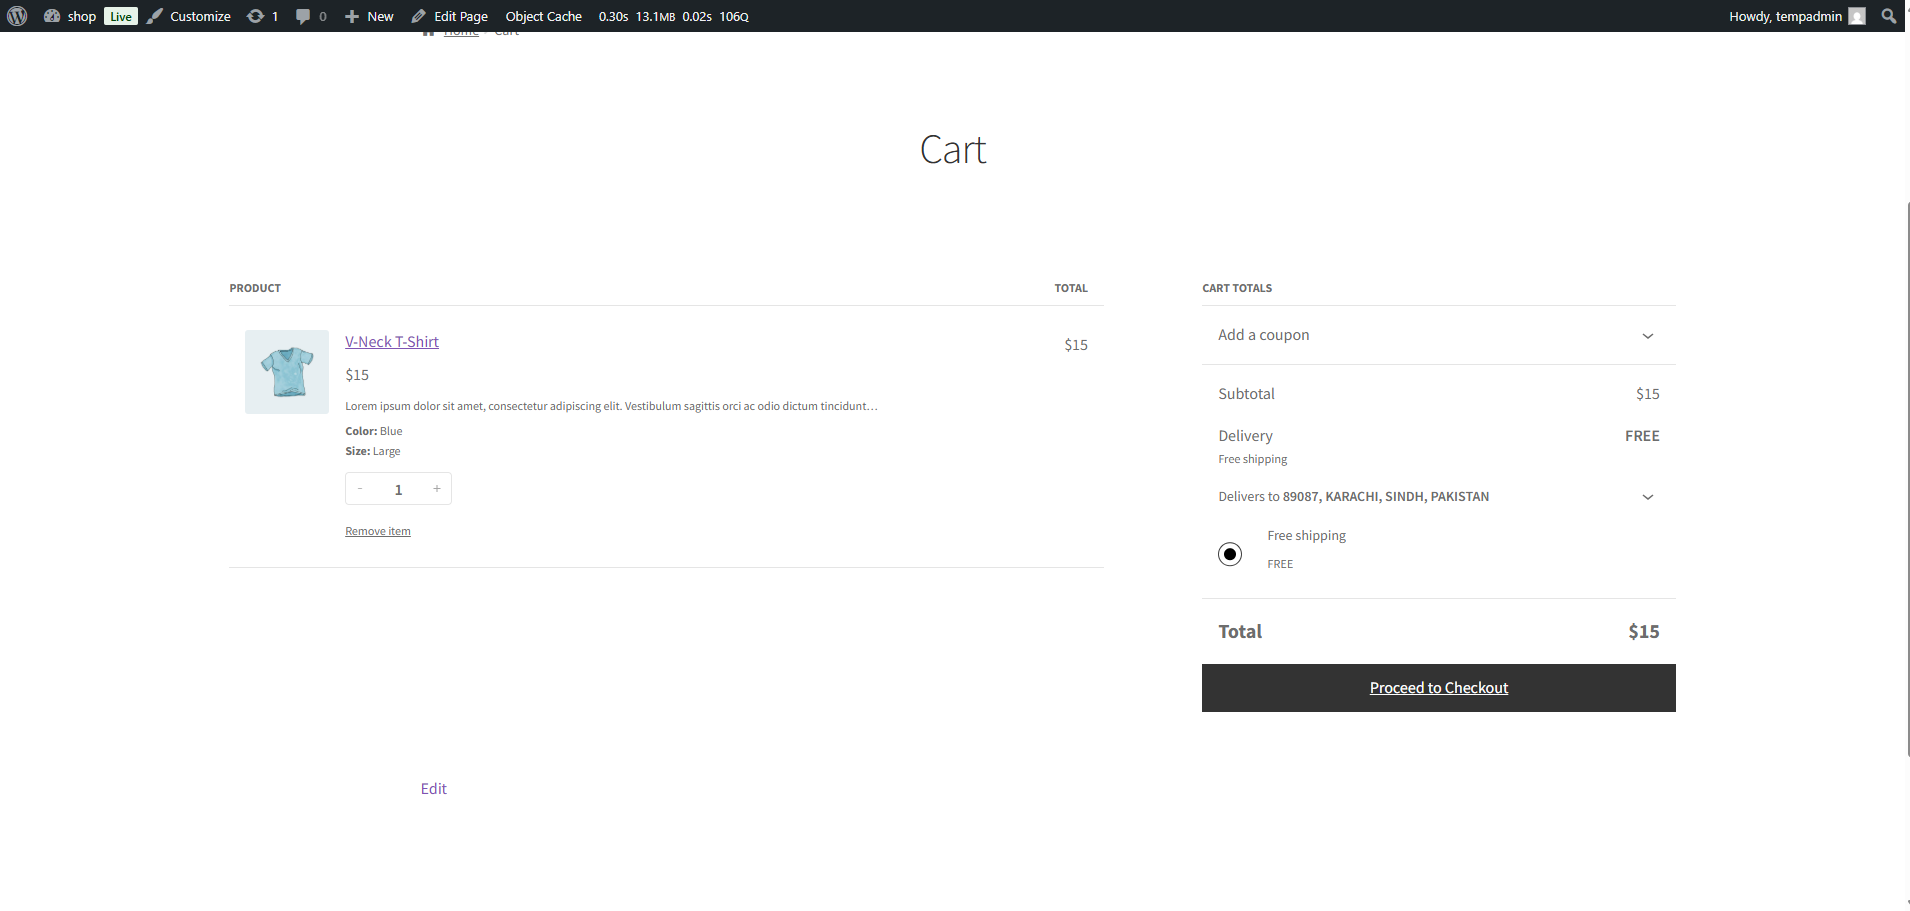
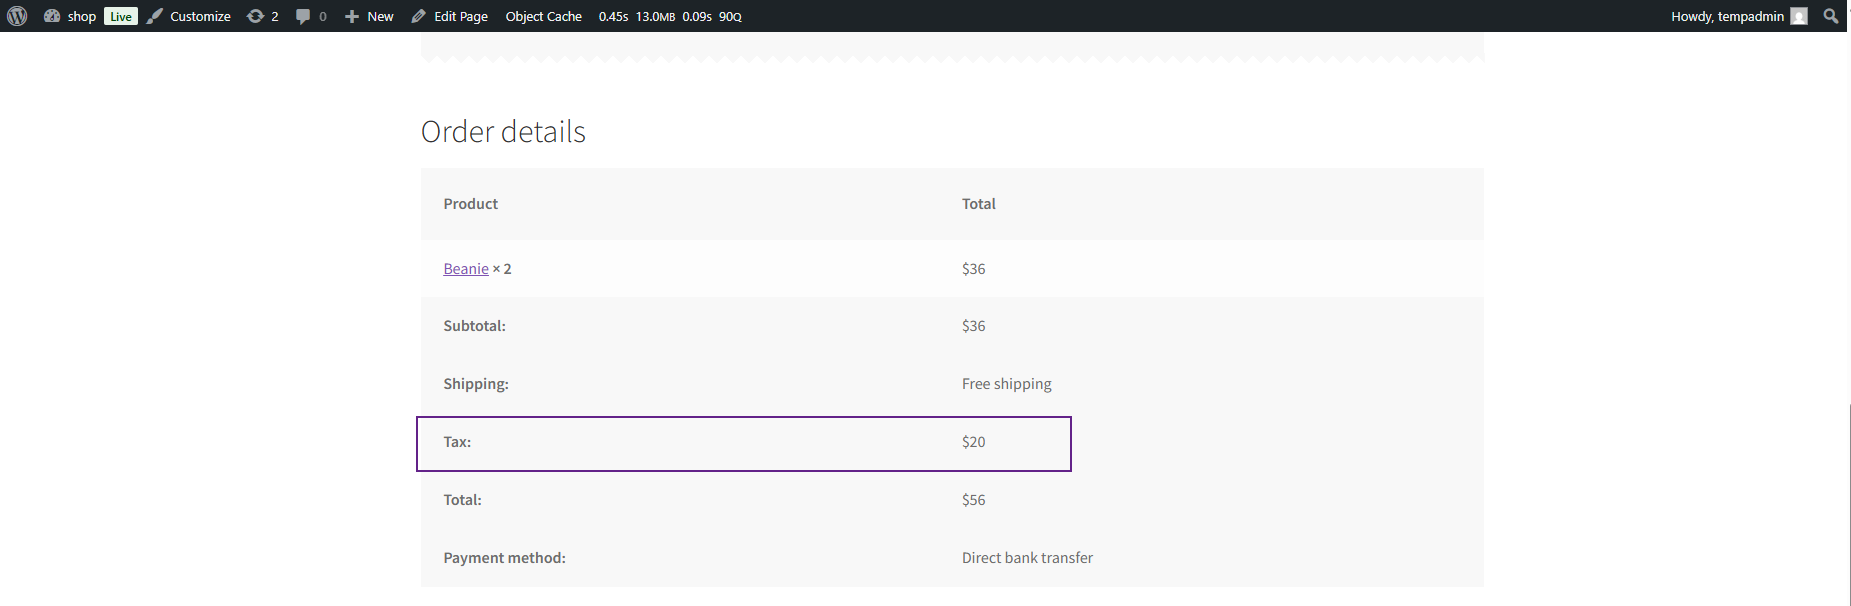
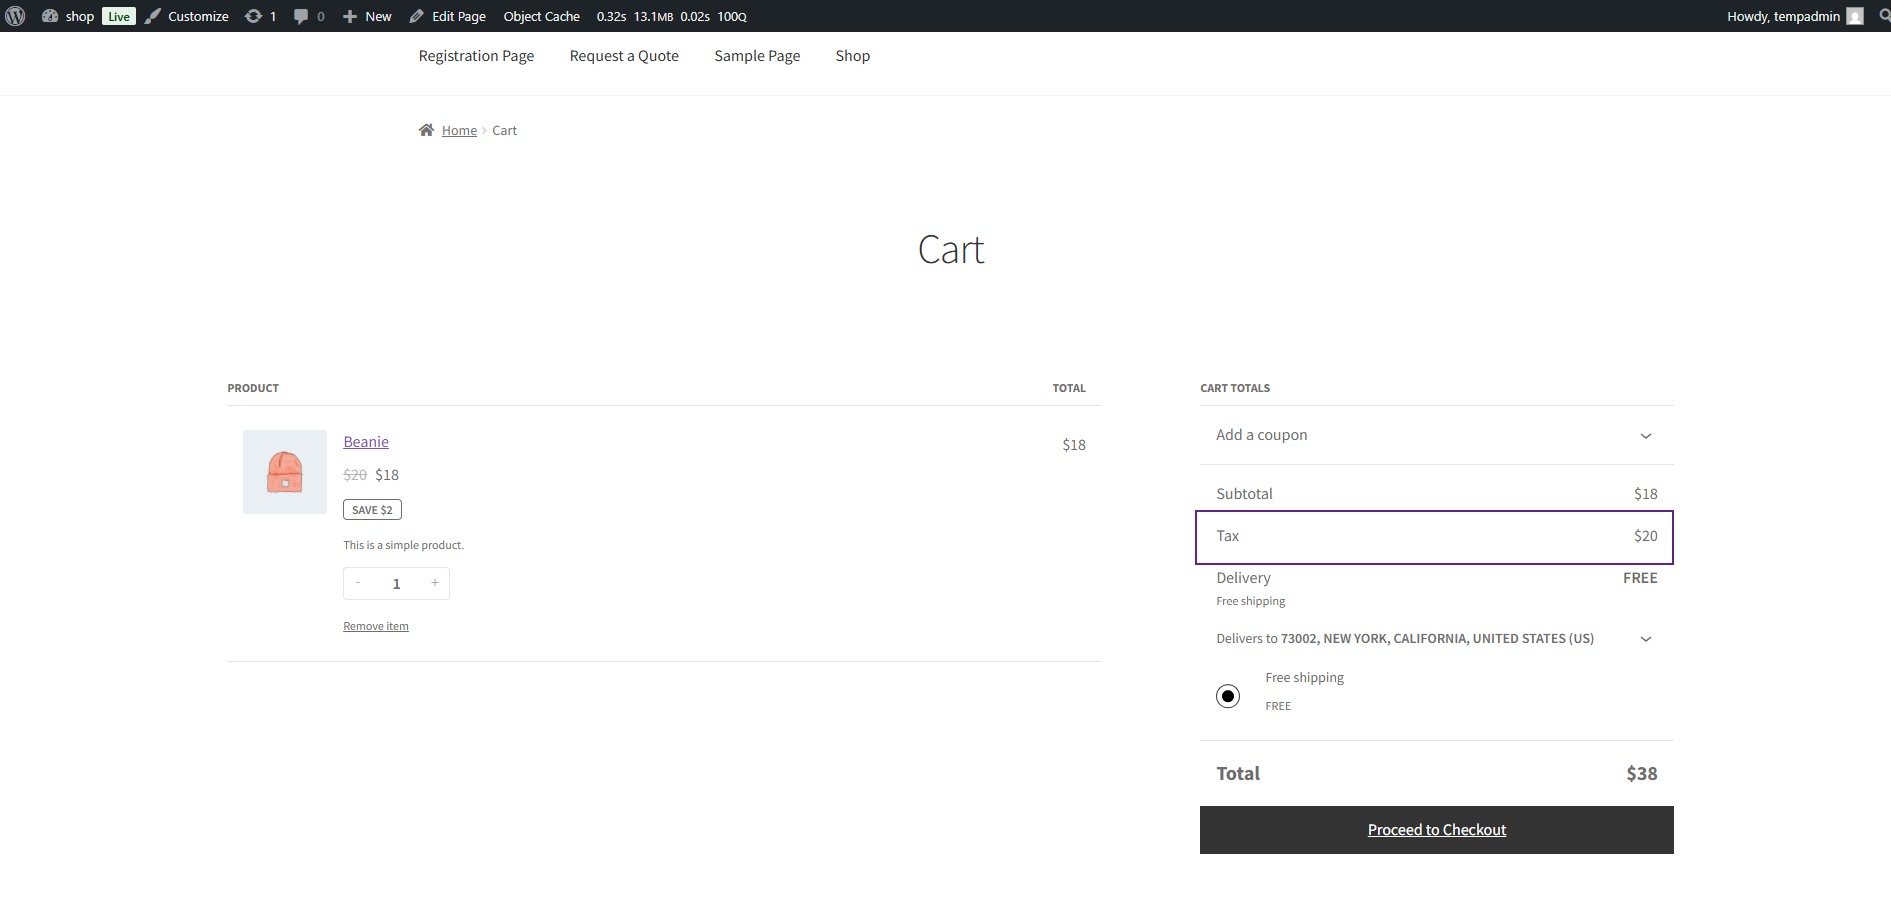
Tax Options
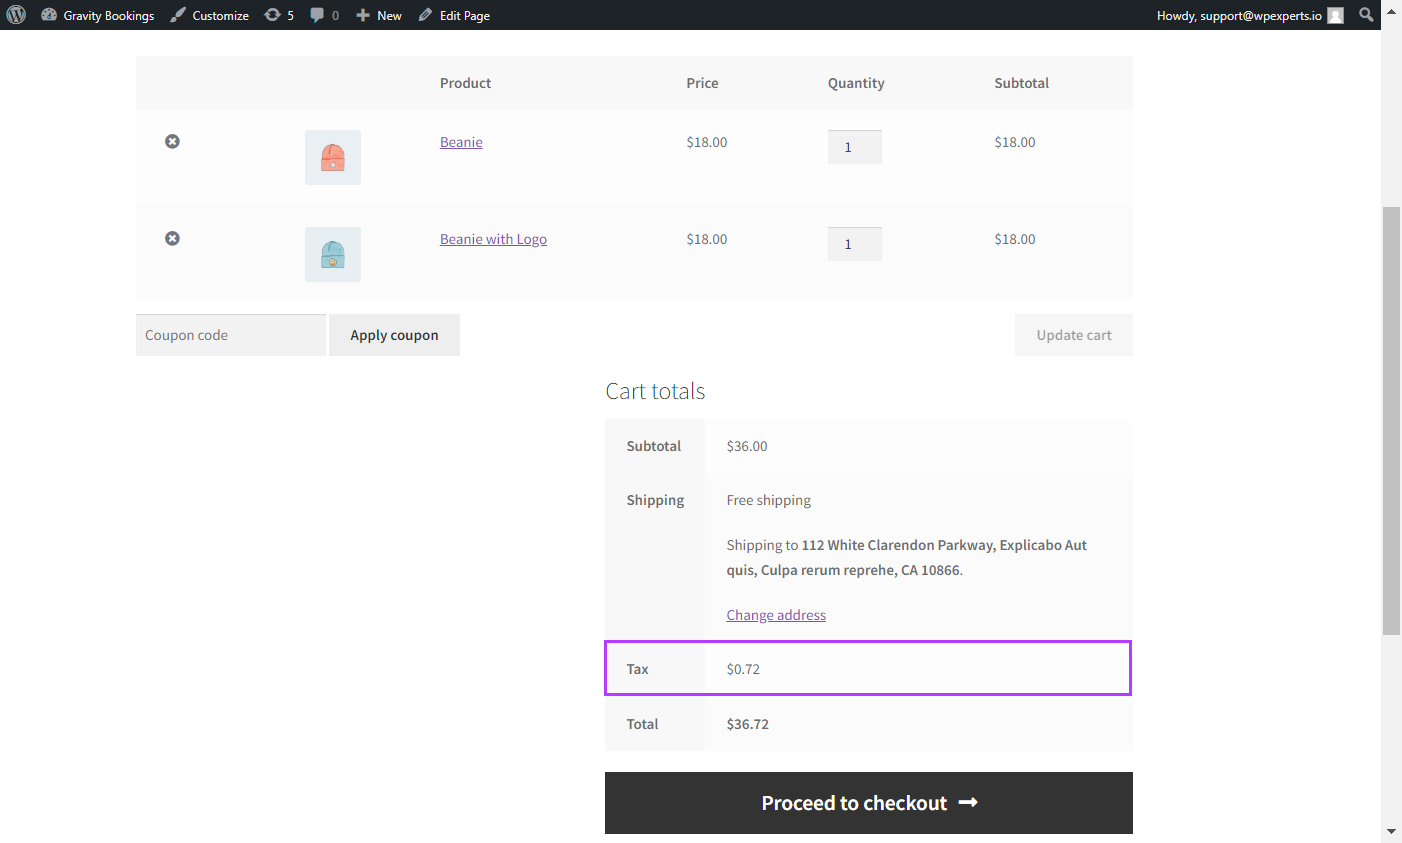
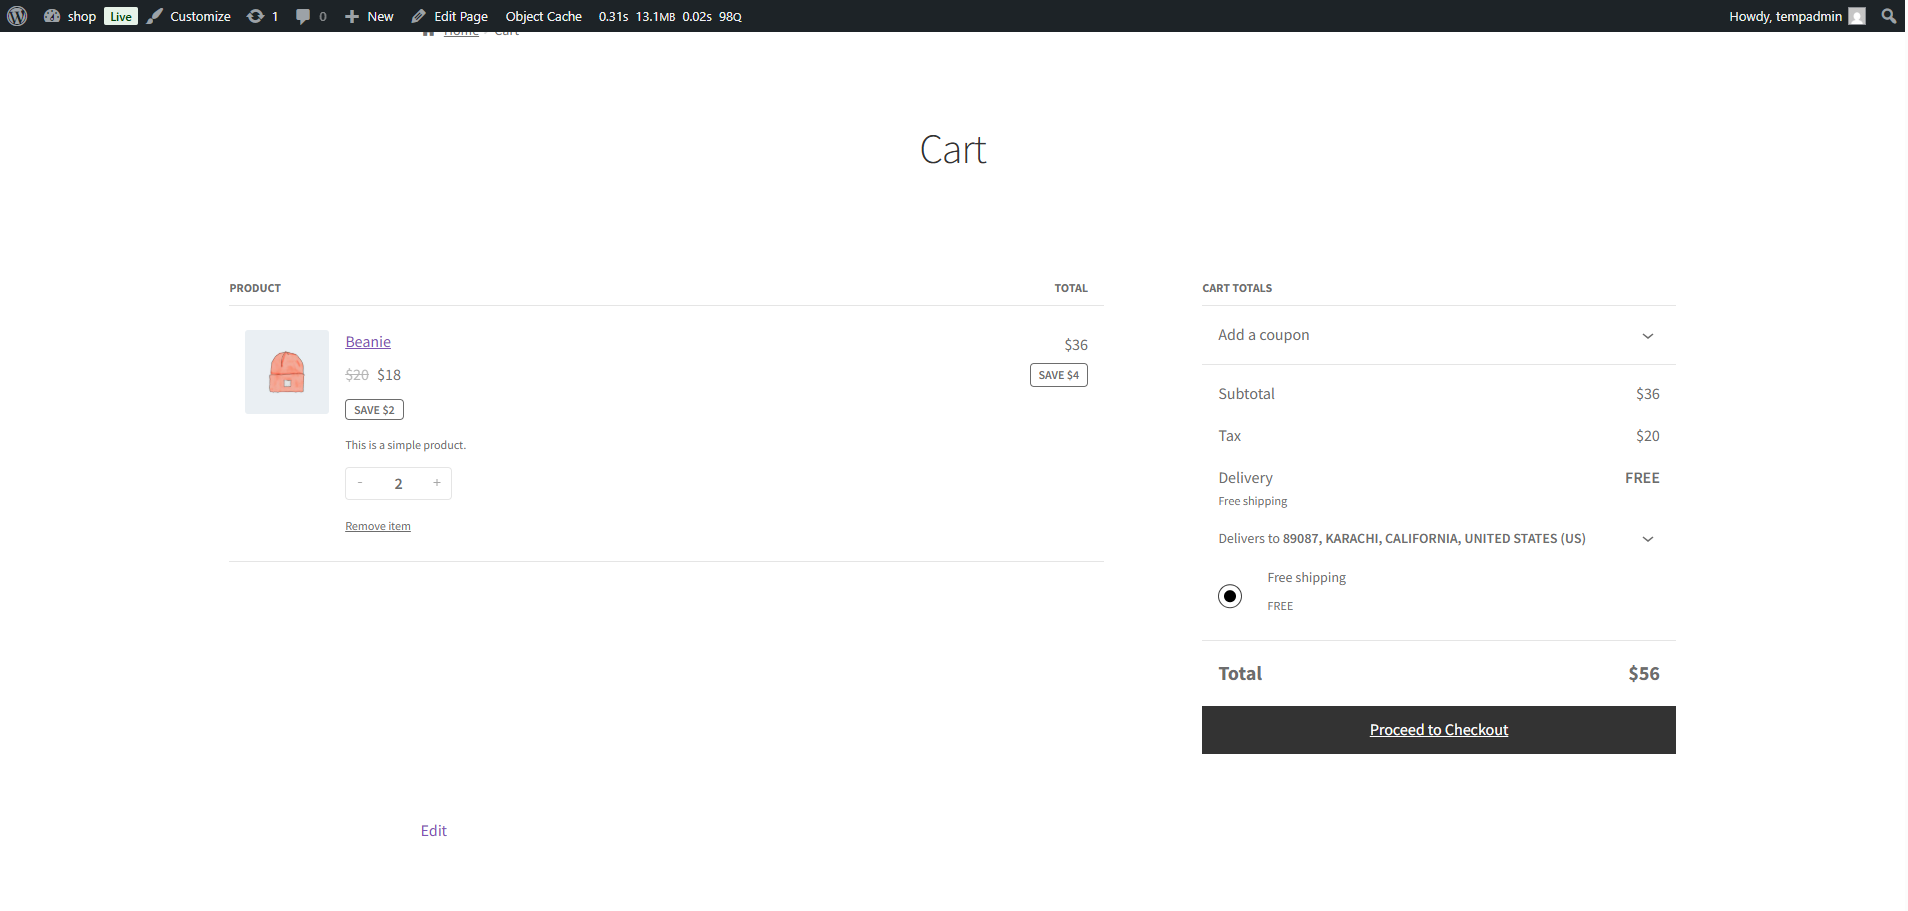
↑ Back to top- The tax option field is a select field allowing the admin to select the tax classes available. Admin will select a tax class from the Tax Class dropdown, which will be applied to the Conditional fee amount. The tax will be displayed separately and added to the Conditionals fee amount. For example, if the Conditional fee is $2 and the tax class rate is 10%, 0.2 will be added to the fees as a tax, and the Conditional fee total will be $2.02.
- Admin can select none in case tax is not required.
User & Role Options
↑ Back to top- Select the User Roles available under the User Role & Options header. Admin can select multiple user roles at the same time. A conditional fee will be displayed to users with the roles selected by the admin on the front end.

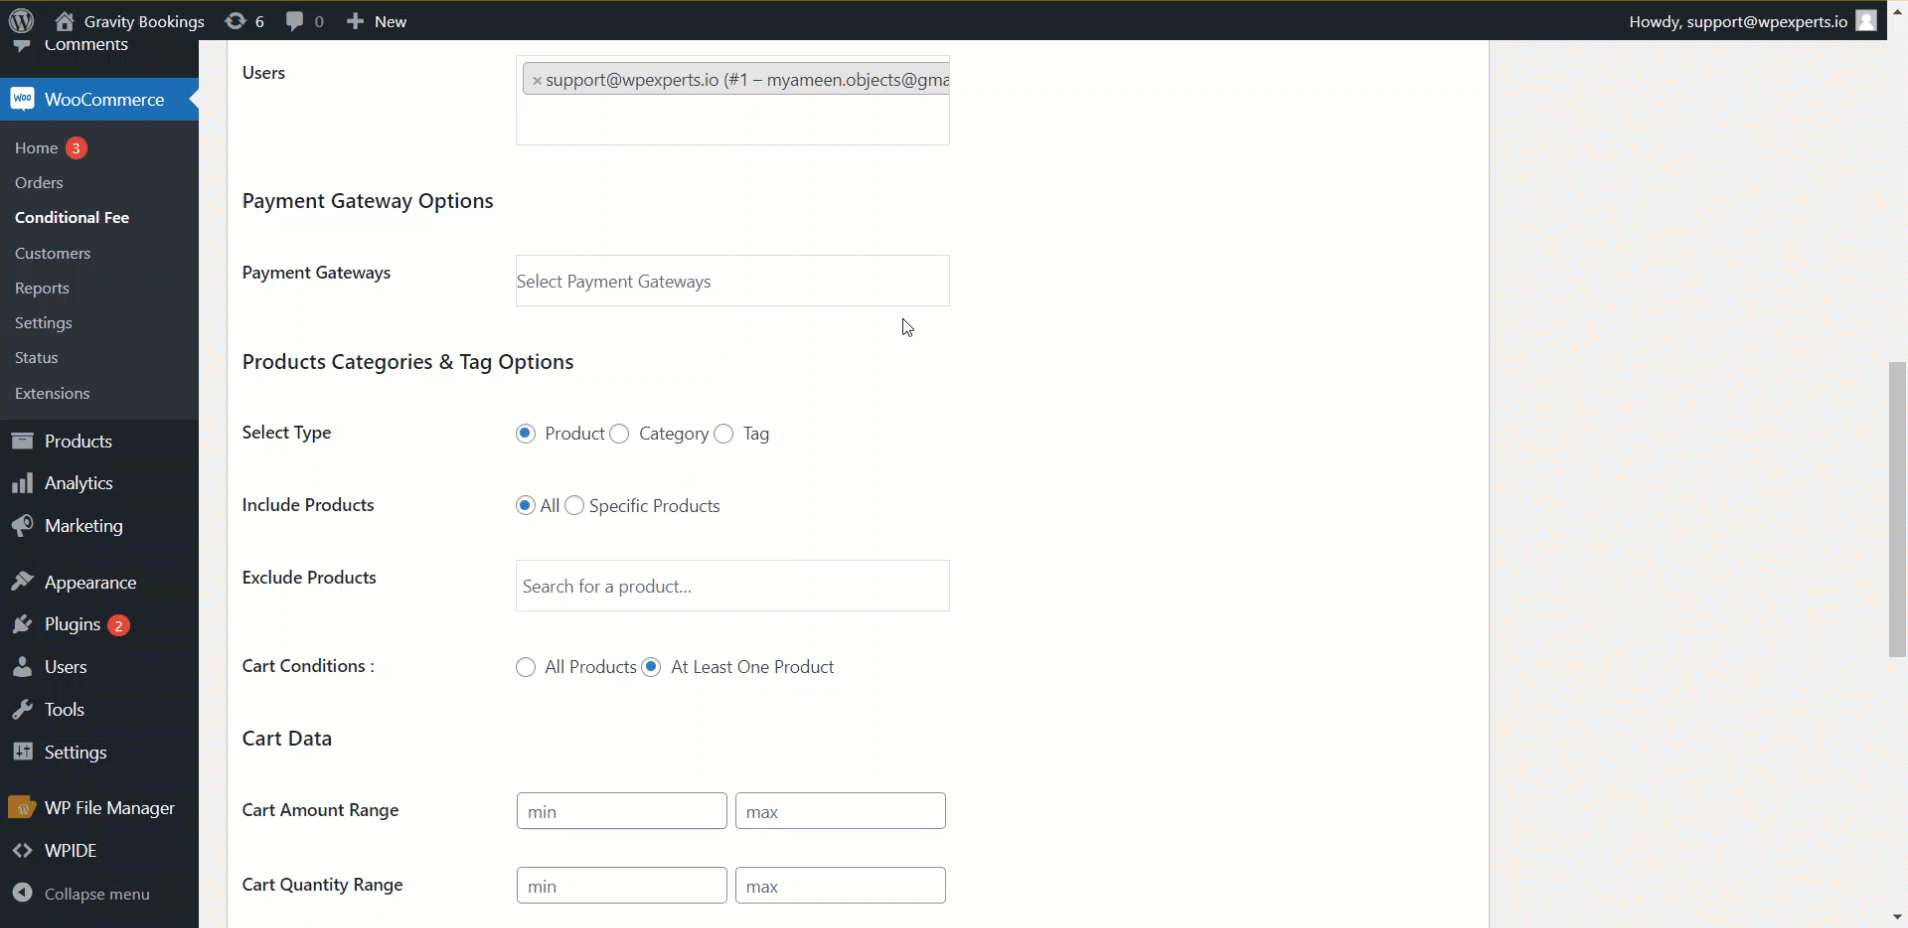
- Besides the Users tab, the admin can input the desired users’ email addresses. Multiple user emails can be selected, and the Conditional fee will be explicitly presented to those users chosen by the admin.

Payment Gateway Options
↑ Back to top- Admin can choose Payment Gateways available. When users select a gateway on the front end, the checkout page displays the applicable Conditional fees.
Please Note:
- If the field is empty, the Conditional Fee will be applicable to all the payment gateways.
- Ensure that the Payment Gateways must be enabled from the wooCommerce Payment Methods settings.
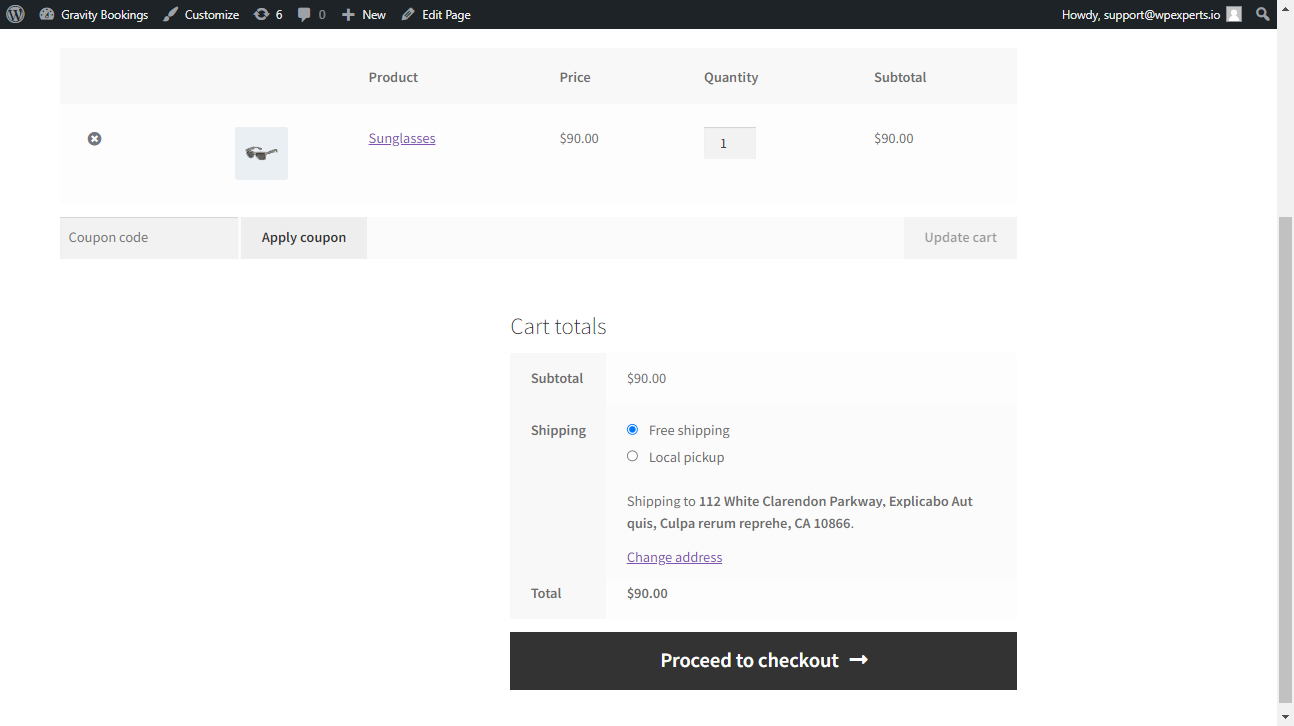
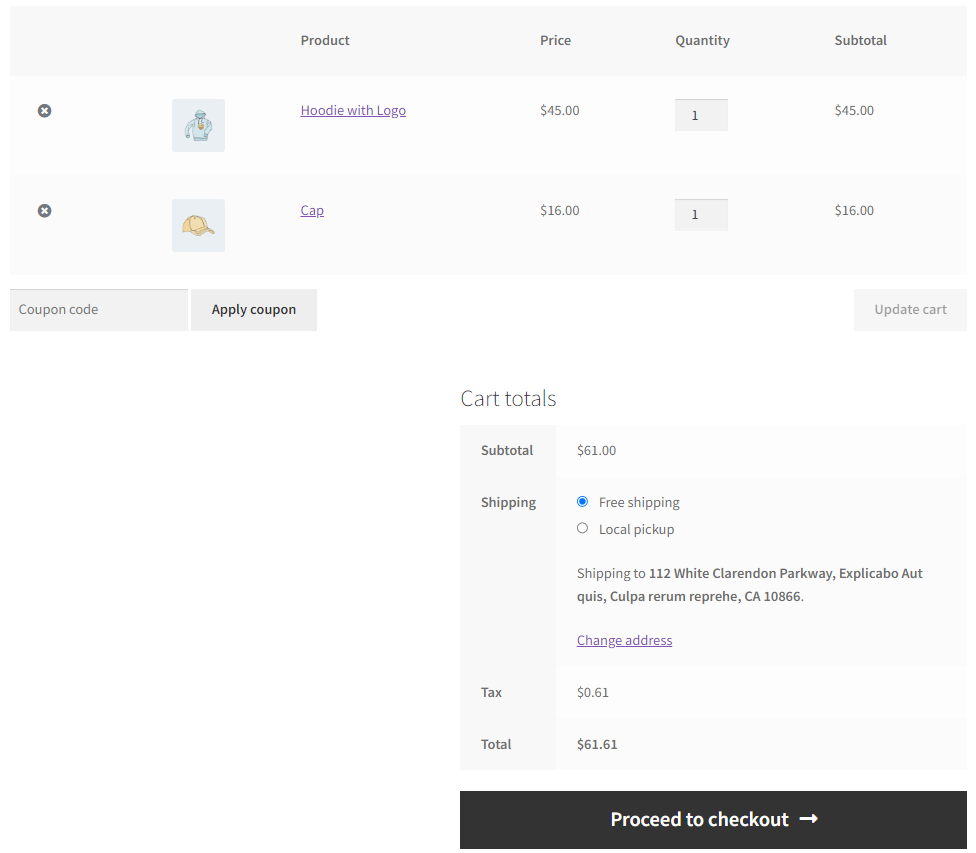
Product Categories & Tag Options
↑ Back to top- Admin can select the desired Types under the header Products Categories & Tag options. i.e., Product, Category, or Tag.
- Here, we have selected the Product radio button.
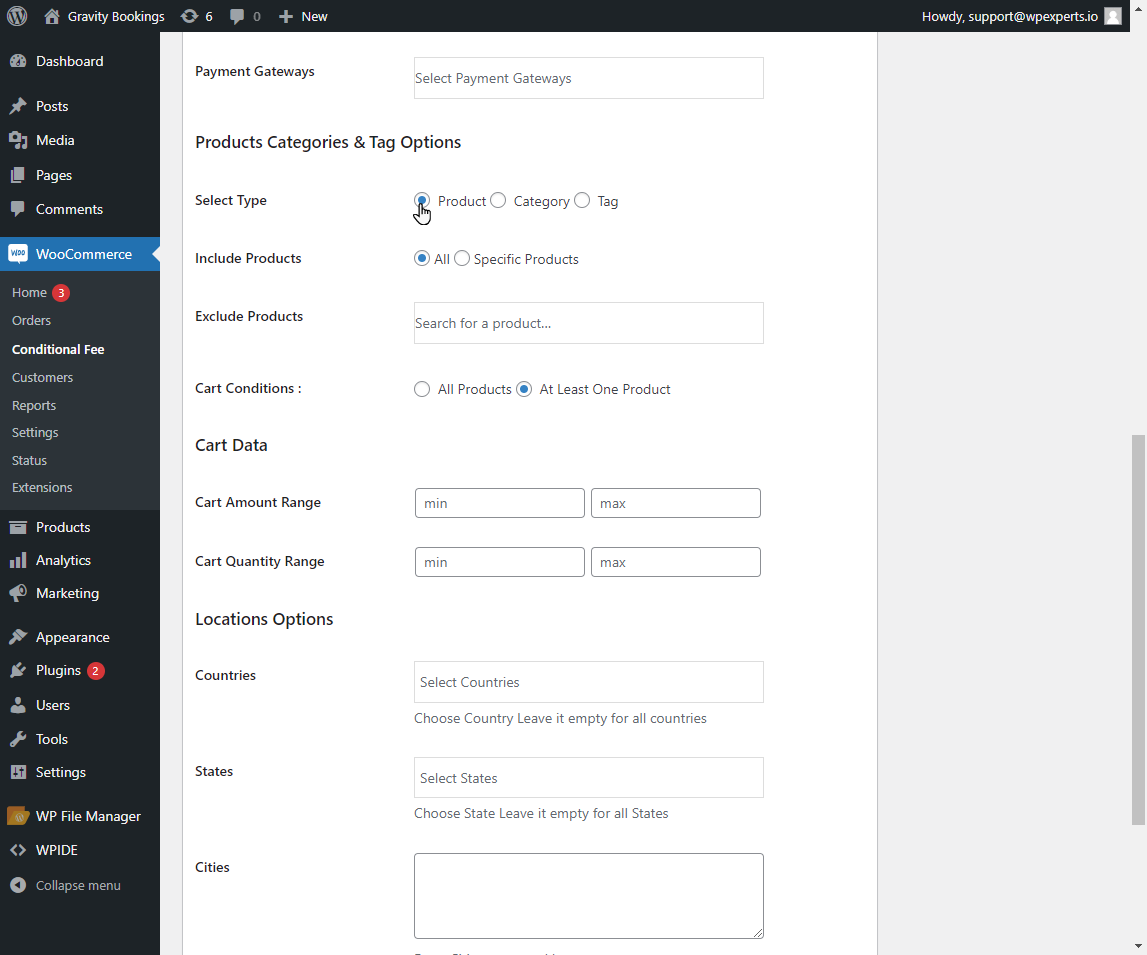
- Besides the Include Product label, there are two radio buttons: All and Specific Products.
- This option is available in all Select Types; Admin can use this feature with Products, Categories, and Tags. It works the same for each of them.
- The admin must select the All or Specific Products radio button beside the Include Products label.
- When the Admin selects the All radio button, the Conditional Fee will be applied to all the products.
- Admin can also exclude products by selecting products besides the Exclude Products label.
Please Note: The Exclude Products option is available to all Select Type when only the All radio button is selected.
Frontend Impact
Before
After

- The conditional fee will only apply to the Specified Products if the Admin selects the Specific Products radio button.
- After selecting the Specific Product radio button, select the Product from the multi-selection combo box.

Please Note: This can be specified to all Select Types, i.e., Product, Categories & Tags.
Frontend Impact
Before
After
- Select the Cart Conditions by selecting All Products or At least one Product radio button.
- Here, we are selecting the All Product radio button.
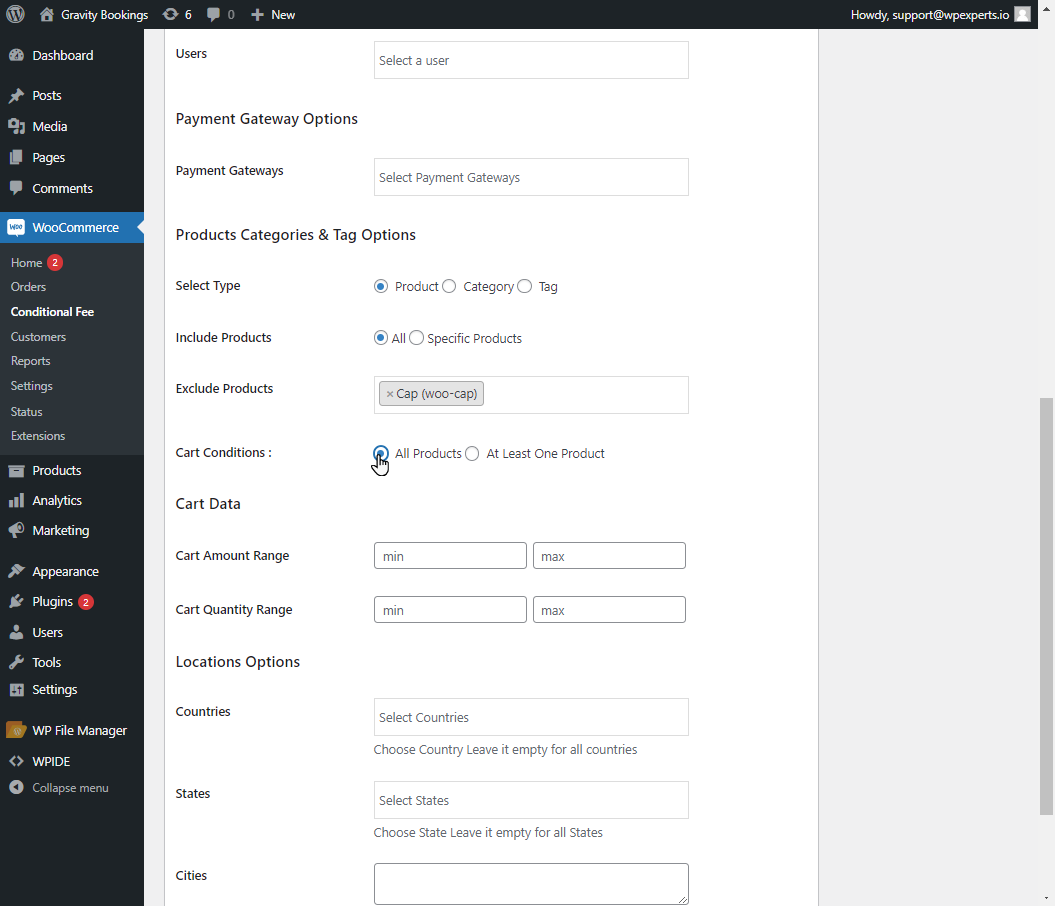
Please Note:
- When the admin chooses the All Products option and includes all products, the fee will be applied to every item in the cart, excluding the specified excluded product.
- If the admin selects the All Products option and specifies certain products, the fee only applies if those are the only items in the cart. If any other product is present, the fee won’t be applied.
- If the admin chooses the At least one Product option and includes all products, the fee will apply to all items in the cart, excluding the specified excluded product. However, it’s important to have at least one product in the cart for the fee to be applicable.
- If the admin selects the At least one Product option and specifies certain products, the fee is activated, but at least one specified product from the backend must be present in the cart for the fee to take effect.
Frontend Impact
- Here, the conditional fee is applied to all the items.
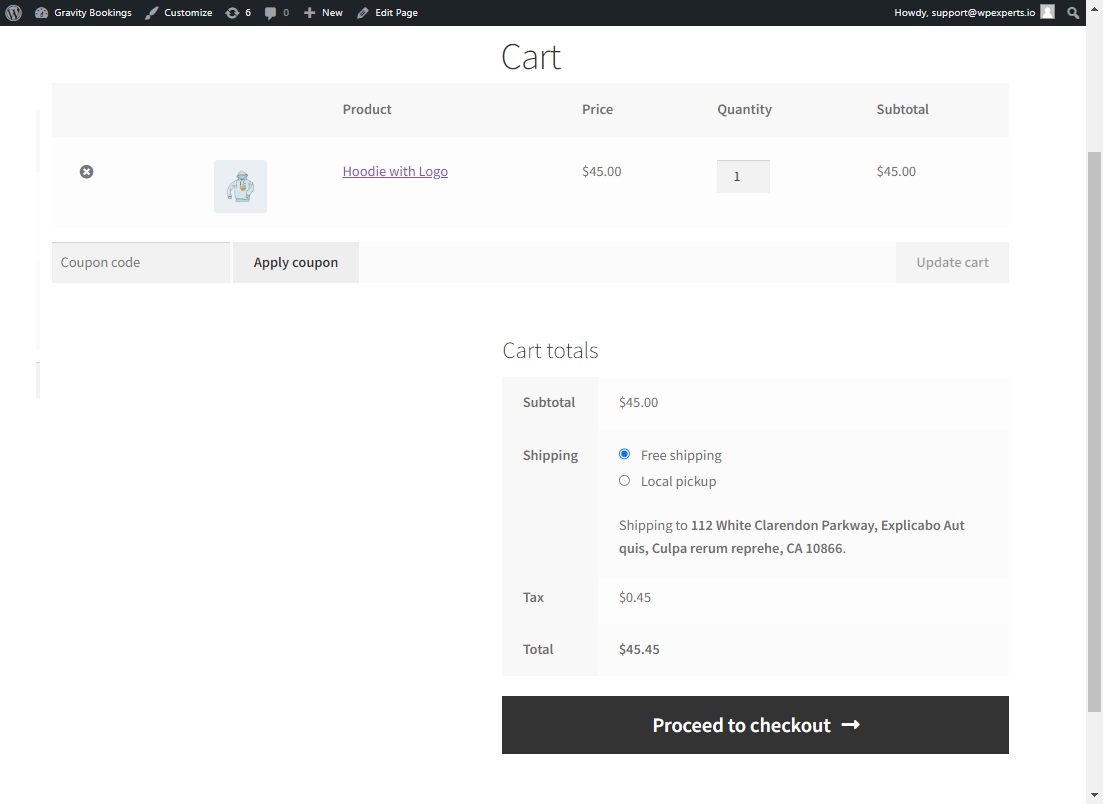
- The conditional fee won’t apply to the excluded products.
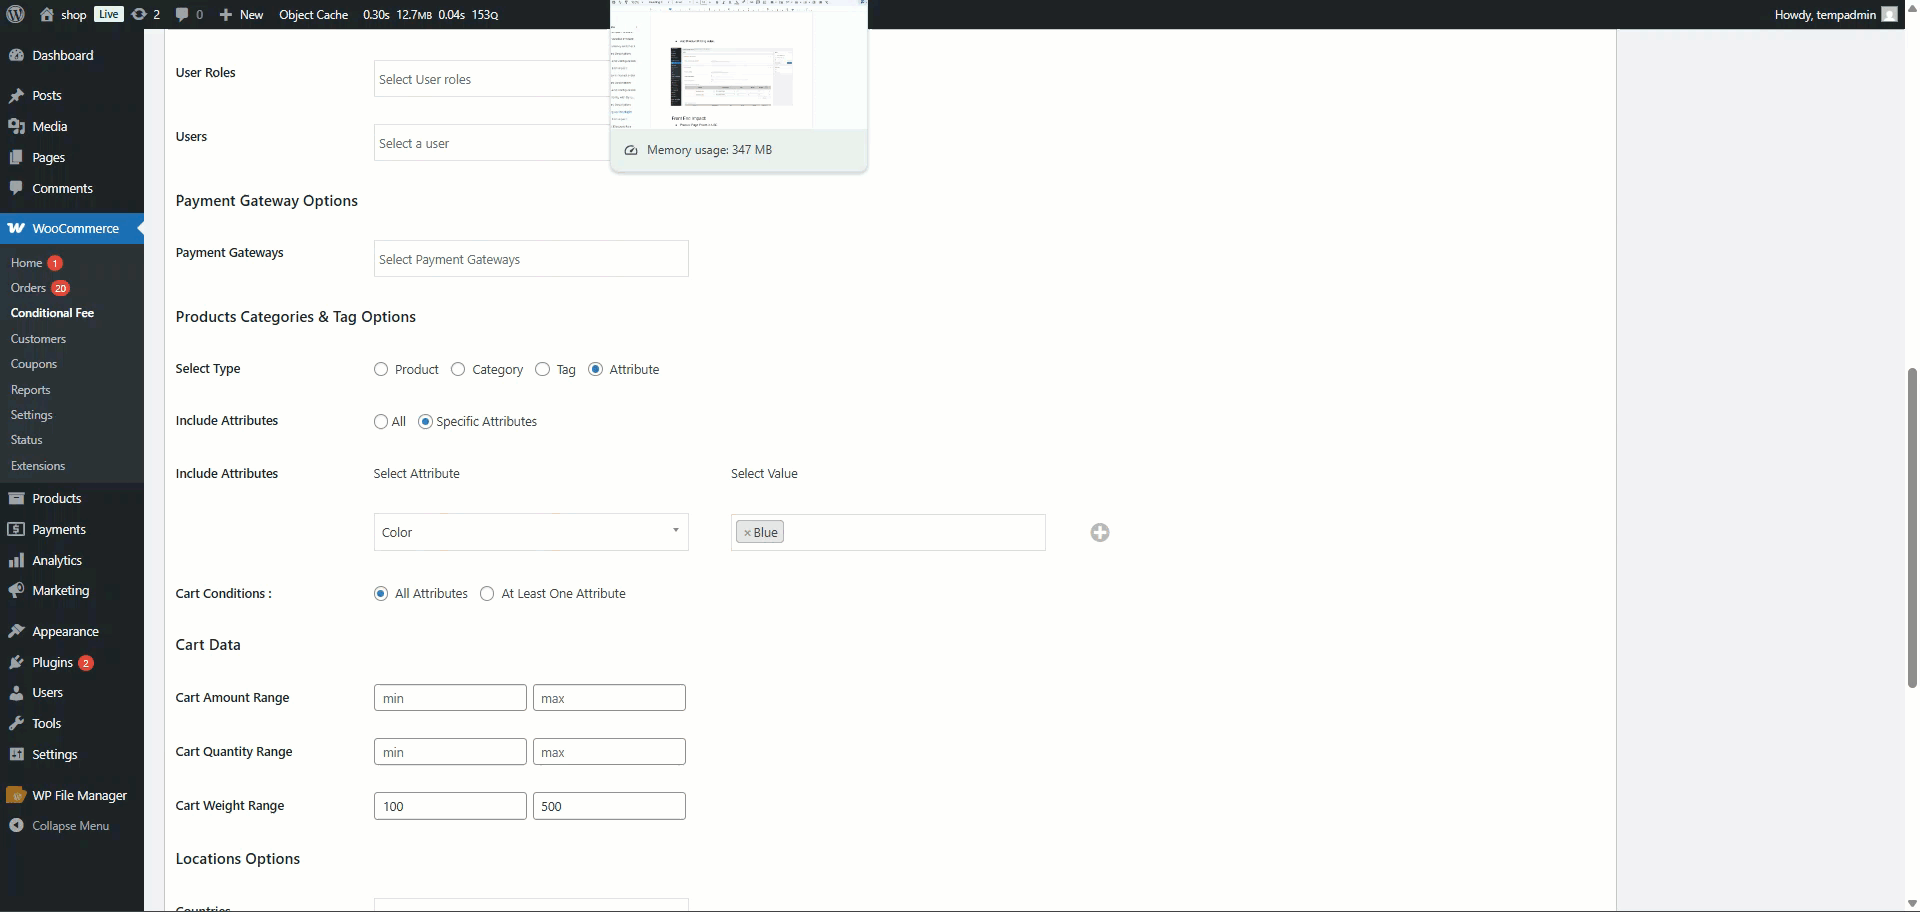
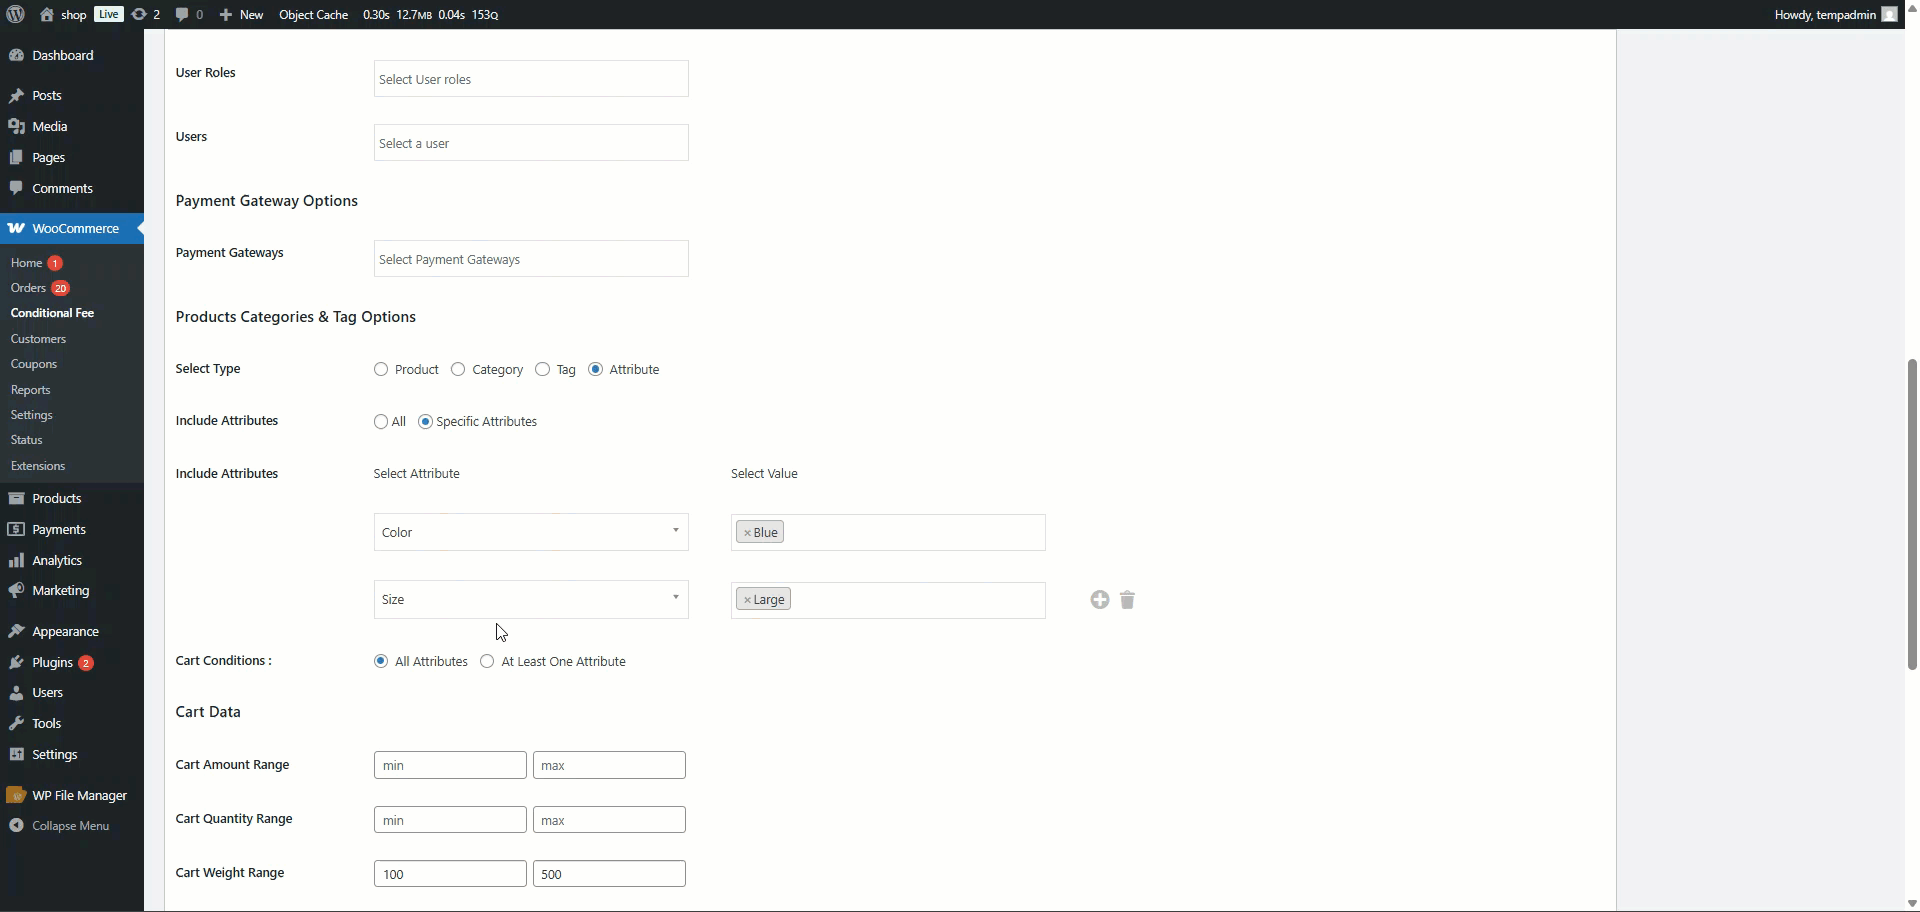
Attribute
↑ Back to topAttribute-Based Fee allows you to apply extra fees based on product attributes (like color or size) in the cart, with options to include or exclude specific attributes.
- Navigate to: WooCommerce > Conditional Fee
- Click Add New Fee Rule or edit an existing one.
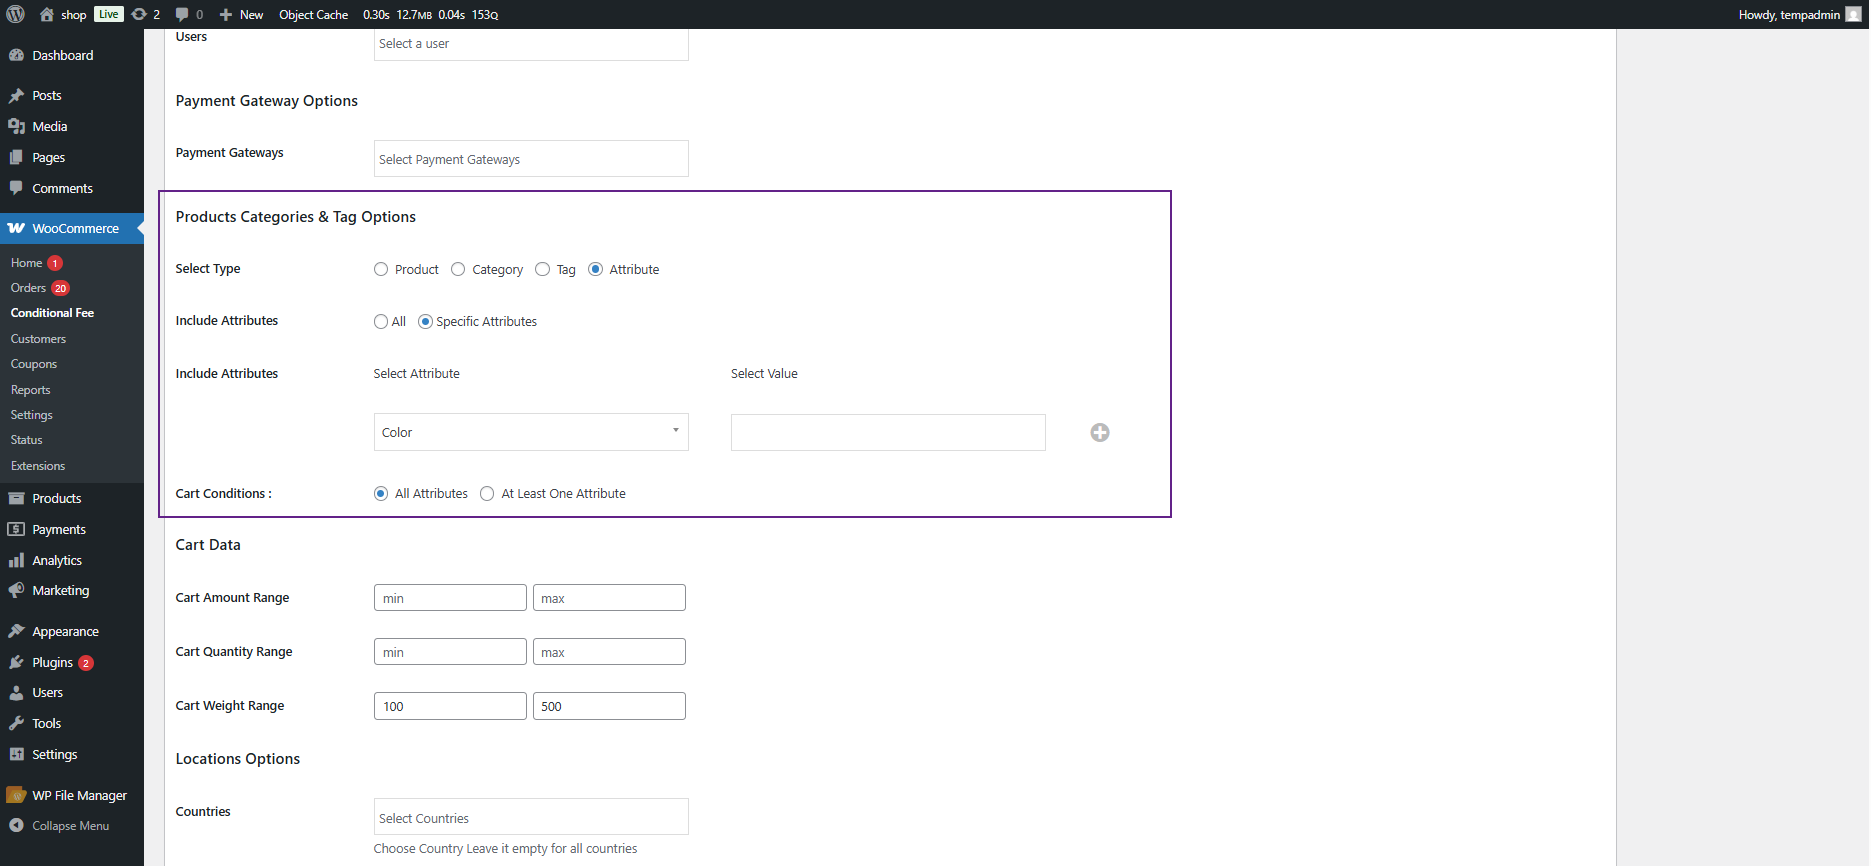
- In the Products, Categories & Tag Options section, select the Attribute radio button under Select Type.
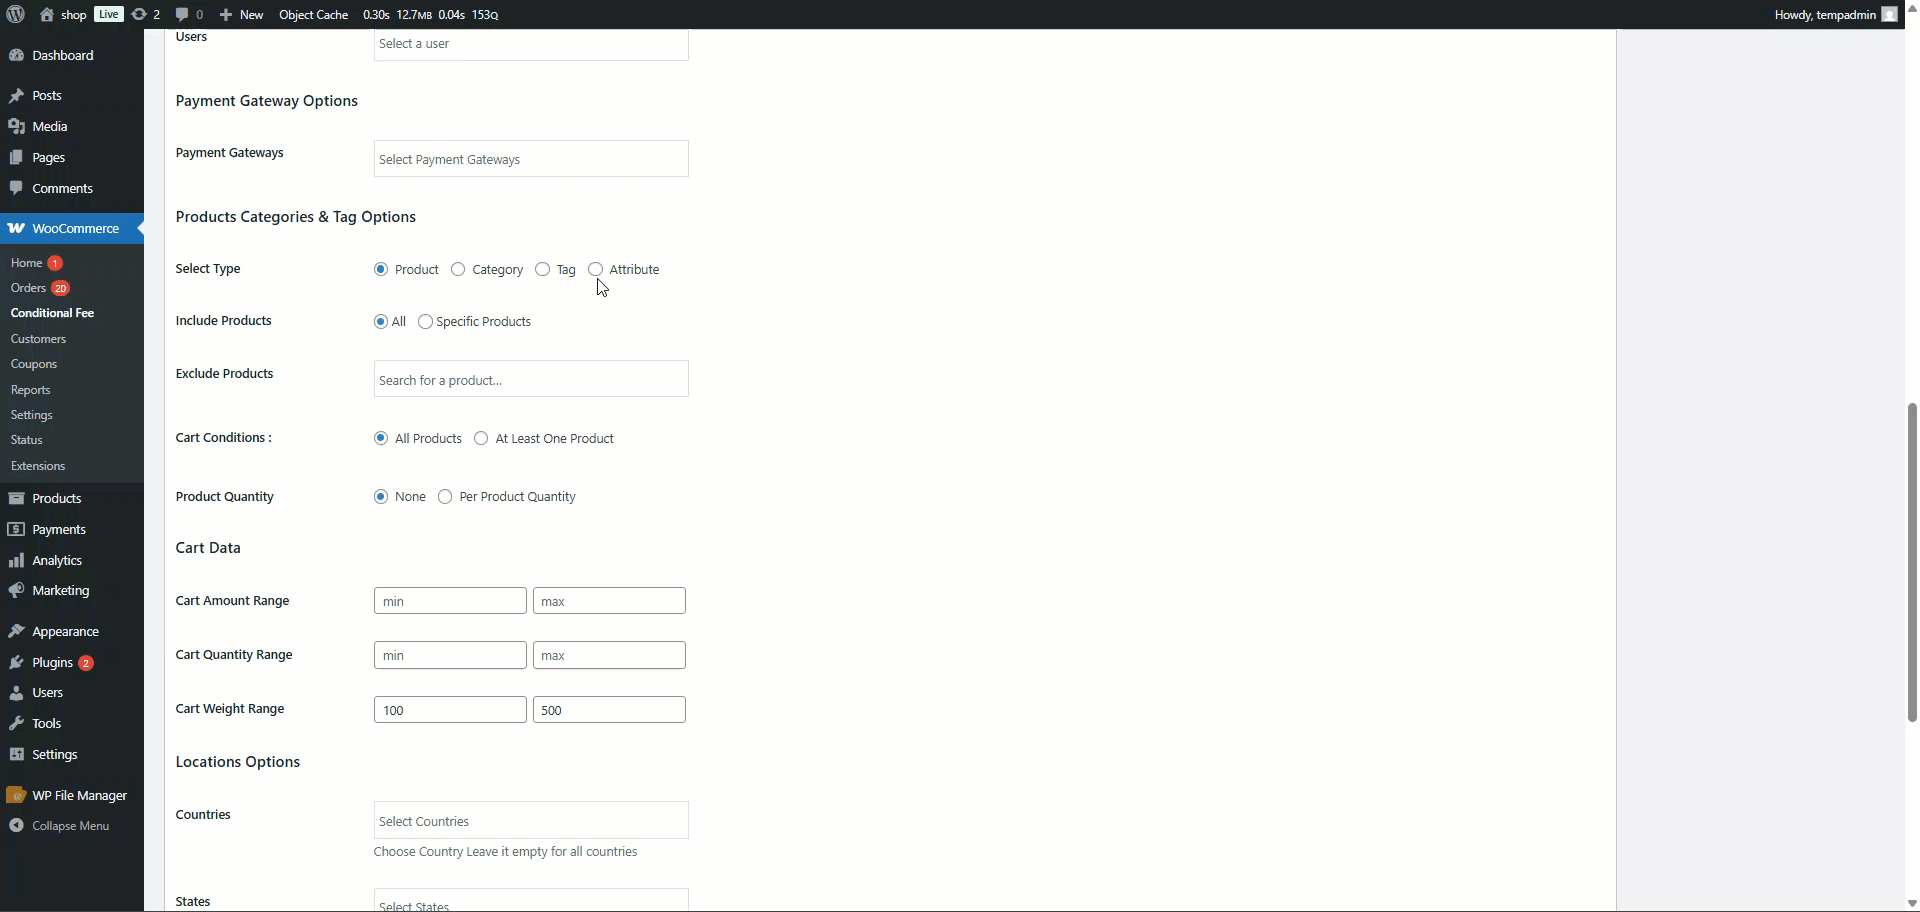
- Once selected, the Include Attributes setting will appear with the following two options:
Include Attributes
↑ Back to top- This setting defines how attributes should be matched to trigger the conditional fee:
All Attributes
- Applies the fee when any product in the cart has an assigned attribute.
- This is a broad condition and does not require selecting specific attributes or values.
- Displays the Exclude Attributes field, allowing you to specify attributes that should not trigger the fee.
Specific Attributes
- It lets you define attribute-based conditions that must be met to apply the fee.
- Activates the Select Attributes section for detailed configuration.
- Exclude Attributes are not available in this mode, as only the defined conditions are used.
Select Attributes – When Specific Attributes is selected
↑ Back to topWhen Specific Attributes is selected, a dynamic field group appears to let you define one or more attribute rules.
Each row contains:
- Select Attribute
A dropdown showing all available product attributes (e.g., Color, Size). Only one attribute can be selected per row.
- Select Value
A multi-select box showing all values for the selected attribute (e.g., Red, Blue, Green). You can select multiple values.
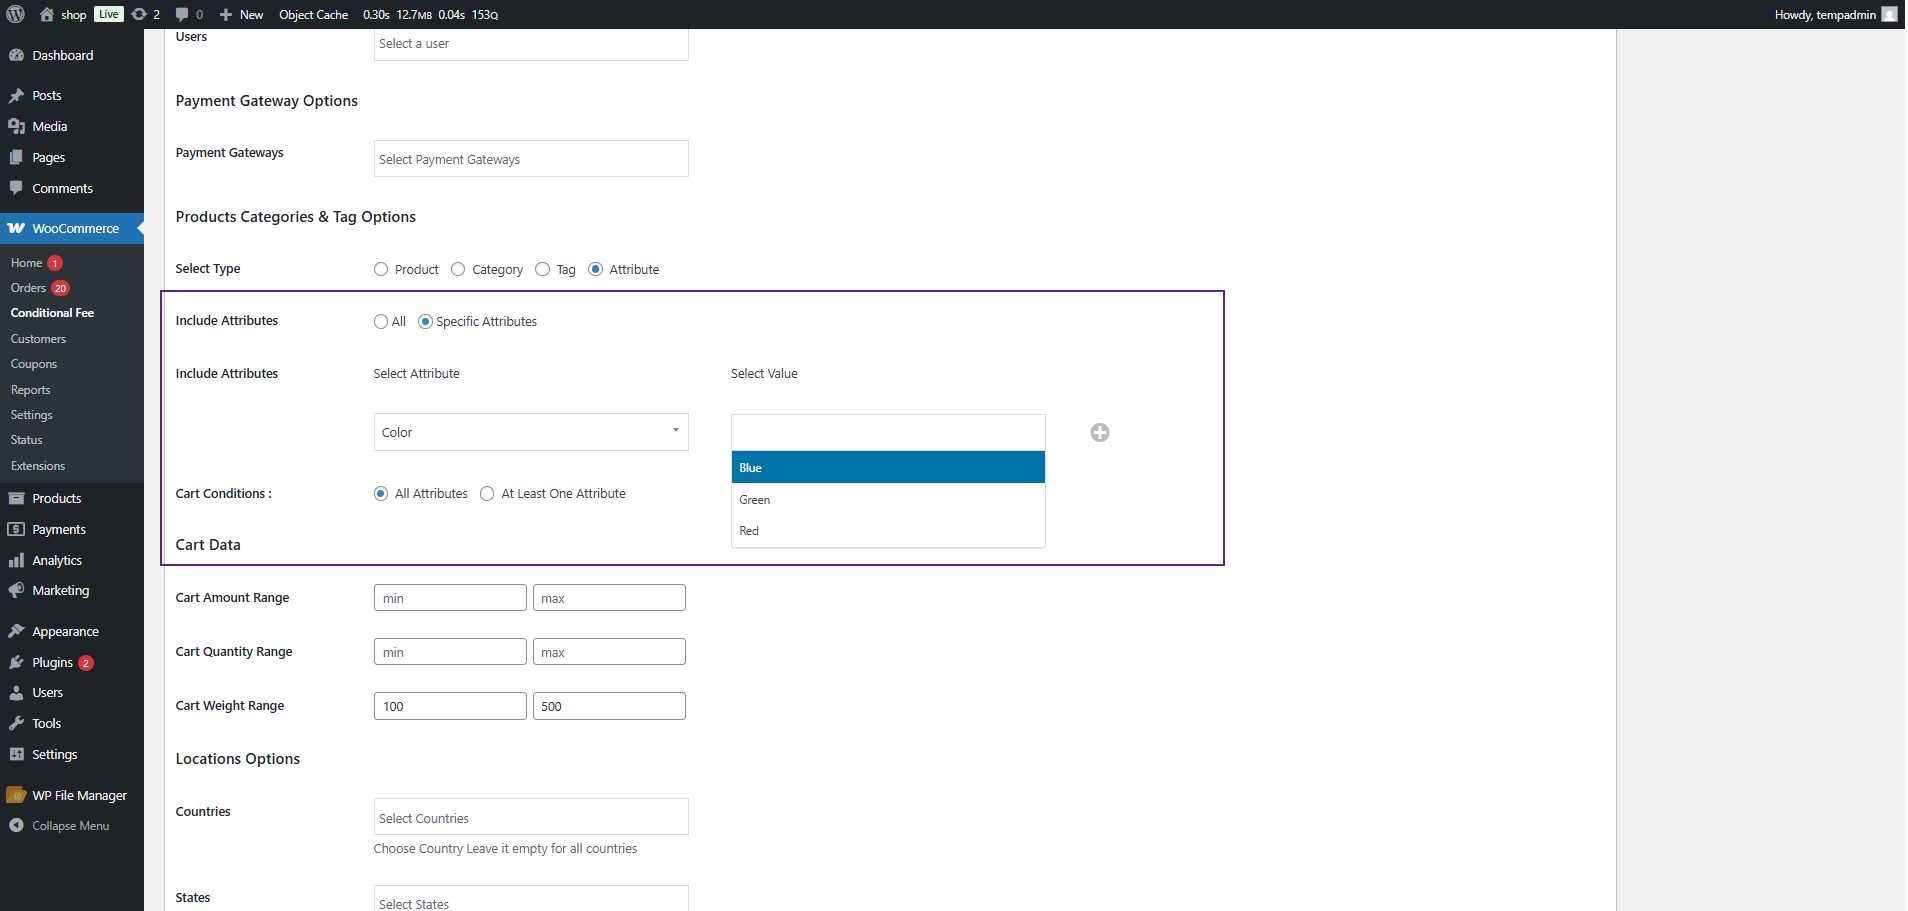
- You can click the Add (+) button to create multiple rows, each with a different attribute or a combination of different values.
Exclude Attributes – Only when All Attributes are selected
↑ Back to top- When Include Attributes is set to All Attributes, the Exclude Attributes field becomes available.
- You can choose attributes (or values) that will be excluded from the fee condition, even if other attributes match.
- This helps filter out exceptions when applying a broad condition.

Cart Condition
↑ Back to topThe Attribute option works with both Cart Condition settings:
- All Products
The fee applies only if every product in the cart matches the attribute rule(s). - At Least One Product
A fee applies if at least one product matches the attribute rule(s).
Frontend Impact
↑ Back to top- Navigate to the Shop page on your website.
- Add a product to the cart that matches the configured conditional fee rule’s attributes.
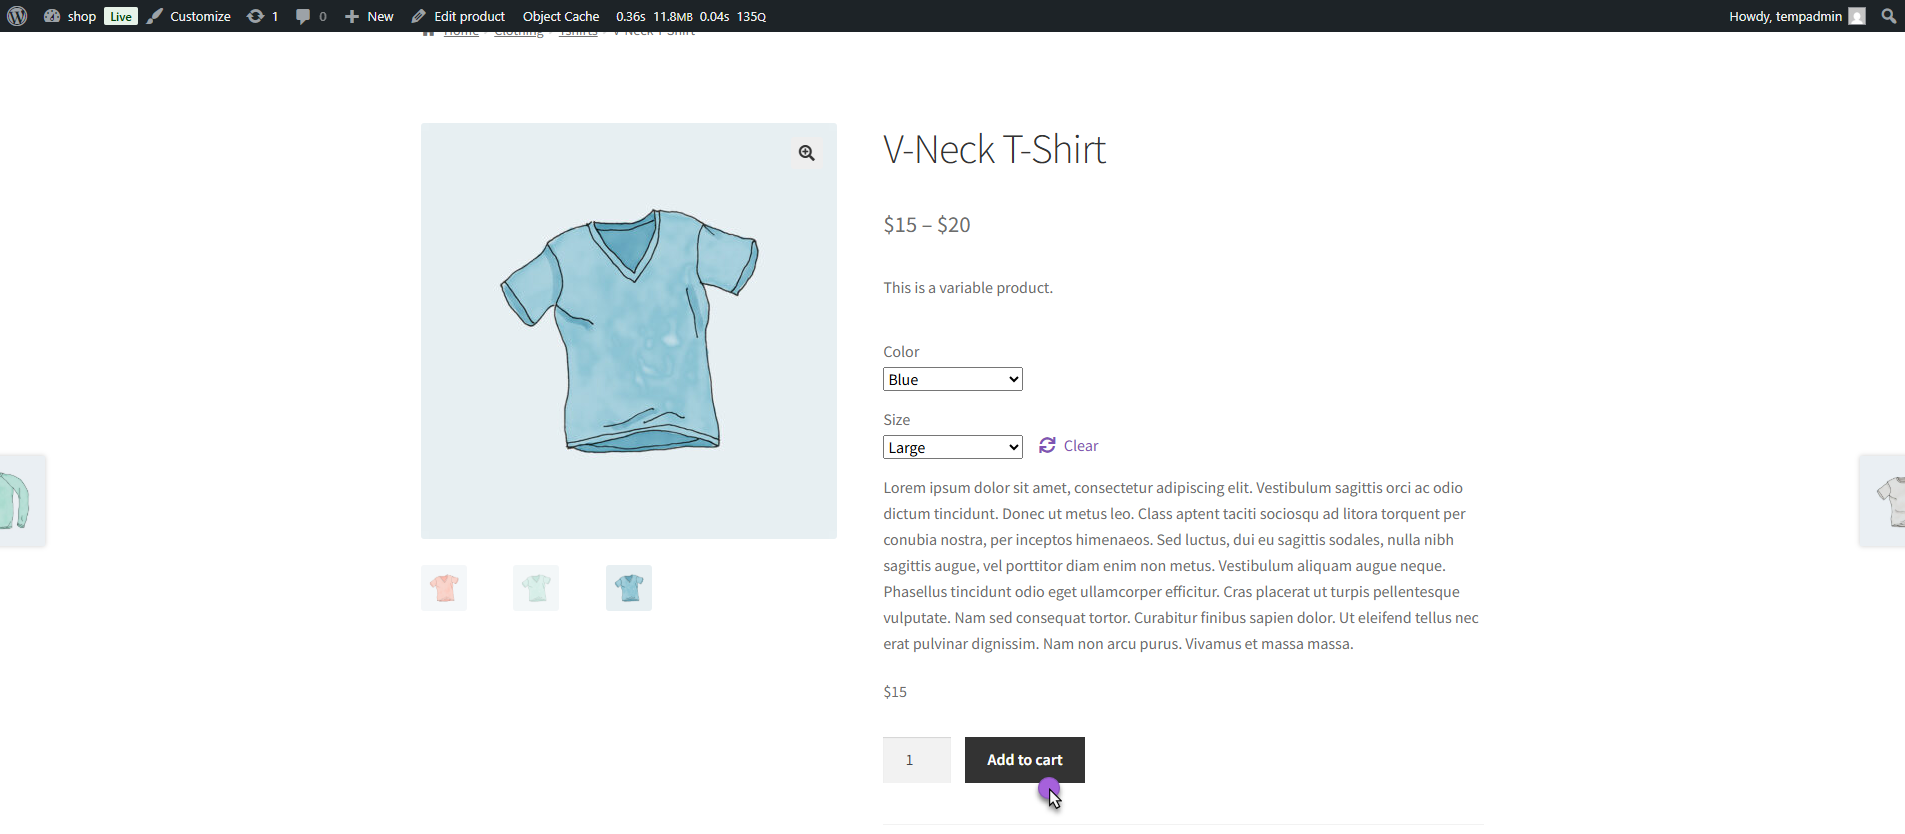
- Proceed to the Cart or Checkout page.
- If the product’s attributes match the rule (e.g., specific Color or Size), the conditional fee will be automatically applied.
- If the product has an attribute listed in the Exclude Attributes section, the fee will not be applied, even if other products meet the rule.
Product Quantity Condition
↑ Back to top- Navigate to: WooCommerce > Conditional Fee
- Create a new rule or edit an existing Conditional Fee Rule.
- Go to the Product, Category, and Tag Options section.
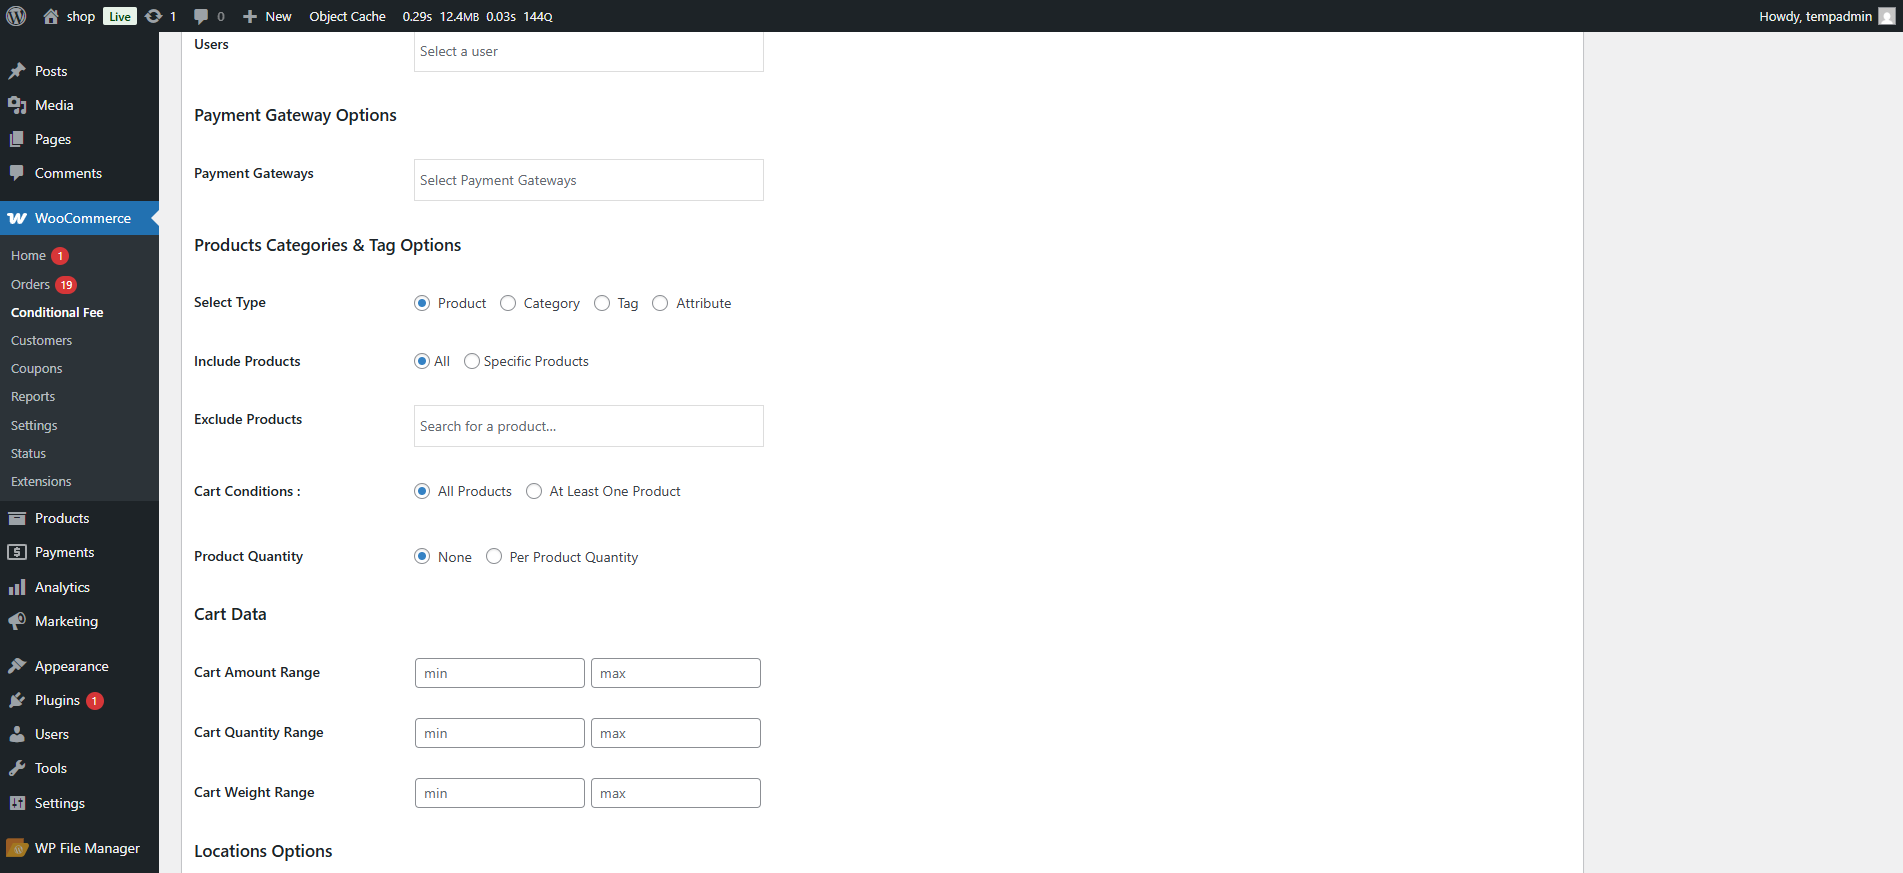
- Set the Select Type to Product.
- A new setting titled Product Quantity will now appear.

Product Quantity Options
↑ Back to topYou will see three radio button choices:
None
- No quantity condition will be applied.
- The rule behaves as a standard product-based fee.
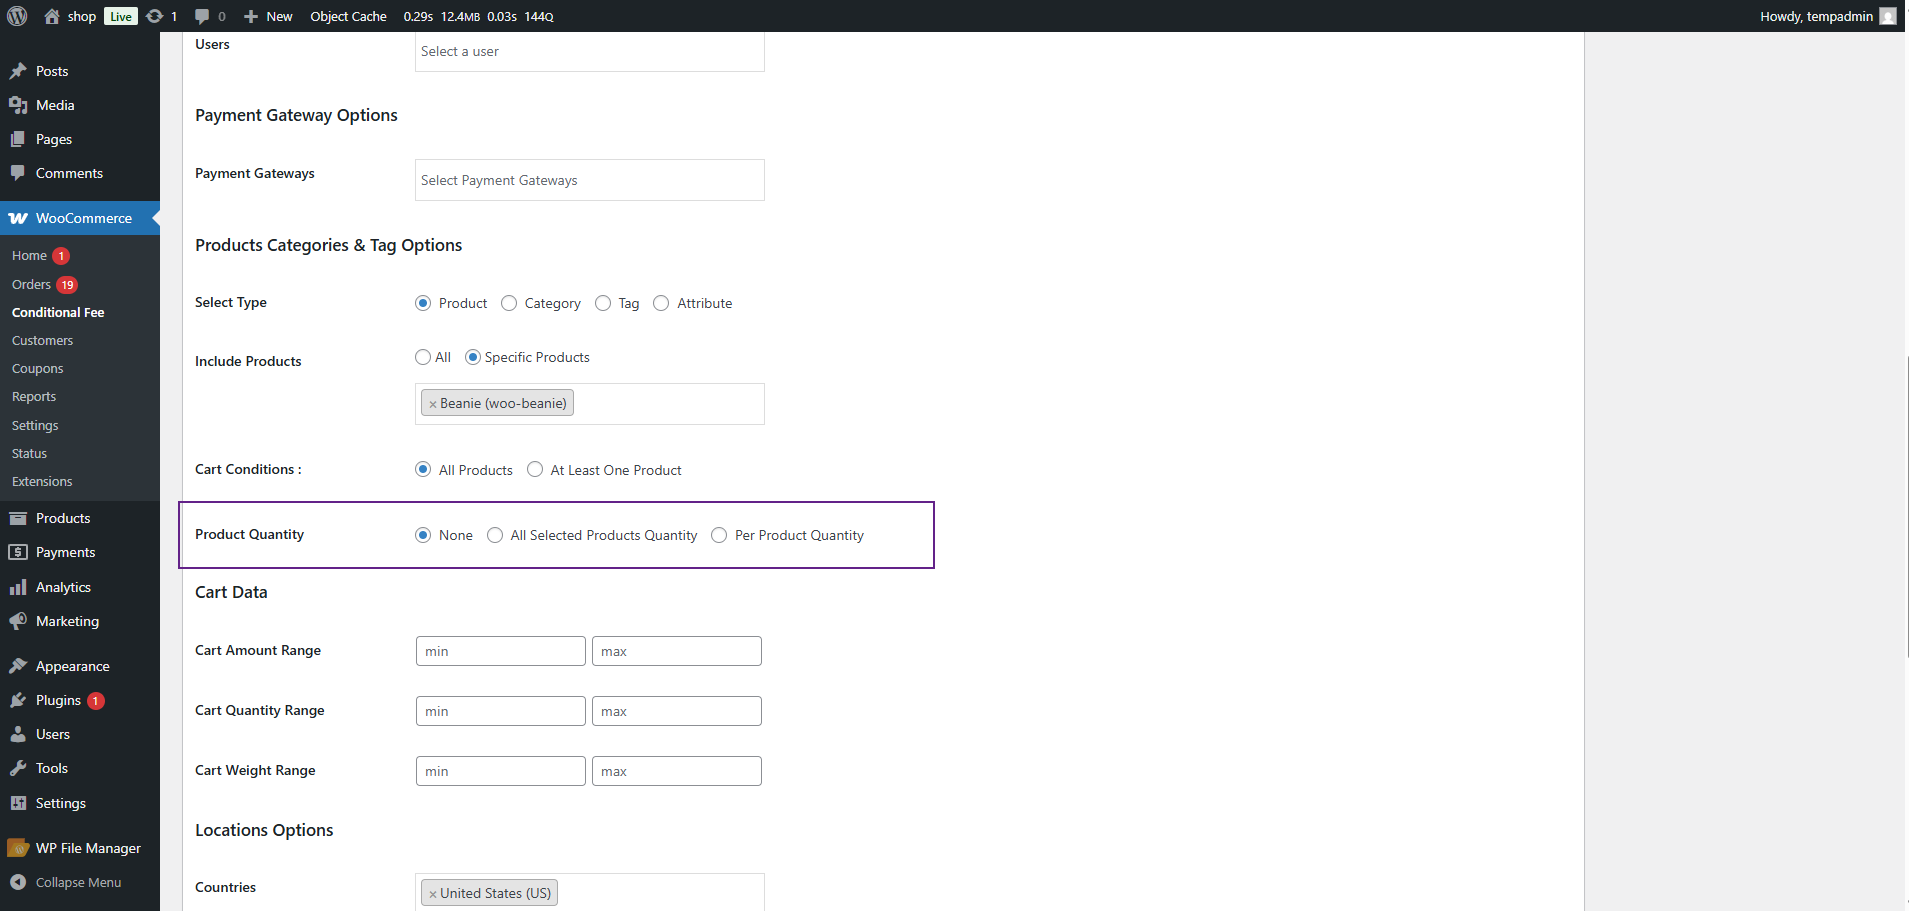
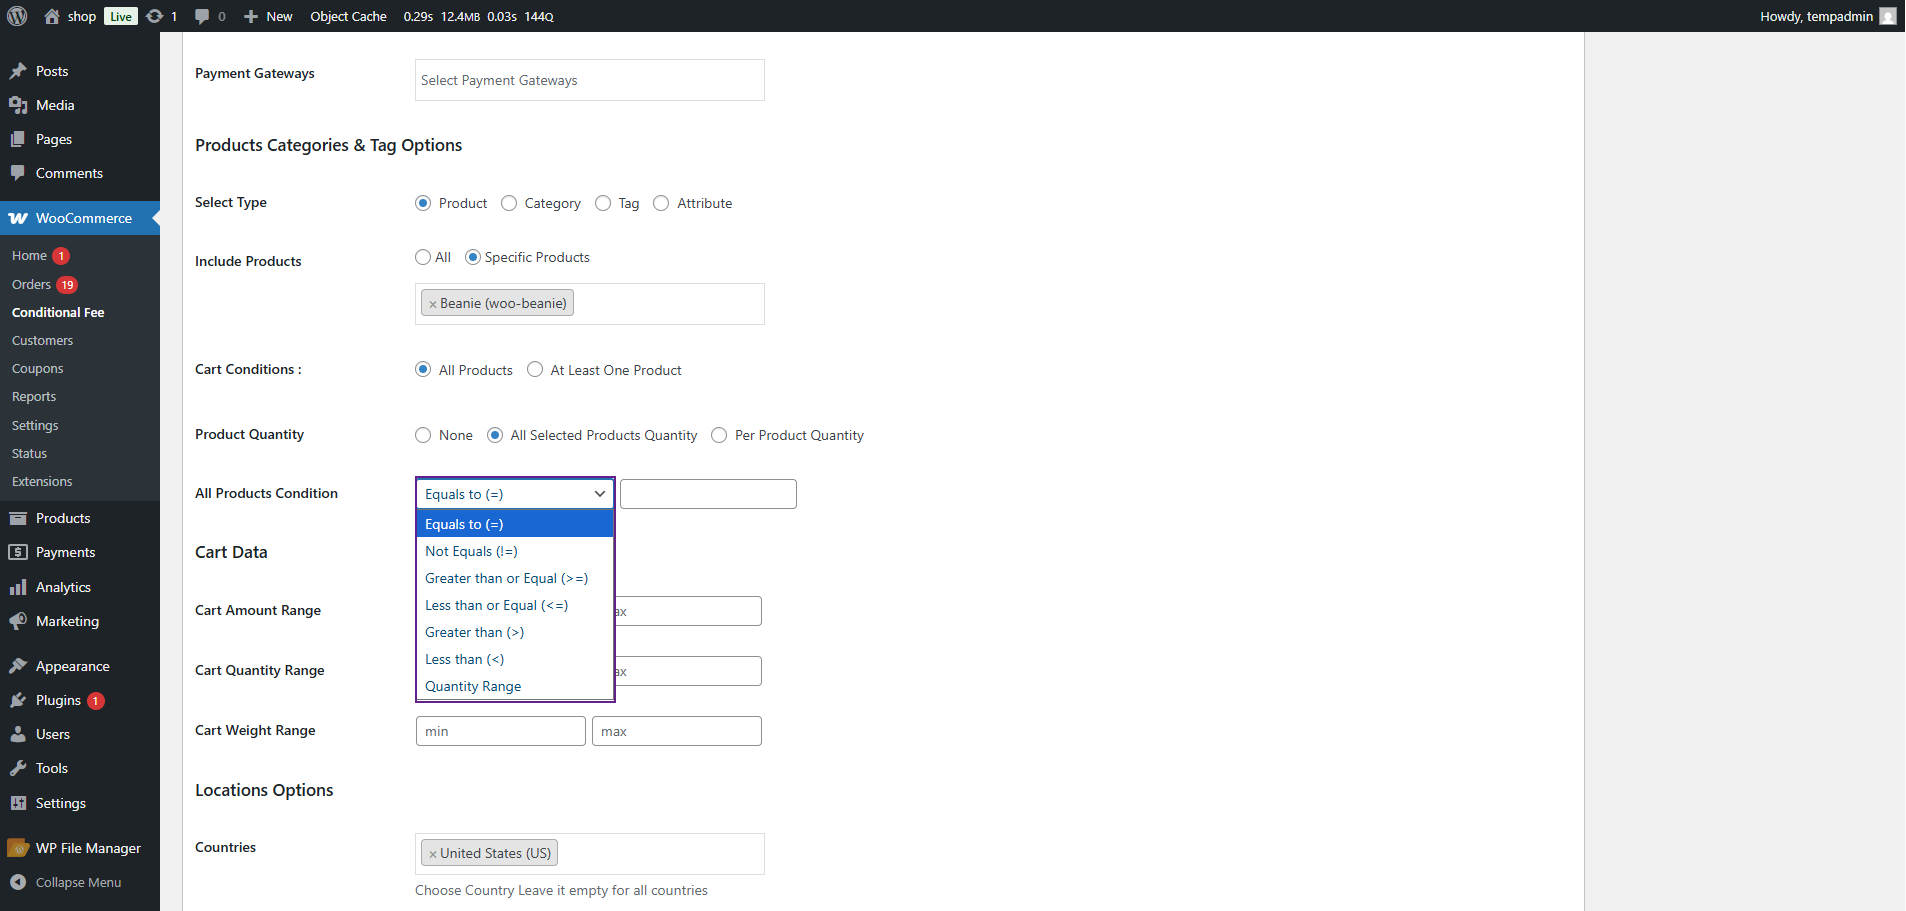
. All Selected Product Quantity
- This option works with both All and Specific Products under Include Products.
Displays:
- A Condition Selector (e.g., Equals, Less Than)
- A single Quantity Input Field
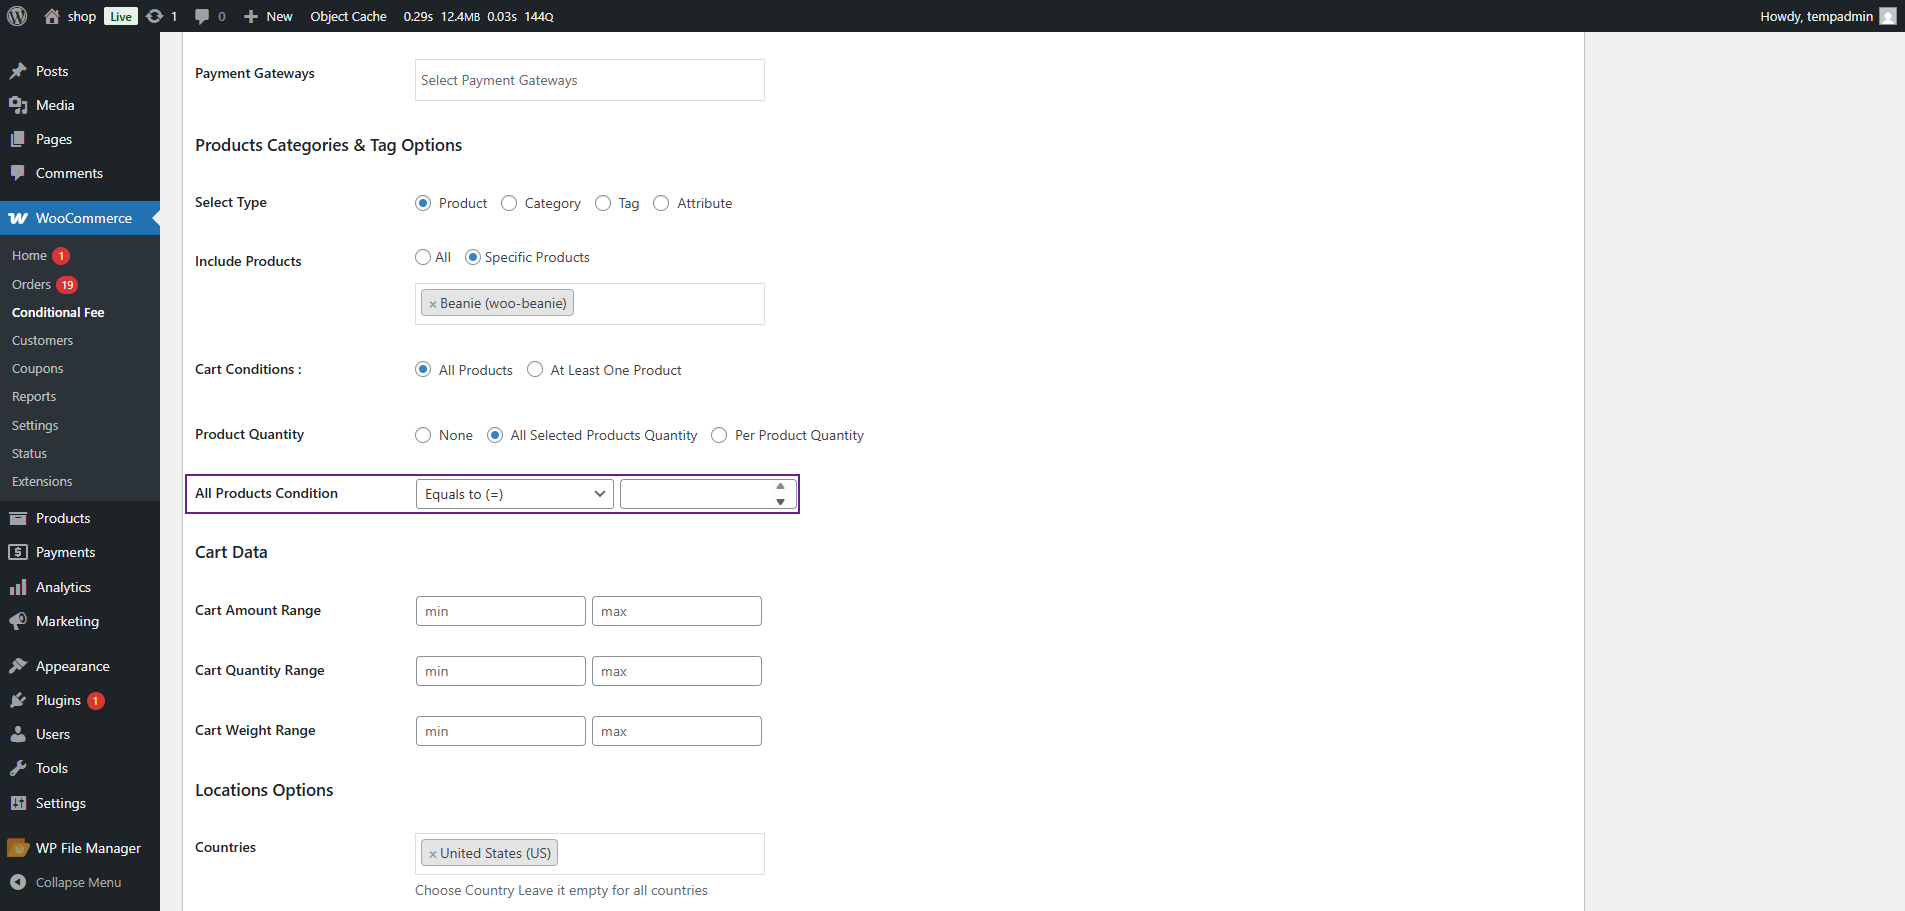
- The condition is applied globally to all included products — no per-product breakdown.
Available Conditions:
- Equals
- Not Equals
- Greater Than
Less Than - Greater Than or Equals To
Less Than or Equals To - Quantity Range (Shows Min and Max input fields)
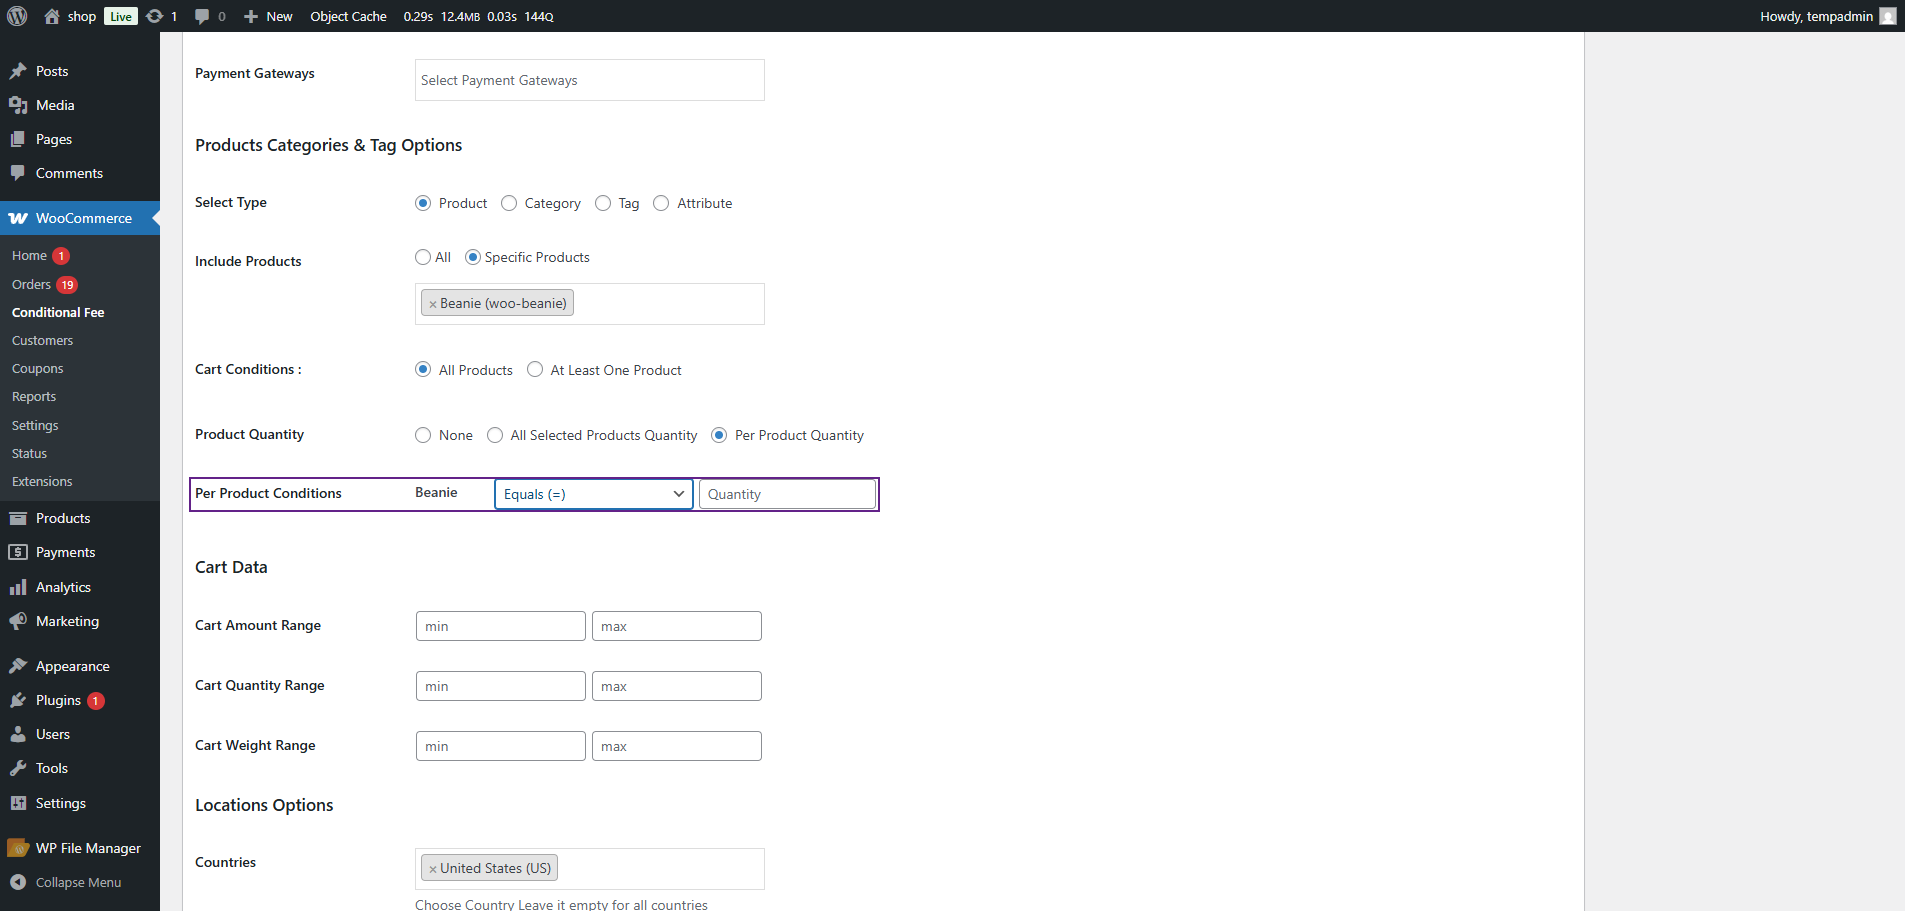
Per Product Quantity
- Works for All or Specific Products under Include Products.
- If Include Products = All, a dynamic table is shown:
Each row includes:
- Product Selector
- Condition Selector
- Quantity Input
Frontend Impact
↑ Back to top- Go to the Shop page and add products to the cart.
- Navigate to the Cart or Checkout page.
- If the cart matches the configured product quantity condition, the conditional fee will automatically appear.
- If the quantity does not meet the defined rules, no fee will be applied.
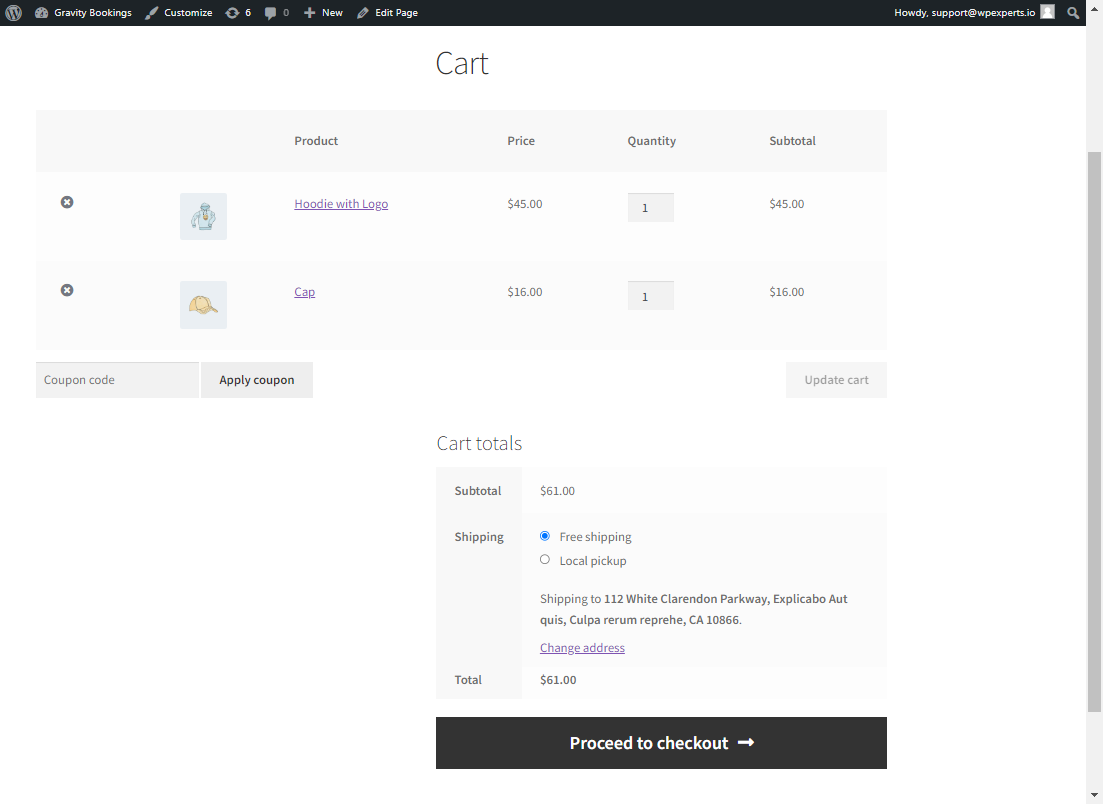
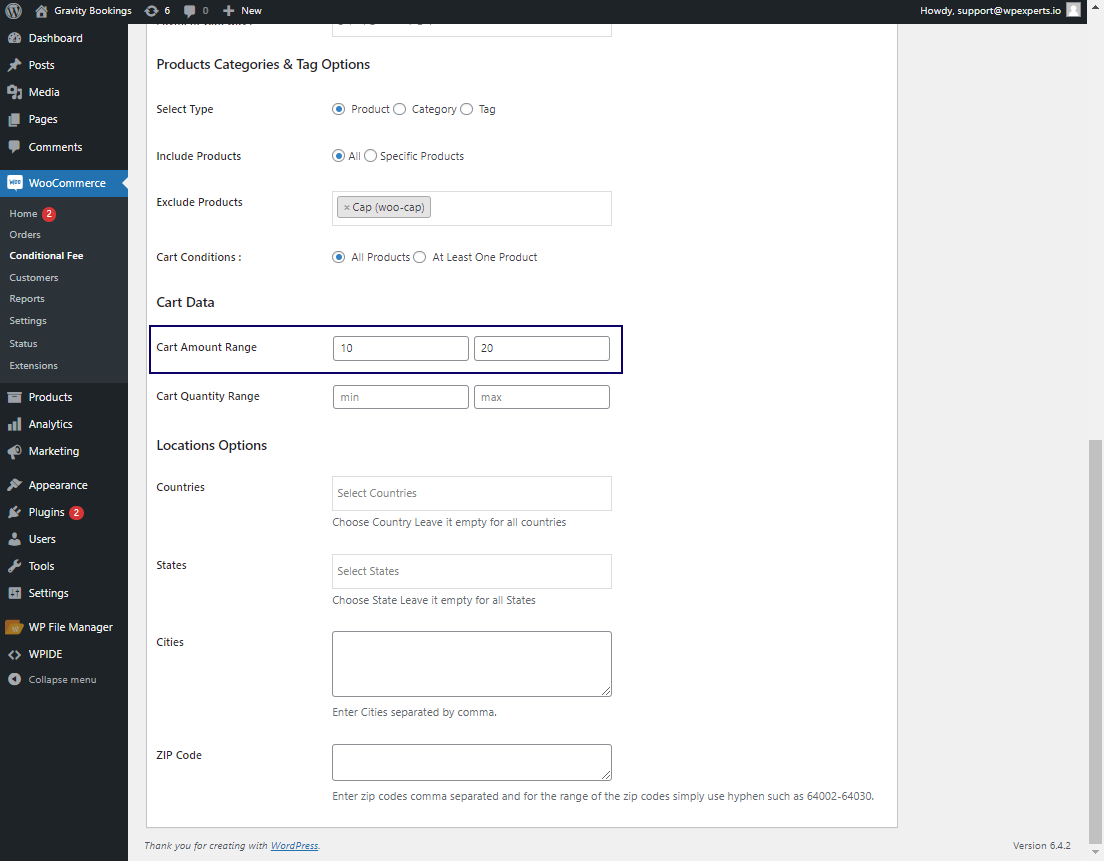
Cart Data
↑ Back to top- The admin can set a Cart Amount Range associated with the cart subtotal. The Conditional fee will be applied if the user’s purchased items are within this specified value range; otherwise, it won’t be applicable.
Frontend Impact
Before
After
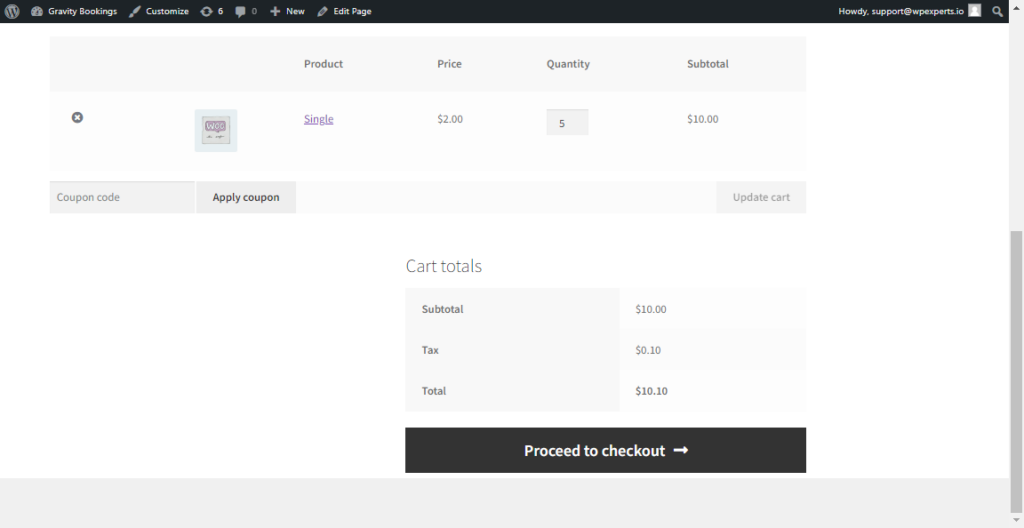
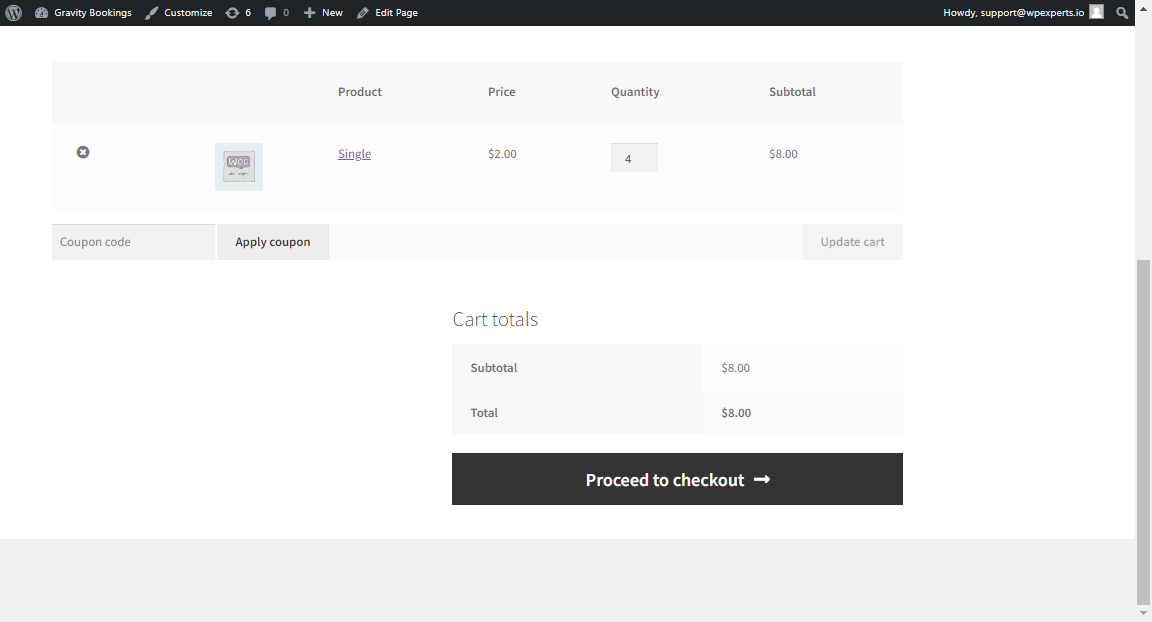
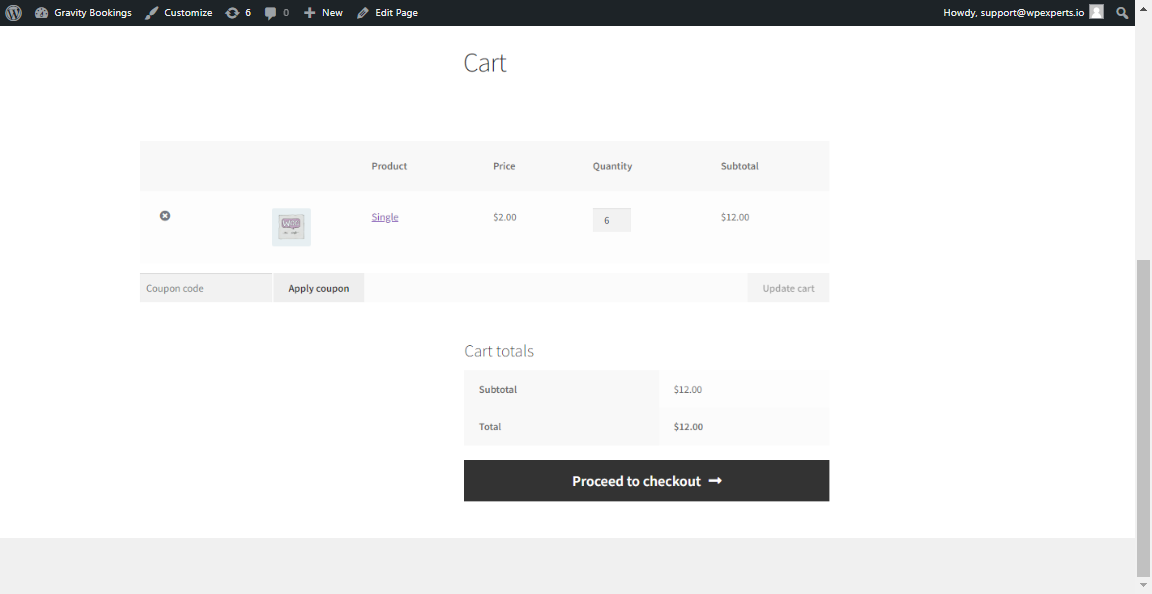
- The admin can establish a Cart Quantity Range by setting a limit on the overall product quantity in the cart, like setting it from 1 to 5. Conditional fees will be applied if the user’s purchased items fall within this specified quantity range; otherwise, they won’t be applied.
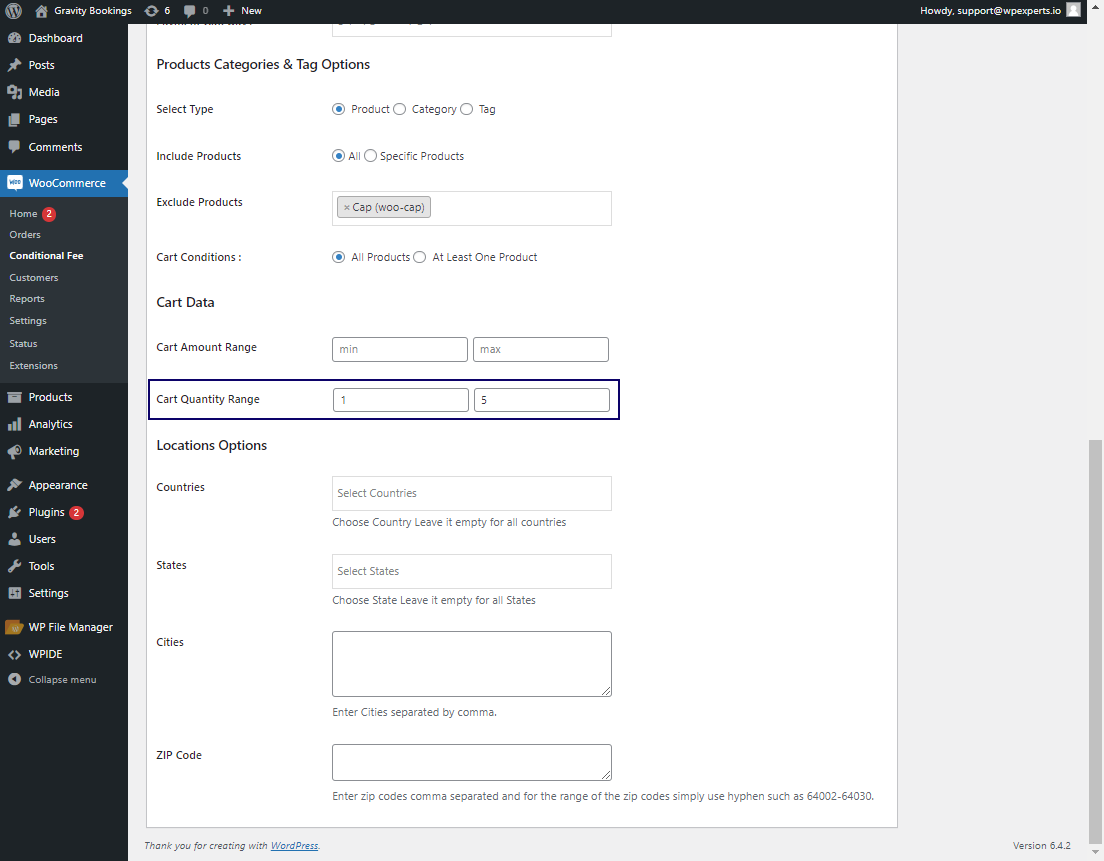
Please Note:
- For the Cart Amount Range and Cart Quantity Range, the admin can apply only the minimum value by setting the minimum value and leaving the maximum value field blank. Likewise, for only the maximum value, the admin sets the maximum value and leaves the minimum value field empty.
- If the admin specifies the Cart Amount Range and Cart Quantity Range, the conditional fee will only be applied when both conditions are met.
Frontend Impact
Before
After

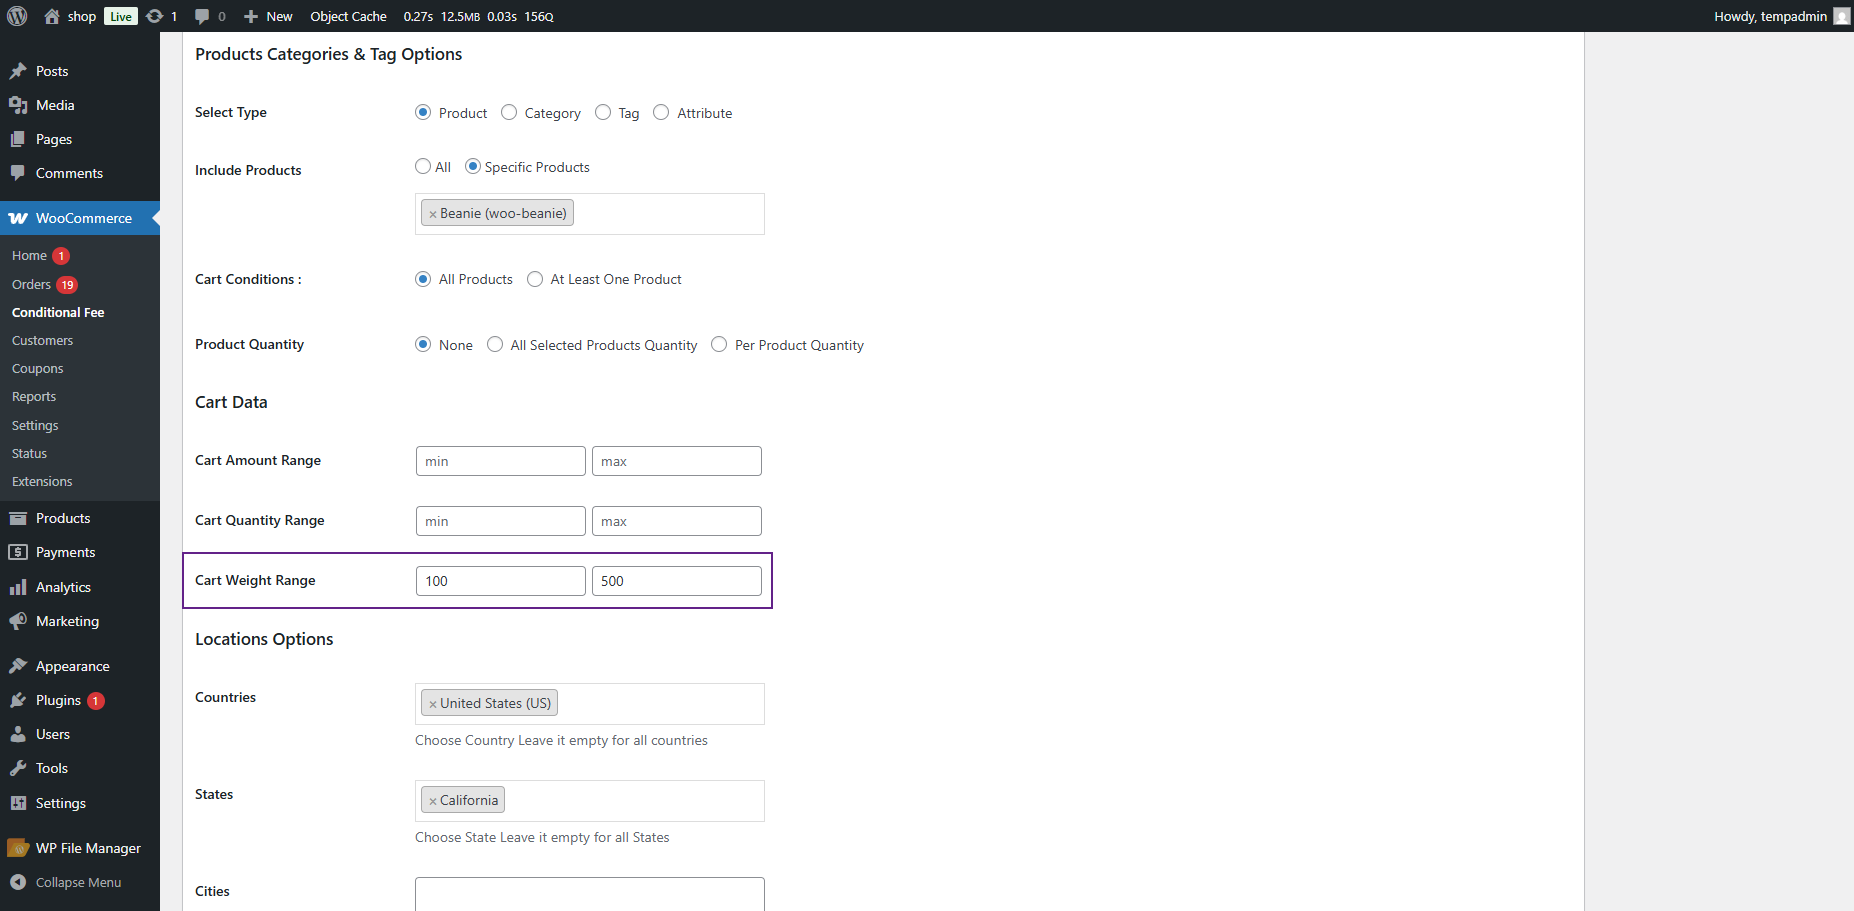
Cart Weight Range
↑ Back to top- Navigate to:WooCommerce > Conditional Fee
- Create a new Conditional Fee Rule or edit an existing one.
- In the rule, scroll to the Cart Data section.

- You will find a setting called Cart Weight Range.

- Enter the minimum and maximum weight limits:
- Min: The lower limit of the cart weight (e.g., 100)
- Max (optional): The upper limit, if you want to cap the weight range (e.g., 500)
Frontend Impact
↑ Back to top- Navigate to the Shop page and add products to the cart.
- Go to the Cart or Checkout page.
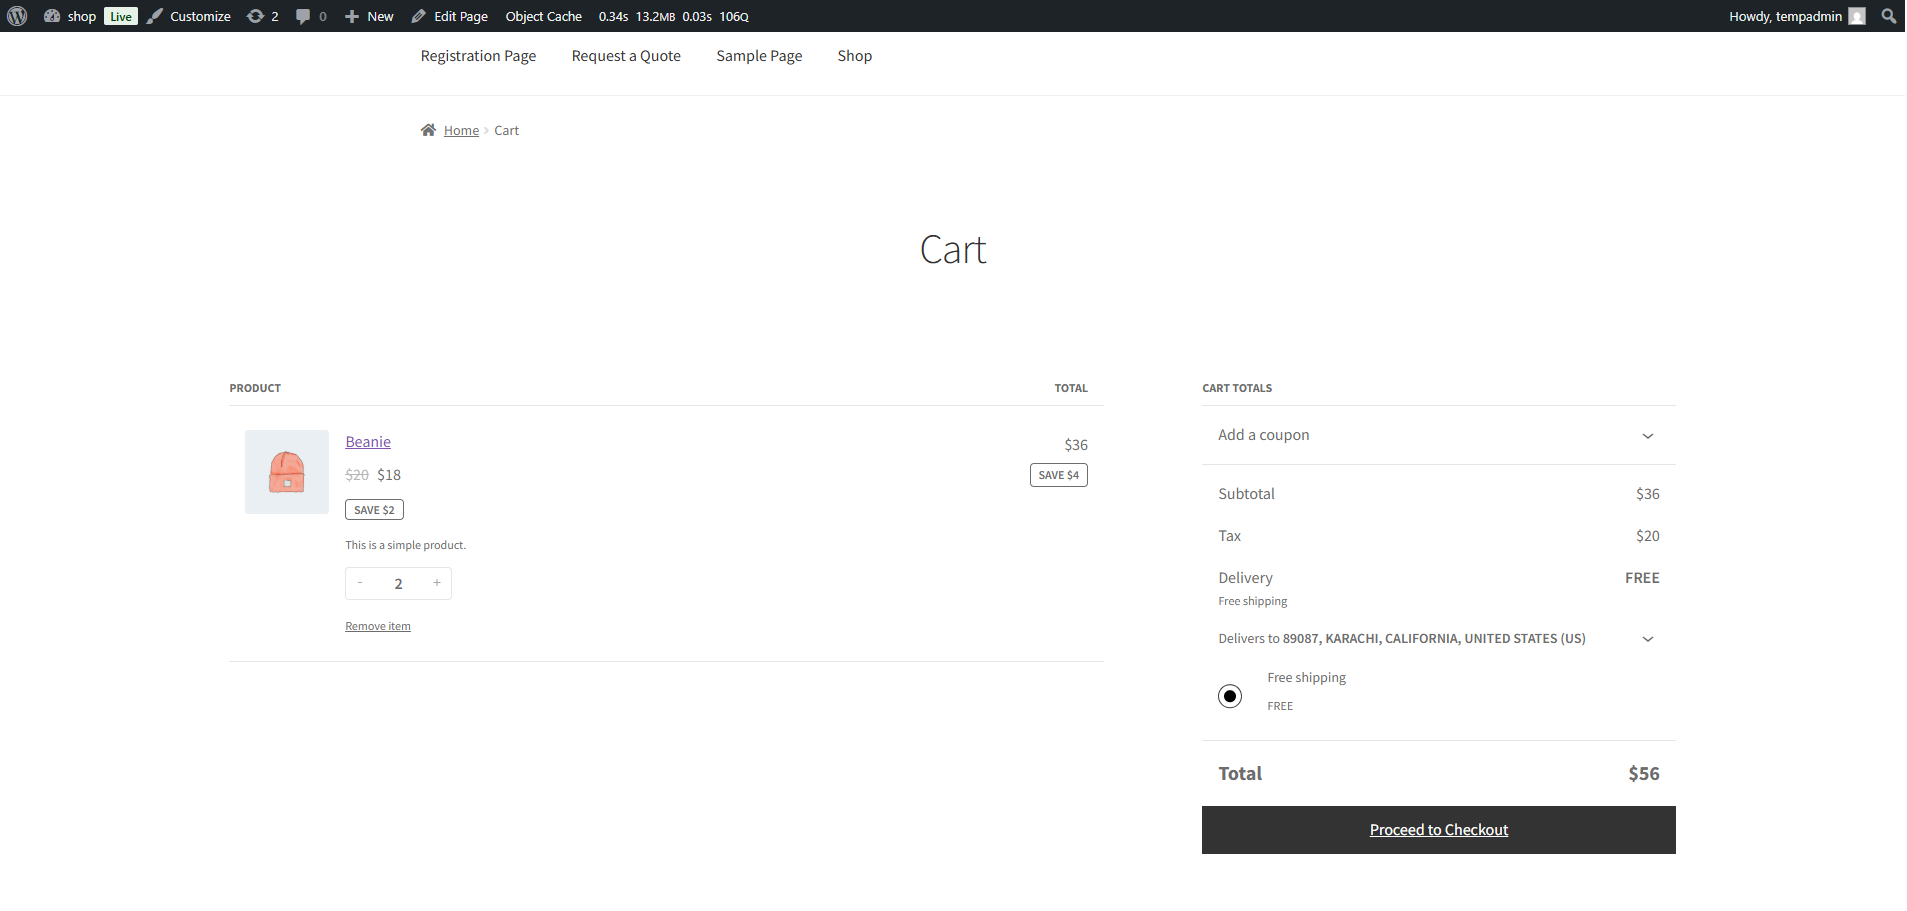
- If the total cart weight matches the configured weight range, the conditional fee will be shown in the order summary.
- If the cart weight is outside the specified range, the fee will not appear.
Locations Options
↑ Back to top- For Countries and States selection, the admin can choose multiple options from dropdowns. For Cities, the admin enters names separated by commas, and for ZIP Codes, they input individual codes or ranges (e.g., 64002-64030). Conditional fees apply to selected countries, states, cities, and zip codes.

Frontend Impact
Before

After
Zone-Based Rule Condition
↑ Back to top- Navigate to: WooCommerce > Conditional Fee
- Click Add New Fee Rule or edit an existing one.
- Scroll down to the Location Options section.
- A new field called Zone will be available as a multi-selector dropdown.
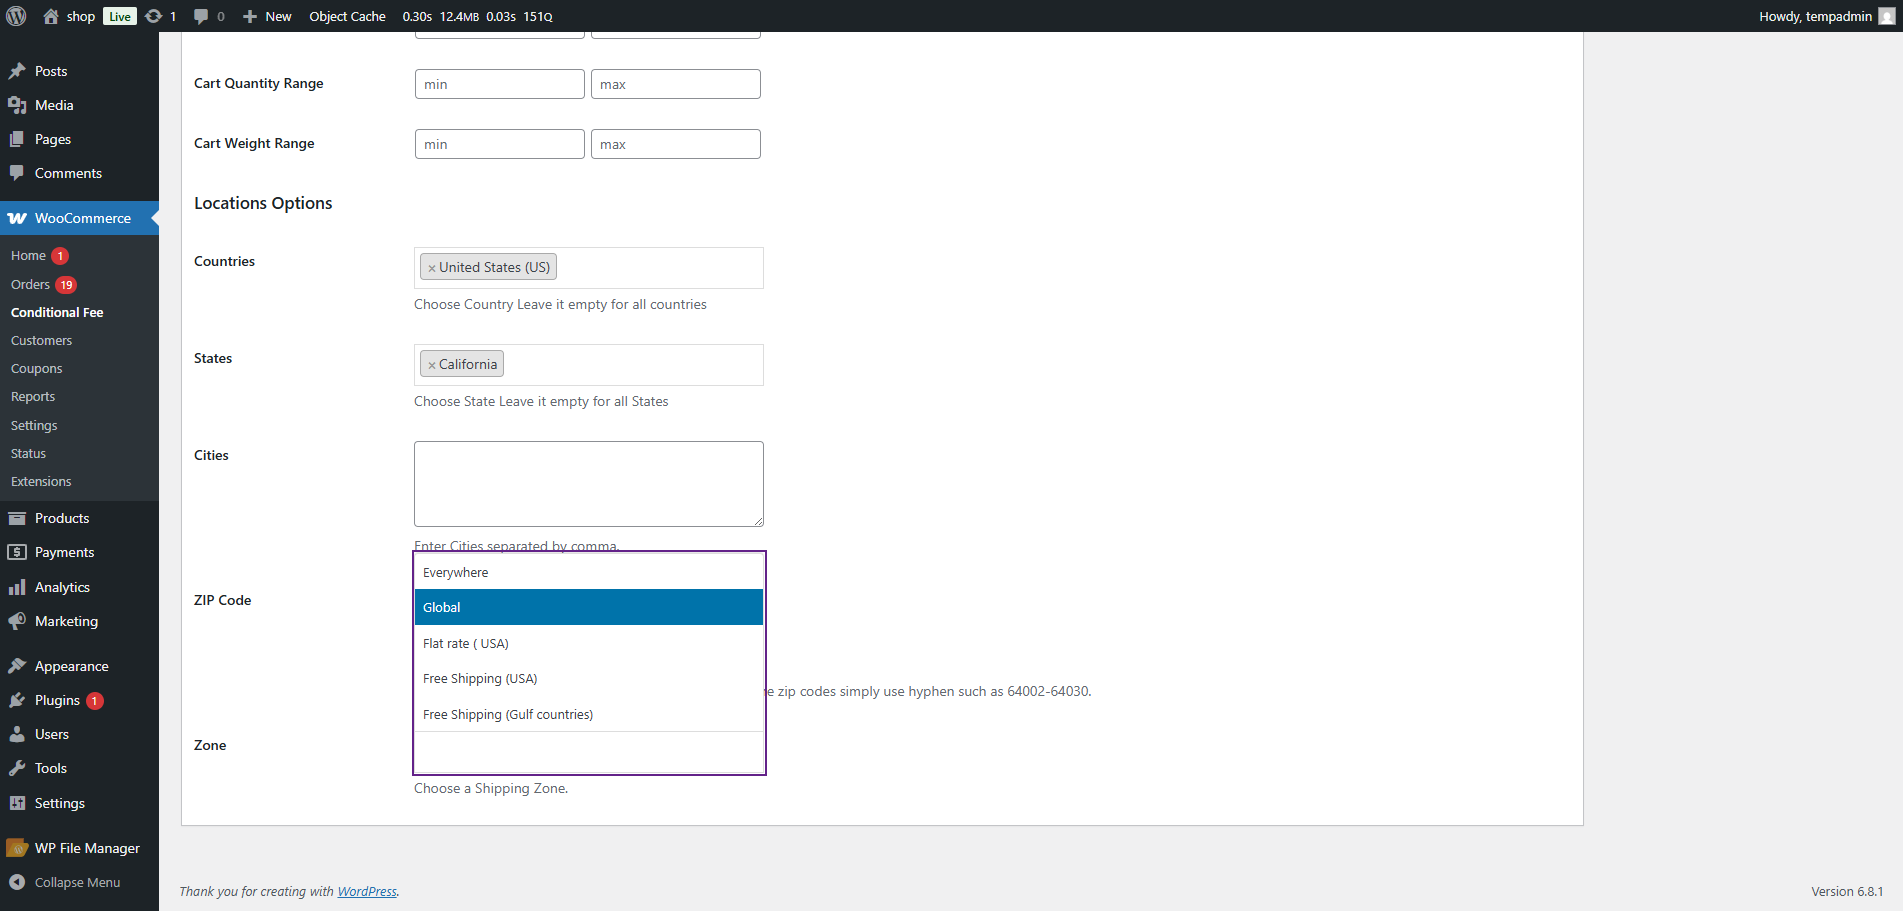
- Select one or more Shipping Zones that you want the rule to target.
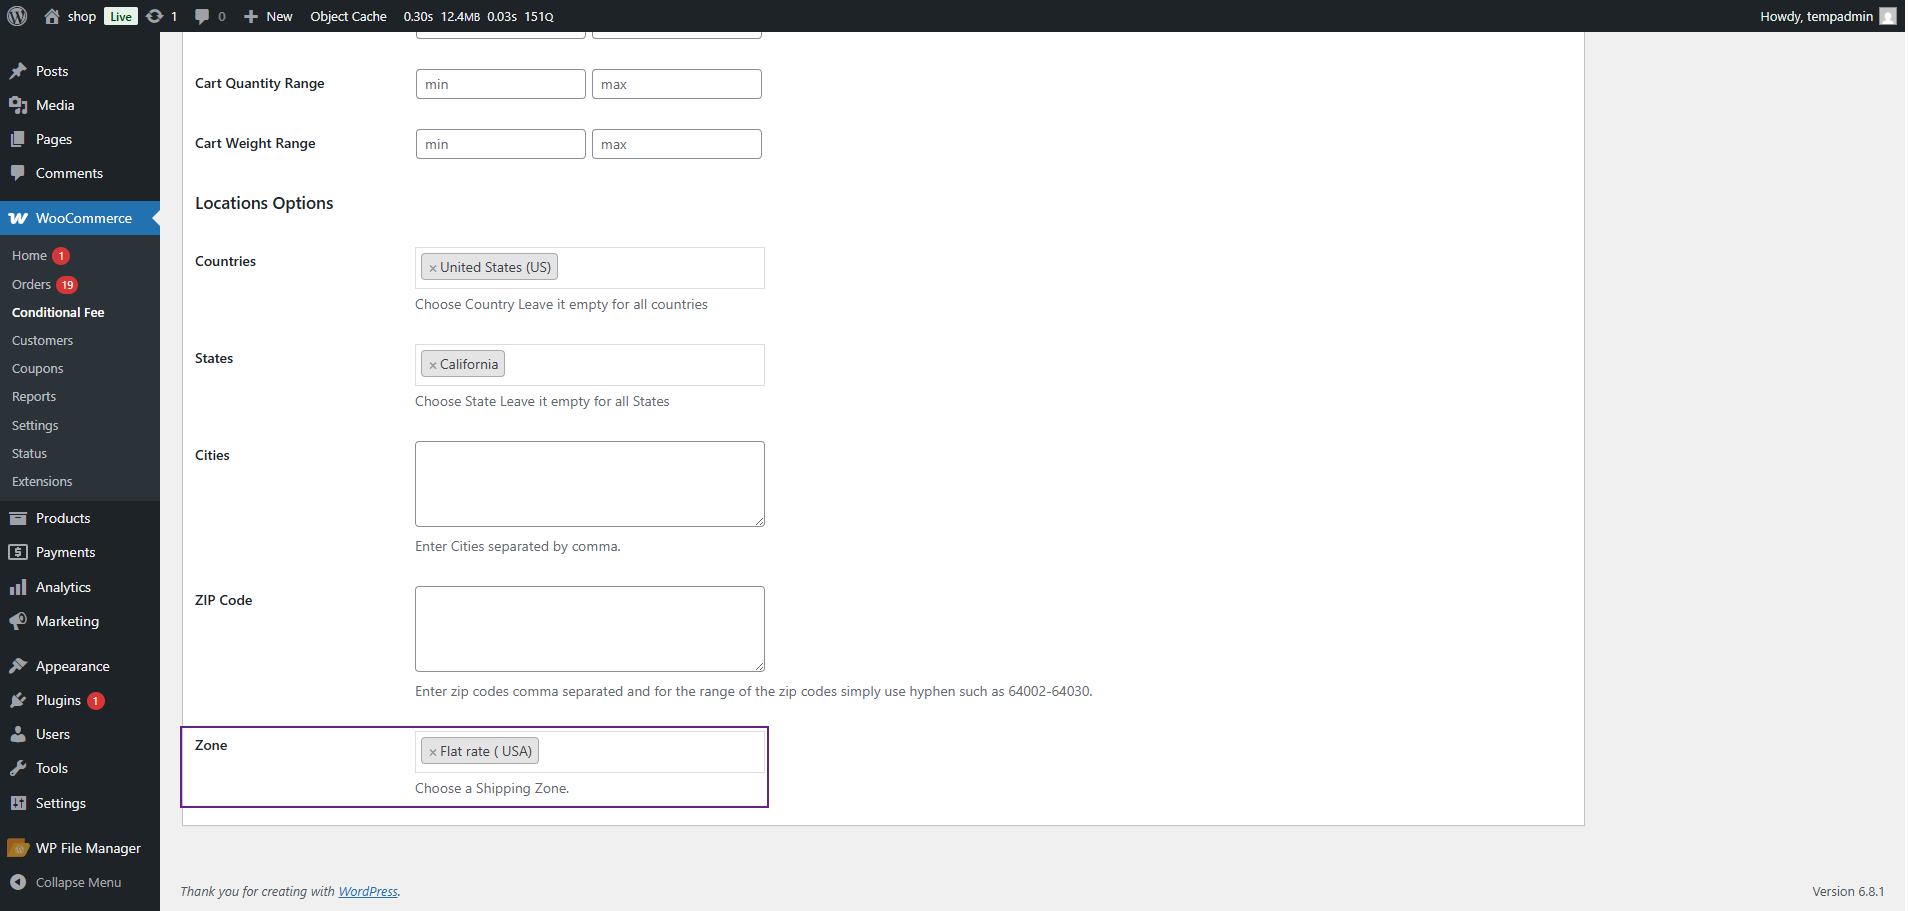
- These zones are pulled from: WooCommerce > Settings > Shipping Zones
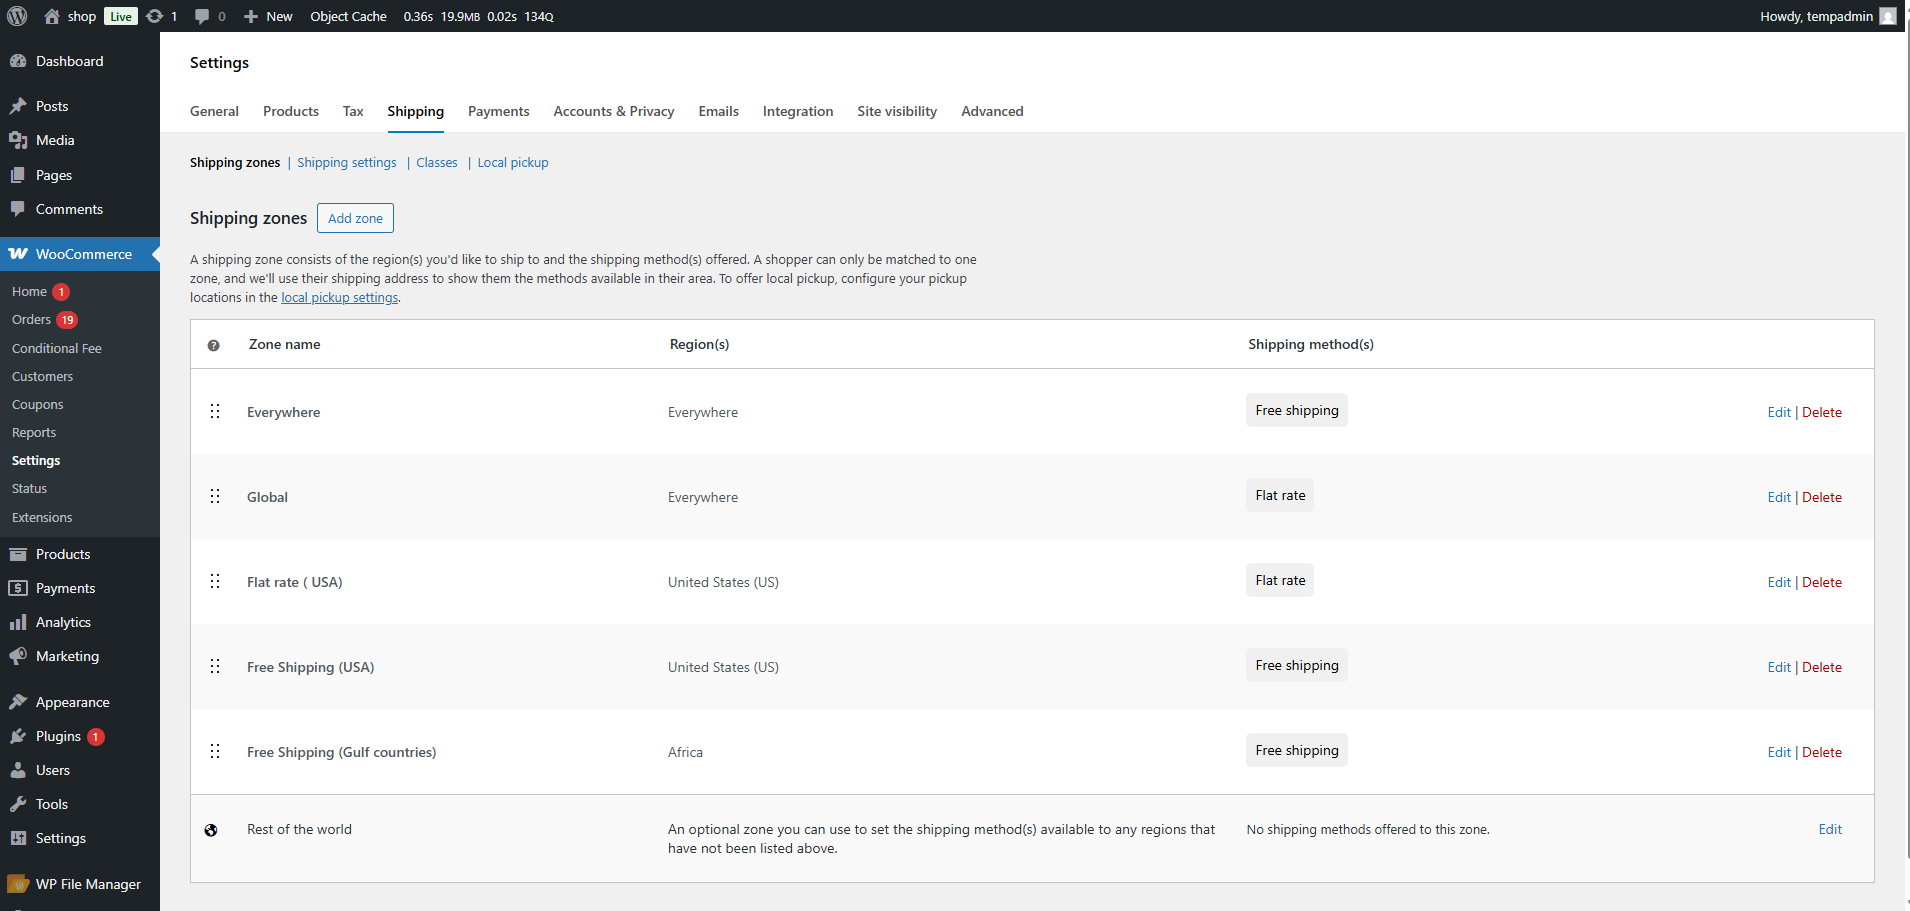
Frontend Impact
↑ Back to top- Navigate to the Shop page and add a product to the cart.
- Go to the Checkout page.
- Select a Shipping Method.
- If the selected method belongs to a Shipping Zone that matches the one defined in the Zone-based rule, the conditional fee will automatically appear in the order summary.
- If the shipping method belongs to a non-matching zone, the conditional fee will not be applied.
Compatibility With Currency Switcher for WooCommerce
↑ Back to topInstallation of Currency Switcher for WooCommerce
↑ Back to top- Download and Install the Currency Switcher.
- Follow the Currency Switcher documentation to set up and configure the plugin.
Getting Started
↑ Back to top- Navigate to: WooCommerce > Conditional Fee
- Create a new Conditional Fee Rule or edit an existing one.
- Ensure that your Currency Switcher plugin is active and properly configured.
- When applying rules such as:
- Cart Amount Range
- Fixed Fee Values
Frontend Impact
↑ Back to top- Navigate to the Shop page and add products to the cart.
- Go to the Cart or Checkout page.
- The fee amount shown on the cart or checkout page is automatically converted into the selected currency.