Note: This product has been retired. Documentation is no longer being updated.
Installation
↑ Back to top- Download the extension from your dashboard
- Go to Plugins > Add New > Upload and select the ZIP file you just downloaded
- Click Install Now, and then Activate
- Go to WooCommerce > Settings > Checkout > Payza and read the next section to learn how to setup and configure the plugin.
Setup and Configuration
↑ Back to topPayza accepts the following currencies. If one of these currencies is not selected in WooCommerce > Settings > General > Currency Options, the Payza gateway will not display on the Checkout page.
Extension Settings
↑ Back to top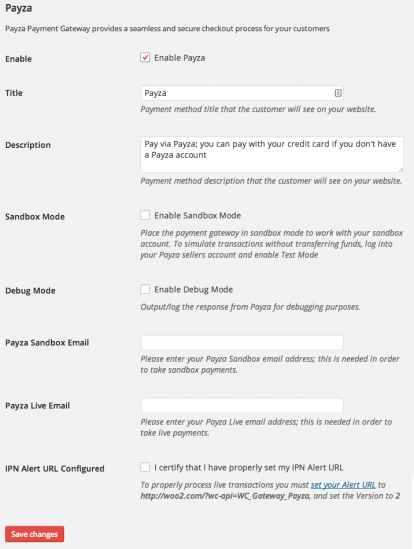
- Enable/Disable – Enable or disable the payment method.
- Title – This is the text shown for the payment during checkout and on the Order Received page.
- Description – This is the text shown under the title during checkout. Limited HTML is allowed. If you enable sandbox mode, this section will also display a notice along with test credit card numbers.
- Sandbox Mode – Enable this option to put the gateway in “sandbox” mode, which will allow you to perform payments using your sandbox account tied to your Payza Sandbox Email described below. Note: the Payza sandbox Instant Payment Notification feature is temporarily inactive. This is a known issue which Payza is working to resolve. Until that time, use your live account with Test Mode enabled to perform test transactions.
- Debug Mode – Enable this to place the gateway in debug mode, which will output debugging messages from the Instant Payment Notification service to a log file found under WooCommerce > System Status > Logs. As a best practice and to maximize performance, only enable this if you experience issues with the plugin.
- Payza Sandbox Email – Your Payza sandbox email, used when the gateway is in Sandbox Mode.
- Payza Live Email – Your Payza live email.
- IPN Alert URL Configured – Enabling this certifies that you have properly configured your IPN (Instant Payment Notification) Alert URL in your Payza account. Your IPN URL will be in the form of
http://www.example.com?wc-api=WC_Gateway_Payzareplacingwww.example.comwith your store’s URL. Configuring your IPN Alert URL is required for properly accepting payment.
Configure IPN Alert URL
↑ Back to top- Log in to Payza with your account.
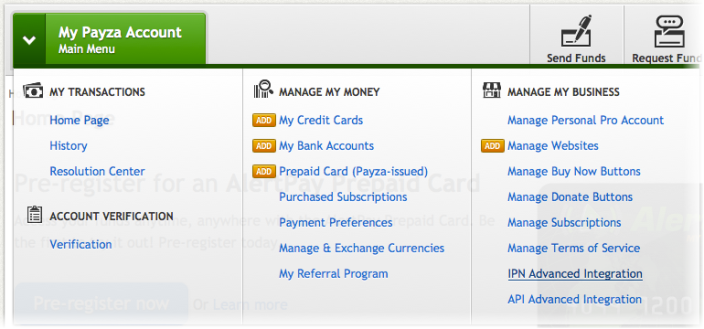
- Click on “My Payza Account Main Menu” on the upper left hand of the screen, then click “IPN Advanced Integration”:
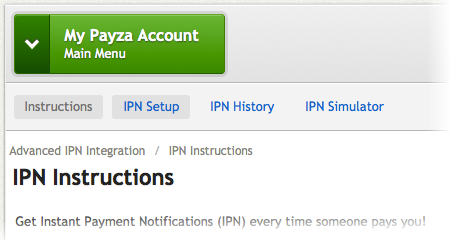
- On the next page click “IPN Setup”:
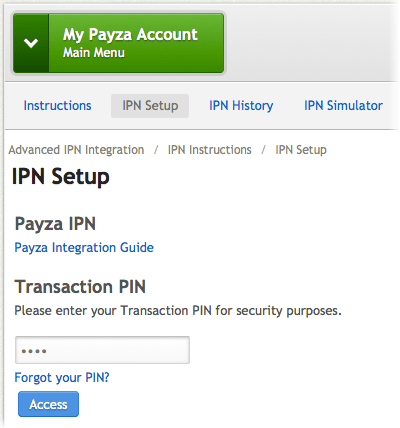
- Enter your Transaction PIN and click “Access”:
- Finally, enable “IPN Status”, enable “IPN Version 2”, and enter your Alert URL, which will be in the form of
http://www.example.com?wc-api=WC_Gateway_Payzareplacingwww.example.comwith your server name, and click “Update” to save the settings:
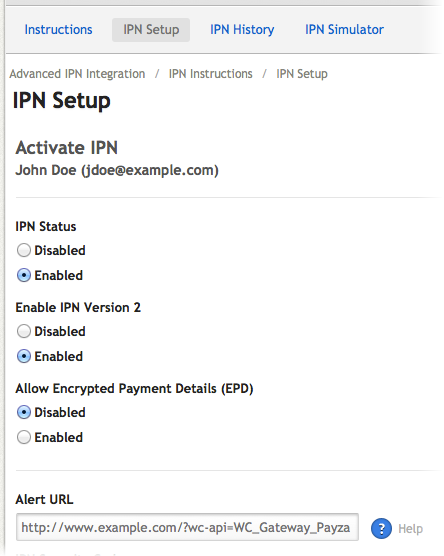
- Return now to your WordPress admin and go to WooCommerce > Settings > Payment Gateways > Payza and check the box next to “IPN Alert URL Configured”.
Test Mode
↑ Back to top- Log in to Payza with your account.
- Click on “My Payza Account Main Menu” on the upper left hand of the screen, then click “IPN Advanced Integration”
- On the next page click “IPN Setup”
- Enter your Transaction PIN and click “Access”
- Finally, enable “Test Mode” and click “Update” to save the settings:
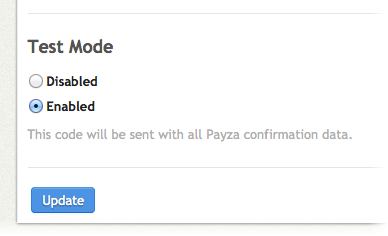
Sandbox Account
↑ Back to topTroubleshooting
↑ Back to top- Check that your Payza Live Email is correct.
- Double-check that your Payza Live Email is correct.
- Enable the debug log, and activate only WooCommerce and Payza using a WordPress default theme to see if the issue persists.
- Submit a support ticket, with the log found under WooCommerce > System Status > Logs as an attachment.
