Overview
↑ Back to topUse SHEIN for WooCommerce by CedCommerce to connect your WooCommerce store directly to SHEIN’s Marketplace. This powerful extension enables you to:
- Sync product listings, inventory, and pricing in real-time.
- Manage everything from a single dashboard without switching between platforms.
- Fulfill orders seamlessly across regions supported by SHEIN, including the US, UK, and EU.
Whether you’re a first-time seller or an experienced D2C brand, the integration simplifies your selling operations and ensures a smoother expansion to the SHEIN marketplace.
About SHEIN for WooCommerce
↑ Back to topThis extension is designed for sellers who want to:
- Quickly onboard their WooCommerce store to SHEIN.
- Automate inventory, pricing, and order management without manual intervention.
- Keep their product data consistent across platforms.
Note: You will need a SHEIN seller account to use this extension.
Apply for a SHEIN seller account.
Features:
↑ Back to top- Centralized control: Monitor inventory, orders, and listings in one place.
- Real-time synchronization: Automatically sync stock levels and prices to avoid overselling.
- Category templates: Assign categories and attributes in bulk for faster product listing.
- Product linking: Map WooCommerce products with existing SHEIN listings to avoid duplicates.
- Flexible plans: Choose subscription tiers that fit your store size and sales volume.
Note: This extension runs in your store’s WP Admin dashboard; no need to log in separately to manage SHEIN operations.
Onboarding
↑ Back to topThe onboarding process helps you set up SHEIN for WooCommerce so you can start syncing products, managing inventory, and fulfilling orders across WooCommerce and SHEIN.
This section will walk you through:
- Connecting your WooCommerce store.
- Linking your SHEIN seller account.
- Selecting your subscription plan.
- Configuring default sync settings.
- Completing the setup and accessing the dashboard.
Step 1: Connect your WooCommerce store
↑ Back to topTo access SHEIN for WooCommerce, open your store’s WP Admin dashboard and navigate to WooCommerce > SHEIN.

When you first install and activate the extension, you’ll see the SHEIN for WooCommerce onboarding screen as shown below:

Automatic connection
- Read the displayed notice carefully; it explains that CedCommerce needs permission to access your store’s product, order, and inventory data. This is necessary to keep SHEIN and WooCommerce in sync.
- Review the terms and select the I agree to the Terms & Conditions checkbox.
- Click Connect Store to proceed.
You’ll see a confirmation and automatically move to the next step.

If automatic connection fails
You may see an error message stating:
Automatic WooCommerce Connection Failed
This means that the review the terms could not link your WooCommerce store automatically. Don’t worry — you can still connect manually.
Manual connection
- Follow the on-screen instructions as shown below:

- Form your store’s WP Admin dashboard, navigate to WooCommerce > Settings > Advanced > REST API.
- Click Add Key.
- Enter a description (e.g., “SHEIN extension”).
- Select a user role (Admin is recommended).
- Set permissions to Read/Write.
- Click Generate API Key.
2. Copy the generated Consumer Key and Consumer Secret from WooCommerce.
3. Paste these keys into the Consumer Key and Consumer Secret fields in the review the terms.
4. Accept the terms and conditions again by checking the box.
5. Click Validate.
The review the terms will now connect your WooCommerce store manually.
If you’re unsure how to generate API keys, click the help icon (?) next to the instructions for detailed guidance.
Step 2: Connect your SHEIN seller account
↑ Back to topOnce your WooCommerce store is connected, the next screen will prompt you to link your SHEIN account as shown below:

Linking an existing SHEIN account
- Click Connect to SHEIN.
- Log in with your SHEIN seller credentials when redirected to the SHEIN seller login page.
- Grant the extension permission to access your SHEIN account data (products, inventory, and orders).

Don’t have a SHEIN seller account?
If you don’t already have a SHEIN seller account:

- Enter your email in the “Enter Your SHEIN Account Email” field.

You’ll be redirected to SHEIN’s seller application page to complete the signup process.
Note: Ensure your SHEIN seller account is approved before proceeding. This extension cannot sync data without a verified account.
Step 3: Choose your subscription plan
↑ Back to topOnce your WooCommerce store and SHEIN accounts are connected, you’ll be asked to select a subscription plan, as shown below:

All plans come with a 7-day free trial, so you can explore the integration fully before committing.
| Plan | Price per month | Order limit | Key features |
| Beginner | $39 | Up to 300 orders | Real-time syncing, basic support |
| Growth | $69 | Up to 600 orders | Faster sync, advanced support |
| Premium | $99 | Up to 1,000 orders | Health checks, end-to-end testing |
| Enterprise | $199 | Up to 2,000 orders | Dedicated account manager, custom features |
How to subscribe:
↑ Back to top- Click Start Free Trial under your chosen plan.
- Enter your payment details if prompted (charges will apply only after the trial ends).
- For Enterprise plans, click Contact Us to get personalized setup assistance.
Step 4: Set default configuration
↑ Back to top
On the Default Configuration screen, enable essential settings to keep WooCommerce and SHEIN synced:
- Sync Product Prices: Enable this to automatically update price changes from WooCommerce to SHEIN.
- Sync Orders: Enable this to import SHEIN orders directly into WooCommerce for fulfillment.
- Click Save and Continue to confirm.
You can change these settings later in the Configuration section of the extension.
Step 5: Complete onboarding
↑ Back to topYou’ll see a confirmation message as shown below:

Click Go to Dashboard to begin managing your products, inventory, and orders.
Summary of what has been set up
↑ Back to top- Your WooCommerce and SHEIN accounts are linked.
- Product, order, and inventory sync is ready.
- You are on a 7-day free trial of your selected plan.
Need help during onboarding? Contact CedCommerce Support directly from your WooCommerce dashboard for 24/7 assistance.
Dashboard
↑ Back to topThe dashboard gives you a quick overview of your WooCommerce and SHEIN integration. Here, you can monitor your store’s performance, track orders and products, and manage your subscription plan — all from a single view.

This section explains every part of the dashboard to help you stay on top of your SHEIN selling activity.
Overview panel
↑ Back to topWhen you access the extension, you will see a welcome message (for example, “Good Morning, [Your Name]”) along with a brief description:
Get a quick overview of your store’s performance.
At the top, navigation tabs allow you to switch between sections:
- Dashboard
- Templates
- Listings
- Failed Orders
- Configuration
- Activities
- Pricing
Each tab opens a different part of the integration for managing specific tasks.
Total Orders
↑ Back to top
This widget displays a summary of your WooCommerce orders synced with SHEIN.
What you see:
- Total Orders: The total number of orders for the selected time range.
- Dropdown filter Change the time range to last 7 days or 30 days, or set a custom range.
- Order Statuses:
- Created: Orders successfully fetched from SHEIN.
- Failed: Orders that could not sync due to errors such as stock issues or API connection problems.
What you can do:
- Quickly assess order volumes and identify failed syncs.
- Filter by time frame to analyze trends.
Total Products
↑ Back to top
This widget shows the status of your WooCommerce products on SHEIN.
What you see:
- Total Products: The number of products synced between WooCommerce and SHEIN.
- Product Statuses:
- Listed: Products successfully published on SHEIN.
- Error: Products with sync or listing errors.
- Pending: Products waiting for approval or publication.
- Not Listed: Products not yet synced with SHEIN.
- Withdrawn: Products removed from SHEIN but still present in WooCommerce.
- Rejected: Products not accepted by SHEIN due to guideline issues.
- Inactive: Products inactive on SHEIN.
- Sold Out: Products with zero stock on SHEIN.
What you can do:
- Monitor product status to ensure everything is listed correctly.
- Identify errors or pending items for faster resolution.
Subscription
↑ Back to top
This section displays details about your current subscription plan.
What you see:
- Plan name: For example, Enterprise Plan.
- Payment details: Monthly subscription cost.
- Next dilling date: Upcoming renewal date.
- Upgrade Plan cutton: Change to a higher plan if needed.
Ongoing Activity
↑ Back to top
This widget tracks real-time actions in your store, such as product syncs, order imports, and inventory updates.
If there is no activity, the message displays:
“No current activity in store. Your sales, orders, and product-related actions will show here.”
Refresh data
↑ Back to top
Click the Refresh link in the top-right corner to update the dashboard and view the most recent sync information.
Templates
↑ Back to topOverview
↑ Back to topThe Templates section allows you to manage and update product listing data efficiently. Templates help you group similar products and apply shared settings like inventory rules, pricing, attributes, and packaging details. This is especially useful when listing multiple products within the same category on SHEIN.

By using templates, you can:
- Assign categories and attributes in bulk.
- Map WooCommerce product data to SHEIN’s required fields.
- Automate pricing and inventory updates for multiple products at once.
Why you should use templates
↑ Back to top| Benefit | Description |
| Save time | Apply settings to multiple products at once. |
| Ensure listing compliance | Meet SHEIN’s category and attribute requirements automatically. |
| Manage at scale | Simplify bulk listing for large WooCommerce catalogs. |
Templates are ideal for sellers who list many products within the same category, such as apparel, accessories, or home goods.
Key template actions available
↑ Back to top| Action | What it does |
| Create Template | Define settings and assign products to a new template. |
| Edit Template | Update category, attributes, or pricing for all products in a template. |
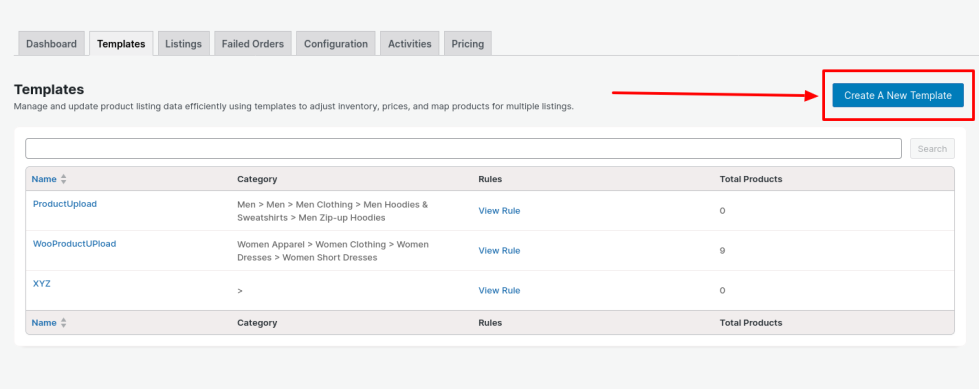
How to access the Templates section
↑ Back to top- Log in to your store’s WP Admin dashboard and navigate to WooCommerce > SHEIN > Templates.
- View your list of templates with the following details:
| Field | Description |
| Template Name | The name you assigned when creating the template. |
| Category Path | The SHEIN category associated with the template. |
| Total Products | Number of products currently assigned. |
| Actions | Options to View, Edit, or Unassign. |
Tip: Start by creating a single template for one product category to learn the workflow before scaling to more.
Creating and managing templates
↑ Back to topHere’s how you can create a new template:
Step 1: Start a new template
- Go to SHEIN > Templates.
- Click Create A New Template.
3. Enter a descriptive name in Category Template Name. Example: Women’s Summer Dresses.
Step 2: Assign a SHEIN category

- Select the most relevant SHEIN category path.
- Example: Women Apparel > Women Dresses > Maxi Dresses
- If the list does not load, click Fetch SHEIN Categories to refresh.
Step 3: Set product filters using Rule Groups
Rule Groups filter WooCommerce products to assign them to the template.

| Field | Example |
| Product Field | Category |
| Condition | Equals |
| Value | Women Dresses |
Click Fetch Products to pull matching items. Review the number of products assigned in Total Products.
Step 4: Map attributes and variations
Variation Attribute Mapping
Link WooCommerce variation attributes (like Size or Color) to SHEIN’s required attributes.

| WooCommerce attribute | SHEIN attribute | Example mapping |
| Size | Size | S, M, L |
| Color | Color | Red, Blue, Green |
Attribute Mapping
Fill in the required attributes for your category.

| Attribute | Example value |
| Season | Summer |
| Sleeve Length | Short Sleeve |
| Fabric Elasticity | Slight Stretch |
Optional attributes can improve product visibility on SHEIN.
Step 5: Add product composition and packaging

| Field | Example |
| Composition | Cotton 60%, Polyester 40% |
| Package Dimensions | 30x25x2 cm |
| Package Weight | 200 g |
Step 6: Set price markup
| Markup Type | Example |
| Percentage Increase | +10% on the WooCommerce price |
| Fixed Increase | +$5 on WooCommerce price |
Step 7: Save your template
Click Save Template. The template will now appear in the Templates list and assigned products will use its settings for SHEIN listings.
Managing templates
↑ Back to top| Action | Description |
| Edit | Click on the template name to change settings and save again. |
| Unassign | Click Unassign to remove all products from the template. |
Advanced Template Settings and Best Practices
↑ Back to topRule Groups for Advanced Product Filtering
Rule Groups allow complex filters for large catalogs.
Example: Assign only Men’s Hoodies under $50.
| Field | Condition | Value |
| Category | Equals | Hoodies |
| Price | Less Than | 50 |
Multiple Rule Groups are supported. Products matching any group will be assigned.
Best practices for attribute mapping
↑ Back to top- Always fill required attributes; missing data leads to listing rejection.
- Optional attributes improve search visibility on SHEIN.
- Double-check variation mapping (SHEIN allows only one variation group).
Pricing strategies for templates
↑ Back to topChoose pricing adjustments carefully:
| Strategy | When to use |
| Same as Store Price | For consistent pricing across sites. |
| Fixed Increase | To account for SHEIN fees or logistics. |
| Percentage Increase | For flexible markup across ranges. |
Common issues and solutions
↑ Back to top| Issue | Solution |
| No products fetched in Rule Groups | Check spelling, value case sensitivity. |
| Missing Storefront Region | Refresh regions and assign correctly. |
| Invalid package dimensions or weight | Review entries to fit within SHEIN limits. |
Best practices for template management
↑ Back to top- Create separate templates for each SHEIN category.
- Use clear, descriptive names for easier management.
- Regularly review templates as SHEIN’s category requirements may change.
Note: A well-configured template can save you hours of work and reduces listing errors.
Listings
↑ Back to topThe Listings section of SHEIN for WooCommerce helps you manage how your WooCommerce products are synchronized and published on the SHEIN Marketplace.
From here, you can view all products, monitor their sync status, edit mappings, and take corrective actions for failed listings.

Overview of the Listings page
↑ Back to topWhen you navigate to WooCommerce > SHEIN > Listings, you will see all products currently synced from your WooCommerce store. Each product entry provides important details about its sync status and offers tools to manage its SHEIN listing.
Fields displayed in listings
| Field | Description |
| Product Image | Thumbnail of the WooCommerce product. |
| Product Name | The product’s title from WooCommerce. |
| SHEIN Category | Category path where the product will be listed on SHEIN. |
| Price | The product price as configured for SHEIN (including markup). |
| Stock | Current stock level synced to SHEIN. |
| Status | The sync status of the product (see table below). |
| Actions | Available actions for managing the product listing. |
Product statuses and their meaning
Each product is assigned a status that indicates its current state on SHEIN.
| Status | Description |
| Listed | Product is successfully published and live on SHEIN. |
| Pending | Product is ready but waiting for manual submission or approval. |
| Error | Product failed to sync due to missing data, mapping issues, or validation. |
| Inactive | Product is synced but not active on SHEIN. |
| Withdrawn | Product was previously listed but has been withdrawn from SHEIN. |
| Rejected | SHEIN rejected the product listing due to policy violations or data issues. |
Managing product listings
↑ Back to topFilters and search
You can filter and search products on the Listings page for easier management:
- Search Bar: Enter a product name or SKU to find a specific listing.
- Status Filter: Filter products by their sync status (e.g., Error, Listed).
- Category Filter: Narrow results by SHEIN category.
Actions available for each product
| Action | Description |
| Edit Mapping | Update category, attribute, or variation mappings for the product. |
| Re-Sync | Retry syncing the product after fixing errors. |
| Withdraw Listing | Remove the product from being published on SHEIN (but keep it in WooCommerce). |
| View Error Details | See detailed reasons for sync failure for error products. |
Editing a product listing
↑ Back to topYou can edit a product listing by following the steps below:
1. Click on the product image that you want to edit.
2. You’ll be taken to the WooCommerce product section.
3. You can edit the product details like title, description, image, etc.

Withdrawing a product listing
↑ Back to topTo remove a product from SHEIN:
- Click Withdraw Listing in the Actions column.
- Confirm withdrawal when prompted. The product will now display its status as Withdrawn.
Best practices for managing listings
↑ Back to top- Regularly check the Error filter to quickly resolve failed listings.
- Ensure all required attributes and packaging details are filled before resyncing.
- Monitor stock levels and pricing to avoid customer complaints or rejection.
- Use the search bar for faster navigation in stores with large catalogs.
Product linking
↑ Back to topThe Product Linking feature allows you to map your WooCommerce products to their respective SHEIN listings. This ensures both systems are synchronized, enabling accurate inventory updates, pricing control, and seamless order management.

This section provides a step-by-step guide to linking, managing, and troubleshooting product mappings.
Why product linking is important
↑ Back to topLinking your products ensures:
- Inventory levels stay consistent across WooCommerce and SHEIN.
- Orders placed on SHEIN are imported into WooCommerce correctly.
- Product updates (price, attributes, stock) sync automatically.
Without linking, products will not sync and could result in overselling or data mismatches.
Accessing the Product Linking Page
↑ Back to top- From your sopre’s WP Admin dashboard, navigate to WooCommerce > SHEIN > Product Linking.
- Here, you’ll see a list of all WooCommerce products that can be mapped to SHEIN listings.
Fields displayed in product linking
↑ Back to top| Field | Description |
| WooCommerce Product | The product name and thumbnail as it appears in WooCommerce. |
| SHEIN Product | The corresponding product on SHEIN, if already linked. |
| Linking Status | Shows whether the product is linked, pending, or needs mapping. |
| Actions | Options to Link, Unlink, or Edit mappings. |
Linking WooCommerce products to SHEIN listings
↑ Back to topIf the integration detects matching SKUs or product identifiers between WooCommerce and SHEIN, it will automatically link them. Linked products will display their SHEIN product name and status as Linked.
Partial linking
↑ Back to topFor products that have variants and all the variants aren’t linked, will be shown in the ‘Partially Linked’ tab.
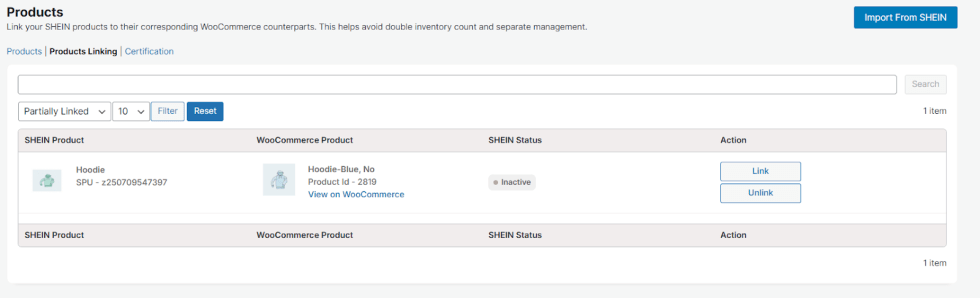
You can link them by linking all the variants.
Unlinking roducts
↑ Back to topTo remove a link between a WooCommerce product and a SHEIN listing:
- Select Linked Products from the dropdown.
- Click Unlink in the Actions column.
- The product’s status will revert to Unlinked, and its inventory might be synced twice with SHEIN.
Troubleshooting common issues
↑ Back to top| Issue | Solution |
| Product not appearing in SHEIN search | Check if the product is live on SHEIN. |
| SKU mismatch between Woo and SHEIN | Update WooCommerce SKU to match SHEIN. |
| Changes not syncing after linking | Ensure the product is marked as Linked. |
Best practices for product linking
↑ Back to top- Regularly review linking status to catch and correct mismatches.
- Use consistent SKUs in WooCommerce and SHEIN for easier auto-linking.
- Avoid duplicate listings on SHEIN to prevent sync errors.
Certification
↑ Back to topThe Certification section allows you to upload and manage product and store-level certificates required by SHEIN. Certain product categories on SHEIN (such as baby products, cosmetics, or electronics) require sellers to provide certifications to prove compliance with safety and regulatory standards.

This guide walks you through accessing the Certificates page, uploading certifications, and managing them effectively.
Why certificates are important
↑ Back to topCertificates ensure your products meet SHEIN’s compliance requirements for specific regions and categories. Without proper certifications:
- Your products may fail to sync or get rejected during the listing process.
- You could face listing delays or account restrictions on SHEIN.
Accessing the certificates section
↑ Back to top- From your store’s WP Admin dashboard, navigate to WooCommerce > SHEIN > Certificates.
- The page displays two tabs:
- Store Certificates
- Product Certificates
Uploading new certificates
↑ Back to top
- Click Upload Certificate.
- Fill in the details:
- Certificate Name: Enter a descriptive name (e.g., FDA Approval – Skincare).
- Certificate Level: Product/Store.
- Choose the certificate from the dropdown.
- Validity Period: Enter the start and expiry dates of the certificate. (This field is only displayed for certificates that need an expiry date.)
- Upload the certificate file (supported formats: PDF, JPEG, PNG).
- Click Save to upload and store the certificate.
Editing or deleting store certificates
↑ Back to top- To edit, click Edit next to the certificate and update details or replace the file.
- To delete, click Delete and confirm the action.
Linking certificates to products
↑ Back to top- Go to the Product Certificates tab.
- Search or browse your WooCommerce products.
- Click Link Certificate for a product requiring certification.
- Select an existing certificate from the dropdown or upload a new one.
- Save changes to apply the certificate to the product.
Viewing certificate assignments
↑ Back to topThe Product Certificates tab shows which products have certificates linked, helping you track compliance across your catalog.
Common questions
↑ Back to top| Question | Answer |
| Do I need certificates for all products? | No, only for categories where SHEIN mandates it. |
| What file types are supported for uploads? | PDF, JPEG, and PNG. |
| How do I know if my product requires a certificate? | Check SHEIN’s category requirements or error messages in Listings. |
Best practices
↑ Back to top- Keep certificate files updated to avoid expiration-related sync issues.
- Regularly check SHEIN’s compliance requirements for changes in product certification rules.
- Name certificates clearly for easy identification when linking them to products.
Failed orders
↑ Back to topThe Failed Orders section helps you identify, troubleshoot, and resolve orders from SHEIN that were not successfully imported into your WooCommerce store. Failed orders can occur due to data mismatches, configuration issues, or API errors. This guide explains how to use the Failed Orders page to monitor and fix such issues.

Why monitor failed orders?
↑ Back to topFailed orders may lead to:
- Delayed fulfillment and customer dissatisfaction.
- Stock inconsistencies between WooCommerce and SHEIN.
- Missed revenue if not resolved promptly.
This section allows you to take quick corrective action to ensure seamless order flow.
Accessing the Failed Orders section
↑ Back to top- From your store’s WP Admin dashboard, navigate to WooCommerce > SHEIN > Failed Orders.
- The page lists all SHEIN orders that failed to sync into WooCommerce.
Overview of the Failed Orders page
↑ Back to top| Field | Description |
| Order ID | Unique identifier for the SHEIN order. |
| Customer Name | Name of the customer who placed the order. |
| Order Date | Date when the order was placed on SHEIN. |
| Failure Reason | Describes why the order failed to sync. |
| Actions | Options to view details and retry syncing the order. |
Common reasons for failed orders
↑ Back to top| Reason for failure | Possible cause |
| Product SKU mismatch | SKU in SHEIN order does not match any WooCommerce product. |
| Missing stock information | Stock level unavailable for one or more ordered products. |
| Pricing configuration error | Price sync settings invalid for the product region. |
| API timeout or connectivity issues | Temporary issue between WooCommerce and SHEIN API. |
Resolving failed orders
↑ Back to topStep 1: View failure details
- Locate the failed order in the list.
- Click View Details to see the error message and related product information.
Step 2: Fix the underlying issue
Depending on the failure reason:
- SKU mismatch: Update your WooCommerce product SKUs to match SHEIN.
- Stock issue: Adjust inventory levels in WooCommerce.
- Pricing error: Review and correct price settings in the extension.
Step 3: Retry sync
After fixing the issue:
- Click Retry Sync in the Actions column.
- The system will attempt to import the order again.
- If successful, the order moves to your WooCommerce orders.
Best practices for managing failed orders
↑ Back to top- Check the Failed Orders page frequently, especially during high-sales periods.
- Use consistent SKUs and product data across WooCommerce and SHEIN to prevent mismatches.
- Monitor stock levels to avoid inventory-related failures.
- If multiple retries fail, contact support with the order ID and error details.
Configuration
↑ Back to topThe Settings section allows you to configure how your WooCommerce store interacts with the SHEIN Marketplace. From here, you can manage core preferences, enable or disable synchronization options, and set up default behaviors for your listings and orders.

This guide provides a step-by-step explanation of each setting so you can optimize your workflow.
Accessing the Settings page
↑ Back to top- From your store’s WP Admin dashboard, navigate to WooCommerce > SHEIN > Settings.
- The Product settings page includes tabs for configuring different aspects of your integration.
Product settings

When Price Sync is turned on using the toggle shown above, any price changes you make to products in WooCommerce will automatically update on SHEIN. You can consider turning it off if you want to set different prices on SHEIN (for example, if you’re running separate promotions or pricing strategies on each platform).
Turning the sync off will stop automatic price updates from WooCommerce to SHEIN. You will need to update prices manually in the SHEIN seller center if needed.
Order management
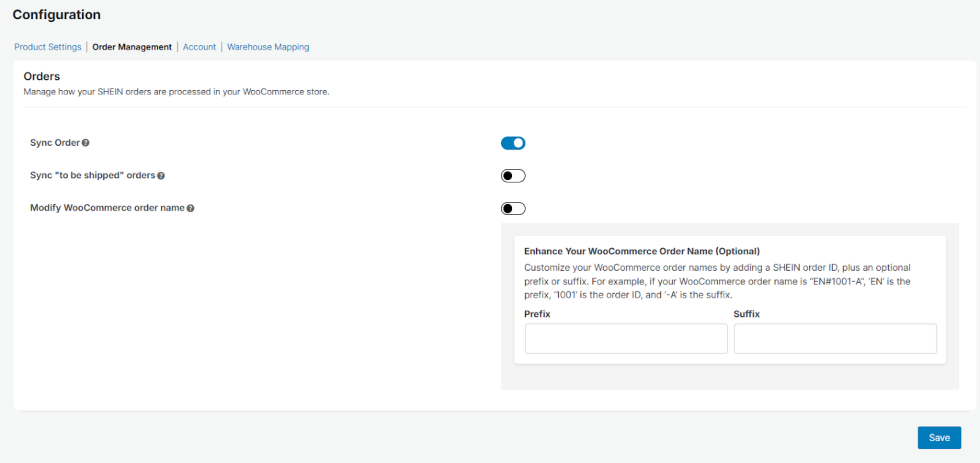
This section helps you manage how SHEIN orders appear and behave inside your WooCommerce store. Use the options below to fine-tune your order sync and fulfillment preferences.
Key settings explained:
- Sync Orders: Enable this to sync and create your SHEIN orders on WooCommerce.
- Sync To Be Shipped Orders: Enable this to sync orders that are marked as ‘To be shipped’ on SHEIN. These orders are confirmed, shipping info is available, and they’re ready for fulfillment.
- Modify WooCommerce order name:
- Add SHEIN order IDs to your WooCommerce order names for simpler identification.
- You can optionally customize the format using a prefix and/or suffix.
Example: If the SHEIN order ID is 1001, a prefix of EN and suffix of -A would result in EN#1001-A.
Account

Here you can view the following account account details:
- Store URL
- Created At
- Business Name
- SHEIN account details like Open Key ID and current account status
Warehouse mapping

Here you can map your SHEIN warehouses with WooCommerce locations. Since WooCommerce only has one location, by default, you’ll have only one location to sync with SHEIN warehouses.
Click Sync Warehouse to fetch new SHEIN warehouses that aren’t visible in the dropdown.
Saving your settings
After making changes:
- Review your selections carefully.
- Click Save Changes at the bottom of the page to apply updates.
Best practices
- Regularly review your settings after major plugin updates or SHEIN policy changes.
- Use the Default Configuration wisely to avoid repetitive setups for new products.
Subscription
View and manage your plans in this section. If you run out of order credits or are about to reach the end of the current plan, consider upgrading your plan to keep things running smoothly.

