The All-in-one PDF Invoice and Packing Slips Suite plugin automatically generates all essential WooCommerce documents, including PDF invoices, packing slips, delivery notes, shipping/address labels, etc.
Documents
↑ Back to topThe user can explicitly enable/disable the document type required for his site and configure individual settings pertaining to each document.
- Enable/Disable Documents: By default, all the document types are in the enabled state. On disabling a document type, the corresponding item will be removed from the menu, and thereby the user will not be able to access it further until it is enabled.
- Settings: Click on the Settings button, to get redirected to the concerned document settings page.
General
↑ Back to topThe address details specified in the general tab will appear across all document types.
- Company Info
- Name – Input the name of your company in this field.
- Logo – Upload a custom company logo or image to appear in the documents. Alternatively, input the URL of the image. By default, the logo appears on the top left corner of the documents.
- Company tax ID: Specify your company tax ID. For e.g. you may enter as VAT: GB123456789, GSTIN:0948745 or ABN:51 824 753 556
- Return Policy/conditions – You can set return policies, terms of conditions, and so on in the given text field.
- Footer – Specify a custom footer that will appear in all documents.
- Address (Sender details)
- Department/Business/Sender – Enter the name of the WooCommerce shop owner.
- Address Line1 – Enter the first line of the address, which is mostly the street name and number.
- Address Line2 – Enter the second line of the address, which can be the apartment number.
- City – Enter the city name of the sender.
- Country/State – Enter the country name of the sender.
- Postal code – Enter the postcode from where you are shipping items.
- Contact number – Specify the contact number of the shop manager.
Lastly, click on the Update settings button to save the data.
Advanced options
↑ Back to topConfigure additional information with respect to custom data, RTL support, packaging formats, etc. from the Advanced tab.

- Add additional fields on the checkout page – Append additional information in documents by selecting the required item from the drop-down. You can select an item from the list of default fields or click the Add Custom Field button to create custom meta fields by providing a custom Field Name and Meta Key. You can add a placeholder for the field and mark it as mandatory or not.
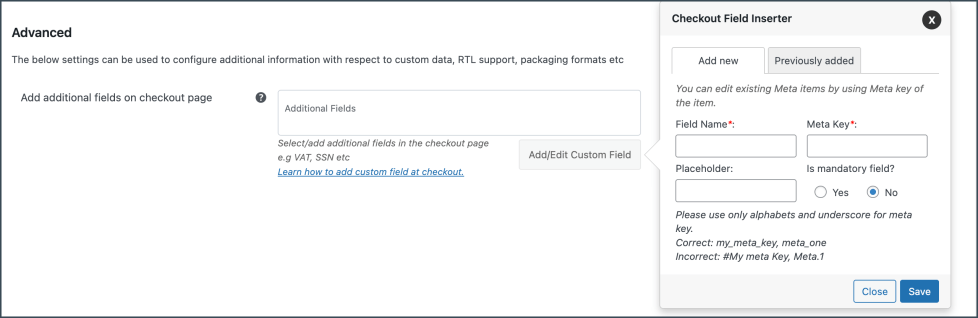
You can view, delete or edit existing meta fields.
- Preview before printing – Enable previewing documents before printing.
- Tracking number meta – Enter the tracking number meta field to add tracking number information. Capture the ‘tracking number meta’ from the respective plugin used for tracking.
- Display state name – Displays the state name instead of the state code in billing and shipping addresses.
- Transport / Sale Terms – Insert additional transportation or sale terms in the proforma invoice.
- Display price in the product table – Configure the product price/subtotal inclusive or exclusive of tax. Click on the WooCommerce tax settings link if it has not been done previously. To display all price columns inclusive of tax, choose Include tax. To display tax in a separate column not included within the price, choose Exclude tax.

- Enable RTL support – To provide support for RTL languages like Arabic, Hebrew, etc., you can use our mPDF addon. Due to the limitations in the built-in DomPDF library that converts HTML to PDF, special characters or images may not be rendered properly. Therefore, it would be better if you could use our free mPDF addon plugin to generate PDFs for documents. PDF library – Choose between Dompdf and mpdf.
- Packaging Type – The packaging type will be applicable to all documents, except the Invoice. You can select the packaging type from the three available options:
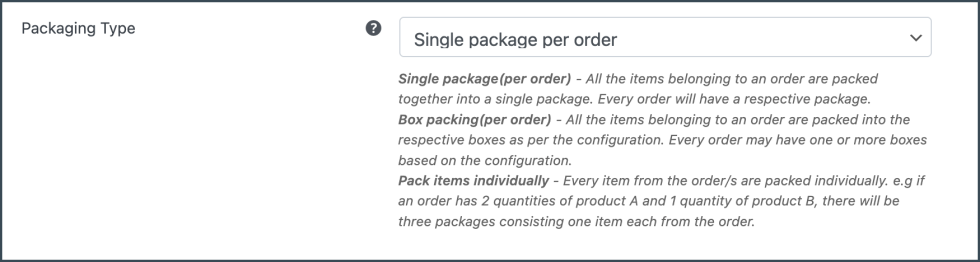
Pack items individually – For example, if an order has 2 quantities of product A and 1 quantity of product B, then there will be three packages consisting of one item each from the order.
Single package (per order) – All the items belonging to the order are packed together into a single package. Every order will have a respective package.
Box packing (per order) – All the items belonging to the order are packed into the respective boxes as per the configuration. Every order may have one or more boxes based on the configuration.
To define a new box size, click the Add Box button. All cart items are packed into custom boxes defined in the Box Size settings. The best-fit box is chosen automatically from the defined boxes. These box dimensions and weight settings are applicable only when Box Packing is selected. Based on your requirement, you can enable or disable a particular box using the checkbox under the Enabled column of the respective box rule.
Finally, click on the Update Settings button to save the settings.
- Temp files – Whenever the PDF documents are sent as email attachments or if printed using the print node, a local copy of the same will be maintained in your system. You can access it from the Temp files section.

- File path: Represents the location where the temp files are saved.
- Total files: Shows the total number of temp files.
- Automatic cleanup: Choose to auto-clean up the tempfiles or not.
- Interval: Set an interval for auto cleanup. Eg: 1440 for 1 day.
Invoice – General Settings
↑ Back to topThe settings included in the general tab are as shown below:

- Enable invoice: Disable to remove the invoice view/print provisions for orders. The admin can still customize the template and set the invoice number.
- Group products by ‘Category’: Enable grouping products based on category.
- Invoice date – You can choose between the order date or the invoice creation date.
- Sort products by: Sort products based on Name and SKU.
- Create invoice automatically – Creates invoices for chosen order statuses. You can select multiple statuses based on your requirements.
- Attach PDF invoice in the order email: Enable attaching the PDF version of the currently active invoice template in the order email.
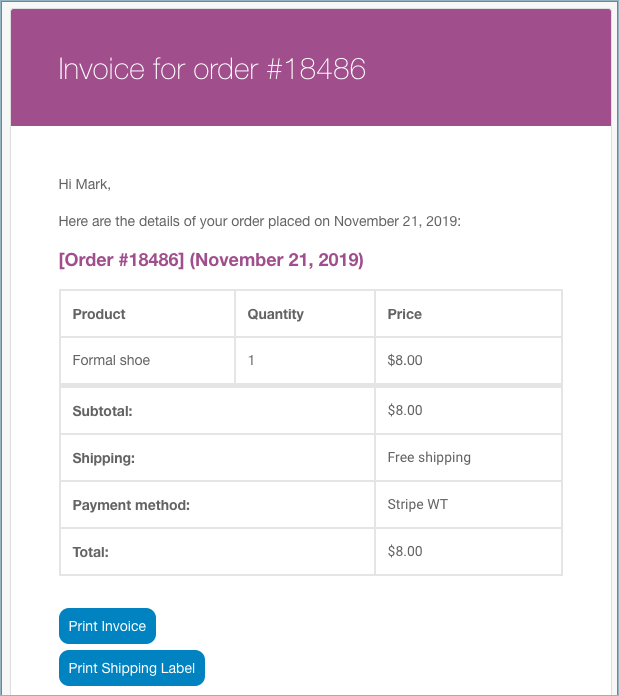
- Enable print invoice button for selected order statuses: You will be able to display a print invoice button for your customers.
- Show variation data below each product: To include variation data of the product in the invoice, enable this option.
- ‘Total tax’ column display options: Displays the total tax column in any of the selected formats. Available formats are: Amount, Rate(%), Rate(%) with amount.
For example, If $500 is the total price and the tax rate is 20%, then the total tax will be displayed in the invoice in the following manner:- Amount-$100
- Rate(%)-20%
- Rate(%) with amount – $100(20%)
- Show separate columns for each tax: Enable having individual columns for tax in the invoice. If multiple taxes are set up in your store, each tax item will be displayed separately in individual columns. The various tax display formats are: Amount, Rate(%), Rate(%) with amount, and Separate columns for Rate(%) and Amount.
- Upload signature: If you want the signature to be displayed in the invoice, upload it in this field.
- Custom logo for invoice: Upload a custom logo different from the invoice. Leave it blank to populate the default logo.
- Use the latest settings for invoice: Enable the application of the most recent settings to previous order invoices. This will match the previous invoices with the upcoming invoices. Caution: Changing the company address, name, or any other settings in the future may overwrite previously created invoices with the most up-to-date information. On disabling, the previous invoices will not be updated to the latest settings.
- Generate invoices for old orders: Enable the generation of invoices for all orders created before plugin installation.
Finally, click on the Update Settings button to save the settings.
Custom invoice number
Next, you can set up a custom invoice number with a prefix/suffix/number series or even mirror the order number as an invoice number, respectively.
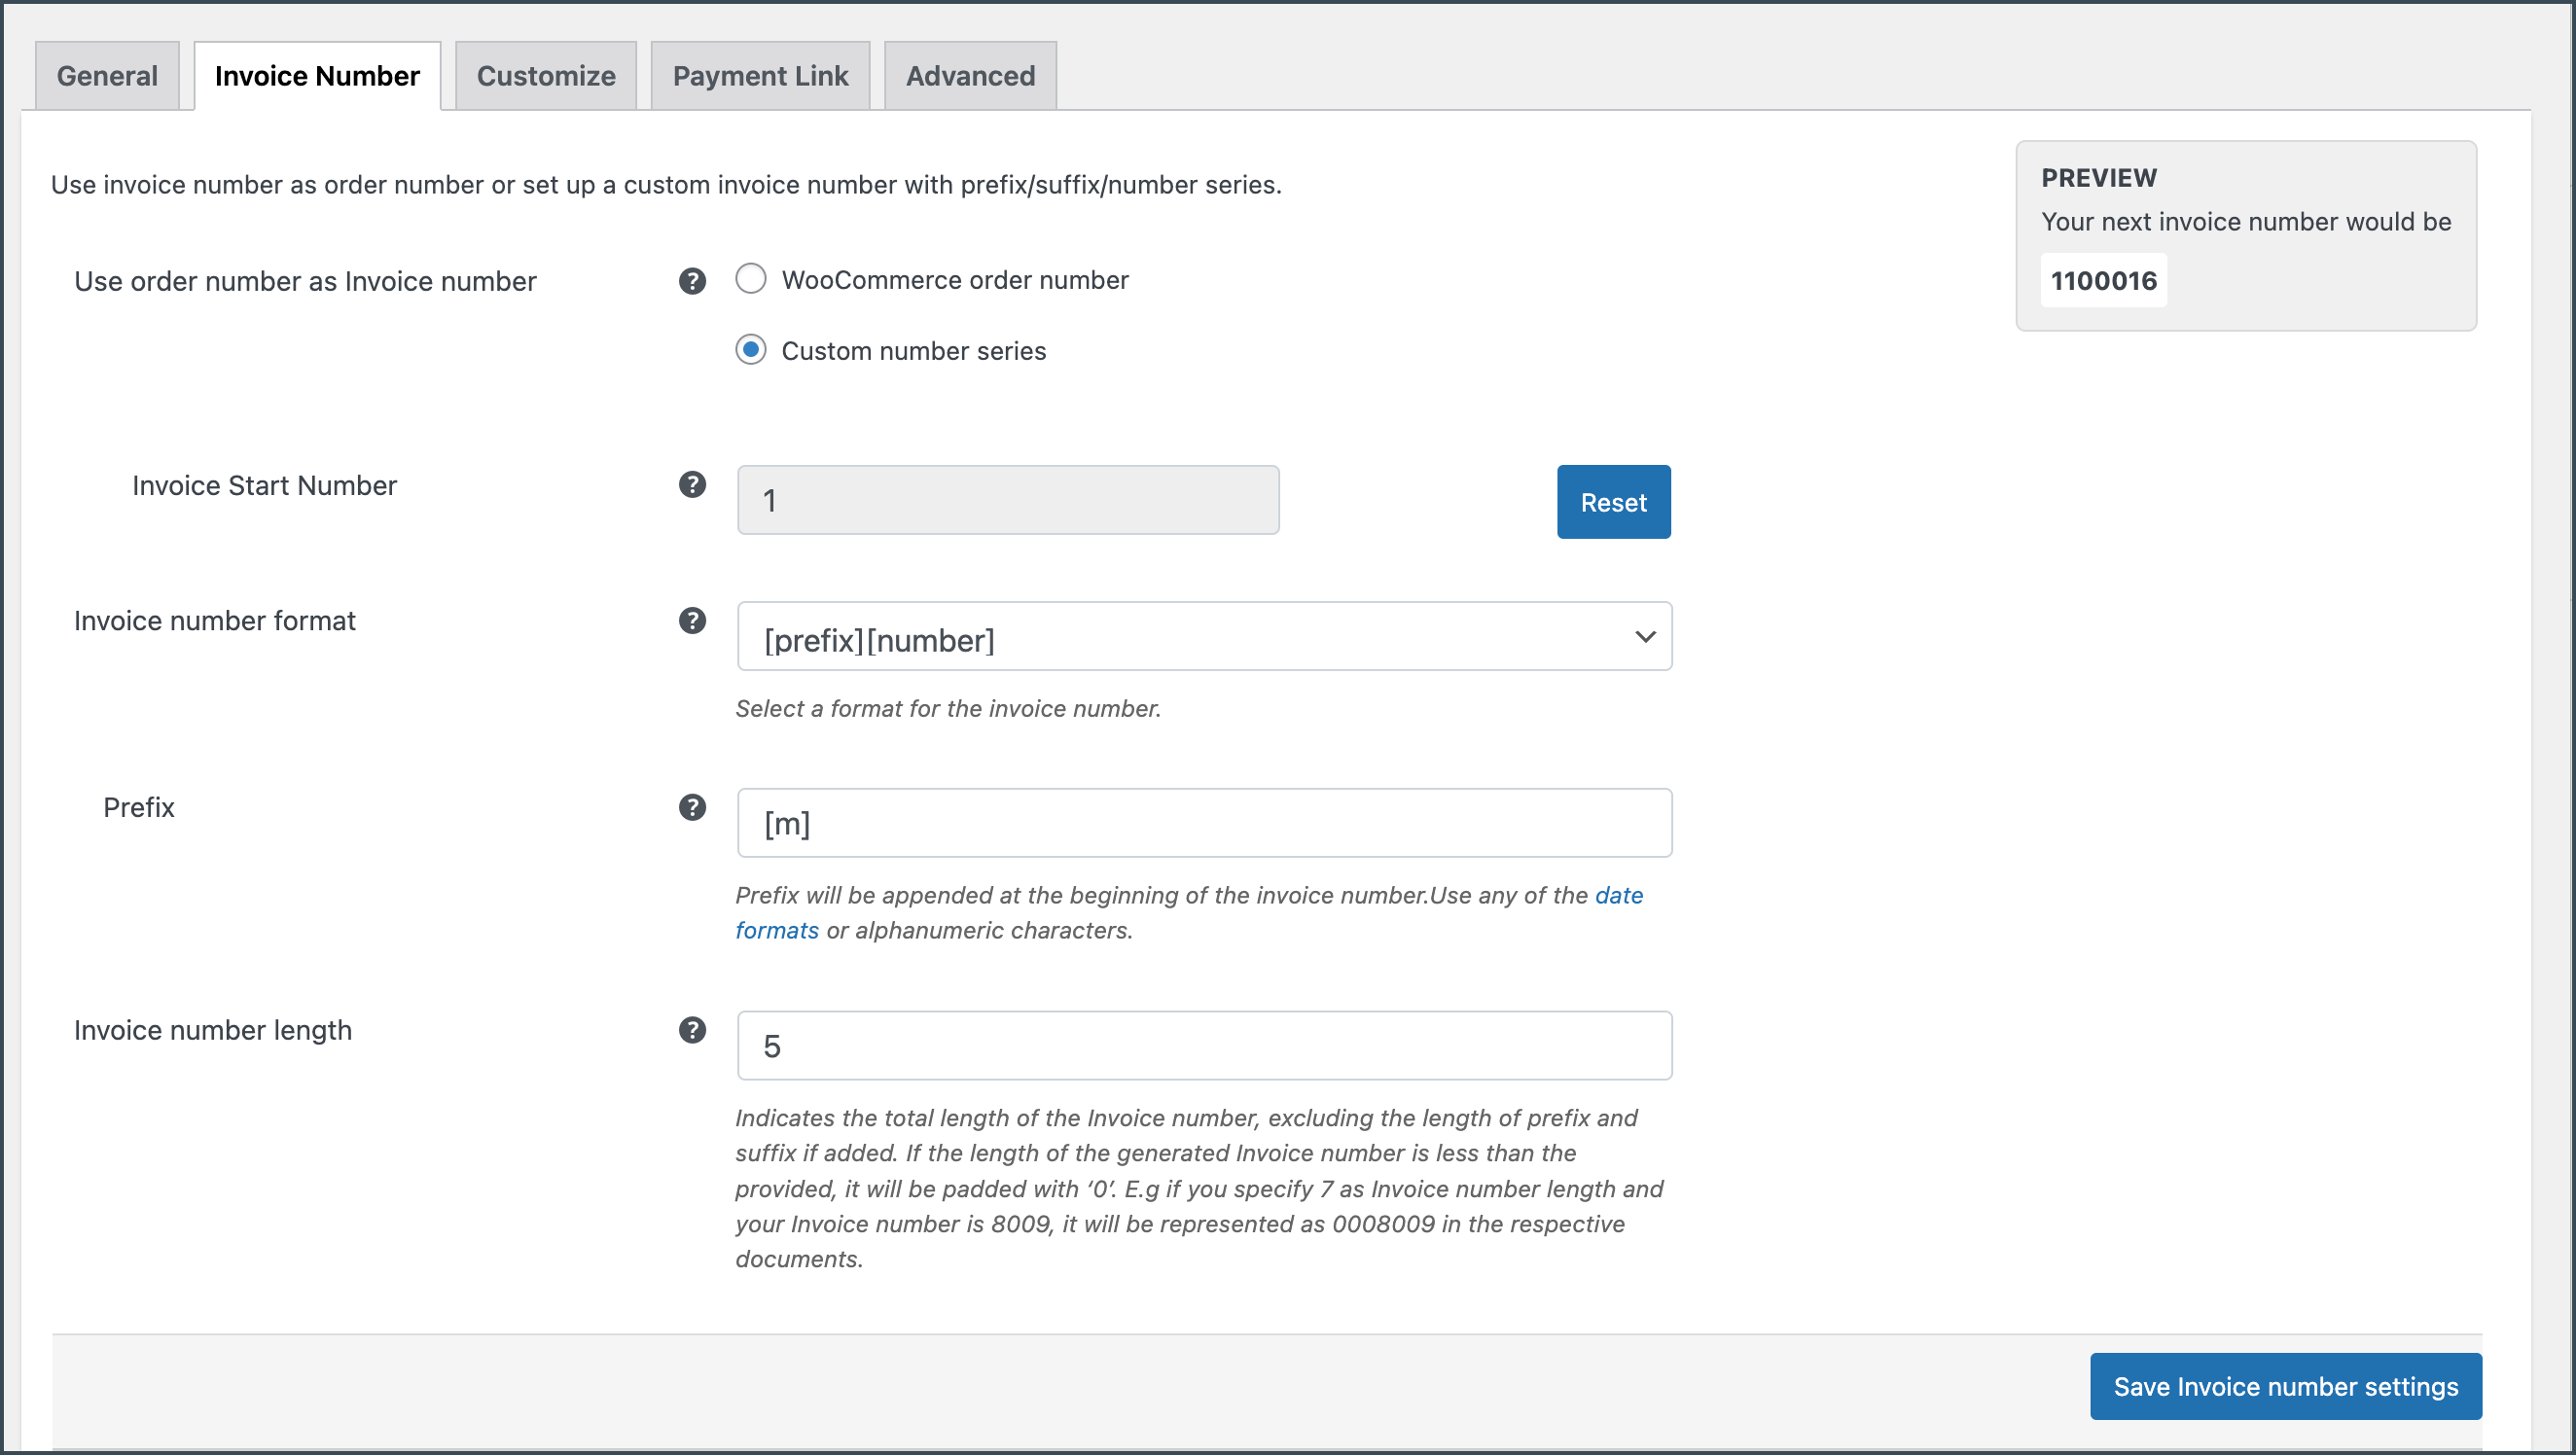
Use the order number as the invoice number: Choose Yes to use the order number as the invoice number. To have a custom invoice number, select No and input the necessary details into the respective fields.
Invoice Start Number: Enter the Invoice Start Number.

Invoice number format: Specify the format in which the invoice has to be generated. For example, [prefix][number][suffix]

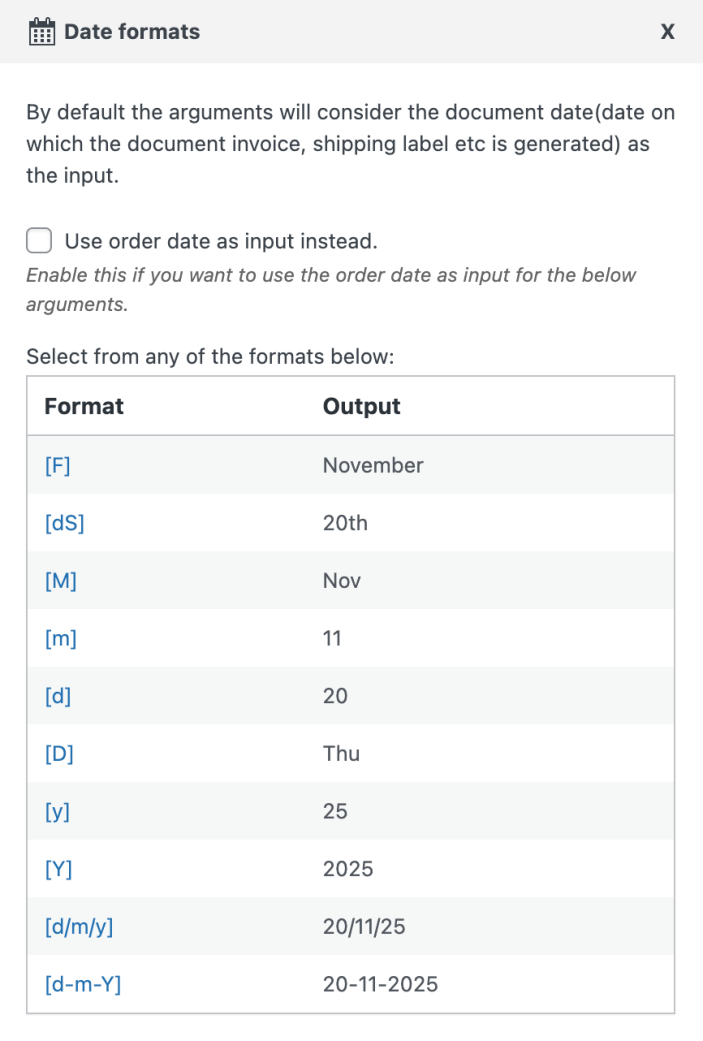
Suffix: Enter the suffix that will appear at the trailing end of the invoice number. You can use any of the date formats or alphanumeric characters as a suffix as shown in the image below.
Invoice number length: Indicates the total length of the invoice number, padded with zeroes. For example, Input invoice number length as 7 with initial number as 8009. Then, the newly generated number will be 0008009, padded with 3 zeroes.
Update and reset the invoice number format settings by clicking on the Update and Reset button.
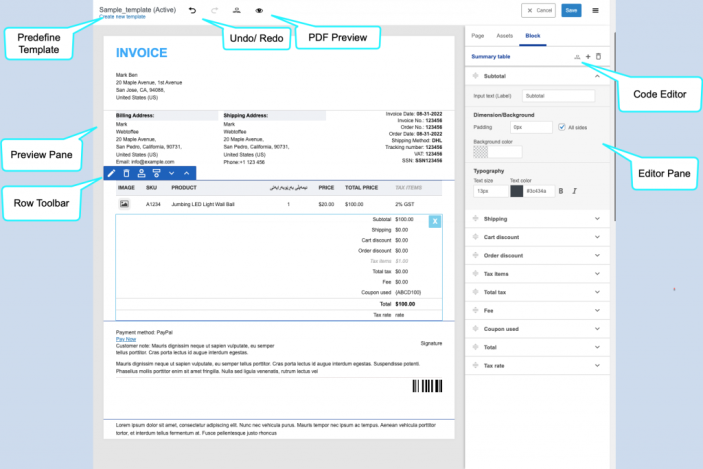
Customize and preview
↑ Back to topThe customizer is intuitive, dynamic, and flexible to work on. It consists of the following:
- Preview pane
- Editor pane
- Predefined templates
- Undo/Redo buttons
- Code editor
- PDF preview
Packing Slip – General Settings
↑ Back to topYou can configure the general settings required for the packing slip from this tab.
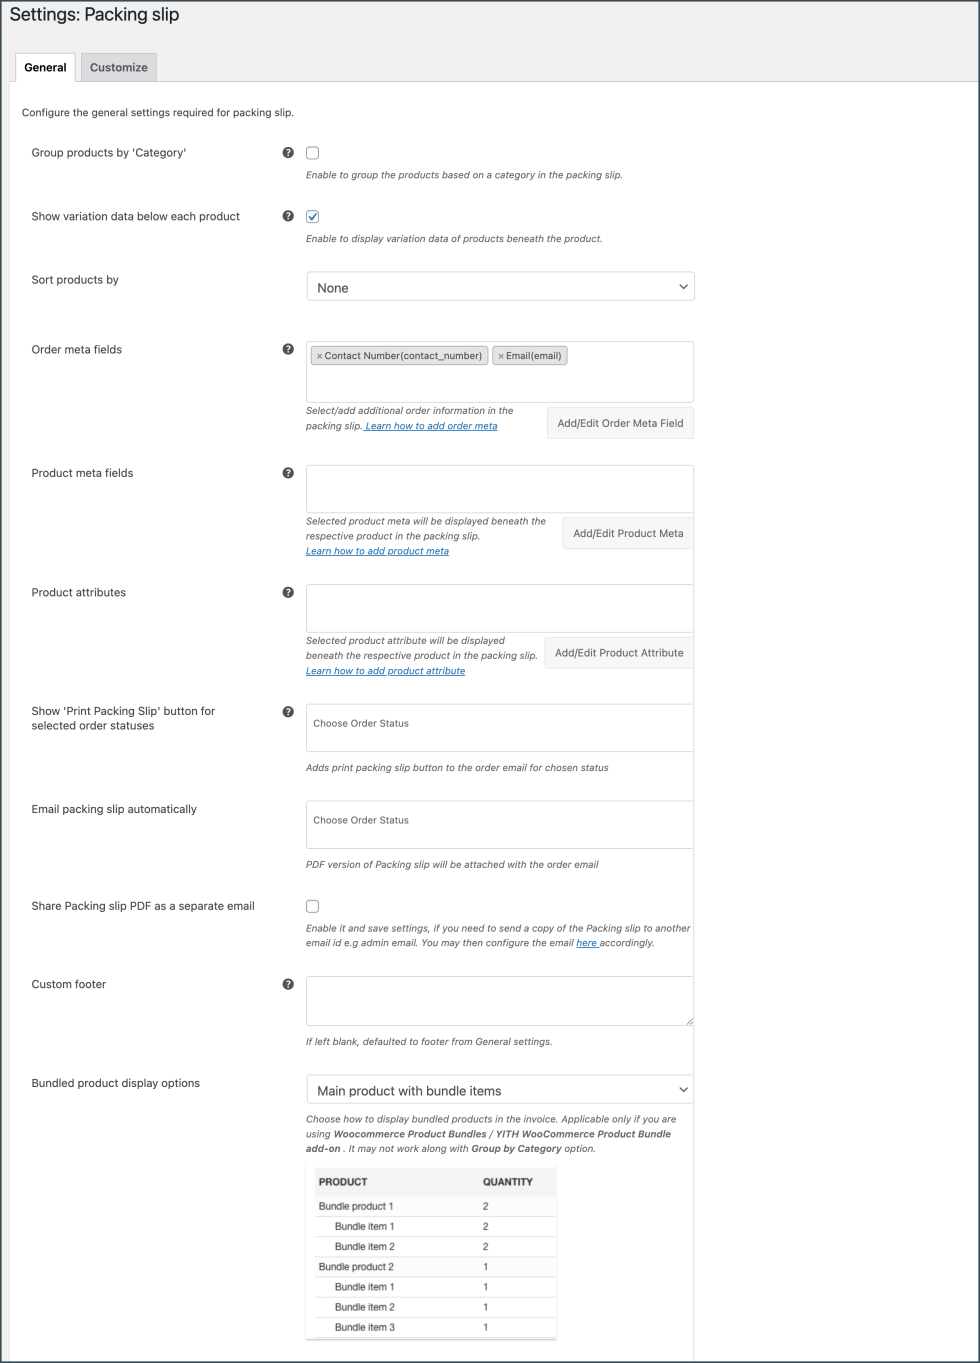
- Group products by Category: Enable to group the products by category.
- Show variation data below each product: To include variation data of the product in the packing slip, enable this option.
- Sort products by: Sort the products on the basis of name or SKU in either ascending or descending order.
Add meta data
↑ Back to top- Order meta fields – This allows you to add additional order meta fields in the packing slips.
- You can select an item from the list of default fields or
- Click the Add/Edit Existing Order Meta field button to create custom meta fields. Input a custom Field Name and the respective Meta Key for the field. Get the order meta keys from the custom field section of the WooCommerce Order page.
- Likewise, you can view, edit, or delete previously created order meta from the previously added tab.
- Product meta fields – This allows you to add meta fields related to the products in the packing slip product table.
- Click the Add/Edit Product Meta to add a new product meta field by providing a custom Field Name and the respective meta key for the field.
- Likewise, you can view, edit, or delete previously created product meta from the previously added tab.
- Product attributes –
- To have product attributes in the invoice, simply add them by using the Add/Edit Product attribute button.
- Add new tab will give you options to specify the field name and the corresponding meta of the product attribute.
- Likewise, you can view, edit, or delete previously created attributes from the previously added tab.
Email Settings
↑ Back to topAttach packing slip PDF in order email for order statuses: Enable to attach PDF version of the currently active packing slip template in the order email.
Share packing slip PDF as a separate email: If you need to send a copy of the Packing slip to another email id, then, select `Yes` and save settings. eg: admin email. You may then configure the email from WooCommerce > Settings > Emails. Click manage against the ‘Packing Slip’ email and enter the recipient emails separated by commas.
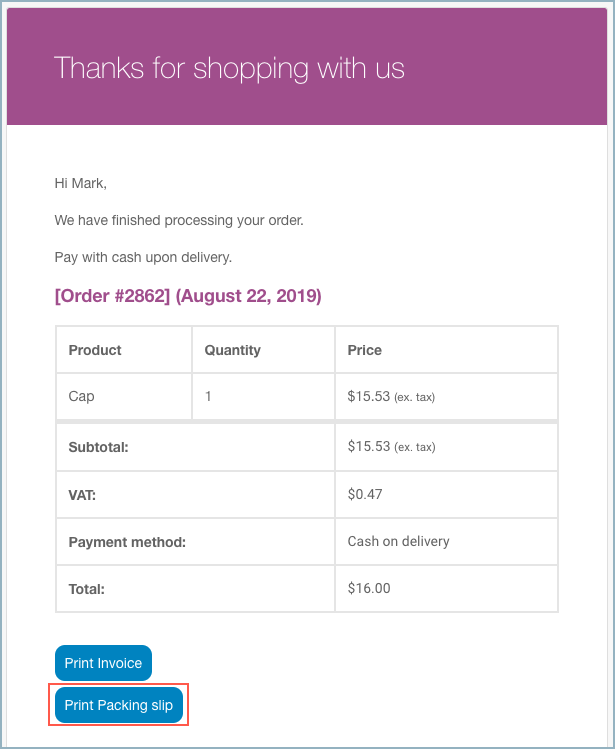
Enable print packing slip option for order status: Adds print packing slip button to the order email for chosen status from the dropdown as shown below.
Custom Footer
Key in with a custom footer for the packing slip in the text area. If left blank, then the default footer from General settings will be loaded.
At last, click the Update Settings button.
Customize Packing Slip
↑ Back to topYou can customize the packing slip using the inbuilt templates and modify them to suit your needs.
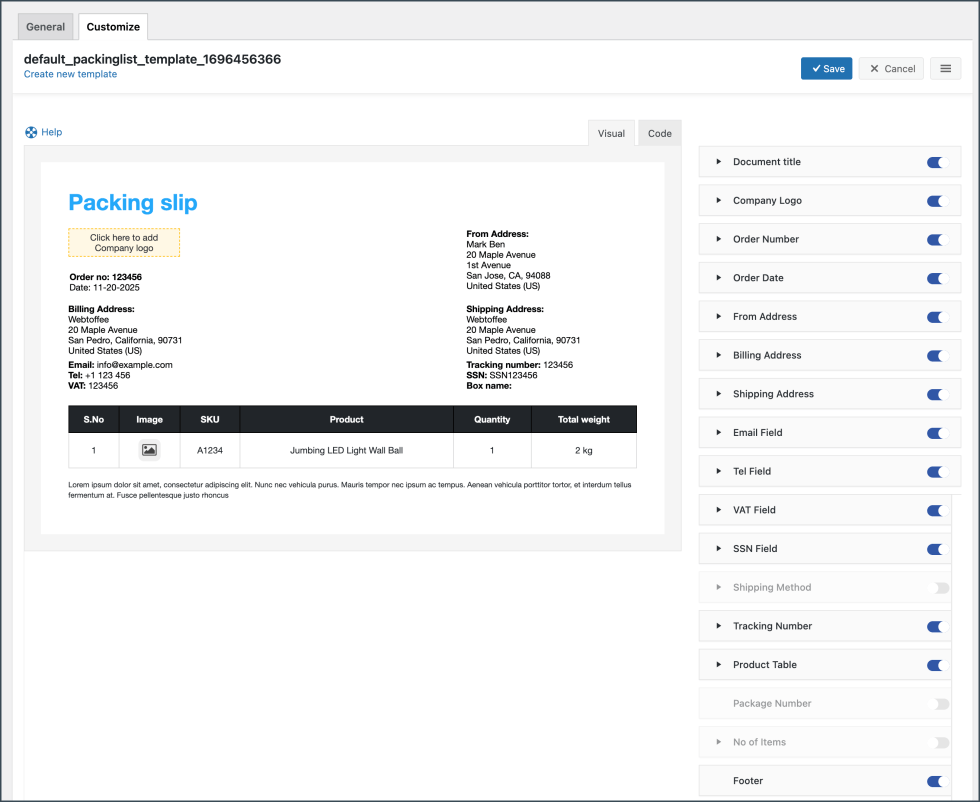
To create a new packing slip template,
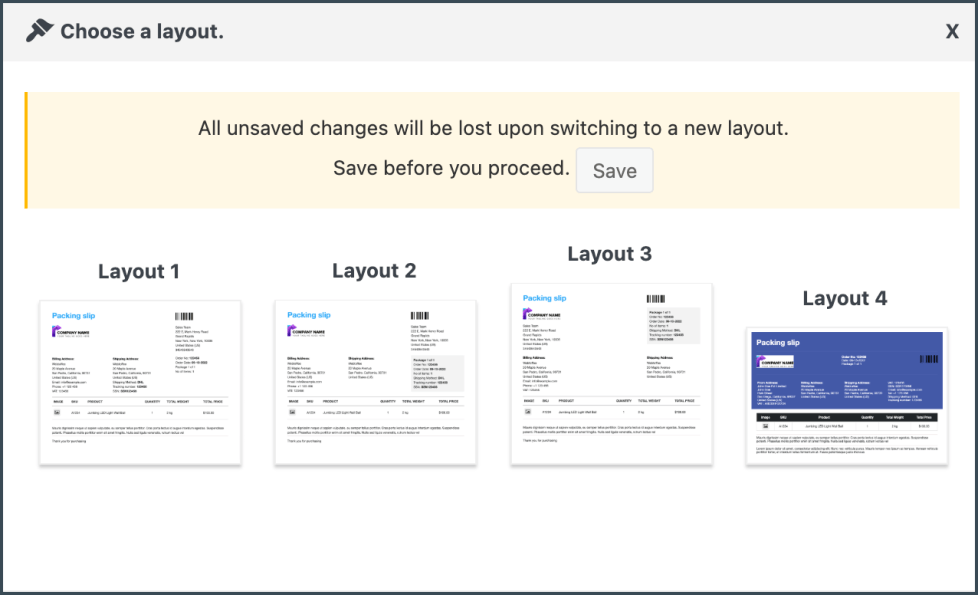
- Select a template from the Create new template option.
- From the inbuilt templates that pop up, choose a layout.
- Make the necessary modifications to the layout and save it.
- After saving, activate the template to use it further for your packing slip.
- You can even switch to the code editor, to make additional customizations other than the one listed in the visual editor.
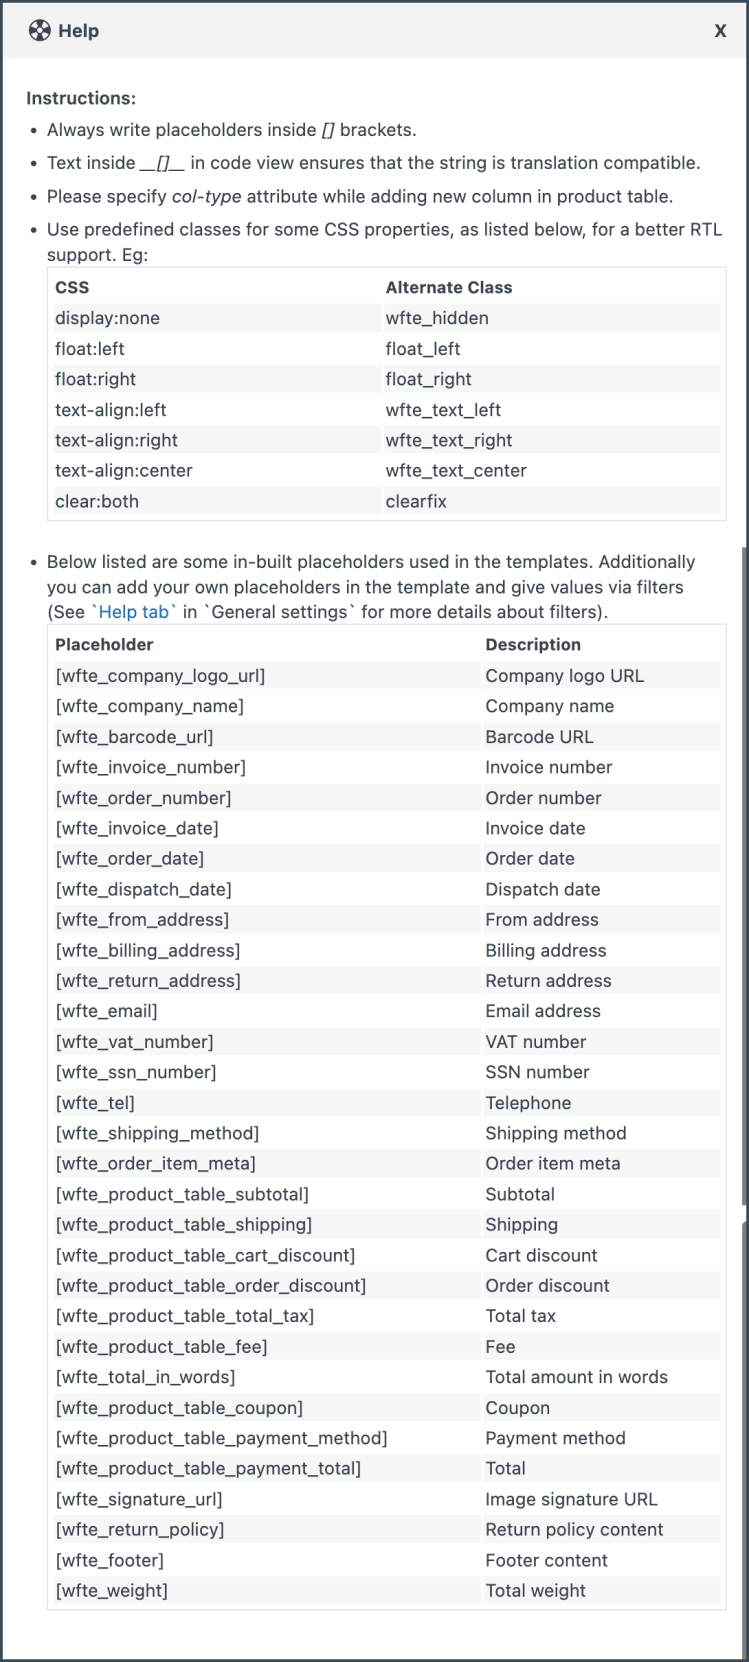
- While making changes via code editor it would be better for you to refer to the help which briefs about placeholders, alternate classes for RTL support, etc as shown below:
- Make the necessary modifications to the layout and save it.
- After saving, activate the template to use it further for your packing slip.
Delivery Note – General Settings
↑ Back to topYou can configure the general settings required for the delivery note.
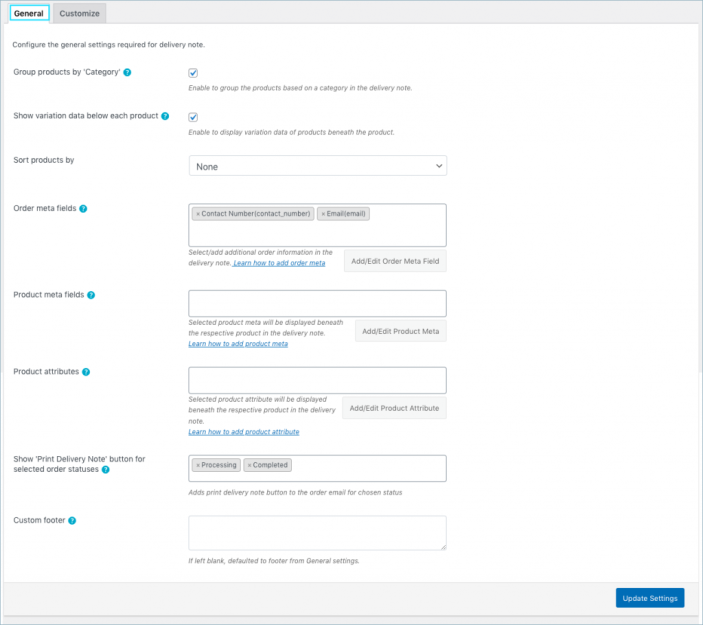
- Group by Category: Enable to group the products by category.
- Show variation data below each product: To include variation data of the product in the delivery note, enable this option.
- Sort products either by Name or SKU.
Add metadata
↑ Back to top- Order meta fields – This allows you to add additional order meta fields in the delivery note. You can select an item from the list of default fields or
- Click the Add/Edit Existing Order Meta field button to create custom meta fields. Input a custom Field Name and the respective Meta Key for the field. Get the order meta keys from the custom field section of the WooCommerce Order page.
- Likewise, you can view, edit, or delete previously created order meta from the previously added tab.
- Product meta fields –
- This allows you to add meta fields related to the products in the delivery note product table. Click the Add/Edit Product Meta to add a new product meta field by providing a custom Field Name and the respective meta key for the field.
- Likewise, you can view, edit, or delete previously created product meta from the previously added tab.
- Product attributes –
- To have product attributes in the delivery note, simply add them by using the Add/Edit Product attribute button.
- Add new tab will give you options to specify the field name and the corresponding meta of the product attribute.
- Likewise, you can view, edit, or delete previously created attributes from the previously added tab.
Show ‘Print Delivery Note’ option for selected order statuses: Adds print delivery note button to the order email for chosen status from the drop-down as shown below.
Custom Footer: Key in with a custom footer for the delivery note in the text area. If left blank, then the default footer from General settings will be loaded.

Click on the Update Settings button to save the settings.
Customize Delivery Note
↑ Back to topYou can customize the delivery note using the inbuilt templates and modify them to suit your needs.
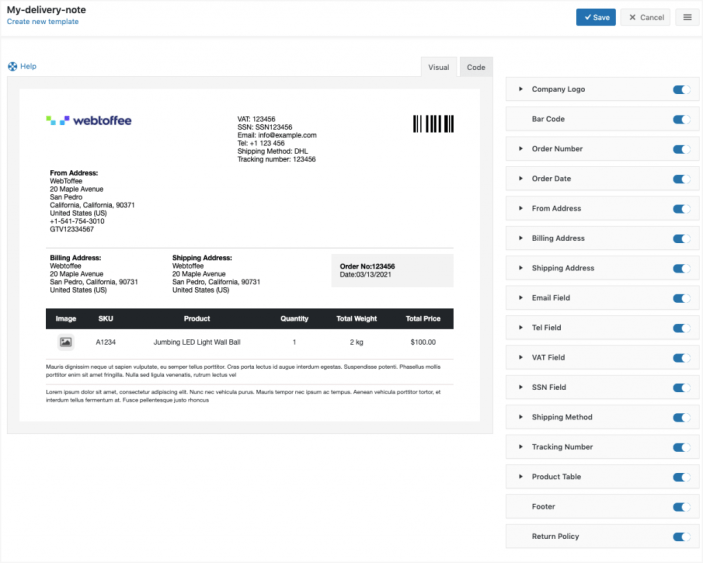
To create a new delivery note template,
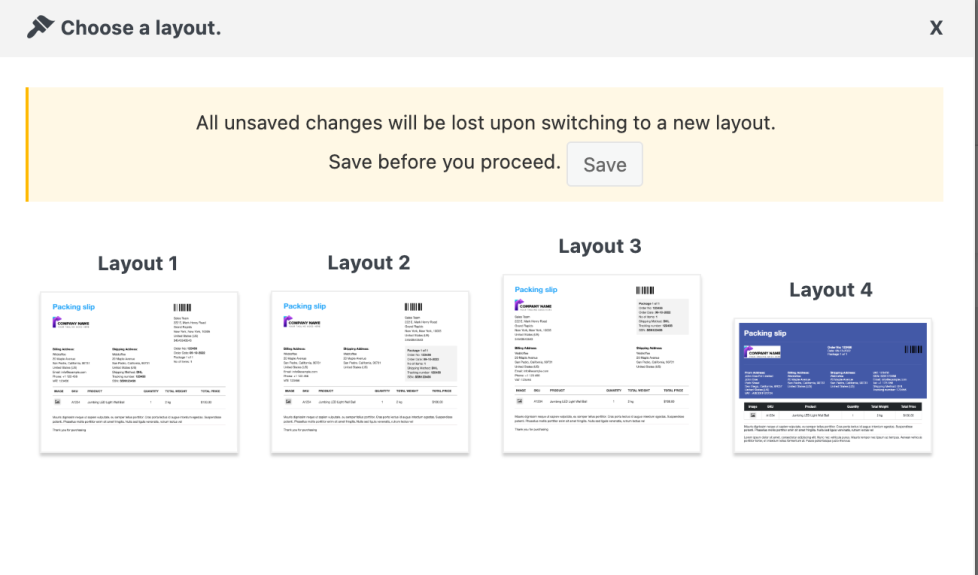
- Select a template from the Create new template option.
- From the inbuilt templates that pop up, choose a layout.
- Make the necessary modifications to the layout and save it.
- After saving, activate the template to use it further for your delivery note.
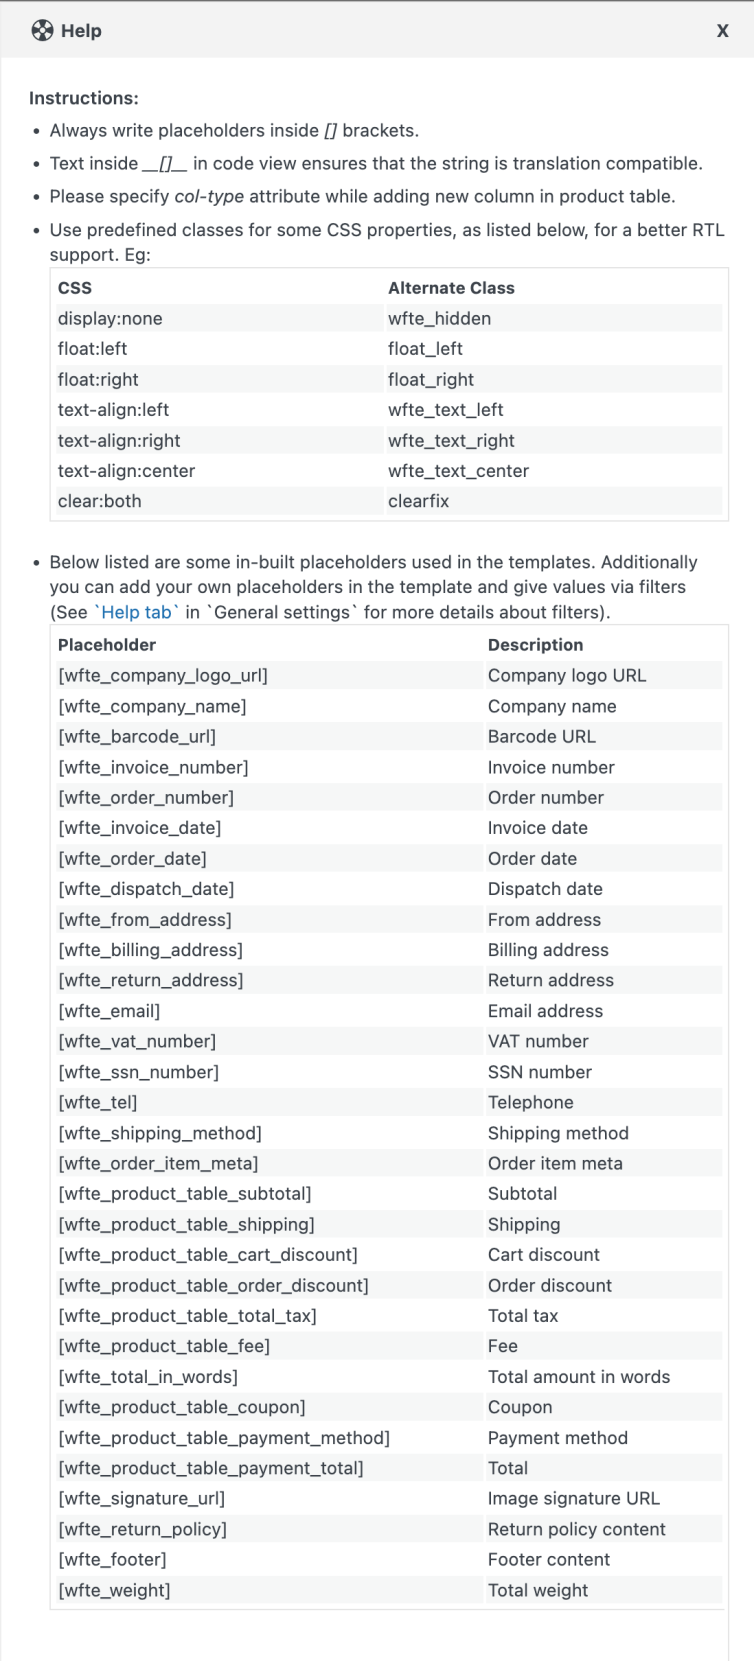
- You can even switch to the code editor, to make additional customizations other than the one listed in the visual editor.
- While making changes via code editor it would be better for you to refer to the help which briefs about placeholders, alternate classes for RTL support, etc as shown below:
- Make the necessary modifications to the layout and save it.
- After saving, activate the template to use it further for your delivery note.
Shipping Label – General settings
↑ Back to topThe settings included in the general tab are the following:
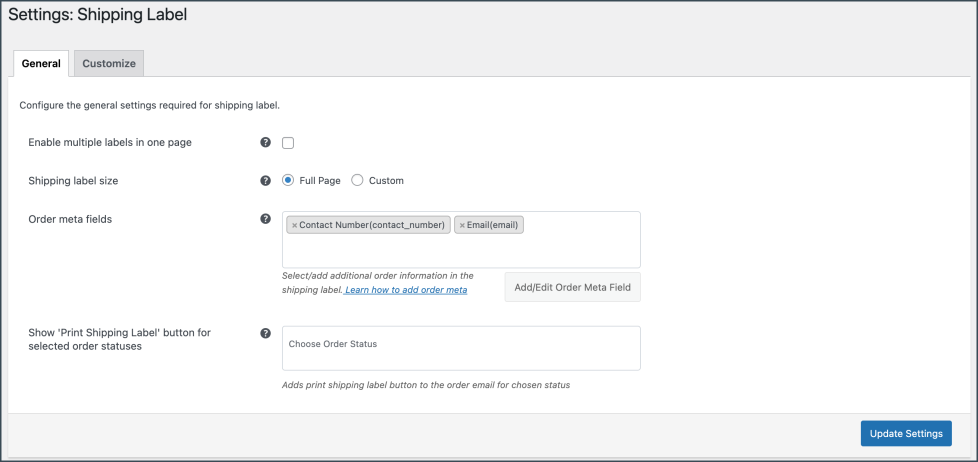
Enable multiple labels on one page – Enable to generate multiple labels on one page itself. When enabled, you will get an option to input the number of labels in a row.
Shipping Label Size – You can choose either full page or set custom size for the shipping label.
- Full Page: This option allows you to print the label which will be spread over the full page. The printing depends on the browser printing option.
- Custom: This option allows you to print the label in the desired size. You can configure a custom shipping label size of your own by entering size values in terms of width and height (inches).

Order Meta Fields – This allows you to add additional order meta fields in the shipping label.
- Select an item from the list of default fields or
- Click the Add/Edit Existing Order Meta field button to create custom meta fields by providing a custom Field Name and the respective meta key for the field. You can get the order meta keys from the custom field section of the WooCommerce Order page.

Show ‘Print Shipping Label’ button for selected order status: Adds print shipping label button to the order email for chosen status from the drop-down as shown below.
Finally, click on the Update Settings button.
Customize shipping label
↑ Back to topSelect a template from pre-defined ones and further customize the shipping label to suite your needs. Head on to the Invoice/Packing > Shipping Label > Customize tab.
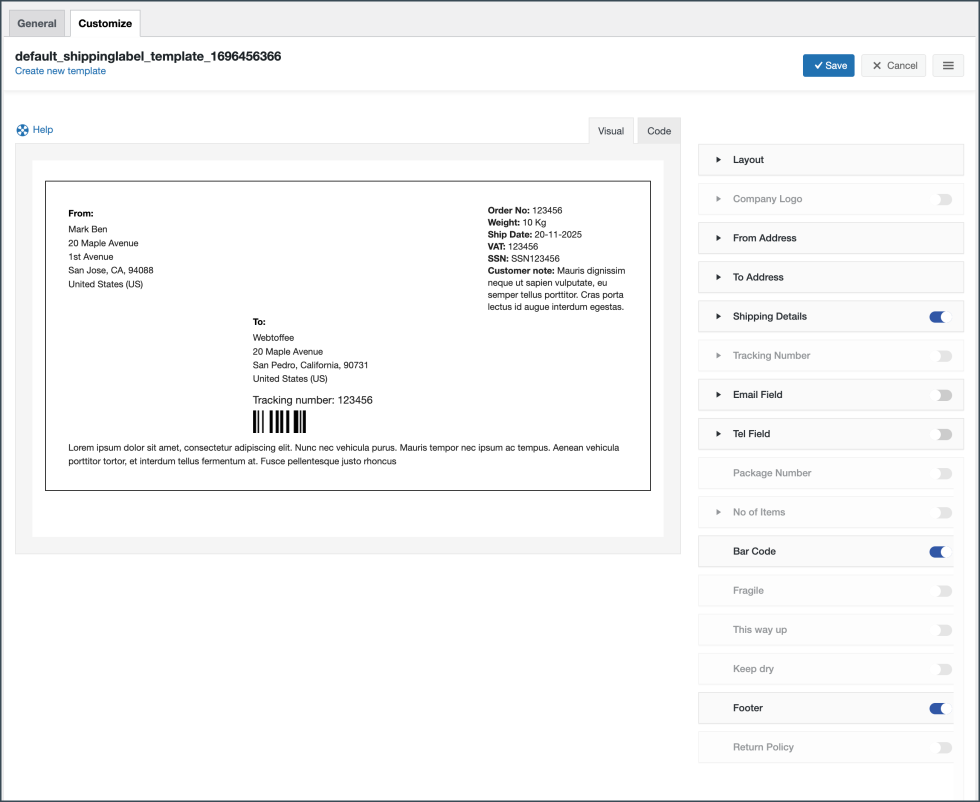
To create a new shipping label template:
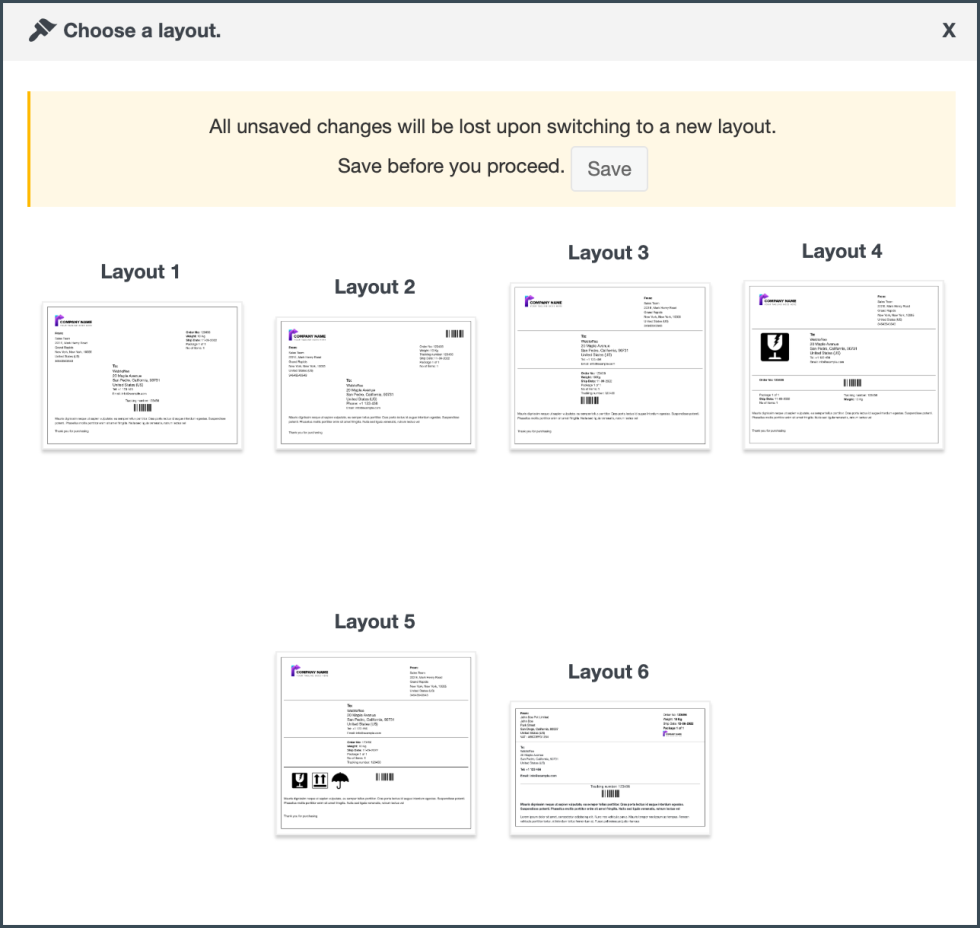
- Select a template from the Create new template option.
- From the inbuilt templates that pop up, choose a layout.
- The template displays sample data for customization. Users can make the necessary changes to the layout using the toggle options.
- You can even switch to the code editor, to make additional customizations other than the one listed in the visual editor.
- While making changes via code editor it would be better for you to refer to the help which briefs about placeholders, alternate classes for RTL support, etc as shown below:
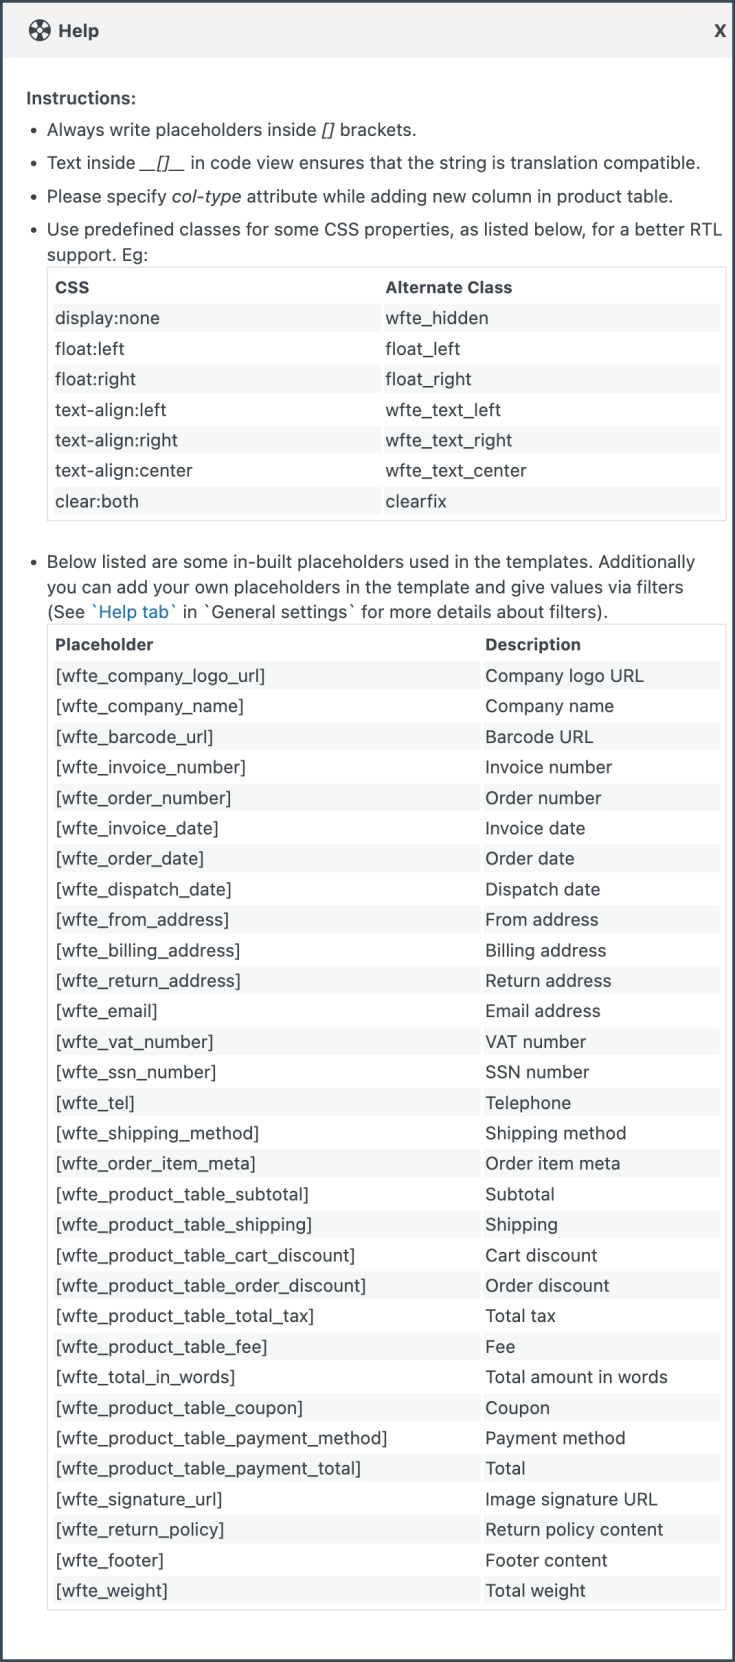
- Make the necessary modifications to the layout and save it.
- After saving, activate the template to use it further for your shipping label.
Credit Note – General Settings
↑ Back to topYou can configure the general settings required for the credit note.
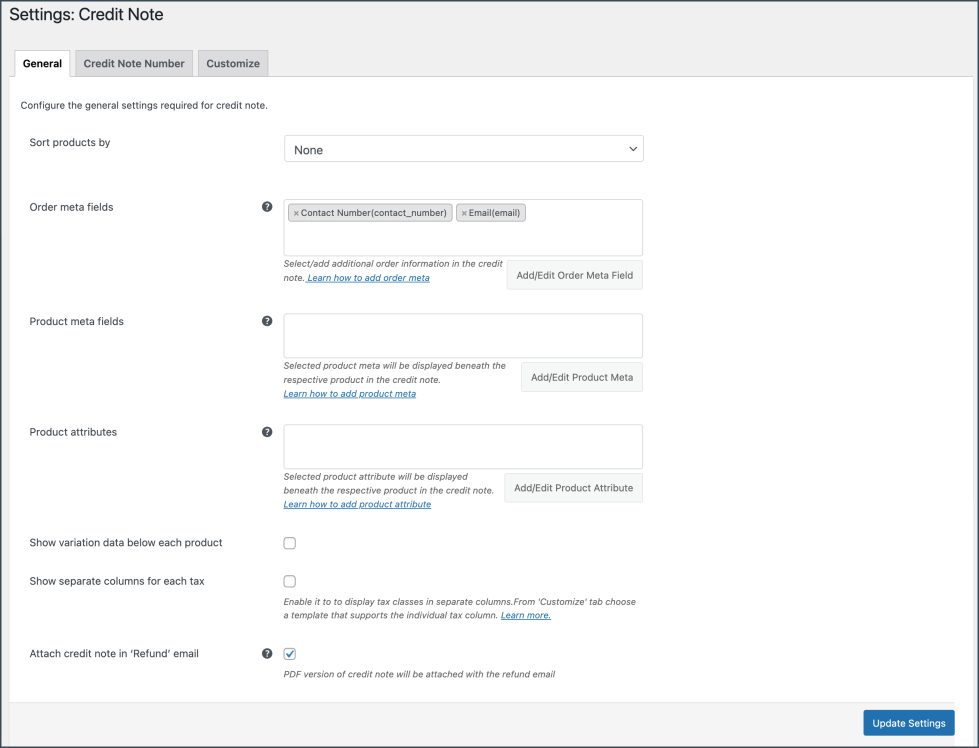
- Sort products either on the basis of Name or on the basis of SKU.
- Order meta fields:
- Append additional order information in the credit note by selecting the required item from the drop-down.
- You can select a field from the list of default fields or click the Add/Edit Existing Order Meta Field button to create custom meta fields by providing a custom Field Name and the respective meta key for the field. Get the order meta keys from the custom field section of the WooCommerce Order page.

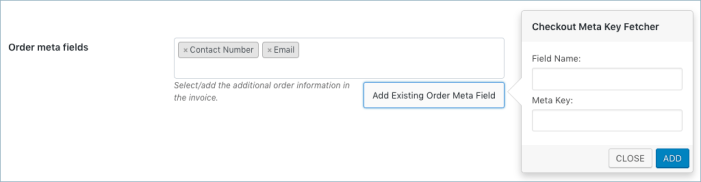
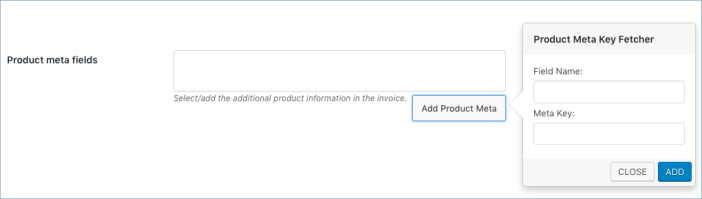
- Product meta fields: Select/add additional product information in the credit note.
- Click the Add/Edit Product Meta to add a new product meta field by providing a custom Field Name and the respective Meta Key for the field.
- Product attributes: Displays additional product details beneath the product.
- Enable variation data: To include variation data of the product in the credit note, enable this option.
- Attach credit note PDF in the email: Enable to attach PDF version of the currently active packing slip template in the order email.
Click on the Update Settings button to save the settings.
Credit Note Number
↑ Back to topNext, you can set up a custom credit note number with prefix/suffix/number series or even mirror the order number as a credit note number respectively.
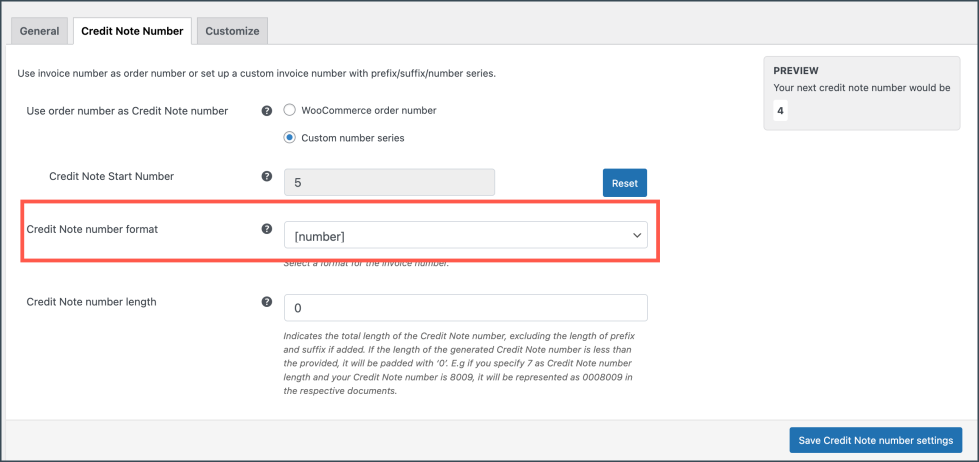
- Use the order number as credit note number: Choose Woocommerce order number to use the order number as the credit note number. If you want to generate a custom credit note number, then select Custom number series and input the necessary details into the populated fields. Credit Note Start Number: Enter the Credit Note Start Number in the field provided.
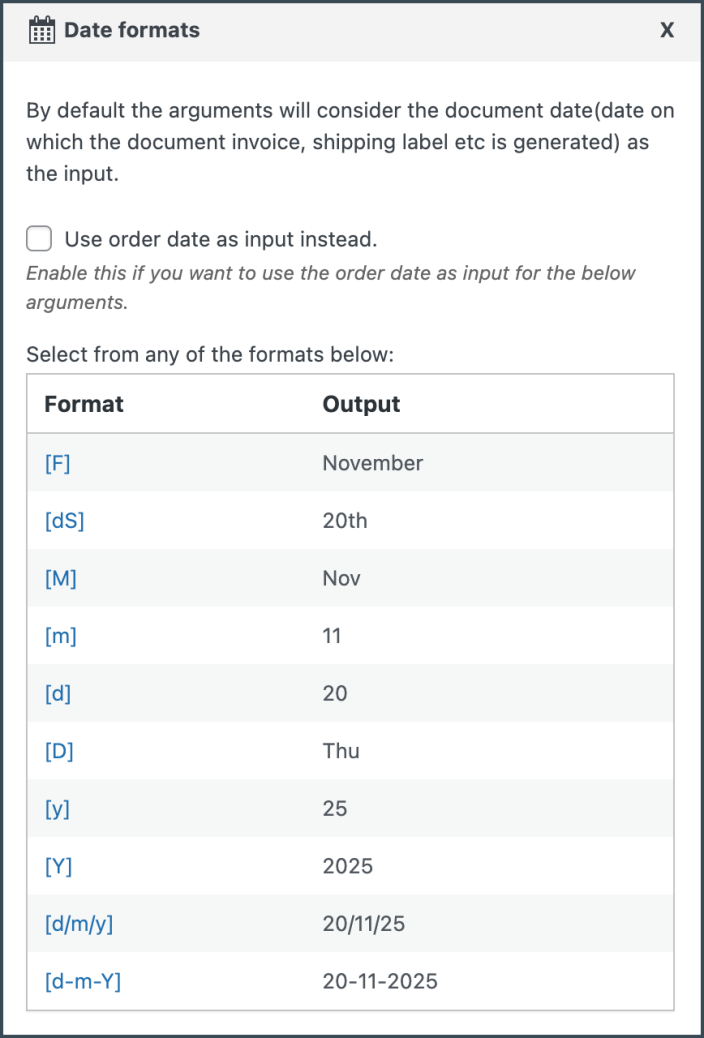
- Credit note number format: Specify the format in which the credit note has to be generated. For example: [prefix][number][suffix]. You can use any of the date formats or alphanumeric characters in this field as shown in the popup.
Credit Note Number Length: Indicates the total length of the credit note number. If the length of the generated credit note number is less than the provided, it will be padded with ‘0’. E.g if you specify 7 as credit note number length and your credit note number is 8009, it will be represented as 0008009 in the respective documents.
Update and reset the credit note number format settings by clicking on the Update and Reset button.
Customize Credit Note
↑ Back to topCustomize the credit note using the inbuilt templates and modify them to suit your needs.
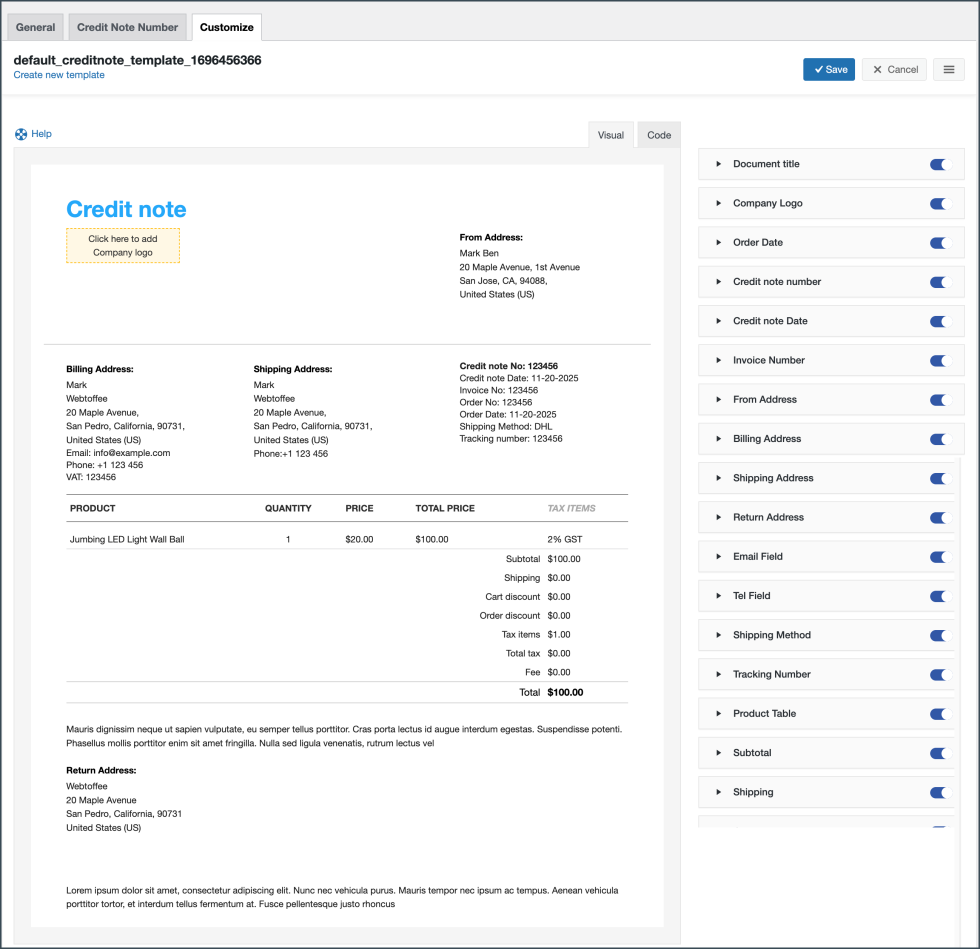
To create a new credit note template,
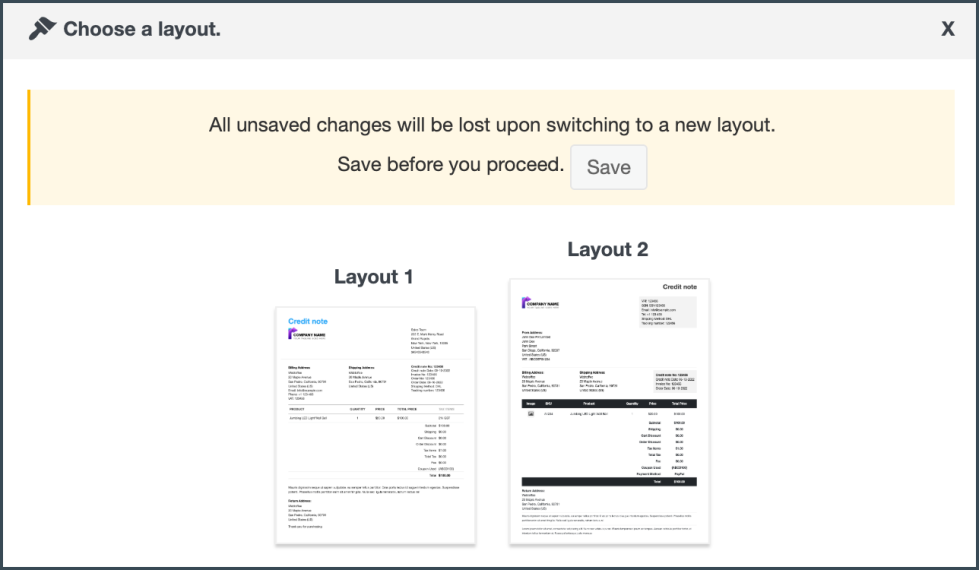
- Select a template from the Create new template option.
- From the inbuilt templates that pop up, choose a layout.
- Make the necessary modifications to the layout and save it.
- After saving, activate the template to use it further for your credit note.
- You can even switch to the code editor, to make additional customizations other than the one listed in the visual editor.
- While making changes via code editor it would be better for you to refer to the help which briefs about placeholders, alternate classes for RTL support, etc as shown below:

- Make the necessary modifications to the layout and save it.
- After saving, activate the template to use it further for your proforma invoice
Proforma Invoice – General settings
↑ Back to topIn the basic set up you can configure proforma invoice-specific generic items and the number.
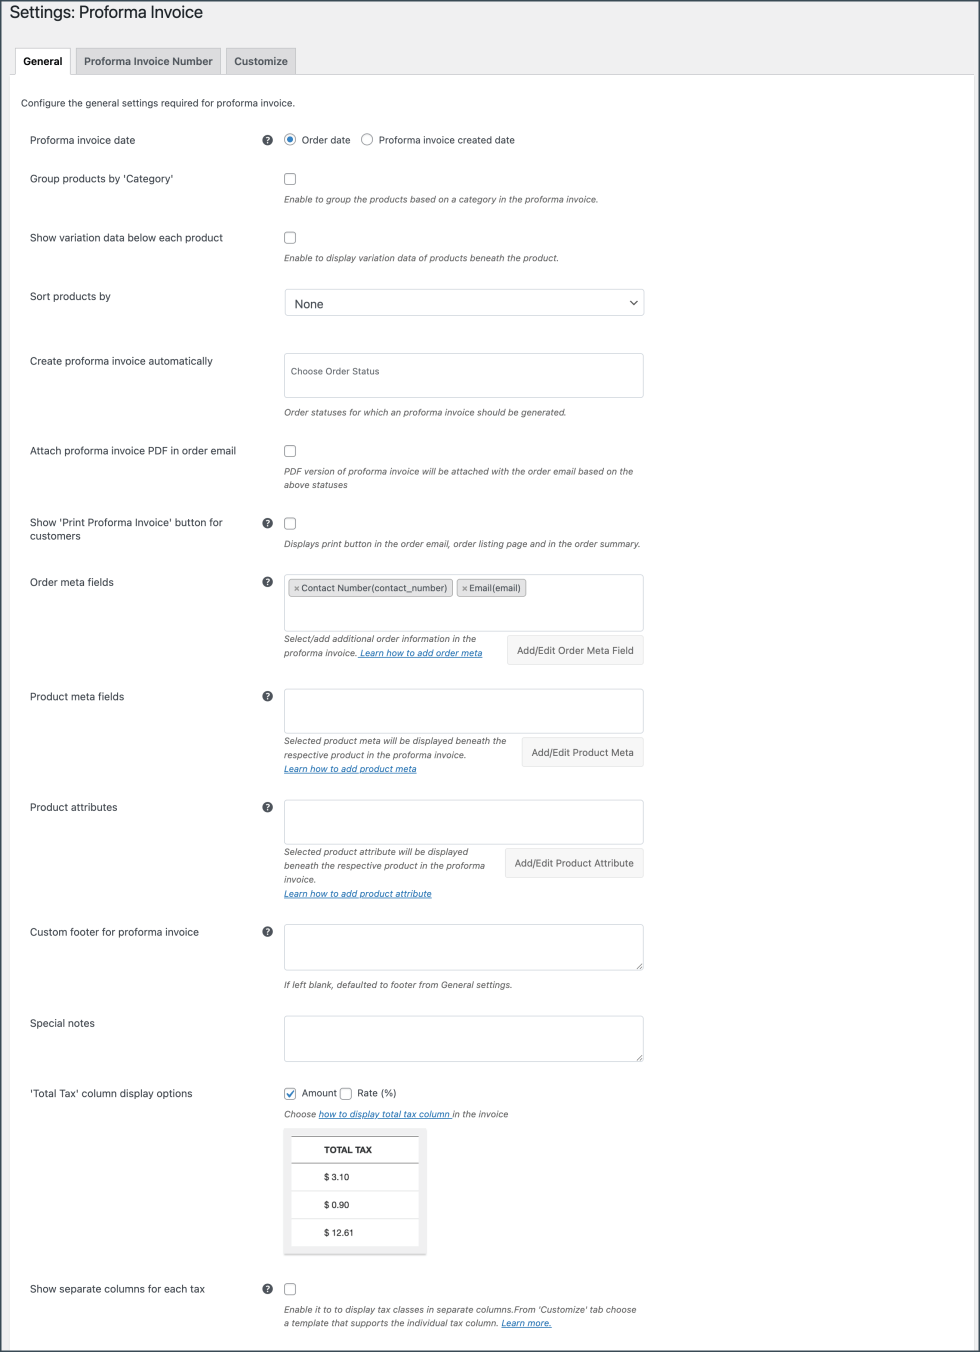
- Proforma invoice date – You can choose between the order date or the proforma invoice created date.
- Group products by category: Enable to group products based on category.
- Show variation data below each product: To include variation data of the product in the proforma invoice, enable this option.
- Sort products by: Sort products based on Name and SKU in the proforma invoice
- Generate Proforma Invoice for Order Statuses- Generates proforma invoices only for chosen order statuses. You can select multiple statuses based on your requirements. You can select multiple statuses based on your requirements.
- Attach proforma invoice PDF in an email: Enable to attach PDF version of the currently active proforma invoice template in the order email.
- Enable Print Proforma Invoice option for customers – You will be able to display a print proforma invoice button for your customers.
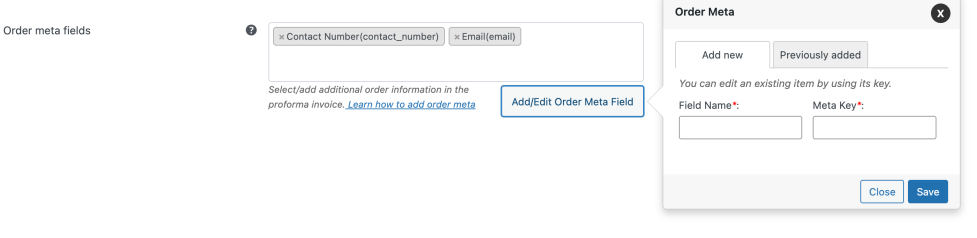
- Order meta fields – This allows you to add additional order meta fields in the proforma invoice.
- You can select an item from the list of default fields or
- Click the Add/Edit Existing Order Meta field button to create custom meta fields. Input a custom Field Name and the respective Meta Key for the field. Get the order meta keys from the custom field section of the WooCommerce Order page.
- Likewise, you can view, edit, or delete previously created order meta from the previously added tab.
- Product meta fields –
- This allows you to add meta fields related to the products in the proforma invoice product table. Click the Add/Edit Product Meta to add a new product meta field by providing a custom Field Name and the respective meta key for the field.
- Likewise, you can view, edit, or delete previously created product meta from the previously added tab.
- Product attributes –
- To have product attributes in the proforma invoice, simply add them by using the Add/Edit Product attribute button.
- Add new tab will give you options to specify the field name and the corresponding meta of the product attribute.
- Likewise, you can view, edit, or delete previously created attributes from the previously added tab.
- Custom footer for proforma invoice: Key in with a custom footer for the proforma invoice in the text area. If left blank, then the default footer from General settings will be loaded.
- Special Notes: Insert relevant notes that need to be added in the proforma invoice in the text area provided.
- Show individual tax column in product table: Enable to categorize different taxes in separate columns.
Finally, click on the Update Settings button.
Proforma Invoice Number
↑ Back to topYou can set up a custom proforma invoice number with prefix/suffix/number series or even mirror the order number as a proforma invoice number respectively.
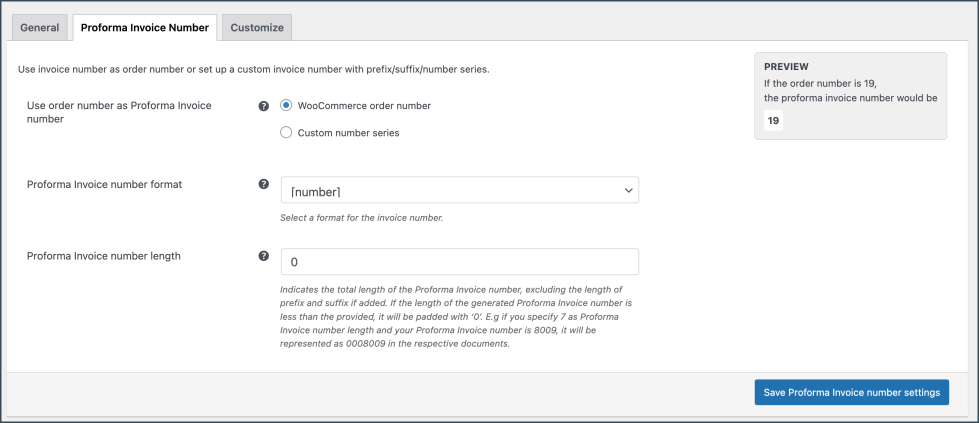
- Proforma invoice number format: Specify the format in which the proforma invoice has to be generated. For example: [prefix][number][suffix]

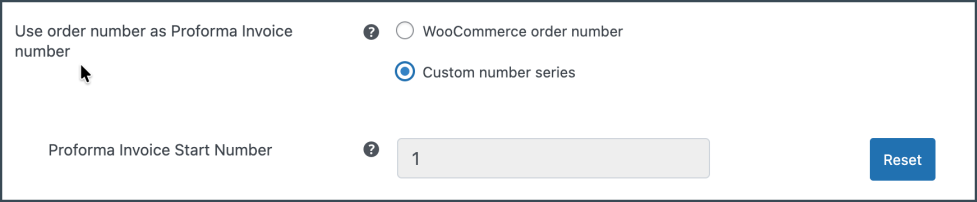
- Use the order number as proforma invoice number: Choose Yes to use the order number as the proforma invoice number. If you want to generate a custom proforma invoice number then select No and input the necessary details into the populated fields. The fields are populated on the basis of the number format previously selected.
- Invoice Start Number: Enter the required proforma invoice start number in the field provided.
- Prefix: Enter a prefix that will be added at the beginning of the proforma invoice number. You can use any of the date formats or alphanumeric characters in this field as shown in the popup.
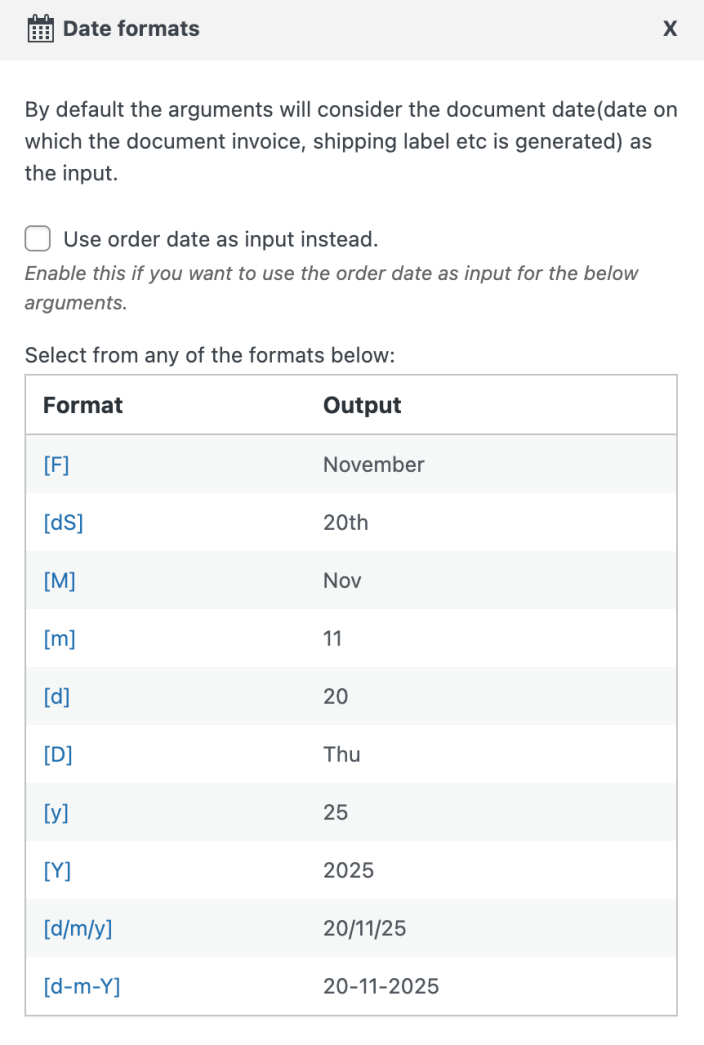
- Suffix: Enter the suffix that will be added at the end of the proforma invoice number. You can use any of the date formats or alphanumeric characters as a suffix as shown in the image above.
- Proforma Invoice Length: Indicates the total length of the proforma invoice number. If the length of the generated proforma invoice number is less than the provided, it will be padded with ‘0’. E.g if you specify 7 as invoice length and your invoice number is 8009, it will be represented as 0008009 in the proforma invoice
Update and reset the proforma invoice number format settings by clicking on the Update and Reset button.
Customize Proforma Invoice
↑ Back to topYou can customize the proforma invoice using the inbuilt templates and modify them to suit your needs.

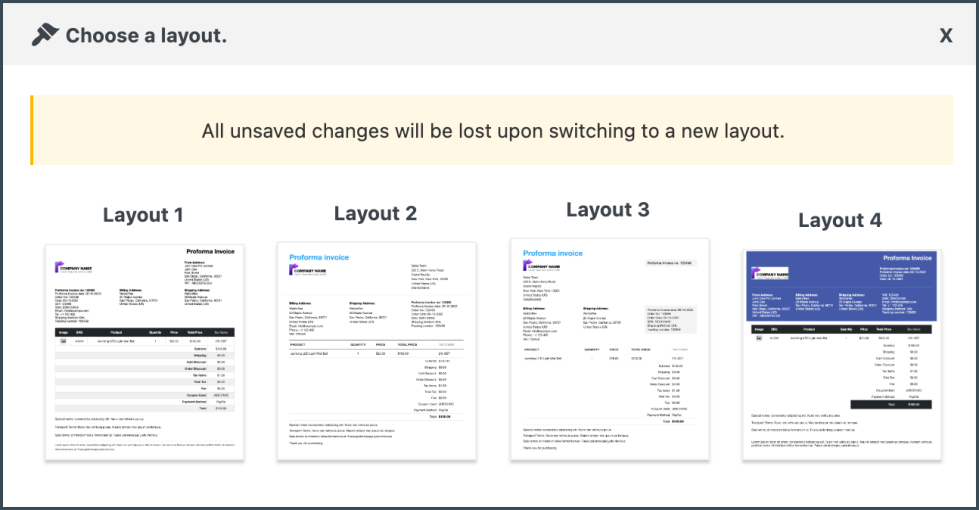
To create a new proforma invoice template,
- Select a template from the Create new template option.
- From the inbuilt templates that pop up, choose a layout.
- Make the necessary modifications to the layout and save it.
- After saving, activate the template to use it further for your proforma invoice.
- You can even switch to the code editor, to make additional customizations other than the one listed in the visual editor.
- While making changes via code editor it would be better for you to refer to the help which briefs about placeholders, alternate classes for RTL support, etc as shown below:

- Make the necessary modifications to the layout and save it.
- After saving, activate the template to use it further for your proforma invoice
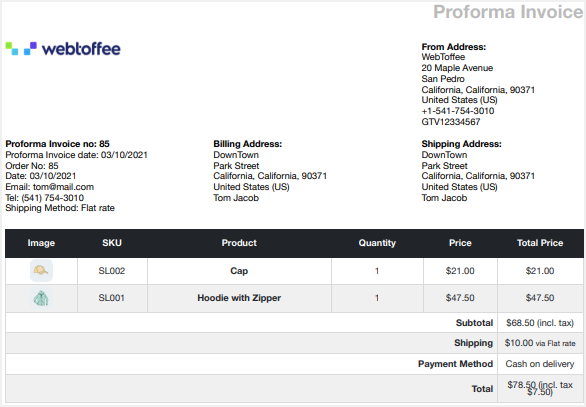
Sample Proforma Invoice
↑ Back to topYou can print the proforma invoice from the WooCommerce Orders page. A sample proforma invoice will be as shown below:
Picklist – General Settings
↑ Back to topThe general settings pertaining to the picklist can be configured from the general tab.
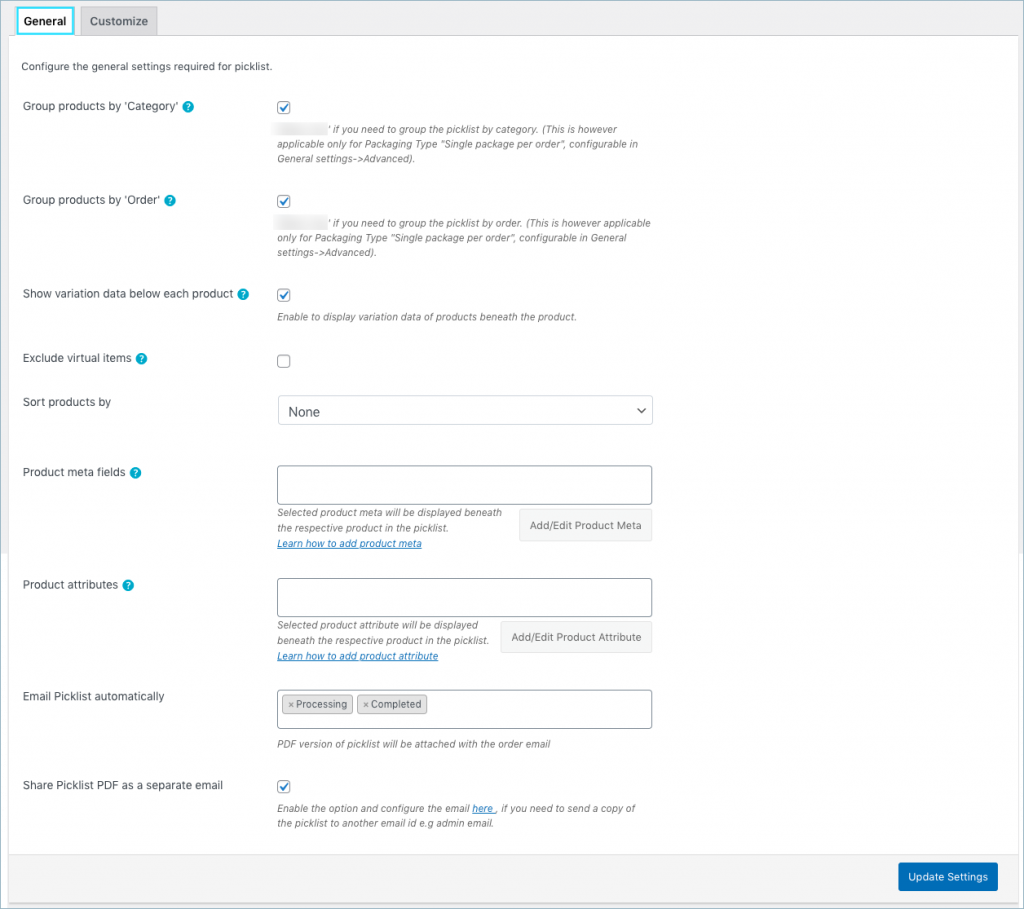
- Group by category: Choose Yes to group the products by category. Groups the products of the same category in the picklist.
- Group by order: Choose Yes to group the products by order. On printing picklist for multiple orders, the products will be categorized by order.
For instance, a pick list for two orders by enabling group by category and group by order will look as shown below:
- Enable variation data: To include variation data of the product in the pick list, enable this option. Displays product variations beneath the product in the product table.
- Exclude virtual items: In order to exclude the virtual deliverables like downloadable books from the picklist, enable this option.
- Sort products by: either on the basis of Name or SKU.
- Product meta fields: Select/add additional product information in the picklist. Click the Add Product Meta to add a new product meta field by providing a custom Field Name and the respective meta key for the field. Get the order meta keys from the custom field section of the WooCommerce Order page.
- Product attributes: Here, you can add and edit the product attributes.
- Attach Picklist PDF in order email for statuses: Picklist in PDF format will be attached with order email for chosen order statuses.
- Share Picklist PDF as a separate email: Enable this option to attach the picklist to any external email ids such as warehouse or store etc. along with the WooCommerce order status mail.
Finally, click on the Update Settings button.
Customize Picklist
↑ Back to topYou can customize the picklist using the inbuilt templates and modify them to suit your needs.
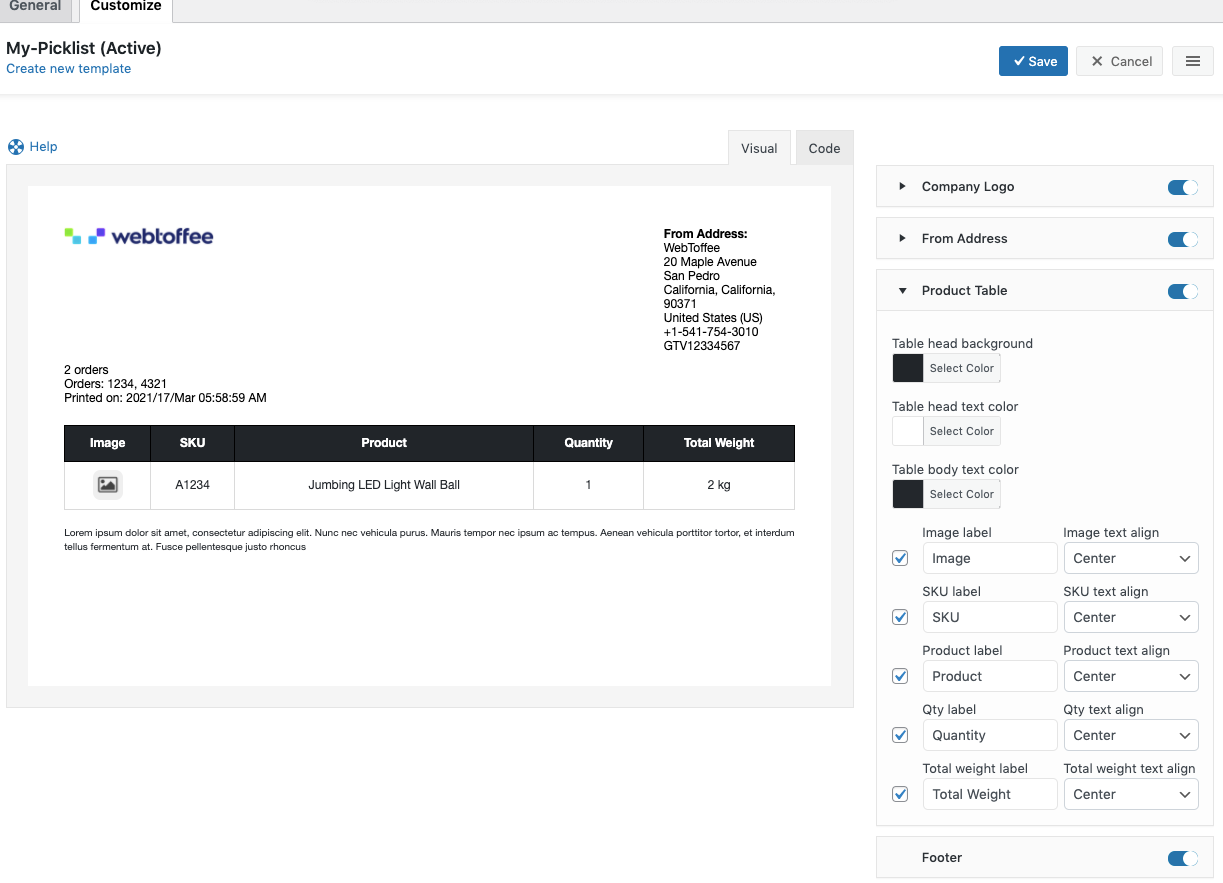
- Toggle buttons are incorporated in the customize tab to enable or disable an item from the template of the pick list. You can make modifications to the current layout by changing the different attributes like font color, style, format, etc provided under each property.
- You can even switch to the code editor, to make additional customizations other than the one listed in the visual editor.
- While making changes via code editor it would be better for you to refer the help which briefs about placeholders, alternate classes for RTL support, etc as shown below:

- Make the necessary modifications to the layout and save it.
- After saving, activate the template to use it further for your picklist.
Sample Picklist
↑ Back to topA sample picklist for multiple orders grouped by category and orders will be as shown below:
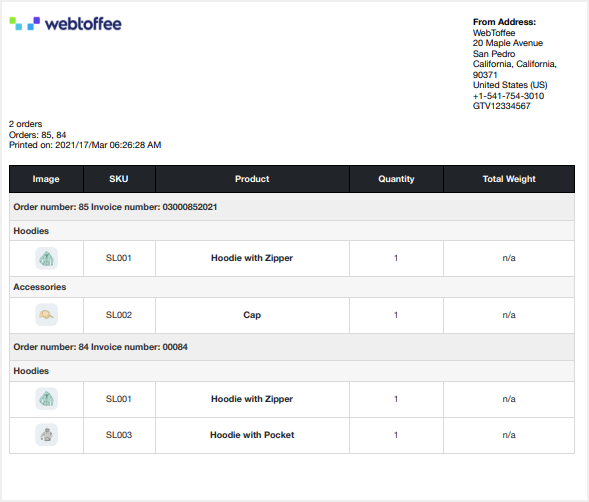
Dispatch Label – General Settings
↑ Back to topYou can configure the general settings required for the dispatch label.
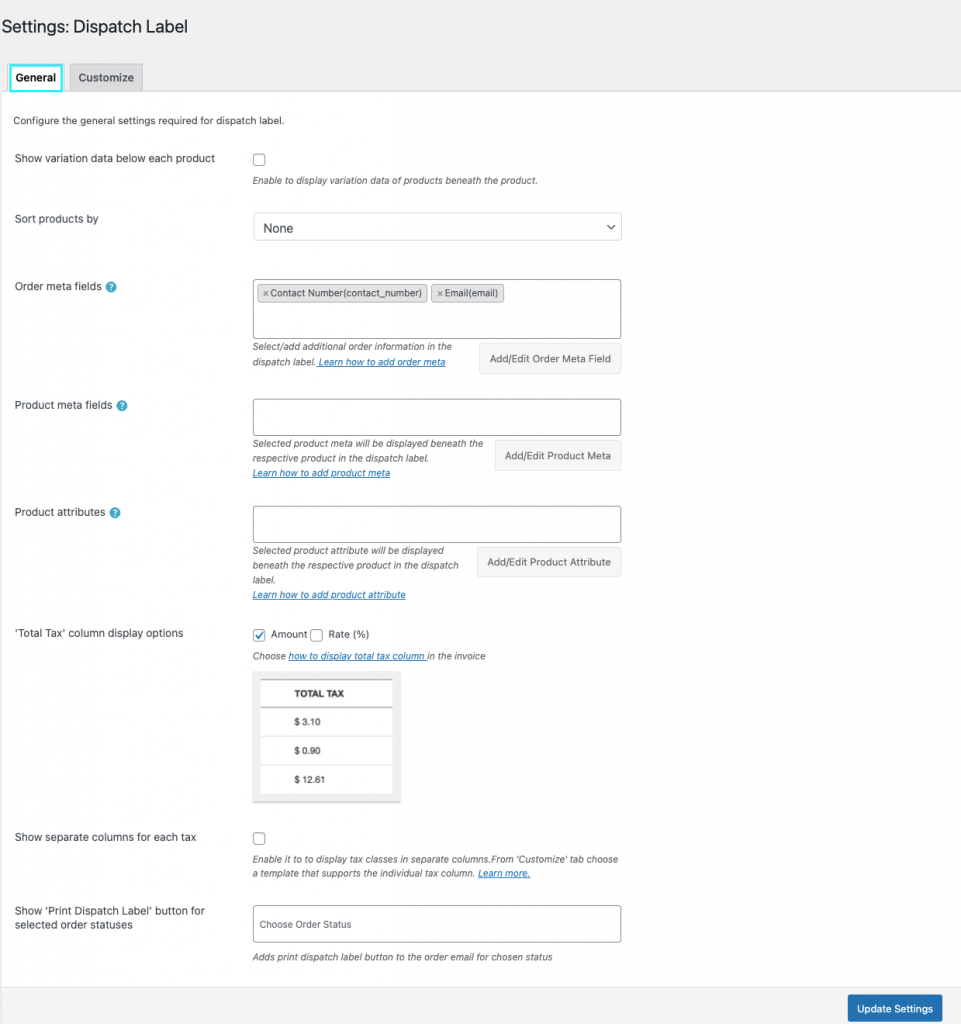
- Show variation data below each product: Displays product variation on the dispatch label.
- Sort products by either on the basis of Name or SKU.
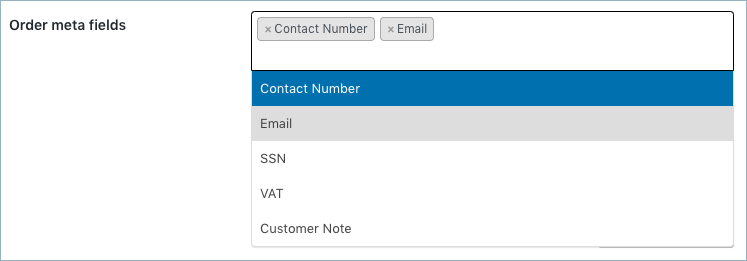
- Order meta fields:
- Select additional order information in the dispatch label from the drop-down.
- You can select an item from the list of default fields or
- Click the Add/Edit Existing Order Meta Field button to create custom meta fields by providing a custom Field Name and the respective Meta Key for the field.
- Likewise, you can view, edit, or delete previously created meta from the previously added tab.
- Product meta fields:
- Select/add additional product information in the dispatch label.
- Click the Add/Edit Product Meta to add a new product meta field by providing a custom Field Name and the respective Meta Key for the field.
- Likewise, you can view, edit, or delete previously created meta from the previously added tab.
- Product attributes –
- To have product attributes in the dispatch label, simply add them by using the Add/Edit Product Attribute button.
- Add new tab will give you options to specify the field name and the corresponding meta of the product attribute.
- Likewise, you can view, edit, or delete previously created attributes from the previously added tab.
- Show individual tax column in product table: Choose ‘Yes’ to have individual columns for tax in the dispatch label.
- Enable print dispatch label for order status: Choose order statuses for which a Print Dispatch Label button will be made available in the order email.
Finally, click on the Update settings button.
Customize Dispatch Label
↑ Back to topYou can customize the dispatch label using the inbuilt templates and modify them to suit your needs.
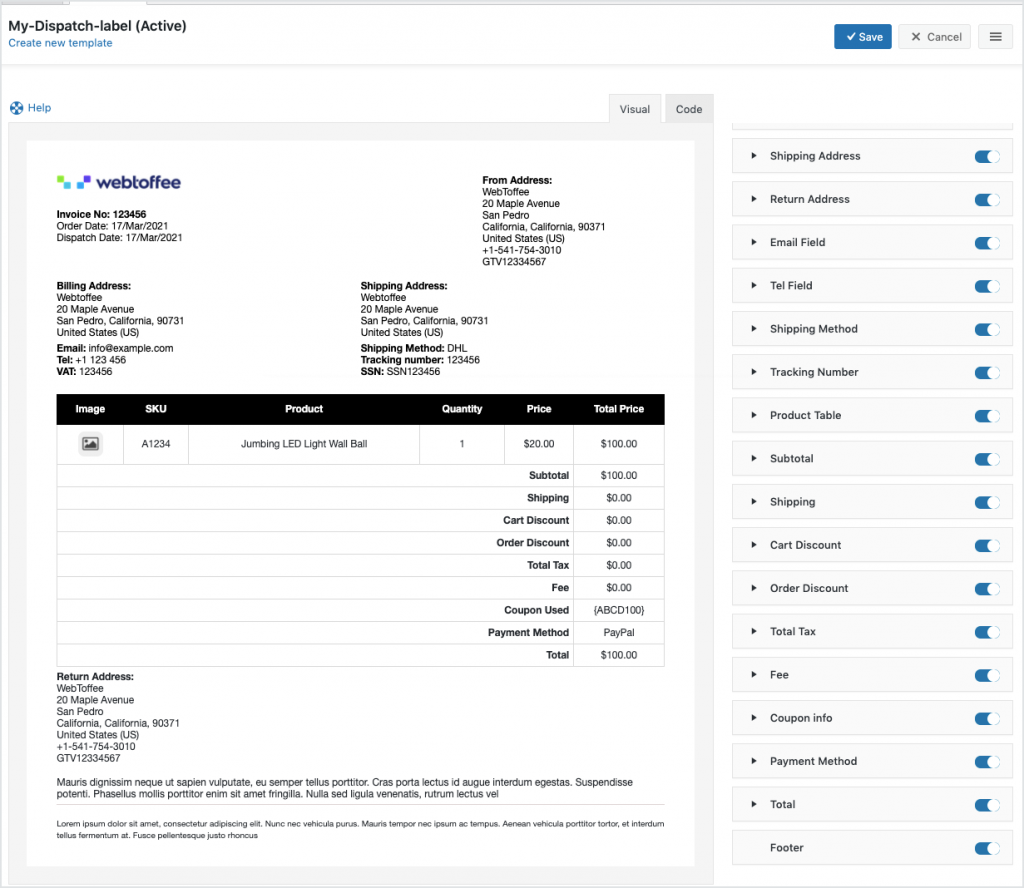
To create a new dispatch label template,
- Select a template from the Create new template option.
- From the inbuilt templates that pop up, choose a layout.
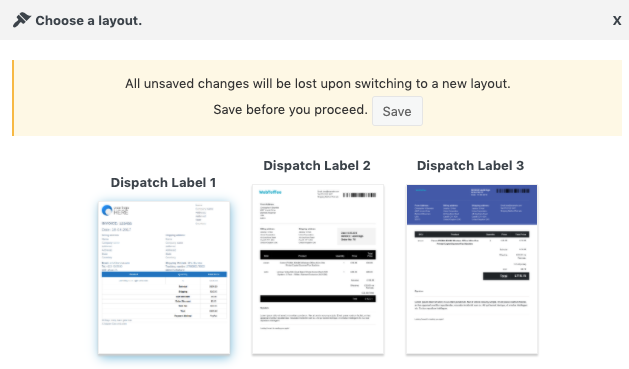
- Make the necessary modifications to the layout and save it.
- After saving, activate the template to use it further for your dispatch label.
- You can even switch to the code editor, to make additional customizations other than the one listed in the visual editor.
- While making changes via code editor it would be better for you to refer to the help which briefs about placeholders, alternate classes for RTL support, etc as shown below:
- Make the necessary modifications to the layout and save it.
- After saving, activate the template to use it further for your dispatch label.
Address Label – Getting Started
↑ Back to topCustomize Address Label
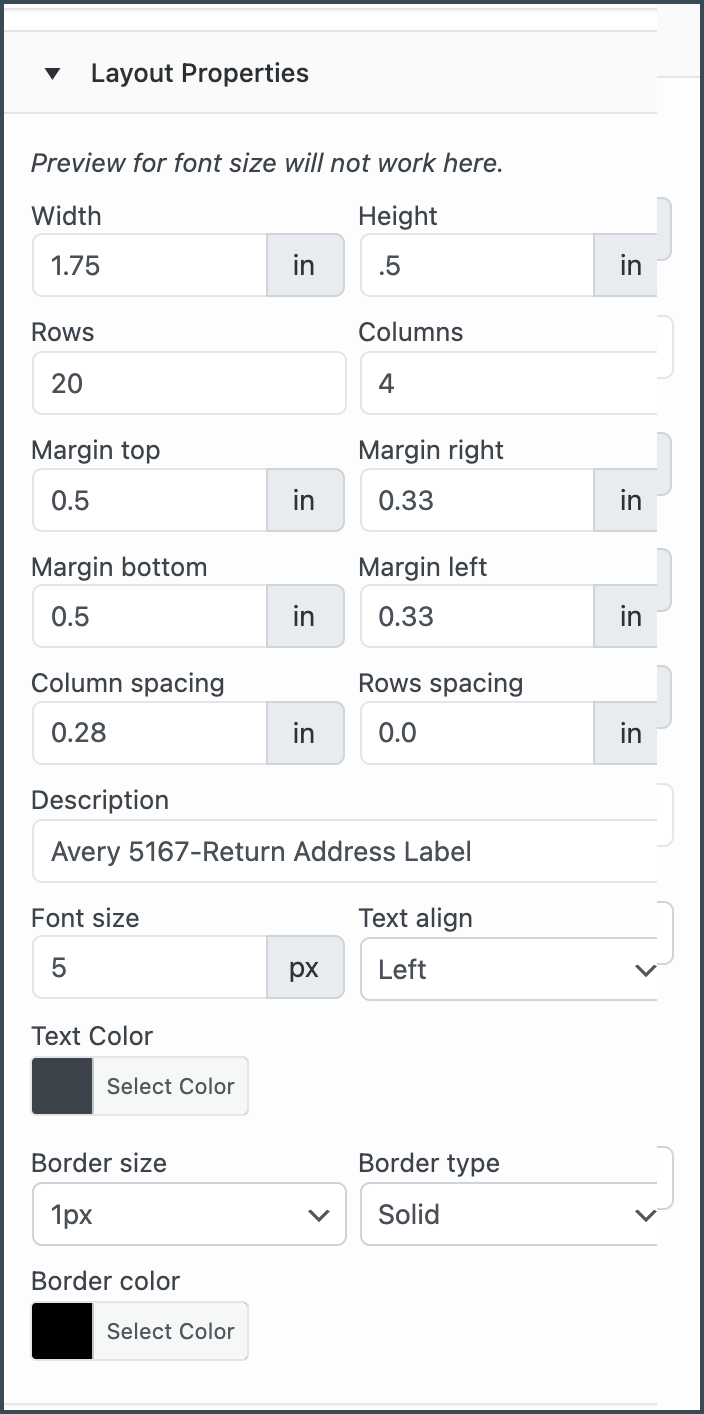
↑ Back to topThe plugin gives provisions to customize the labels with inbuilt templates as well as design them with different sizes and properties.
To create a new address label template,
- Select a template from the Create new template option or from the layout dropdown.
- From the inbuilt templates that pop up, choose a layout.

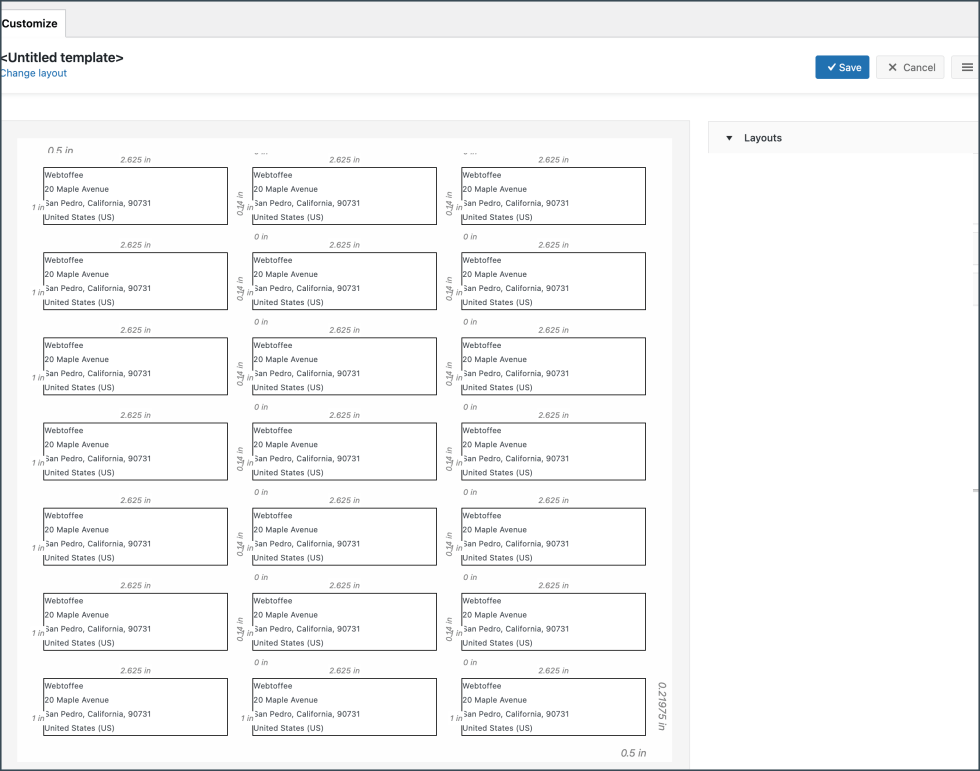
- The template displays sample data for customization. Users can make the necessary changes to the layout using the toggle options.
- Make the necessary modifications to the layout from the options provided in the properties drop down and save it.
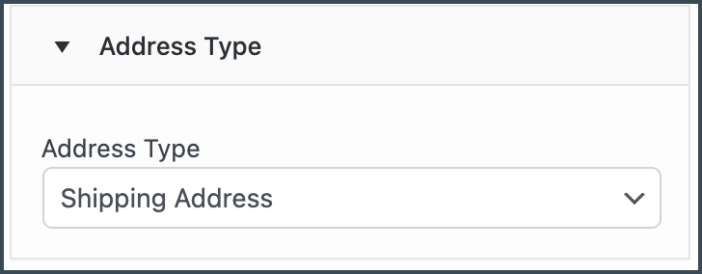
- You can choose an Address type to appear on the label.
- After saving, activate the template to use it further for your address label.