Overview
↑ Back to topWindcave Gateway for WooCommerce connects your store to Windcave for card payments. For standard checkout, customers are redirected to Windcave’s hosted PxPay payment page and returned to your WooCommerce store after the transaction. The extension also uses PxPost for supported refunds, authorization completions, and automatic WooCommerce Subscriptions renewals.
This guide covers installation, account credentials, gateway settings, checkout testing, order management, subscriptions, and troubleshooting. The steps reflect the current gateway settings and subscription payment workflows.
Before you begin
↑ Back to top- An active WooCommerce store with HTTPS enabled and administrator access.
- An active Windcave merchant account authorized for the payment services and currencies you intend to use.
- Windcave PxPay credentials for hosted checkout. These typically include a PxPay Access URL, user name, and access key.
- Separate Windcave PxPost credentials if you plan to process refunds, complete authorization transactions, update subscription payment methods, or collect recurring payments.
- The WooCommerce Subscriptions extension, installed and active, if you intend to sell subscriptions with automatic renewals.
1. Install the extension
↑ Back to top- Download Windcave Gateway for WooCommerce from My Account > Downloads on WooCommerce.com.
- In WordPress, go to Plugins > Add New Plugin > Upload Plugin.
- Choose the downloaded ZIP file, select Install Now, then Activate Plugin.
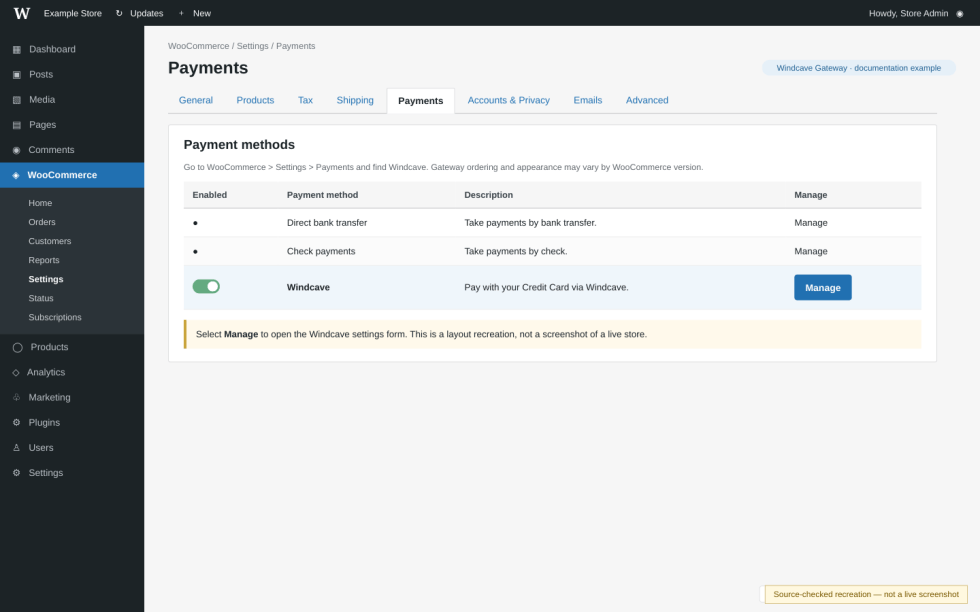
- Go to WooCommerce > Settings > Payments.
- Find Windcave and select Manage or Finish setup, depending on the WooCommerce admin interface.
2. Obtain your Windcave credentials
↑ Back to topContact Windcave or use your merchant onboarding information to obtain credentials enabled for the services you need. The PxPay and PxPost credentials are not interchangeable.
PxPay credentials
↑ Back to top- Px-Pay Access URL: The endpoint provided or approved by Windcave. The extension’s current default is
https://sec.windcave.com/pxaccess/pxpay.aspx. - Px-Pay User: Your Windcave PxPay user name.
- Px-Pay Password: The access key associated with the PxPay user. It may be described by Windcave as an access key rather than a password.
PxPost credentials
↑ Back to top- Px-Post Access URL: Your Windcave PxPost endpoint. The extension’s default is
https://sec.windcave.com/pxpost.aspx. - Px-Post User: Your Windcave PxPost user name.
- Px-Post Password: The password or key provided for PxPost.
Check with Windcave if you are unsure whether an account supports recurring token billing, refunds, or authorization completion. Do not guess endpoint URLs or use PxPay credentials in the PxPost fields.
3. Configure the gateway
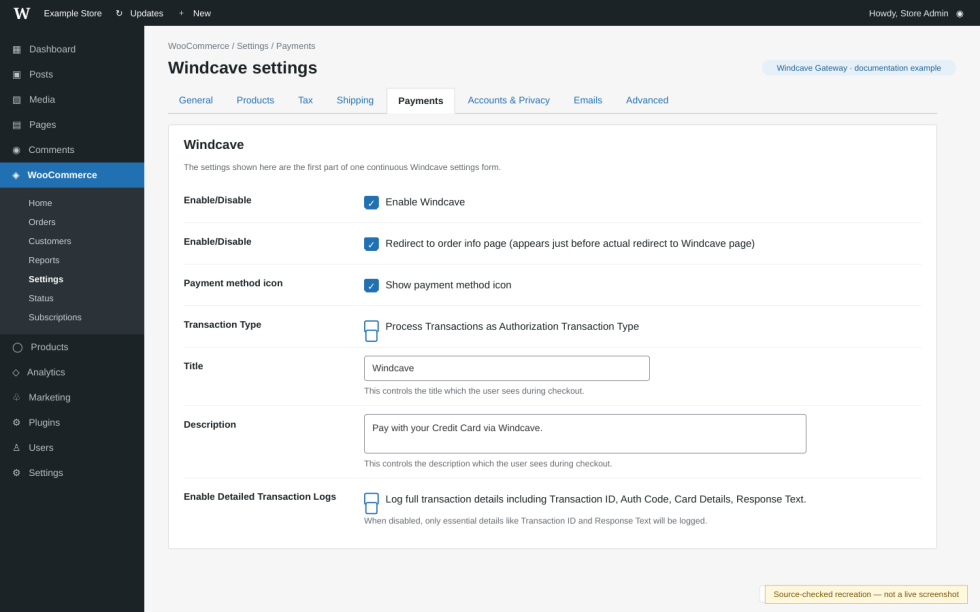
↑ Back to topOpen WooCommerce > Settings > Payments > Windcave. The settings are grouped into general checkout options, PX PAY Settings, and PX POST Settings.
General checkout settings
↑ Back to top- Enable/Disable – Enable Windcave: Select to offer Windcave as an available payment gateway.
- Redirect to order info page: Show an intermediate order information page before redirecting the customer to the Windcave payment page. Enabled by default.
- Payment method icon – Show payment method icon: Display supported payment icons beside the Windcave method at checkout.
- Transaction Type – Process Transactions as Authorization Transaction Type: When enabled, request an authorization rather than an immediate purchase. Authorized payments must later be completed while still eligible. Leave this disabled for normal immediate purchase transactions.
- Title: The name shown at checkout. The default is Windcave.
- Description: The explanation shown to customers under the gateway at checkout.
- Enable Detailed Transaction Logs: Include additional transaction details in logs. This setting is disabled by default; use only for a specific troubleshooting need and turn it off afterward.
PX PAY Settings
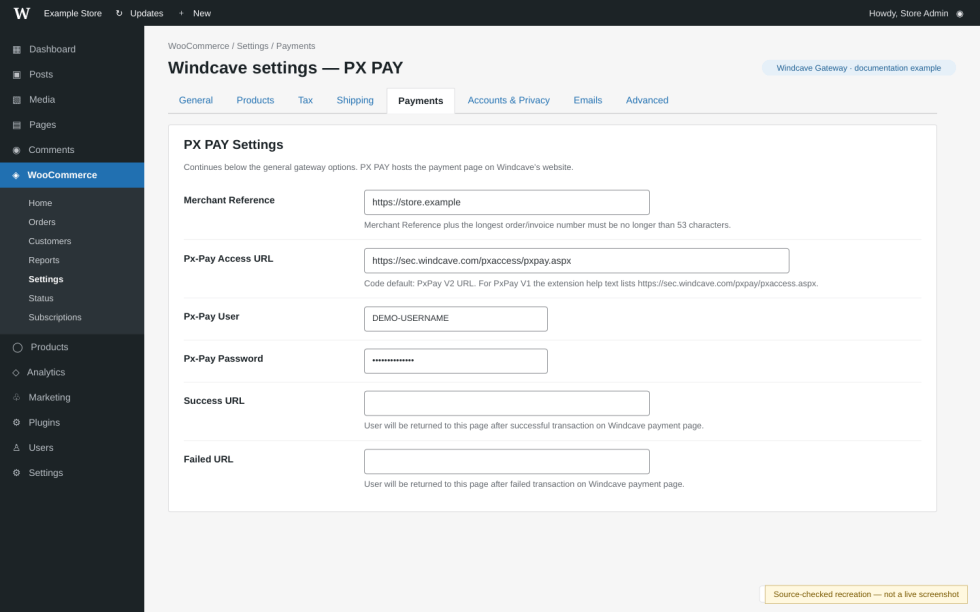
↑ Back to top- Merchant Reference: A store name or identifier that appears in Windcave transaction records. The identifier and the longest order or invoice number together must not exceed 53 characters. Use a short recognizable value.
- Px-Pay Access URL, Px-Pay User, and Px-Pay Password: Enter the credentials and URL provided for your PxPay account.
- Success URL: Optional destination for customers returning after a successful payment.
- Failed URL: Optional destination for customers returning after a failed payment.
Leave optional return URLs blank unless you have a specific return-page requirement. A return-page redirect is not, by itself, proof that a payment was captured; check the order and Windcave transaction result.
PX POST Settings
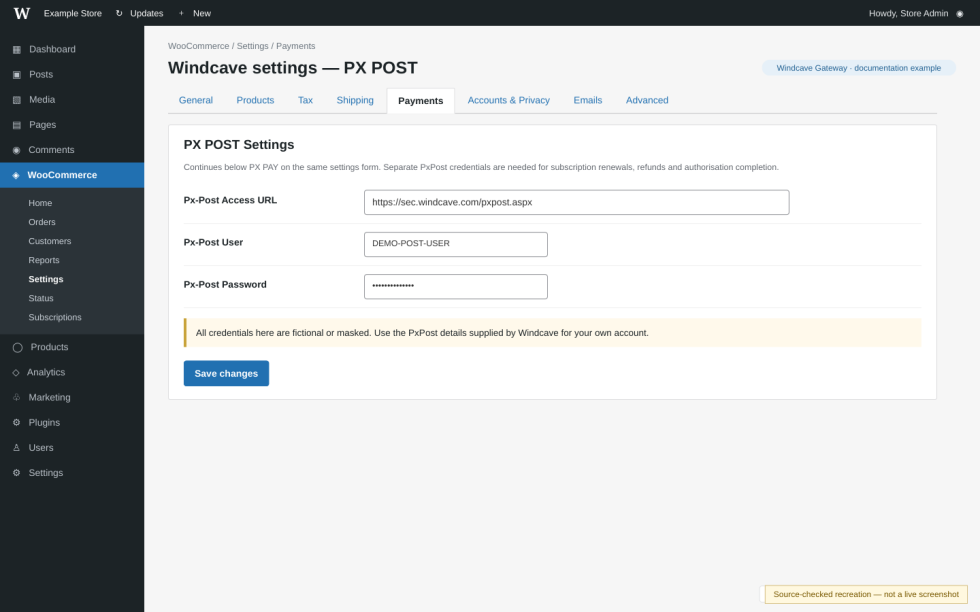
↑ Back to top- Px-Post Access URL: The server-to-server transaction endpoint supplied by Windcave.
- Px-Post User: The user name supplied for PxPost.
- Px-Post Password: The corresponding PxPost credential.
PxPost is necessary for supported subscription renewals, payment-method updates, refunds, and completing authorizations. It requires a merchant account with the appropriate services enabled.
- Select Save changes.
- Reload the settings page and check for a credential validation notice. A notice about invalid PxPay or PxPost credentials indicates that the corresponding service needs review.
- If you only intend to use hosted checkout, be aware that a separate PxPost validation notice does not necessarily indicate a problem with PxPay checkout. Configure PxPost before using features that require it.
4. Test checkout before accepting live payments
↑ Back to topThe extension does not provide a separate Test Mode switch. Testing is performed using the applicable Windcave test credentials and endpoints; use live credentials when you are ready to accept real payments.
- Use a staging store if possible, and obtain test credentials and test-card instructions from Windcave.
- Enter the corresponding test PxPay credentials and URL in the Windcave settings. Do not mix test and live credentials.
- Place a test order using either the classic WooCommerce checkout or the Checkout block used by your store.
- Choose Windcave and complete the payment on the Windcave-hosted page using the designated test payment details.
- Return to WooCommerce and open the order under WooCommerce > Orders.
- Confirm the payment outcome, order status, and transaction reference. Test a declined or canceled payment as well as an approved payment.
- Restore live Windcave credentials and endpoints before accepting real orders.
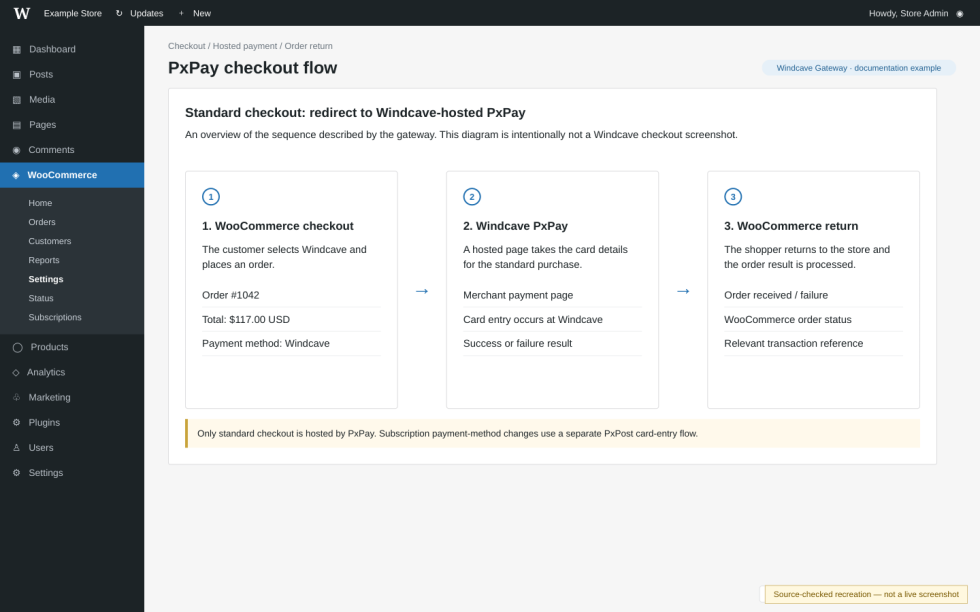
For standard checkout, the customer enters card details on Windcave’s hosted page. Some subscription payment-method change flows are different; see the subscription section below.
5. Review transaction results in WooCommerce
↑ Back to top- Go to WooCommerce > Orders and open the order.
- Review its payment method, current status, order notes, and available Windcave transaction details.
- Use the Windcave transaction reference when reconciling the order with your Windcave merchant account.
The transaction details area can display information such as transaction ID, authorization code, and response text. Additional fields may be shown when detailed transaction logging is enabled. The extension also records payment-related events for diagnostic purposes.
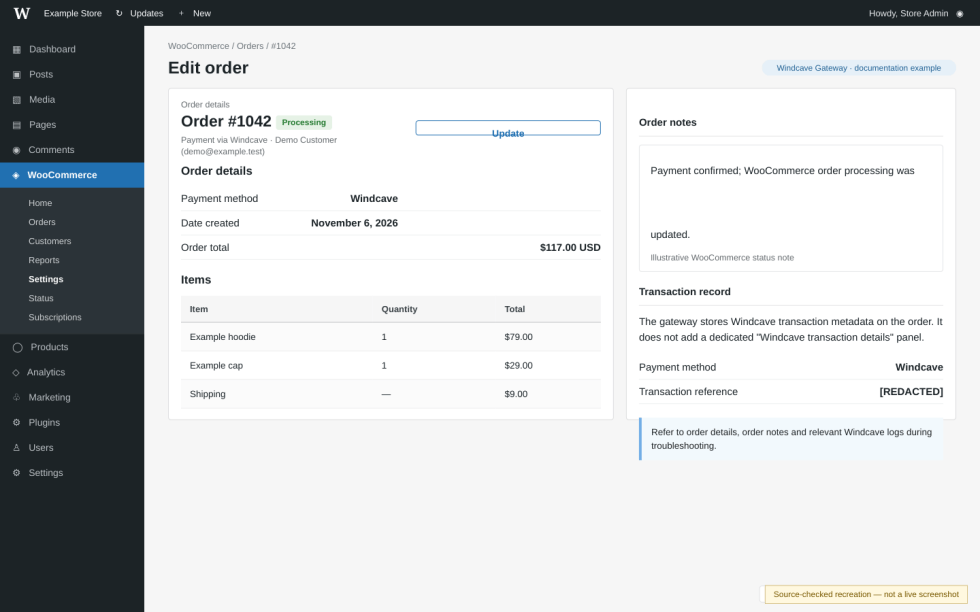
If Windcave shows an approved payment but the order is still pending or failed, verify the transaction in Windcave before attempting another charge. Check the order notes and payment notification/return path, then contact support if the result is inconsistent.
6. Authorize a payment and complete it later
↑ Back to topUse an authorization when you need to reserve funds before completing the transaction, such as when an order requires review before fulfillment.
- Go to WooCommerce > Settings > Payments > Windcave.
- Enable Process Transactions as Authorization Transaction Type and save.
- Place an eligible test order and confirm that Windcave authorized the payment.
- Open the order in WooCommerce > Orders. An authorized order may appear as On hold until completion.
- In the Order actions menu, select Complete Windcave authorisation transaction, if available, and apply the action.
- Review the order notes and the updated transaction status. Confirm the completion in Windcave if the outcome is unclear.
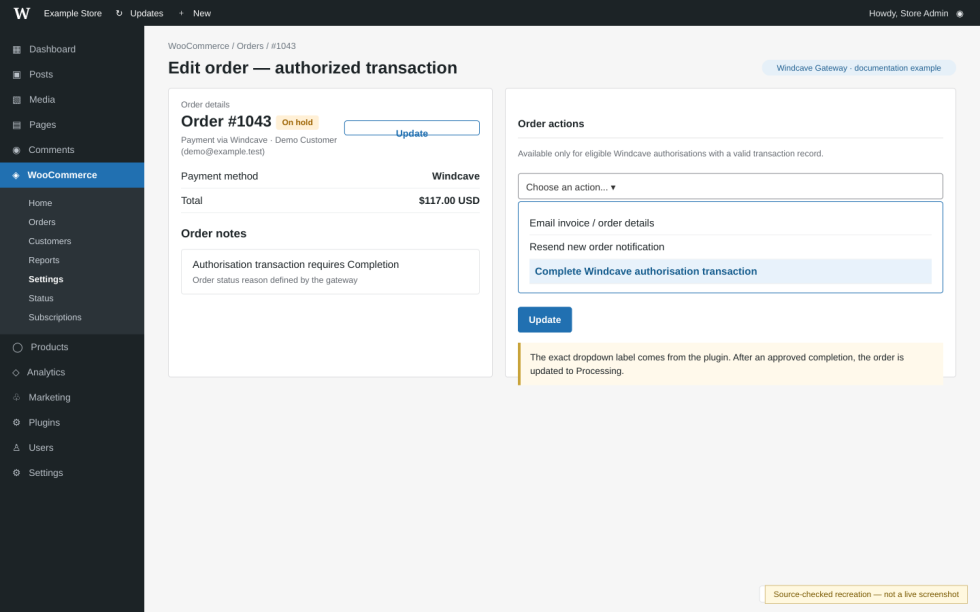
Completion is subject to Windcave and card-issuer authorization validity. If the action is unavailable or completion fails, check whether the authorization is still eligible and that PxPost is configured correctly. Do not submit an unrelated new payment to compensate without first checking the original transaction.
7. Issue a refund from WooCommerce
↑ Back to topThe extension uses WooCommerce’s standard order refund workflow, with PxPost used to request a supported refund from Windcave.
- Go to WooCommerce > Orders and open the Windcave-paid order.
- Confirm that a transaction was completed and that you have valid PxPost credentials.
- In the order items area, select Refund.
- Enter the full or partial amount and any applicable quantities or reason.
- Select the option to process the refund through the Windcave payment gateway, rather than a manual refund-only action.
- Review the resulting order notes and refund status. Verify the refund with Windcave if an error is displayed.
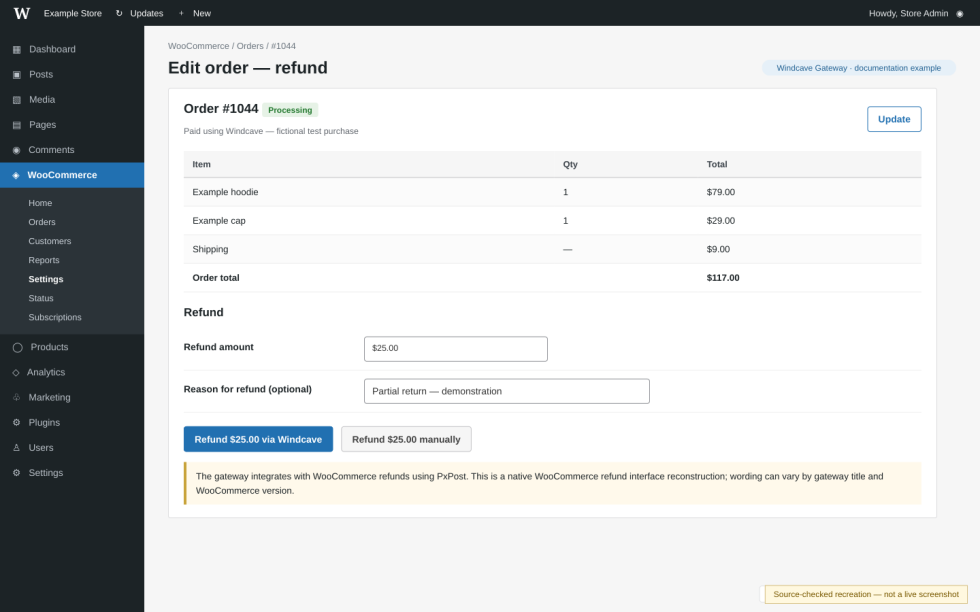
If a refund fails, check the PxPost credentials, merchant permissions, eligible transaction reference, and refund amount. A manually recorded WooCommerce refund does not necessarily send funds back to the customer; choose the gateway refund action when you want Windcave to process it.
8. Configure WooCommerce Subscriptions
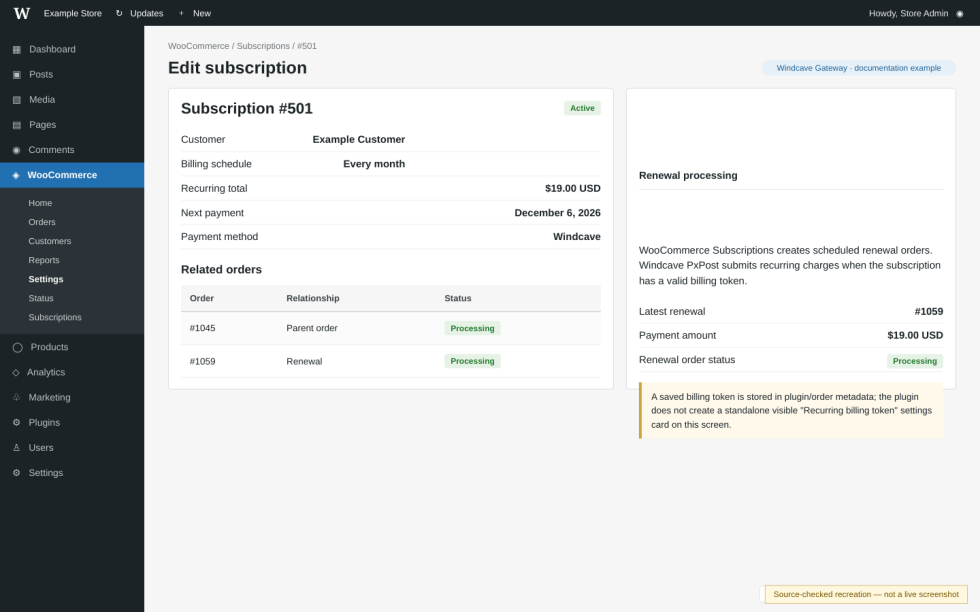
↑ Back to topWindcave Gateway for WooCommerce integrates with WooCommerce Subscriptions to support automatic renewal charges using a saved Windcave billing token. WooCommerce Subscriptions is required for this functionality.
Set up recurring payments
↑ Back to top- Install and activate WooCommerce Subscriptions.
- Confirm that Windcave is enabled and both PxPay and PxPost credentials are correct.
- Use a test product with a Simple subscription or Variable subscription product type.
- Complete an eligible initial subscription checkout through Windcave.
- Open the order and associated subscription. Check that the original payment succeeded and that a Windcave billing token was recorded for future renewals.
- Test a scheduled renewal using an appropriate staging/test workflow before enabling live subscription sales.
The extension requests card tokenization for eligible simple and variable subscription purchases. Renewal charges are subsequently submitted through PxPost. The extension also supports common WooCommerce Subscriptions management functions, including cancellation, suspension, reactivation, recurring amount and date changes, and multiple subscriptions, subject to WooCommerce Subscriptions rules.
Change a subscription payment method
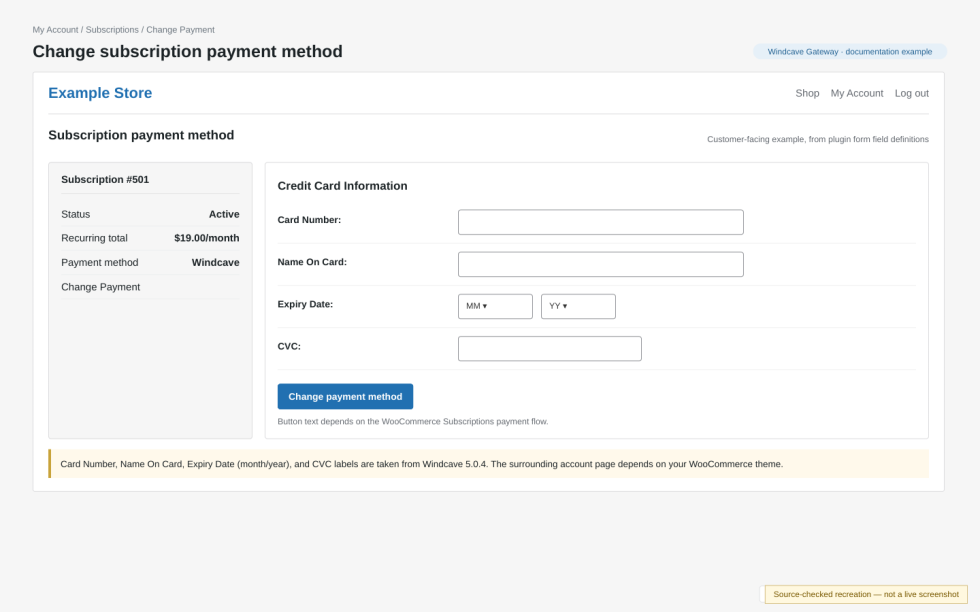
↑ Back to top- As the customer, go to My Account > Subscriptions and open the relevant subscription.
- Select Change Payment or Change Payment Method if the action is available.
- Choose Windcave, enter the requested new payment details, and submit the update.
- Look for the success confirmation and verify that the subscription remains set up for automatic payments.
Availability of the Change Payment action depends on the subscription status, renewal settings, and WooCommerce Subscriptions requirements. The extension also declares support for administrator-initiated payment method changes.
Handle a missing saved billing token
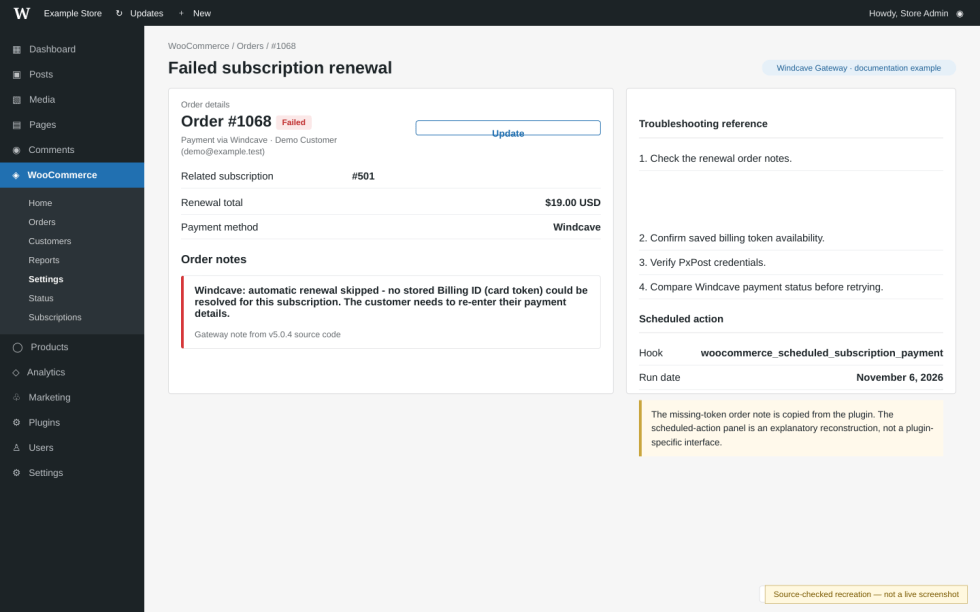
↑ Back to topA Windcave Billing ID or DpsBillingId identifies a card stored for future charges. If the original payment did not return a valid billing token, automatic renewals cannot use that payment method.
- Open the failed renewal order and review its order notes.
- Look for a message indicating that the renewal was skipped because no stored Billing ID could be resolved.
- Ask the customer to use Change Payment on the subscription, or to complete the failed renewal through the normal WooCommerce payment flow, so a new card token can be established.
- After a successful payment-method update, check the subscription and its next scheduled renewal.
Investigate a failed or declined renewal
↑ Back to top- Open the renewal order and read the Windcave order note, which may include the response text and code.
- Confirm the original order or subscription has a usable saved token.
- Check that PxPost credentials are valid and recurring/token billing is enabled for your Windcave account.
- Compare the currency of the original tokenized payment with the renewal currency. A mismatch can contribute to a decline.
- Review WooCommerce > Status > Scheduled Actions for a delayed or failed renewal task.
- If the customer needs to update the card, direct them to the subscription’s payment-method change option or the payment link for the failed renewal.
The extension records more informative renewal failure notes and skips renewal requests for orders already marked as paid. However, if a charge was completed at Windcave but not recorded in WooCommerce, reconcile it before retrying; do not assume a retry is safe solely because the WooCommerce order is unpaid.
9. Compatibility and checkout behavior
↑ Back to top- Classic checkout: The extension supports the traditional WooCommerce checkout flow.
- Cart and Checkout blocks: The extension includes a WooCommerce Blocks payment method integration.
- High-Performance Order Storage (HPOS): The extension declares HPOS compatibility and includes HPOS-aware order metadata helpers.
- Checkout currency: Windcave must be configured to accept the currency being charged. Subscription renewals may need to use the currency recorded for the original tokenized transaction.
After substantial updates to WooCommerce, WooCommerce Subscriptions, PHP, or checkout customizations, test one-time purchases, renewal payments, refunds, and authorization actions on staging before deploying changes.
10. Troubleshooting
↑ Back to topWindcave is missing at checkout
↑ Back to top- Check that the extension is active and Enable Windcave is selected.
- Verify that the checkout is using a supported WooCommerce payment method integration.
- Check the store currency and the merchant account’s enabled services.
- Review the gateway settings for credential validation notices.
PxPay or PxPost credentials show as invalid
↑ Back to top- Confirm the correct user name, password/access key, and endpoint for the service.
- Check that test credentials are not paired with live endpoints or vice versa.
- Confirm with Windcave that the merchant account has the relevant service enabled.
- If PxPay works but refunds or renewals fail, review PxPost specifically.
Customer cannot return from Windcave or order remains unpaid
↑ Back to top- Test successful and unsuccessful payments with the configured success and failure return URLs.
- Confirm that your site is reachable over HTTPS and that redirects do not lead to an incorrect domain.
- Check for caching, security rules, or a firewall blocking valid payment return or notification requests.
- Compare the WooCommerce order status and notes with the actual Windcave transaction before recharging the customer.
Refund or authorization completion fails
↑ Back to top- Check PxPost user credentials and permitted transaction types.
- Confirm that the original payment has an eligible Windcave transaction reference.
- For refunds, use the WooCommerce order’s gateway refund action rather than a manual-only refund.
- For authorization completions, confirm the authorization has not expired and is still available to complete.
Windcave approved payment, but the customer closed the browser
↑ Back to top- The extension can process a Windcave payment notification even when the customer does not finish returning to the store in their browser.
- Check the actual Windcave transaction and WooCommerce order notes to see whether the notification was received.
- Confirm the store’s callback route is reachable, and investigate firewall or caching rules that may interfere with valid Windcave notifications.
- Do not create a replacement order or payment until the existing transaction has been reconciled.
Windcave returns a QT response for a renewal
↑ Back to top- Check the renewal order note for the billing token lookup and any additional response details.
- Compare the renewal currency with the original transaction currency associated with the saved card token.
- Ask Windcave to confirm what the response code means for the particular merchant account and transaction.
- If no valid token was ever created, the customer must provide new payment details before automatic renewals can resume.
Renewal fails with a missing Billing ID or a decline
↑ Back to top- Review the renewal order note and confirm whether the saved token is present.
- If the token is missing, ask the customer to enter a new payment method. Historic transactions cannot be used to create a token retrospectively.
- If the token exists, verify PxPost access, the original payment currency, and the Windcave response code.
- Before manually retrying a renewal, check for an already approved Windcave charge.
Change Payment is not available for a subscription
↑ Back to top- Confirm the subscription is eligible for automatic recurring payments and has a future payment scheduled.
- Check its status and whether WooCommerce Subscriptions allows payment-method changes in the current environment.
- Confirm that the Windcave payment gateway is enabled and its PxPost connection is available.
11. Check diagnostic logs and contact support
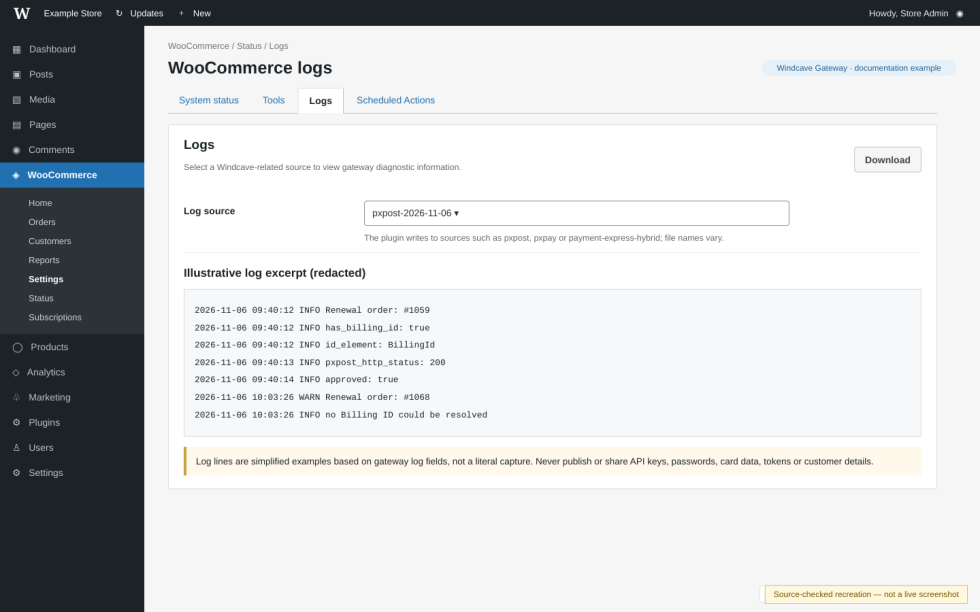
↑ Back to top- Go to WooCommerce > Status > Logs.
- Look for log entries related to Windcave, including
pxpay,pxpost, orpxhybrid, where available. - Review relevant entries alongside the order notes and the transaction status shown in Windcave.
- If needed, capture the exact error message and steps to reproduce the issue on a staging site.
- When contacting support, provide the plugin version, WooCommerce version, PHP version, whether the checkout uses blocks, whether HPOS is enabled, and a description of the affected workflow.
Protect sensitive information: Never send complete raw payment logs, card details, CVV, API access keys, passwords, or unredacted billing tokens in a support request. Review and redact logs before sharing them. Leave Enable Detailed Transaction Logs disabled unless temporarily required for authorized troubleshooting.
For installation or troubleshooting assistance, use the support option on the Windcave Gateway for WooCommerce Marketplace product page.