Affiliate for WooCommerce helps add and manage affiliates and track performance from a single place – commissions, sales, payout, leaderboard, etc. Earn money without hard work. Increase your brand outreach, and get potential customers.
The plugin simplifies your onboarding by guiding you through the initial setup. This ensures your affiliate program is ready to go in just a few easy steps.
This documentation will guide you through the onboarding process.
Let’s get started
↑ Back to top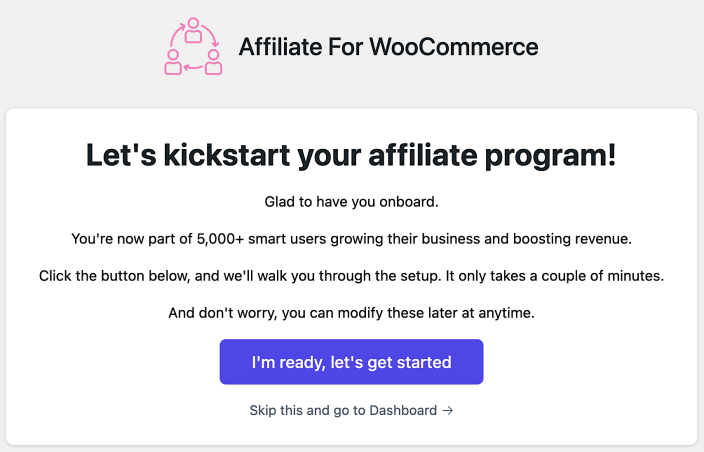
Once the plugin is activated, you will be taken to the start page of the onboarding process with the following two options:
- I’m ready, let’s get started (Recommended): Begin the step-by-step onboarding process.
- Skip this and go to Dashboard: Bypass the setup process and go directly to the plugin’s dashboard (WordPress admin > WooCommerce > Affiliates Dashboard).
Tip
We highly recommend following the step-by-step onboarding process, as it helps to ensure that all the elementary setup is properly configured for your affiliate program.
Onboarding process overview
↑ Back to topThe onboarding process consists of 5 simple steps:
- Essential settings
- Commissions
- Payouts
- Affiliates
- Getting started
Important Navigation Notes:
- You can skip any step during the setup by clicking on the Skip option at the bottom, which will take you to the next step.
- Once you are done with making changes in any step, click on Save & Next, so it saves your changes in the current step and goes to the next step.
- The final step will have the option to Ready to roll – open dashboard.
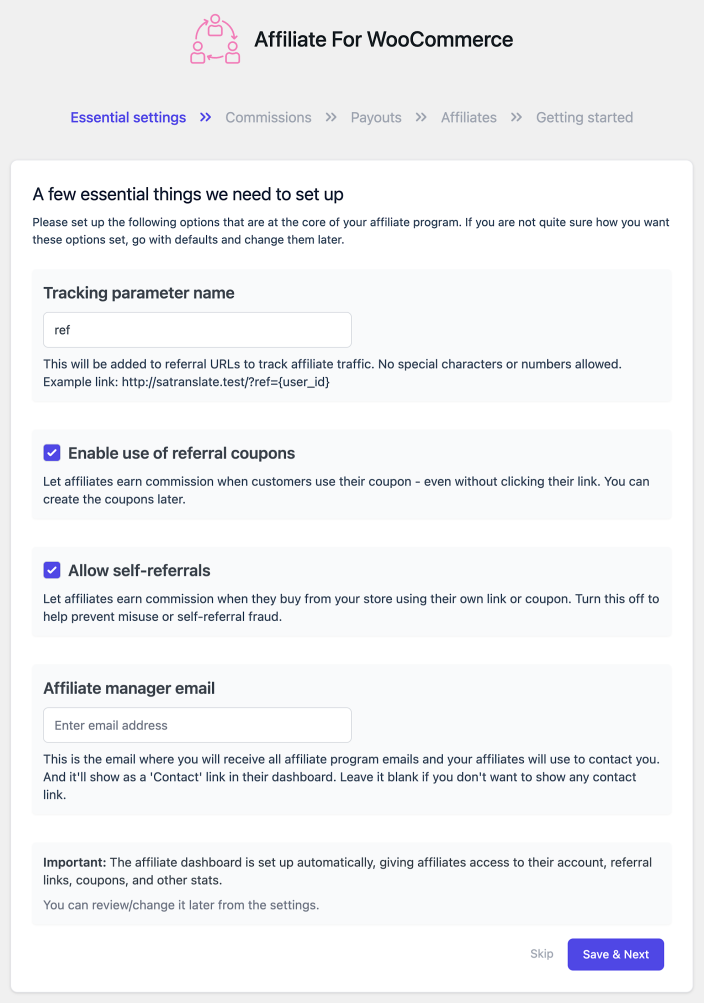
Step 1: Essential settings
↑ Back to topIn this section, you’ll set up the foundational settings for your affiliate program:
- Tracking parameter name: By default, the tracking parameter appended to your affiliate links is ref (e.g.,
yoursite.com/?ref=123). You can change this to anything that better suits your brand, such as aff or partner – learn more. - Enable use of referral coupons: Use this so you can assign specific WooCommerce coupons to your affiliates. They can then share these discount codes with their customers for referral purposes – learn more.
- Allow self-referrals: You can keep it enabled to allow your affiliates to earn commissions on purchases they make themselves using their own links – learn more.
- Affiliate manager email: Enter the email address that should receive all important administrative notifications and updates regarding your affiliate program – learn more.
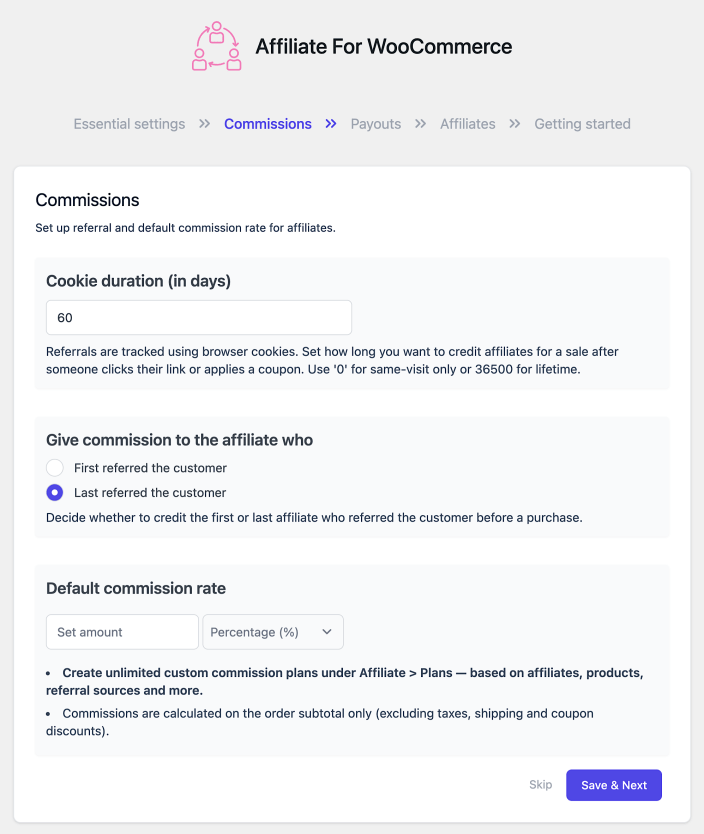
Step 2: Commissions
↑ Back to topThis step allows you to define the commission for your affiliates.
- Cookie duration (in days): Set the expiration (in days) of the tracking cookies. This determines how long the cookie will stay inside the visitor’s browser, ensuring affiliates get credit if the customer returns to purchase within that time frame – learn more.
- Give commission to the affiliate who:
- First referred the customer: The affiliate whose referral link/coupon was used for the first time.
- Last referred the customer: the affiliate whose referral link/coupon was used last/recently.
- Default commission rate: This is your storewide default commission rate. Visit here to learn more about the Storewide Default Commission. Additional customization options for commissions can be done using different commission plans.
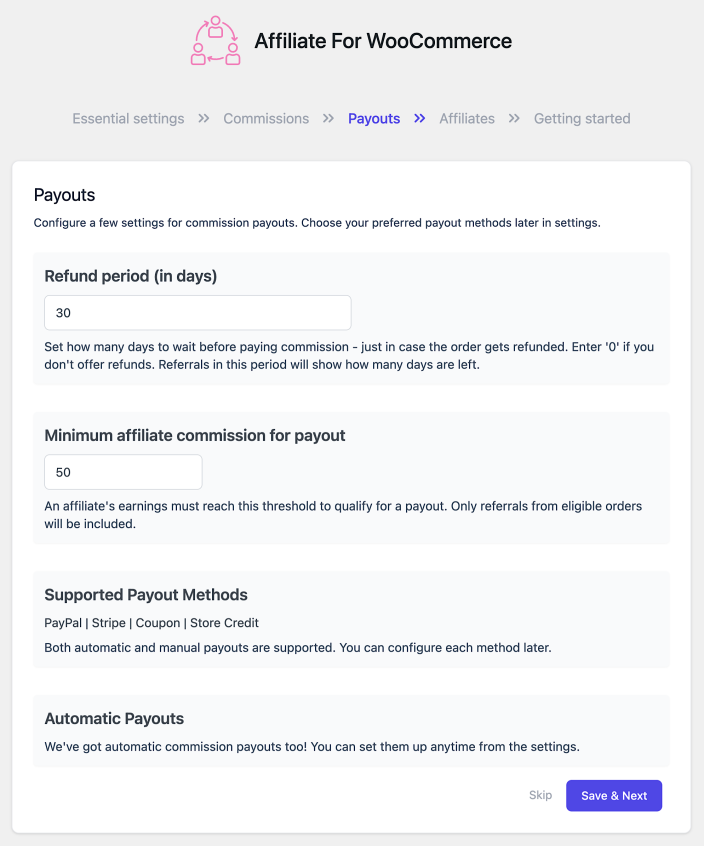
Step 3: Payouts
↑ Back to top- Refund period (in days): Set this to match your store’s return/refund policy. Why? Waiting for the refund period to expire before paying affiliates ensures you don’t accidentally pay out commissions on canceled or refunded orders – learn more.
- Minimum affiliate commission for payout: Set a minimum threshold that an affiliate must earn before they can be paid (e.g., $50). This reduces your administrative overhead by limiting the number of small payout transactions you have to process – learn more.
- Supported Payout Methods: Configure which methods you will use to pay your affiliates (e.g., PayPal, Stripe, Store Credit, Coupon) – learn more.
- Automatic Payouts: If you wish to streamline the process, you can configure automatic payouts, so affiliates are paid automatically when they reach the required criteria – learn more.
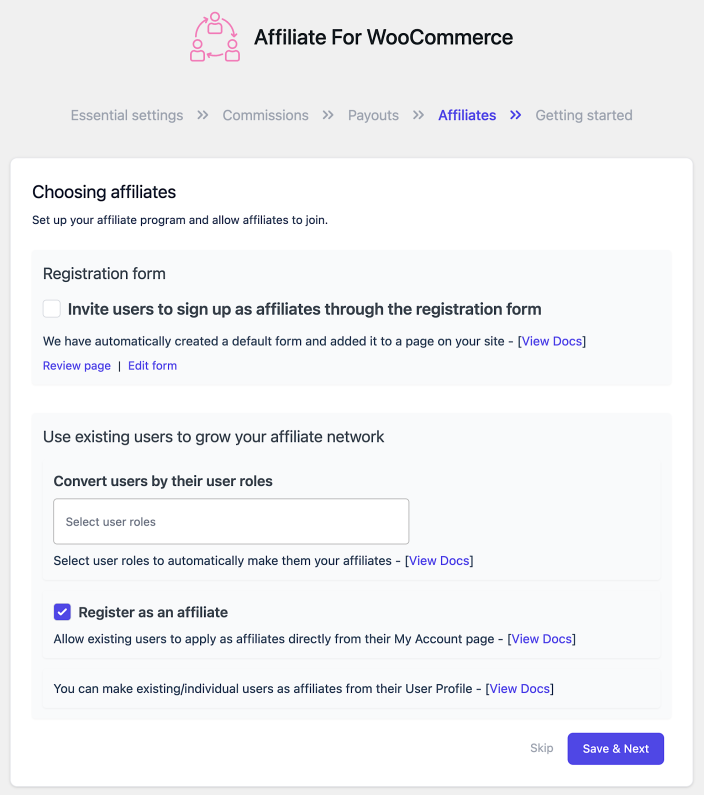
Step 4: Affiliate Setup
↑ Back to topIn this step, you’ll configure how new affiliates can join your program using the following options:
- Registration form: Enable an affiliate registration form that allows users to sign up directly for your affiliate program. This form can be displayed on your website. Visit here to learn more about setting up an affiliate registration form.
Use existing users to grow your affiliate network
- Convert users by their user roles: Choose specific WordPress user roles (such as Customer or Subscriber) that will automatically become affiliates. This allows you to make affiliates based on user role (learn more).
- Register as an affiliate: Allow existing users to apply as affiliates directly from their My Account page – learn more.
Step 5: Getting Started
↑ Back to topThis final step ensures your system is properly configured to track referrals without issues.
Check recommended settings for caching
Note
Caching plugins often cause tracking failures. Ensure your caching plugin is configured to ignore or not cache URLs that contain your tracking parameter – learn more from our doc.
Recommended actions
Make me an affiliate: Enable this to automatically create an affiliate account for your admin user. This allows you to safely test affiliate functionality from your current logged-in account without needing a dummy account.
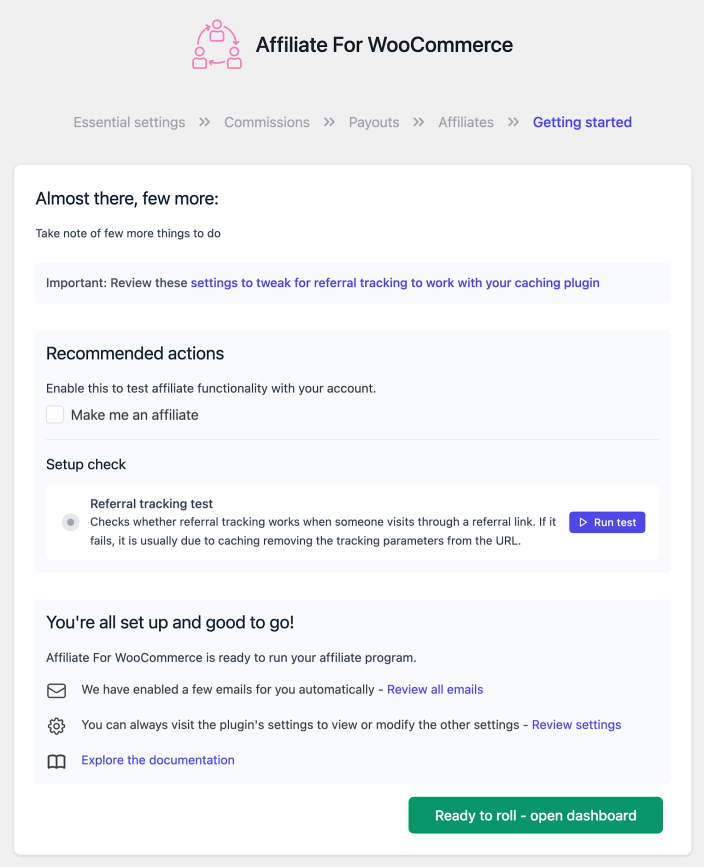
Set up check – Referral tracking test (Recommended)
We have made a tool to automatically detect whether referral tracking is working on your site.
To check:
- Click on Run test.
- It will generate a test link below. Copy this link and open it in a completely new Incognito/Private browser window to verify referral tracking.
- Once you visit the link, if it works as expected, it will show the message: Referral cookie detected. Tracking is working correctly – which means it’s good to go.
- If it doesn’t work as expected, it will show a message: No referral cookie detected. This is often caused by caching removing tracking parameters from the URL. Review your caching settings – In that case, you must check and adjust your caching settings or reach out to us by raising a support ticket.
Completion
You can also find links to review all emails and settings for your affiliate program on this page.
To finish the setup, click on Ready to roll – open dashboard, which will take you to the plugin’s main dashboard, where you can start managing your affiliate program.
FAQs
↑ Back to top1. How to revisit the onboarding process?
↑ Back to topImportant Note
If you retake the onboarding process, any existing settings related to the specific areas being configured will be overridden. Ensure that you review any important settings before retaking the onboarding.
Although there isn’t a direct option, you can revisit/retake the onboarding process by modifying your WordPress admin URL by following these steps:
- Go to your WordPress admin area.
- Take your admin URL (e.g.,
https://example.com/wp-admin). - Add the following segment to the URL:
admin.php?page=affiliate-for-woocommerce#!/onboarding. - Your final URL should look like this:
https://example.com/wp-admin/admin.php?page=affiliate-for-woocommerce#!/onboarding. - Press Enter, and you will be redirected to the onboarding process.
Feature request
↑ Back to topHave a feature request or enhancement suggestion for Affiliate For WooCommerce? Submit a request or send it to us from here.