Developed by WPExperts
Tested with WordPress 6.8 · WooCommerce 10.0
For Users of Older Versions: If you are using an older version of Donation for WooCommerce, refer to the [https://wpexperts.io/docs/donation-for-woocommerce/] for the legacy features and configuration options.
Table of Contents
↑ Back to top1. Introduction & How It Works
2. System Requirements & Compatibility
3. Installation
4. Getting Started
5. Dashboard & Analytics
6. Campaign Management
7. Campaign General Settings
8. Build & Design — Campaign Page Builder
9. Donation Form Designer
10. Donation Amount
11. Recurring Donations
12. Donation Goals
13. Donation Causes
14. Timer & Urgency
15. Donor Engagement
16. Tributes
17. Gift Aid
18. Processing Fees
19. Terms & Conditions
20. E-Cards
21. Campaign Embed
22. One Page Checkout
23. Campaign Categories
24. Donation Reports
25. Donation Emails
26. General Settings
27. Legacy Features
28. Front-End Donation Flow
29. Feature Dependencies
30. Troubleshooting & FAQ
Introduction & How It Works
↑ Back to topDonation For WooCommerce (internally identified as “WC Donation”, plugin slug wc-donation) turns a standard WooCommerce store into a fundraising platform. Each fundraising campaign an administrator creates is backed by a hidden WooCommerce product: when a donor gives money, they are actually purchasing that product through the normal WooCommerce cart and checkout, which is why donations appear in WooCommerce Orders, respect WooCommerce payment gateways, and can be refunded like any other order.
As of version 4.0.0 the plugin ships with two parallel campaign experiences:
- The new Campaign Page Builder experience. A drag-and-drop page builder and a matching Donation Form Designer, used to design the public campaign page and the donation form field-by-field. Every campaign created from version 4.0.0 onward uses this experience automatically.
- The legacy experience. Campaigns created before version 4.0.0 keep rendering with the original, non-builder template unless the store owner explicitly opts them into the new builder from a notice shown inside the campaign editor.
This manual documents the interface exactly as it exists in the installed plugin files, including both the current builder-based workflow and the legacy screens and shortcodes that remain fully functional alongside it.
System Requirements & Compatibility
↑ Back to topThe following requirements and compatibility notes are declared in the plugin’s own readme.txt file and verified against the plugin’s code.
Configuration
↑ Back to top| Requirement | Value |
|---|---|
| WordPress | Requires at least 5.0 |
| PHP | Requires at least 5.6 |
| WooCommerce | Required — the plugin registers WooCommerce products behind every campaign and cannot function without WooCommerce active. |
| Stable version tested | Tested up to WooCommerce 10.9.4 / WordPress 7.0.2 (per the bundled readme.txt at the time this manual was produced). |
| License | GNU General Public License v3.0 |
Dependencies / Validation
↑ Back to top- WooCommerce Subscriptions (a separate, third-party plugin) is required to configure Recurring Donations on a campaign. If it is not active, the Recurring Donations tab in the campaign editor is visibly present but is disabled (dimmed and non-interactive) with the on-screen message: “WooCommerce Subscriptions is inactive. Activate WooCommerce Subscriptions plugin to configure recurring donation settings.”
- The plugin declares compatibility with WooCommerce High-Performance Order Storage (HPOS), the WooCommerce Cart and Checkout blocks, Dokan, and WC Product Vendors (per readme.txt / changelog history).
- PDF receipts and PDF report exports are generated using the bundled Dompdf library (vendor/dompdf); no external PDF service is required.
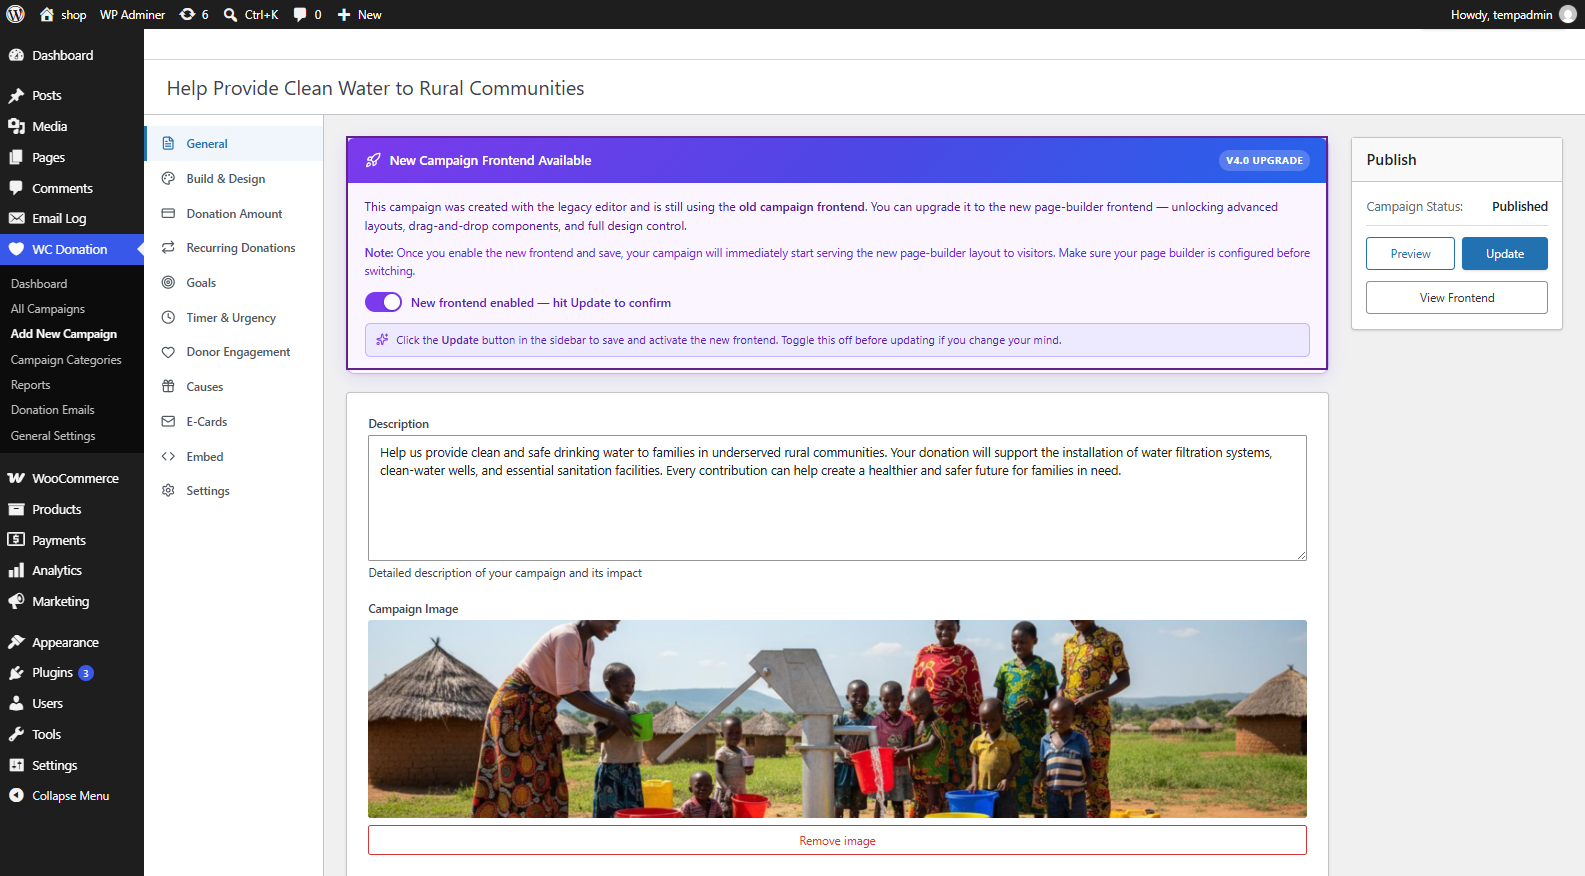
Important: Existing Campaigns and New Frontend
If you are using an older version of Donation for WooCommerce and already have existing donation campaigns, please review the legacy campaign documentation before updating to the latest version of the plugin.
The latest version introduces a new Campaign Page Builder and a new campaign frontend. Existing campaigns created with the legacy editor may continue using the old campaign frontend until they are upgraded.
Important: Do not update or switch existing campaigns to the new frontend without reviewing and configuring the new Campaign Page Builder first. Changes to the campaign frontend may affect how your existing campaigns are displayed and configured.
For existing campaigns, refer to the Legacy Features / Previous Version Documentation before upgrading or enabling the new frontend.
For new campaigns created with the latest version, use the new Campaign Page Builder and Donation Form Designer documented in this manual.
Installation
↑ Back to topDonation For WooCommerce is installed the same way as any other WordPress plugin.
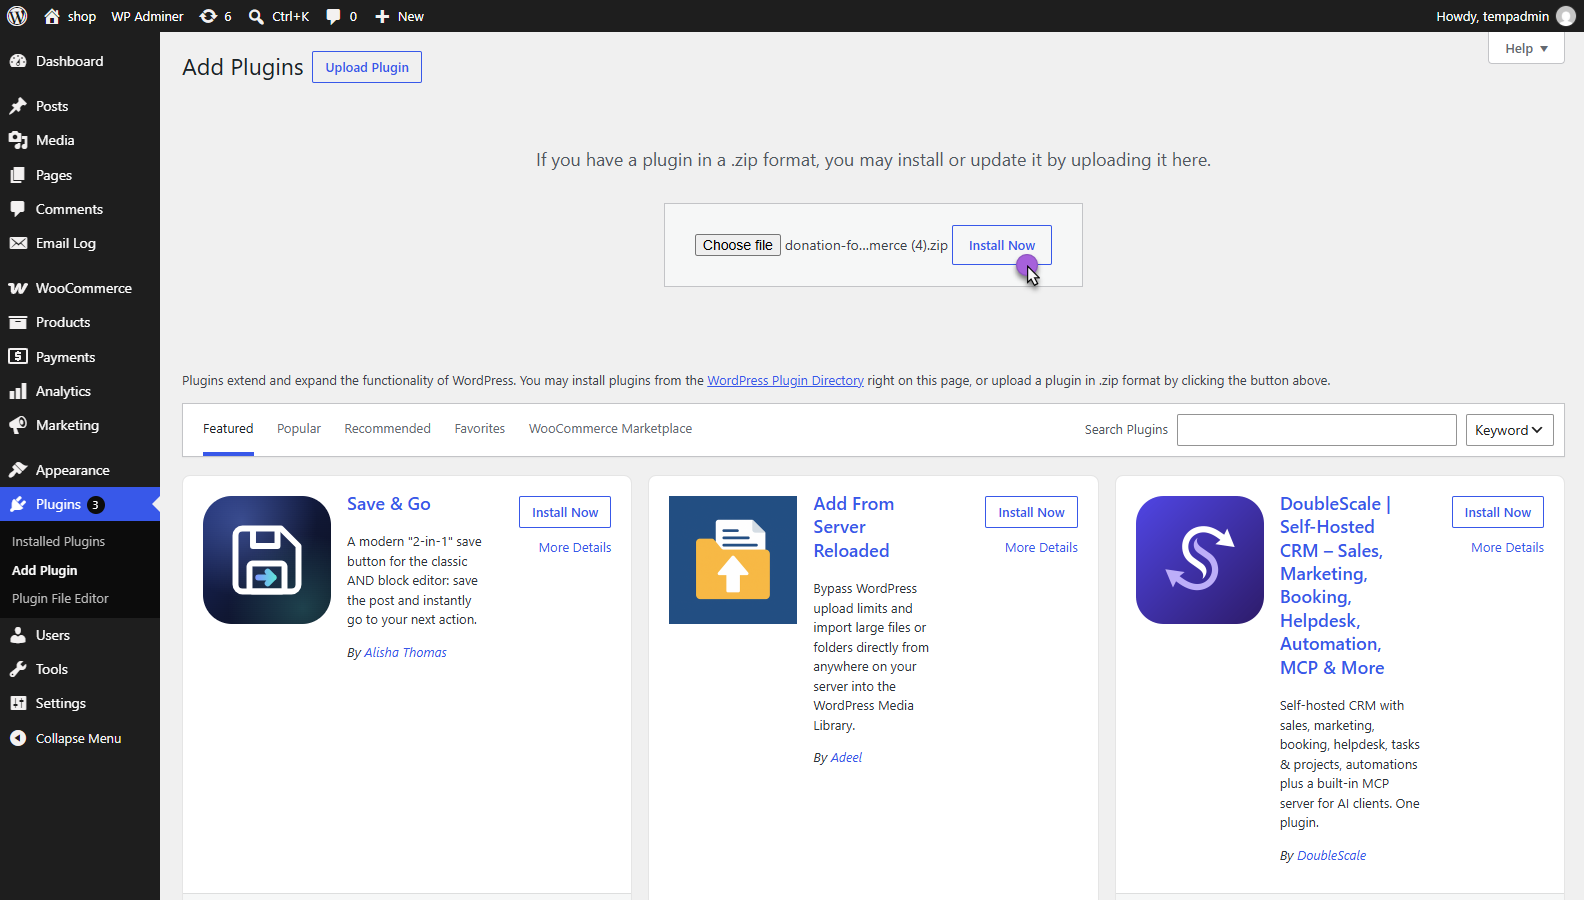
- Navigate to WordPress Admin Dashboard → Plugins → Add New, then select Upload Plugin and choose the plugin’s .zip file.
- Select Install Now, then select Activate.
- Confirm that WooCommerce is installed and active. If WooCommerce is missing, install and activate it before continuing.
- After activation, a new top-level WC Donation menu appears in the WordPress admin sidebar, with the dashicons heart icon.
Getting Started
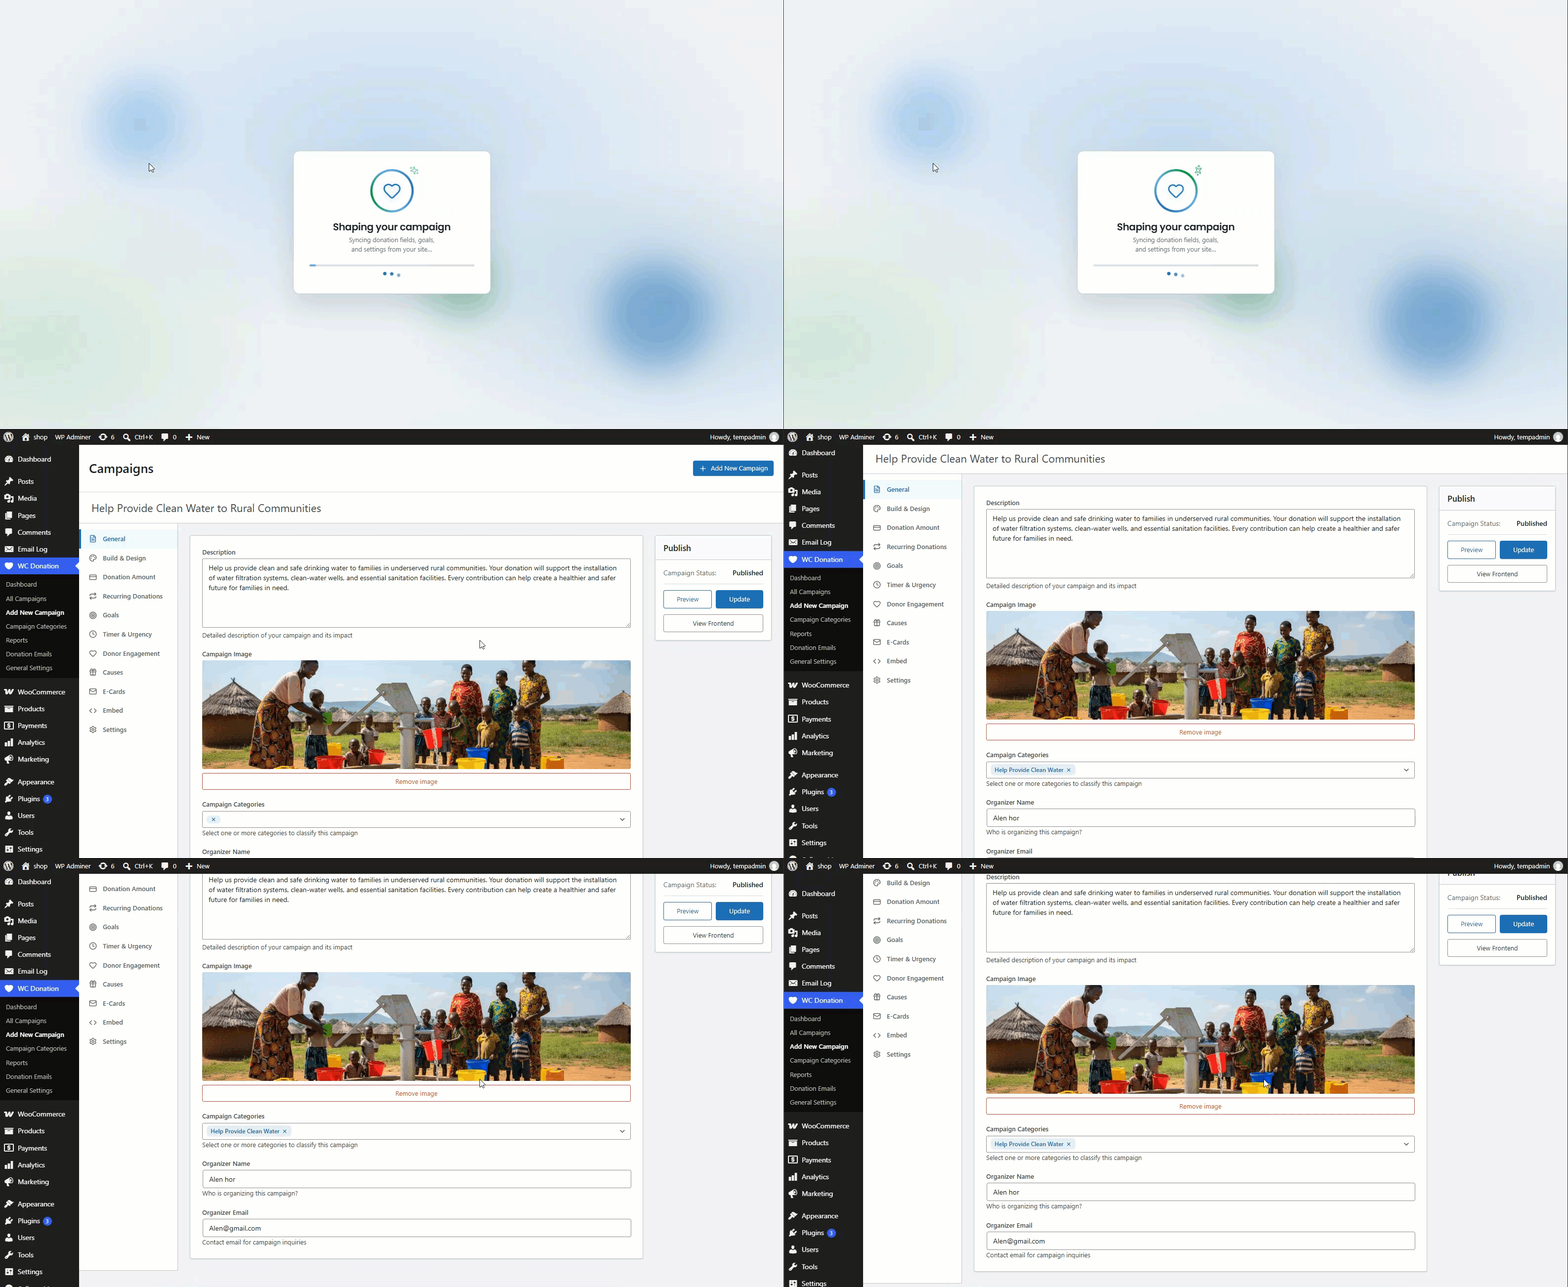
↑ Back to topThis section walks through creating a first campaign end-to-end using the current (Campaign Page Builder) workflow.
First-time setup checklist:
- Navigate to WC Donation → Add New Campaign.
- Enter a Campaign Title at the top of the editor — this becomes the WooCommerce product name behind the campaign and the default page heading.
- Work through the sidebar tabs in order: General, Build & Design, Donation Amount, Recurring Donations, Goals, Timer & Urgency, Donor Engagement, Causes, E-Cards, Embed, and Settings. None of the tabs are mandatory except the title; sensible defaults (predefined amount tiers, a Title / Description / Amount Levels / Donate button starter layout) are pre-filled automatically.
- Select Publish (or Save Draft) in the top toolbar.
- Open the Embed tab to place the campaign on a WordPress page, or copy the campaign’s shortcode from the All Campaigns list to place it manually.
Dashboard & Analytics
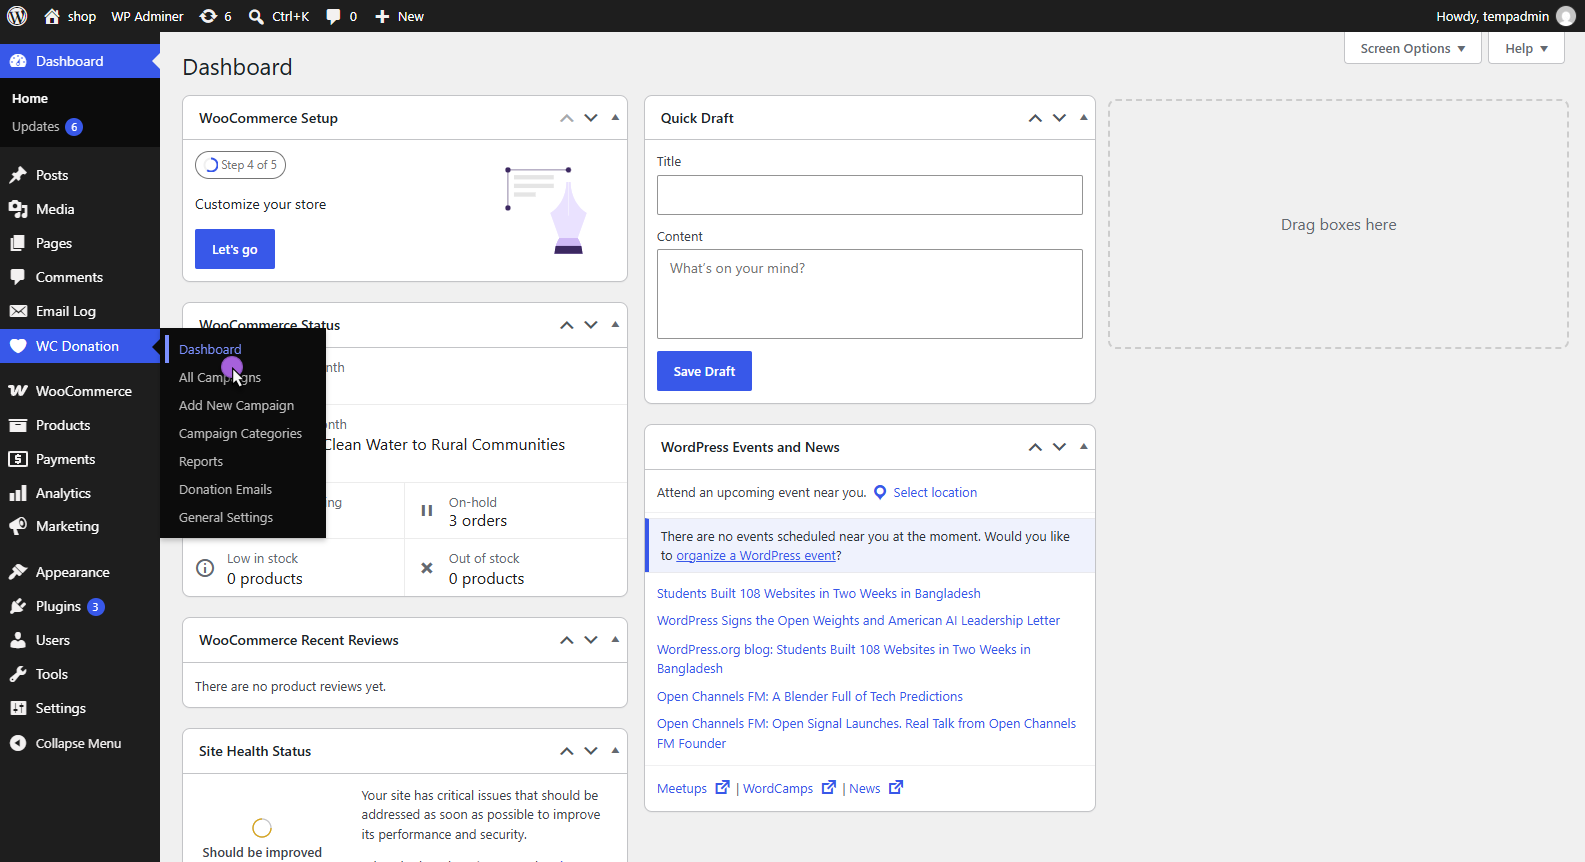
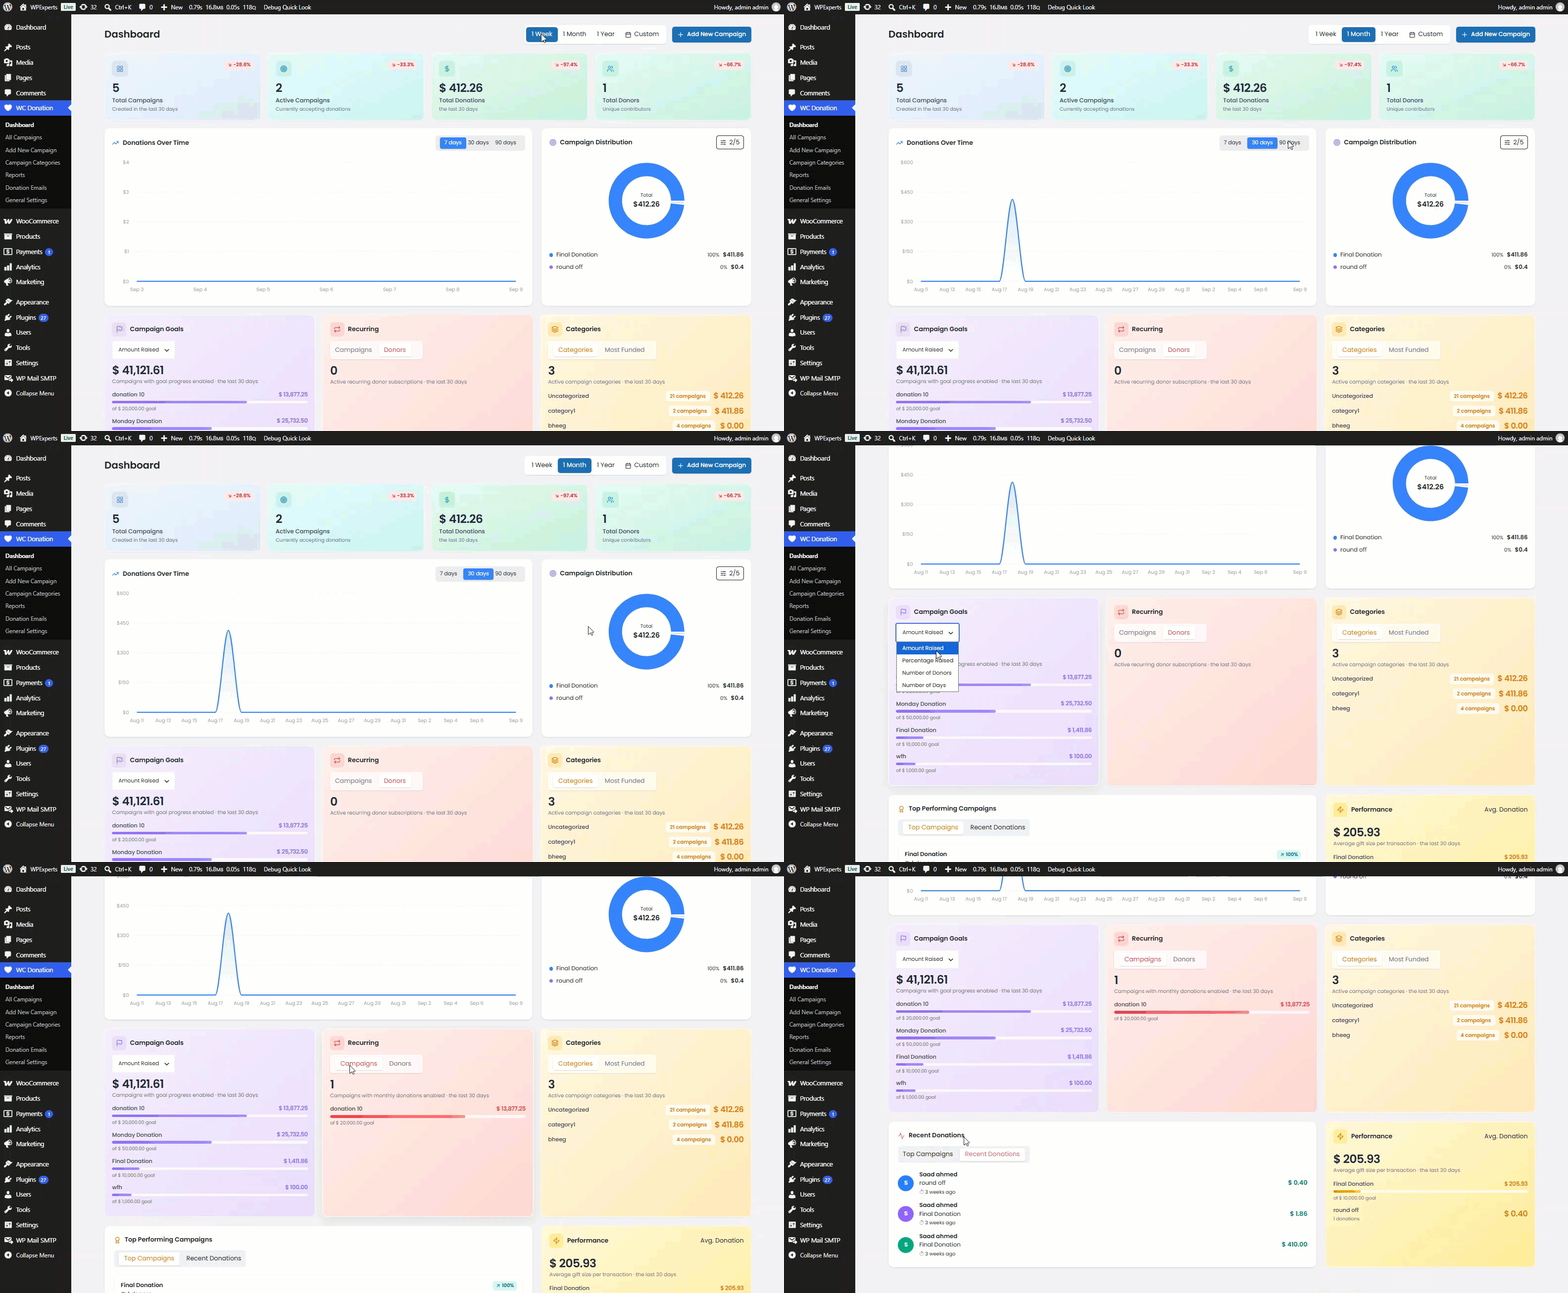
↑ Back to topThe Dashboard is the plugin’s home screen and gives a store owner a fundraising-wide view across every campaign, independent of any single campaign’s own reporting.
Navigation
↑ Back to topNavigation: WordPress Admin Dashboard → WC Donation → Dashboard
Configuration
↑ Back to topDate Filter
Every number on the dashboard responds to a single date filter control at the top of the page. Selecting a different range recalculates every scorecard, chart, and section below it, and also recomputes the period-over-period trend (percentage up or down) shown on each scorecard by comparing the selected range against an equal-length prior period.
| Option | Meaning |
|---|---|
| Last 7 days | Rolling 7-day window ending today. |
| Last 30 days | Rolling 30-day window ending today. This is the default filter on first load. |
| Last 12 months | Rolling 364-day window ending today. |
| Custom range | A specific Start Date and End Date chosen from a calendar picker. |
Scorecards
| Scorecard | What it shows |
|---|---|
| Total Campaigns | Number of campaigns created within the selected date range, with a trend versus the prior period. |
| Active Campaigns | Number of distinct campaigns that received at least one donation in the selected range and are currently Published or Private. The subtitle shows either “Currently accepting donations” or, when applicable, “N ending soon” for campaigns using a Number of Days goal whose end date falls within the next 14 days. |
| Total Donations | Total money raised across all campaigns within the selected range, formatted in the store’s currency. |
| Total Donors | Count of unique contributors in the selected range, deduplicated by donor email (falling back to order ID when no email is present). |
Charts
| Chart | What it shows |
|---|---|
| Donations Over Time | A line chart of daily donation totals, with a toggle between 7-day, 30-day, and 90-day rolling windows. |
| Campaign Distribution | A chart of the top 5 campaigns by total amount raised within the selected filter period. |
Insight Sections
Below the charts, the dashboard breaks performance down into four further groupings, each scoped to the selected date filter:
| Section | What it shows |
|---|---|
| Campaign Goals | Campaigns with a donation goal enabled, grouped by their Goal Type (Amount Raised, Percentage Raised, Number of Donations, Number of Days), each with a headline summary and up to 4 top rows sorted by progress. |
| Recurring | Two lists: campaigns that have monthly / recurring donations enabled, and active recurring donor subscriptions aggregated by donor email. |
| Categories | Total amount raised per Campaign Category, plus a separate “Top campaigns by amount raised” (Most Funded) list. |
| Performance | Average donation size per campaign (total raised divided by number of donations), each row optionally annotated with that campaign’s goal progress. |
Dependencies / Validation
↑ Back to top- A campaign only appears in “Active Campaigns” and the insight sections if it has at least one recorded donation report row within the filtered window, and its post status is Published or Private (Draft and Trashed campaigns are excluded).
- “N ending soon” on the Active Campaigns scorecard only appears for campaigns using the Number of Days goal type with a valid end date; other goal types never trigger this label.
Campaign Management
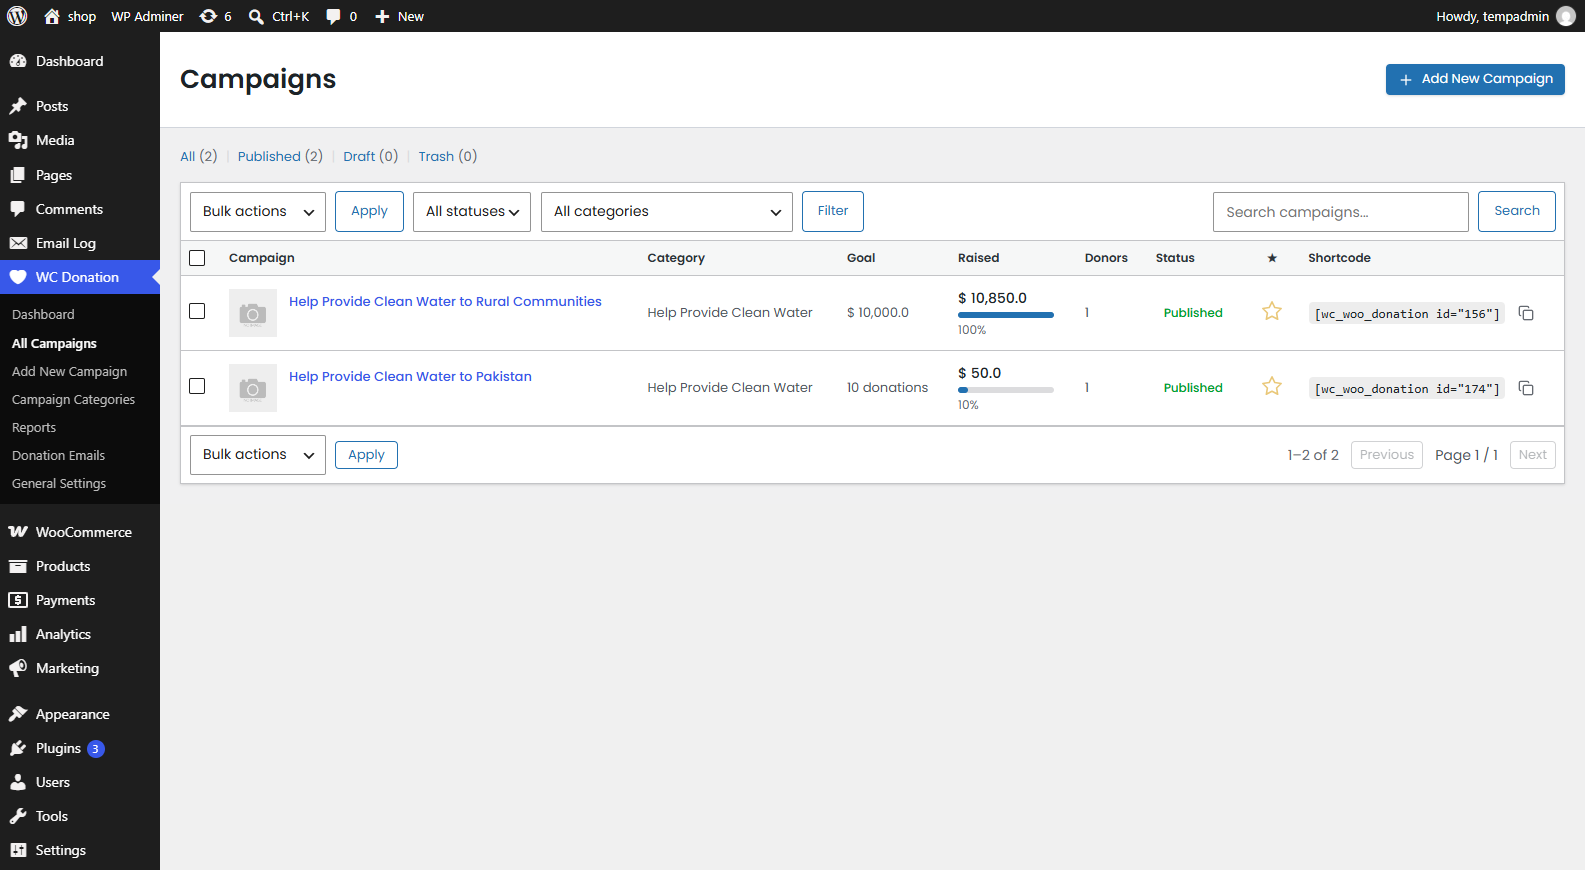
↑ Back to topThe All Campaigns screen is the master list of every campaign, regardless of whether it uses the new builder or the legacy editor.
Navigation
↑ Back to topNavigation: WordPress Admin Dashboard → WC Donation → All Campaigns
Configuration
↑ Back to topList columns and row information
| Element | Description |
|---|---|
| Thumbnail | The campaign’s featured image, or a default placeholder image when none has been set. |
| Title / Categories | Campaign title and any assigned Campaign Categories. |
| Goal | The configured goal label (amount, percentage, donation count, or target date) and percentage raised, or an em dash when no goal is enabled. |
| Raised / Donors | Total amount raised and total distinct donor count for the campaign, formatted with the store’s currency. |
| Status | Published, Draft, Pending, Private, Scheduled, or Trash, shown as a coloured status badge. |
| Featured flag | Indicates whether the campaign is marked as Featured (see the Settings tab in Section 7 of the campaign editor). |
| Shortcode | The campaign’s ready-to-copy embed shortcode, in the exact form [wc_woo_donation id=”ID”]. |
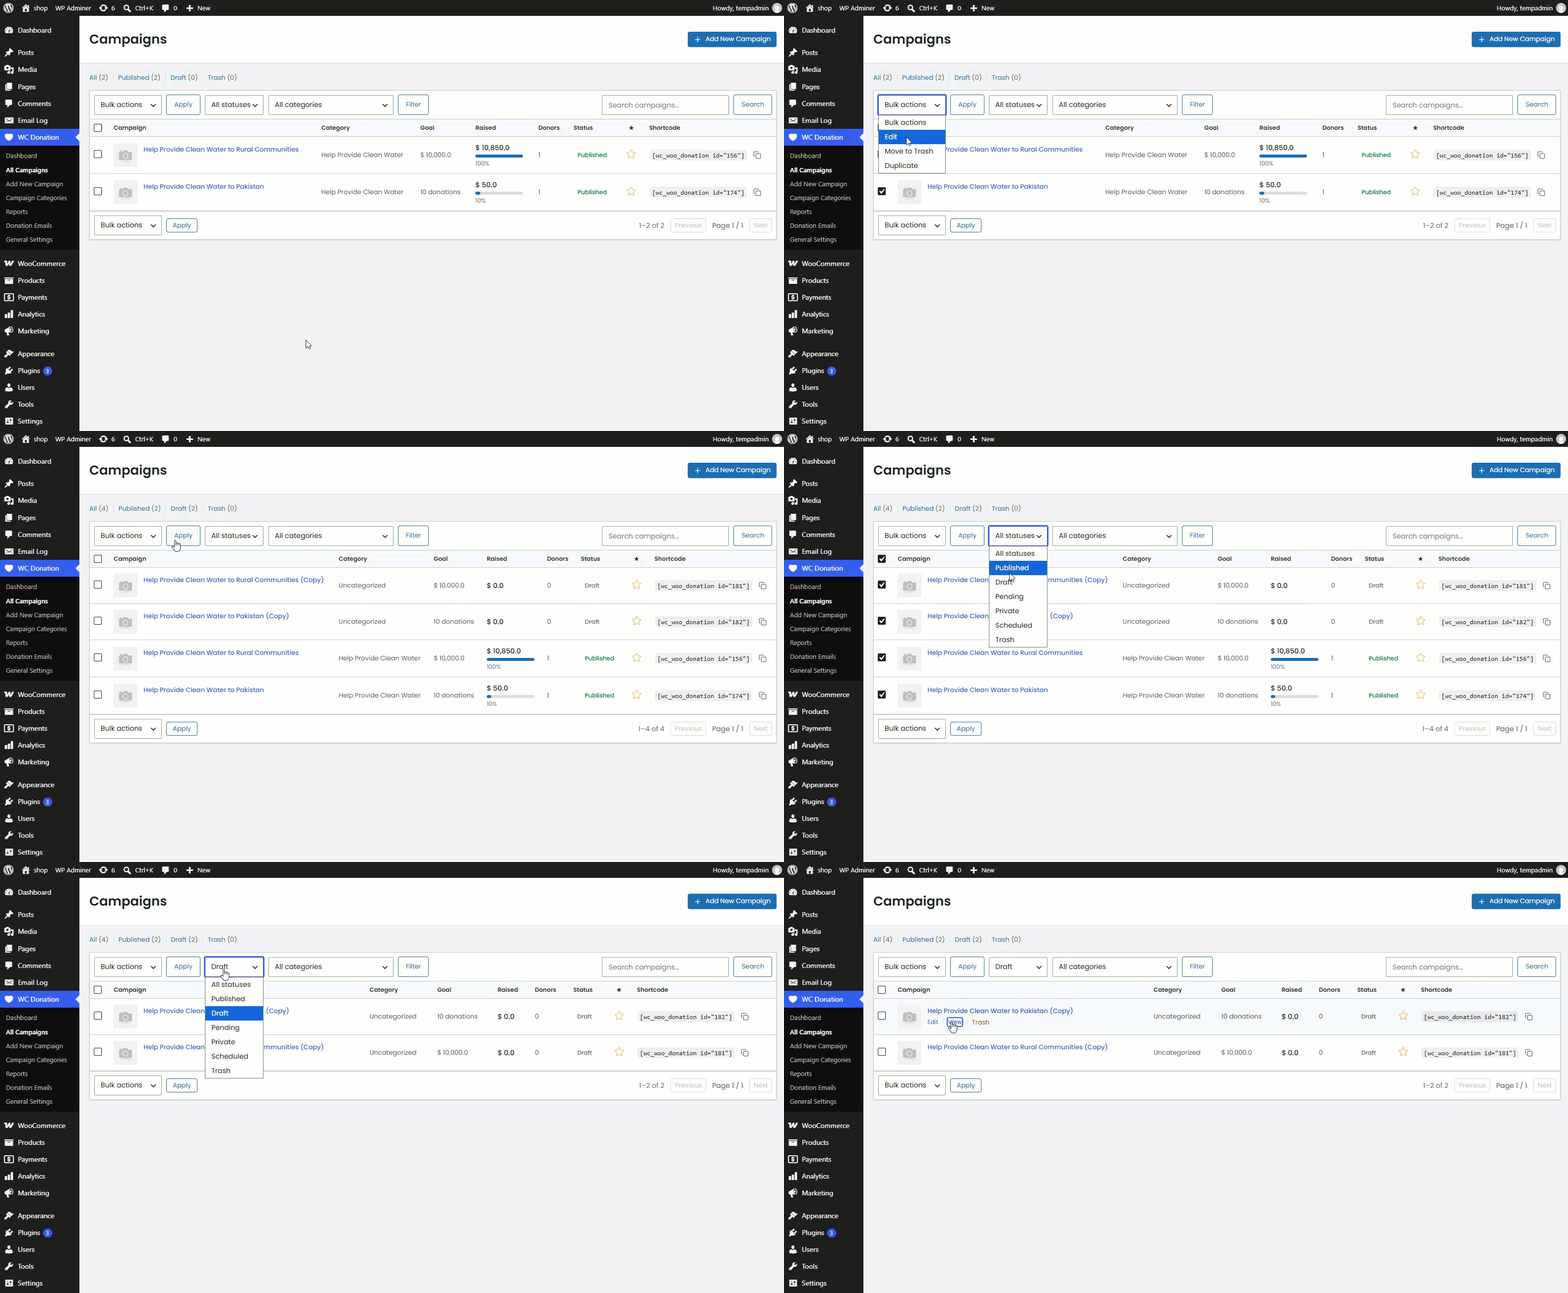
Filters and bulk actions
| Control | Behavior |
|---|---|
| Status tabs | All / Publish / Draft / Trash, each showing a live count. |
| Search | Full-text search across campaign titles. |
| Category filter | Restrict the list to a single Campaign Category. |
| Trash | Moves selected campaigns to Trash (a soft delete; the campaign can be restored). |
| Delete Permanently | Only available for campaigns already in Trash. Permanently deletes the campaign post and its meta. |
| Duplicate | Creates a copy of a campaign as a new Draft, titled “<Original Title> (Copy)”. All settings and the featured image are copied; a brand-new WooCommerce product is generated for the duplicate (the original’s product is not shared), and the duplicate always uses the new Campaign Page Builder frontend regardless of what the source campaign used. |
Dependencies / Validation
↑ Back to top- Permanent deletion is only possible for campaigns that are already in the Trash — this is a deliberate safeguard against accidental data loss.
Campaign General Settings
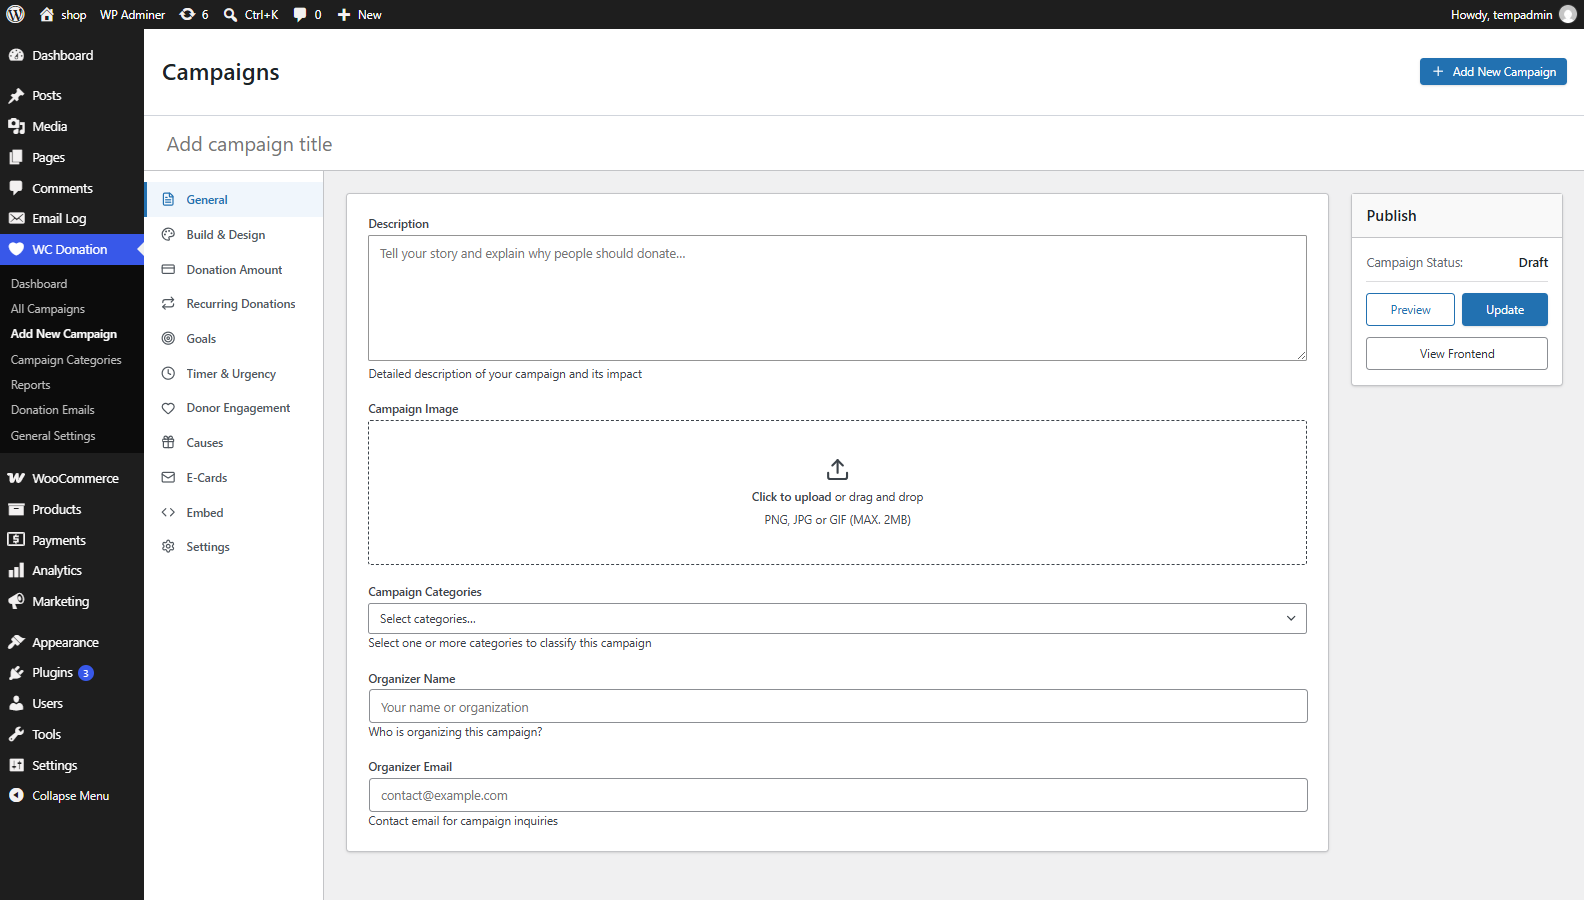
↑ Back to topThis is the first tab inside the campaign editor and covers the campaign’s basic descriptive information — everything that is not the visual layout, the donation form, or a specific feature such as Goals or Timer.
Navigation
↑ Back to topNavigation: WordPress Admin Dashboard → WC Donation → Add New Campaign (or edit an existing campaign) → General tab
Configuration
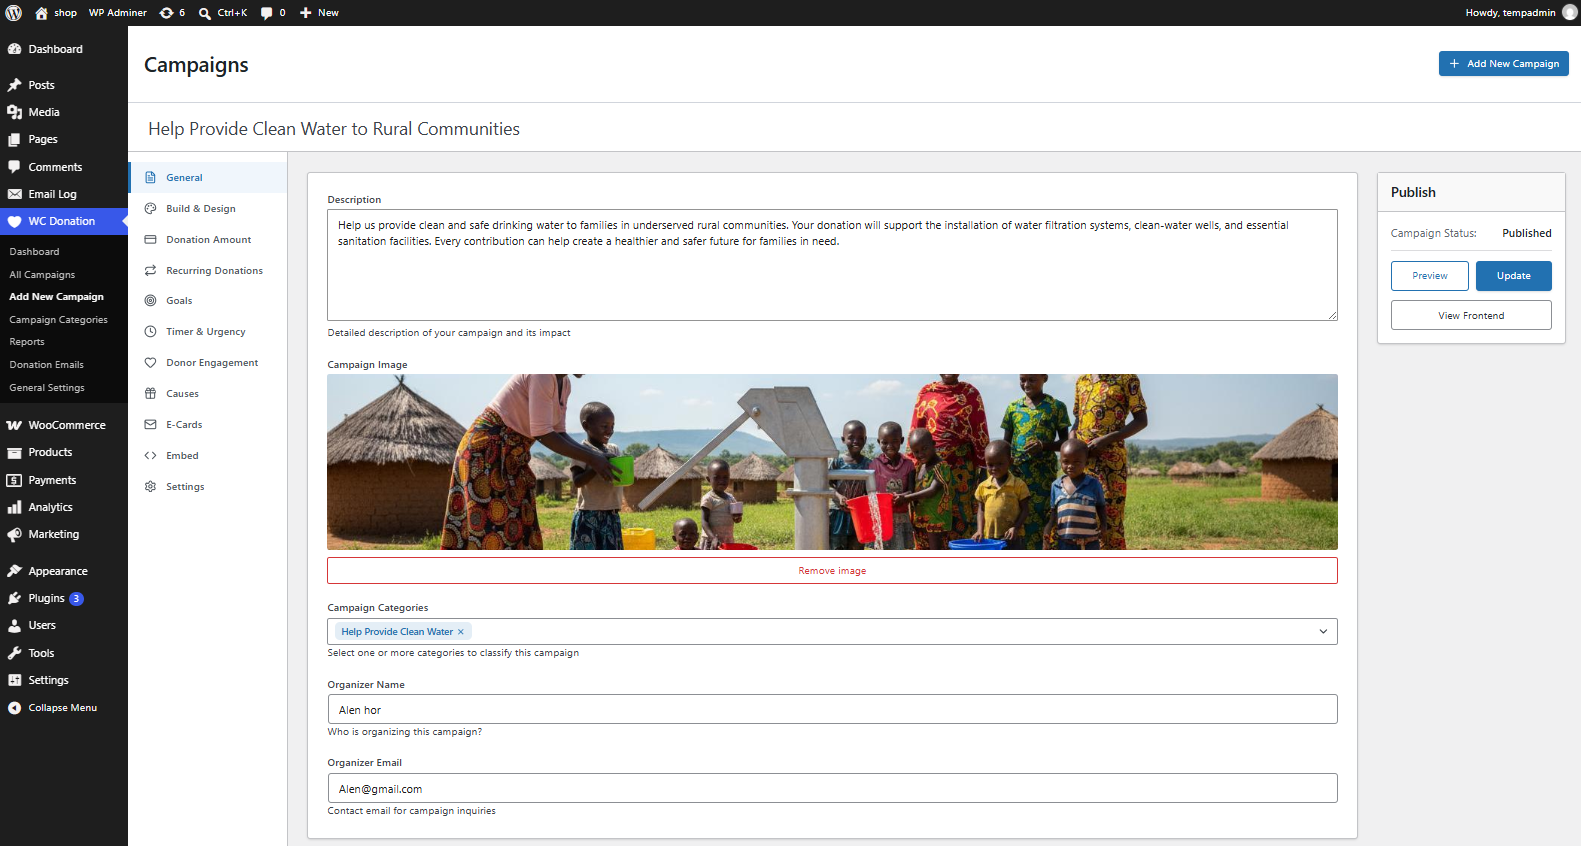
↑ Back to top| Setting | Description |
|---|---|
| Description | A long-form textarea for the campaign story (“Tell your story and explain why people should donate…”). This is separate from the campaign Title entered at the top of the editor. |
| Campaign Image | Upload or select from the media library a featured image for the campaign (PNG, JPG, or GIF, 2MB maximum). This image is also used as the campaign’s WooCommerce product thumbnail and appears in the All Campaigns list. |
| Campaign Categories | Assign one or more Campaign Categories (see Section 23) to classify the campaign. |
| Organizer Name | The name of the person or organization running the campaign. |
| Organizer Email | A contact email for campaign inquiries. |
Front-End Impact
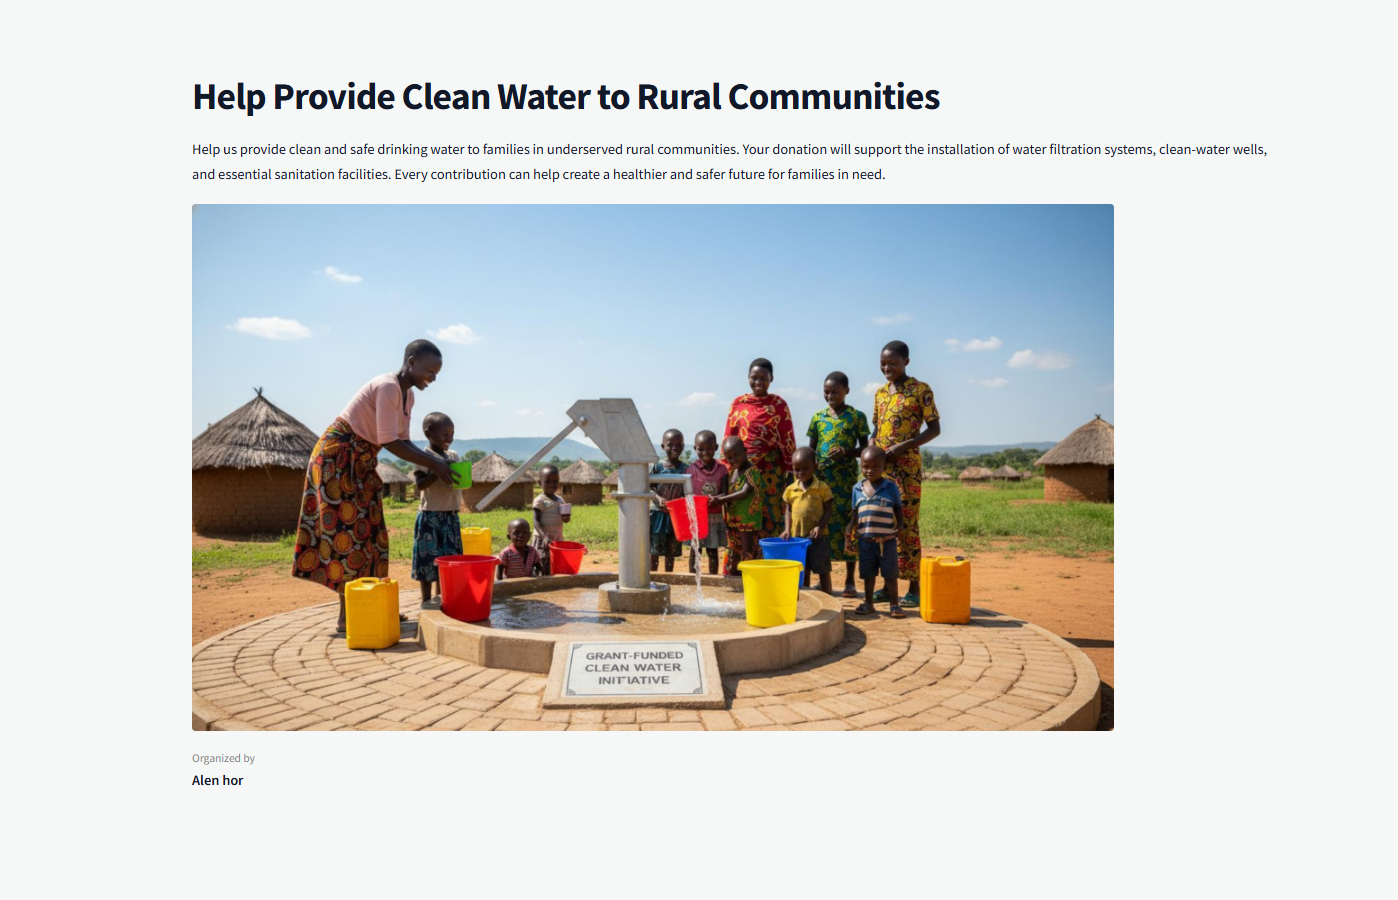
↑ Back to topThe Description appears as the main campaign story wherever a Description block is placed in the Campaign Page Builder layout. Organizer Name / Email appear wherever an Organizer Info block is placed. The Campaign Image is used as the default image wherever an Image block is added, and in list or grid displays of the campaign (All Campaigns block, Featured block, product thumbnails).
Build & Design — Campaign Page Builder
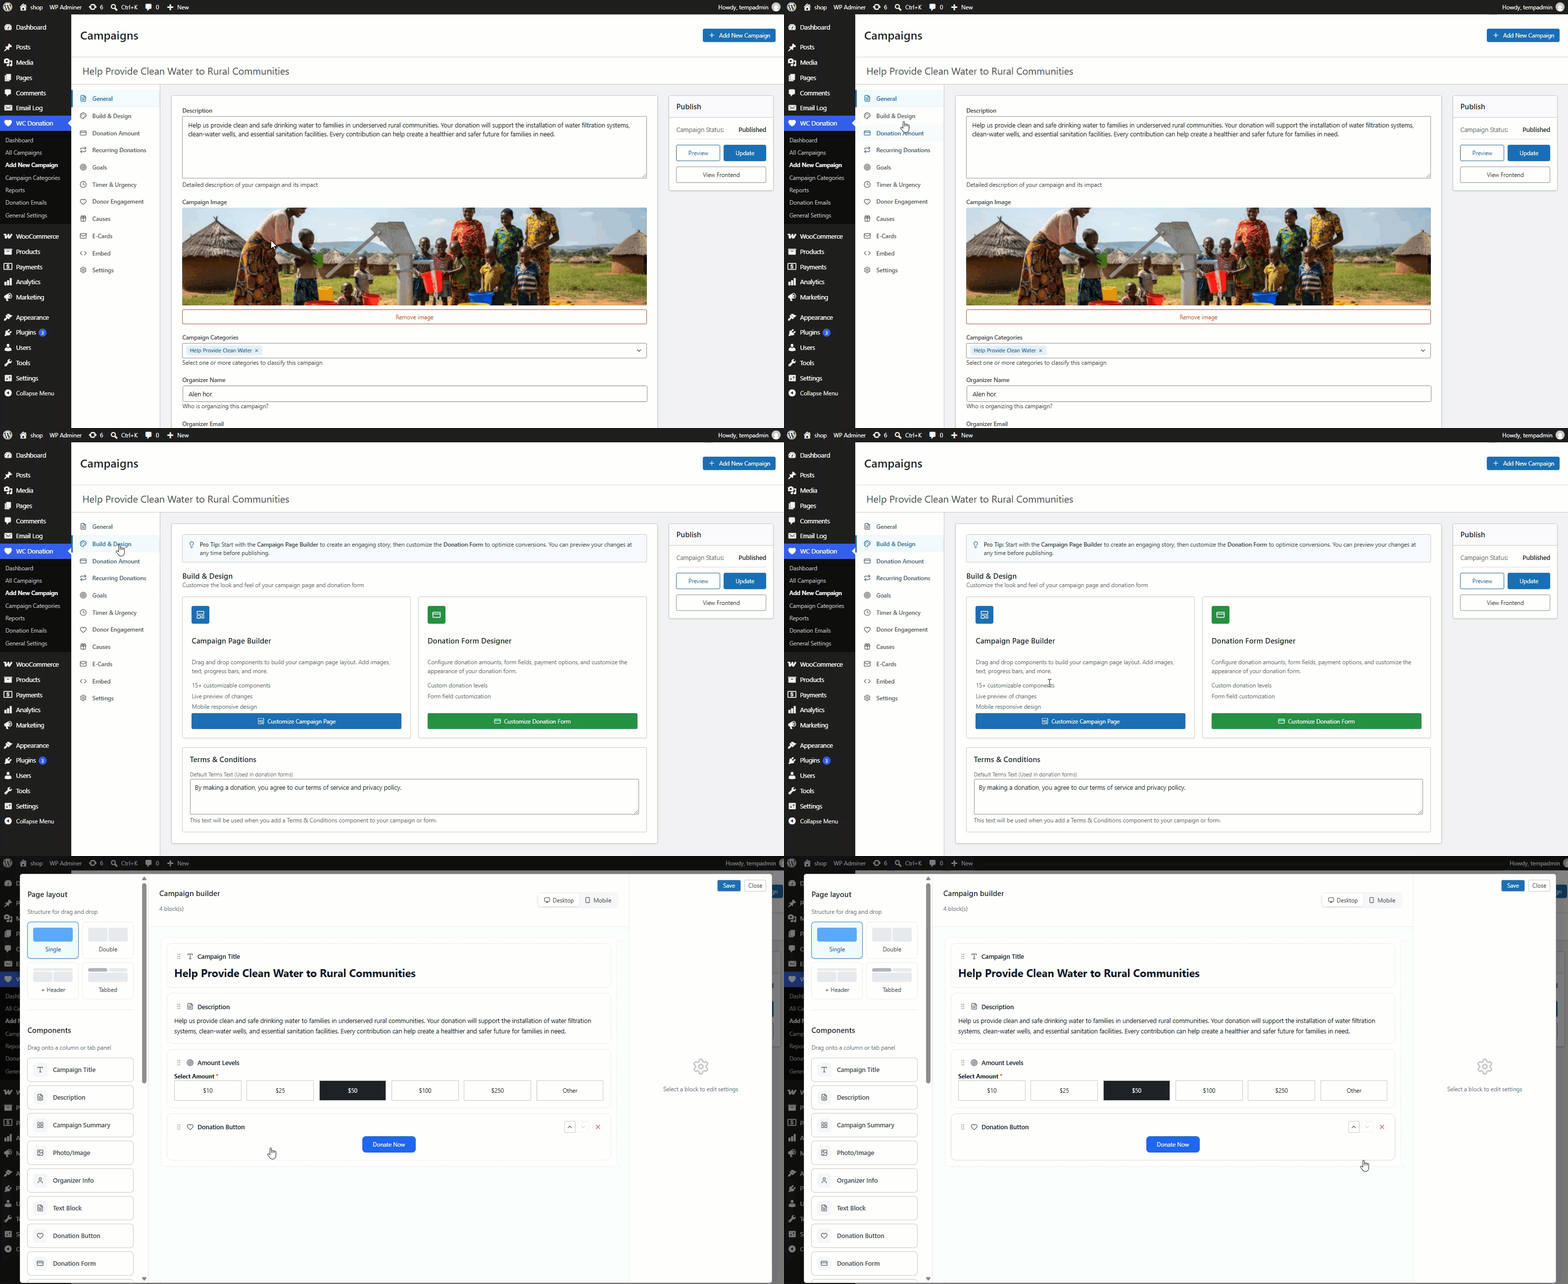
↑ Back to topThe Build & Design tab is the visual heart of the new campaign editor. It contains two connected sub-tools: the Campaign Page Builder, which lays out the public campaign page, and the Donation Form Designer (documented in Section 9), which lays out the donation form itself. A “Donation Form” block placed on the page canvas is the bridge between the two — it renders whatever fields are currently configured in the Donation Form Designer.
Navigation: WordPress Admin Dashboard → WC Donation → Add New Campaign → Build & Design tab → Campaign Page Builder
Feature Description
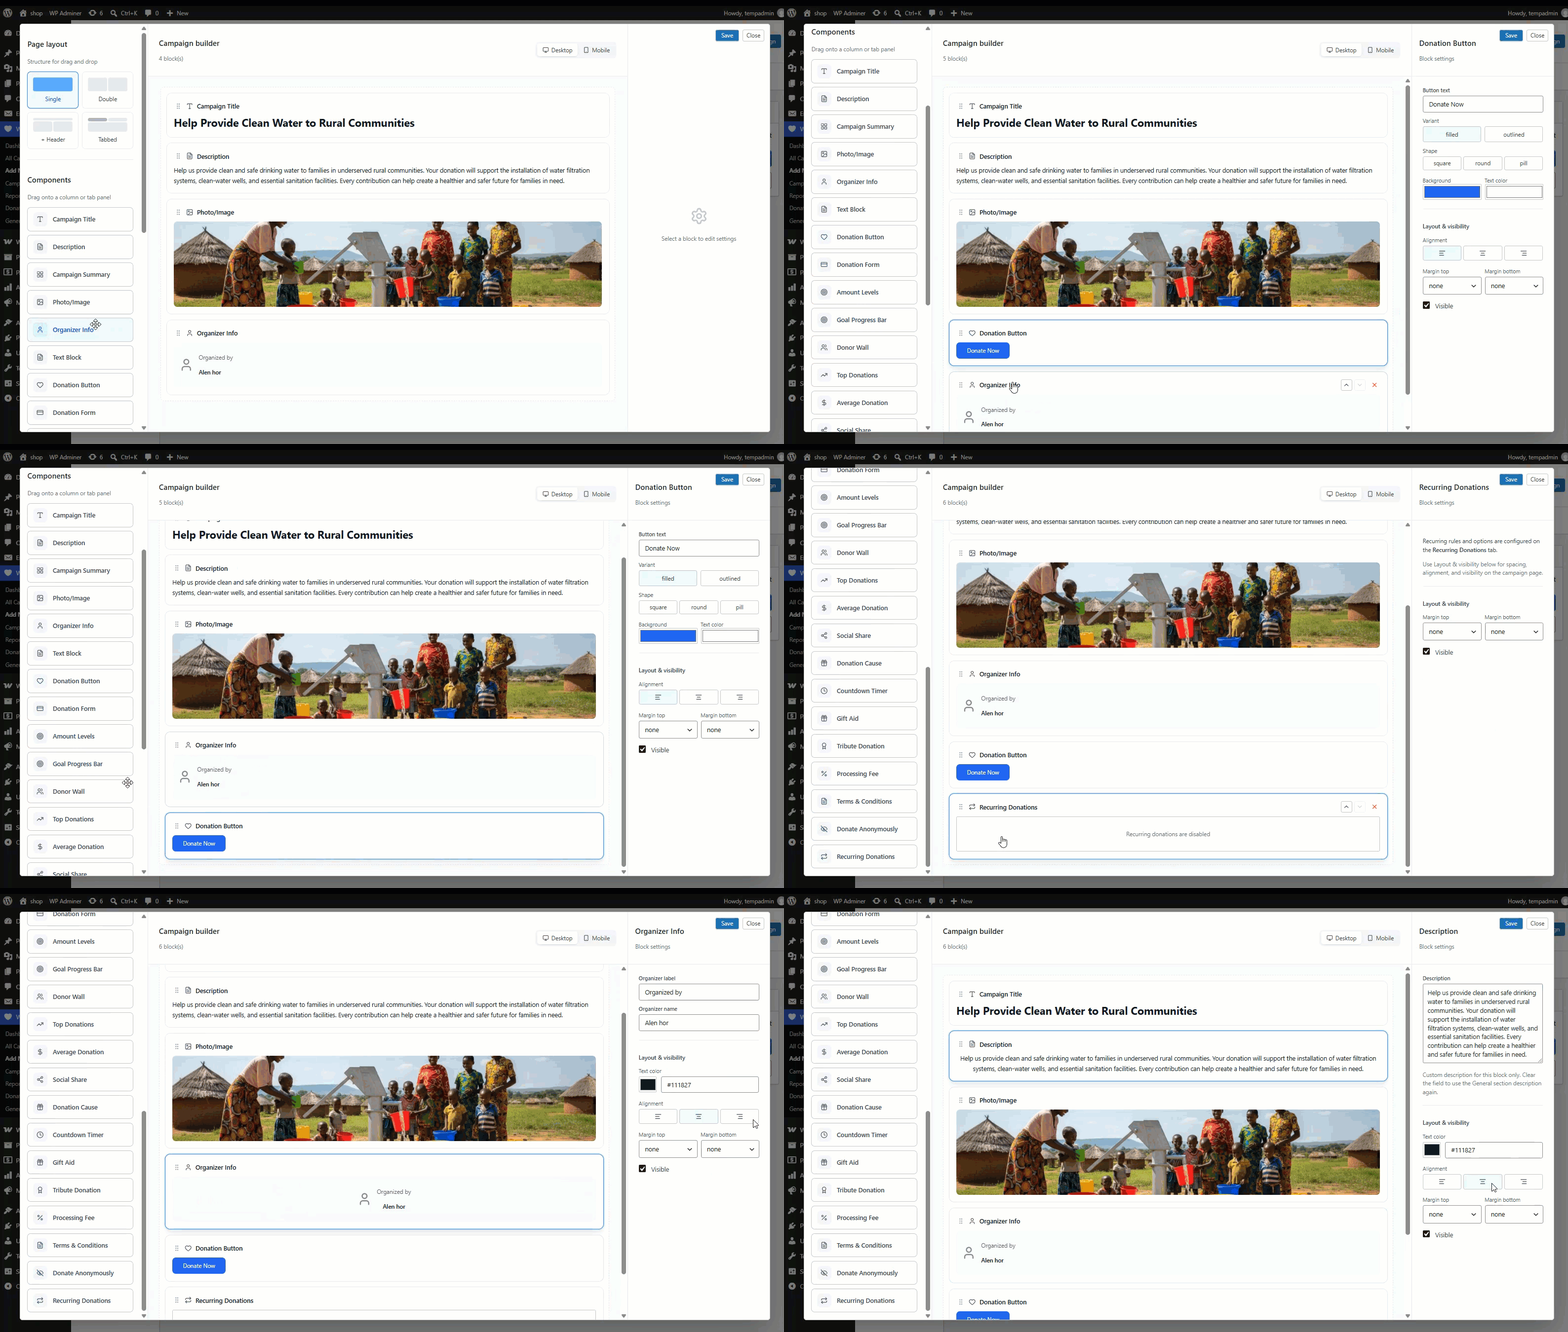
↑ Back to topThe builder is a drag-and-drop canvas. A left-hand sidebar lists every available component; components are dragged onto the canvas, reordered, and removed. A live desktop/mobile preview toggle shows how the page will render at each breakpoint. An empty canvas displays a placeholder card reading “Build Your Campaign Page — Drag components from the left sidebar to design a beautiful, conversion-optimized campaign page”, with three feature callouts: Drag & Drop, Live Preview, Customize.
Page Layout
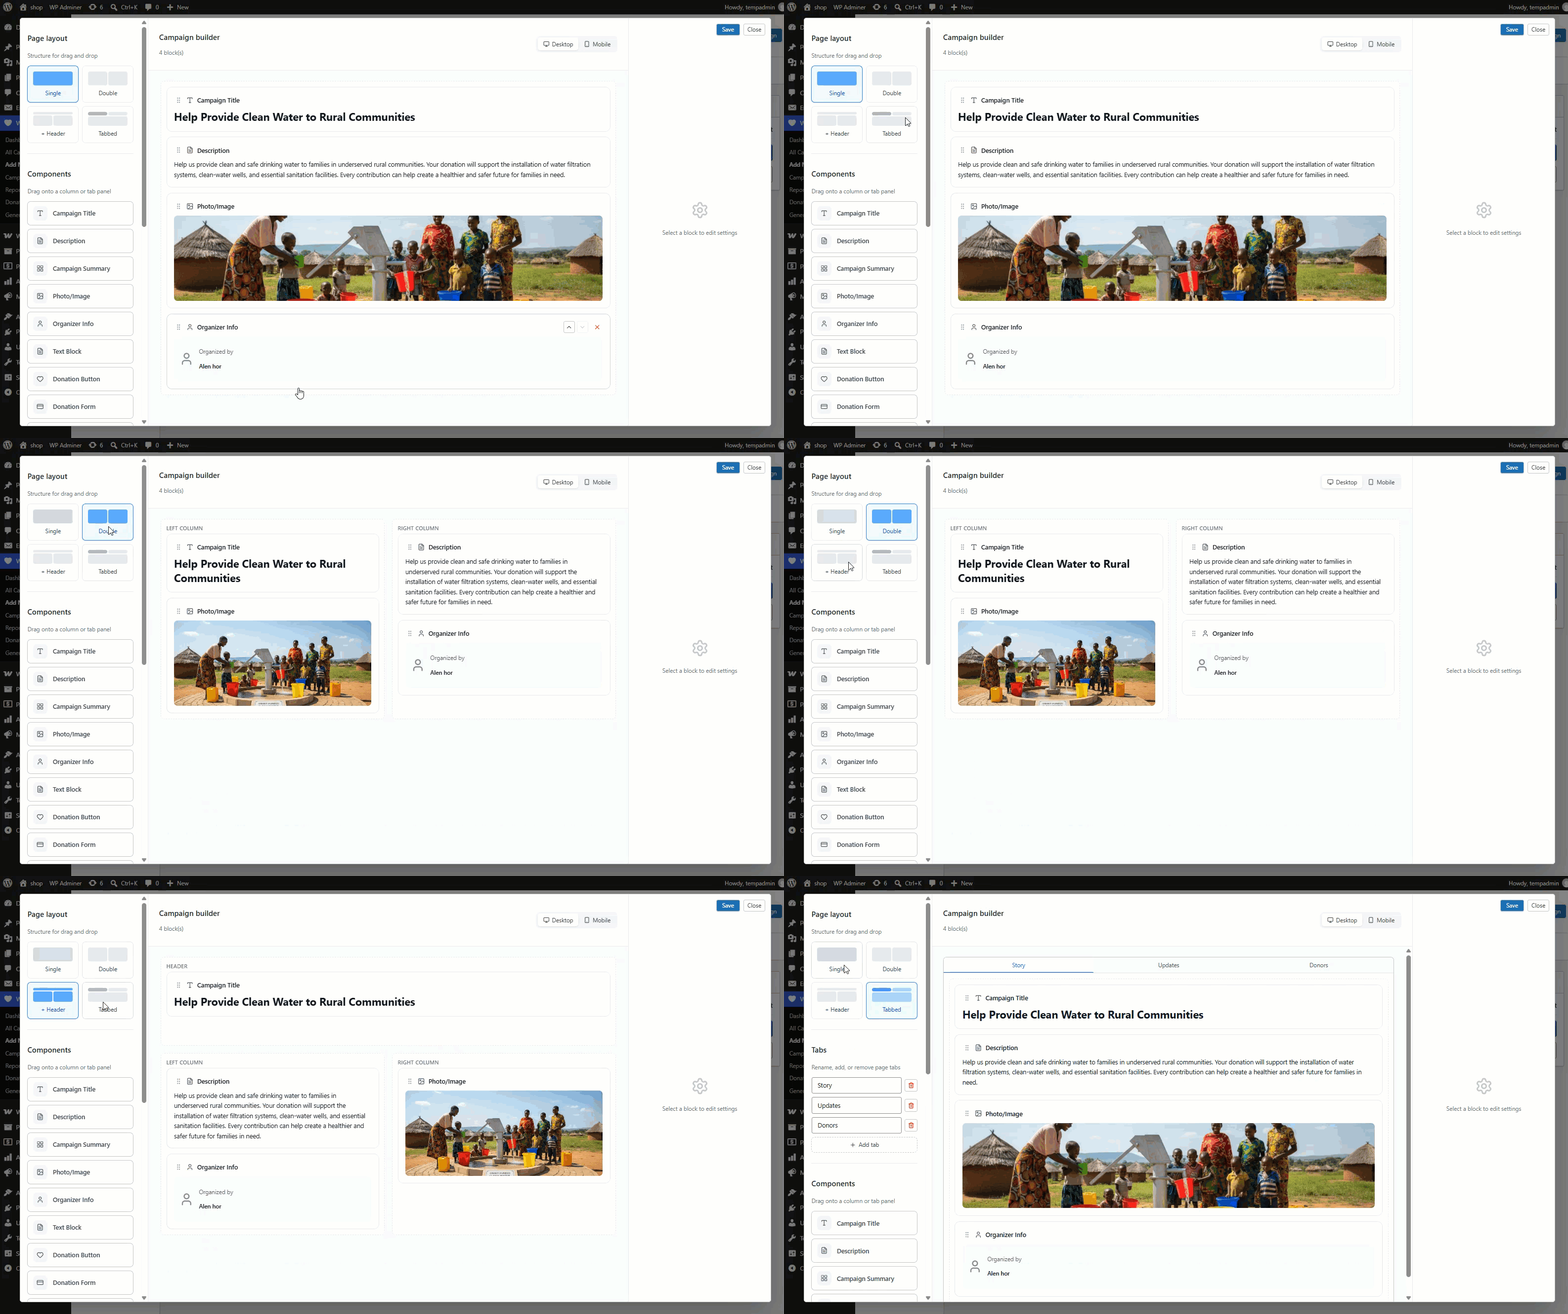
↑ Back to topA “Page layout” control (“Structure for drag and drop”) at the top of the sidebar sets how the canvas is divided into drop regions. Switching layouts automatically re-distributes any components already placed on the canvas so nothing is lost.
| Layout | Behavior |
|---|---|
| Single | One full-width column (region: main). This is the default layout for a new campaign. |
| Double | Two side-by-side columns (regions: left, right). Existing components are redistributed alternately between the two columns. |
| + Header (Double + Header) | A full-width header region on top, with two columns (left, right) beneath it. The first existing component becomes the header; the rest alternate between the two columns below. |
| Tabbed | The canvas is split into named tabs, each with its own independent single-column region. Switching to Tabbed for the first time creates three default tabs — Story, Updates, Donors — and moves existing components into the first tab. |
Managing Tabs (Tabbed layout only)
When the Tabbed layout is active, a “Tabs” panel appears below the layout selector (“Rename, add, or remove page tabs”):
- Each tab has an editable text field for its label.
- A trash icon removes a tab; the control is disabled once only one tab remains, since a Tabbed layout must always have at least one tab.
- An Add tab button appends a new, unnamed tab to the end of the list.
Component Library
↑ Back to topThe full component palette available in the Campaign Page Builder is listed below. Components are dragged from this list onto any drop region on the canvas. A short set of components — Gift Aid, Tribute Donation, Processing Fee, Terms & Conditions, and Donate Anonymously — are single-use: once one instance has been placed anywhere on the canvas, that component is greyed out in the sidebar with an “(In use)” label until the existing instance is removed.
| Component | Purpose |
|---|---|
| Campaign Title | Displays the campaign’s Title. |
| Description | Displays the General tab’s Description text. |
| Campaign Summary | A row of quick stats — Raised, Donors, Days Left — each individually togglable. |
| Photo/Image | Displays the General tab’s Campaign Image, or a custom image chosen for this block. |
| Organizer Info | Displays Organizer Name and Organizer Label (“Organized by”). |
| Text Block | A free-form block of plain text. |
| Donation Button | A standalone call-to-action button (default text “Donate Now”) independent of the form. |
| Donation Form | Renders the fields currently configured in the Donation Form Designer (Section 9). Shows a placeholder prompting the admin to configure the Donation Form Designer if no fields have been added yet. |
| Amount Levels | Displays the predefined/custom amount options configured on the Donation Amount tab. |
| Goal Progress Bar | A live progress bar reflecting the Goals tab’s settings. |
| Donor Wall | A public list of donors, per the Donor Engagement tab’s settings. |
| Top Donations | A leaderboard of the highest individual donations, with its own title, rank-badge, donor-name, and colour settings. |
| Average Donation | Shows the average donation amount and, optionally, total donation count / median donation. |
| Social Share | Share buttons, per the Donor Engagement tab’s enabled platforms. |
| Donation Cause | A cause-selection control, per the Causes tab. |
| Countdown Timer | A live countdown, kept in sync with the Timer & Urgency tab (see below). |
| Gift Aid | The UK Gift Aid opt-in checkbox and explanation text (single-use). |
| Tribute Donation | The “in honor/memory of” tribute opt-in and message field (single-use). |
| Processing Fee | The “cover the processing fee” opt-in checkbox (single-use). |
| Terms & Conditions | The terms opt-in checkbox and link (single-use). |
| Donate Anonymously | The “donate anonymously” opt-in checkbox (single-use). |
| Recurring Donations | A read-only indicator; actual recurring behavior is configured on the Recurring Donations tab. |
Working with components
↑ Back to top| Action | Behavior |
|---|---|
| Add | Drag a component from the sidebar onto any region of the canvas. It is inserted at the drop position. |
| Reorder | Drag a placed component up or down within its region, or across regions/tabs; the layout re-flows live as you drag. |
| Edit | Select a component on the canvas to open its settings panel. Every component exposes a shared “Common” group — Text Color, Alignment, Margin Top, Margin Bottom, and a Visible toggle — in addition to settings specific to that component type (for example, Top Donations exposes “Show total donations count” and “Show median donations” checkboxes and its own color pickers). |
| Delete | Remove a component from the canvas using its delete control; single-use components become available in the sidebar again once removed. |
Preview & Responsive Behavior
↑ Back to topA Desktop / Mobile toggle above the canvas switches the live preview between breakpoints so layout and spacing can be checked on both before publishing.
Dependencies / Validation
↑ Back to top- The Countdown Timer block is not an independent set of settings — its rules are shared live with the Timer & Urgency tab; a note directly under the block’s settings states: “Timer rules are shared with the Timer tab. Changes here or there stay in sync.”
- The Goal Progress Bar block shows “Goal is disabled for this campaign.” if the Goals tab has not enabled a goal, and shows a note that the live percentage preview only applies to the Amount Raised goal type when a non-amount goal type is selected.
- The Donor Wall and Social Share blocks each display a disabled notice (“Donor Wall is disabled in Donor Engagement.” / “Social Share is disabled in Donor Engagement.”) if the corresponding toggle on the Donor Engagement tab is off.
Donation Form Designer
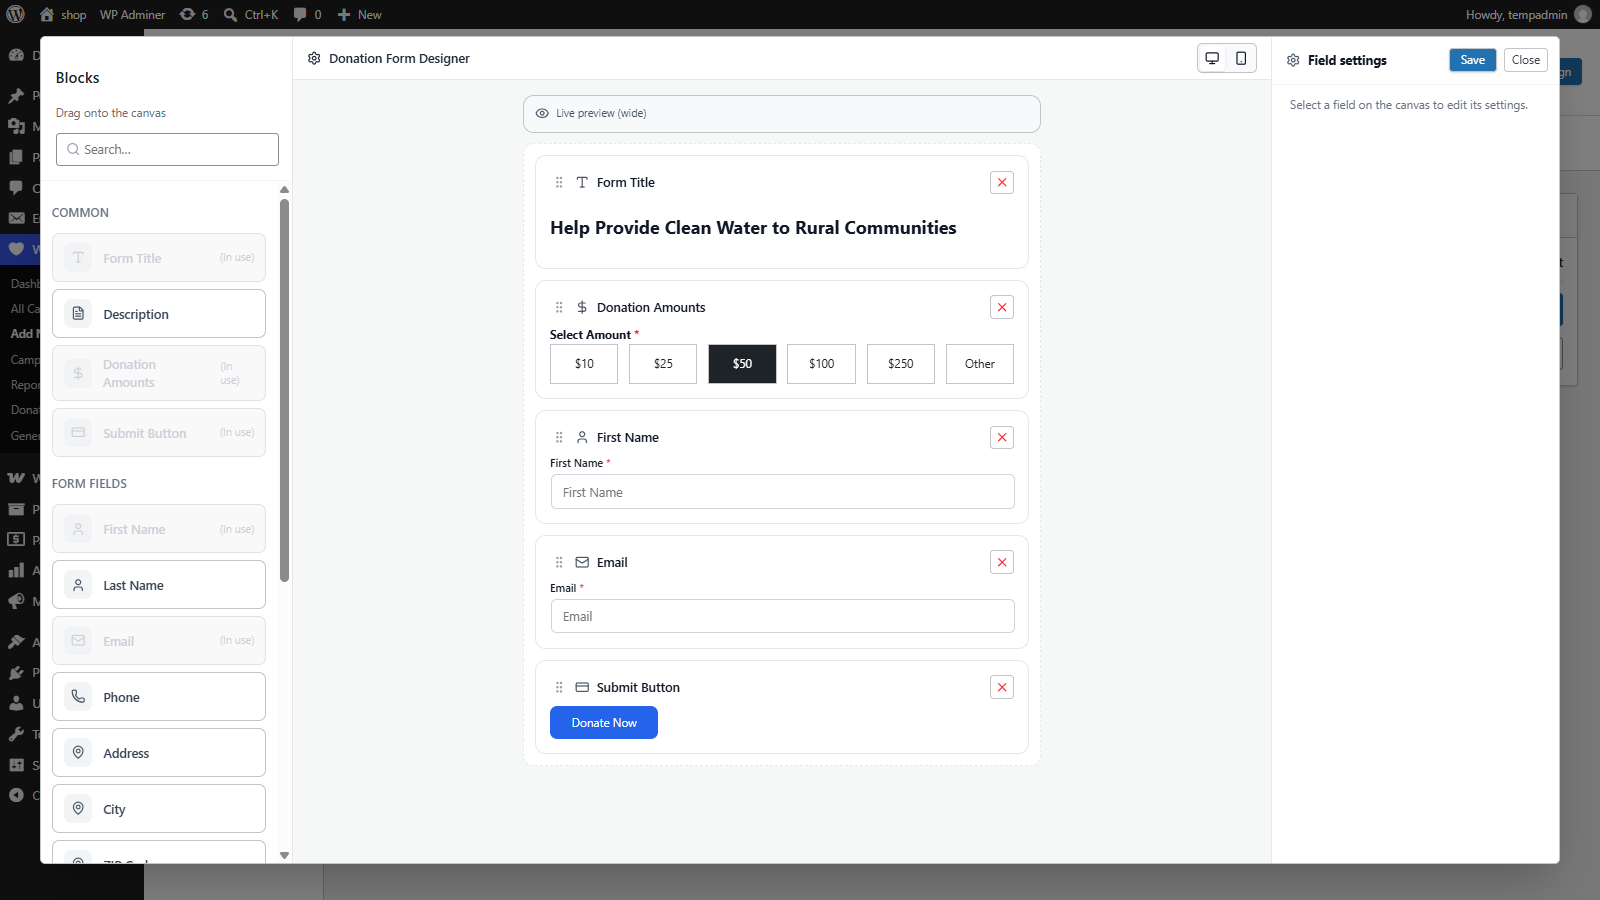
↑ Back to topThe Donation Form Designer is a second, dedicated drag-and-drop canvas — reached from inside the Build & Design tab — used to design the fields of the actual donation form (as opposed to the surrounding campaign page). Its output is what a “Donation Form” component displays when placed in the Campaign Page Builder.
Navigation: WordPress Admin Dashboard → WC Donation → Add New Campaign → Build & Design tab → Donation Form Designer
Feature Description
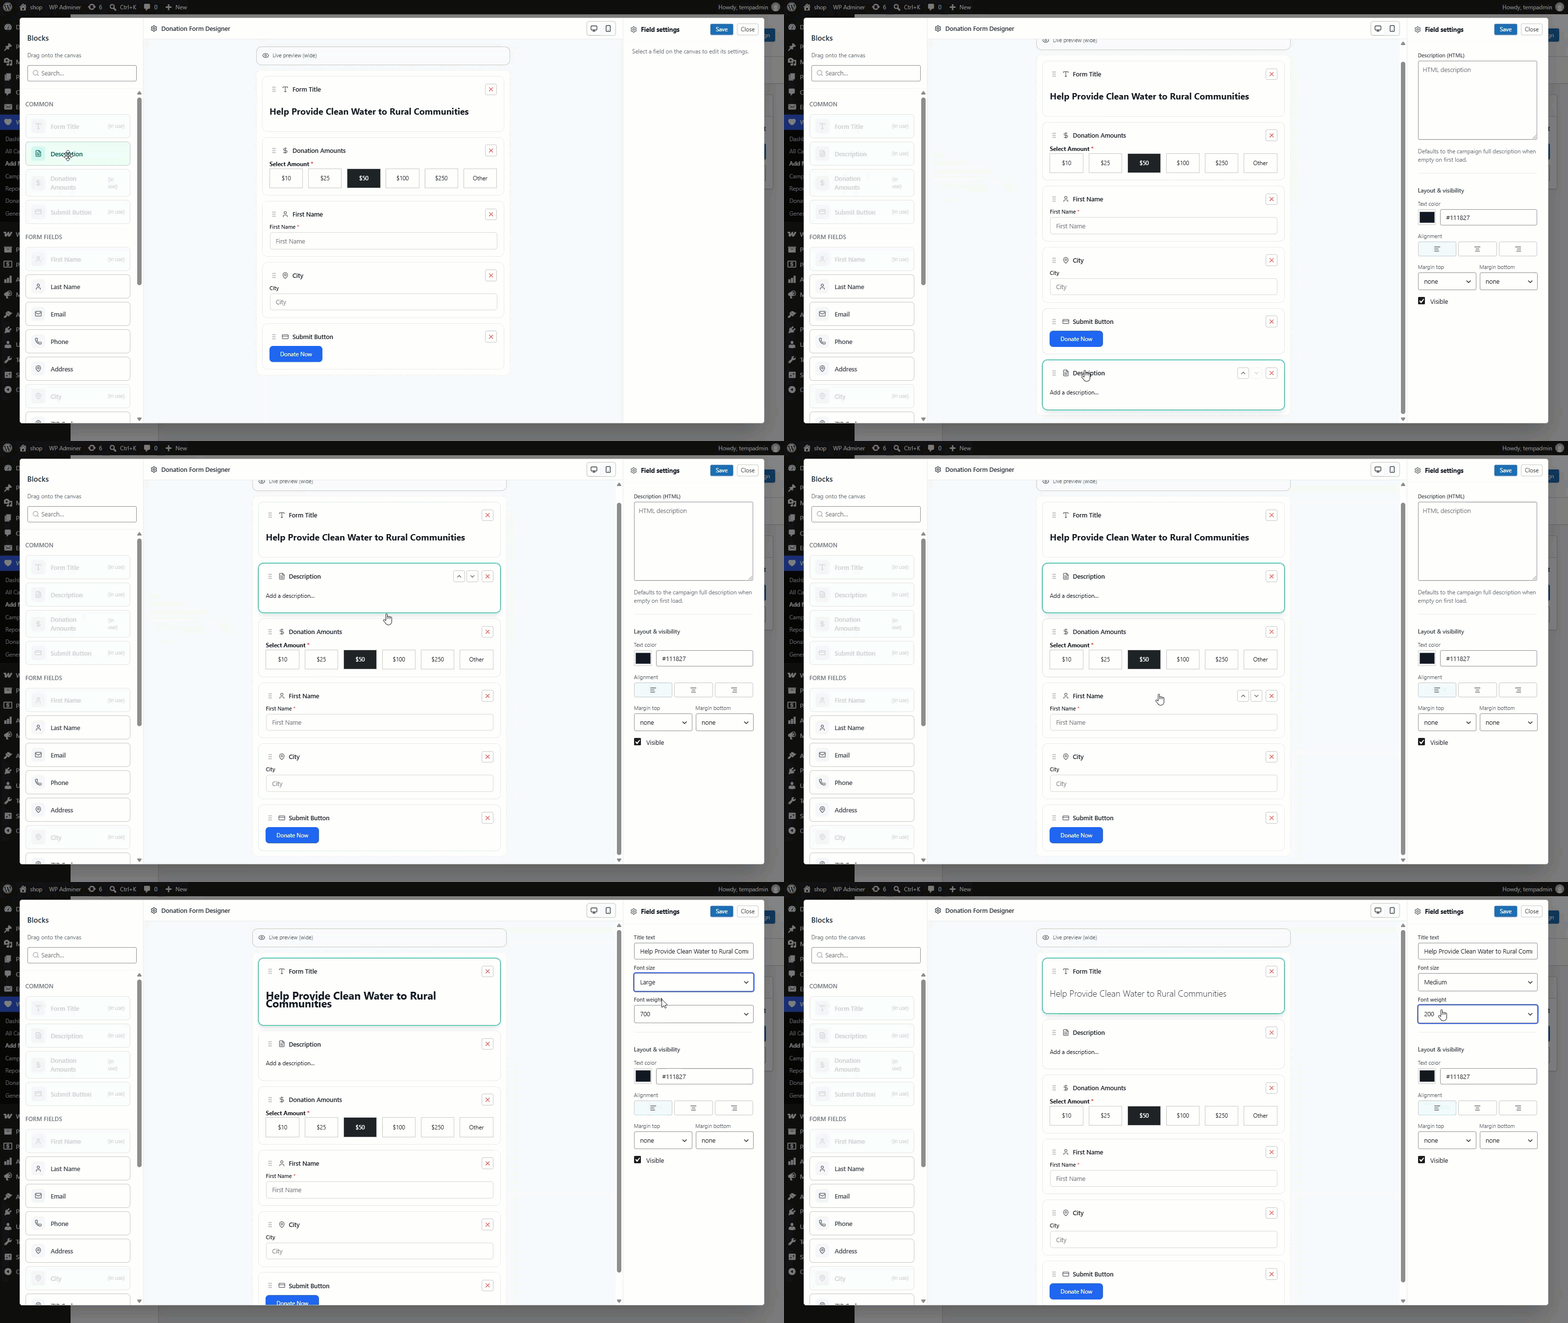
↑ Back to topLike the Page Builder, the Form Designer works by dragging elements from a palette onto a canvas, then configuring each one individually. Its palette is a shorter, form-specific list of 18 element types:
| Element | Purpose |
|---|---|
| Form Title | The heading shown at the top of the donation form. Configurable font size and font weight. |
| Description | A short block of descriptive text within the form. |
| Donation Amounts | The amount-selection control, sourced from the Donation Amount tab (Section 10). |
| Donate Button | The form’s submit/call-to-action button. |
| First Name | Donor first-name text field. |
| Last Name | Donor last-name text field. |
| Donor email text field. | |
| Phone | Donor phone-number text field. |
| Address | Donor street-address text field. |
| City | Donor city text field. |
| ZIP | Donor postal/ZIP code text field. |
| Message | An optional free-text message field for the donor. |
| Recurring | The recurring-donation opt-in, reflecting the Recurring Donations tab (single-use). |
| Anonymous | The “donate anonymously” opt-in checkbox (single-use). |
| Gift Aid | The UK Gift Aid opt-in and explanation (single-use). |
| Tribute | The tribute-donation opt-in and message field (single-use). |
| Processing fee | The “cover the processing fee” opt-in checkbox (single-use). |
| Terms | The terms-and-conditions opt-in checkbox and link (single-use). |
Same Page vs. Modal Popup Placement
↑ Back to topThe “Donation Form” component placed on the campaign page (Section 8) has its own Form Display Type setting, controlling how the designed form is presented to the donor:
| Setting | Description |
|---|---|
| Same Page | The default. The donation form is shown inline, in the position where the Donation Form block was placed on the campaign page. |
| Modal Popup | The donation form opens in an overlay/modal instead of being shown inline. |
A companion Form Width setting controls the rendered width of the form panel:
| Option | Rendered width |
|---|---|
| Small | 400px |
| Medium | 600px (default) |
| Large | 800px |
| Full width | Fills the available container width |
A Background Color setting is also available for the form panel.
Donation Amount
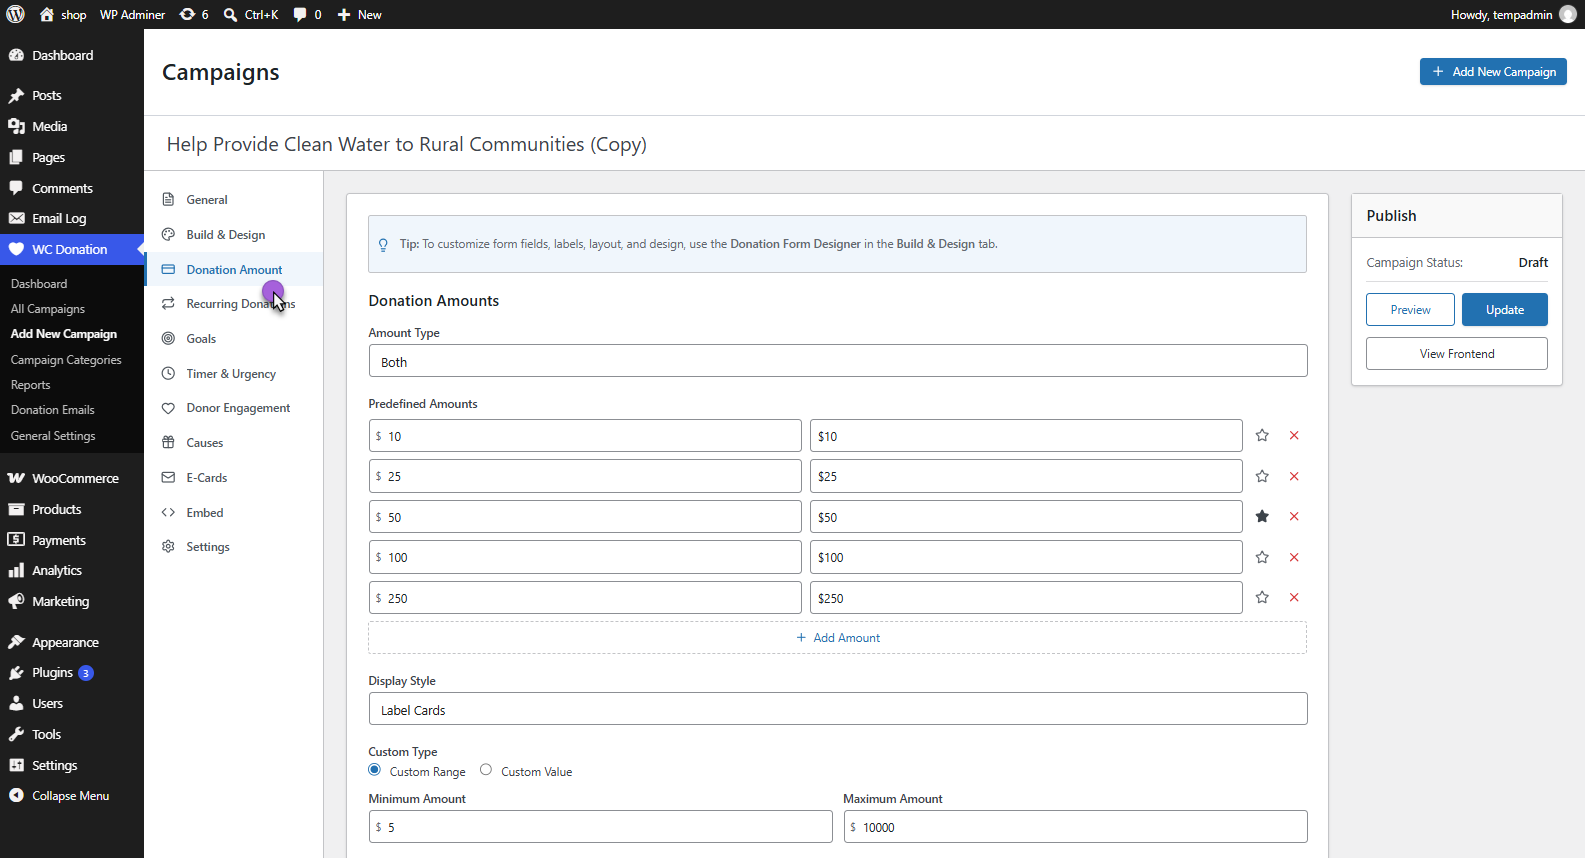
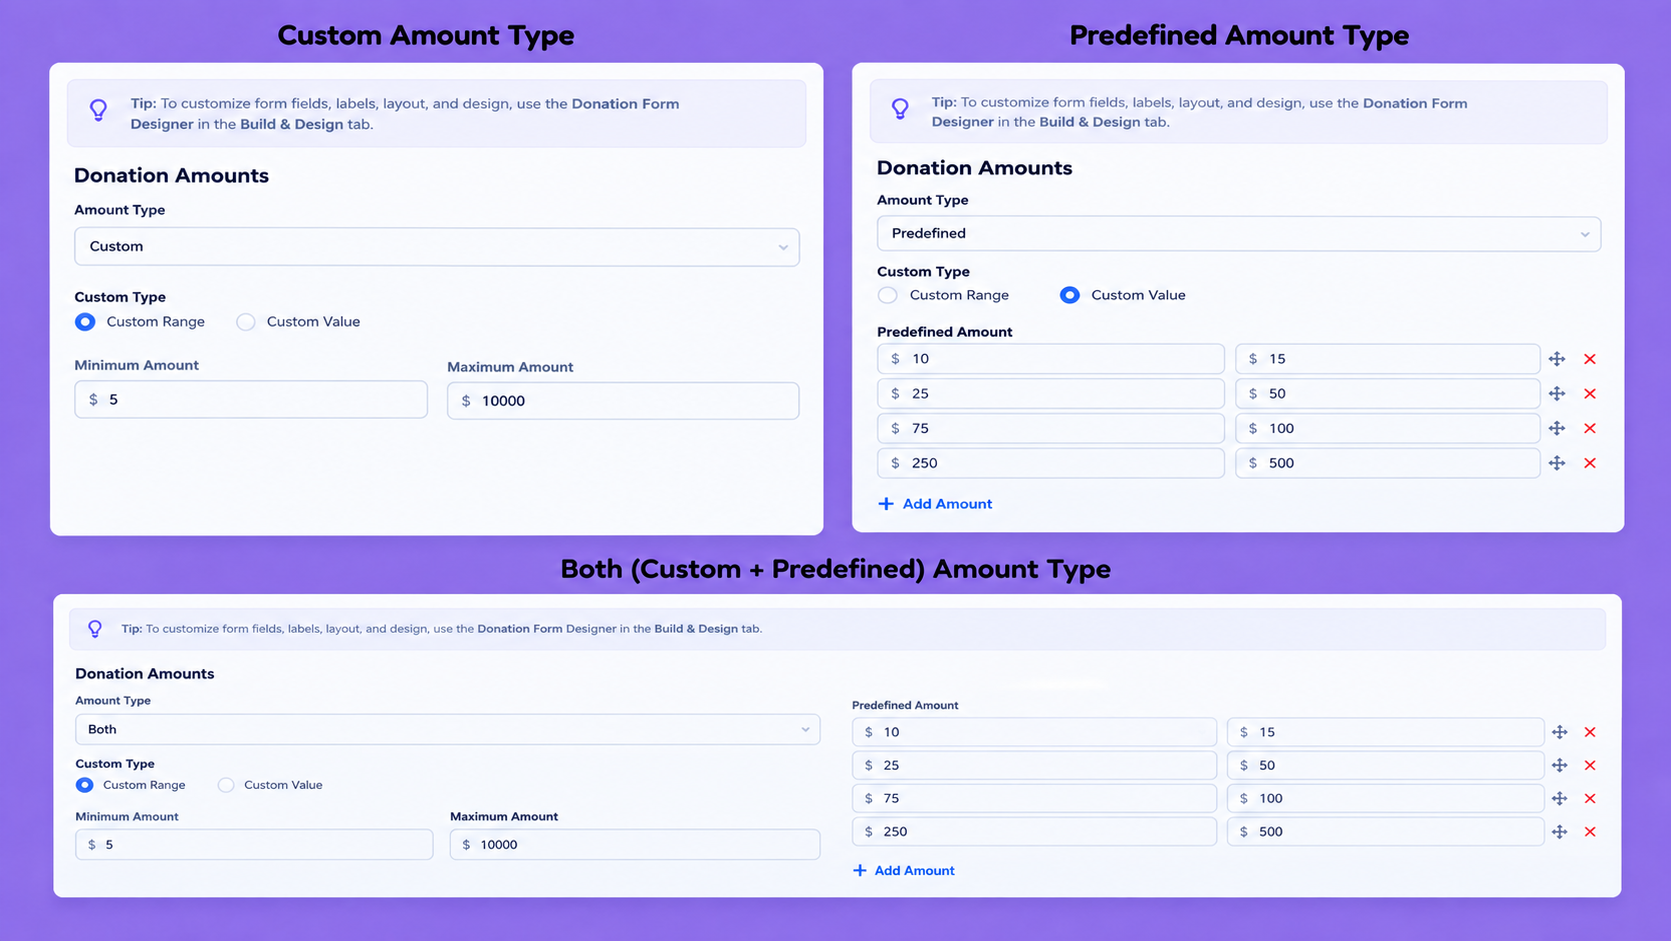
↑ Back to topThe Donation Amount tab (labelled “Donation Amount” in the sidebar; internally the “donation-form” section) controls how much a donor can give and how those choices are presented. A tip banner at the top of the tab reminds the admin: “To customize form fields, labels, layout, and design, use the Donation Form Designer in the Build & Design tab” — this tab only controls the amount of logic, not the surrounding form fields.
Navigation
↑ Back to topNavigation: WordPress Admin Dashboard → WC Donation → Add New Campaign → Donation Amount tab
Configuration
↑ Back to topAmount Type
| Option | Behavior |
|---|---|
| Both | Offers both predefined tiers and a custom/free-entry amount (default). |
| Predefined | Only the fixed amount tiers below are offered. |
| Custom | Only a free-entry amount is offered. |
Predefined Amounts (shown for Predefined or Both)
| Setting | Description |
|---|---|
| Amount rows | Each row has an Amount and a Label. Rows can be added (“Add Amount”), reordered, marked as the Default pre-selected option (star icon), or removed (trash icon). |
| Display Style | How the tiers are rendered to the donor: Label Cards, Radio Buttons, or Dropdown. |
Currency Settings
| Setting | Description |
|---|---|
| Currency Position | Before the amount (e.g. $100) or After the amount (e.g. 100$). |
| Currency Background / Currency Symbol Color | Color pickers controlling how the currency symbol is styled next to the amount fields. |
Recurring Donations
↑ Back to topEnables advanced recurring donation functionality using WooCommerce Subscriptions for better subscription management and control.
- Download and install the WooCommerce Subscriptions.
- Follow the WooCommerce Subscriptions documentation to set up and configure the plugin.
- Go to WordPress Admin Dashboard > WC Donation > All Campaigns > Edit Campaign.
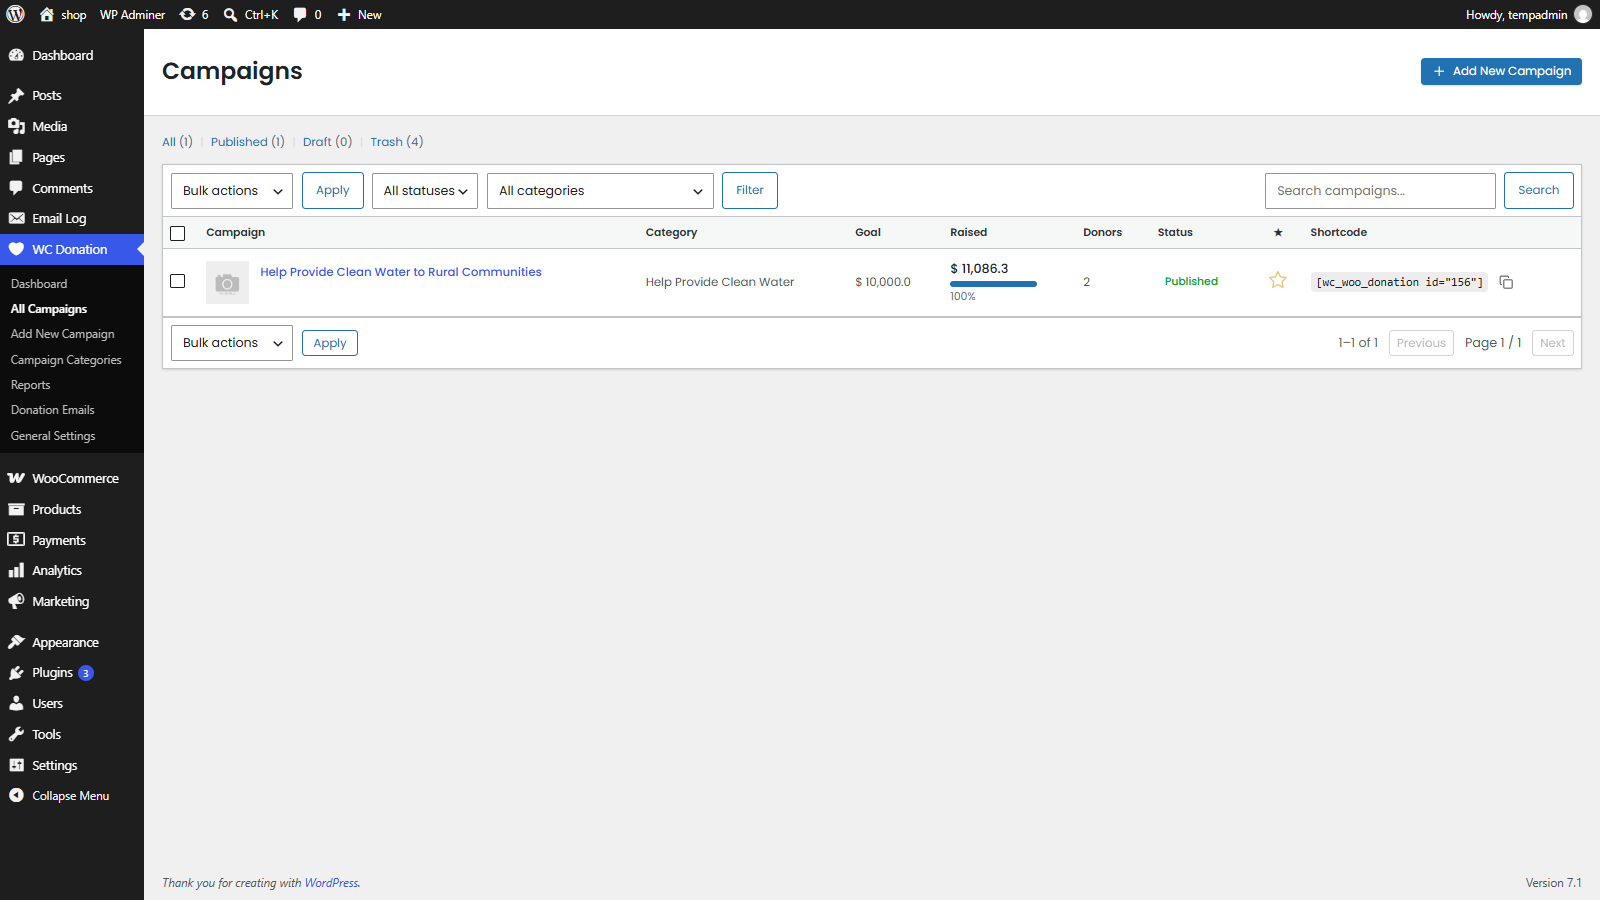
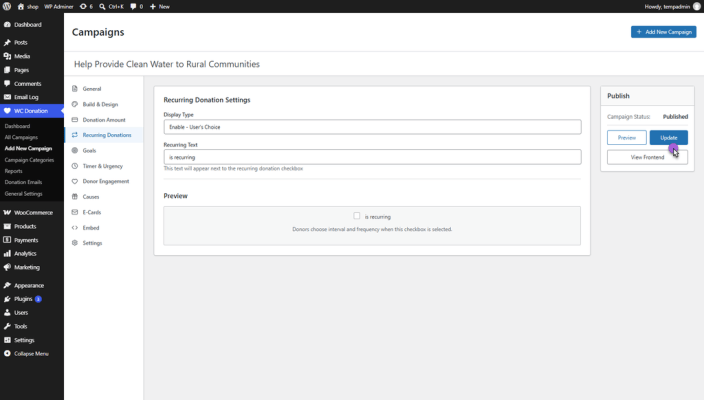
- On the Edit Campaign screen, click on the Recurring Donations option.
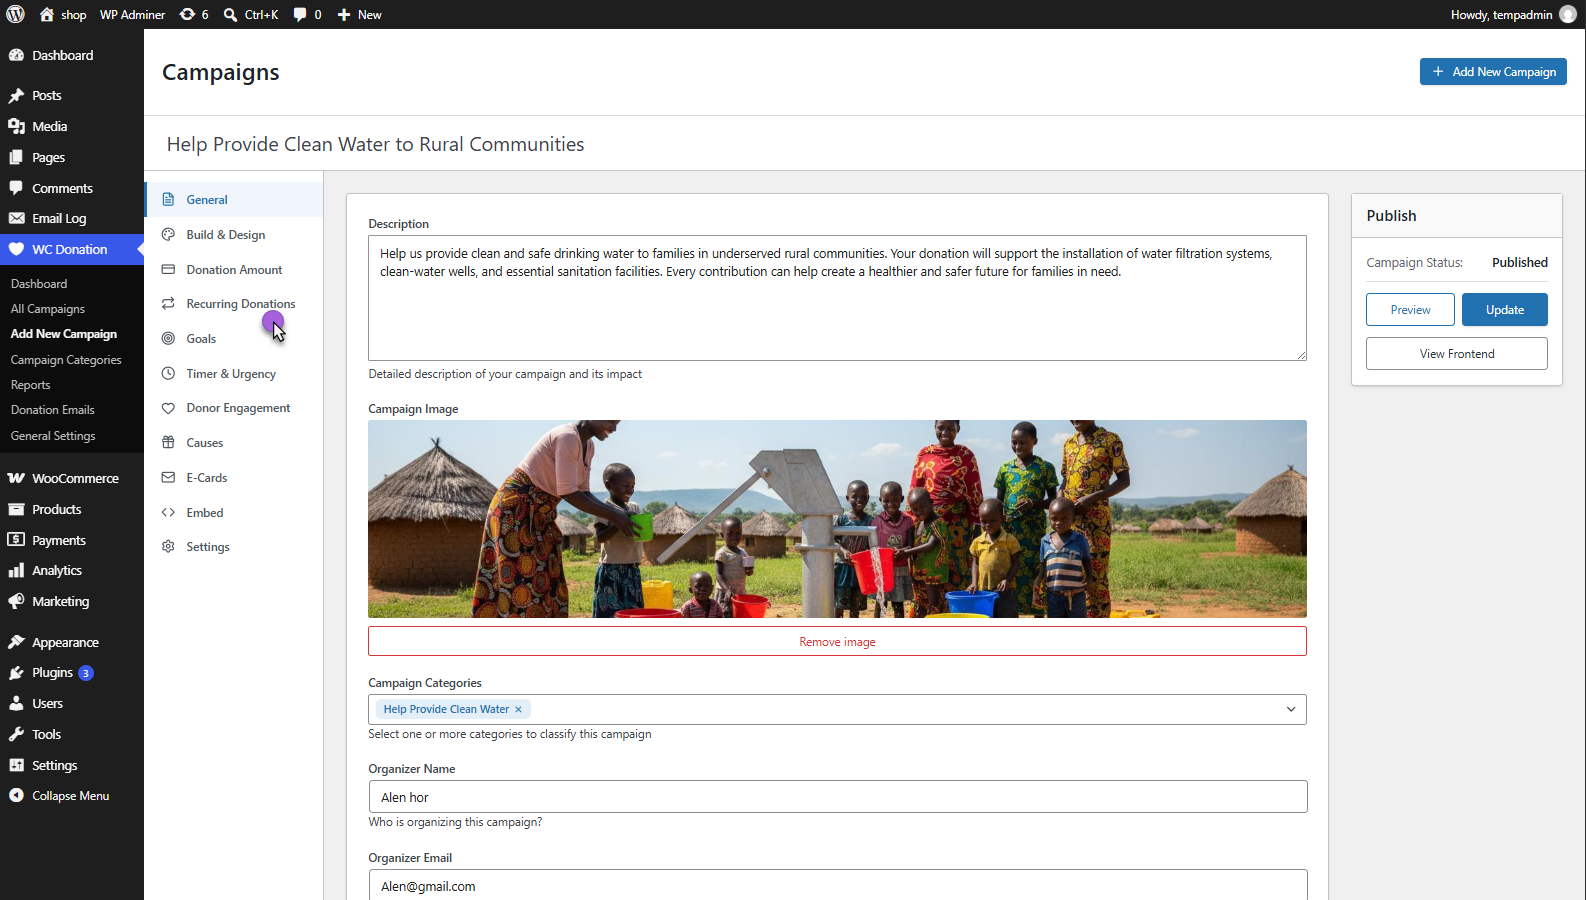
- In the Display Type dropdown, select Enable User Choice.
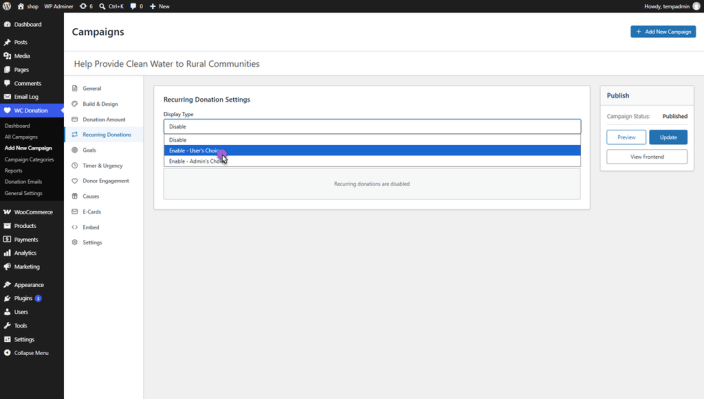
- Click the Update button to save changes.
Front End Impact
- Login to your account.
- Navigate to the Donation Single Product Page.
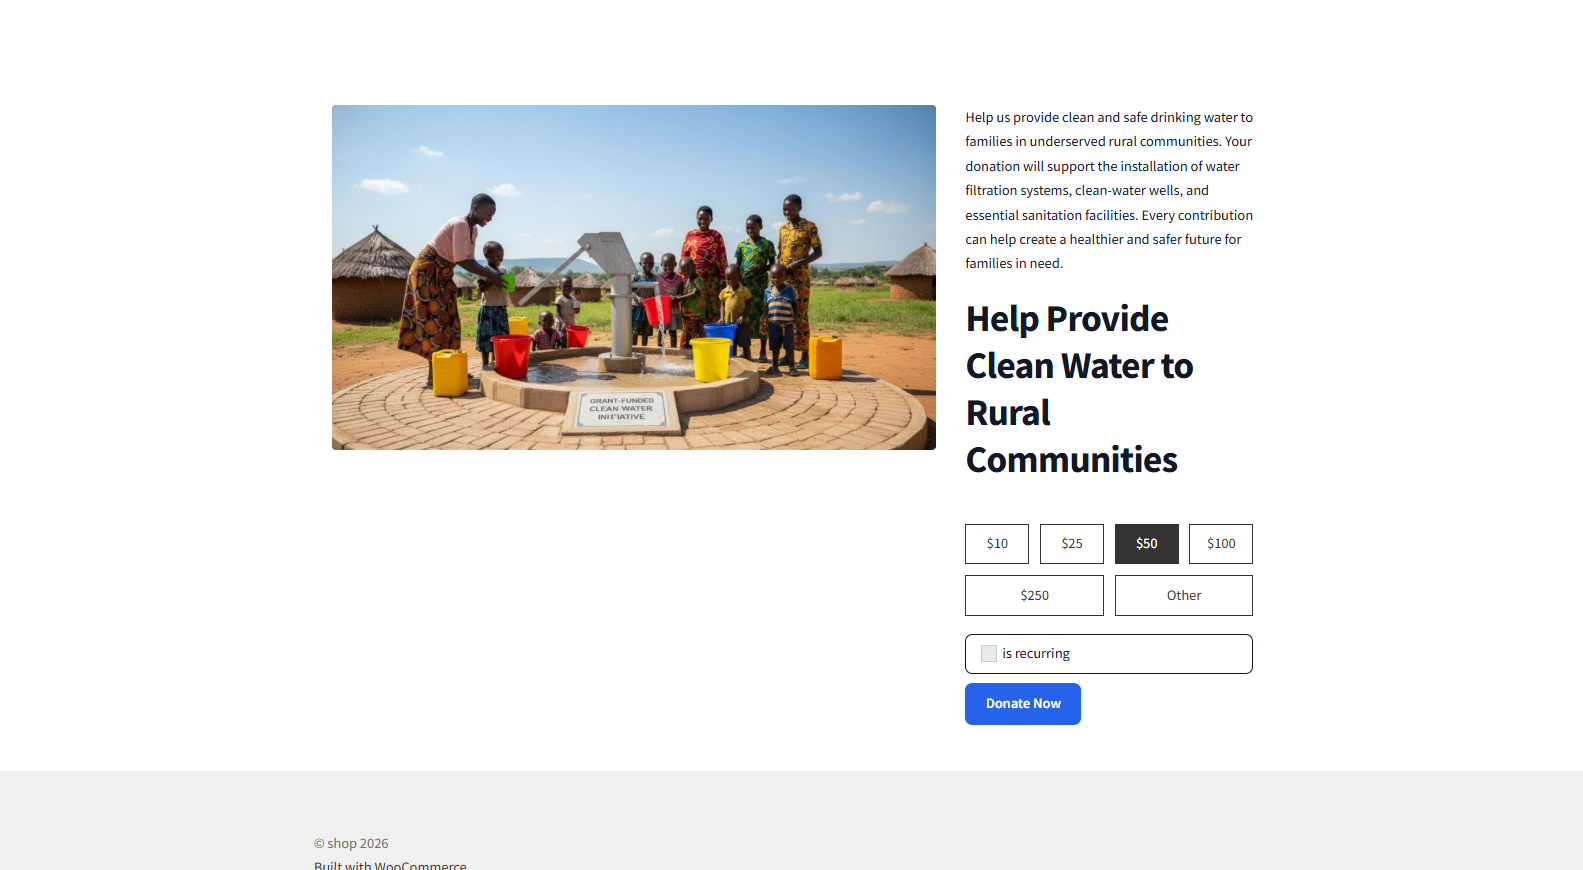
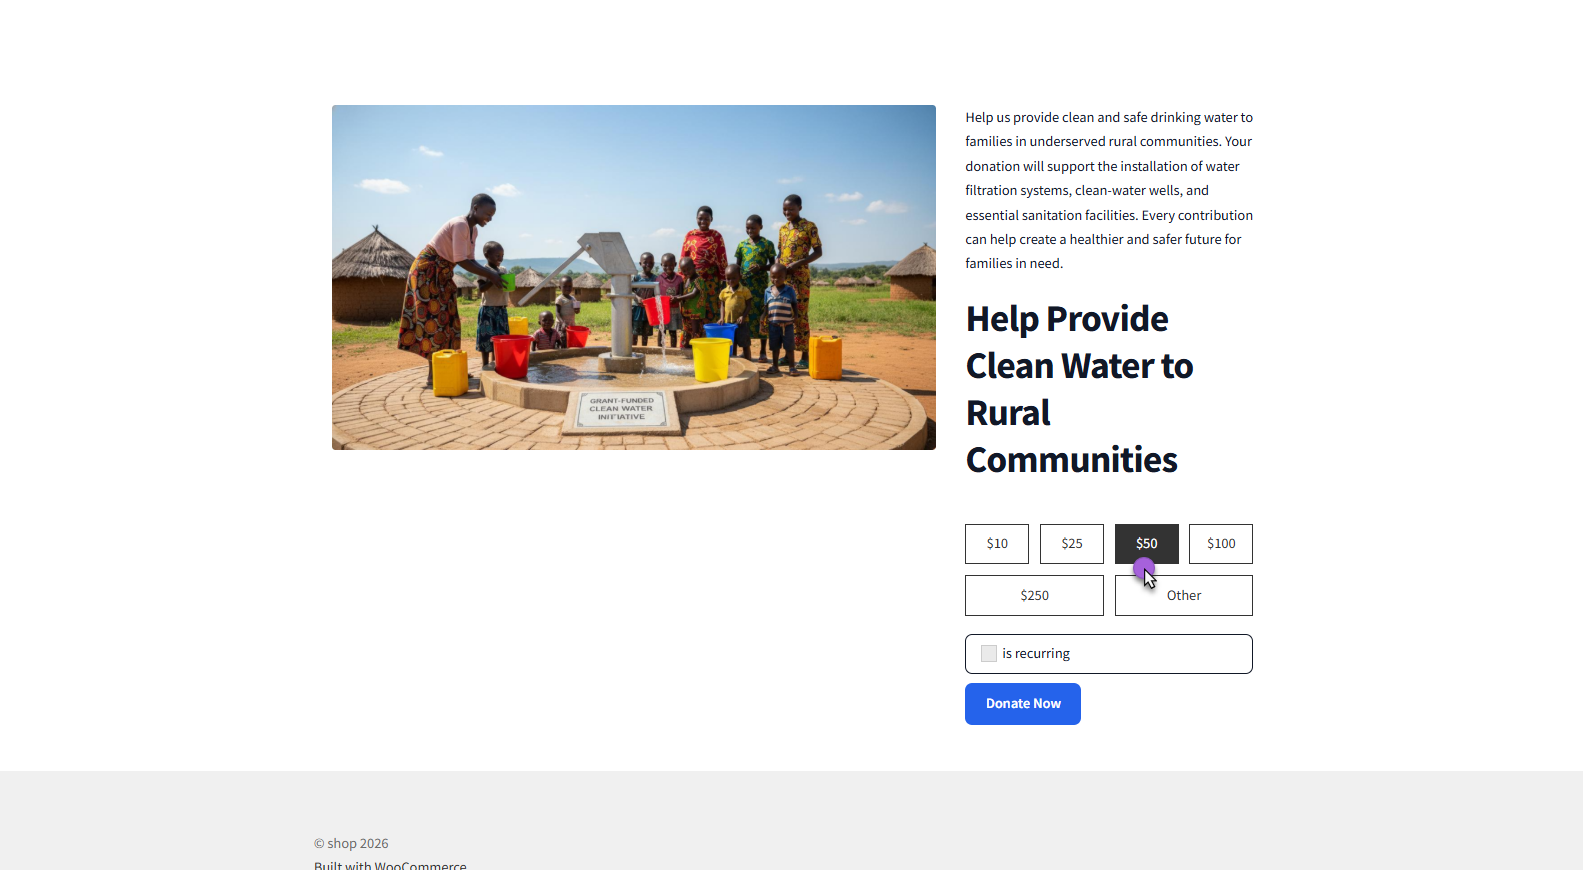
- Select the Donation Amount.
- Check the Is Recurring option.
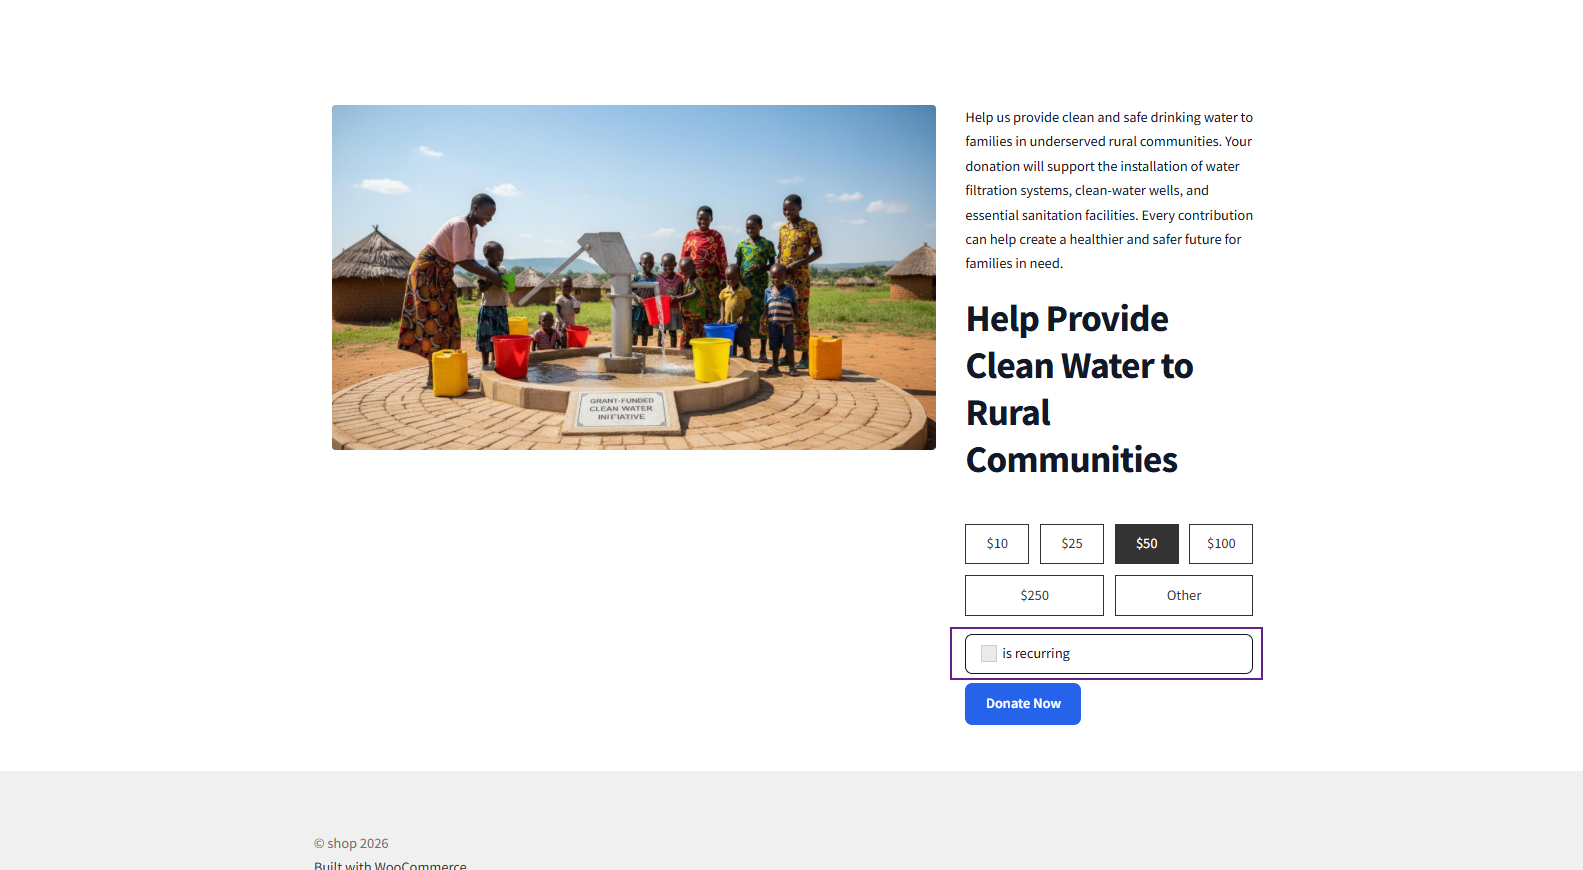
- When the Is Recurring option is checked, the interval selection for recurring donations will appear.
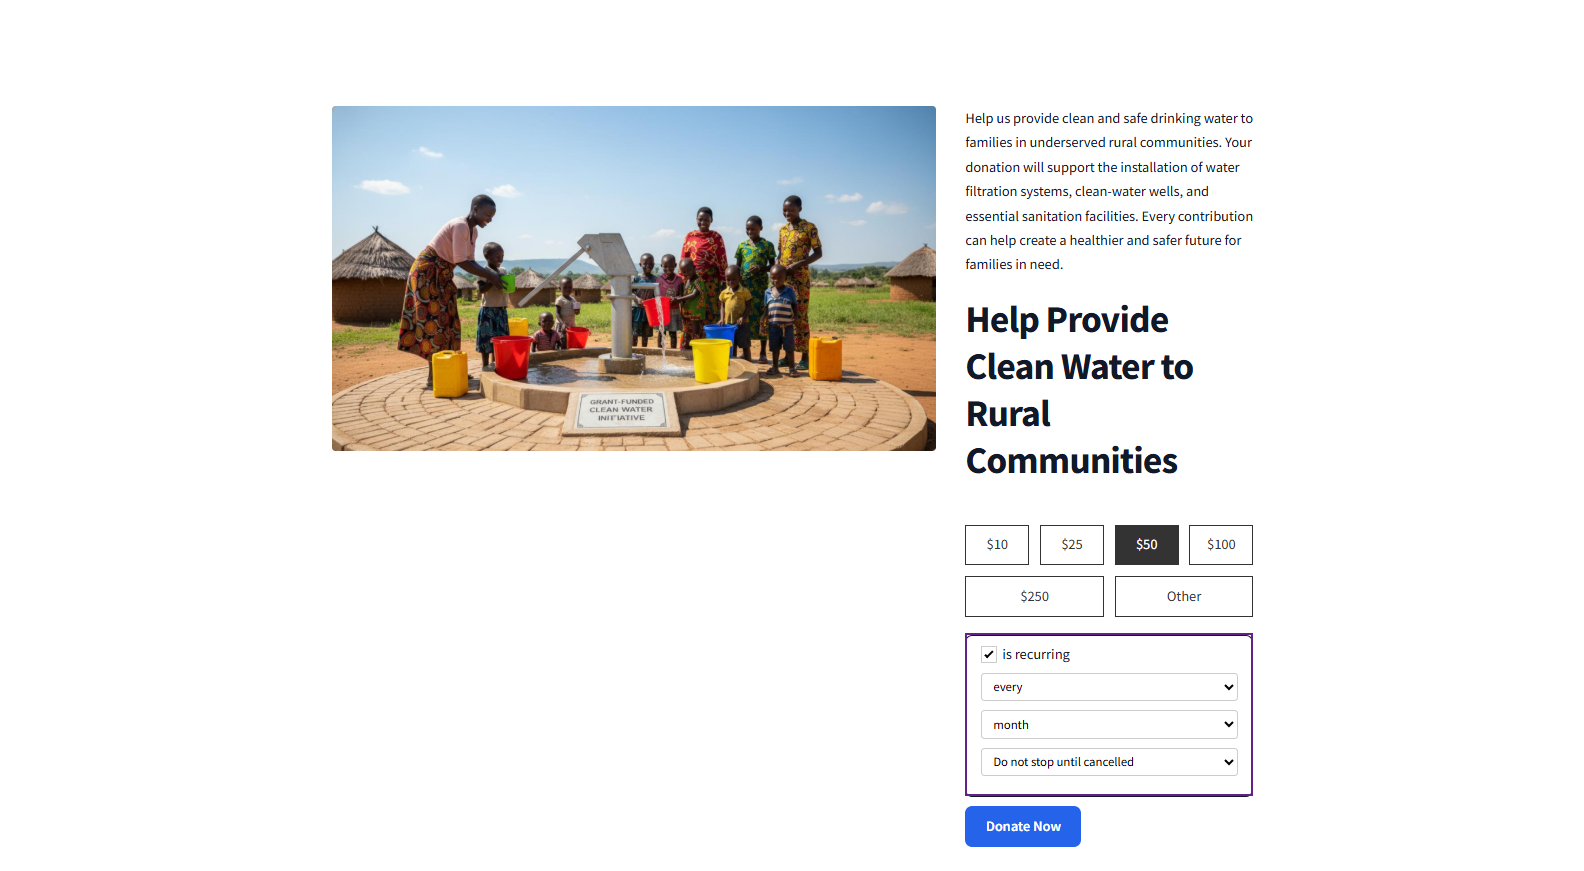
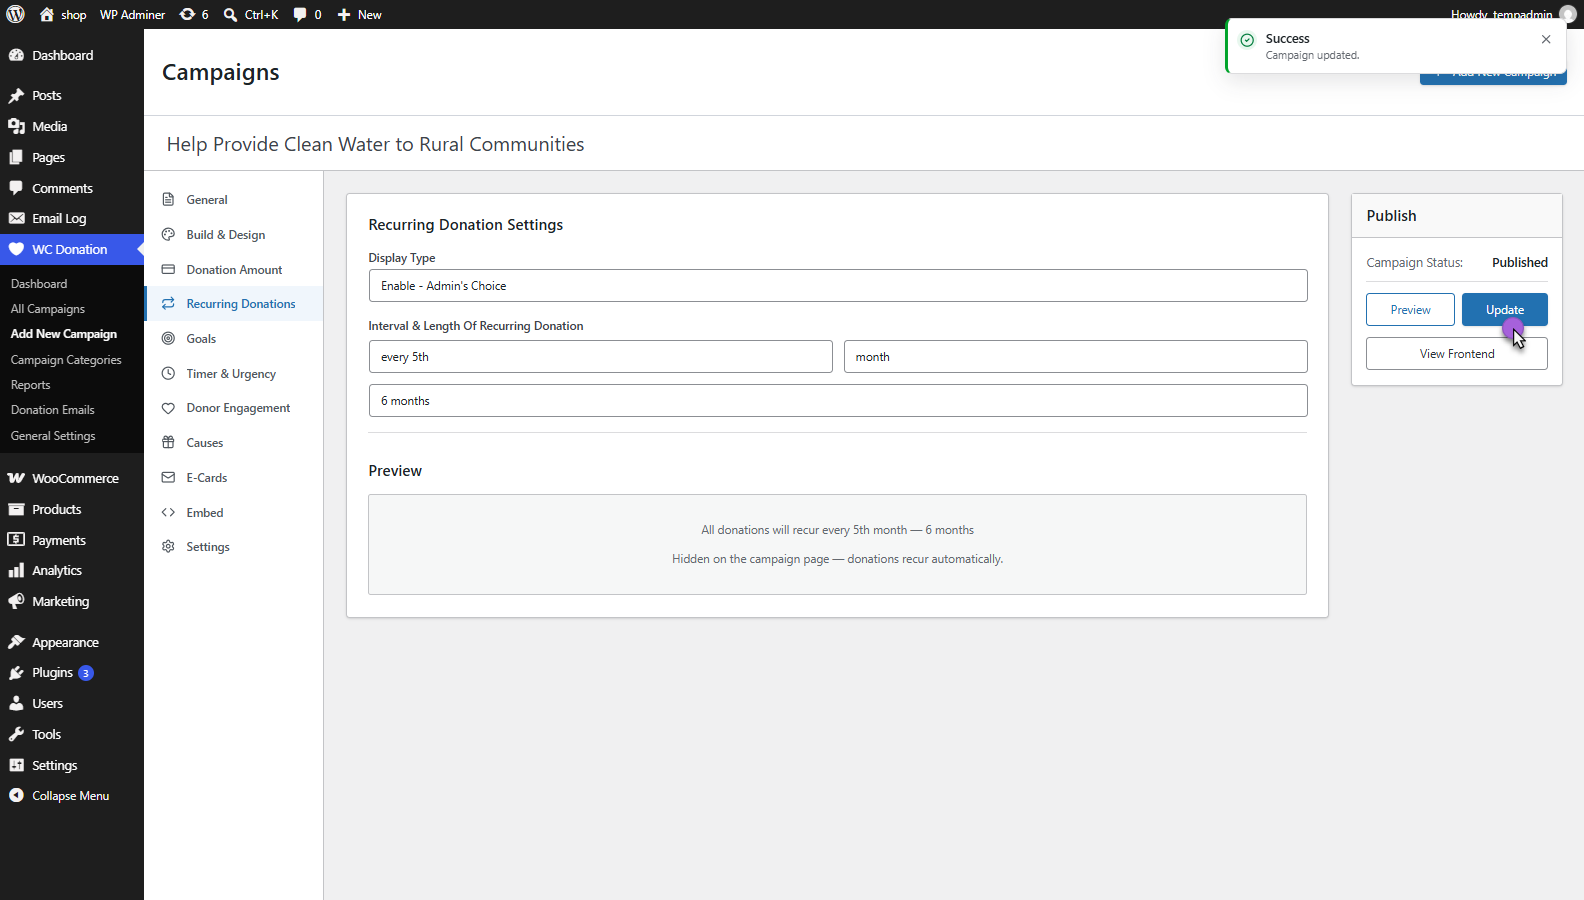
Enable – Admin’s Choice
- Select the Enable – Admin’s Choice option from the Display Type. This will allow the admin to configure recurring Donation settings.
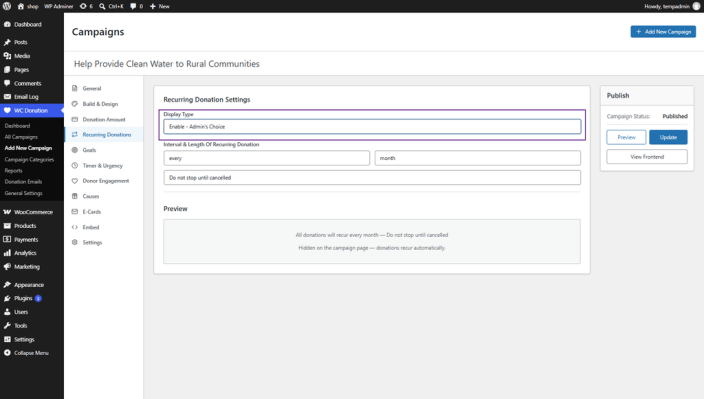
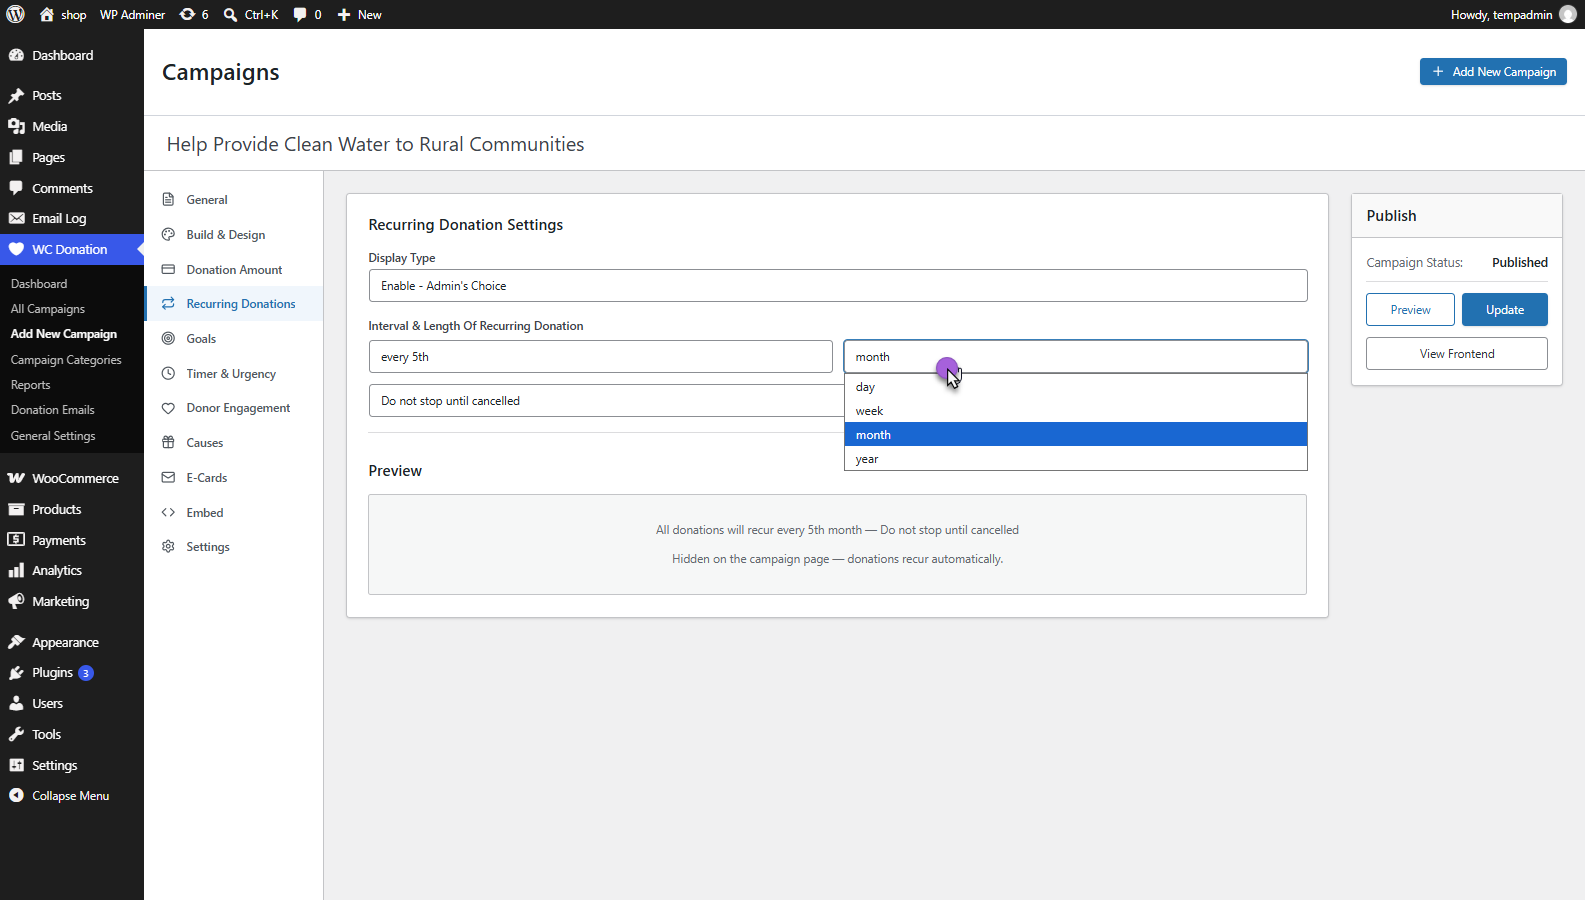
- The admin can set the subscription interval in the Subscriptions Per Interval field. The interval can be set in Days, Weeks, Months, and Years. Whatever the interval value is set by the admin, the subscription will run according to that cycle. For example, if 5 months is selected, the subscription will be charged after every 5 months.
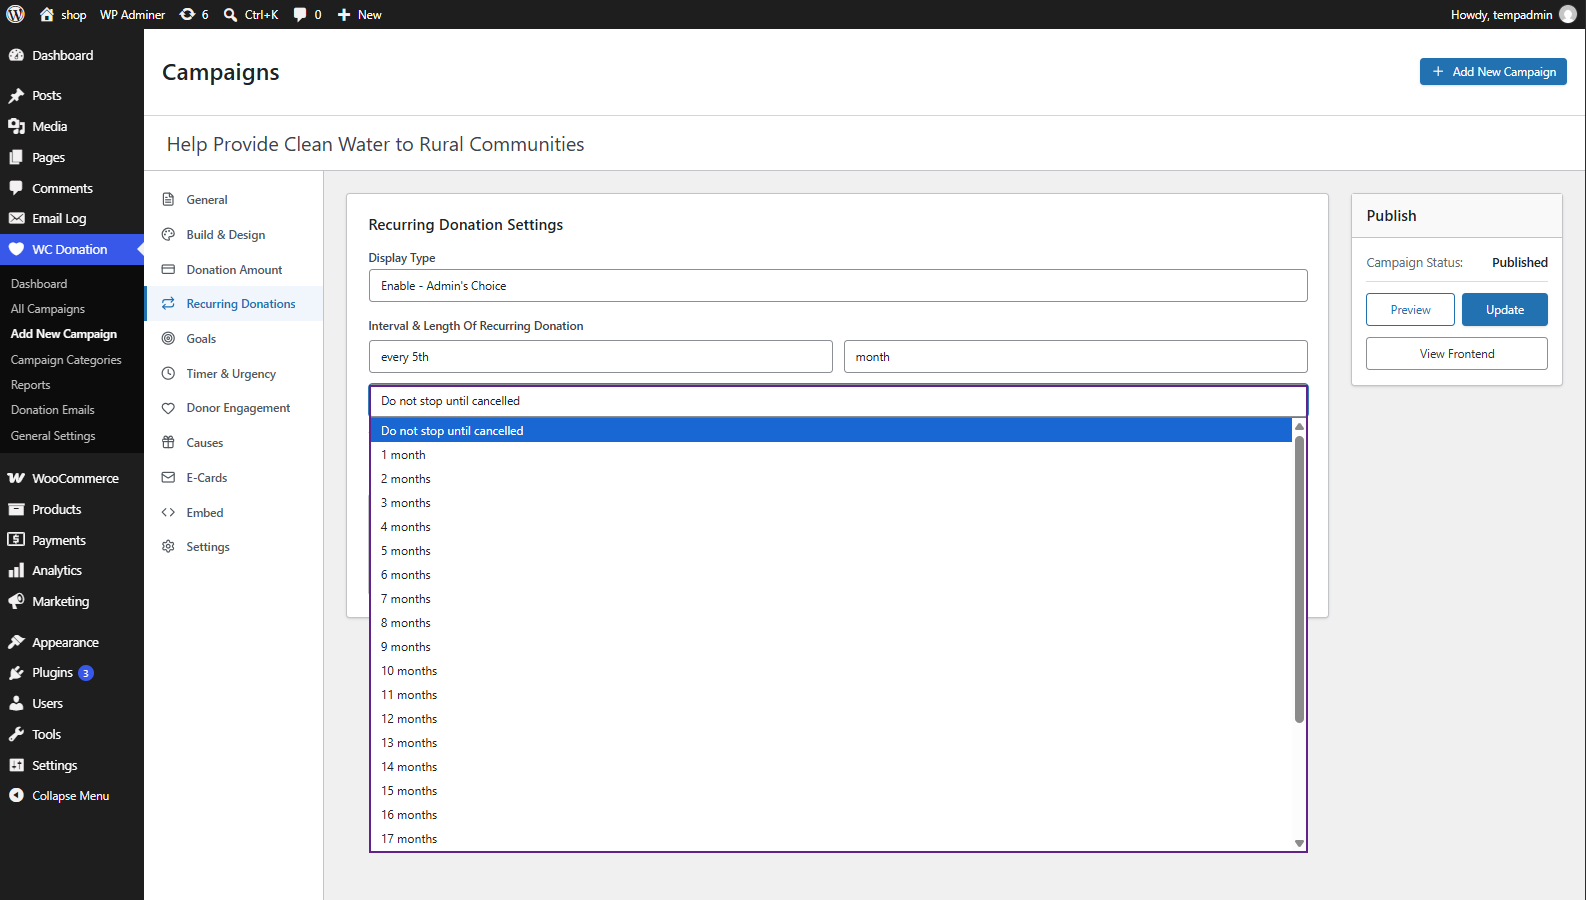
- The admin can set the subscription expiry interval in the Subscriptions Expiry Interval field. If left empty, the subscription will never expire. Whatever the value admin enters, the subscription cycle will no longer be active after that time. For example, if the expiry is set to 6 months, the subscription will expire after 6 months.
- Click on the Update button to save Changes.
Front-End Impact
- Login to your account.
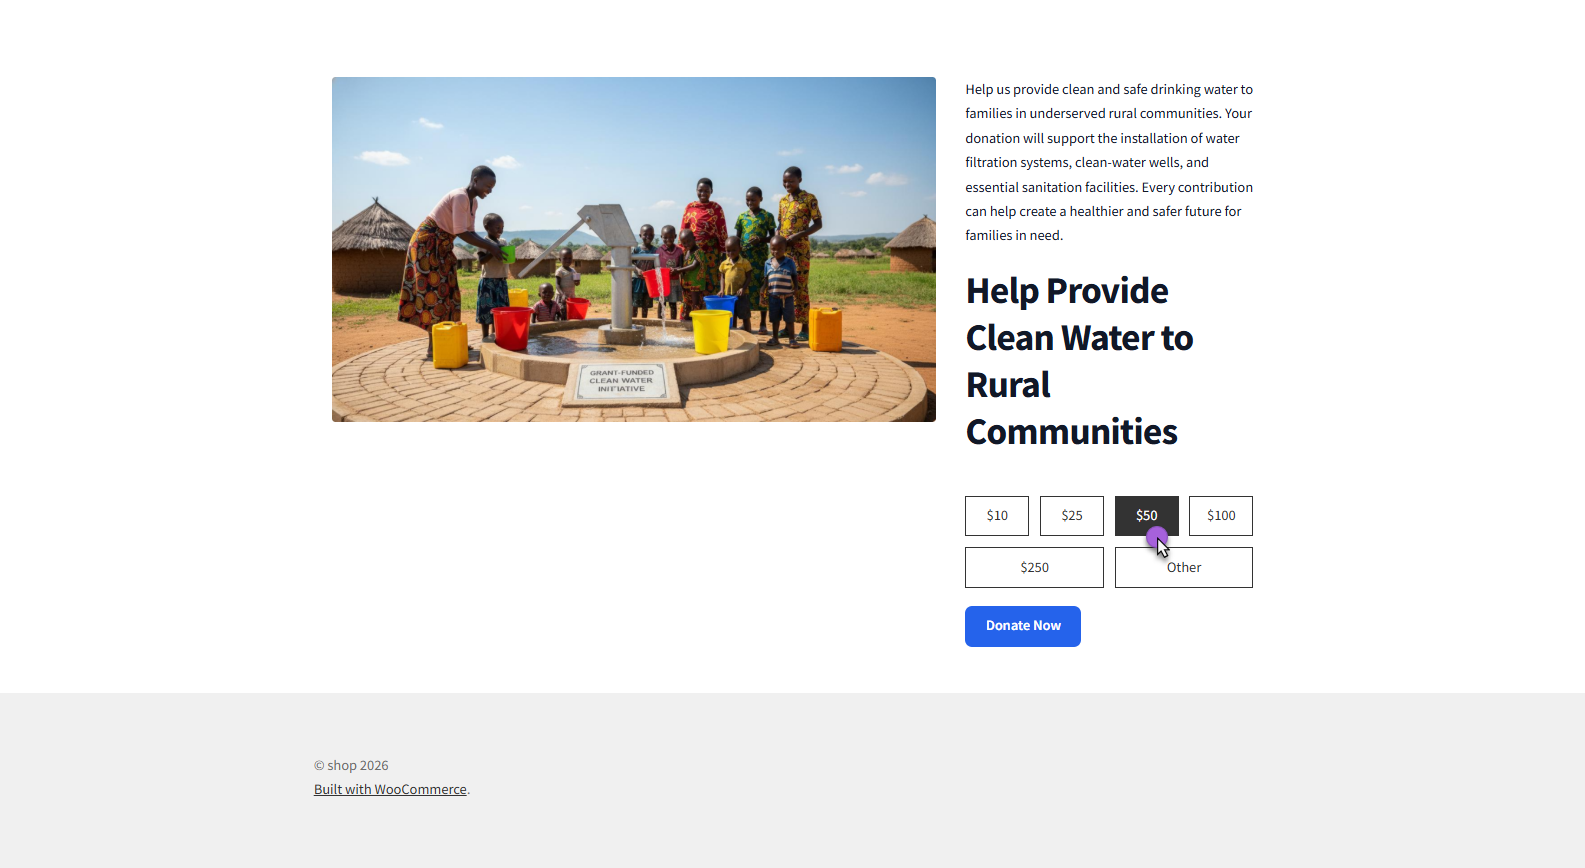
- Go to the Single Donation Page. Select the Donation amount.
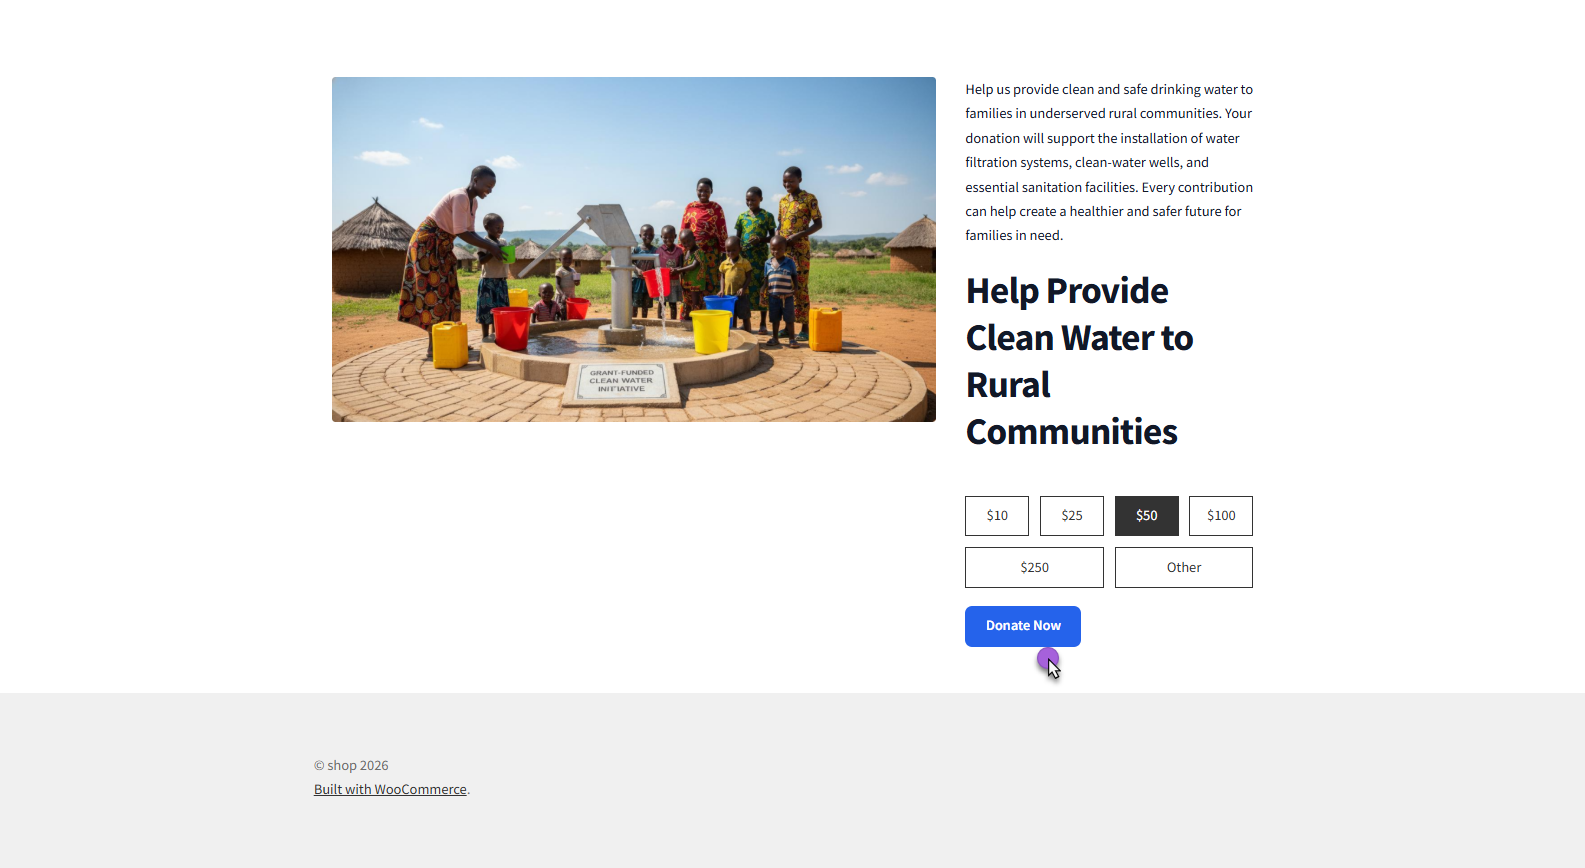
- Click on the Donate button.
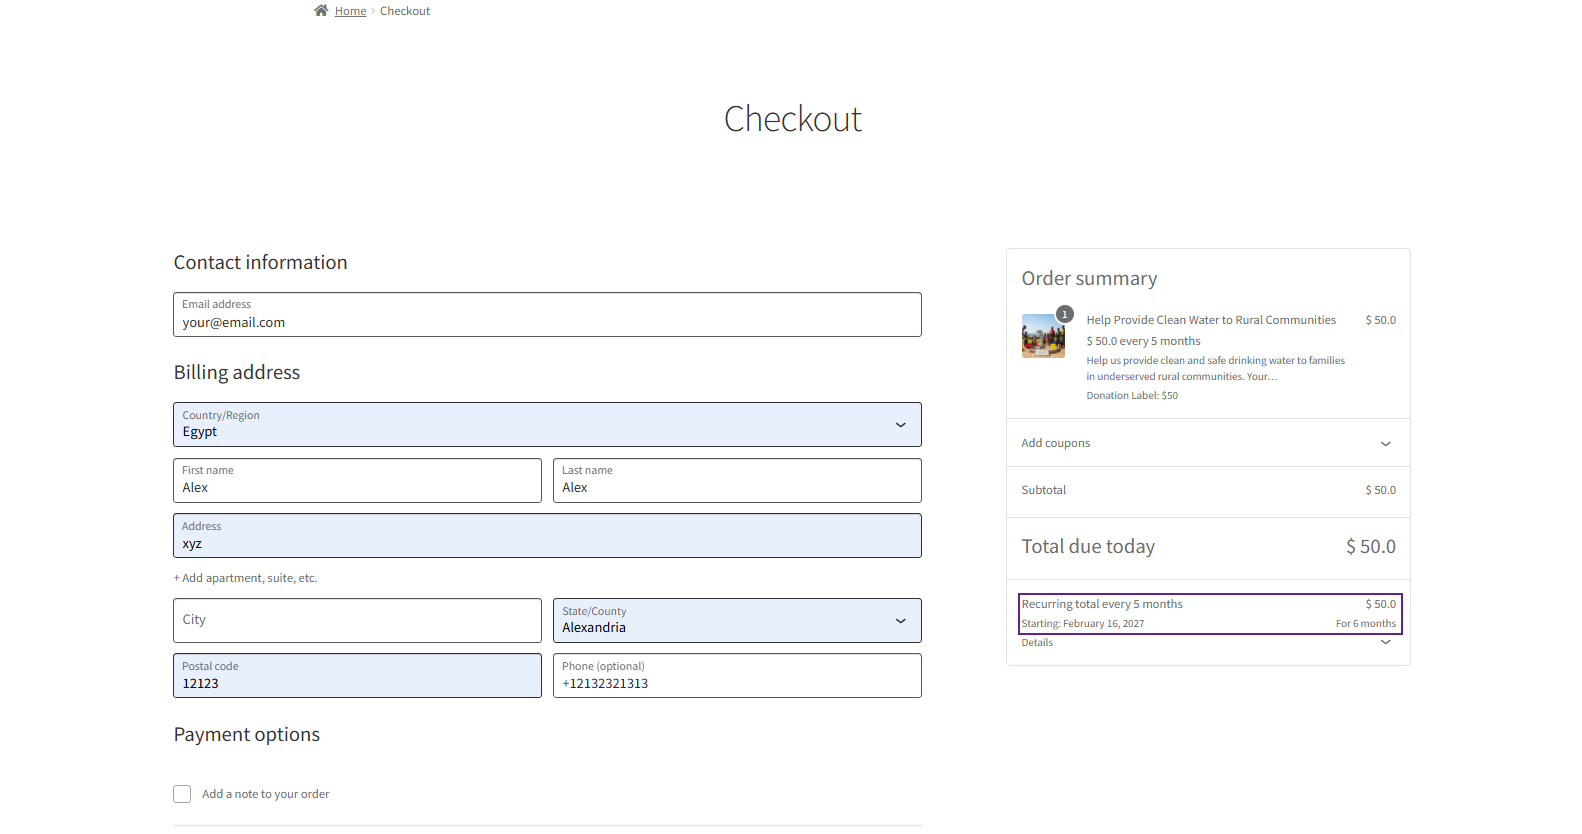
- Go to the Cart page. The details of the Donation subscription will appear.
Donation Goals
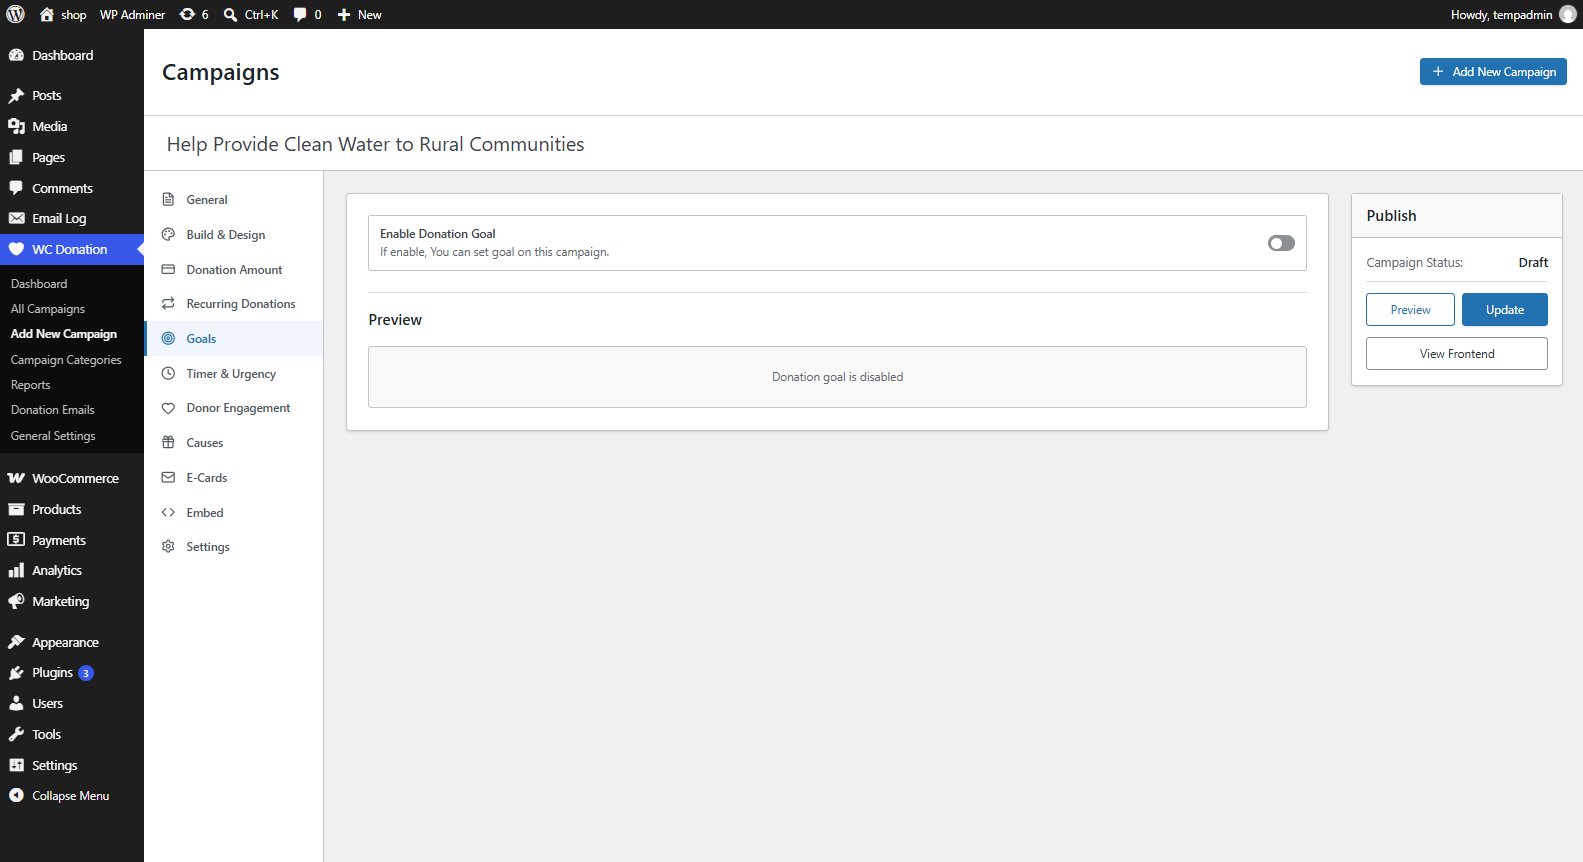
↑ Back to top- The Goals tab lets a campaign display fundraising progress toward a target, in one of four different ways.
- Navigation: WordPress Admin Dashboard → WC Donation → Add New Campaign → Goals tab
Configuration
↑ Back to topEnable Donation Goal
- Enable Donation Goal: Master toggle. When off, no goal fields are shown and the campaign displays no progress indicator.
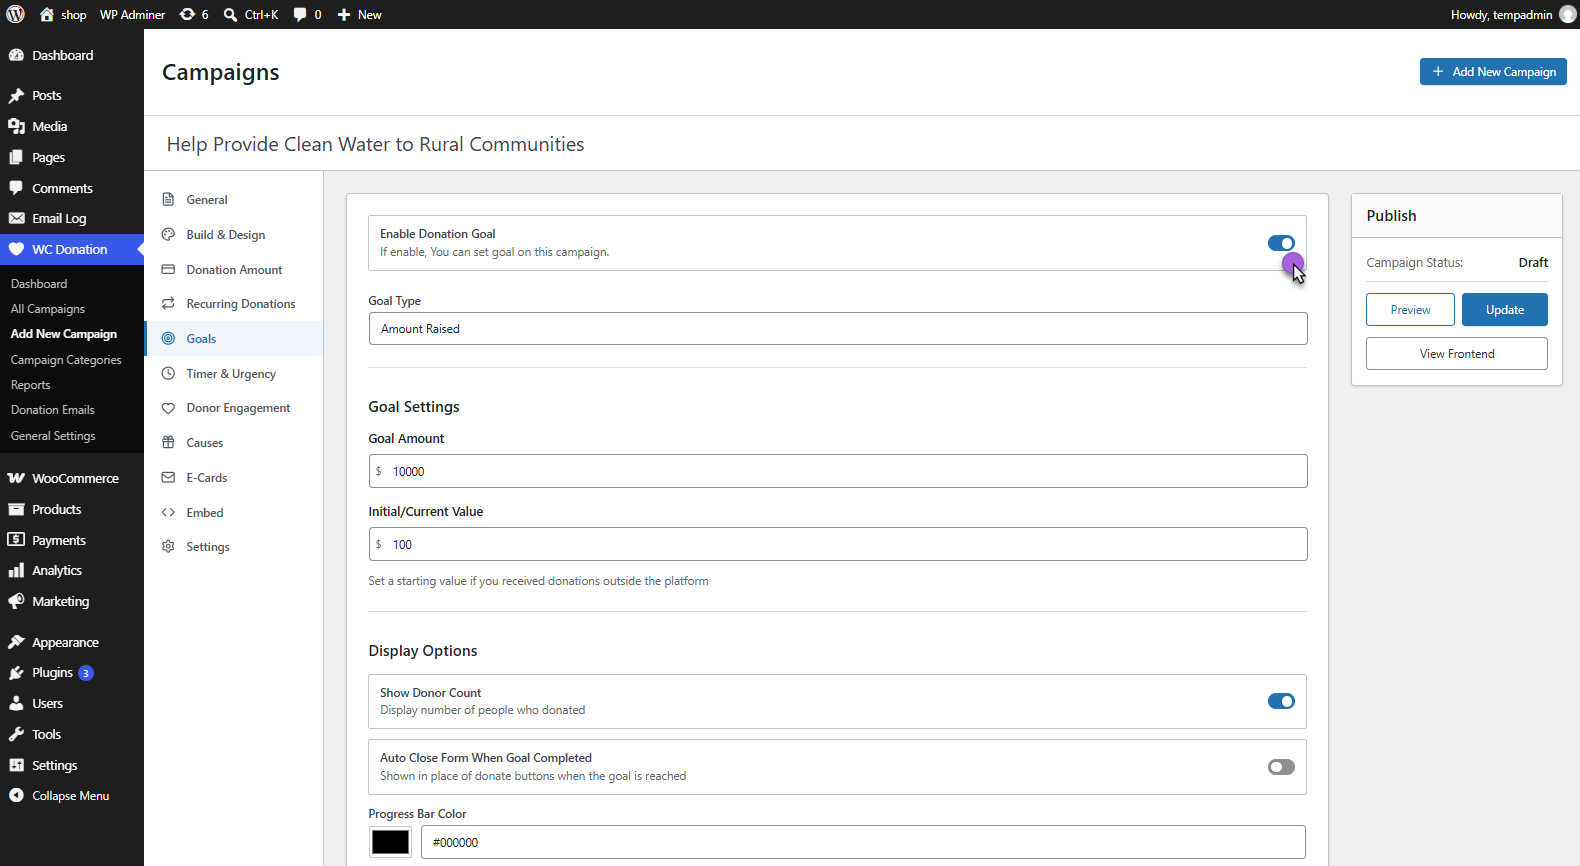
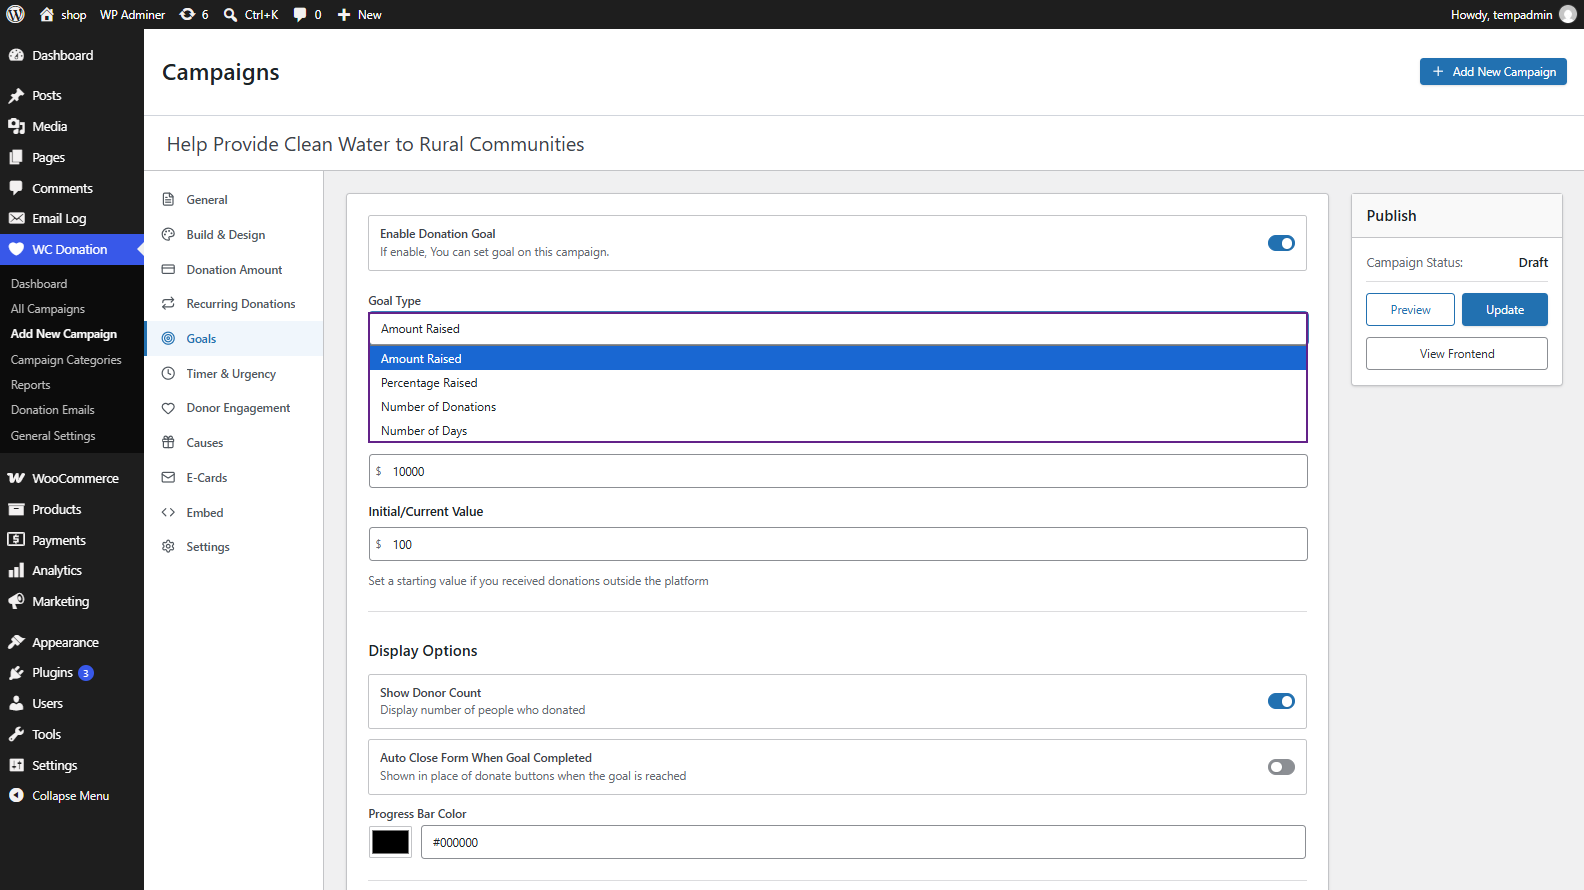
- Goal Type: Amount Raised, Percentage Raised, Number of Donations, or Number of Days.
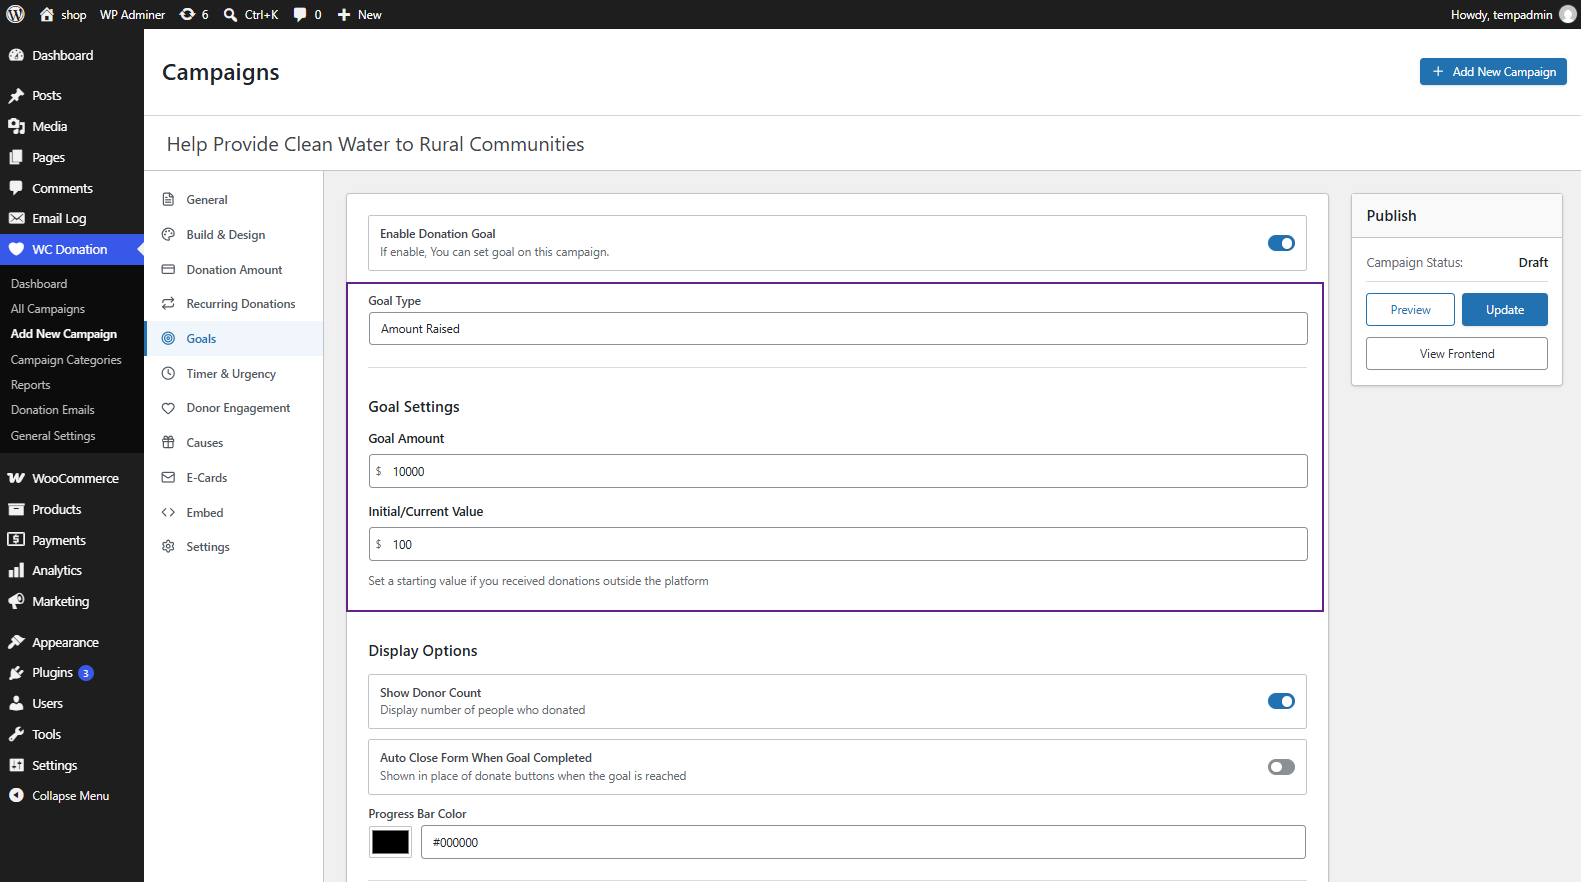
Goal Settings (varies by Goal Type)
- Amount Raised: Goal Amount and an Initial/Current Value used to pre-seed progress if donations were received outside the platform.
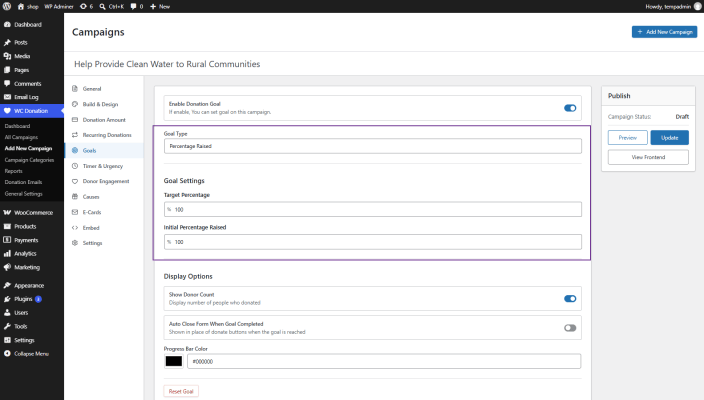
- Percentage Raised: Target Percentage and an Initial Percentage Raised.
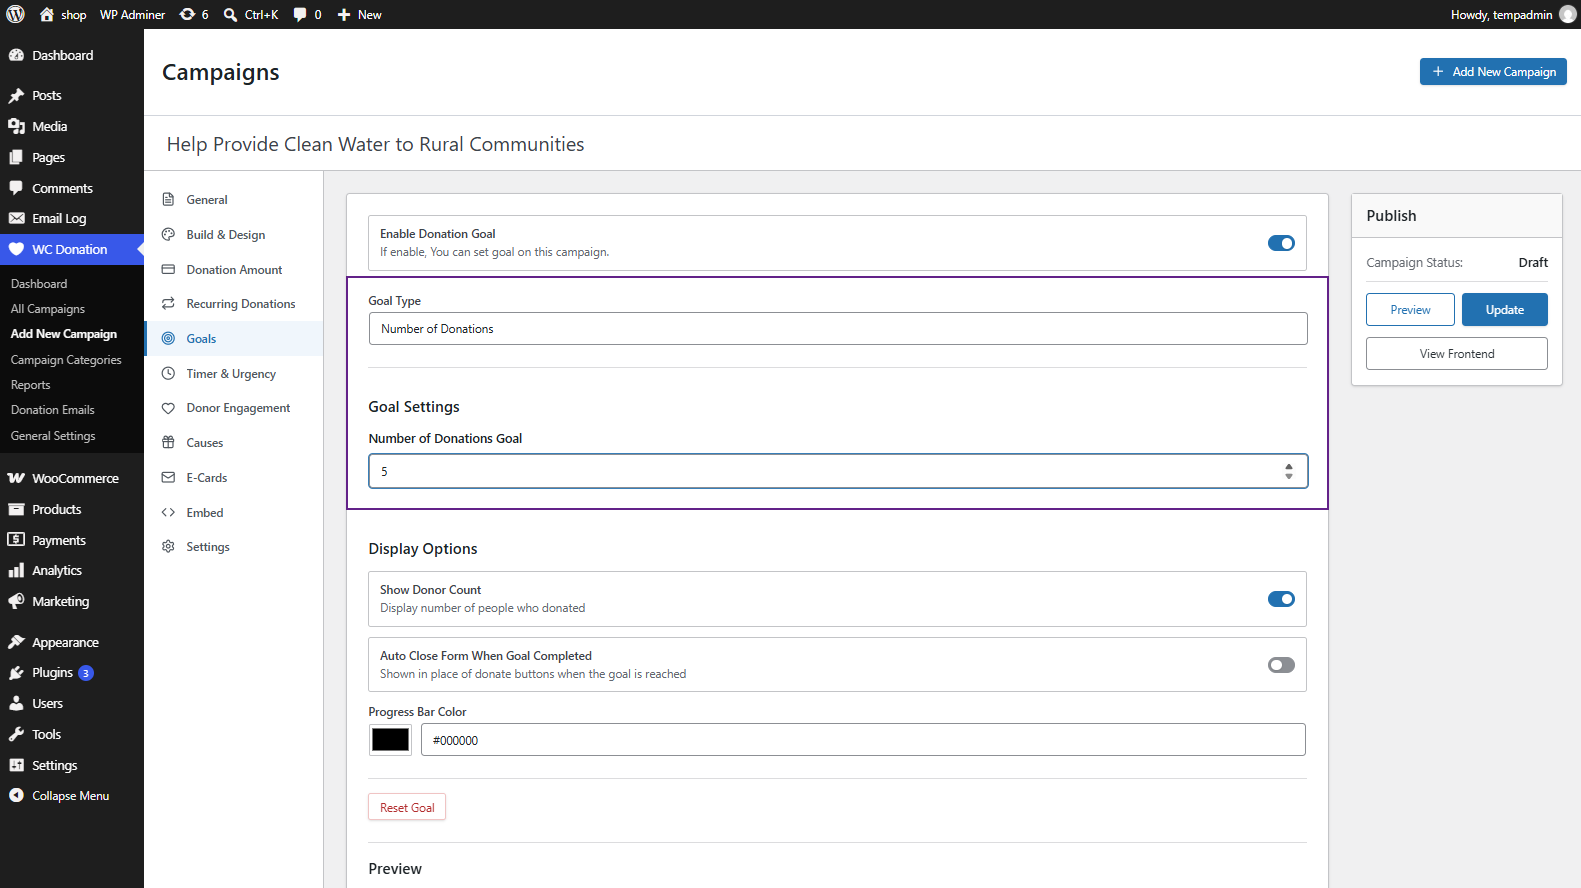
- Number of Donations: Number of Donations Goal (a target donation count).
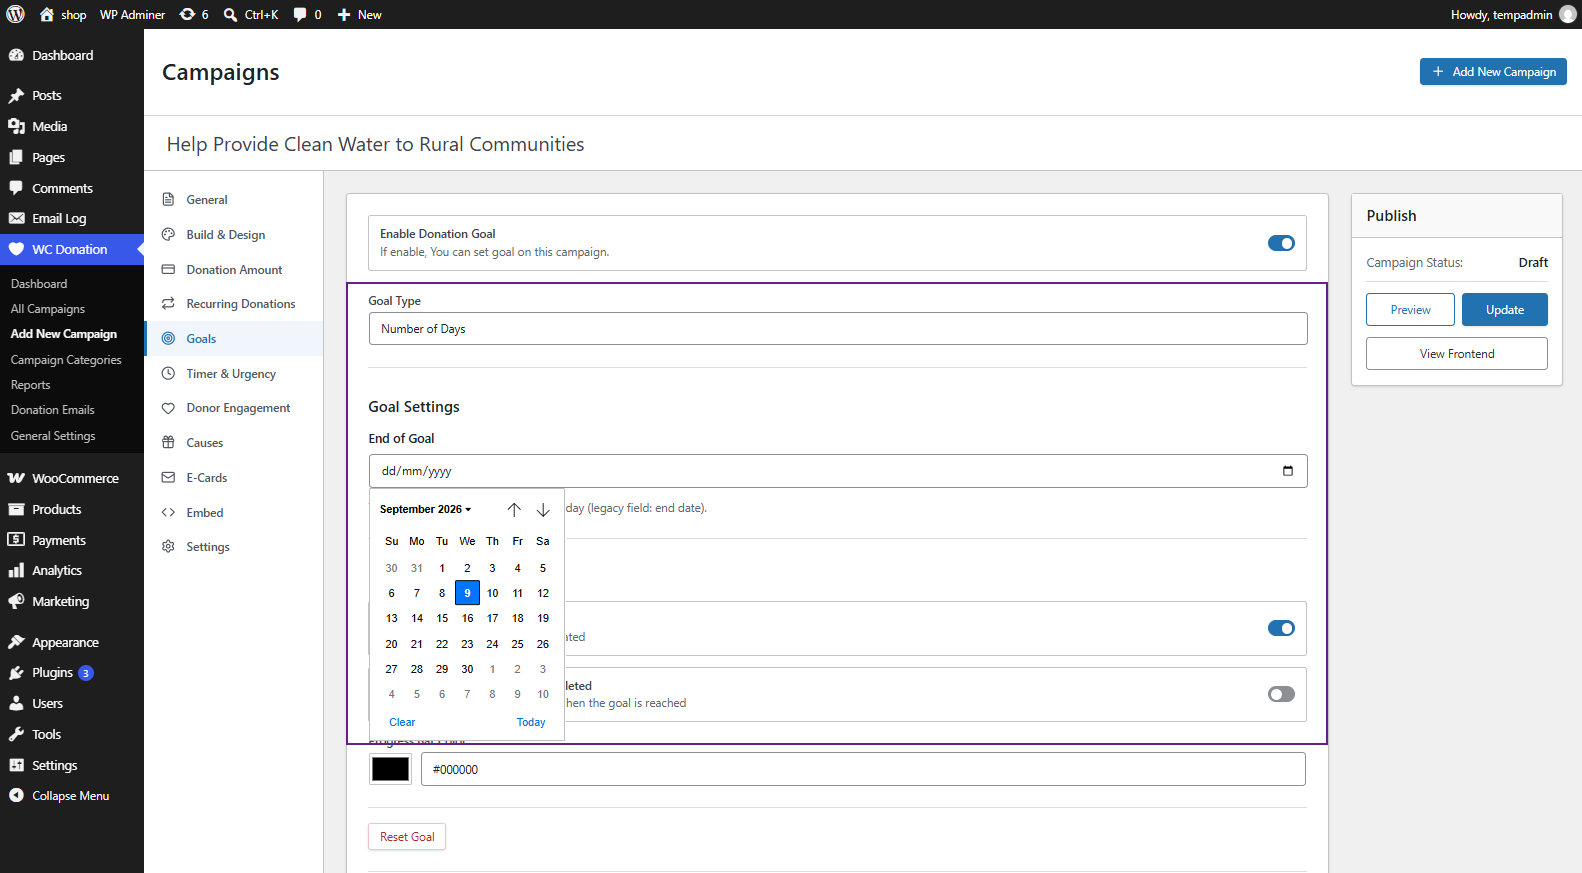
- Number of Days: End of Goal — a date after which the goal window closes (documented in the interface as a legacy field: end date).
Display Options
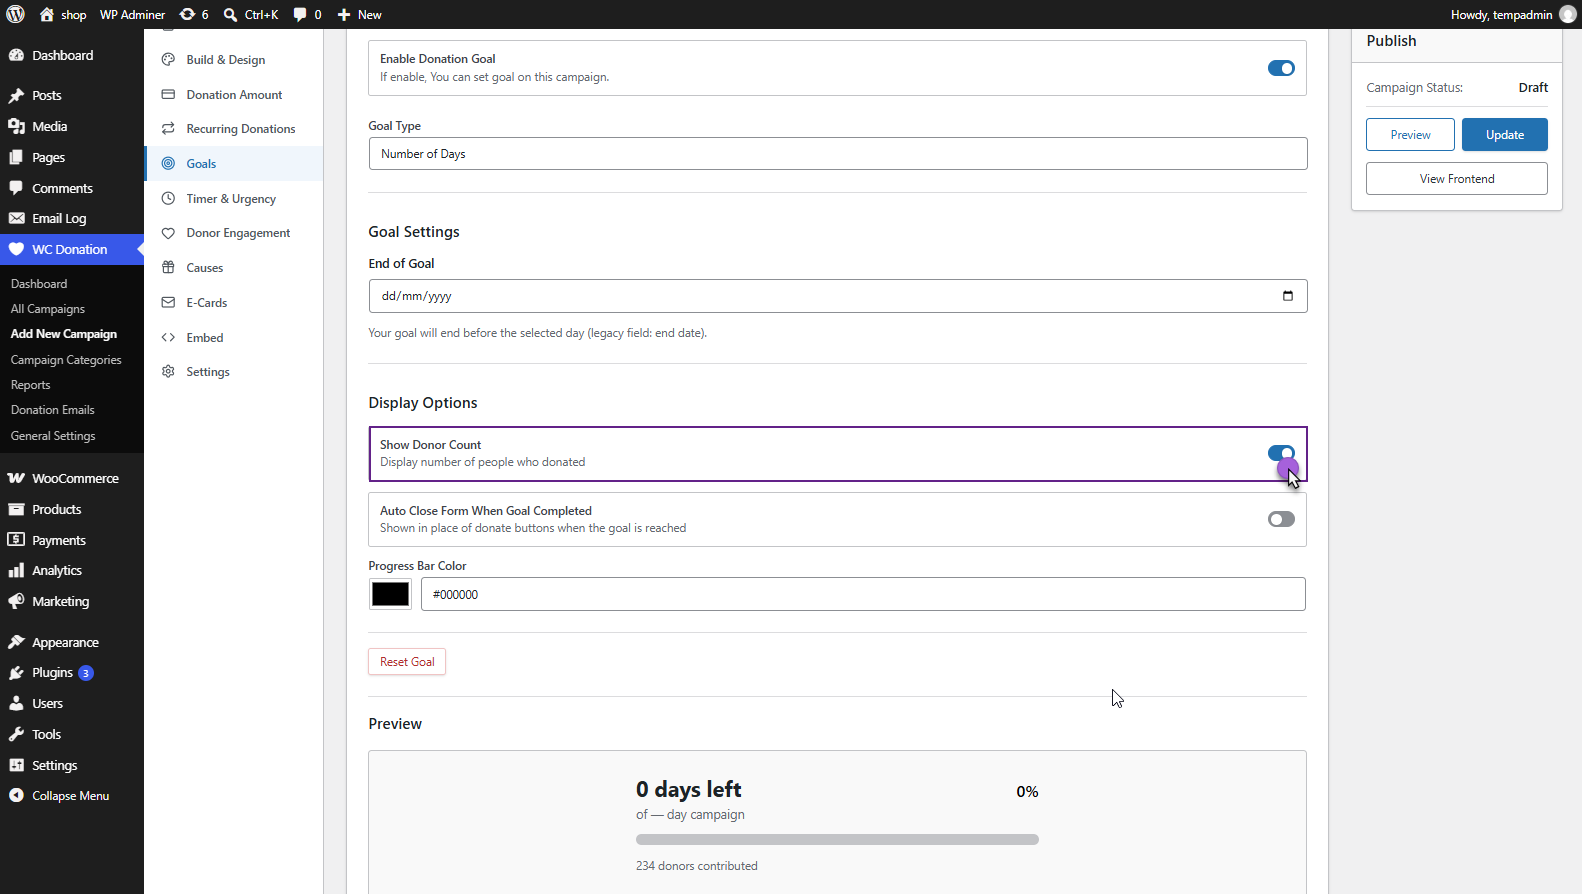
- Show Donor Count: Displays the number of people who donated alongside the goal.
- Auto Close Form When Goal Completed: When the goal is reached, a Completion message is shown in place of the donation buttons.
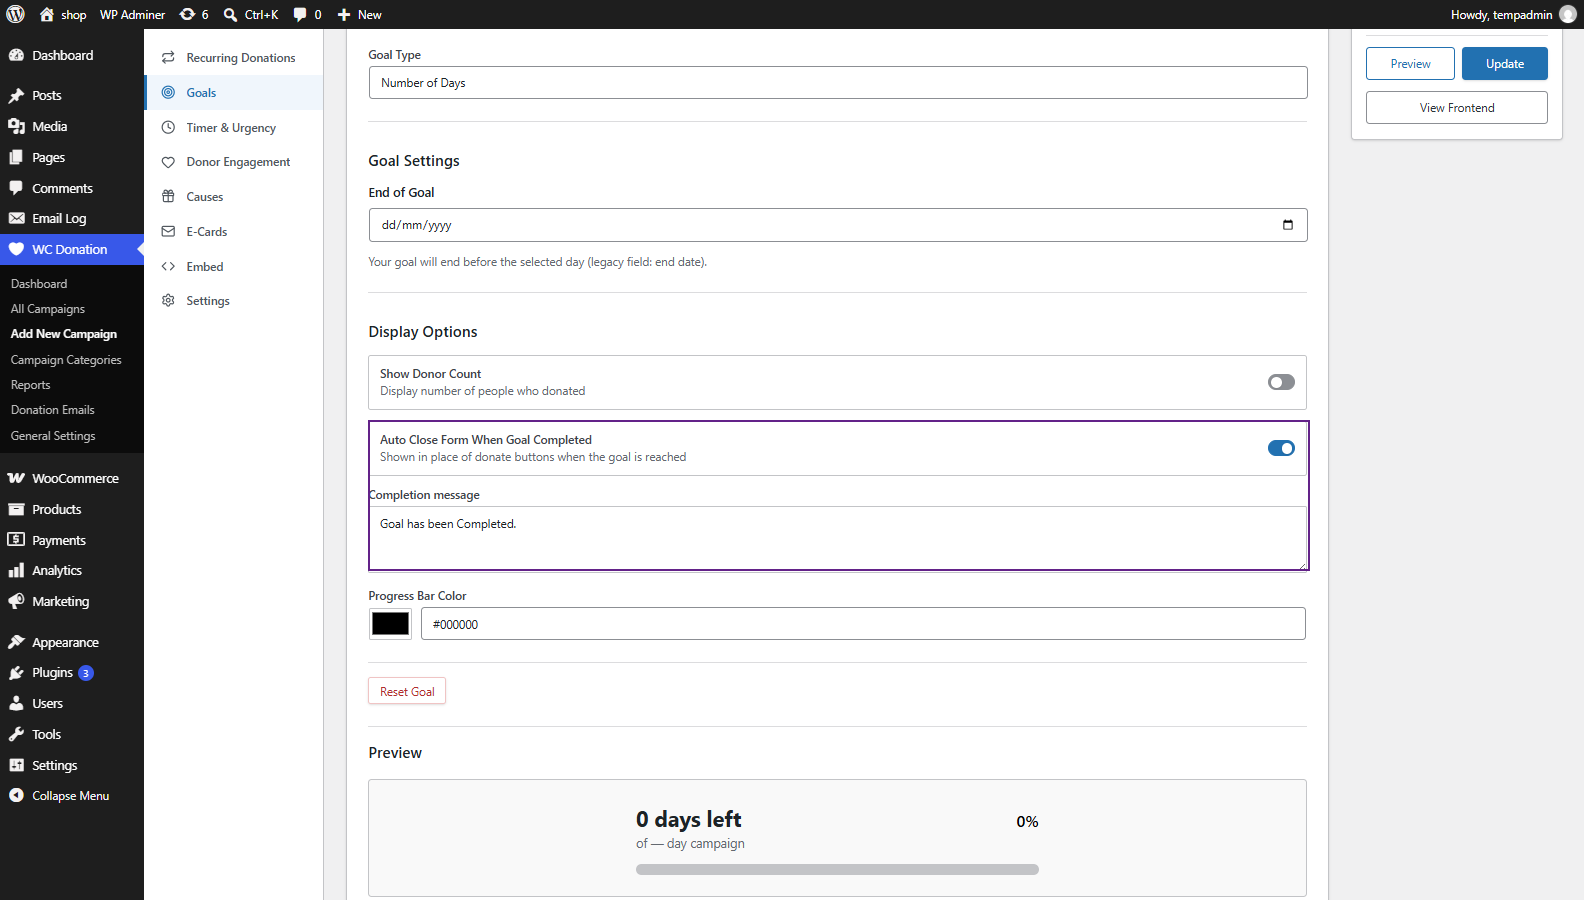
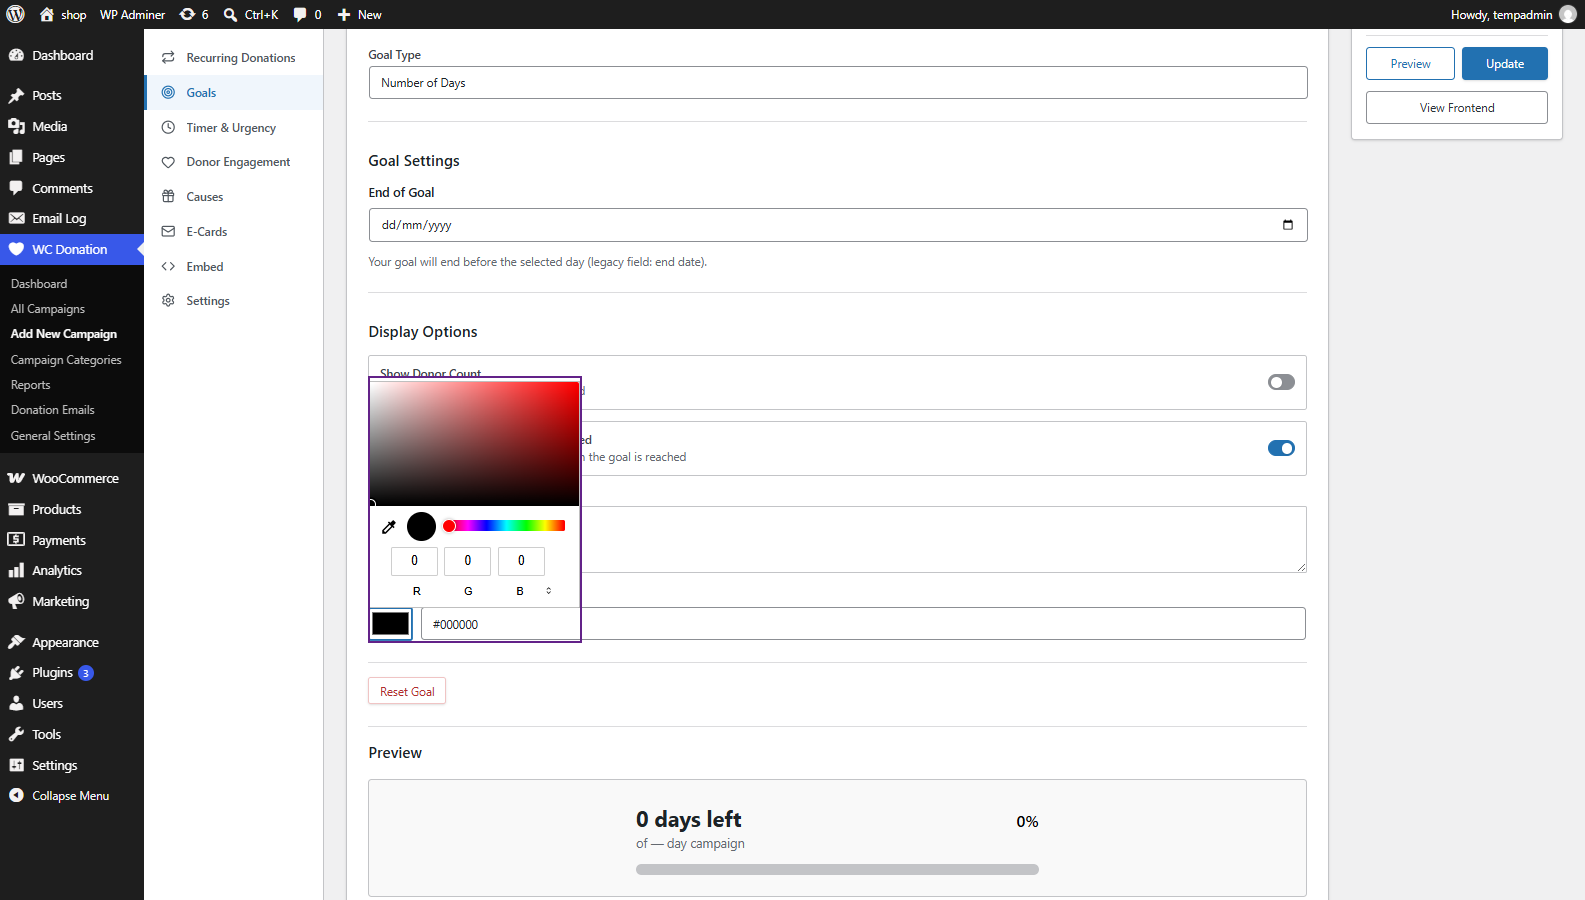
- Progress Bar Color: Color picker for the goal progress bar.
Reset Goal
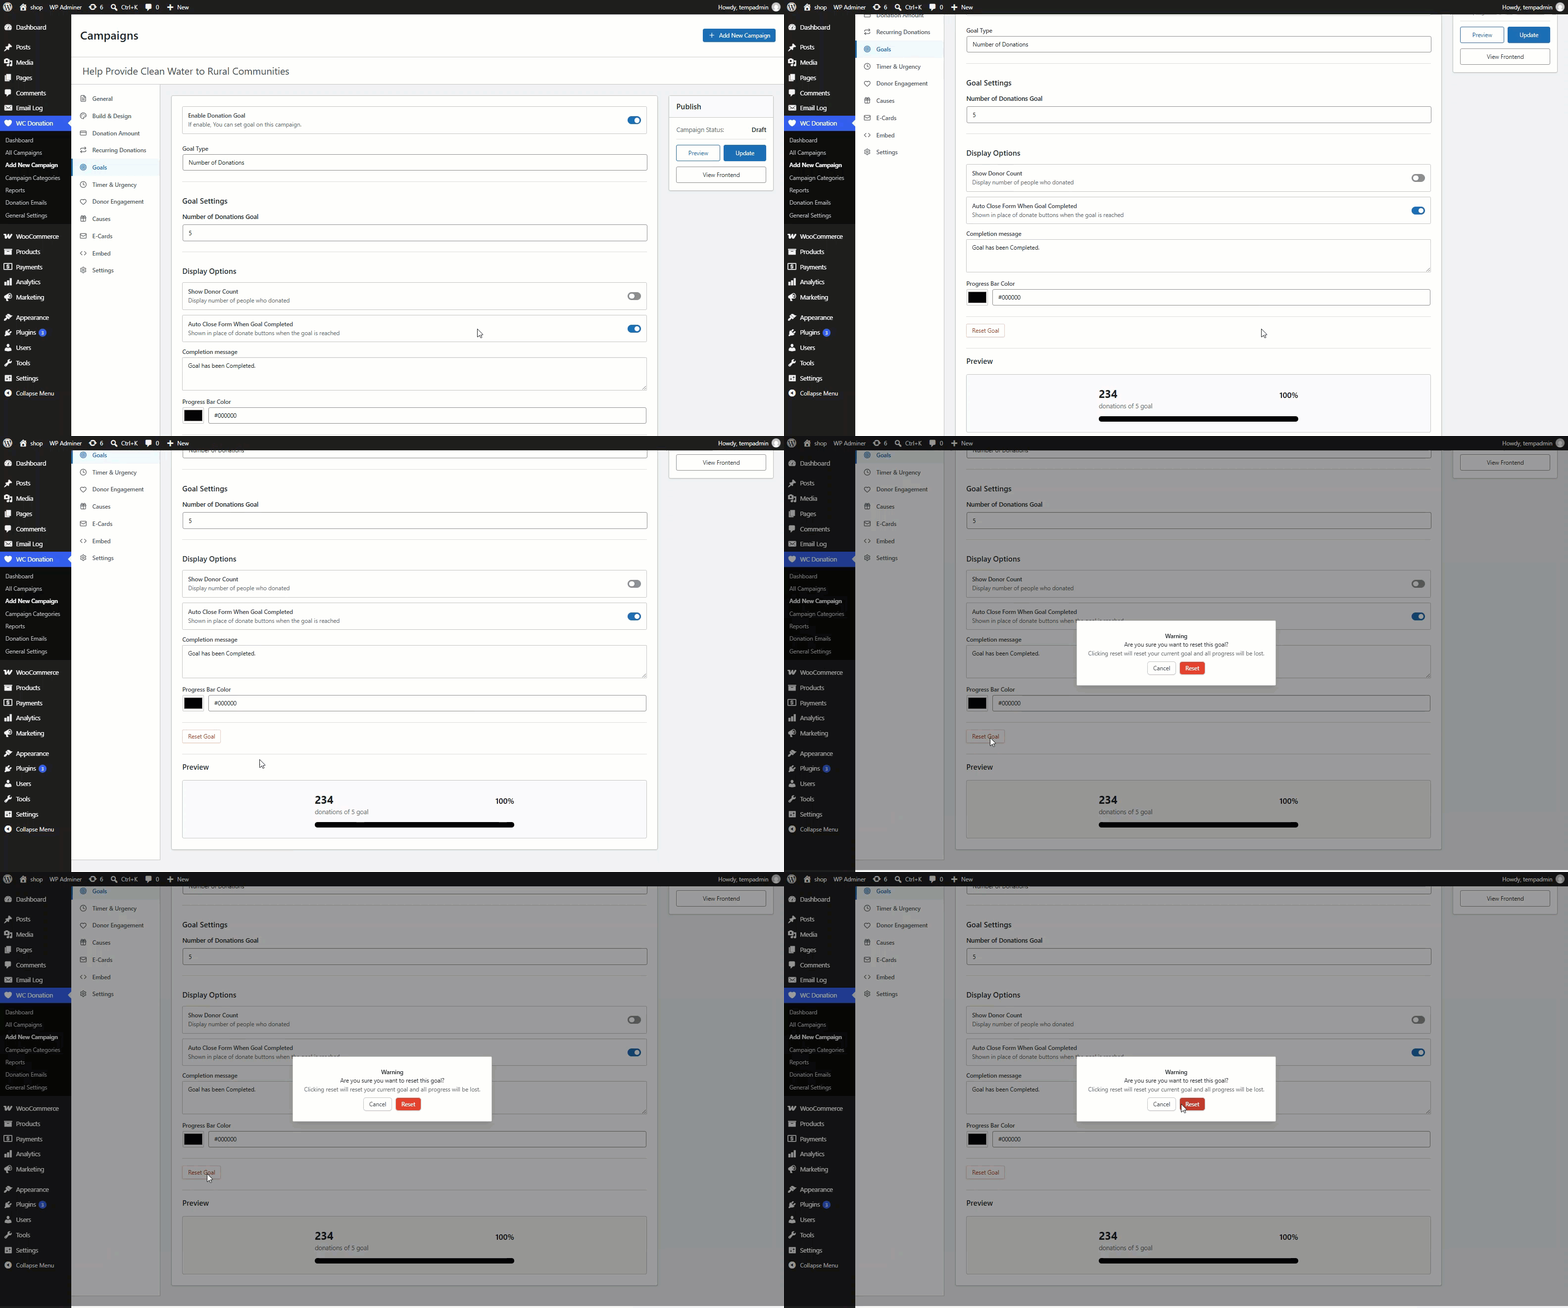
- A Reset Goal button clears the campaign’s recorded progress back to zero. It is disabled until the campaign has been saved at least once (“Save the campaign first to reset goal progress.”) and requires confirmation in a dialog before it takes effect.
Timer & Urgency
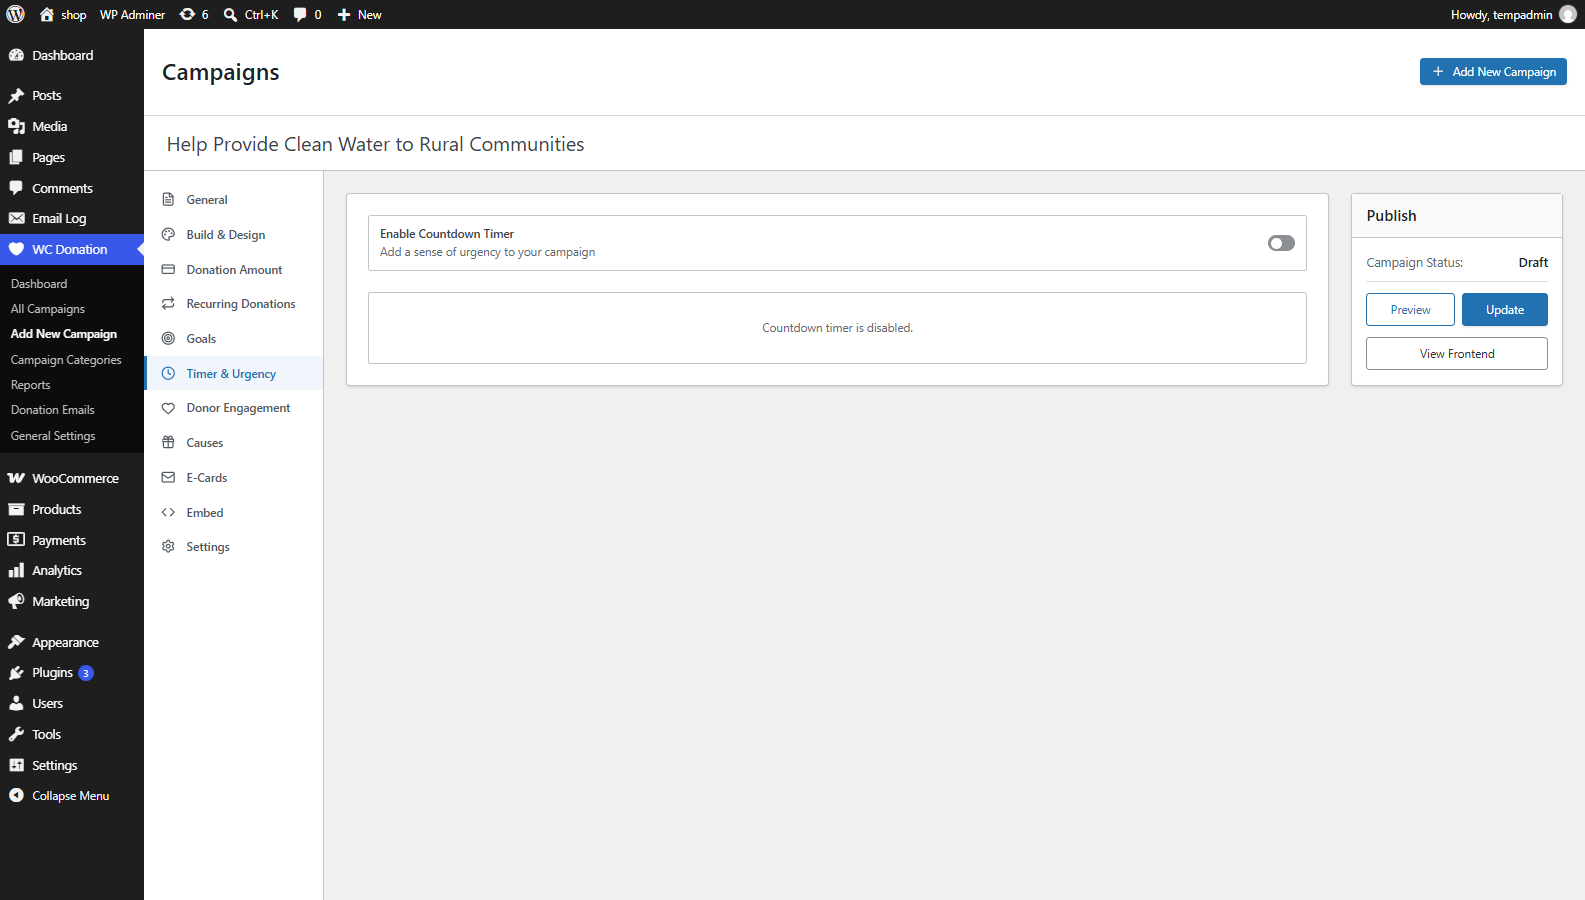
↑ Back to topThe Timer & Urgency tab adds a countdown to a campaign to create urgency around giving, and can also restrict when donations are accepted.
- Navigation: WordPress Admin Dashboard → WC Donation → Add New Campaign → Timer & Urgency tab
Configuration
| Setting | Description |
|---|---|
| Enable Countdown Timer | Master toggle. |
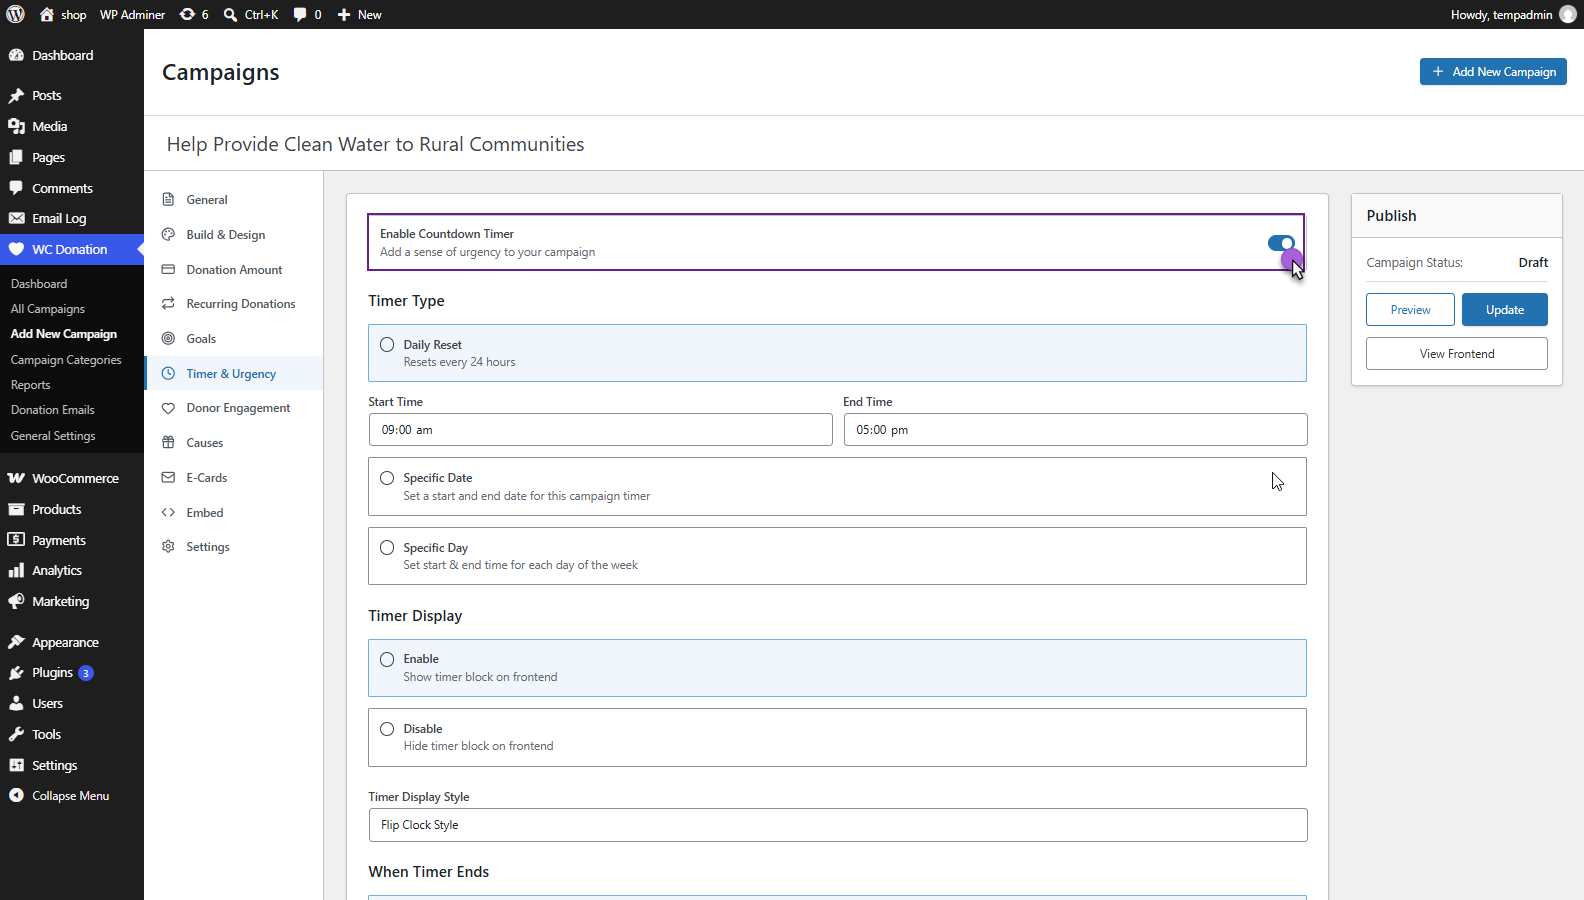
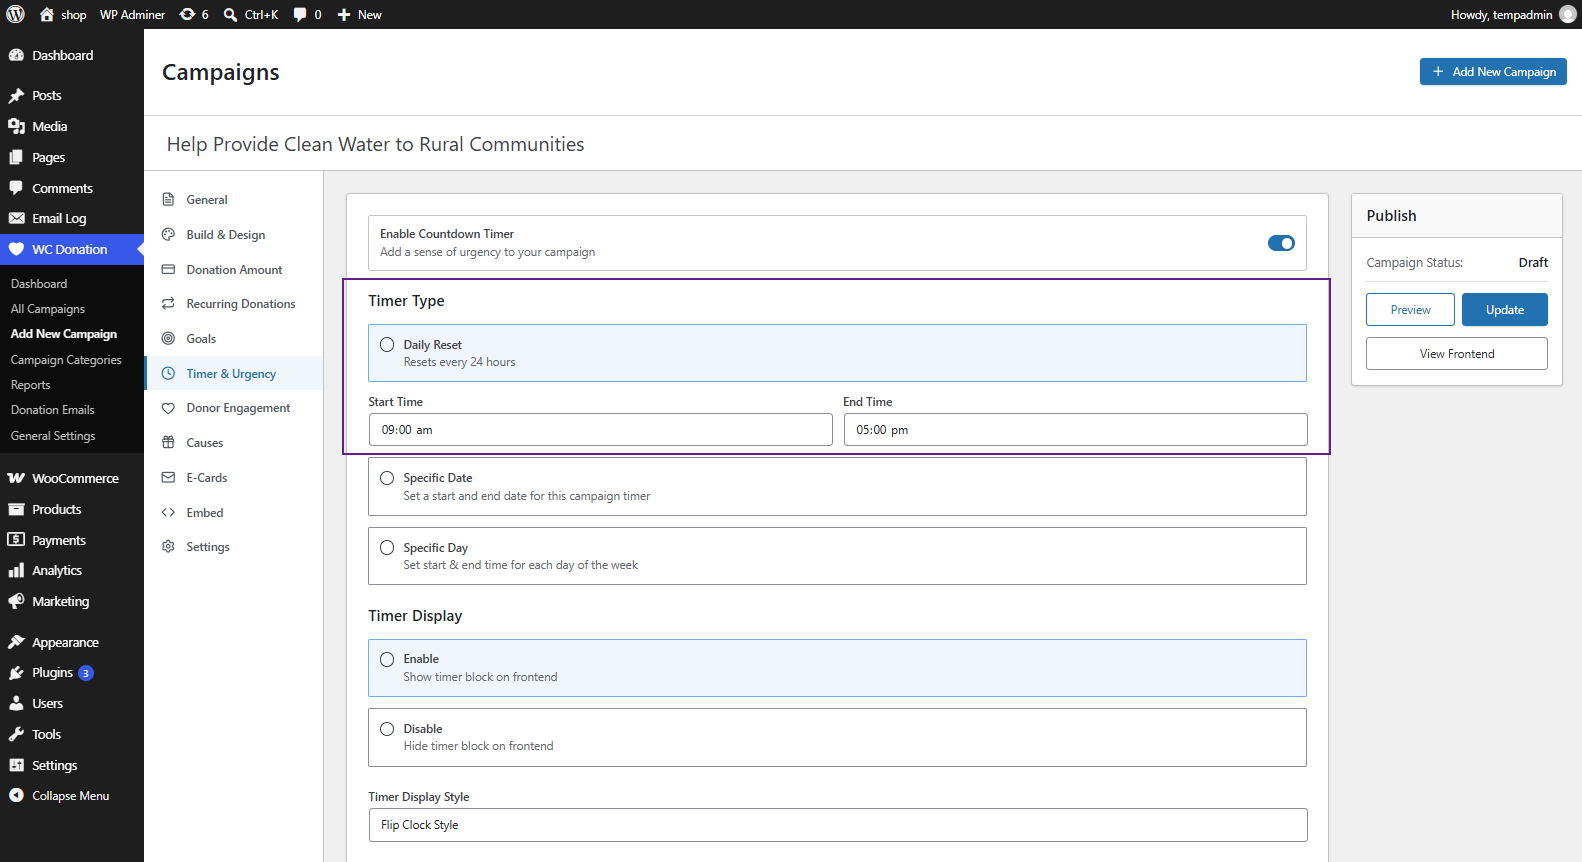
Timer Type
- Daily Reset: The timer resets every 24 hours between a configured Start Time and End Time each day.
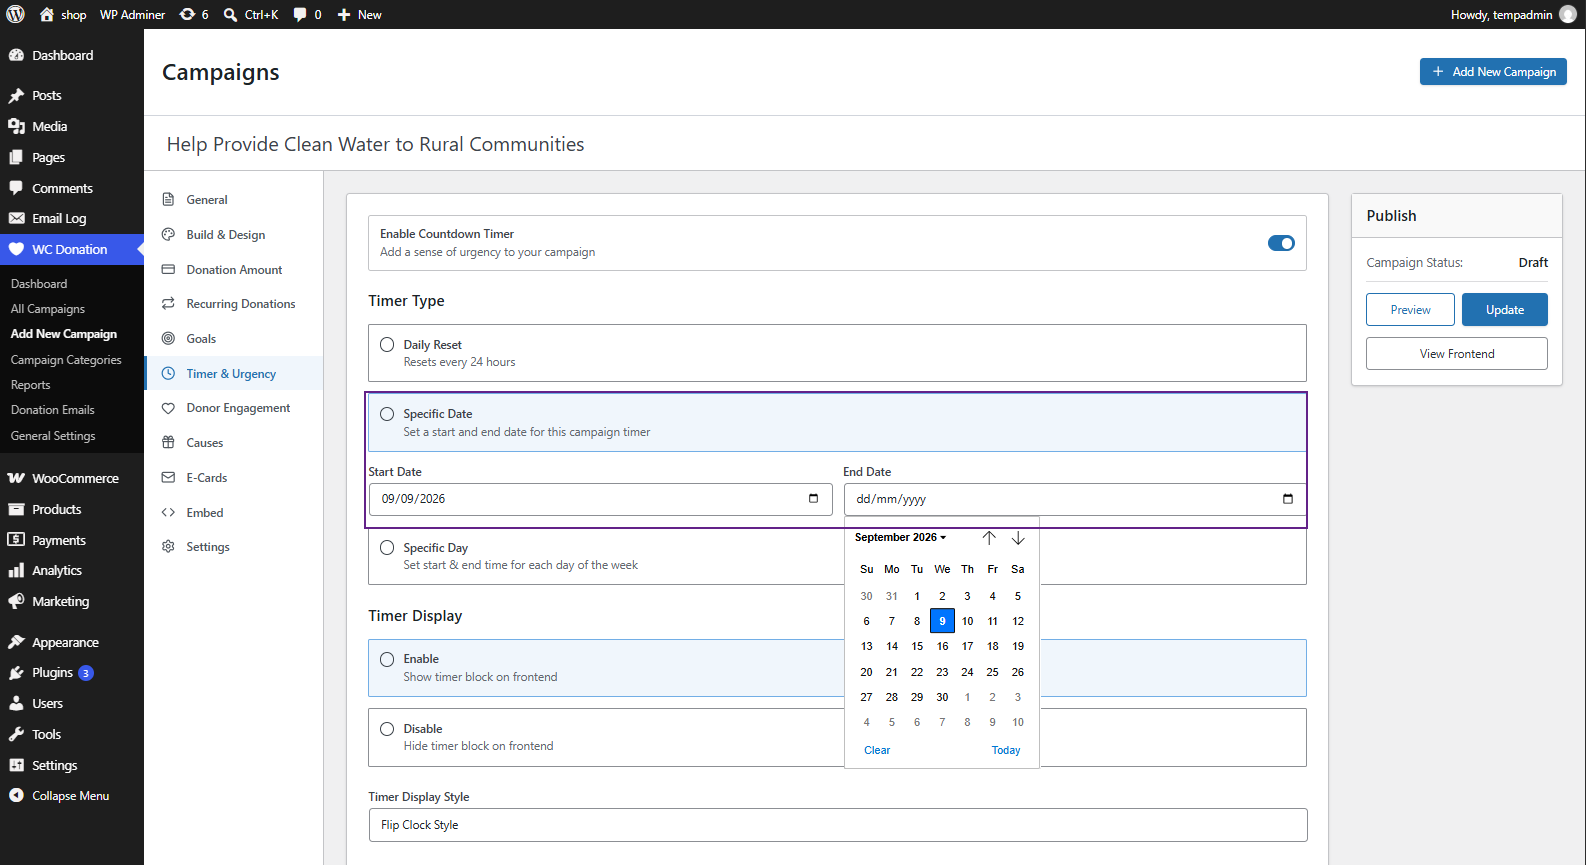
- Specific Date: A single Start Date and End Date span for the entire campaign.
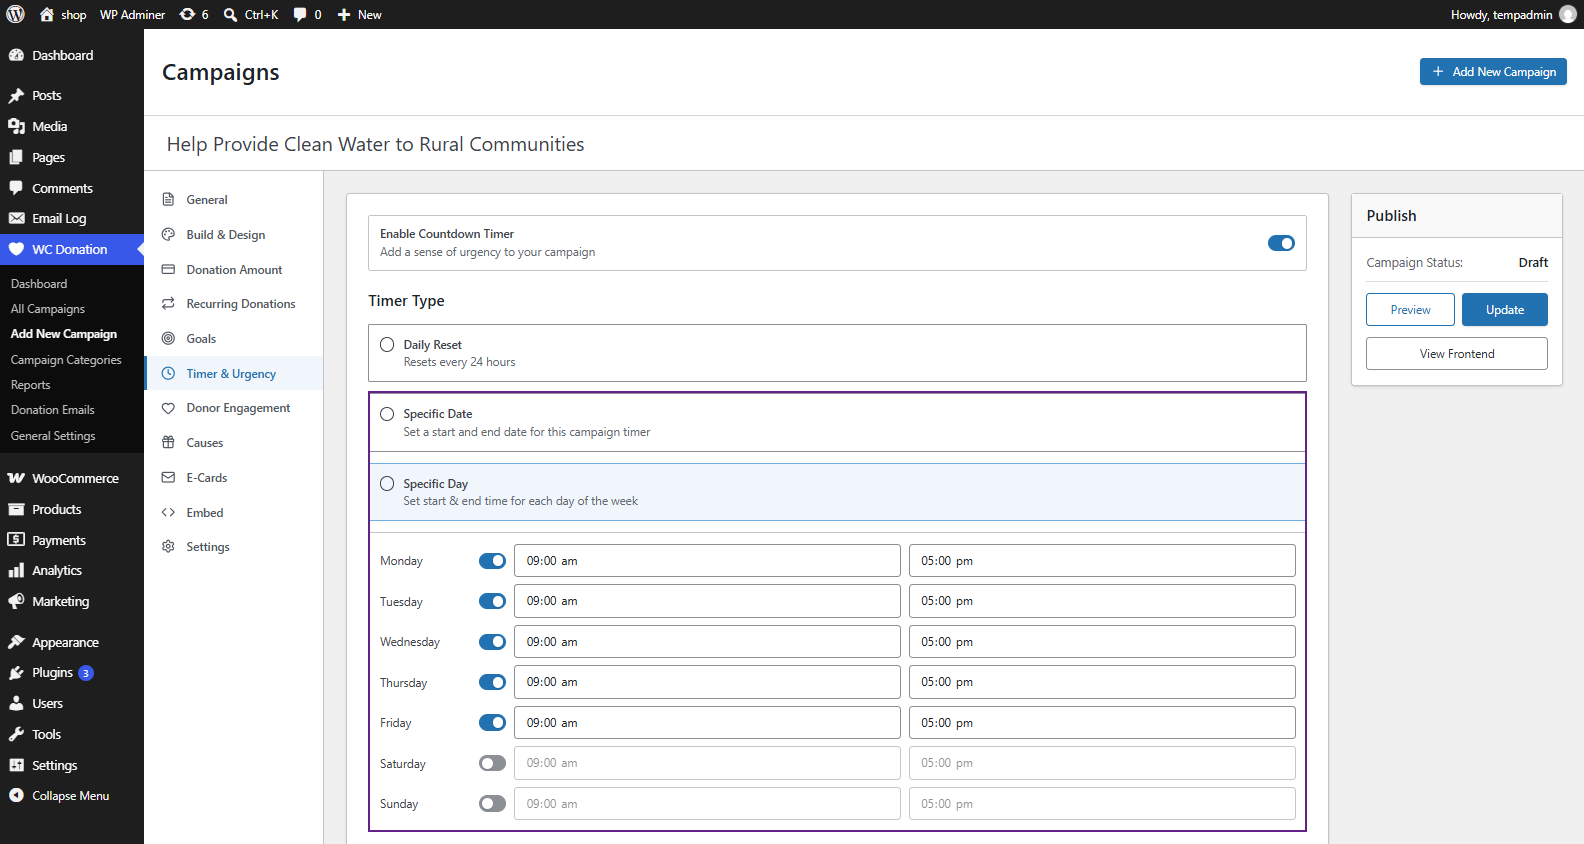
- Specific Day: An independent on/off toggle and Start/End time pair for each day of the week (Monday through Sunday).
Timer Display
- Enable / Disable: Whether the countdown block is actually shown on the front end, independent of the timer rules themselves running in the background.
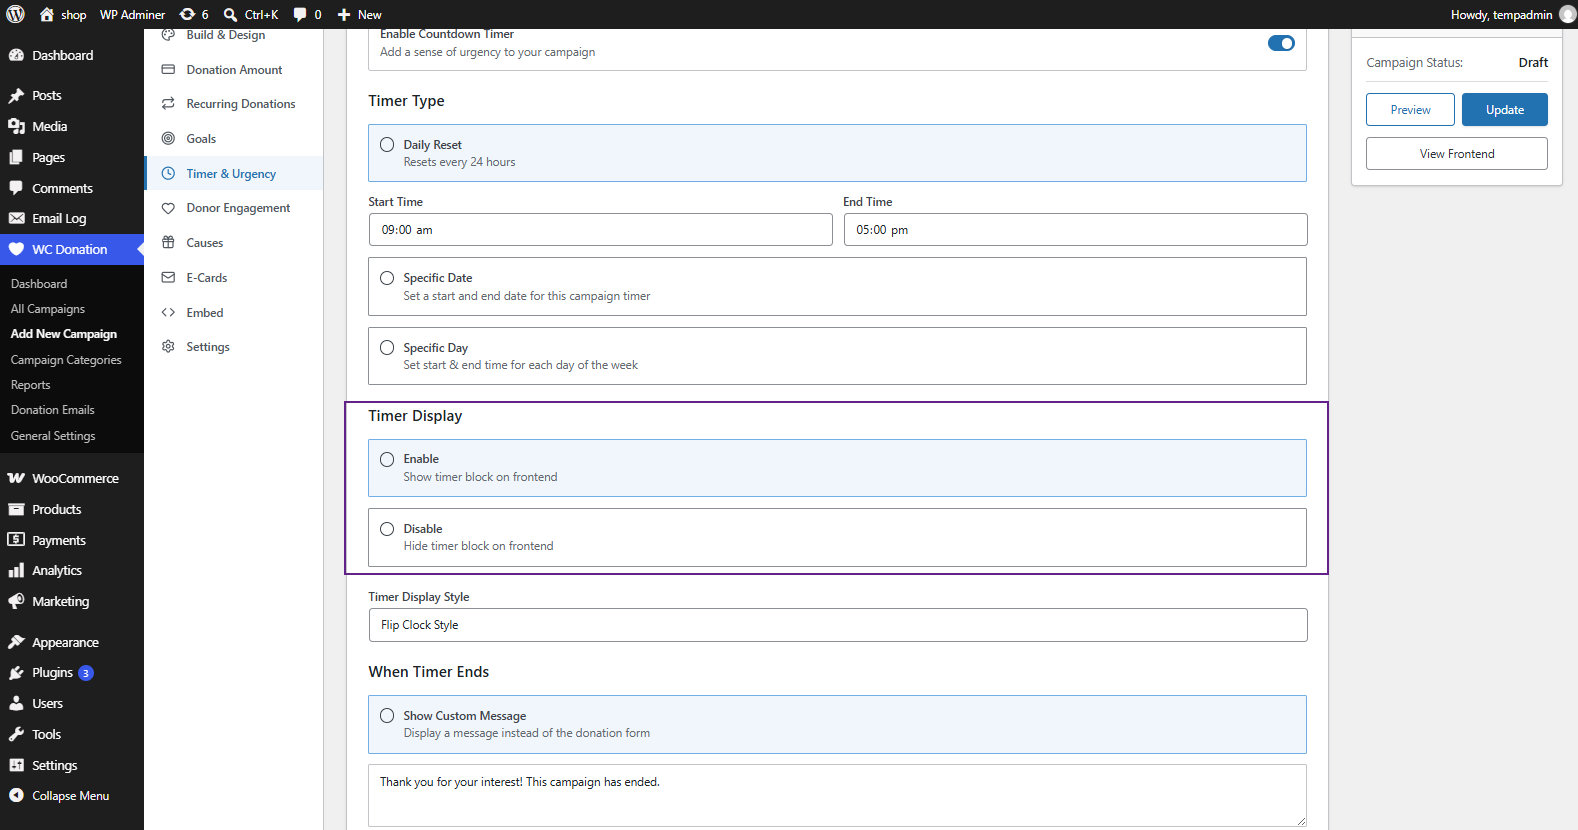
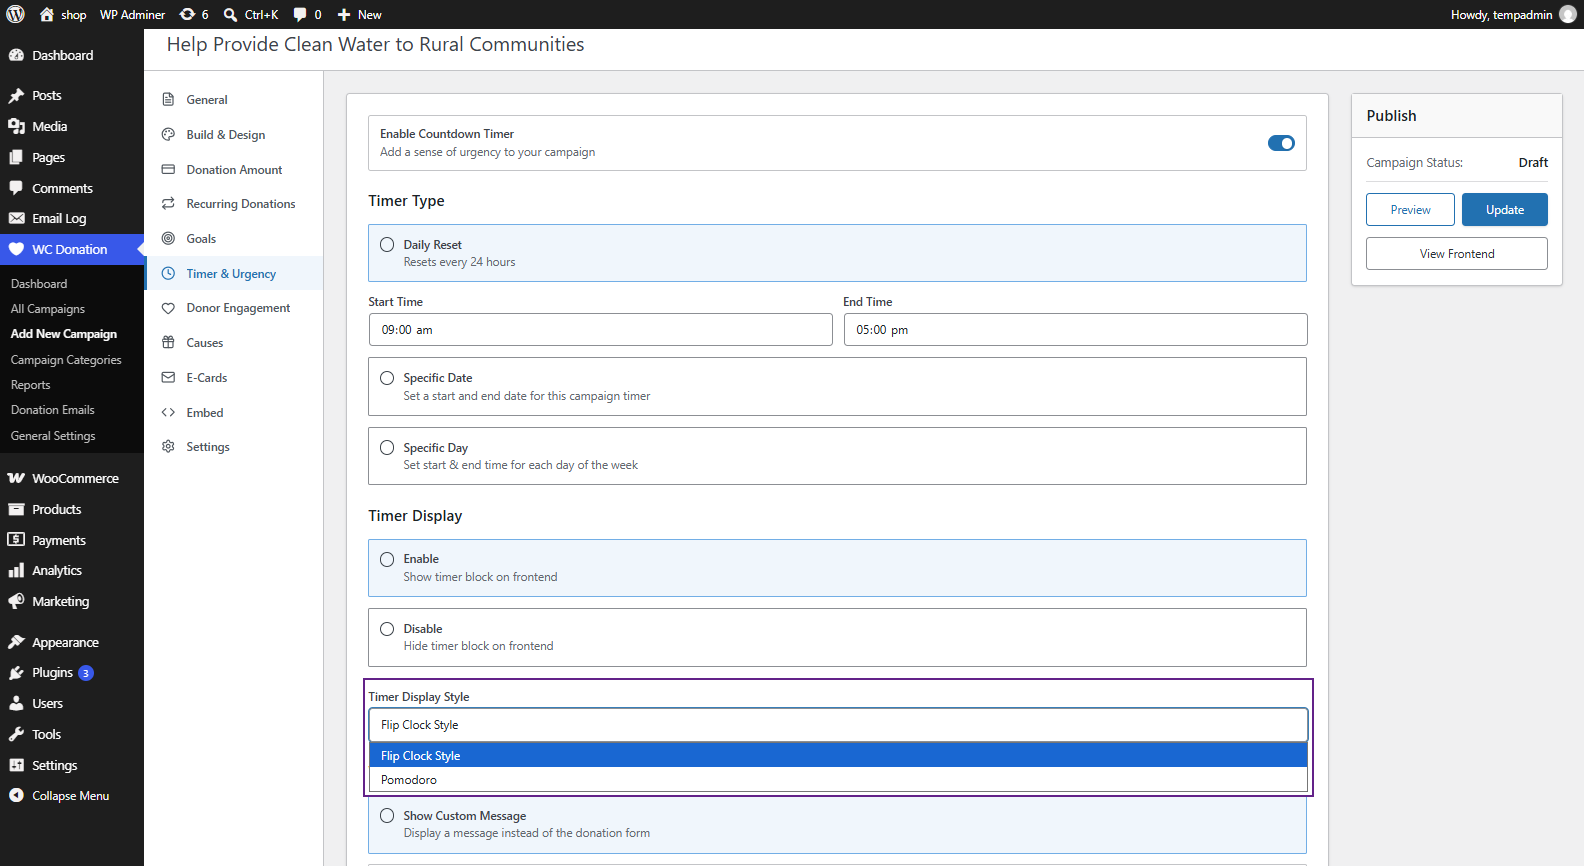
- Timer Display Style: Flip Clock Style or Pomodoro, when display is enabled.
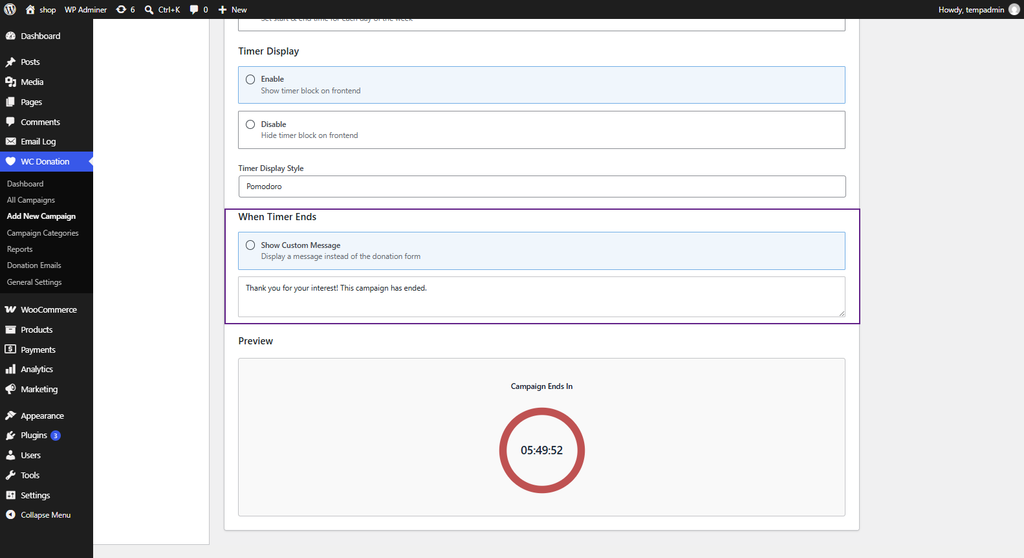
When Timer Ends
- Show Custom Message: Displays an End Message instead of the donation form once the timer’s window has ended.
Donor Engagement
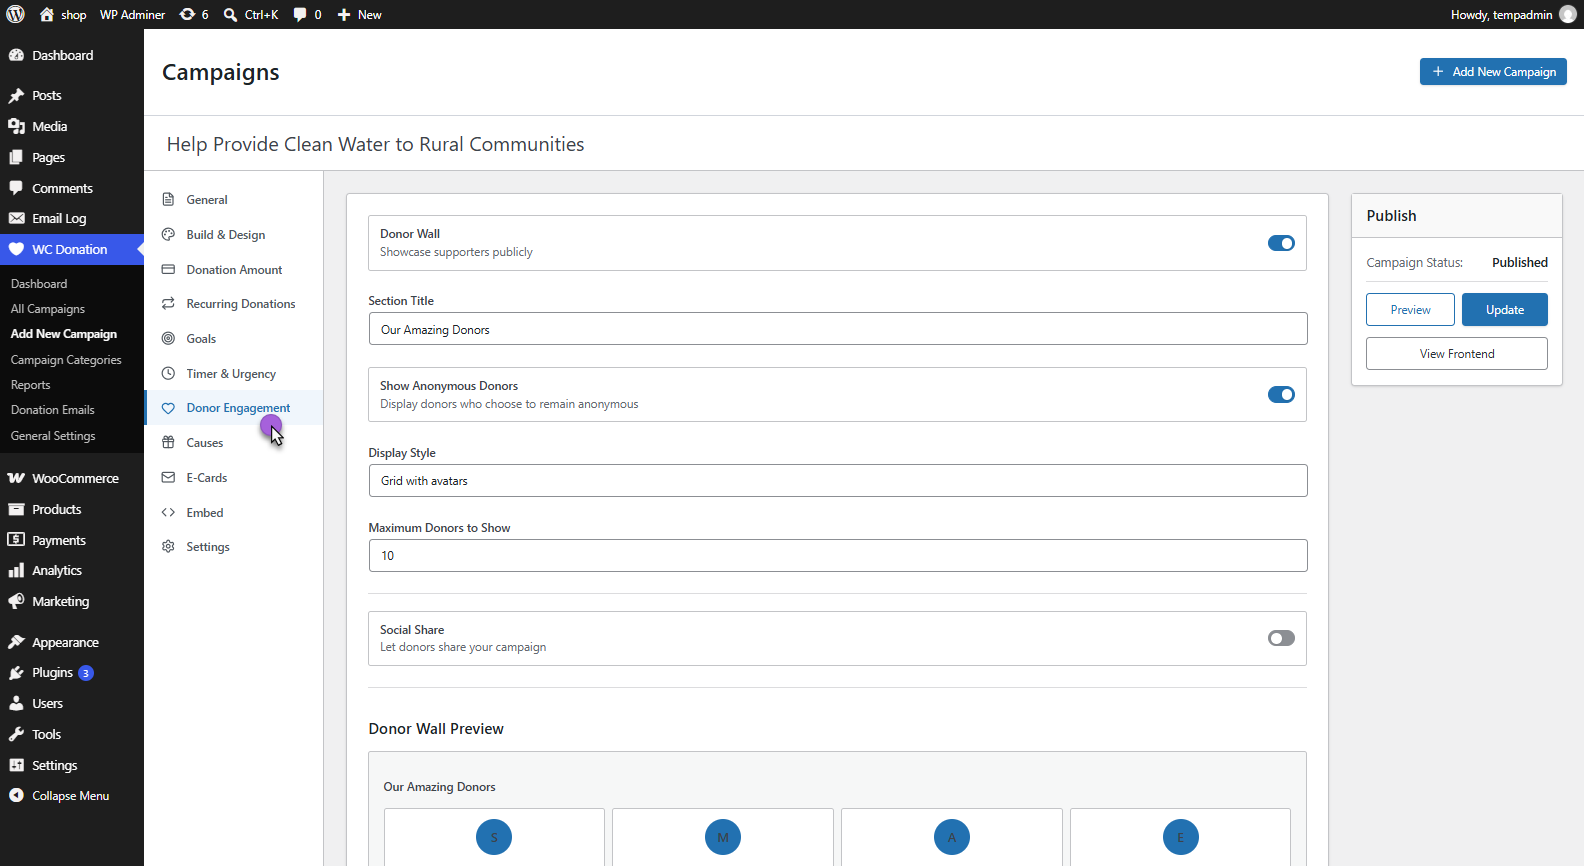
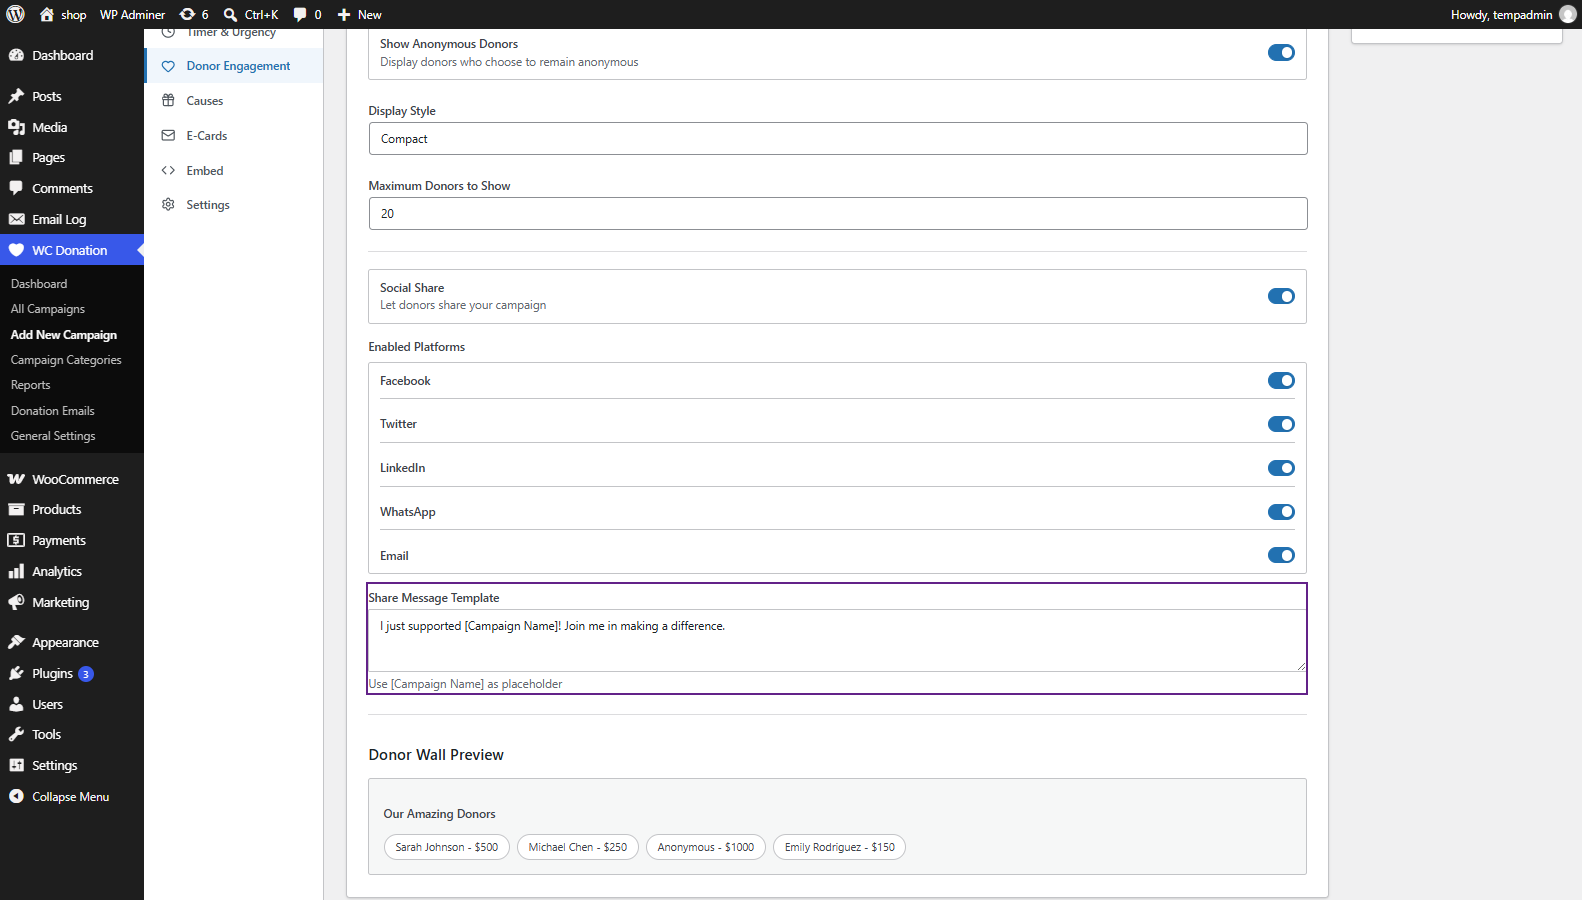
↑ Back to topThe Donor Engagement tab controls two donor-facing social features: publicly showcasing donors (the Donor Wall), and letting donors share the campaign on social media.
- Navigation: WordPress Admin Dashboard → WC Donation → Add New Campaign → Donor Engagement tab
Configuration
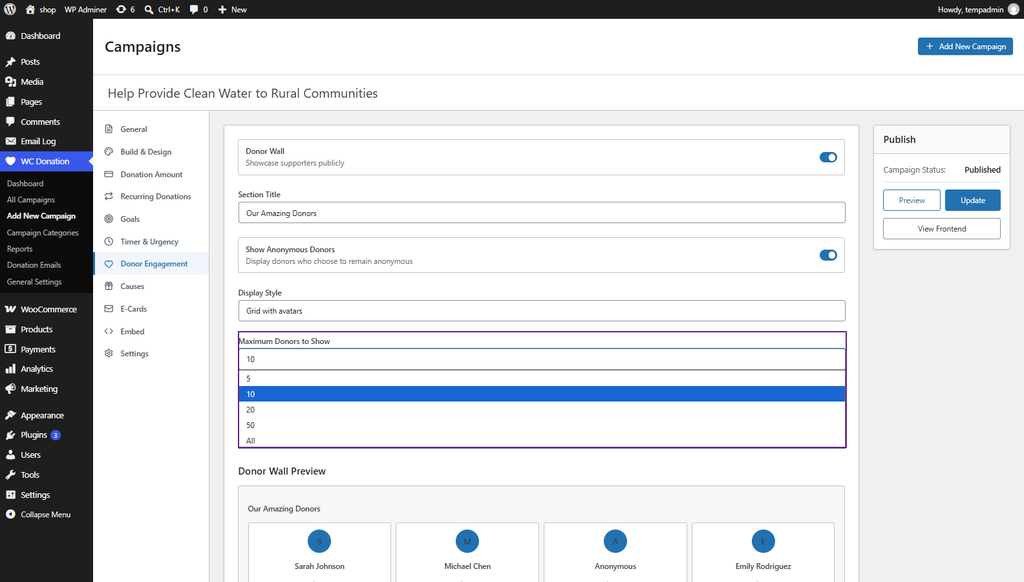
↑ Back to topDonor Wall
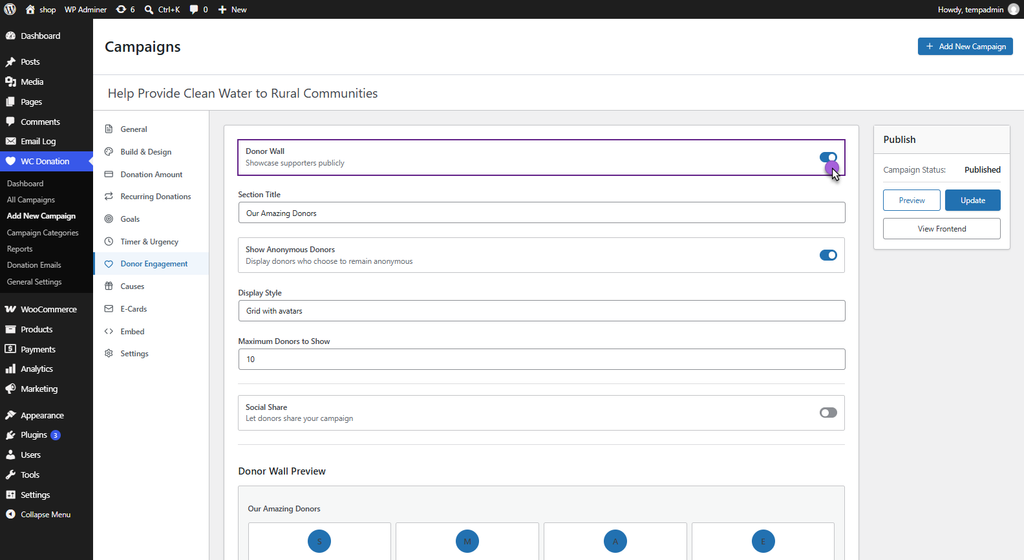
- Donor Wall: Master toggle to publicly showcase supporters.
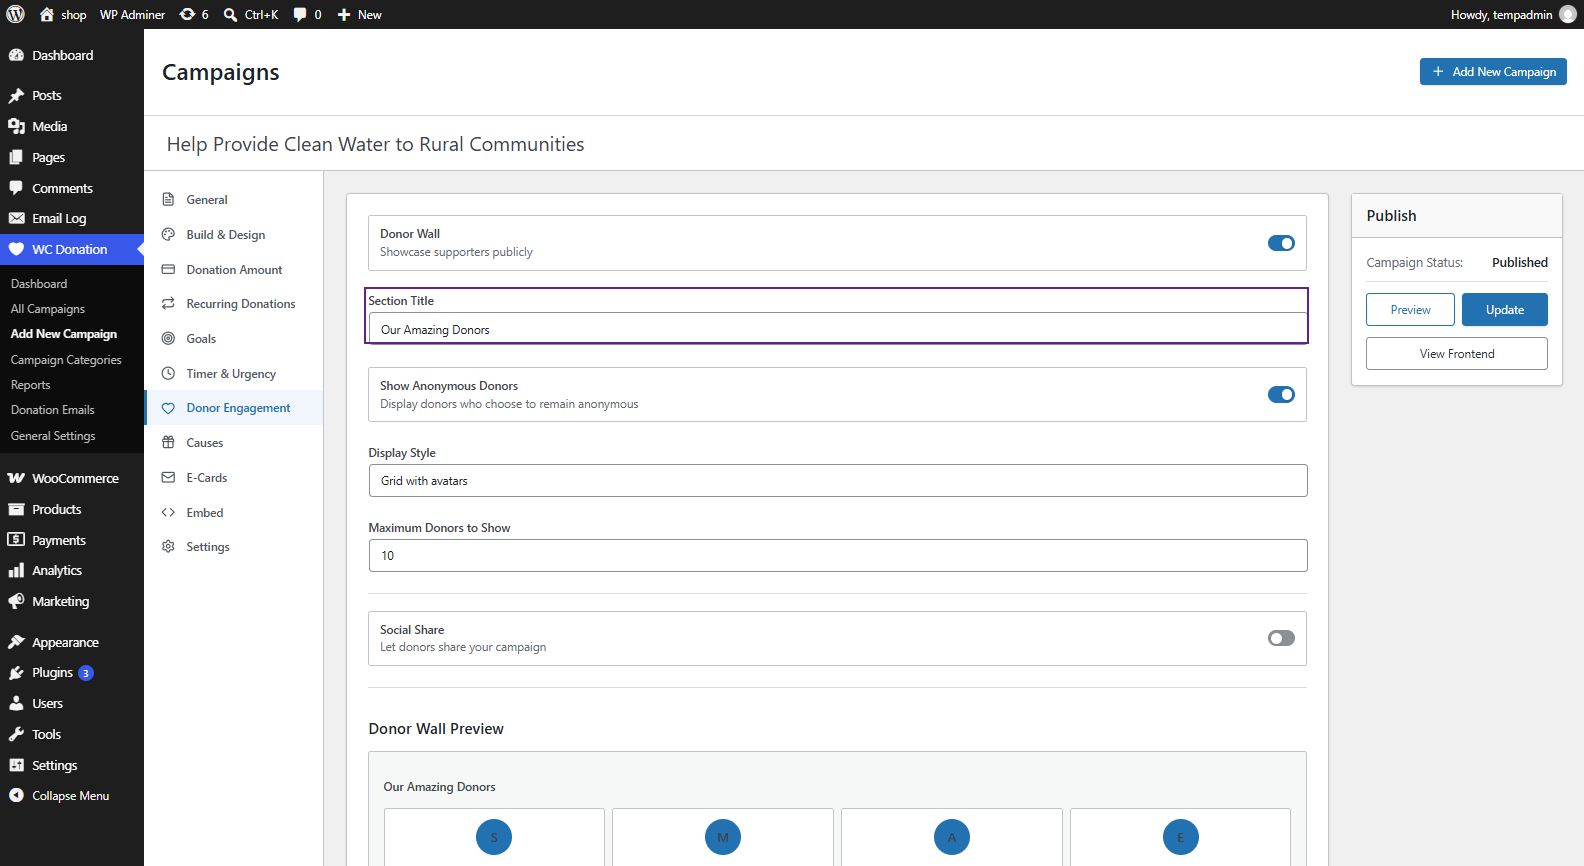
- Section Title: Heading shown above the donor list (default “Our Amazing Donors”).
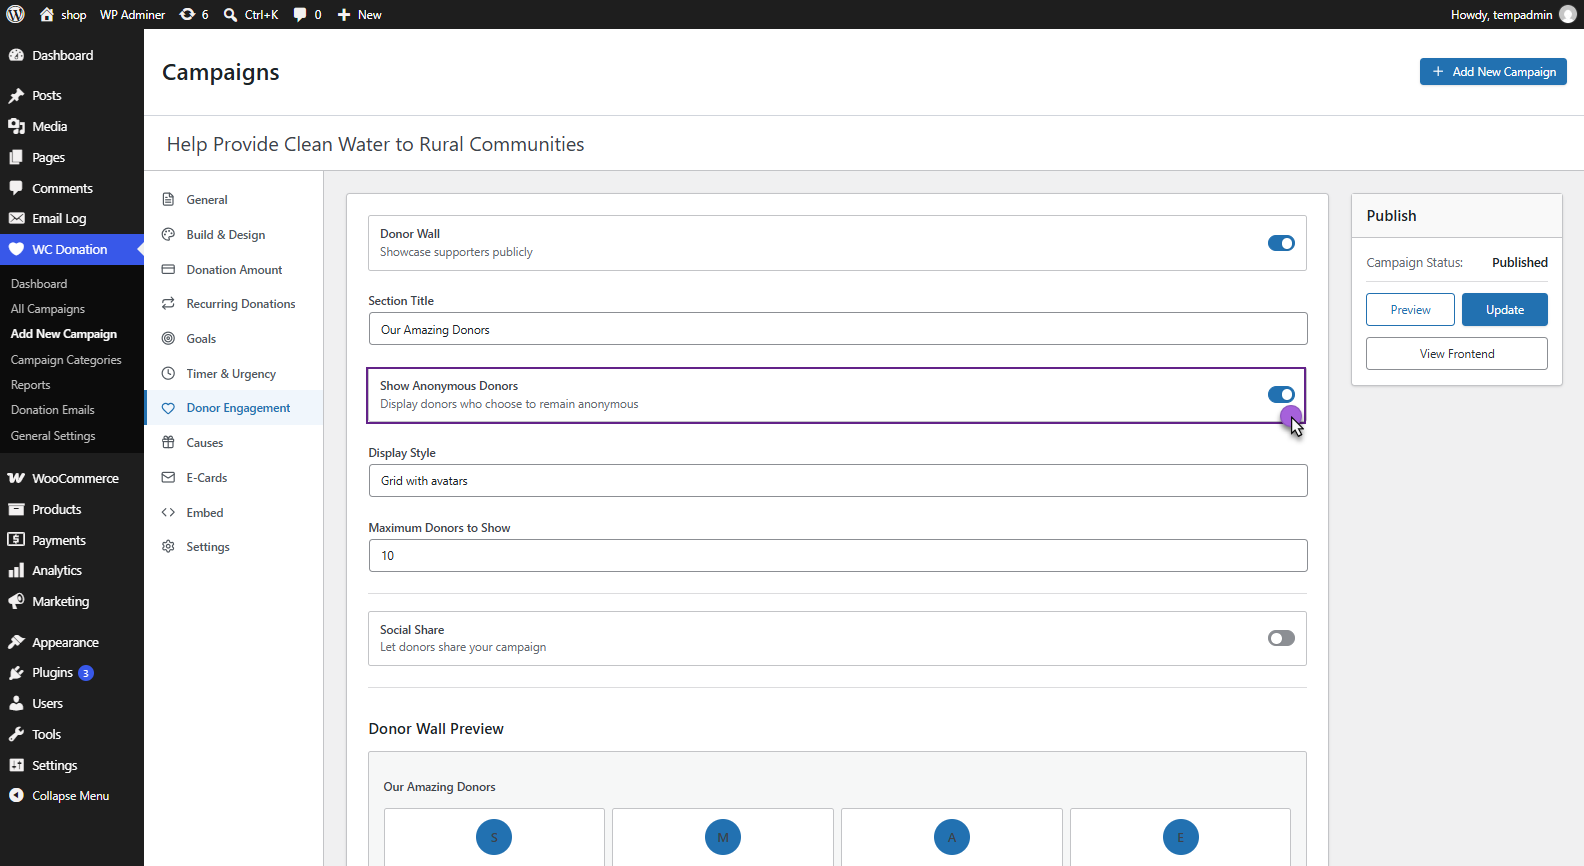
- Show Anonymous Donors: Whether donors who chose to remain anonymous are still listed (typically without their name).
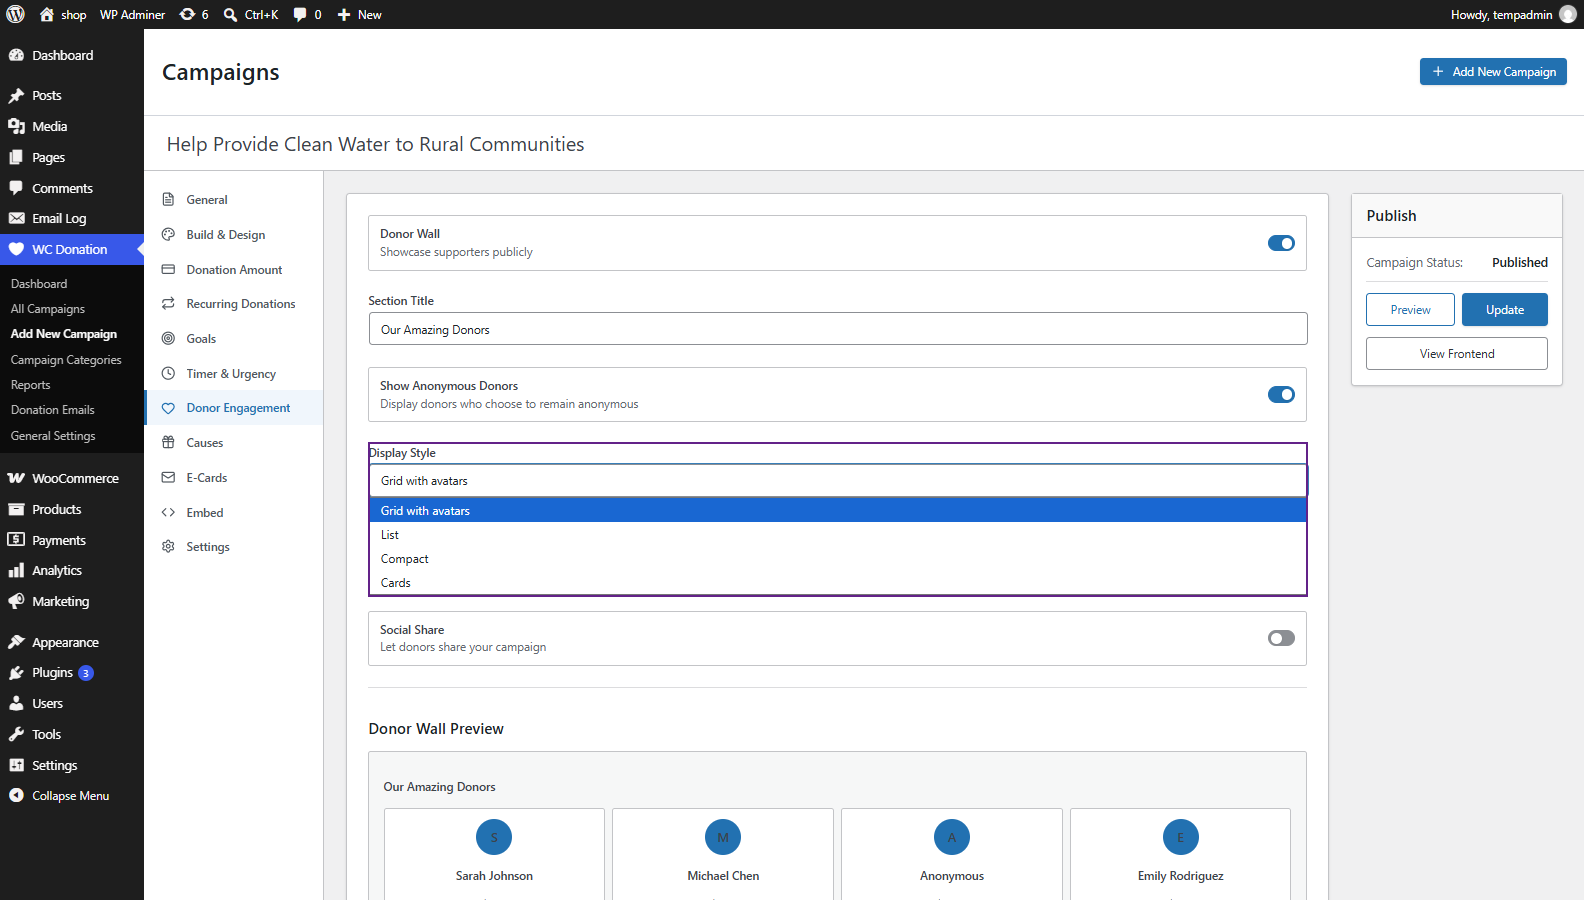
- Display Style: Grid with avatars, List, Compact, or Cards.
- Maximum Donors to Show: 5, 10, 20, 50, or All.
Front-End Impact
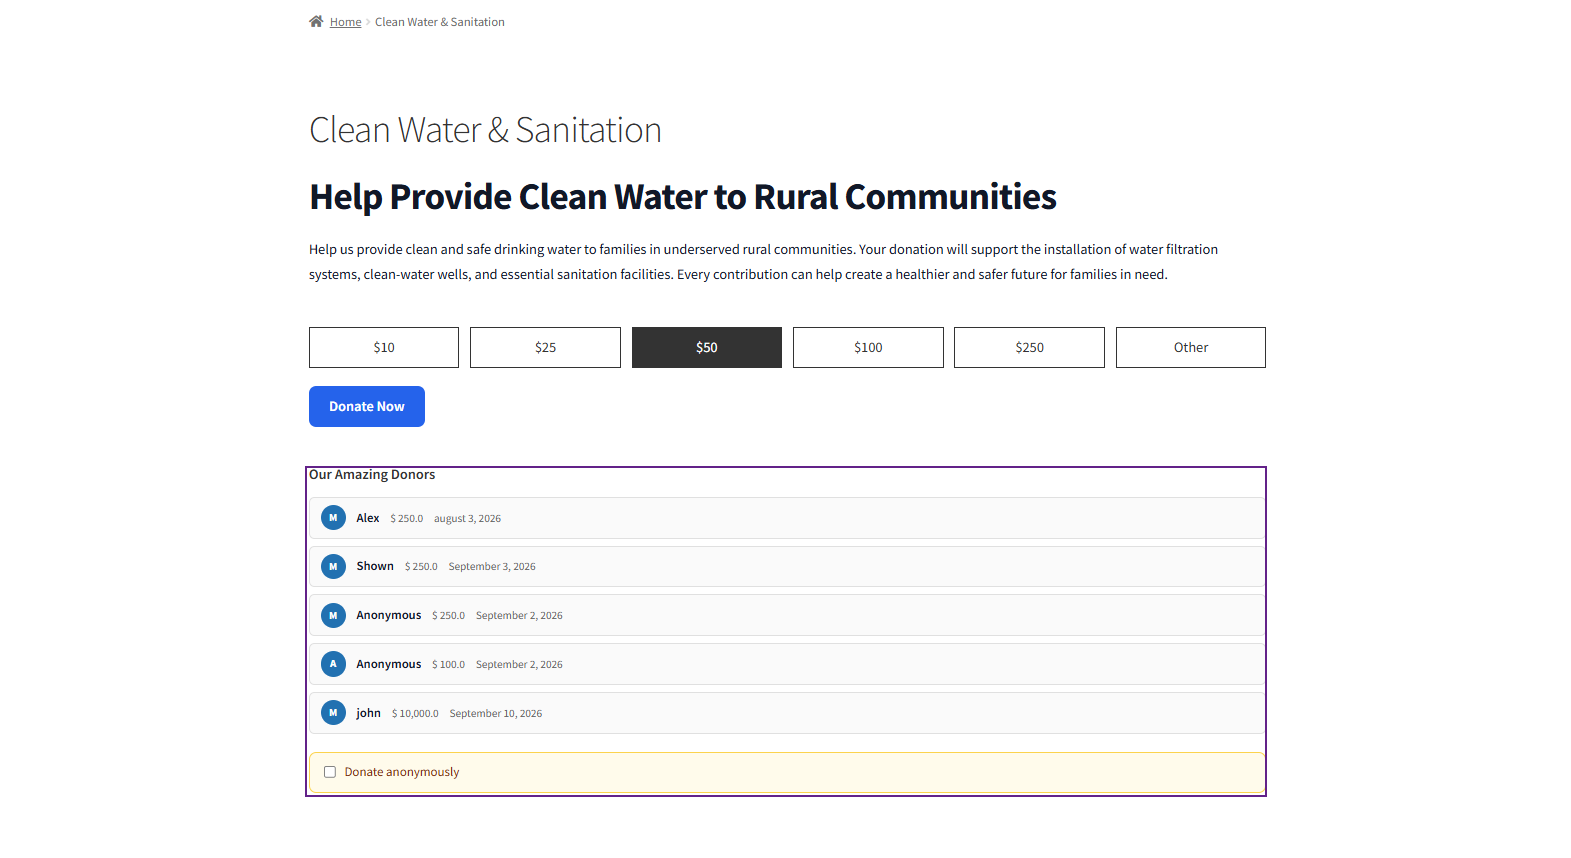
- A live Donor Wall Preview at the bottom of the tab mirrors the chosen Display Style before publishing.
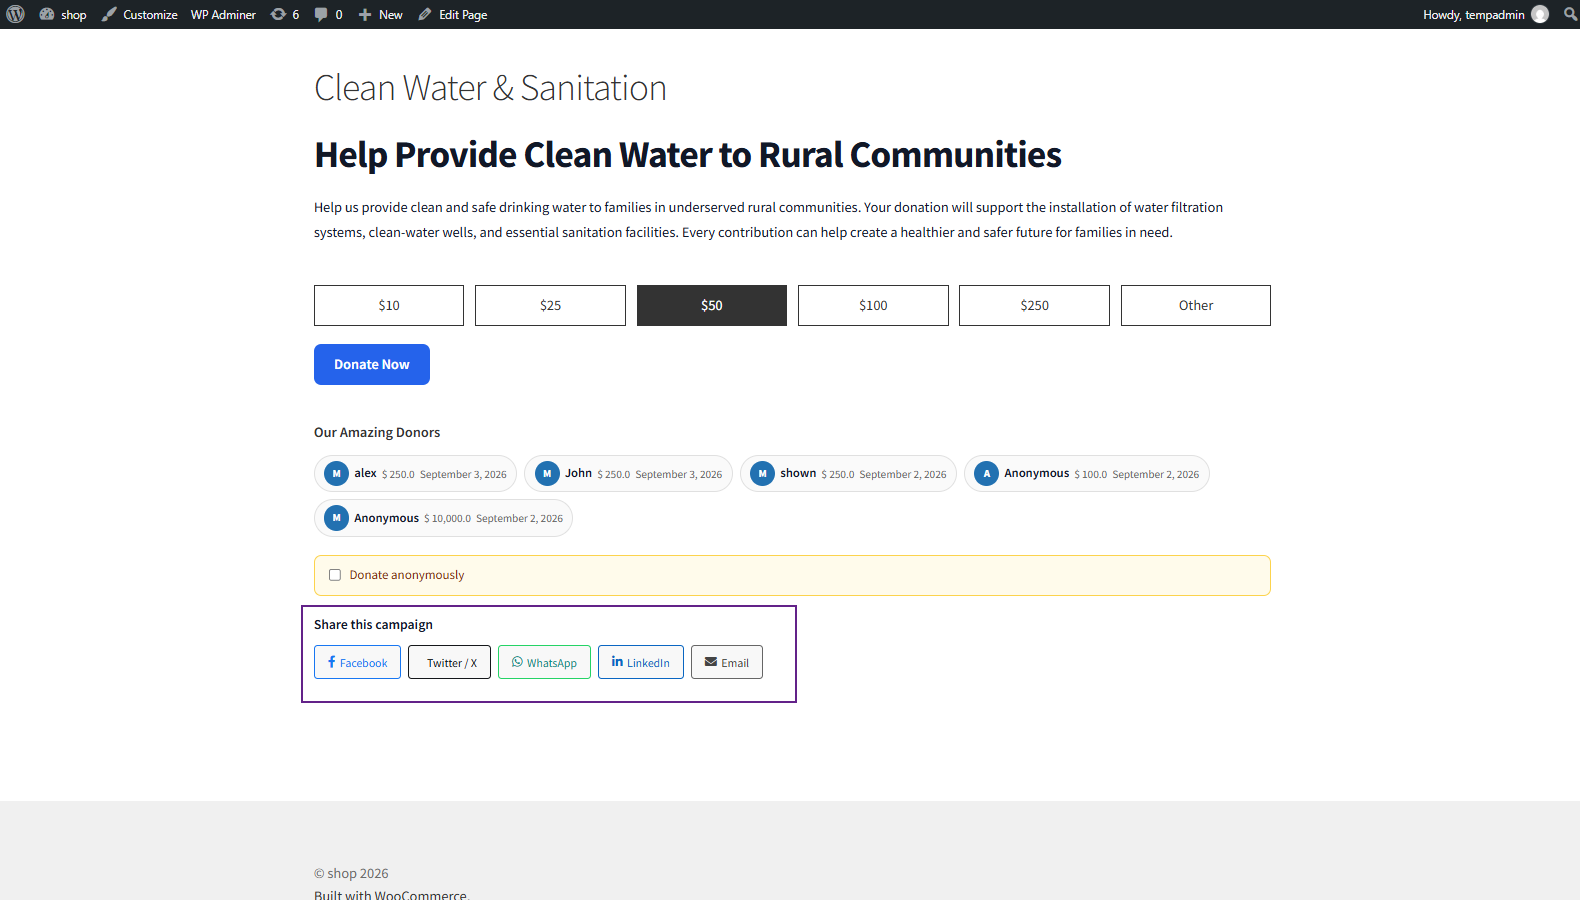
- On the live site, this tab drives the Donor Wall components in the Campaign Page Builder.
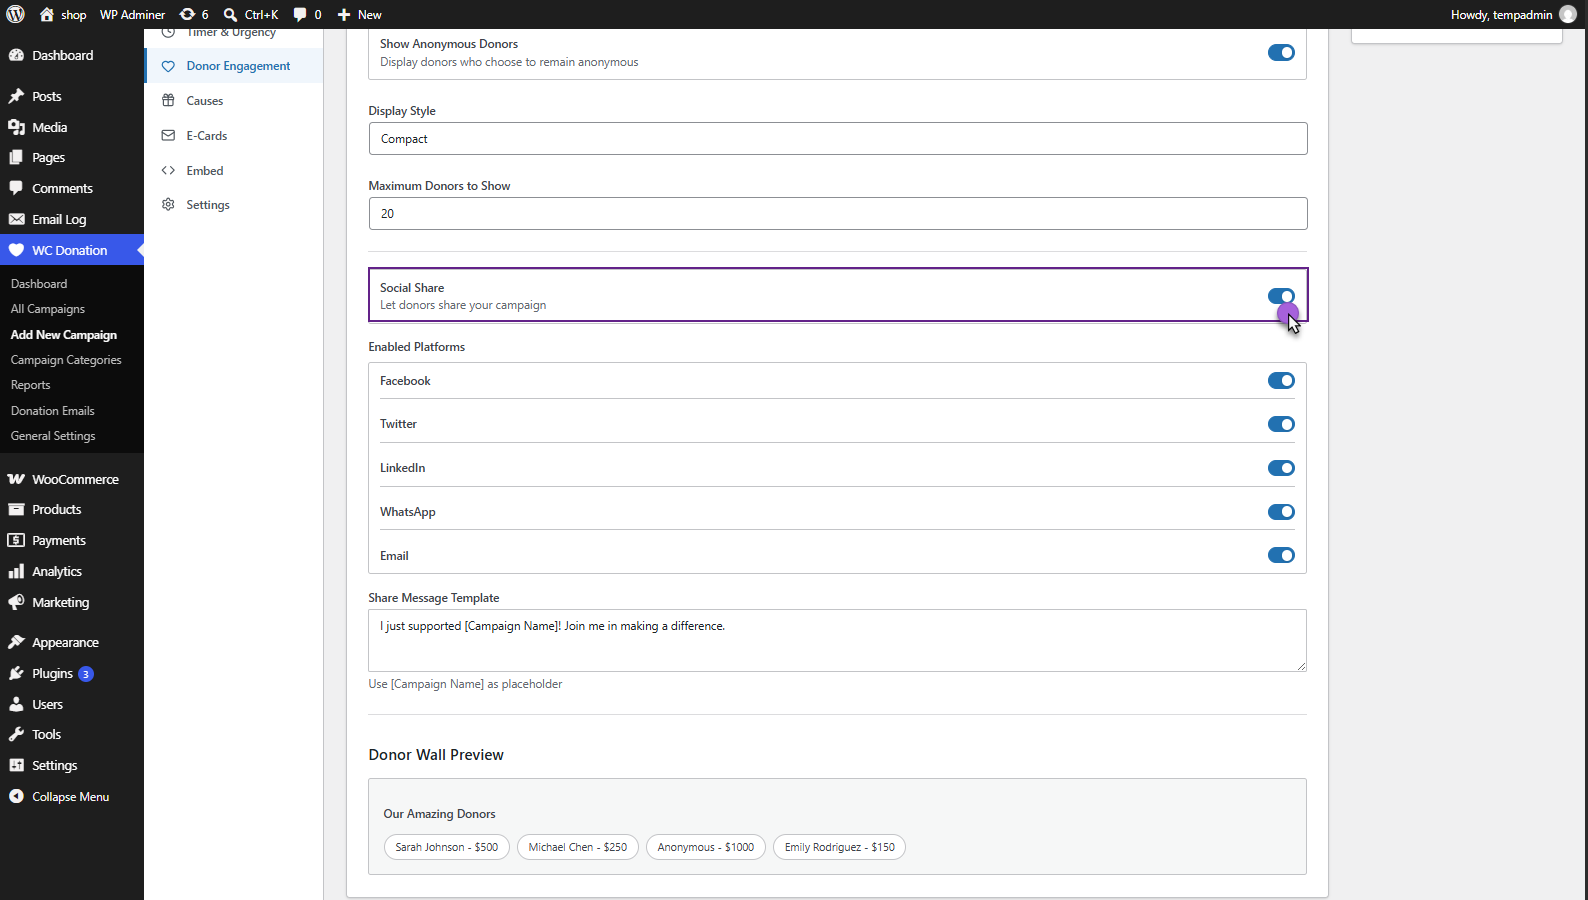
Social Share
- Social Share: Master toggle to let donors share the campaign.
- Enabled Platforms: Facebook, Twitter, LinkedIn, WhatsApp, and Email, each with its own toggle.
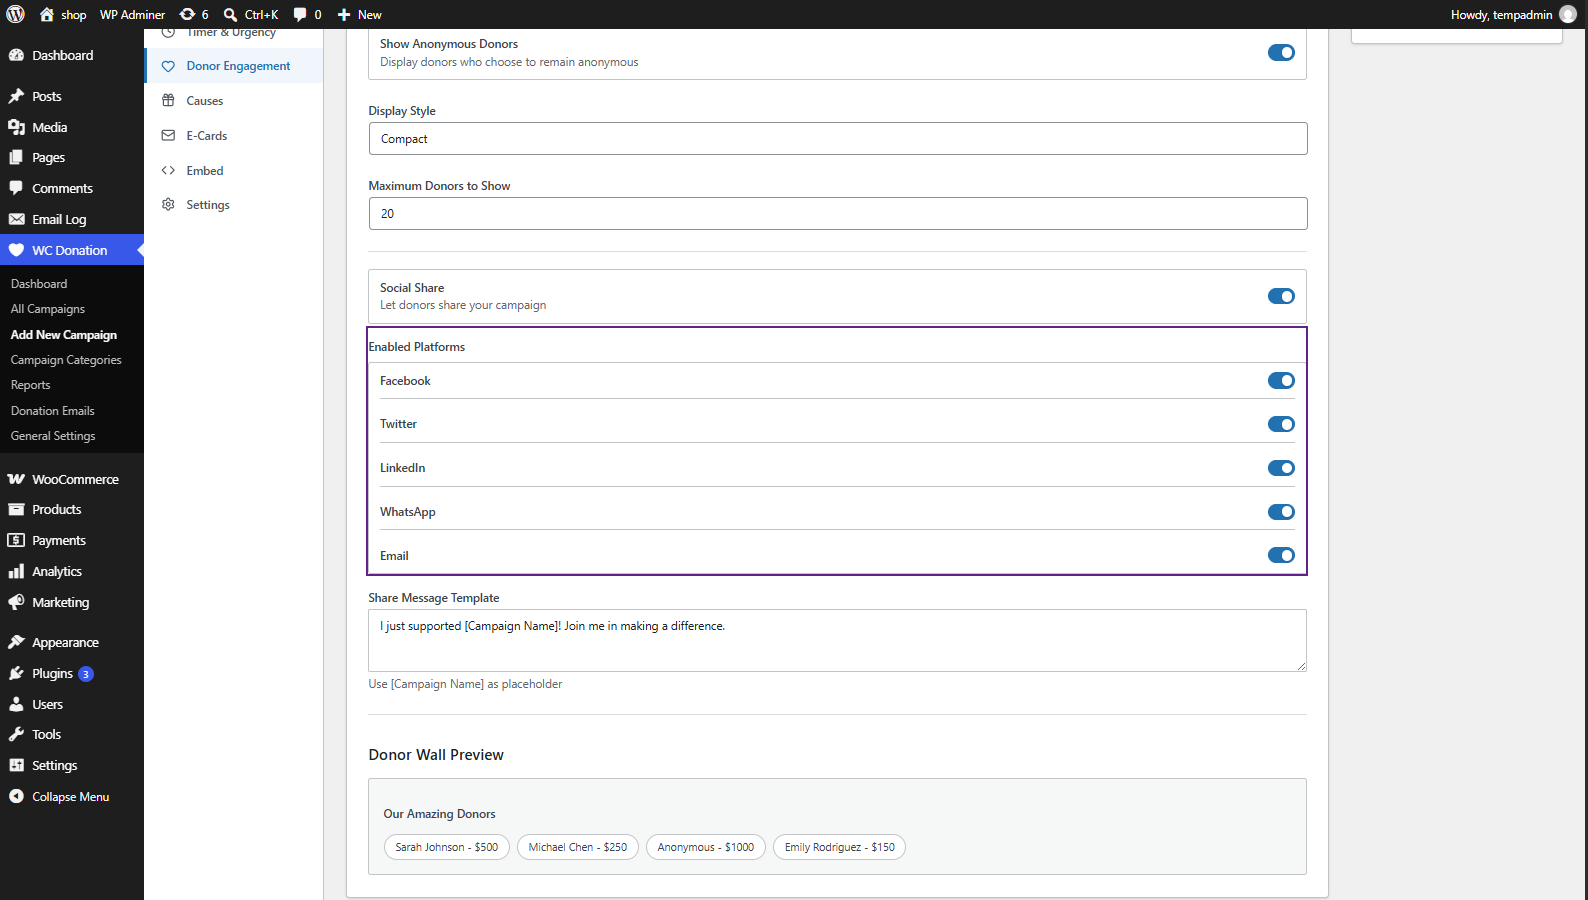
- Share Message Template: The pre-filled share text, supporting a [Campaign Name] placeholder (default: “I just supported [Campaign Name]! Join me in making a difference.”).
Front-End Impact
- On the live site, this tab drives the Social Share components in the Campaign Page Builder (Section 8).
Donation Causes
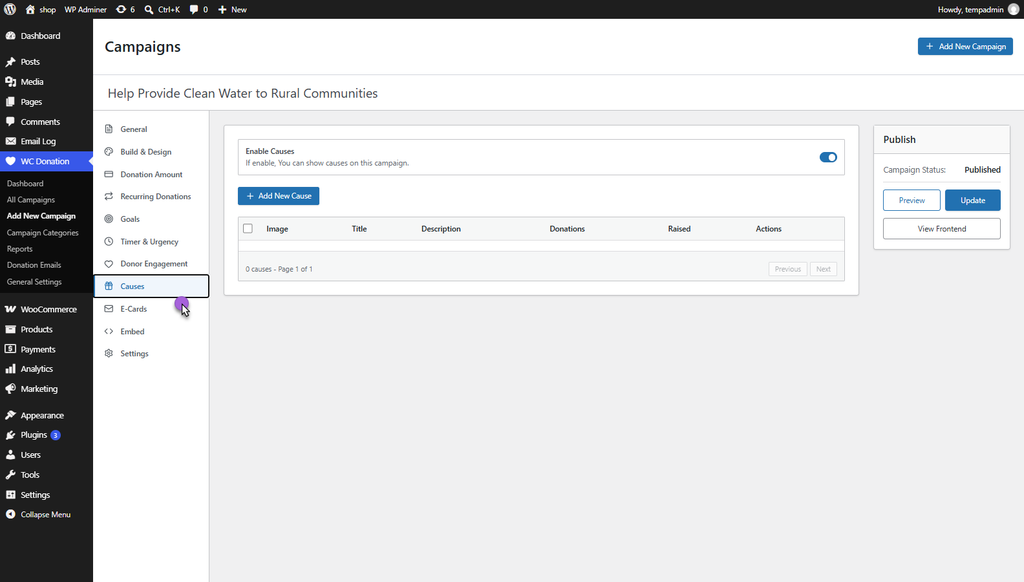
↑ Back to topCauses let a single campaign raise money for more than one specific purpose (for example, “Medical Supplies”, “Shelter”, “Food”), letting the donor choose which cause their gift supports.
- Navigation: WordPress Admin Dashboard → WC Donation → Add New Campaign → Causes tab
Configuration
↑ Back to top- Enable Causes: Master toggle. When off, the campaign shows no cause selector.
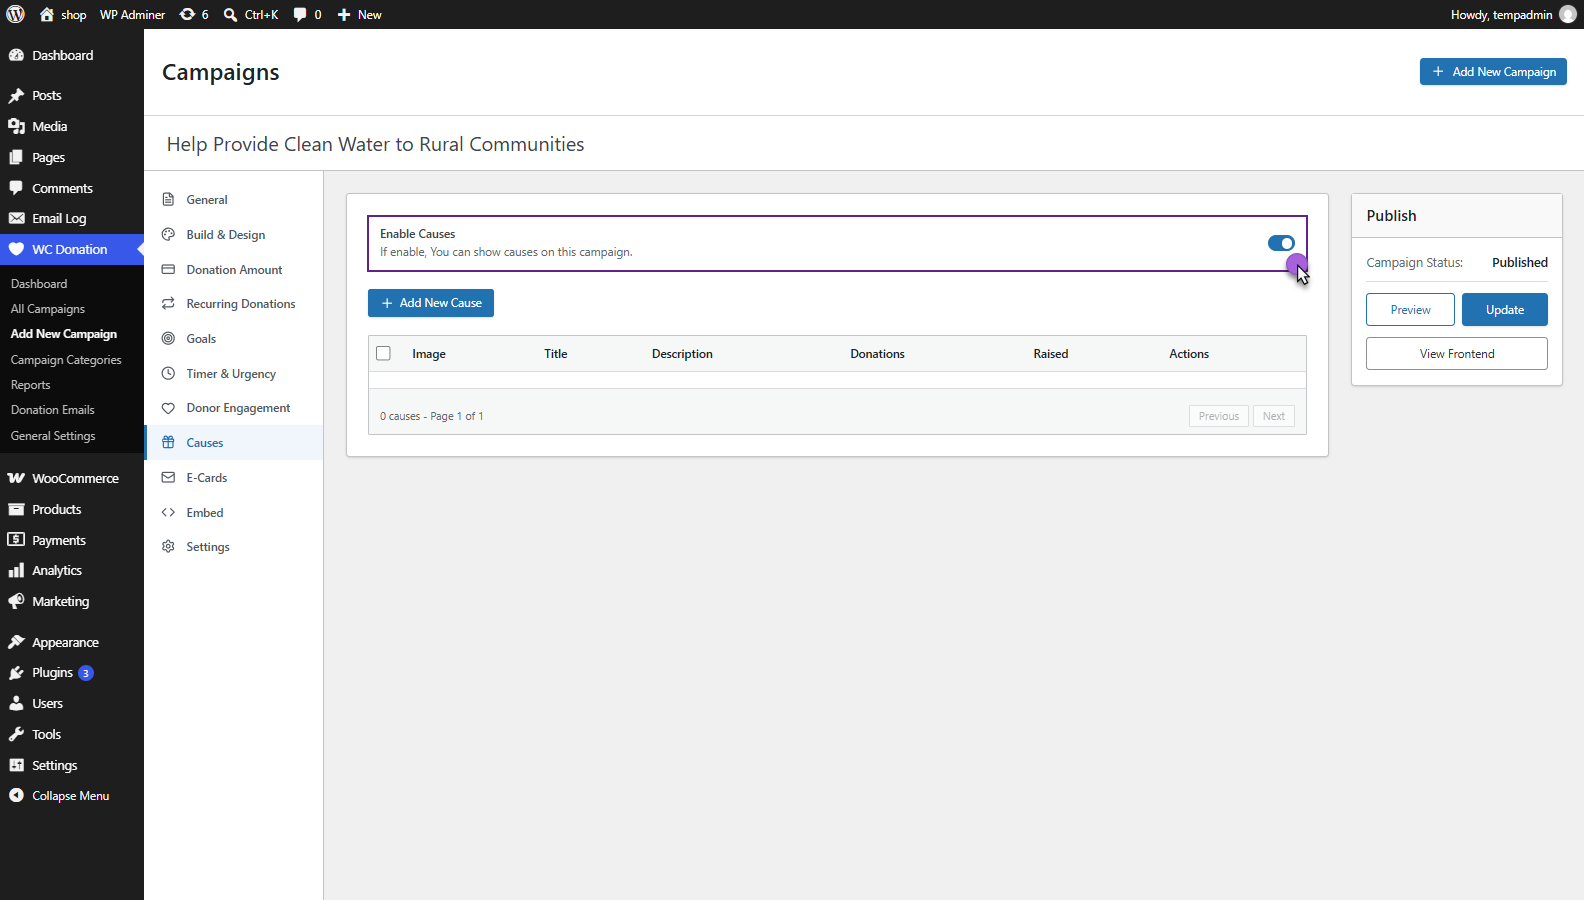
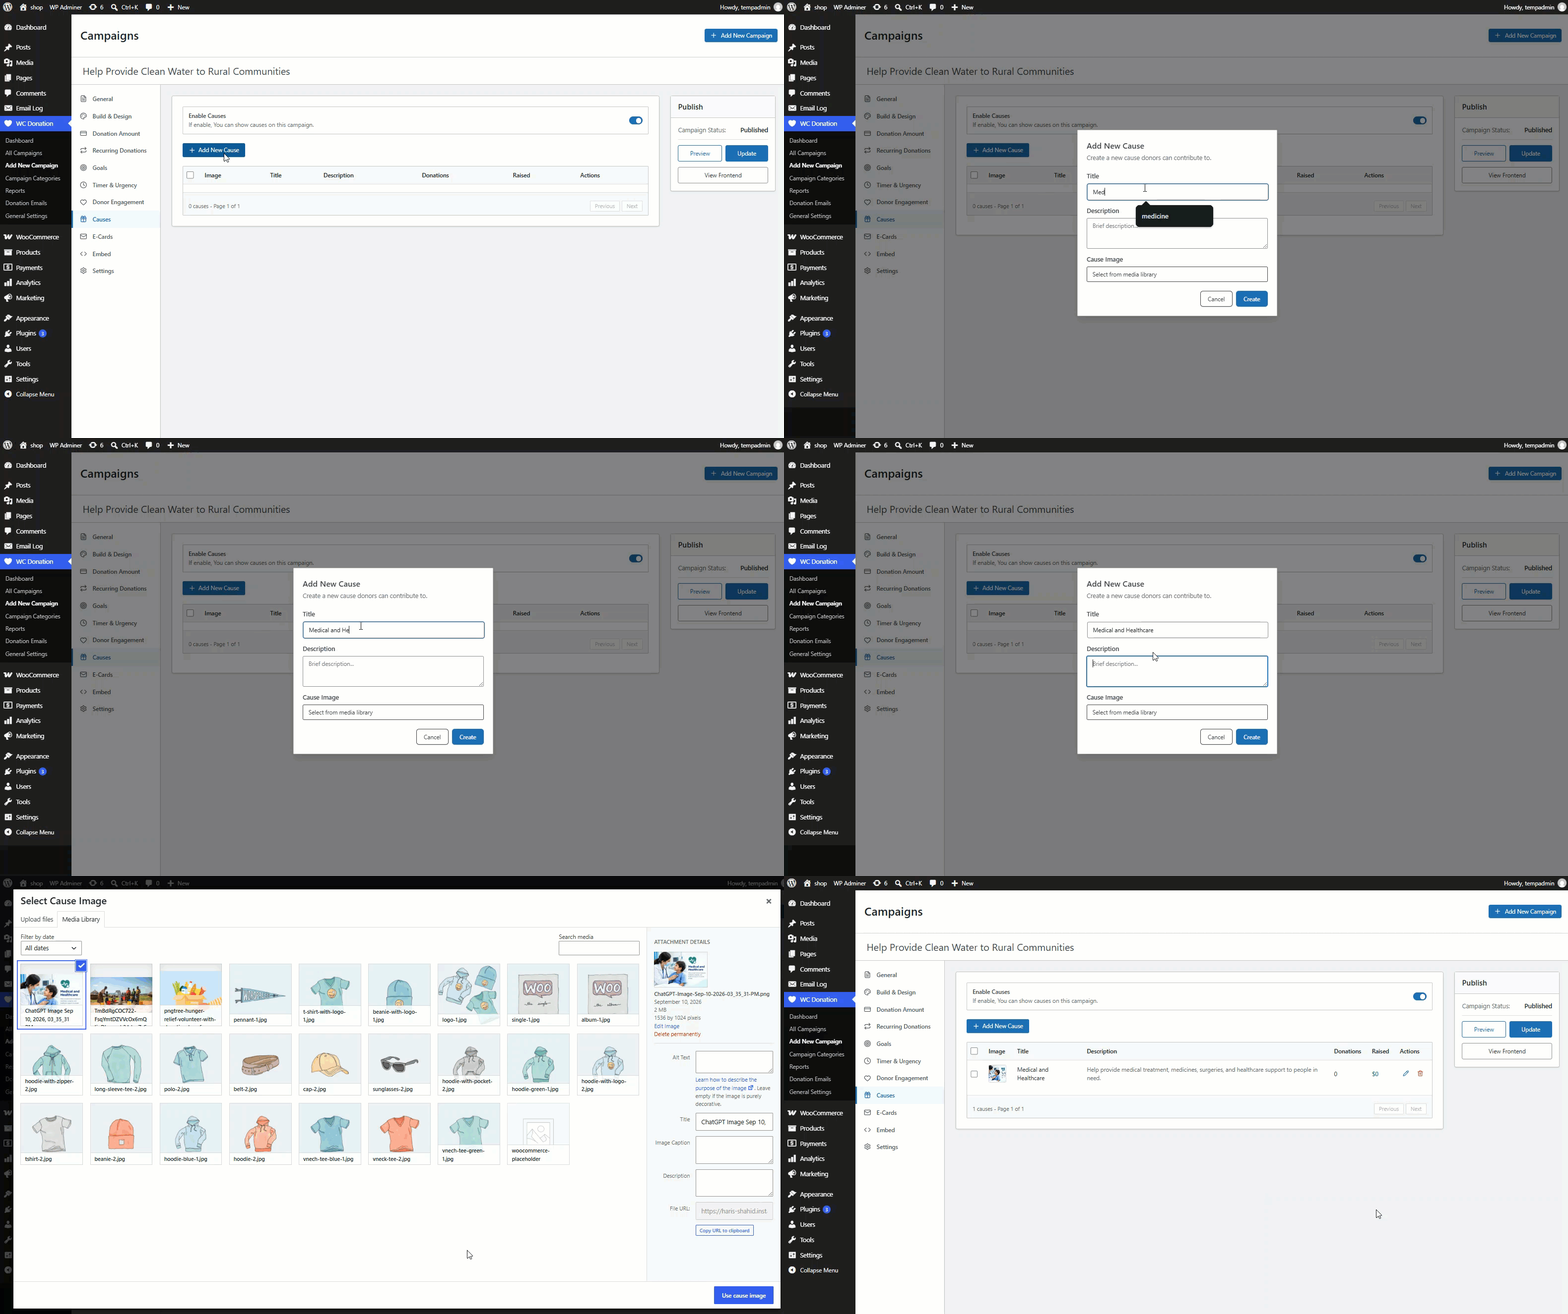
- Add New Cause: Opens a dialog to create a cause with a Title, a Description, and a Cause Image.
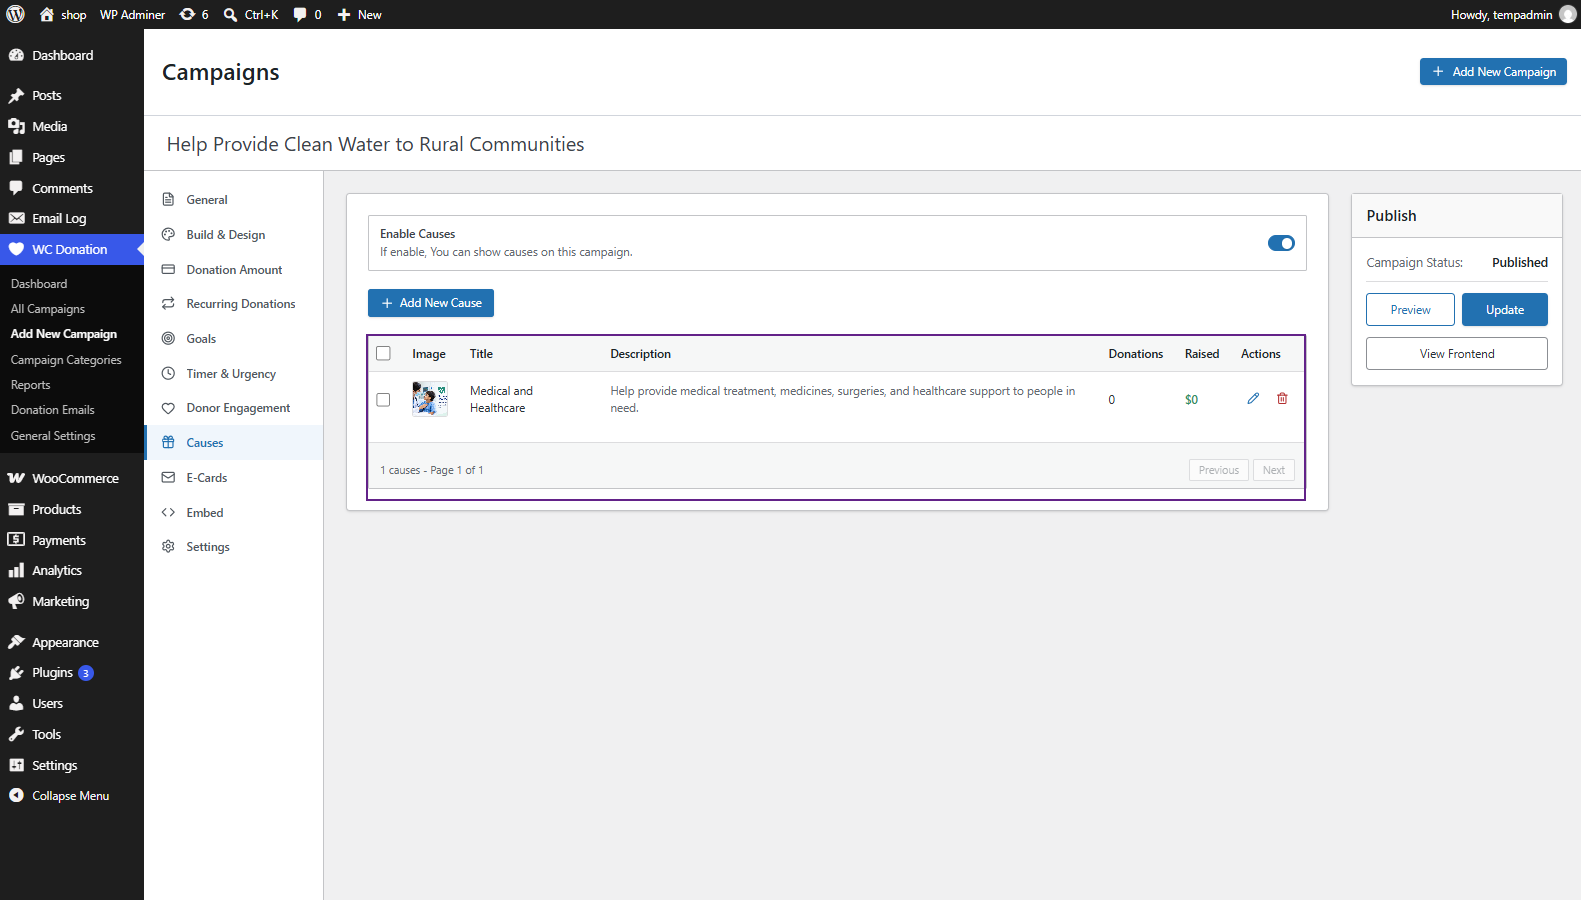
- Causes table: Lists every cause with its Image, Title, Description, running Donations count, and Raised amount, plus per-row Edit and Delete actions. The table is paginated at 10 rows per page and supports row selection with checkboxes for bulk actions.
Front-End Impact
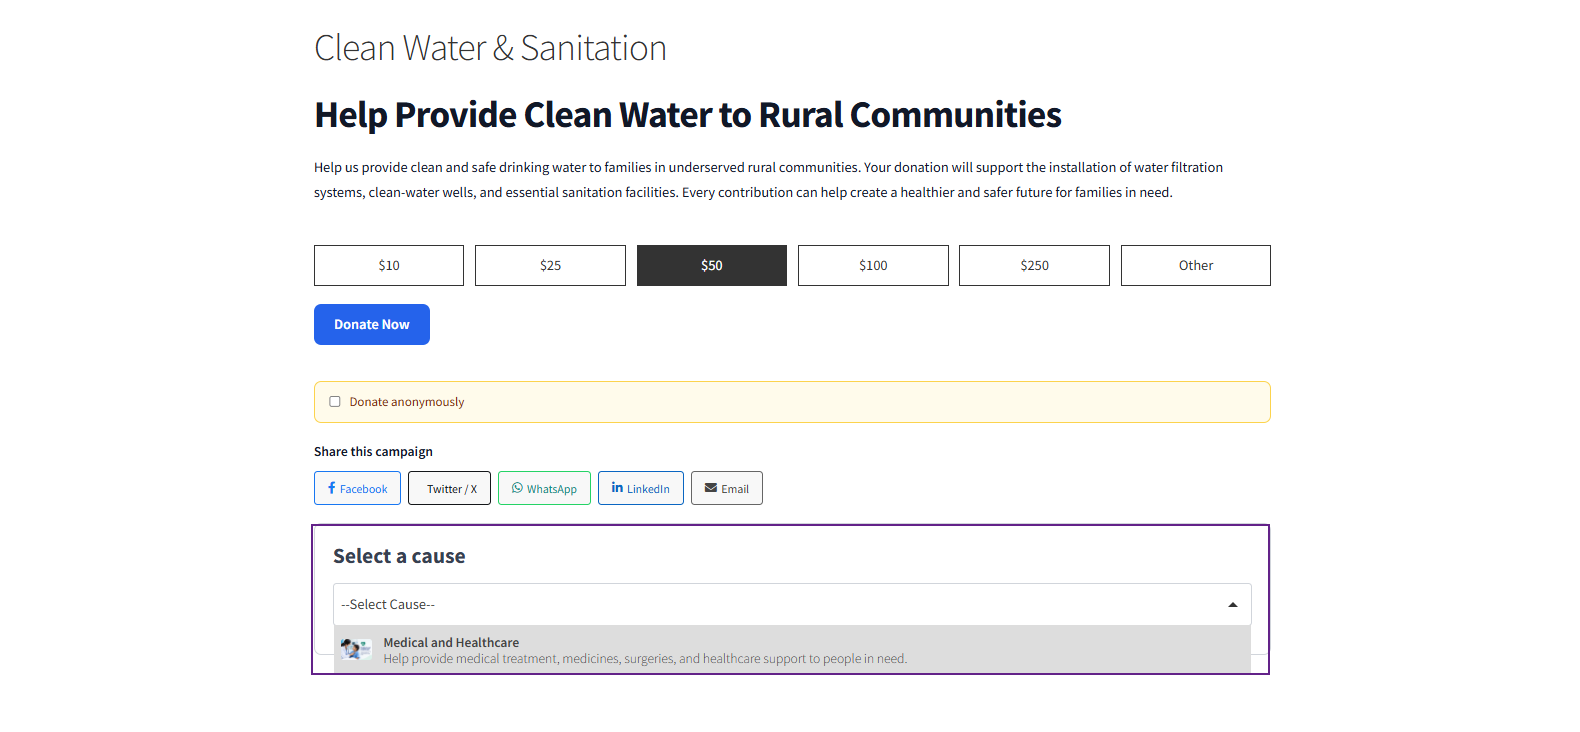
- When enabled, a cause-selection control (dropdown or list, depending on the Donation Cause component’s settings) appears on the donation form, letting the donor pick which cause their donation is earmarked for. This table and Donation Reports track and show donation totals and counts for each cause.
E-Cards
↑ Back to topE-Cards are thank-you card graphics sent to a donor by email after they give. A campaign can use one of several built-in template designs, or upload a fully custom template image.
- Navigation: WordPress Admin Dashboard → WC Donation → Add New Campaign → E-Cards tab
Configuration
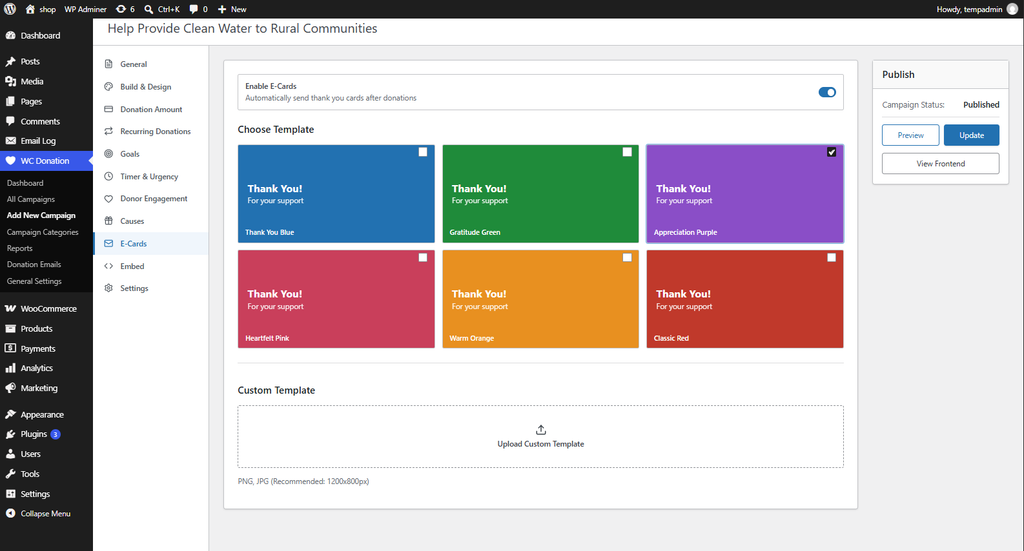
↑ Back to top- Enable E-Cards: Master toggle (“Send thank you cards in Donation Emails after donations”). If disabled, the tab shows only a notice that E-Cards are disabled.
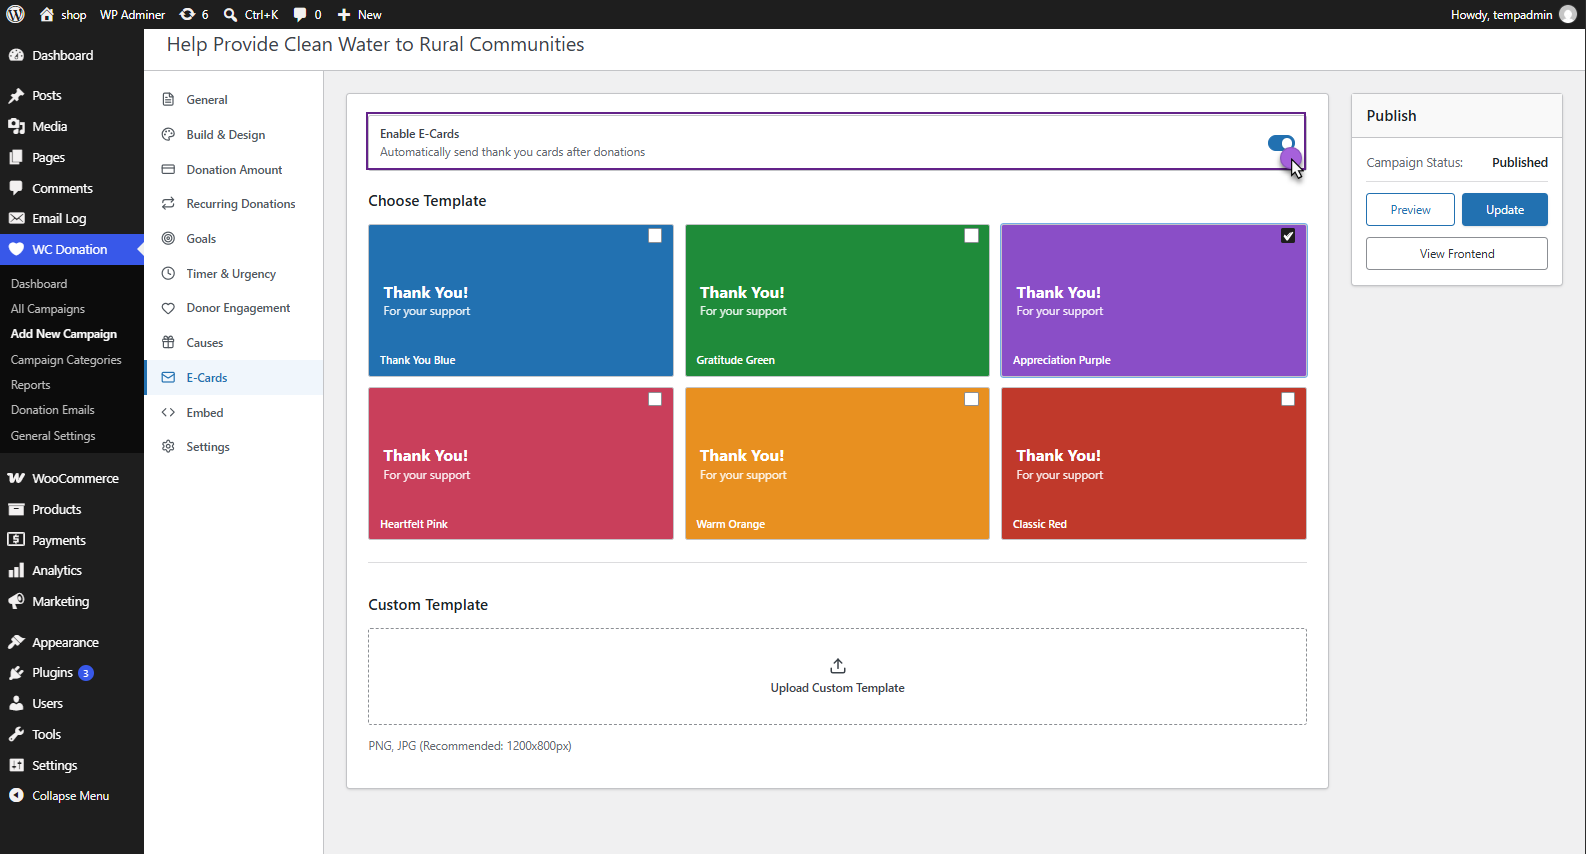
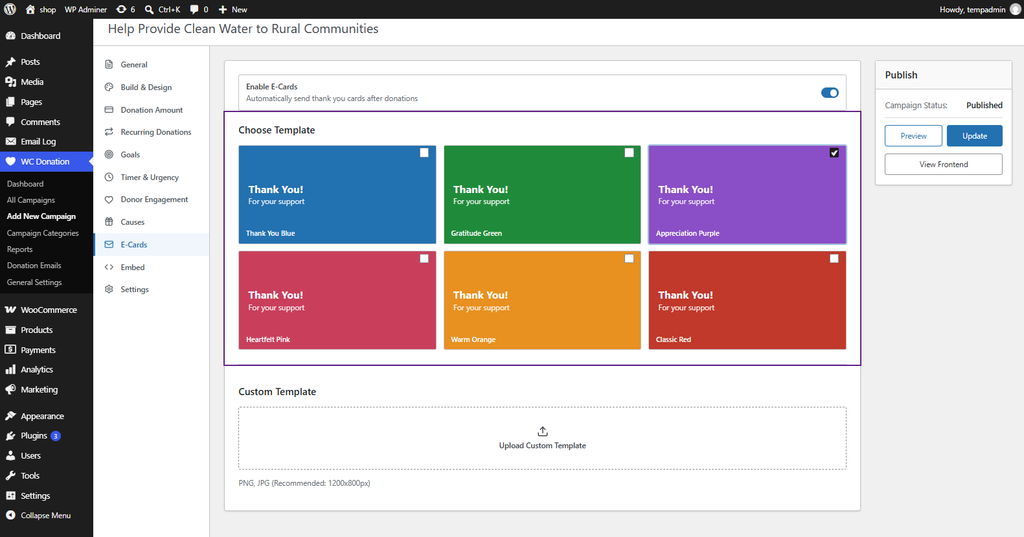
- Choose Template: A gallery of built-in colour templates, each rendered as a “Thank You! For your support” card. Templates observed in the plugin’s own naming include Classic Red, Gratitude Green, Thank You Blue, Warm Orange, Appreciation Purple, and Heartfelt Pink. Selecting a template highlights it with a checkmark.
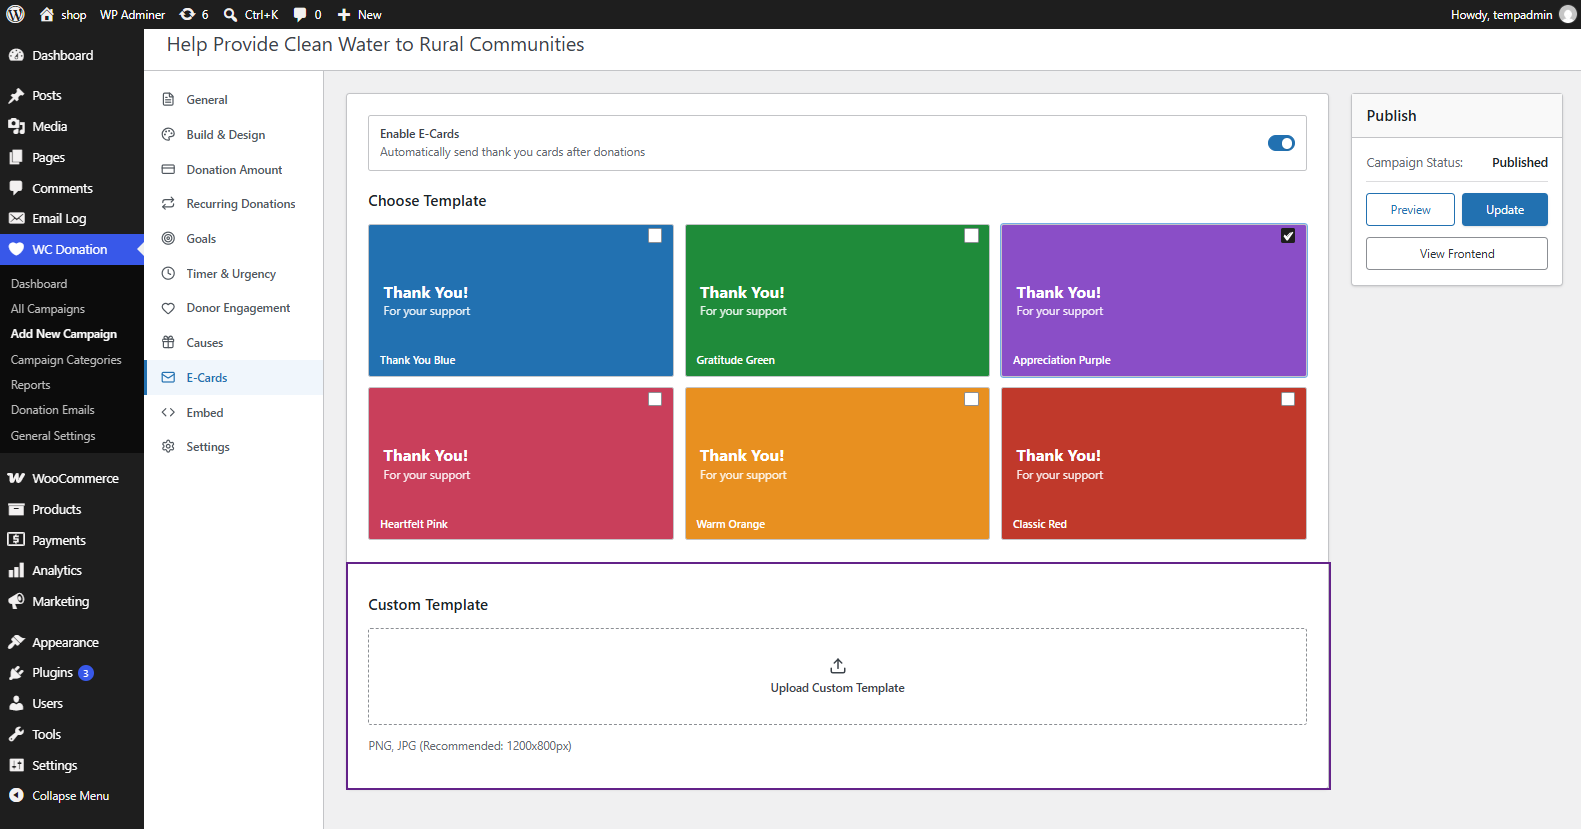
- Custom Template: Upload a fully custom card image instead of a built-in template (PNG or JPG, recommended 1200×800px), with the ability to remove it and revert to a built-in template.
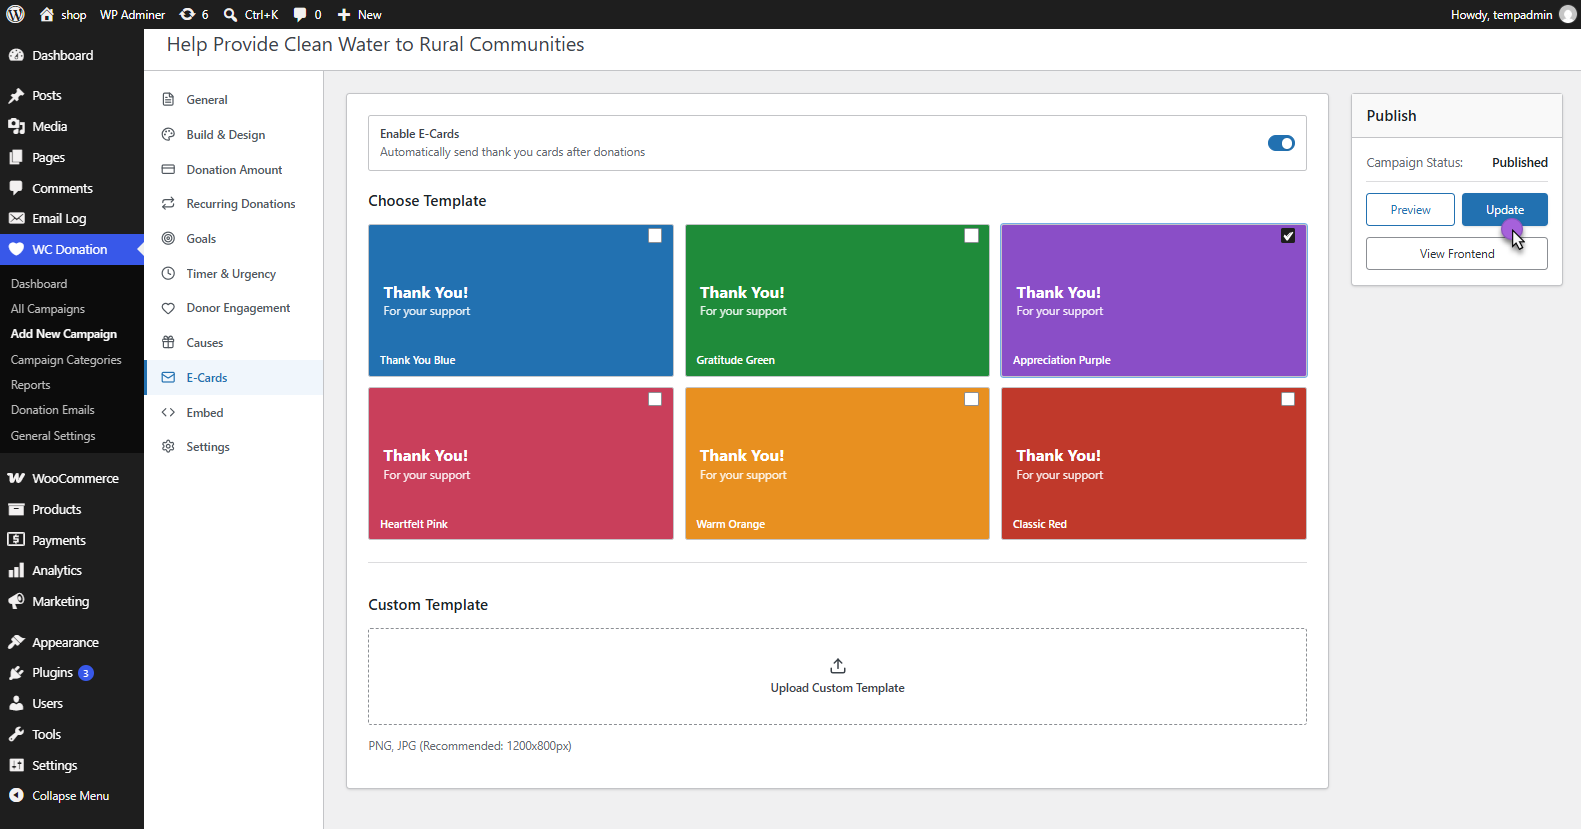
- Click Update to save the changes.
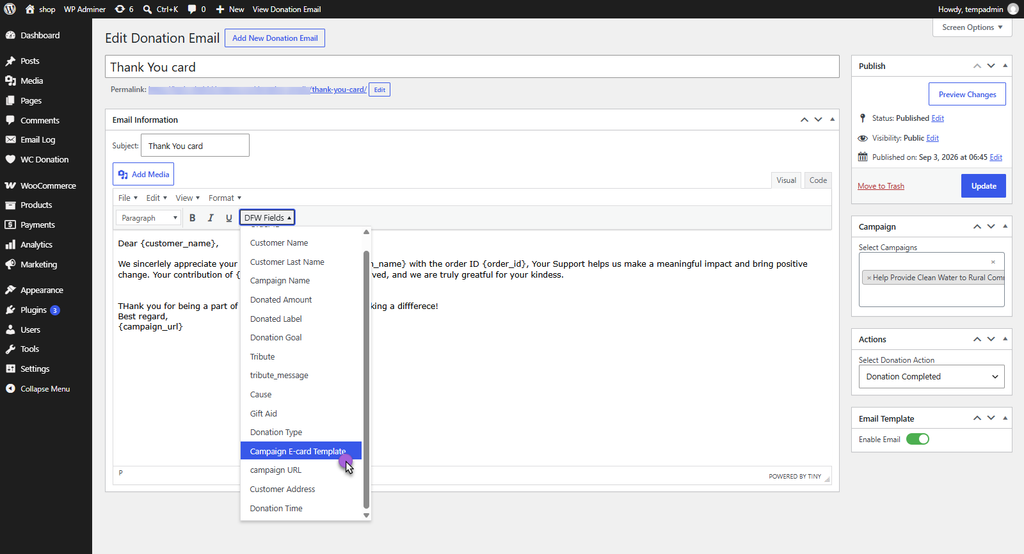
- Now, navigate to WordPress Admin Dashboard > WC Donation > Donation Emails > Edit Email.
- Use the DFW Fields dropdown to insert the E-Card Template tag into the email.
Front End Impact
- When a user donates to a campaign and the order status is marked as Completed, as set by the admin, the system will trigger and send an email with the E-Card Template to the user.

Campaign Embed
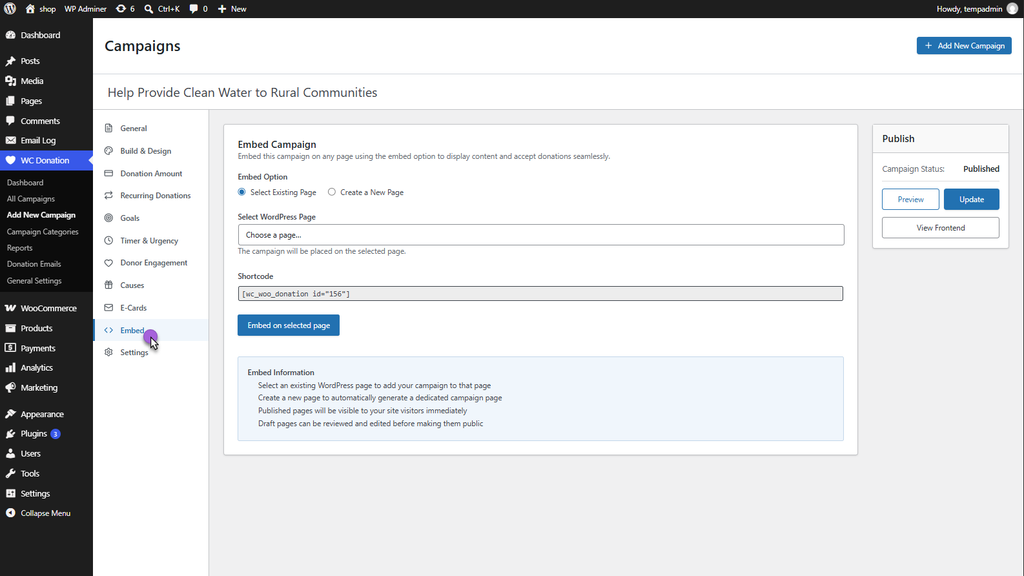
↑ Back to topThe Embed tab is the primary tool for placing a saved campaign onto a live WordPress page.
- Navigation: WordPress Admin Dashboard → WC Donation → Add New Campaign → Embed tab
Configuration
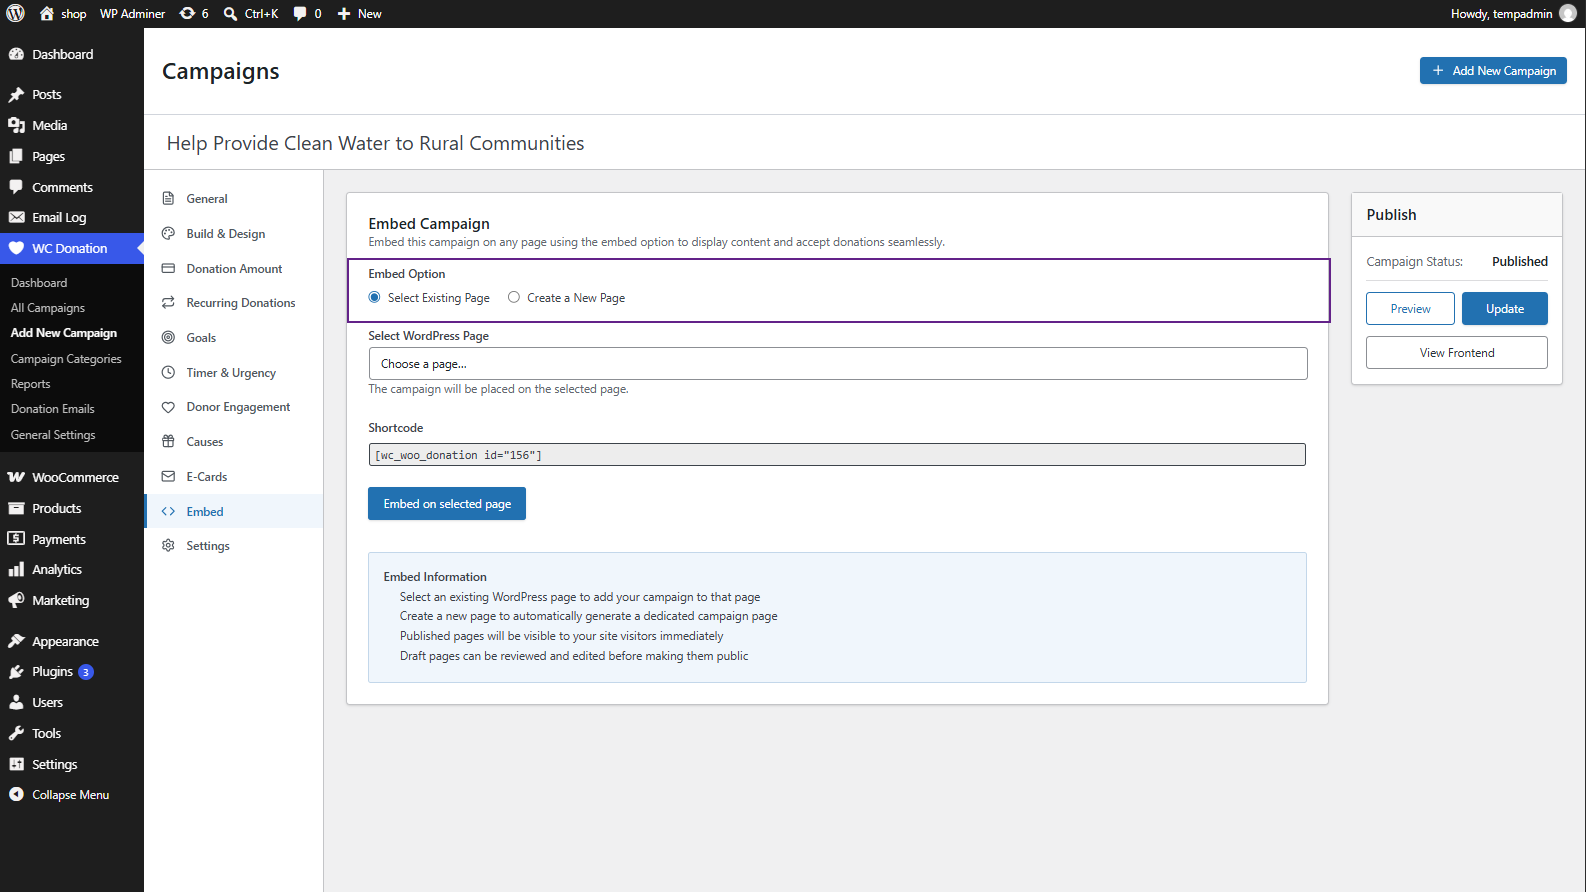
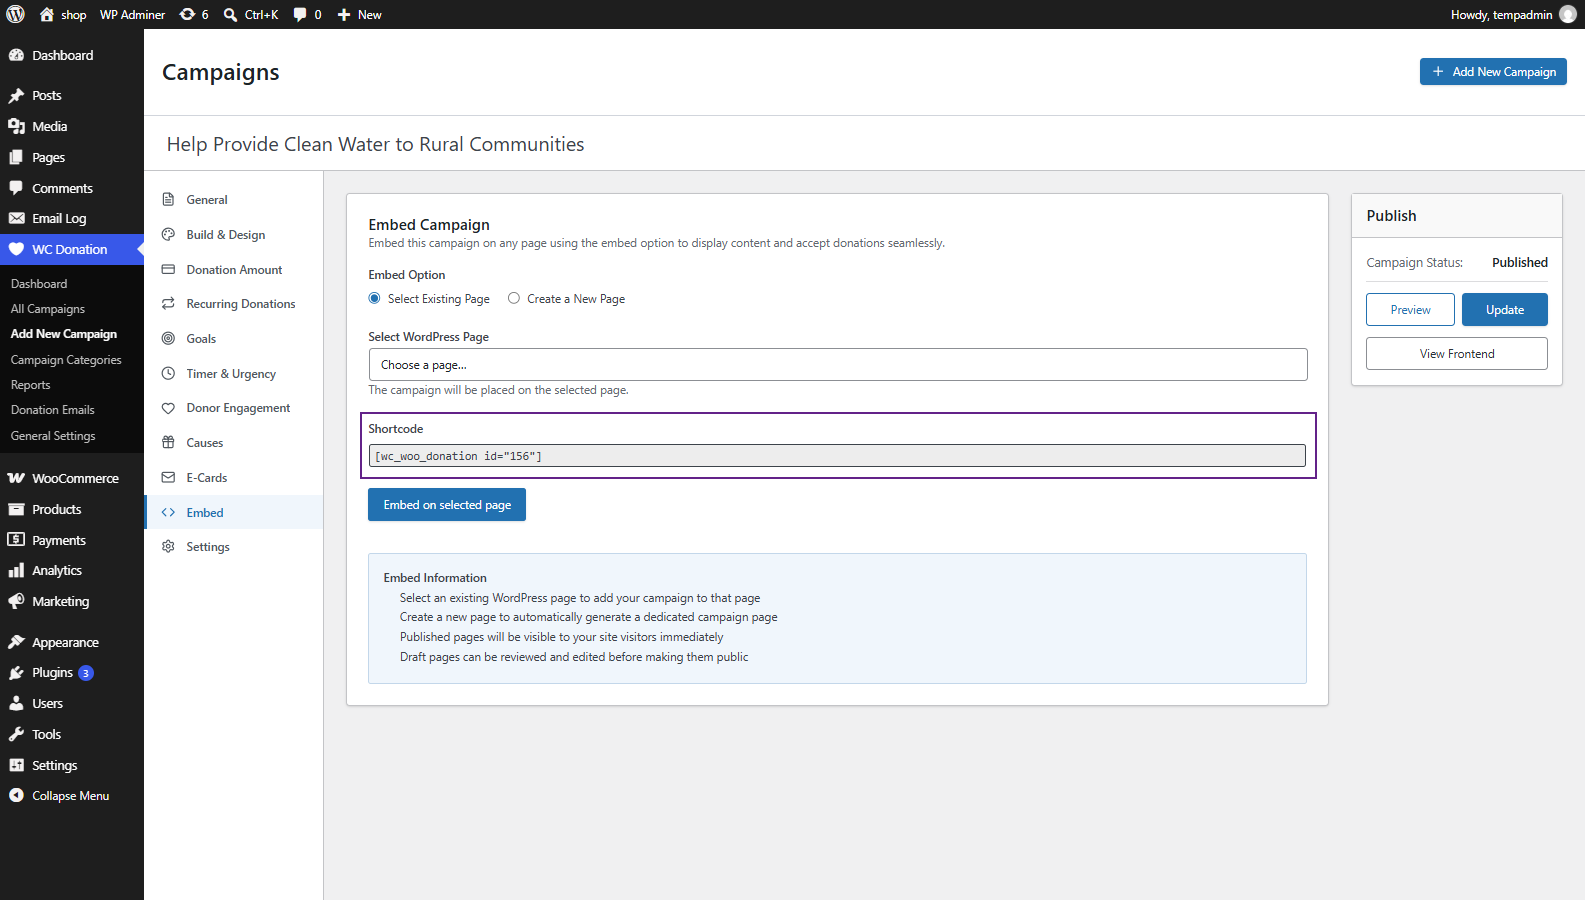
↑ Back to top- Embed Option: Select Existing Page or Create a New Page.
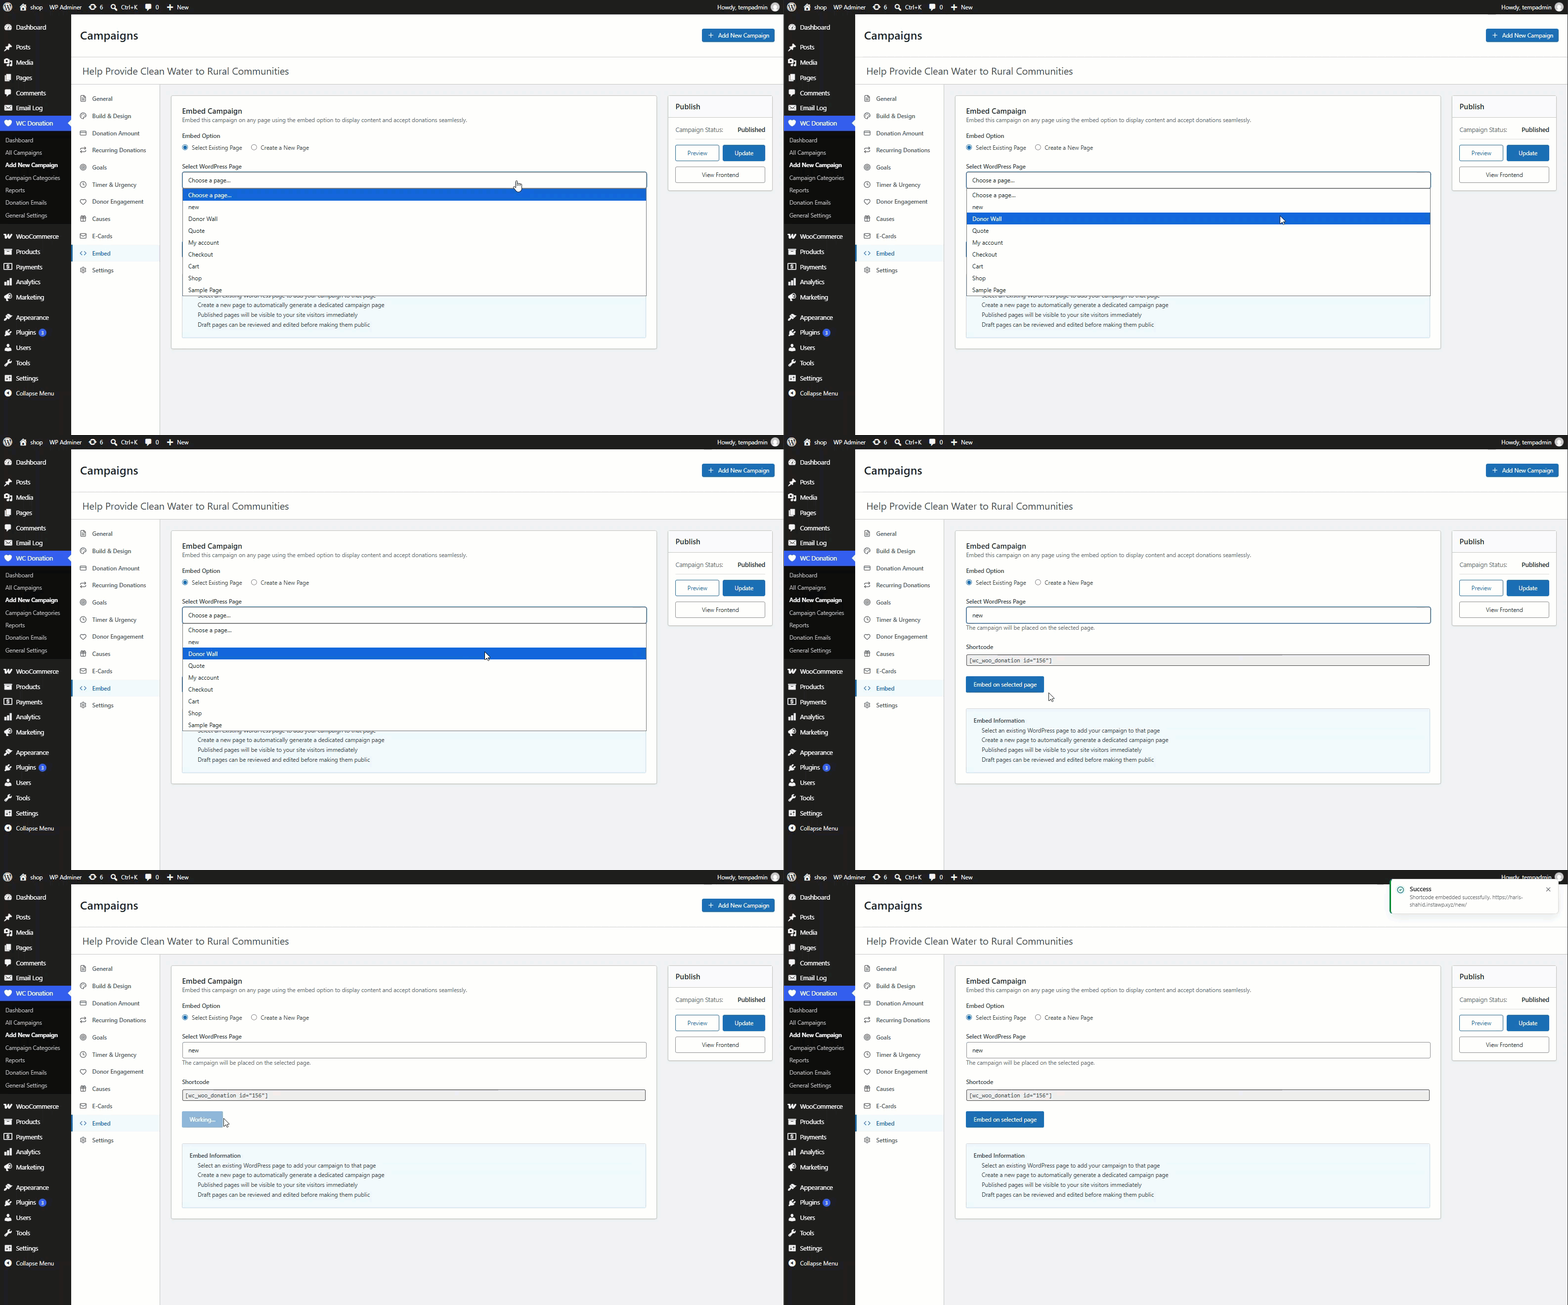
- Select WordPress Page (Existing): A dropdown of the site’s existing WordPress pages.
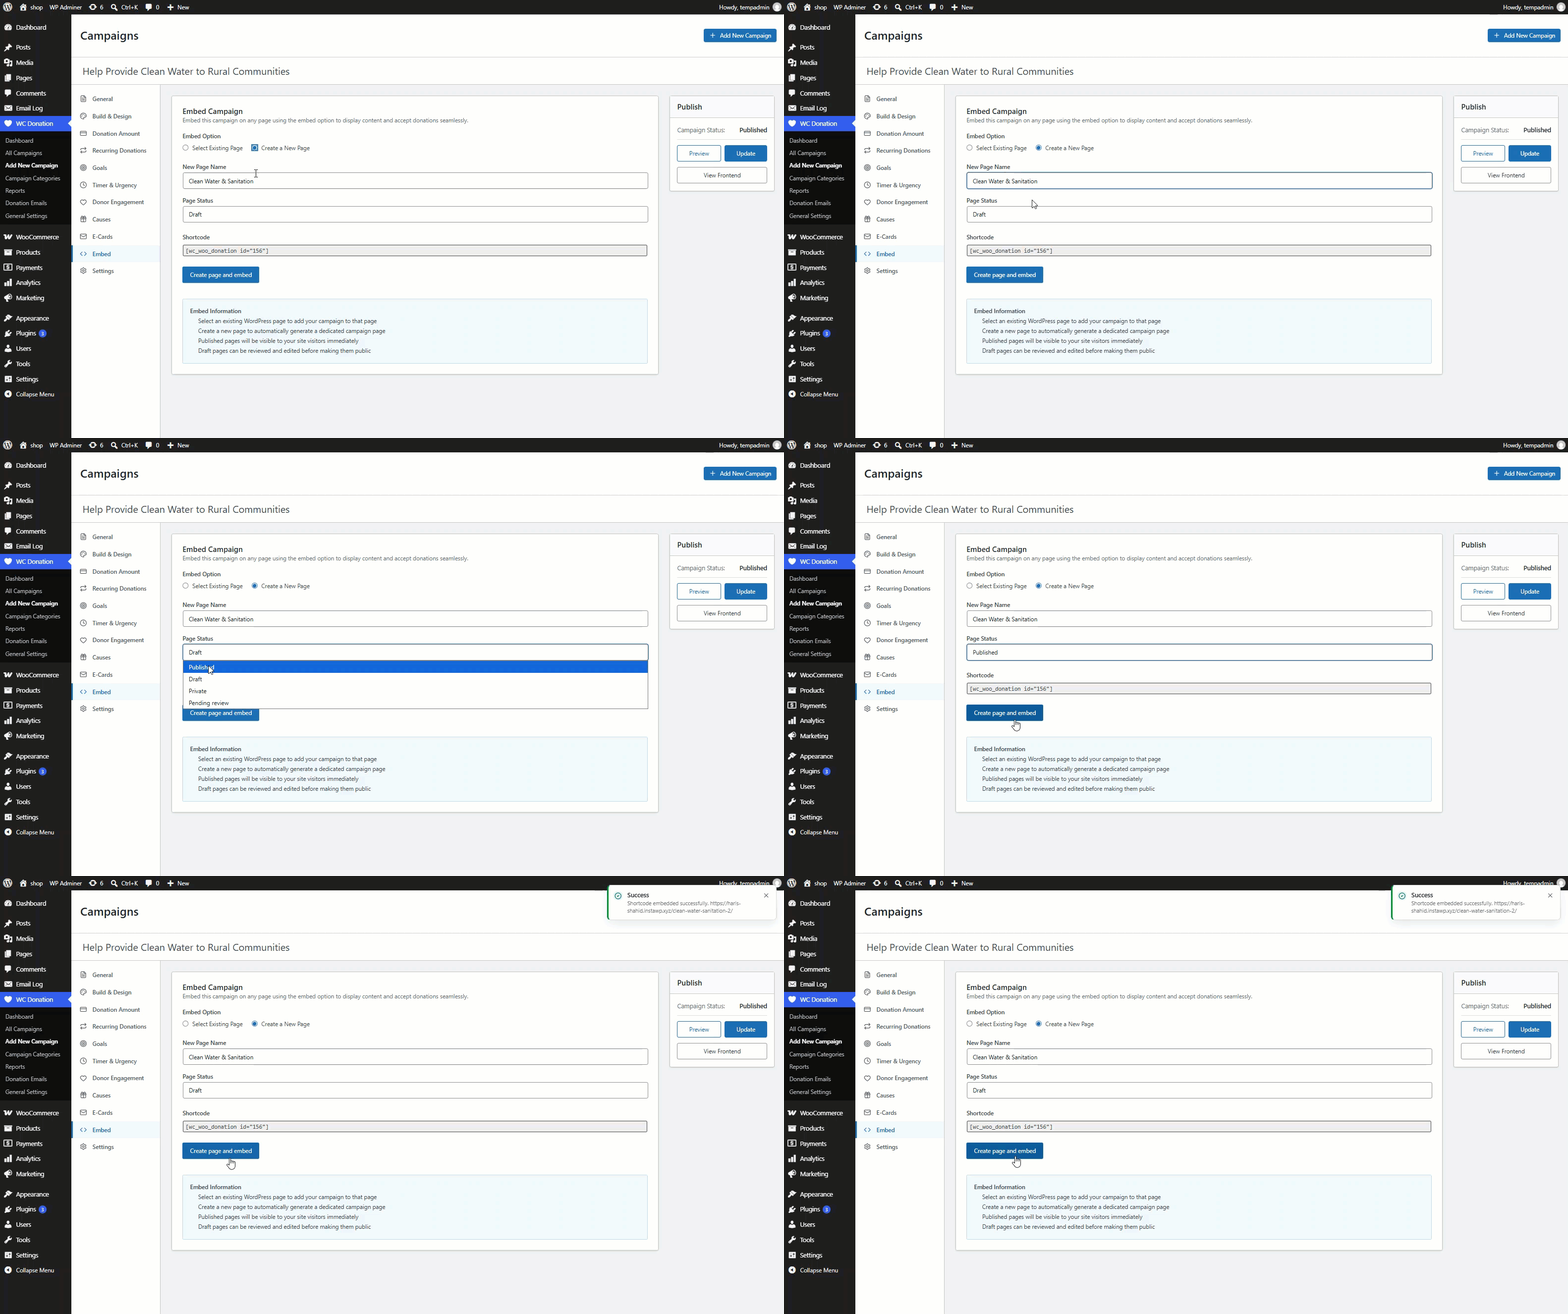
- New Page Name / Page Status (New): The title for a brand-new page, and its initial status: Published, Draft, Private, or Pending review.
- Shortcode: A read-only display of the exact shortcode that will be embedded, e.g. [wc_woo_donation id=”ID”].
Dependencies / Validation
- A campaign must be saved (Published or Draft) at least once — so that it has an ID — before it can be embedded; until then the tab shows: “Save the campaign first, then embed the shortcode on a page.”
- Choosing Select Existing Page without picking a page, or Create a New Page without entering a name, blocks the embed action with an inline error.
Selecting the action button (“Embed on selected page” or “Create page and embed”) inserts the campaign’s shortcode into the chosen or newly created page automatically — there is no need to copy and paste the shortcode by hand. An “Embed Information” panel summarizes the behavior:
- Selecting an existing page adds the campaign to that page.
- Creating a new page automatically generates a dedicated campaign page.
- Published pages are visible to visitors immediately.
- Draft pages can be reviewed and edited before you make them public.
Campaign Settings
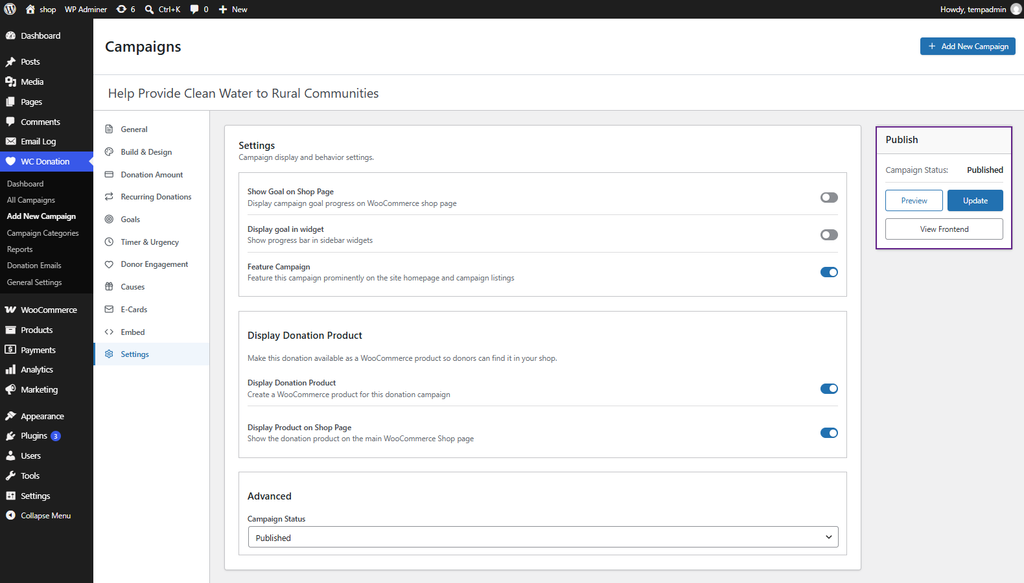
↑ Back to topThe Campaign Settings section controls campaign visibility, donation product availability, shop display, and the campaign’s publishing status.
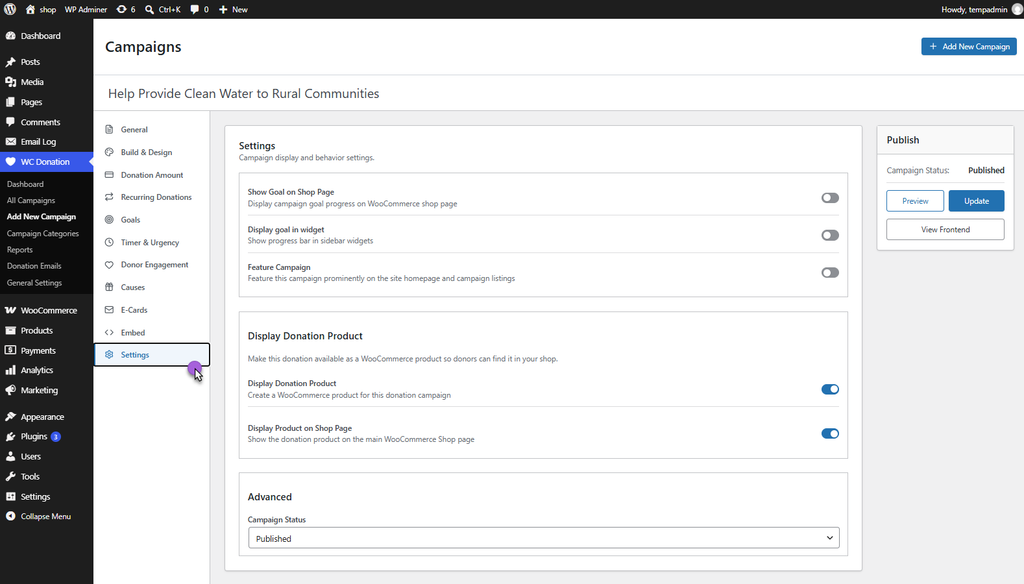
- Navigation: WordPress Admin Dashboard → WC Donation → Add New Campaign / Edit Campaign → Settings
Settings
The Settings section contains options that control how the campaign displays and where campaign progress appears.
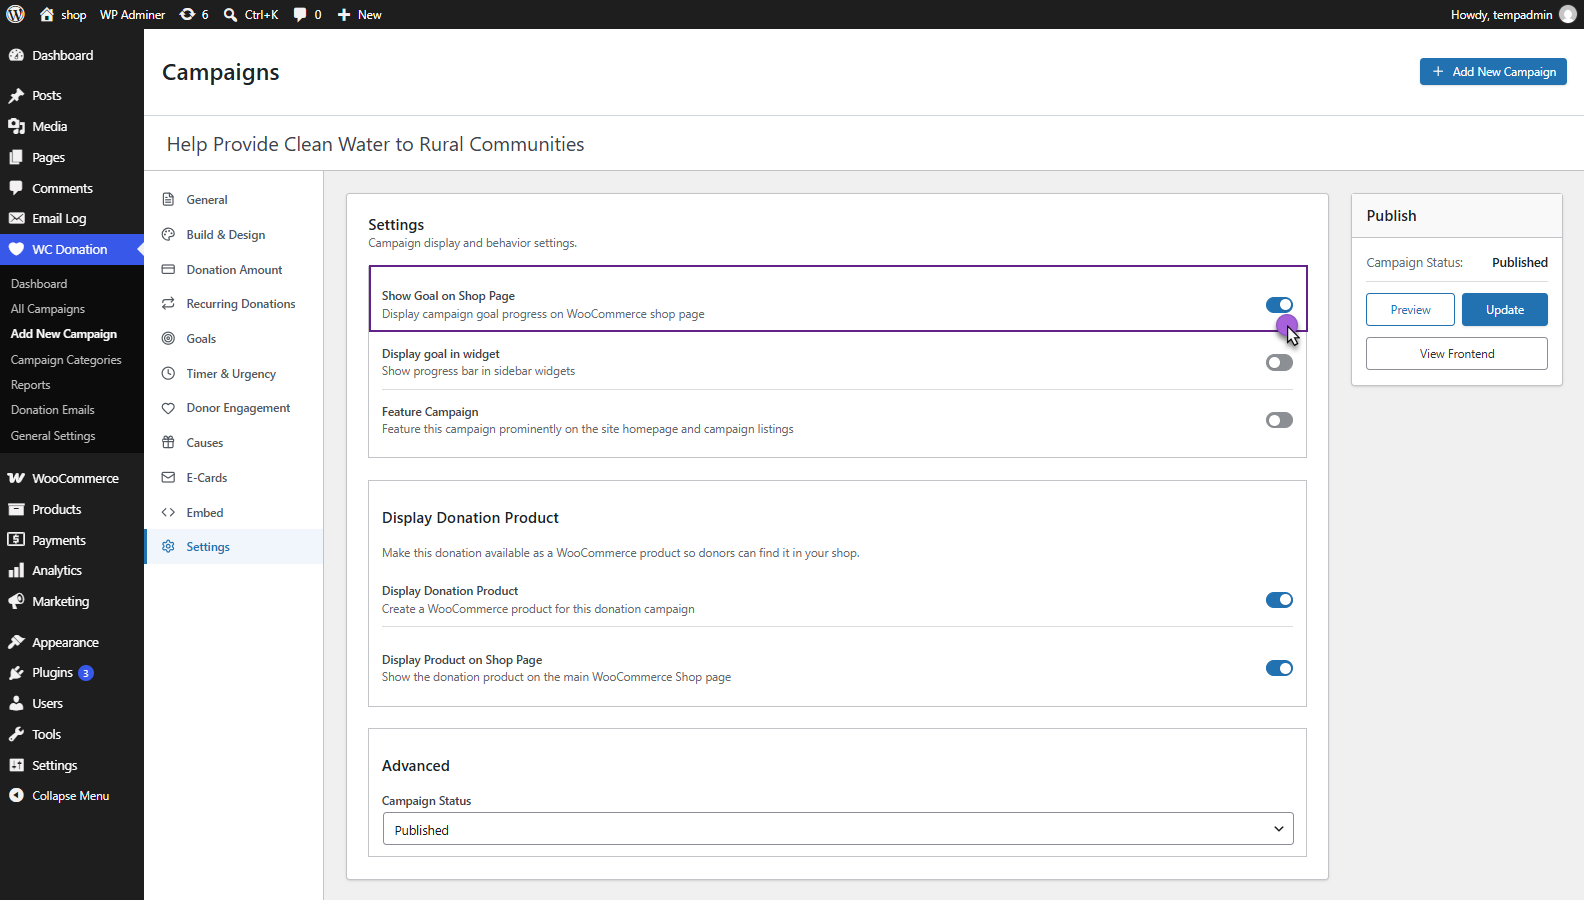
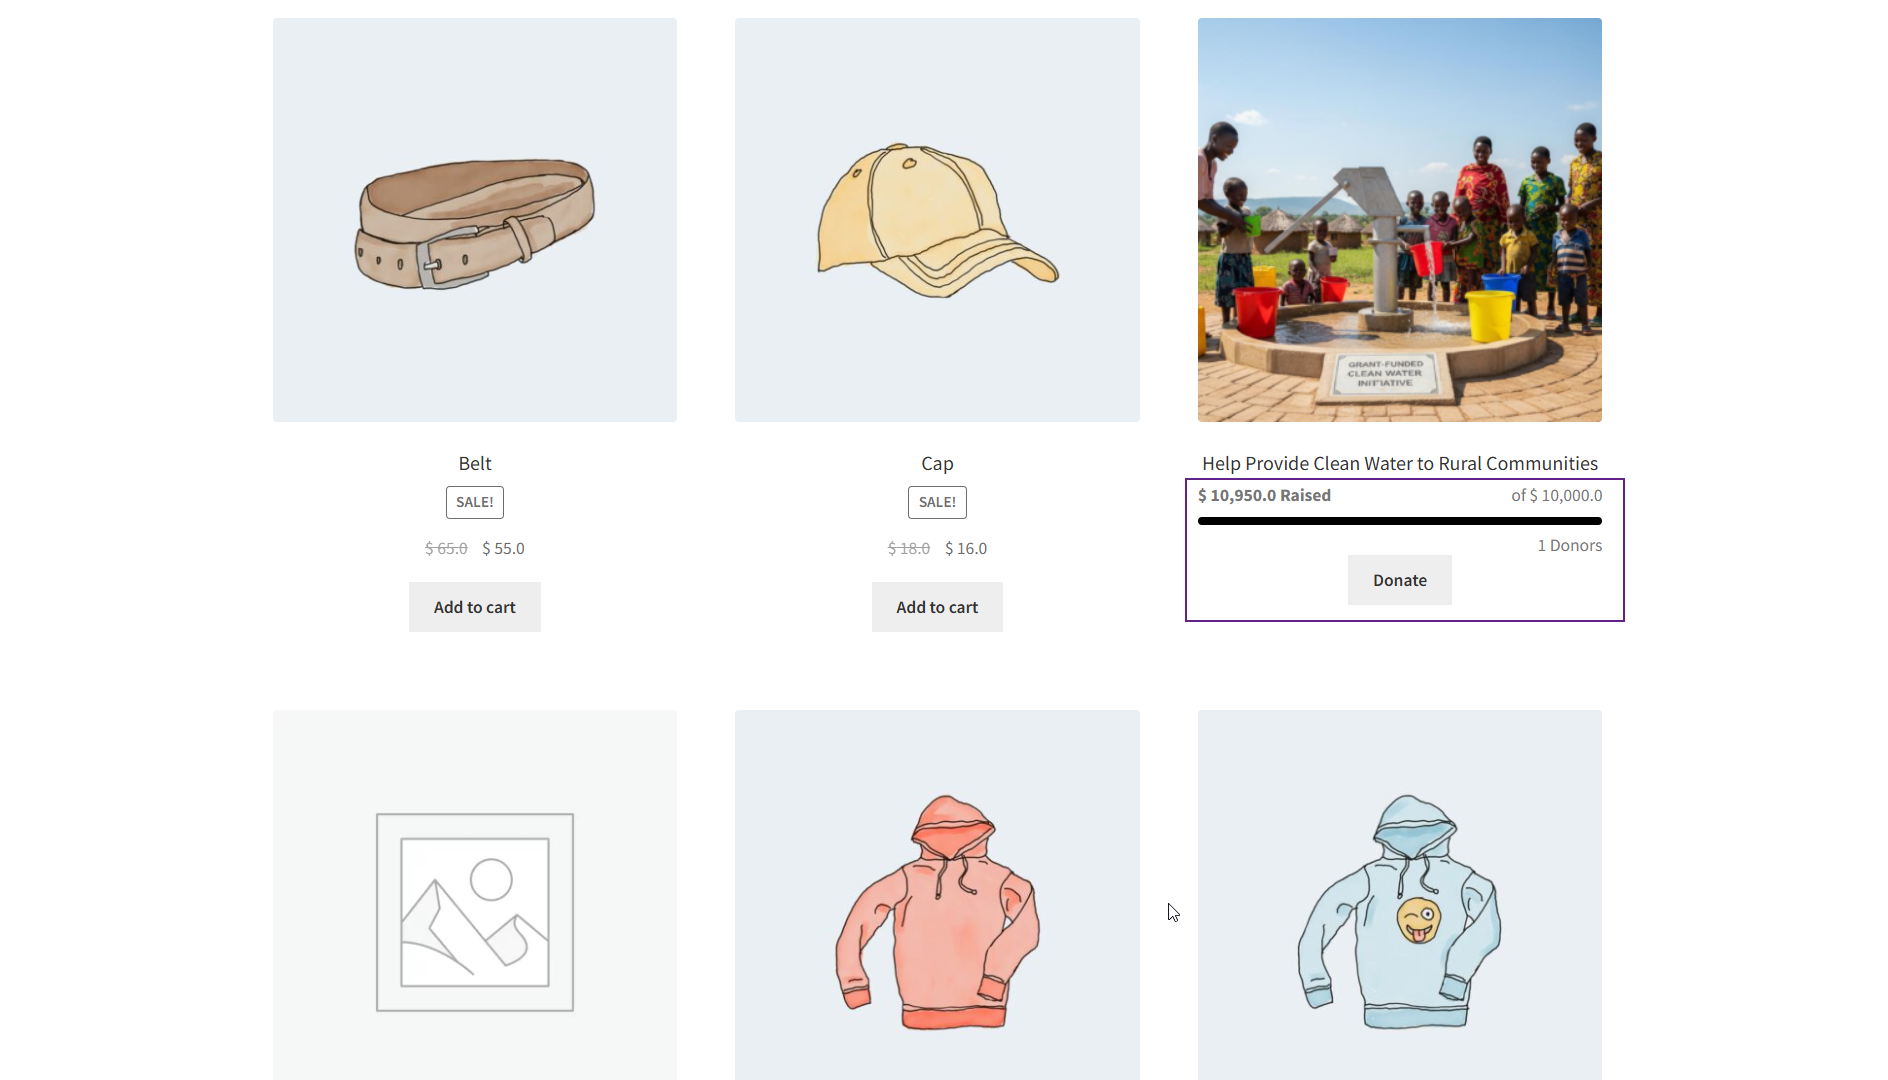
Show Goal on Shop Page
- Displays the campaign goal progress on the WooCommerce Shop page.
Front-End Impact
- When enabled, the campaign goal/progress appears on the campaign’s WooCommerce shop listing where supported.
Display Goal in Widget
- Displays the campaign goal progress in sidebar widgets.
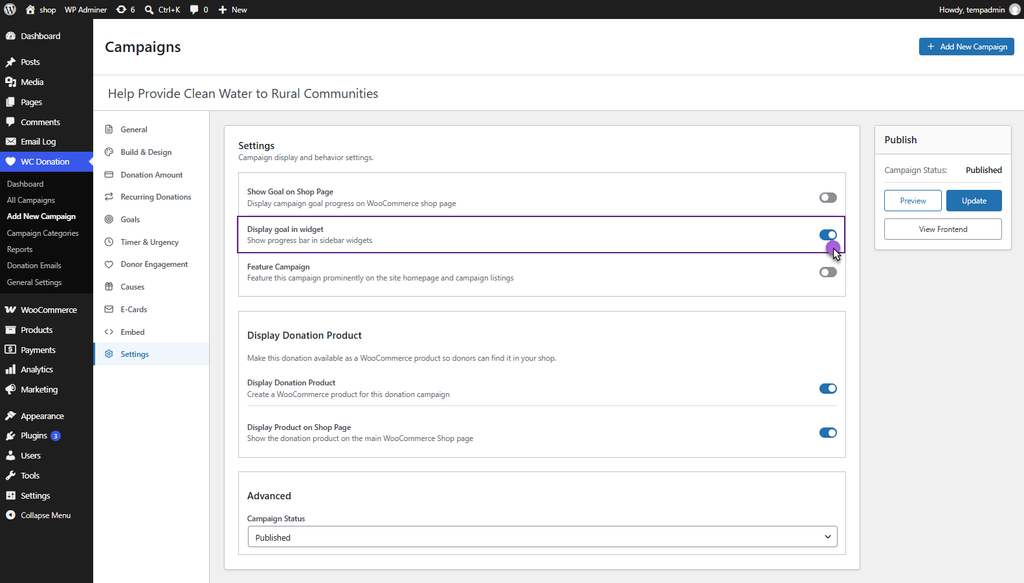
- When done, click Update.
| NOTE | Make sure to add the widget to apply this feature. |
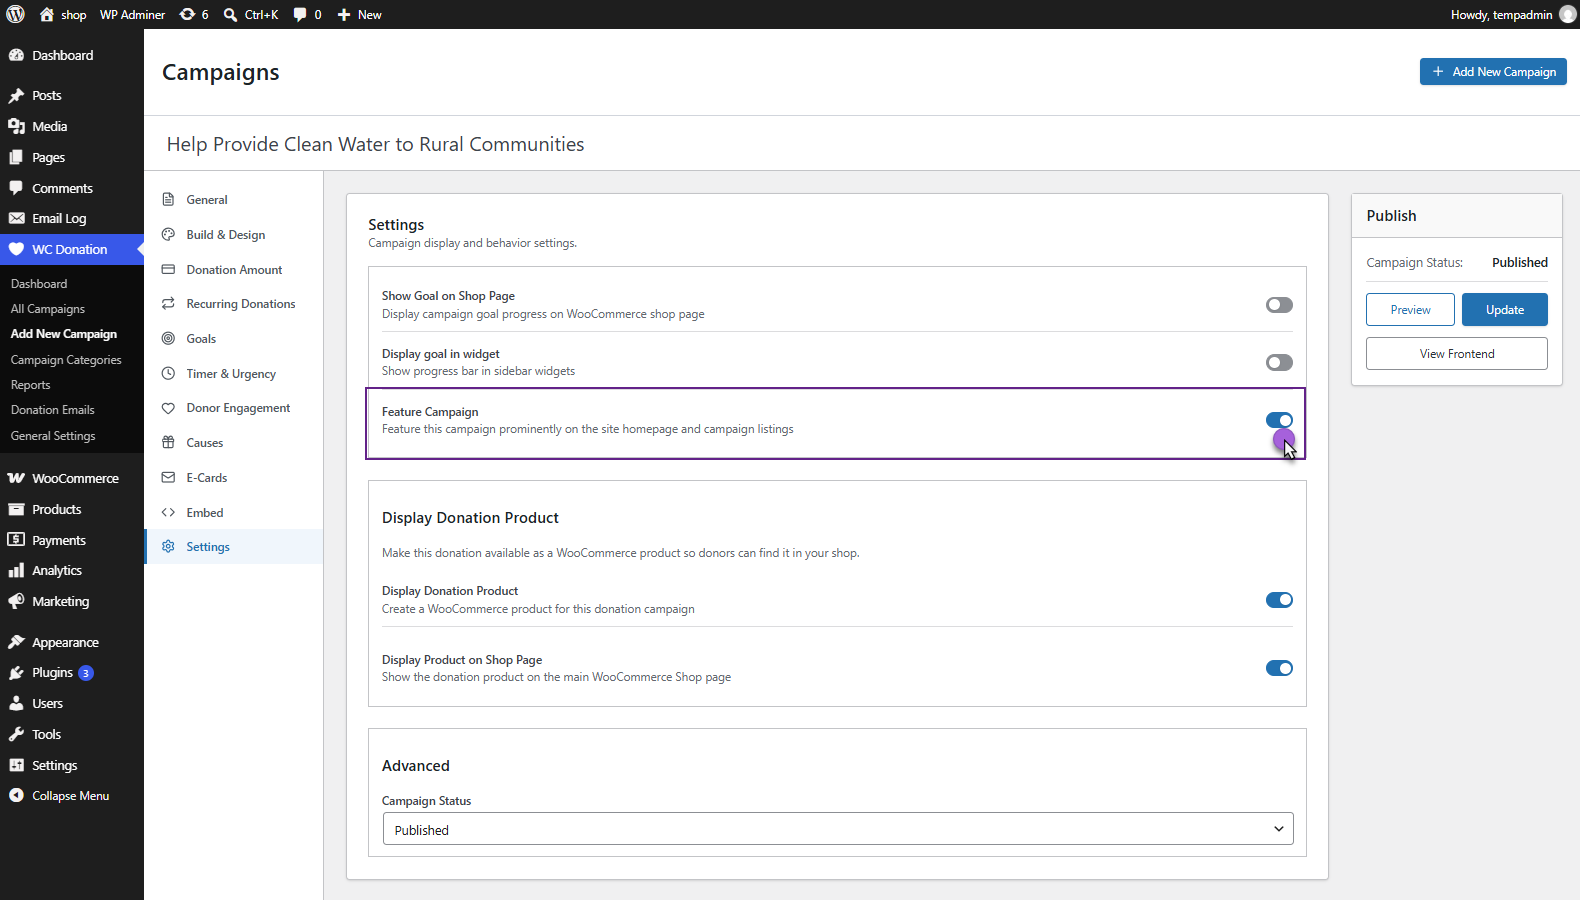
Feature Campaign
- Marks the campaign as a featured campaign so it can be given prominent placement.
Display Donation Product
- The Display Donation Product section controls whether the donation campaign is also made available through the WooCommerce product system.
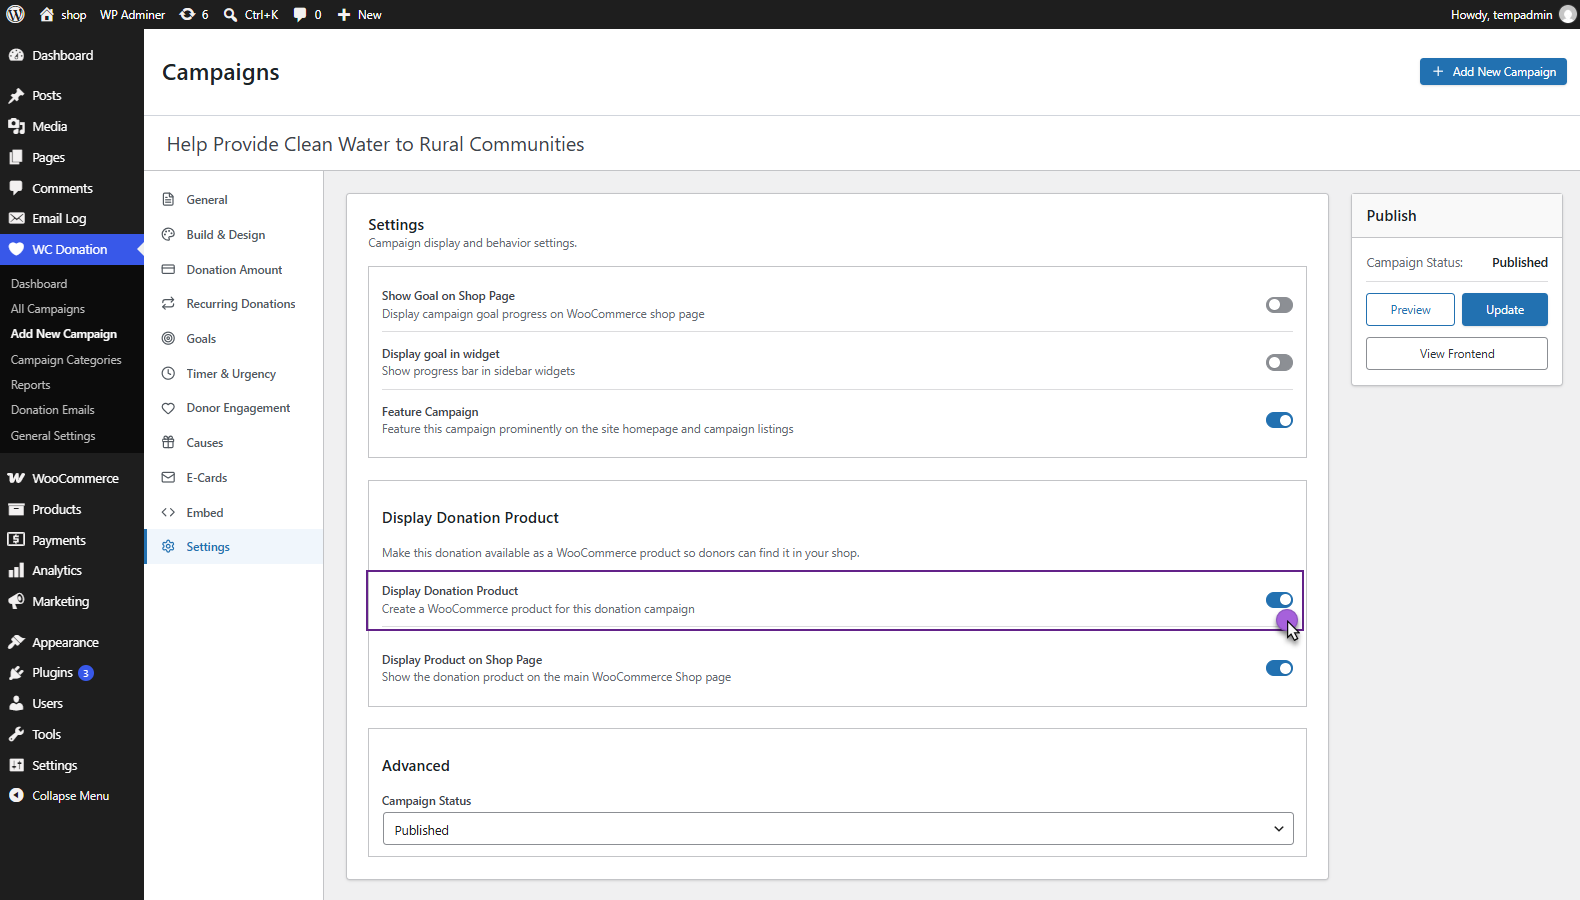
Display Donation Product
- Creates a WooCommerce product for the donation campaign.
Front-End Impact
- When enabled, the donation becomes available as a WooCommerce product so donors can access it through the store.
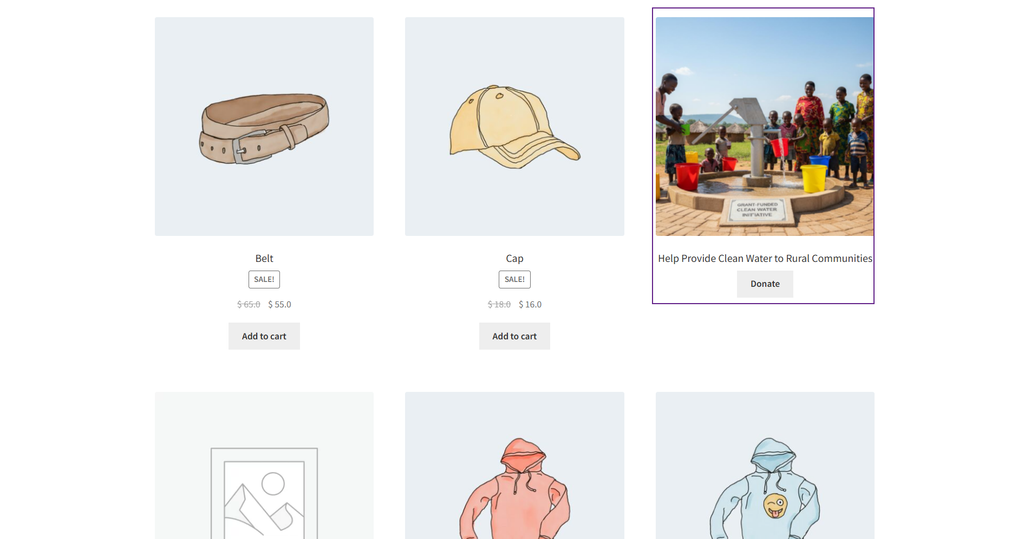
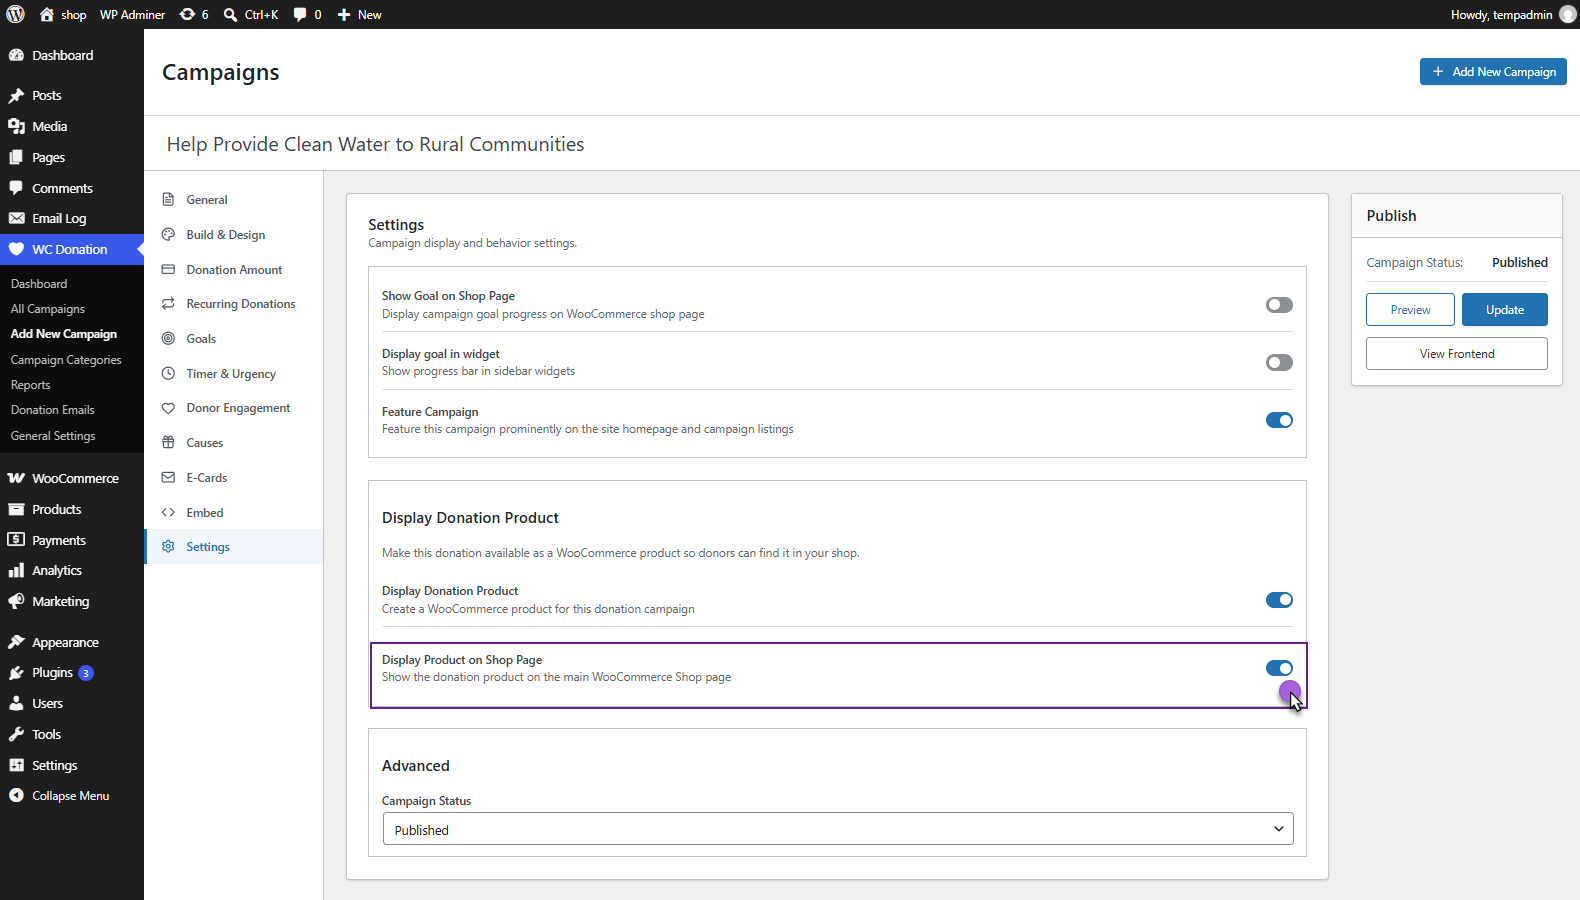
Display Product on Shop Page
- Controls whether the donation product is displayed on the main WooCommerce Shop page.
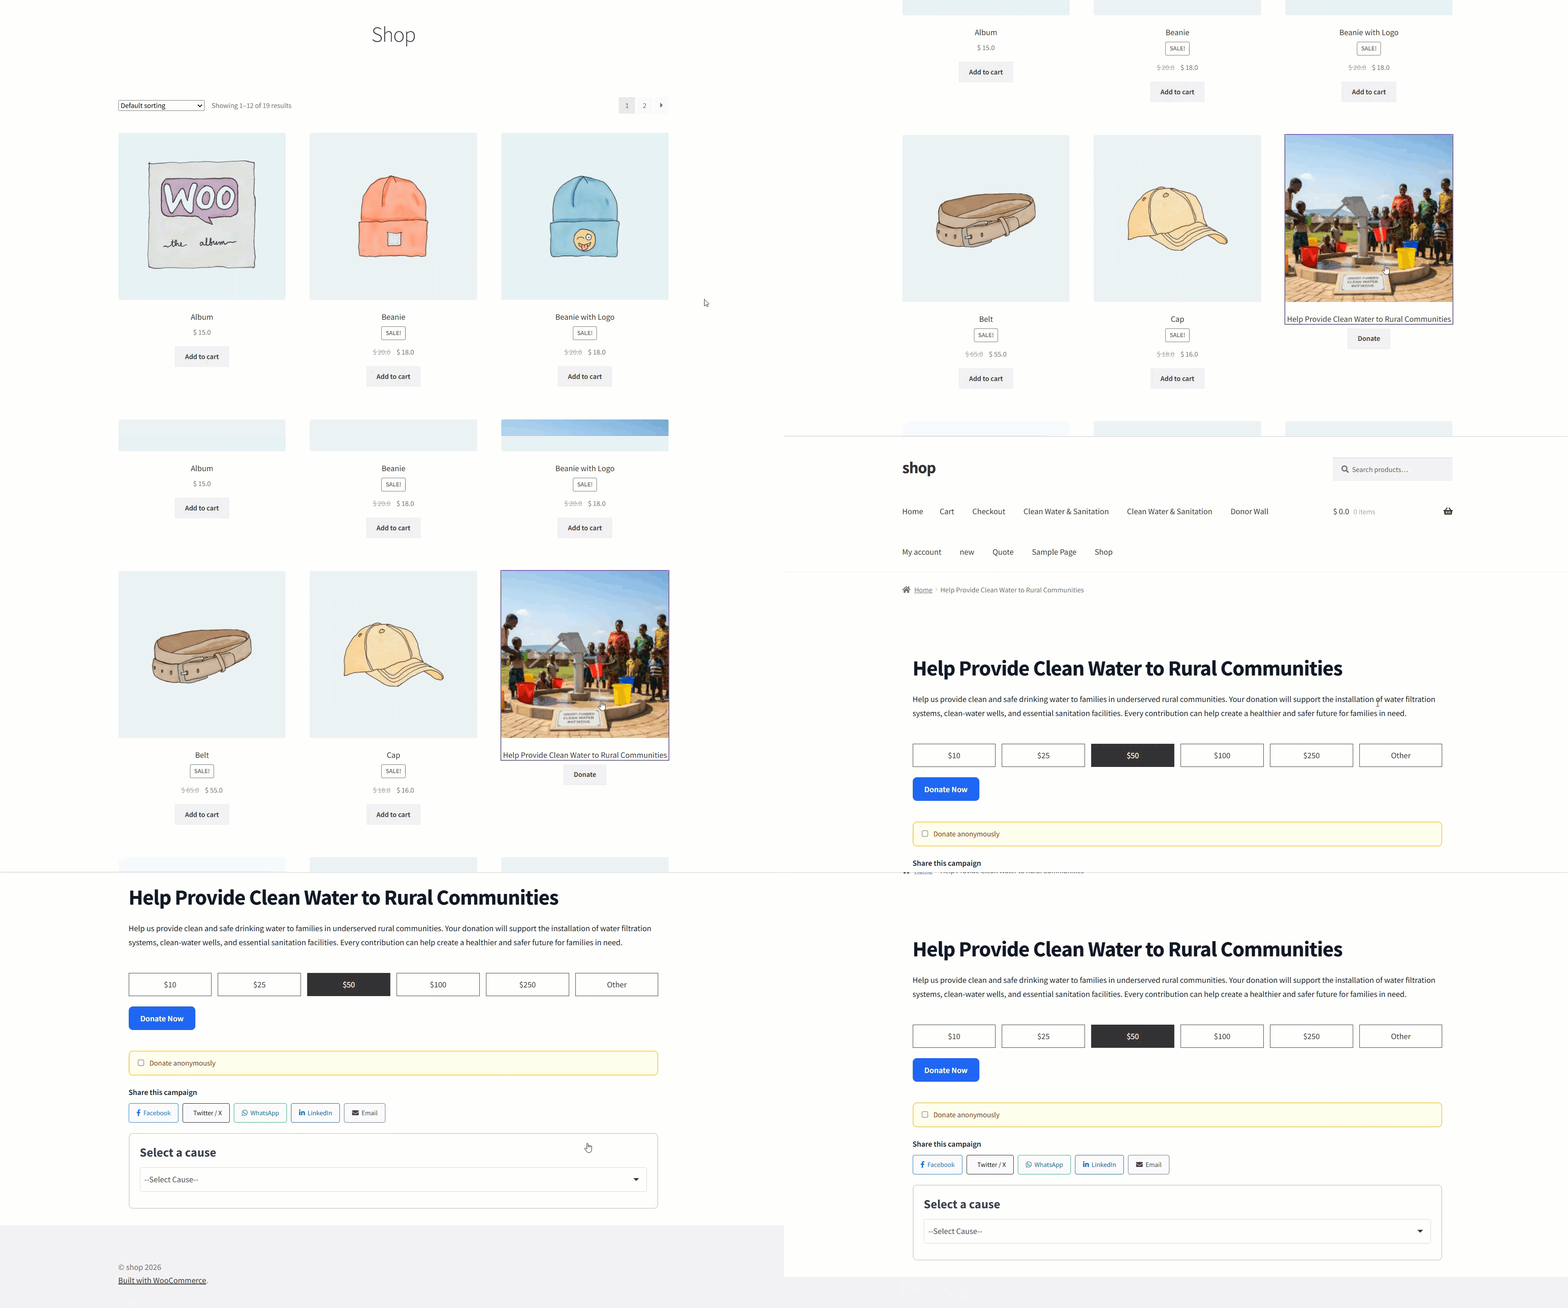
Front-End Impact
Advanced
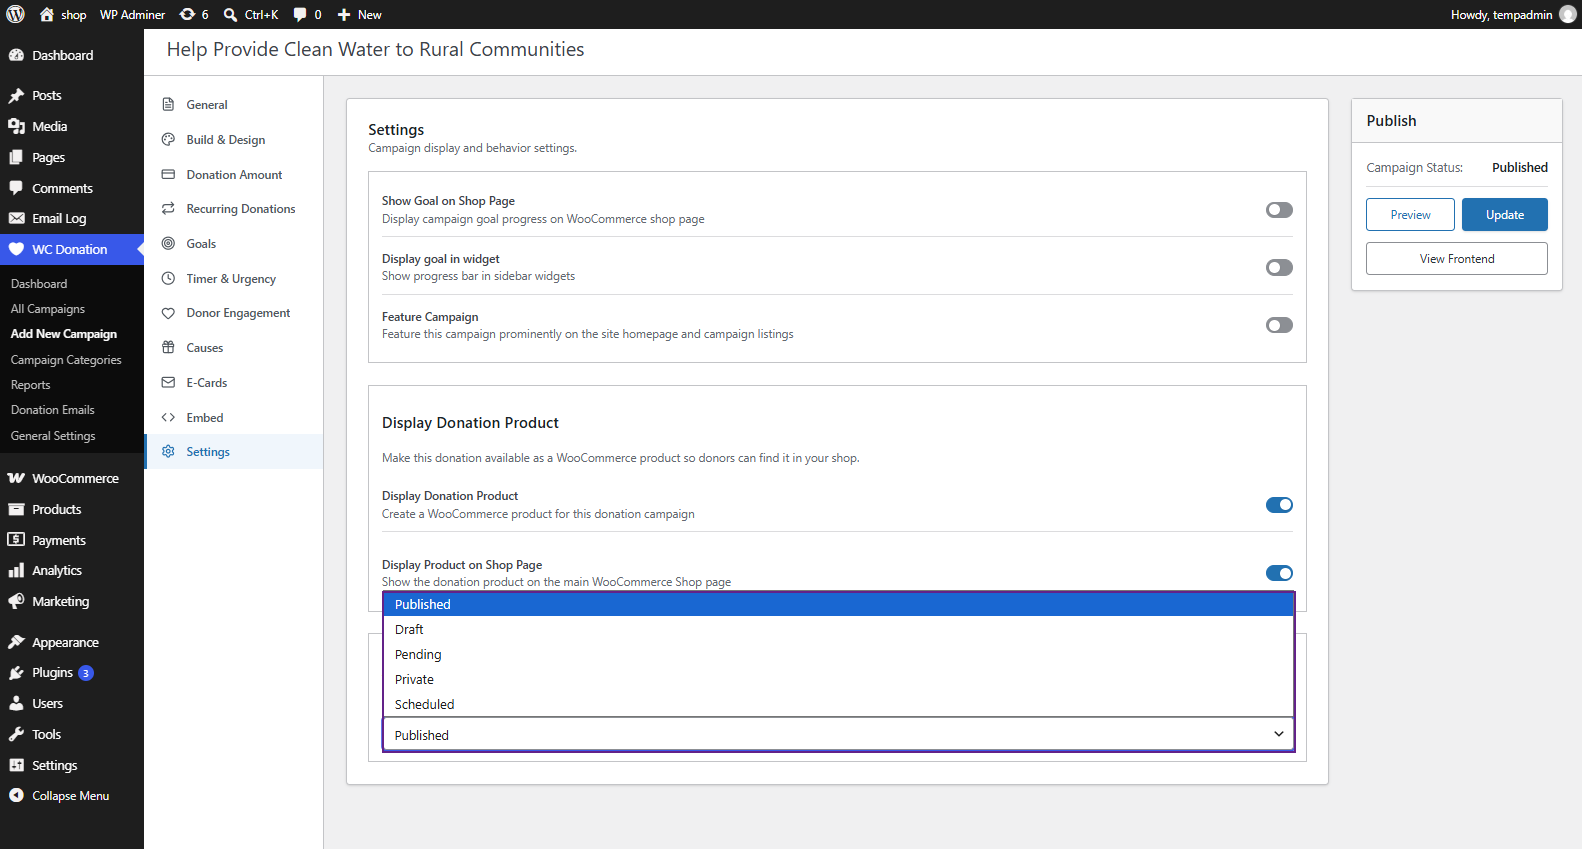
The Advanced section controls the campaign’s current status.
Campaign Status
- Defines the campaign’s current publishing status.
Publish Panel
↑ Back to top| Control | Description |
| Campaign Status | Displays the current campaign status. |
| Preview | Previews the campaign before making further changes live. |
| Update | Saves changes made to an already published campaign. |
| View Frontend | Opens the campaign on the front end. |
Campaign Categories
↑ Back to top- The Campaign Categories feature allows the admin to organize donation campaigns into categories, making it easier to manage campaigns in the backend and helping users find relevant campaigns on the frontend.
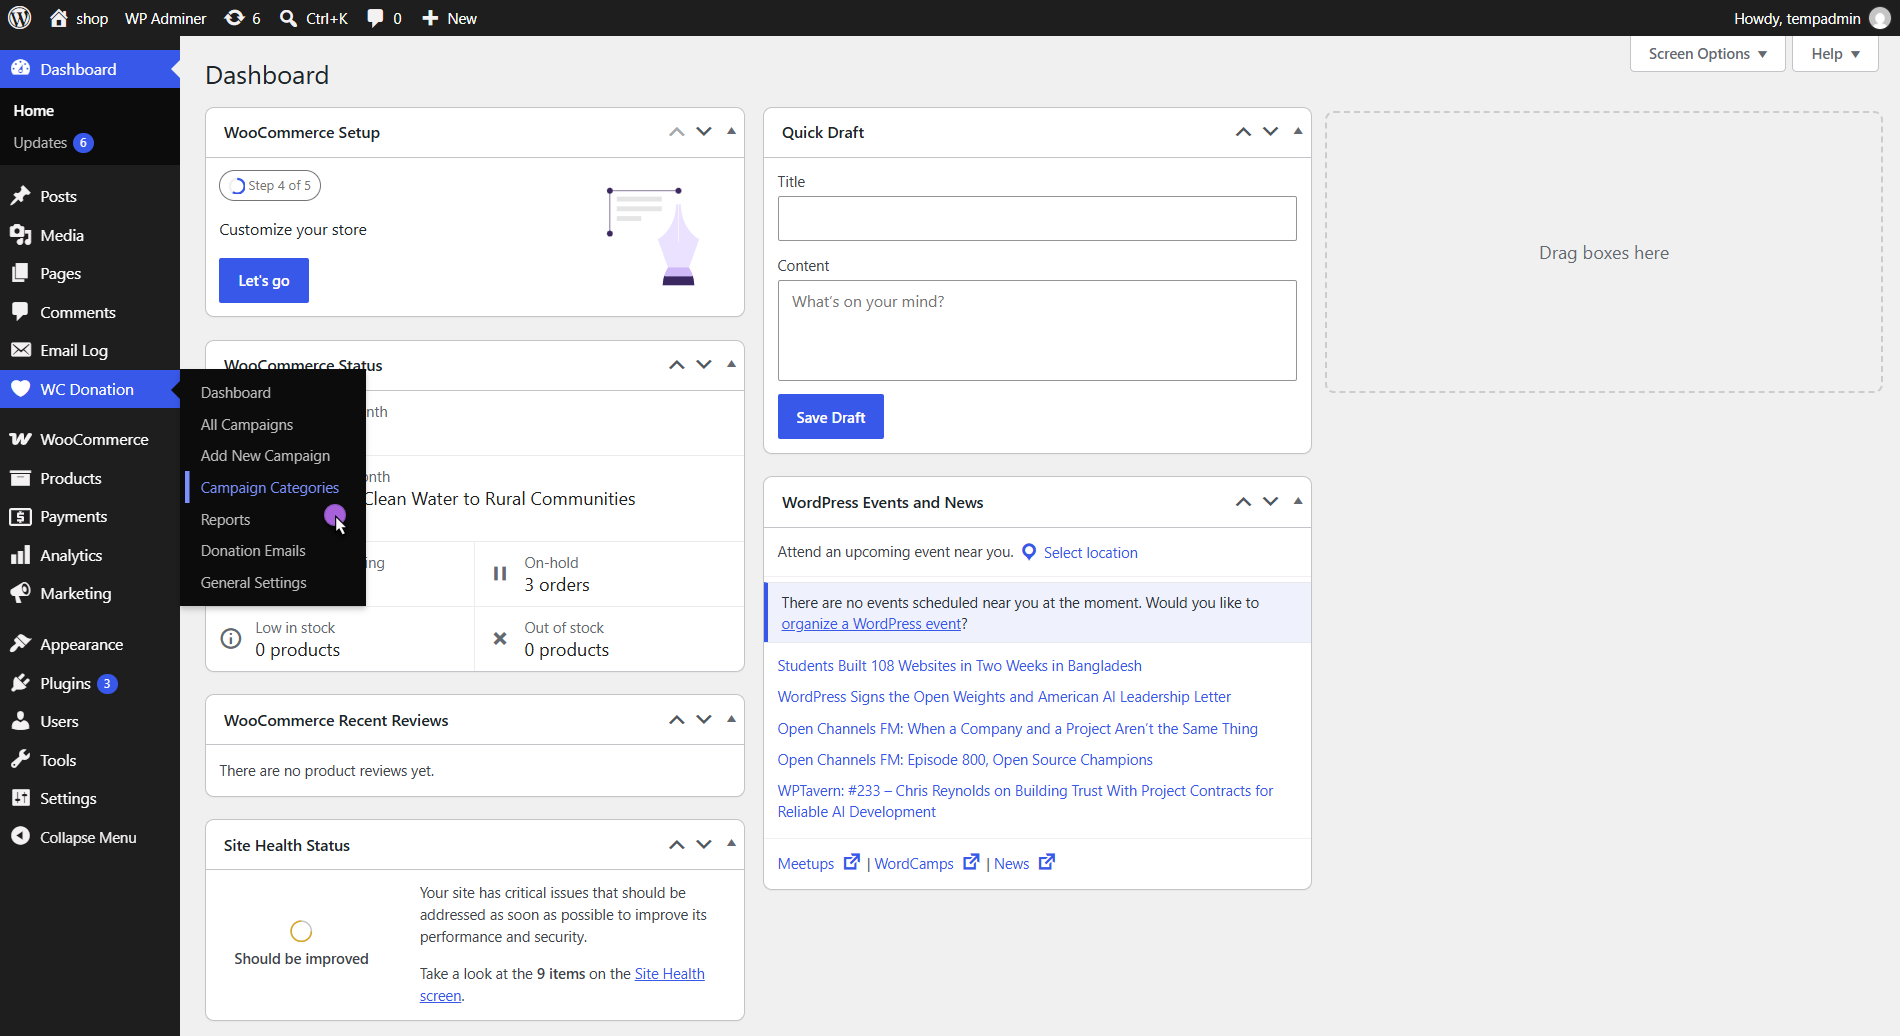
- Go to WordPress Admin Dashboard > WC Donations > Campaigns Categories.
- The Campaign Categories edit page will appear.
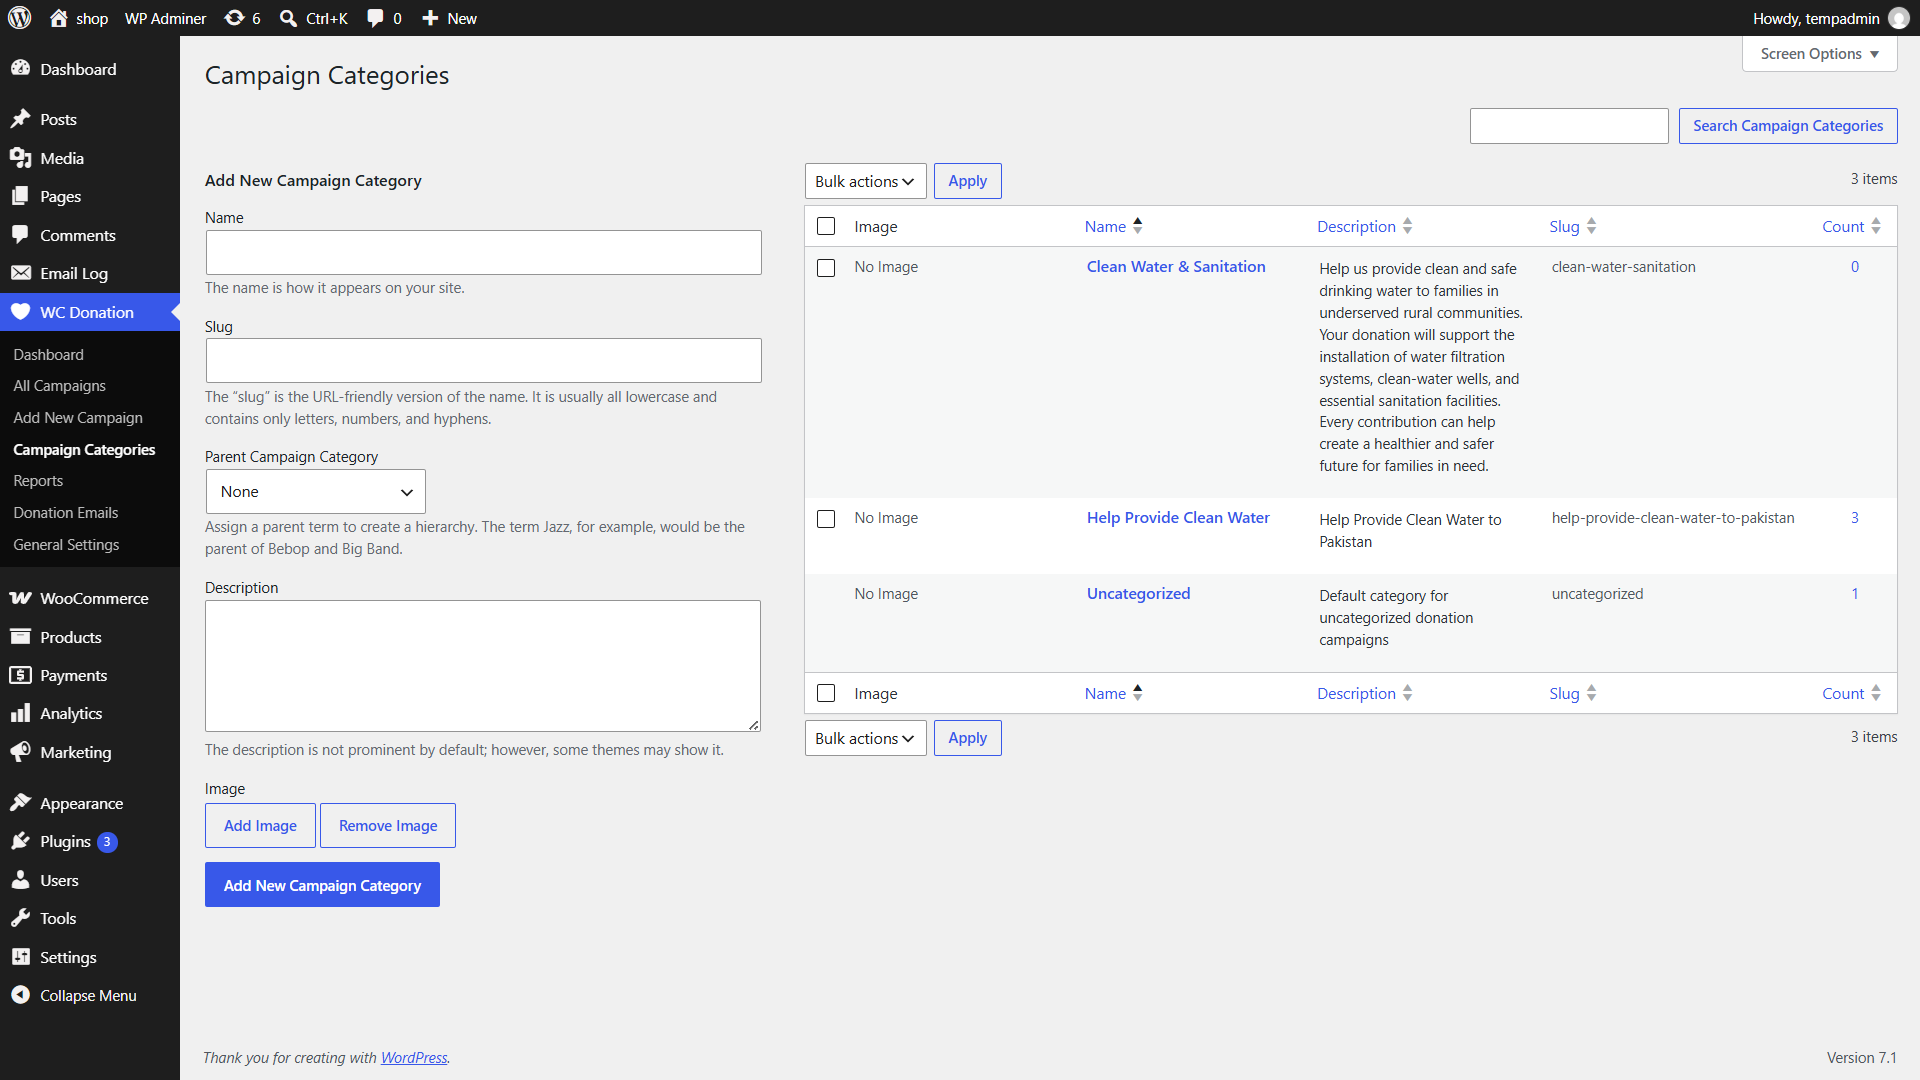
- The Admin can add a Name, Slug, Parent Campaign Category, Description, and Image for each category.
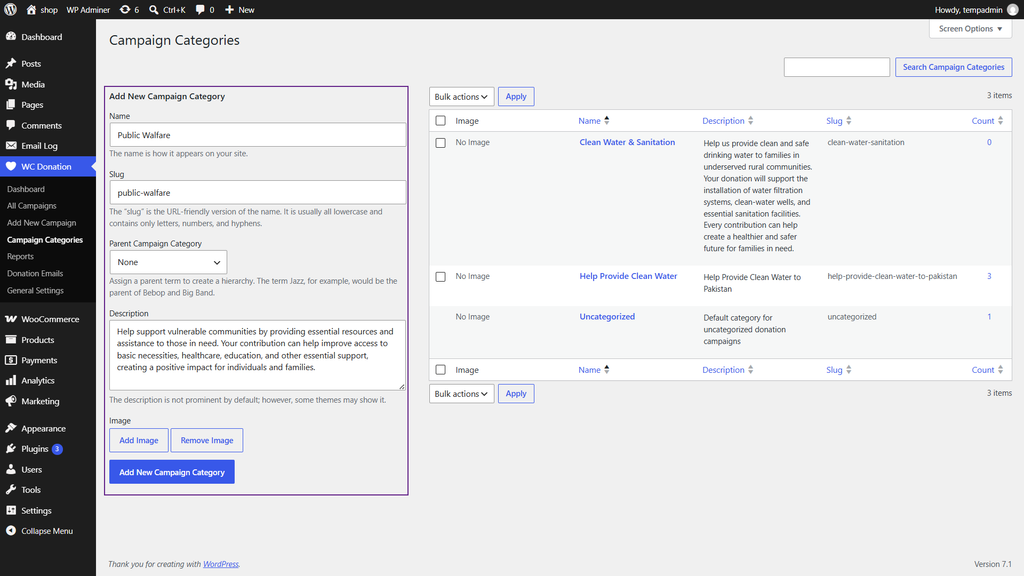
- Click on the Add New Campaign Category.
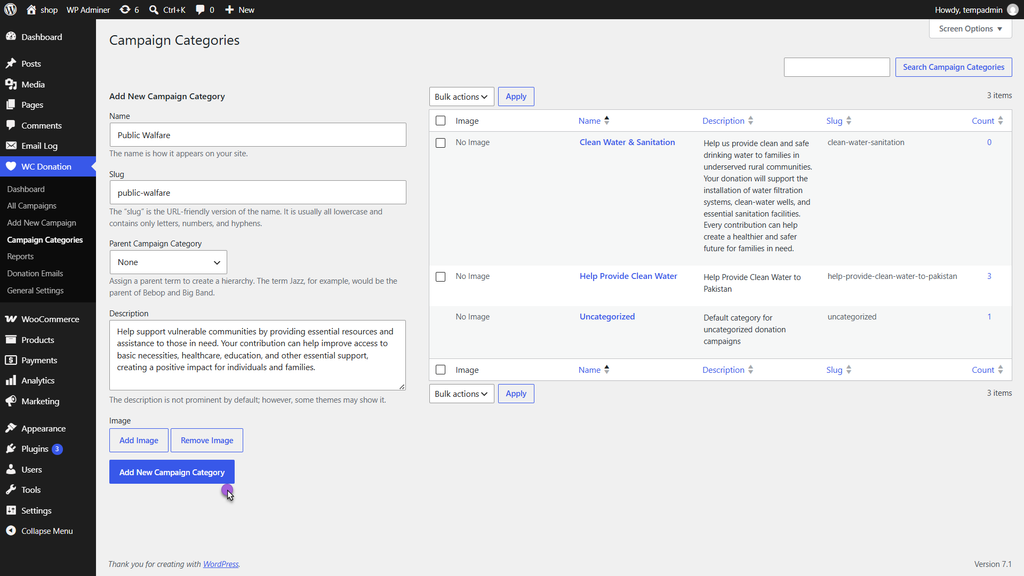
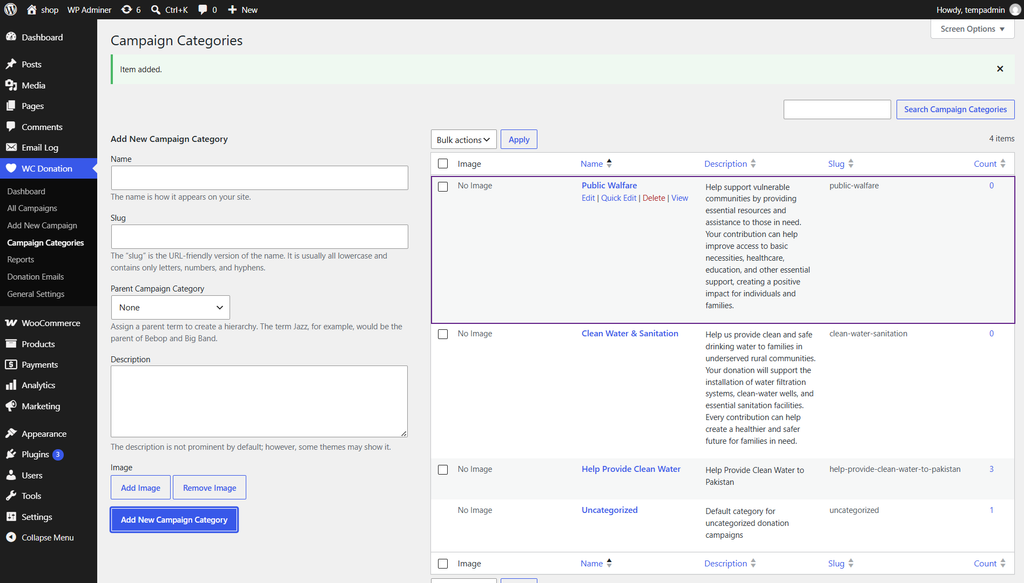
- A new Campaign Category will be created and listed in the table.
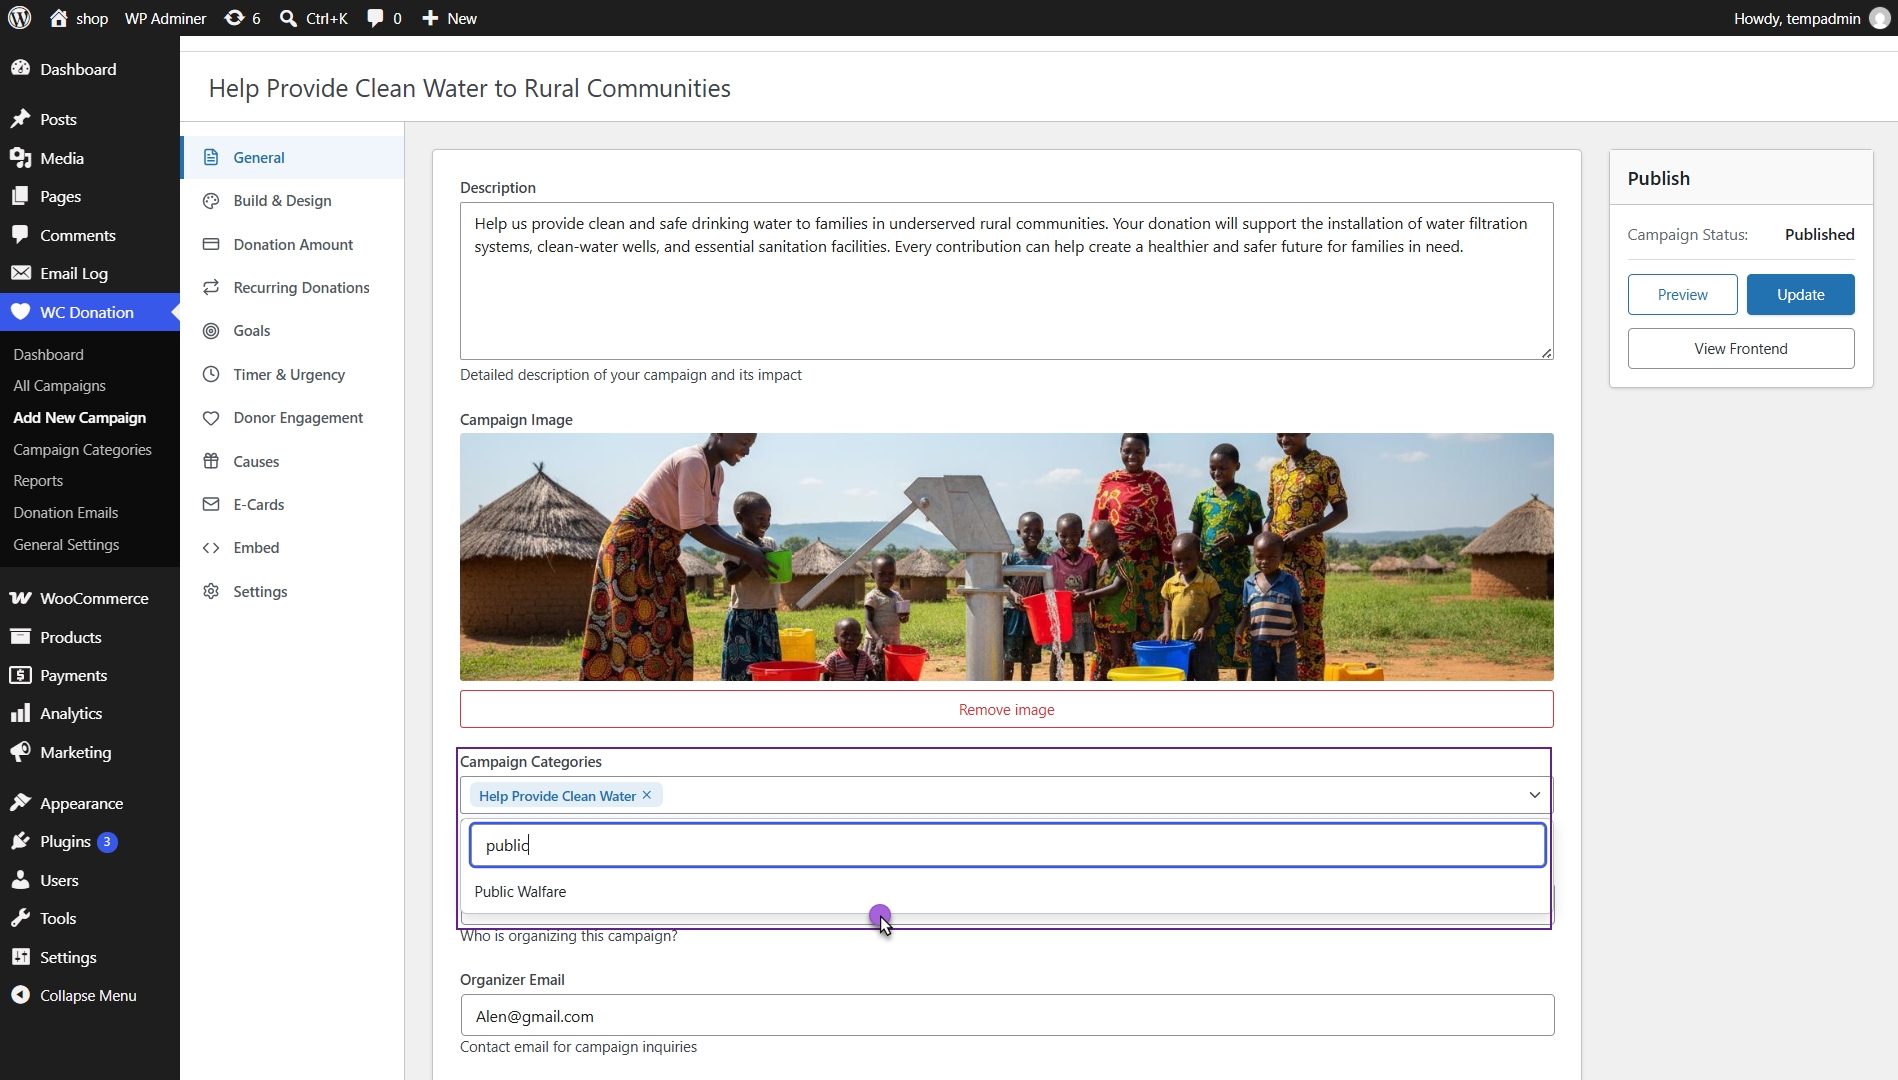
- Once done with creating a Campaign Category, Go to WordPress Admin Dashboard > WC Donations > All Campaigns > Edit Campaign.
- There will be a Campaign Category selector in the General.
Donation Reports
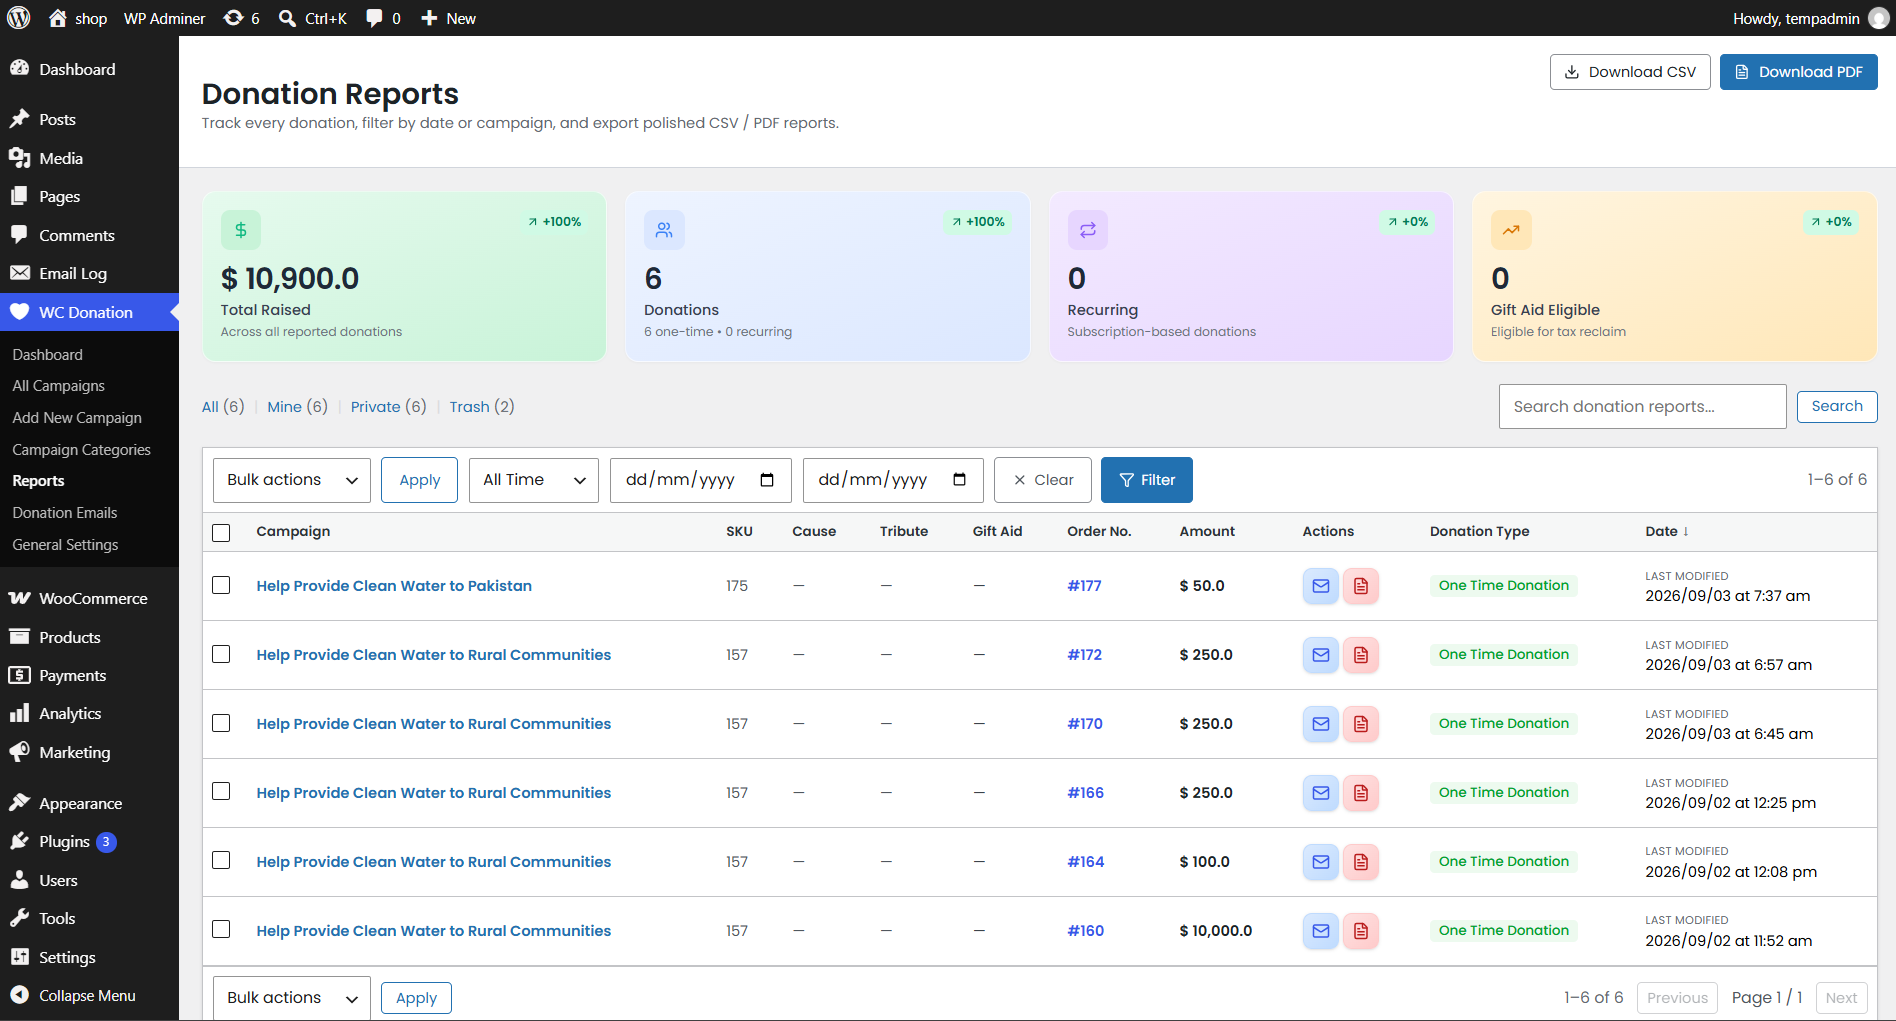
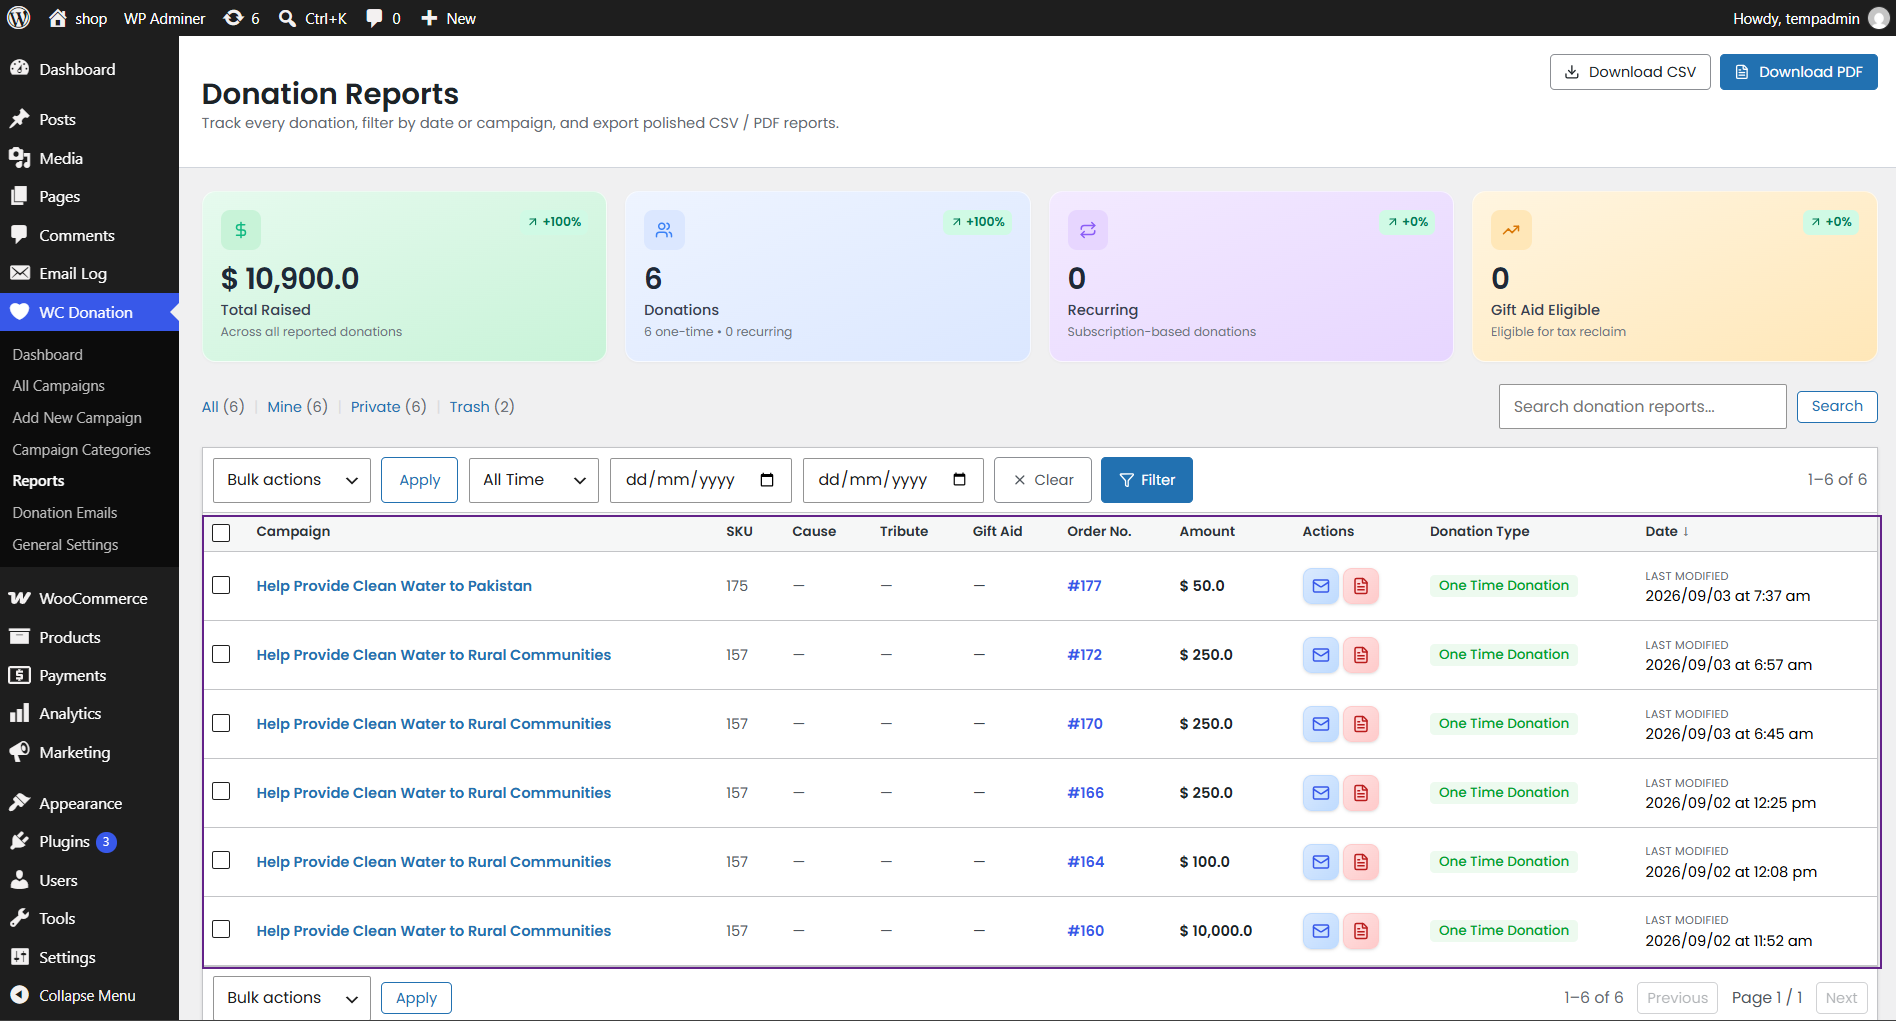
↑ Back to topThe Reports screen is a plugin-wide, order-level ledger of every individual donation, independent of the campaign-level totals shown in the Dashboard.
- Navigation: WordPress Admin Dashboard → WC Donation → Reports
Configuration
↑ Back to topColumns
| Column | Description |
|---|---|
| Campaign | The campaign the donation was made to; selecting it opens a detail view of that report row. |
| SKU | The linked WooCommerce product’s SKU. |
| Cause | The cause selected by the donor, if Causes are enabled on that campaign. |
| Tribute | Tribute details, if the donation was made as a tribute. |
| Gift Aid | Whether Gift Aid was selected on this donation. |
| Order No. | The underlying WooCommerce order number. |
| Amount | The donated amount. |
| Donation Type | One-time or recurring. |
| Date | Sortable ascending/descending. |
Filters and actions
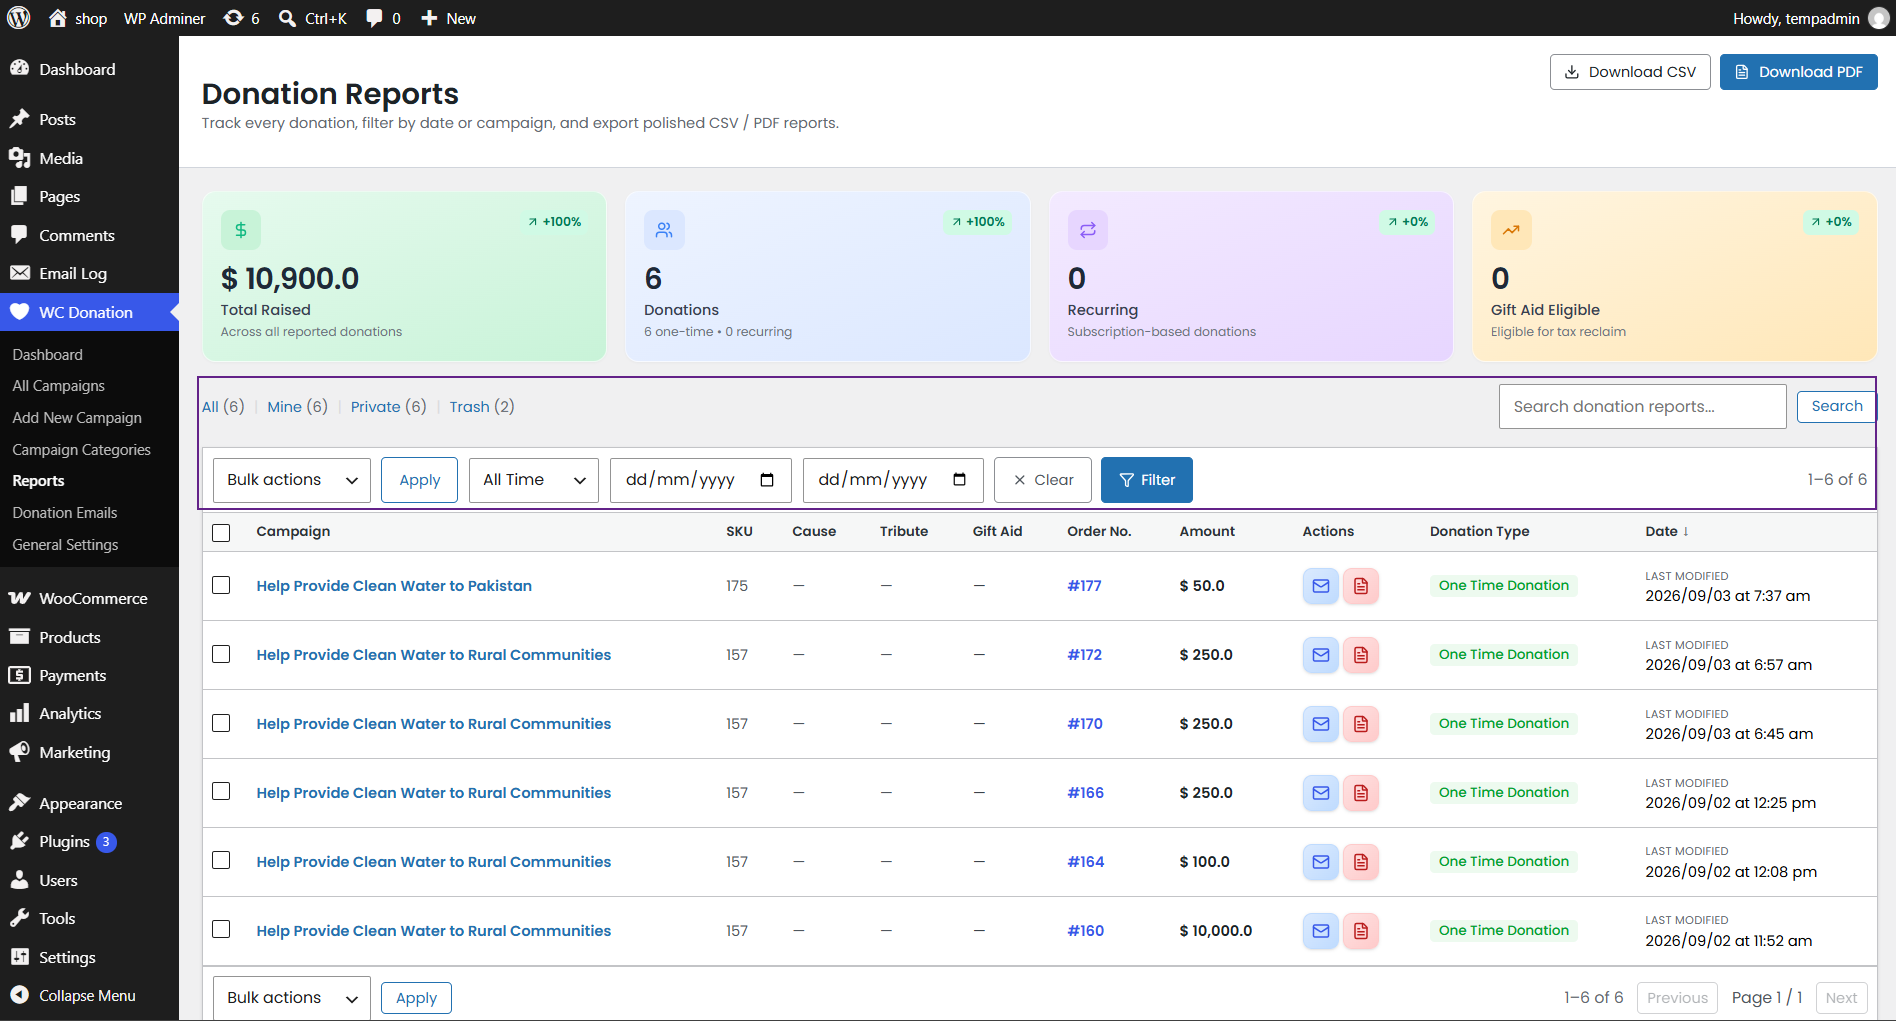
| Control | Description |
|---|---|
| View tabs | All / Mine / Private / Trash. |
| Search | Searches donation reports by keyword. |
| Date filter | Today, Yesterday, Last Week, Last Month, Last Year, or a custom date range. |
| Download CSV / Download PDF | Exports the currently filtered report list. |
| Move to Trash / Delete Permanently | Bulk actions on selected report rows. |
| Email Receipt | Available from a report’s detail view; resends the donation receipt email to the donor. |
Dependencies / Validation
- A “Total Raised” summary and a one-time / recurring split are shown alongside the filtered list.
- This admin screen is distinct from the front-end shortcode [donation_reports] (Section 27), which lets a logged-in donor view and export only their own donation history.
Donation Emails
↑ Back to topThe Donation Email feature allows the admin to configure and send automated email notifications containing donation details to donors and recipients after a donation is completed.
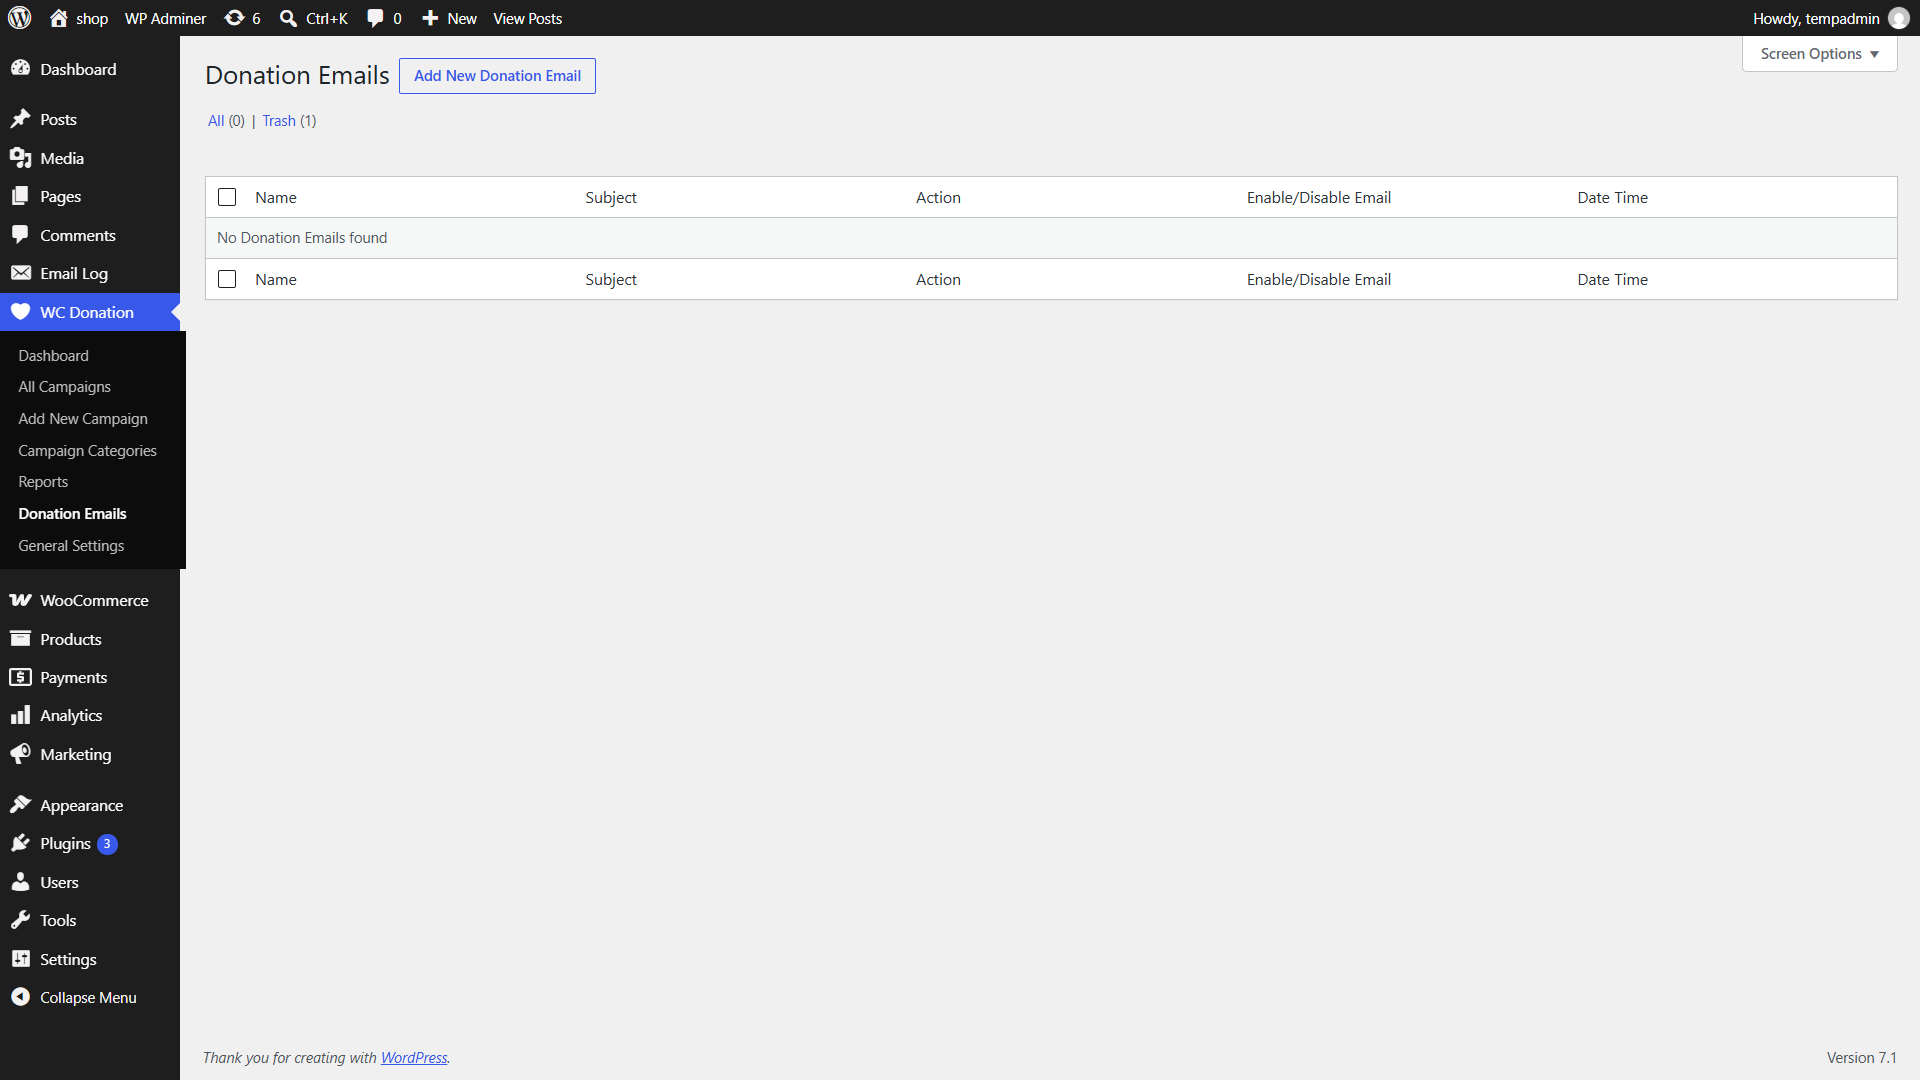
- Navigate to WordPress Admin Dashboard > WC Donation > Donation Emails.
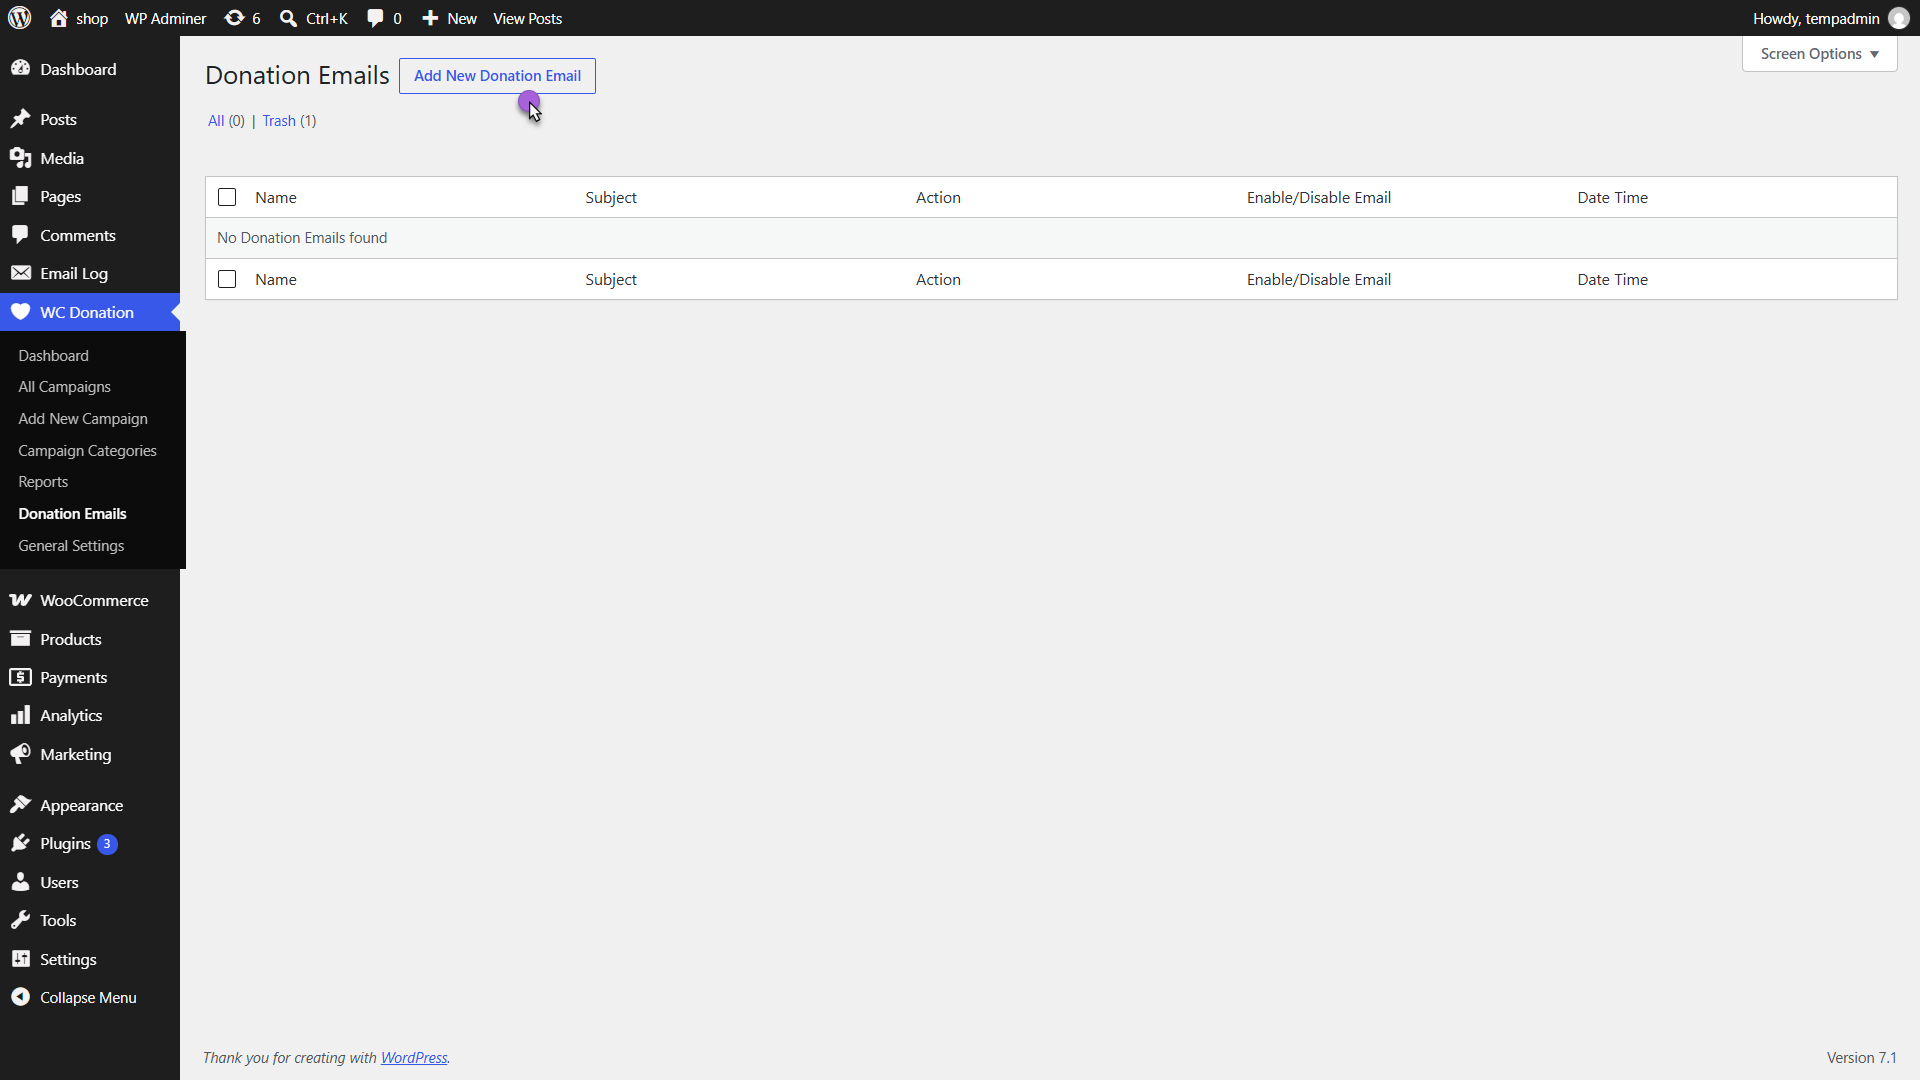
- Click on Add New Donation Email.
- Enter a Title in the Add Title field.
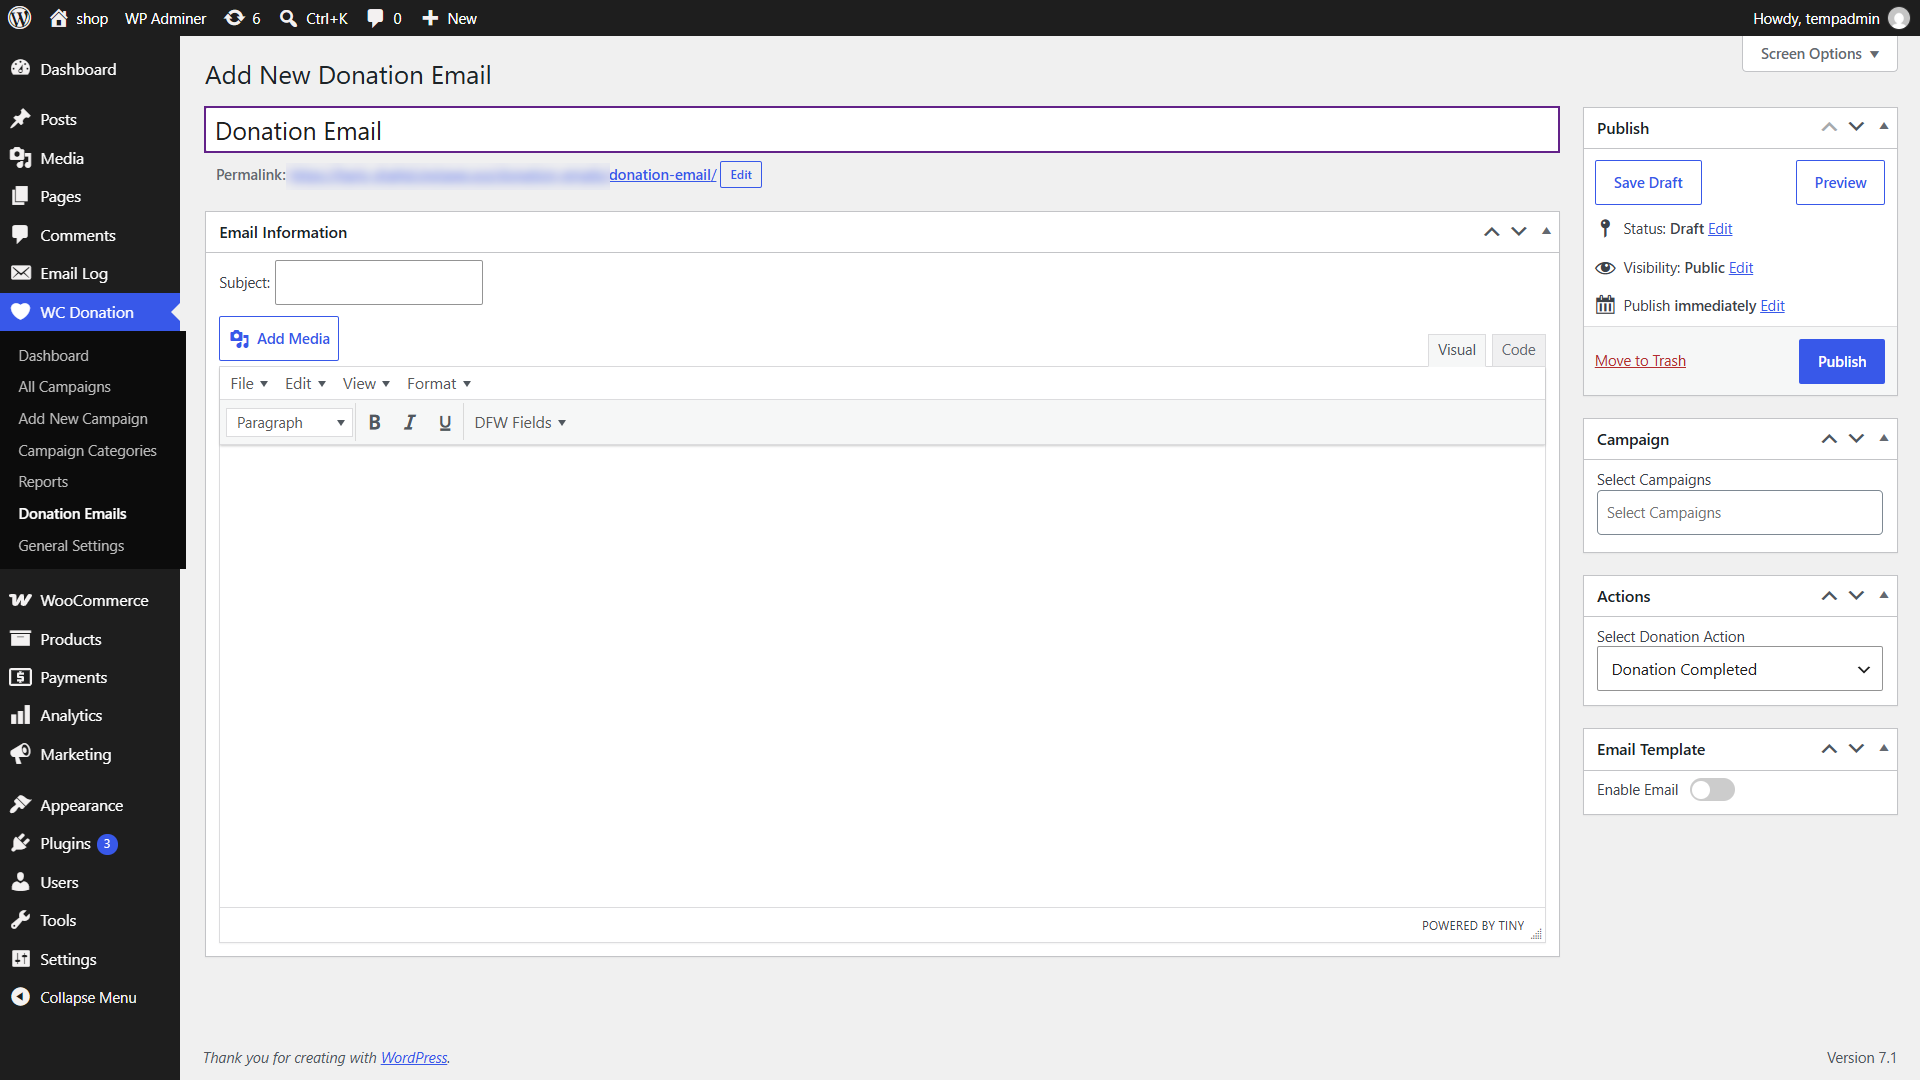
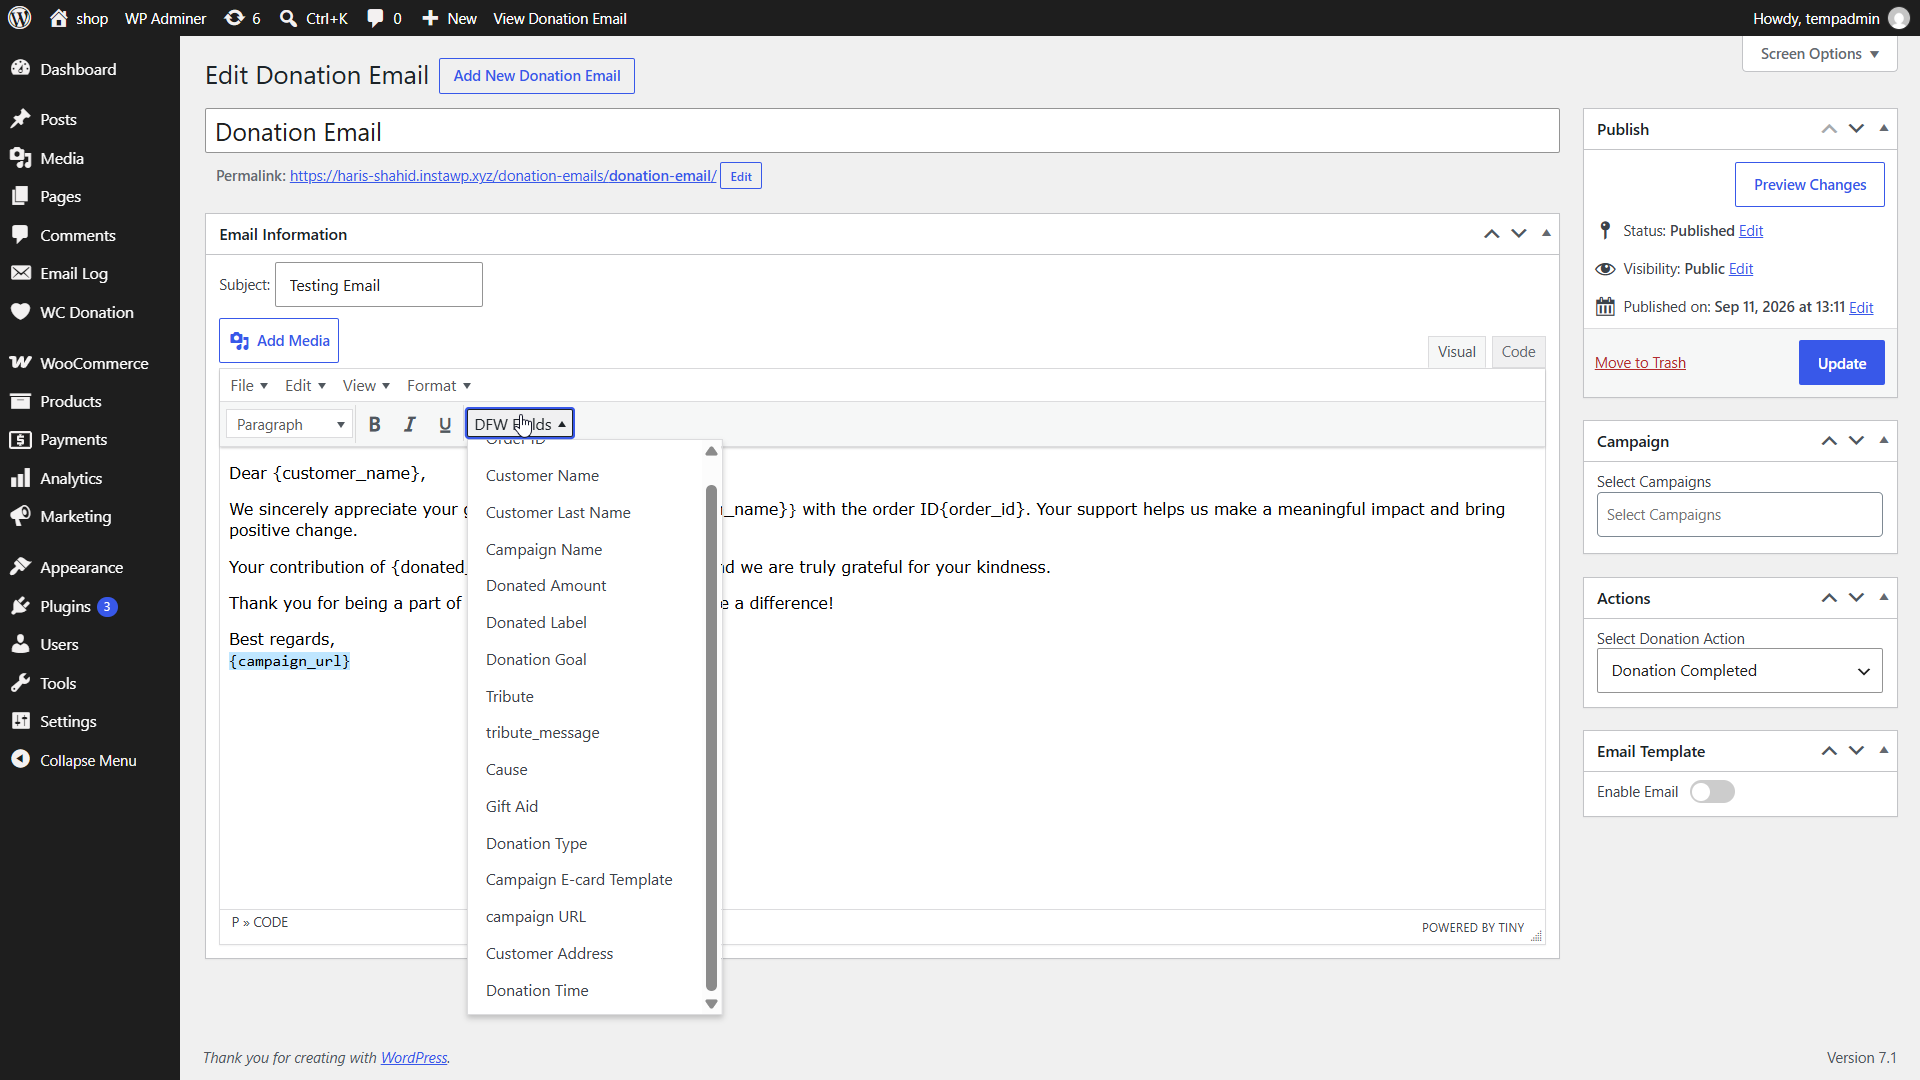
- Enter a Subject of email in the Subject field.
- Use the DFW Fields dropdown to insert tags into the Email Body.
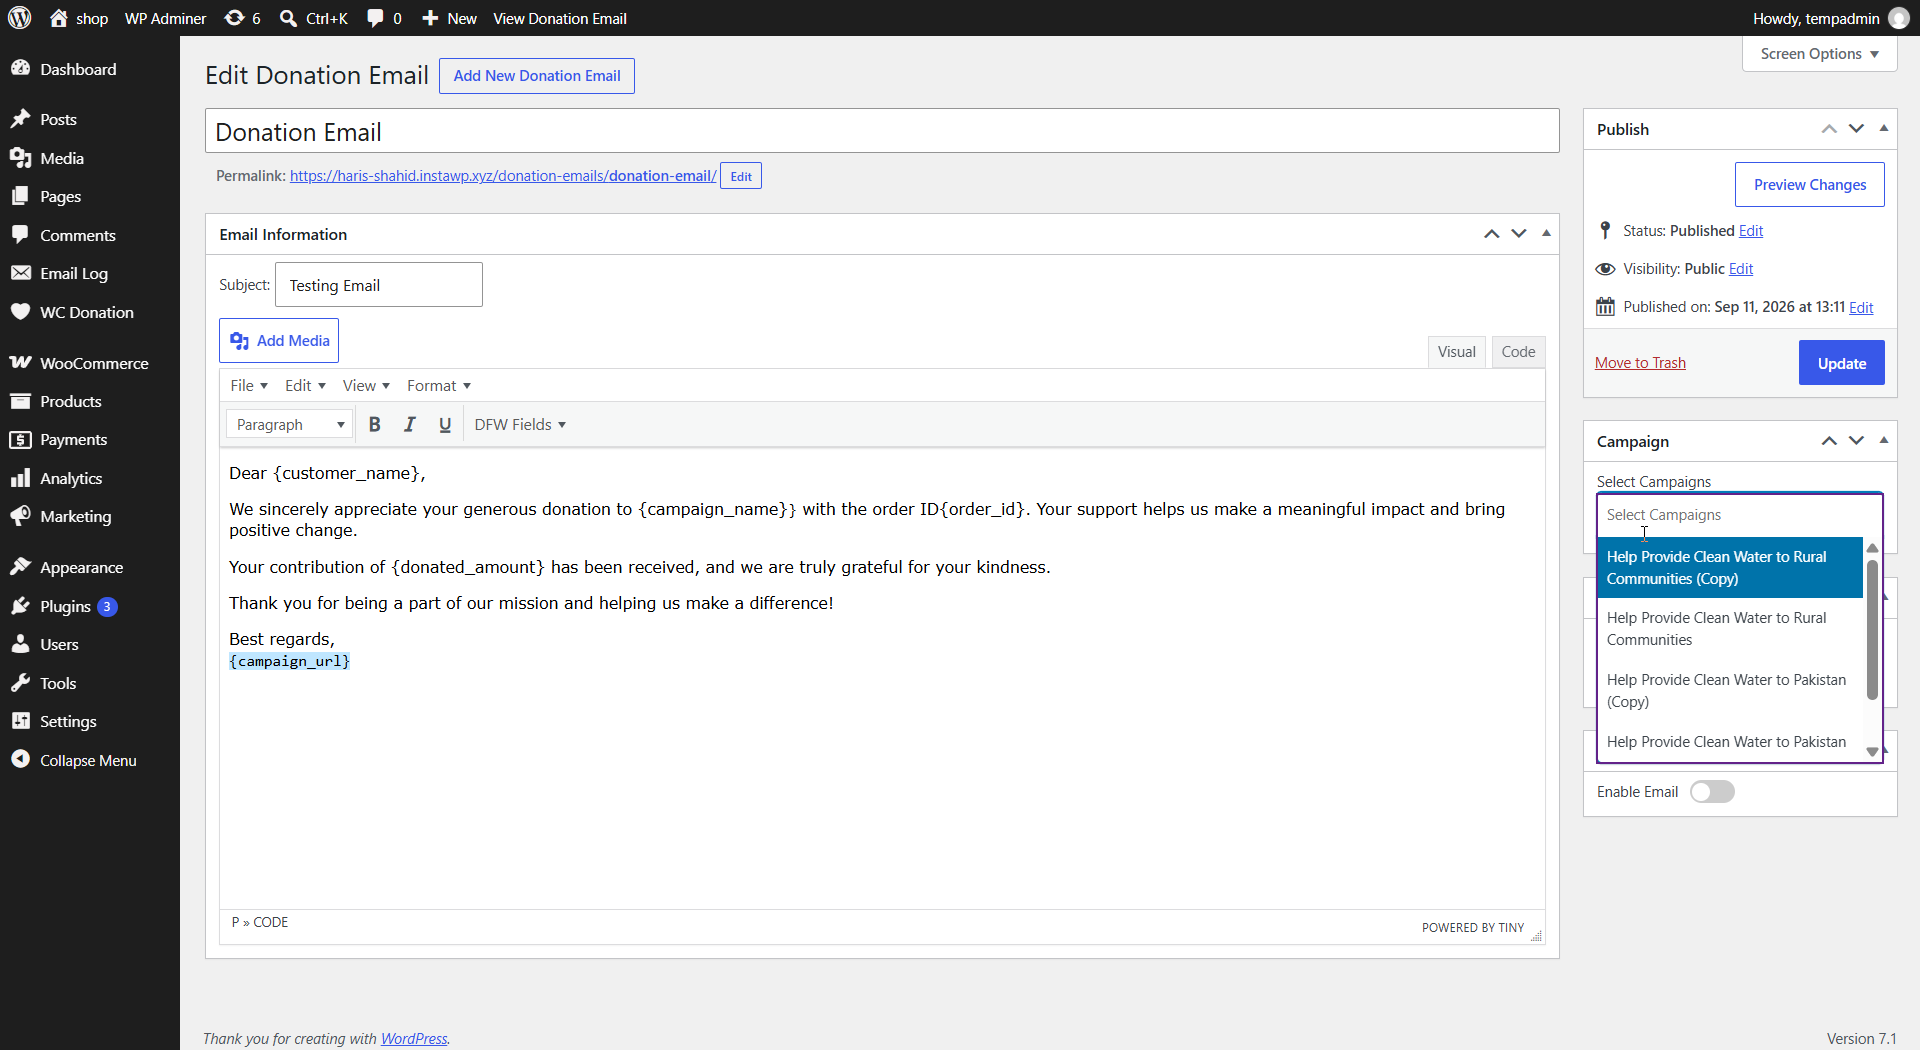
- In the Campaigns meta box, select the campaigns to which this email applies.
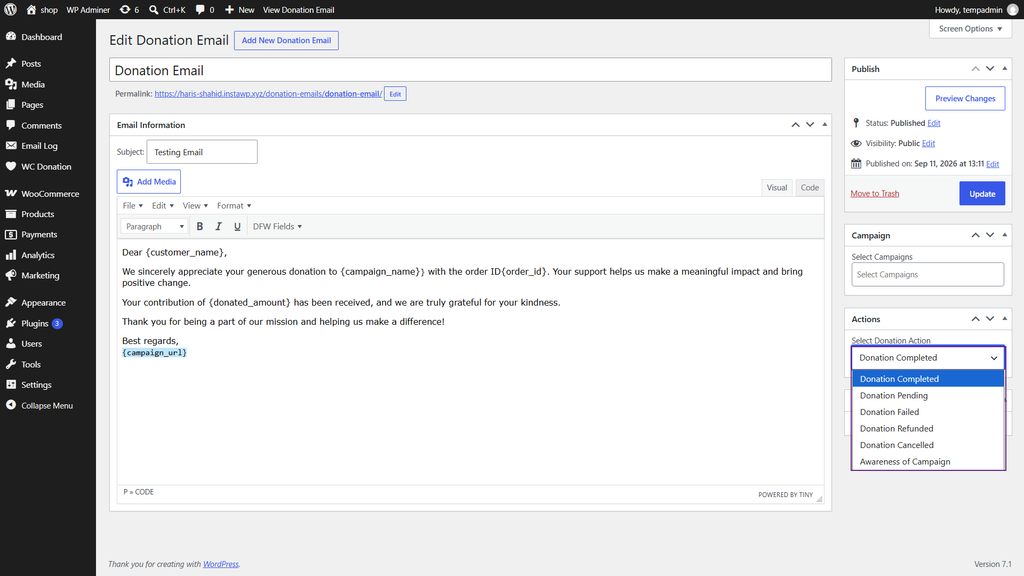
- In the Actions meta box, choose when the email will be triggered.
- Enable the email template using the Enable Template option.

- Click Publish to save the email template.

Front End Impact
- When a user donates to a campaign and the order status is marked as Completed, as set by the admin, an email will be triggered and sent to the user.

General Settings
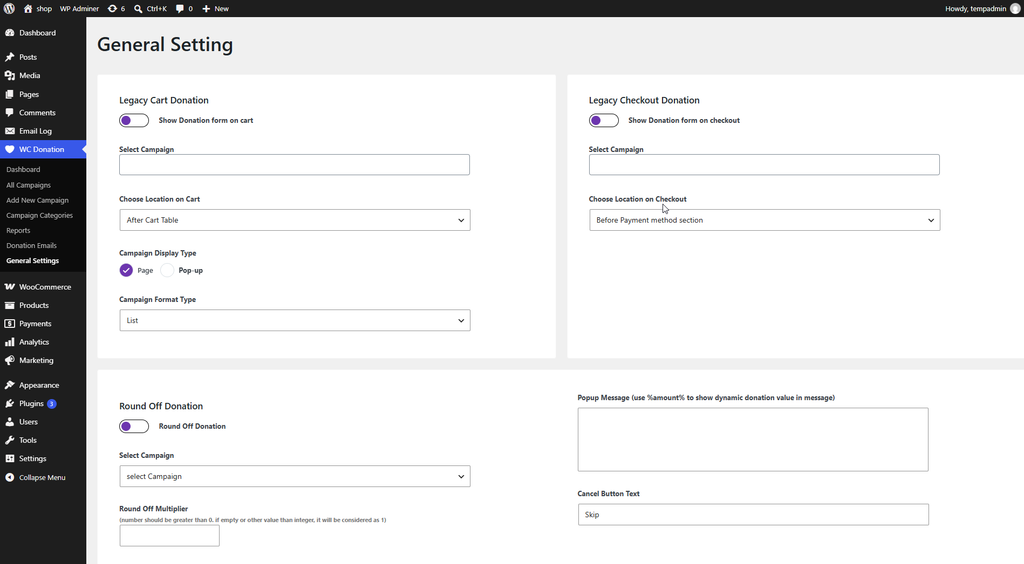
↑ Back to top- Navigate to the WordPress Admin Dashboard > WC Donation > General Settings.
Configuration
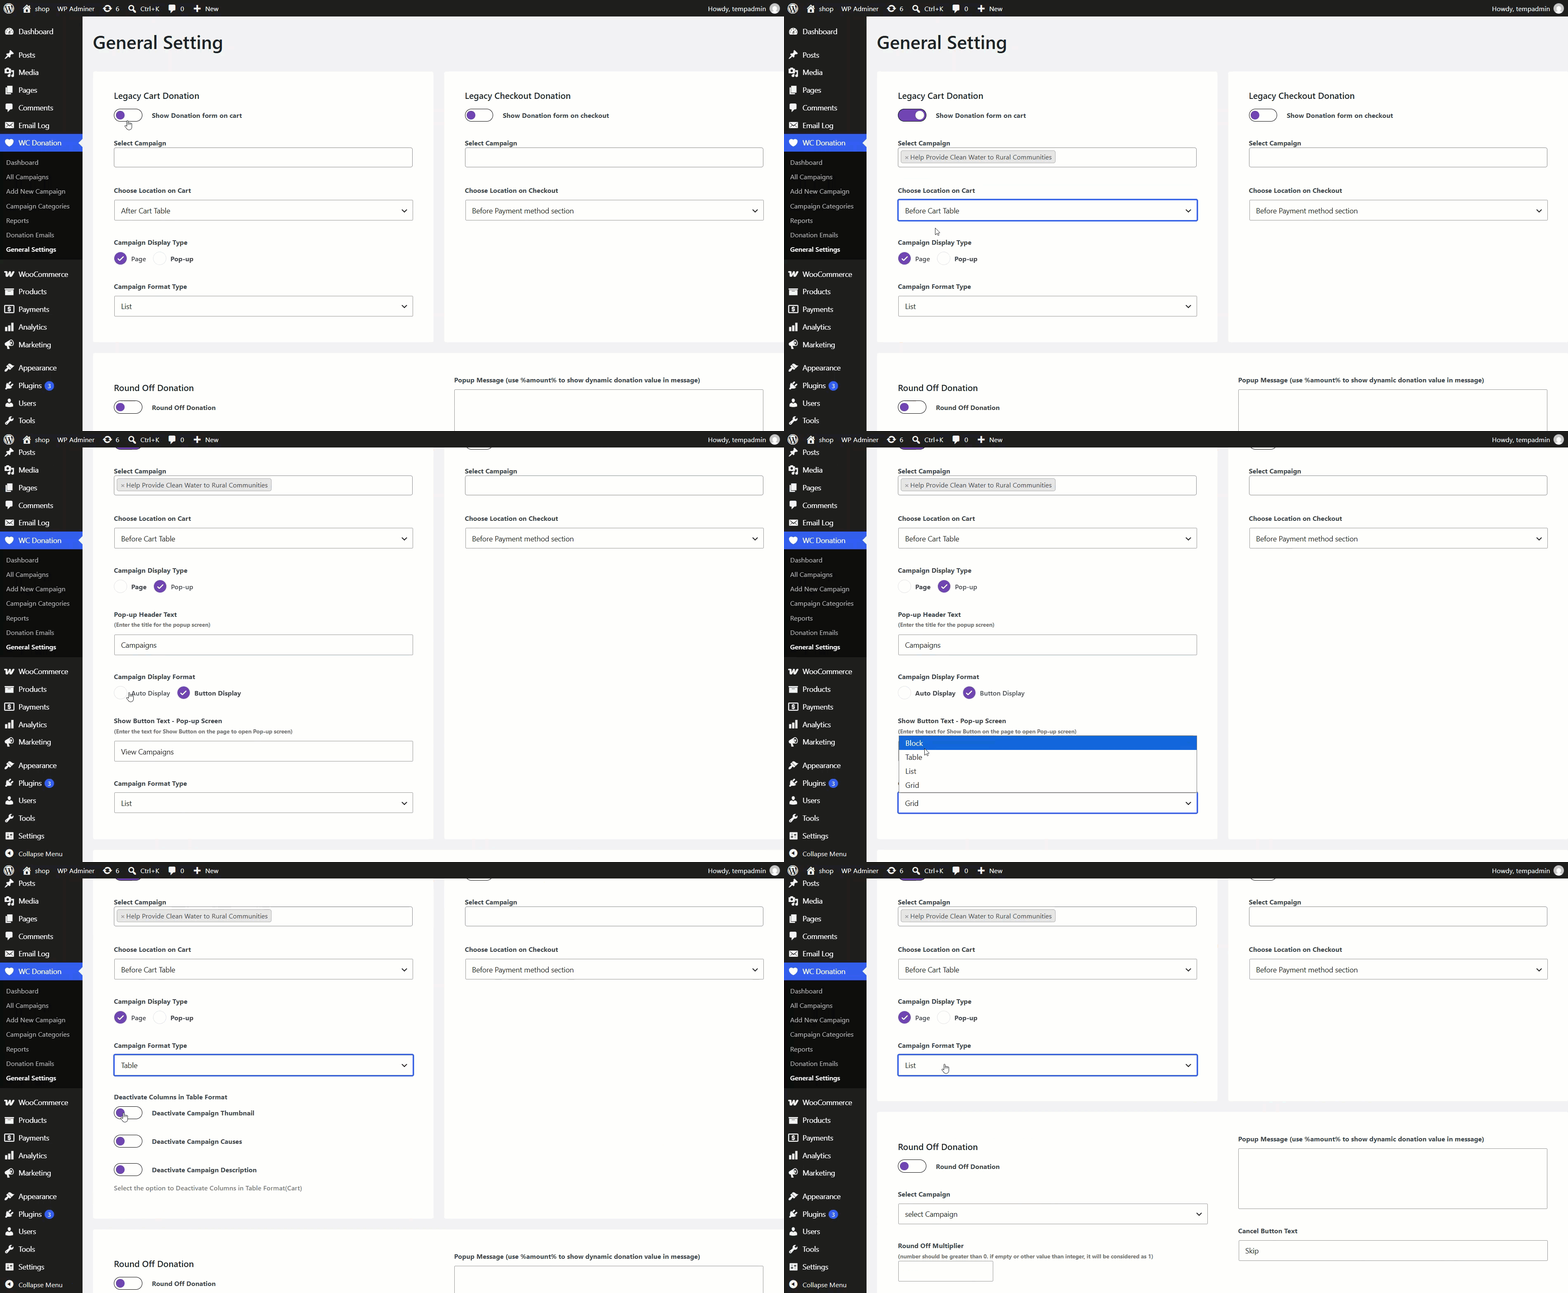
↑ Back to topLegacy Cart Donation
| Setting | Description |
|---|---|
| Show Donation form on cart | Master toggle for showing a donation prompt on the WooCommerce cart page. |
| Select Campaign | Multi-select of which campaigns are offered on the cart. |
| Choose Location on Cart | Before Cart Table, After Cart Table, or After Cart. |
| Campaign Display Type | Page (inline) or Pop-up. |
| Pop-up Header Text / Campaign Display Format | Only shown for Pop-up: the modal’s title text, and the display format (e.g. button display) used inside it. |
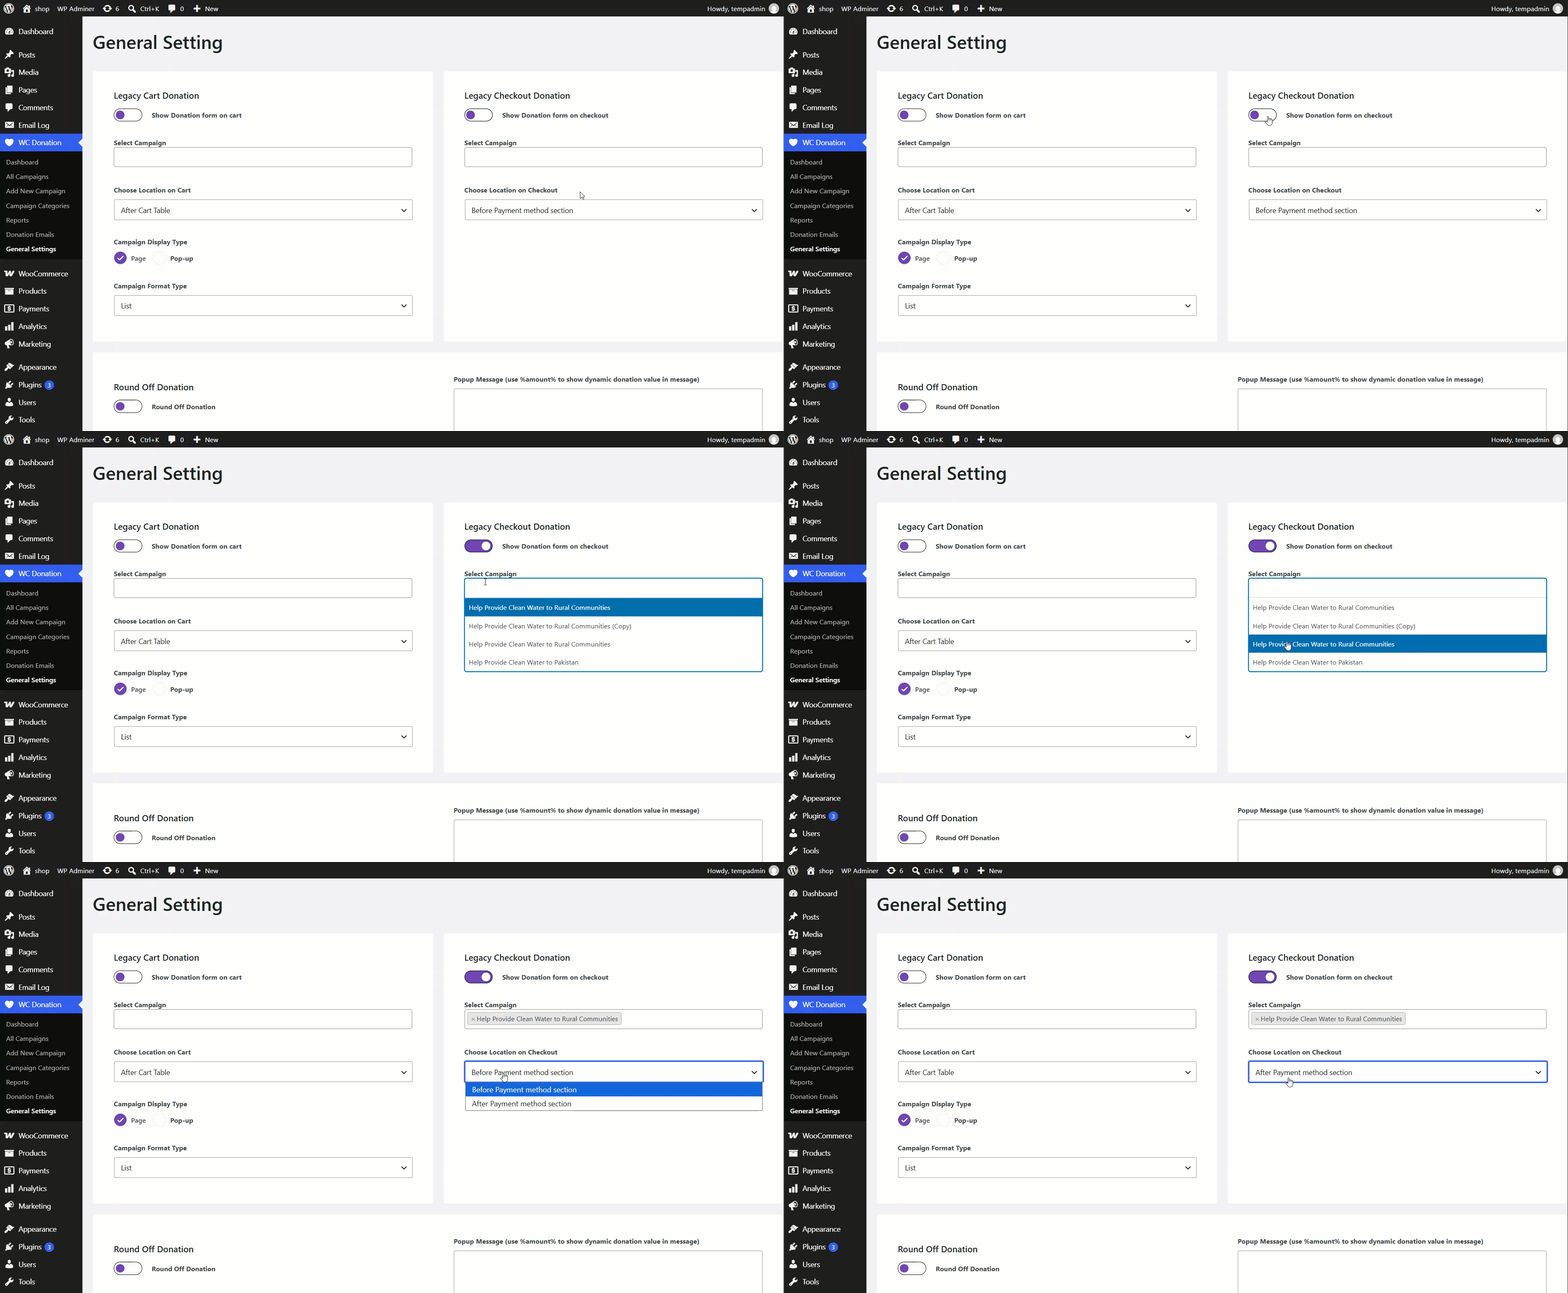
Legacy Checkout Donation
| Setting | Description |
|---|---|
| Show Donation form on checkout | Master toggle for the checkout-page donation prompt. |
| Select Campaign | Multi-select of which campaigns are offered at checkout. |
| Choose Location on Checkout | Before Payment method section or After Payment method section. |
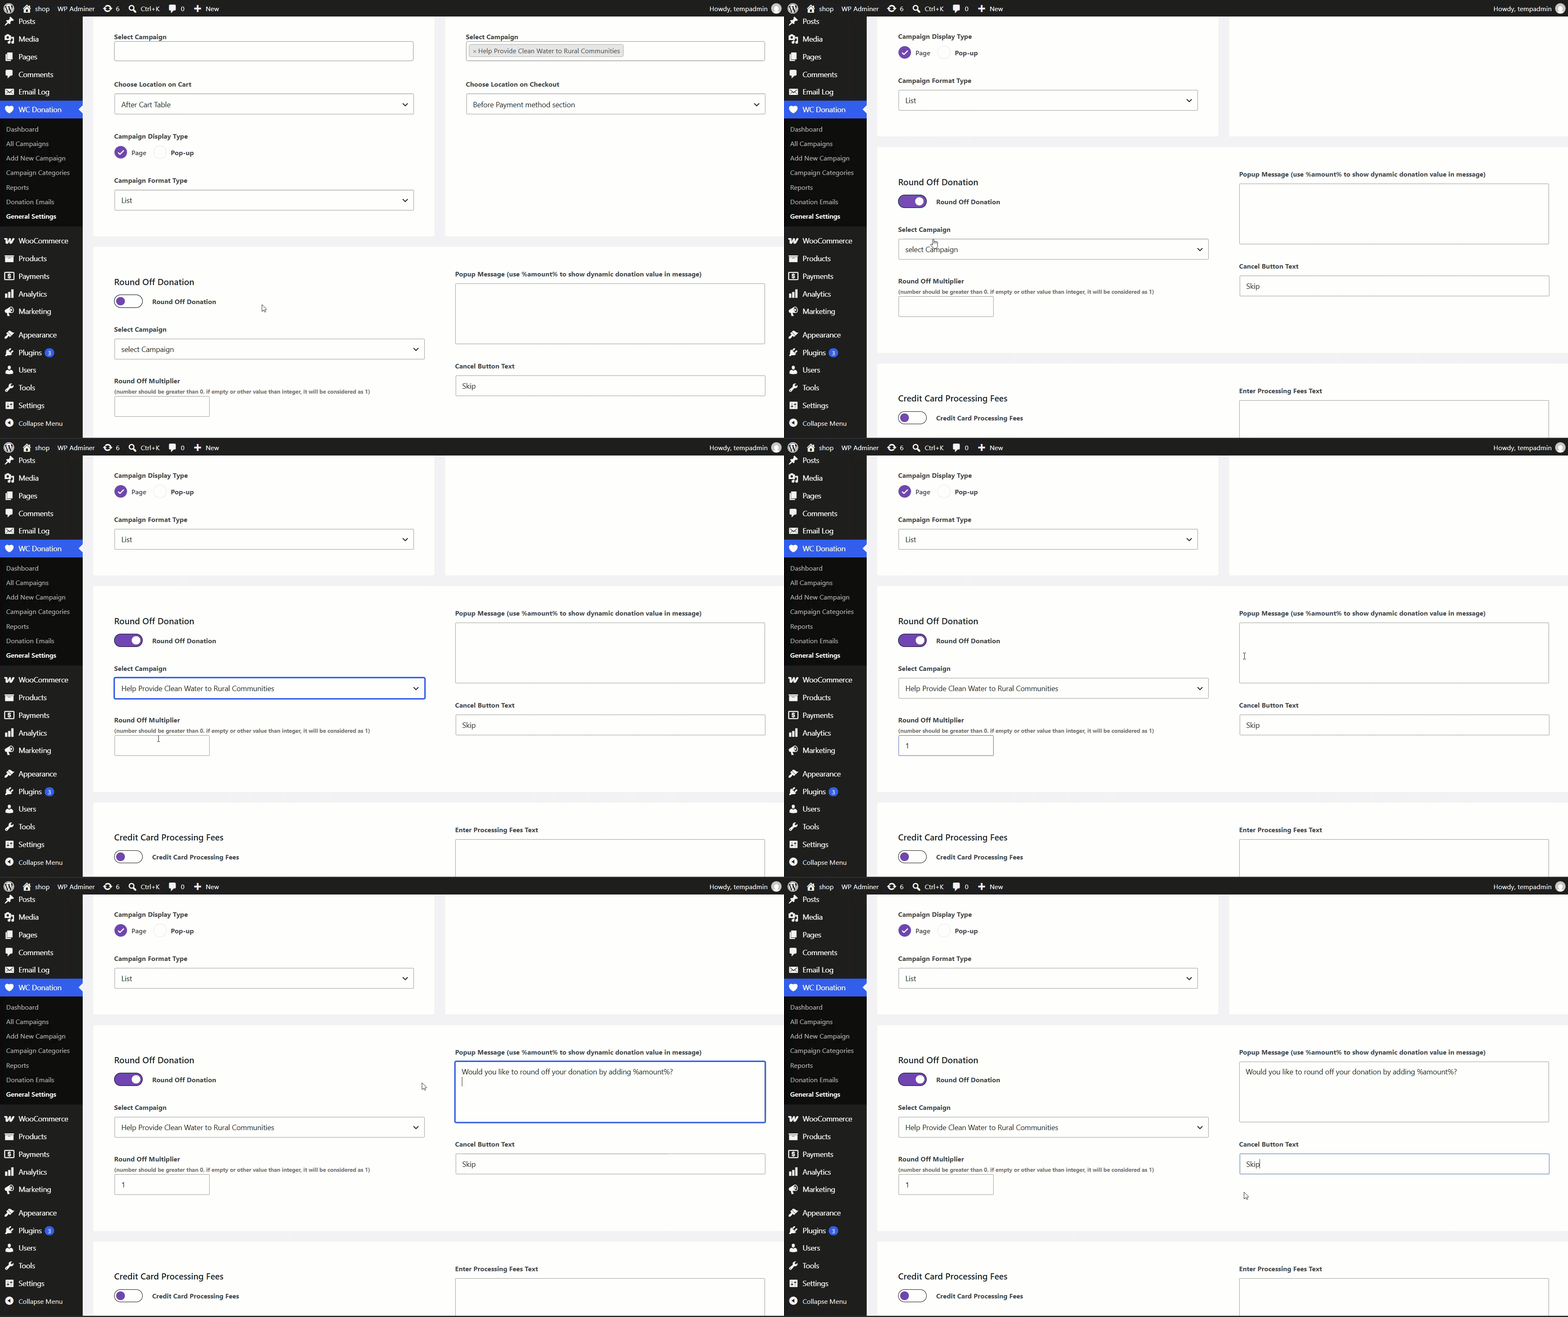
Round Off Donation
| Setting | Description |
|---|---|
| Round Off Donation | Master toggle. Rounds a customer’s cart total up to the nearest whole unit and offers the difference as a donation. |
| Select Campaign | The single campaign that receives round-off donations. Only campaigns not already selected for Legacy Cart or Legacy Checkout donation, and that do not have a Goal enabled, are offered in this list. |
| Round Off Multiplier | A number greater than 0 that scales the rounding unit; any non-integer or empty value is treated as 1. Required once Round Off Donation is enabled. |
| Popup Message | Supports a %amount% placeholder that is replaced with the calculated round-off value. |
| Cancel Button Text | The label for the button that skips the round-off prompt. |
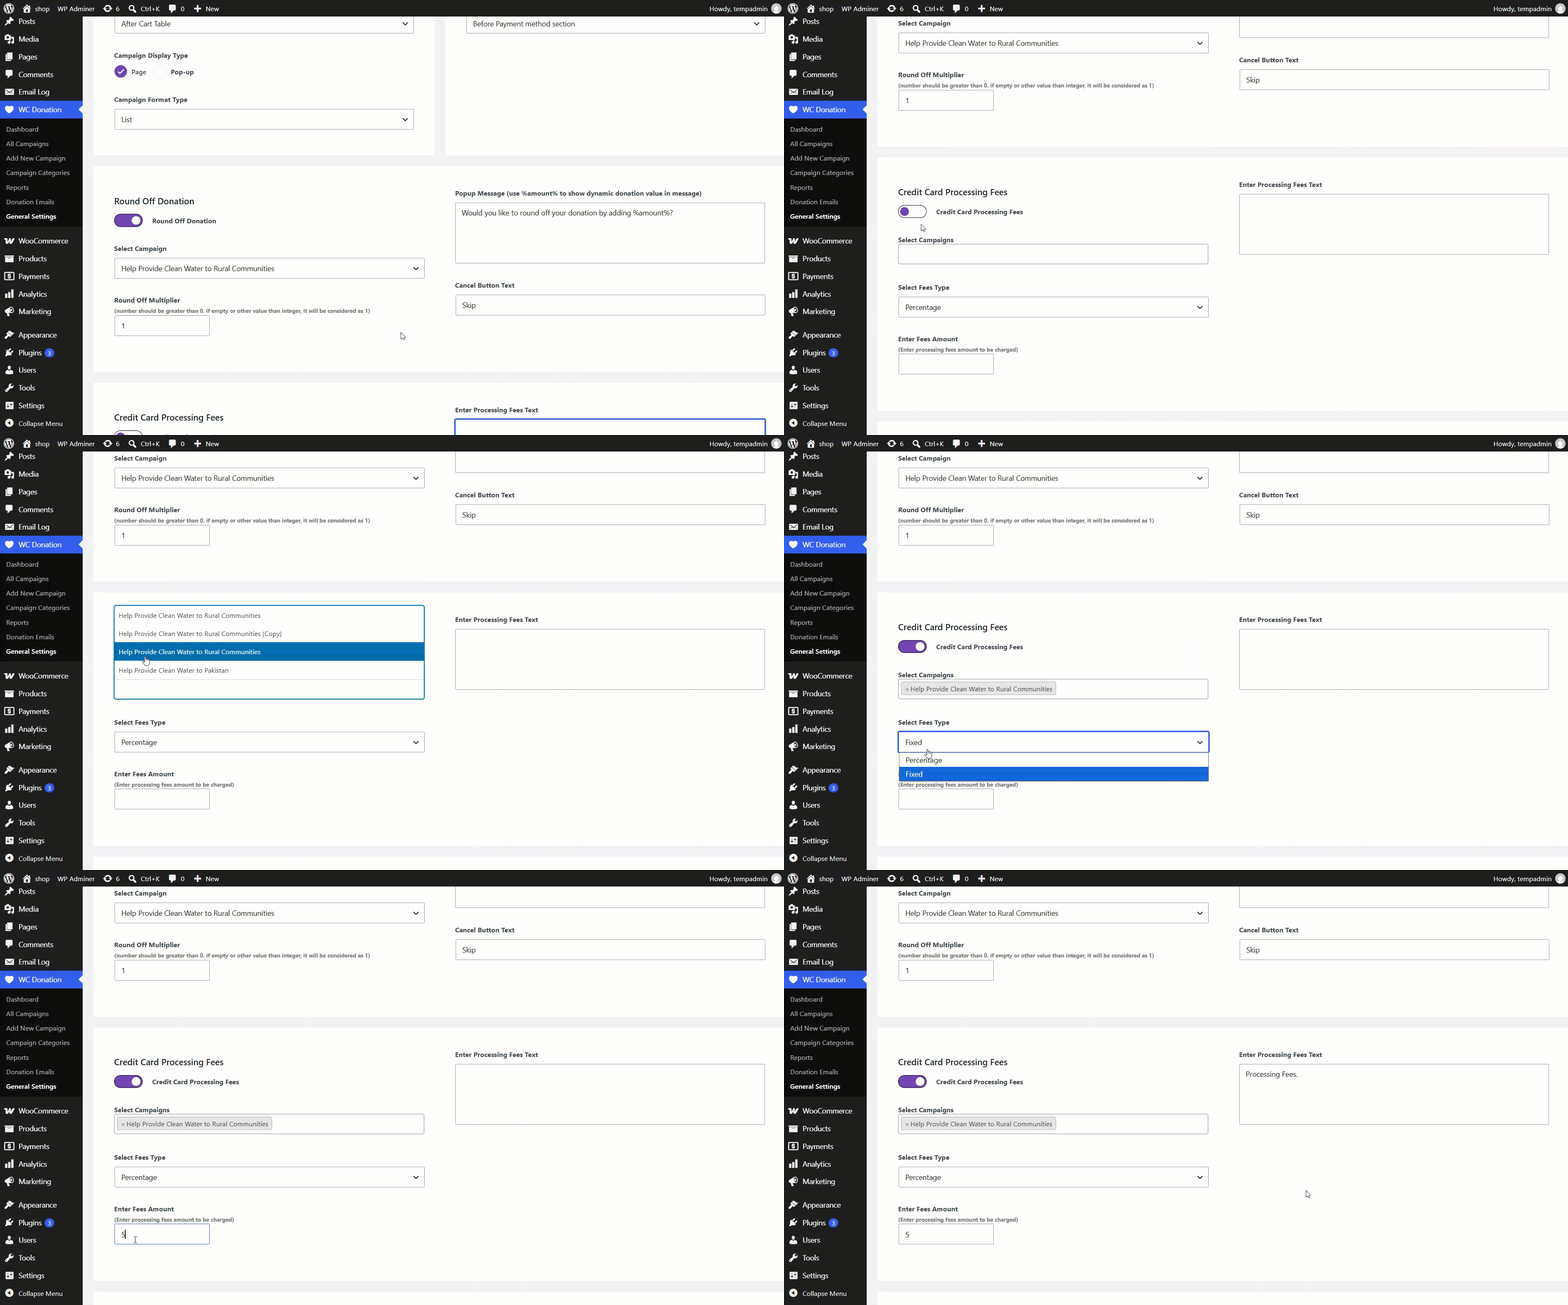
Credit Card Processing Fees
↑ Back to top| Setting | Description |
|---|---|
| Credit Card Processing Fees | Master toggle store-wide. |
| Select Campaigns | Which campaigns show the processing-fee prompt. |
| Select Fees Type | Percentage or Fixed. |
| Enter Fees Amount | Required once the feature is enabled. |
| Enter Processing Fees Text | The message shown alongside the option. |
Gift Aid (UK)
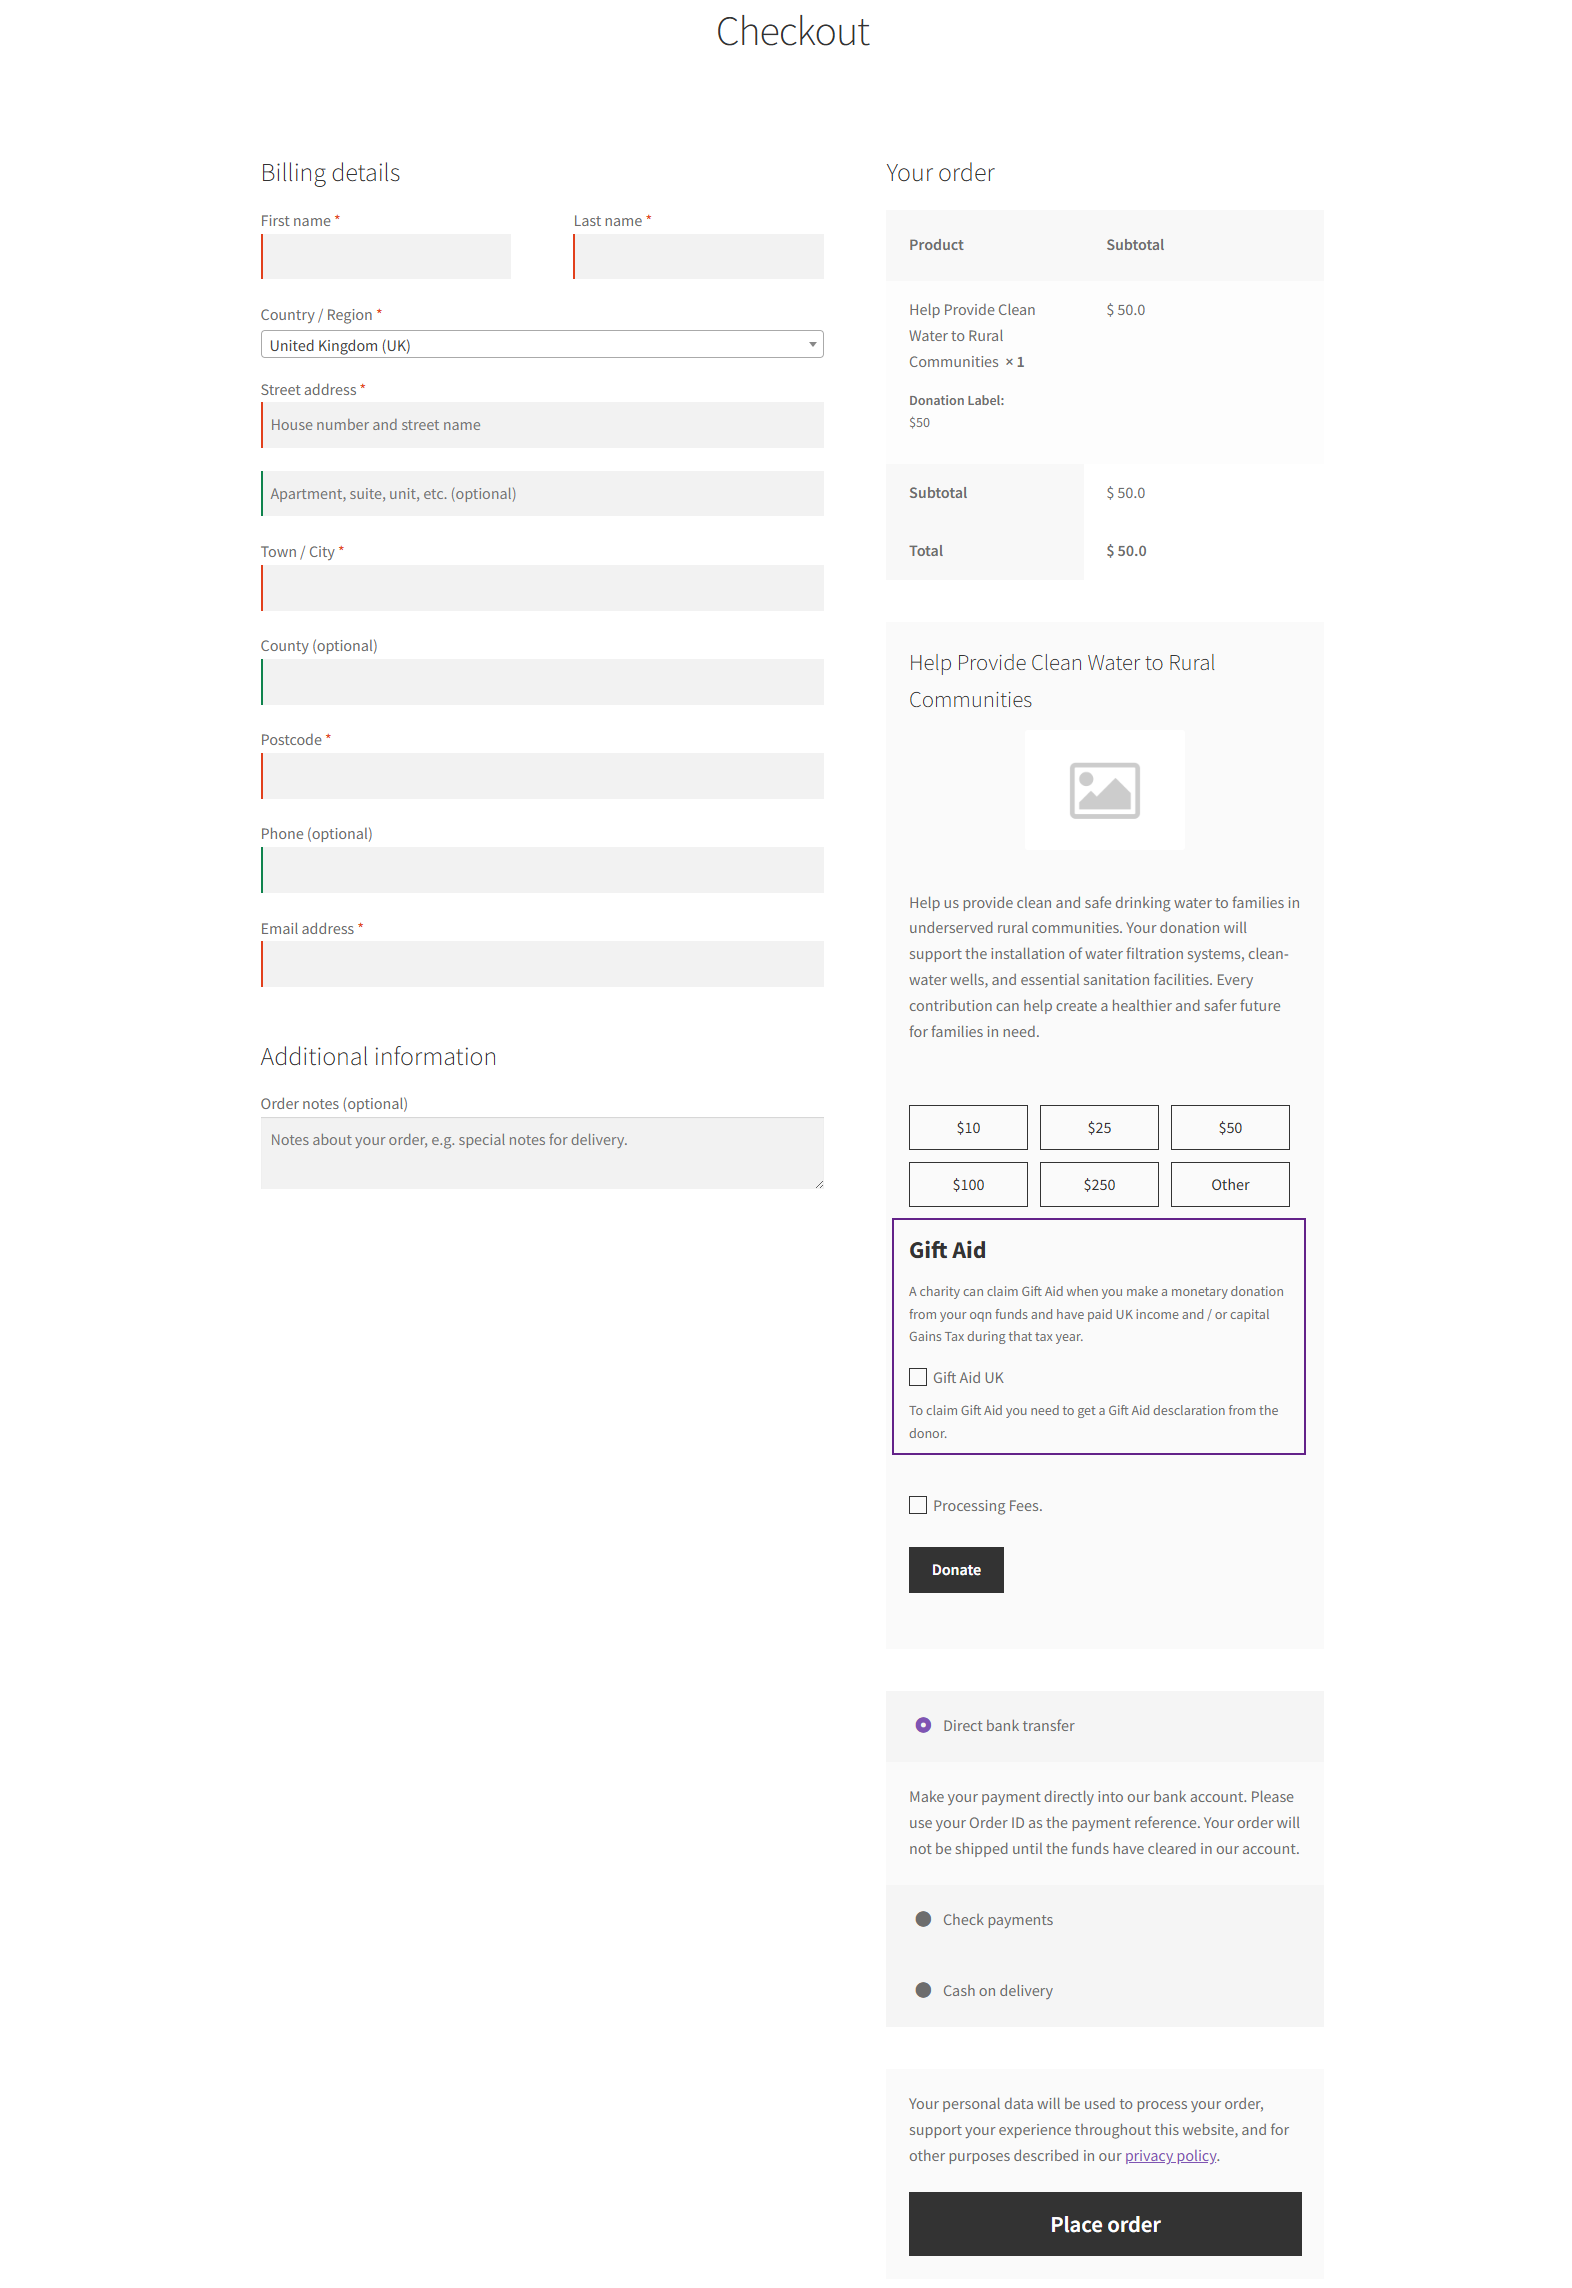
↑ Back to topGift Aid (UK) is a donation enhancement feature that allows eligible UK taxpayers to increase the value of their donation at no extra cost. When enabled, donors can confirm their Gift Aid declaration during checkout, enabling the organization to reclaim additional tax and increasing the total donation received.
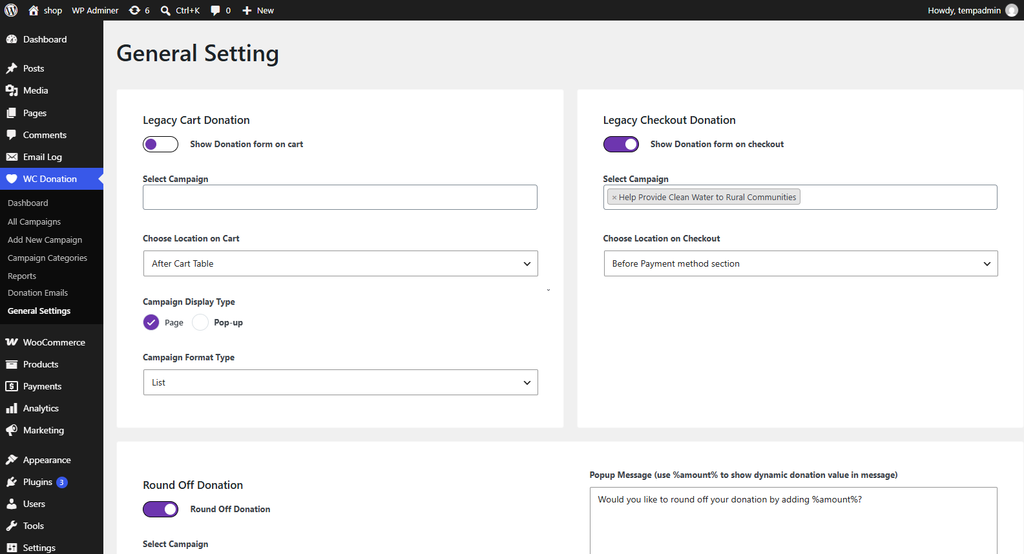
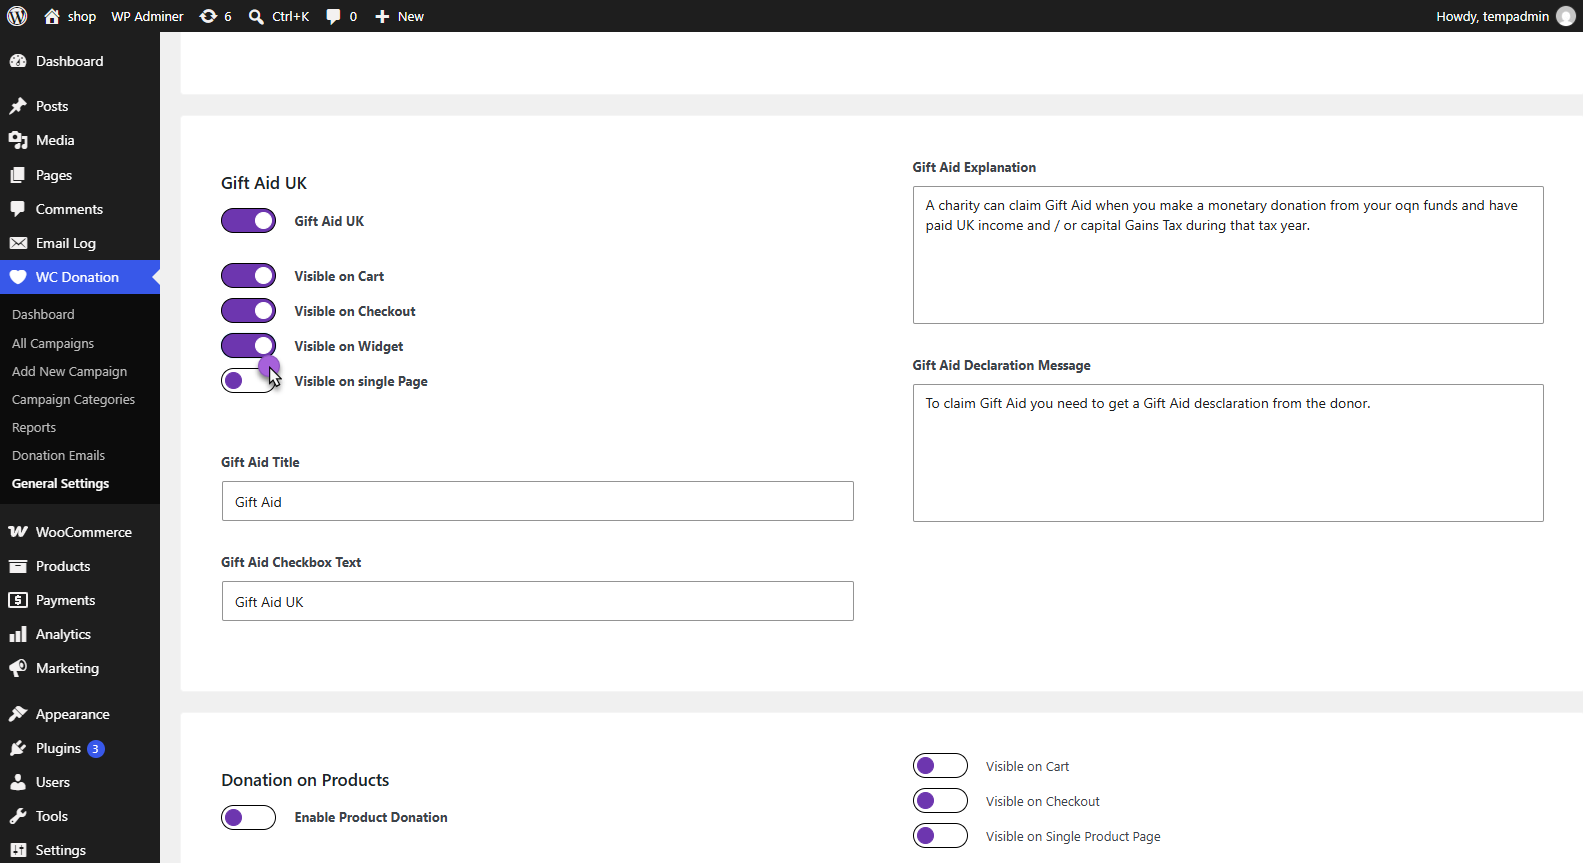
- Once you click on the General Settings, the admin can see Gift Aid UK settings.
- You can enable or disable the Gift Aid UK by using the toggle button under the General Settings.
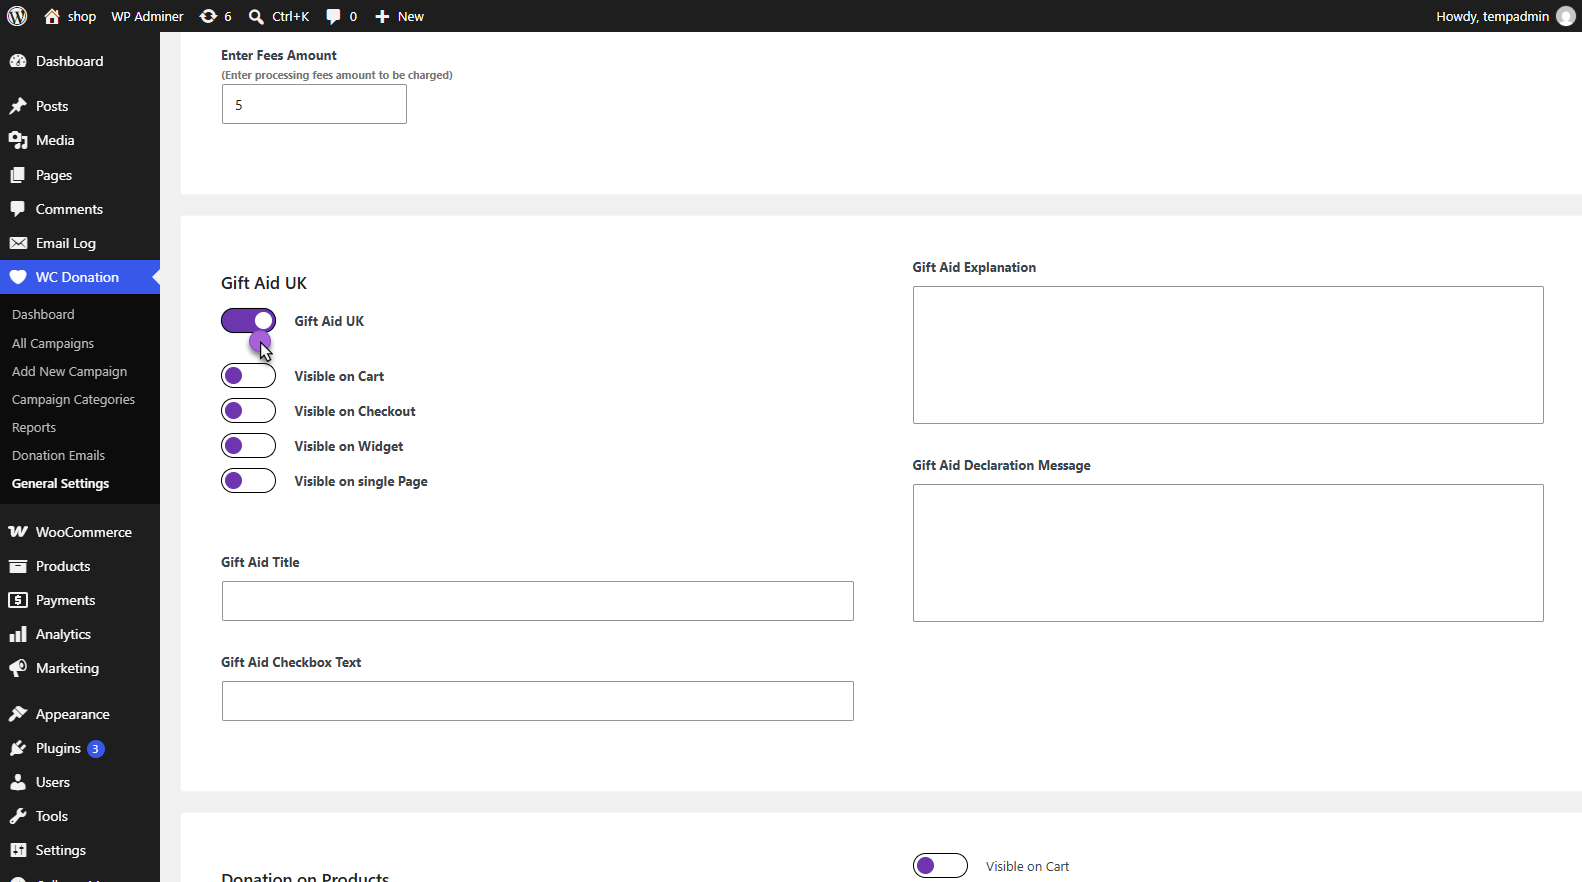
| NOTE | To display Campaigns, users must define Campaign in the Legacy Cart Donation and Legacy Checkout Donation. |
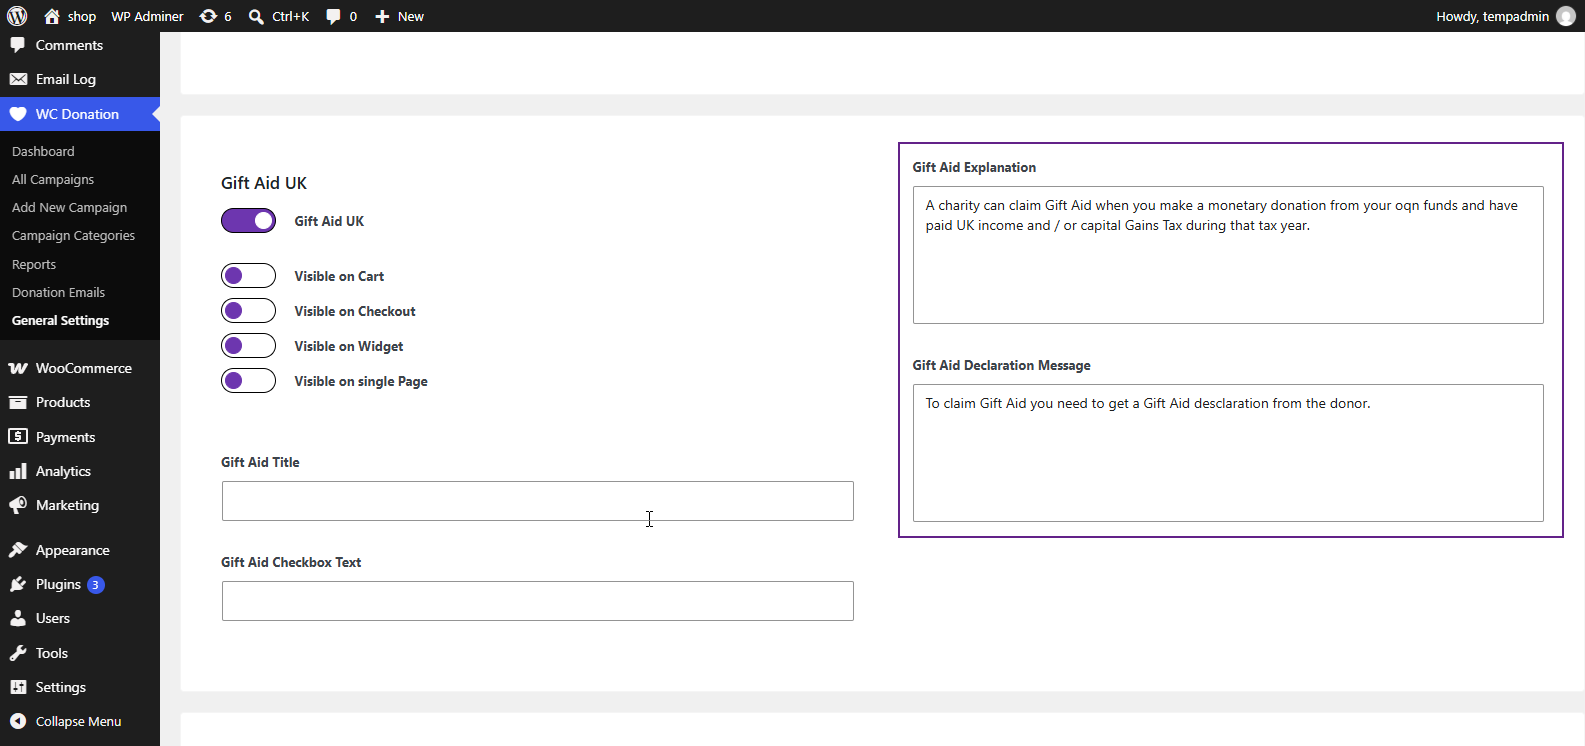
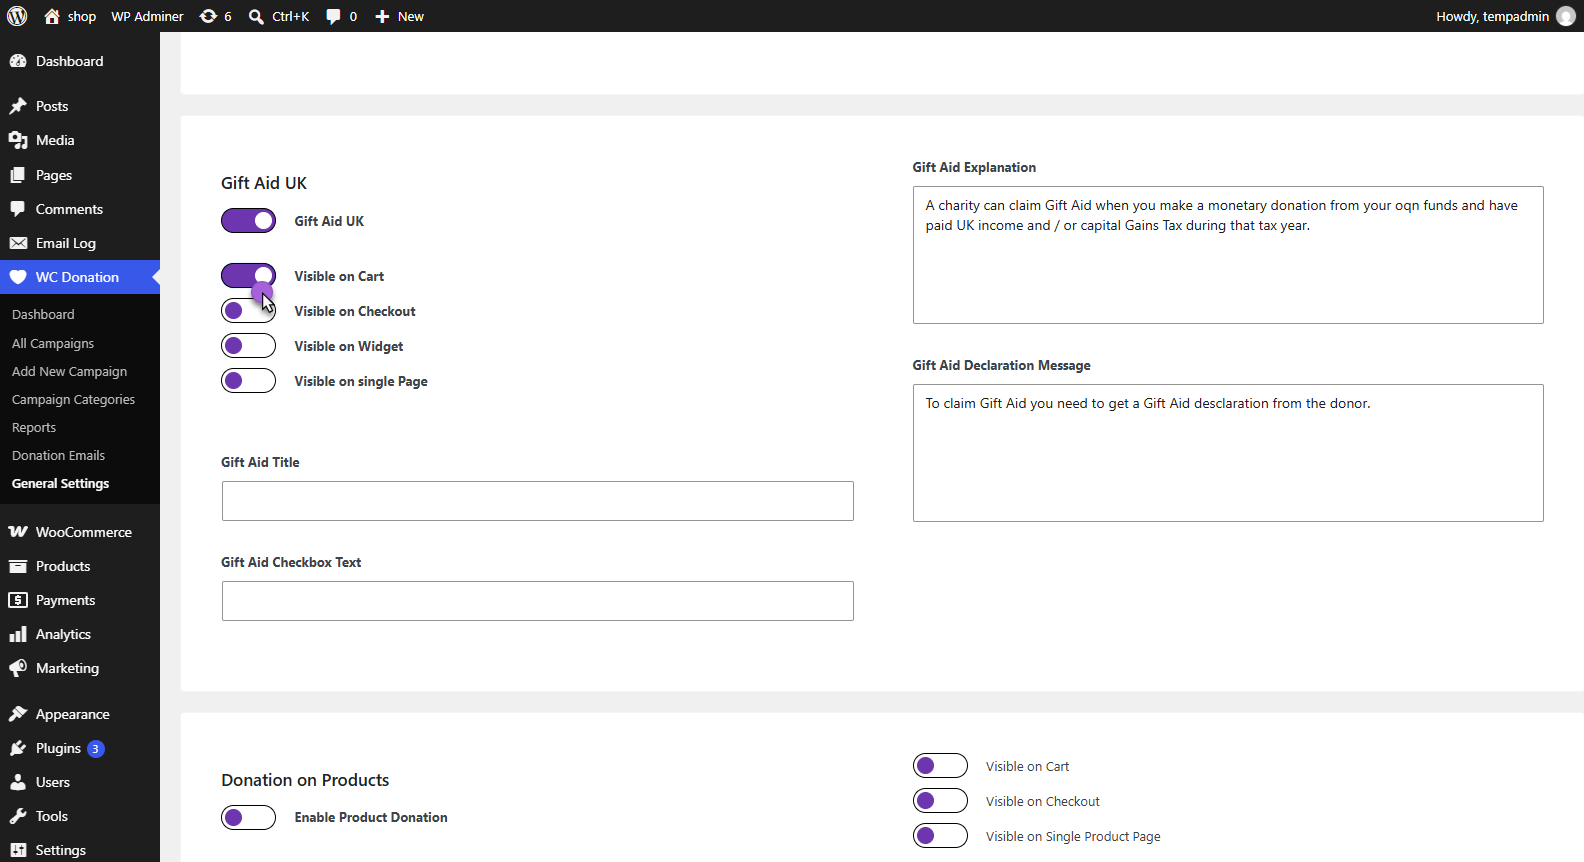
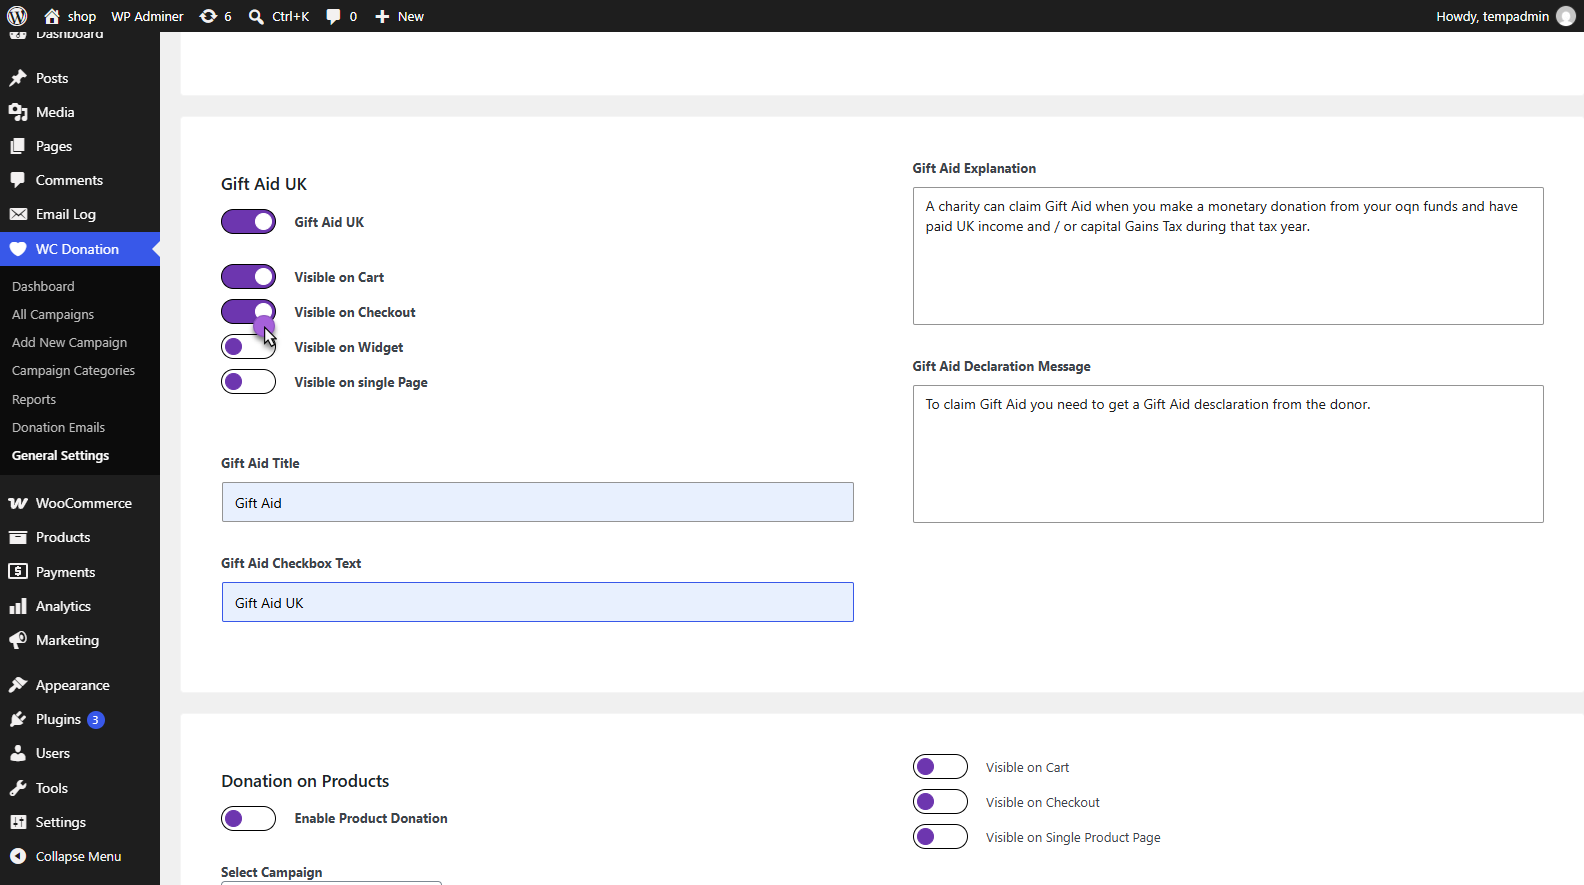
- Admin must add the Gift Aid Title, Gift Aid Checkbox Text ,Gift Aid Explanation and Gift Aid Declaration Message text boxes in the respective fields.
Front-End Impact
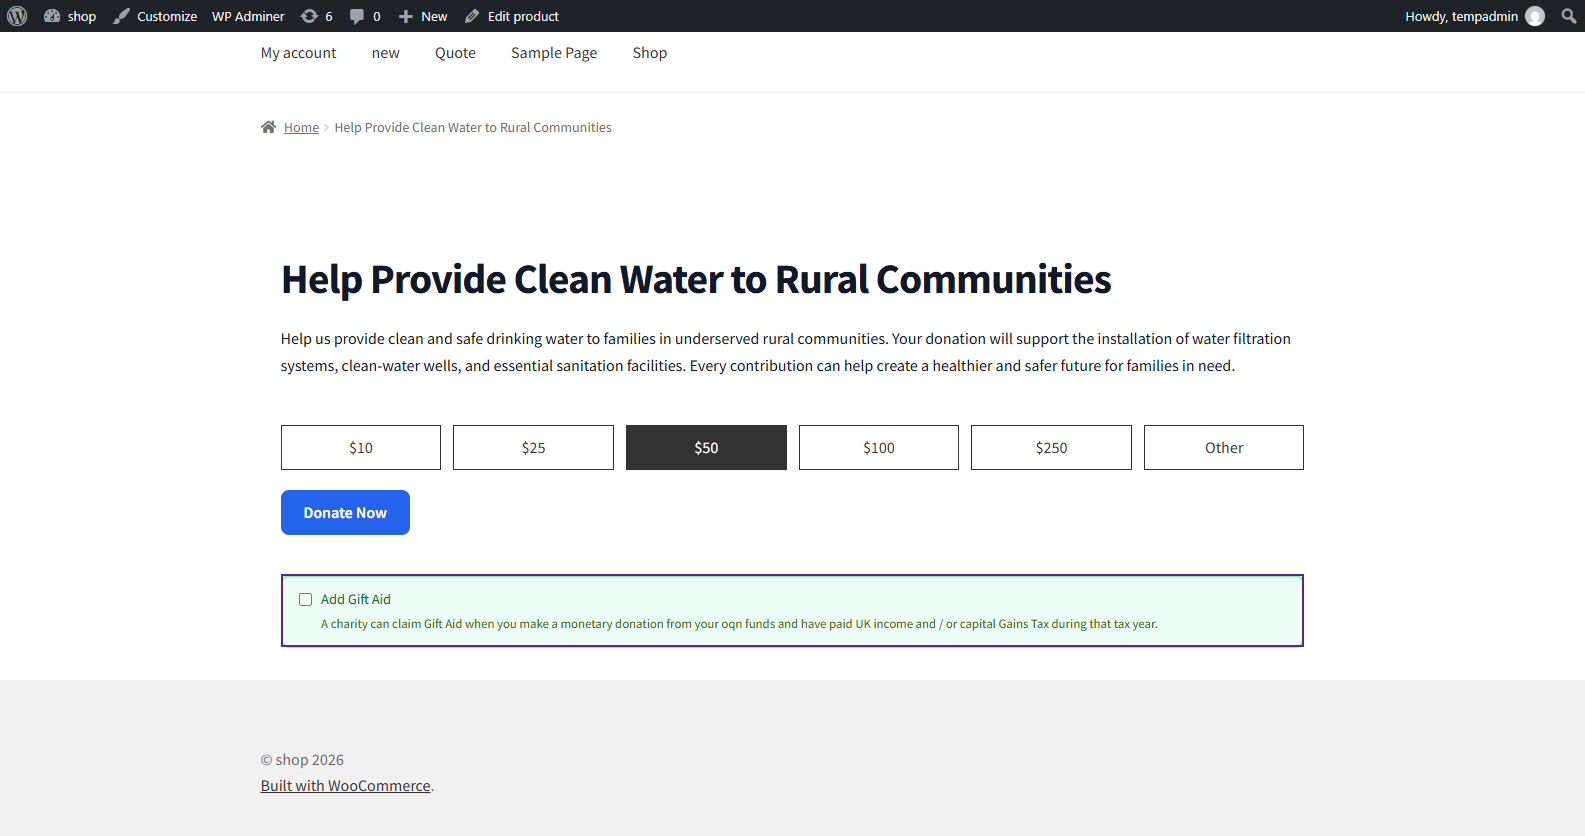
- Admin must enable the Gift Aid UK on the following checkboxes:
Visible on Cart
Front-End Impact
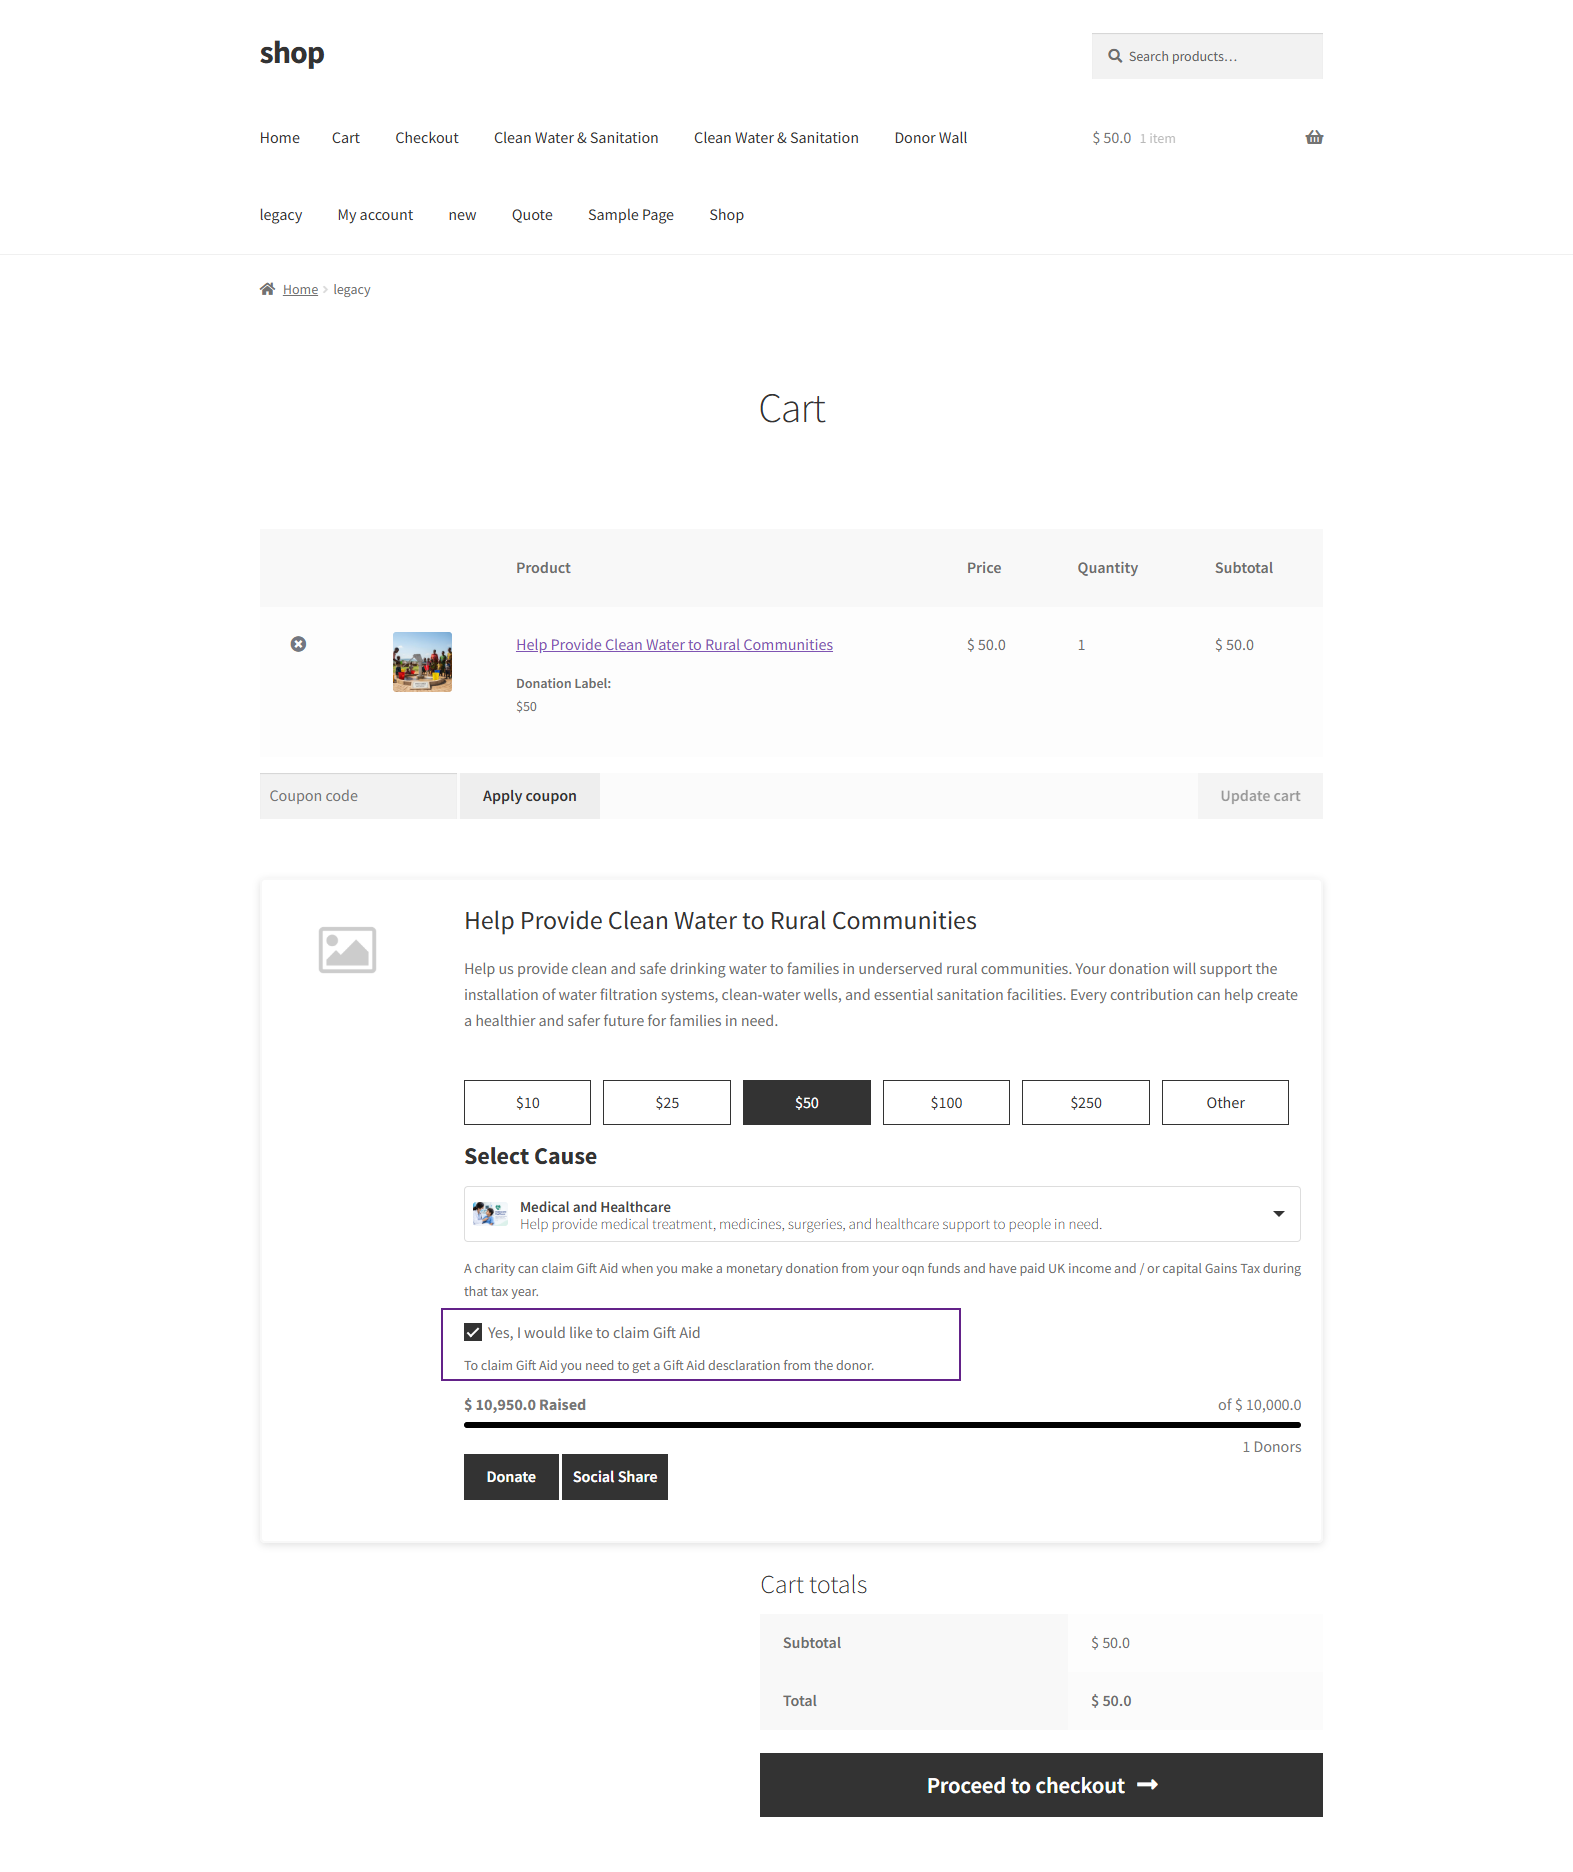
Visible on Checkout
Front-End Impact
Visible on Widget
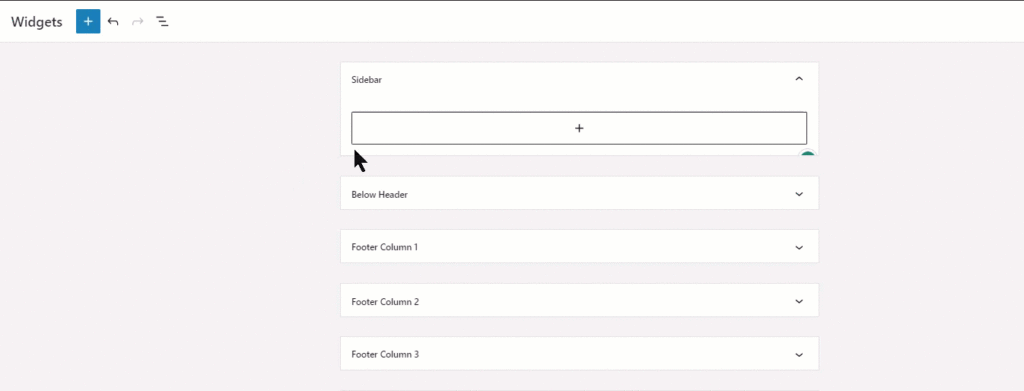
- After the changes are applied and saved, the admin must set the widgets from the WordPress Admin dashboard> Appearance > Widgets.
- Select the desired Campaign and click the Save button.
Front-End Impact

Visible on Single Page
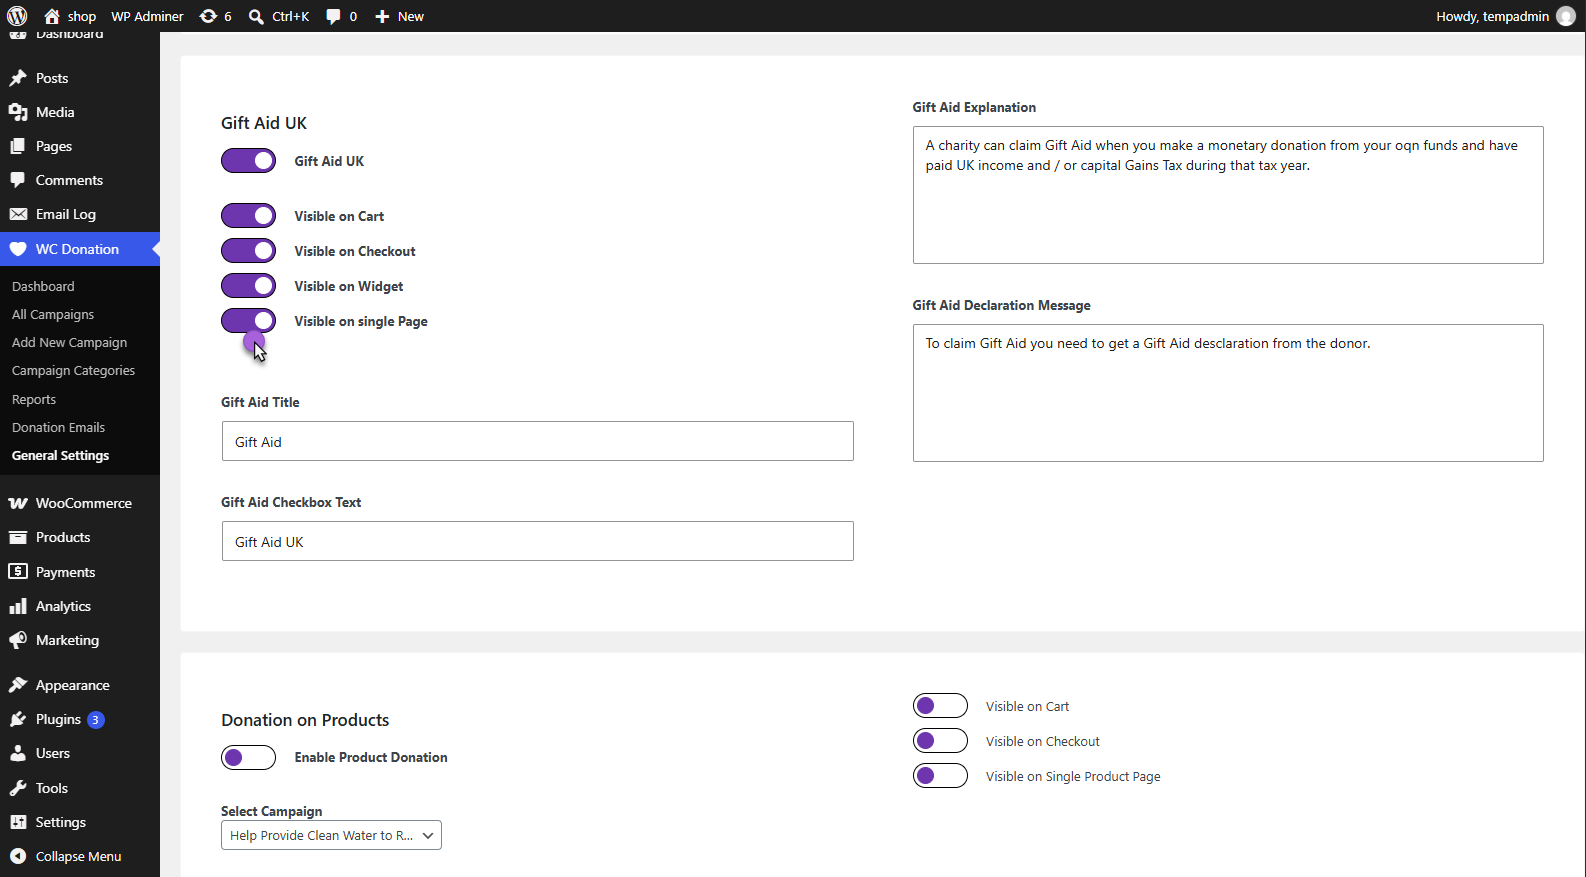
Front-End Impact
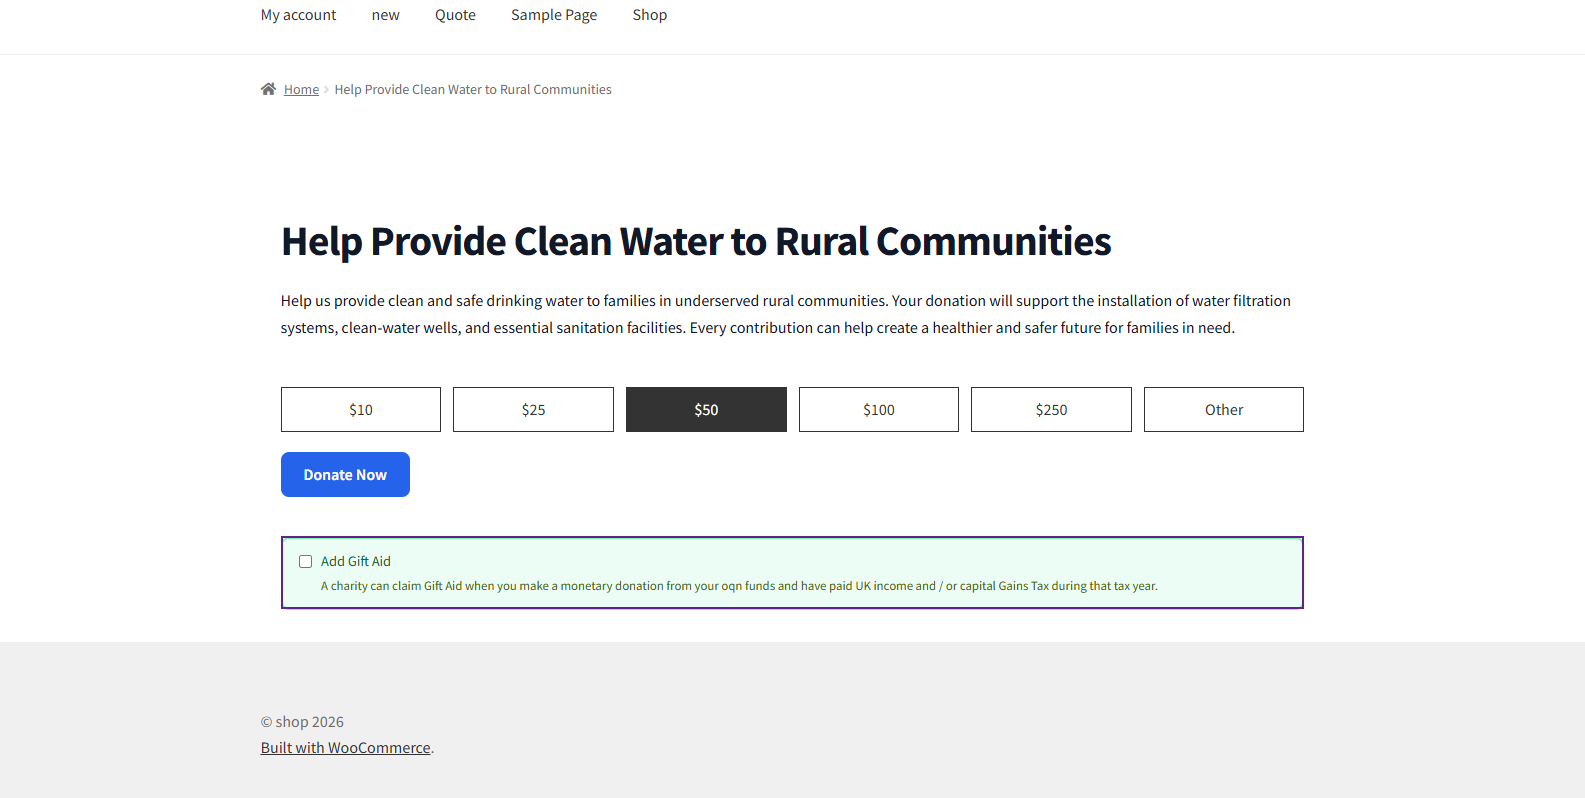
Donation on Product
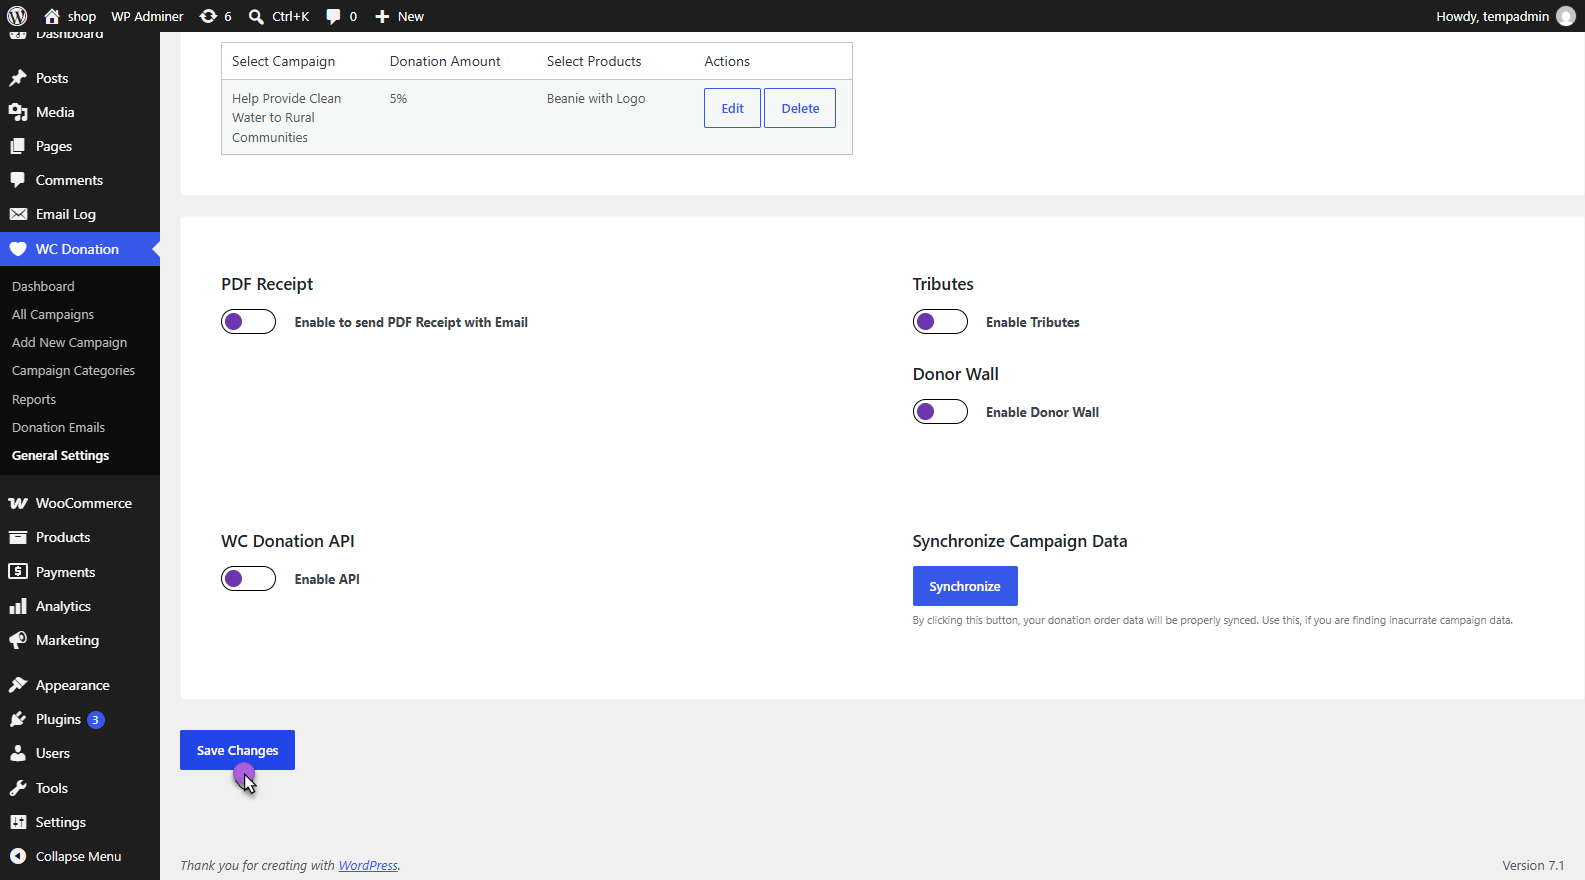
↑ Back to topThe Donation on Product feature allows the admin to attach a donation amount to a product, either as a fixed amount or a percentage. This donation value is automatically deducted from the product price and treated as a donation when the product is purchased.
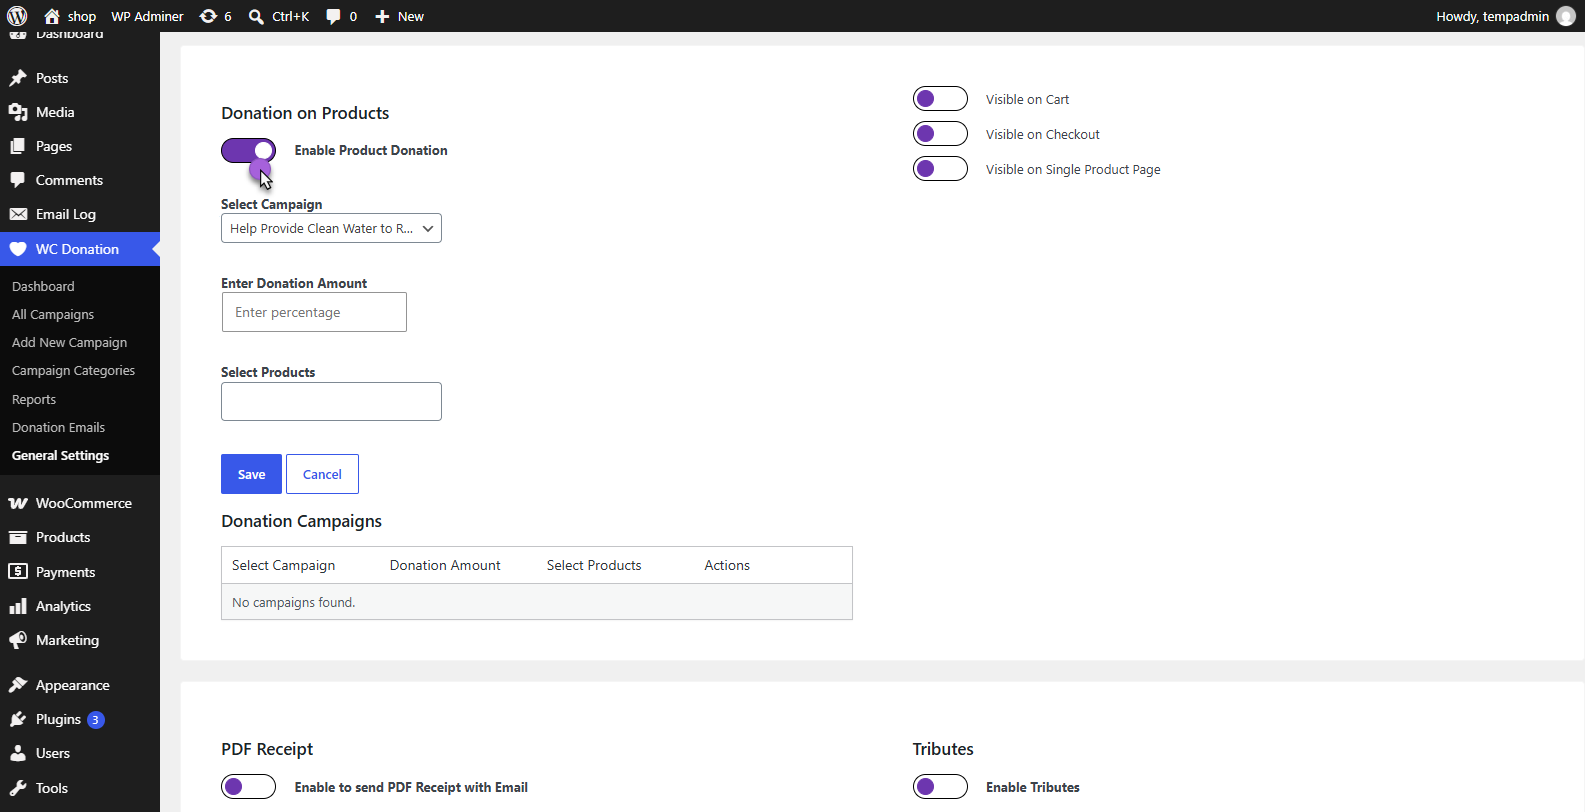
- Navigate to WordPress Admin Dashboard > WC Donation > General Settings.
- Locate and enable the Donation on Products toggle button.
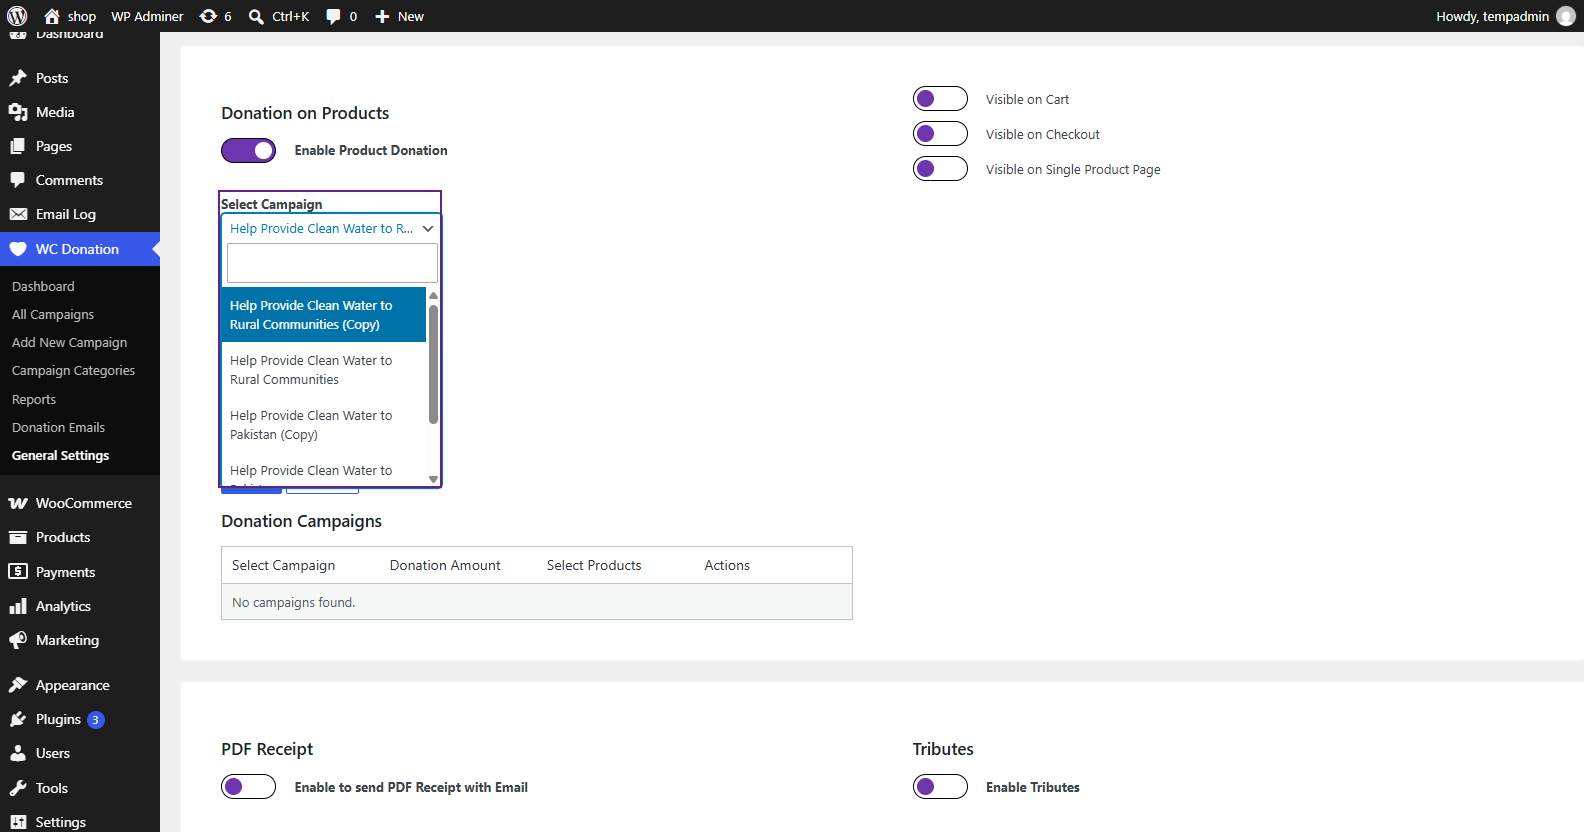
- Select the campaign from the Select Campaign dropdown.
- Enter the donation amount as a percentage in the Enter Donation Amount field.
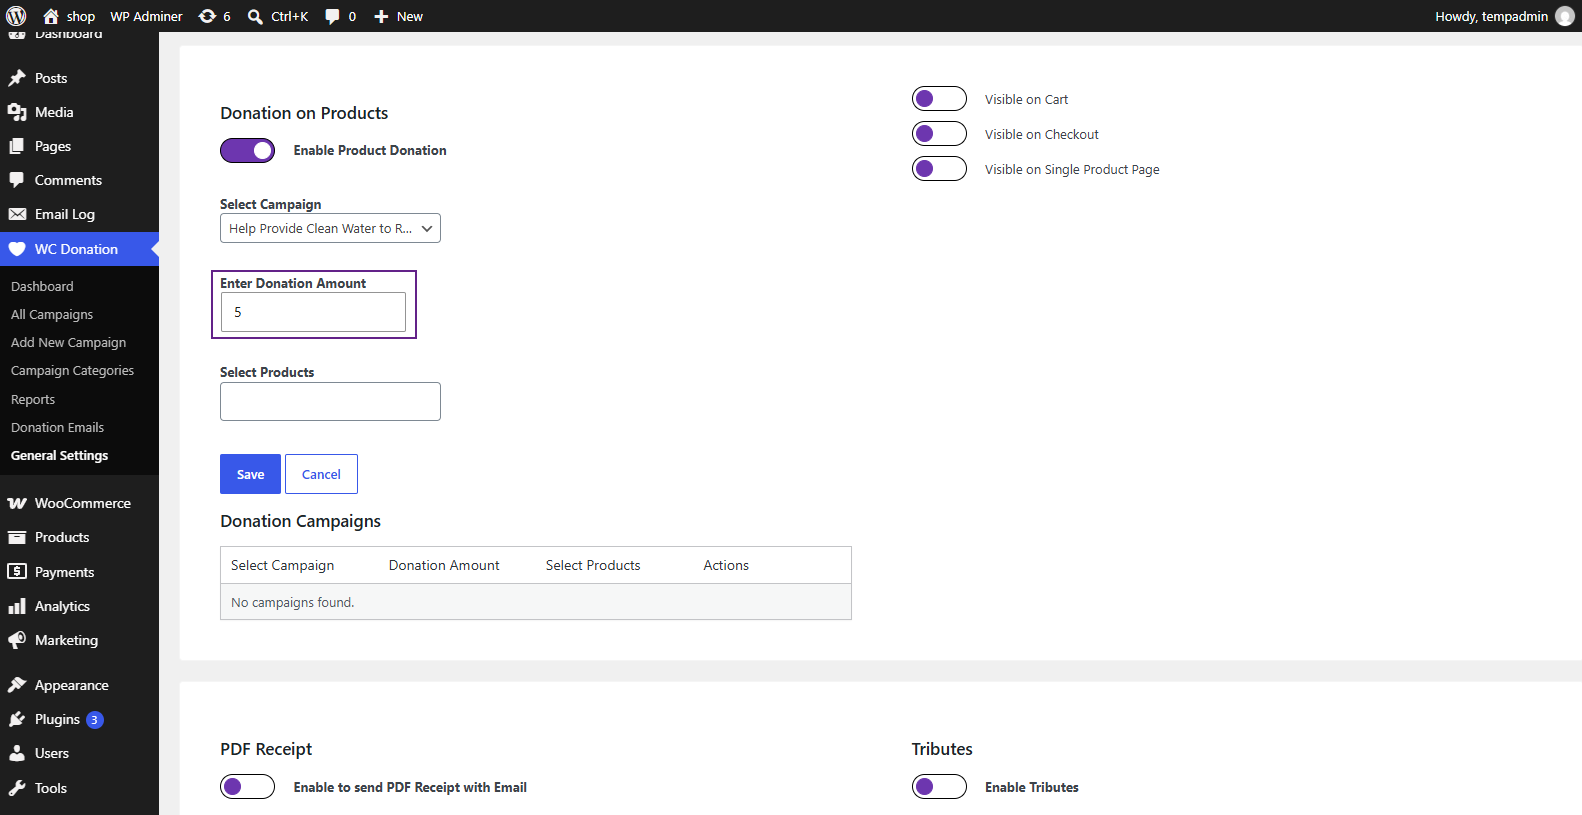
| NOTE | The value entered in the Enter Donation Amount field will be in percentage (%) |
- Choose the product from which the donation amount will be deducted when purchased using the Select Products field.
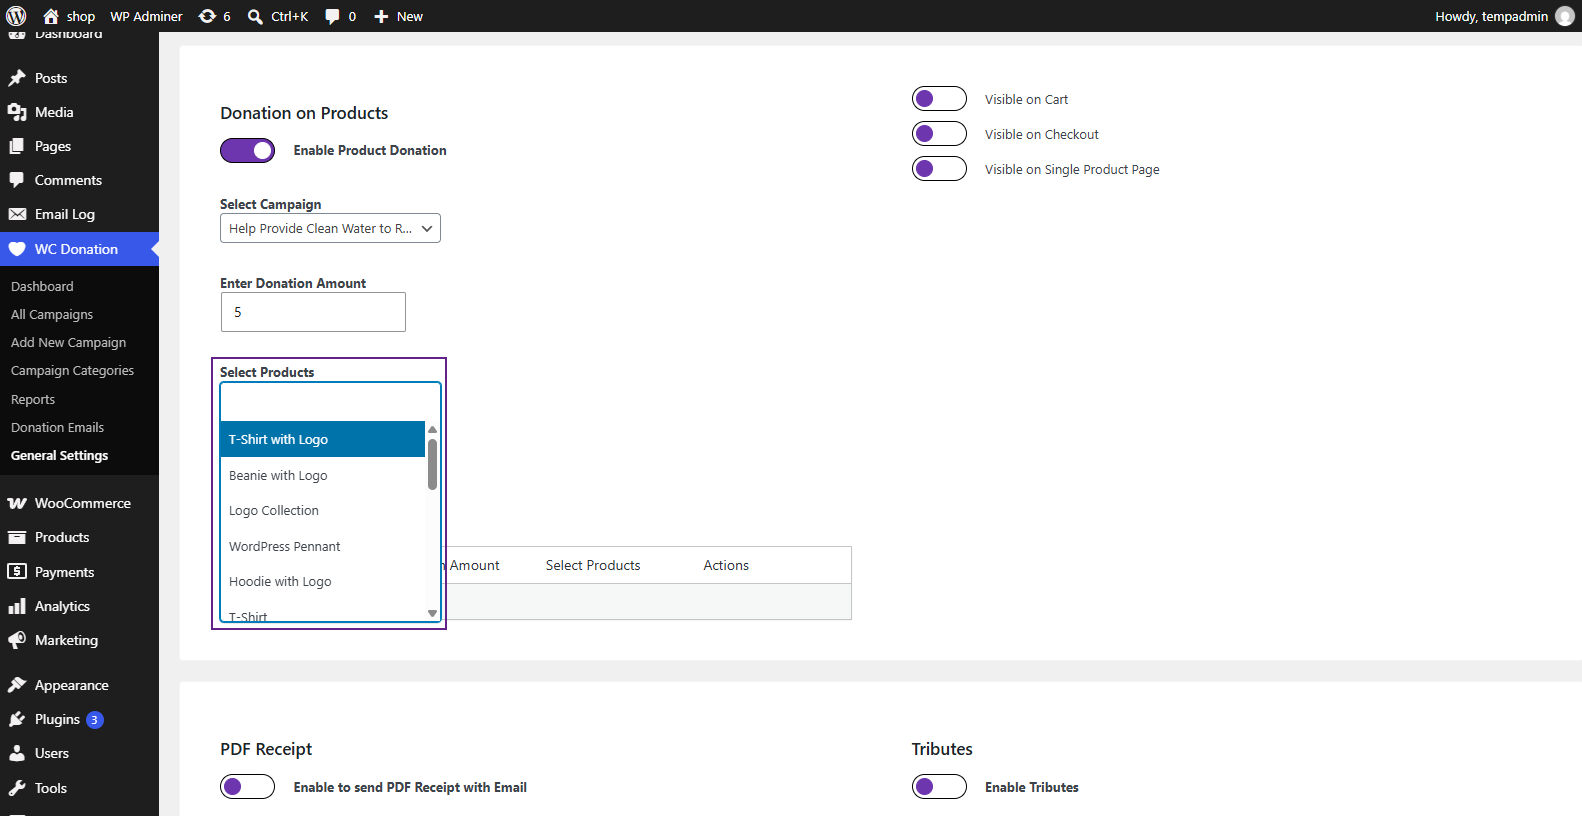
- Click the Save button to apply the settings.
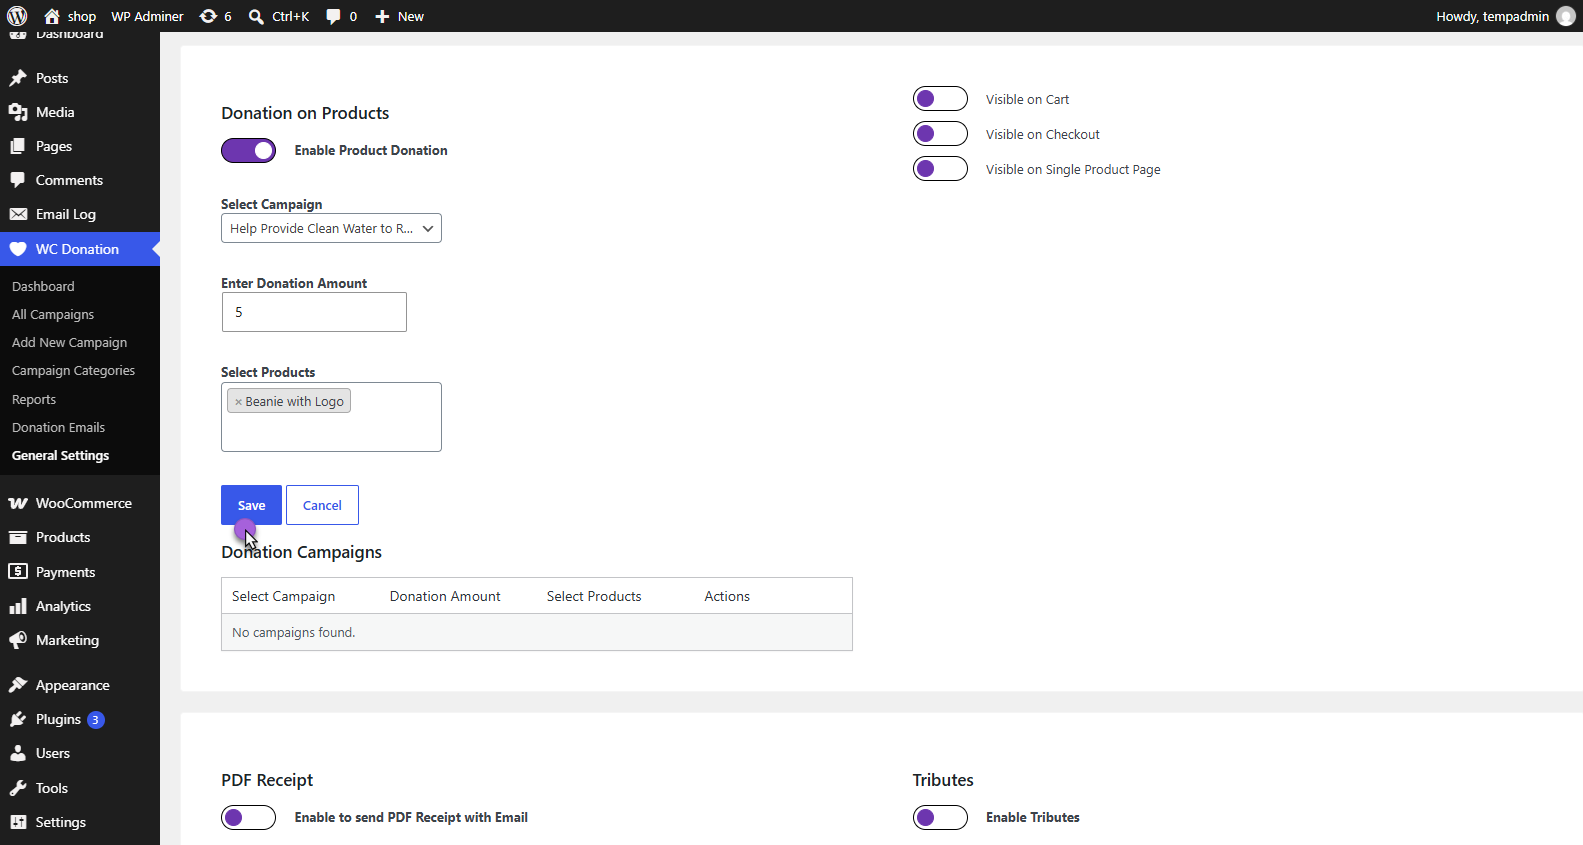
- The selected product will be listed in the Donation Campaign table.
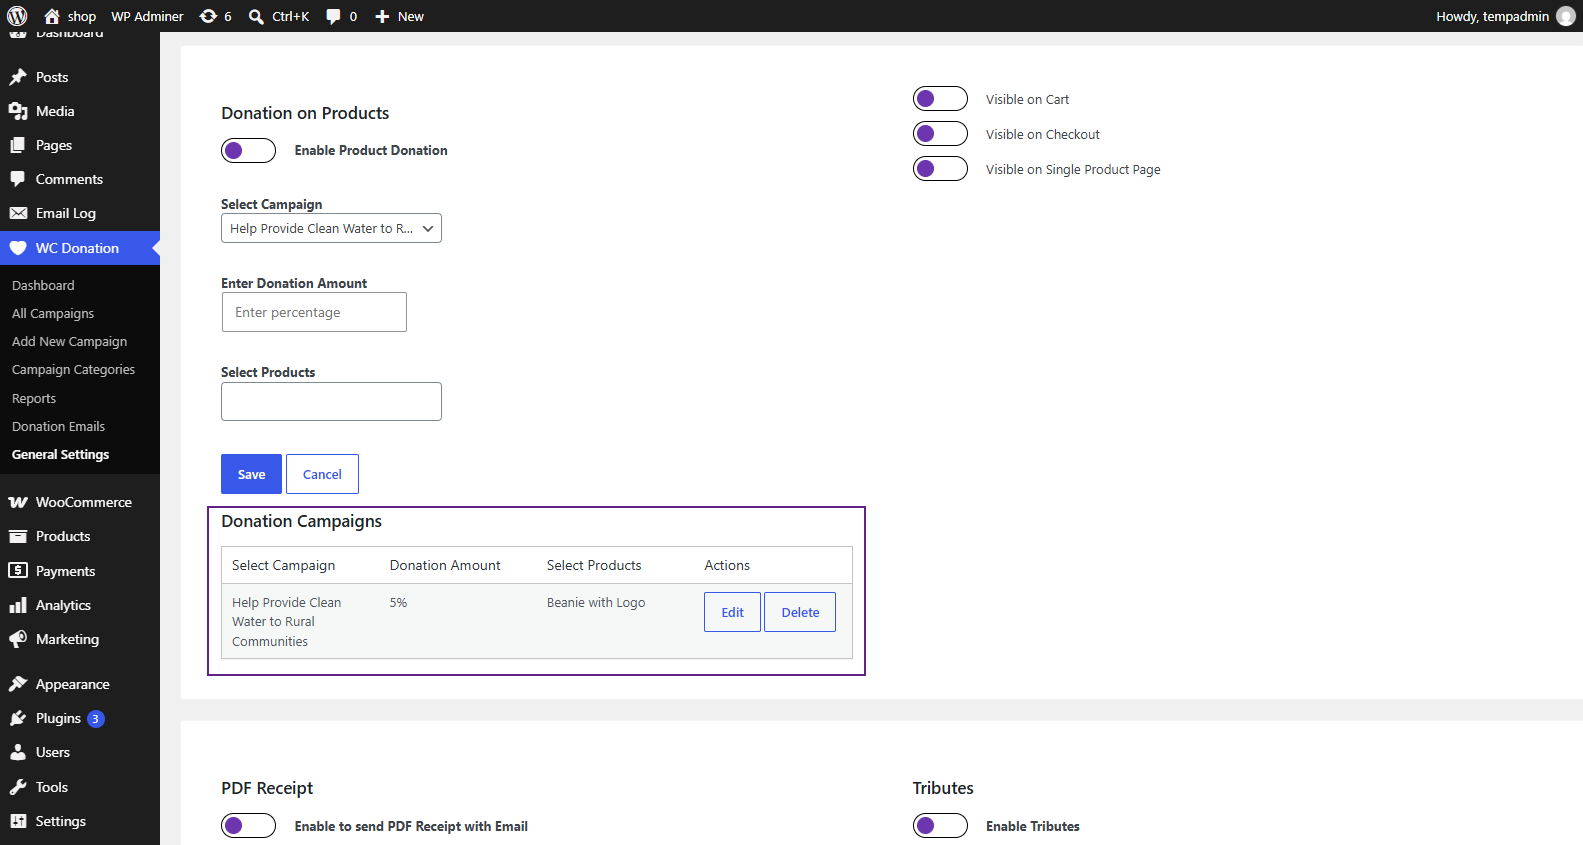
- The admin can edit the product from the table.
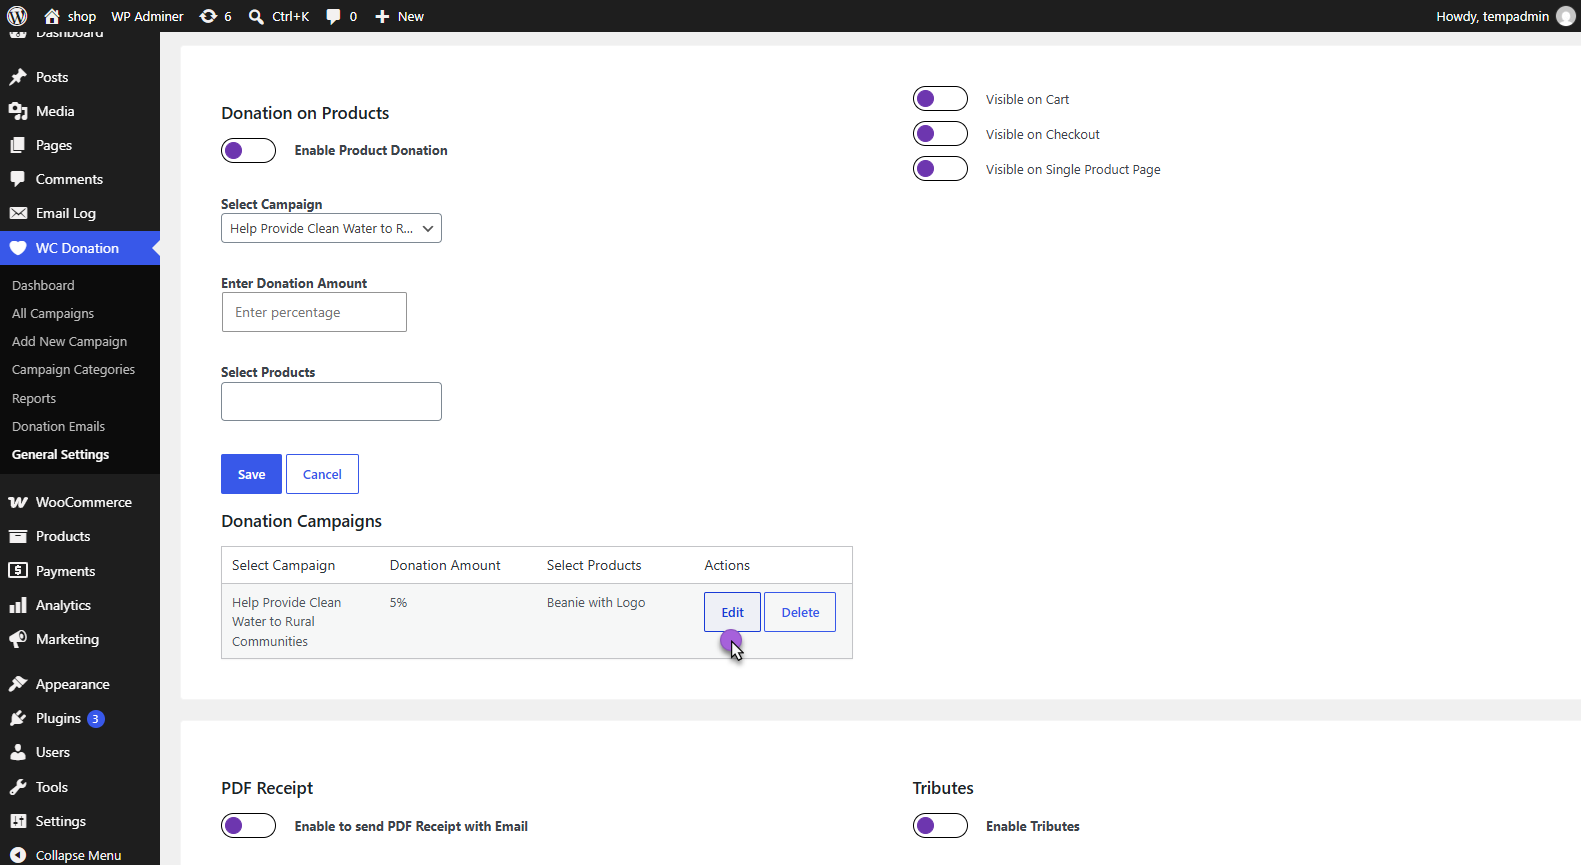
- The admin can delete the product from the table.
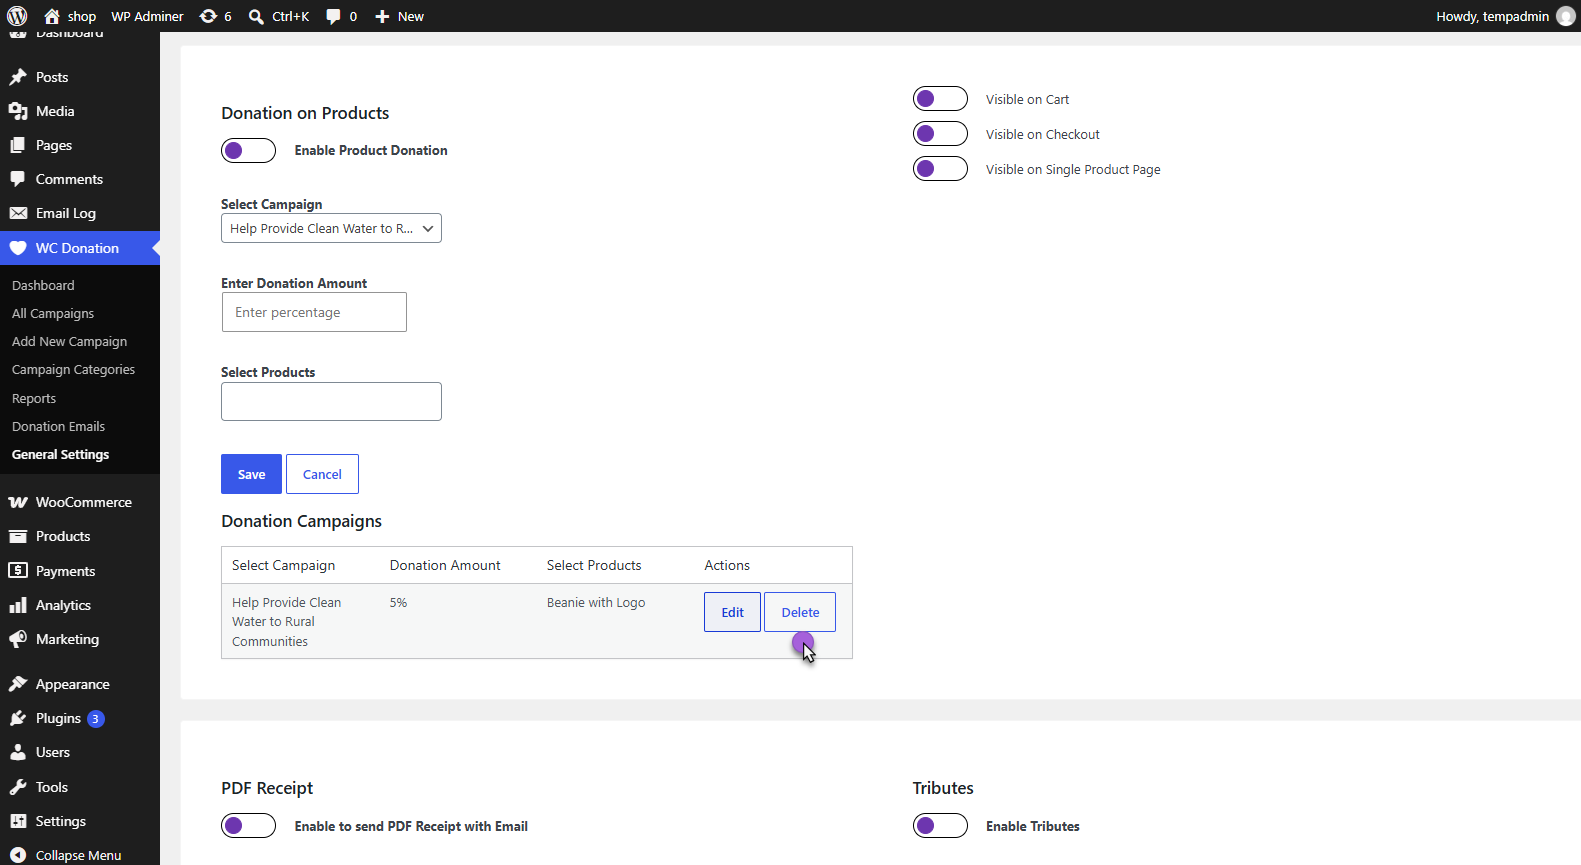
- Enable the following visibility options if needed:
- Visible on Cart: Displays donation details on the Cart page.
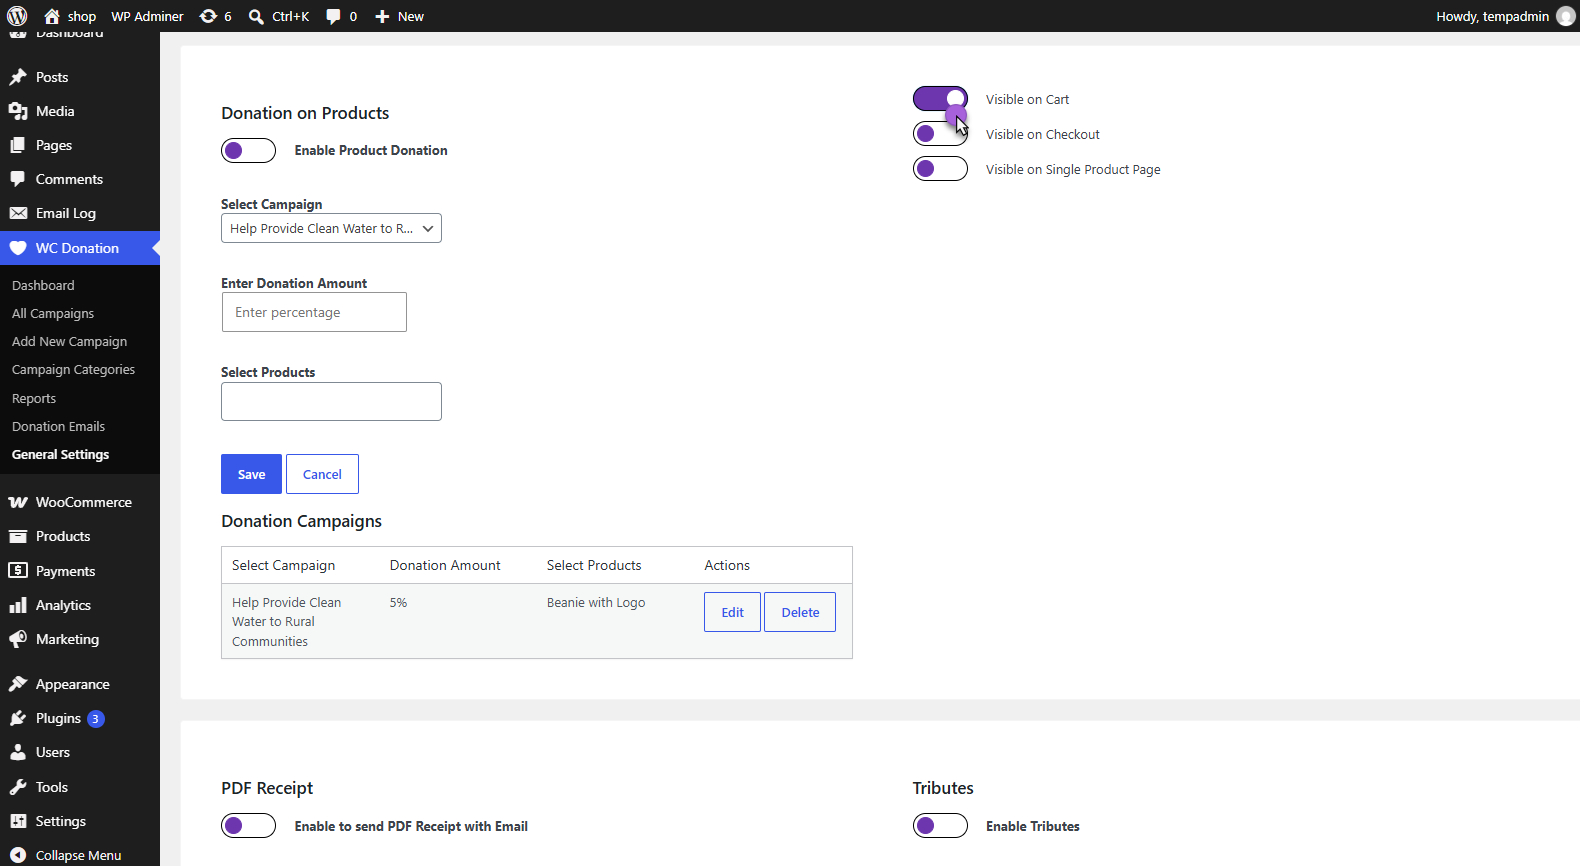
- Visible on Checkout: Displays donation details on the Checkout page.
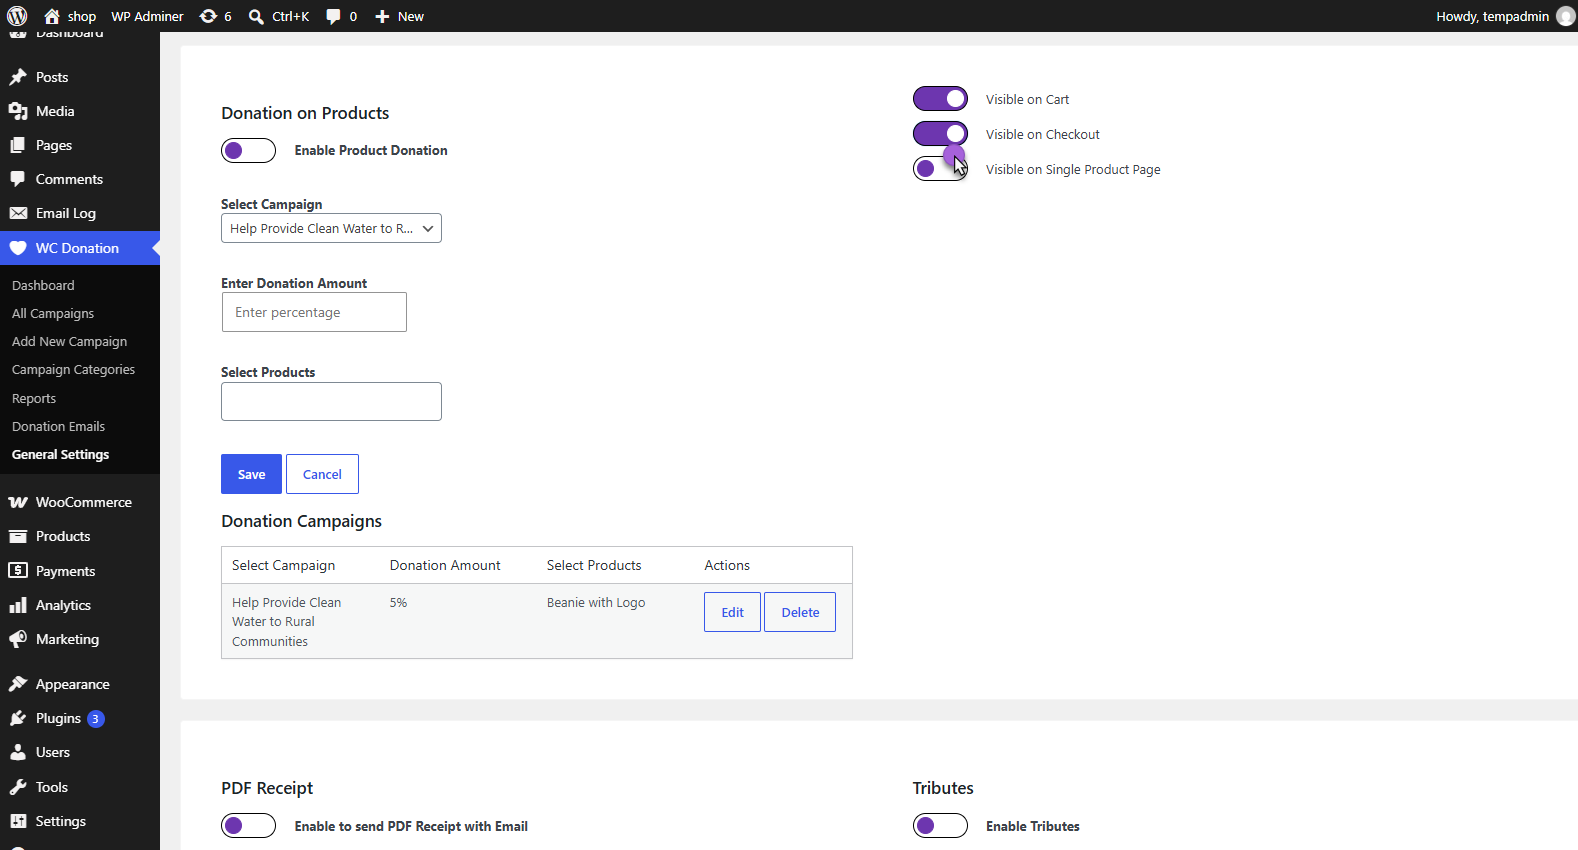
- Visible on Single Product: Displays donation details on the Single Product page.
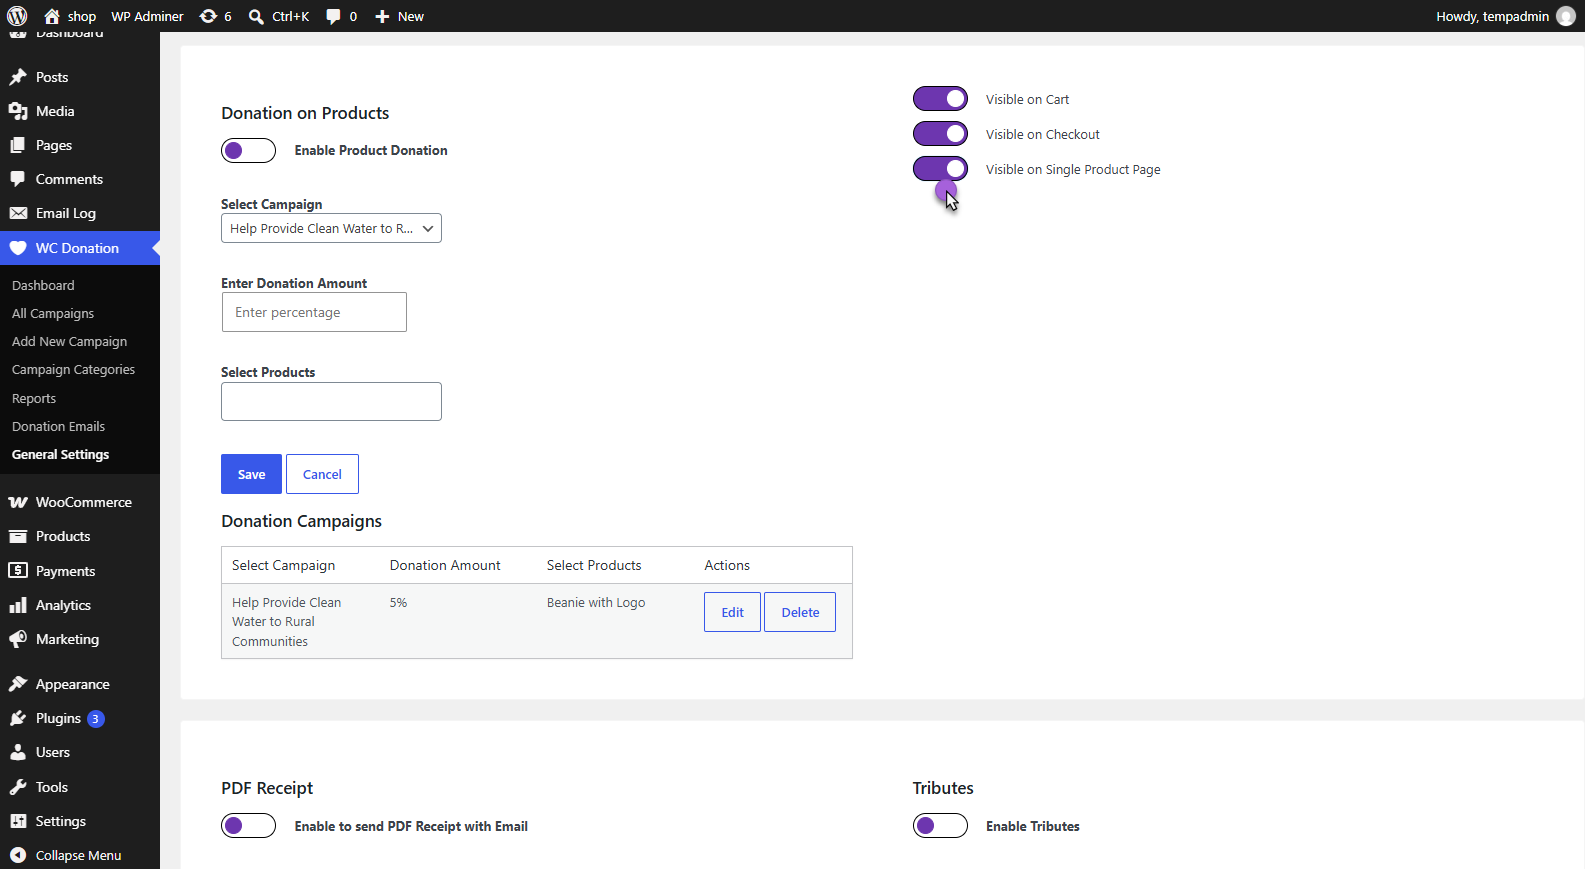
- Click on the Save Changes button to update the settings.
Front End Impact
- Login to your account.
- Go to the Single Product Page – The Donation on Product message will be displayed.

- Add the Product to the Cart – The Donation on Product message will appear on the Cart page.

- Proceed to Checkout – The Donation on Product message will also be shown on the Checkout page.

- A specific amount will be deducted from the order total and allocated to the selected donation campaign.

PDF Receipt
- Go to the bottom of the page and enable the PDF Receipt toggle button.

- Once done, click on the Save Changes button.
- Now navigate to the Admin Dashboard > WC Donation > Reports.
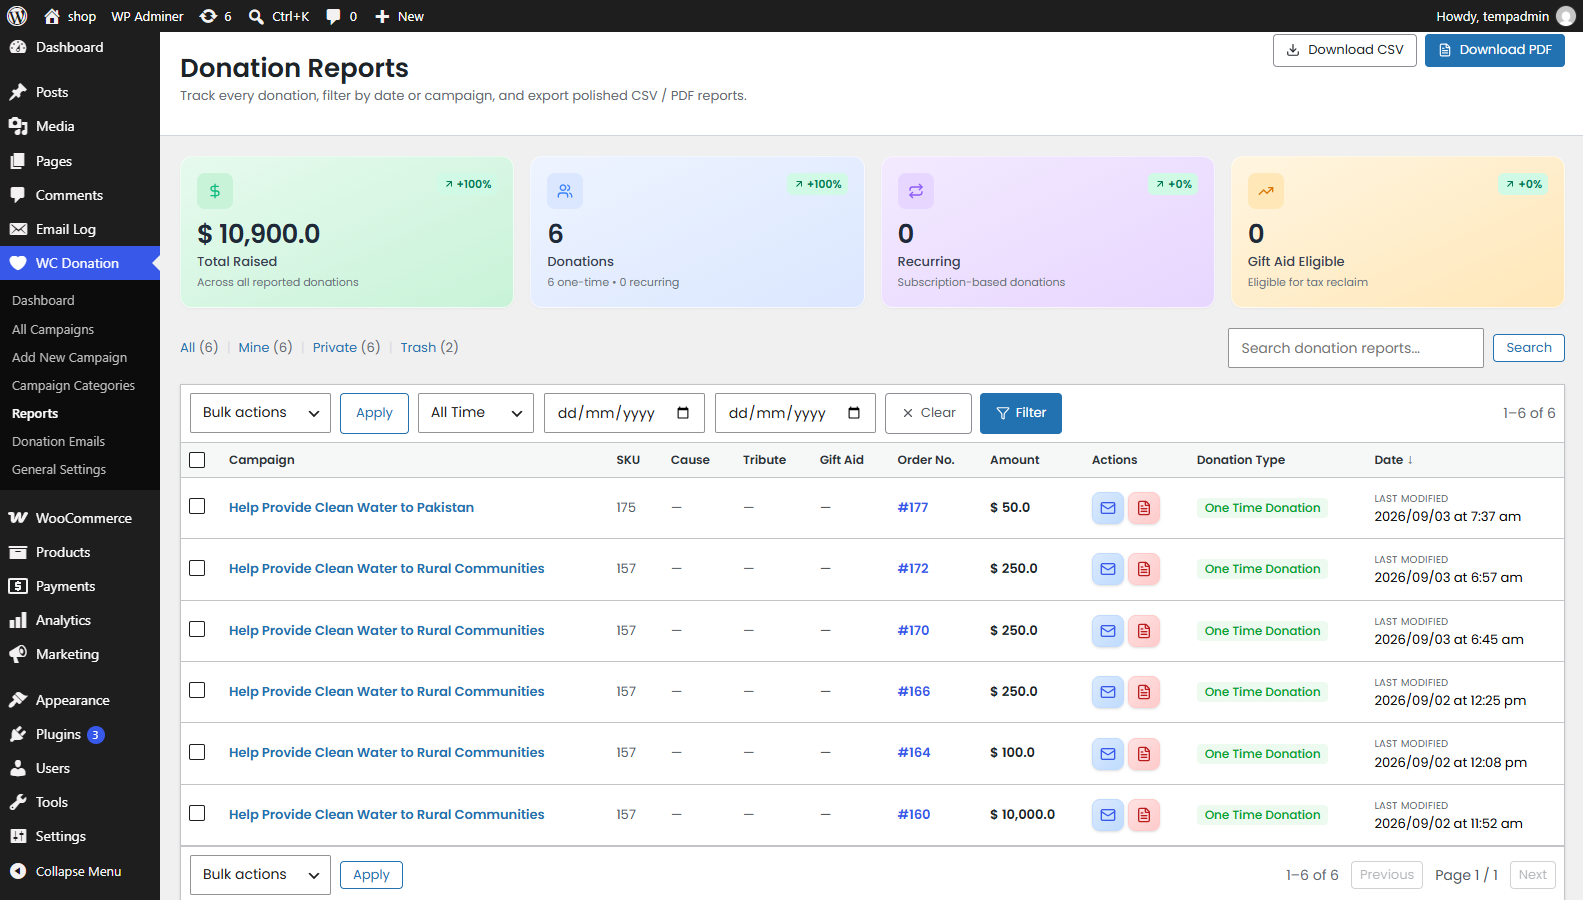
- Now you’re on the Donation Reports page.
- All the reports of each donation with all the details are present on this page.
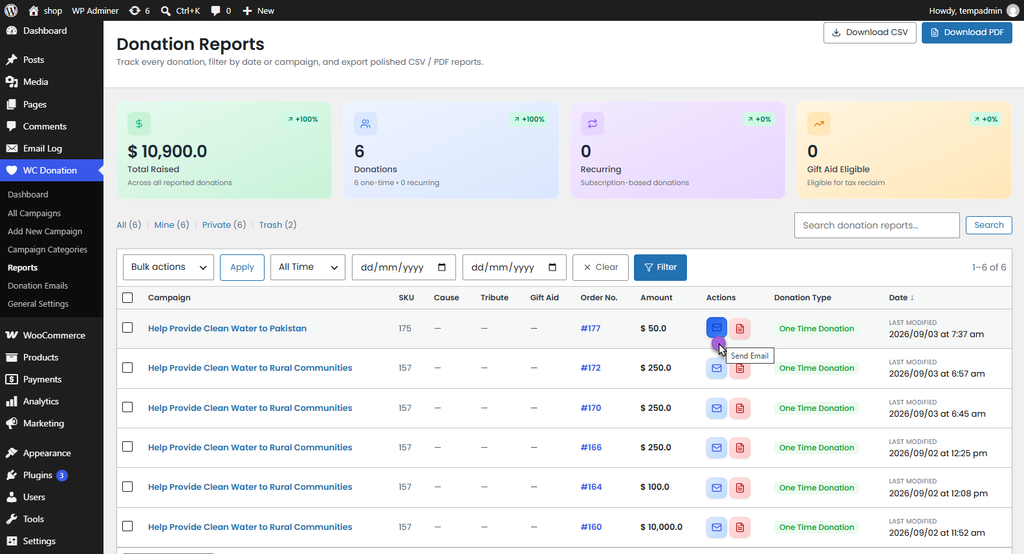
- In the Actions column, two icons are present,
- Click the Email icon to send the report of the donation to the user.
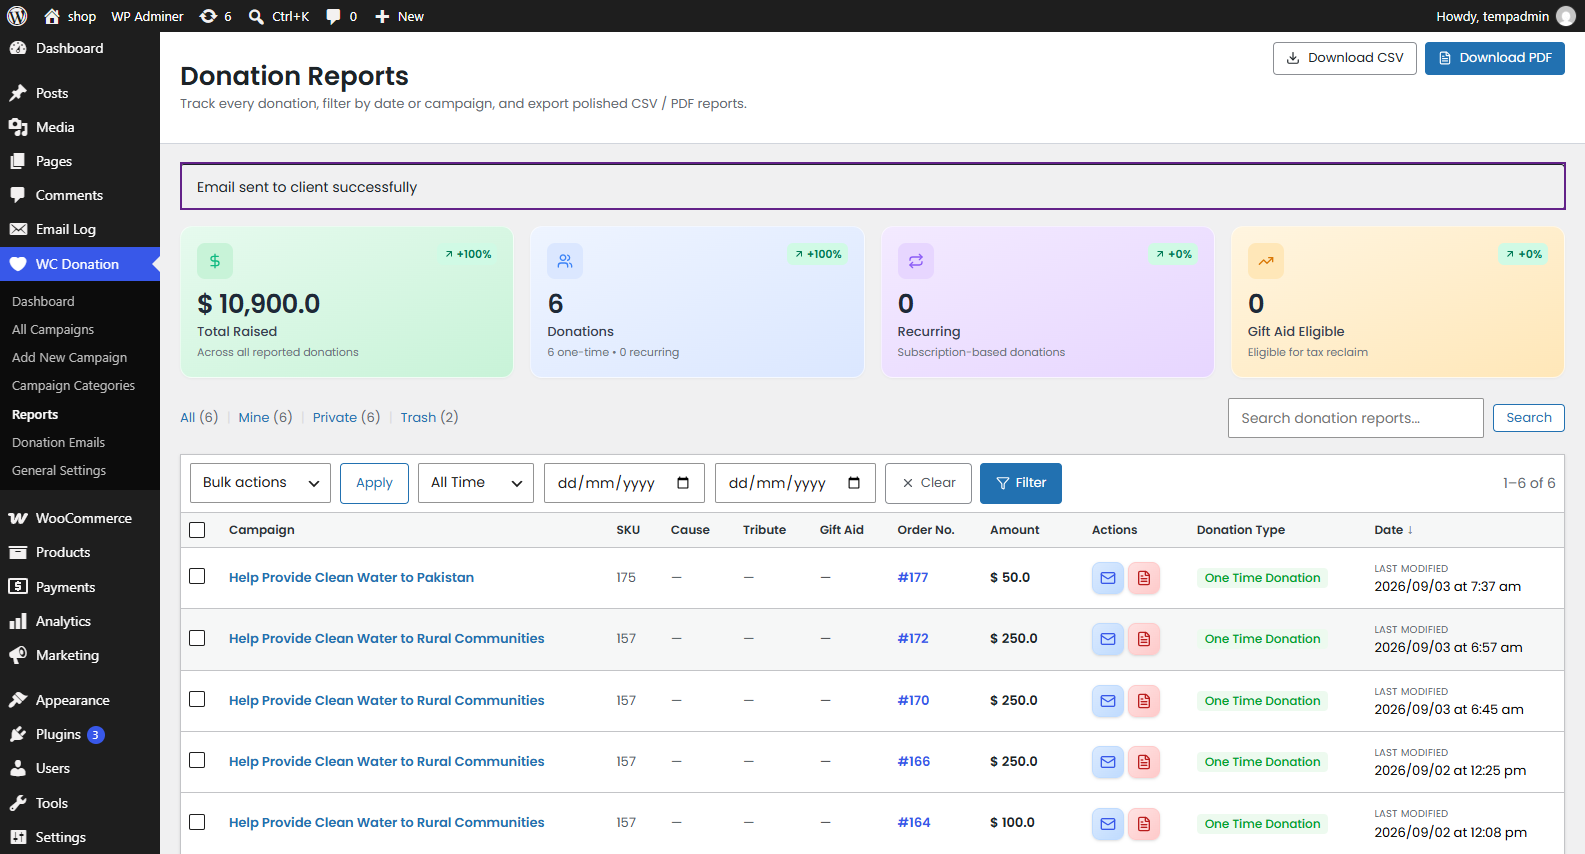
- You’ll be notified when the email is sent successfully.
- The user will receive an email about the details of the donation and the report in PDF format.
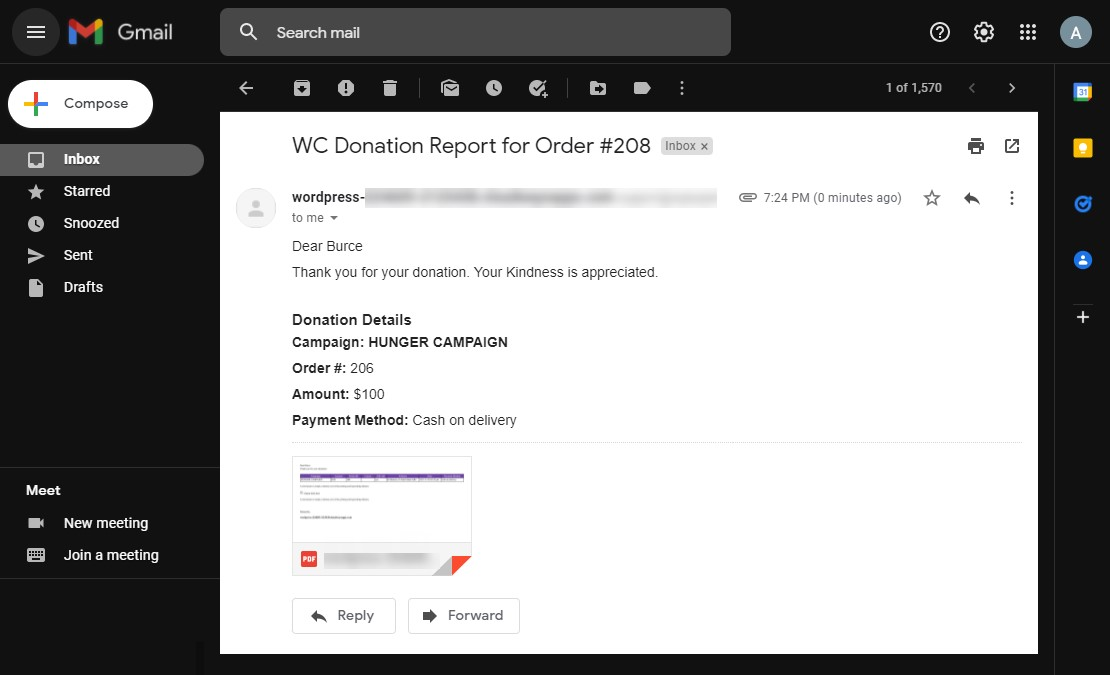
- Click the PDF icon to send the donation report to the user.
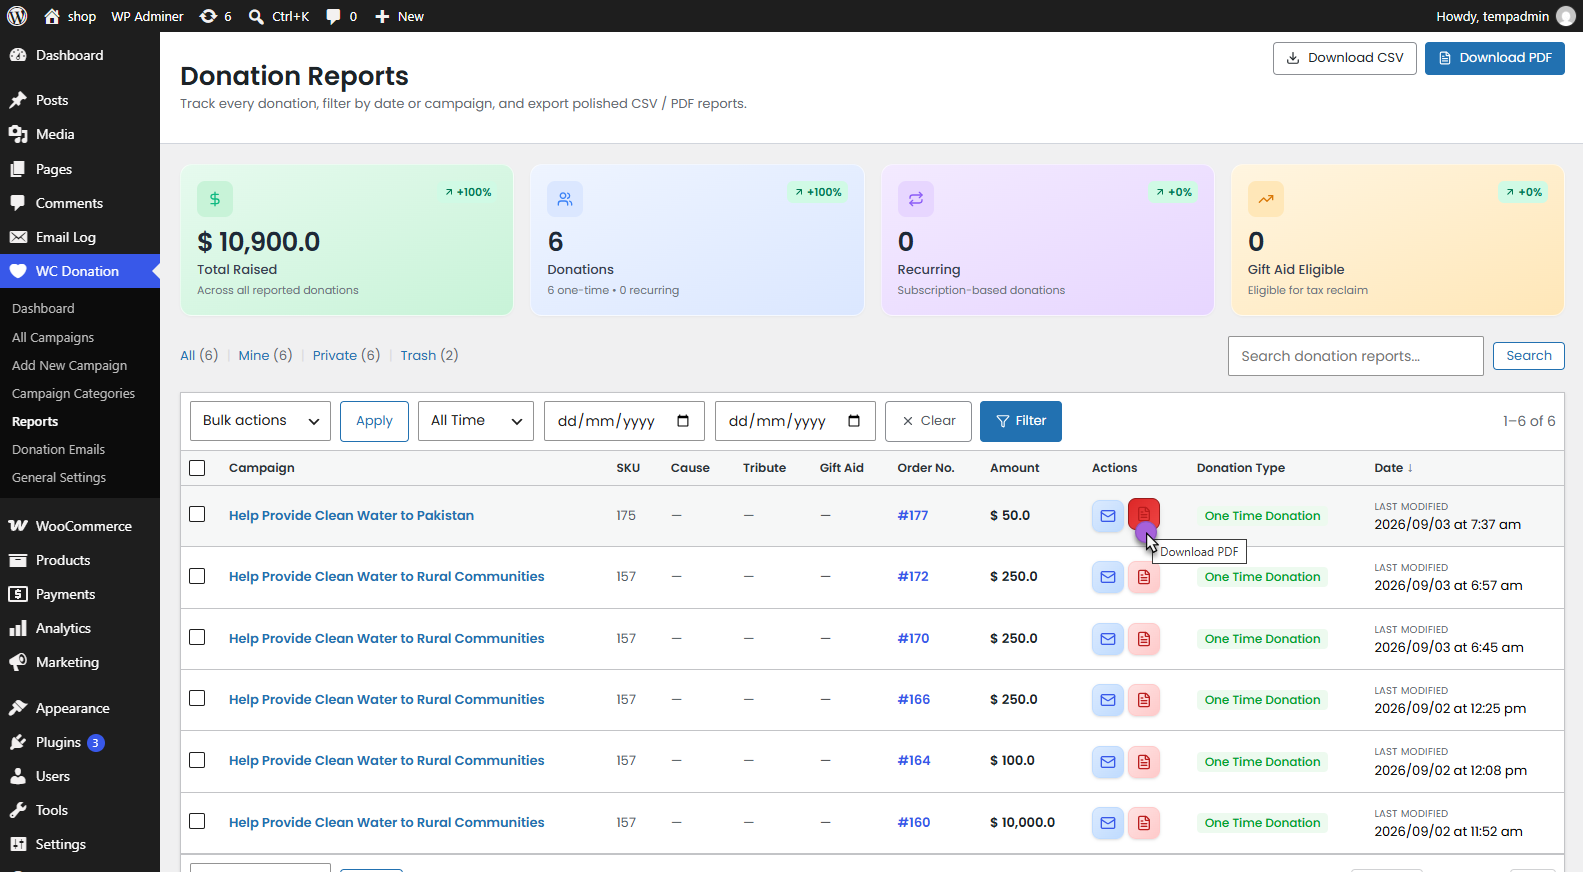
- The report will be downloaded in PDF format.
- Click on the report to open.
- The report will have all the details of that individual donation.
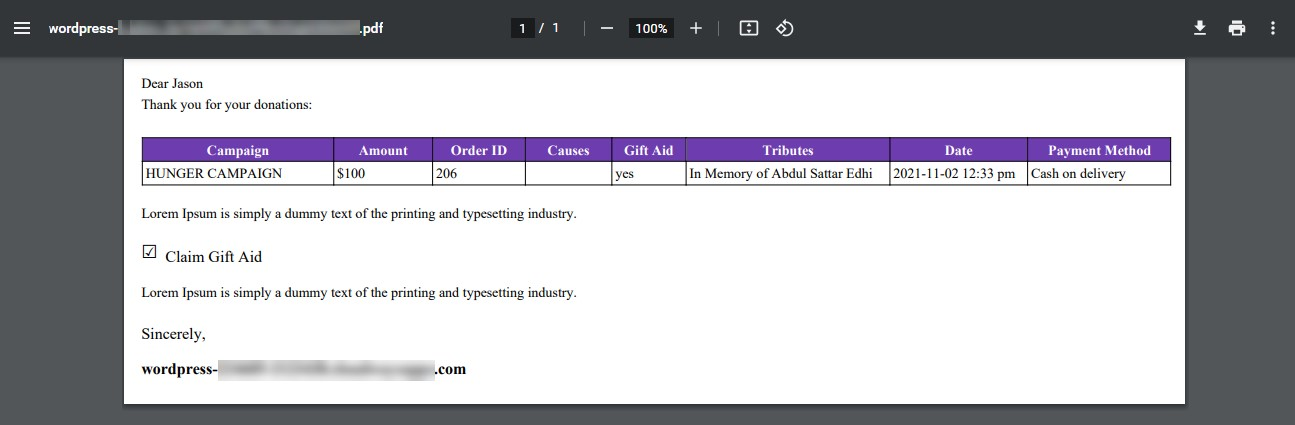
WC Donation API
↑ Back to top- Go to the bottom of the page and enable the WC Donation API toggle button.

- Once done, click on the Save Changes button.
Synchronize Campaign Data
↑ Back to top- At the bottom of the page, a Synchronize Campaign Data option is present.
- Click on the Synchronize button.
- Clicking on this button will ensure your donation order data is synchronized correctly. Use this option if you encounter incorrect campaign data.
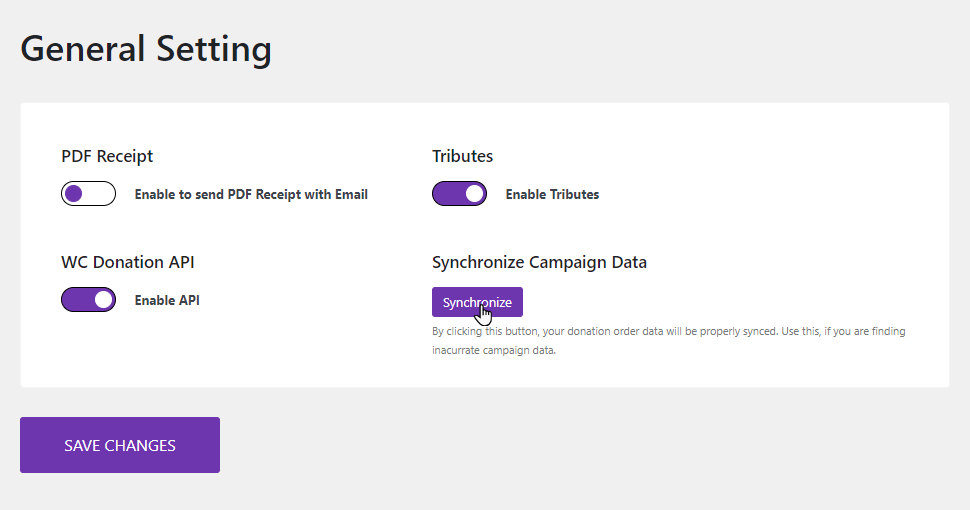
Tribute (Messages)
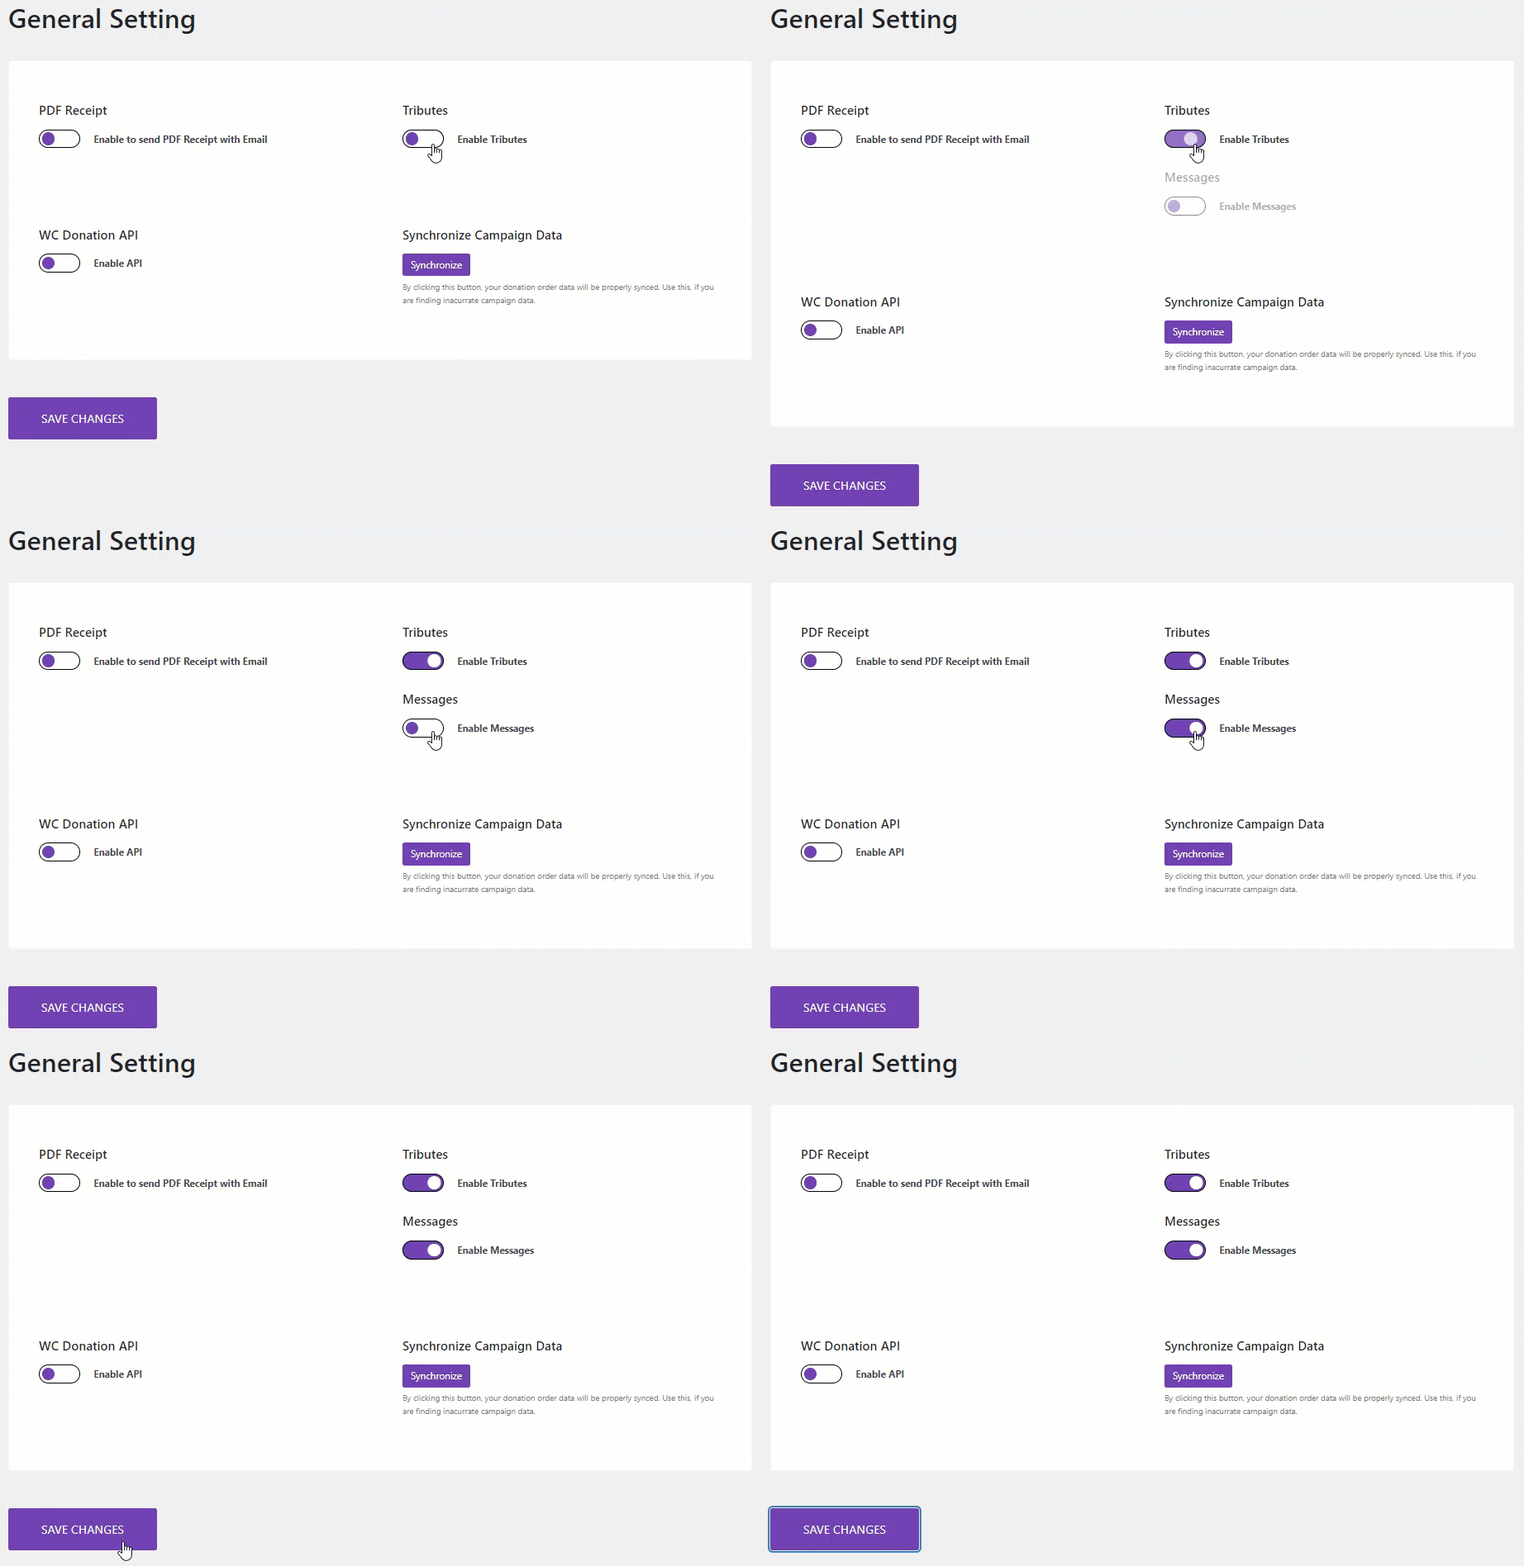
↑ Back to top- Navigate Tributes in General Settings.
- Enable the Tributes option. Once done, a Messages option will appear.
- Now enable the Messages option.
- Click on Save Changes.
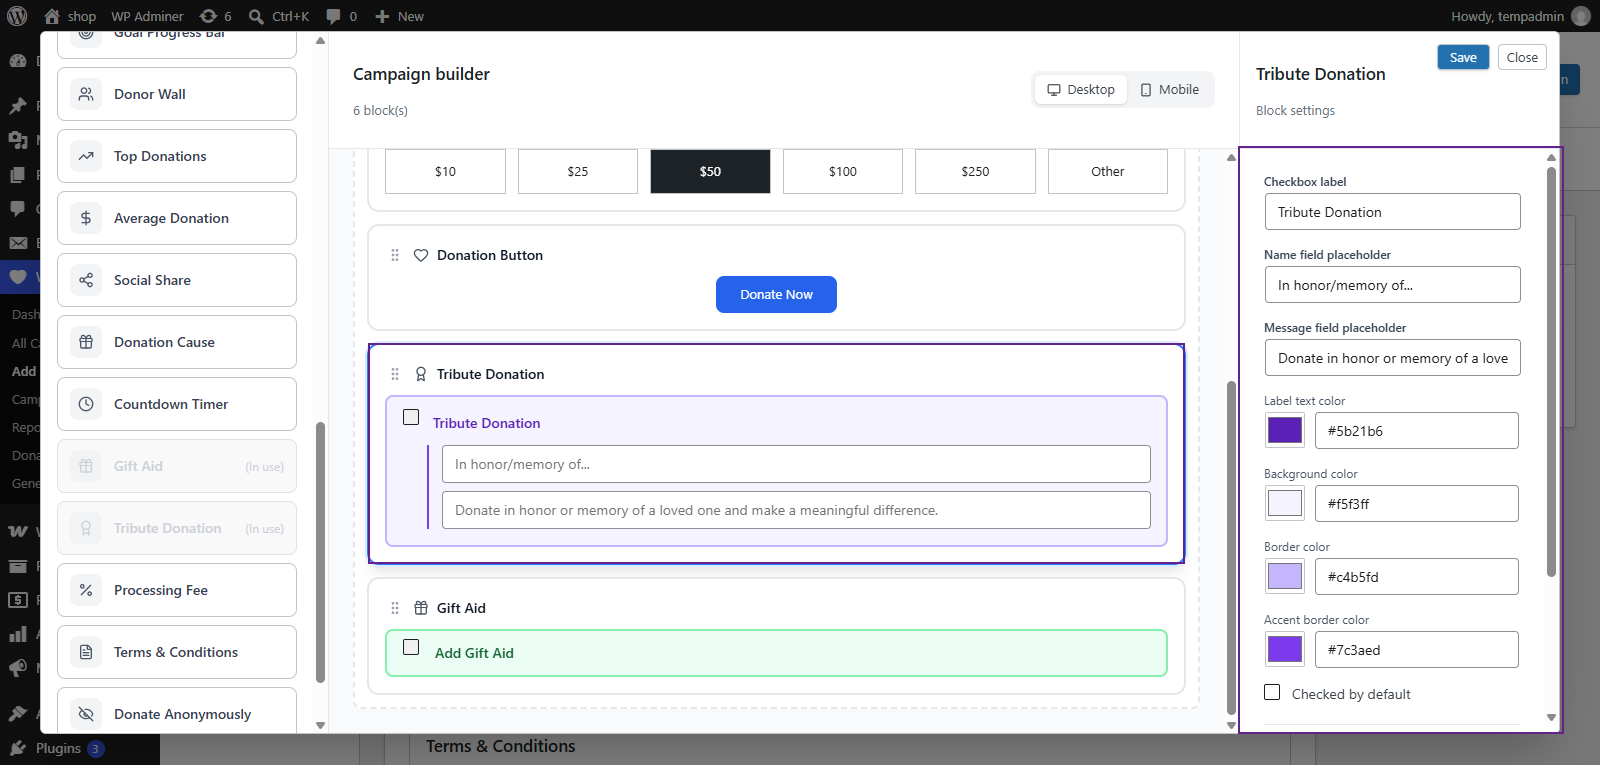
- Add a new campaign or edit an existing campaign.
- Navigate to Campaign Page Builder.
- Add Tribute donation Components
- Enter a label that will appear on the front-end.
- Click on the Publish/Update button.
Front-End Impact
Product Page
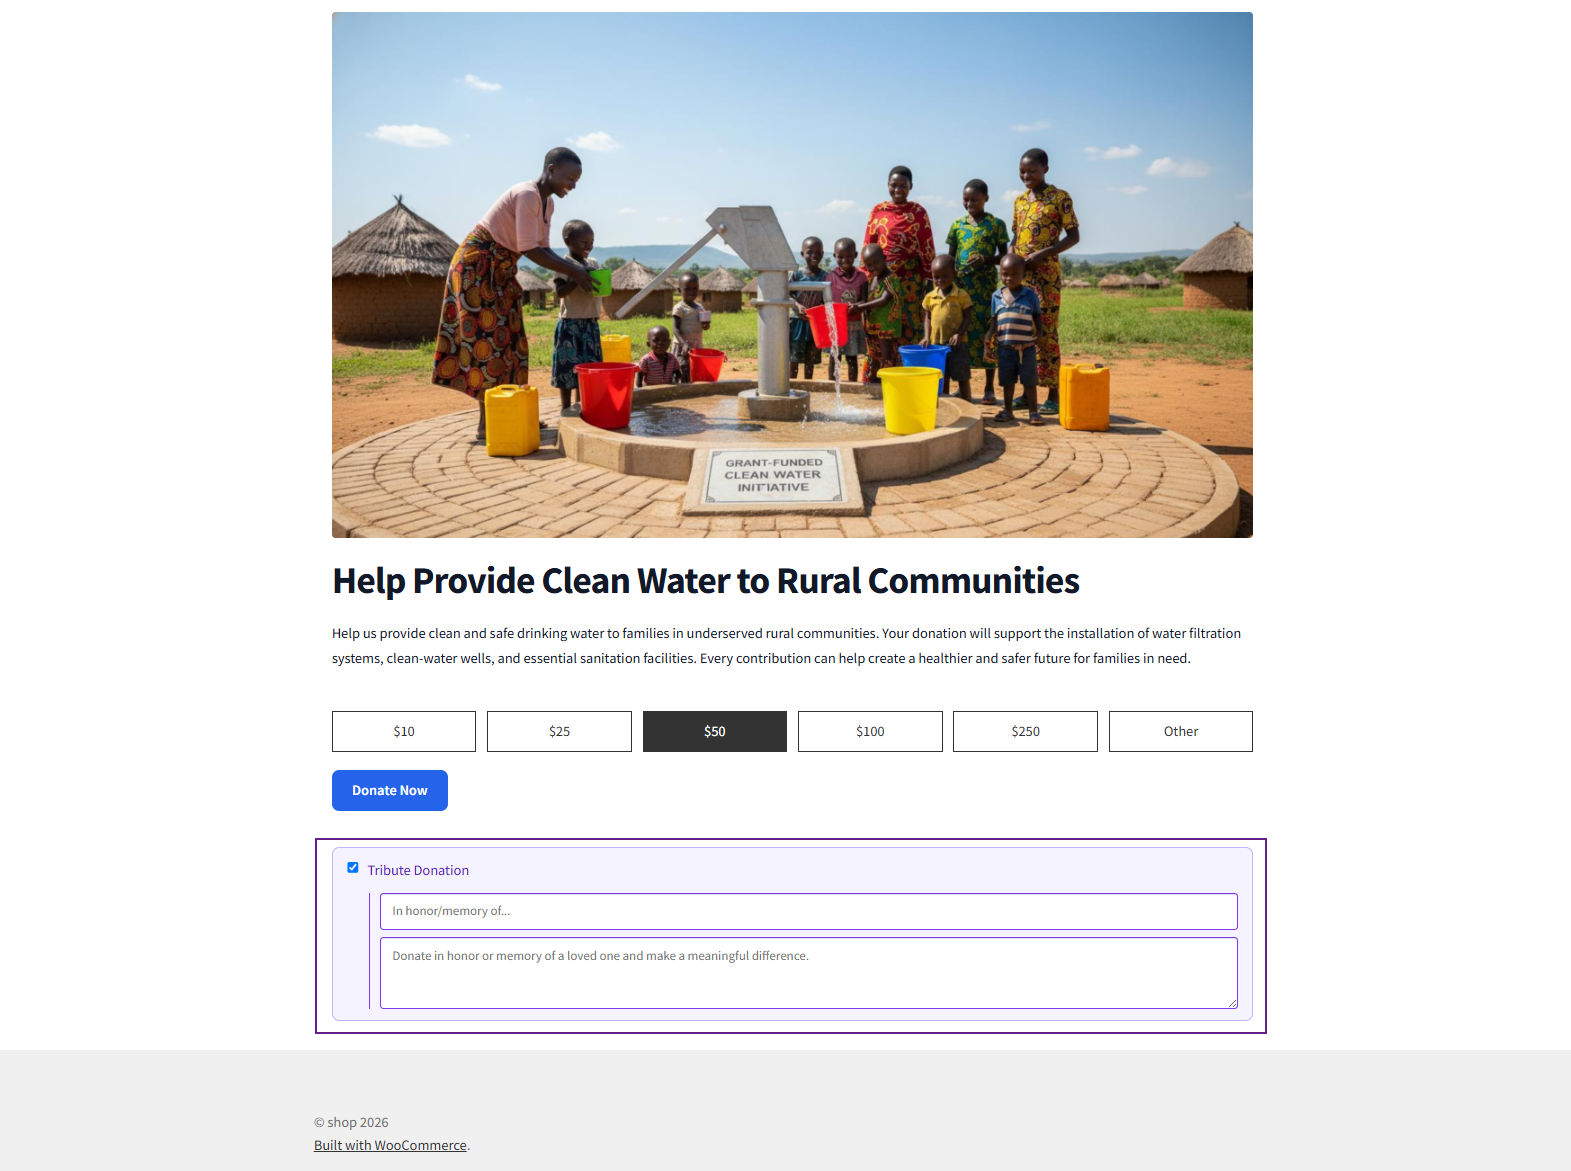
- Go to the Product Page of the donation campaign.
- The user will enter the donation amount in the Donation text box.
- The user will select the Tribute and enter the Name and Message from whom the user is tributing.
- Once done, the user will click the Donate button.
Checkout Page
- The user will be redirected to the Checkout page.
- The user will enter the required credentials.
- Once done, the user clicks the Place Order button to complete the donation.
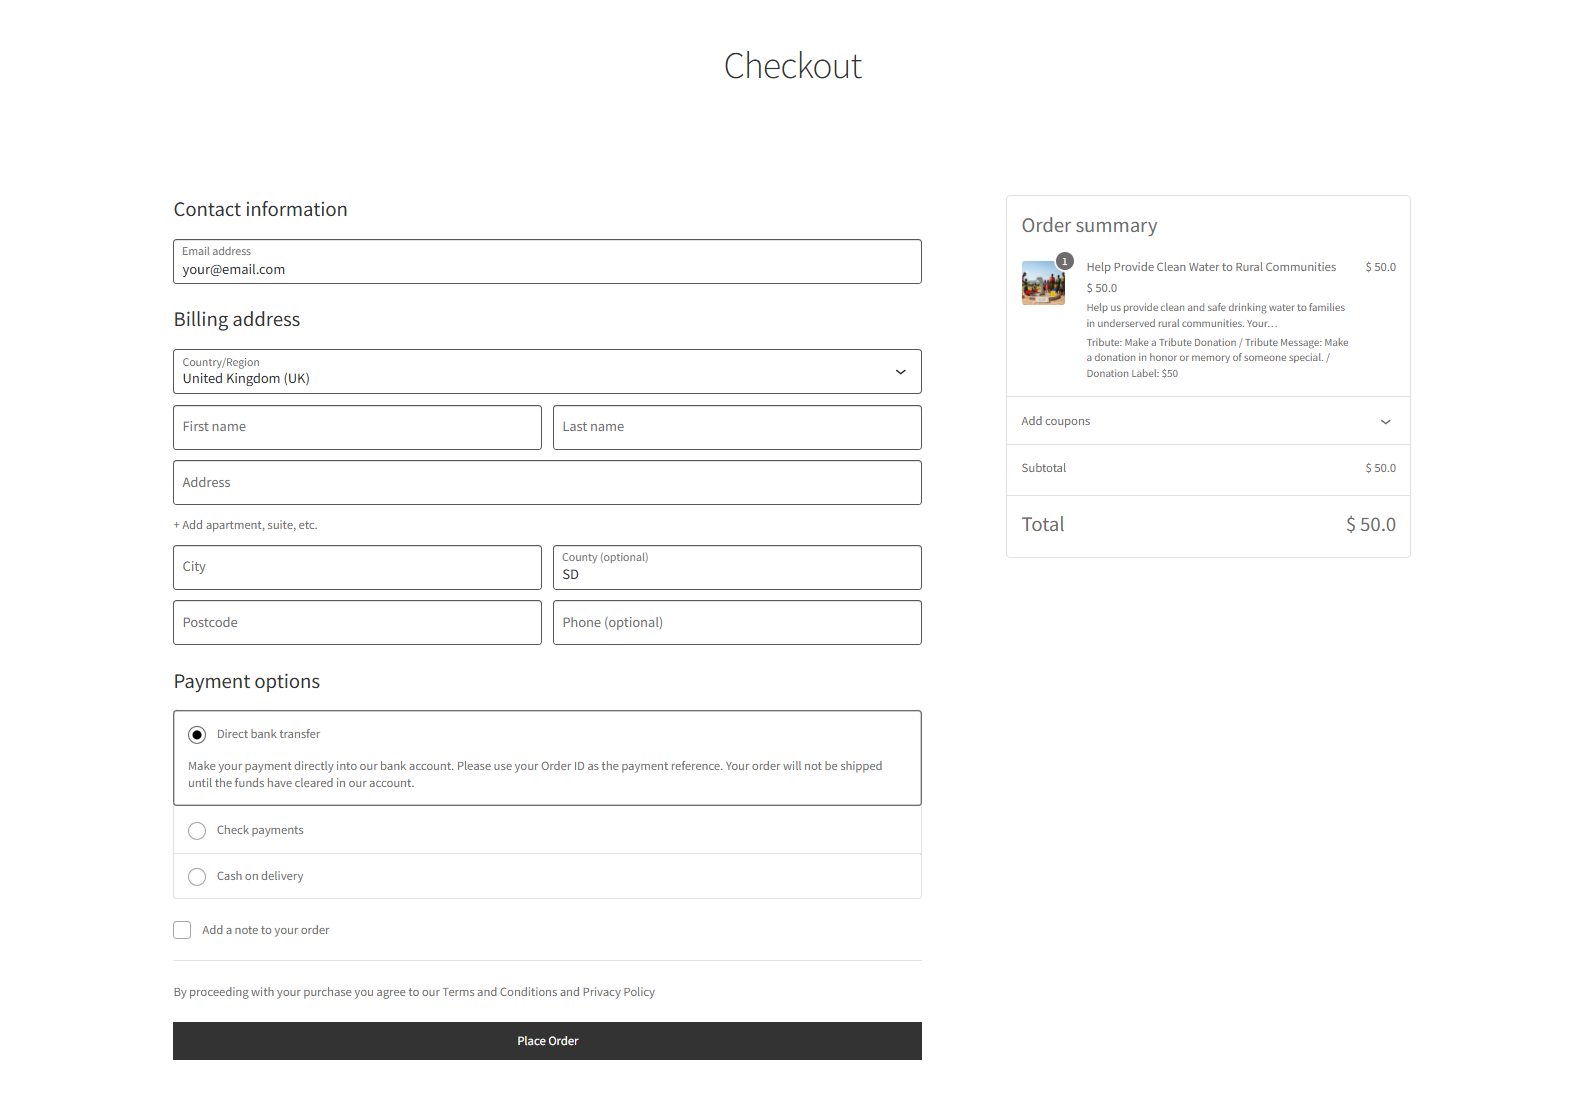
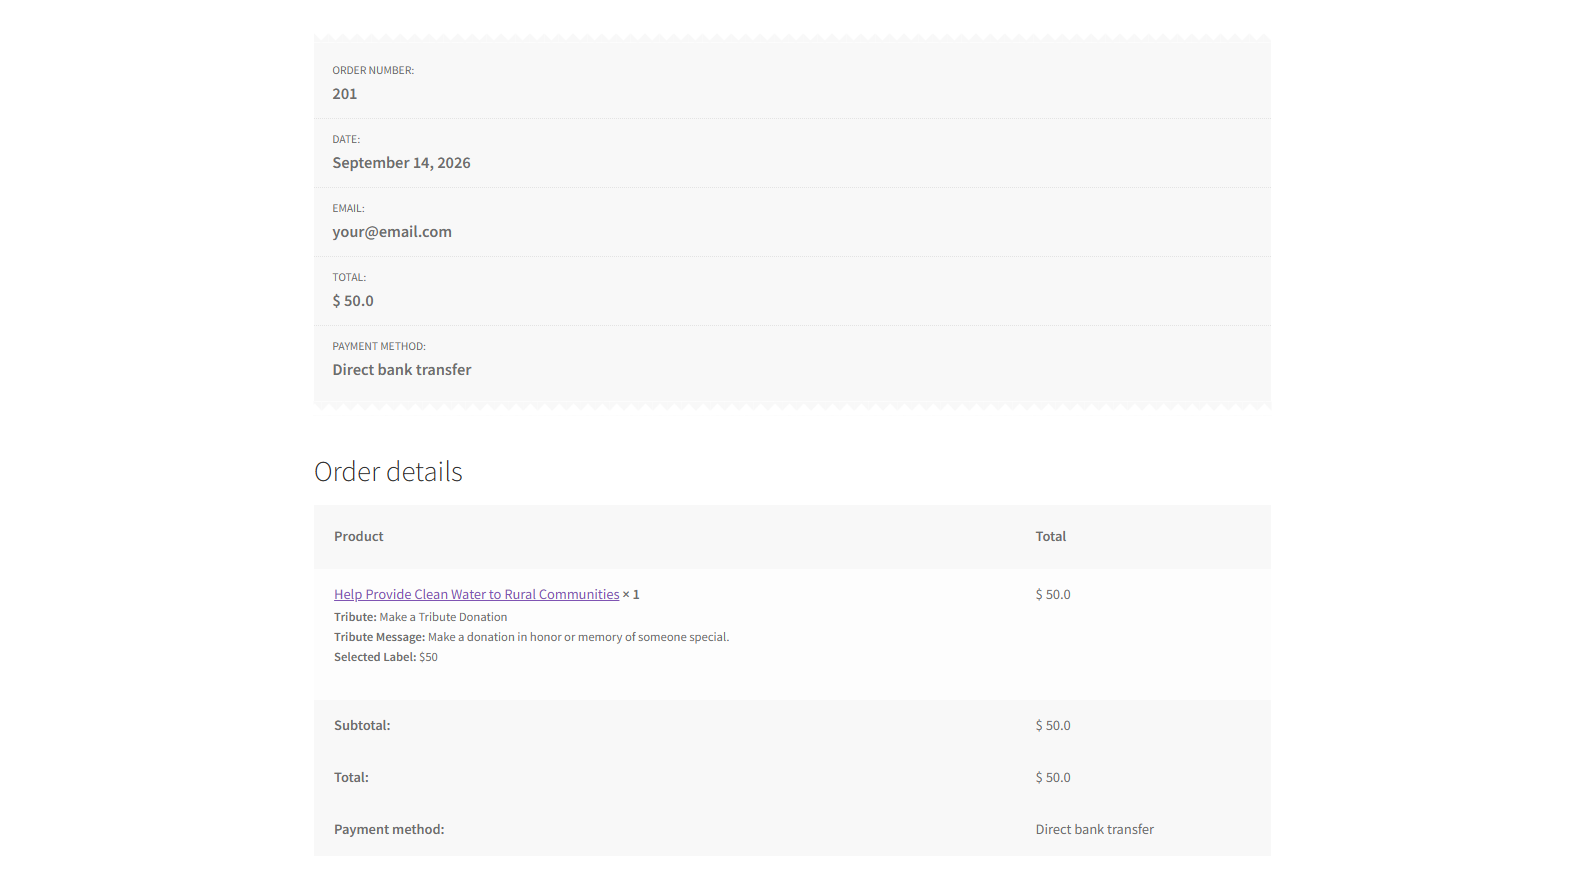
| NOTE | Once the user is on the Checkout Page, navigate to the Cart Page. We can see that the tribute is displayed under the item. |
- A Thank you message will appear with the order description after the order is placed successfully.
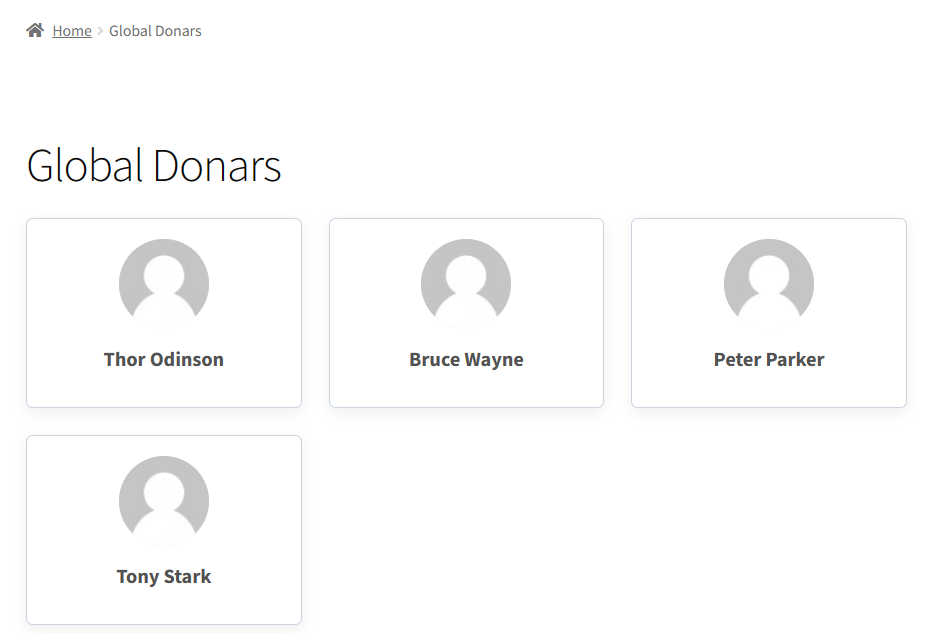
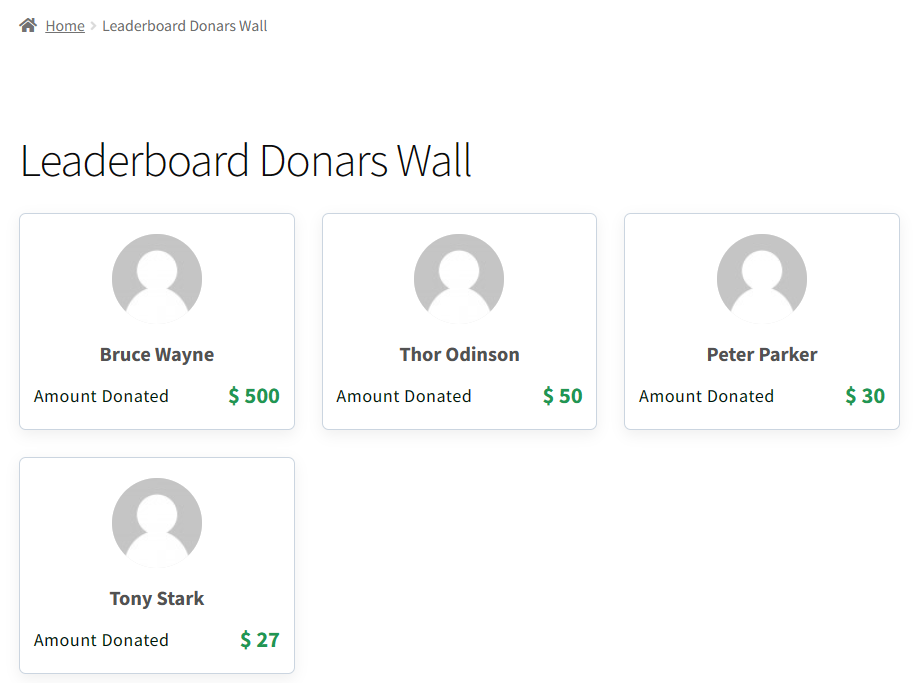
Donor Wall
↑ Back to topThe Donor Wall feature allows the admin to display a list of donors associated with a donation campaign on the frontend.
This tab includes two options:
- Campaign Donor List: Displays the names and donation details of donors who choose to make their donation public.
- Campaign Anonymous List: Displays donations made anonymously without revealing donor identities.
- Go to the Admin Dashboard > WC Donation > General Settings.
- Add the Donor Wall section below the Messages option.
- Two shortcodes will appear below the Donor Wall option, which will work globally.
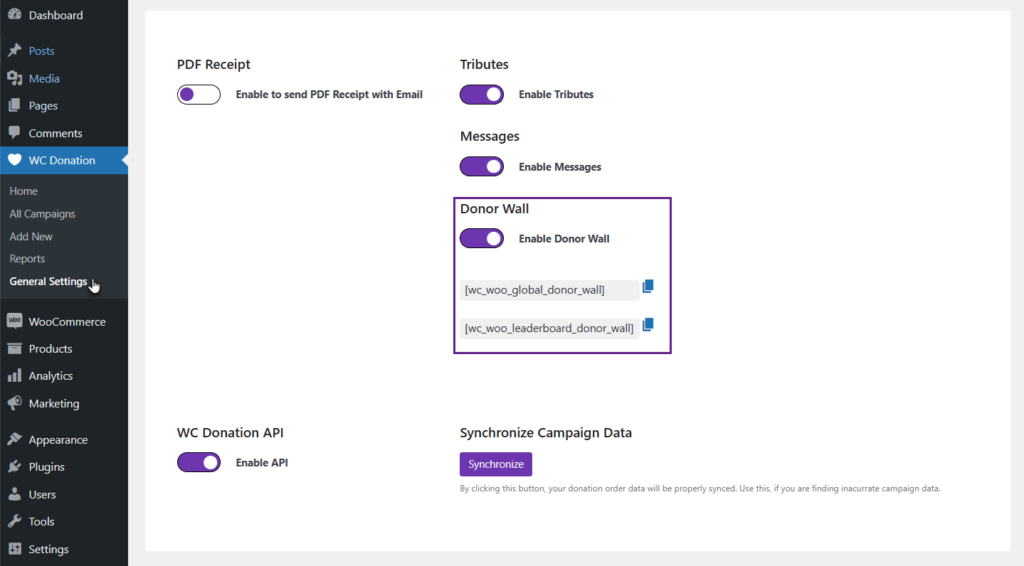
Global Donors Wall Shortcode
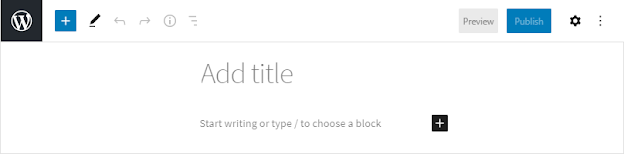
- Navigate to WordPress Admin Dashboard > Pages > Add New.
- A new page would open.
- Add the Title of the page.
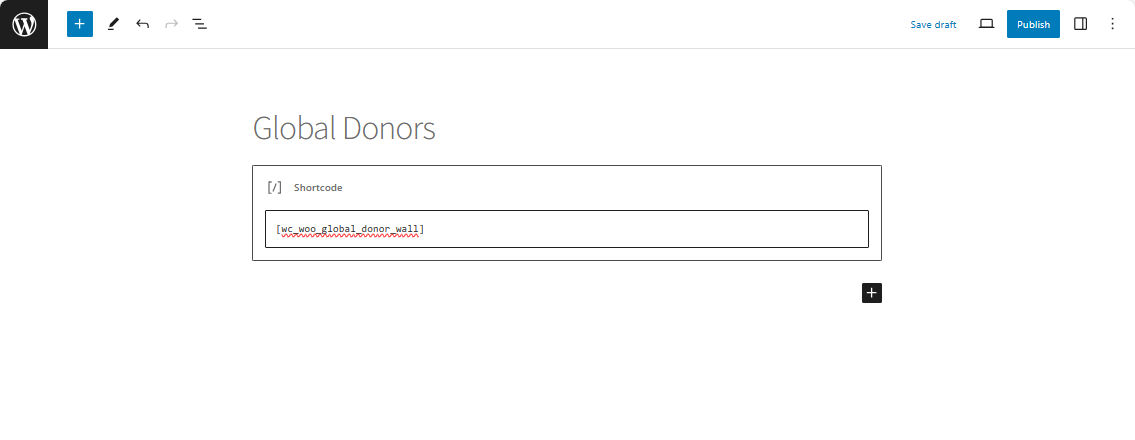
- Select the Shortcode element.
- Now paste the shortcode.
- Click on the Publish button.
Front-End Impact
Global Donors Wall
Leaderboard Donors Wall Shortcode
- Navigate to WordPress Admin Dashboard > Pages > Add New.
- A new page would open.
- Add the Title of the page.
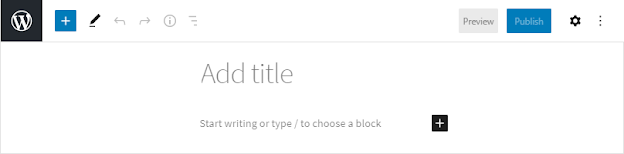
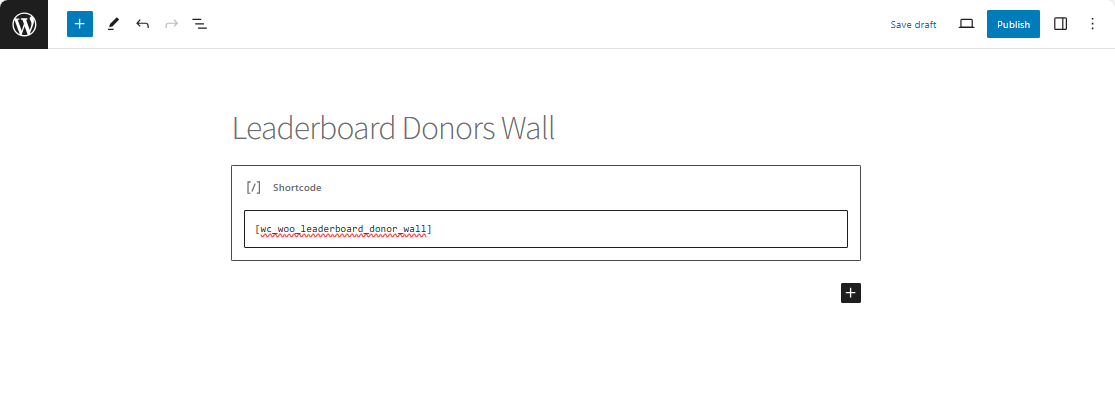
- Select the Shortcode element.
- Now paste the shortcode.
- Click on the Publish button.
Front-End Impact
Leaderboard Donors Wall
WC Donation Checkout
↑ Back to topThe WC Donation Checkout feature allows the admin to control how donors complete the donation process on the frontend by selecting a checkout style for each campaign.
Using the Select Style dropdown, the admin can choose between two checkout experiences:
- Single Page Checkout
The entire donation process—donation amount selection, donor information, and payment—is completed on a single page. This option is ideal for users who prefer a quick and straightforward checkout with minimal steps. - Multi-Step Wizard Checkout
The donation process is displayed in a step-by-step pop-up window that guides donors through multiple stages, such as selecting the donation amount, entering personal details, and choosing a payment method. All steps are completed within a single pop-up, allowing users to donate without leaving the current page. This structured flow improves clarity, reduces confusion, and enhances the overall donation experience.
- Navigate to WordPress Admin Dashboard > Pages > Add New Page.
- Enter a title for the page.

- Search for the WC Donation Checkout block.

NOTE: This feature will work only when the Legacy Checkout Donation is disabled in WordPress Admin Dashboard > WC Donation > General Settings > Legacy Checkout Donation.
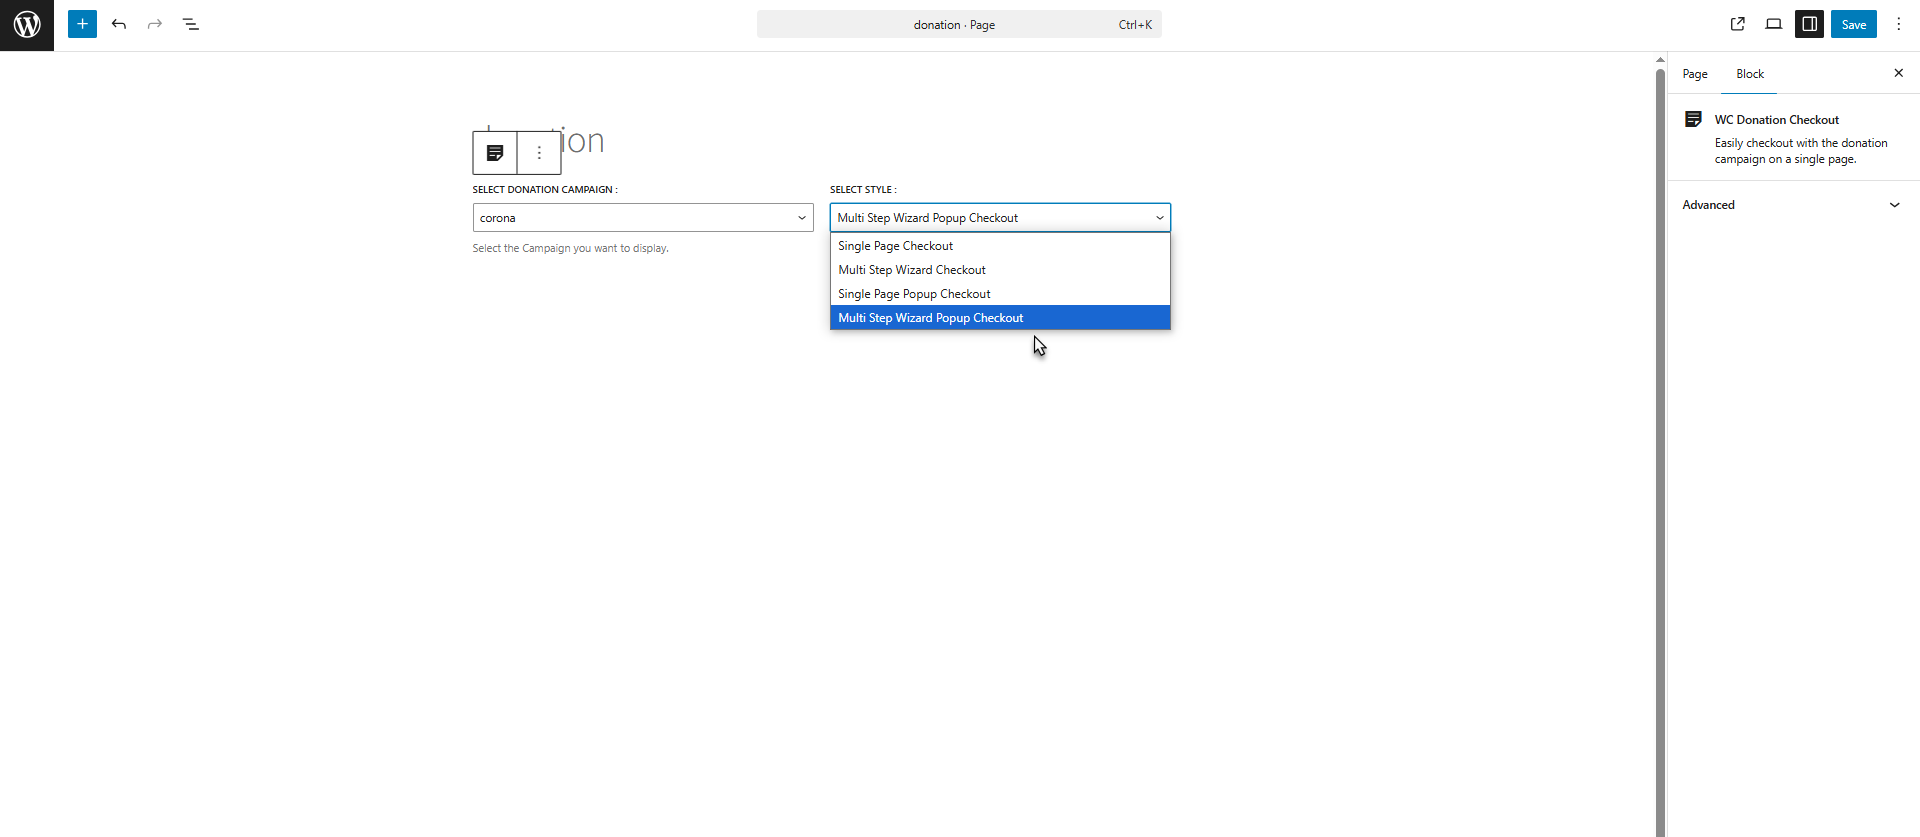
- Select the donation campaign from the Select Donation dropdown.

Choose the style from the Select Style dropdown for the campaign display on the front end. There are two options available:
- Single Page Checkout: The donation checkout process will be completed on a single page.
- Multi-Step Wizard Checkout: The donation checkout process will be divided into multiple steps for a guided experience.

- Click the Publish button to save and publish the page.

Single-Page Popup Checkout
The donation process is completed within a single pop-up page, allowing users to enter their details and make the payment without leaving the current screen. This ensures a quick and smooth checkout experience.

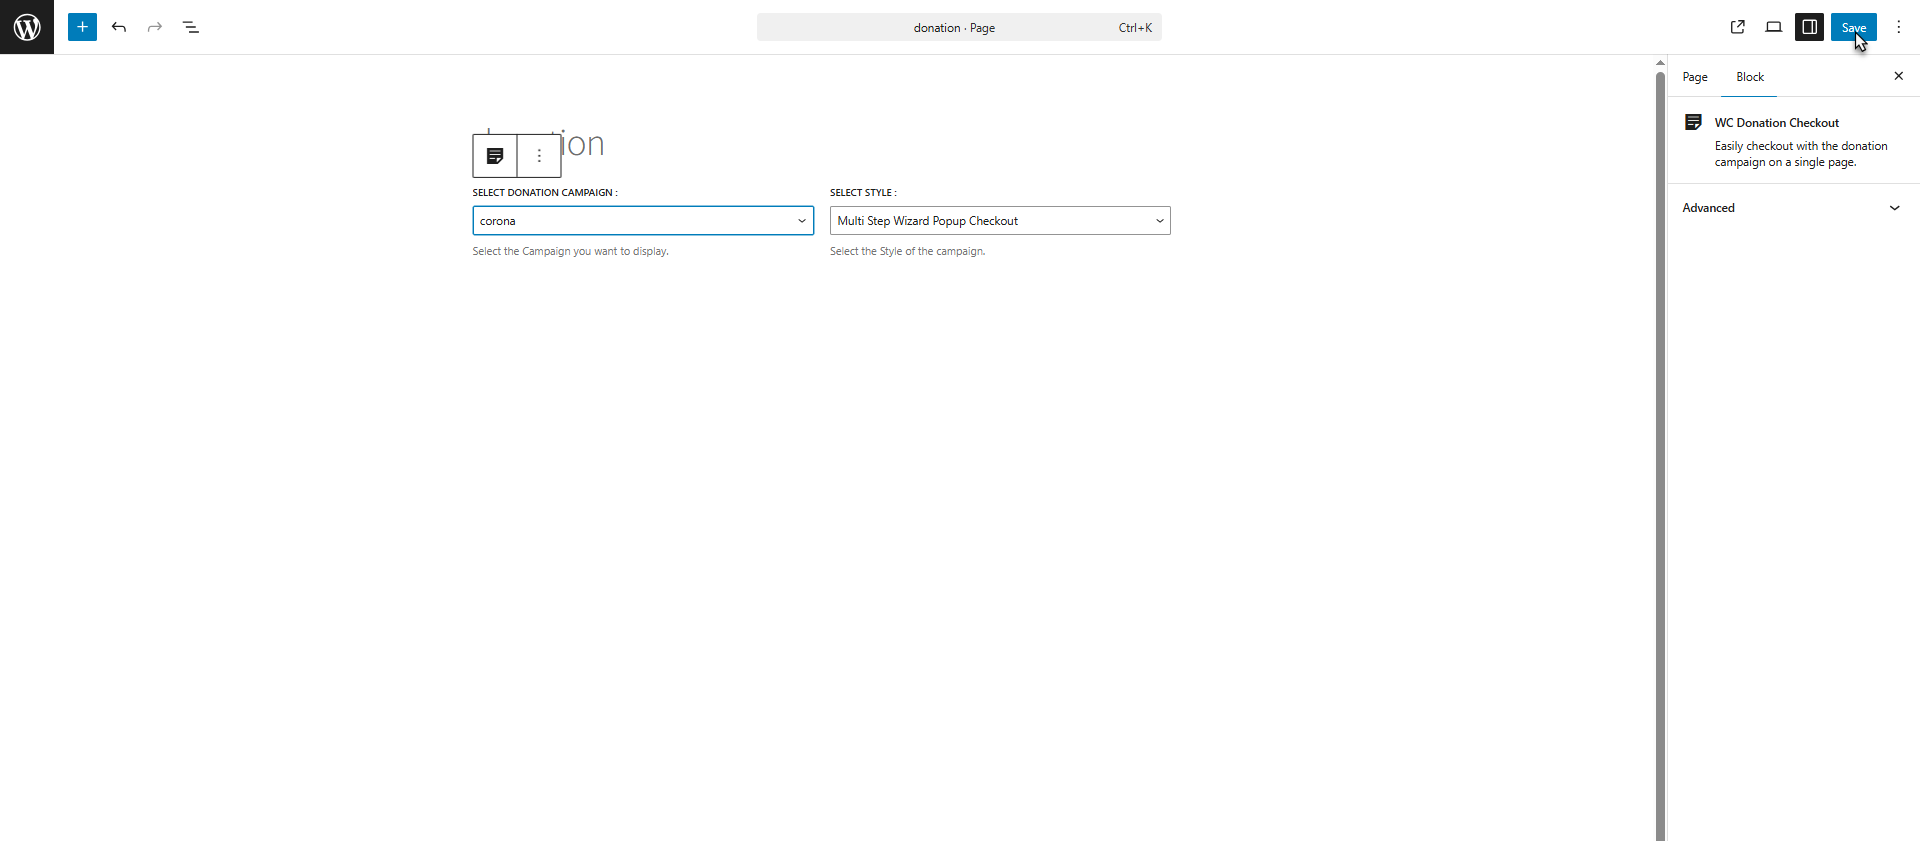
- Click the Publish or Save button to save and publish the page.

Multi-Step Wizard Popup Checkout
The donation process is completed through a step-by-step pop-up window, guiding users through multiple stages of amount selection, personal details, and payment method within the same pop-up. This structured flow helps ensure clarity, ease of use, and a smooth donation experience without navigating away from the current screen.
- Click the Publish or Save button to save and publish the page.
Front End Impact:
↑ Back to top- Single Page Checkout
- Go to the Donation Checkout page. The selected donation campaign will be displayed.

- Choose the desired amount.

- Click on the Place Order button to donate into the campaign.

- The donation will be done through Single Page Checkout.

- Multi Step Wizard Checkout
- Go to the Donation Checkout page. The selected donation campaign will be displayed.

- Select the donation amount and click on Continue to Donate.

- Fill out the necessary details. Once completed, click on Continue to Donate.

- Select the Payment Option and click on the Place Order.

- The donation is done through Multiple Step Wizard Checkout.

Single-Page Popup Checkout
- Go to the donation section and click the Donate Now button.
- A pop-up checkout window will appear.
- Select the desired donation amount.
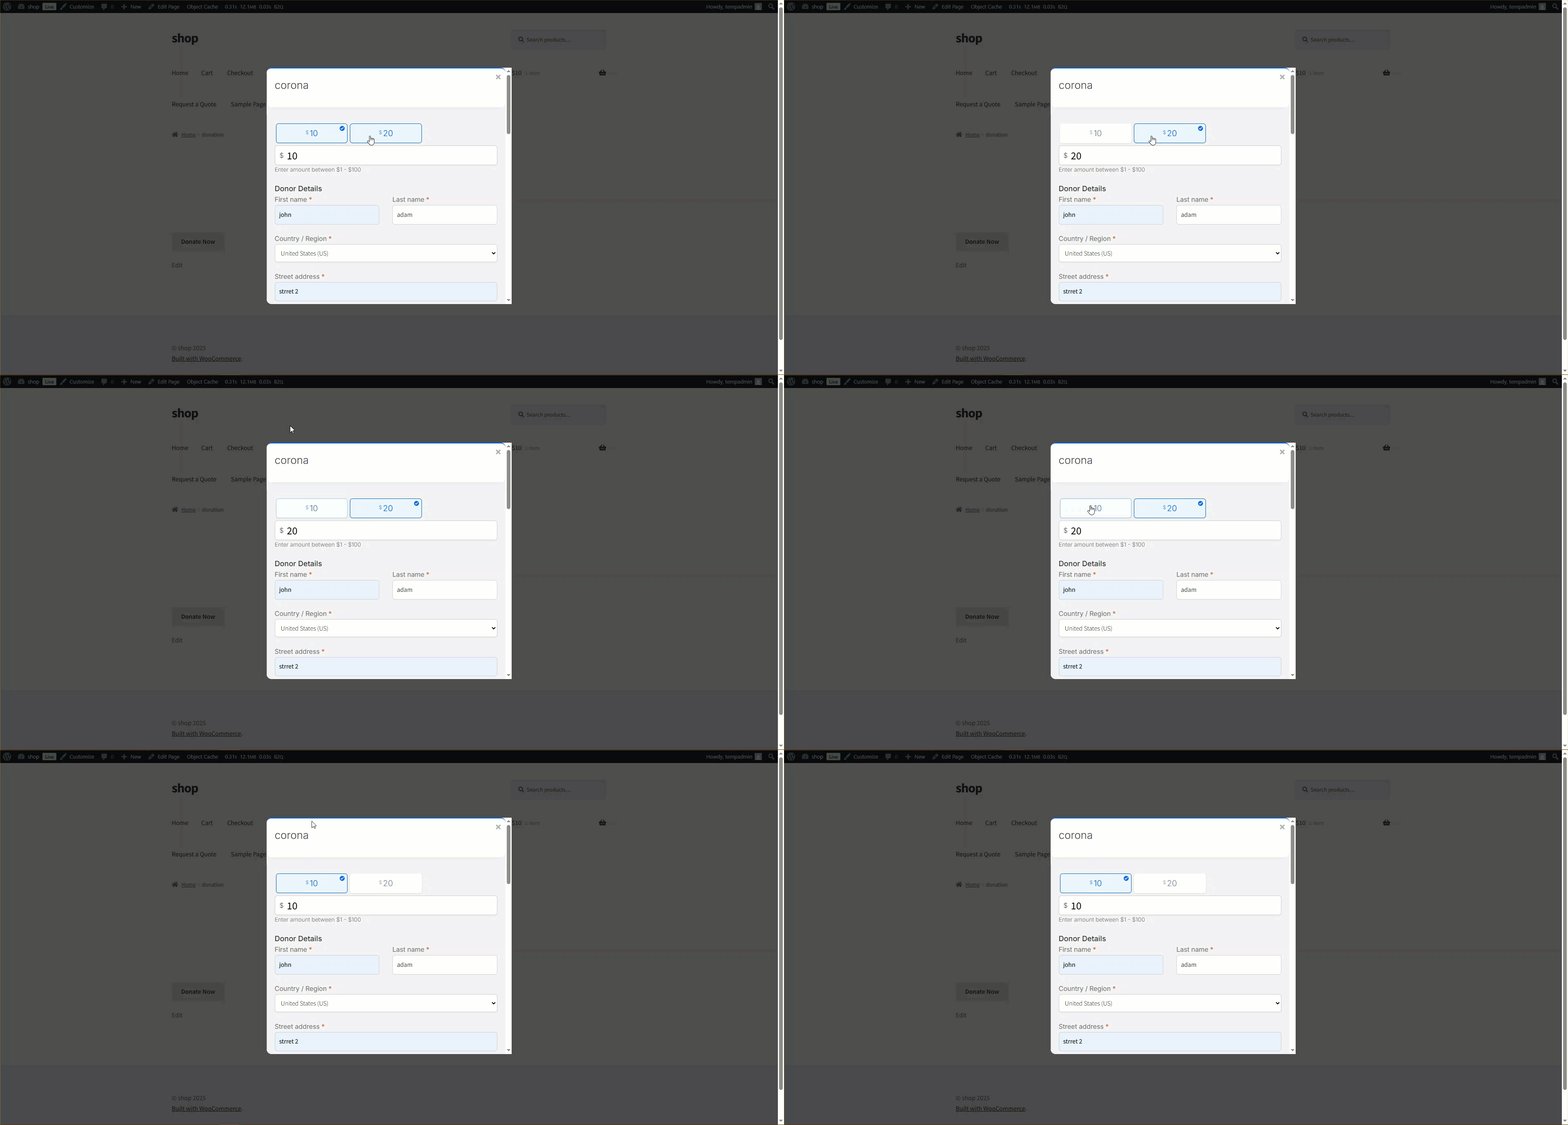
- Enter your billing and payment details directly within the pop-up.
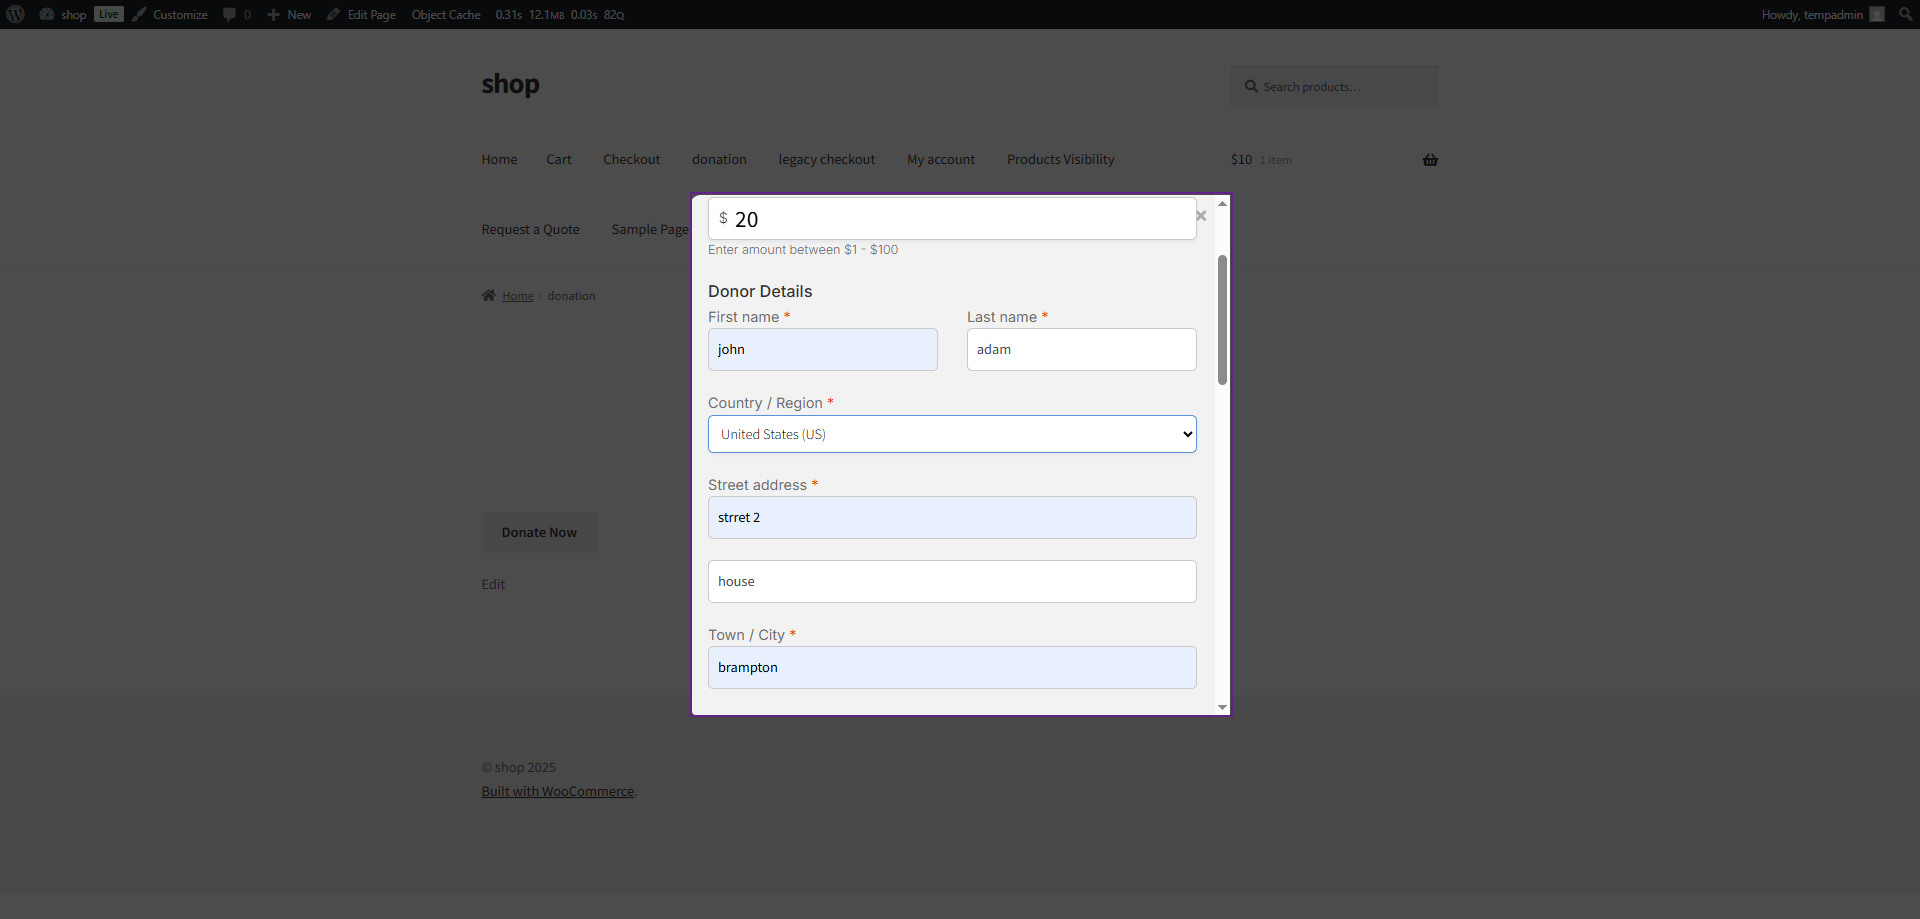
- Click the Donate or Place Order button to complete the donation.
- The donation will be completed instantly through the Single Page Popup Checkout, without leaving the current page
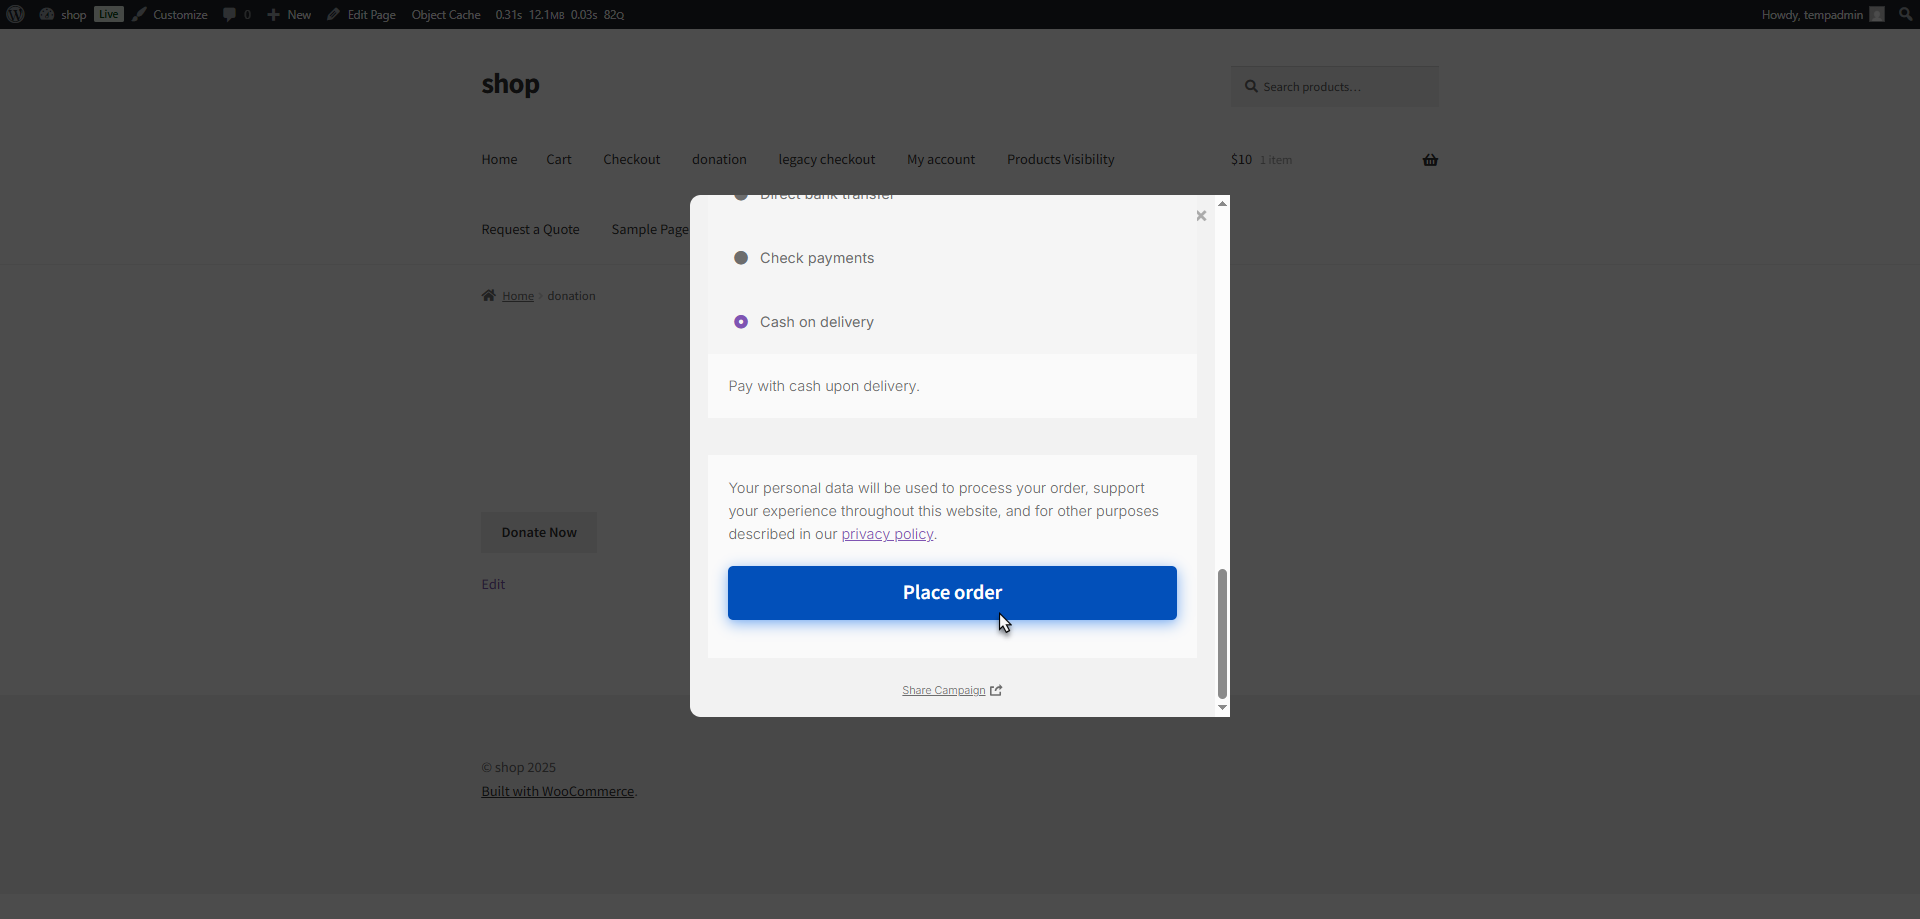
- The donation is done through Single-Page Popup Checkout.
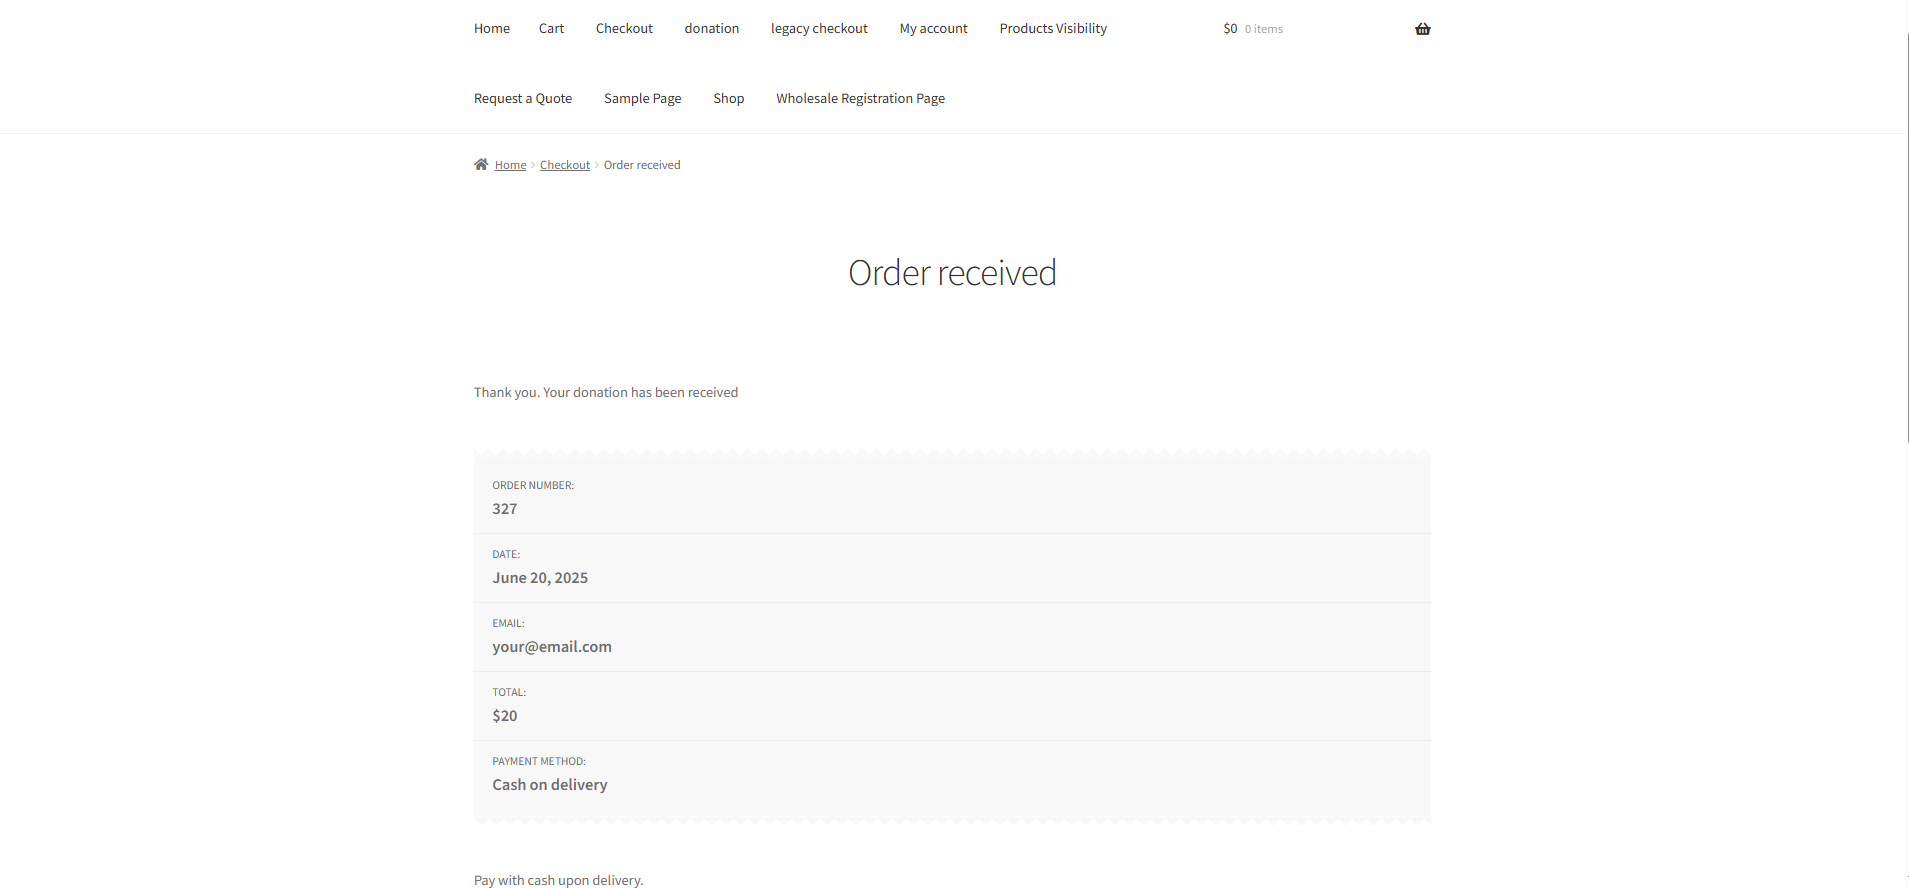
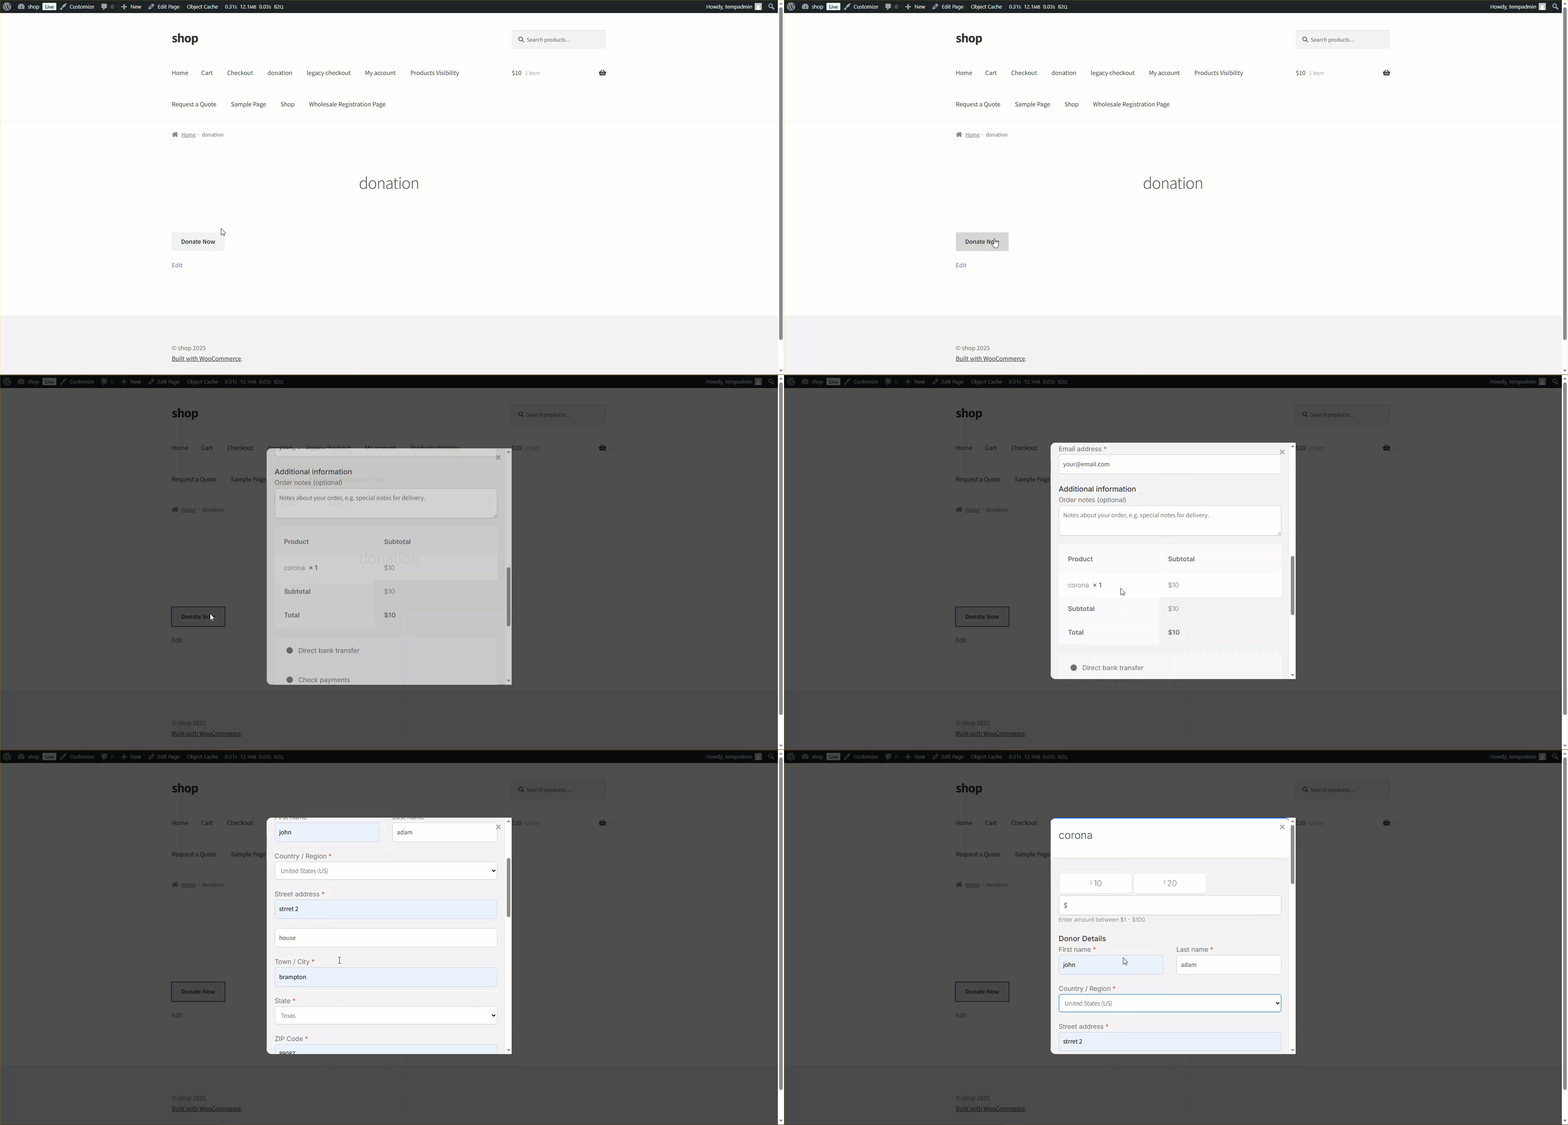
Multi-Step Wizard Popup Checkout
- Go to the donation section and click the Donate Now button.
- A pop-up checkout window will appear.
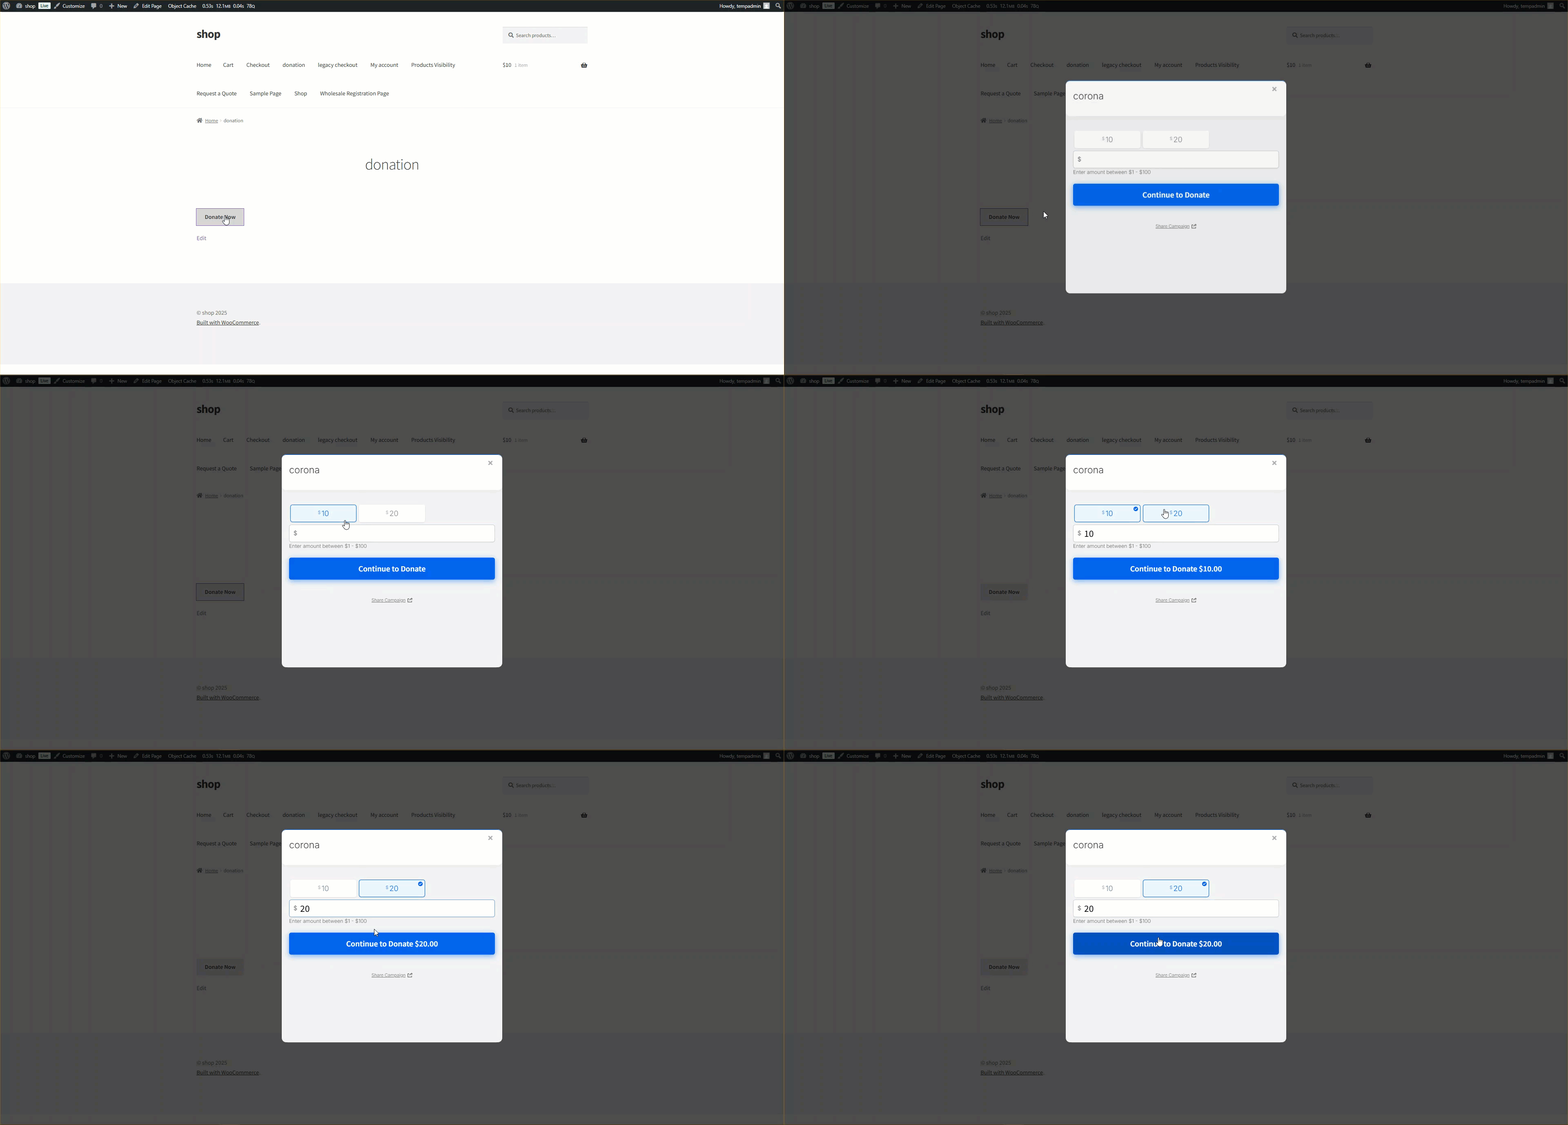
- Fill out the necessary details. Once completed, click on Continue to Donate.
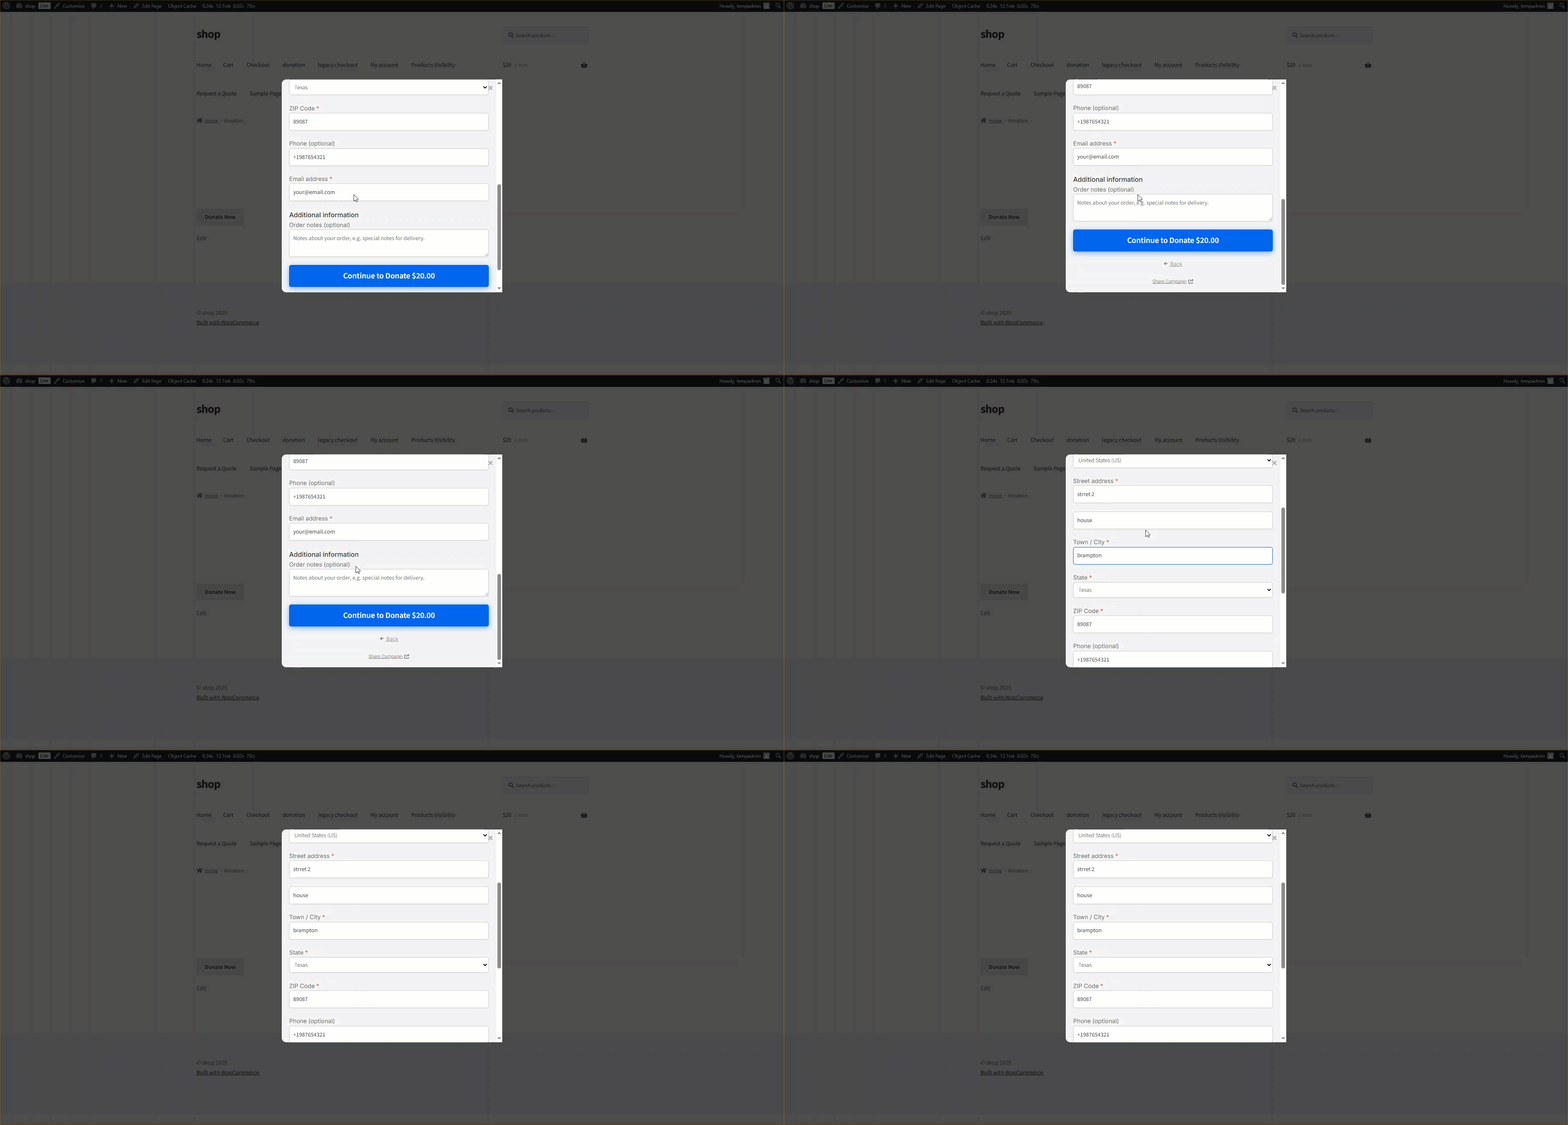
- Now, choose your preferred payment option and click on the Place Order button.
- The donation will be completed through a Multi-Step Wizard Popup Checkout, without redirecting to a separate page.
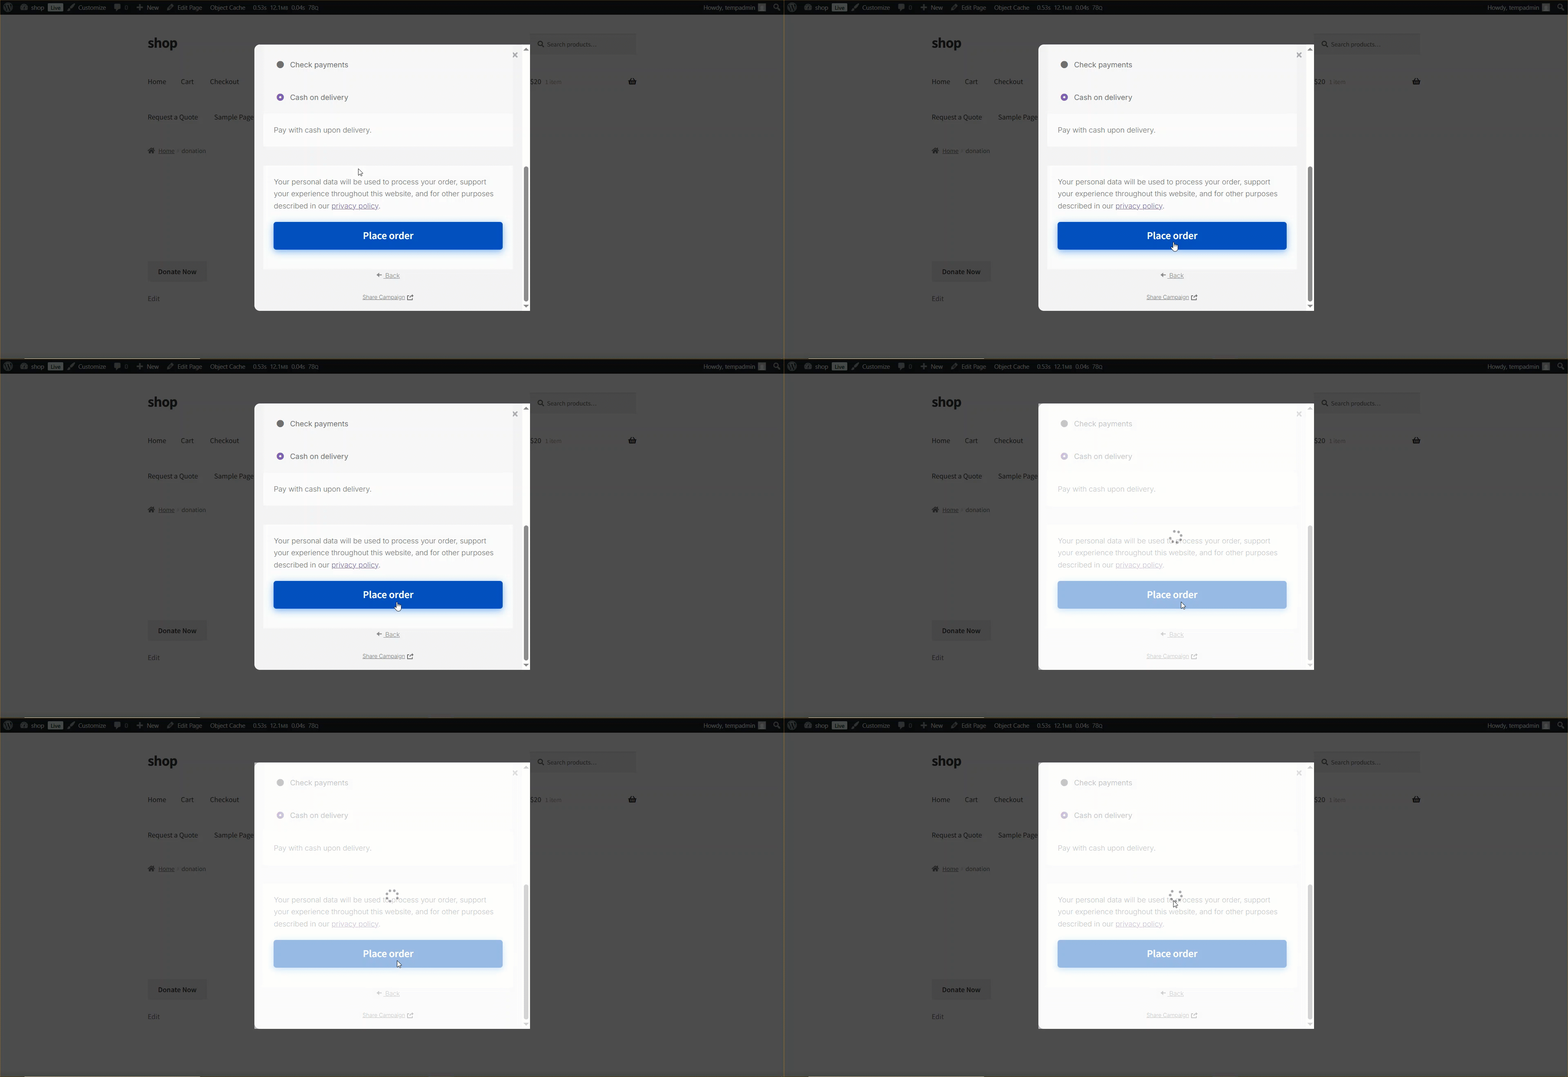
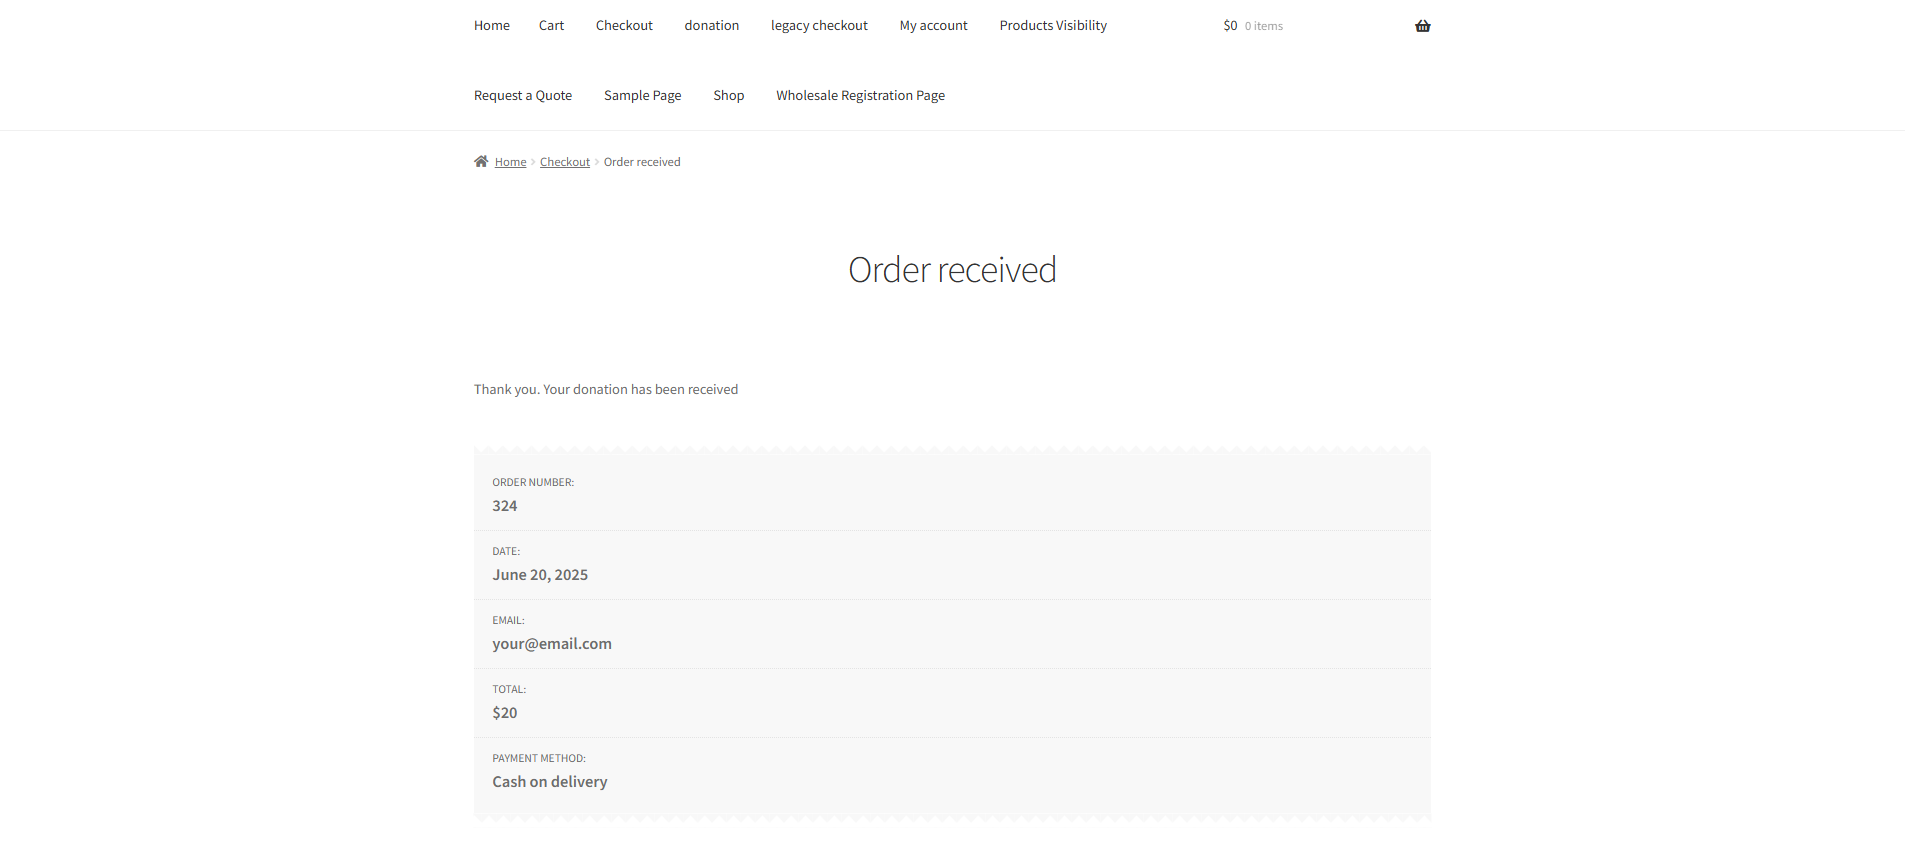
- The donation is done through Multi-Step Wizard Popup Checkout.
Front-End Donation Flow
↑ Back to topThis section explains the complete donation process from the donor’s perspective, including campaign access, donation amount selection, additional donation options, checkout, and donation confirmation.
Accessing the Campaign
Navigate to: WordPress Admin Dashboard → WC Donation → Campaigns
- Open the campaign that you want to display on the frontend.
- Configure the campaign details, donation amounts, and required form fields.
- Publish or update the campaign.
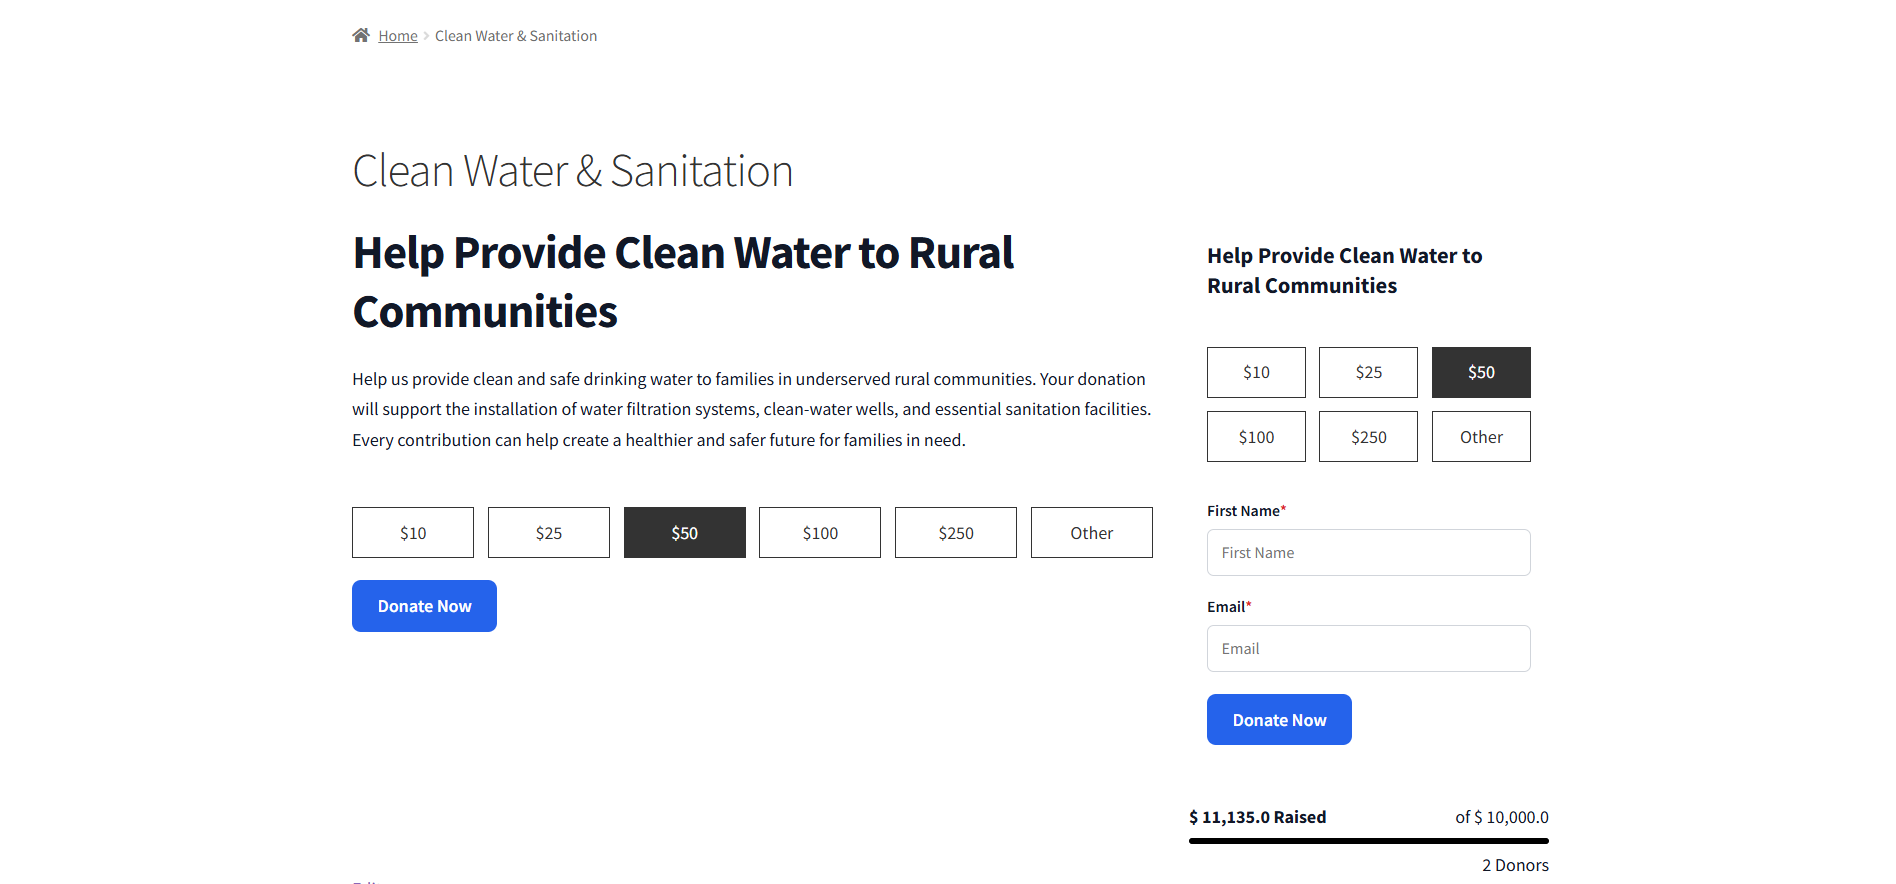
- Open the campaign from its frontend URL.
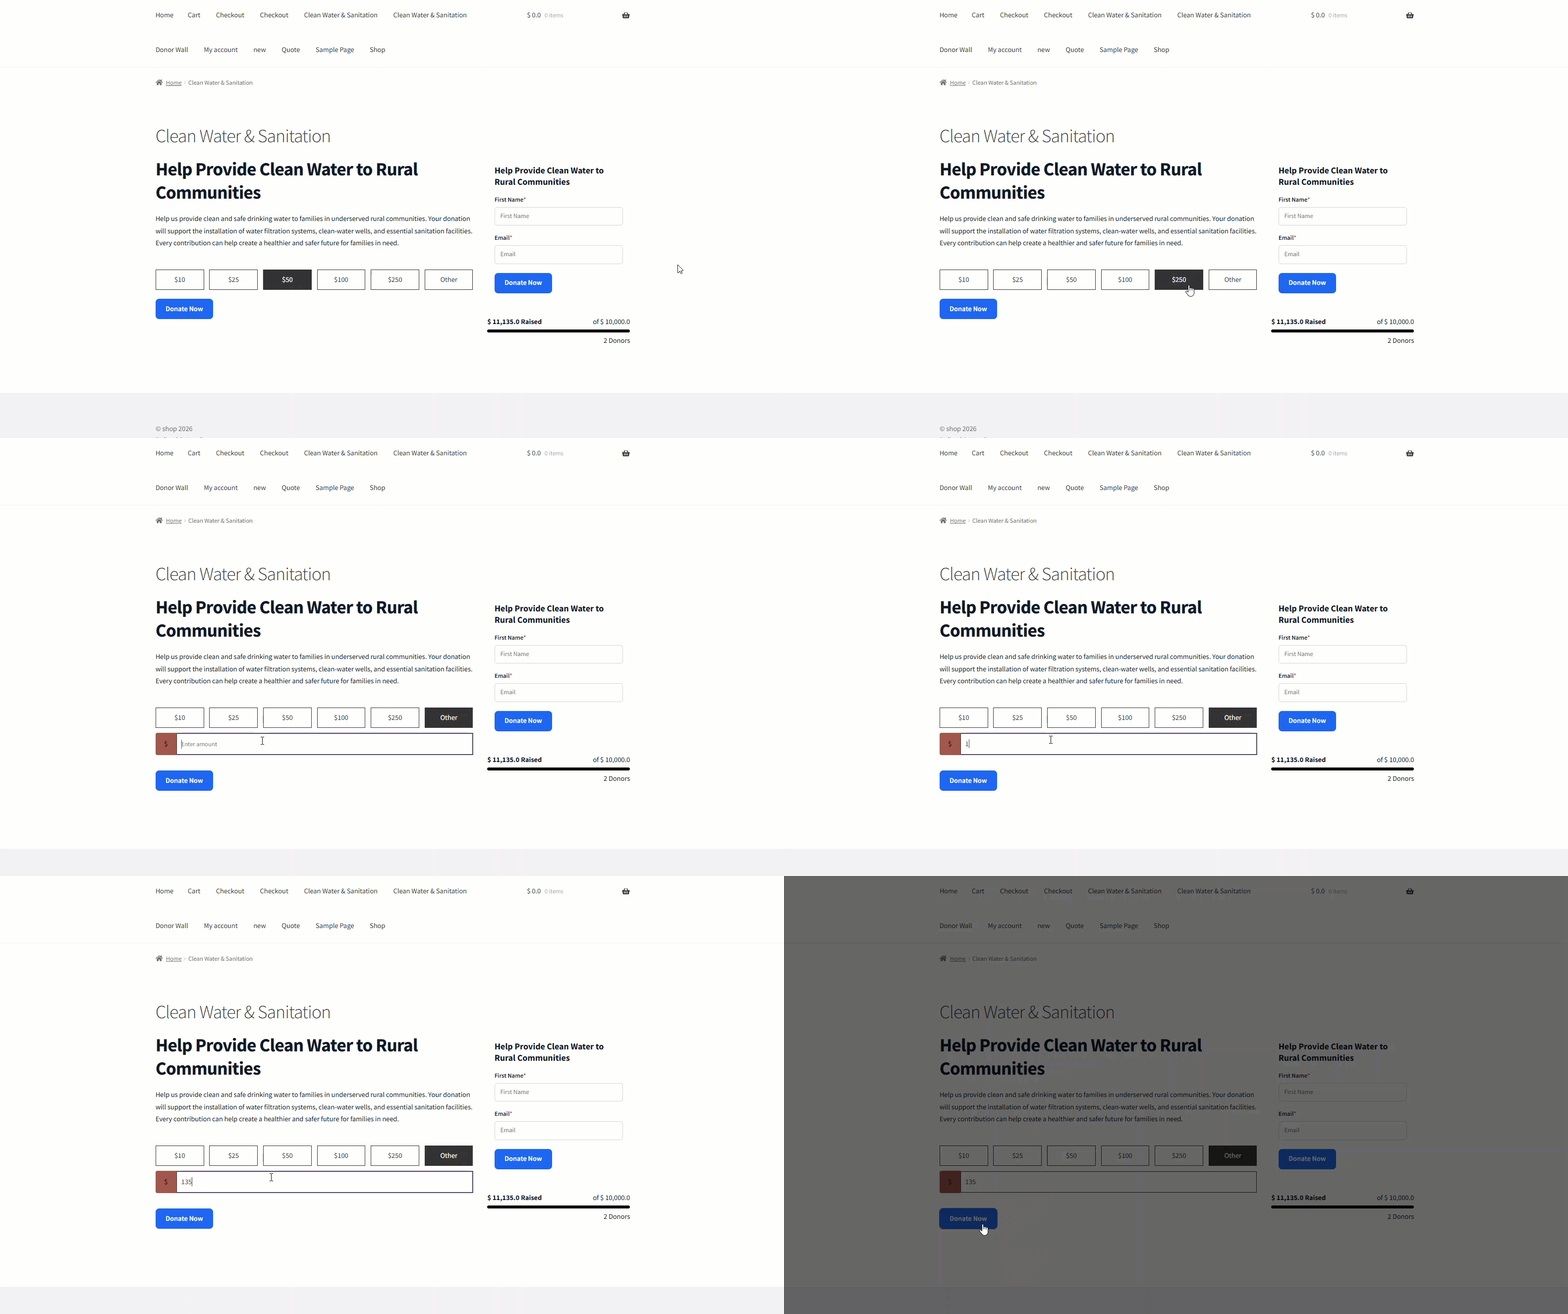
Selecting a Donation Amount
Navigate to: Campaign Frontend → Donation Amount
- Review the available predefined donation amounts.
- Select the desired donation amount.
- If Custom Amount is enabled, enter a custom donation amount.
- Continue to the remaining donation form fields.
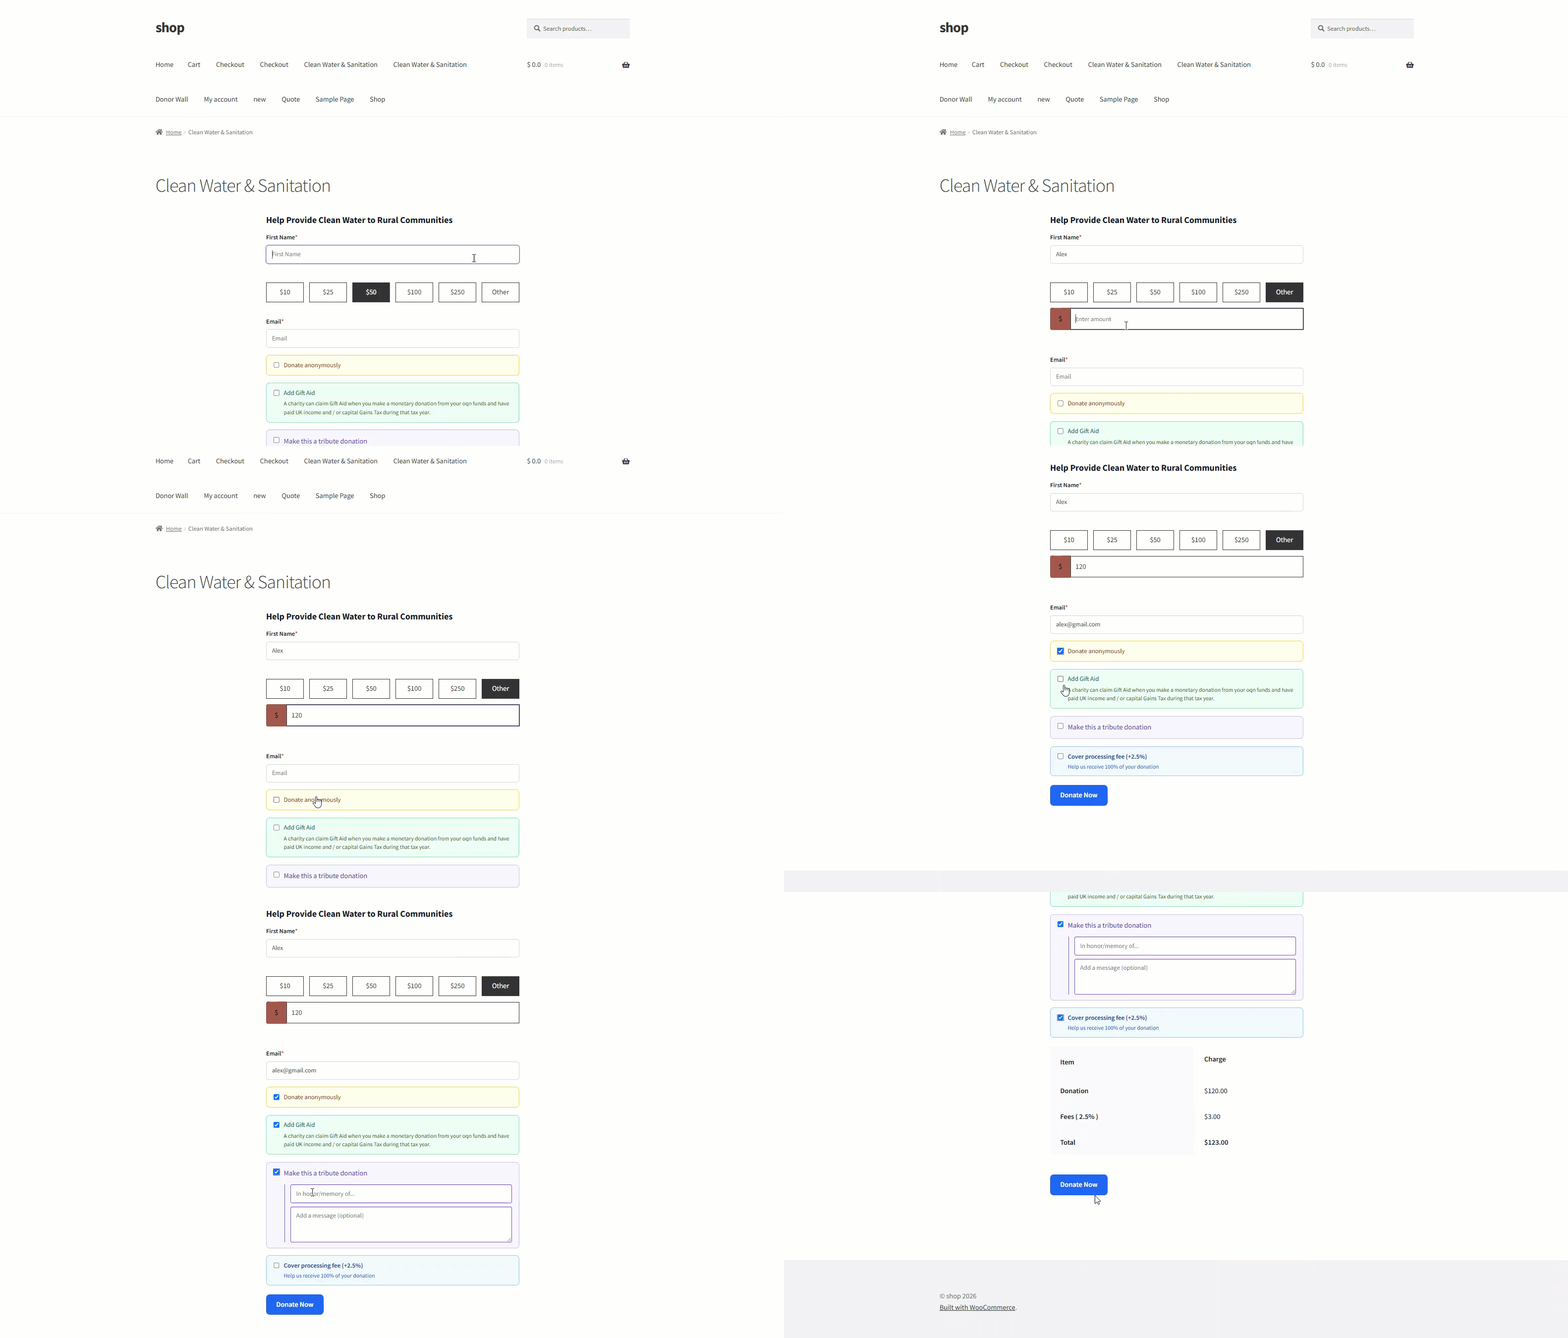
Completing the Donation Form
Navigate to: Campaign Frontend → Donation Form
- Enter the required donor information.
- Complete any additional fields enabled by the administrator.
- Depending on the campaign configuration, the form may include options such as:
- Recurring Donations
- Donate Anonymously
- Gift Aid
- Tribute Donation
- Processing Fee
- Terms and Conditions
- Review the entered information before proceeding.
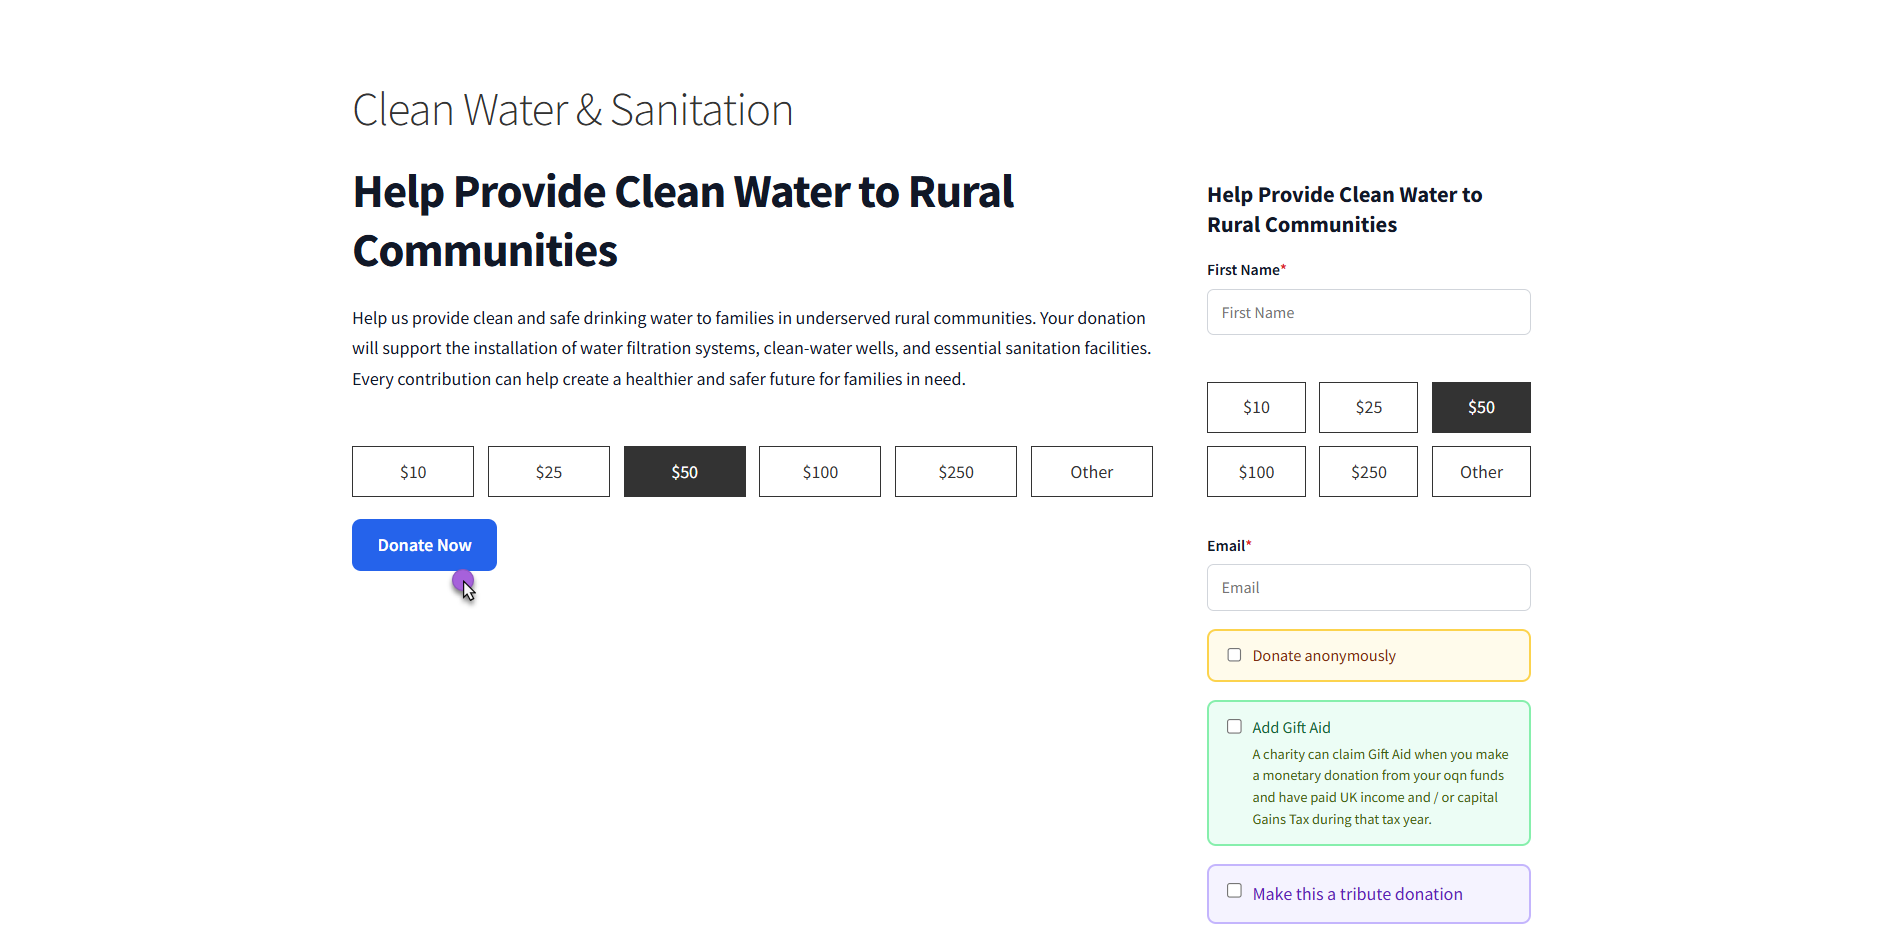
Submitting the Donation
Navigate to: Campaign Frontend → Donation Form → Donate
- Review the donation amount and entered information.
- Click the Donate button.
- The donation is added to the WooCommerce cart.
- Continue to the checkout page to complete the payment.
Completing the Checkout
Navigate to: WooCommerce Checkout
- Review the donation details and total amount.
- Enter or confirm the required billing and contact information.
- Select an available payment method.
- Click Place Order to complete the donation.
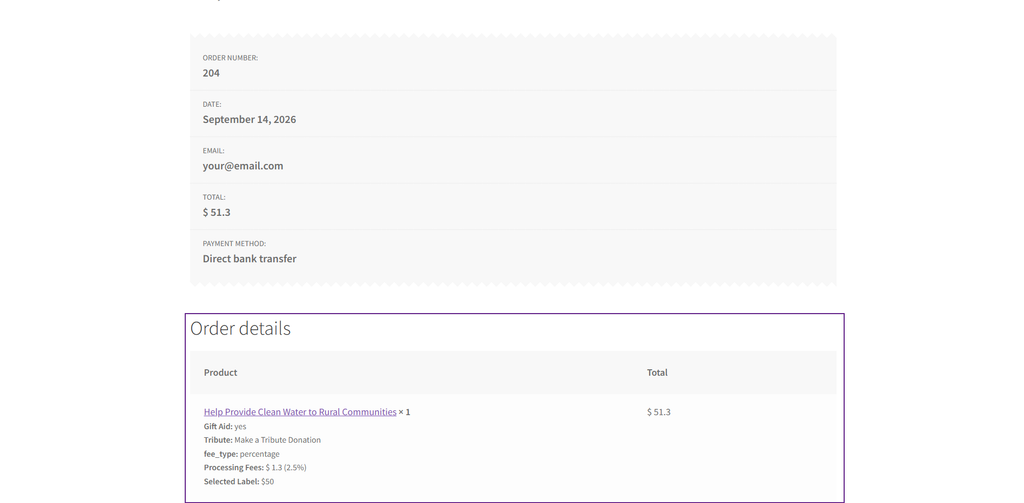
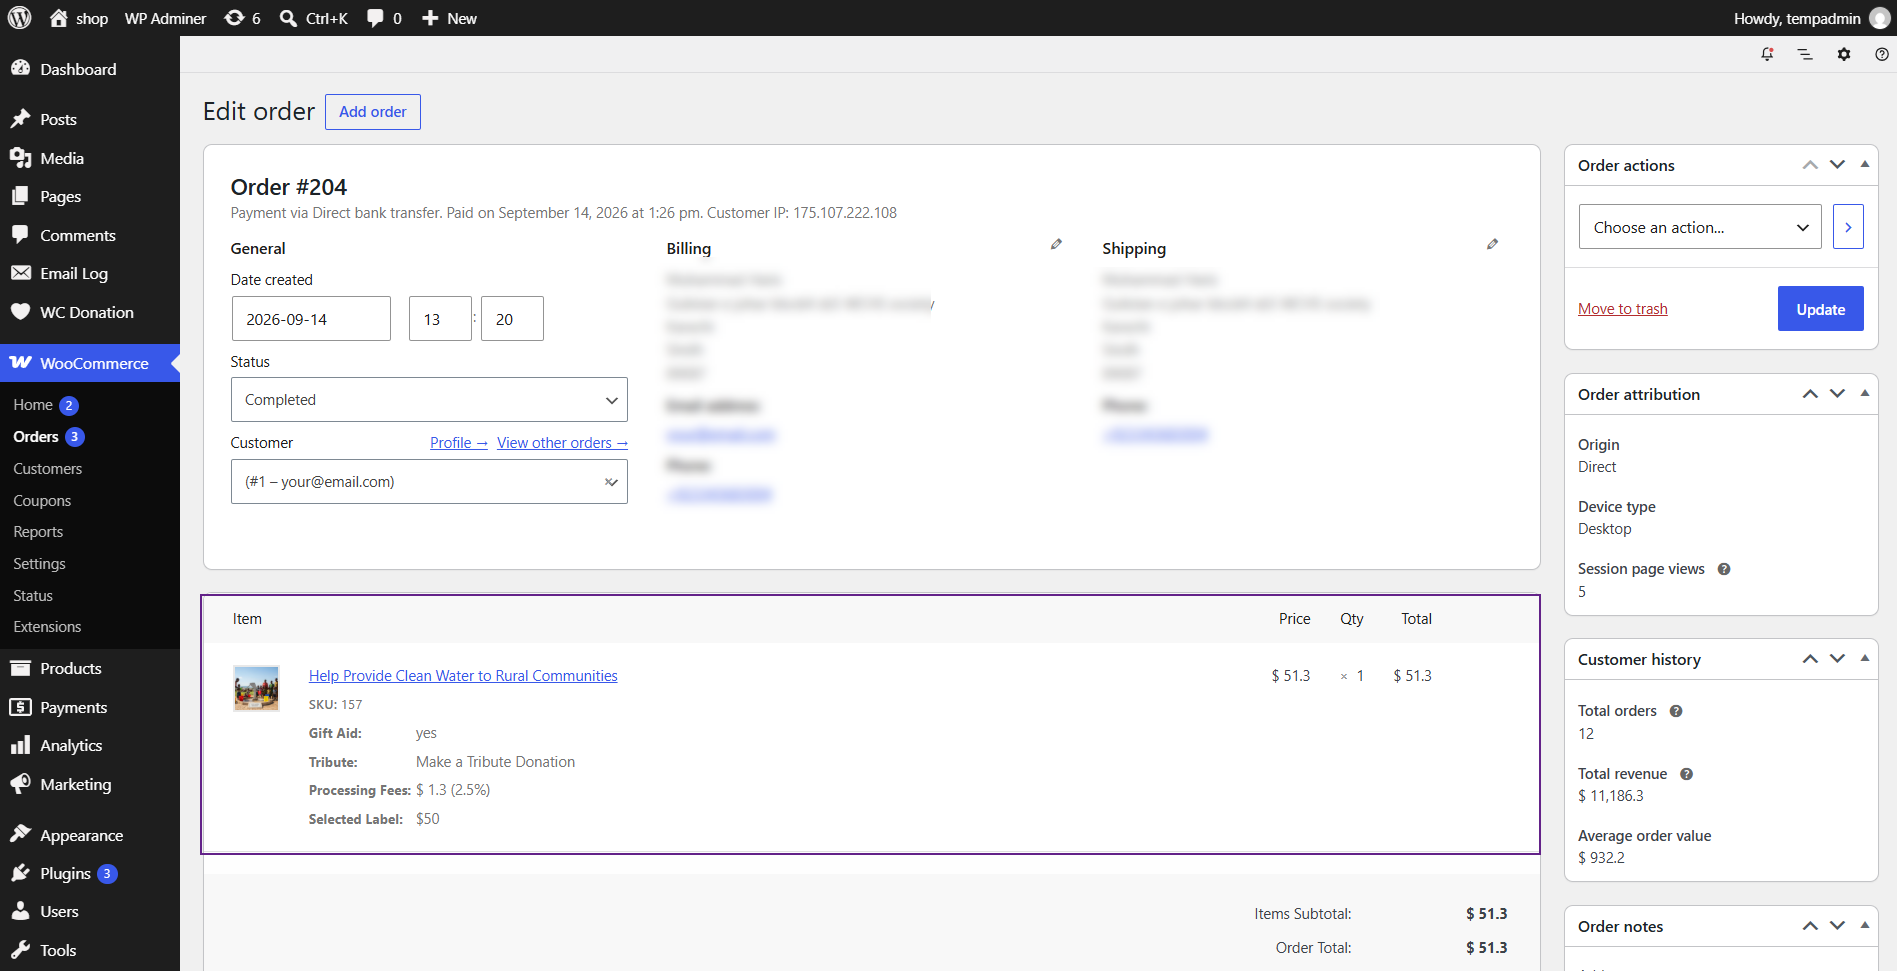
Donation Confirmation
Navigate to: WooCommerce → Order Received
- After successful payment, WooCommerce displays the order confirmation page.
- Review the donation order details and payment information.
- The donation is recorded against the campaign.
- The campaign’s donation totals and donor information are updated according to the campaign configuration.
- The configured donation confirmation email is sent to the donor.
Troubleshooting & FAQ
↑ Back to topA campaign’s raised amount or donor count looks wrong.
Use Synchronize Campaign Data on the General Settings page (Section 26). This re-syncs order and donation totals against campaigns and is the plugin’s own recommended fix for inaccurate campaign data.
The Recurring Donations tab is greyed out and I can’t change anything.
WooCommerce Subscriptions is not active. Install and activate WooCommerce Subscriptions, then return to the campaign editor.
A component I want to add is greyed out in the Page Builder or Form Designer sidebar.
Gift Aid, Tribute Donation, Processing Fee, Terms & Conditions, and Donate Anonymously are single-use — the campaign already has one instance placed somewhere on the canvas. Remove the existing instance before adding a new one.
I edited a campaign but it still looks like the old design.
The campaign is most likely still on the legacy editor. Open the campaign and look for the notice about the legacy layout with an Enable new campaign frontend control; note that switching cannot be undone from the interface.
The Goal Progress Bar or Donor Wall block on my page isn’t showing anything.
Check that the underlying feature is actually enabled: Goals must be enabled on the Goals tab for the Progress Bar to render, and Donor Wall / Social Share must be enabled on the Donor Engagement tab for those blocks to render — each shows an explanatory placeholder rather than an error when its source setting is off.
Can I change the checkout style used when I embed a campaign from the Embed tab?
Not directly — the Embed tab always generates a Single Page Checkout–style shortcode. To use one of the other three checkout styles (Multi Step Wizard Checkout, Single Page Popup Checkout, Multi Step Wizard Popup Checkout), add the WC Donation Checkout Gutenberg block to a page manually and choose the style there (Section 22).
Can I permanently delete a campaign right away?
No — a campaign must be moved to Trash first. Delete Permanently is only available for campaigns that are already in the Trash, as a safeguard against accidental data loss.
Where do I turn on the site-wide donor wall shortcodes?
General Settings → Donor Wall → Enable Donor Wall. Once enabled, the page reveals two ready-to-copy shortcodes: [wc_woo_global_donor_wall] and [wc_woo_leaderboard_donor_wall].