GP Cart Button Master allows your WooCommerce store to create rule-based Add to Cart buttons with custom text, direct-to-checkout redirects, styling, floating mobile buttons, and quantity limits.
Installation
↑ Back to topTo start using a product from WooCommerce.com, you can use the “Add to store” functionality on the order confirmation page or the My subscriptions section in your account.
- Navigate to My subscriptions.
- Find the Add to store button next to the product you’re planning to install.
- Follow the instructions on the screen, and the product will be automatically added to your store.
Alternative options and more information at:
Managing WooCommerce.com subscriptions.

Basic usage
↑ Back to top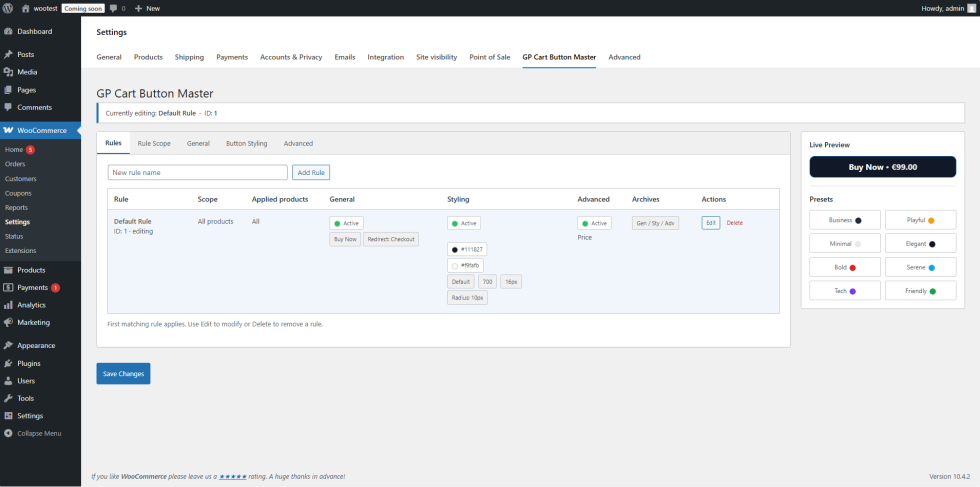
GP Cart Button Master works using “Rules”. Each rule can target all products or only selected products, and can control button behavior, design, and advanced options.
Access the plugin
↑ Back to topFrom your store’s WP Admin dashboard, navigate to:
WooCommerce > Settings > GP Cart Button Master
You will see the Rules screen, where you can create, edit, reorder, and delete rules.
Tip:
Rules are evaluated in order. The first matching rule is applied.
Creating your first rule
↑ Back to top- Go to WooCommerce > Settings > GP Cart Button Master
- Click Add New Rule
- Configure the rule:
Rule Name
Internal name used to identify the rule in your list.
Scope
Choose where the rule applies:
- All products
- Selected products (pick products from the selector)
General settings (behavior)
- Button text: Change “Add to cart” to your preferred label (example: “Buy now”, “Add to basket”)
- Direct Checkout: Skip the cart and send customers straight to checkout
- Redirect URL (optional): Send customers to a custom page instead of checkout/cart
Styling (design)
- Background color
- Text color
- Font size / weight
- Border radius
- Padding and spacing (if included in the settings)
Advanced settings
Enable extra features when needed:
- Custom quantity UI (if enabled): replaces the default quantity selector with a styled control
- Show icon in the button
- Show price in the button
- Floating Add to Cart (mobile): show a sticky Add to Cart bar/button on product pages
- Quantity limits: set a maximum quantity allowed per product (per rule)
- Shake animation (optional)
Applying rules on shop/category archives
↑ Back to topSome settings can optionally be applied on shop/category pages (archives).
In your rule, enable the archive options (for example: Apply on archives) if you want your button text and styling to appear on:
- Shop page
- Category pages
- Tag pages (if supported)
Tip:
Many stores only enable archive styling, while keeping “Direct Checkout” for product pages only. This avoids unexpected behavior when customers add items from archives.
Deleting rules
↑ Back to topFrom WooCommerce > Settings > GP Cart Button Master:
- Find the rule you want to remove
- Click Delete
Only that rule is removed. The plugin itself and other rules are not affected.
Rule order and priority
↑ Back to topRules are processed from top to bottom.
If two rules can match the same product, the rule placed higher in the list wins.
Variable products and out-of-stock products are handled differently.
For variable or out-of-stock products, Cart Button Master skips certain “general” changes (such as button text, redirects, icon, and price display). Styling still apply.
Tip:
This prevents breaking WooCommerce’s default variable product flow (select variations before adding to cart).
Troubleshooting
↑ Back to topRule not applying
↑ Back to top- Confirm the product matches the rule scope (All products vs Selected products)
- Check rule order: move the rule higher if another rule is matching first
- Clear any caching (page cache, minify, server cache) and retest
Button text or redirect not changing on variable products
↑ Back to topThis is expected behavior:
General changes are skipped for variable products to keep the “Choose options” flow intact.
Use styling options if you want visual consistency.
Floating button not showing on mobile
↑ Back to top- Confirm Floating Add to Cart is enabled in the rule’s Advanced settings
- Test on an actual mobile device (or browser device mode)
- Check theme conflicts: sticky headers or z-index rules can hide the bar
Quantity limit not working
↑ Back to topIf another plugin also limits quantities, temporarily disable it and retest
Confirm the max quantity is enabled and set in the rule
FAQs
↑ Back to topHelp customers by answering commonly asked questions.
Can I apply different settings to specific products?
Yes. Each rule can target all products or only selected products.
Does it support shop/category archives?
Yes. You can choose whether each rule applies on shop/category pages (archives) using the “Apply on archives” toggles.
Do variable or out-of-stock products get affected?
General changes like button text, redirects, icon, and price display are skipped for variable or out-of-stock products. Styling can still apply.
Does it include a floating mobile Add to Cart button?
Yes. Enable it in Advanced settings and it will appear on single product pages on mobile.
Can I limit quantities?
Yes. You can set a maximum quantity per product (per rule) in the Advanced tab.