Installation
↑ Back to topTo start using a product from WooCommerce.com, you can use the “Add to store” functionality on the order confirmation page or the My subscriptions section in your account.
- Navigate to My subscriptions.
- Find the Add to store button next to the product you’re planning to install.
- Follow the instructions on the screen, and the product will be automatically added to your store.
Alternative options and more information at:
Managing WooCommerce.com subscriptions.

Usage
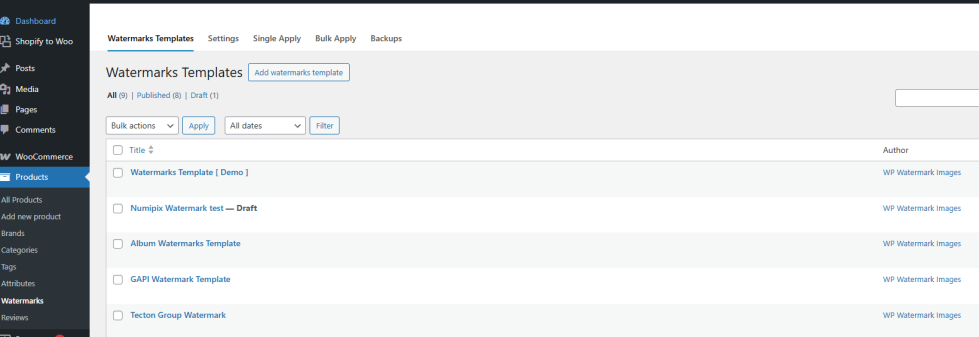
↑ Back to topWatermarks Templates
↑ Back to topIn order to start watermarking your images, you need to create a watermark template first.
Watermarks template is the place where you set up the text and image watermarks in order to apply them later on images in bulk or upon upload or download downloadable images through WooCommerce.
Watermark templates page is listed under Products -> Watermarks -> Watermarks Templates
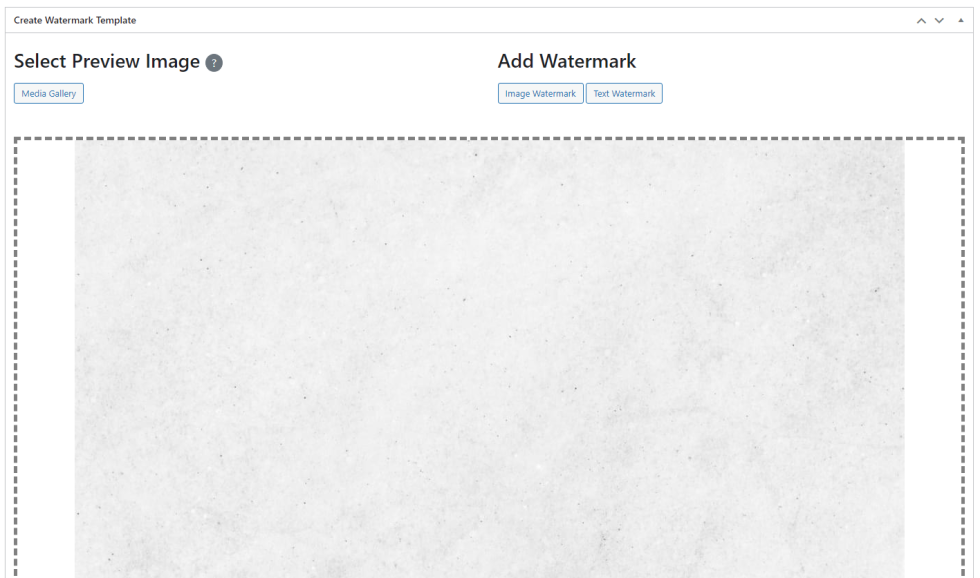
Select Preview Image
You can select an image to test and preview the watermarks on it; the selected image won’t be affected. You don’t have to select one; you can keep the default one as above.
Add Watermark
You can add a text or image watermark.
Image Watermark
Clicking on the Image Watermark button will open the media modal so you can choose the image you want as a watermark.
Center a Watermark
In order to center a watermark in any of the position boxes , you need to set these options in the watermark panel.
- Check Relative to center
- Choose Offset as percentage
- Set Left and Top to 50%
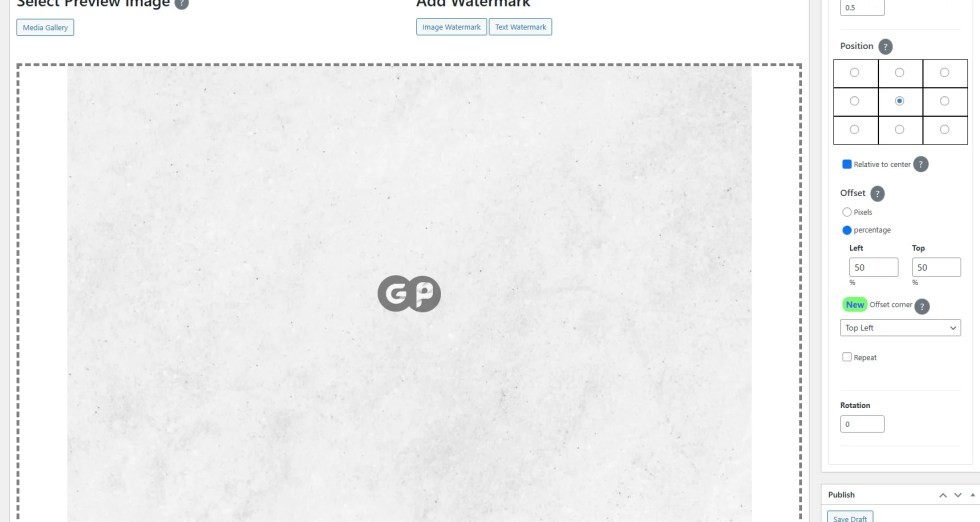
Corner a watermark
In order to corner a watermark, you need to set these options in the watermark panel.
- Un-check Relative to center
- Choose Offset as pixels
- Set Left and Top to pixels space value you want from the corner
- Choose Offset Corner to point to the corner you want the watermark on
Example: Corner a watermark in the bottom right corner of the image with 10px space from the bottom right corner.

Auto Watermarking
↑ Back to topYou can set any watermarks template to be applied automatically on uploaded images.
You can control when the watermarks template is applied on uploaded images based on the image name, image dimensions and the place where the image is uploaded in order to distinguish it from other uploaded images.
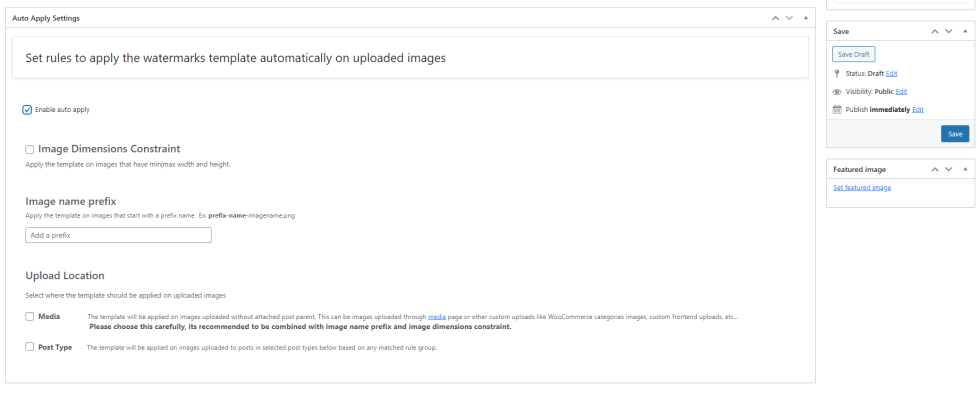
Upload location
This filter depends on the post parent of the uploaded image.
When you upload an image inside a post, the image is attached to the post. the post becomes the image’s post parent. when you upload an image in media page for example, The images are not attached to any post.
You can check each image whether it’s attached to a post or not from the media library page or the image’s edit page.

Media
This option for images uploaded and not attached to a post, like in the media page or any other custom uploads, so be careful using this option, always combine this option with the image prefix name and image dimensions to make the filter accurate.
Examples of general Uploads with no attached post parent [ Media Upload ]

Post Type
This option for images uploaded in any post in any post type [ post – page – product – etc… ].
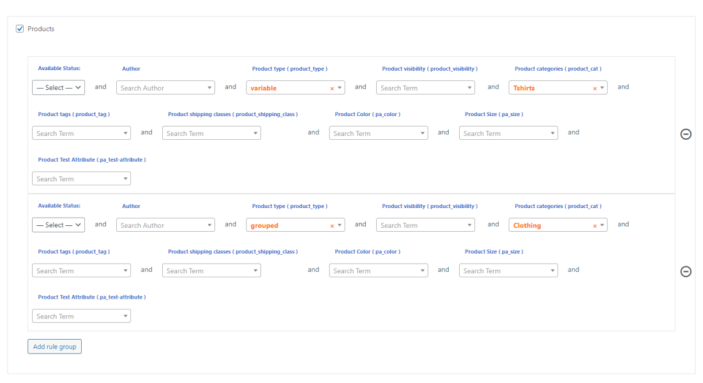
Post Type Rules
You can set group rules for each post type to filter the uploaded images based on the posts criteria.
Example: Apply The watermarks Template on images uploaded to variable products that have Tshirts category OR grouped products that have Clothing category.
Demo
↑ Back to topExample: Apply the watermarks template on images uploaded to variable products that have Tshirts category.
Bulk Apply
↑ Back to topYou can apply watermark templates to images in bulk.

Steps:
↑ Back to top- Select the Watermarks Template.
- Select the images directly from the media.
- Or Select images by posts then Search for images in selected posts button.
- Uncheck any image you don’t want to be watermarked.
- Select the Apply-Type method [ overwrite | create new ].
- Select which sizes to apply the watermarks on.
- Click Apply button to apply the watermarks template on the selected images.
Notes:
↑ Back to top- You can select posts directly from any post type or select posts by filters [ posts status – posts date range – posts authors – posts terms ] .
- Select images by posts will get images related to posts as [ featured images – images uploaded into the post – WooCommerce Gallery images ].
Demo
↑ Back to topExample: Apply a watermarks template on images attached to grouped products that have Clothing category.
Single Apply
↑ Back to topThe single Apply tab is a quick way to add watermarks to a single image without the need to create a watermark template.
You can select the image, add the watermarks over the image, preview the watermarks on the image, and then apply them to it.
Backups
↑ Back to topYou can restore the original image from backup if you chose this option before overwriting the image.
There are two ways to restore the image backup
Single Image Backup
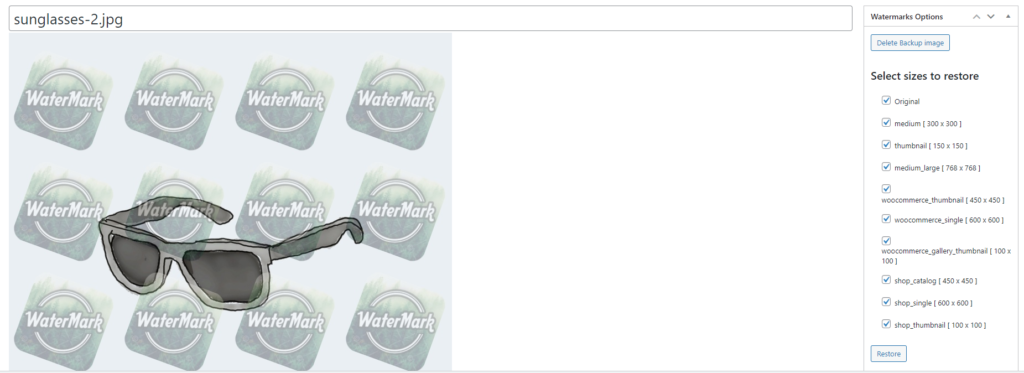
You can restore the backup of the image from the edit page. You can select each size to restore it. The backup image is still there until you decide to delete it.
The edit page has a Subsizes metabox so you can track the status of each sub-size.

The backup image still exists until you decide to delete it.
Demo
↑ Back to topBulk Images Backup
You can make a full backup and restore to images from the Backups tab.
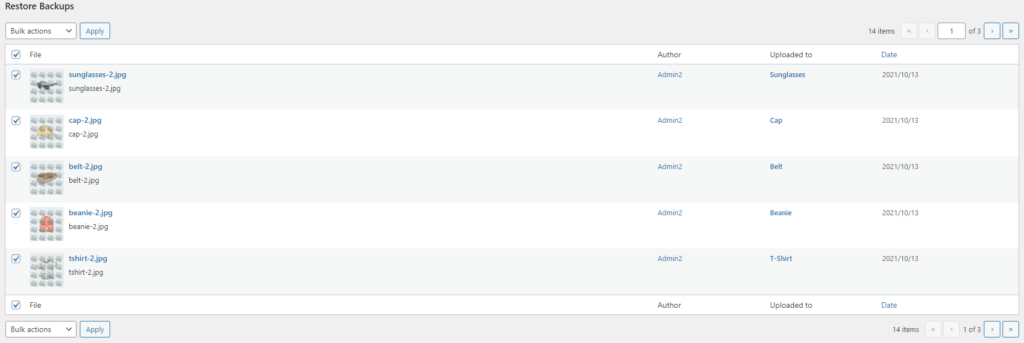
This way will apply a full backup to all sub-sizes, including the original size, and will delete the backup image after that.
Dynamic Watermarks
↑ Back to topYou can set dynamic text watermarks which will be filled dynamically based on the user’s data.
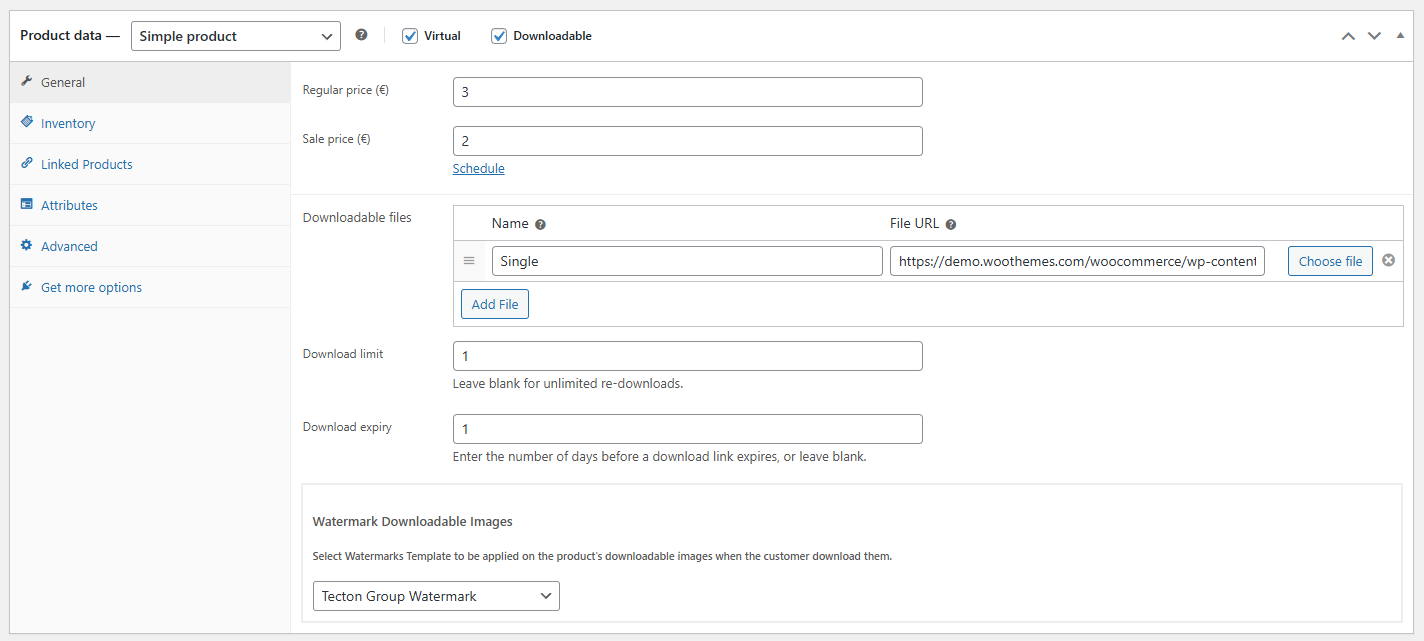
This feature is ideal for WooCommerce downloadable images, where each customer receives a uniquely watermarked file. You can choose text watermarks or placeholders to be printed on the image based on the customer’s data.
Step 1
Create a watermark template. Choose a text watermark. select Dynamic placeholders
You can select a general user field, a WooCommerce order field or a customer field.

The placeholders will be set in the watermark to be replaced with the customer’s related data
Step 2
Connect the watermarks template with the WooCommerce product.
And the result when a customer downloads the image will be :

FAQs
↑ Back to topHelp customers by answering commonly asked questions.
Can I use dynamic watermarks for each customer and order?
Yes. The plugin supports dynamic text placeholders that are automatically replaced with real customer, user, and WooCommerce order data.
This is especially powerful for downloadable products, where each customer receives a uniquely watermarked image based on their order and account information.
Does auto watermarking work only for WooCommerce products?
No. Auto watermarking works for any WordPress upload location, including media uploads, posts, pages, and WooCommerce products.
You can precisely control when a watermark is applied using rules such as upload location, post type, product type, categories, image name, and image dimensions.
Can I apply different watermark templates to different products or product types?
Yes. You can assign different watermark templates based on product type, categories, and product rules.
This allows you to use one watermark style for simple products, another for variable or grouped products, and completely different templates for specific categories or downloadable items.