Overview
↑ Back to topThe Mirakl Connect by CedCommerce Integration helps BigCommerce sellers expand their reach by connecting their store directly with Mirakl Connect. With this connector, sellers can list, sync, and manage their products, inventory, and orders across Mirakl Connect, right from their BigCommerce dashboard — eliminating manual uploads, reducing operational errors, and accelerating multichannel growth.
What is Mirakl Connect?
↑ Back to topMirakl Connect is a global platform that links sellers to 400+ marketplaces built on Mirakl’s technology — including Carrefour, Best Buy, and Decathlon. It enables sellers to onboard once and access multiple marketplaces (they’re eligible for) using a unified interface, simplifying the way they grow across international markets.
Advantages of Integrating Mirakl Connect with your WooCommerce Store:
- Efficient workflow
- Establish connections with Mirakl-powered marketplaces
- Order tracking
- Complete control
- Automatic inventory synchronization
Mirakl Connect WooCommerce Connector Key Features
↑ Back to topSeamless App Onboarding and Setup
Experience a seamless onboarding process and effortless setup with the connector’s intuitive interface. Take advantage of advanced configuration options enabling a smooth setup process.
Improved Operations
Achieve seamless synchronization of products, orders, fulfillments, and inventory levels between your Mirakl Connect account and WooCommerce, improving day-to-day operations.
Effective Order Management
The connector will provide you with a feature to set up an aside inventory. By setting aside a certain amount of inventory as reserves, you can ensure that you have enough stock to fulfill orders more effectively even when demand spikes or supply is disrupted. effectively even when demand spikes or supply is disrupted.
Note: The terms ‘Mirakl Connect Integration’ and ‘Mirakl Connect Connector’ are used in the same context in this entire guide.
Installation
↑ Back to topInstall the Mirakl Connect Integration for WooCommerce by following these steps:
- Download and install the Mirakl ConnectIntegration for WooCommerce zip file
- Log into your WooCommerce-backed
- Upon landing on the WordPress backend, visit the left-hand sidebar
- Locate and hover over the Plugins option. Click on the Installed Plugins button
- Locate and click on the Add New button on the Plugins page
- In the Upload Plugins section, click on the Choose File button
- Choose the Mirakl Connect Integration for WooCommerce zip file
- Finally, click on the Install button
Once the connector is installed, you can simply access it via the following two ways:
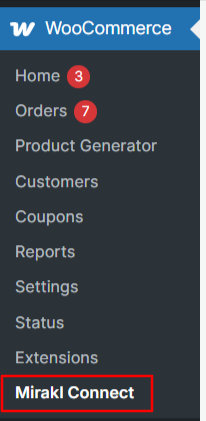
A) By clicking on ‘Mirakl Connect’ in the left-hand side navigation panel, as shown below:
B) By clicking on the ‘Mirakl Connect’ button in the top WordPress Admin Bar (also called the Toolbar), as shown below:

Onboarding
↑ Back to topStep 1: Authorize Mirakl Connect
↑ Back to topThe CedCommerce Mirakl Connect Integration for WooCommerce is easy and quick to use. This section will help you understand how to get onboard on the connector.
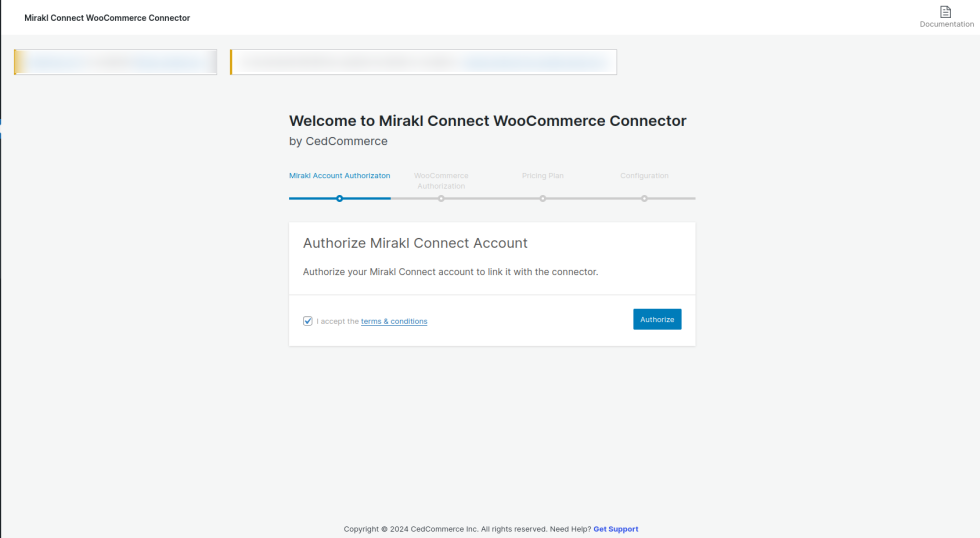
Once the plugin is installed on your WooCommerce store, select ‘Mirakl Connect‘ under the WooCommerce submenu from left hand side. Click on the ‘I accept the terms and conditions’ checkbox. Next, click the ‘Authorize’ button as shown in the image below, granting consent to the connector for order fulfillment and product synchronization.
Step 2: WooCommerce Store Authorization
↑ Back to topOnce the plugin is installed on your WooCommerce store successfully, navigate to the CedCommerce menu and then click on the Mirakl submenu. Authorize your WooCommerce account by simply clicking on the ‘Authorize’ button and the WooCommerce store gets connected effortlessly.
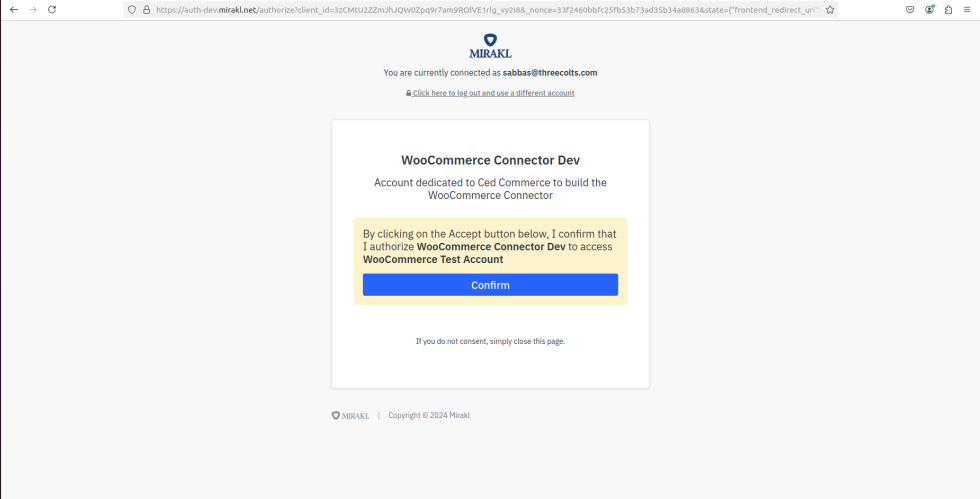
After that, click on the ‘Approve’ button to authorize your WooCommerce account.

However, if you face any problem in this automatic WooCommerce authorization process then you can connect manually as well. Just click on the ‘Connect Manually instead’ button and you will be redirected to a page where you need to provide your WooCommerce store’s Consumer Key and Consumer Secret.
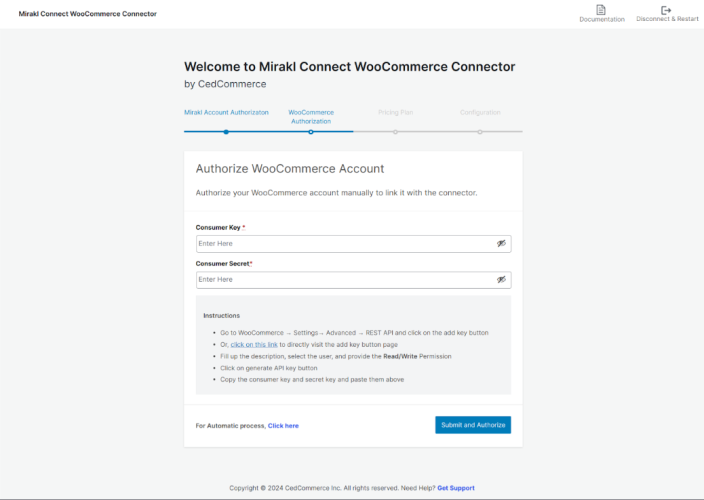
To get these details, follow the mentioned path:
- WooCommerce store backend-> Settings -> Advanced -> REST API & click on the ‘Add key’ button.
- Fill up the description, select the user, provide Read/Write permission & then click on the ‘Generate API key‘ button.
- Copy the consumer key as well as the secret and paste them into the given fields
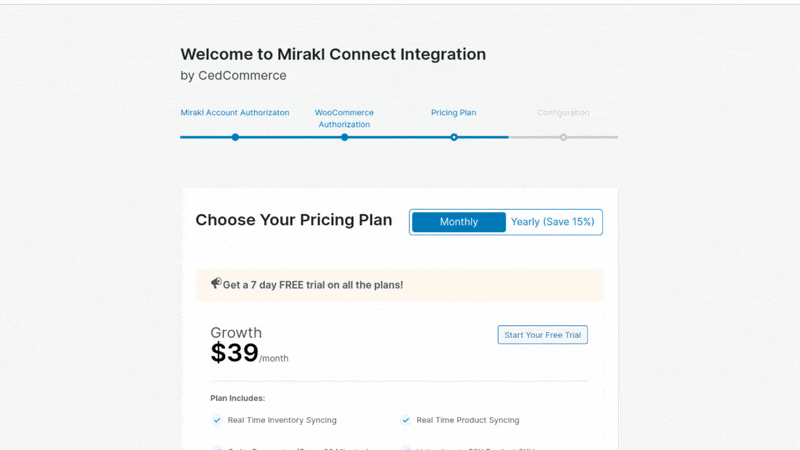
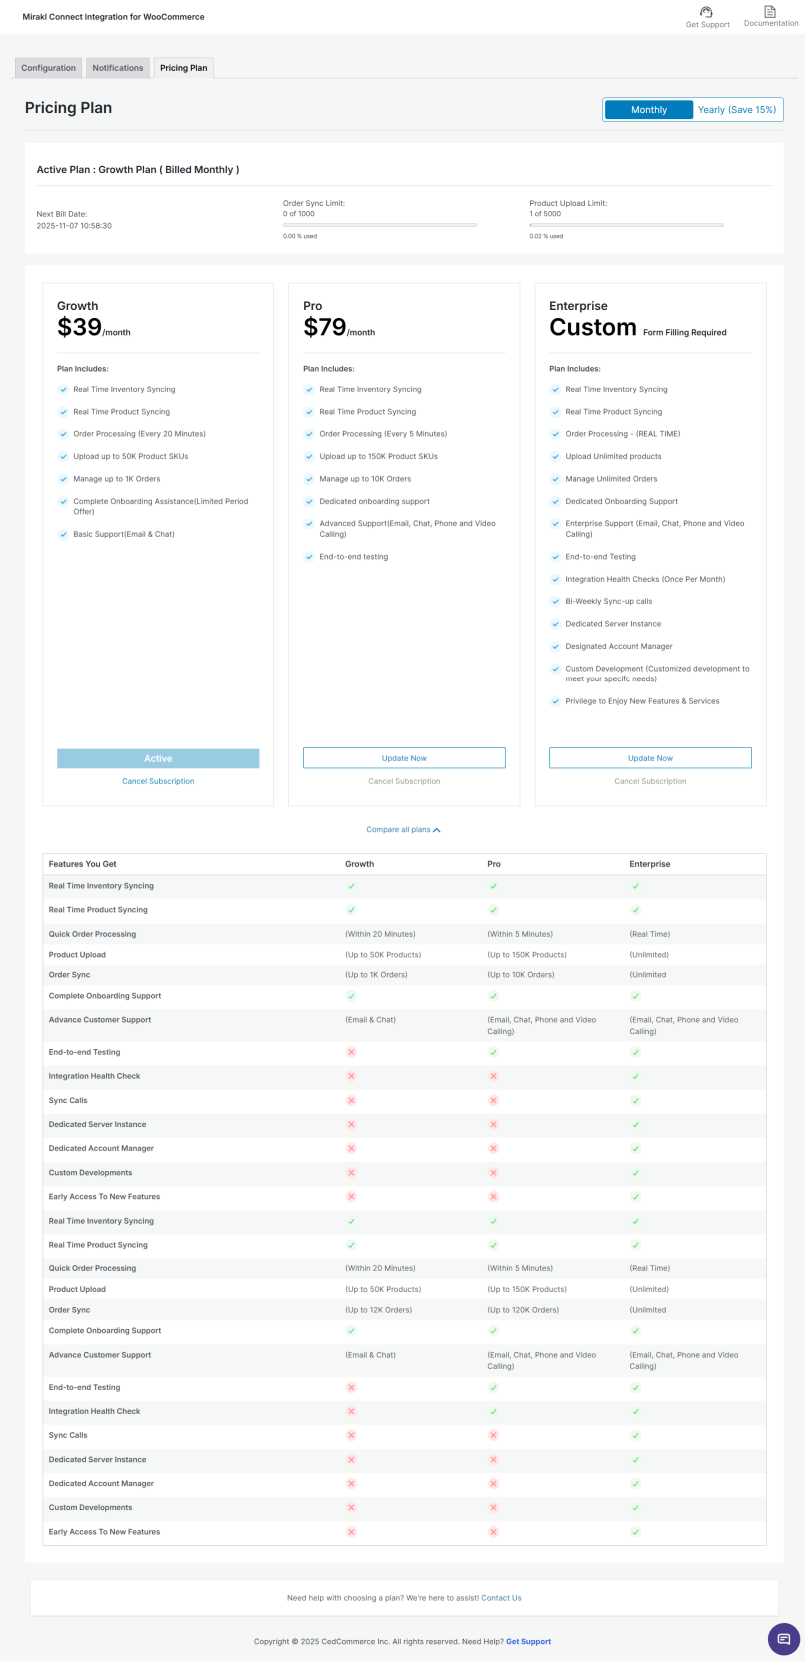
Step 3: Select a Pricing Plan
↑ Back to topPay less to sell more with the Mirakl Connect Integration for WooCommerce. Pricing starts at just $39/month. CedCommerce offers a range of basic, advanced, and custom plans for all your business needs.
- No hidden or extra fees
- Cancel any time with ease
- Free onboarding support
- 7-day free trial before you even think about paying!
Step 4: Configuration
↑ Back to top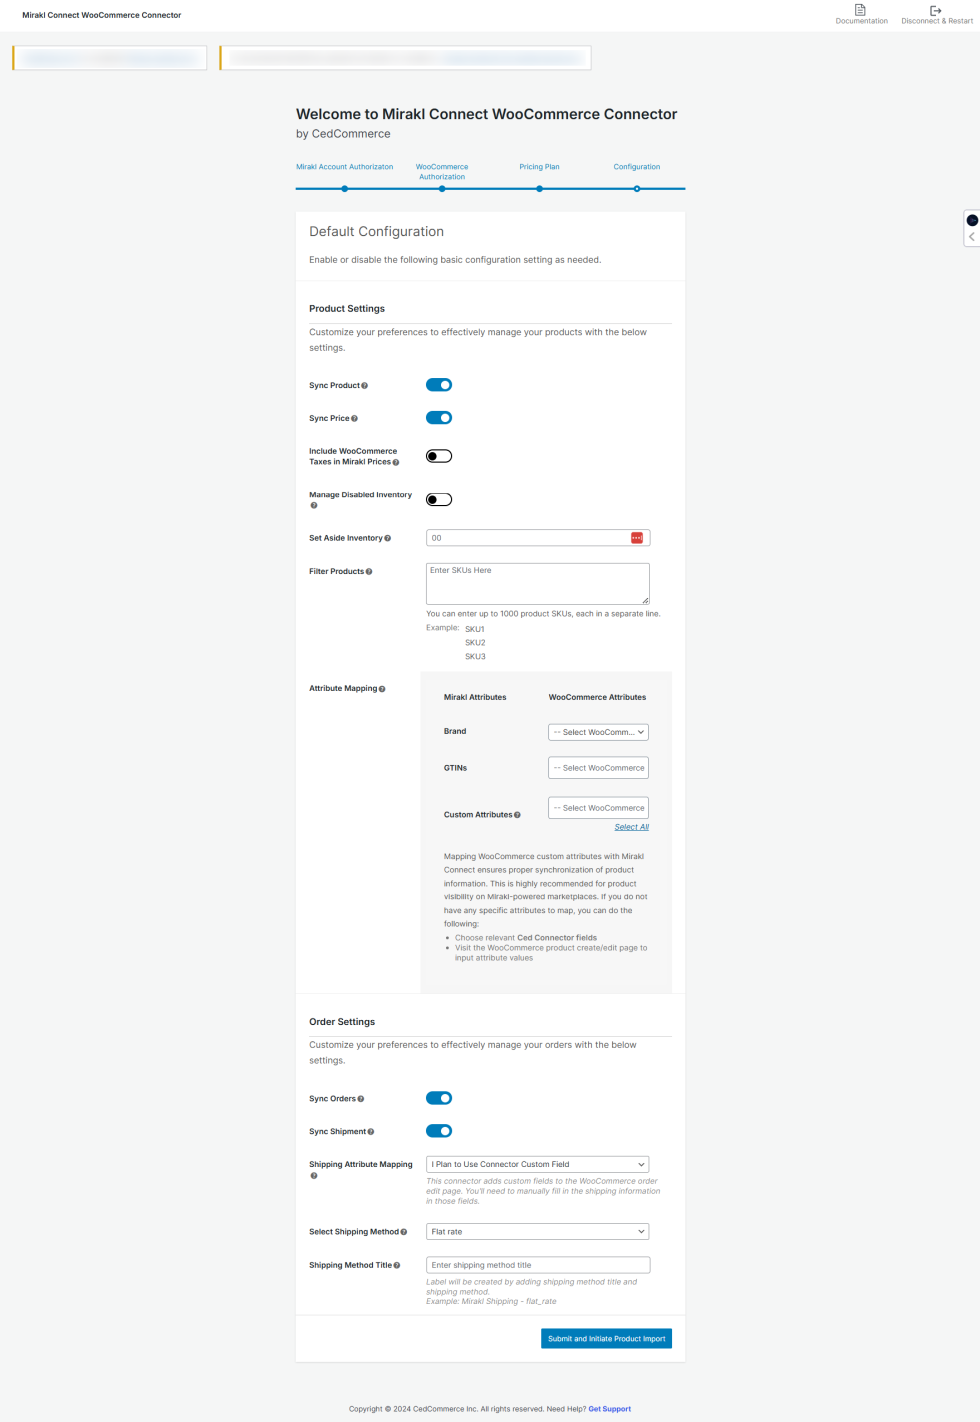
The onboarding process concludes with this final step. You can now begin your account setup by choosing your preferences for the necessary settings. Here’s a brief overview of all the necessary settings you need to check out:
Product Settings: Includes syncing settings related to your WooCommerce products. You can use these settings to sync, list, map, and enhance the visibility of your products on Mirakl Connect.
Order Settings: Includes syncing settings related to the orders that come from Mirakl Connect (via Mirakl-powered marketplaces). You can use these settings to sync orders, shipment methods, and shipment attributes.
Note: Explore the Products and Orders sections for a detailed breakdown of settings.
Once you’ve made the necessary selections, click on ‘Submit and Initiate Product Import’.
Product Settings
↑ Back to top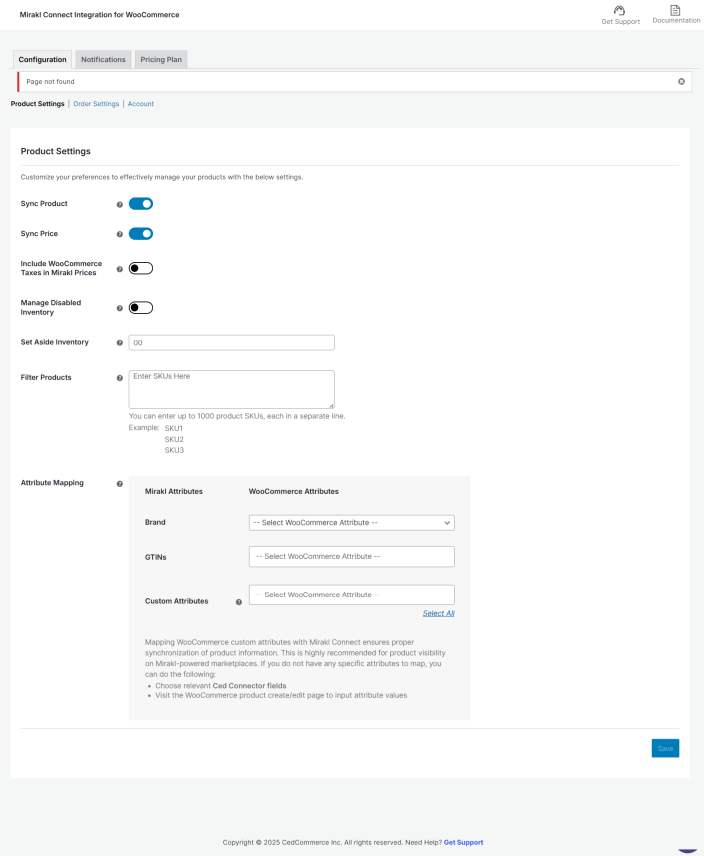
1. Sync Product – By enabling the product syncing option, you can streamline the process of synchronizing products from WooCommerce to Mirakl Connect. However, if you choose to disable this option, products will not sync to Mirakl Connect.
Note: The Mirakl Connect Integration for WooCommerce only retrieves ”Simple’ and ‘Variable’ products from WooCommerce and lists them on Mirakl Connect.
2. Sync Price – The Enable/Disable option controls the synchronization of prices to Mirakl Connect. When price syncing is disabled, price synchronization will not be performed.
3. Include WooCommerce Taxes in Mirakl Prices – Enabling this option will allow you to upload products on Mirakl including the tax amount that you have set on WooCommerce. If you enable this option then you need to select a rate for available tax classes in your WooCommerce store.
4. Manage Disabled Inventory – Enabling this option will assign a max inventory value of 999999 to those WooCommerce products who haven’t been assigned a default inventory value on WooCommerce store. Such products will carry this max inventory value to Mirakl Connect. This option is great for such products where you don’t need to keep track of inventory stock.
5. Designate a specific quantity of Aside inventory for your WooCommerce store by entering the desired value in the provided box.
The Aside inventory feature allows you to set aside a designated number of items from your total inventory count for your WooCommerce store, while the remaining count is sent to your Mirakl Connect account. For instance, if you have 100 bags in total and you reserve 10 bags for your WooCommerce store, then only 90 bags will be sent to your Mirakl Connect account.
6. Filter Products – If there are specific products in your WooCommerce store that you prefer not to list on Mirakl Connect, you can provide those SKUs here. You can input up to 1000 SKUs.
Note: You can only enter one SKU in a line.
7. Attribute Mapping – Here you need to map the WooCommerce product attributes with Mirakl Connect for effective product synchronization. This is a mandatory step as Mirakl Connect requires the following field attributes – Brand, GTINs, and Custom Attributes. By default, WooCommerce doesn’t provide the Brand and GTIN fields. So, if you’re using a different plugin for such attributes, choose that option from the dropdown. Or, if you haven’t assigned the attributes yet, you can use this connector’s provided fields for attribute mapping.
How to input the connector’s provided fields for attribute mapping?
- Visit the ‘Products‘ section on your WooCommerce store
- Click on edit product
- In the product data dropdown, enter the Brand and GTIN values in the ‘Ced Connector Brand‘ and ‘Ced Connector GTIN‘ fields
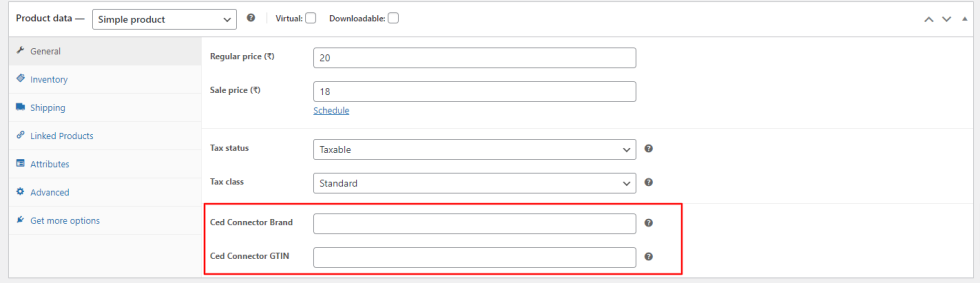
Note: Mapping the WooCommerce custom attributes with Mirakl Connect helps with better visibility of products on Mirakl-powered marketplaces.
Orders
↑ Back to top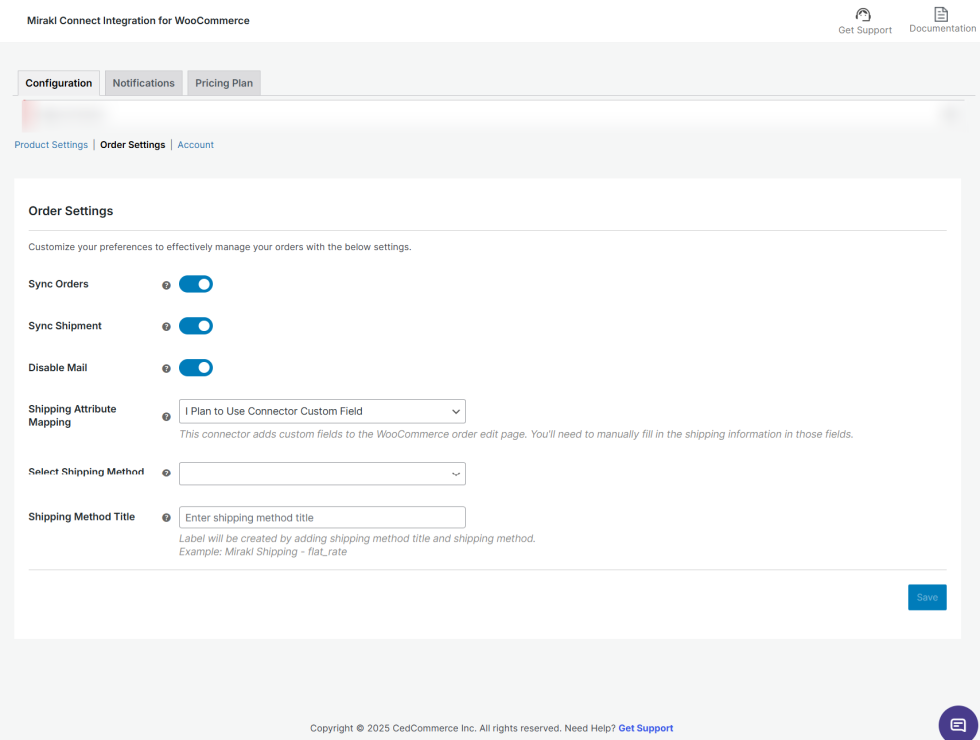
- Sync Orders – Enabling this option allows you to create the Mirakl Connect orders on the WooCommerce store automatically.
- Sync Shipment – By enabling this option, the shipments from the WooCommerce store will be automatically synchronized to Mirakl Connect.
- Disable Mail – Disables WooCommerce’s default order emails for Mirakl-imported orders to prevent duplicate notifications, since marketplaces handle customer communication directly.
- Shipping Attribute Mapping – Select a relevant option here on how you manage shipments on the WooCommerce store so the shipment-related details can be mapped automatically. Mapping will help in synchronizing the shipments from the WooCommerce store to Mirakl Connect effectively. The available options are:

Using WooCommerce Shipment Tracking Plugin: Choose this option if you are using this plugin for shipment on WooCommerce.
Using Other Plugins for Shipment: Choose this option if you are using any other plugin for shipment on WooCommerce. However, if you choose this option then you need to choose the WooCommerce attributes for the following fields so that shipment details can be synchronized effectively.
- Tracking number
- Carrier code
- Tracking URL
- I Plan to Use Connector Custom Field: Choose this option if you are not using any plugin and would like to leverage the connector’s custom field. Custom fields will be displayed inside the order details on your WooCommerce store and you need to provide the value for these fields at the time of shipment creation.
- Select Shipping Method – Select a preferred shipping method here to synchronize the shipping cost to the Mirakl Connect.

- Shipping Method Title – Within WooCommerce’s order edit page, the shipping method title appears as a label, reflecting the selected shipping method. For instance, any value entered in the provided field is a prefix to the selected shipping method. For example, if ‘Mirakl’ is entered here and ‘flat_rate’ is selected in the ‘Shipping Method‘ setting, the label will read ‘Mirakl – flat_rate’ on the order edit page.
Once you have completed the above actions, you can complete the setup by clicking on ‘Save’. This action will trigger the import of all online products that are in stock or have perpetual inventory to the connector, followed by the export of the catalog to Mirakl Connect, ensuring comprehensive integration between the platforms.
More About Orders
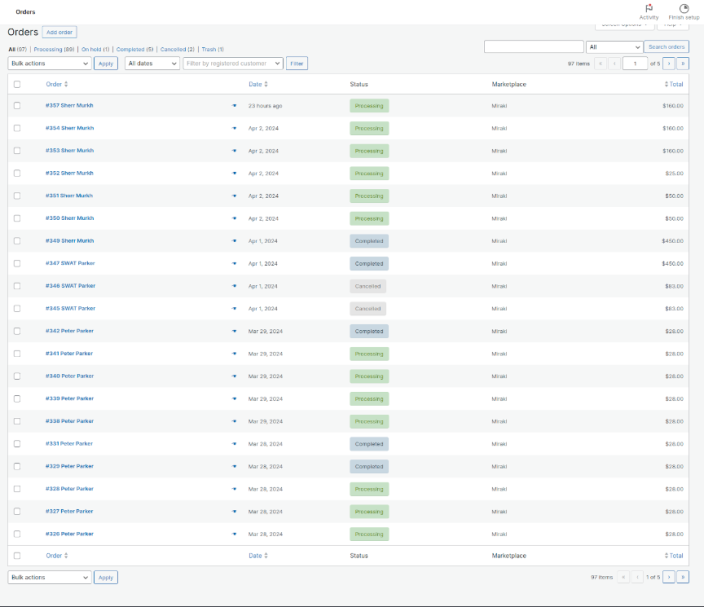
↑ Back to topThe Mirakl Connect Integration for WooCommerce is carefully devised to best suit the selling needs of a demanding eCommerce business. Receive all your Mirakl Connect orders in the connector and manage them from within the WooCommerce store effortlessly. Whenever you receive an order on Mirakl Connect, it will sync with the plugin, and the order will be fetched to your WooCommerce store within 5 minutes. Once you fulfill the order, update the tracking details in your WooCommerce store, and the same will be synced and updated on the Mirakl Connect, making the order fulfilled for you.
So now, you don’t have to worry about going back and forth on multiple platforms to manage your orders; you can do all of it with a single connector. On the order listing grid of your WooCommerce store, the Marketplace column will be displayed. Whenever any order is synced from Mirakl Connect, you can view it in the ‘Mirakl’ column.
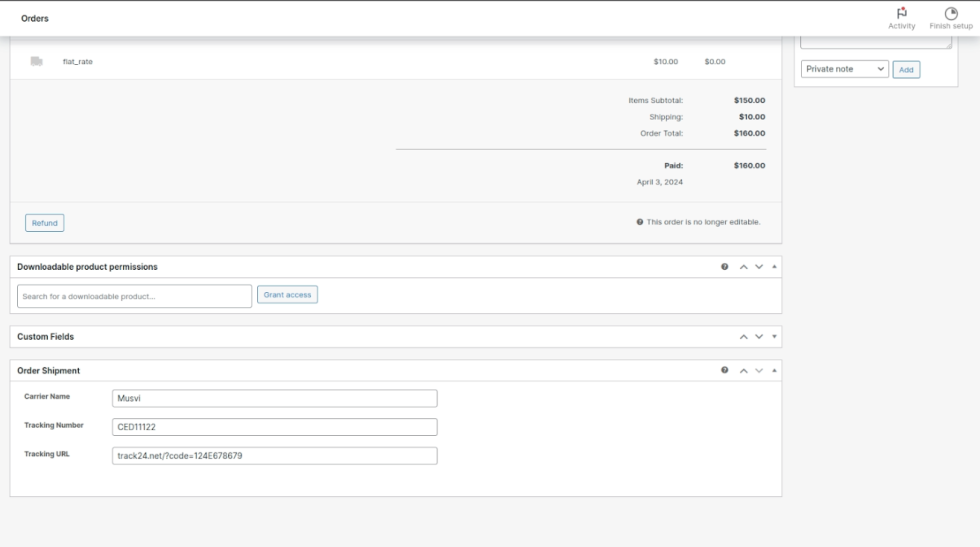
If you have selected the option ‘I Plan to Use Connector Custom Field’ in the shipping attributes mapping section then go to the order detailed page and provide the details for the Tracking number, Carrier Name, and Tracking URL as shown in the below image so that the shipment details can be synchronized to the Mirakl Connect accordingly.
Account
↑ Back to top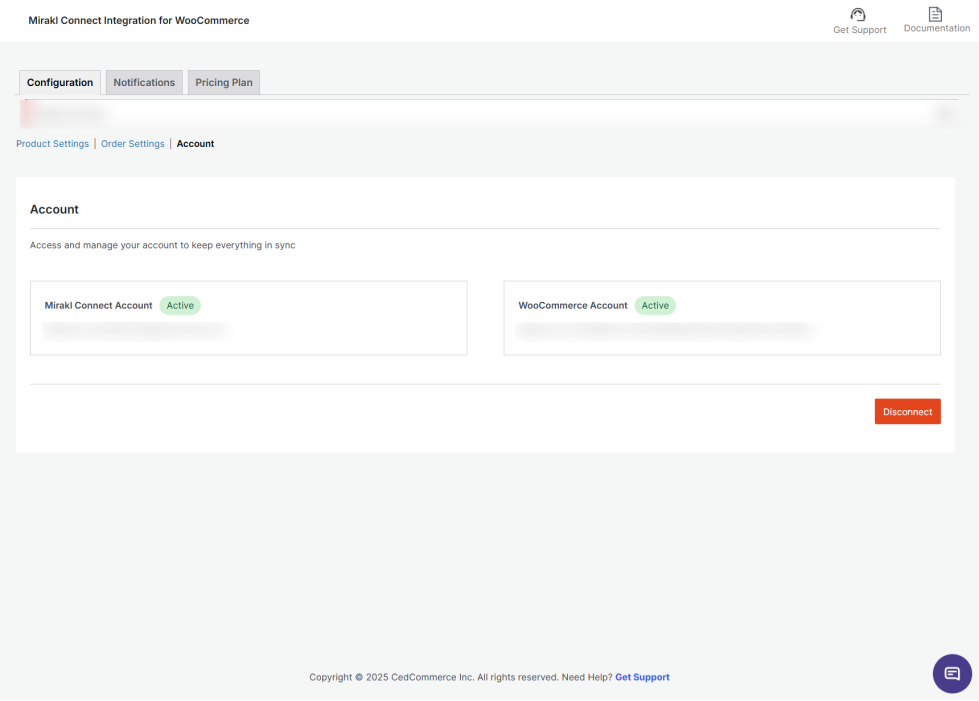
In this section, you can check which Mirakl Connect and WooCommerce accounts are active. You also have the option to ‘disconnect’ your WooCommerce account from the connector.
Disconnect: Clicking this button on the header will disconnect the Mirakl Connect account as well as the WooCommerce store with the connector and you will be redirected to the onboarding step where you need to reauthorize the account.
How to Disconnect the Account?
↑ Back to topTo disconnect your Mirakl and WooCommerce accounts, you need to –
- Click on the ‘Disconnect’ button
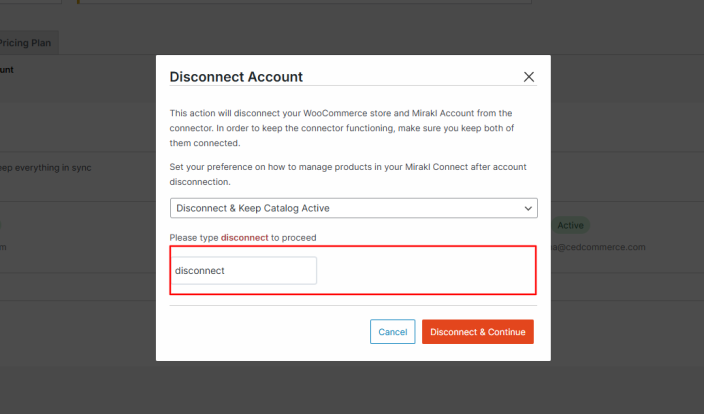
- A pop-up window will appear, as shown in the image below. Please read carefully and proceed accordingly.
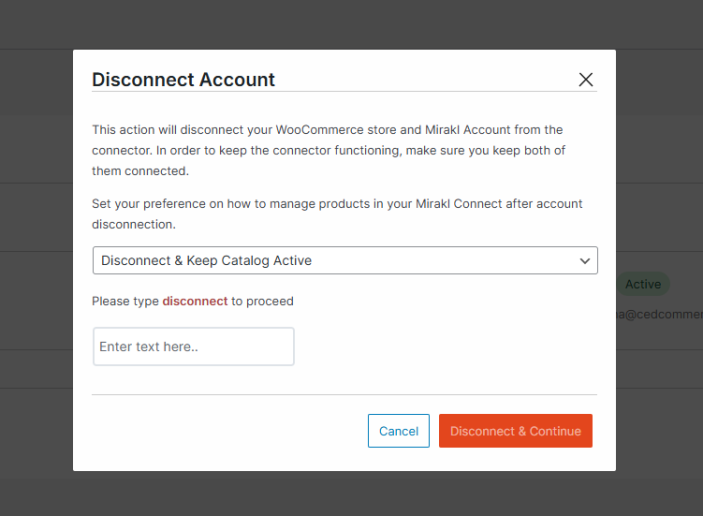
Select a relevant option on how to manage products in your Mirakl Connect after account disconnection. The following options will be displayed:
- ‘Disconnect & keep catalog active’: Selecting this will disconnect your WooCommerce and Mirakl Connect accounts but keep your product catalog active on Mirakl Connect.
- ‘Deactivate Products’: Selecting this will disconnect your WooCommerce and Mirakl Connect accounts and deactivate your products on Mirakl Connect.
- ‘Delete Products’: Selecting this will disconnect your WooCommerce and Mirakl Connect accounts and delete your products from Mirakl Connect.
Then, type the word ‘disconnect’ in the given box, as shown in the image. Lastly, click the ‘Disconnect & Continue’ button to confirm your action.
Note All your information will be deleted from the connector on account disconnection. You can no longer access the connector until you reconnect your Mirakl Connect account and WooCommerce store from scratch.
A successful account disconnection message will be shown on the screen.
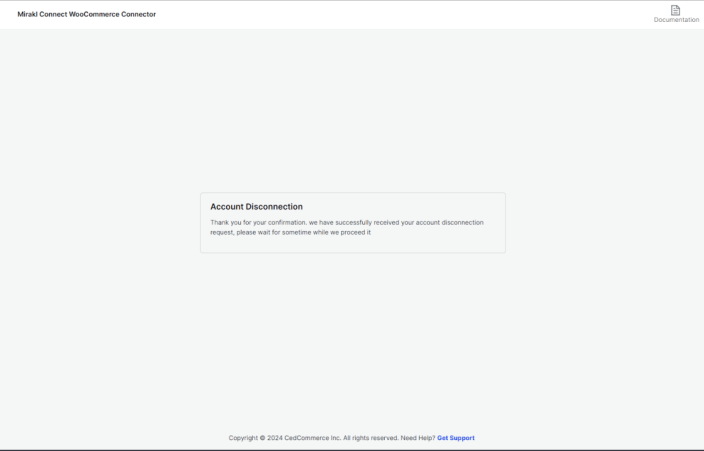
If you try to log in again, you’ll have to reconnect the connector by authorizing the Mirakl Connect and WooCommerce accounts again. You’ll be redirected to the ‘Authorize Mirakl Connect’ screen.
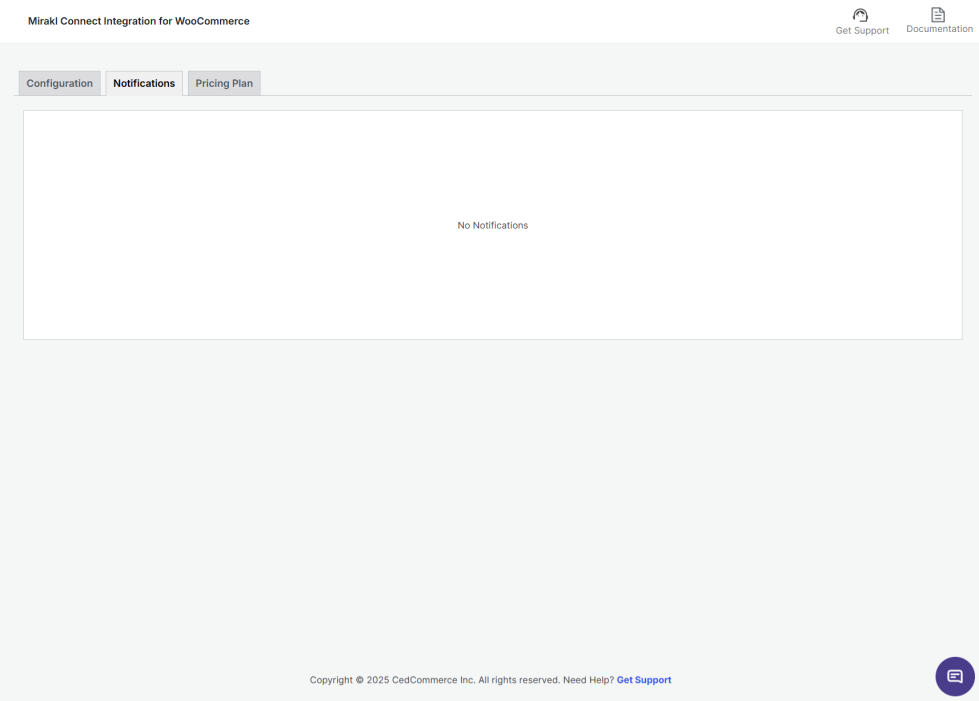
Notifications
↑ Back to topThis section displays order-processing notifications. These notifications will help you stay on top of things by taking prompt action. The entire process of order management across both WooCommerce and Mirakl Connect is updated in the notifications section. Here’s a brief breakdown of the scope of notifications you can expect to see:
- Orders from Mirakl Connect are checked for product availability and then accepted
- Order is created on WooCommerce and the processing starts
- Shipment details are synced back to Mirakl Connect
Pricing
↑ Back to topExplore and manage pricing plans in this section. You can choose from a range of ‘Basic’ or ‘Advanced’ plans for monthly or yearly packages.
Each plan comes with a 7-day free trial period.
You can also apply for an Enterprise plan if you don’t find the right pricing plan for your business. To apply for an Enterprise plan you’ll have to fill a form and the CedCommerce team will connect with you shortly. Check out the pricing plans here.
In case, you have some queries or conerns, reach out to us at CedCommerce support.