Product Accessories allows your WooCommerce store to showcase complementary products right from the single product page.
Installation
↑ Back to topTo start using a product from WooCommerce.com, you can use the “Add to store” functionality on the order confirmation page or the My subscriptions section in your account.
- Navigate to My subscriptions.
- Find the Add to store button next to the product you’re planning to install.
- Follow the instructions on the screen, and the product will be automatically added to your store.
Alternative options and more information at:
Managing WooCommerce.com subscriptions.

Overview
↑ Back to topThe Product Accessories plugin allows WooCommerce store owners to display curated or automatically generated product lists as “Accessories” tabs on product pages. This powerful tool helps boost upsells, improve product recommendations, and enhance the customer shopping experience.
- Increase Sales: Show relevant accessories, add-ons, and complementary products
- Improve User Experience: Help customers find related items easily
- Flexible Configuration: Choose between curated lists or automatic rule-based selection
- Customizable Display: Control layout, styling, and product count
- No Coding Required: Easy-to-use interface for all skill levels
Installation
↑ Back to topAutomatic Installation
↑ Back to top- Login to your WordPress admin dashboard
- Navigate to Plugins → Add New
- Search for “Product Accessories”
- Click Install Now and then Activate
Manual Installation
↑ Back to top- Download the plugin ZIP file
- Navigate to Plugins → Add New → Upload Plugin
- Choose the ZIP file and click Install Now
- Click Activate Plugin
Requirements: WordPress 5.8+, WooCommerce 5.0+, PHP 7.4+
Setup and Configuration
↑ Back to topGetting Started
↑ Back to top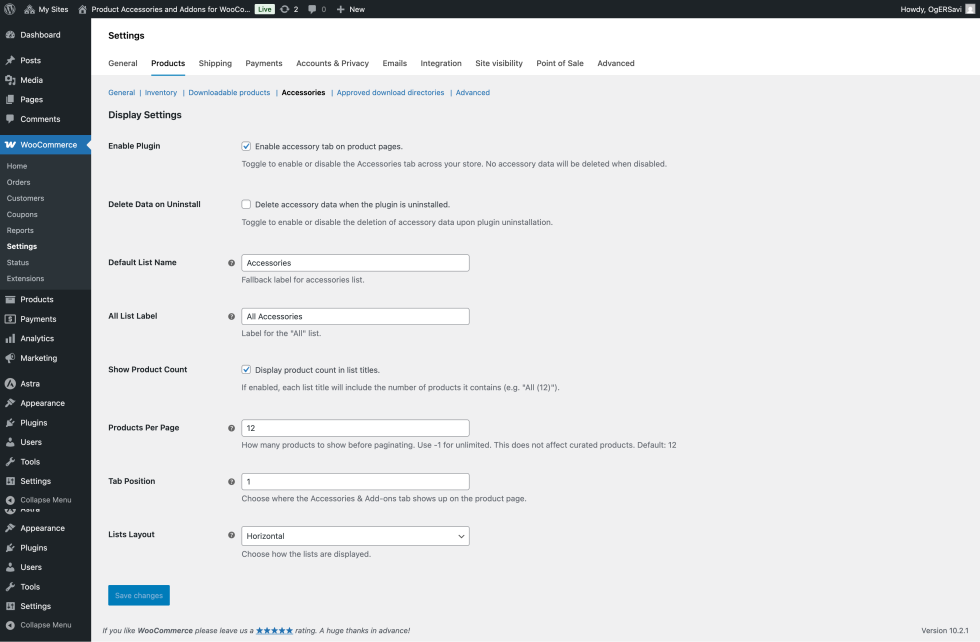
- Go to: WooCommerce → Settings → Products → Accessories and enable the plugin
- Configure global settings like tab name, layout, and product count
Display Settings
↑ Back to topEnable Plugin
- Purpose: Master switch to enable/disable the accessories tab across your store
- Default: Enabled
- Note: Disabling won’t delete your data, just hide the tabs
Default Tab Name
- Purpose: Sets the default name for accessories tabs
- Default: “Accessories”
- Usage: This appears as the main tab title on product pages
“All” Tab Label
- Purpose: Label for the tab that shows all products from all lists
- Default: “All”
- Usage: When you have multiple product lists, this tab combines them
Products Per Page
- Purpose: Controls how many products are displayed per page
- Default: 12
- Range: 1-50 products
- Note: Affects pagination behavior
Tab Position
- Purpose: Controls where the accessories tab appears relative to other product tabs
- Default: 25
- Usage: Lower numbers = earlier position, higher numbers = later position
Hide Empty Tabs
- Purpose: Automatically hides tabs when no products are found
- Default: Enabled
- Benefit: Prevents empty tabs from appearing to customers
Show Product Count
- Purpose: Displays the number of products next to tab names
- Default: Enabled
- Example: “Accessories (8)” instead of just “Accessories”
Tab Layout
- Options:
- Vertical: Tabs appear as a sidebar with products on the right
- Horizontal: Traditional tab layout with content below
- Default: Vertical
Delete Data on Uninstall
- Purpose: Removes all plugin data when uninstalling
- Default: Disabled
- Warning: Enable only if you’re sure you want to permanently delete all accessory configurations
Setting up a Product List
↑ Back to top- Navigate to the Product that you would like to add lists to
- Edit any product and navigate to the Accessories tab
- Enter your Tab Name. This will display in the same Tabs as Product description
- Enter the text for the All Lists Label
- Click Add A List to start adding lists.
- Give the List a name and choose a Product Source
Product Source: Curated Products
↑ Back to topCurated Products are manually selected items. Add the items item by using the field for a simple look up.
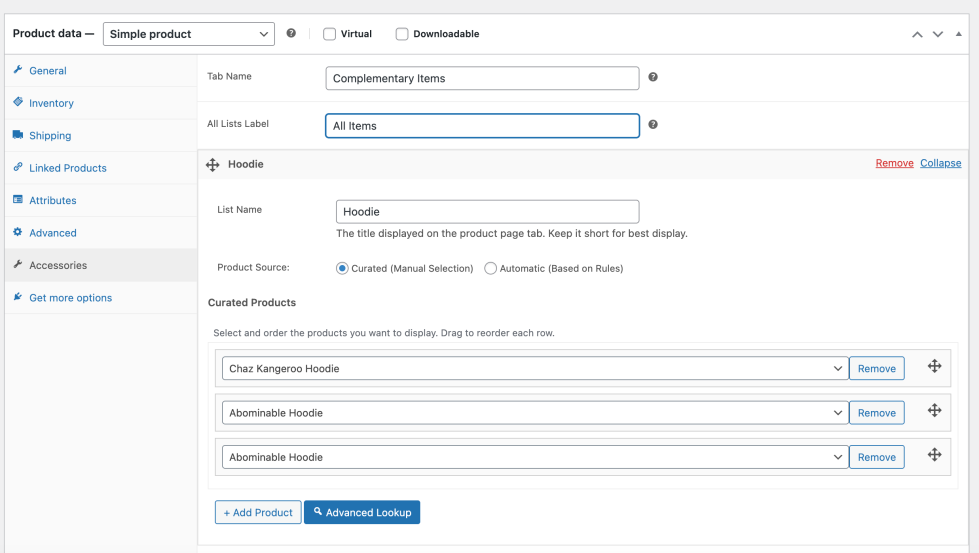
If your site has 100’s or even 1000’s of products, you can use the Advanced Lookup option that will allow you to filter products based on different criteria.
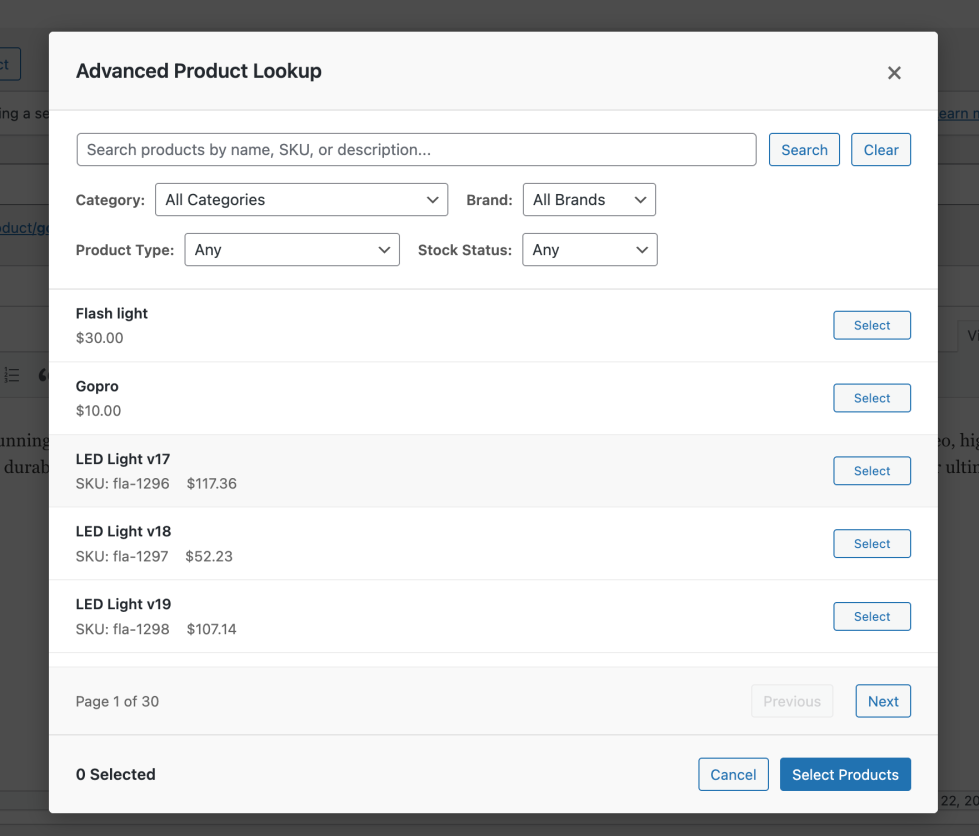
The Advanced Lookup modal provides powerful search and filtering capabilities:
Search Functionality
- Real-time search as you type
- Search by product name, SKU, or description
- Fuzzy matching finds relevant results even with typos
Filtering Options
- Categories: Filter by product categories and subcategories
- Product Types: Include/exclude variable products, simple products, etc.
- Stock Status: Show only in-stock items or include out-of-stock
- Brands: Look up products by brand
Selection Tools
- Bulk Selection: Select multiple products with checkboxes
- Select All: Choose all products from current search results
- Selection Counter: See how many products you’ve selected
- Preview Selected: Review your selection before adding
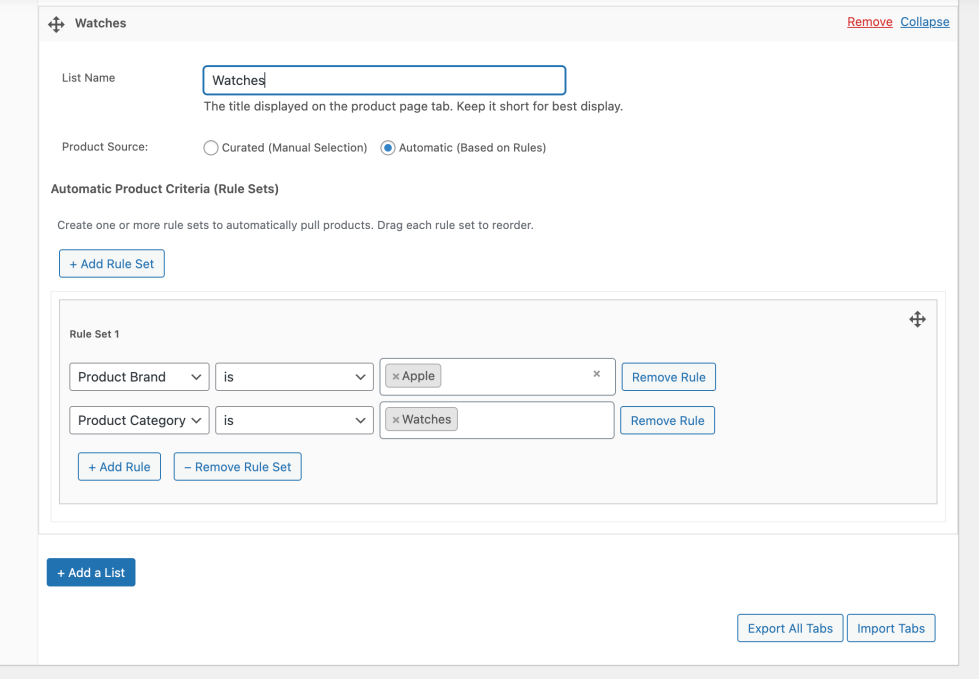
Product Source: Automatic
↑ Back to topAutomatic product lists use rules to dynamically include products based on criteria you define.
Step 1: Set the Mode
- Select Automatic from the mode dropdown
- The interface will update to show rule configuration tools
Step 2: Understanding Rule Structure
Rules work with AND/OR logic:
- Rule Sets: Groups of rules joined by OR logic
- Individual Rules: Within each set, joined by AND logic
- Example: (Category = Electronics AND Brand = Apple) OR (Brand = Adidas AND Category = shoes)
Step 3: Create Your First Rule Set
- Each rule set appears as a separate box
- Click Add Rule to add conditions
- Configure each rule with:
- Field: What product attribute to check
- Operator: How to compare (equals, greater than, etc.)
- Value: The value to compare against
Step 4: Add More Rule Sets (Optional)
- Click Add Rule Set to create alternative conditions
- Products matching ANY rule set will be included
- This provides powerful flexibility for complex selections
Available Rule Fields
↑ Back to topCategorization
- Product Categories: Match by category (supports subcategories)
- Product Tags: Match by assigned tags
- Product Brands: Match by brand (if using brand taxonomy)
Use curated lists to manually select products, or rule-based lists to automatically include products based on categories, tags, brands, price, or inventory. The Advanced Lookup feature provides filters for categories, tags, product types, stock status, and price ranges.
Frontend Display
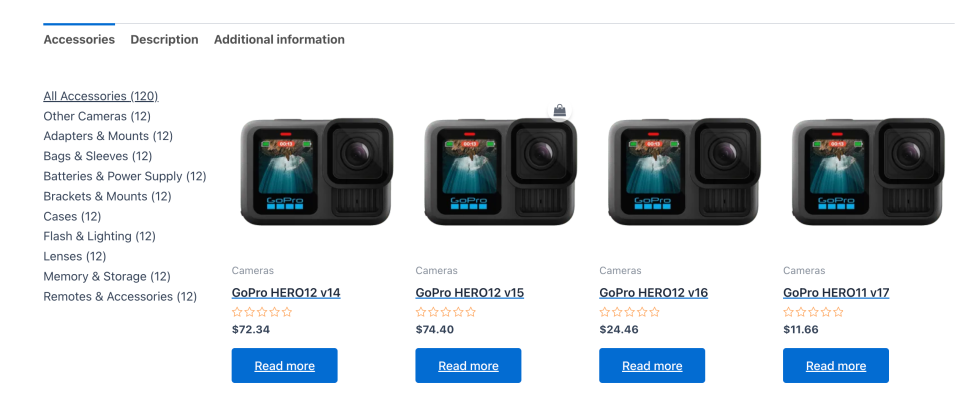
↑ Back to topTab Appearance
↑ Back to topYour accessories appear as a new tab on product pages, alongside default WooCommerce tabs like “Description” and “Reviews.”
Layout Options
↑ Back to topVertical Layout (Default)
- Sidebar Navigation: Tab names appear in a left sidebar
- Product Grid: Selected products display in a grid on the right
- Pagination: Navigate through multiple pages of products
- Best For: Stores with multiple product lists or longer product names
Horizontal Layout
- Traditional Tabs: Tab names appear horizontally above content
- Full-Width Grid: Products use the full content width
- Compact Navigation: Good for single or few product lists
- Best For: Stores with shorter tab names or single product lists
Product Display
↑ Back to topEach product in the accessories tab shows:
- Product Image: Linked to the product page
- Product Title: Linked to the product page
- Price: Current price with sale price if applicable
- Add to Cart Button: Direct purchase option
- Stock Status: In stock, out of stock, or backorder information
Customer Experience
↑ Back to top- Easy Navigation: Click between different accessory categories
- Quick Purchase: Add accessories directly to cart
- Seamless Integration: Matches your theme’s WooCommerce styling
- Mobile Responsive: Works perfectly on all device sizes
Usage
↑ Back to topOn the frontend, customers will see a new “Accessories” tab on the product page. This tab can use a vertical layout (sidebar tabs with product grid) or a horizontal layout (classic tabs across the top). Each product shows image, title, price, stock, and add-to-cart.
Troubleshooting
↑ Back to top- Accessories tab not appearing? Ensure plugin is enabled and the product has at least one accessories list.
- Products not showing? Check curated products are in stock, or verify your rules match existing products.
- Layout issues? Switch between vertical/horizontal layout or check theme compatibility.
- Advanced Lookup not working? Verify JavaScript loads correctly and test with a default theme.
For persistent issues, test with default themes, disable other plugins, check error logs, and contact support with detailed setup info.
FAQs
↑ Back to top
Can I use this plugin with any theme?
Yes, it works with any properly coded WooCommerce theme.
Will this slow down my site?
No, it is optimized for performance. Use pagination and specific rules for large catalogs.
Can I customize the appearance?
Yes, override templates or apply custom CSS.
Can I mix curated and rule-based lists?
Yes, you can use different modes per tab.
Does it support variable products?
Yes, the plugin supports simple, variable, grouped, and external products.
Is it translation ready?
Yes, it includes translation files and follows WordPress internationalization standards.