Top 3 Features
↑ Back to top- Inventory Syncing
This feature is automatically ON as soon as you install QuickSync. It ensures your stock levels remain accurate and consistent, reducing the risk of overselling or stockout. - Product Syncing
This feature allows sellers to designate one store as the ‘Master’ and sync updates automatically to other connected stores. - Selective Syncing
This feature empowers you to choose exactly which products to synchronize, giving you flexibility and control over your inventory and product management.
Setup and Installation
↑ Back to top- Log in to your Etsy account
– Go to www.etsy.com/market/sellers_login
– and log in with your credentials - Install from the WooCommerce App Store
– Install the app on your WooCommerce store.
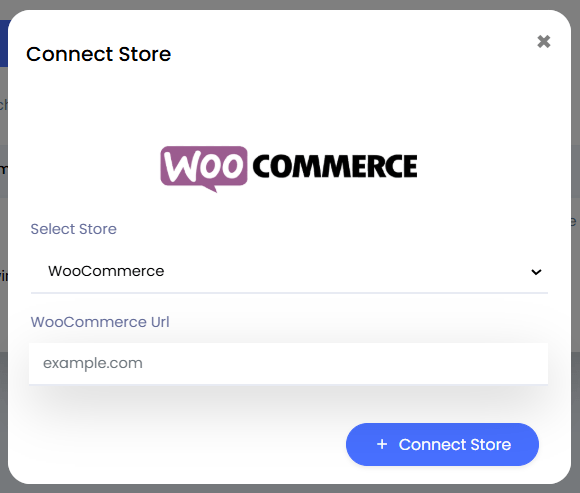
– Click ‘Connect Store‘ on your QuickSync dashboard; Choose Woo.
– Enter your store URL (example: ‘wordpress.mystore.org‘) and click ‘connect‘.
3. Connect your Etsy store
– Click ‘Connect Store’ on your QuickSync dashboard; Choose Etsy and login if it asks you to. (in most cases, when you already have your Etsy store open, there’s no need to log in)

4. Sync Products
– Click on “Sync products” in the dashboard
– Choose which store you’d like to sync products from with the ‘create products‘ toggle.
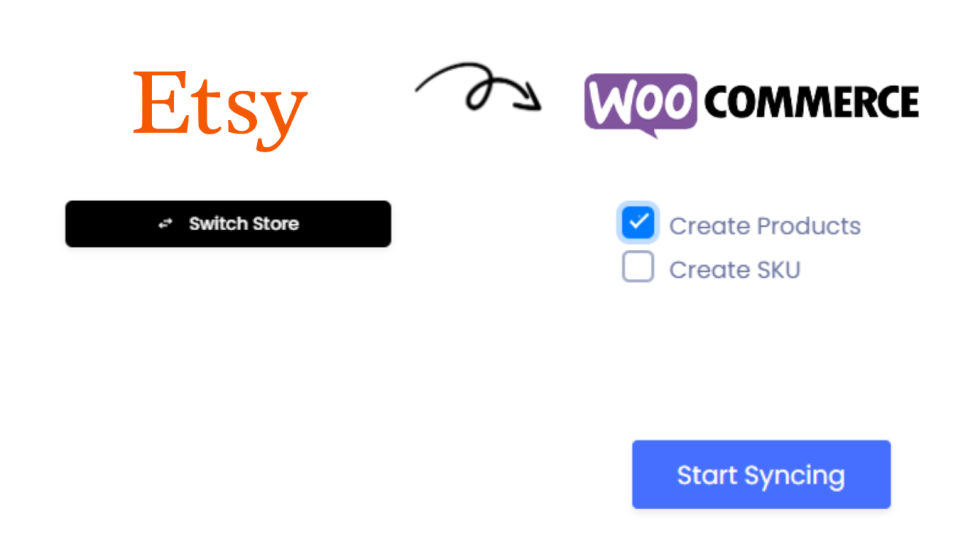
(This means you want the products from your Etsy store to be created in WooCommerce)
– You should see all of your synced products under the ‘synced‘ column.
– To check, go to your WooCommerce store, the products from the store you chose to sync from should be there.
Inventory Syncing
↑ Back to top- Real-Time Updates: Any change in inventory on one platform is instantly reflected across all connected platforms, maintaining consistency.
- Multi-Platform Integration: QuickSync seamlessly integrates with various platforms, including TikTok, Shopify, Clover, Square, WooCommerce, eBay, Etsy, and Amazon.
- Automated Syncing: The system automatically updates stock levels, eliminating the need for manual adjustments.
- Multi-Location Inventory Syncing: Easily sync inventory across multiple locations. Whether you have separate warehouses or retail outlets, QuickSync keeps stock levels accurate for each location and provides location-specific updates.
- Platform-Specific Inventory Rules: QuickSync understands that each platform has unique inventory rules, and discrepancies can arise when managing stock across multiple channels.
How Inventory Syncing Works
↑ Back to top- Real-Time Updates Across Platforms
– QuickSync continuously monitors and updates stock levels whenever there’s a change—whether it’s a sale, return, or manual adjustment. - Centralized Inventory Database
– QuickSync maintains a centralized database that is the single source of truth for your inventory.
– Any stock changes on connected platforms are synced with this database, which then updates all other platforms accordingly. - Conflict Resolution (aka Race condition handling)
– If there are simultaneous updates from multiple platforms, QuickSync resolves conflicts by following predefined rules (e.g., prioritizing a specific platform or using timestamps to determine the most recent update.)
Product Syncing
↑ Back to topThis feature ensures that changes made to the product details—such as titles, descriptions, images, prices, or variants—are automatically reflected on all connected sales channels. By designating a Master store, you can centralize product management, making updates easier and faster.
1. Master Store Setup
Designate one store as the Master Store, where you will manage the product. Changes made to the Master Store are automatically synced to all other connected stores.
2. Automatic Updates
Updates to product details such as titles, prices, descriptions, images, and SKUs are synced in real-time across all platforms.
3. Selective Product Syncing
Choose which products to sync between the Master Store and others. Flexibility to exclude certain products from being updated.
4. Variant Management
Sync product variants (e.g., sizes, colors) and ensure consistency across all platforms.
5. Conflict Prevention
QuickSync prevents accidental overwrites when syncing by using the Master Store as the source of truth for product data.
How to Use Product Syncing
1. Designate the Master Store
- Log in to your QuickSync dashboard.
- Navigate to the Product Syncing section.
- Select the store you want to designate as the Master Store.
2. Start Syncing
- Enable Product Syncing in your QuickSync dashboard.
- Make updates to your products in the Master Store (e.g., changing the price or adding a new image).
- QuickSync automatically updates all connected stores with the latest product information.
Example Use Case
You sell a T-shirt on Etsy(Master Store) and WooCommerce.
1. Update Product in Etsy:
Change the T-shirt price from $20 to $25 on Etsy.
Add a new image to the product listing.
2. QuickSync in Action:
QuickSync detects the changes in the Etsy (Master Store).
Updates the T-shirt price and image on WooCommerce automatically.
3. Result:
The product details are consistent across Etsy and WooCommerce without any manual work.
Selective Syncing
↑ Back to topThis functionality is designed to save time, streamline processes, and cater to specific business needs.
- Multiple Selection Methods
- QuickSync offers three ways to select products for syncing:
a. Using Lists: Manually pick individual products from a dropdown.
b. Using Filters: Filter products by attributes like name, category, vendor, tags, or collections.
c. Using Excel Sheets: Import a list of products via an Excel file.
- Include or exclude products based on your specific requirements, allowing for tailored syncing strategies.
- Dynamic Filtering Options: Use filters to find and sync products based on predefined criteria, ensuring efficiency and precision.
- Real-Time Updates: Once selected, synced products are updated in real-time across all connected platforms.
How Selective Syncing Works
- Using Lists
- Navigate to the Products section in your QuickSync dashboard.
- Select “Using List” from the drop-down menu.
- Choose individual products from the list displayed.
- Click Sync Products to start syncing the selected items.
2. Using Filters
- Select “Using Filters” from the options.
- Define filters based on product attributes:
- Name
- Vendor
- Category
- Tag
- Product Type
- Collection
- Specify whether to Include, Exclude, or apply an Exact Match.
- Click Filter Products to display the filtered list and sync the desired products.
3. Using Excel Sheet
- Choose “Using Excel Sheet” from the options.
- Download the provided Excel template and fill it with the list of products you want to sync.
- Upload the edited file to QuickSync using the Import via Excel option.
- Click Import to initiate the syncing process.
Example Use Case
You sell home decor items across Etsy and WooCommerce. However, you want to sync only your seasonal holiday collection to Etsy.
- Filter your products:
Use the Filter Products option to filter items with the “Holiday” tag.
Specify Include in the filter settings.
2. QuickSync in Action:
Specify Include in the filter settings.
Sync the filtered list of products to Etsy.
3. Result:
Only your holiday collection is synced to Etsy, while other products remain unaffected.