Add multiple and unlimited fields to the registration form to acquire more information from users. Enable user role-based registrations on your store and approve user role requests automatically or manually.
Installation
↑ Back to top- Download the registration-fields-and-user-approvals.zip file from your WooCommerce account.
- At the WordPress Admin Panel, go to Plugins > Add New and Upload Plugin with the file you downloaded after purchase.
- Install Now and Activate extension.
More information at: Install and Activate Plugins/Extensions.
Configurations:
↑ Back to topAfter installing the “Registration Fields & User Roles Approvals” extension, go to WooCommerce>registrations Fields tab to view or edit existing created fields.

You can click “Sort Fields” button to sort the order of fields.


Click the “Add New Field” button to add a new custom field for registration form.

In each field settings, you can set the field label, name, description and choose the field type, you want to add from 20 types of fields.

Move to the Show/hide field section to add “And Type” conditions to show or hide this field based on user input on other existing fields.

In a “Field Setting” section, you can enable or disable this field on the registration page, my account page, order edit page, order email, and other settings.

Now open the field mapping section to find the specific field’s name which you can use for this field if you want to map this field with any checkout field. You just have to copy the field name and paste it to “Field Name” field to map this field to corresponding checkout field.

Now go to WooCommerce>Settings>Registration Fields>General Settings to configure the general settings of this extension.
General Settings:
↑ Back to topFrom here, you can check the option to hide the product prices for the guest users and display the customized message instead of product price.

Configure the radio button settings from here as well.

User Role Approvals:
↑ Back to topIf you have enabled user role based registrations then you can visit “User Role Approvals” tab to automatically approve all the registrations or manually approve all the registrations or automatically approve only registrations with specific user roles.

You can also customize the message to display to users when their role is pending, approved, or awaiting for approval.

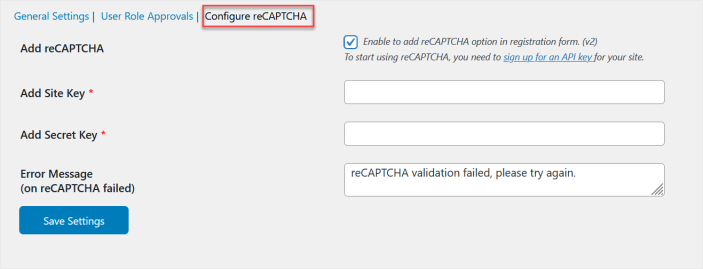
Configure reCAPTCHA:
↑ Back to topMove to the “Configure reCAPTCHA” tab to enable Google reCAPTCHA on registration form to avoid spam registration.
View Customer Data & Approve or Reject User Role Requests
↑ Back to topNavigate to the “Users” section in the admin panel and click the “View” button in the users table to view detailed information in a popup about any user, including additional details.


If user role registrations are enabled on your site, you can also view the user’s role status and approve or reject roles directly from the table.
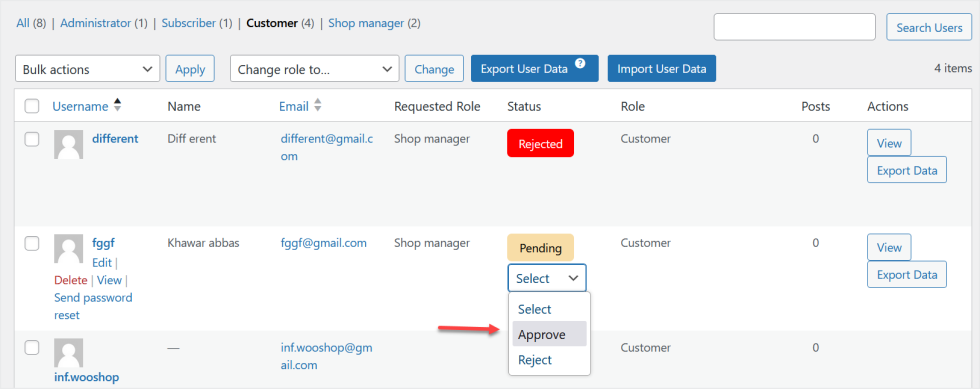
Additionally, you can use the “Export” or “Import” buttons to import or export all or specific users as a CSV file for migration purposes.

Customize Emails
↑ Back to topGo to WooCommerce>Settings>Emails to customize the emails which will be sent to both users and admin upon user role request, pending, and auto approvals.
