Seasonal Product Availability lets you define annual availability periods for products, automatically showing or hiding the “Add to Cart” button based on seasons. Perfect for bakeries, florists, farm shops, and event sellers who only sell products at specific times of year.
Installation
↑ Back to topTo start using a product from WooCommerce.com, you can use the “Add to store” functionality on the order confirmation page or the My subscriptions section in your account.
- Navigate to My subscriptions.
- Find the Add to store button next to the product you’re planning to install.
- Follow the instructions on the screen, and the product will be automatically added to your store.
Alternative options and more information at:
Managing WooCommerce.com subscriptions.

Setup and Configuration
↑ Back to topSeasonal Product Availability for WooCommerce allows you to configure out-of-season messaging either on a global level or on an individual product level, working with both simple products and product variations. By default, all products in your store remain available, even with global out of season messaging set, since availability windows will need to be set in each product’s editor window to enable our plugin’s functionality.
- With our plugin, you can set global out-of-season messaging, so that any out-of-season product carries the same messaging and link, so this doesn’t have to be set for each product.
- You can set a year-independent date range that defines a product or an individual variation’s availability. Between the dates you enter, your product will be available, and outside that window, it will be unavailable. If no dates are entered, the product will always be available.
- You can customise your out-of-season messaging per product. When messaging is set on the product level, it will override the global settings for that product or variation only and can be particularly useful if you’d like to change the messaging per holiday or type of product.
- You can direct your customers to a different link or page, who would otherwise have wanted to buy that product. For example, if you do allow special orders of out-of-season products, you could link to the site’s contact page, or you could direct customers to in-season products they might like.
Global Seasonal Availability Settings
↑ Back to topTo get started with our plugin by configuring your global settings, head to WooCommerce > Seasonal Availability.
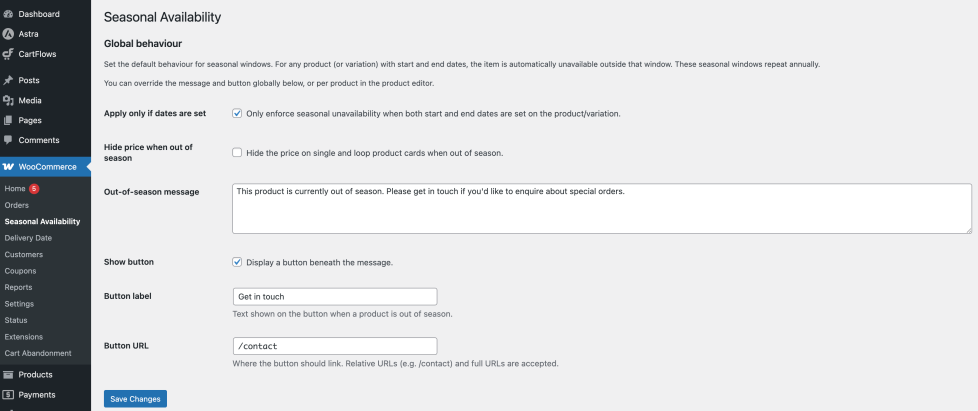
When you’re in the global settings area, you’ll see that there are many options you can configure, which include:
- Apply only if dates are set: If only some of your products are seasonal, you can check this box, which means that by default all products are available and you’d have to specify a date range in the product editor for seasonal availability to take effect. However, if, for example, you have a store where all your products are seasonal, then uncheck this box, so that by default all products are unavailable, then requiring you to specify dates in a specific product’s editor for it to be available within those dates.
- Hide price when out of season: When a product is out of season, this setting gives you full control over whether or not the price shows. If you’d like to prevent the price from showing when the product is out of season, simply check this box, or leave it unchecked for the price to show.
- Out-of-season message: This is the message that will show globally when your product is out of season. If you have out-of-season products, you can override this message by setting the out-of-season message in that product’s editor.
- Show button: You may not always want to have a button or link shown when a product is out of season, as it might be that you prefer just to display the message. If you’d like to show a link, check the box, or leave it unchecked to hide the button globally. This can be overridden on a product level.
- Button label: This would be the text label shown on the global button, should you choose to enable it. You do not need to leave this field empty to prevent the button from showing, as its visibility is controlled by the checkbox above.
- Button URL: Similar to the button label, this is the link you would have on the global out-of-season button. You can enter either an exact or relative URL and this will only show on a global level if the checkbox above is checked.
Simple Product Settings
↑ Back to topOnce you’re happy with your store’s global configuration, you can then edit settings for specific products. Our plugin works with both simple products and product variations. To edit the settings for a simple product, head to Products > All Products > Product Name and then once you’re in the editor, scroll down to the Product Data box.
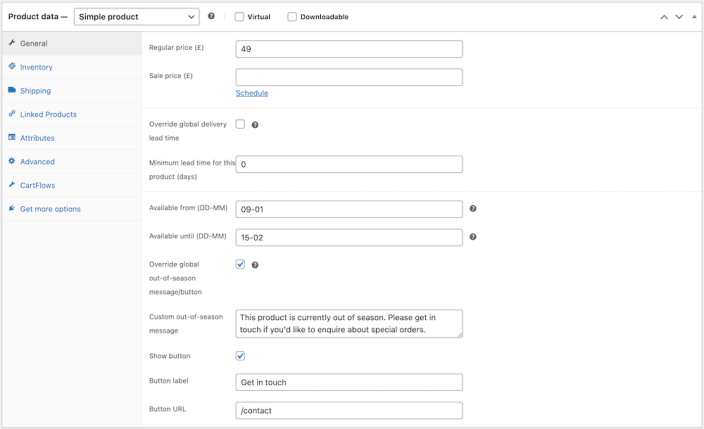
Once you’re in the General tab of the product editor, you’ll see several settings, which will allow you to configure seasonal availability for this particular product:
- Available from (DD-MM): This is where you specify the start of your product’s availability window, in the format DD-MM. In this case, the start of the window has been set as the 9th January, or 09-01, which means that before this date, the product will be unavailable, but it will be automatically available when that date is reached, each year.
- Available until (DD-MM): Here, you specify the end of the product’s availability window, in the same format as the start of the window. In this example, it has been set to the 15th February, or 05-02, and once this date passes, your out-of-season message will show instead of the ‘add to cart’ button.
- Override global out-of-season message/button: If you’d like to specify different settings to what you have configured globally, then check this box. However, if you are happy with your global settings, leave this box unchecked.
- Custom out-of-season message: This setting is only relevant if you have checked the override box above. This is where you write the message for this particular product, particularly helpful if you like to have different messages for different products or seasons.
- Show button: If you are configuring this message for this particular product and you’d like to show a button, then check this box. If not, leave it unchecked.
- Button label: If you are configuring this message for this particular product and you have chosen to show a button, type in what you’d like the button’s text label to be.
- Button URL: Similarly, for the button label, type in what you’d like the button’s link to be. This field can accept either exact or relative URLs.
Variable Product Settings
↑ Back to topWhen it comes to changing settings for individual product variations, you still largely edit the product level settings in the General tab. However, you can specify a different date/availability range for each individual product variation, which is particularly useful if you have one variable seasonal product that contains variations for different seasons.
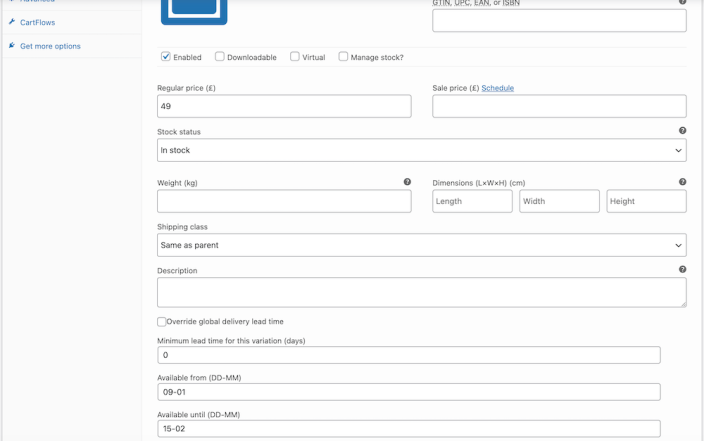
In this case, you still must enter dates in the Available from (DD-MM) and Available until (DD-MM) to set this window. Dates must be entered in the same format as with simple products. For example, if you were to start selling Christmas products at the start of December, you’d enter 01-12 (for the 1st December) in this field.
Usage & Display
↑ Back to topWith Seasonal Product Availability for WooCommerce, once a date availability range has been entered, either for a simple or variable product, it will automatically take effect each year, so as the owner/admin of the website, you do not need to remember to manage the product’s availability each year.
For a typical simple product (i.e., one where the customer cannot choose a variation, but there is just a quantity selector and an add to cart button), the out-of-season messaging, once activated, will look similar to the product below.
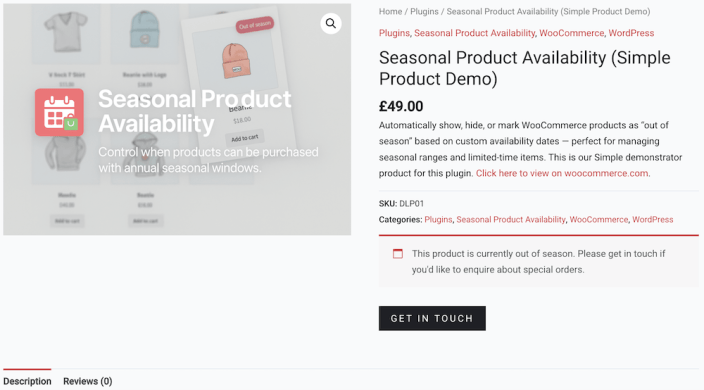
In this case, you can see that we have chosen to keep the price displayed for the product, even though it is out of season. You can also see the message we have chosen to display, alongside the get in touch link/button. These are all settings that could be configured individually using the settings described above.
For a variable product, once a specific variation has been selected, should that particular variation be out of season, then the messaging will look similar to the product below.

Here, once the specific variation has been selected, you can see that the custom out-of-season message has become visible and that the add to cart button has changed colour – i.e., it has been disabled, so your customer cannot place this specific variation into their basket.
Troubleshooting
↑ Back to topProducts not showing as available when they should
↑ Back to top- Double-check the seasonal dates entered. They should be in DD-MM format, and the year is ignored.
- Ensure the seasonal window covers today’s date. For example, if you entered
01-06to31-08, the product will only be available from June 1st through August 31st each year. - Confirm that the product doesn’t have a per-product override that is conflicting with your global window.
Products are purchasable all year round
↑ Back to top- Make sure you’ve actually enabled a seasonal window. If both start and end dates are left blank, the product is available year-round.
- If you want global rules to apply, ensure the “Override global availability” checkbox is not ticked in the product editor.
- Check caching: if you use a caching plugin, clear your cache and refresh to see updated availability logic.
Variation products are confusing customers
↑ Back to top- If all variations are out of season, the variation selector will be hidden.
- If some variations are in season, only those will be available — make sure you’ve set seasonal windows for each variation correctly.
- If customers still see unavailable variations, flush transients via WooCommerce → Status → Tools → Clear WooCommerce transients.
Variation products are confusing customers
↑ Back to top- Verify you’ve entered a valid label and URL in the product’s seasonal settings (or in global settings).
- Make sure to click Update/Publish after making changes.
- If the message looks “broken” on the front end, check if your theme overrides WooCommerce templates. Switching temporarily to Storefront can help identify theme conflicts.
Timezone issues (availability off by one day)
↑ Back to top- Check your WordPress timezone under Settings → General.
- The plugin uses your site’s timezone setting; if it’s set to UTC instead of a city, you may see off-by-one-day issues.
- Correct the timezone and re-save your seasonal settings.
Nothing happens after installing the plugin
↑ Back to top- Confirm WooCommerce is installed and active.
- Go to WooCommerce → Seasonal Availability to configure global settings.
- Check if you see the “Seasonal Availability” tab in product data when editing a product. If not, deactivate and reactivate the plugin.
FAQs
↑ Back to topHelp customers by answering commonly asked questions.
Can I set more than one seasonal window per product?
At present, each product supports one seasonal window (global or per-product override). If you need multiple ranges (e.g. Spring and Christmas), we recommend splitting the product into duplicates with different availability windows.
What happens if I leave the seasonal window blank?
If no dates are set, the product will remain purchasable year-round.
Does this plugin support variable products?
Yes. If all variations are out of season, the variation selector will be hidden. If only some variations are in season, customers will only see the available options.