Share order status and shipment tracking information with your customers with the Order and Shipment Tracking Plugin. Allow customers to track the progress of their orders with each status change.
Installation
↑ Back to top- Download the .zip file from your WooCommerce account.
- Go to: WordPress Admin > Plugins > Add New and Upload Plugin. Select Choose File for the file you have downloaded.
- Install Now and Activate Plugin.
More information at Install and Activate Plugins/Extensions.
Setup and Configuration
↑ Back to topAfter activating Shipment and Order Tracking for WooCommerce, “Shipment Tracking” will display in the WordPress admin under the WooCommerce menu. Click to view and configure settings for the plugin.
Order Tracking
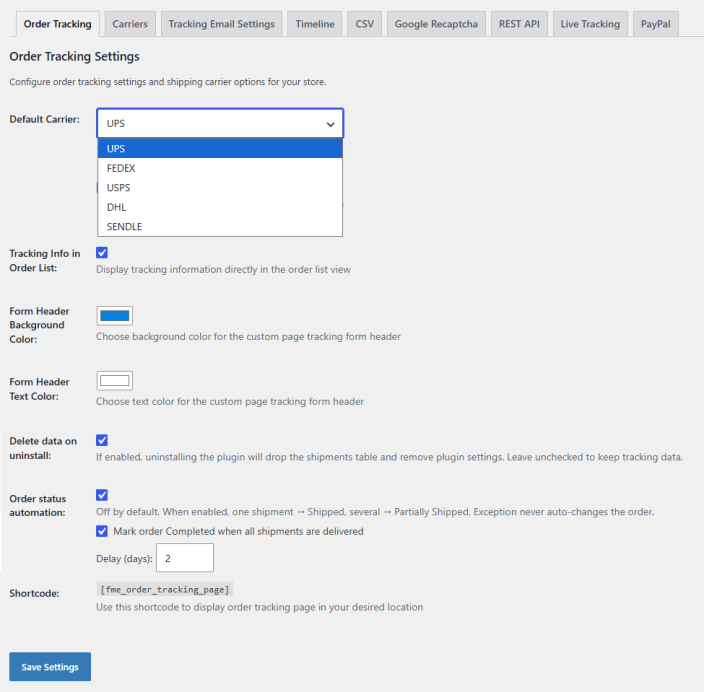
↑ Back to topIn this tab, configure order tracking settings and shipping carrier options for your store. Go to WooCommerce > Shipment Tracking > Order Tracking:
- Default Carrier: Choose the default shipping carrier for order tracking:
- UPS
- FEDEX
- USPS
- DHL
- SENDLE
- Tracking Info in Order List: Enable to display tracking information directly in the order list view.
- Form Header Background Color: Choose background color for the custom page tracking form header.
- Form Header Text Color: Choose text color for the custom page tracking form header.
- Delete Data on Uninstall: If enabled, uninstalling the plugin will drop the shipments table and remove plugin settings.
- Order Status Automation: Automatically update shipment status based on shipment progress. If an order ships in one parcel, it moves to Shipped once tracking is added. If it ships in several parcels, it moves to Partially Shipped.
- Shortcode: Use this shortcode to display the order tracking page in your desired location.
Carriers
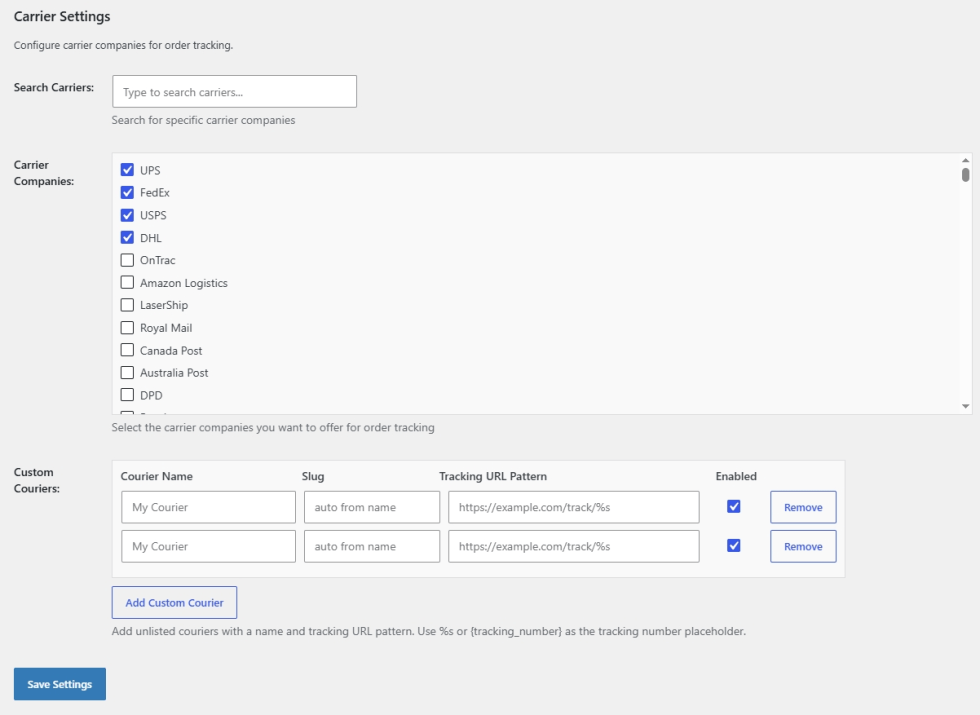
↑ Back to topSet up the settings for carrier companies for order tracking. Go to WooCommerce > Shipment Tracking > Order Tracking and configure the following:
- Search Carriers: Type a carrier name to find it quickly in the carrier list.
- Carrier Companies: Select the carriers you want to offer for order tracking.
- Custom Couriers: Add couriers that aren’t in the list. Each one has these fields:
- Courier Name: Enter the name of the courier.
- Slug: Generated automatically from the courier name.
- Tracking URL Pattern: Enter the courier’s tracking URL. Use %s or {tracking_number} where the tracking number should go (e.g., https://example.com/track/%s).
- Enabled: Turn the custom courier on or off.
- Remove: Delete the custom courier.
- Add Custom Courier: Adds a new row for another custom courier.
Tracking Email Settings
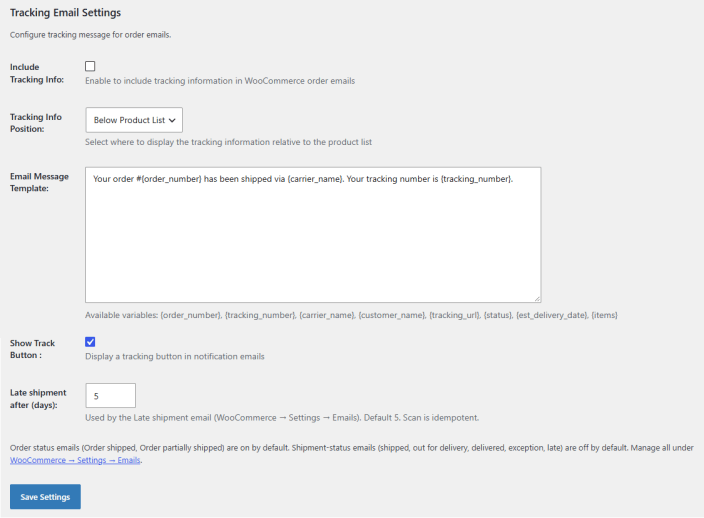
↑ Back to topIn this tab, choose how tracking information appears in order emails. Go to WooCommerce > Shipment Tracking > Tracking Email Settings:
- Include Tracking Info: Enable to add tracking information to WooCommerce order emails.
- Tracking Info Position: Choose where the tracking information appears in the email, relative to the product list:
- Above Product List
- Below Product List
- Email Message Template: Write the tracking message that customers see in order emails. You can use these variables:
- {order_number}
- {tracking_number}
- {carrier_name}
- {customer_name}
- {tracking_url}
- {status}
- {est_delivery_date}
- {items}
- Show Track Button: Enable to add a tracking button to notification emails.
- Late Shipment After (Days): Enter the number of days after which a shipment counts as late. The Late Shipment email uses this value. The default is 5. Running the scan more than once will not send the same late shipment email twice.
Note: The order status emails (Order shipped and Order partially shipped) are on by default. The shipment status emails (shipped, out for delivery, delivered, exception, and late) are off by default. You can manage all of these emails under WooCommerce > Settings > Emails.
Timeline
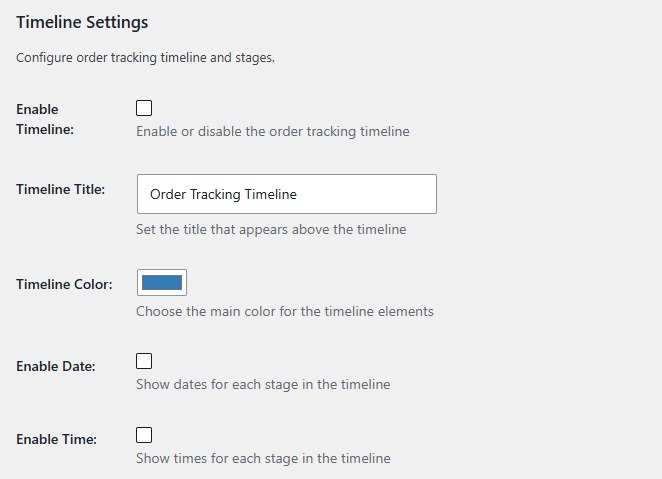
↑ Back to topIn this tab, set up the order tracking timeline and its stages. Go to WooCommerce > Shipment Tracking > Timeline:
- Enable Timeline: Turn the order tracking timeline on or off.
- Timeline Title: Enter the title that appears above the timeline (e.g., Order Tracking Timeline).
- Timeline Color: Choose the main color for the timeline elements.
- Enable Date: Enable to show the date for each stage in the timeline.
- Enable Time: Enable to show the time for each stage in the timeline.
Timeline Stages
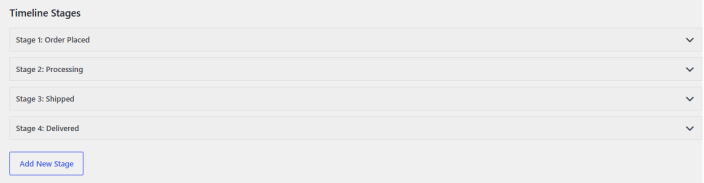
↑ Back to topThe timeline comes with four default stages:
- Stage 1: Order Placed
- Stage 2: Processing
- Stage 3: Shipped
- Stage 4: Delivered
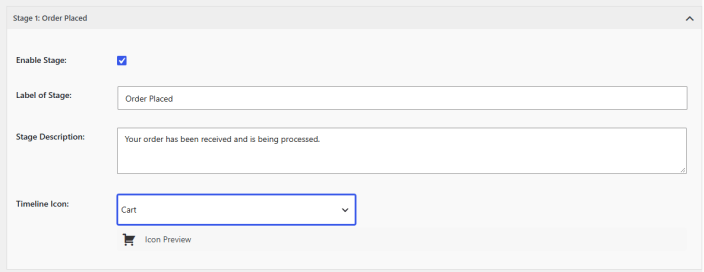
Click a stage to expand it and configure the following:
- Enable Stage: Turn this stage on or off in the timeline.
- Label of Stage: Enter the stage name that customers see (e.g., Order Placed).
- Stage Description: Enter a short message that explains the stage to customers (e.g., “Your order has been received and is being processed.”).
- Timeline Icon: Choose an icon for the stage. The Icon Preview below the field shows the icon you selected.
CSV Settings
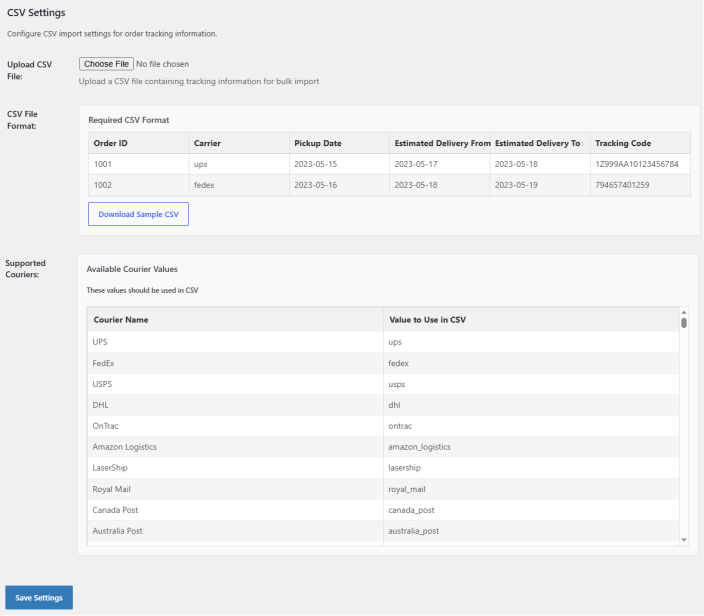
↑ Back to topIn this tab, import tracking information in bulk from a CSV file. Go to WooCommerce > Shipment Tracking > CSV:
- Upload CSV File: Upload a CSV file with the tracking information you want to import in bulk.
- CSV File Format: Your CSV file needs these columns:
- Order ID: The WooCommerce order number (e.g., 1001).
- Carrier: The carrier value for the courier (e.g., ups). See Supported Couriers below.
- Pickup Date: The date the shipment was picked up (e.g., 2023-05-15).
- Estimated Delivery From: The first day of the estimated delivery window.
- Estimated Delivery To: The last day of the estimated delivery window.
- Tracking Code: The tracking number from the carrier.
- Download Sample CSV: Download a sample file in the required format to use as a template.
- Supported Couriers: Lists each courier and the value to enter in the Carrier column of your CSV.
Google Recaptcha
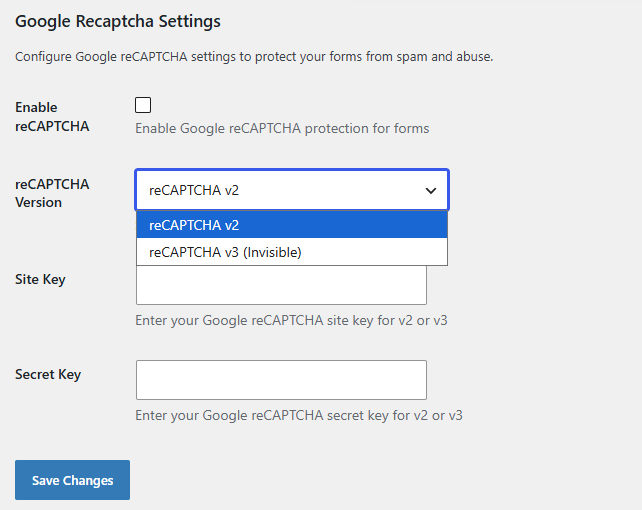
↑ Back to topIn this tab, set up Google reCAPTCHA to protect your forms from spam and abuse. Go to WooCommerce > Shipment Tracking > Google reCAPTCHA:
- Enable reCAPTCHA: Enable to add Google reCAPTCHA protection to forms.
- reCAPTCHA Version: Choose which version of reCAPTCHA to use:
- reCAPTCHA v2
- reCAPTCHA v3 (Invisible)
- Site Key: Enter your Google reCAPTCHA site key for the version you selected.
- Secret Key: Enter your Google reCAPTCHA secret key for the version you selected.
REST API
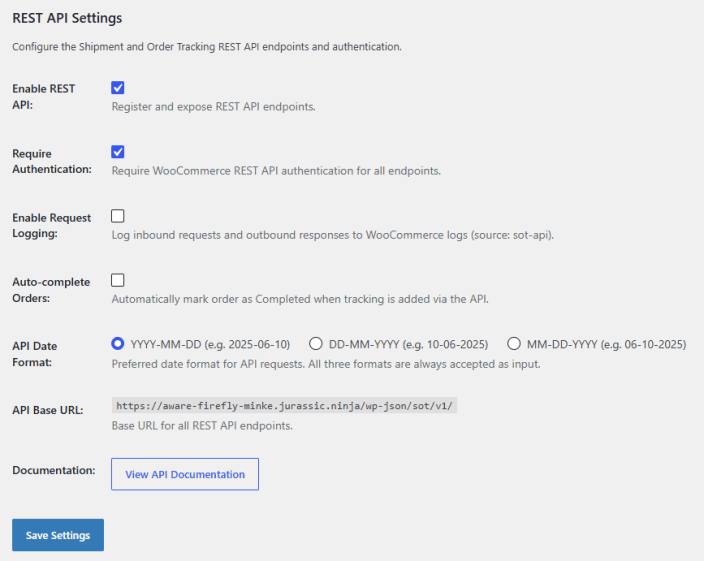
↑ Back to topIn this tab, set up the plugin’s REST API endpoints and how they’re authenticated. Go to WooCommerce > Shipment Tracking > REST API:
- Enable REST API: Enable to register the plugin’s REST API endpoints and make them available.
- Require Authentication: Enable to require WooCommerce REST API authentication for all endpoints.
- Enable Request Logging: Enable to record incoming requests and outgoing responses in the WooCommerce logs, under the source sot-api.
- Auto-complete Orders: Enable to mark an order as Completed automatically when tracking is added through the API.
- API Date Format: Choose the date format the API uses:
- YYYY-MM-DD (e.g., 2025-06-10)
- DD-MM-YYYY (e.g., 10-06-2025)
- MM-DD-YYYY (e.g., 06-10-2025)
The API accepts input in any of these three formats, whichever one you choose.
- API Base URL: Shows the base URL for all REST API endpoints, in the format https://yourstore.com/wp-json/sot/v1/.
- Documentation: Click View API Documentation to open the API reference.
Live Tracking
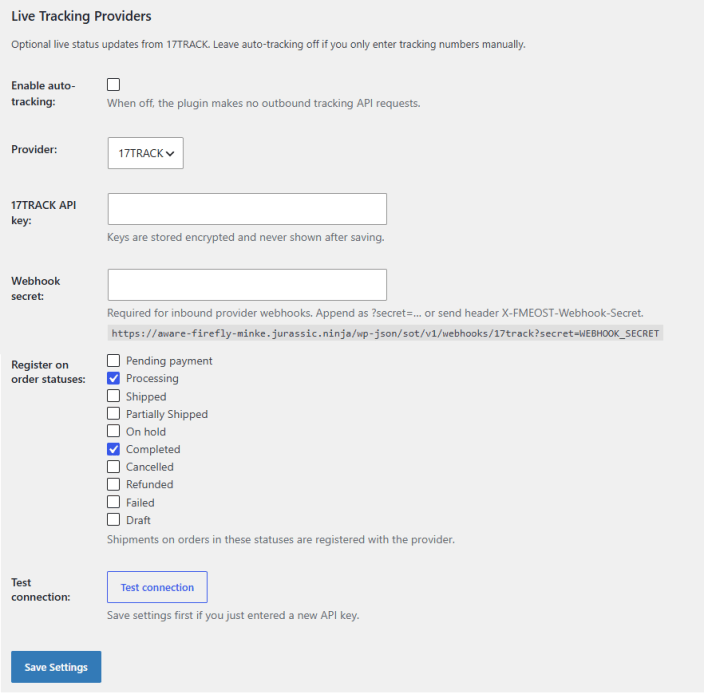
↑ Back to topIn this tab, connect a live tracking provider to get automatic shipment status updates from 17TRACK. If you only enter tracking numbers manually, leave auto-tracking off. Go to WooCommerce > Shipment Tracking > Live Tracking:
- Enable Auto-tracking: Enable to get live status updates from the provider. When it’s off, the plugin makes no outgoing requests to the tracking API.
- Provider: Choose the live tracking provider (17TRACK).
- 17TRACK API Key: Enter your 17TRACK API key. Keys are stored encrypted and are not shown again after you save.
- Webhook Secret: Enter a secret that verifies incoming webhooks from the provider. This is required for webhooks to work. Send the secret in one of two ways:
- Add it to the webhook URL as ?secret=, in the format https://yourstore.com/wp-json/sot/v1/webhooks/17track?secret=WEBHOOK_SECRET
- Send it in the X-FMEOST-Webhook-Secret header
- Register on Order Statuses: Select the order statuses whose shipments get registered with the provider:
- Pending payment
- Processing
- Shipped
- Partially Shipped
- On hold
- Completed
- Cancelled
- Refunded
- Failed
- Draft
- Test Connection: Click to check the connection to the provider. If you just entered a new API key, save your settings before testing.
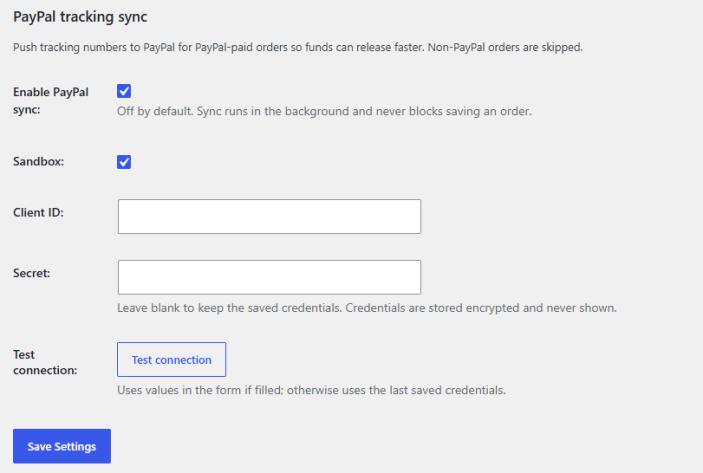
PayPal
↑ Back to topIn this tab, send tracking numbers to PayPal for orders paid through PayPal, so PayPal can release the funds sooner. Orders paid another way are skipped. Go to WooCommerce > Shipment Tracking > PayPal:
- Enable PayPal Sync: Enable to send tracking numbers to PayPal. This is off by default. The sync runs in the background and never stops an order from saving.
- Sandbox: Enable to connect to the PayPal sandbox, so you can test before going live.
- Client ID: Enter your PayPal Client ID.
- Secret: Enter your PayPal Secret. To keep the credentials you already saved, leave this blank. Credentials are stored encrypted and are never shown.
- Test Connection: Click to check the connection to PayPal. If the form is filled in, the test uses those values. If not, it uses the last credentials you saved.