Manage product stock from backend and frontend with powerful filters, sorting options, import/export, and more.
Installation
↑ Back to topTo start using a product from WooCommerce.com, you can use the “Add to store” functionality on the order confirmation page or the My subscriptions section in your account.
- Navigate to My subscriptions.
- Find the Add to store button next to the product you’re planning to install.
- Follow the instructions on the screen, and the product will be automatically added to your store.
Alternative options and more information at: Managing WooCommerce.com subscriptions.
Configuration
↑ Back to topAfter you have installed and activated the Plugin, go to WooCommerce > Settings > Stock Manager. Here you will find the following sections to configure:
General Settings
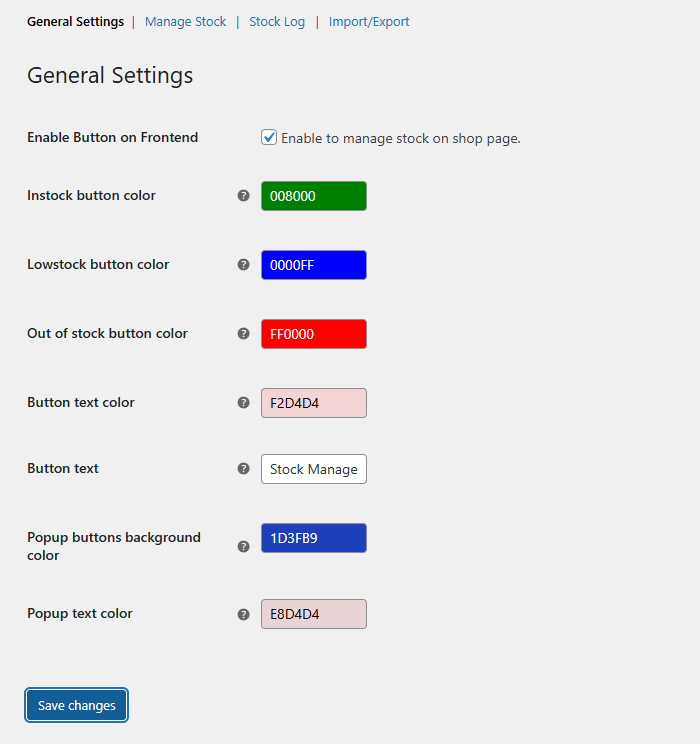
↑ Back to topConfigure the general settings, go to WooCommerce > Settings > Stock Manager > General Settings, and configure the following:
- Enable Button On Frontend: Click the checkbox to enable stock management on the frontend of your store.
- In-Stock Button Color: Set the color for the in-stock button.
- Lowstock Button Color: Choose the color for the low stock button.
- Out Of Stock Button Color: Select the color for the out of stock button.
- Button Text Color: Choose the text color for the stock button.
- Button Text: Enter the text for the stock button.
- Popup Buttons Background Color: Choose to set the background color of the popup buttons.
- Popup Text Color: Choose the text color for the pop-up.
Click the “Save Changes” button to apply the configured settings.
Manage Stock
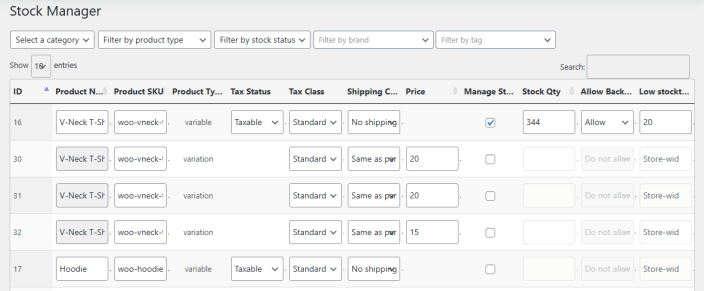
↑ Back to topIn this tab, you can manage the stock of all products. Go to WooCommerce > Settings > Stock Manager > Manage Stock, and you will find all the product stock in a list view. Here you will find the following information that you can manage:
- Product Name
- Product SKU
- Product Type
- Tax Status
- Tax Class
- Shipping Class
- Price
- Manage Stock (Checkbox)
- Stock Quantity
- Allow Backorders
- Low Stock Threshold
You can use different filters to refine the product data and make stock management easy. You can filter products based on the following criteria:
- Filter by Category
- Filter by Product Type
- Filter by Stock Status
- Filter by Brand
- Filter by Tag
Click on the “Save Changes” button to implement the changes. You can also click the “Export CSV” button to export the data as a CSV file.
Stock Log
↑ Back to topIn this section, you can check the stock logs for any product. Go to WooCommerce > Settings > Stock Manager > Stock Log and find the following:
You can use filters such as category, tag, or brand to refine the data and find the required stock logs for products. To check the stock log for any product, click the “History” button, and you can see the stock history. You can see the date and stock quantity in the history.

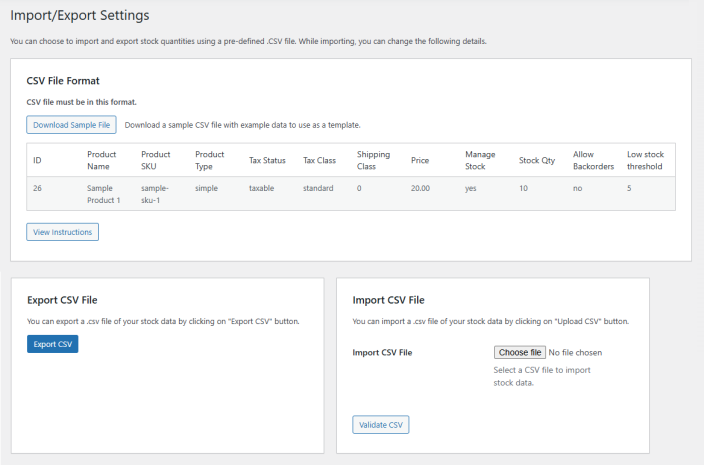
Import/Export Settings
↑ Back to topIn this tab, you can import or export stock data in a CSV format. Go to WooCommerce Settings > Stock Manager > Import/Export Settings, and here you can import/export stock quantities with the following details:
Download the sample file to review the CSV before exporting the real data.
When importing/exporting, you can edit some fields, and some are mandatory. To see details, click on the “View Instructions” button.
Mandatory Fields
↑ Back to top- ID: Required for identification, but cannot be changed.
- Product Type: Readonly field, cannot be changed.
- Product Name: Readonly for product variations, editable for simple products.
- Tax Status: Not editable for product variations.
Editable Fields
↑ Back to top- ID: Product id is required to correctly import and export stock data (readonly – used for identification only).
- Product Name: Product name/title (readonly for variations).
- Product SKU: Product unique code (Stock Keeping Unit).
- Product Type: Product type (simple, variable, etc.) – readonly field.
- Tax Status: Product tax status, i.e., taxable, shipping (not editable for variations).
- Tax Class: Product tax class, i.e., reduced-rate, standard.
- Shipping Class: Product shipping class id to set the shipping class for the product.
- Price: Product regular price.
- Manage Stock: Enable the manage stock option using this column. Use values “yes” to enable managed stock and “no” to disable the managed stock option for the product.
- Stock Qty: New stock quantity.
- Allow Backorders: Acceptable values are “yes”, “no”, “notify”.
- Low stock threshold: Low stock threshold value.
To export, click on the “Export CSV” button to export the stock data in CSV format.
To import, upload a CSV file and click on the “Validate CSV” button to validate the uploaded CSV file.
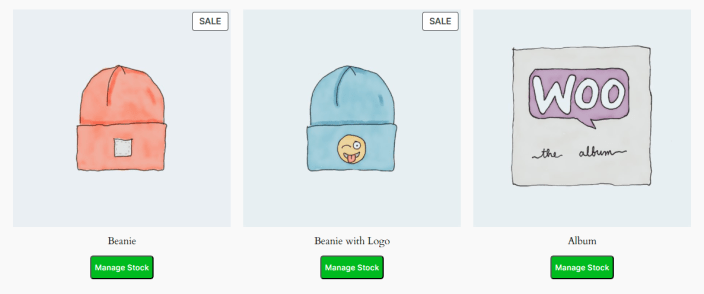
Manage Stock From Frontend
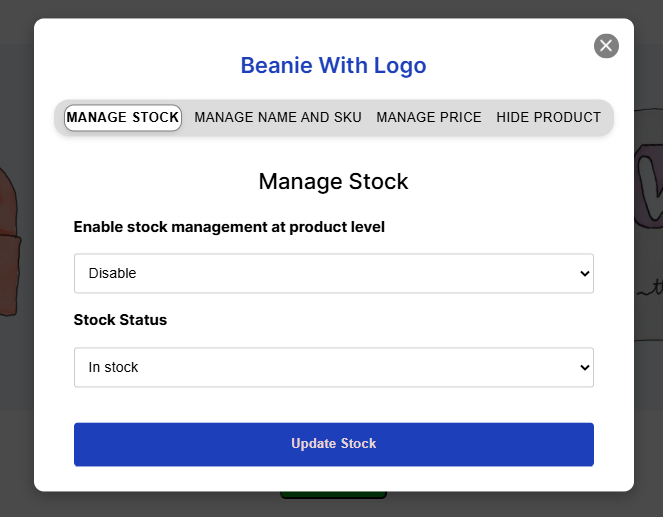
↑ Back to topThe WooCommerce stock manager plugin allows you to manage the stock from the frontend as well. By clicking on the “Manage Stock” button, you can configure the following in a pop-up:
- Manage Stock: Here, you can enable/disable stock management at the product level and configure the stock status.
- Manage Name and SKU: In this section, you can manage the product details that include:
- Product Name
- SKU
- Tax Status
- Tax Class
- Shipping Class
- Manage Price: In this section, you can manage the price for the product. You can configure the following:
- Regular Price($)
- Sale Price($)
- Sale Starts (Date)
- Sale Ends (Date)
- Hide Product: Select if you want to display or hide the product.