
Hide Product for WooCommerce extension allows you to manage product visibility based on multiple conditions. Admins can create different rules to restrict products by their type, attribute, price, dimension, shipping class, and category. You can also provide access to selected user roles, customers, countries, and states. Moreover, admins can create a secret link or passcode to help customers view hidden items directly from the product page. Simply track hidden product details from a single dashboard and manage product visibility rules with ease.
Installation
↑ Back to top- Download the .zip file from your WooCommerce account.
- In your WordPress Admin, go to Plugins > Add New and upload the plugin by choosing the downloaded file.
- Click Install Now, then activate the extension.
For further help, refer to Install and Activate Plugins/Extensions.
Setup and Configuration
After installing and activating the Hide Product for WooCommerce plugin, a new Hide Product option will appear in the WooCommerce settings. Select this option to access a detailed dashboard where you can track total hidden products, blocked attempts, success rate, access rate, and more. From the main menu, go to “Rules” to create multiple conditions for hiding different types of products. You can also provide access through secret links, passcodes, selected countries, specific customers, and different states.
Once you have configured the rules, go to WooCommerce > Settings > Hide Product. From this section, you can customize the passcode popup according to your needs and add custom error messages for hidden items. Moreover, you can choose the appropriate action to take after multiple failed passcode attempts.
Setting Up Hide Product for WooCommerce
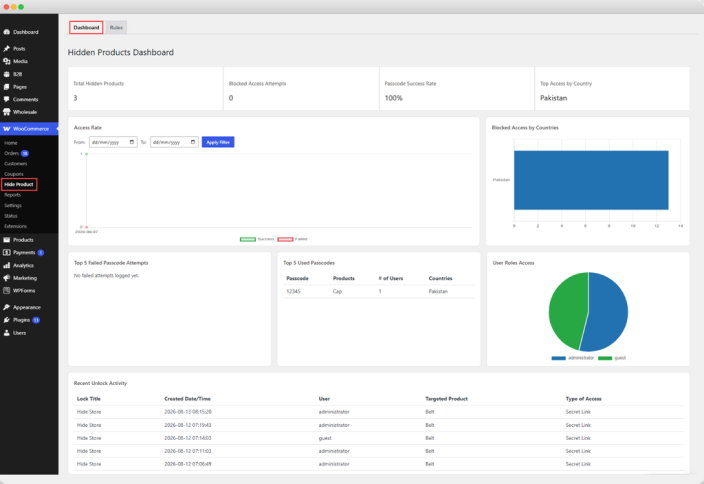
Accessing the Hidden Products Dashboard
↑ Back to topGo to WP Admin Panel > WooCommerce > Hide Products > Dashboard.
Here you can view the following insights:
- Total Hidden Products: The total number of products currently hidden from customers
- Blocked Access Attempts: The number of times customers have attempted to access the hidden products.
- Passcode Success Rate: View the percentage of successful product accesses made using the passcode.
- Top Access by Country: View the list of countries that are allowed to access the hidden products
- Access Rate Graph: Track product access activity over time through a visual graph
- Top 5 Failed Passcode Attempts: View the five passcodes with the highest number of failed access attempts
- Top 5 Used Passcodes: Track the five most frequently used passcodes to access hidden items
- User Role Access: Track hidden product access based on different user roles
- Recent Unlock Activity: View the latest activity of customers accessing hidden products
Creating Hidden Products Rules
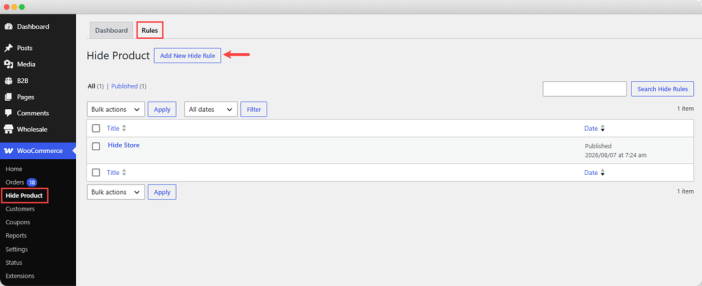
Go to WP Admin Panel > WooCommerce > Hide Products and select Rules.
This section allows you to create, manage, and organize multiple hide product rules. You can also view the following details for each rule:
- Title
- Published date
- From the table, locate any created rule and click Edit to update its configuration.
- To create a new rule, select “Add New Hide Rule” and fill in the following details:
Rule Creation
↑ Back to topRule title: Add a custom title for the hide product rule
Hide Entire Store: Enable the option to hide the entire store from customers. Disable it to hide specific products or categories.
Lock Conditions: From this section, you can define multiple conditions under which a product or category should be hidden. In the given table, select from the following condition types:
- Products: Select this option, choose “Equals To,” and add the desired products you want to hide from the users.
- Category: Select this option, choose “Equals To,” and add any category you want to hide.
- Tags: Select this option, choose “Equals To,” and select the tags you want to hide from customers.
- Brands: Choose any desired brand and hide it from customers.
- Product Type: Select this option to hide simple, grouped, or variable products from customers.
- Shipping Class: Select this option if you want to hide products based on their assigned shipping classes.
- Product is: Select this option if you want to hide physical or virtual products from customers.
- Product Attribute: Select this option if you want to hide products based on specific attributes. For example, if you select “ Small” or “Grey Color,” products with these attributes will be hidden.
- Product Value: Select this option if you want to hide products based on their prices. Choose Equals To and enter the minimum and maximum price range. Products falling within the defined range will be hidden from customers.
- Product Dimension: Select this option if you want to hide products based on their dimensions. Enter the minimum and maximum range for length, width, and height. Products falling within the defined range will be hidden.
- Category Product Count: Select this option if you want to hide categories based on the minimum or maximum number of products they contain. For example, if you enter the minimum value as 1 and the maximum value as 5, categories with 1 to 5 products will be hidden.
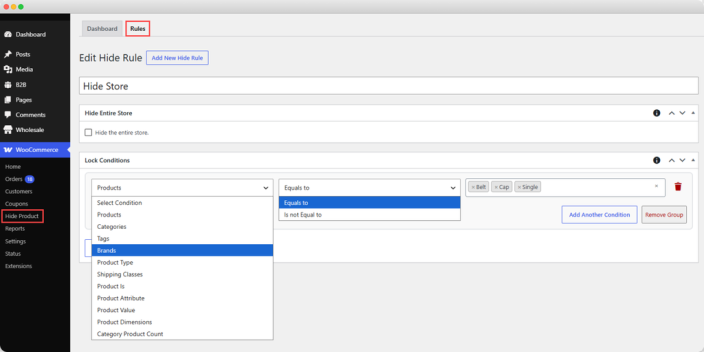
NOTE: For each condition, you can select the “Not Equal To” option if you want to show the selected product or category. You can click “Add Another Condition” to add multiple conditions to the same rule. Use “Remove Group” to delete the entire condition group.
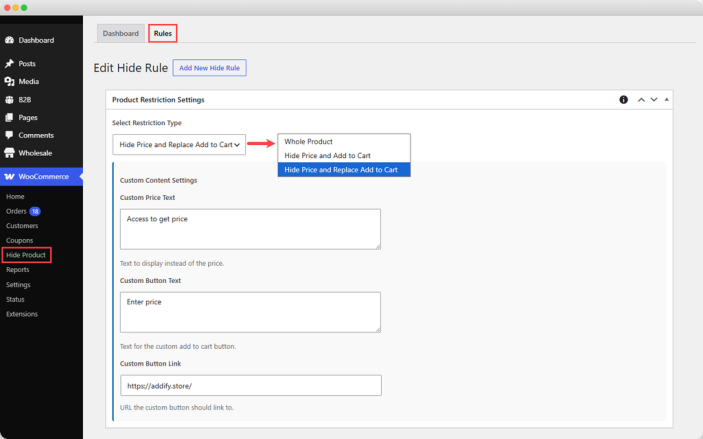
Product Restriction Settings
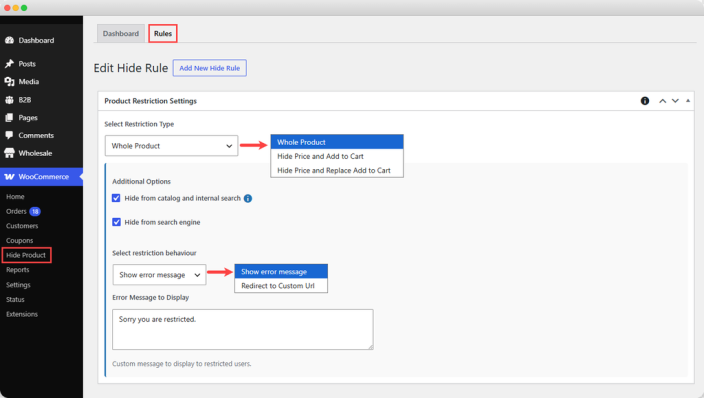
From this section, you can choose to hide products partially or completely. Following are the configuration steps:
- Select Restriction Type: From the dropdown, you can choose to hide the:
- Whole Product: Select this option if you want to hide the entire product from the customer. You can also select additional options such as:
- Hide from Catalog and Internal Search: Enable the button if you want to hide a product from your store’s catalog and internal search results.
- Hide from Search Engine: Check this option if you want to hide the product from search engine results.
- Select Restriction Behavior: From the dropdown, you can choose what action to take when a customer tries to access the restricted product:
- Error Message to Display: Choose to show a custom error message.
- Redirect to Custom URL: Enter any URL and redirect customers to that page.
- Price and Add-to-Cart button: Select this option if you want to hide the price and add-to-cart button of the restricted item.
- Price and Replace Add-to-Cart button: Select this option if you want to hide the price and replace the add-to-cart button. You can add:
- Custom Price Text: Enter custom text to display instead of the price
- Custom Button Text: Enter custom text for the add-to-cart button
- Custom Button Link: Add a custom URL and link the button to the page you want customers to visit.
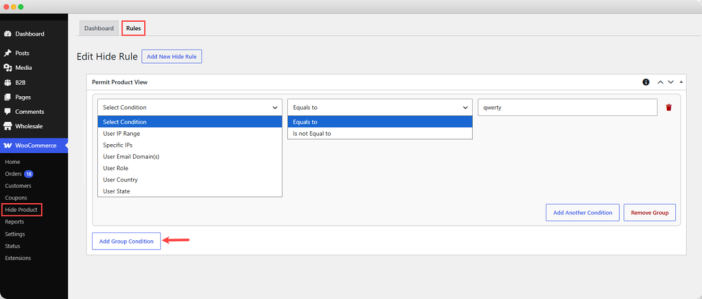
Permit Product View
From this section, you can create multiple conditions to give access by:
- User IP Range: Allow access to customers within a specific IP address range
- Specific IPs: Enter specific IP addresses that should be allowed to access the restricted products.
- User Email Domain(s): Give access to customers using email addresses from specific domains
- User Role: Give access to selected user roles.
- User Country: Allow customers from selected countries to access the hidden product
- User State: Allow customers from selected states to access the hidden product
- Access with Passcode: Set a passcode that users must enter to view the hidden item.
Note: The passcode field will appear below the hidden item, allowing users to access a passcode page and enter the code.
- Access Via Secret Link: Create a secret link that customers can use to access the product
NOTE: If you select “Hide Price and Replace add-to-cart button,” then passcodes and secret links will not work. If you select “Hide Price and add-to-cart button,” then users can access via passcode. If you hide the whole product, users can access it using both passcodes and secret links.
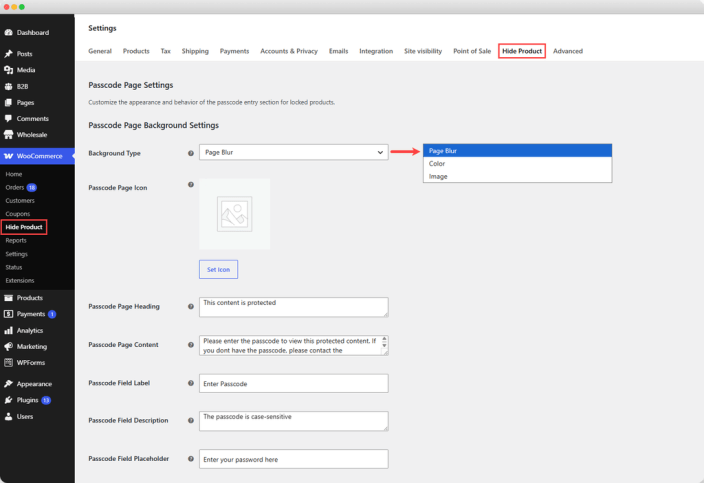
Passcode Page Settings
Go to WP Admin Panel > WooCommerce > Settings and select Hide Product.
Here you can configure the following settings for the passcode page:
Background Type: Select a background type for the passcode page as:
- Page blur: Blur the background of the page when the passcode page appears.
- Color: Select a custom color for the passcode page background.
- Background Color: Use the color picker to choose the background color
- Background Opacity: Set the opacity of the background. 0 will make the background transparent, while 1 makes it solid.
- Image: Choose to add any custom image for the passcode background
- Background image: Upload a custom image from your media gallery to use as the background.
Passcode Page Icon: Upload a custom icon to display on the passcode page.
Passcode Page Heading: Enter a custom heading to display on the passcode popup
Passcode Page Content: Add a message that shows why the content is restricted.
Passcode Field Label: Add text for the label displayed above the passcode input field.
Passcode Field Description: Display guidance regarding passcode requirements
Passcode Field Placeholder: Enter placeholder text inside the passcode input field.
Additional Options
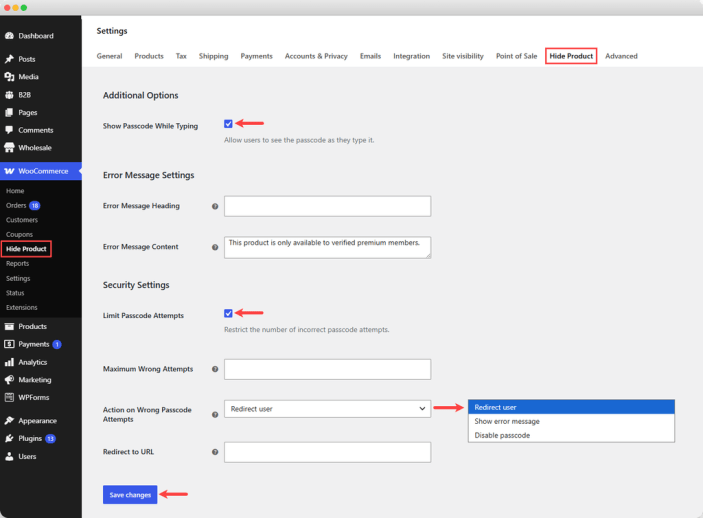
Show Passcode While Typing: Check the button if you want to allow users to see the passcode as they type.
Error Message Settings
- Error Message Heading: Enter a custom heading to display when an incorrect passcode is entered.
- Error Message Content: Enter a custom message to display when the entered passcode is incorrect.
Security Settings
- Limit Passcode Attempts: Check the button if you want to restrict the number of incorrect passcode attempts.
- Maximum Wrong Attempts: Enter how many wrong attempts a customer is allowed to make
- Action on Wrong Passcode Attempts: From the dropdown, choose what happens when the allowed attempts are exceeded:
- Show Error Message: Select this option to display an error message when a user enters multiple incorrect passcodes
- Custom Lock Message: Enter a custom error message to display after too many failed attempts
- Show Error Message: Select this option to display an error message when a user enters multiple incorrect passcodes
- Redirect User: Enable this option to redirect users after they exceed the failed passcode limit.
- Redirect URL: Add a URL where the users should be redirected
- Disable Passcode: Choose to temporarily disable the passcode field
- Disable Duration: Enter specific minutes for which the passcode field should remain hidden.
FAQs
↑ Back to topQ1. How to hide specific products in WooCommerce?
To hide specific products, you can use the Hide Products for WooCommerce plugin. Once the plugin is installed and activated, you can follow the steps mentioned below:
- Go to WP Admin Panel > WooCommerce> Hide Products and select Rules
- Select Add New Hide Rule and add a custom title
- From the Lock Conditions, select Products and choose Equals To
- Select the products you want to hide from customers
- From Product Restriction Settings, you can choose to hide the whole product or just hide its price and add-to-cart button.
- You can also replace add-to-cart button with any custom text or link
- If you choose to hide the whole product, then you can also hide it from the catalog and internal search results.
Q2. How to hide products by price, type, or dimension in WooCommerce?
To hide products based on their type dimension or price, you can use Koala App’s Hide Product for WooCommerce extension. Activate the plugin and then follow the steps below:
- Go to WP Admin Panel> WooCommerce> Hide Products > Rules
- Select Add New Hide Rule and enter a title
- Under Lock Conditions, select the condition type you want to use.
- You can hide products based on their category, tags, brand, price, dimension, attribute, shipping class, or physical/virtual status.
- Add the minimum/maximum values for the selected condition and create multiple groups.
- You can click Add Another Condition to add multiple conditions to the same rule.
- Select “Not Equal To” if you want to show the selected products or categories instead.
Q3. How to protect hidden WooCommerce products with a passcode?
To allow customers to access hidden products using a passcode, you can configure Hide Product for WooCommerce extension. Activate the plugin and follow these steps:
- Go to WP Admin Panel > WooCommerce> Hide Products > Rules
- Fill in the rule title, add multiple visibility conditions, and configure restriction settings
- Under Permit Product View, select Access with Passcode and set the required passcode
- The passcode field will appear below the hidden item
- Go to WooCommerce > Settings > Hide Product to customize the passcode page
- From this section, you can select the background type for the passcode page: blur, image, or color
- Customize the passcode page icon, heading, content, description, and placeholder.
- Under Security settings, enable Limit Passcode Attempts to restrict the number of incorrect attempts.
- Add a maximum number of failed attempts and choose an action such as show an error message, redirect users, or disable the passcode for specific minutes.
Q4. How to allow selected customers to access hidden WooCommerce products?
To allow selected customers to view hidden products, you can use the Permit Product View settings. Follow the steps mentioned below:
- Go to WP Admin Panel > WooCommerce > Hide Products > Rules and create or edit a hide product rule.
- From Permit Product View, select the condition you want to use for providing access.
- You can allow access based on specific IP addresses, IP ranges, email domains, user roles, countries, or states.
- You can also select Access with Passcode and set a passcode that users must enter to view the hidden product.
- Alternatively, select Access Via Secret Link to create a secret link that customers can use to access the product.

