
CSV Order Status Changer for WooCommerce updates the statuses of existing orders from a CSV file. You can preview proposed changes, control customer status emails, and process updates interactively or in the background.
This guide explains how to prepare a file, validate it, apply updates, and review the results. The extension does not create orders, import tracking numbers, or change order items and totals.
Requirements
↑ Back to top- WordPress 6.8 or later.
- WooCommerce 7.1 or later, installed, and active.
- PHP 7.4 or later.
- A WordPress account with permission to manage WooCommerce.
The extension supports High-Performance Order Storage (HPOS) and legacy order storage, and is compatible with Cart and Checkout Blocks. Background processing uses the scheduler included with WooCommerce; no separate service account is required.
Installation
↑ Back to topTo start using a product from WooCommerce.com, you can use the “Add to store” functionality on the order confirmation page or the My subscriptions section in your account.
- Navigate to My subscriptions.
- Find the Add to store button next to the product you’re planning to install.
- Follow the instructions on the screen, and the product will be automatically added to your store.
Alternative options and more information at:
Managing WooCommerce.com subscriptions.
After activation, open WooCommerce > Order Status CSV. This is where you upload files, select processing and email options, and review results.
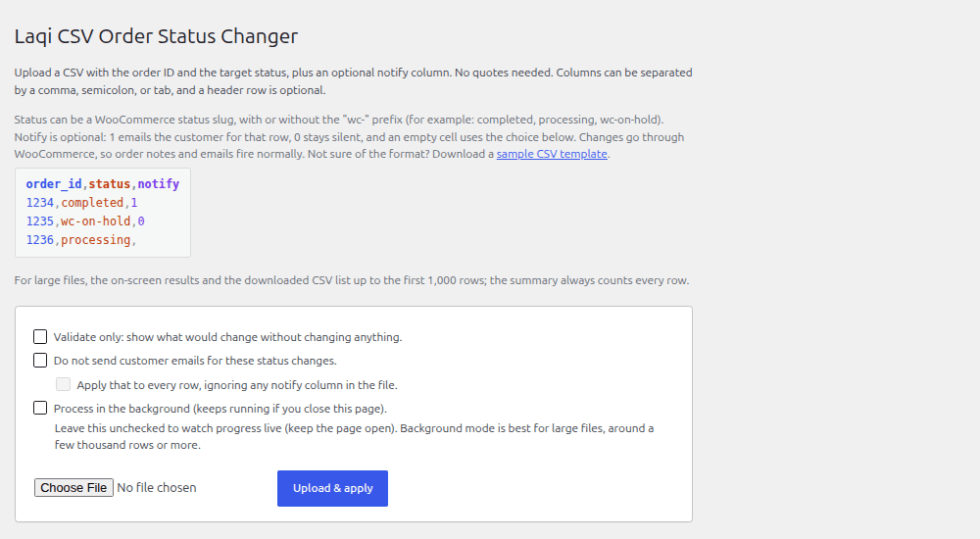
Before you start
↑ Back to topStart by preparing your CSV, validate the proposed changes, then choose your email and processing options. The sections below take you through each step.
Prepare your CSV
↑ Back to topDownload a sample
↑ Back to top- Open WooCommerce > Order Status CSV.
- Select the sample CSV template link in the instructions.
- Open the file in your spreadsheet application. Replace its example rows with the orders and statuses you intend to update.
- Save the file as CSV, rather than an Excel workbook (.xlsx).
The sample contains example rows using a selection of statuses registered on your store. Replace the example order IDs and statuses with the updates you intend to make.
Required columns
↑ Back to topUse order_id for the existing WooCommerce order ID and status for its target status. Each row can specify a different target. For example:
order_id,status
1234,completed
1235,on-hold
1236,processing
Replace 1234, 1235, and 1236 with your own order IDs. Use the numeric ID WooCommerce assigns to the order. An extension may display a different order number, so confirm the original ID if your store uses custom numbering. IDs must be positive whole numbers; text, decimal values, negative numbers, and empty IDs are skipped.
Use the status identifier, such as on-hold, rather than its display label, such as “On hold.” The wc- prefix is optional: completed and wc-completed identify the same status. Custom statuses must already be registered on your store.
Optional customer email column
↑ Back to toporder_id,status,notify
1234,completed,1
1235,wc-on-hold,0
1236,processing,The optional notify column controls customer status emails per row. Use 1 to allow the normal notification, 0 to suppress it, or leave the cell empty to follow the screen setting. The Customer email settings section explains the file-wide override.
Headers and separators
↑ Back to topA header row is optional. With the headers order_id, status, and optionally notify, columns can appear in any order. Without headers, the order must be order ID, status, then optional notify.
The plugin automatically recognizes comma, semicolon, and tab separators, including UTF-8 CSV files exported by Excel.
Validate the file
↑ Back to top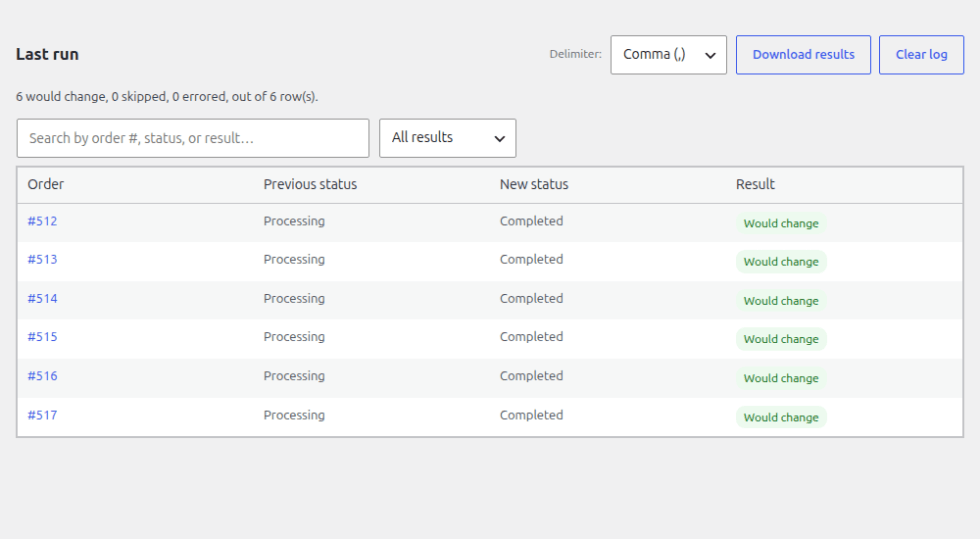
- Open WooCommerce > Order Status CSV and select your CSV file.
- Enable Validate only: show what would change without changing anything.
- Leave background processing unchecked for an interactive preview, and keep the page open.
- Select Upload and apply. With Validate only selected, this button starts validation and does not apply the changes.
- Review the summary and results. Correct invalid IDs, missing orders, and unknown statuses in your source file.
- Upload the corrected file and validate again if you made changes.
Would change means the order exists, the target status is available, and its current status differs. Validation does not change orders or send customer status emails. It checks the file and current orders without running the integrations triggered by an actual status change.
Customer email settings
↑ Back to topChoose whether the imported status changes should send normal WooCommerce customer emails. The optional notify column takes priority over the default screen setting, unless you enable the override for every row.
| Setting or CSV value | Customer status email behavior |
|---|---|
notify=1 | Allows the normal WooCommerce notification for that row. |
notify=0 | Suppresses the notification for that row. |
| Notify is empty or the column is absent | Follows Do not send customer emails for these status changes: checked suppresses notifications; unchecked allows them. |
| Both suppression options are checked | Suppresses notifications for every imported row, including rows with notify=1. |
To suppress customer status emails for the entire file, enable Do not send customer emails for these status changes, then Apply that to every row, ignoring any notify column in the file.
Allowing notifications follows WooCommerce’s normal email rules; it does not force an email for every status. The same controls apply in interactive and background mode, including queued WooCommerce status emails. Administrator notifications, order notes, and emails for unrelated orders continue normally. Messages sent independently by another integration may have separate settings.
Apply the updates
↑ Back to topInteractive processing
↑ Back to top- Select the validated CSV file again.
- Leave Validate only unchecked.
- Choose the customer email settings for this run.
- Leave Process in the background unchecked.
- Select Upload and apply.
- Keep the page open until processing finishes, then review the summary and results.
The screen updates progress as orders are processed. Each applied change uses WooCommerce’s normal order update process, including order notes and status-change actions.
Background processing
↑ Back to top- Select the validated CSV again, leave Validate only unchecked, and choose the customer email settings.
- Enable Process in the background (keeps running if you close this page).
- Select Upload and apply.
- After the job starts, you can leave the page. Return to WooCommerce > Order Status CSV to check its progress and results.
Background processing depends on your store’s scheduled tasks. Progress moves in batches and can pause between them. Refresh status checks the latest progress; it does not make the next batch run sooner.
Cancel a running job
↑ Back to topSelect Cancel job and confirm to stop the remaining work. Completed changes remain, and a row already in progress may finish. Canceling also clears the job’s saved results, so download the currently recorded results first if you need them.
Review and download results
↑ Back to top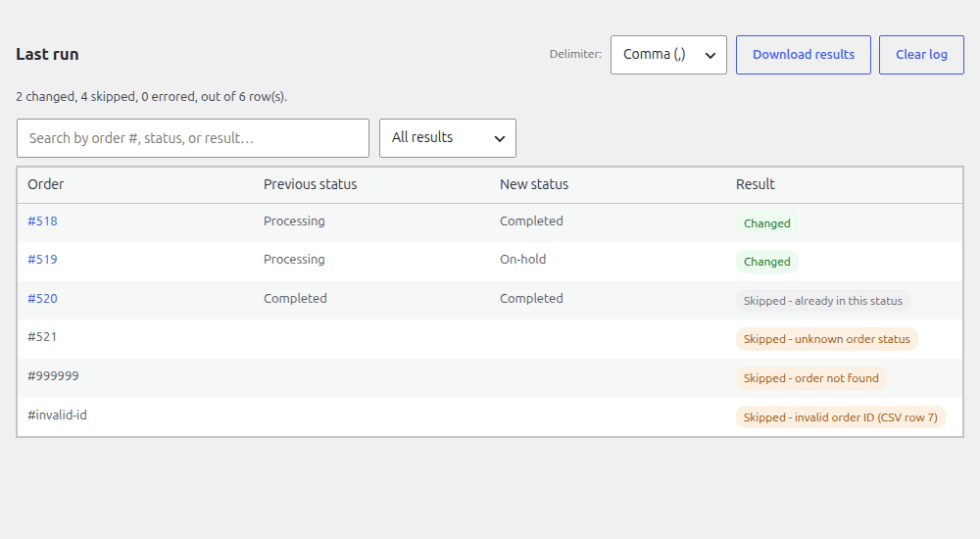
- Changed: The order moved to the target status.
- Would change: Validation found a proposed change without applying it.
- Skipped: The order already had the target status.
- Needs attention: The row has an invalid ID, an unknown status, or an order that could not be found. These rows count toward the skipped summary total.
- Errored: The status change could not be completed or confirmed. Check the order itself before retrying.
Search by order number, status, or result text, and use the result filter to narrow the displayed rows. Where an order link is available, open it to inspect the order and its notes.
Invalid IDs are displayed with the entered value and CSV row number. Row numbering includes the header and blank rows. Invalid IDs have no order link and do not change an order.
Download the result log
↑ Back to top- Wait for the run to finish to capture its final recorded results.
- Choose Comma (,), Semicolon (;), or Tab in the Delimiter selector.
- Select Download results and save the CSV.
The screen and download retain the first 1,000 result rows; summary counts cover the whole run. To keep a detailed result for every row, use files of no more than 1,000 data rows and download each result before starting another run. Search and filters apply to the recorded rows. The download includes all recorded results, regardless of the current search or filter.
Download results before starting another run or selecting Clear log. Clear log removes the saved results from the plugin screen and cannot be undone; it does not reverse order updates or remove their order notes.
Troubleshooting
↑ Back to topThe file will not upload
↑ Back to topMake sure the file is saved as CSV. Hosting upload, request, storage, and PHP limits still apply even though the plugin has no row-count limit. Try a smaller CSV. If that works, split the remaining file or ask your host to check the applicable limits.
The result says invalid order ID
↑ Back to topUse the CSV row number in the result to find the entry, then check the intended order’s original WooCommerce ID. Replace the entry with that confirmed ID and validate again. Do not guess the ID by removing characters from a custom order number.
The result says order not found
↑ Back to topCheck that the order exists on this store and that you used its internal ID. Order IDs from another store or a different copy of the database may identify different orders or no order at all.
The result says unknown order status
↑ Back to topCheck the status identifier against the status registered on your store. The sample template contains examples, not a complete list. For a custom status, check the identifier in the extension that provides it and confirm the extension is active.
A background job stops progressing
↑ Back to top- If the screen offers Resume, select it to queue the next batch.
- If the problem returns, open WooCommerce > Status > Scheduled Actions and check for failed or overdue processing actions.
- Ask your host or site administrator to check WordPress scheduled tasks and WooCommerce Action Scheduler.
- If you decide to cancel and use interactive processing, inspect the orders already processed and prepare the remaining work first.
A short gap between background batches is normal. Use Refresh status to check the latest progress.
An interactive run stops progressing
↑ Back to topKeep the processing tab open and check your internet connection. If the screen reports an error, record it and reload the plugin page to inspect the current job. Review existing progress before starting replacement work. Contact support if it repeatedly stalls.
A row reports an error
↑ Back to topOpen the order and check its current status and notes before retrying. A status-change action may fail after some work has already happened. The plugin continues with later rows, but it cannot roll back changes made by other integrations. Include the result and relevant WooCommerce logs in a support request.
Customers received unexpected emails
↑ Back to topCheck whether the file contains notify=1 and whether both suppression options were enabled. Use the Customer email settings table above to check their priority. If another extension sends its own messages, review that extension’s settings too.
Expected customer emails were not sent
↑ Back to topCheck that neither the row nor the screen suppressed the notification. Confirm the order actually changed status and the relevant notification is enabled in WooCommerce > Settings > Emails. Allowing notifications does not force an email for every status or confirm delivery.
Frequently asked questions
↑ Back to topCan I use custom order statuses?
↑ Back to topYes. Use the exact identifier of a status registered on your store. For statuses added by another extension, check that extension’s settings or documentation for the identifier.
Will uploading the same file change orders again?
↑ Back to topOrders already in the requested status are skipped. If an order’s status has changed since the previous run, processing the same row can change it again and trigger the associated actions. Validate and review before rerunning a file.
Can I undo a run?
↑ Back to topThere is no automatic rollback. Review the orders and recorded previous statuses to plan any corrections. Moving an order back is another status change and may trigger notifications or integrations; it does not undo their earlier effects.
Does changing a status issue a refund or collect a payment?
↑ Back to topThis is an order-status tool, not a payment or refund import tool. Do not treat a status update as confirmation that money has moved. WooCommerce and connected integrations may react to status changes, so verify financial transactions in the appropriate system.
Get support
↑ Back to topFor help with a WooCommerce.com purchase, open WooCommerce support and select CSV Order Status Changer. Your request will be routed to Laqi Logistics.
Include your plugin, WordPress, and WooCommerce versions; whether you used validation, interactive, or background processing; the result message; and the steps that led to the problem. If a sample CSV is needed, remove unnecessary customer information and provide it through the private support request.
Developer reference
↑ Back to topThese hooks are for developers customizing version 1.15.8. Store owners do not need code changes for normal use.
laqi_cosc_chunk_size: Filter the number of rows in an interactive request. Default:1.laqi_cosc_batch_size: Filter the number of rows in a background batch. Default:25.laqi_cosc_batch_delay: Filter the delay between background batches in seconds. Default:0.laqi_cosc_order_note: Filter the note added during an applied change. Receives the note, order ID, and target status without thewc-prefix.laqi_cosc_after_process: Action fired when a run completes, receiving its result-log array. The log is capped at 1,000 entries. This action also runs on completed validation jobs; it is not proof that orders changed.laqi_cosc_enable_logging: Return true to log caught status-change exceptions to WooCommerce logs. Disabled by default; the log source iscsv-order-status-changer.
Test customizations on a staging store. Larger batch sizes increase work per request. Keep credentials and unnecessary customer information out of custom logs and order notes.