
Dropshipfy helps you manage a dropshipping workflow directly from your WooCommerce store.
This guide covers installation, initial setup, product configuration, settings, shortcodes, and common troubleshooting steps.
Before you begin
↑ Back to top- Make sure WooCommerce is installed and active.
- Have the Dropshipfy plugin ZIP file available on your computer.
- Decide how customers should access dropshipping: only users with the dedicated Dropshipper role, or anyone including guests and regular customers.
- Decide whether you want to use your regular WooCommerce prices or set separate dropshipping prices.
How Dropshipfy works: Choose which products to offer, control access through the dedicated Dropshipper role or allow anyone to participate, configure pricing and fees, and manage all dropshipping orders from one place..
1. Install and activate Dropshipfy
↑ Back to top- Log in to your WordPress admin dashboard.
- Go to Plugins > Add New Plugin.
- Click Upload Plugin.
- Click Choose File and select the Dropshipfy ZIP file.
- Click Install Now.
- When installation is complete, click Activate.
After activation, open WooCommerce > Dropshipping in your WordPress admin sidebar. The Dropshipfy dashboard and settings will be available there.
2. Open the Dropshipfy dashboard
↑ Back to topGo to WooCommerce > Dropshipping and select the Dashboard tab.
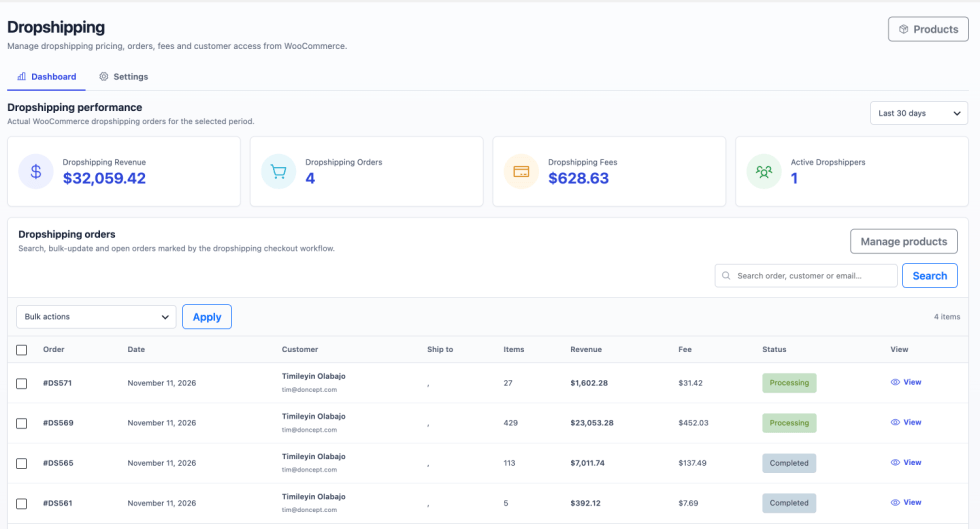
The dashboard provides an overview of your dropshipping activity for the selected date range. It includes:
- Dropshipping Revenue: Revenue from dropshipping orders.
- Dropshipping Orders: Number of dropshipping orders.
- Dropshipping Fees: Fees recorded for dropshipping orders.
- Active Dropshippers: Number of active Dropshippers.
- Dropshipping Orders Table: A searchable list of dropshipping orders, including order number, date, customer, shipping destination, item count, revenue, fee, status, and a link to view each order.
Use the date filter to change the reporting period. You can search the orders table by order number, customer name, or email address. You can also select orders and use the available bulk actions to update their statuses.
3. Configure general settings
↑ Back to topGo to WooCommerce > Dropshipping > Settings. Start with the General section. These settings control the main dropshipping workflow, user access, and order identification.
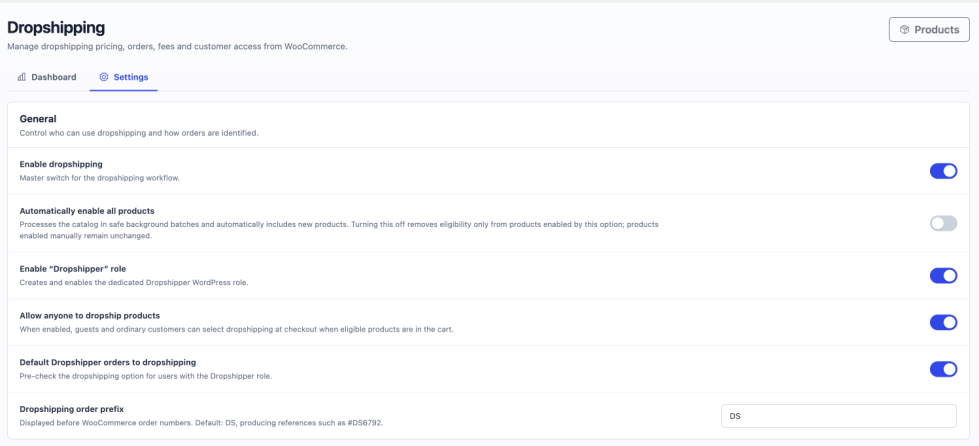
Enable dropshipping
↑ Back to topThis is the main switch for the Dropshipfy workflow. Turn it on to make dropshipping available on your store. Turn it off to disable the dropshipping workflow across the store.
Automatically enable all products
↑ Back to topEnable this option to make your product catalog available for dropshipping automatically. Dropshipfy processes products in background batches and also includes new products as they are added to your store.
When you turn this option off, it removes dropshipping eligibility only from products enabled through this automatic option. Products you enabled manually remain unchanged.
Use this setting when you want your entire catalog, including future products, to be available for dropshipping. Leave it off when you prefer to choose eligible products yourself.
Enable the “Dropshipper” role
↑ Back to topThis option creates and enables the dedicated Dropshipper WordPress user role. Turn it on if you want to limit dropshipping access to users assigned this role.
Enabling the role makes it available on your site. It does not automatically assign the role to existing users.
Allow anyone to dropship products
↑ Back to topWhen enabled, guests, and regular customers can select the dropshipping option at checkout when eligible products are in their cart. When disabled, the checkout option is limited to users with the Dropshipper role.
Choose the access model that fits your store. For a role-restricted program, leave this option off. To let any customer or guest choose dropshipping at checkout, turn it on.
Default Dropshipper orders to dropshipping
↑ Back to topWhen enabled, the dropshipping option is pre-selected at checkout for users with the Dropshipper role. This saves those customers from having to select it manually for each order.
Dropshipping order prefix
↑ Back to topUse this field to add a custom prefix to dropshipping order numbers. The default prefix is DS, producing references such as #DS6792.
To change it:
- Find Dropshipping order prefix in the General section.
- Enter the prefix you want to use.
- Save your settings.
The updated prefix applies to new dropshipping orders going forward. Existing order references are not changed.
4. Configure product display
↑ Back to topThe Product display section controls where eligible dropshipping products appear and which audiences can see them. These visibility settings are separate from the settings that determine who can select dropshipping at checkout or access dropshipping pricing.
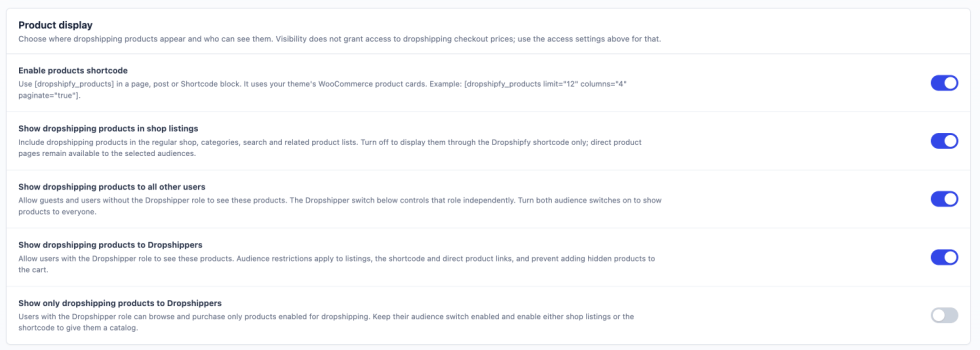
Enable products shortcode
↑ Back to topTurn this option on to use the Dropshipfy products shortcode on a WordPress page or post. The shortcode displays products using your theme’s WooCommerce product cards.
Use the shortcode in a Gutenberg Shortcode block:
[dropshipfy_products]You can also use the example below to display up to 12 products in four columns with pagination enabled:
[dropshipfy_products limit="12" columns="4" paginate="true"]Add the shortcode to the page where you want the dropshipping catalog to appear, then publish or update the page.
Show dropshipping products in shop listings
↑ Back to topTurn this on to include eligible dropshipping products in your regular WooCommerce shop, category pages, search results, and related product lists.
Turn it off if you want to display dropshipping products through the Dropshipfy shortcode instead. Direct product pages remain available according to the audience visibility settings.
Show dropshipping products to all other users
↑ Back to topThis setting controls whether guests and users without the Dropshipper role can see eligible dropshipping products. It controls product visibility, not checkout eligibility by itself.
Show dropshipping products to Dropshippers
↑ Back to topTurn this on to allow users with the Dropshipper role to see eligible dropshipping products. Audience restrictions apply to shop listings, the shortcode, and direct product links. Products hidden from an audience cannot be added to the cart by that audience.
Show only dropshipping products to Dropshippers
↑ Back to topWhen enabled, users with the Dropshipper role can browse and purchase only products that are enabled for dropshipping.
To provide a catalog to Dropshippers, keep Show dropshipping products to Dropshippers enabled and make products available through shop listings or the shortcode.
Important: Product visibility and dropshipping access are different controls. The Product display settings determine which products an audience can see. The General setting Allow anyone to dropship products determines whether guests and regular customers can select the dropshipping option at checkout.
5. Configure dropshipping prices
↑ Back to topOpen the Pricing section under WooCommerce > Dropshipping > Settings.
Enable dropshipping prices
↑ Back to top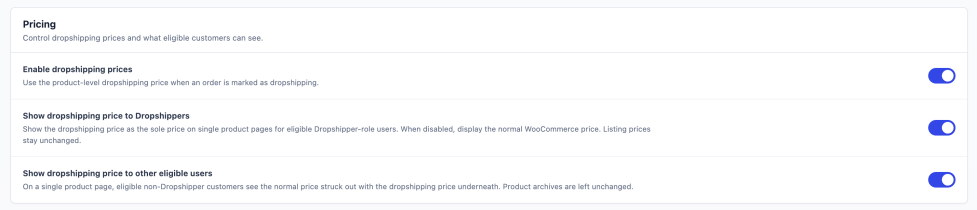
Turn this on to use the dropshipping price entered on a product when an order is marked as a dropshipping order. If this option is off, the regular WooCommerce product price is used.
Show dropshipping price to Dropshippers
↑ Back to topWhen enabled, users with the Dropshipper role see the dropshipping price as the displayed price on the single product page. When disabled, they see the regular WooCommerce price on that page.
This setting affects single product pages. Shop and category listing prices remain unchanged.
Show dropshipping price to other eligible users
↑ Back to topEnable this setting to show the dropshipping price to other eligible users on the single product page. The regular price appears crossed out, with the dropshipping price displayed underneath it.
Product archive and shop listing prices remain unchanged by this setting.
6. Configure checkout options
↑ Back to topThe Checkout section lets you customize the dropshipping option shown to customers and how shipping details are collected.
Checkout checkbox label
↑ Back to topThis is the text displayed beside the dropshipping checkbox at checkout. The default label is This is a Dropshipping order.
You can change the label to match the wording used by your business. For example, you may use “This order is for dropshipping” or another clear description.
Require an end-customer shipping address
↑ Back to topEnable this option if the dropshipper should provide the end customer’s shipping address during checkout. When selected, Dropshipfy automatically opens the Ship to a different address fields and validates the main shipping fields.
Leave it disabled if the standard checkout shipping address is sufficient for your workflow.
7. Configure dropshipping fees
↑ Back to topThe Dropshipping fee section lets you add a fee to the checkout total when a customer selects the dropshipping option. The fee is optional and is disabled unless you enable Add a dropshipping fee.
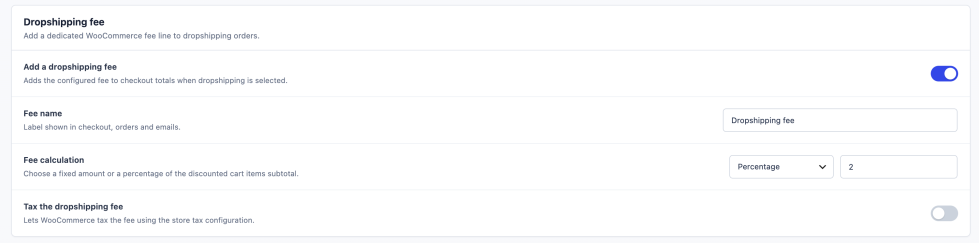
Add a dropshipping fee
↑ Back to topTurn this on to apply the configured fee to checkout totals when dropshipping is selected.
Fee name
↑ Back to topEnter the label customers will see for the fee in checkout, orders, and emails. For example, you could use Dropshipping fee or another label that describes the charge.
Fee calculation
↑ Back to topChoose how the fee is calculated:
- Fixed amount: Adds a set amount to the order.
- Percentage: Calculates the fee as a percentage of the discounted cart items subtotal.
Enter the amount or percentage after choosing the calculation method.
Tax the dropshipping fee
↑ Back to topEnable this option to let WooCommerce apply tax to the fee using your store’s tax configuration.
The fee name, calculation, and tax options take effect only when Add a dropshipping fee is enabled.
8. Configure email notifications
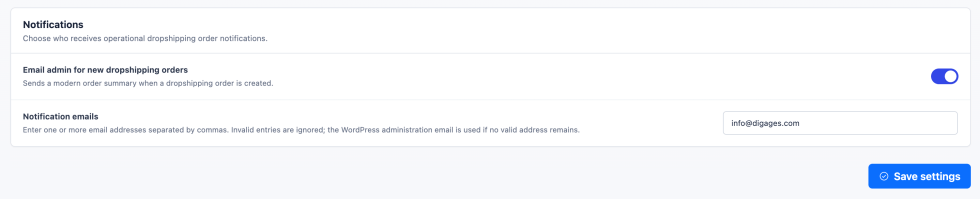
↑ Back to topIn the Notifications section, you can control whether an admin notification is sent when a new dropshipping order is created and where that notification is delivered.
Email admin for new dropshipping orders
↑ Back to topEnable this option to send an order summary email when a dropshipping order is created.
Notification emails
↑ Back to topEnter one or more email addresses to receive the notifications. Separate multiple addresses with commas.
Invalid email addresses are ignored. If no valid address remains, Dropshipfy uses the WordPress administration email address.
After updating the notification settings, click Save settings.
9. Make products available for dropshipping
↑ Back to topYou can make products available for dropshipping automatically, in bulk, or individually.
Automatically enable all products
↑ Back to topTo make the entire catalog available, go to WooCommerce > Dropshipping > Settings > General and enable Automatically enable all products. Dropshipfy processes the catalog in background batches and automatically includes new products.
Remember that turning this option off removes eligibility only from products enabled by this automatic setting. Products enabled manually remain enabled.
Enable dropshipping for multiple products
↑ Back to top- Go to Products > All Products in your WordPress dashboard.
- Select the products you want to make available for dropshipping using the product checkboxes.
- Open the Bulk actions menu.
- Choose Enable dropshipping.
- Click Apply.
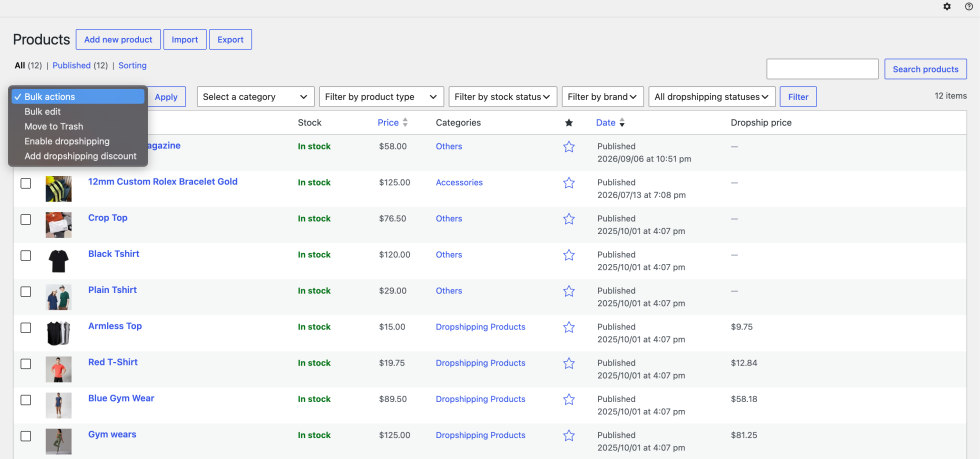
Use the product list filters, including the dropshipping status filter, to help locate products and review their availability. You can also open the product list using the Products button on the Dropshipfy dashboard or the Manage products button above the dropshipping orders table.
Enable dropshipping for an individual product
↑ Back to top- Go to Products > All Products.
- Find the product and click Edit.
- In the Product data panel, open the General tab.
- Enable Enable dropshipping.
- If you want to use a separate dropshipping price, enter it in the Dropshipping price field.
- Click Update or Publish to save the product.
A product must be enabled for dropshipping to become eligible. The separate dropshipping price is used only when Enable dropshipping prices is also turned on in the Pricing settings and the order is marked as a dropshipping order.
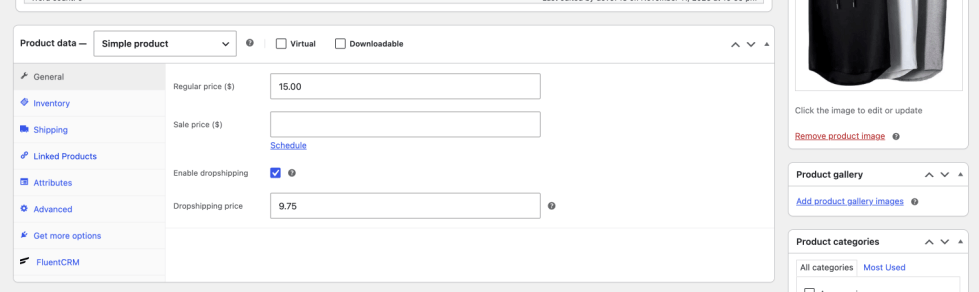
If a product has no dropshipping price, its regular WooCommerce price is used for the dropshipping order.
10. Set up dropshipper access
↑ Back to topDropshipfy provides a dedicated Dropshipper WordPress user role. You can use this role to limit access to your dropshipping workflow, or allow other customers and guests to select dropshipping at checkout.
Assign the Dropshipper role to a user
↑ Back to top- Go to Users > All Users in your WordPress dashboard.
- Find the user account you want to update and click Edit.
- Locate the Role field.
- Select Dropshipper.
- Click Update User.
To create a new WordPress user with this role, use Users > Add New and select Dropshipper as the role before saving the account.
Choose your access model
↑ Back to top- Dropshipper-only access: Keep Allow anyone to dropship products disabled. Only users with the Dropshipper role can select the dropshipping option at checkout.
- Open access: Enable Allow anyone to dropship products. Guests and regular customers can then select the dropshipping option at checkout when eligible products are in their cart.
The audience visibility options in Product display should also be configured to match who you want to see the products. Showing a product to an audience does not, by itself, grant that audience access to dropshipping checkout pricing.
11. What customers see at the storefront and checkout
↑ Back to topThe customer experience depends on the access, visibility, and pricing settings you choose.
Product pages
↑ Back to topIf the relevant price display option is enabled, eligible users can see the dropshipping price on the single product page. Depending on the setting, the dropshipping price may appear by itself or underneath the regular price, which is crossed out.
The price display settings do not change the prices shown in shop and category product listings.
Checkout
↑ Back to topWhen eligible products are in the cart, an eligible customer can select the dropshipping checkbox. The checkbox text comes from Checkout checkbox label.
If Default Dropshipper orders to dropshipping is enabled, the option is pre-selected for users with the Dropshipper role. If Require an end-customer shipping address is enabled, the additional shipping address fields open and the main shipping fields are validated. If a dropshipping fee is enabled, it is added to the checkout total when the dropshipping option is selected.
12. Use the Dropshipfy products shortcode
↑ Back to topThe Dropshipfy shortcode lets you display eligible dropshipping products on a specific WordPress page or post instead of relying only on the regular shop listings.
- Go to WooCommerce > Dropshipping > Settings.
- In Product display, enable Enable products shortcode.
- Open the WordPress page or post where you want the catalog to appear.
- Add a Shortcode block in Gutenberg.
- Paste the shortcode into the block.
- Publish or update the page.
Basic shortcode:
[dropshipfy_products]Example with display options:
[dropshipfy_products limit="12" columns="4" paginate="true"]The example requests 12 products, displays them in four columns, and enables pagination. The products use your theme’s WooCommerce product card design.
Product visibility restrictions also apply to the shortcode. Make sure the relevant audience visibility settings are enabled for the people who should see the catalog.
13. Manage dropshipping orders
↑ Back to topDropshipping orders are available in WooCommerce > Dropshipping > Dashboard, in the Dropshipping orders table. They also appear in the standard WooCommerce Orders screen alongside regular store orders.
From the Dropshipfy dashboard, you can:
- Identify orders using the configured dropshipping order prefix.
- Search by order number, customer name, or email address.
- Review the order date, customer, shipping destination, item count, revenue, fee, and status.
- Select multiple orders and apply a bulk status action.
- Open an individual order using View.
Available bulk status actions include Pending payment, Draft, Processing, On hold, Completed, Cancelled, Refunded, Failed, and Abandoned.
14. Recommended setup checklist
↑ Back to topBefore making Dropshipfy available to customers, review the following:
- Confirm Enable dropshipping is turned on.
- Choose whether to enable all products automatically or select products manually.
- Decide whether dropshipping is limited to the Dropshipper role or open to guests and regular customers.
- Configure product visibility for the relevant audiences.
- Enable dropshipping prices if you plan to use separate prices, and enter those prices on eligible products.
- Decide whether to charge a dropshipping fee. If so, configure its name, calculation method, amount, and tax setting.
- Set a recognizable order prefix so dropshipping orders are easy to identify.
- Configure the checkout label and decide whether an end-customer shipping address is required.
- Set the notification recipients and enable admin email notifications.
- If using the shortcode, enable it and test the page where it appears.
- Place a test order using the customer access model you plan to offer. Check the product visibility, checkout option, price, fee, shipping fields, order reference, dashboard entry, and admin notification.
15. Troubleshooting
↑ Back to topCustomers cannot see the dropshipping option at checkout
↑ Back to top- Confirm Enable dropshipping is turned on in General settings.
- If access is restricted, confirm the customer has the Dropshipper role and is logged in.
- If you want guests and regular customers to use the option, enable Allow anyone to dropship products.
- Confirm that at least one product in the cart is enabled for dropshipping.
The dropshipping price is not applied
↑ Back to top- Confirm Enable dropshipping prices is turned on in Pricing settings.
- Confirm the order is marked as a dropshipping order at checkout.
- Confirm the product is enabled for dropshipping and has a dropshipping price entered.
- If no dropshipping price is set for a product, its regular WooCommerce price is used.
The dropshipping price is not displayed on a product page
↑ Back to top- Check the relevant price display option in Pricing settings.
- For role-based display, confirm the user is logged in with the Dropshipper role.
- Remember that these display settings affect single product pages, not shop or category archive prices.
A dropshipping product is not visible
↑ Back to top- Confirm the product is enabled for dropshipping.
- Review Show dropshipping products in shop listings if you expect it to appear in the regular shop, category, search, or related product listings.
- Review the audience switches for all other users and Dropshippers.
- If using a shortcode, confirm Enable products shortcode is on and the shortcode is added to the page.
- Remember that audience restrictions also apply to shortcode results and direct product links.
The dropshipping fee is not added at checkout
↑ Back to top- Confirm Add a dropshipping fee is enabled.
- Confirm the checkout order is marked as a dropshipping order.
- Review the fee name, calculation type, and amount or percentage.
The admin email notification is not received
↑ Back to top- Confirm Email admin for new dropshipping orders is enabled.
- Check that the addresses in Notification emails are valid and separated by commas.
- If no valid recipient address remains, Dropshipfy uses the WordPress administration email address.
16. Frequently asked questions
↑ Back to topCan guests and regular customers place dropshipping orders?
↑ Back to topYes. Enable Allow anyone to dropship products in the General settings. Guests and regular customers can then select the dropshipping option at checkout when eligible products are in their cart.
Do I have to make every product available for dropshipping?
↑ Back to topNo. You can enable all products automatically, select multiple products using the bulk action, or enable dropshipping on individual product pages.
Do I have to set a separate dropshipping price for every eligible product?
↑ Back to topNo. Separate dropshipping prices are optional. If a product does not have a dropshipping price, its regular WooCommerce price is used when the order is marked as a dropshipping order.
Does Dropshipfy require a minimum order quantity?
↑ Back to topNo. Dropshipfy does not require a minimum order quantity to use dropshipping pricing.
Can I change the dropshipping order prefix?
↑ Back to topYes. Update Dropshipping order prefix in the General settings. The new prefix applies to new orders going forward.
Are dropshipping fees required?
↑ Back to topNo. Fees are optional. They are added only when Add a dropshipping fee is enabled and the checkout is marked as a dropshipping order.
Do dropshipping orders appear in WooCommerce Orders?
↑ Back to topYes. They appear in the Dropshipfy dashboard and in the standard WooCommerce Orders screen.
Does product visibility automatically give customers access to dropshipping prices?
↑ Back to topNo. Product display settings control who can see eligible products. Checkout eligibility and price display are controlled separately by the General and Pricing settings.
Can I display dropshipping products on a custom page?
↑ Back to topYes. Enable the products shortcode setting and add [dropshipfy_products] to a Gutenberg Shortcode block on the page or post.
Are dropshipping prices shown in shop and category listings?
↑ Back to topThe price display settings described above apply to single product pages. Shop and category archive listing prices remain unchanged.

