
Show shoppers when an item is expected to ship, arrive, or come back in stock. Set defaults for the store, then make exceptions for categories, individual products, or variations such as sizes and colors.
Requirements
↑ Back to top- WordPress 6.5 or newer.
- WooCommerce 8.0 or newer, installed, and active.
- PHP 8.1 or newer.
Installation
↑ Back to top- Download Delivery Lead Time from your WooCommerce.com account.
- In WordPress, go to Plugins → Add New Plugin → Upload Plugin.
- Select the ZIP file, click Install Now, then click Activate Plugin.
- Go to WooCommerce → Settings → Delivery Lead Times.
Show your first lead time
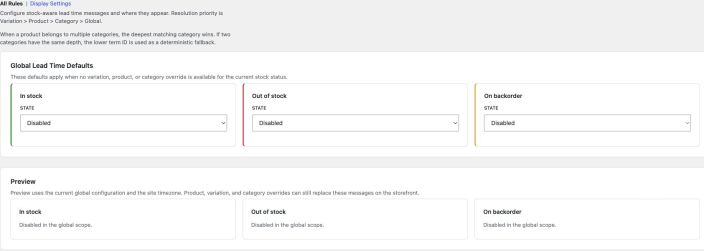
↑ Back to top- In WooCommerce → Settings → Delivery Lead Times, open All Rules.
- Under Global Lead Time Defaults, find In stock and set State to Enabled.
- Choose Static text for Message type. Enter “Dispatches in 2 business days” in Static message.
- Click Save changes, then check the In stock message in Preview.
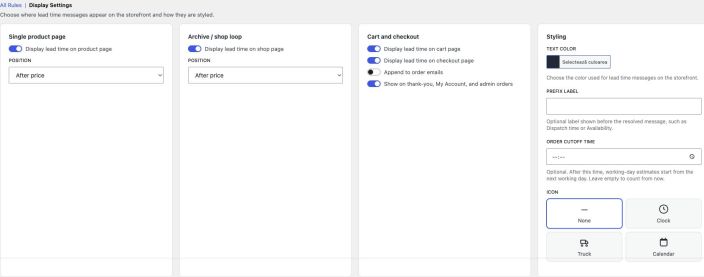
- Open Display Settings and make sure Display lead time on product page is on. Pick a Position, such as After price, and save any changes.
- View an in-stock product that uses the global rule and check the message near the price.
Repeat for Out of stock and On backorder if you want to show messages for those items. Each stock status has its own rule.
Choose a message type
↑ Back to top| Message type | When to use it | What to enter |
|---|---|---|
| Static text | You want to write your own message. | For example, “Dispatches in 2 business days” or “Restock expected next week.” |
| Date-based | You know the target dispatch, restock, or backorder shipping date. | Select a Target date. The extension adds wording based on stock status and stops using that rule once the date has passed. |
| Working days | You want a rolling estimate. | Enter the number of working days to add. The extension counts Monday through Friday and shows an estimated date. |
Working-day estimates use the time zone set in WordPress under Settings → General. Set Order cutoff time in Display Settings if you want estimates at or after that time to start from the next working day. On weekends, the extension starts from the next working day. Public holidays count as weekdays by default.
For example, with a 2:00 p.m. cutoff and a two-working-day rule, a Monday estimate before the cutoff lands on Wednesday. At or after the cutoff, it lands on Thursday.
Set exceptions
↑ Back to topThe extension checks rules for the current stock status in this order.
- Selected variation
- Product
- Product category
- Global default
At the variation, product, and category levels, Inherit higher scope checks the next rule, Use custom message applies the message you enter, and Hide message stops the search for that stock status. If a custom rule is blank or its date has passed, the extension checks the next rule. If a product belongs to several categories, the deepest assigned category with an applicable rule takes priority. At the same depth, WooCommerce’s lower category ID takes priority.
Change a product’s lead time
↑ Back to top- Go to Products and open the product you want to change.
- In Product data, select Lead time.
- For the relevant stock status, choose Use custom message and enter the message or estimate. Choose Hide message if you want to suppress the timing for that stock status.
- Update the product and check the storefront.
Change a variation’s lead time
↑ Back to top- Open a variable product and go to Product data → Variations.
- Expand a variation and find Lead time.
- Set the rule for its stock status, then click Save changes in the Variations panel.
- On the product page, select the variation and check its message.
On shop and archive pages, variable products use the parent product’s lead time because shoppers have yet to select a variation.
Change a category’s lead time
↑ Back to top- Go to Products → Categories and edit the category.
- Find its lead time settings and set the rule for the relevant stock status.
- Save the category and check a product assigned to it.
Choose where messages appear
↑ Back to topGo to WooCommerce → Settings → Delivery Lead Times → Display Settings.
| Setting | What it controls |
|---|---|
| Display lead time on product page | Turns on automatic placement on product pages. Choose a position near the title, price, description, add-to-cart control, or product details. |
| Display lead time on shop page | Shows the message on supported shop and archive layouts. Choose a position near the rating or price. |
| Display lead time on cart page | Shows timing next to each eligible cart item. |
| Display lead time on checkout page | Shows timing next to each eligible checkout item. |
| Append to order emails | Includes lead times beside order items in WooCommerce order emails. |
| Show on thank-you, My Account, and admin orders | Shows lead times in order details after purchase. |
| Text color, Prefix label, and Icon | Set the storefront text color, add a short label such as “Dispatch time,” or choose a clock, truck, or calendar. |
| Order cutoff time | Shifts the starting day for working-day estimates at or after the cutoff. Leave it blank if you do not use a cutoff. |
The Cart and Checkout blocks display the message as text beneath the item name. Use a fresh test order to check emails and the order details screens.
Place a message with the Product Lead Time block
↑ Back to topIn the WordPress block editor, add Product Lead Time where you want the message. In a product context, the block can use the current product. On a standalone page, enter the product ID in the block settings. Preview the page to check the message and review automatic placement if you see it twice.
Troubleshooting
↑ Back to topA product has no lead time
↑ Back to topCheck the product’s current stock status, confirm the relevant display option is on, and check for a Hide message rule on the variation, product, or category. If you use a date, verify it has not passed. Save your changes and refresh the product page. For a variable product, select a variation to see its own rule.
An estimate appears one day later than expected
↑ Back to topCheck the WordPress time zone, the cutoff time, and whether the estimate crosses a weekend. Working days begin counting after the starting day. Use the global Preview to check the storewide rule.
The message is missing from cart, checkout, or emails
↑ Back to topCheck the individual toggle for the affected location in Display Settings. Refresh cart and checkout after adding a product with a visible lead-time message. For emails, use a new test order and check the order email itself. If the problem persists, note whether the affected page uses WooCommerce blocks or the classic layout.
Can I set estimates by shipping zone or carrier?
↑ Back to topEstimates use the stock rules you set. Use your WooCommerce shipping settings to manage rates, methods, and zones.
Get help
↑ Back to topOpen a support request from your WooCommerce.com account. Include the affected product’s stock status, the rule you expect to apply, the affected page or email, and your WordPress, WooCommerce, and extension versions. A screenshot with customer information removed can help show where the message should appear.