
File Drop for WooCommerce lets customers upload files on the product page, cart page, and checkout page with their orders. Store owners set file types, size limits, upload rules, and who can upload, and they collect customer files and notes so each order can be produced accurately.
You can also show the file upload on the thank-you page, charge for an upload, require a file before checkout, and approve or reject files from the order screen.
Installation
↑ Back to top- Download File Drop for WooCommerce and keep the
.zipfile. - In WordPress, go to Plugins → Add New → Upload Plugin.
- Choose the
.zipfile and click Install Now. - After installation, click Activate. WooCommerce must already be active.
- Open WooCommerce → Settings → File Drop and continue to the configuration settings.
You can also upload the file-drop folder to /wp-content/plugins/ and activate it from the Plugins screen.
Configuration
↑ Back to topIn the admin panel, go to WooCommerce → Settings → File Drop. This is where you configure the WooCommerce file upload plugin.
The page has these sections:
- Rules — create and manage file upload rules for the product, cart, checkout, and thank-you pages
- General — custom file types, secure storage, emails, and upload button appearance
- Marketplace — shown only when Dokan or WCFM is active
Each section has its own Save changes button. File Drop does not use the main WooCommerce Save changes button at the bottom of the settings screen.
Add a file upload rule
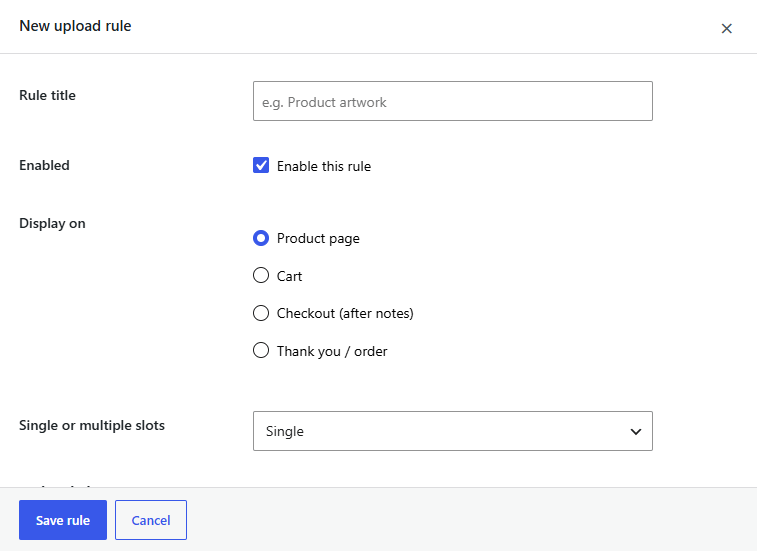
↑ Back to topGo to WooCommerce → Settings → File Drop → Rules and click Create rule. Configure the following:
- Rule title. Name the rule, for example “Product artwork.” This name appears in the rules list.
- Enabled. Enable or disable this file upload rule. You can also toggle a rule from the list.
- Display on. Choose the page where customers upload files for this rule:
- Product page
- Cart page
- Checkout page (after order notes)
- Thank you / order page
- Single or multiple slots. A slot is one upload field, such as “Front” and “Back.”
- Single shows one file upload.
- Multiple lets you add more than one file upload. Click Add slot for each extra file. Extra slots can be removed.
Settings for each file upload
↑ Back to topIf you select Single, one slot is shown. If you select Multiple, use Add slot and set each file upload on its own. Every slot has the same settings:
- Price. Optional charge when the customer uploads a file for this slot. Use
0for a free upload. - Discount type. None, Fixed, or Percent.
- Discount value. The fixed amount or the percent taken off the file price.
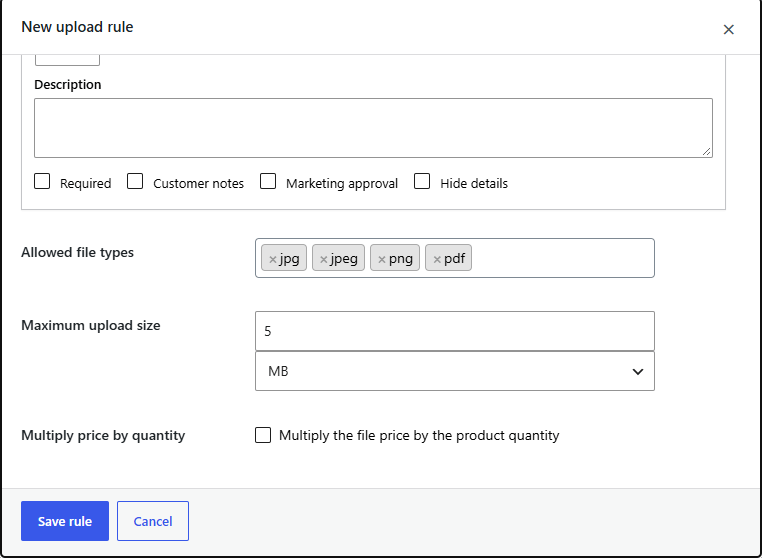
- Description. Short text that tells the customer what to upload.
- Required. The customer must upload the file before they can continue. A required file cannot be removed after upload. If you reject it, the customer can replace it.
- Customer notes. Shows a note field with the file upload.
- Marketing approval. Shows a checkbox that asks permission to use the file for marketing.
- Hide details. Hides the slot details on the storefront.
File type, size, and who can upload
↑ Back to topThese settings apply to the whole rule:
- Allowed file types. Select the file types customers can upload. Built-in types include images (jpg, jpeg, png, gif, webp, heic, heif, bmp), documents (pdf, doc, docx, xls, xlsx, ppt, pptx, txt, rtf, csv), audio, video, and archives (zip, rar, 7z). Custom extensions from the General section appear in this list. Executable file types are always blocked.
- Maximum upload size. Set the maximum file size in KB or MB.
- Multiply price by quantity. Multiplies the file upload price by the product quantity.
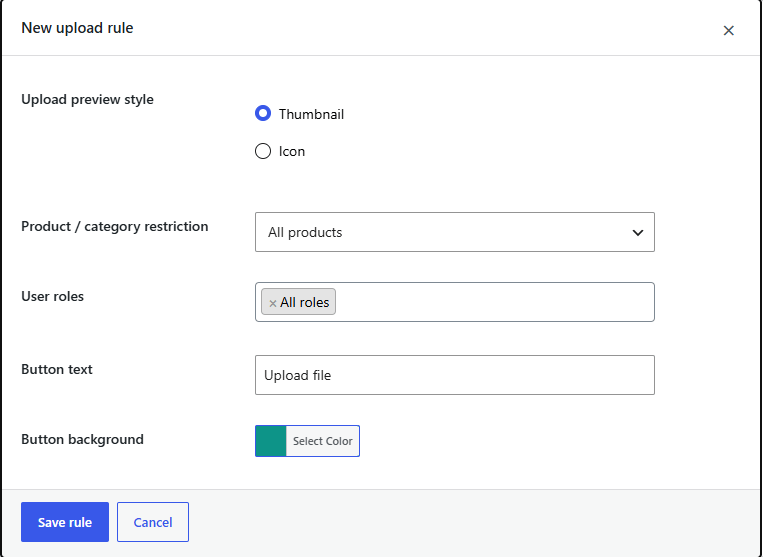
- Upload preview style. Thumbnail or Icon.
- Product / category restriction. Choose where the file upload is shown:
- All products
- Specific products
- Specific categories
- Include / exclude. Include only the selected products or categories, or show the upload on every product except the ones you select.
- User roles. Show the file upload only to selected roles, or leave it available to every customer.
Button settings
↑ Back to top- Button text. Text on the file upload button. The default is “Upload file.”
- Button background. Background color for this rule’s button.
- Button text color. Text color for this rule’s button.
Click Save rule.
Manage rules
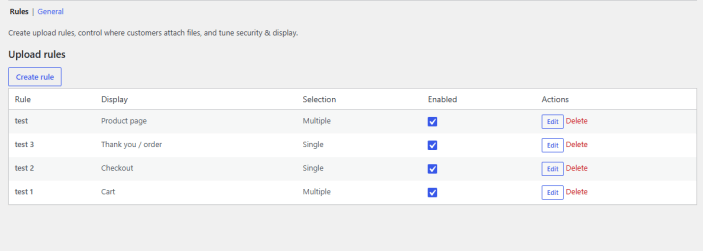
↑ Back to topTo manage rules, go to WooCommerce → Settings → File Drop → Rules.
Each rule shows its title, the page it appears on, whether it allows a single file or multiple files, and whether it is enabled.
- Use the checkbox to enable or disable a rule.
- Click Edit to change a rule.
- Click Delete to remove a rule.
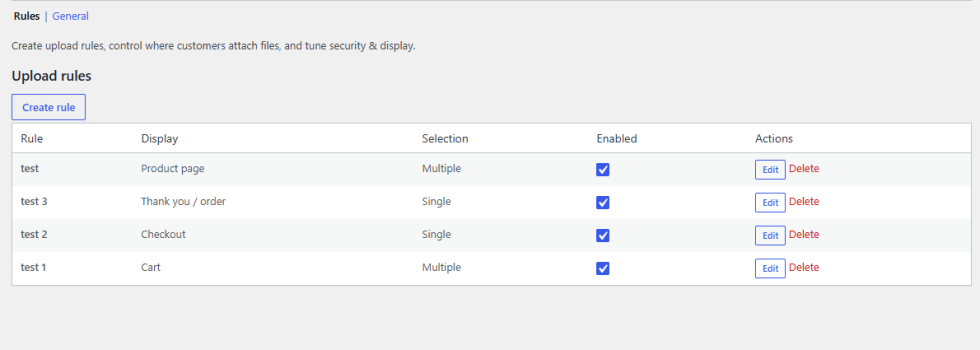
Customers do not see a file upload until at least one rule is enabled.
Custom file extensions
↑ Back to topGo to WooCommerce → Settings → File Drop → General.
In Extra extensions, enter file extensions separated by commas, for example ai, psd, eps. These extensions then appear in the allowed file types list when you edit a rule. Add them here before you select them on a rule. Executable types stay blocked even if you list them.

Additional settings
↑ Back to topStill on WooCommerce → Settings → File Drop → General, configure security, order behavior, and how the upload button looks.
Security and orders
↑ Back to top- Secure upload folder. Stores uploads in a protected folder and blocks direct access to the files. Stored file names are randomized, and files are not served as web pages.
- Use secure file links. Serves local uploads through signed links instead of a public file URL. Turn this on together with the secure upload folder.
- Upload directory. Folder name under
wp-content/uploads/where customer files are stored. - Order status when files are present. Choose the WooCommerce order status to apply when a file is uploaded, or choose No change to keep the normal order status.
- Disable mail on accept/reject. Stops the email that tells the customer a file was accepted or rejected.
- Send files as email attachments. Attaches the uploaded files to WooCommerce order emails.
Upload button settings
↑ Back to topThese styles apply across the store. A rule can still set its own button text and colors.
- Button layout. Drop zone, Minimal, or Pill.
- Uploaded item layout. Chip, Name only, or Name and image.
- Single or multiple upload buttons.
- One button (popup) opens a popup for the file upload. The popup shows the same slot details as the page. Set the heading with Popup header text.
- One button per slot shows a separate upload button for each file. Use this when a rule allows multiple files.
- Button icon. Cloud, Arrow up, Image, or None.
- Background, Text, Background hover, and Text hover. Colors for the file upload button.
- Button padding. Space inside the button.
- Default button text. Used when a rule does not set its own label.
- Show progress bar. Shows a progress bar while the file uploads.
- Enable image cropper. Lets customers crop an image before upload. PNG and WebP keep their format.
- Enable admin feedback notes. Lets you add a note when you accept or reject an uploaded file. The note is saved with the file and can be included in the customer email.
Click Save changes on this section.
Files column on WooCommerce orders
↑ Back to topGo to WooCommerce → Orders. A Files column shows which customers uploaded files and that the order has uploads attached.
View, download, and approve customer uploaded files
↑ Back to topOpen any order to view the files the customer uploaded. You can download each file and accept or reject it from the order.
- Customer notes appear under the file name when notes are enabled.
- Feedback notes appear when admin feedback is enabled.
- A rejected file can be replaced by the customer.
- A required file cannot be removed.
Note: After you accept or reject a file, update the order if WooCommerce asks you to save. When accept/reject email is enabled, the customer is notified.
Files uploaded on the product page are stored with the order line item. Files uploaded on the cart page, checkout page, or thank-you page are stored with the order.
While required artwork is still waiting for approval, the order can move to Awaiting artwork. When those files are approved, the status returns to Processing. On Dokan, the order cannot be marked complete while required artwork is still unapproved.
Uploaded files are also listed in order emails. Enable Send files as email attachments if the email should include the files.
Upload files with a shortcode
↑ Back to topPlace the file upload in page content with:
[file_drop]Optional attributes:
rule_id— show one rule by its IDposition—product,cart,checkout, orthankyou
Example:
[file_drop rule_id="12" position="product"]The shortcode still follows that rule’s product, category, and user-role limits.
Cart and Checkout blocks
↑ Back to topFile Drop adds the file upload to the WooCommerce Cart and Checkout blocks, including required product files for items already in the cart. Classic cart and checkout templates are supported as well. Checkout rules appear after the order notes field.
Check artwork before the file is accepted
↑ Back to topOn the product edit screen, File Drop preflight checks print artwork before the upload is accepted. Dokan vendors can set the same options on their product form.
- Enable. Turn the check on for this product.
- Preflight mode. Warn only, or block the upload and add to cart.
- Min width (px) and Min height (px).
- Min DPI.
- Print width (in) and Print height (in).
- Required PDF pages. Use
0to allow any page count. - Bleed and Trim size.
Marketplace file uploads (Dokan and WCFM)
↑ Back to topWhen Dokan or WCFM is active, go to WooCommerce → Settings → File Drop → Marketplace. These limits apply to every vendor file upload rule.
- Vendor max upload size (MB). The largest file a vendor rule may allow.
- Vendors may charge file fees. When this is off, vendors cannot add a price to a file upload.
- Force approval required on vendor rules. Vendor uploads must be approved.
- Extra blocked extensions. Comma-separated file types vendors cannot allow.
- File-fee commission rate %. Commission on file-upload fees. Leave this blank to use the marketplace product rate.
- Storage cap per vendor (MB). Use
0for unlimited storage. Vendors can see how much of the cap they have used. - Storage warning percent. When to warn that storage is nearly full.
- Retention days after completed. How long to keep files after the order is completed. Use
0to keep files. - Enable malware scan hook and Enable content flag hook. Turn these on when a scanner or moderation tool is connected to the site.
Vendors create rules from the File Drop area of their dashboard. They can set a title, the page, product IDs, allowed file types, maximum size, slot price, and whether the file is required. Marketplace limits still apply.
Production pack. On the vendor dashboard, choose a date range and click Build zip to download a zip of current approved files.
Compatibility
↑ Back to topThe WooCommerce file upload works with:
- WooCommerce High-Performance Order Storage
- Cart and Checkout blocks
- WPML
- Elementor and Divi product layouts
- Dokan and WCFM
FAQs
↑ Back to top
Is it possible to restrict the size or type of file the user uploads in WooCommerce?
Yes. The file upload rules let you set a maximum file size in KB or MB and restrict the file types a customer can upload. You can apply that limit to all products or to selected products and categories. Add custom extensions under General, then select them on the rule. Executable file types cannot be allowed.
Does the WooCommerce checkout file upload allow multiple file uploads?
Yes. Set the rule to Multiple and add a slot for each file. You can require any slot, set a price, and collect a customer note. One rule can cover the whole catalog, or only the products you select.
On which pages can customers upload files in WooCommerce?
Customers can upload files on the product page, the cart page, the checkout page after order notes, and the thank-you / order page. You can also place the uploader with the
[file_drop]shortcode.
Can customers upload a file on the WooCommerce product page before add to cart?
Yes. Create a rule, set Display on to Product page, and choose all products or selected products and categories. Mark the slot Required when the file must be attached before the customer continues.
How do I approve or reject customer uploaded files on a WooCommerce order?
Open the order under WooCommerce → Orders. The Files column shows which orders include uploads. Accept or reject each file on the order. The customer can replace a rejected file. A required file cannot be removed. Enable admin feedback if you want to send a note with the decision.

