Use Google reCAPTCHA for WooCommerce to add extra security to your store. It allows you to add Google reCAPTCHA to WordPress and WooCommerce login, registration, password reset, checkout, comment pages, and more. It can support both Google reCAPTCHA v2 and v3, including invisible reCAPTCHA.
With this, you can protect your store by stopping unwanted login attempts, checkout submissions, card checking, password resets, spam comments, and other suspicious activities. It offers reCAPTCHA v3, which shows CAPTCHA only when suspicious activity is detected, making it easier for real customers to use your store. You can also set the v3 spam score based on your store’s security needs.
Installation
- Download the .zip file from your WooCommerce account.
- In your WordPress Admin, go to Plugins > Add New and upload the plugin by choosing the downloaded file.
- Click Install Now, then activate the extension.
For further help, refer to Install and Activate Plugins/Extensions.
How to get reCaptcha Keys:
↑ Back to topYou can get the reCaptcha keys for free from here. Please make sure you are loggedin using your gmail account to get the reCaptcha keys. You can get V2 or V3 keys from here. The V2 keys will allow you to show reCaptcha under each form, whereas the V3 appears only when the reCaptcha senses suspicious traffic. You will notice reCaptcha logo in the bottom-right corner of pages where you have enabled reCaptcha.
Setup and Configuration
↑ Back to topAfter installing and activating the Google Recaptcha for WooCommerce extension, a reCAPTCHA option will be displayed before the WooCommerce menu. It allows you to create and manage reCAPTCHA based on your store security needs.
Let’s explore this powerful extension.
Setting Up Google reCAPTCHA for WooCommerce
↑ Back to topGENERAL SETTINGS
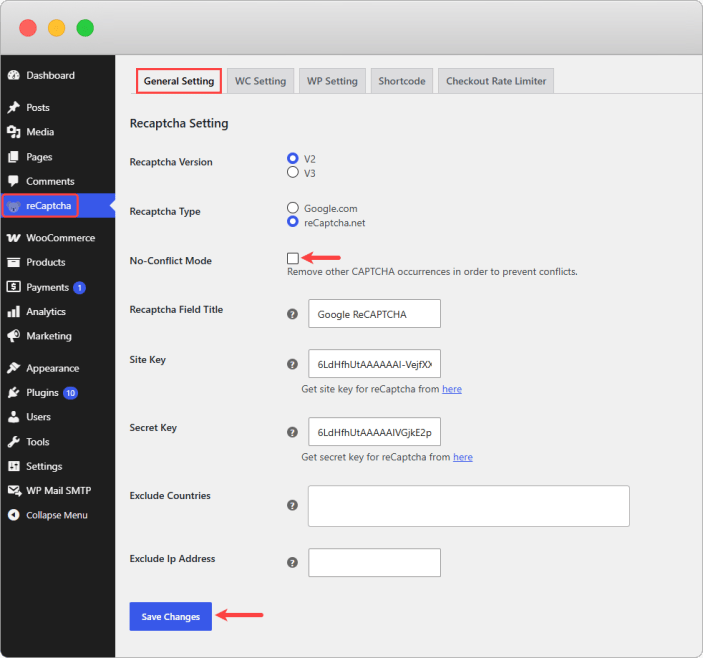
In general settings, you can configure the following:
ReCAPTCHA Settings
In reCAPTCHA settings, you can:
- ReCAPTCHA Version: Select your desired reCAPTCHA version, such as:
- V2
- V3
- ReCAPTCHA Type: Set your desired type of reCAPTCHA, such as
- Google .com
- reCAPTCHA.net
reCaptcha Score:
↑ Back to topYou can set reCaptcha score between 0.1 to 0.9.
- 0.9 = ReCaptcha will show unless the system is 90% sure it’s human. Humans will most likely be marked as bots and will be asked to solve reCaptcha.
- 0.1 = ReCaptcha will show unless the system is 10% sure it’s human. Bots are likely to pass.
We recommend starting the reCaptcha score from 0.3 or 0.4 and then increasing it if bot attacks are still coming.
- No-Conflict Mode: Enable this to remove the CAPTCHA occurrence in order to prevent conflict.
- ReCAPTCHA Field Title: Add the custom field title for reCAPTCHA.
- Site Key: Add the site key for reCAPTCHA.
- Secret Key: Add the secret key for reCAPTCHA.
- Exclude Countries: Select specific countries from the list to exclude where you do not want to display the reCAPTCHA.
- Exclude IP Address: Select specific IP addresses where you do not want to display the reCAPTCHA.
- Save Changes: After applying all modifications, click the Save Changes button to save and implement all changes.
WC SETTINGS
In WooCommerce settings, you can configure the following:
ReCAPTCHA Settings
WC Registration
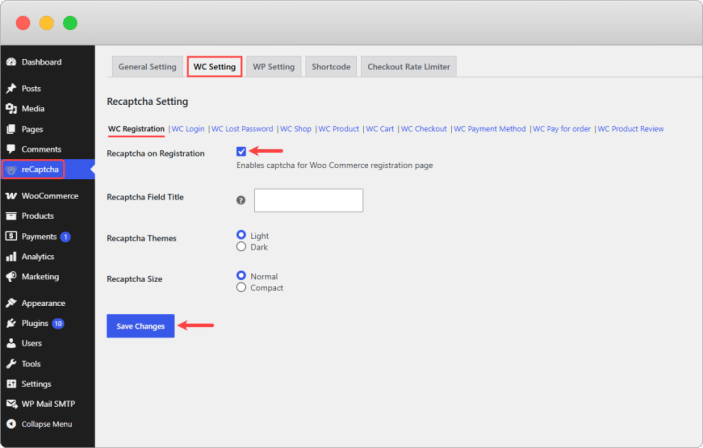
For WC registration settings, you can configure the following actions:
- ReCAPTCHA on Registration: Enable this to display the reCAPTCHA on the registration page.
- ReCAPTCHA Field Title: Add the custom title for the reCAPTCHA field.
- ReCAPTCHA theme: Set your preferred theme for reCAPTCHA, such as
- Light
- Dark
- ReCAPTCHA Size: Set the reCAPTCHA size, such as
- Normal
- Compact
- Save Changes: Click on Save Changes to save and implement all modifications.
WooCommerce Login
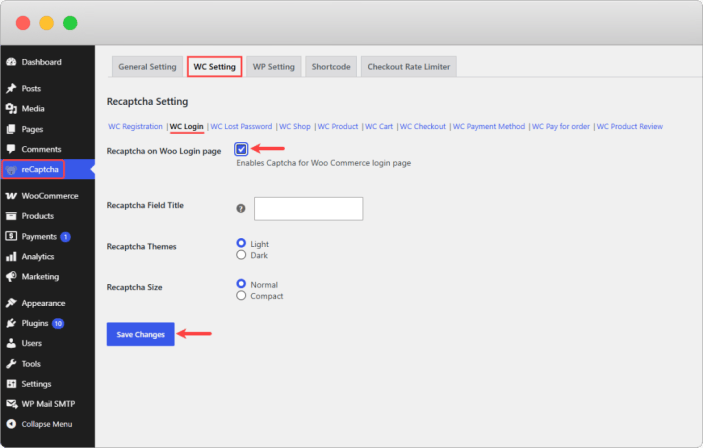
For WC Login settings, you can:
- ReCAPTCHA on Woo Login Page: Enable this to display the reCAPTCHA on the WooCommerce login page.
- ReCAPTCHA Field Title: Add the custom title for the reCAPTCHA field.
- ReCAPTCHA theme: Set your preferred theme for reCAPTCHA, such as
- Light
- Dark
- ReCAPTCHA Size: Set the reCAPTCHA size, such as
- Normal
- Compact
- Save Changes: Click on Save Changes to save and implement all modifications.
WooCommerce Lost Password
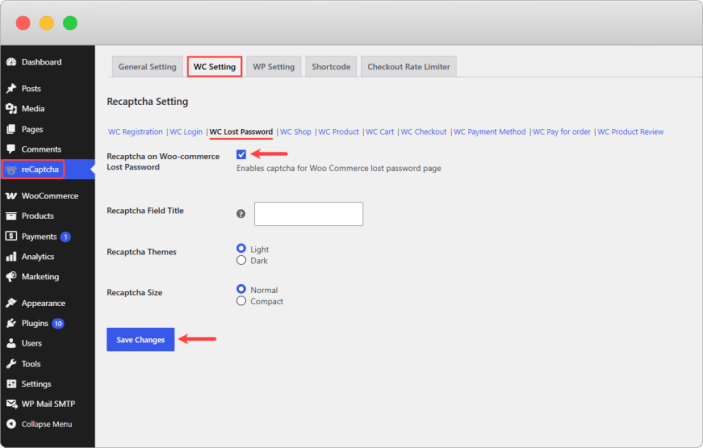
In this module, you can configure the following:
- ReCAPTCHA on WooCommerce Lost Password: Enable this to display the reCAPTCHA on the WooCommerce lost password page.
- ReCAPTCHA Field Title: Add the custom title for the reCAPTCHA field.
- ReCAPTCHA theme: Set your preferred theme for reCAPTCHA, such as
- Light
- Dark
- ReCAPTCHA Size: Set the reCAPTCHA size, such as
- Normal
- Compact
- Save Changes: Click on Save Changes to save and implement all modifications.
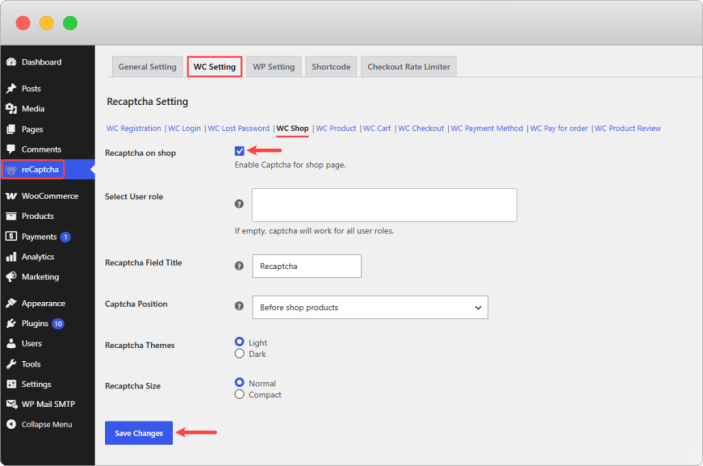
WooCommerce Shop
To configure the WC Shop settings, you can:
- ReCAPTCHA on Shop: Enable this to display the reCAPTCHA on the Shop page.
- Select User Role: Select the specific user roles for which you want to display reCAPTCHA. If you leave this field empty, it will work for all users.
- ReCAPTCHA Field Title: Add the custom title for the reCAPTCHA field.
- CAPTCHA Position: Set the display position of the reCAPTCHA on the page, such as
- Before the product page
- After the product page
- ReCAPTCHA theme: Set your preferred theme for reCAPTCHA, such as
- Light
- Dark
- ReCAPTCHA Size: Set the reCAPTCHA size, such as
- Normal
- Compact
- Save Changes: sasfadClick on Save Changes to save and implement all modifications.
WooCommerce Product
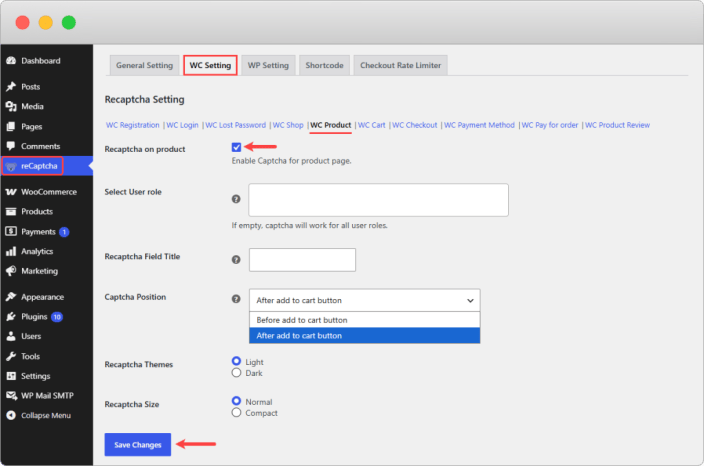
For WC product settings, you can:
- ReCAPTCHA on Product: Enable this to display the reCAPTCHA on the Product page.
- Select User Role: Select the specific user roles for which you want to display reCAPTCHA. If you leave this field empty, it will work for all users.
- ReCAPTCHA Field Title: Add the custom title for the reCAPTCHA field.
- CAPTCHA Position: Set the display position of the reCAPTCHA on the page, such as
- After the Add to Cart button
- Before the Add to Cart button
- ReCAPTCHA theme: Set your preferred theme for reCAPTCHA, such as
- Light
- Dark
- ReCAPTCHA Size: Set the reCAPTCHA size, such as
- Normal
- Compact
- Save Changes: Click on Save Changes to save and implement all modifications.
WooCommerce Cart
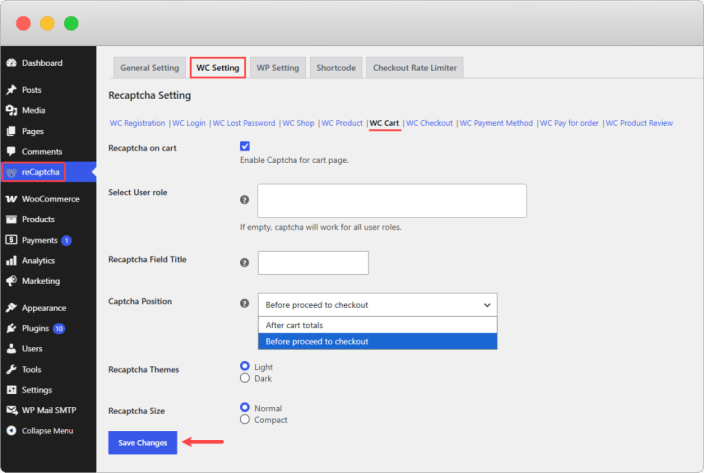
For WC Cart settings, you can:
- ReCAPTCHA on Cart: Enable this to display the reCAPTCHA on the cart page.
- Select User Role: Select the specific user roles for which you want to display reCAPTCHA.
- ReCAPTCHA Field Title: Add the custom title for the reCAPTCHA field.
- CAPTCHA Position: Set the display position of the reCAPTCHA on the page, such as
- Before proceeding to checkout
- After Cart total
- ReCAPTCHA theme: Set your preferred theme for reCAPTCHA, such as
- Light
- Dark
- ReCAPTCHA Size: Set the reCAPTCHA size, such as
- Normal
- Compact
- Save Changes: Click on Save Changes to save and implement all modifications.
WooCommerce Checkout
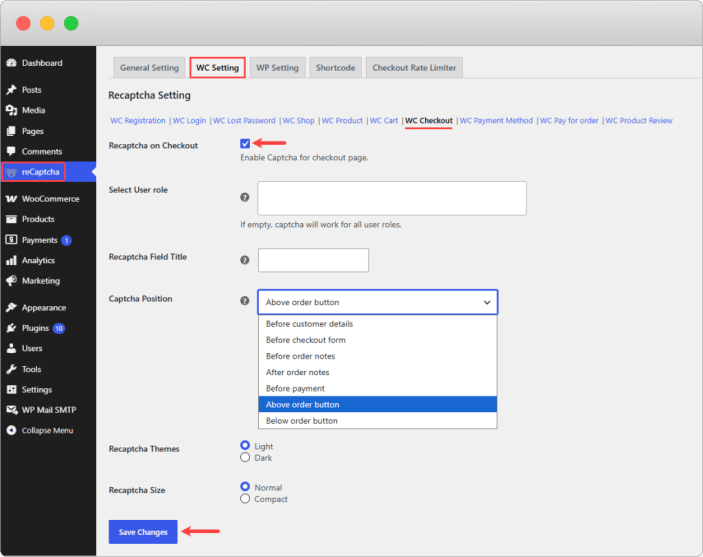
For WC Checkout settings, you can:
- ReCAPTCHA on Checkout: Enable this to display the reCAPTCHA on the checkout page.
- Select User Role: Select the specific user roles for which you want to display reCAPTCHA. If you leave this field empty, it will work for all users.
- ReCAPTCHA Field Title: Add the custom title for the reCAPTCHA field.
- CAPTCHA Position: Set the display position of the reCAPTCHA on the page, such as
- Before customer details
- Before the checkout form
- Before order notes
- After order notes
- Before Payment
- Above order button
- Below the order button
- ReCAPTCHA theme: Set your preferred theme for reCAPTCHA, such as
- Light
- Dark
- ReCAPTCHA Size: Set the reCAPTCHA size, such as
- Normal
- Compact
- Save Changes: Click on Save Changes to save and implement all modifications.
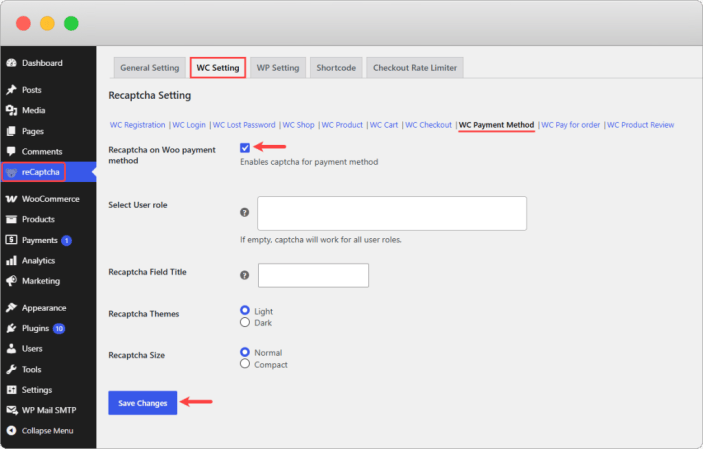
WooCommerce Payment Method
For payment method settings, you can configure the following:
- ReCAPTCHA on Payment Method: Enable this to display the reCAPTCHA on the payment method.
- Select User Role: Select the specific user roles for which you want to display reCAPTCHA. If you leave this field empty, it will work for all users.
- ReCAPTCHA Field Title: Add the custom title for the reCAPTCHA field.
- ReCAPTCHA theme: Set your preferred theme for reCAPTCHA, such as
- Light
- Dark
- ReCAPTCHA Size: Set the reCAPTCHA size, such as
- Normal
- Compact
- Save Changes: Click on Save Changes to save and implement all modifications.
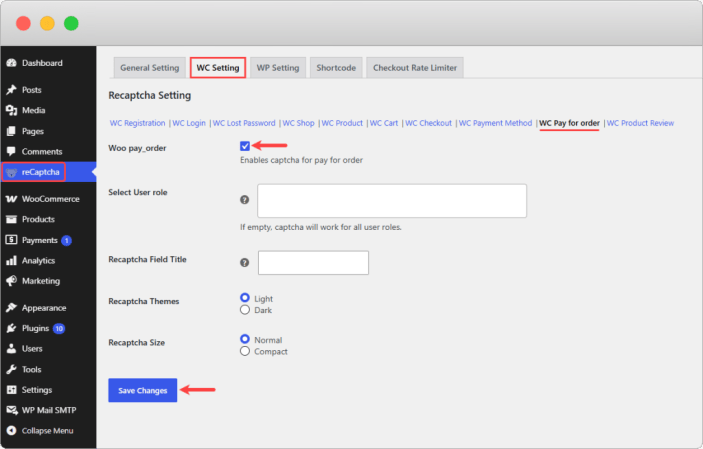
WooCommerce Pay-Order
To configure pay-order settings, you can:
- Woo Pay-order: Enable this to display the reCAPTCHA for pay order.
- Select User Role: Select the specific user roles for which you want to display reCAPTCHA. If you leave this field empty, it will work for all users.
- ReCAPTCHA Field Title: Add the custom title for the reCAPTCHA field.
- ReCAPTCHA theme: Set your preferred theme for reCAPTCHA, such as
- Light
- Dark
- ReCAPTCHA Size: Set the reCAPTCHA size, such as
- Normal
- Compact
- Save Changes: Click on Save Changes to save and implement all modifications.
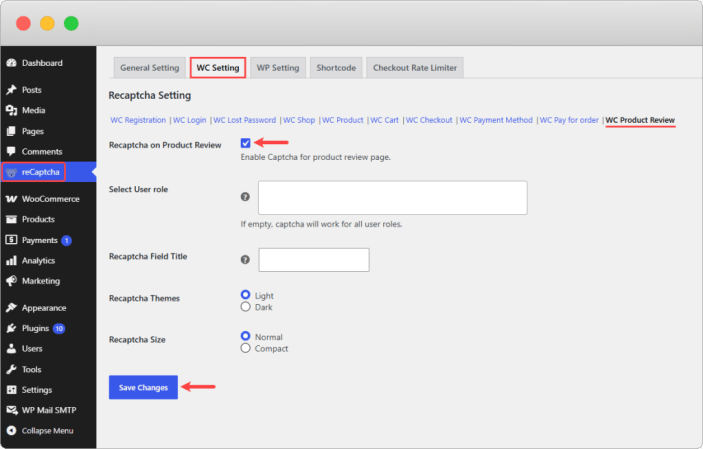
WooCommerce Product Review
To configure product review settings, you can:
- ReCAPTCHA on Product Review: Enable this to display the reCAPTCHA on the Product review page.
- Select User Role: Select the specific user roles for which you want to display reCAPTCHA. If you leave this field empty, it will work for all users.
- ReCAPTCHA Field Title: Add the custom title for the reCAPTCHA field.
- ReCAPTCHA theme: Set your preferred theme for reCAPTCHA, such as
- Light
- Dark
- ReCAPTCHA Size: Set the reCAPTCHA size, such as
- Normal
- Compact
- Save Changes: Click on Save Changes to save and implement all changes.
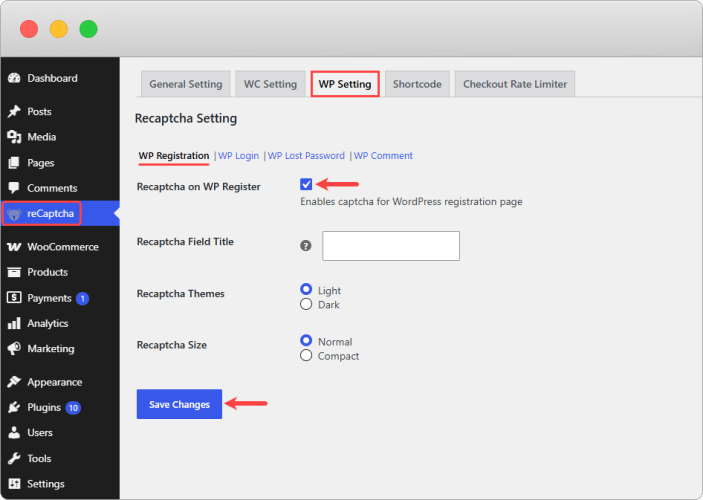
WordPress SETTINGS
To configure the WordPress settings, you can perform the following actions:
ReCAPTCHA Settings
WP Registration
In this module, you can:
- ReCAPTCHA on WP Registration: Enable this to display the reCAPTCHA on the WordPress registration page.
- ReCAPTCHA Field Title: Add a custom title for the reCAPTCHA field.
- ReCAPTCHA theme: Set your preferred theme for reCAPTCHA, such as
- Light
- Dark
- ReCAPTCHA Size: Set the reCAPTCHA size, such as
- Normal
- Compact
- Save Changes: Click on this option to save and apply all settings.
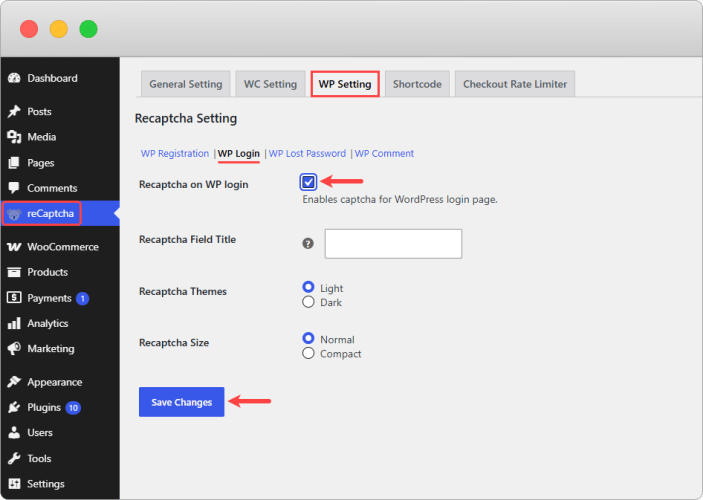
WordPress Login
To configure the WP login settings, you can:
- ReCAPTCHA on WP Login: Enable this to display the reCAPTCHA on the WordPress login page.
- ReCAPTCHA Field Title: Add a custom title for the reCAPTCHA field.
- ReCAPTCHA theme: Set your preferred theme for reCAPTCHA, such as
- Light
- Dark
- ReCAPTCHA Size: Set the reCAPTCHA size, such as
- Normal
- Compact
- Save Changes: Click on this option to save and apply all settings.
WordPress Lost Password
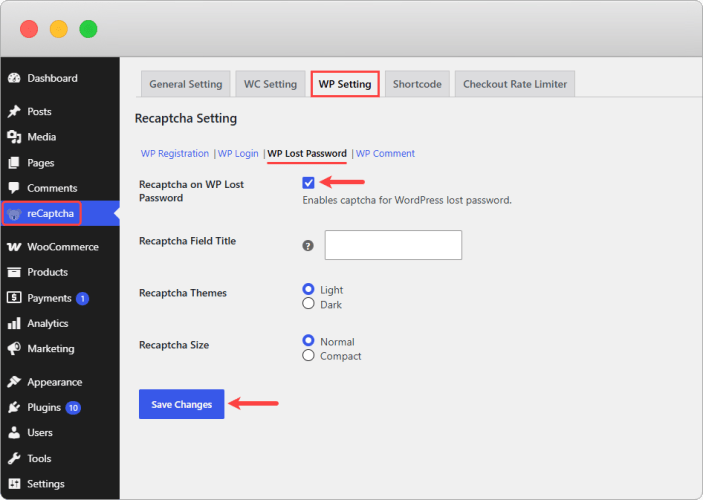
To configure the WP lost password settings, you can:
- ReCAPTCHA on WP Lost Password: Enable this to display the reCAPTCHA on the WordPress lost password page.
- ReCAPTCHA Field Title: Add a custom title for the reCAPTCHA field.
- ReCAPTCHA theme: Set your preferred theme for reCAPTCHA, such as
- Light
- Dark
- ReCAPTCHA Size: Set the reCAPTCHA size, such as
- Normal
- Compact
- Save Changes: Click on this option to save and apply all settings.
WordPress Comment
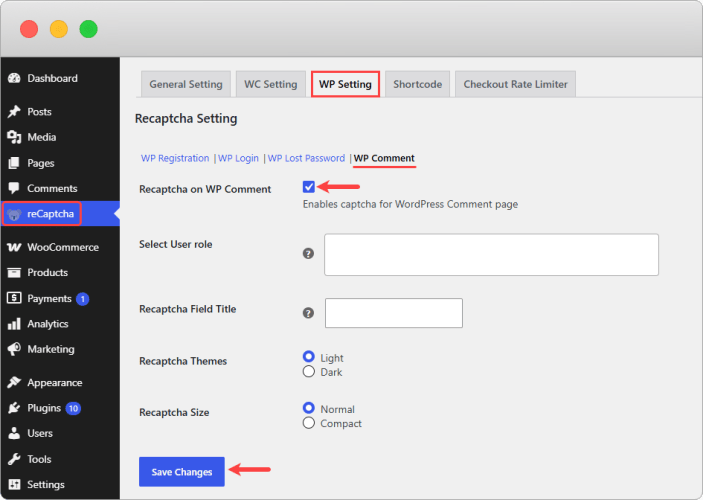
- ReCAPTCHA on WP Comment: Enable this to display the reCAPTCHA on the WordPress comment page.
- Select Use Role: Select the specific user roles for which you want to display reCAPTCHA. If you leave this field empty, it will work for all users.
- ReCAPTCHA Field Title: Add a custom title for the reCAPTCHA field.
- ReCAPTCHA theme: Set your preferred theme for reCAPTCHA, such as
- Light
- Dark
- ReCAPTCHA Size: Set the reCAPTCHA size, such as
- Normal
- Compact
- Save Changes: Click on this option to save and apply all settings.
SHORT CODES
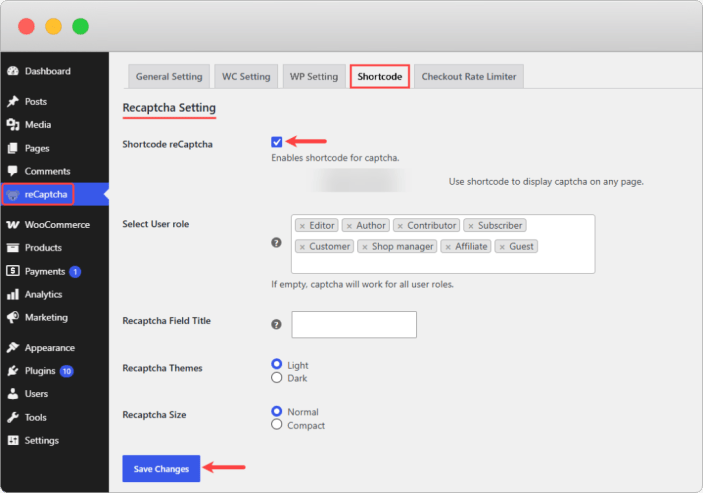
Use this module to display the reCAPTCHA feature on any page using shortcodes. To configure the shortcode settings, you can:
ReCAPTCHA Settings
You can:
- Shortcodes reCAPTCHA: Enable this option to display the CAPTCHA at any page using shortcodes.
- Select User Role: Select the specific user roles for which you want to display reCAPTCHA. If you leave this field empty, it will work for all users.
- ReCAPTCHA Field Title: Add the custom title for the reCAPTCHA field.
- ReCAPTCHA theme: Set your preferred theme for reCAPTCHA, such as
- Light
- Dark
- ReCAPTCHA Size: Set the reCAPTCHA size, such as
- Normal
- Compact
- Save Changes: Click on this option to save and apply all settings
CHECK OUT RATE LIMITER
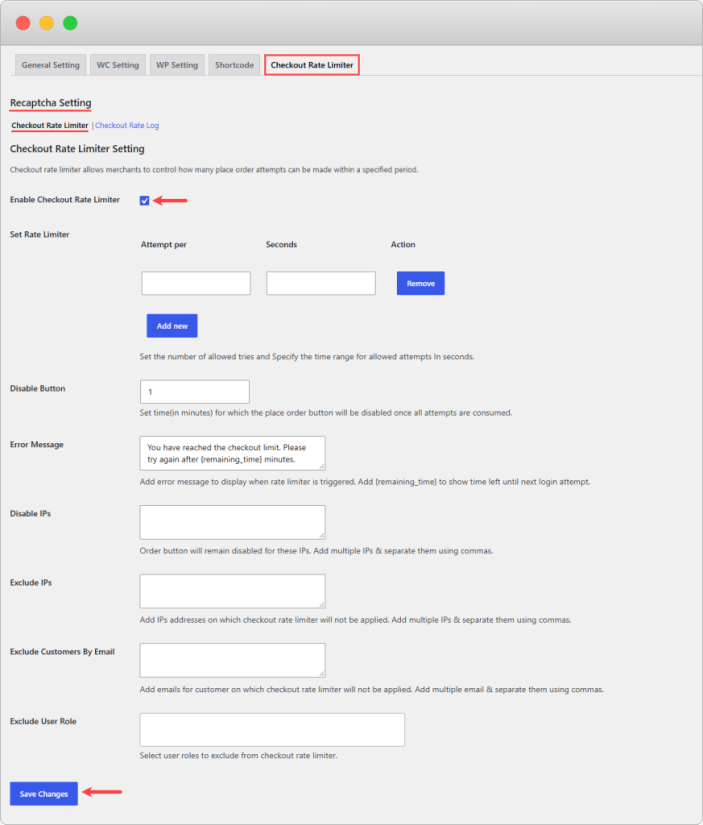
Click Checkout Rate Limiter. By default, the Rate Limiter settings will open. This module allows merchants to control how many order attempts customers can make within a specific time period. In this module, you can configure the following settings:
ReCAPTCHA Settings
Checkout Rate Limiter Settings
You can:
- Enable Checkout Rate Limiter: Enable or disable the checkout rate limiter. If you enable this option, you can configure the following settings:
- Set Rate Limiter: Set the checkout rate limit by adding:
- Attempts Per: Enter the total number of checkout attempts allowed.
- Seconds: Enter the number of seconds allowed for the specified attempts.
- Action: Remove an existing rate limiter rule.
- Add New: Click this option to add a new rate limiter rule.
- Disable Button: Set the time for which the Place Order button will be disabled once all allowed attempts have been used.
- Error Message: Add a custom error message that will be displayed when the rate limit is reached. The message can also show how many attempts are remaining.
- Disable IPs: Add specific IP addresses for which the Place Order button will be disabled.
- Exclude IP: Add specific IP addresses where the checkout rate limiter will not be applied.
- Exclude Customer by Email: Add specific customer email addresses where the checkout rate limiter will not be applied.
- Exclude User Role: Select specific user roles that will be excluded from the checkout rate limiter.
- Save Changes: Click Save Changes to save and apply all changes.
- Set Rate Limiter: Set the checkout rate limit by adding:
Checkout Rate Log
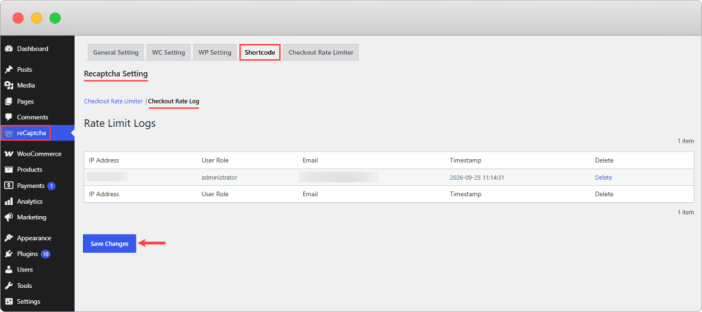
The Rate Limit Logs module allows you to view records of checkout attempts that were restricted by the Checkout Rate Limiter. By using these logs, you can monitor when checkout rate limits are applied and other checkout-related activity.
The rate limit logs are displayed in a grid view with the following details:
Grid Details:
- IP Address: Displays the IP address from which the checkout attempt was made.
- User Role: Displays the user role associated with the checkout attempt.
- Email: Displays the email address of the user who made the checkout attempt.
- Timestamp: Displays the date and time when the checkout attempt was made.
- Delete: Allows you to delete existing records when needed.
Note:
- If no records are available, a “No records available” message will be displayed in this grid.
- The checkout rate logs depend on the Checkout Rate Limiter settings.
FAQs
↑ Back to top- Not blocking registrations, card checking, card testing, or fake checkout attempts?
If the card checking attempts are made by bots, the extension will be able to block those attempts. However, if the card checking attempts are made by real users, the extension won’t be able to block them. Since reCAPTCHA is built to block automated bots, if it’s a real person, they can solve that reCaptcha to prove they are human and place card-testing checkouts. We have placed additional measures like a checkout rate limiter; still, you would need a fraud prevention extension along with reCaptcha to block card-testing orders. Here is how WooCommerce advises fighting card testing attempts.
2. What does Google reCAPTCHA for WooCommerce do?
Ans: It can protect your store from:
- Spam and unwanted submissions.
- Suspicious login and checkout attempts.
- Unwanted password resets and comments.
3. How can I configure Google reCAPTCHA for WooCommerce?
Ans: To configure Google reCAPTCHA, follow these steps:
- Go to WordPress Admin > reCAPTCHA.
- Select reCAPTCHA version v2 or v3.
- Enter your Site Key and Secret Key.
- Enable reCAPTCHA for the required WooCommerce or WordPress pages.
- Configure the available options according to your requirements.
- Click Save Changes to apply the settings.
4. Is it possible to add reCAPTCHA on different pages of my store?
Ans: Yes, you can add reCAPTCHA on different pages such as
- WooCommerce & wordpress login
- Registration,
- Cart
- Checkout
- Payment
- Product review pages.
- Lost password
- Comment pages.
- Any Custom pages using shortcodes.
5. Can I control who can see reCAPTCHA on my WooCommerce store?
Ans: Yes, with this, you can control where reCAPTCHA is displayed by using options such as:
- Select specific user roles for different WooCommerce and WordPress areas.
- Exclude specific countries and IP addresses from displaying reCAPTCHA.
6. Can I limit repeated checkout attempts with this plugin?
Ans: Yes. The Checkout Rate Limiter allows you to control how many checkout attempts customers can make within a specific time period. You can set the allowed attempts, disable the Place Order button after the limit is reached, display a custom error message, and exclude specific IP addresses, customer emails, or user roles from the limit.