Bulk Tag Creator allows your WooCommerce store to Easily create WooCommerce Product Tags in Bulk — Manually or via CSV upload and assign them instantly to products.
Installation
↑ Back to topTo start using a product from WooCommerce.com, you can use the “Add to store” functionality on the order confirmation page or the My subscriptions section in your account.
- Navigate to My subscriptions.
- Find the Add to store button next to the product you’re planning to install.
- Follow the instructions on the screen, and the product will be automatically added to your store.
Alternative options and more information at:
Managing WooCommerce.com subscriptions.

Setup and Configuration
↑ Back to topGetting started
↑ Back to topTo set up your store with Bulk Tag Creator:
- Go to: Products > Bulk Tags Creator.
- On this page you can see two tabs. One is for manually creating the Tags and the other is for creating tags via CSV import.
- In manual way, you have to enter the Tags separated by comma and select the other fields as per requirements.
- If you want to import the tags via CSV then go to CSV Import tab and choose the CSV and import it.
- You can also assign the tags directly to products by selecting them in the Select Products field. This option is available in both manual and csv import.
Let’s see both the tag creation methods one by one.
1. Manual Entry
Let’s say you want to create the Tag A, Tag B and Tag C on your store and automatically get it assigned it to a particular products.
For this you have to enter Tag A,Tag B,Tag C in ‘Enter tag separated by comma’ field and write description as per your requirement. Then select the required products to which you want to get these tags assigned automatically.
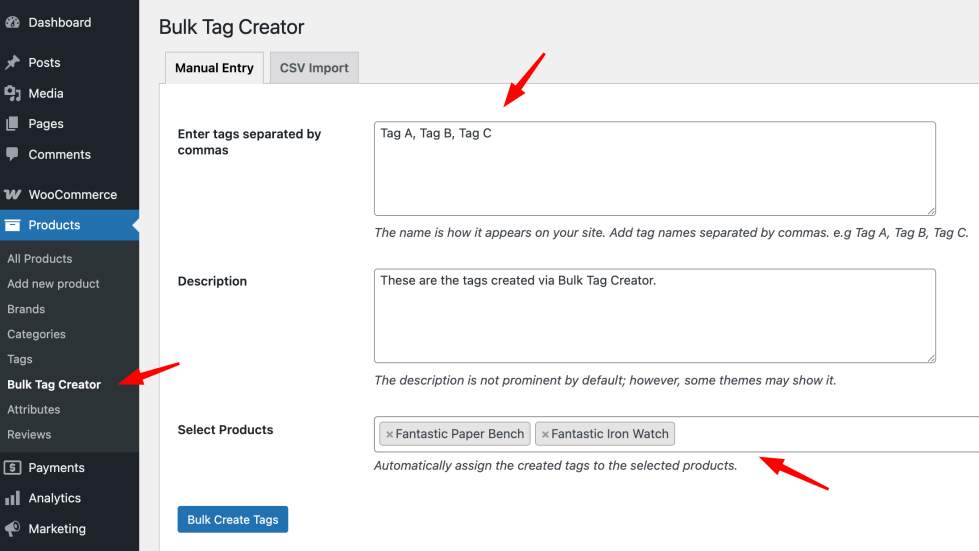
Once entered the values in the fields then click on Bulk Create Tags button and the tags will get created and it will be automatically assigned to the selected products.
2. CSV Import
Go to CSV Import tab, here you will see sections for the downloading the sample csv file and the section to upload the CSV file. You should have or create the CSV in required format to make this functionality. Download the sample CSV using Download Sample Button available at very end of the CSV Import page.

Sample CSV will look as shown in the below image.

Create your CSV according to the mentioned format and upload it by selecting it the Select CSV File field. Once selected, choose the products in case you want the tags to be assigned automatically to products. Once all the things are done then click on Import Tags from CSV button.
Once the tags are created then you will get the message as below.

As you can see in the below image that the Tags that we created during this got created and also assigned to the product.

Similarly you can use this plugin to create the Tags in bulk. This will definitely save your time.
Troubleshooting
↑ Back to topCSV not uploading?
- Ensure the file format is
.csv
- The first row should be the header:
name
Tags not assigning?
- Make sure you’ve selected products before clicking “Create/Import”.
FAQs
↑ Back to top
Can I assign the same tag to multiple products?
Yes. During manual entry or CSV import, simply select multiple products to apply the tags to.
Will duplicate tags be created?
No. The plugin checks if a tag already exists and skips duplicates.
What product types are supported?
All WooCommerce product types: simple, variable, grouped, etc.