Step-by-step kit builders make it easier for customers to configure complex configurable products by breaking the configuration process into smaller steps. In this guide you will learn how to create the Build Your Skateboard composite product, as seen in the Store Owner’s Guide.

Plugins/Extensions Used
↑ Back to topConfiguration
↑ Back to topTo configure the Build Your Skateboard composite product, follow these steps:
- Create the Composite
- Go to Products and click Add New.
- Enter a Title, Description and Short Description.
- Locate the Product Data panel and select the Composite product type.
- Define Components and Component Options
Typically, a skateboard consists of:
- a deck (the actual board of the kit),
- a set of wheels,
- a set of trucks for mounting the wheels on the deck,
- a set of wheel bearings,
- some mounting hardware and,
- some optional grip tape.
Customers will use our skateboard builder to create the skateboard they want by picking a product from each of these part categories. This guide assumes that the Deck, Trucks, Wheels, Bearings, Hardware and Grip Tape product categories already exist and that products have been created and added to them already.
- Locate the Product Data panel and go to Components.
- Click Add Component to create a Component and name it Deck.
- Locate the Component Options field, choose Select categories in the drop-down and select the Decks category.
- Repeat steps b-c for the Trucks, Wheels, Bearings, Hardware and Grip Tape Components.

- Configure Pricing Options
Each personalized skateboard costs as much as the sum of its parts, while the assembly service is offered for free:
- Go to the Components tab, expand each Component and check the Priced Individually box.
- Go to the General tab and ensure that the Regular Price and Sale Price fields are blank.
Note that the prices of all products contained in skateboard Components must be positive: WooCommerce does not support negative cart item prices.
Configuring the Composite Price
When dealing with complex composite products that contain many Component Options, avoid choosing the Catalog Price > Calculate from/to option. Finding the configuration with the lowest price can be a very resource-intensive process. In such cases, it is highly recommended to choose either the Use defaults or the Hide option.
- Configure Shipping Options
When a custom skateboard order is processed, the chosen parts are always assembled together: Customers always receive a fully functional skateboard. Additionally, the weight of a complete skateboard is about the same as the total weight of all parts used to assemble it.
- Locate the Product Data > Shipping tab and choose the Composite Type > Assembled option.
- Enter Dimensions and, optionally a Shipping Class.
- Leave the Weight field empty and choose the Assembled Weight > Preserve option to dynamically calculate the weight of the complete skateboard based on the chosen parts.
- Configure Layout Options
Personalizing a skateboard without looking at the available designs or reading part descriptions is not a very pleasant experience.
The Thumbnails style makes Component Options look similar to your WooCommerce shop catalog. Options are paginated and can be sorted/filtered.
Step-by-step builders created with Composite Products are usually laid out using the Stepped or the Progressive option. The Stepped layout is more suitable in this scenario, due to the complexity and length of the information presented in each Component.
Showing customers a live summary of their selections is another way to improve their experience. In this case, the Composite Products Summary widget has been added to the sidebar of the Storefront theme.
- Go to the Components tab.
- Select the Stepped layout.
- Expand all Components and, in each one, locate the Options Style drop-down and select Thumbnails.
- Go to Appearance > Widgets. Locate the WooCommerce Composite Product Summary widget and add it to your sidebar.
- Add Finishing Touches
Choose a Product Image, add some Gallery items and, finally, tweak the layout of the composite product page.
Layout Tweaks
Most WooCommerce-compatible WordPress themes default to a two-column product page layout: The first column contains the main product image and gallery, while the second one is reserved for product details and options. This space-conserving approach works well for Simple and Variable products, which usually contain only a few form elements.
In contrast, Composite products tend to have longer forms requiring multiple steps/interactions to complete. Sometimes you may find that your theme’s two-column layout makes Composite products look space-constrained and hard to interact with. Some themes allow you to modify the layout of individual product pages to display product details and options in a single column. For example, if you are using Storefront, the Storefront Powerpack plugin includes options for:
- allocating more width to product form content, or
- stacking product form content below the main product image and gallery.
If you are experiencing layout issues with a Composite product and your theme does not provide any per-product layout options:
- Navigate to Product Data > Components.
- Locate the Form Location option.
- Choose Before Tabs to stack form content before the product tabs.
In most cases, choosing Before Tabs will allocate the entire page width to the form contents of your Bundle. However, note that the Before Tabs option is not guaranteed to work reliably with all themes!
A similar result can be achieved with the free WooCommerce Stacked Product Layout plugin.
Result
↑ Back to top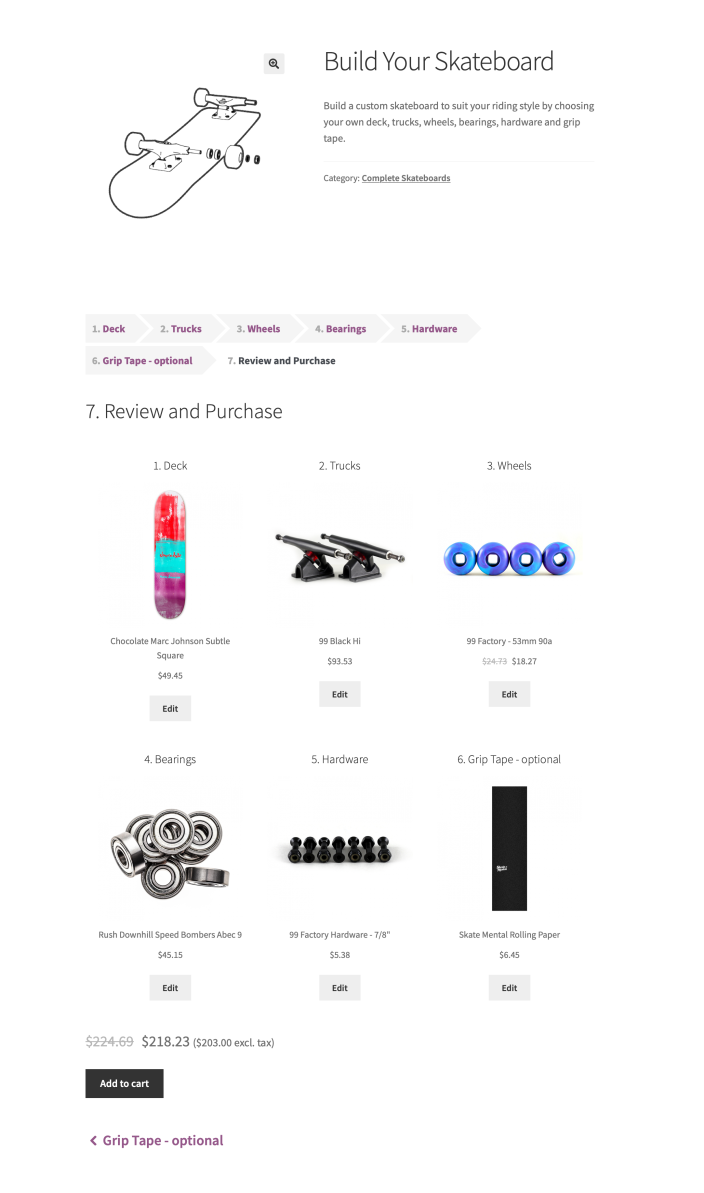

Questions & Support
↑ Back to topHave a question? Please fill out this pre-sales form.
Already purchased and need assistance? Get in touch with us via the Help Desk!