
Introduction & How It Works
↑ Back to topCurrency Switcher for WooCommerce extends your WooCommerce store beyond its single-currency limitation. It adds a conversion layer that detects each visitor’s preferred currency, converts all product prices in real time, and, when configured, allows customers to complete checkout in their chosen currency.
Whether you run a regional boutique serving three countries or a global marketplace with dozens of currencies, this plugin scales to match your needs with geolocation auto-detection, exchange rate APIs, per-product custom pricing, geographic zone pricing, and payment gateway controls.
How the Currency Flow Works
Understanding this flow is essential before configuring the plugin:
Step 1 | Base Currency |
|---|
Step 2 | Secondary Currencies Added |
|---|
Step 3 | Customer Currency Detected |
|---|
Step 4 | Prices Converted & Displayed |
|---|
Step 5 | Order Placed & Recorded |
|---|
System Requirements & Compatibility
↑ Back to top| Requirement | Version / Detail |
|---|---|
| Plugin Version | 2.0.2 |
| PHP Version | 7.4 or greater |
| WordPress Version | 4.6 or greater (tested up to 6.8) |
| WooCommerce Version | 5.0 or greater (tested up to 10.0) |
| WooCommerce Requirement | The Core WooCommerce plugin must be active |
| Multisite | Supported — settings stored per-site or network-wide |
Confirmed Compatible Integrations
| Plugin | Notes |
|---|---|
| WooCommerce Subscriptions | Works with recurring billing; enable Shop Currency for payments in selected currency |
| WPML + WooCommerce Multilingual | Required for the currency-by-language feature |
| MaxMind Geolocation | Requires WooCommerce MaxMind integration key (Section 6.3) |
| WooCommerce Deposits | Compatible; currency detection runs after cart session load |
| Elementor, Divi, WPBakery | Switcher shortcode works inside all major page builders |
| WooCommerce Blocks Checkout | Supported |
| WP Rocket, LiteSpeed, W3TC | Requires cache exclusion setup — see Section 20 |
Installation
↑ Back to topFollow these steps to install the plugin from a downloaded ZIP file:
- Log in to your WordPress Admin Dashboard.
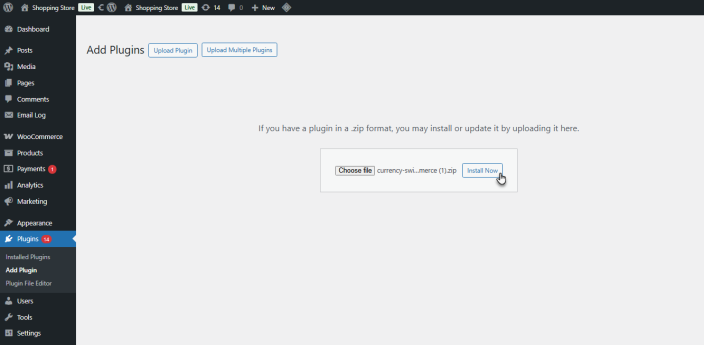
- Navigate to Plugins > Add New. Click the Upload Plugin at the top of the page.
- Click Choose File, select the Currency Switcher for Woo file you downloaded, and click Open.
- Click Install Now and wait for the upload to complete.
- Click Activate Plugin.
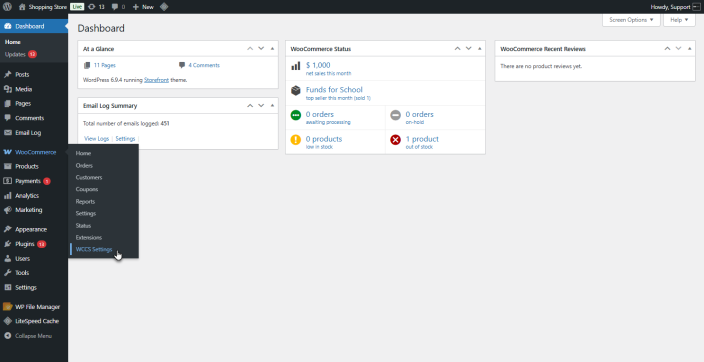
After activation, you will find a new WCCS Settings menu item under WooCommerce in your admin sidebar.
| TIP | You can also install directly from the WooCommerce Marketplace. Navigate to WooCommerce > Extensions > Add Extensions, search for “Currency Switcher“, and click Add to Store. |
Quick Start — Your First Multi-Currency Setup
↑ Back to topThis five-step checklist helps your store accept multiple currencies. Each step links to the relevant full section for deeper configuration.
| Step 1 | Confirm Your Base CurrencyGo to WooCommerce > Settings > General. Your Currency setting is the base — all product prices must be entered in this currency. |
| Step 2 | Add Secondary CurrenciesGo to WooCommerce > WCCS Settings. Under the Currencies section, select currencies from the dropdown. Add a label, set an exchange rate (or choose API auto-update), and save. (Full guide: Section 5.1) |
| Step 3 | Place the Switcher on Your SiteChoose a placement: (a) Widget — go to Appearance → Widgets, add WCC Switcher Widget to any sidebar or footer. (b) Menu — enable Add Menu in WCCS Settings. (c) Shortcode — paste [wcc_switcher] on any page. |
| Step 4 | Decide: Display Only or Full CheckoutIf you want customers to pay in their selected currency, enable Shop Currency in WCCS Settings > General. If you only need price display in other currencies but process payments in your base currency, leave this off. |
| Step 5 | Test the SwitcherVisit your shop page, switch to a different currency, add to cart, and proceed to checkout. Confirm that prices convert correctly, the switcher persists across pages, and your payment gateway accepts the currency. |
| NOTE | If you use a caching plugin (WP Rocket, LiteSpeed Cache, etc.), you must exclude the currency cookie from cache. |
Core Configuration
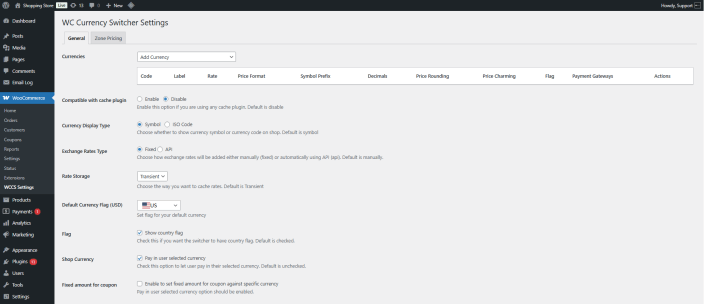
↑ Back to topAll main plugin settings live under WordPress Admin Dashboard > WooCommerce > WCCS Settings > General. This section walks through each configuration area.
Adding & Managing Currencies
↑ Back to topThe Currencies section is the central table for defining every secondary currency your store supports.
To add a currency:
- In the Currencies section, open the currency dropdown and select the currency you want to add (e.g., GBP, EUR, AUD).
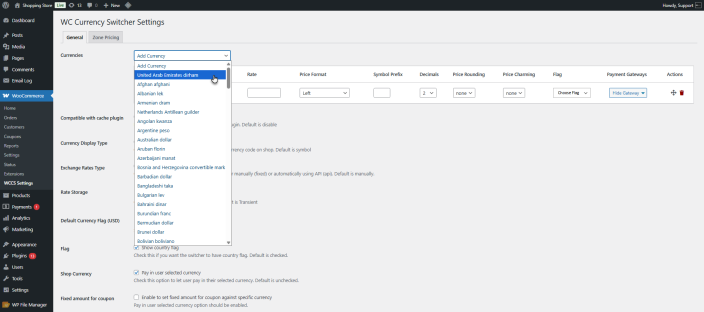
- The currency appears as a row in the table.
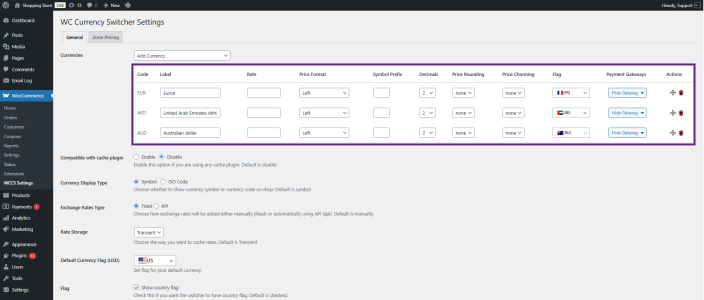
- Enter a Label Name, this is the display name shown in the switcher widget (e.g., “Pound Sterling”, “Euro”, or just “GBP”).
- Set the Exchange Rate. If using Fixed mode, enter the rate manually (e.g., “0.79” means 1 USD = 0.79 GBP). If using API mode, click Update All to fetch rates.
- Set Decimals (typically 2 for most currencies; 0 for JPY, KWD, etc.).
- In Price Format, set the alignment of currency from the dropdown option
- Optionally set a Flag from the dropdown for visual identification.
- Optionally configure Payment Gateway visibility for this currency.
- Click Save Changes.
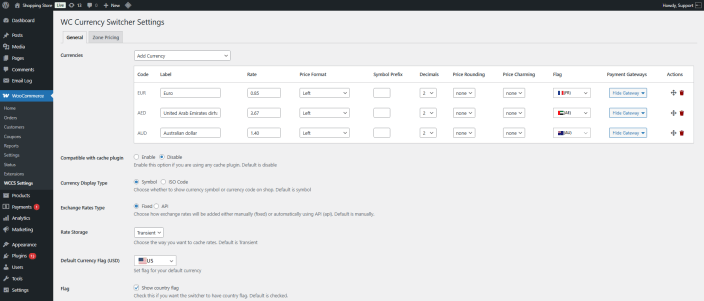
Managing the currency list:
- Drag rows up or down to reorder how currencies appear in the switcher.
- Click the delete icon on any row to remove a currency.
- If you change your WooCommerce base currency, update all exchange rates immediately (either via the Update All button in API mode or manually in Fixed mode).
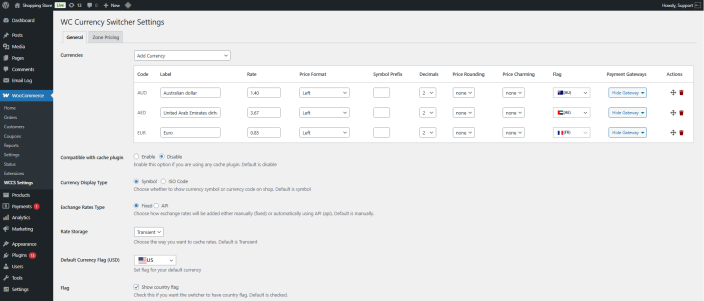
| NOTE | When you change the WooCommerce base currency, any secondary currency that matches the new base currency will be automatically removed from the WCCS currency table. |
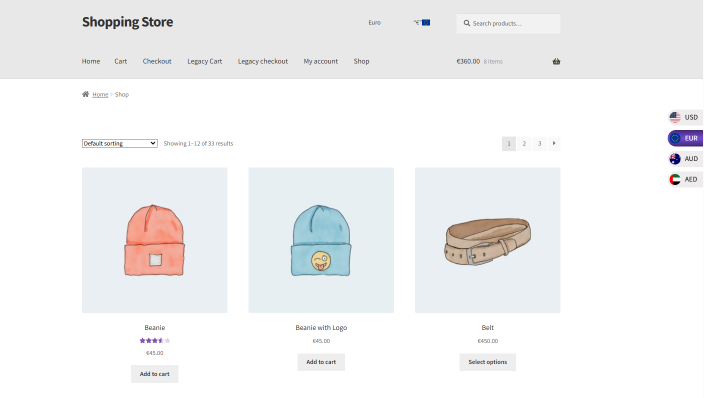
Front End Impact
- Before the currency switch
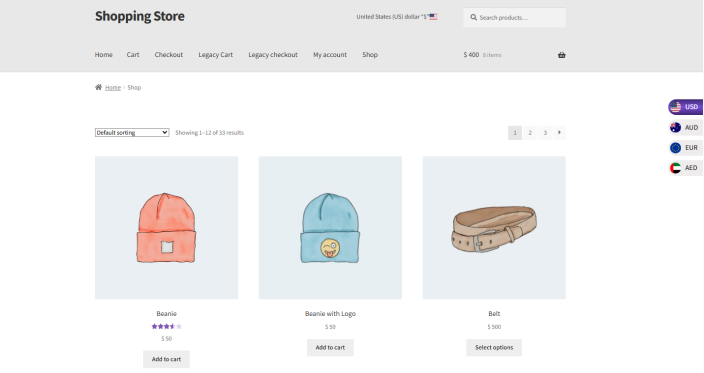
- After the currency switch
Exchange Rate Types: Fixed vs. API
↑ Back to topChoose between two exchange rate strategies from the Exchange Rate Type dropdown.
Fixed Exchange Rate
You set the rate manually. Best for stores with stable pricing contracts, wholesale pricing tiers, or markets where you want full control over displayed prices regardless of market fluctuations.
- Navigate to WCCS Settings and select Fixed as the Exchange Rate Type.
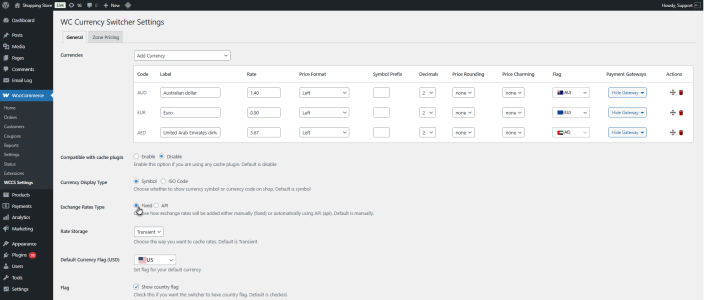
- For each currency in the table, enter the exchange rate in the Rate field.
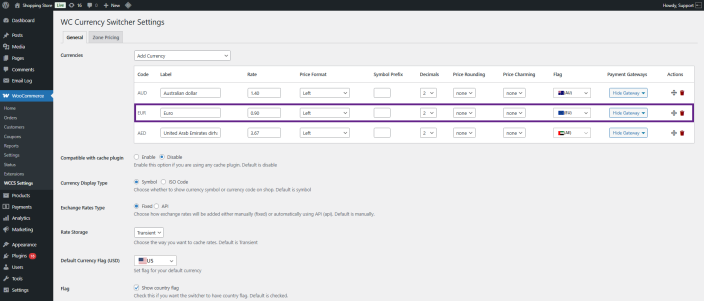
- The rate represents how many units of the secondary currency equal 1 unit of your base currency. For example, if your base is USD and you add GBP at 0.90, then a $100 product shows as £90.
- Click Save Changes. Rates remain fixed until you manually update them.
API Exchange Rate
Rates are fetched automatically from an exchange rate service and updated on a schedule. Best for stores where accuracy to market rates matters.
- Select API as the Exchange Rate Type.
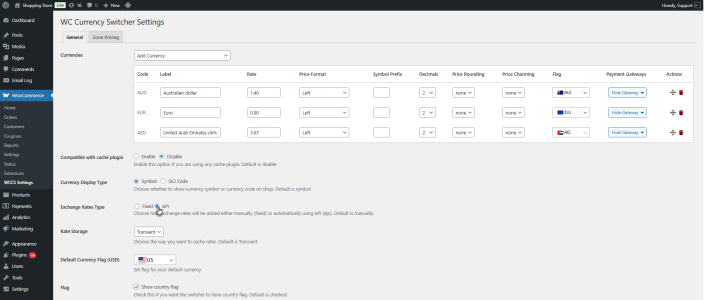
- Click on the Get API Key or visit the following exchange rate API service provider website to get API Key and API limitations.
- https://openexchangerates.org/
- https://www.abstractapi.com/api/exchange-rate-api
- https://apilayer.com/marketplace/fixer-api
- Choose an Exchange Rate Provider from the dropdown.
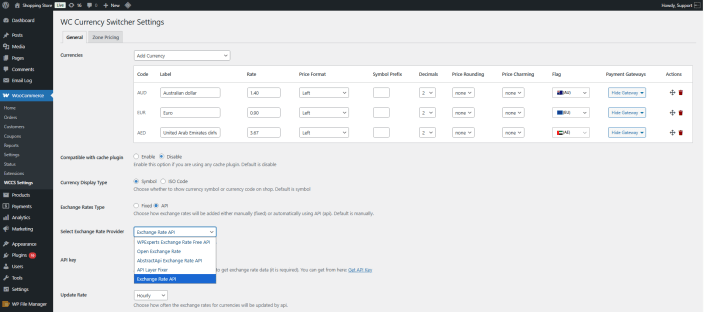
- Enter the API Key for the selected provider.
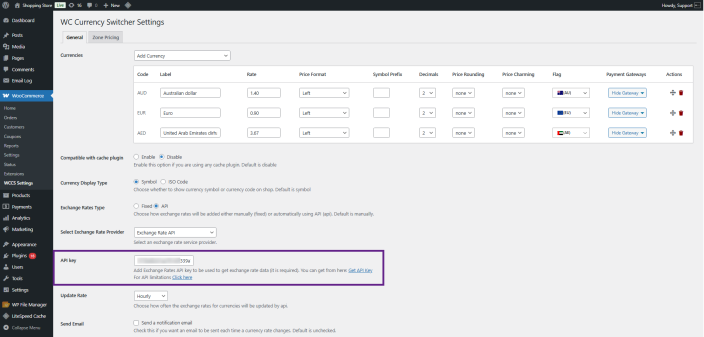
- Choose an Update Rate (e.g., every 12 hours, daily, weekly).
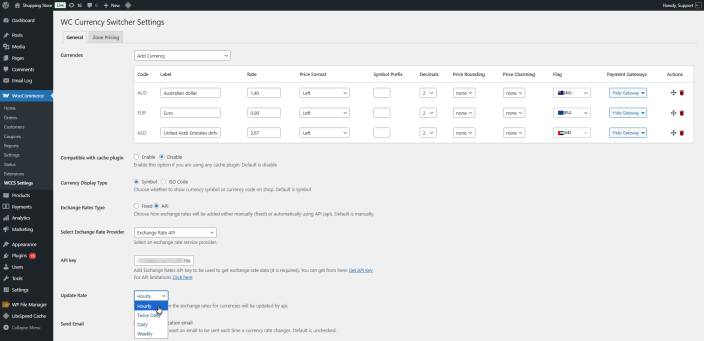
- Optionally enable Send Email to receive a notification email whenever rates are updated.
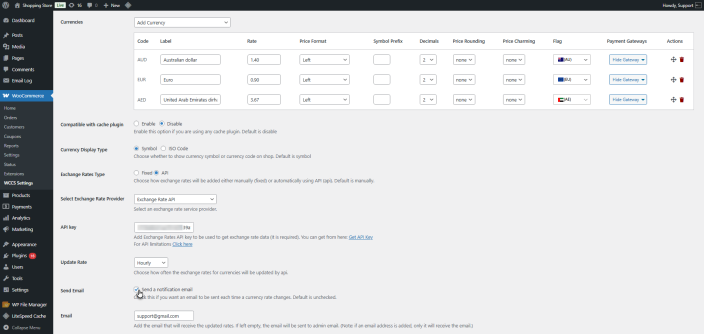
- Click Save Changes, then click Update All to fetch current rates immediately.
- An update button will appear at the top of the table. Once clicked, the rates will be updated.
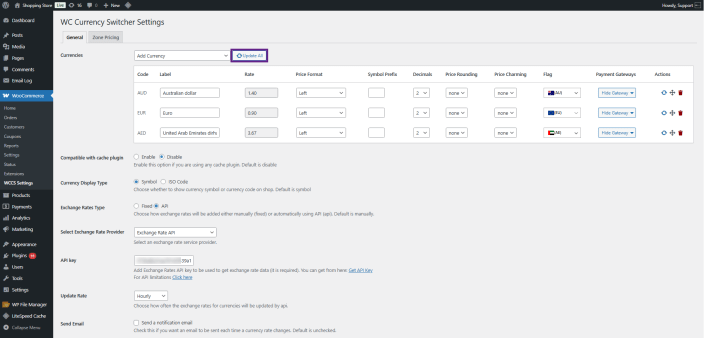
WPExperts Exchange Rate API
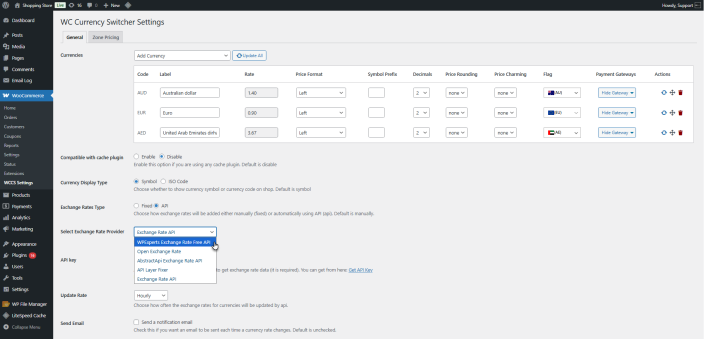
↑ Back to topThe WPExperts Exchange Rate API is the recommended provider; it is included with your plugin license and requires no separate sign-up or API key.
- Go to WooCommerce > WCCS Settings > General.
- Set the Exchange Rate Provider to WPExperts Exchange Rate Free API.
- Click Save Changes.
- Click Update All to fetch the current rates for all configured currencies.
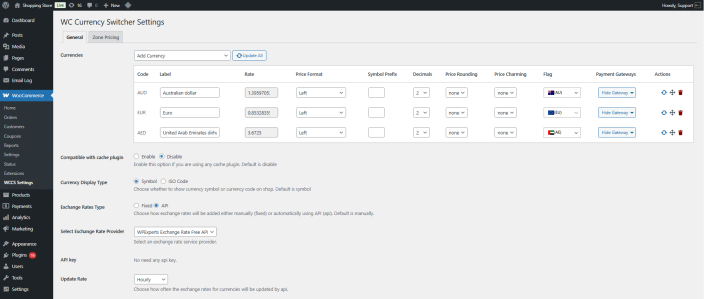
TIP | Use WPExperts API for any base currency without restriction. It is the simplest option for stores that want live rates without managing an API account. |
|---|
Price Formatting: Position & Symbol
↑ Back to topEach currency can have its own price format settings, which are controlled in the Currencies table.
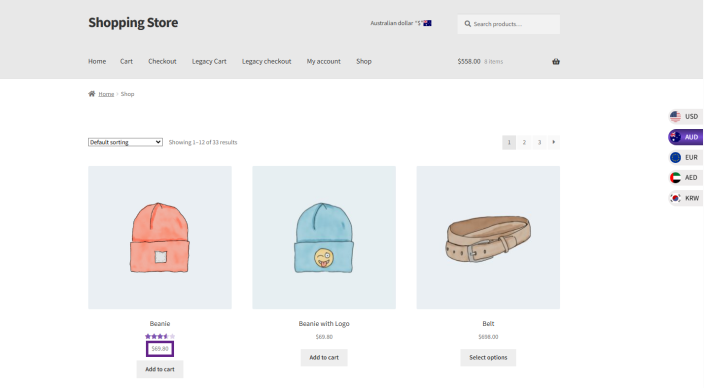
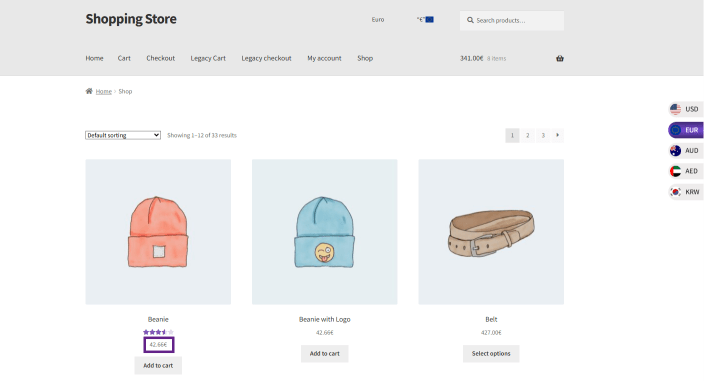
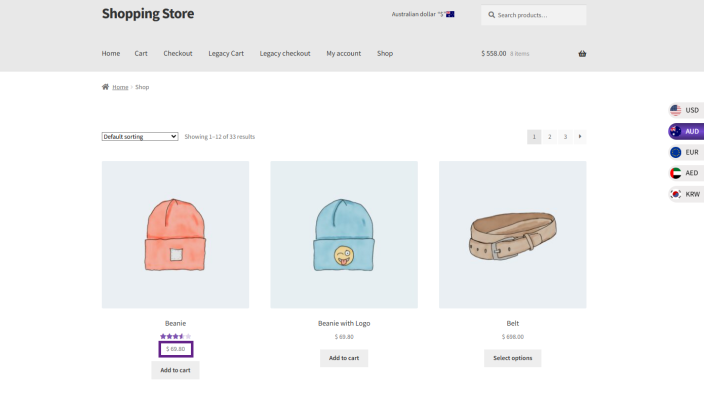
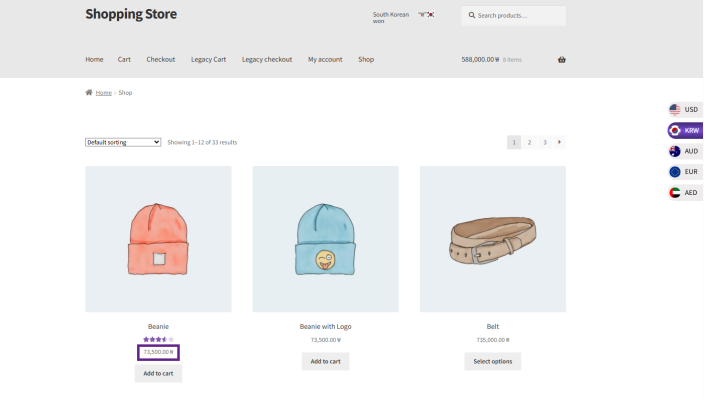
Price Format (Position)
| Option | Example |
|---|---|
| Left | £49.99 |
| left with space | £ 49.99 |
| Right | 49.99£ |
| Right, with space | 49.99 £ |
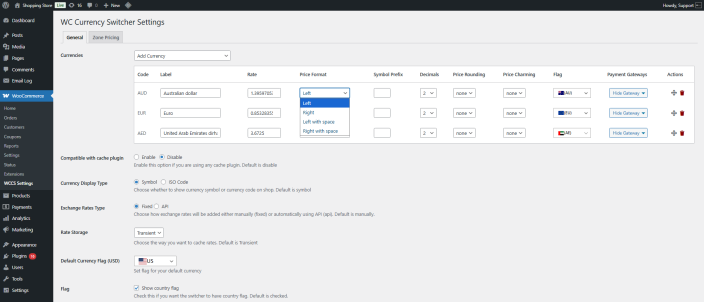
Front End Impact
- Left
- Right
- Left with Space
- Right with Space
Currency Display Type
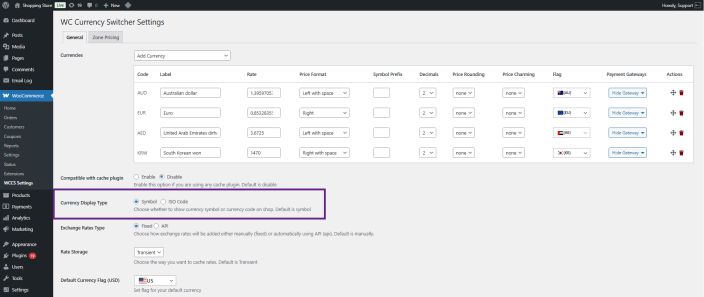
↑ Back to topUnder WCCS Settings, you can set whether the switcher and price labels show the symbol (£, €, $) or the ISO code (GBP, EUR, USD).
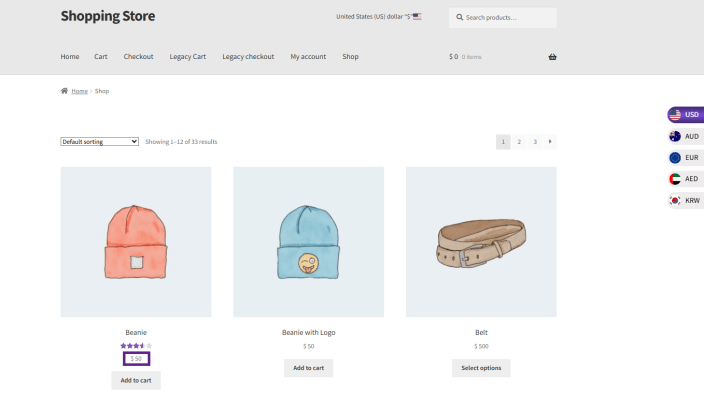
- Symbol: displays the currency symbol inline with prices.
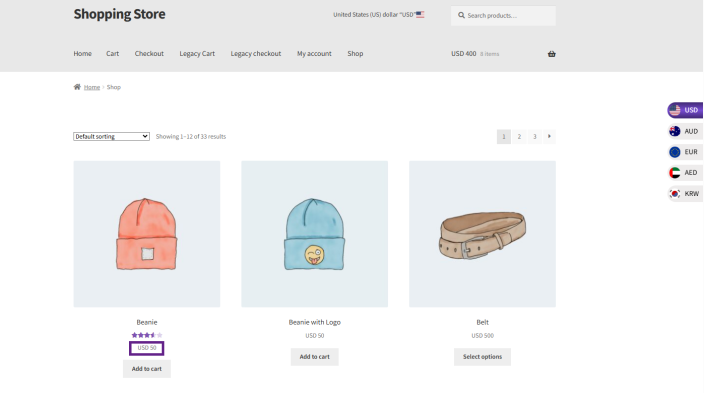
- ISO Code: displays the three-letter code (e.g., USD 49.99 rather than $49.99). Useful in markets where the symbol is ambiguous.
Front End Impact
- Symbol
- ISO
Currency Prefix
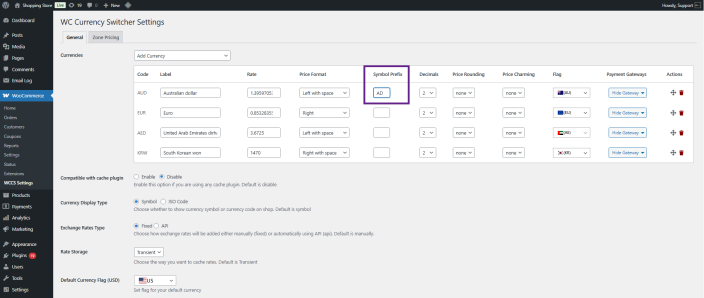
↑ Back to topYou can add a custom prefix before the currency symbol. Navigate to WCCS Settings, select Symbol as the display type, and enter your prefix in the Symbol Prefix column in the Currencies table for the relevant currency. This is useful for currencies like PKR, where a local prefix may be preferred.
Front End Impact
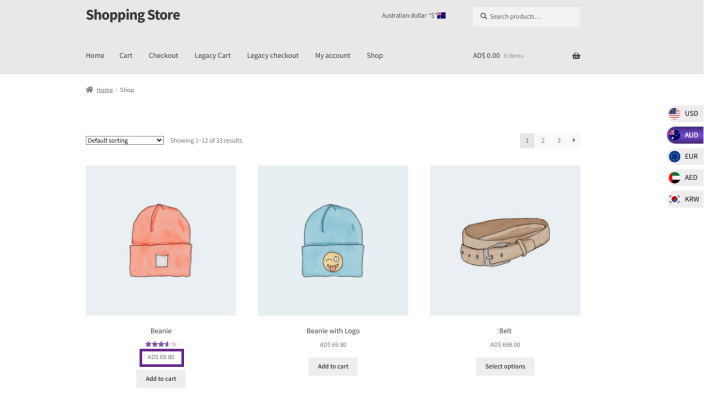
Price Rounding
↑ Back to topPrice Rounding adjusts the converted price to the nearest increment, producing cleaner-looking prices in secondary currencies. Every currency has its own rounding setting.
Rounding Option | Effect (example: converted price = 87.32) |
|---|---|
None | Price displayed as-is: 87.32 |
0.25 | Rounds to nearest 0.25: 87.25 or 87.50 |
0.50 | Rounds to nearest 0.50: 87.50 |
1 | Rounds to nearest whole number: 87 or 88 |
5 | Rounds to nearest 5: 85 or 90 |
10 | Rounds to nearest 10: 90 |
To configure: Navigate to WooCommerce > WCCS Settings > General, locate the Price Rounding column in the Currencies table, and select the increment from the dropdown for each currency.
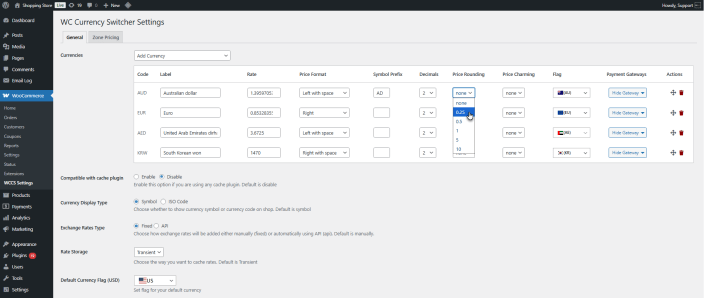
Front End Impact
- Before
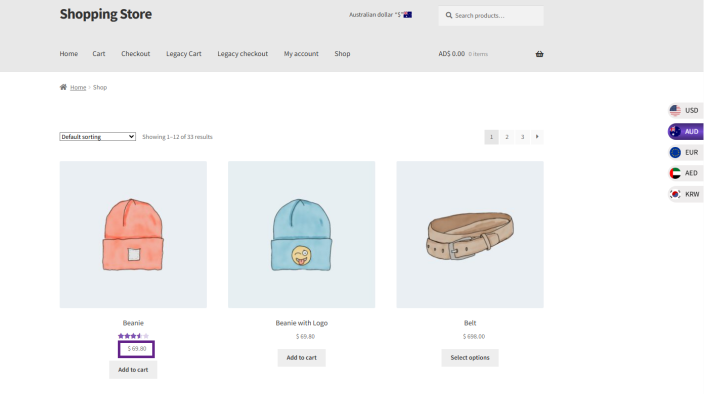
- After
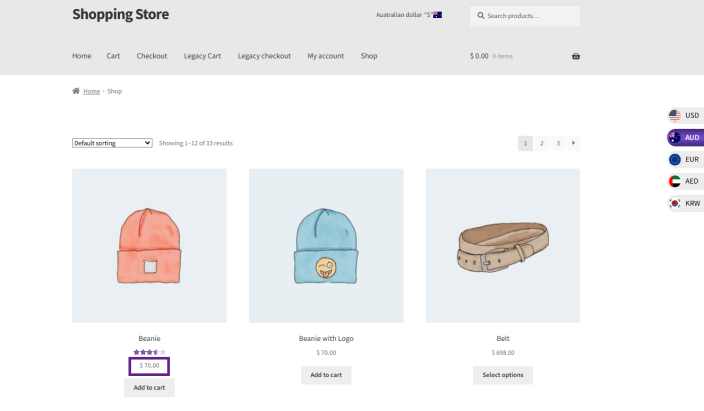
Price Charming
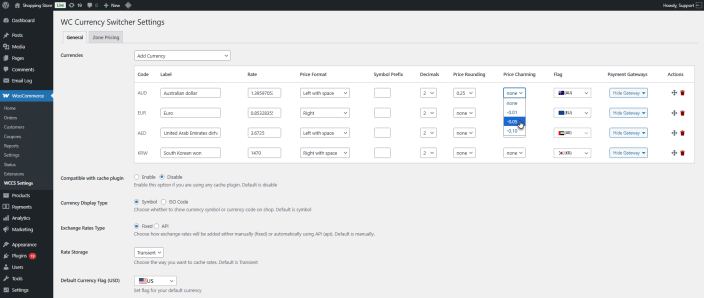
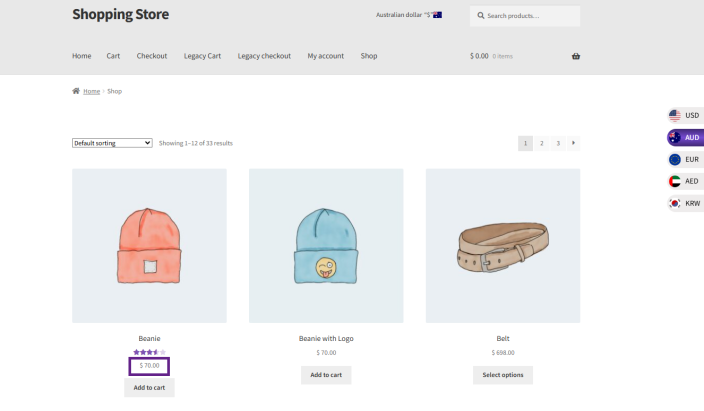
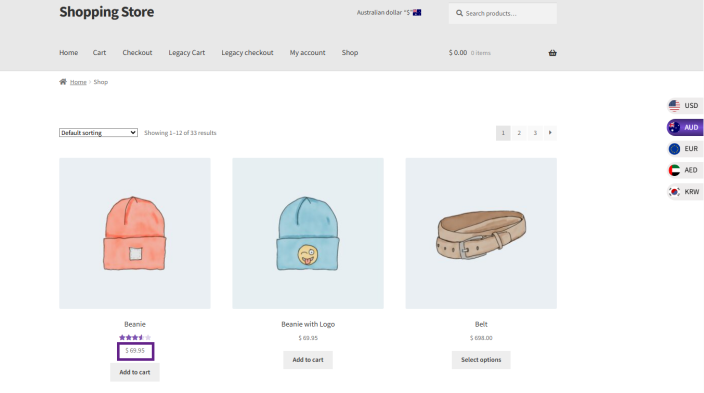
↑ Back to top- Price Charming subtracts a small amount from the converted price to create psychologically appealing price endings (e.g., €87.50 → €87.45). It runs after Price Rounding.
Charm Option | Effect (example: after rounding = 87.50) |
|---|---|
None | No adjustment: 87.50 |
-0.01 | Subtract 0.01: 87.49 |
-0.05 | Subtract 0.05: 87.45 |
-0.10 | Subtract 0.10: 87.40 |
| NOTE | When both Price Rounding and Price Charming are active, rounding is applied first, charming second. Example: converted price 87.20 with rounding 0.50 → 87.50, then charm -0.05 → 87.45. |
|---|
- Navigate to WooCommerce > WCCS Settings > General, locate the Price Rounding column in the Currencies table, and select the increment from the dropdown for each currency.
Front End Impact
- Before
- After
Geolocation: Auto-Detect Customer Currency
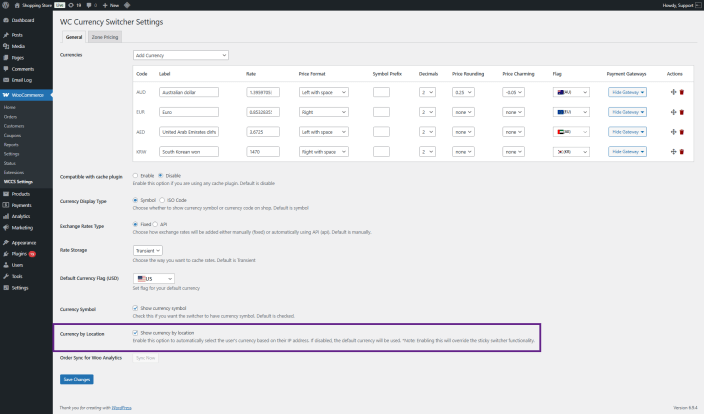
↑ Back to topCurrency by Location automatically sets the active currency based on the visitor’s IP address, providing a localized experience from the moment they land on your store.
To enable:
- Go to WooCommerce > WCCS Settings > General. Check the Currency by Location checkbox.
- A new dropdown appears: Select API Type. Choose between Ipapi and Default.
| NOTE | You must add the target currency to your Currencies table for it to activate automatically. If a visitor’s detected currency is not in your list, the store’s default currency is used. |
|---|
Currency by Location (Ipapi)
↑ Back to topUses the ipapi.com service for IP-to-currency detection. Requires a free or paid IPAPI account.
- Select Ipapi as the API Type.
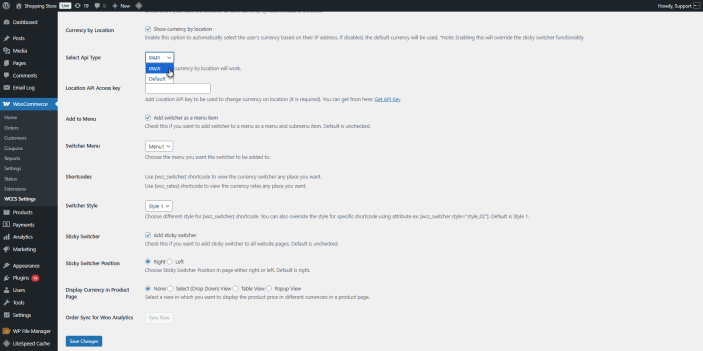
- Click Get API Key to open the IPAPI dashboard.
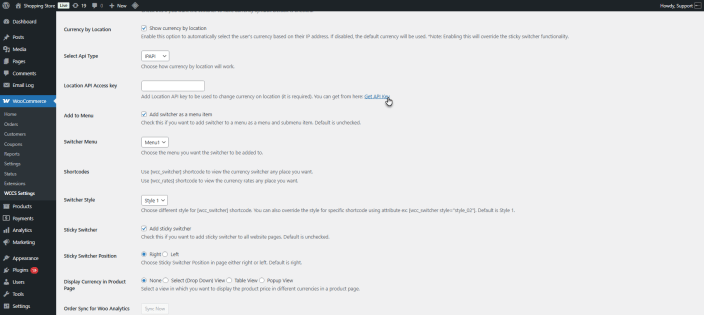
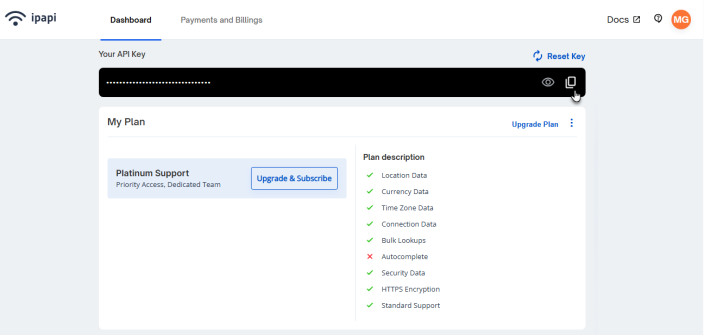
- Create an account.Copy the API Access Key from your dashboard.
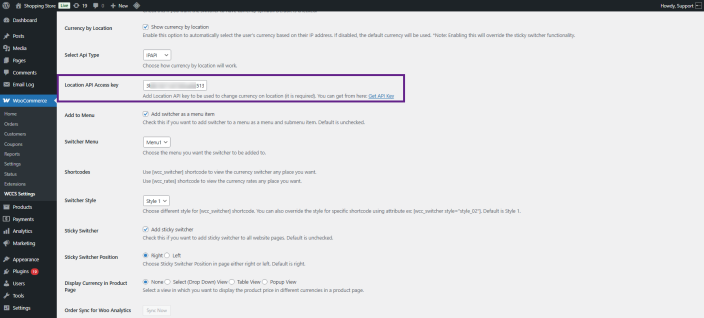
- Paste it in the Location API Access Key field in WCCS Settings. Click Save Changes.
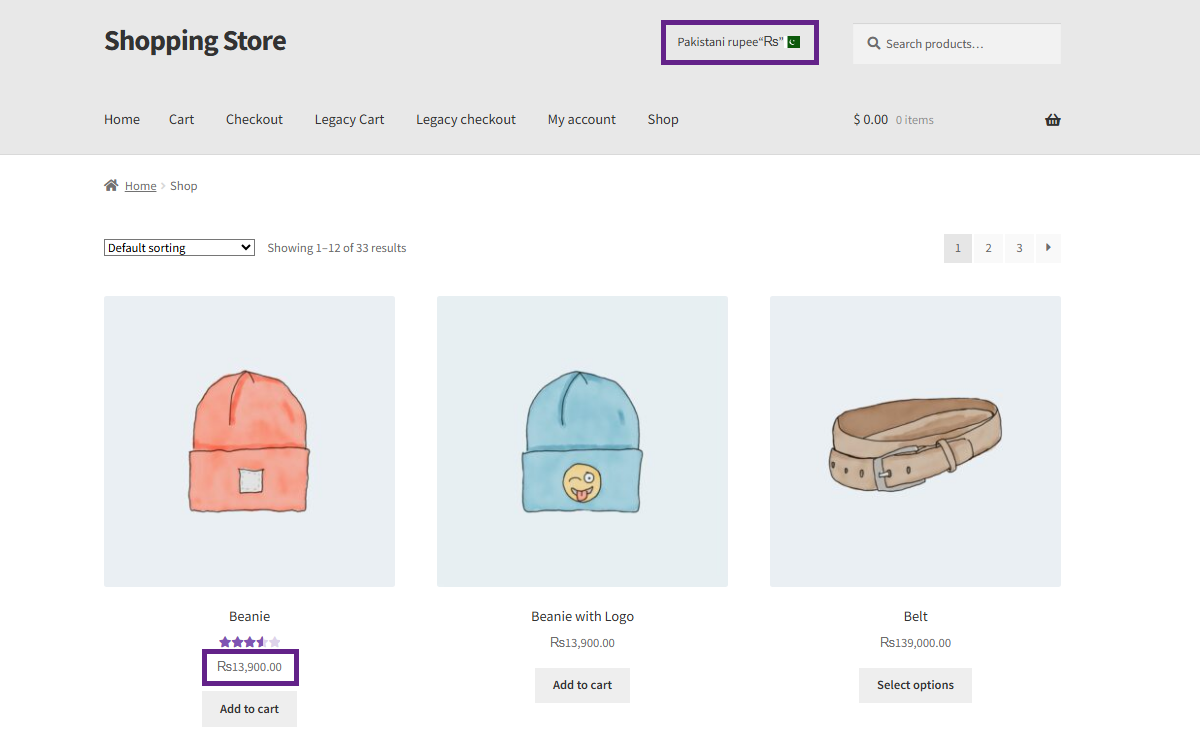
Front End Impact
- The user will visit the website and make a purchase.
- The currency that would be active would depend on his location.
Currency by Location (Default / WPExperts)
↑ Back to topUses the WPExperts geolocation service, included with your plugin license. No additional API account or key is needed.
- Select Default as the API Type. Click Save Changes.
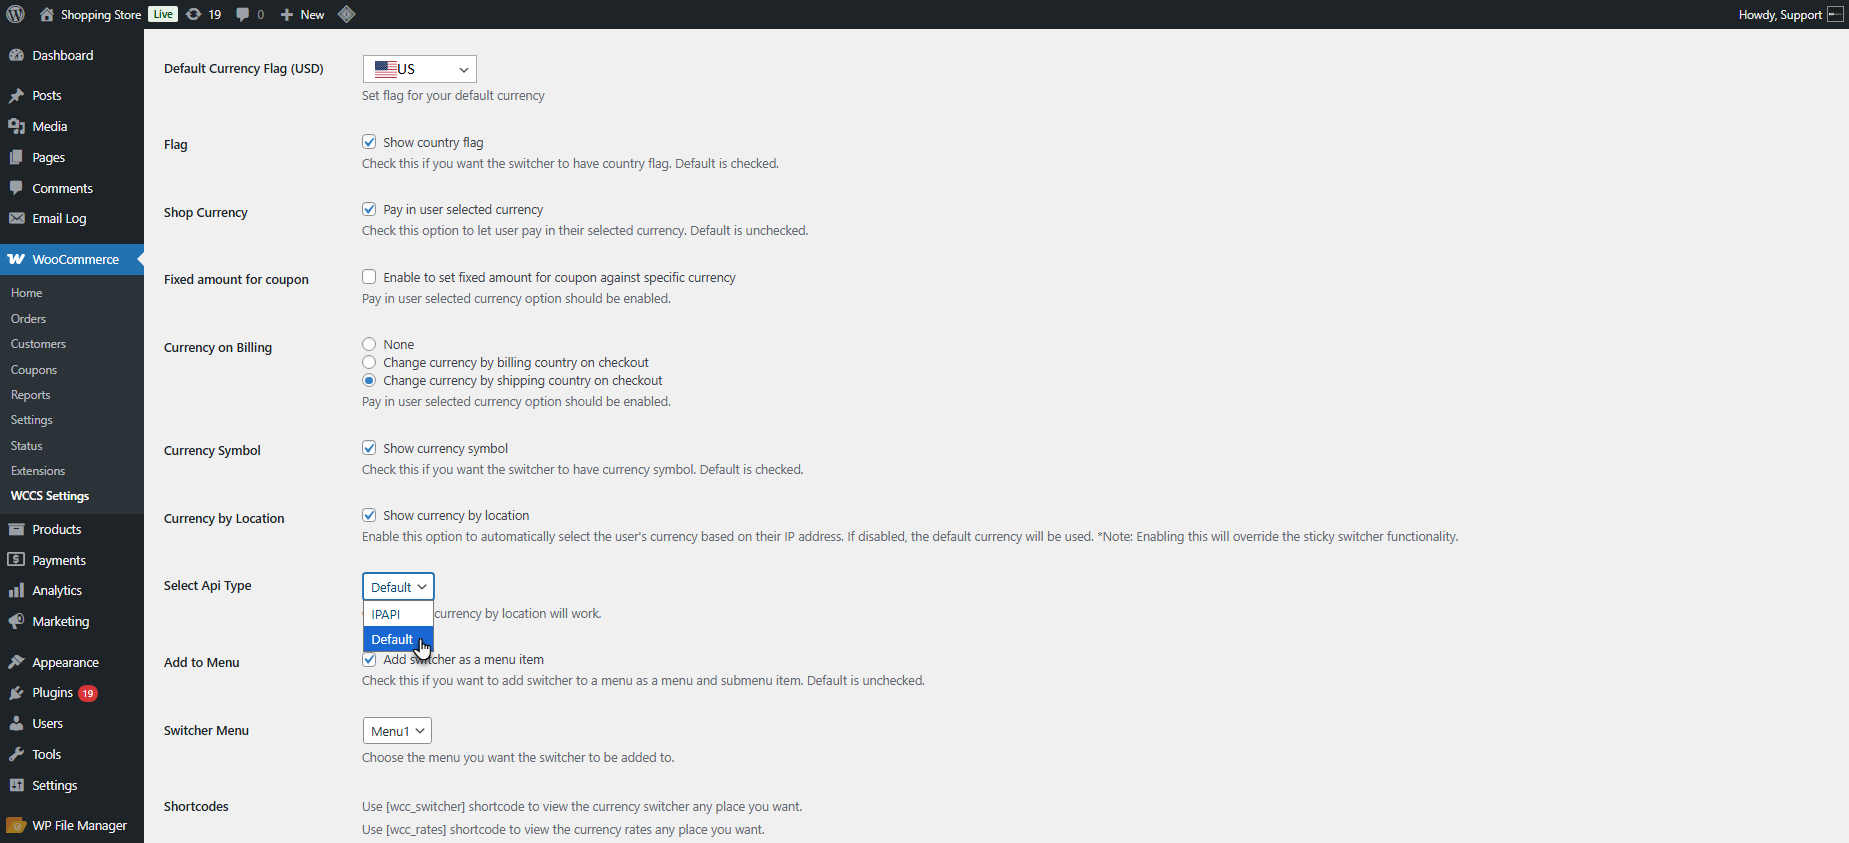
The plugin will automatically call the WPExperts location API using your plugin license token on each new visitor session.
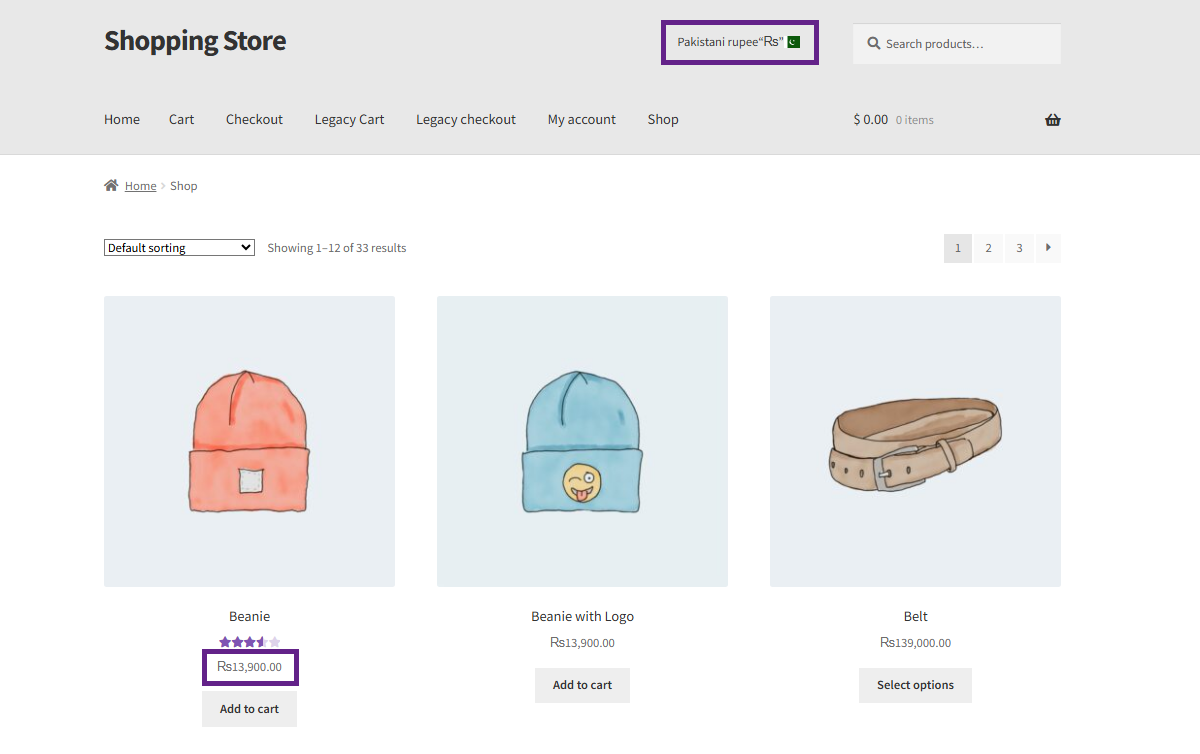
Front End Impact
- The user will visit the website and make a purchase.
- The currency that would be active would depend on his location.
MaxMind Geolocation Integration
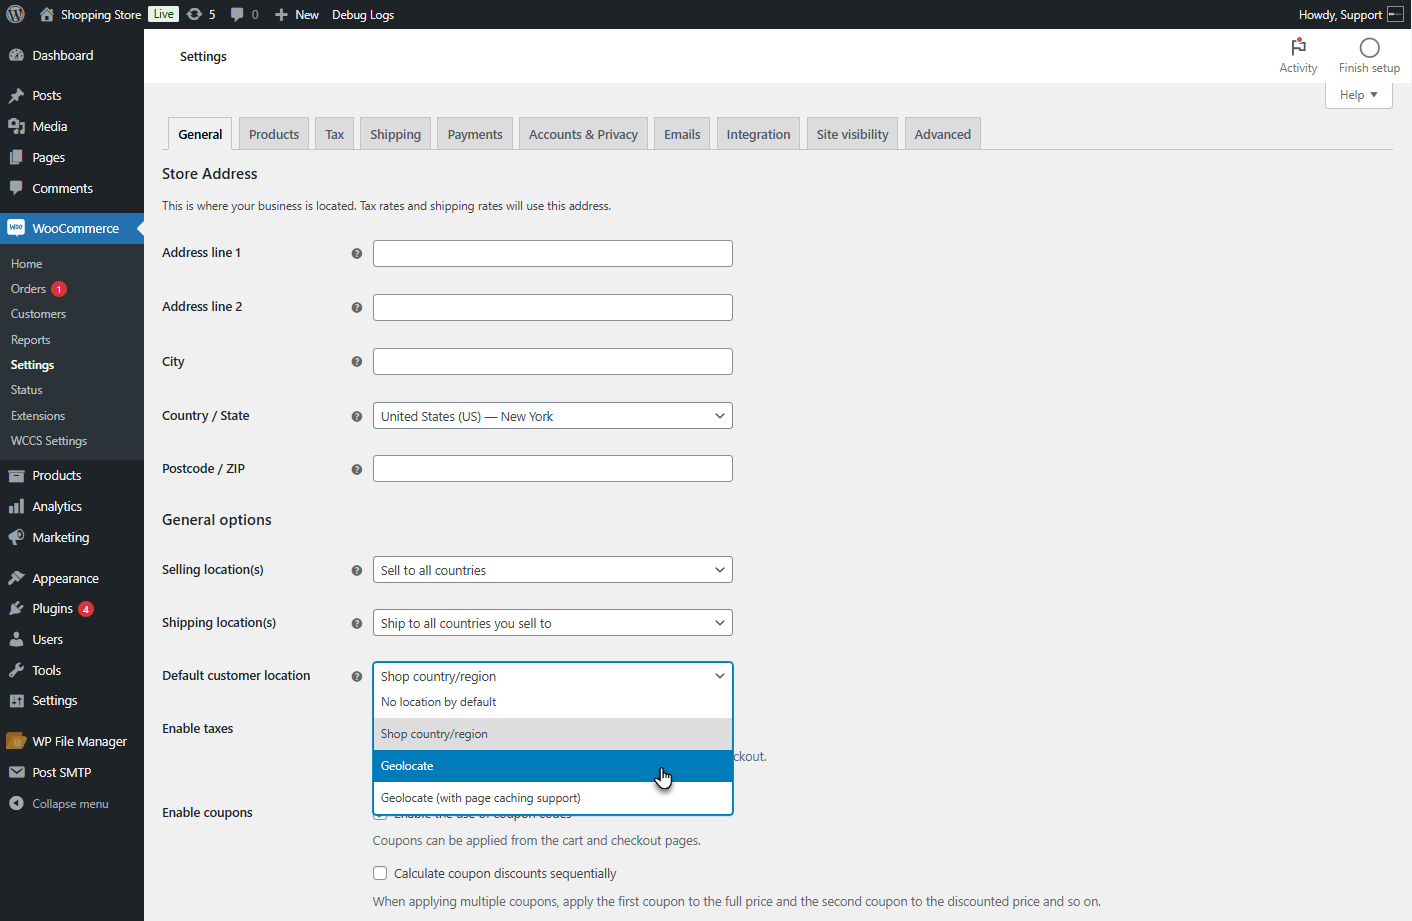
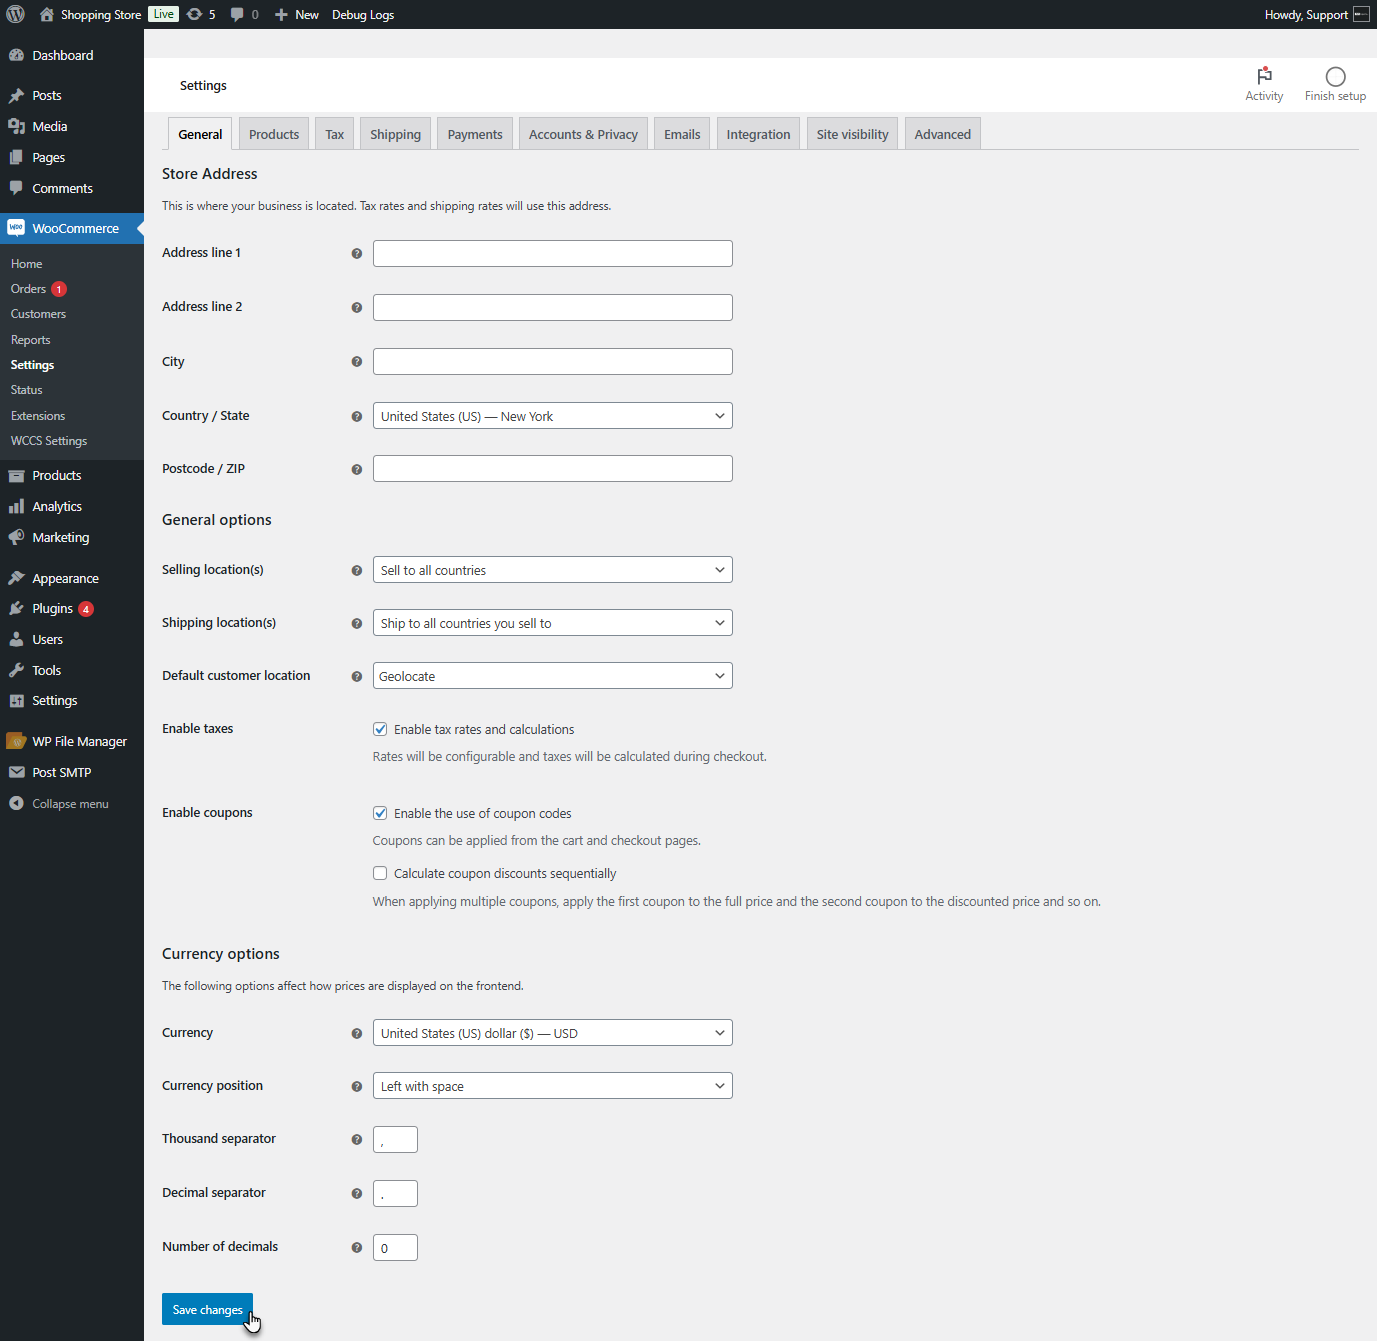
↑ Back to topMaxMind is WooCommerce’s built-in geolocation system. When WooCommerce is configured to use MaxMind, Currency Switcher automatically uses it for location detection; no additional setup is needed beyond enabling it in WooCommerce.
- Go to the WooCommerce > Settings > General.
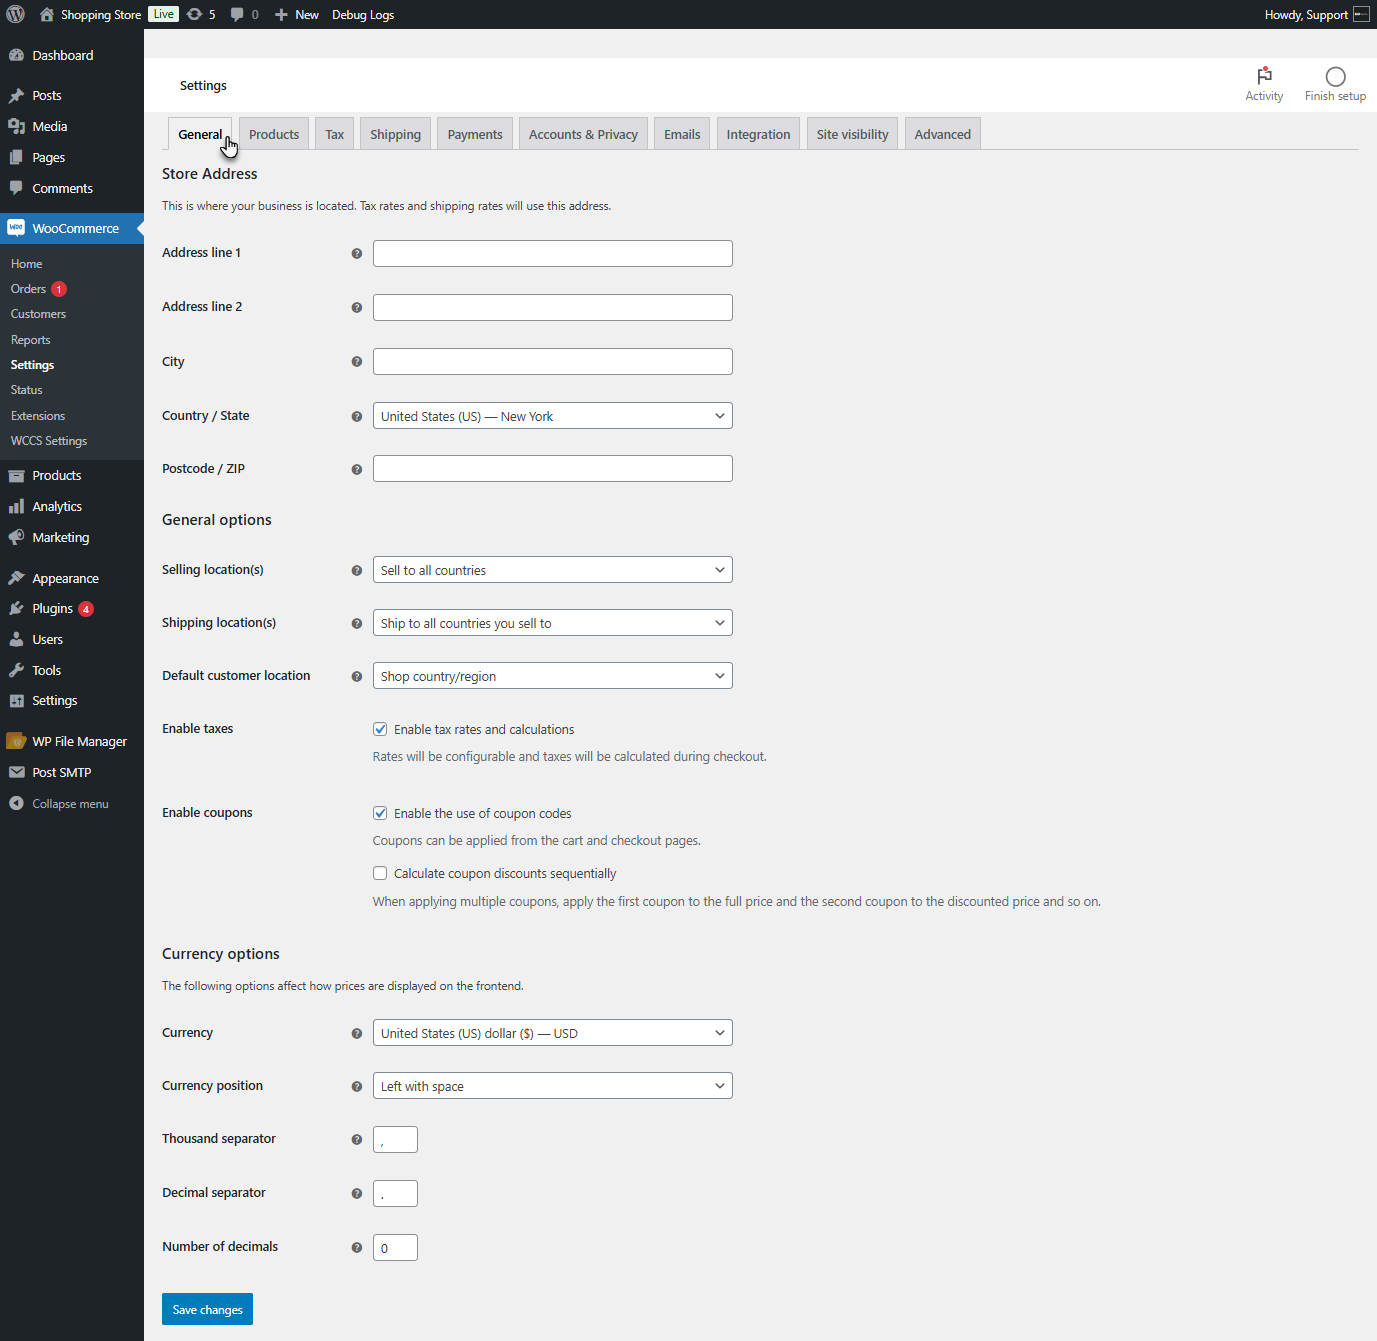
- Navigate to the Default Customer Location and select Geolocate from the dropdown.
- Click on the Save Changes button to update the settings.
- Now navigate to the WooCommerce > Settings > Integration.
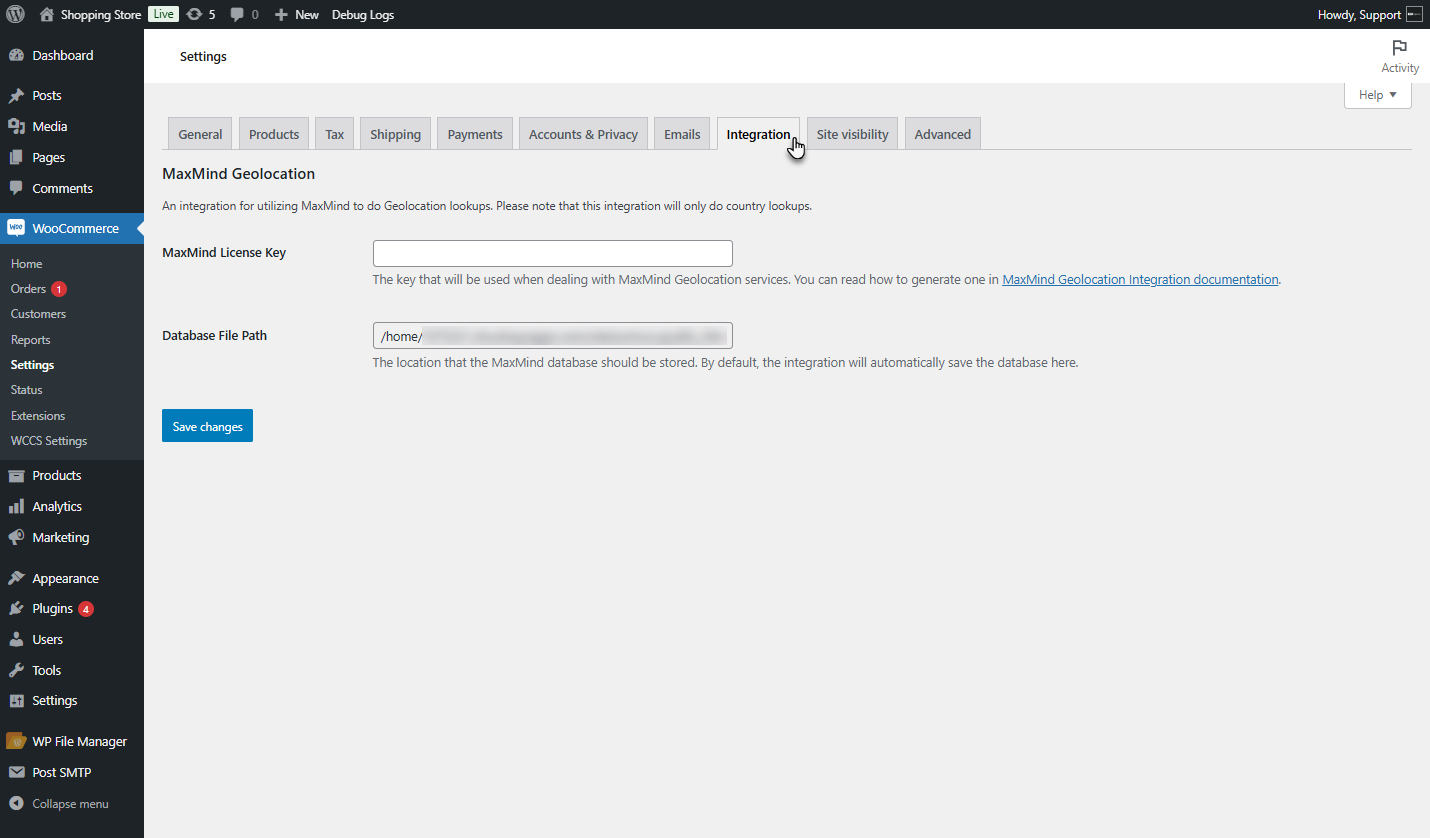
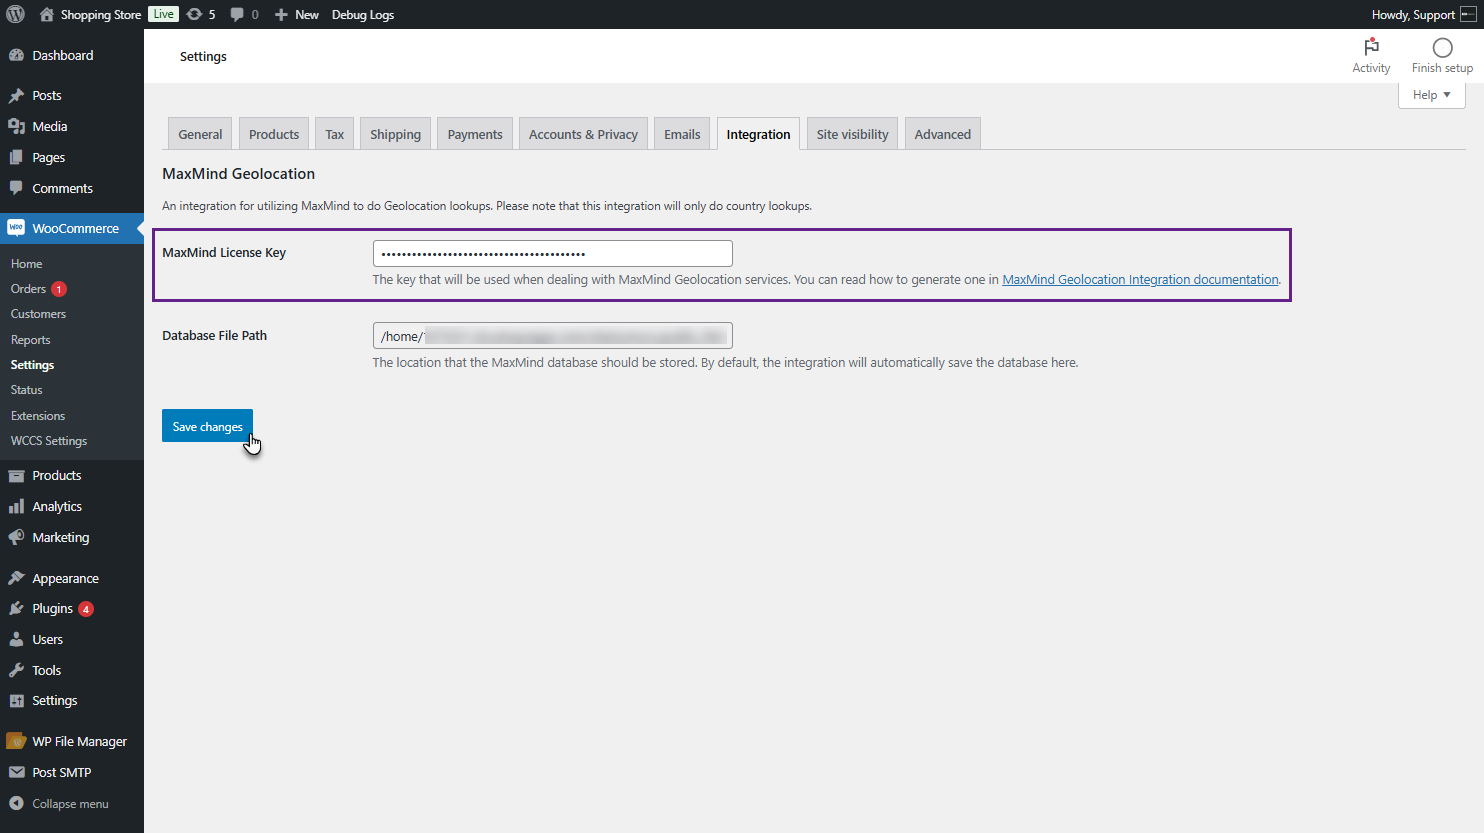
- To get the MaxMind License Key, follow the MaxMind Integration Documentation or visit MaxMind.
- Enter the MaxMind Key in the MaxMind License Key and click the save changes button.
Front End Impact
- Log in to your account.
- The currency will automatically adjust based on your location on the Shop page.
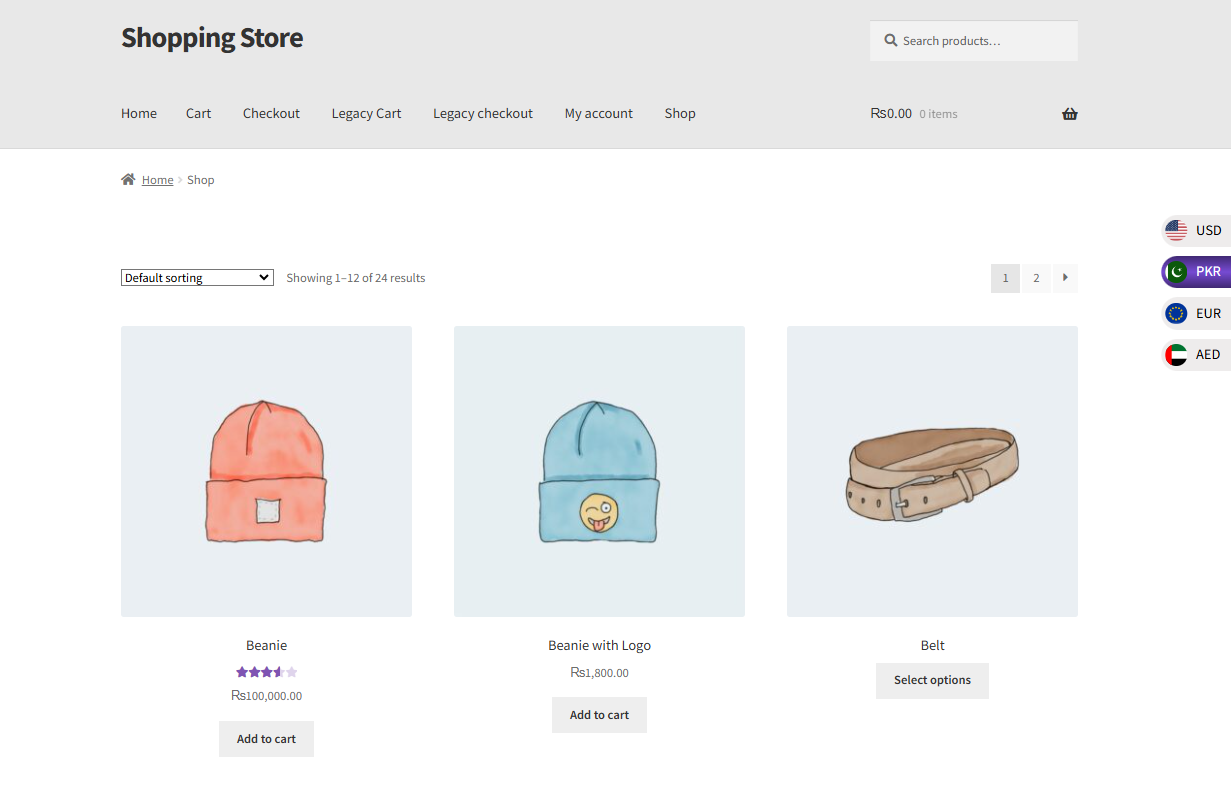
- Navigate to the Cart page, where the currency will also be switched to match your location.
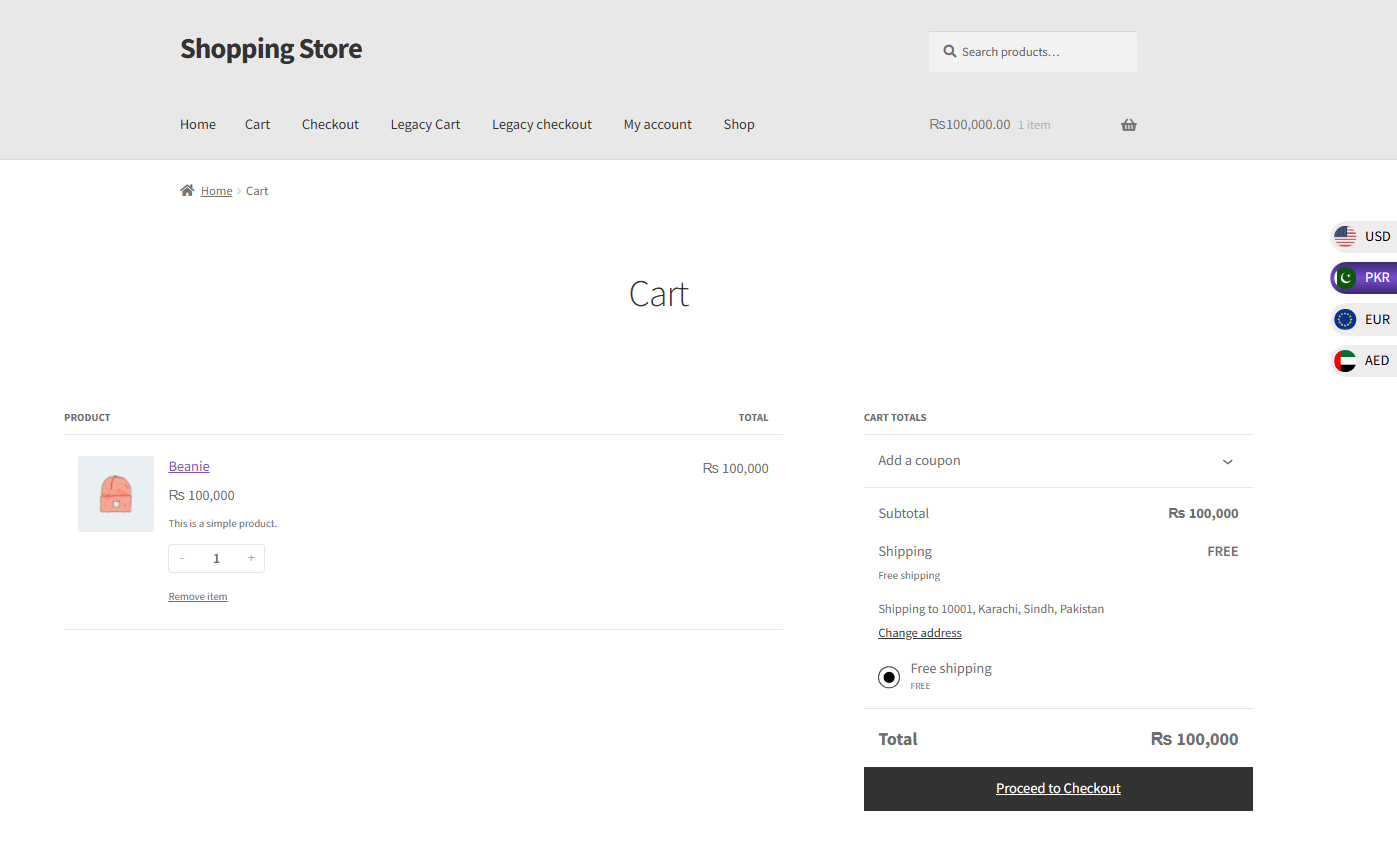
- On the Checkout page, the currency will update to reflect your current location again.
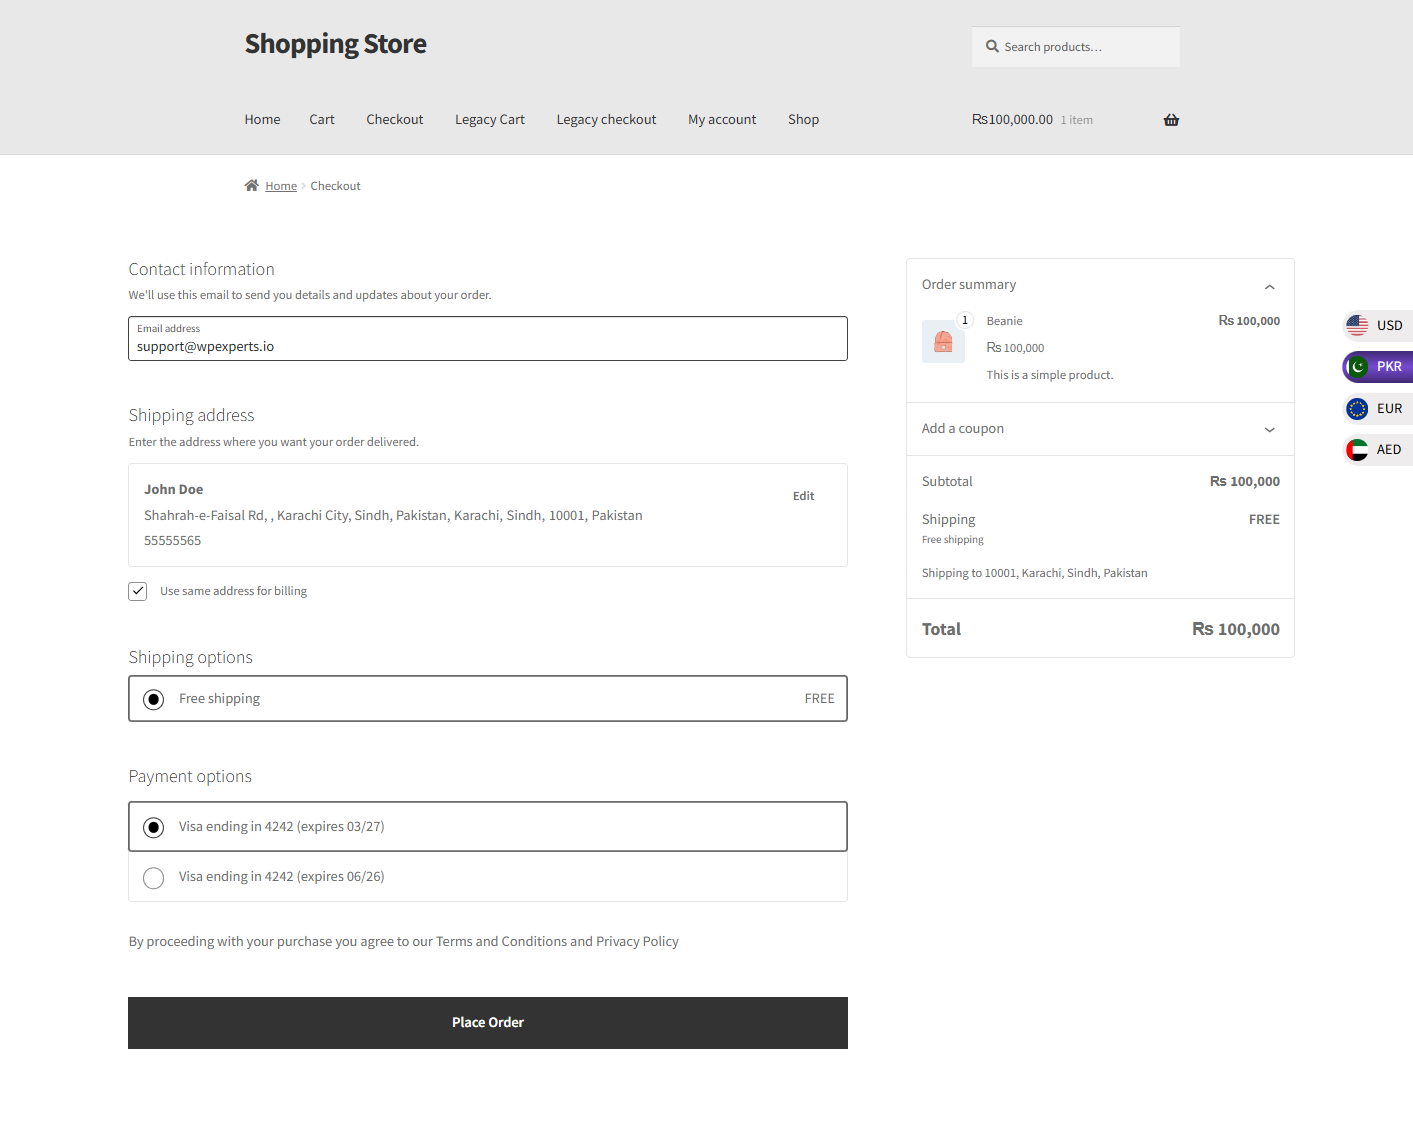
Currency Switcher will now use WooCommerce’s MaxMind geolocation on the shop, cart, and checkout pages to automatically set the appropriate currency.
Checkout Behavior & Currency Control
↑ Back to topThree settings determine how currency selection interacts with the checkout process. These settings can conflict with each other — read this section carefully before configuring.
| IMPORTANT | Only one of “Currency on Billing” and “Zone Pricing” should be active at a time. Both rely on country/location detection, but apply the currency at different points and use different logic. Enabling both will cause unpredictable behavior. |
|---|
Shop Currency Pay in Selected Currency
↑ Back to topWhen enabled, customers complete the actual payment in their selected currency. When disabled, prices display in the selected currency but the order is processed and charged in your base currency.
- Navigate to WooCommerce > WCCS Settings > General.
- Check the Shop Currency option.
- Click Save Changes.
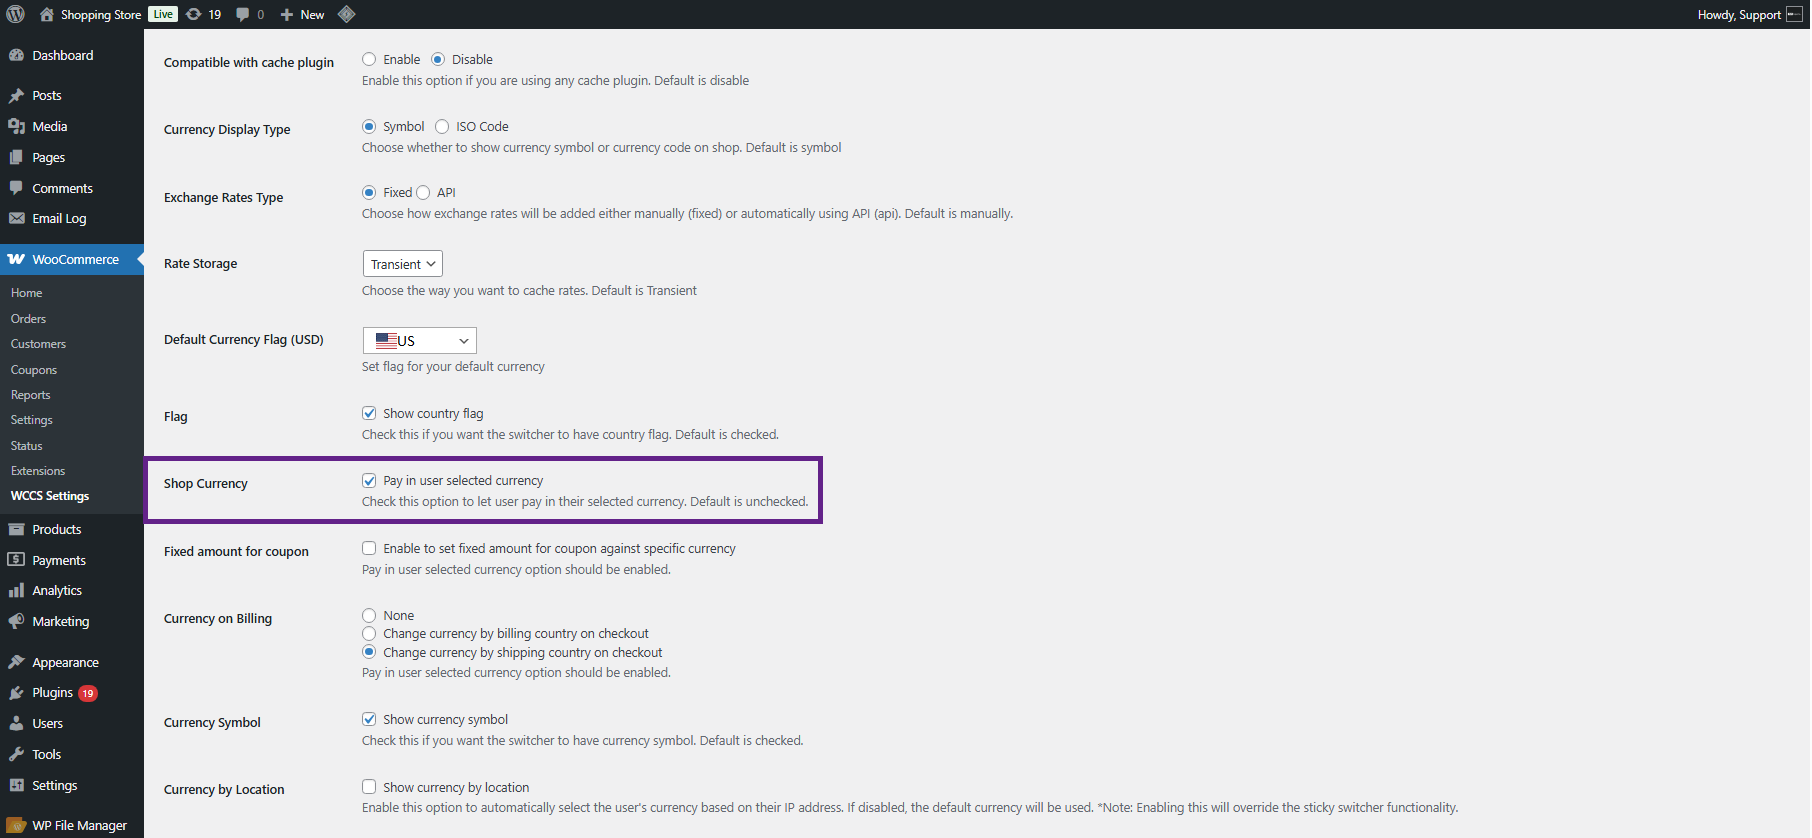
Front End Impact
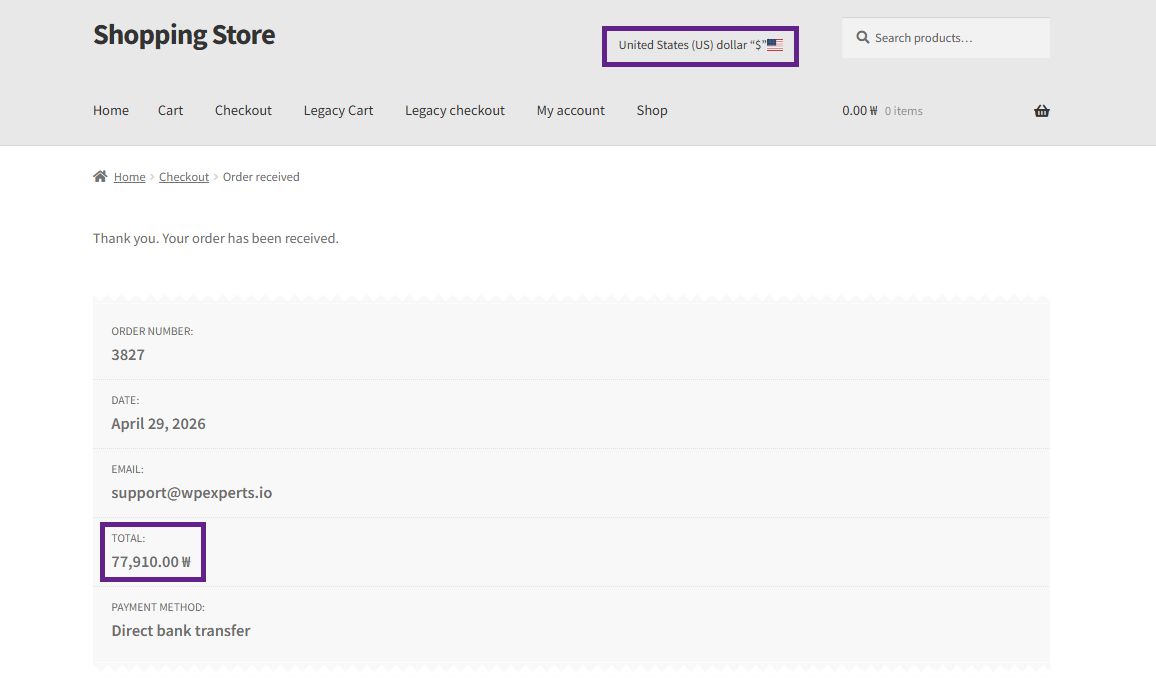
- The base currency is USD, and the order is placed in the selected currency, which is South Korean Won.
Currency on Billing (Switch by Billing Country)
↑ Back to topAutomatically switches the active currency based on the country the customer selects in the billing address at checkout. This means a customer who enters a UK billing address will automatically see GBP prices, even if they had a different currency selected when browsing.
- Enable Shop Currency first.
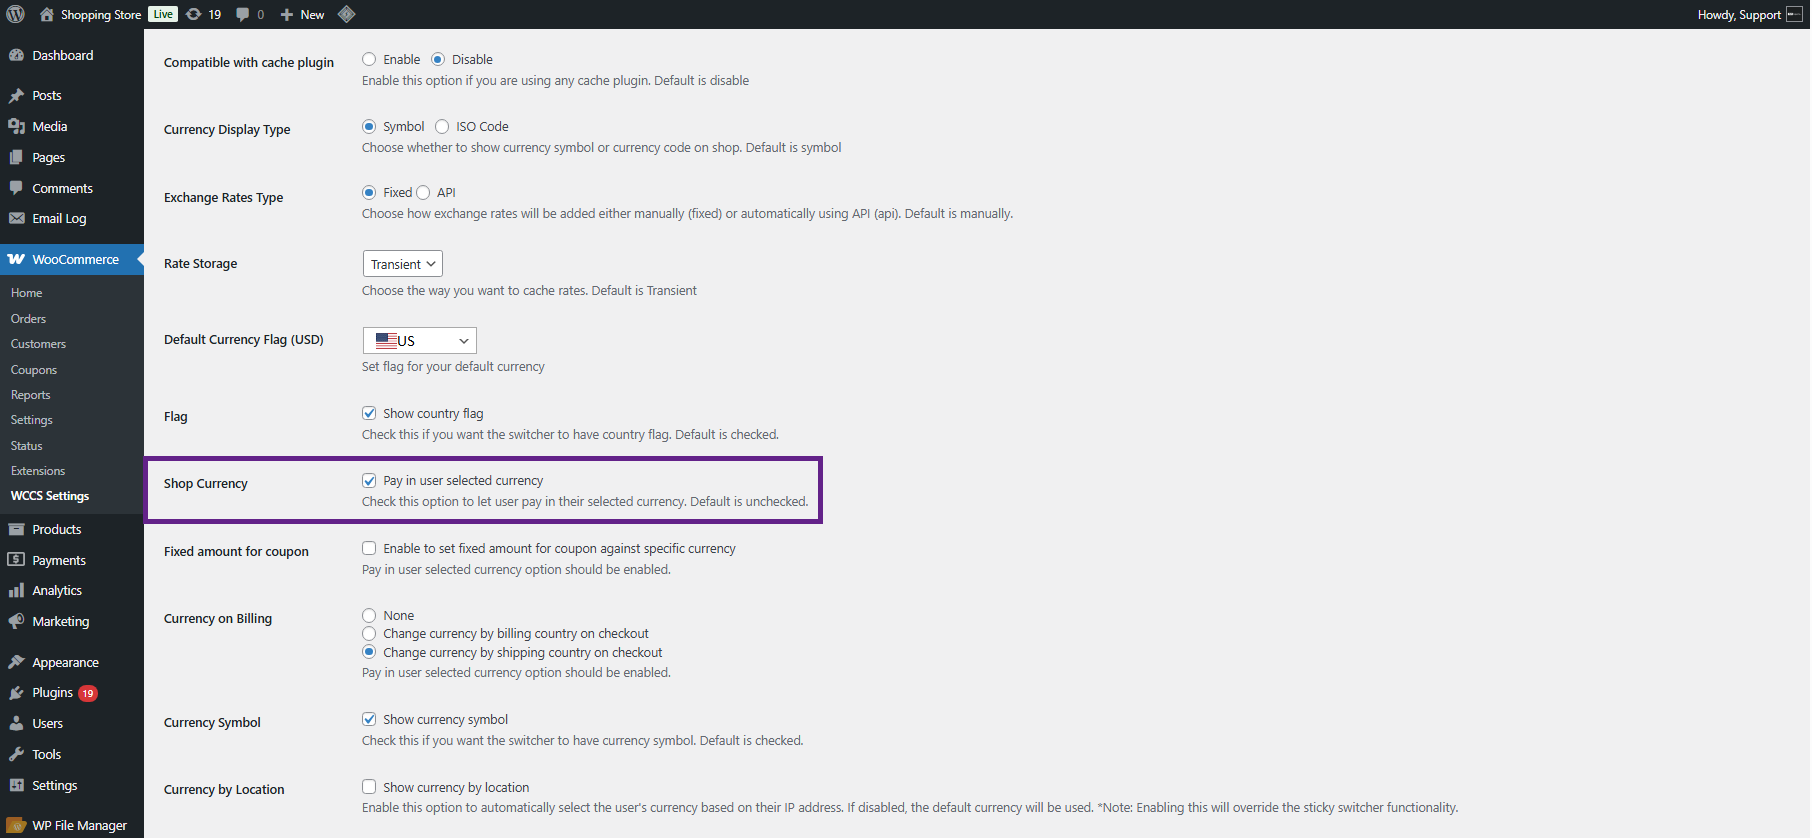
- Navigate to WCCS Settings and locate Currency on Billing.
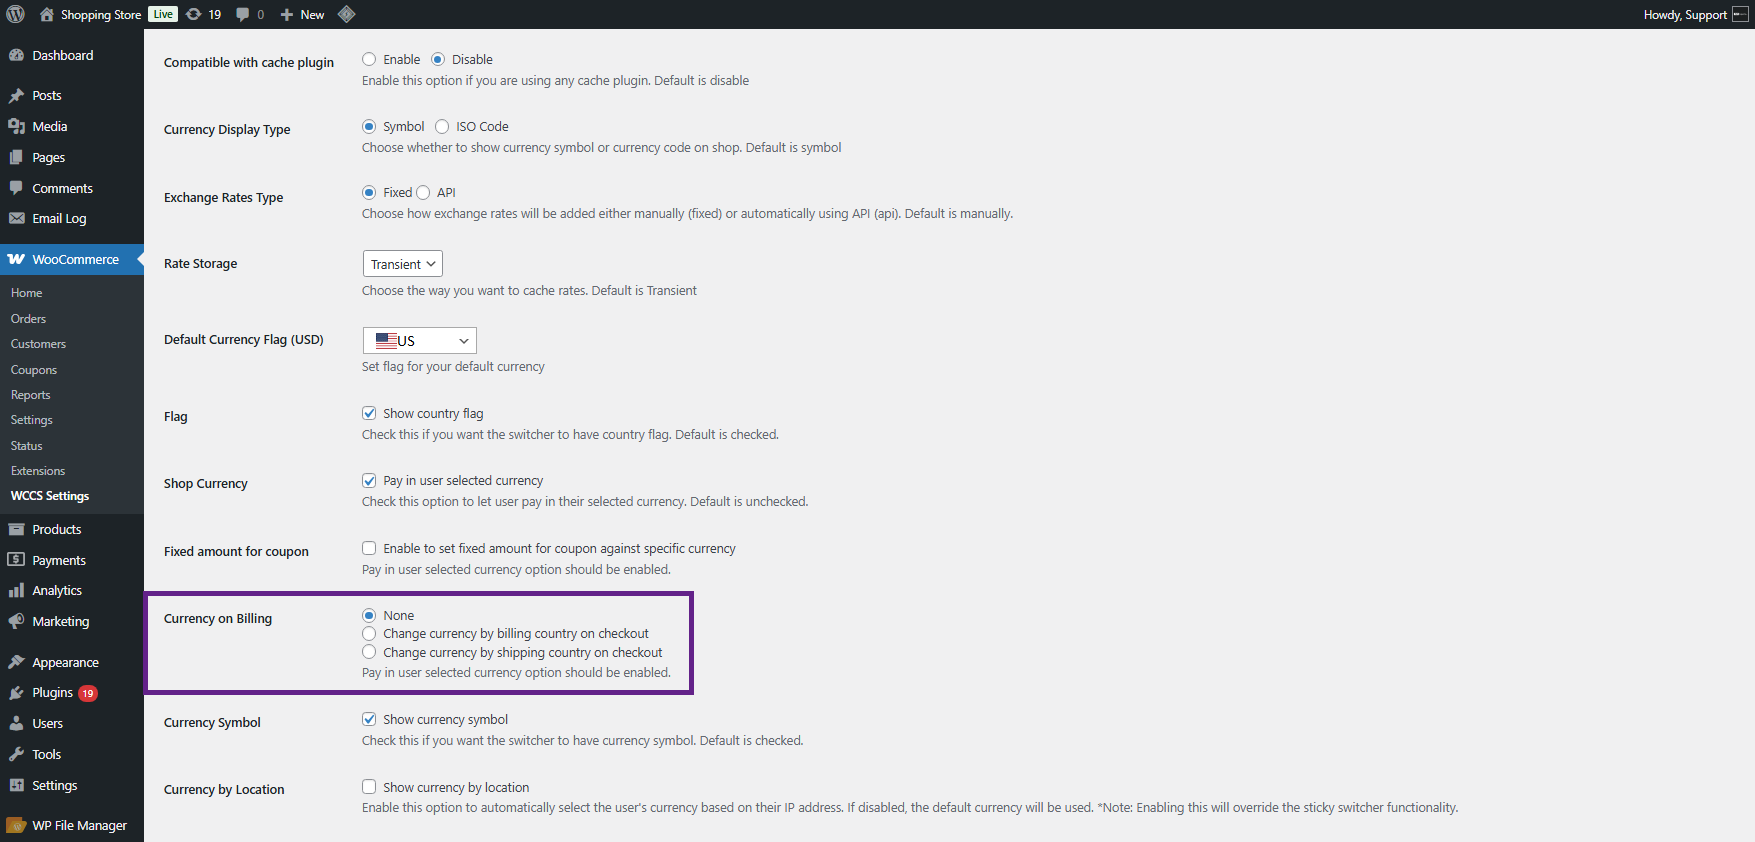
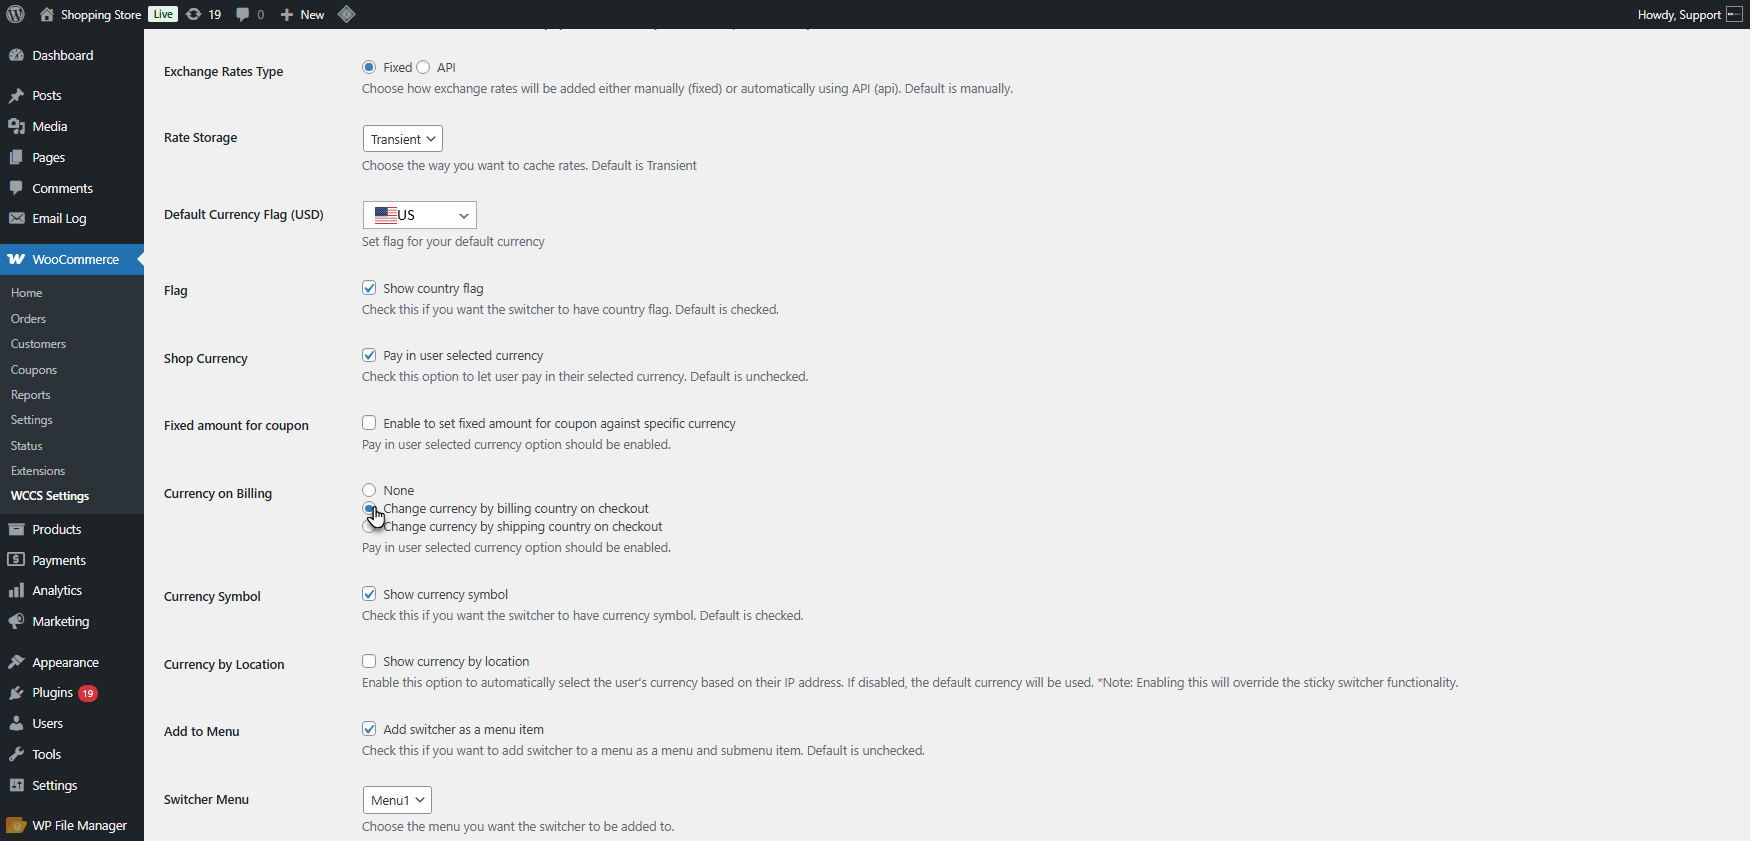
- Select Change currency by billing country on checkout. Click Save Changes.
| NOTE | The currency for each billing country is determined by your Currencies table. If the billing country’s currency is not in your table, the currency does not switch. |
|---|
| WARNING | Disable Currency on Billing when using the Coupon Fixed Amount feature, and disable it when using Zone Pricing. These features conflict. |
|---|
Front End Impact
- The user visits the website and browses the shop. After selecting an item and proceeding to the checkout page.
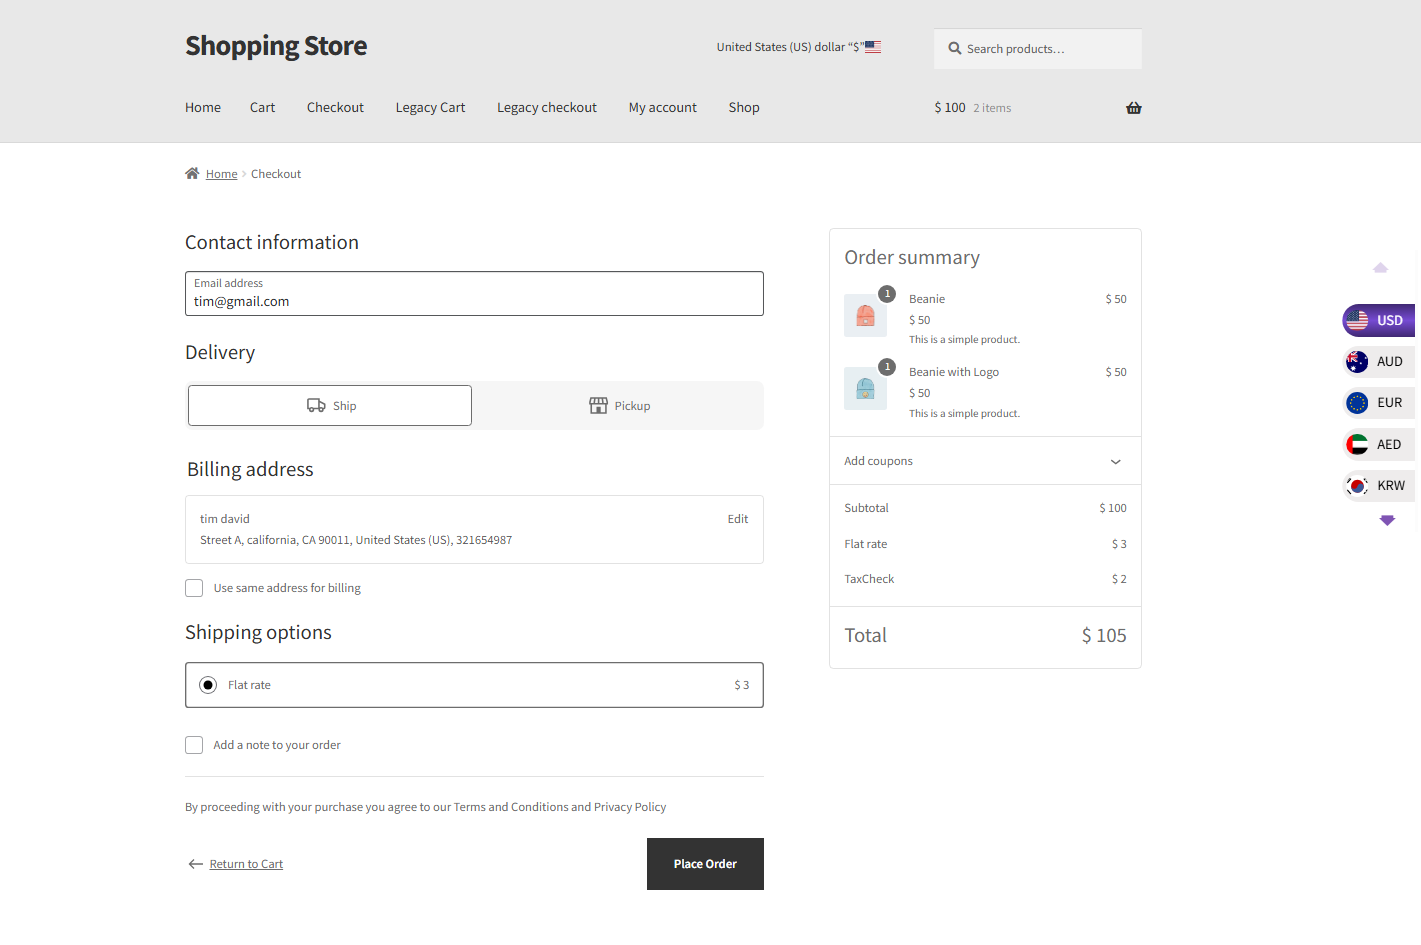
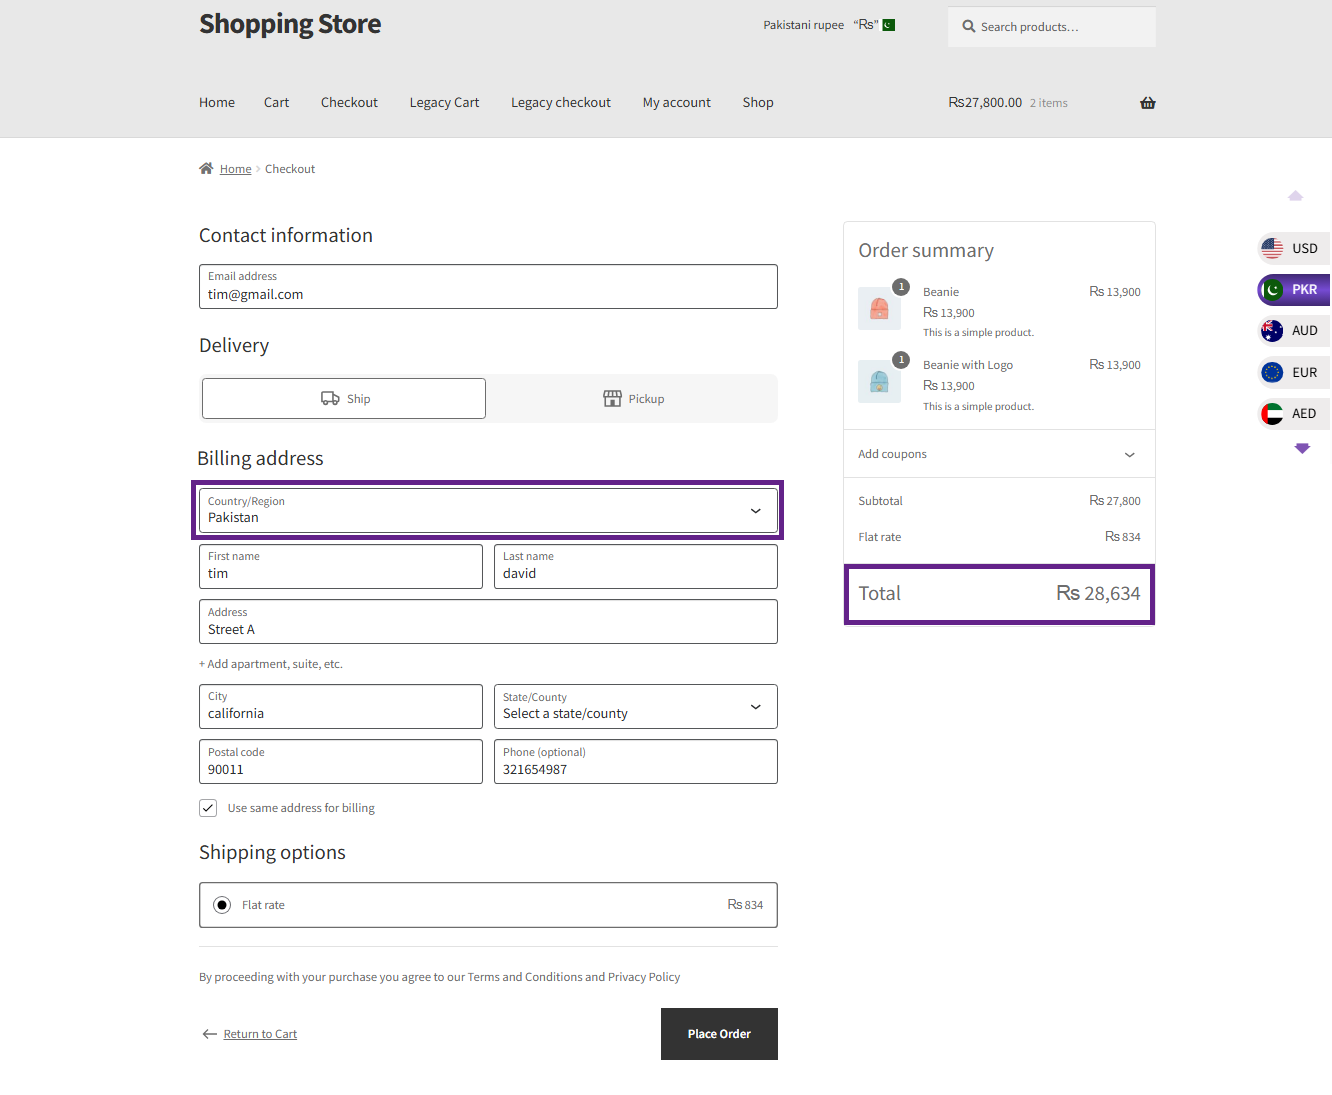
- The user must select a country or region in the Billing Details section. Once a country is selected in the Country / Region field, the currency automatically updates to match the selected country.
Switch Currency on Customer Shipping
↑ Back to topSimilar to Currency on Billing, but triggers the currency switch when the customer enters their shipping address rather than their billing address.
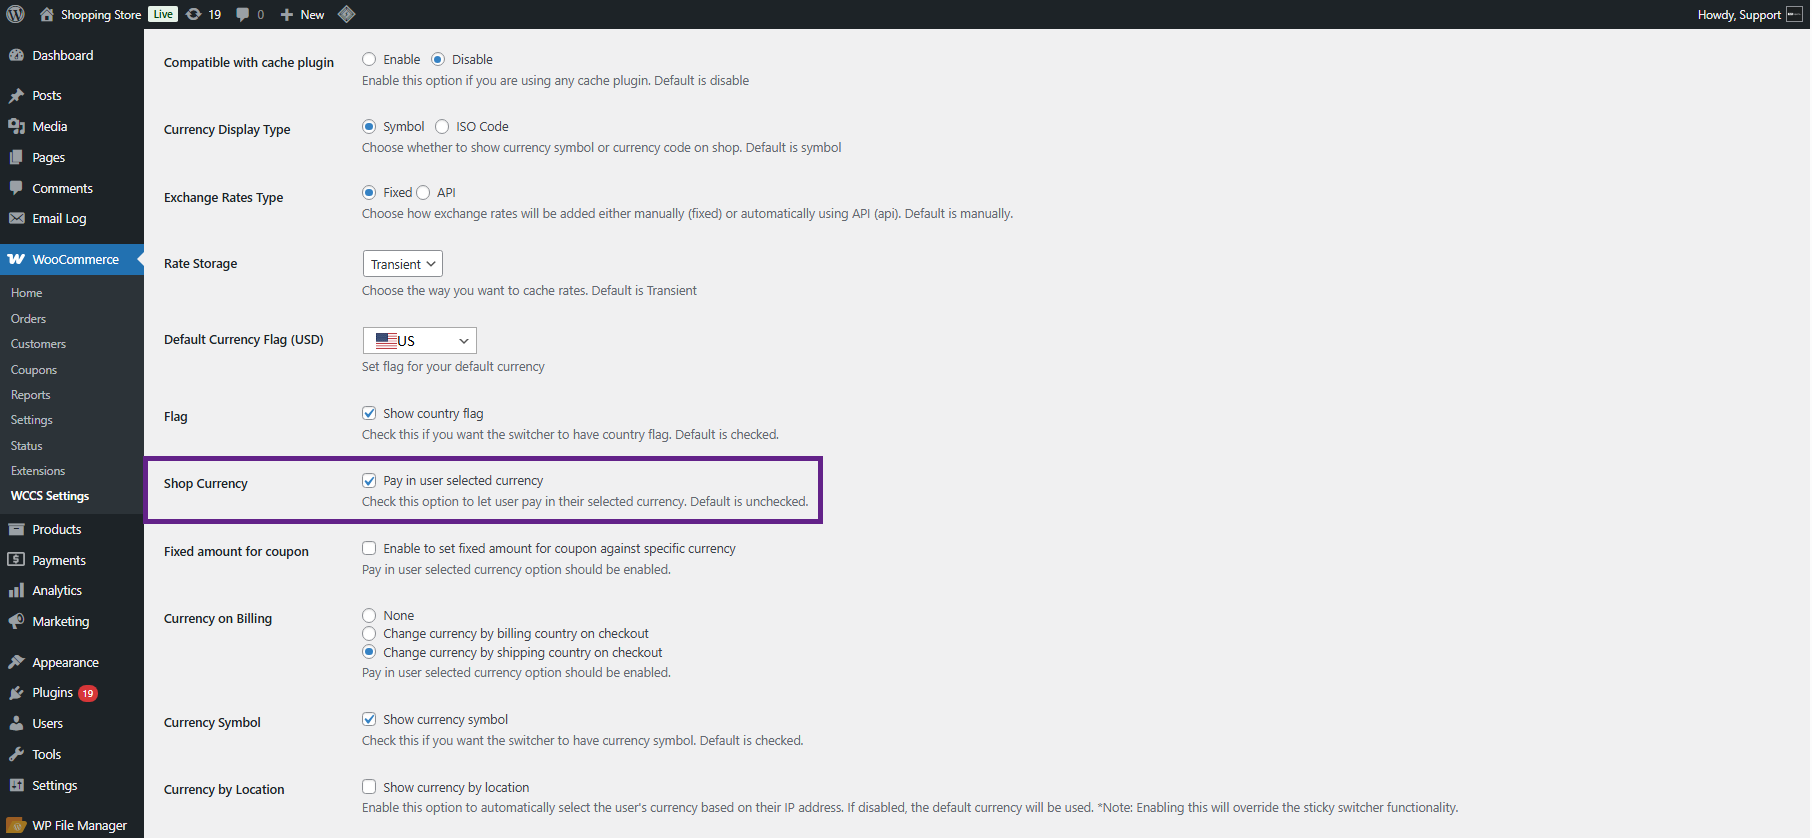
- Enable Shop Currency first.
- Navigate to WCCS Settings and locate Currency on Billing.
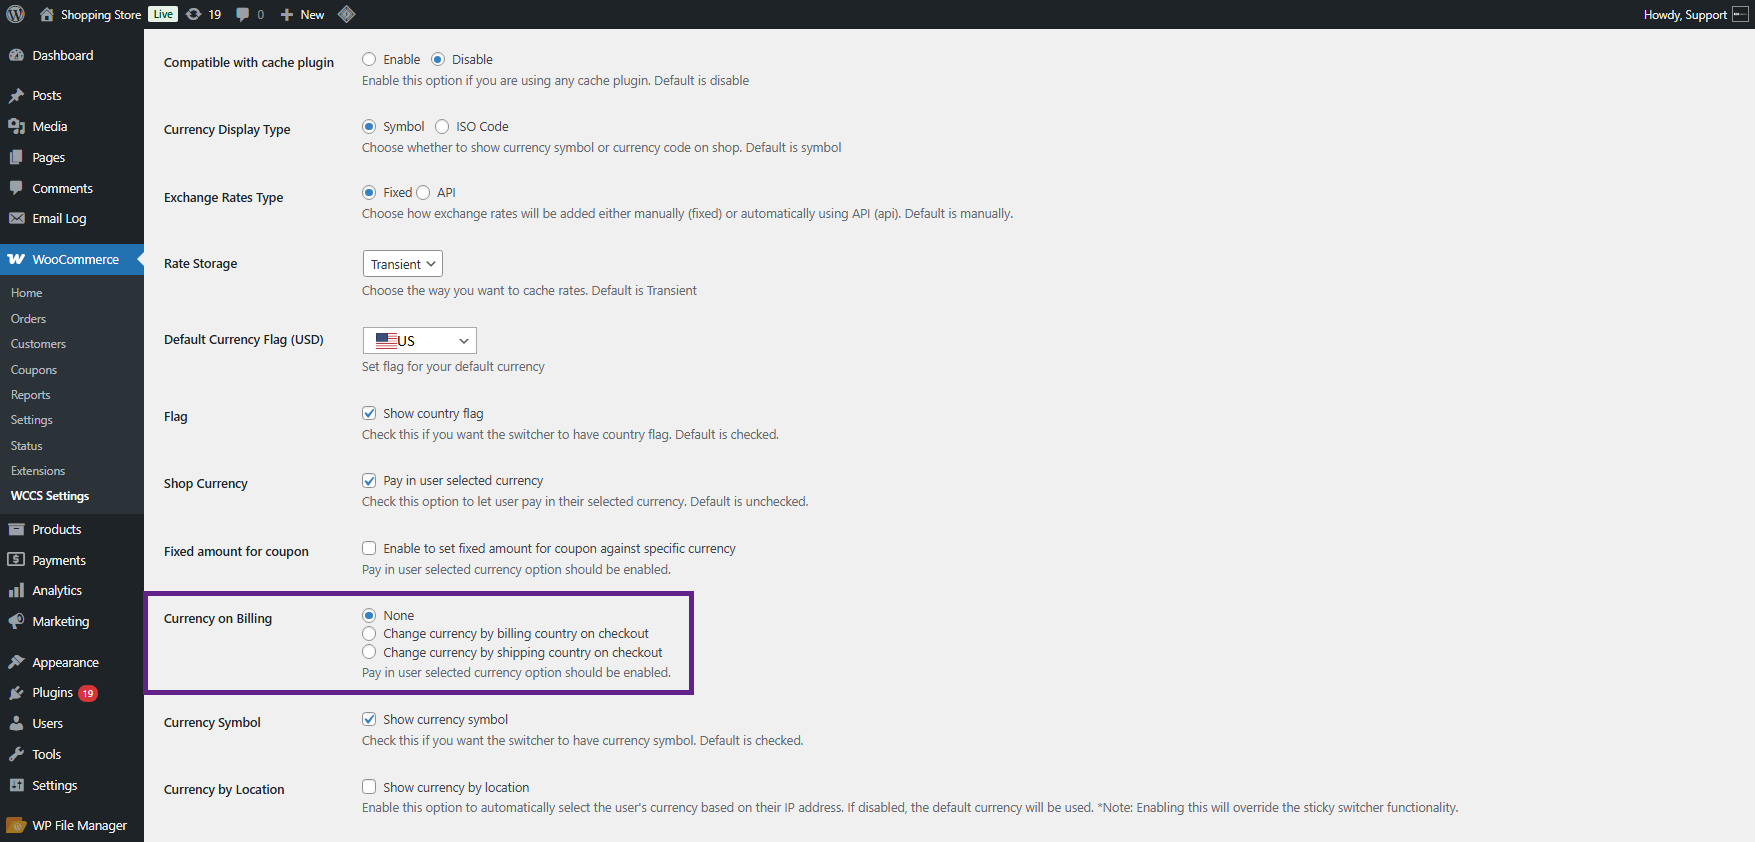
- Select Change currency by shipping country on the checkout. Click Save Changes.
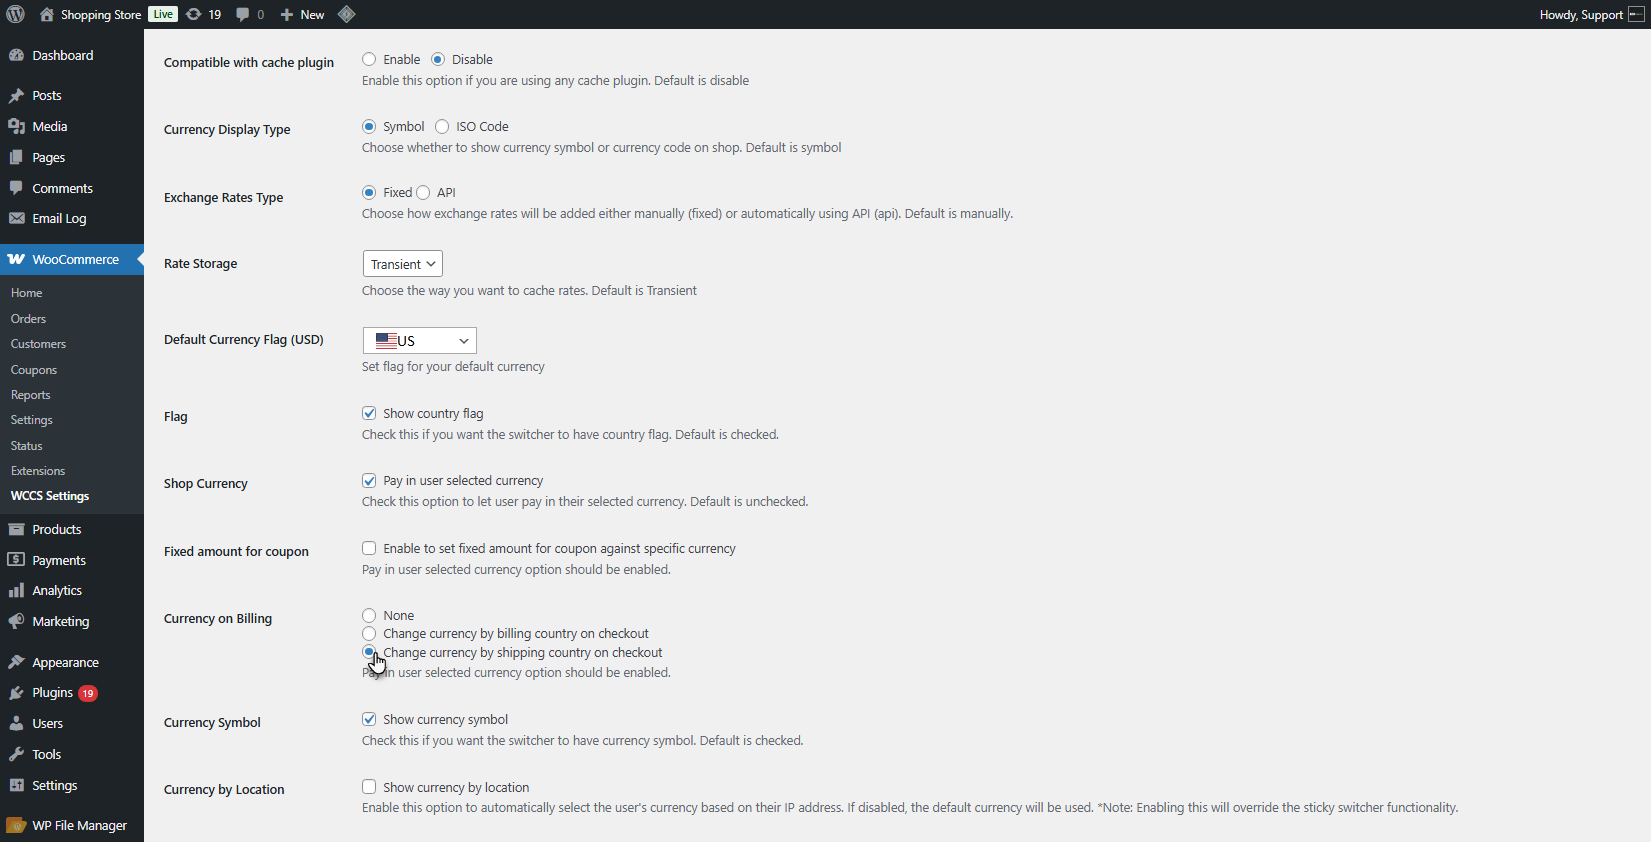
Front End Impact
- The user visits the website and browses the shop. After selecting an item and proceeding to the checkout page.
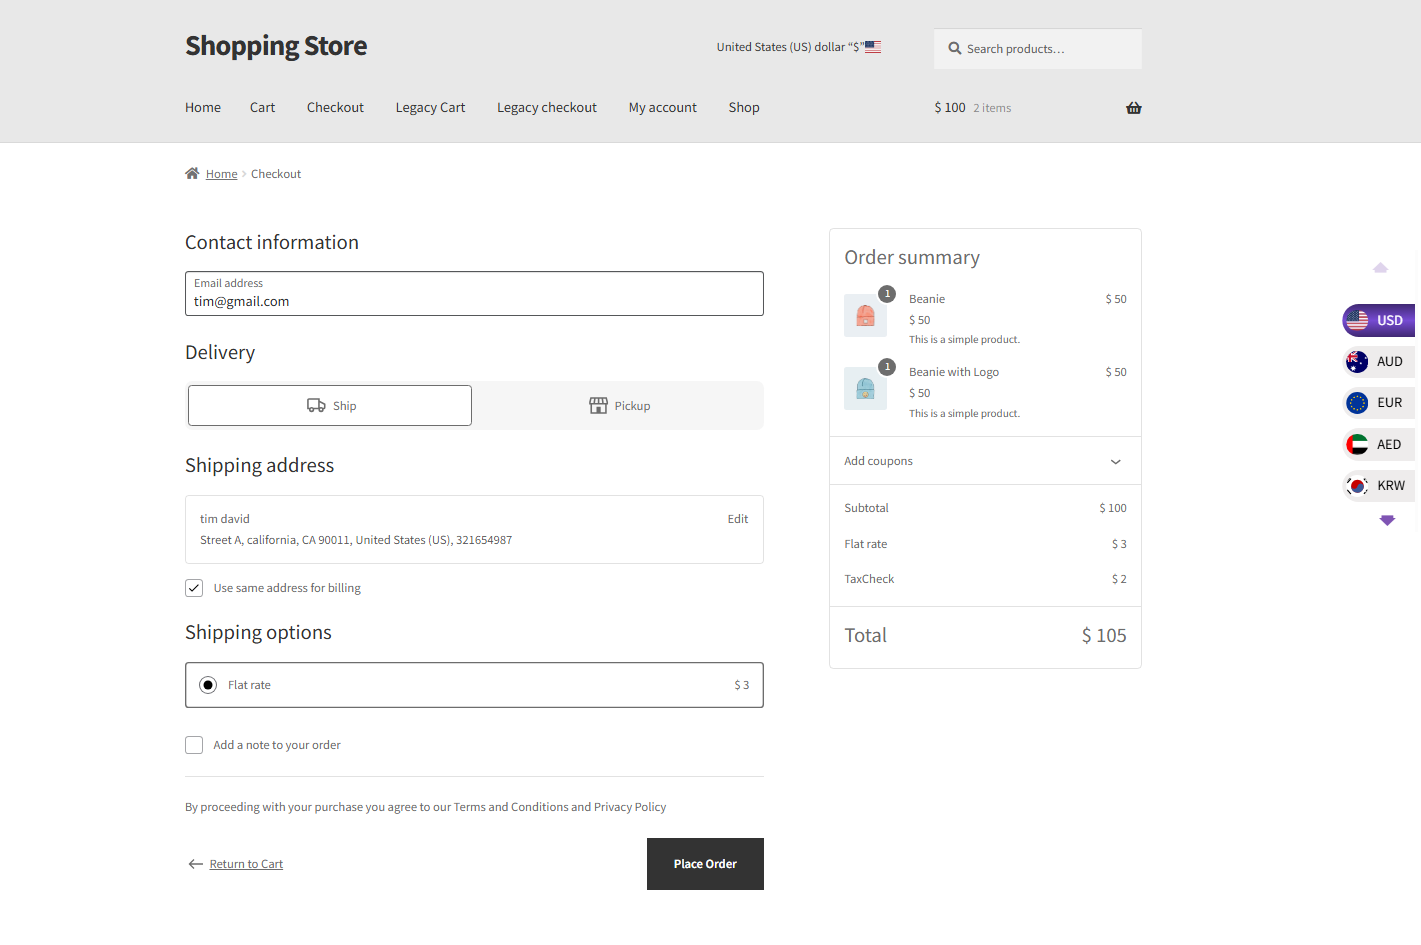
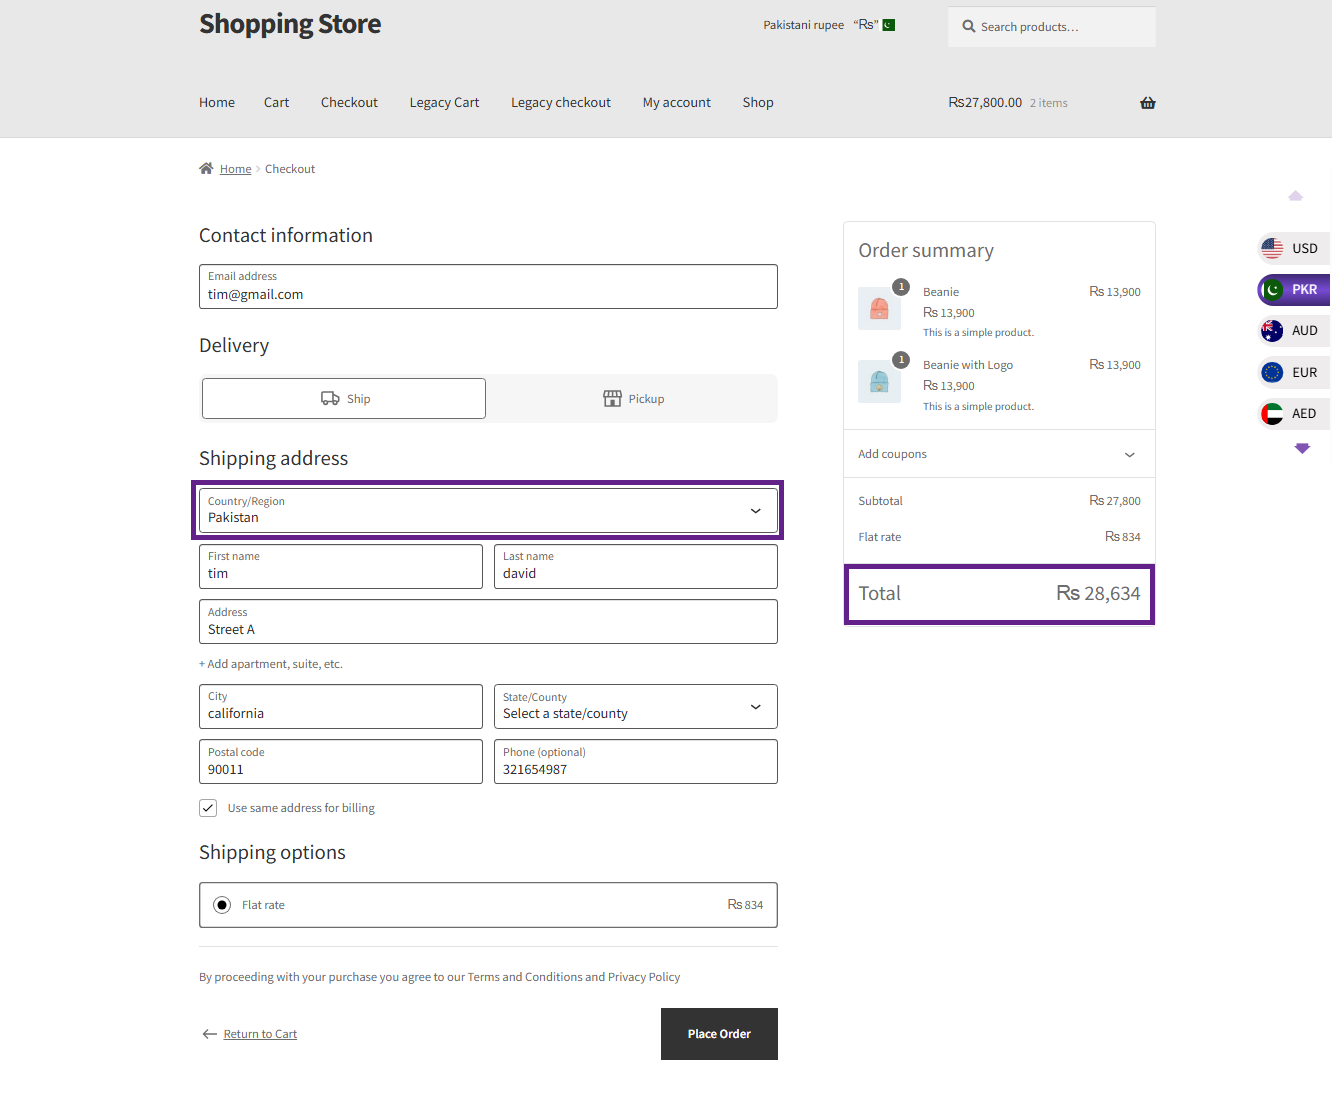
- When the user selects a country in the Country / Region field in the shipping details, the currency automatically updates to match the selected country.
Zone Pricing
↑ Back to topZone Pricing groups countries into named zones, each with a dedicated currency and exchange rate. When a customer’s detected location falls within a zone, that zone’s currency activates automatically. This is the most precise way to serve targeted pricing to specific regions.
| IMPORTANT | Zone Pricing requires Shop Currency ON, Currency by Location ON, and Currency on Billing OFF. Configure these before creating zones. |
|---|
Configuring Zones
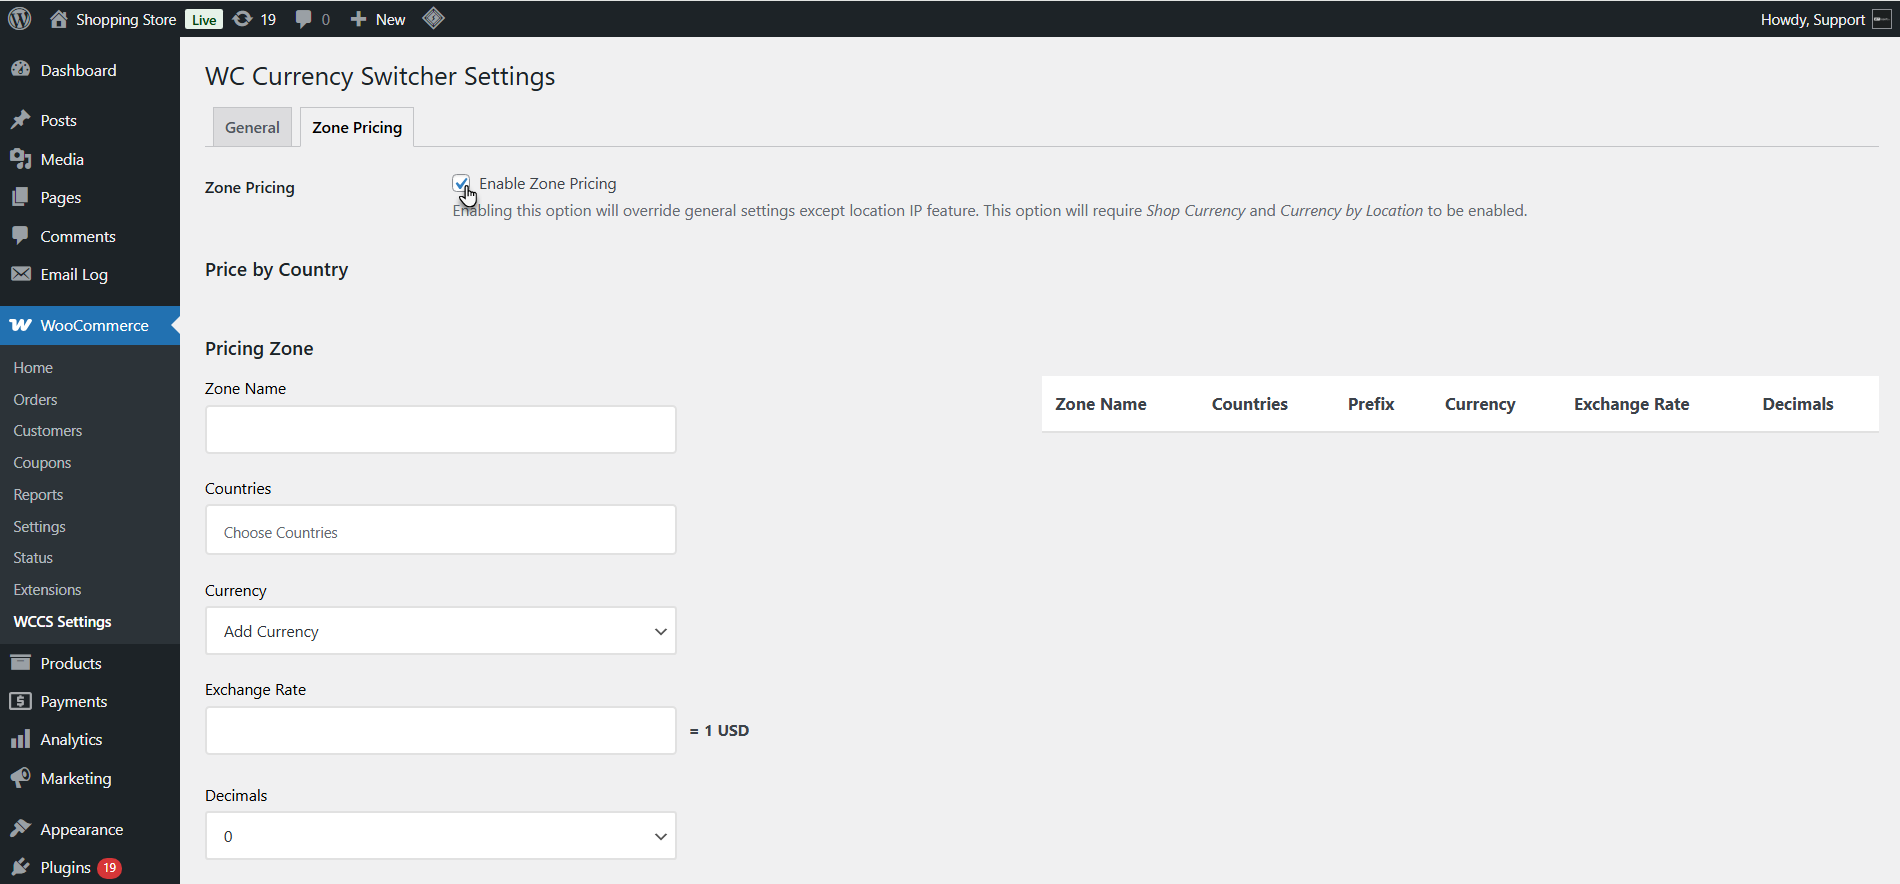
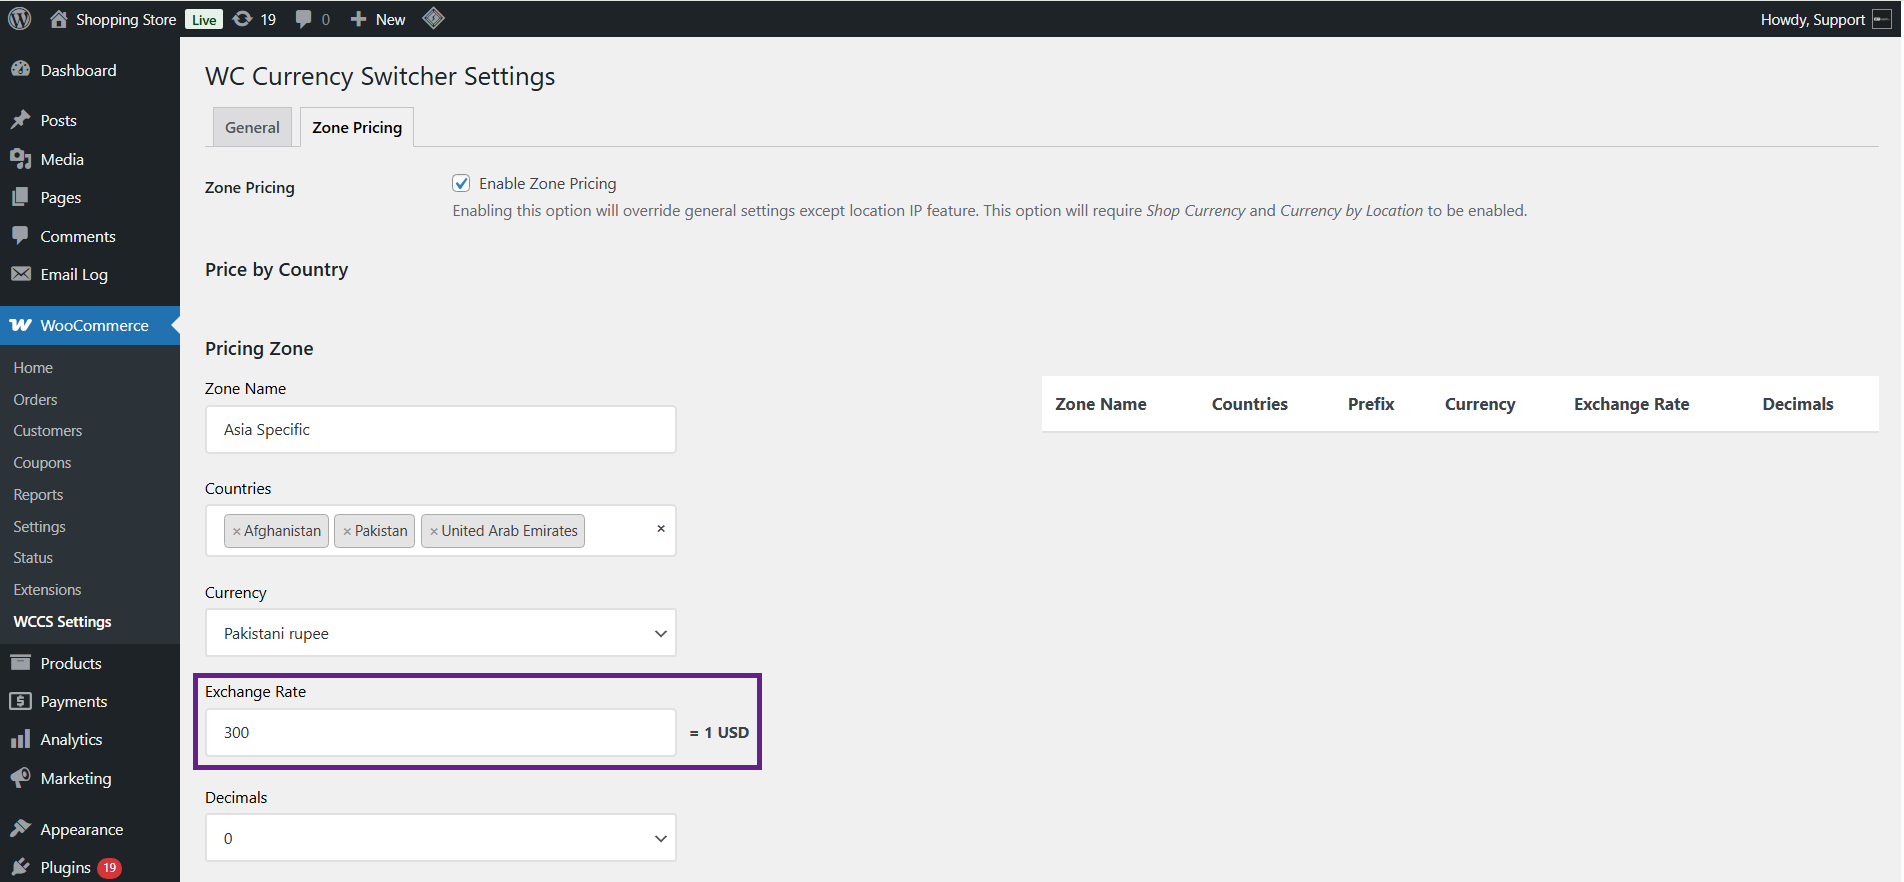
↑ Back to top- Go to WooCommerce > WCCS Settings and click the Zone Pricing tab.
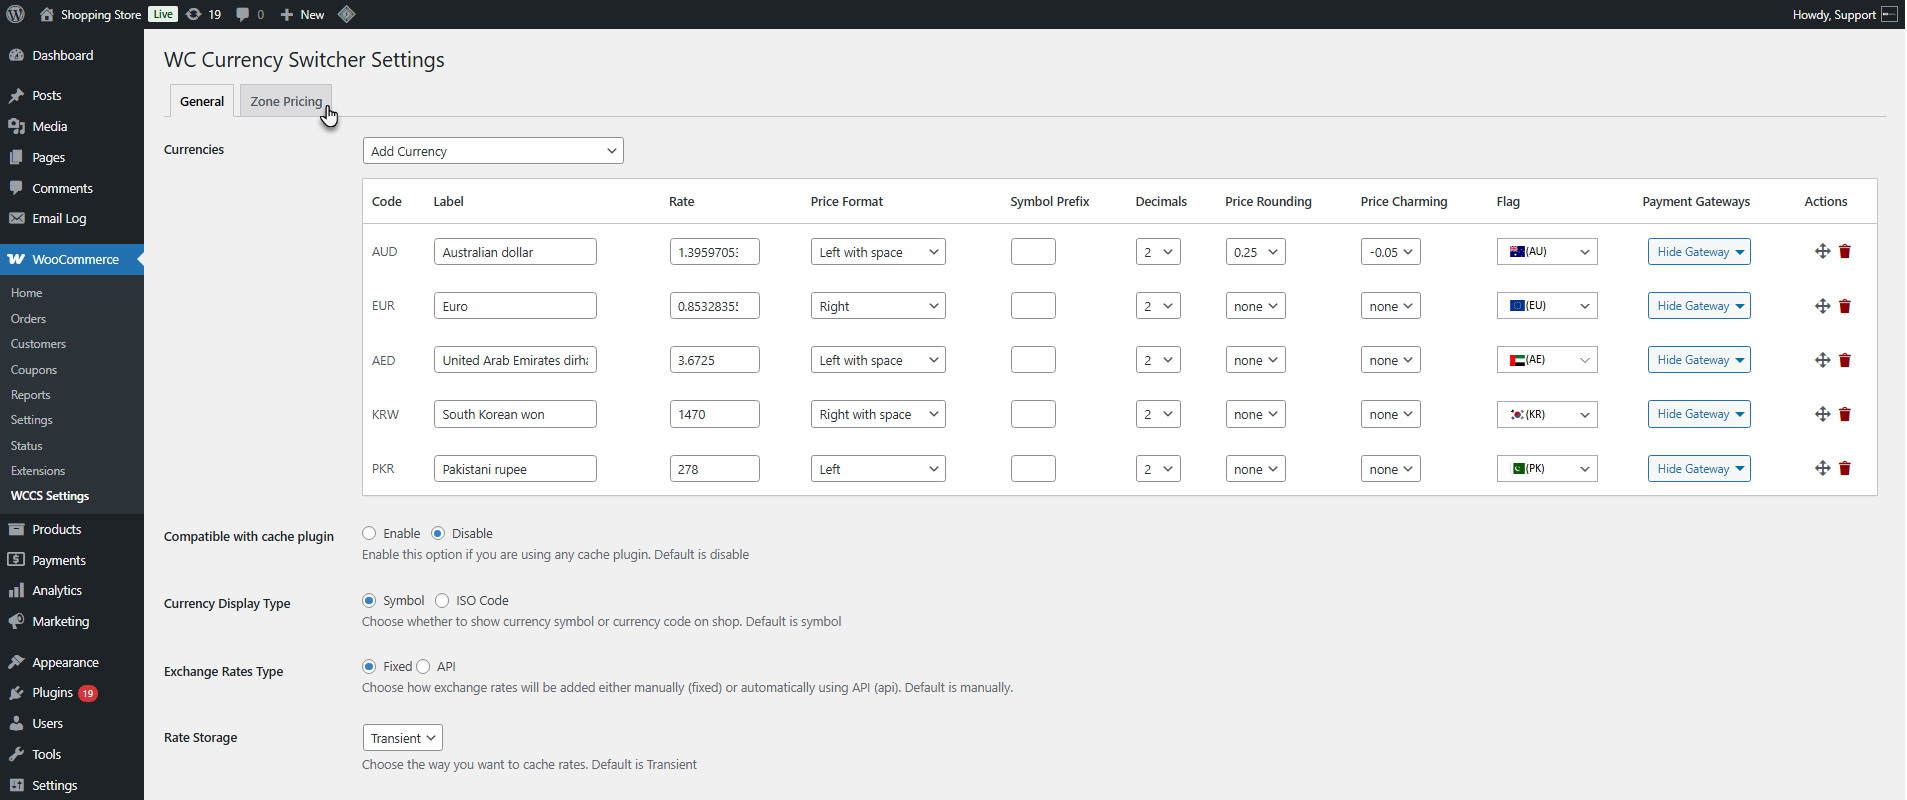
- Check Enable Zone Pricing.
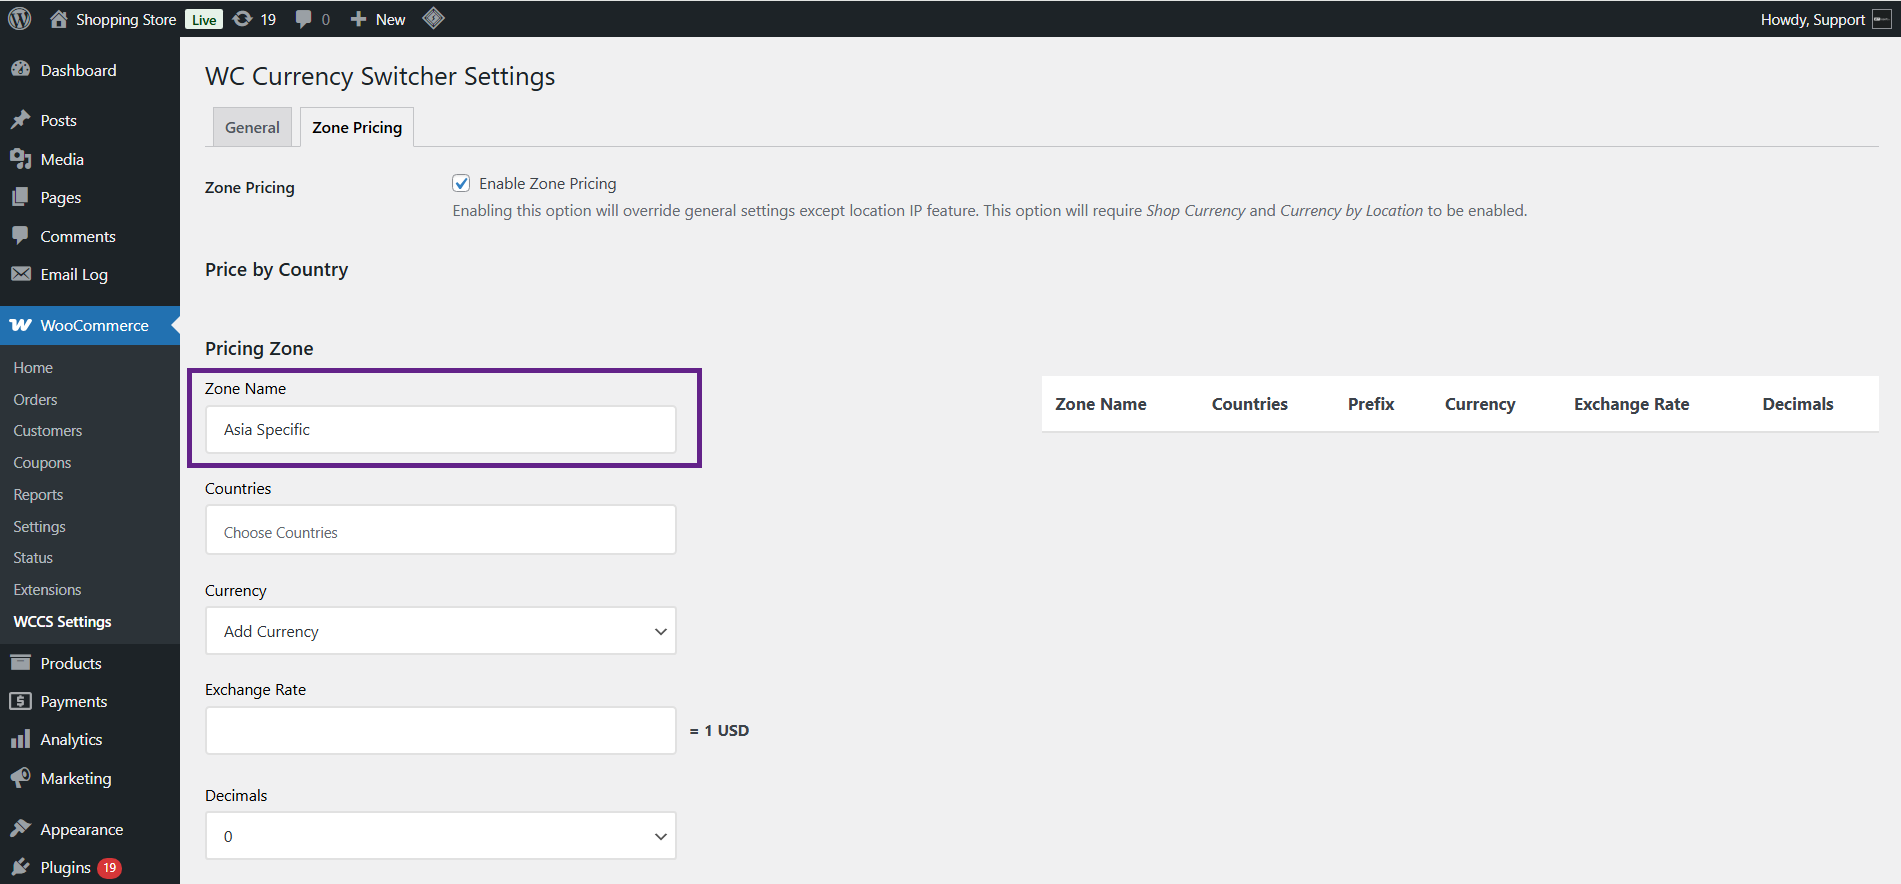
- In the Pricing Zone section, enter a Zone Name (e.g., “Asia Specific”).
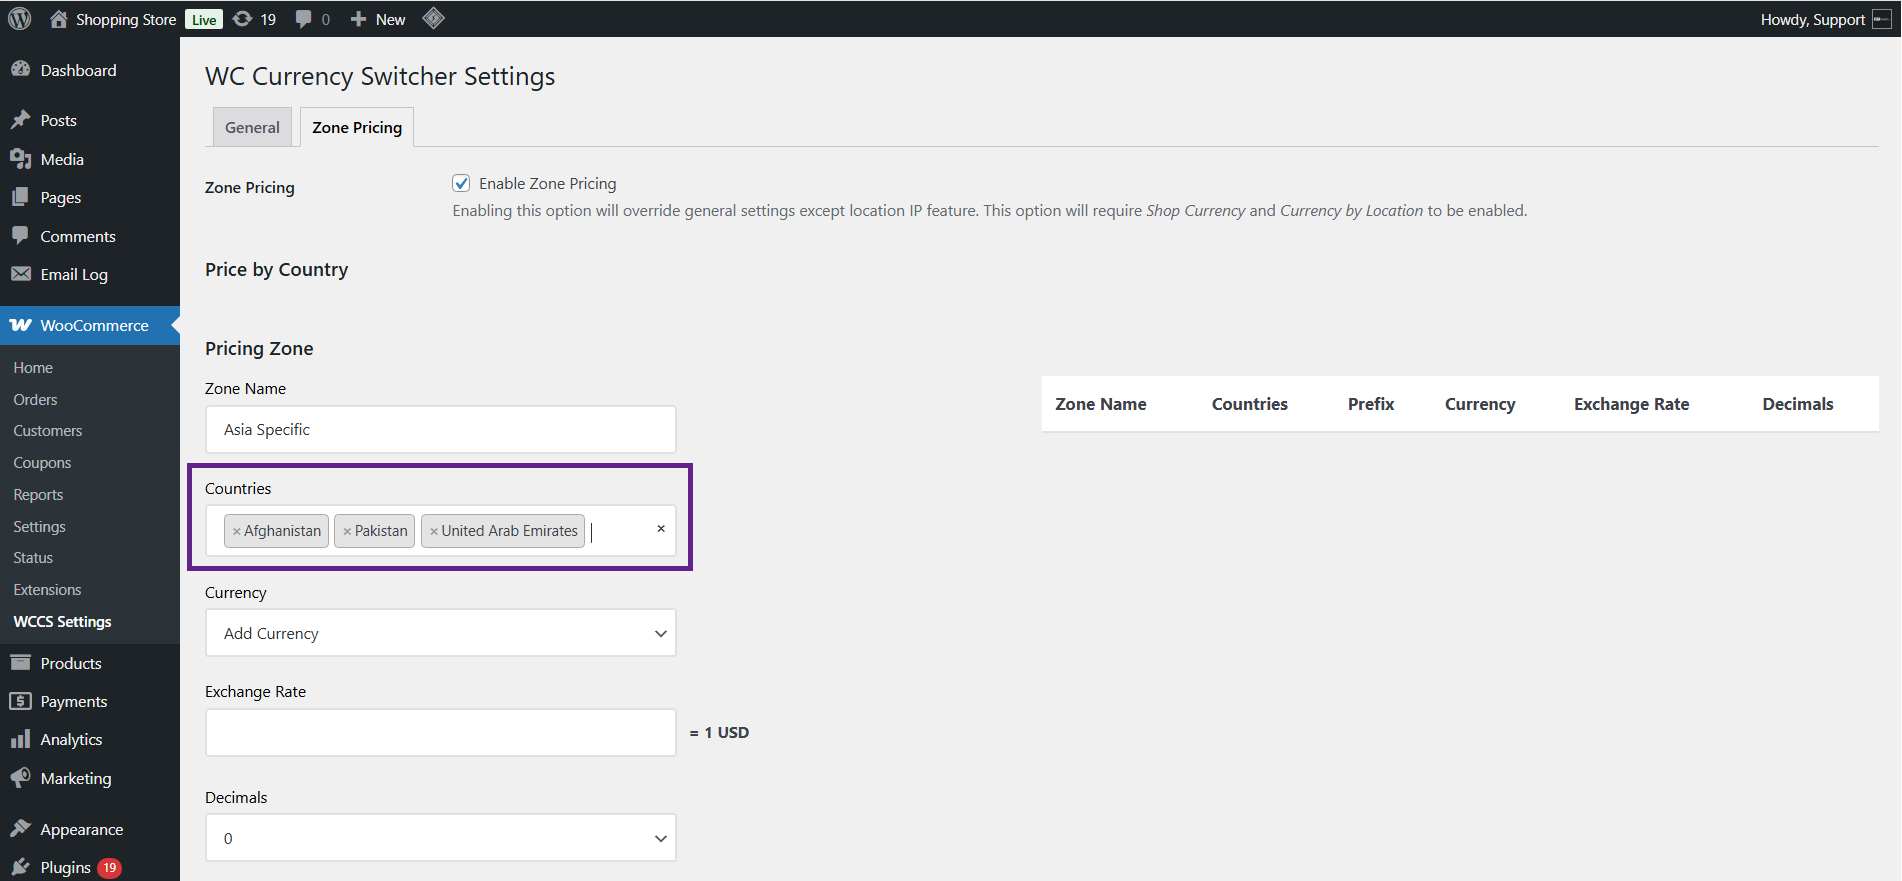
- In Countries, select all countries that belong to this zone. Multiple countries can be added.
- In Currency, select the single currency for this zone (e.g., PKR).
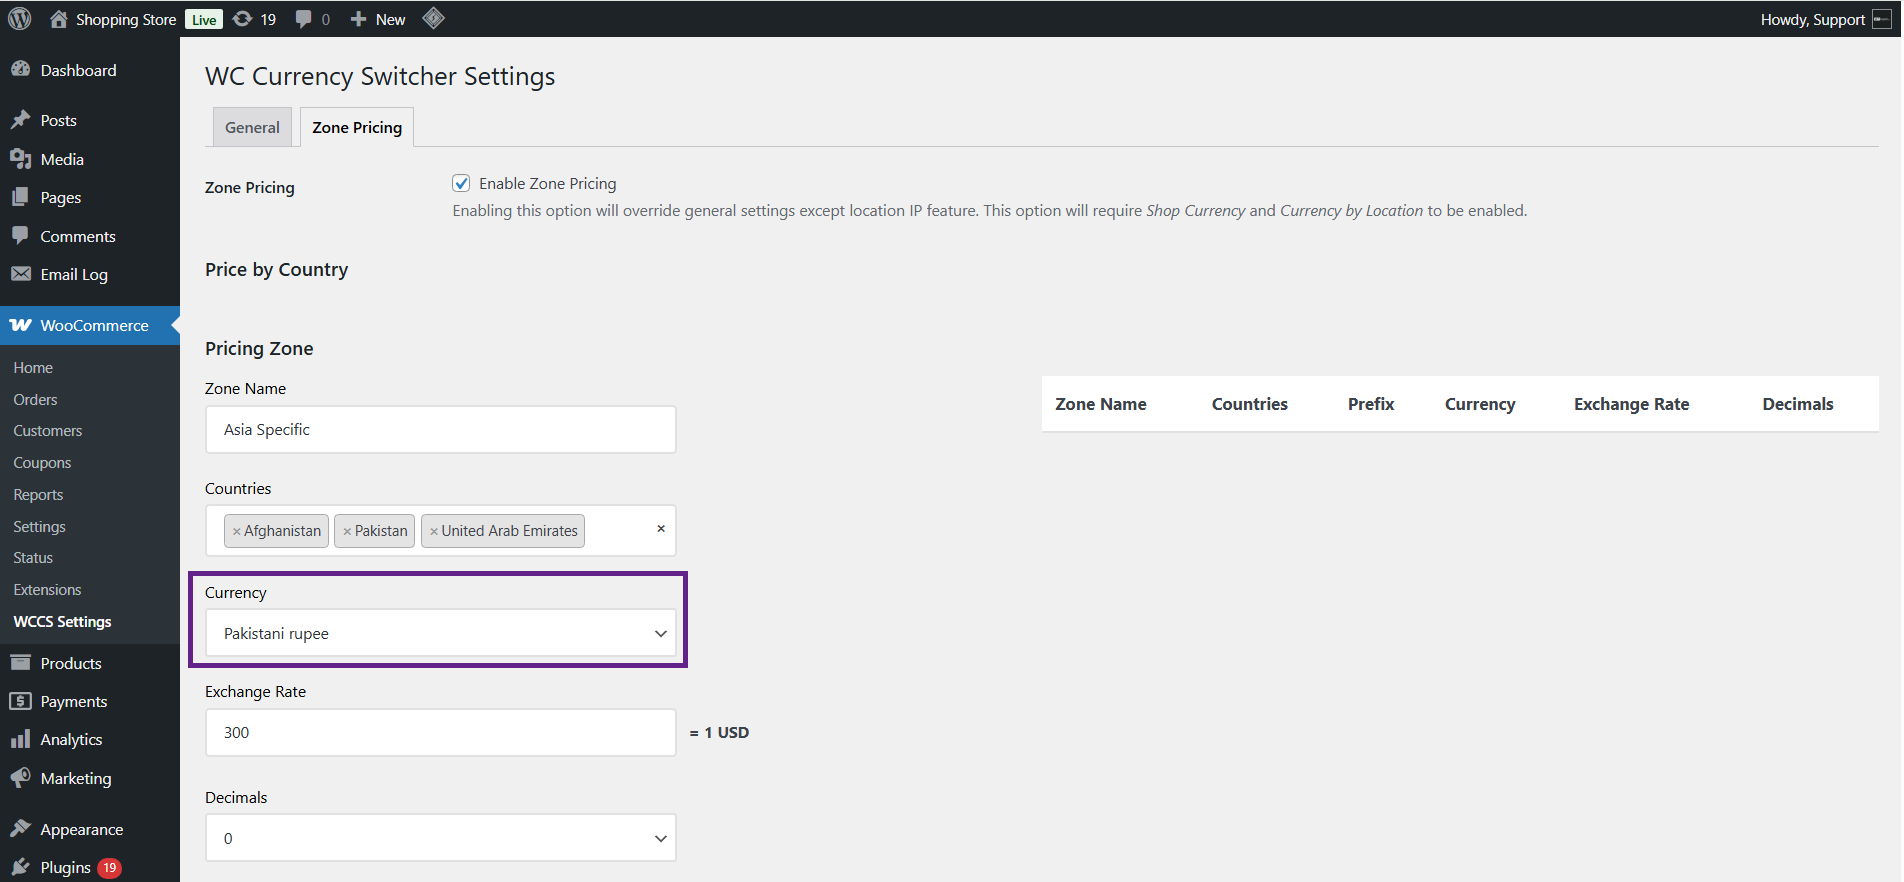
- In Exchange Rate, enter the rate relative to your base currency.
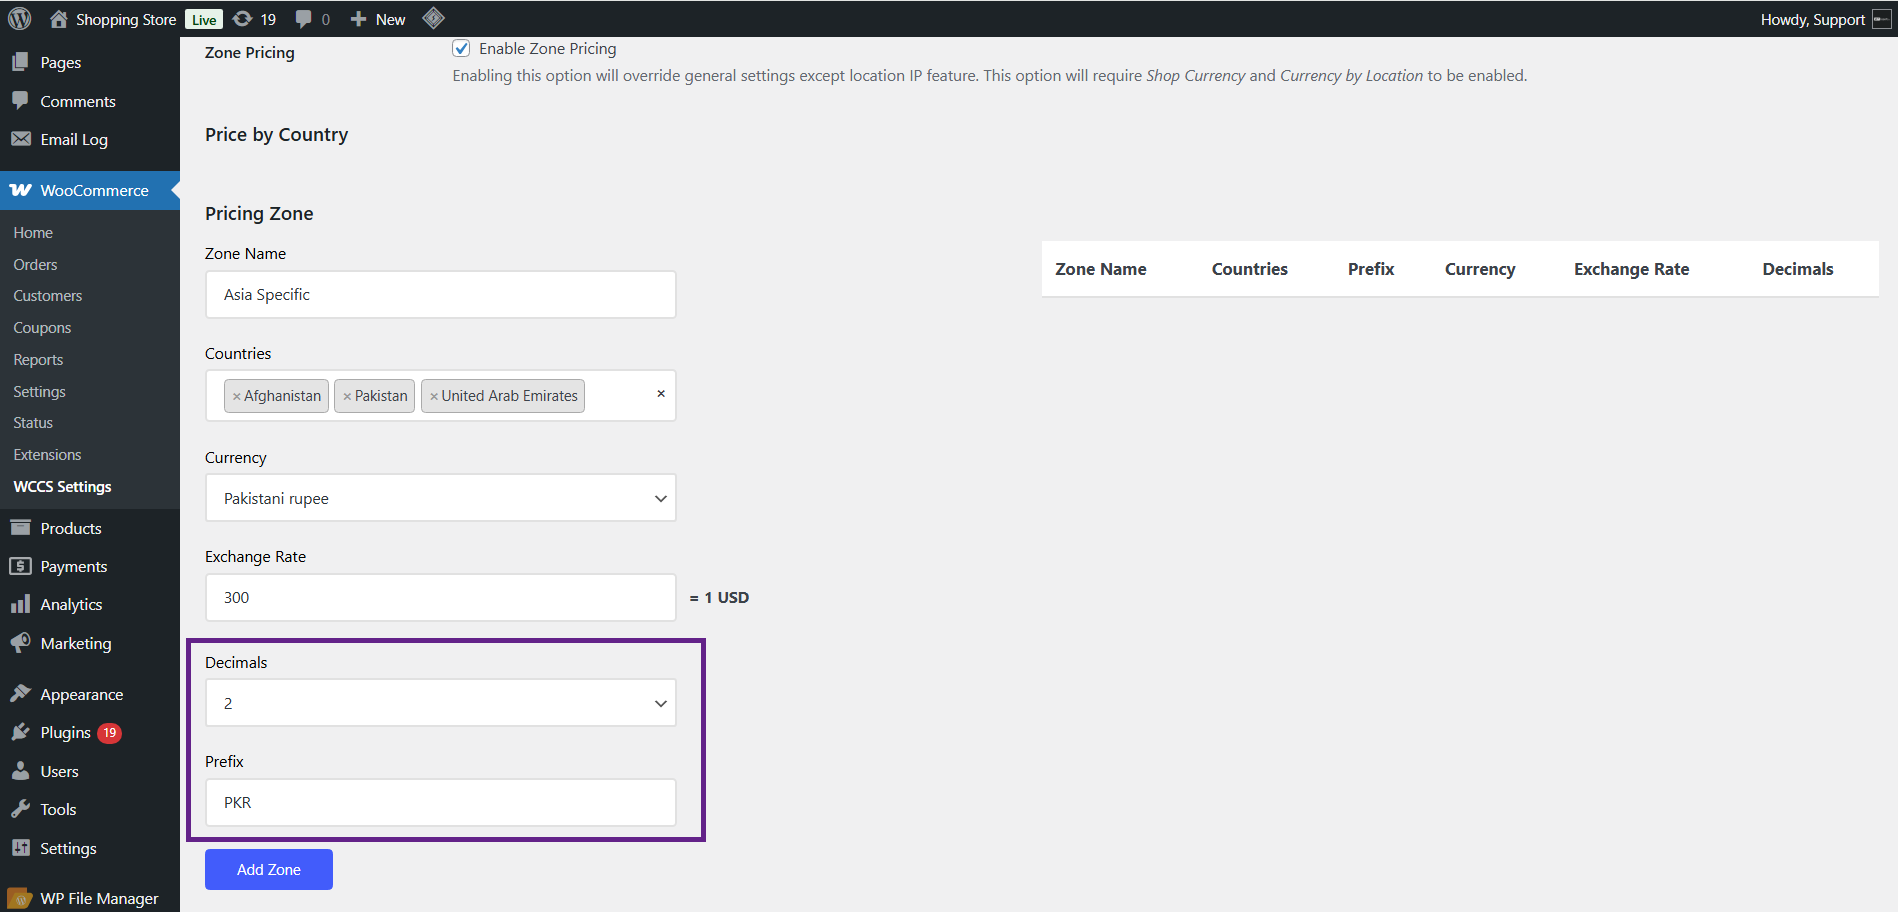
- Select the decimal and Prefix for the currency if needed.
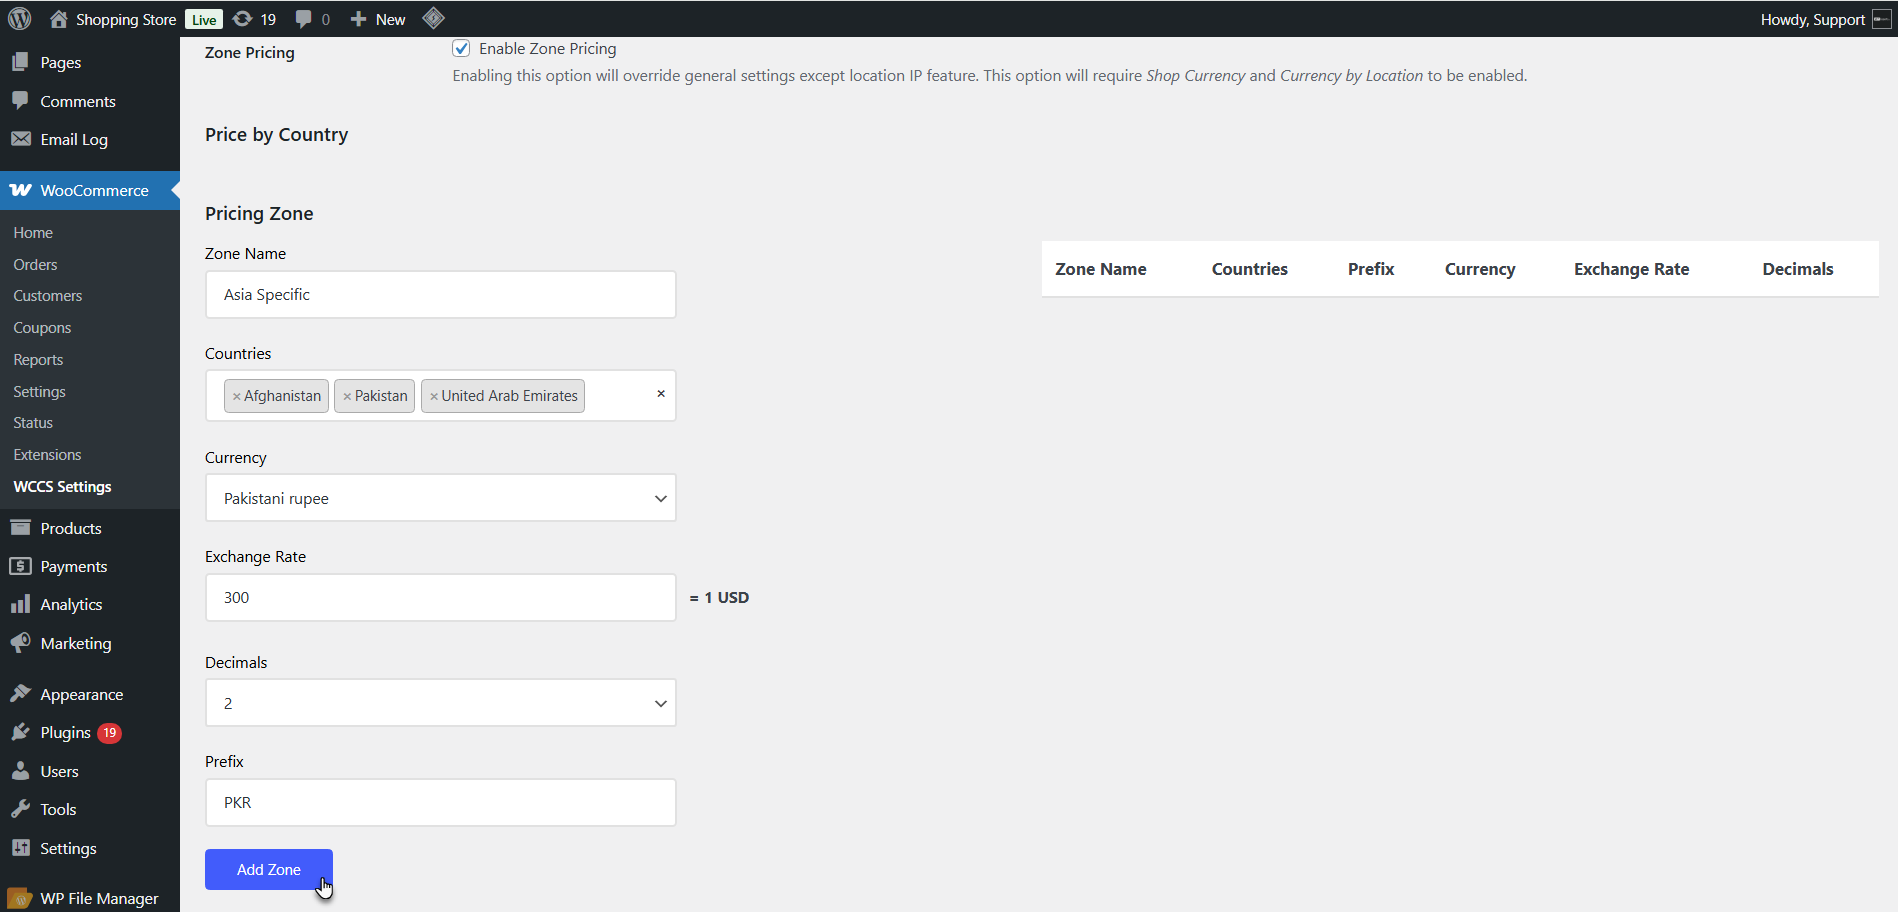
- Click Add Zone. The zone appears in the list on the right.
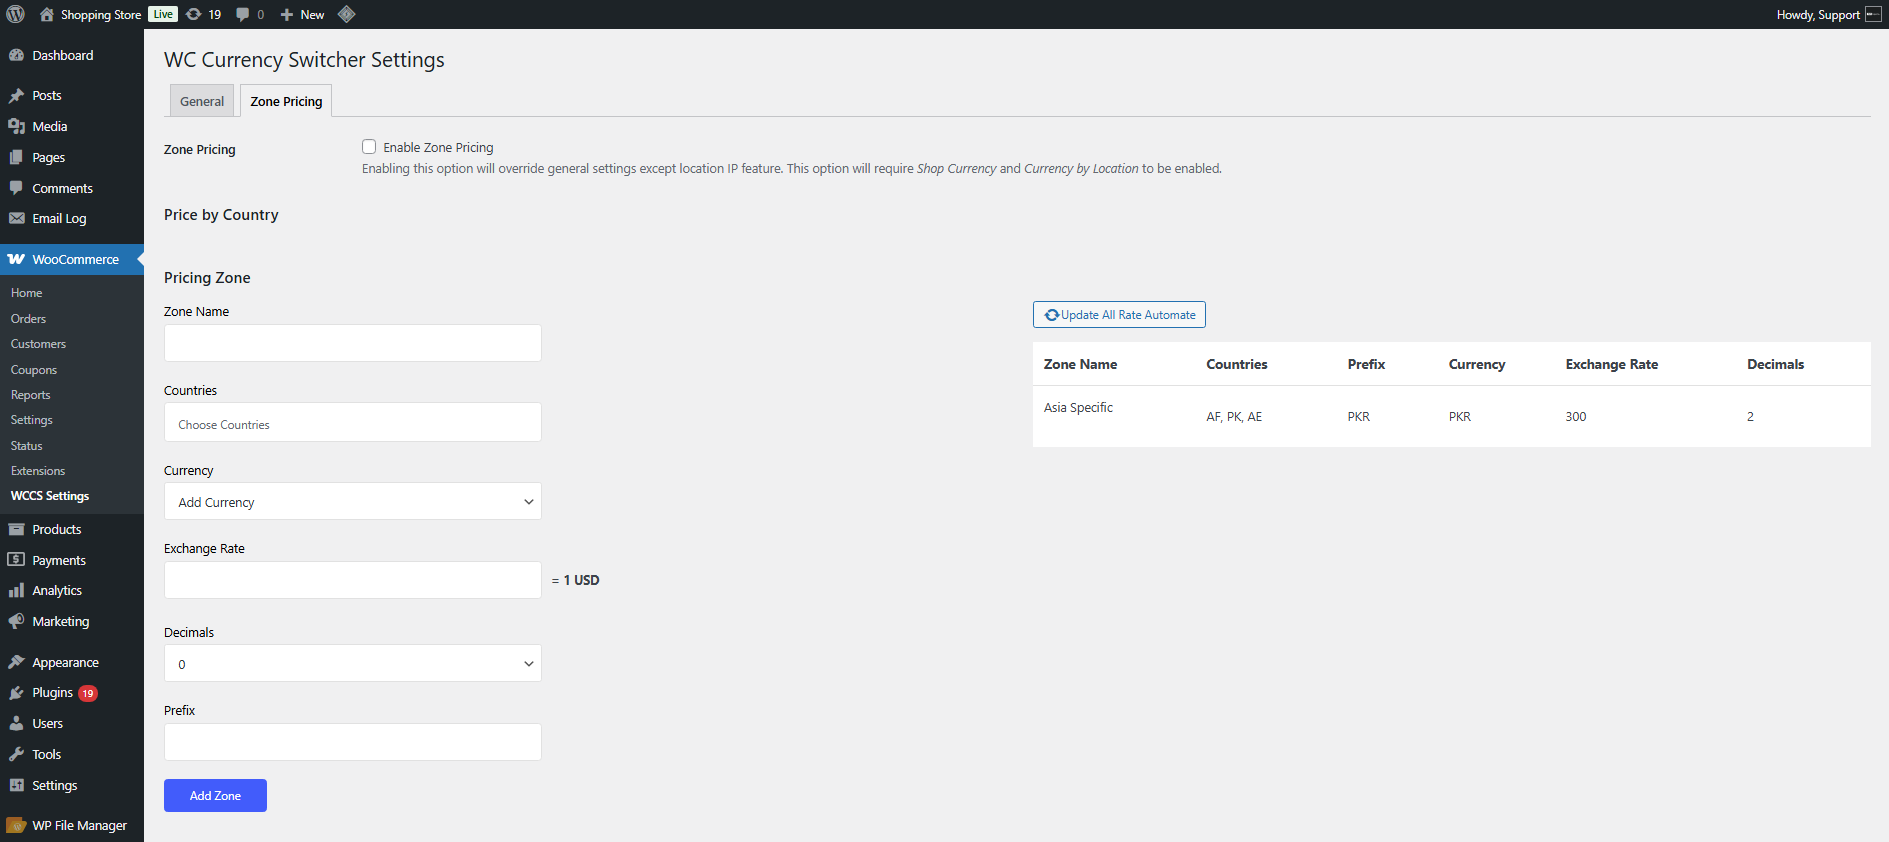
- The Zone will be added.
- Repeat for additional zones (e.g., “United Kingdom” with GBP, “Asia Pacific” with SGD).
To edit a zone: hover over it in the zone list and click Edit. To delete: hover and click Delete.
Front End Impact
- The currency is displayed based on the user’s location and assigned pricing zone. For example, a user from United Arab Emirates will see PKR if that zone is configured accordingly.
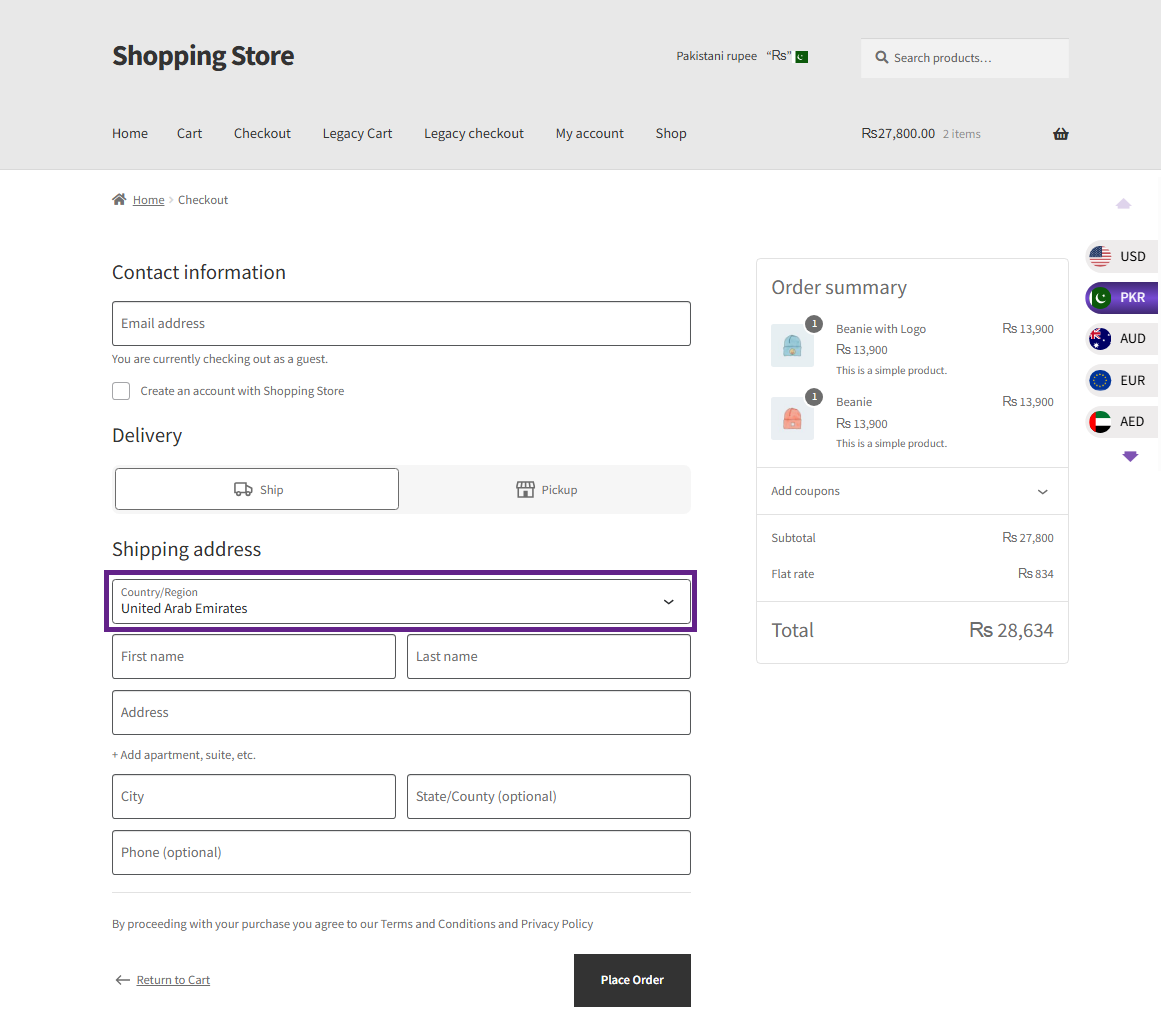
Per-Product Zone Price Override
↑ Back to topIndividual products can override the zone exchange rate, allowing you to set a more precise rate for a specific product in a specific zone without changing the zone globally.
- Navigate to the product edit page (Products > All Products > Edit).
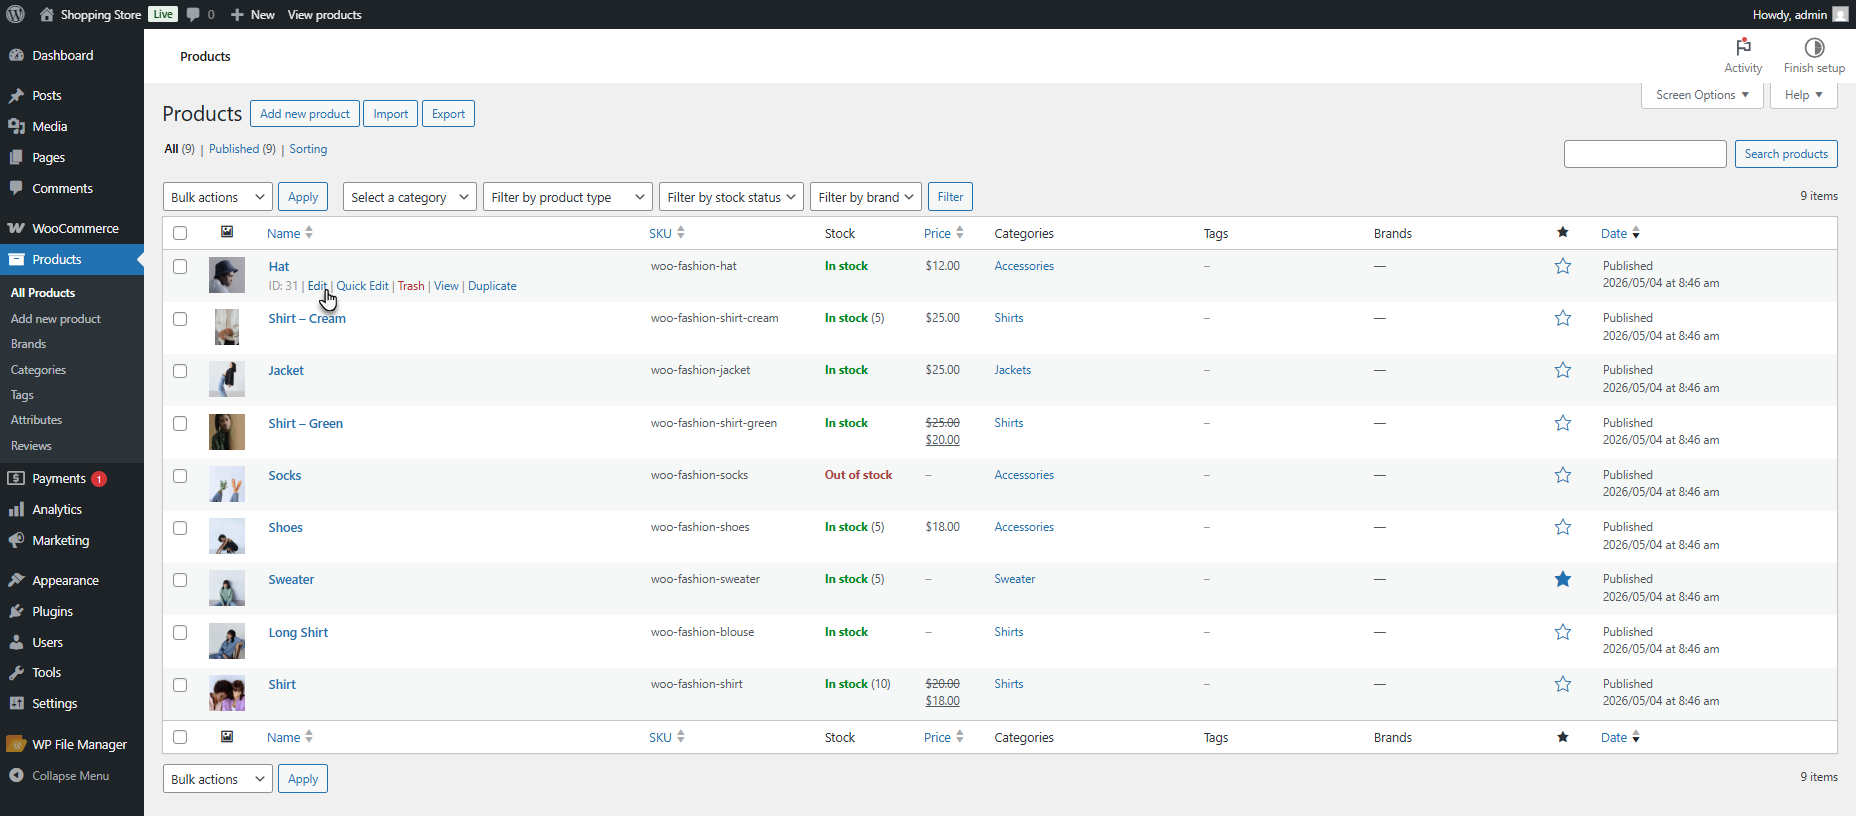
- In the Product Data section, click the WCCS Zone Pricing tab.
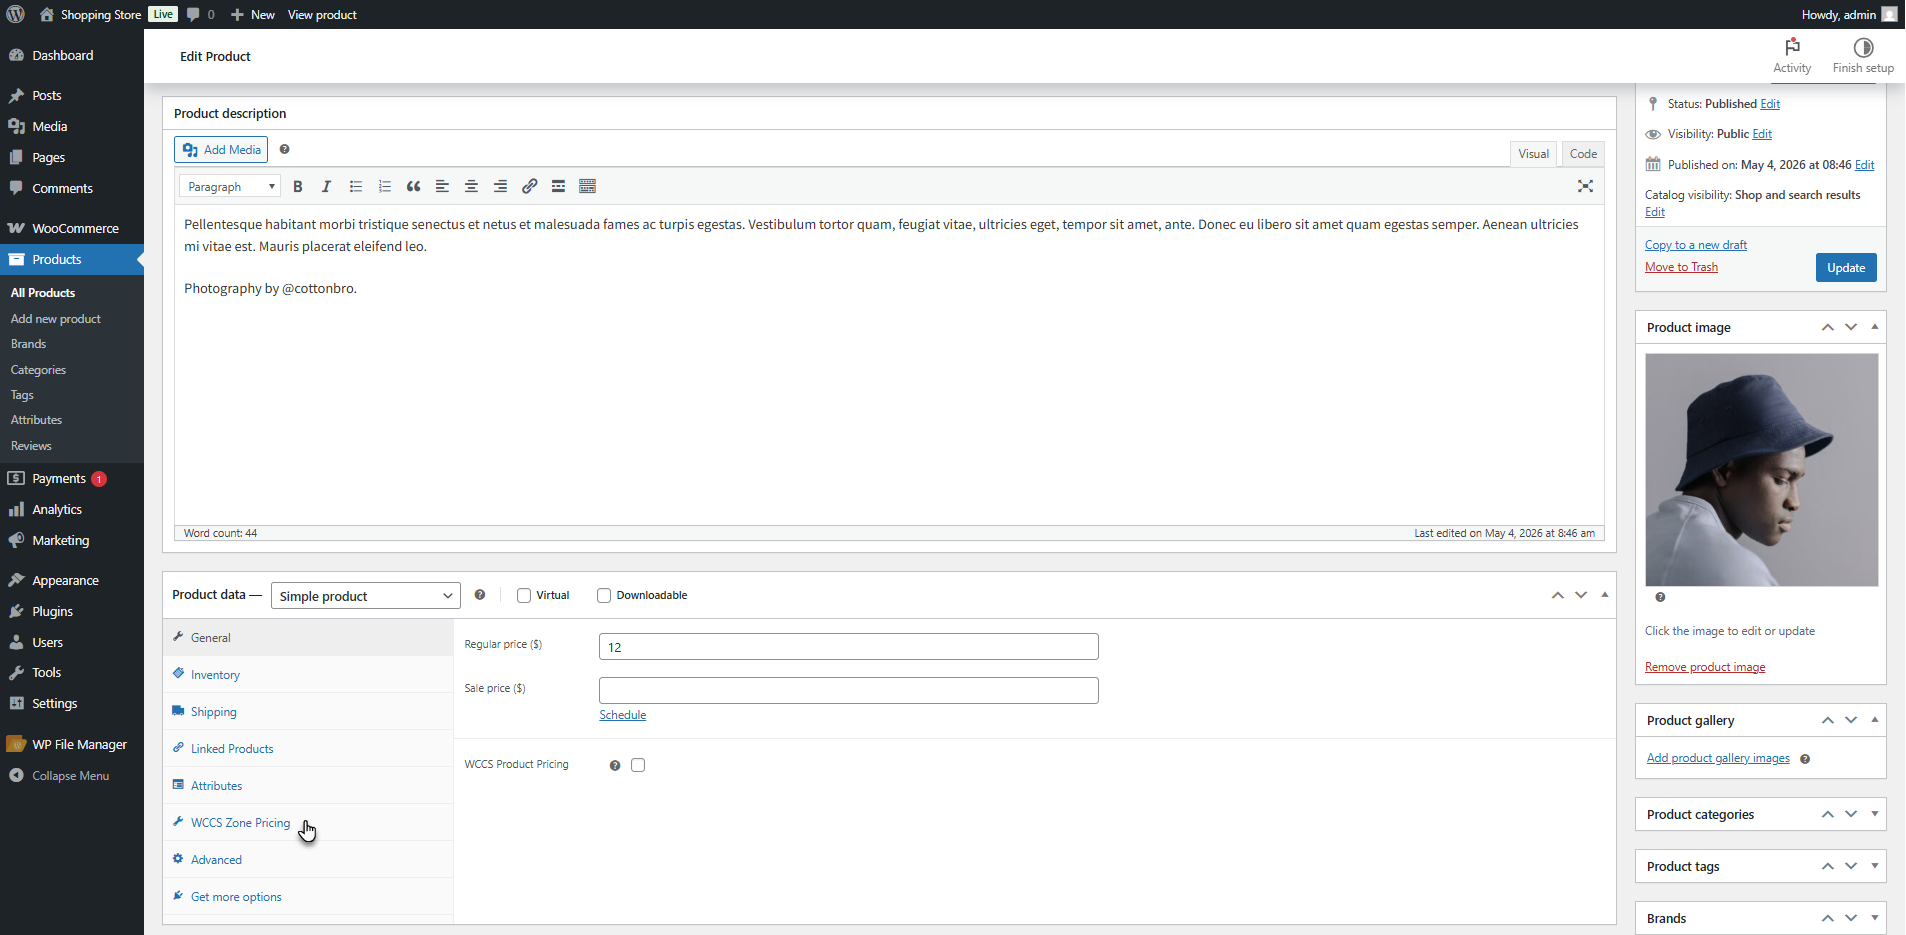
- The table shows each zone with its default exchange rate.
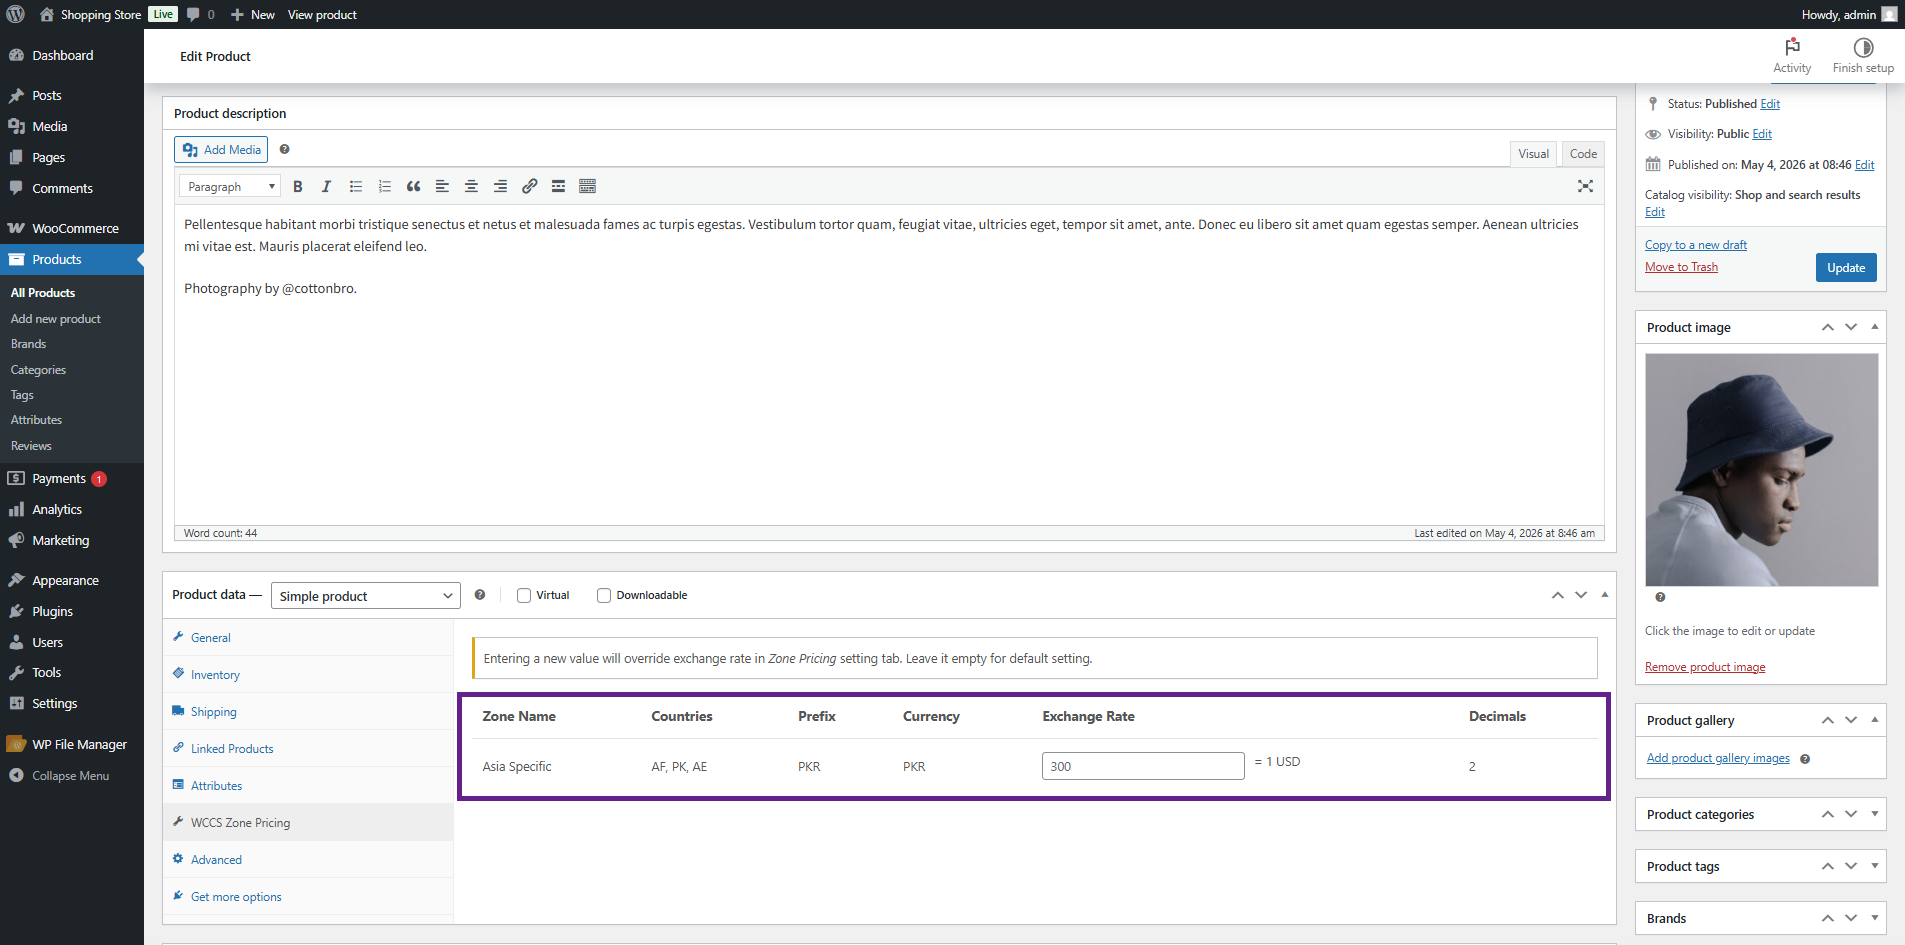
- Enter a new rate in the Exchange Rate field for any zone you want to override. Leave it empty to use the zone’s global rate. Click Update.
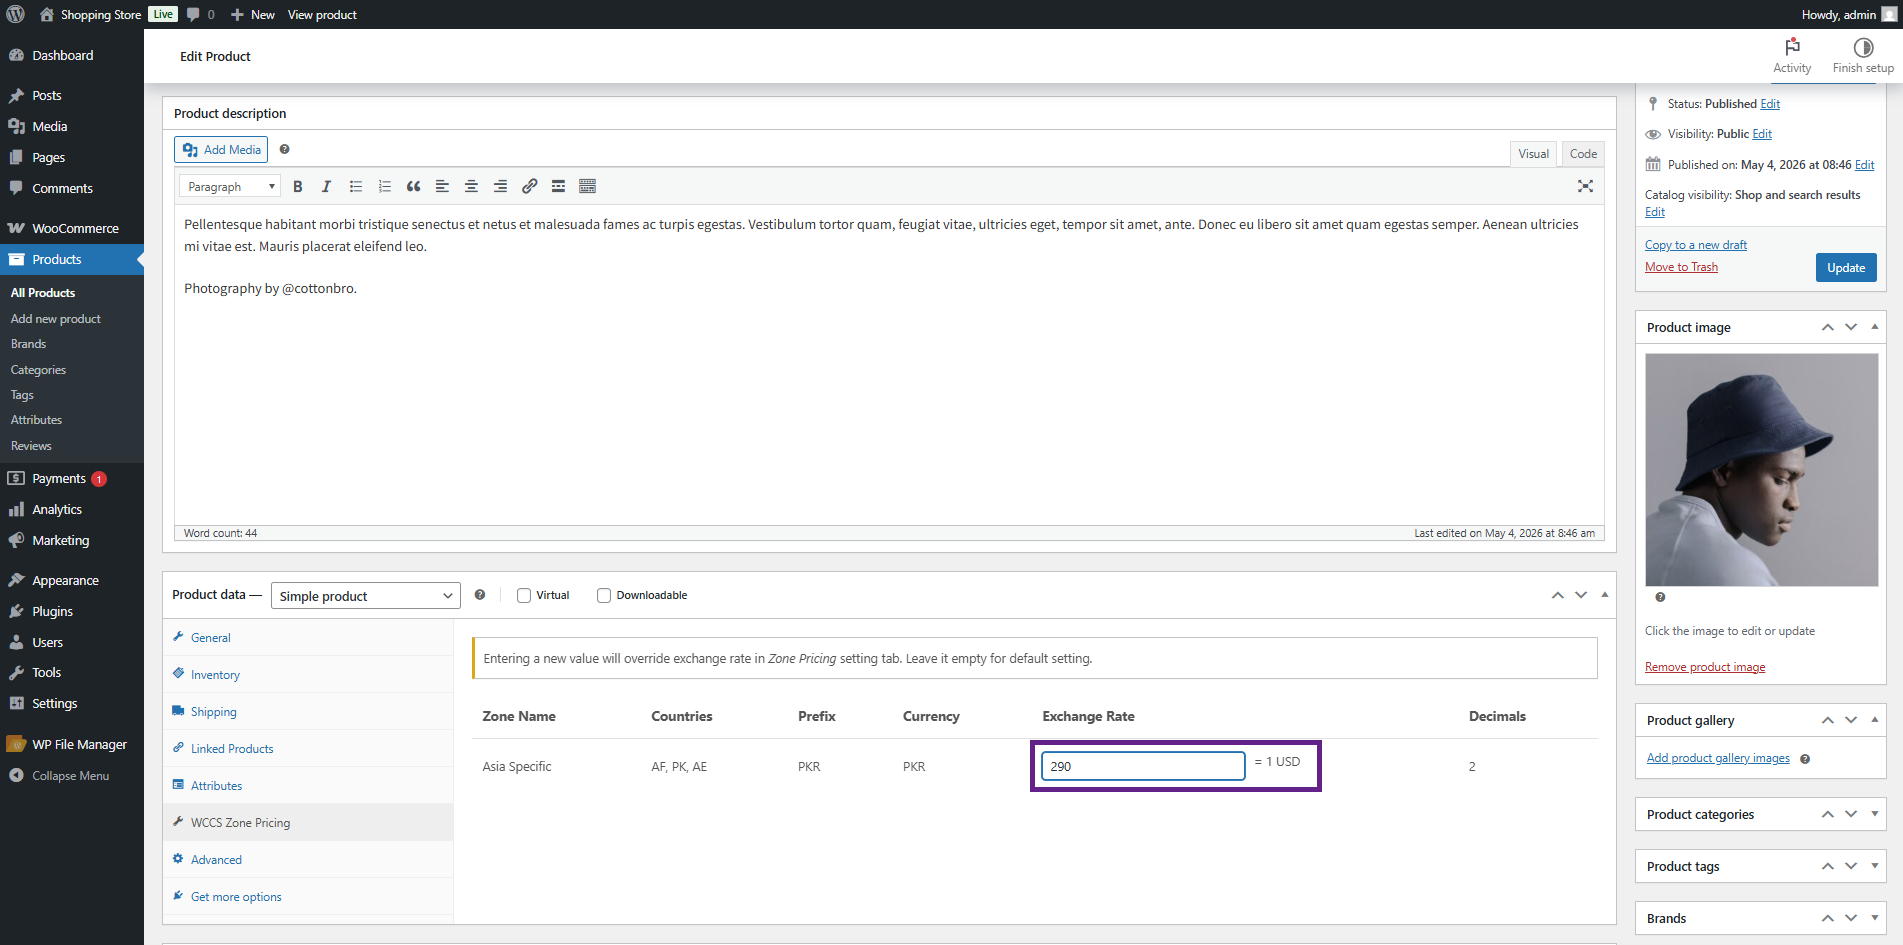
| NOTE | Entering a value in the per-product Zone Pricing tab overrides only that product’s rate for that zone. All other products continue using the zone’s global rate. |
|---|
Front End Impact
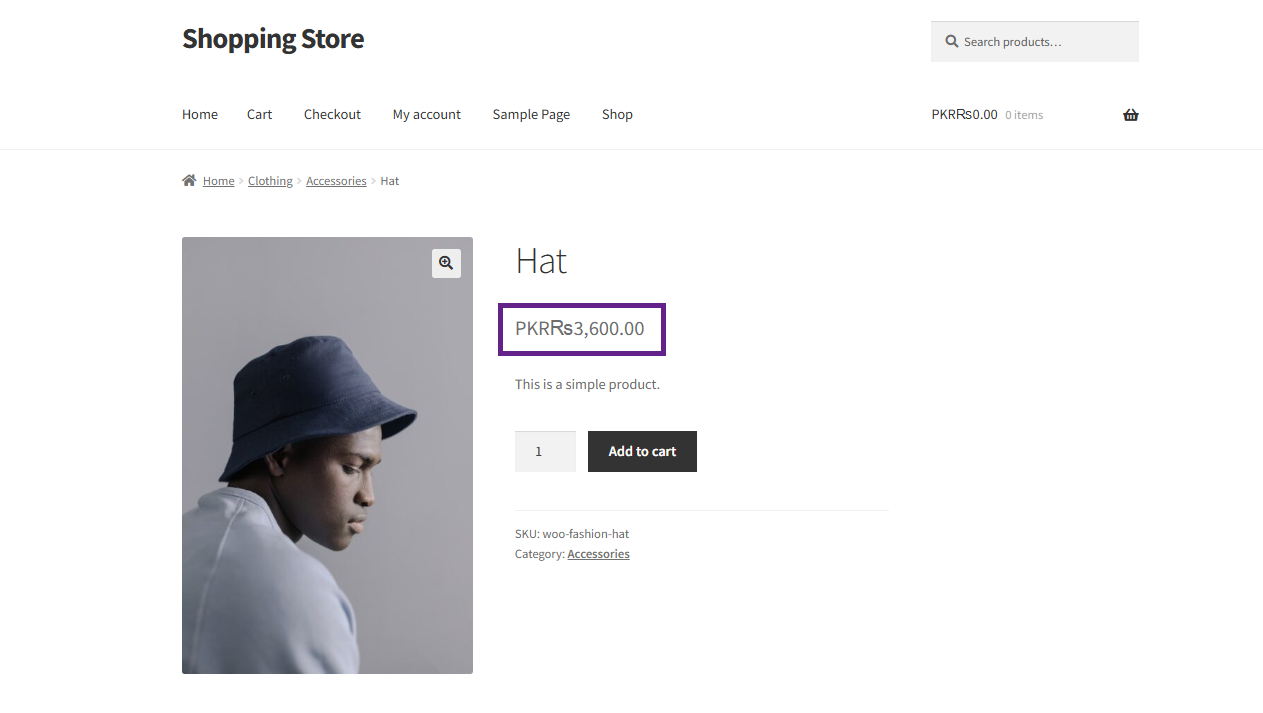
- Before
The default zone pricing is applied, and the product price is based on the global general zone pricing. For example, if 1 USD = 300 PKR and the product price is $12, it will be equal to 3600 PKR.
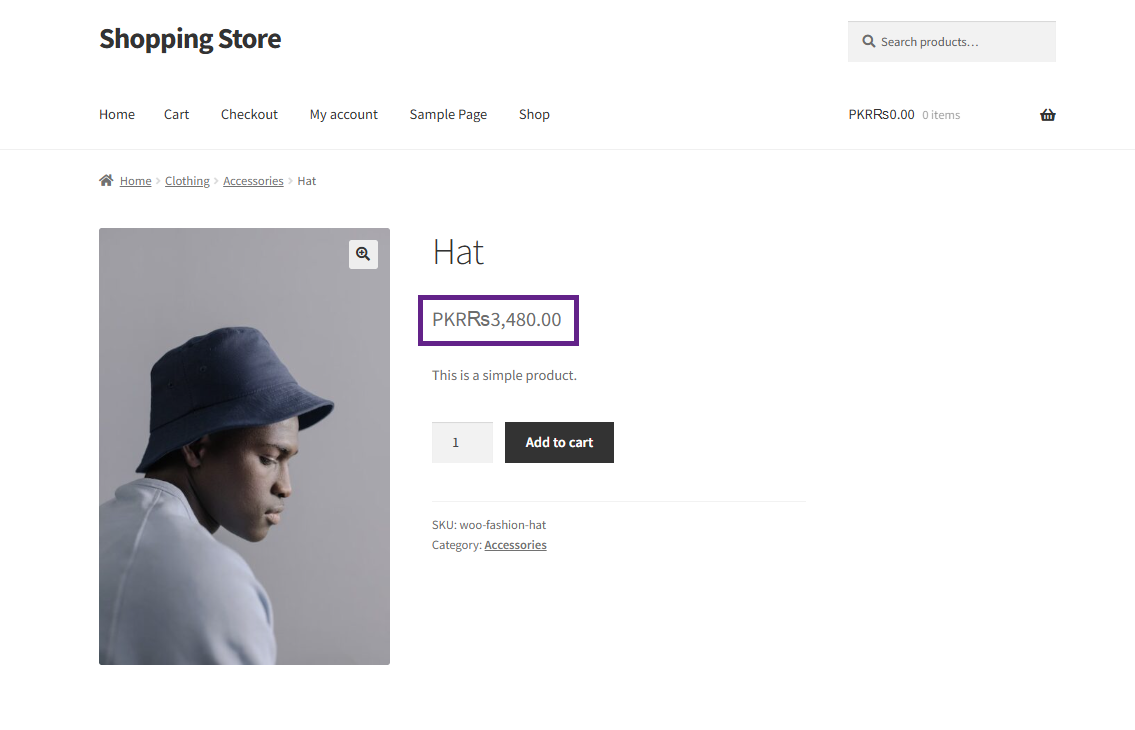
- After
When per-product zone pricing is applied (e.g., 1 USD = 290 PKR), the product price is updated accordingly based on the new rate.
Per-Product Pricing in Different Currencies
↑ Back to topInstead of relying on exchange-rate conversion, you can set a completely custom price for each currency on a per-product basis. When a custom price is set for a currency, it is displayed instead of the converted price.
| TIP | Use per-product pricing when exchange-rate conversion produces awkward numbers, or when you have agreed fixed prices for specific markets |
|---|
Simple Products
↑ Back to top- Navigate to Products > Edit Product.
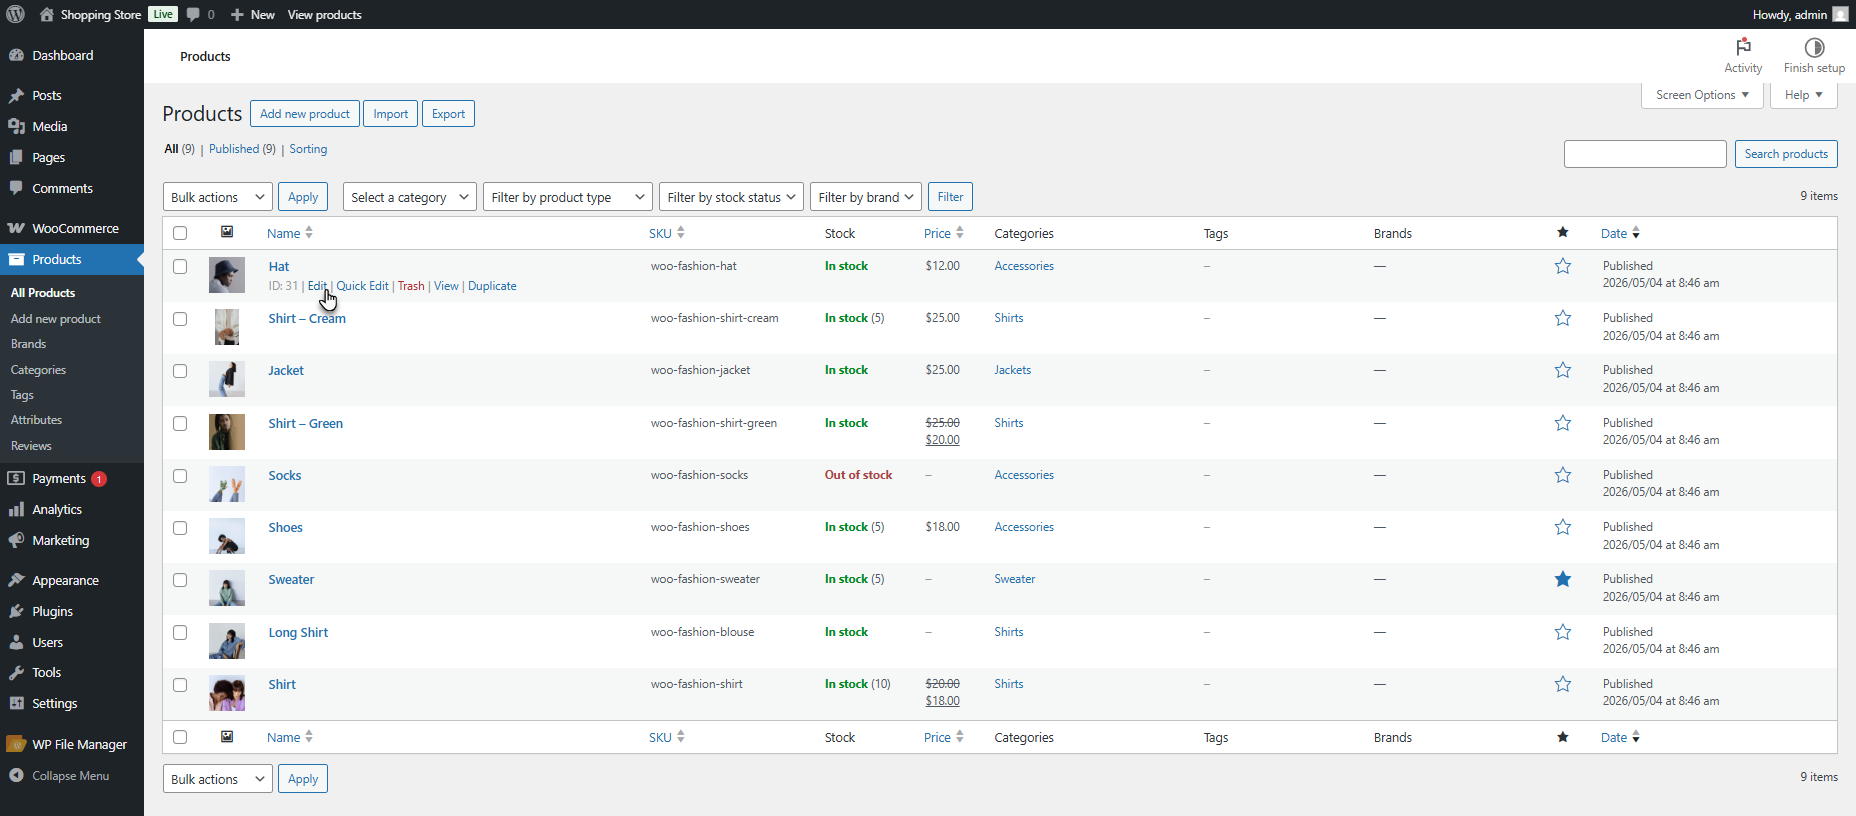
- In the Product Data section, click the General tab. Check the WCCS Product Pricing checkbox.
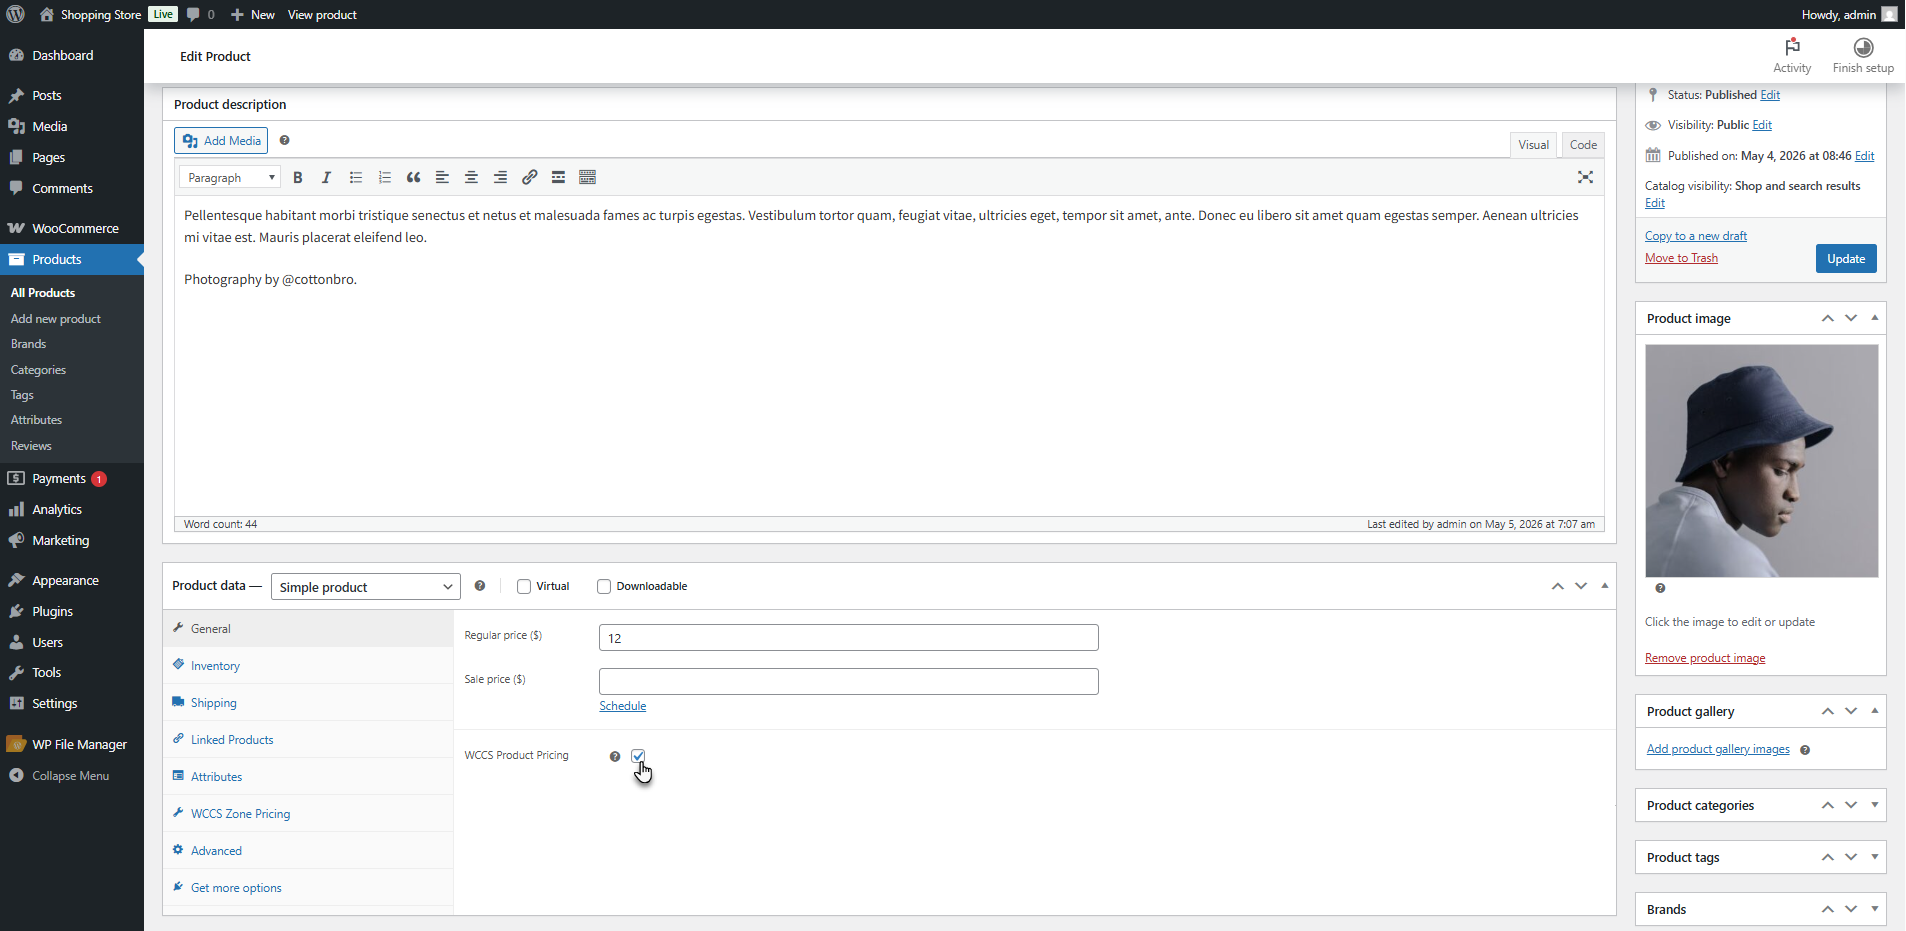
- A pricing table appears showing all active currencies. For each currency, enter a Regular Price and optionally a Sale Price. Click Update or Publish.
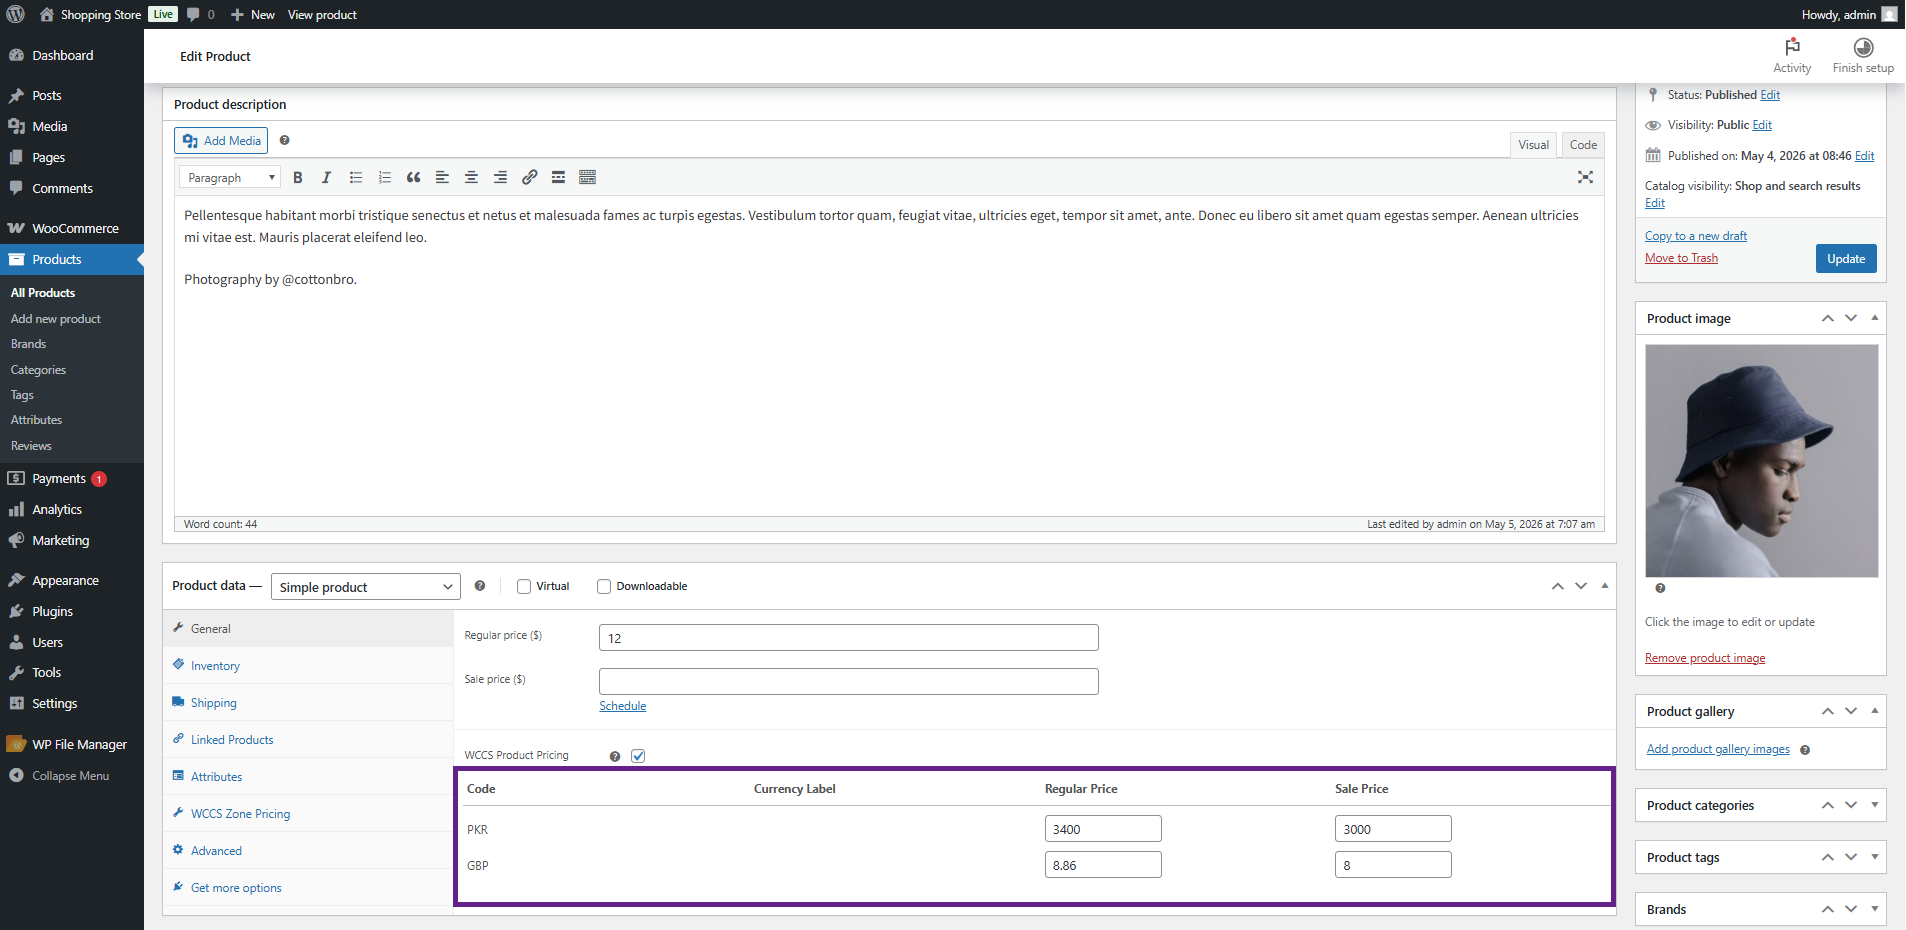
| NOTE | If you leave a currency’s price field empty, the price will fall back to the exchange-rate conversion for that currency. |
|---|
Front End Impact
- Go to the Shop page. Navigate to a product that has custom currency pricing set.
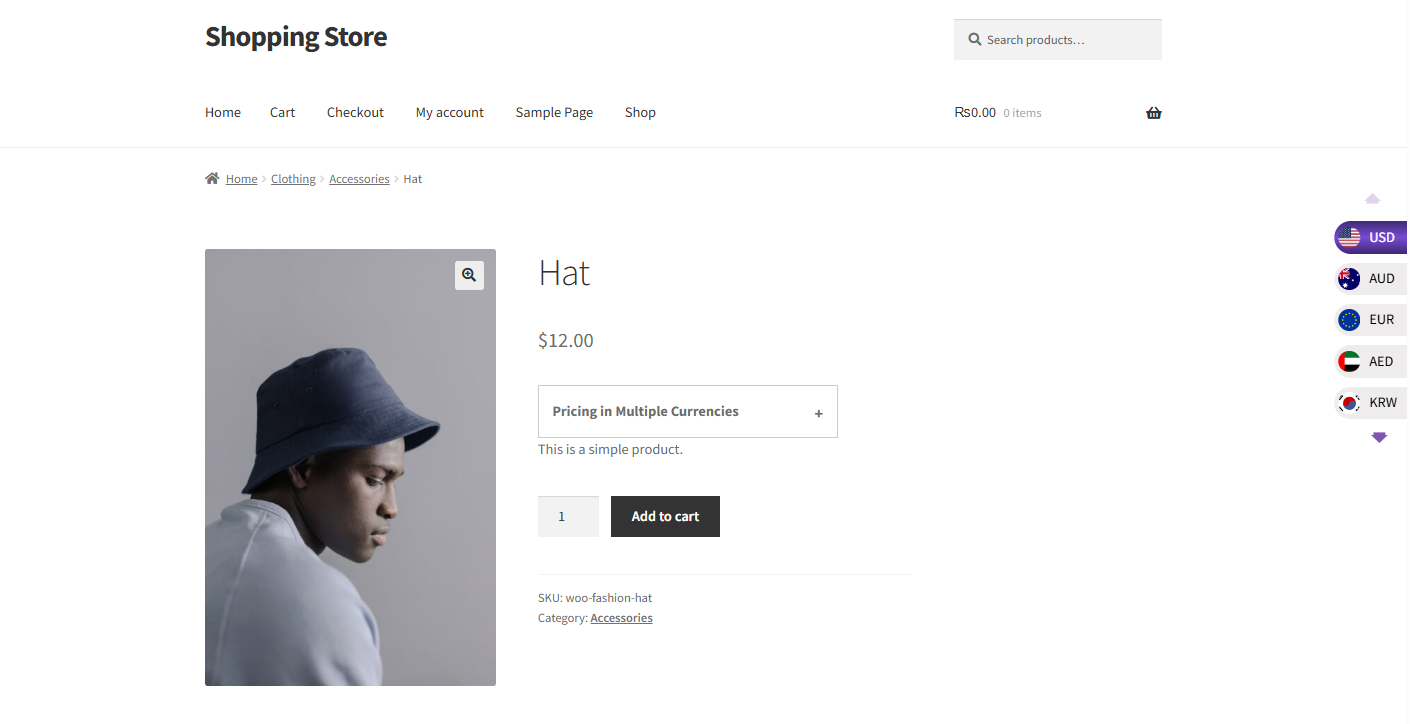
- Prices will display in the currency selected from the currency switcher.
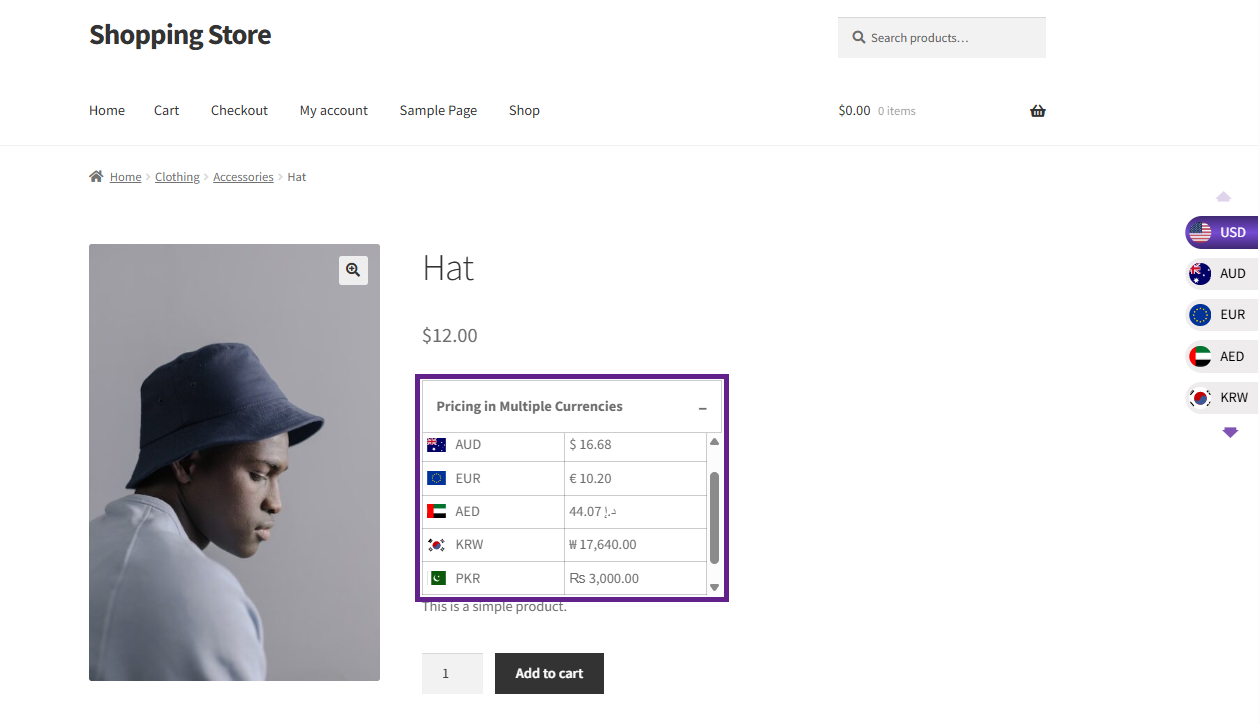
The display of currency for different zones can be changed by navigating to WooCommerce > WCCS Settings > General > Display Currency on Product Page.
Variable Products
↑ Back to top- Navigate to Products > Edit Product.
- In the Product Data section, click the Variations tab. Expand a variation by clicking on it.
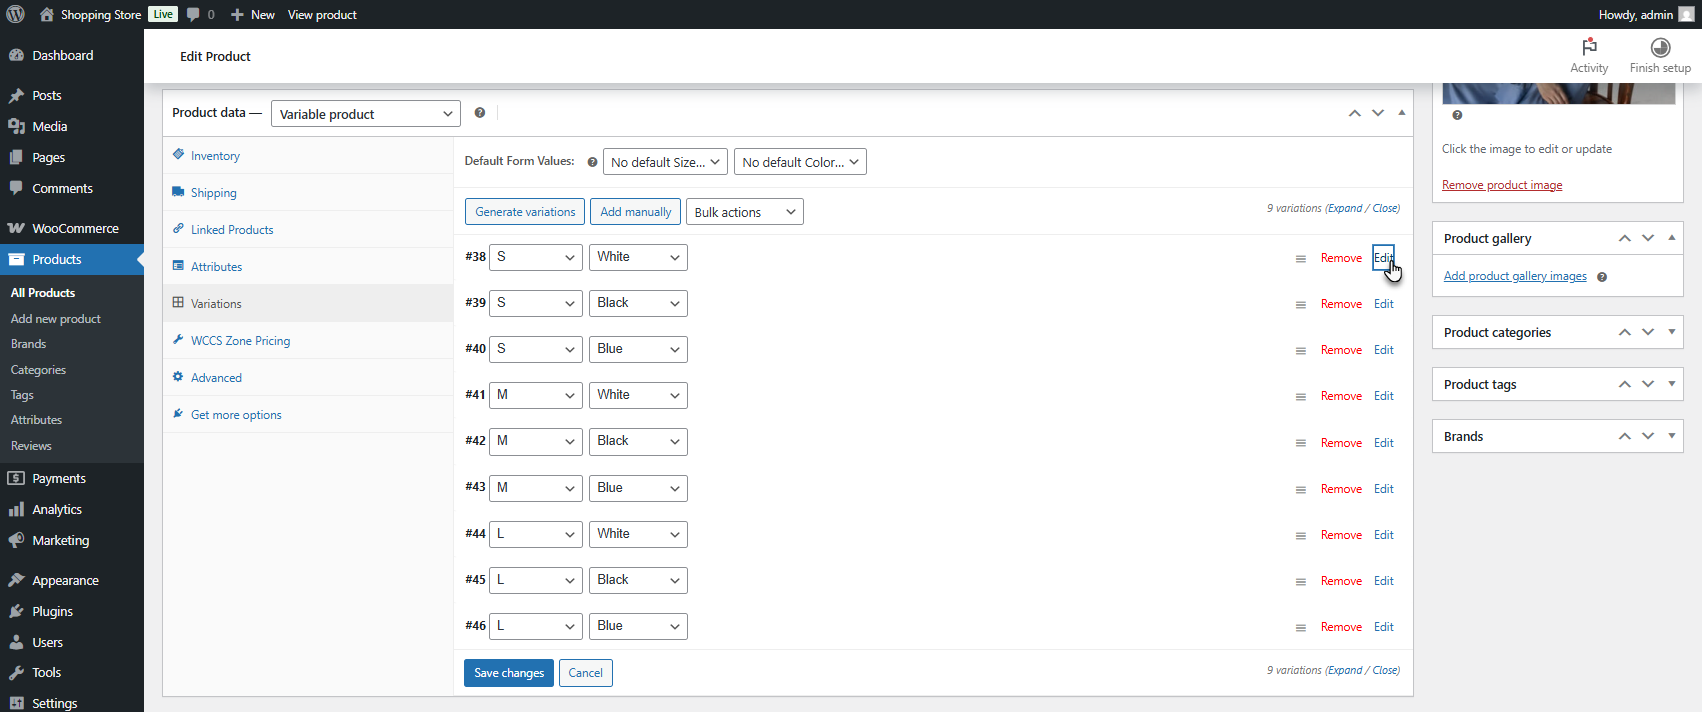
- Check the WCCS Product Pricing checkbox for that variation.
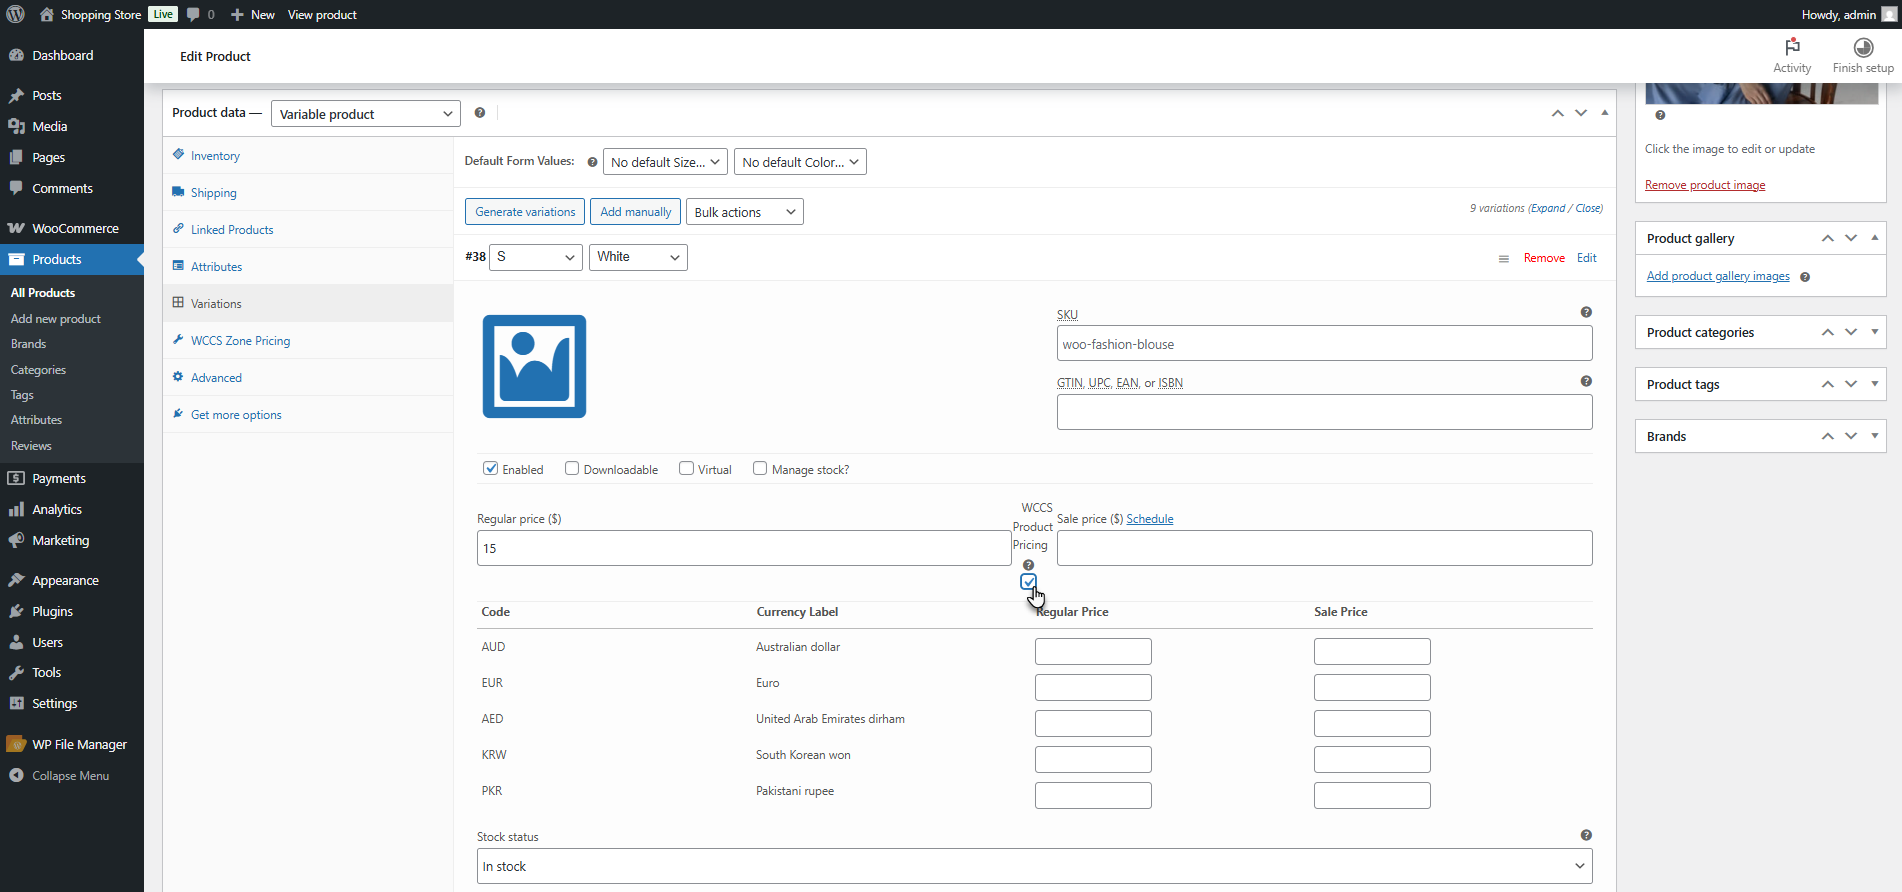
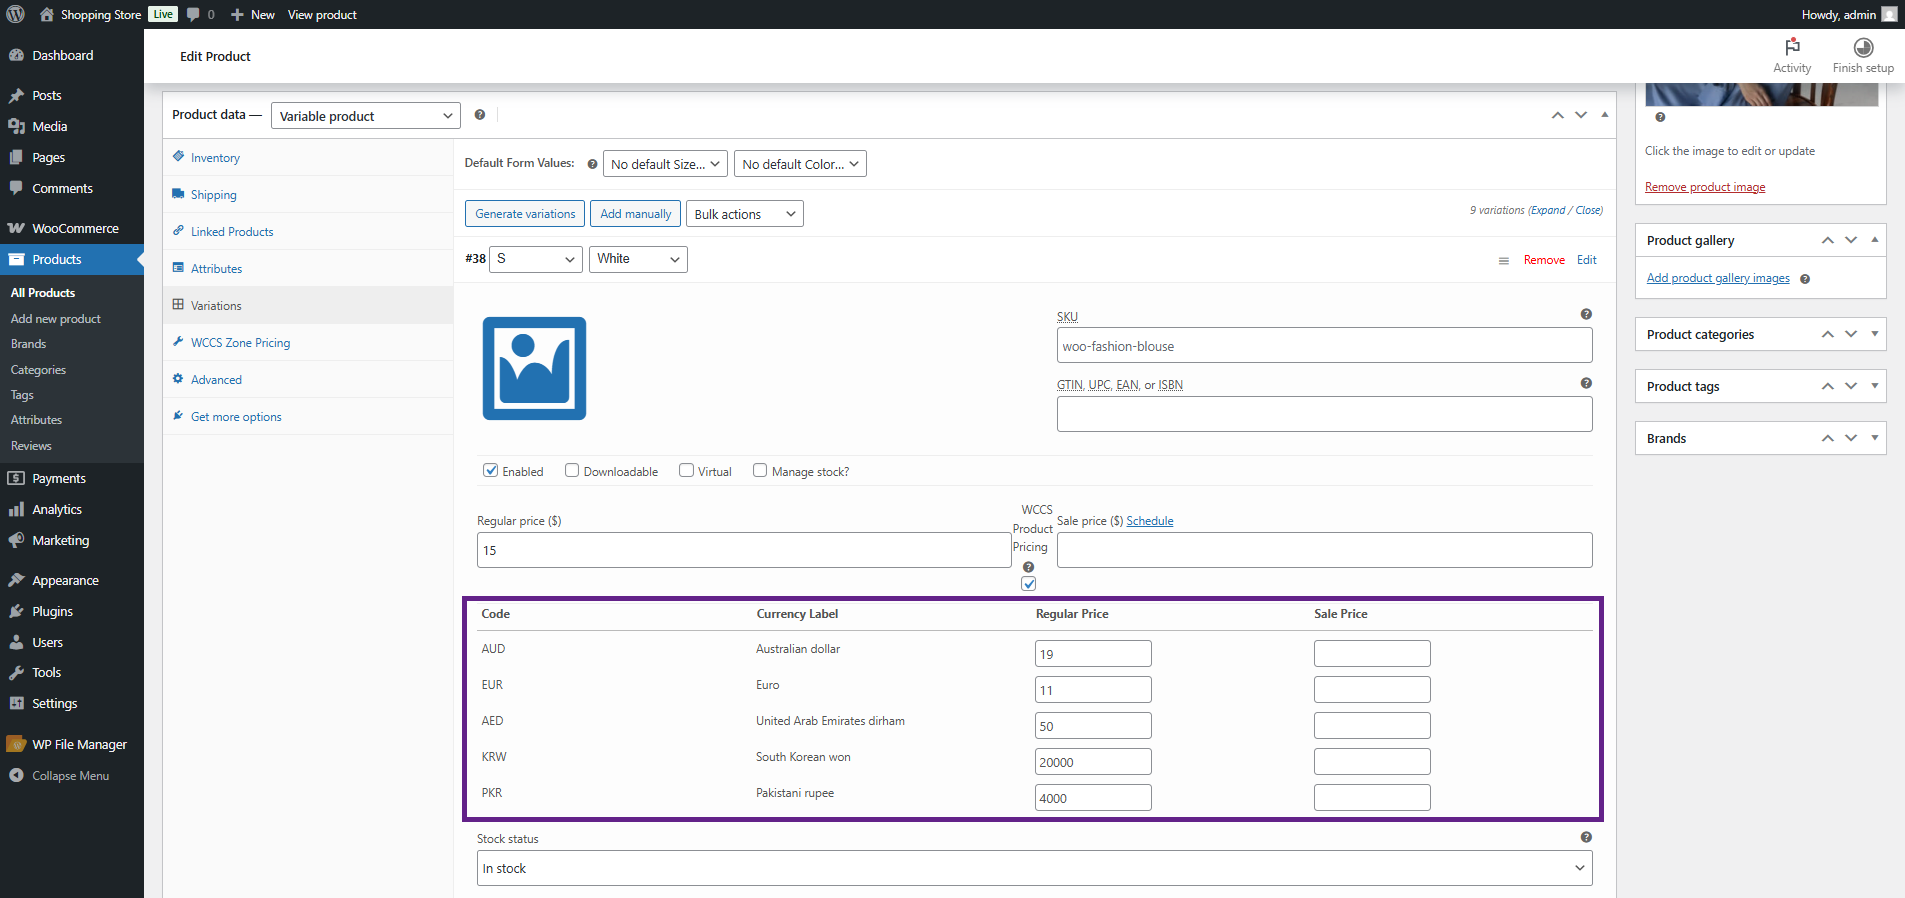
- Enter the Regular Price and Sale Price for each currency in the table.
- Repeat for other variations as needed.
- Click Save Changes, then Update the product.
Front End Impact
- Go to the Shop page. Navigate to a product that has custom currency pricing set.
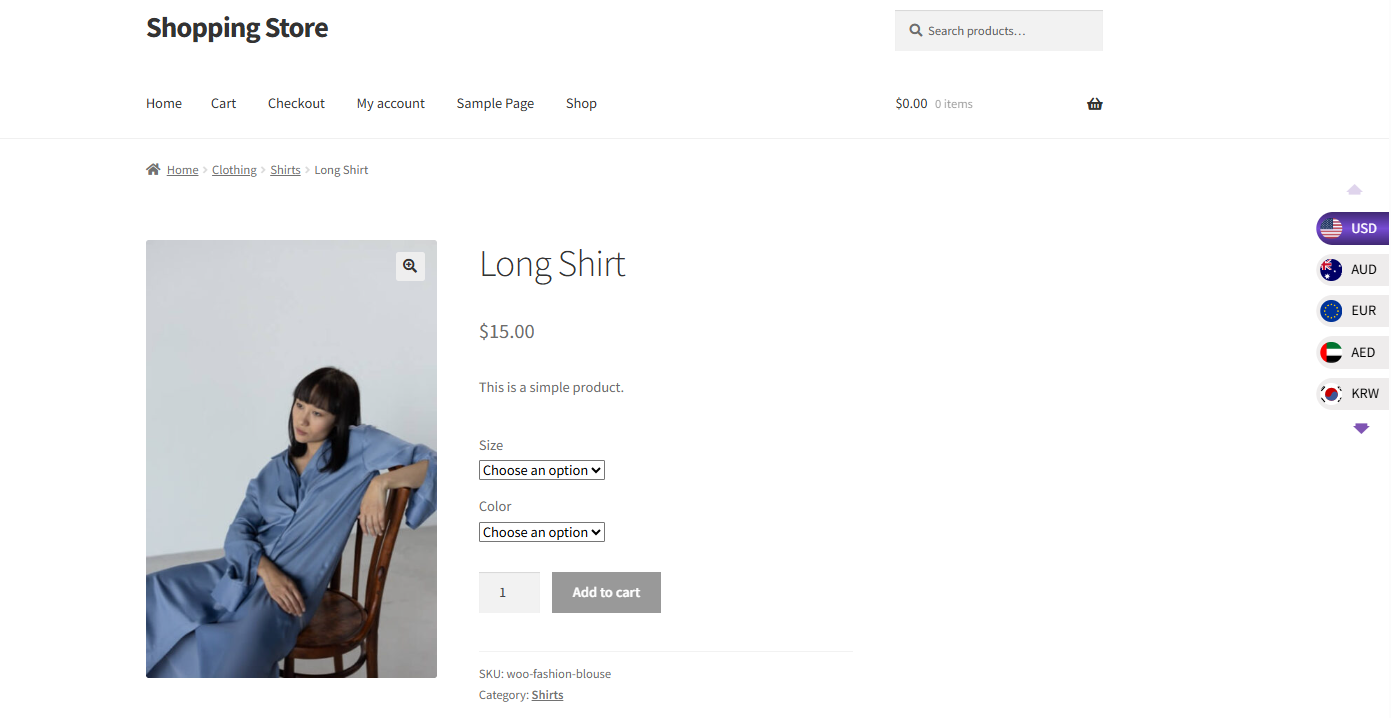
- Prices will display in the currency selected from the currency switcher.
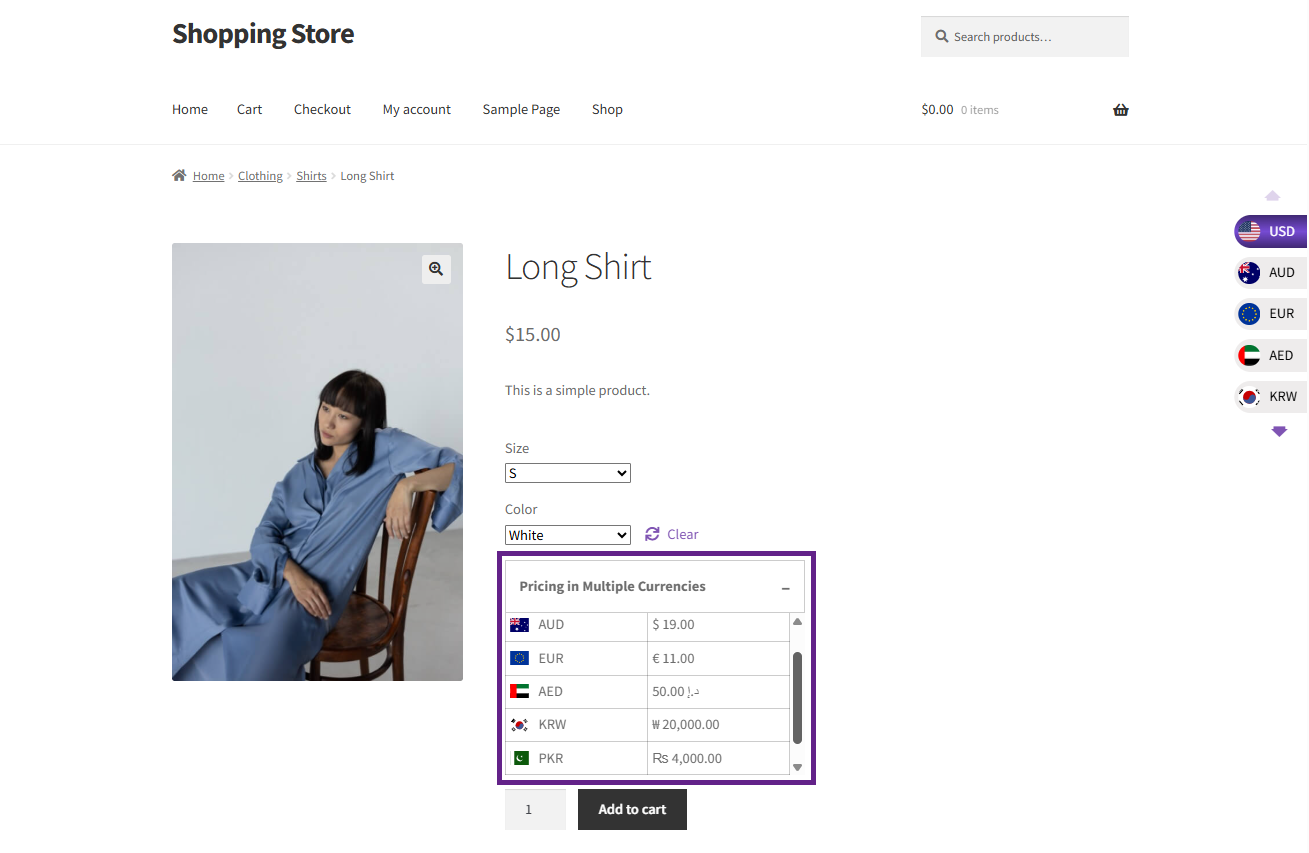
The display of currency for different zones can be changed by navigating to WooCommerce > WCCS Settings > General > Display Currency on Product Page.
Coupons in Multi-Currency
↑ Back to topCurrency Switcher extends WooCommerce coupons with multi-currency awareness. Two coupon features are available: fixed amounts per currency and minimum/maximum spend thresholds per currency.
| IMPORTANT | Both coupon features require Shop Currency to be enabled in WCCS Settings. The Coupon Fixed Amount feature also requires Currency on Billing to be DISABLED. |
|---|
Fixed Amount Coupons
↑ Back to topNormally, a WooCommerce fixed-amount coupon deducts the same numeric value regardless of currency (e.g., a $5 coupon deducts 5 in all currencies). With this feature, you set a specific deduction amount for each currency.
- To enable the Fixed Amount Coupons, navigate to the WooCommerce > WCCS Settings > Fixed amount for coupon. Check this option.
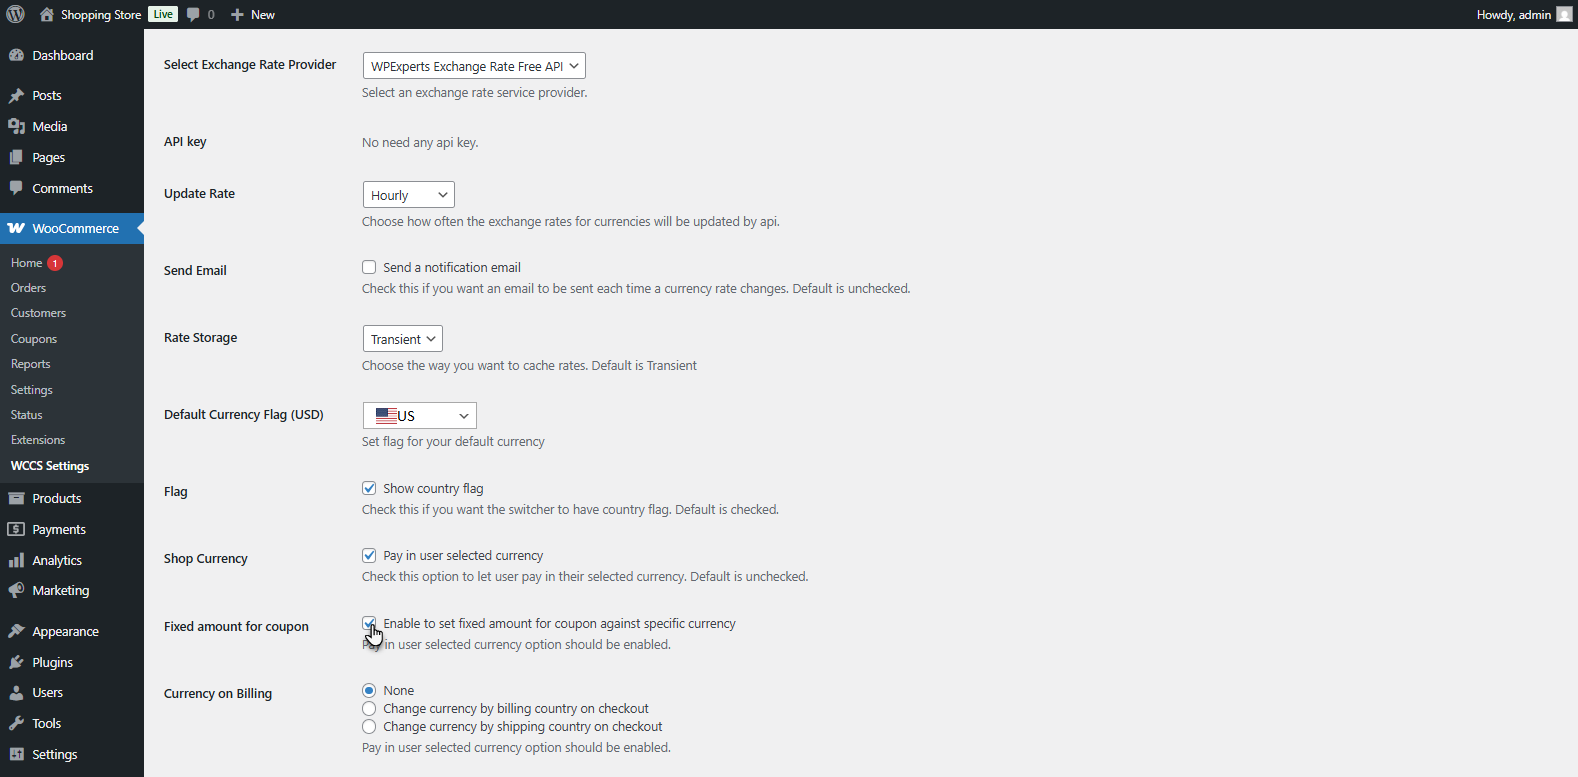
- Once Fixed amount for coupon is enabled, Go to Marketing > Coupons.
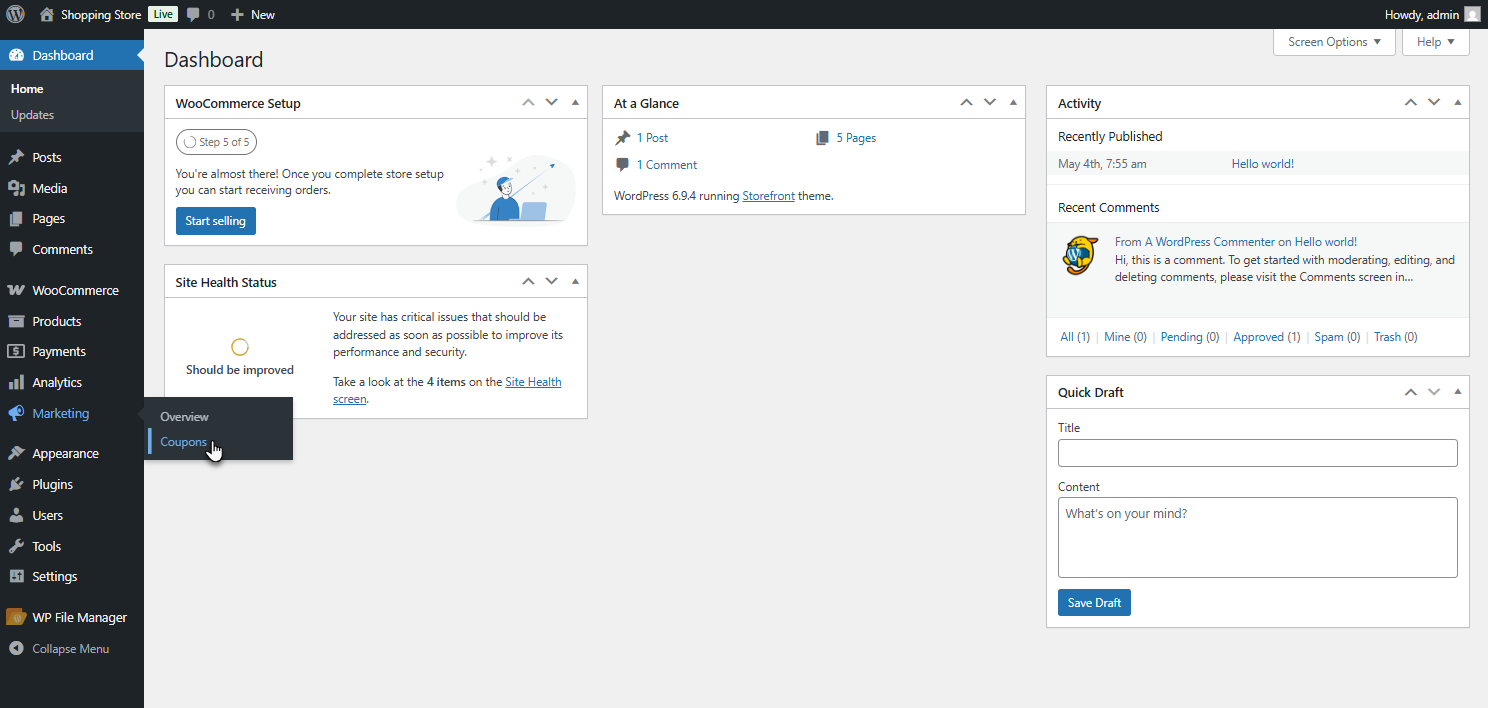
- Edit an existing coupon or click Add Coupon.
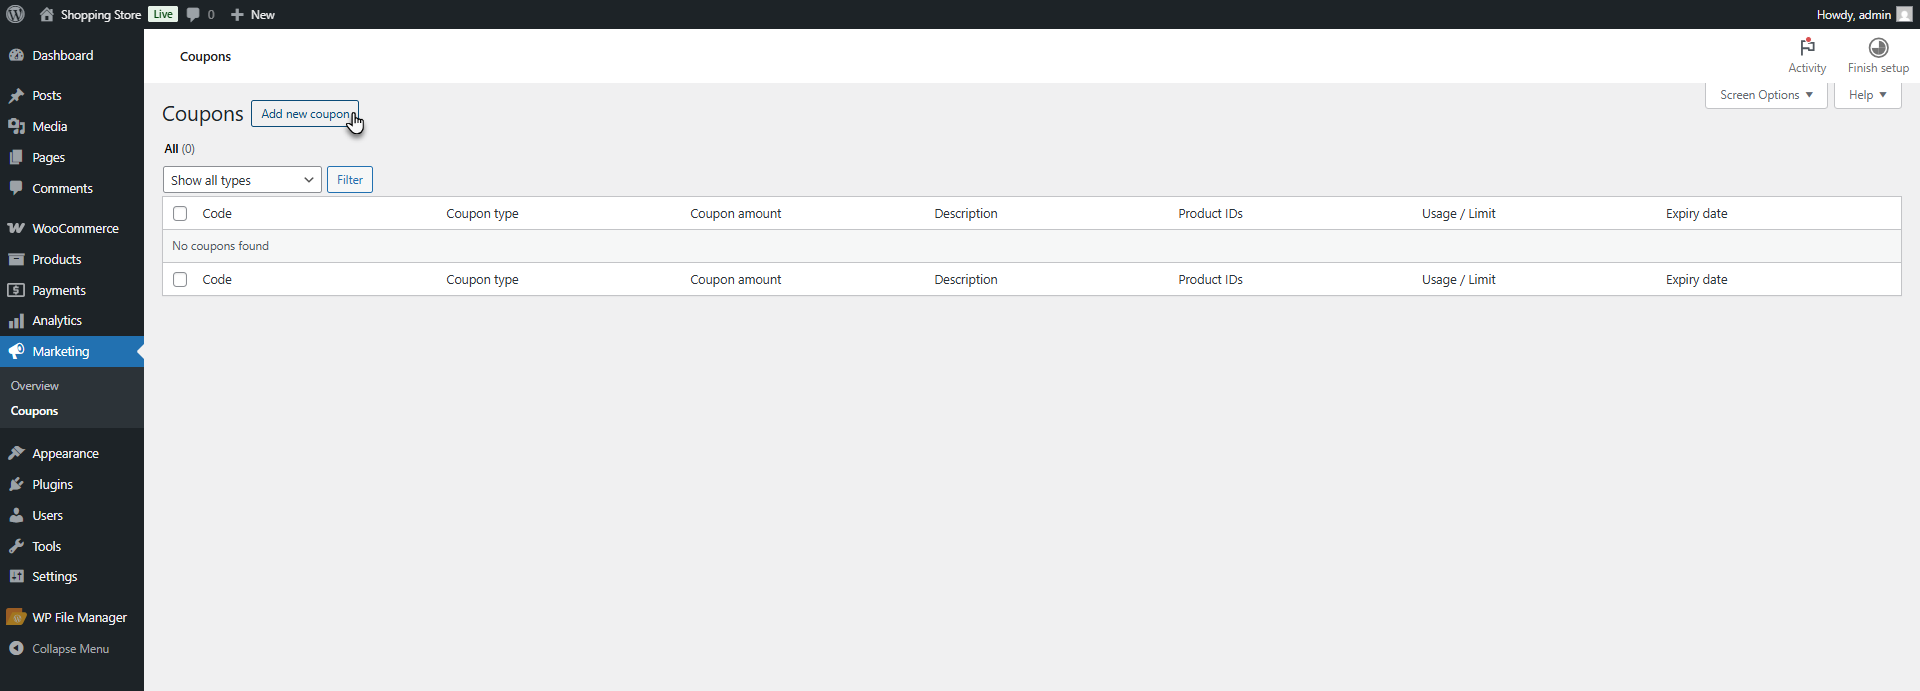
- Add a Coupon Code or Auto-Generate and add description if needed.
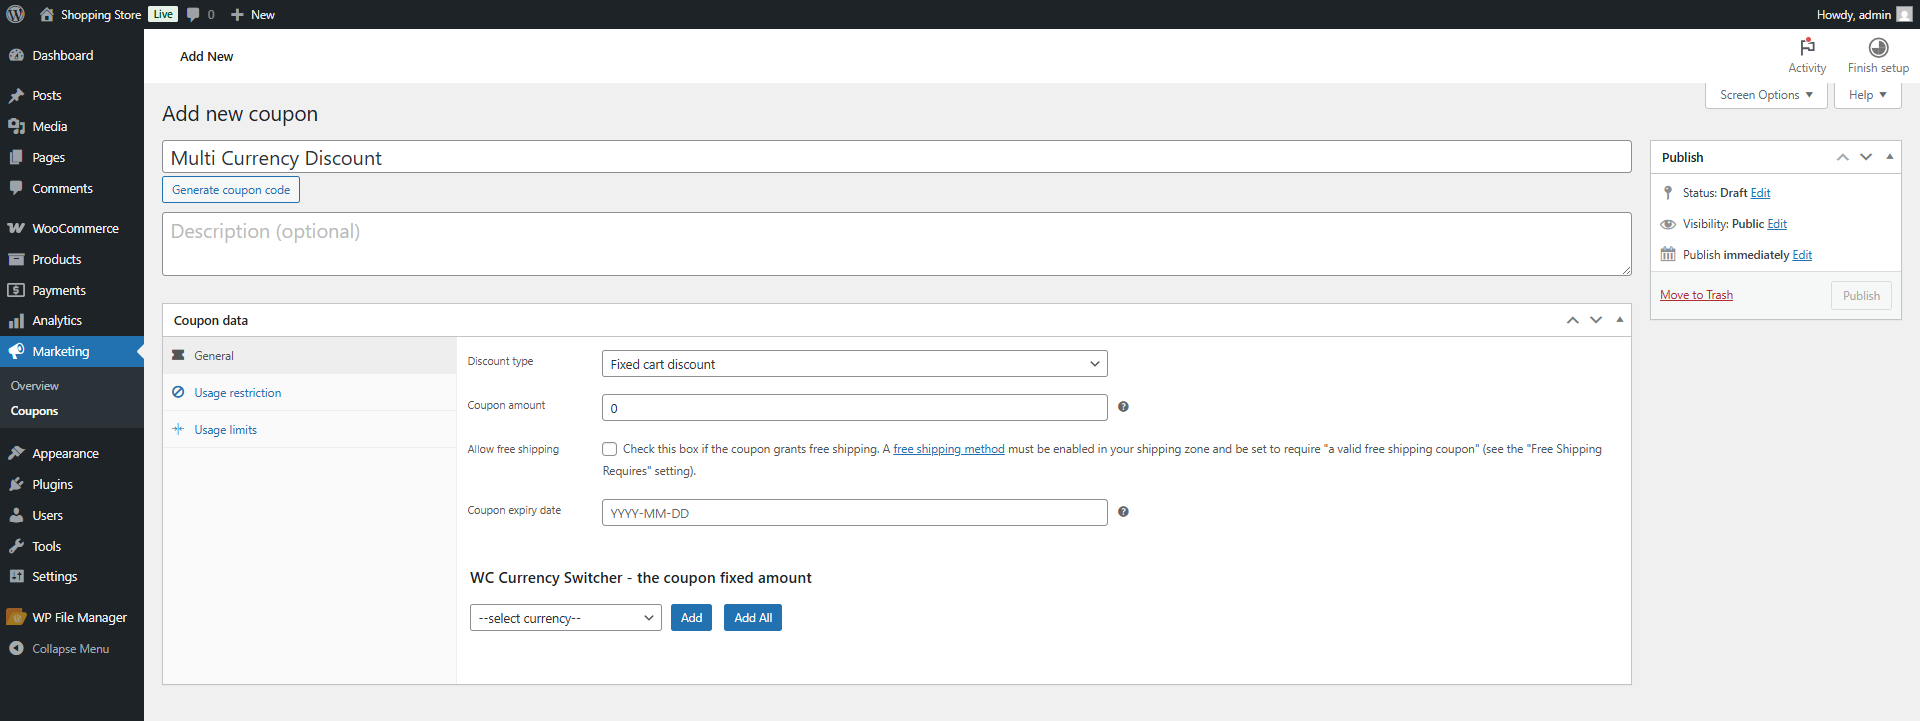
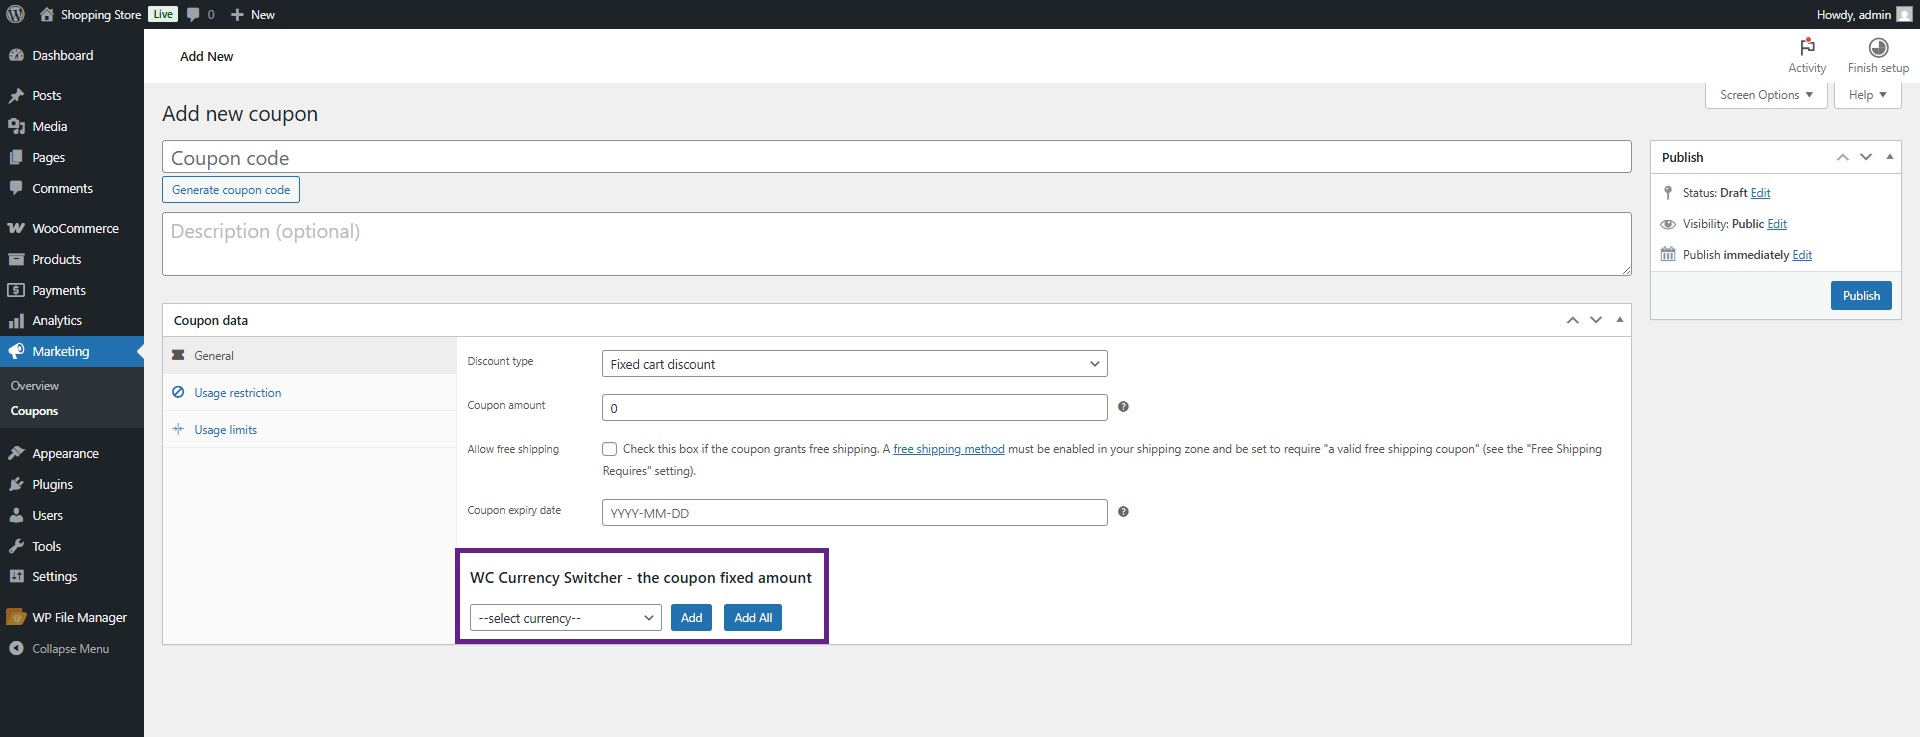
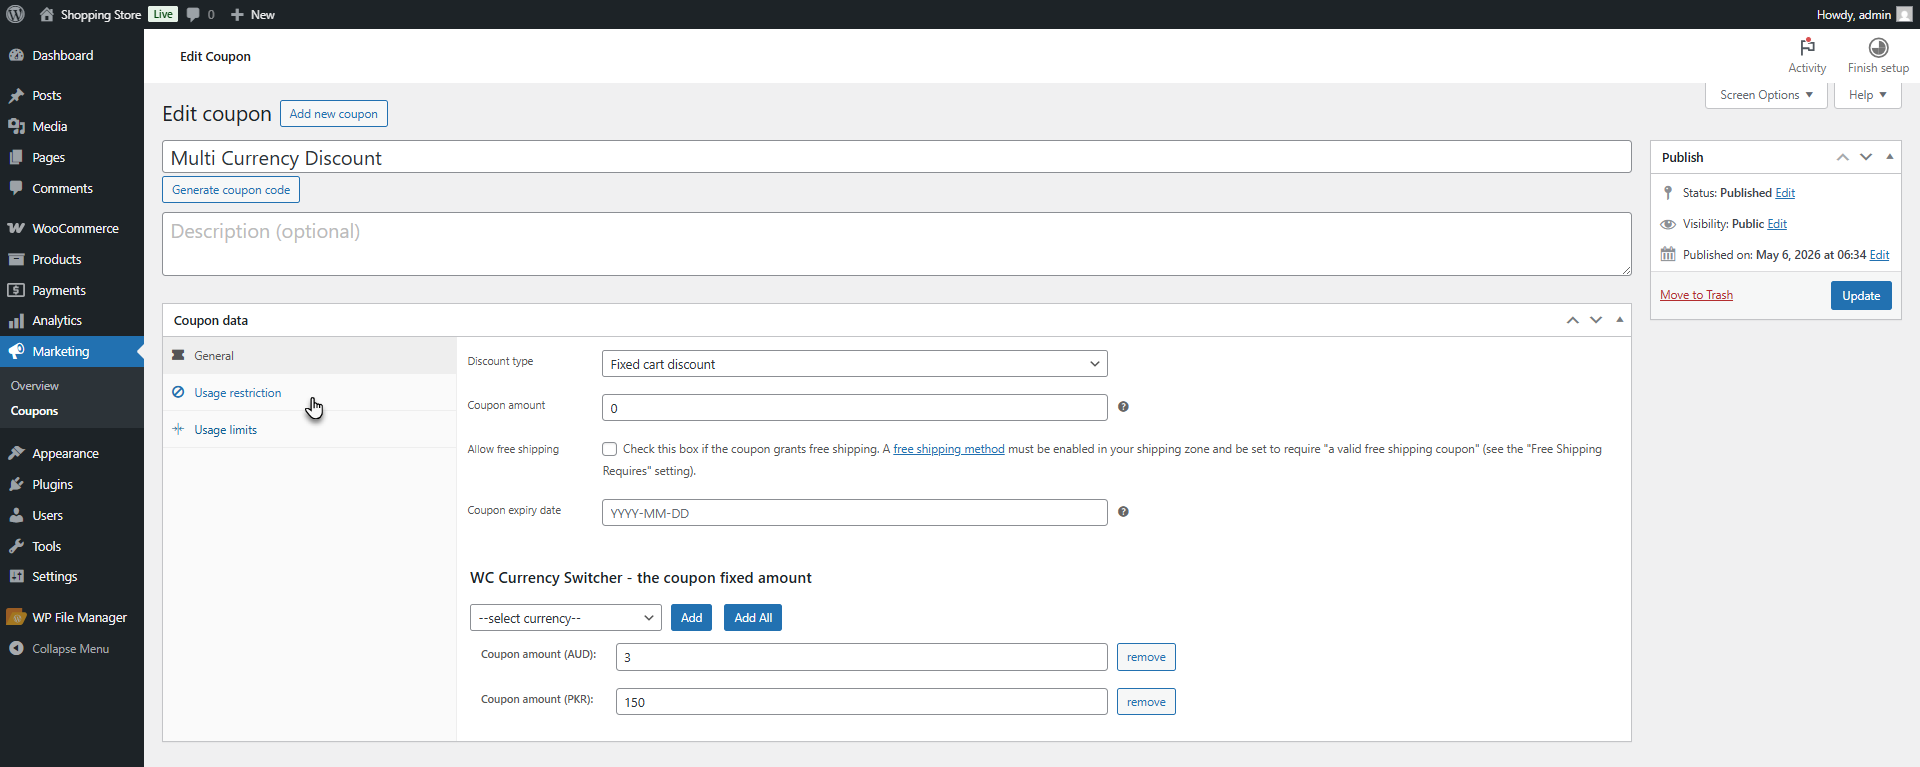
- In the General tab, locate WC Currency Switcher – Coupon Fixed Amount.
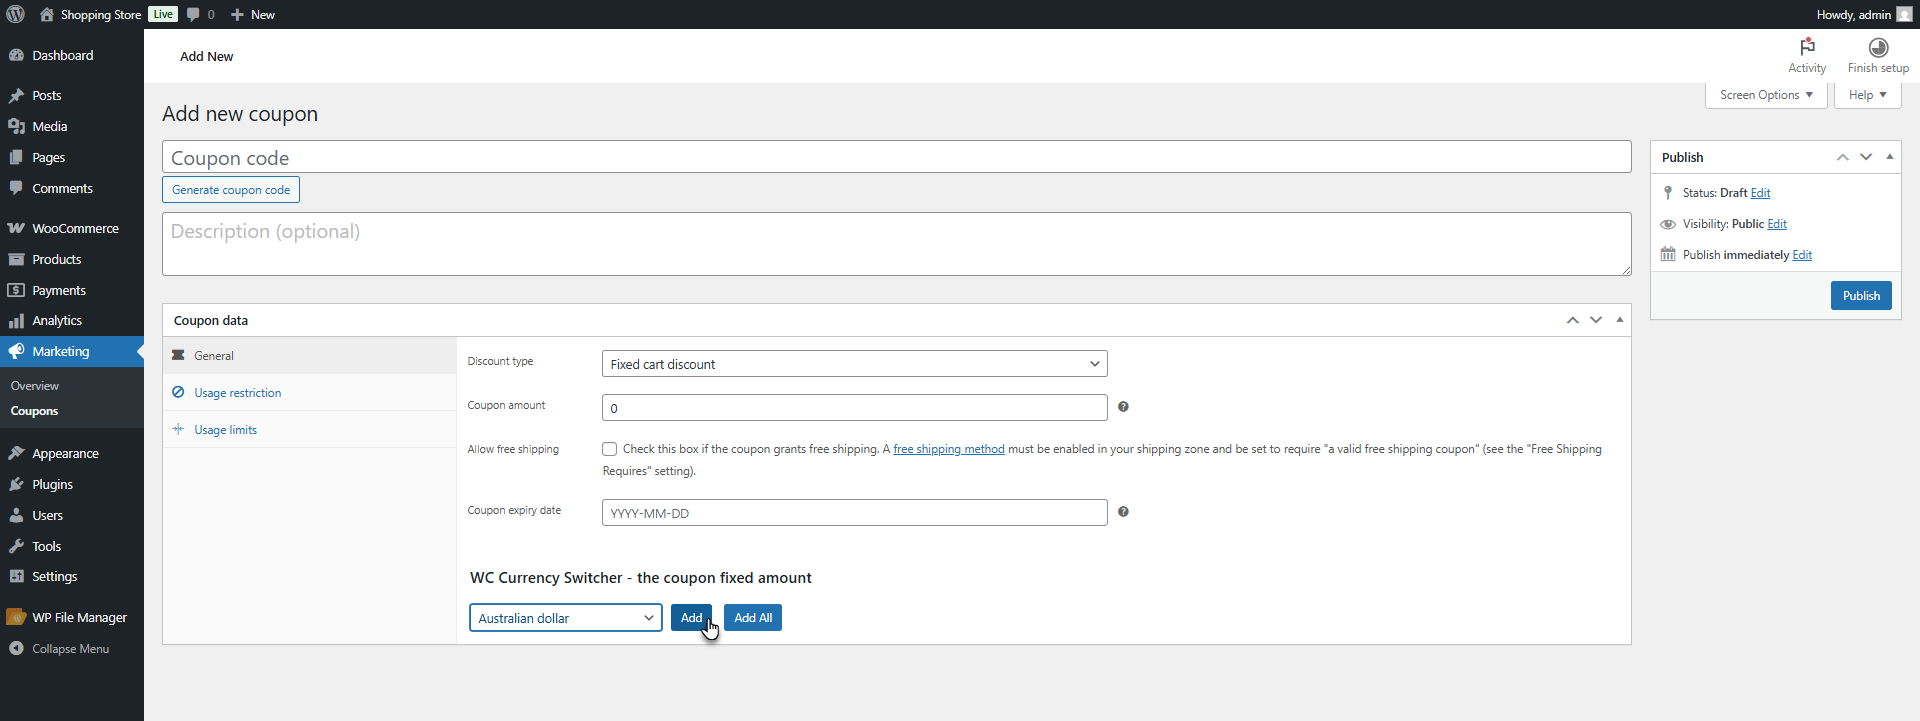
- Select a currency from the dropdown and click Add.
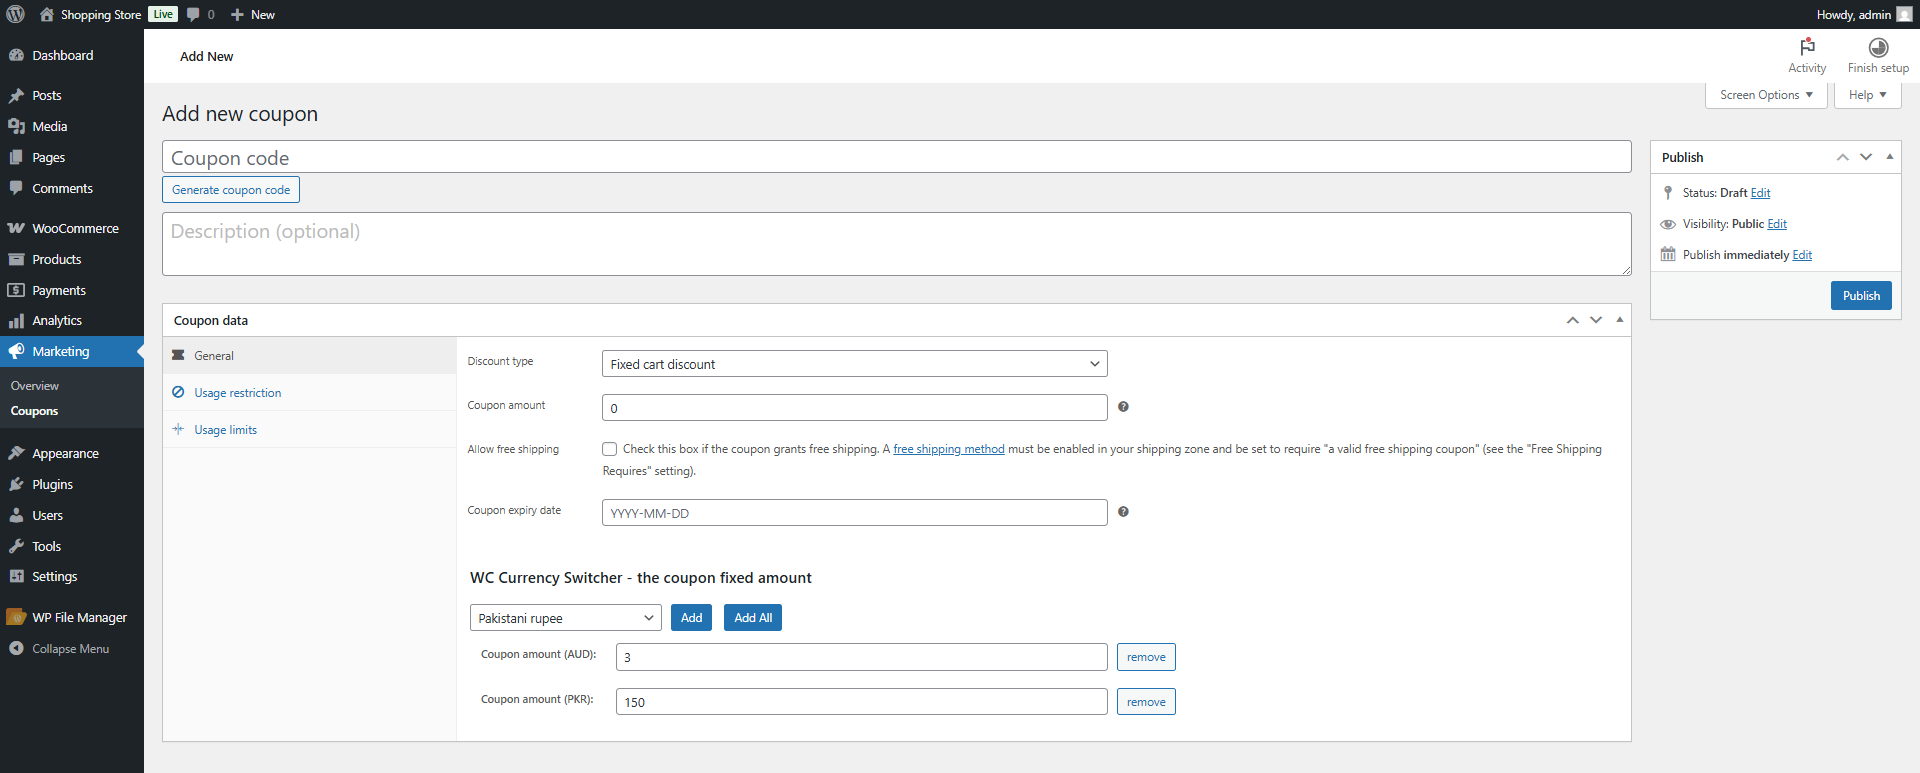
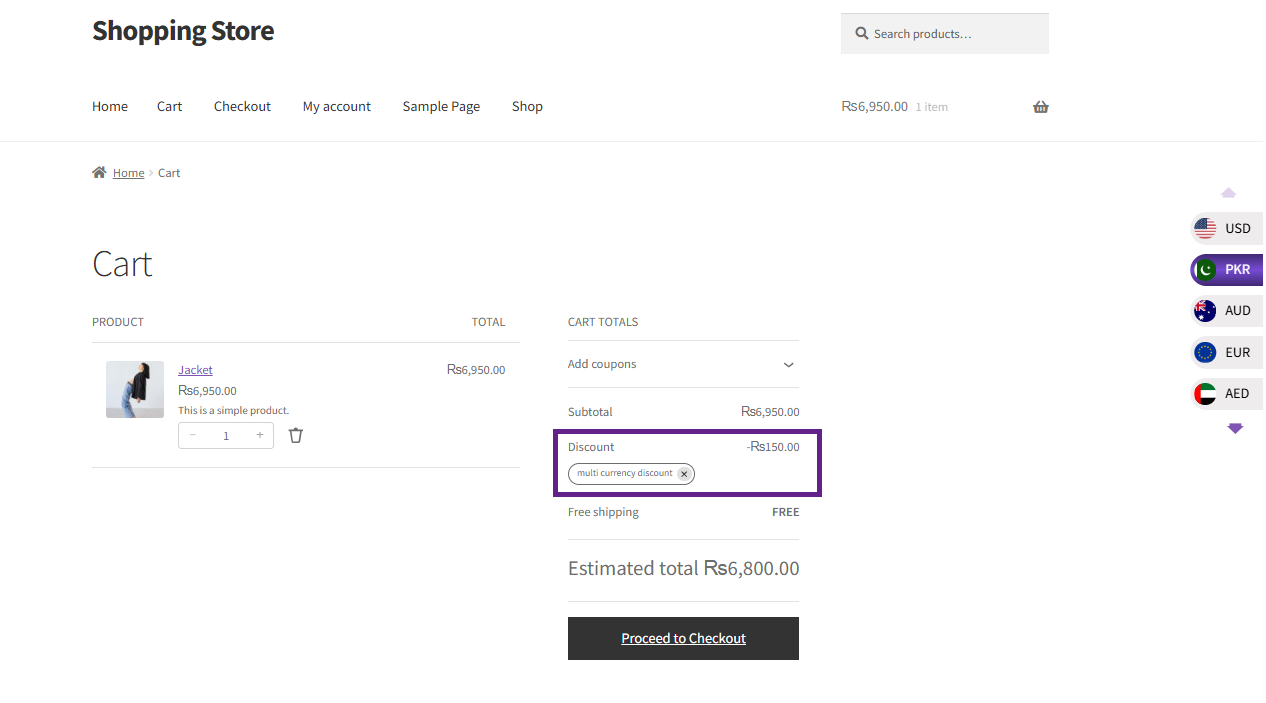
- Enter the discount amount for that currency (e.g., select AUD and enter 3.00 to deduct $4.00 when AUD is active). Click Add All to add all configured currencies at once.
- Set amounts for each currency and click Update / Publish.
Front End Impact
- The user visits the shop, adds an item to the cart, and applies a coupon on the Cart page. Once applied, a confirmation is shown, and the discount is reflected in the cart totals.
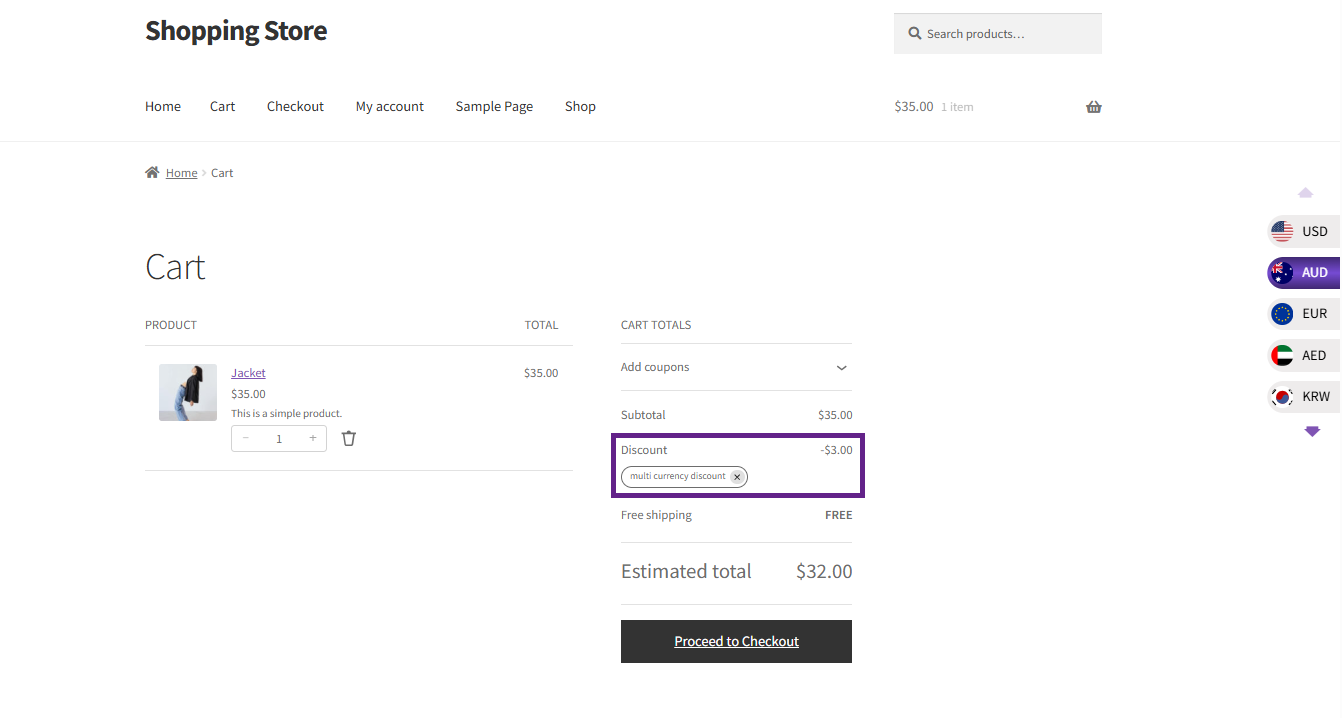
- When the currency is switched, the discount is displayed according to the amount set by the admin for the coupon.
Coupon Usage Restrictions (Min/Max)
↑ Back to topSet minimum and maximum cart totals for coupon validity per currency. This prevents exchange-rate differences from making the same coupon dramatically more or less restrictive in different markets.
- Edit the coupon and click the Usage Restriction tab.
- Locate WC Currency Switcher – Coupon Minimum and Maximum Amount.
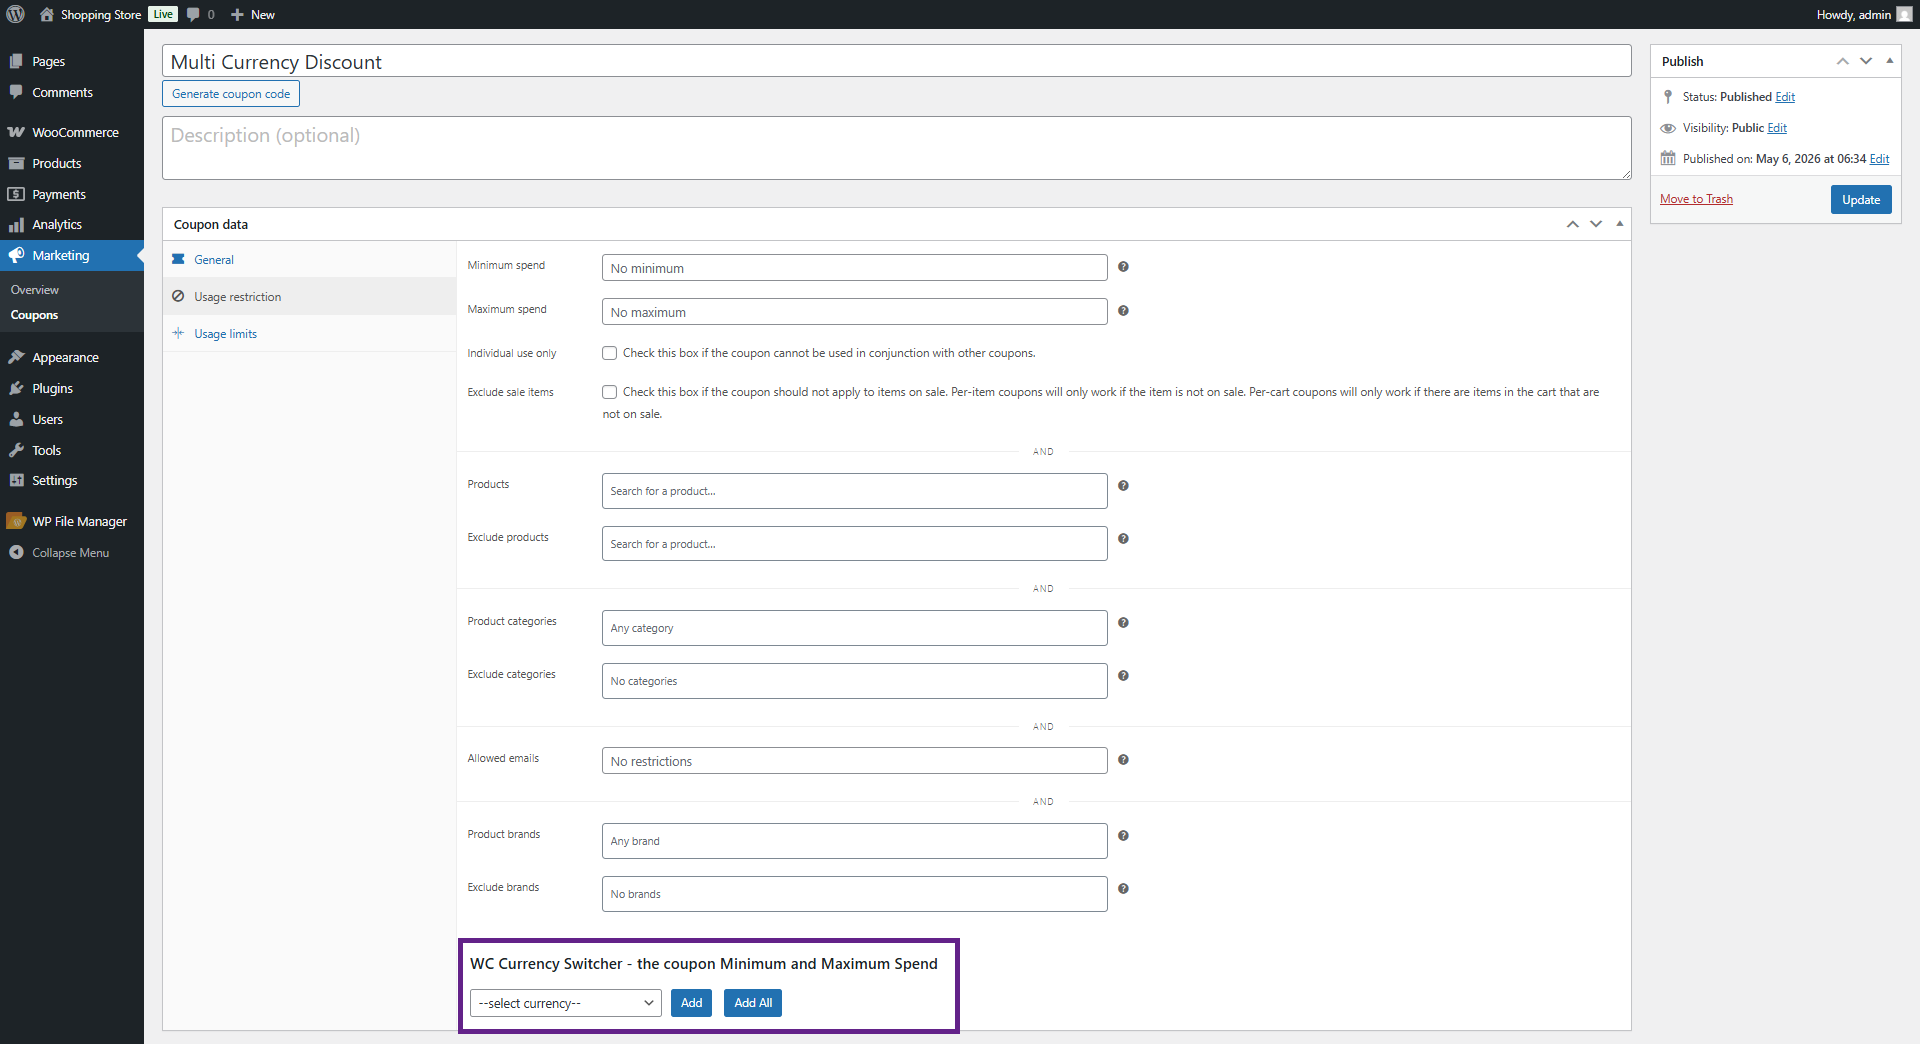
- Add currencies and set the Minimum Spend and Maximum Spend for each.
- The coupon applies only when the cart total falls within the specified range, AND that currency is active.
- Click Update / Publish.
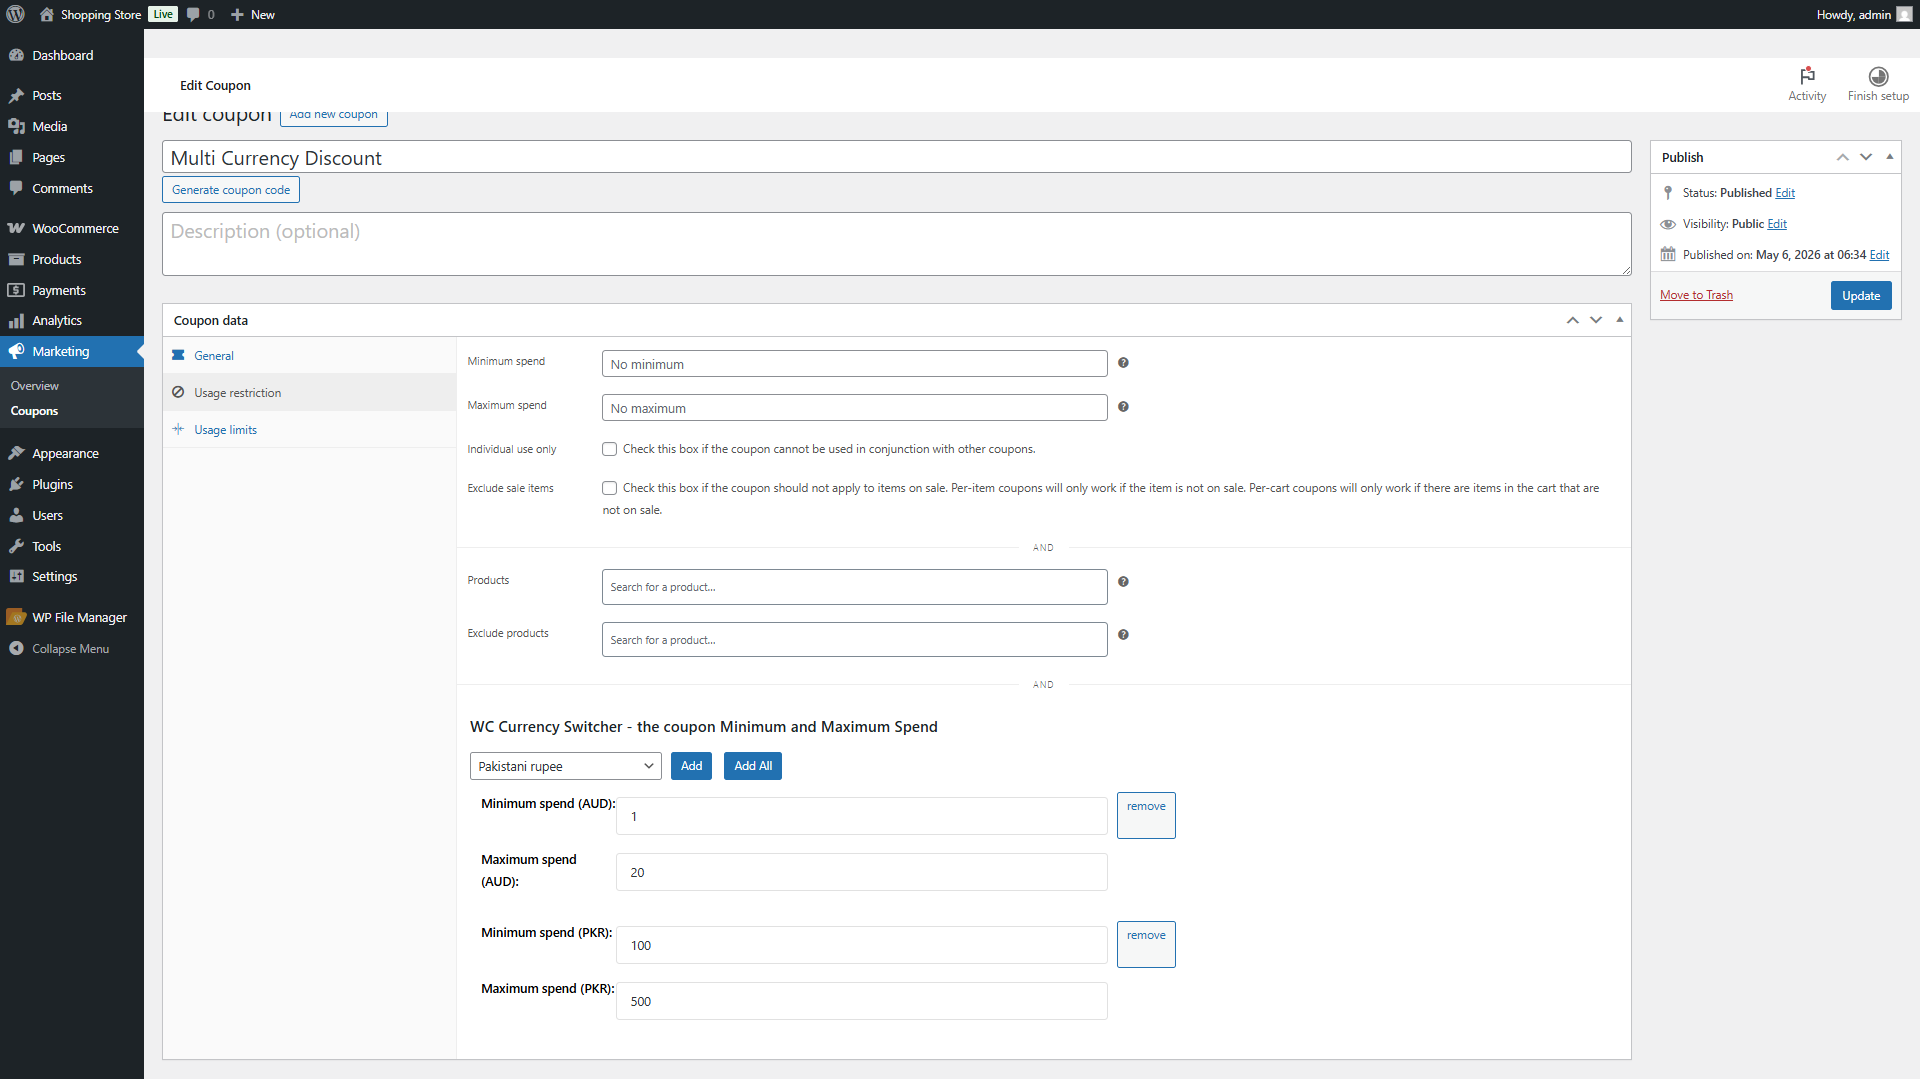
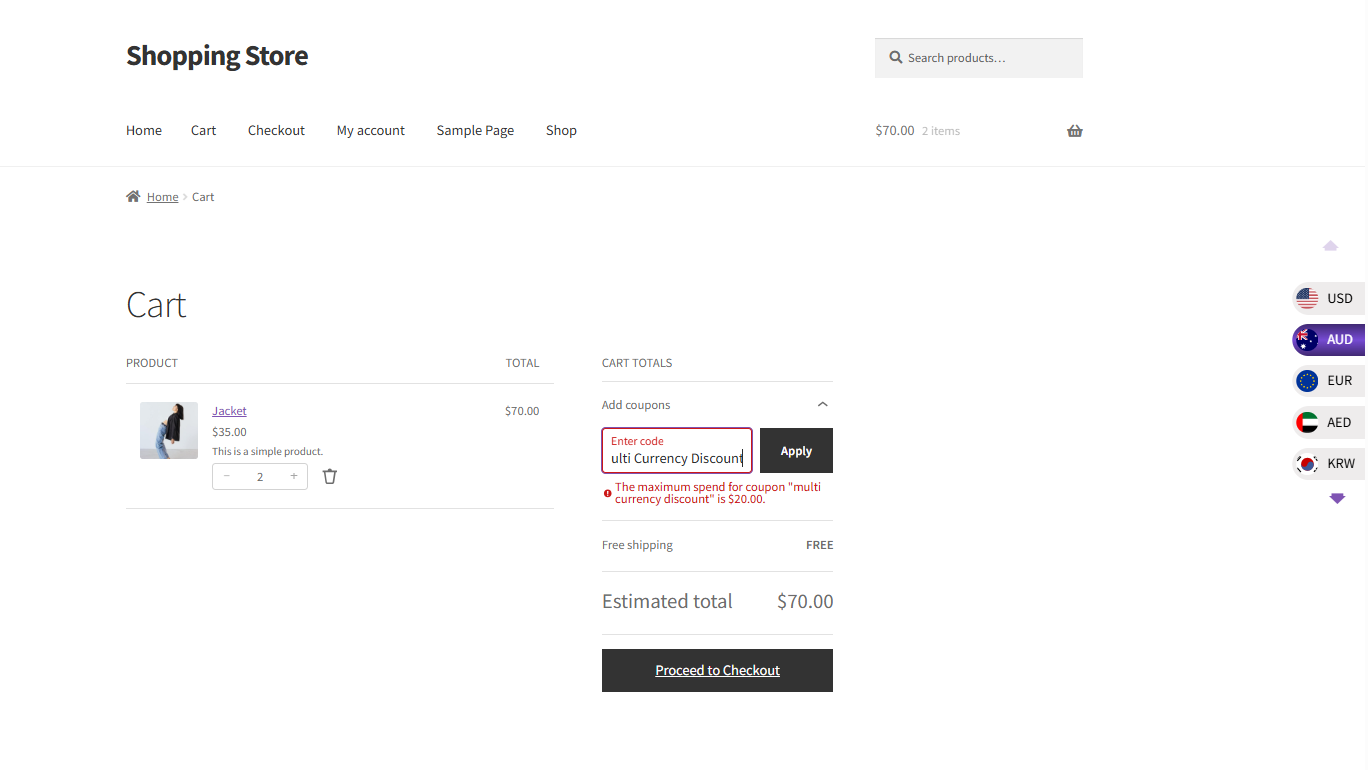
NOTE | If the cart total is below the Minimum Spend for the active currency, the coupon is rejected with an error message. The same happens if the cart exceeds the Maximum Spend. |
|---|
Front End Impact
- If the subtotal is outside the minimum or maximum spend limits, the coupon will not be applied, and a message will be displayed at the top.
Display & Switcher Styles
↑ Back to topCurrency Switcher can be displayed in multiple locations using widgets, navigation menus, shortcodes, or a sticky floating button. Four visual styles are available.
Switcher Widget
↑ Back to top- Go to Appearance > Widgets.
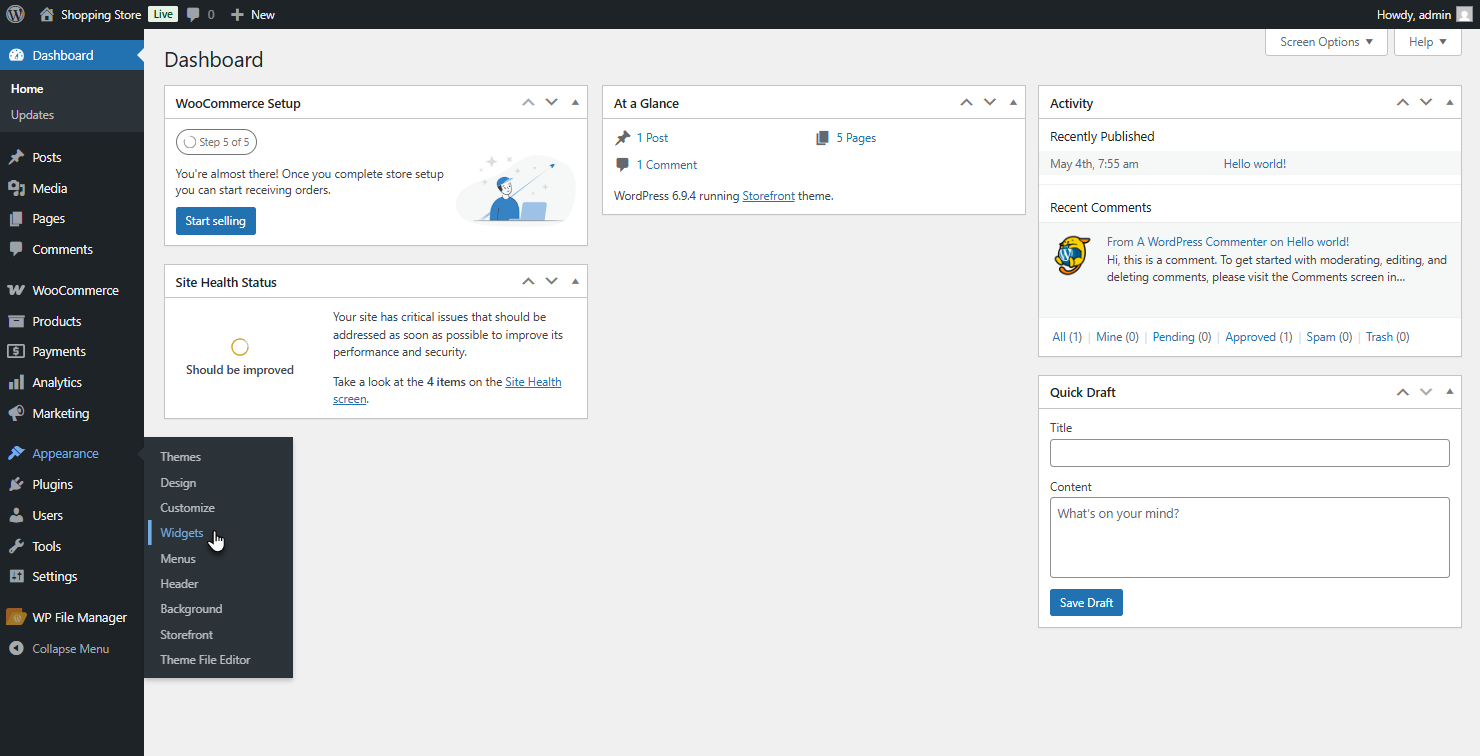
- Find WCC Switcher Widget in the available widget list. Drag it to your desired widget area (sidebar, footer, header, etc.) or click Add Widget.
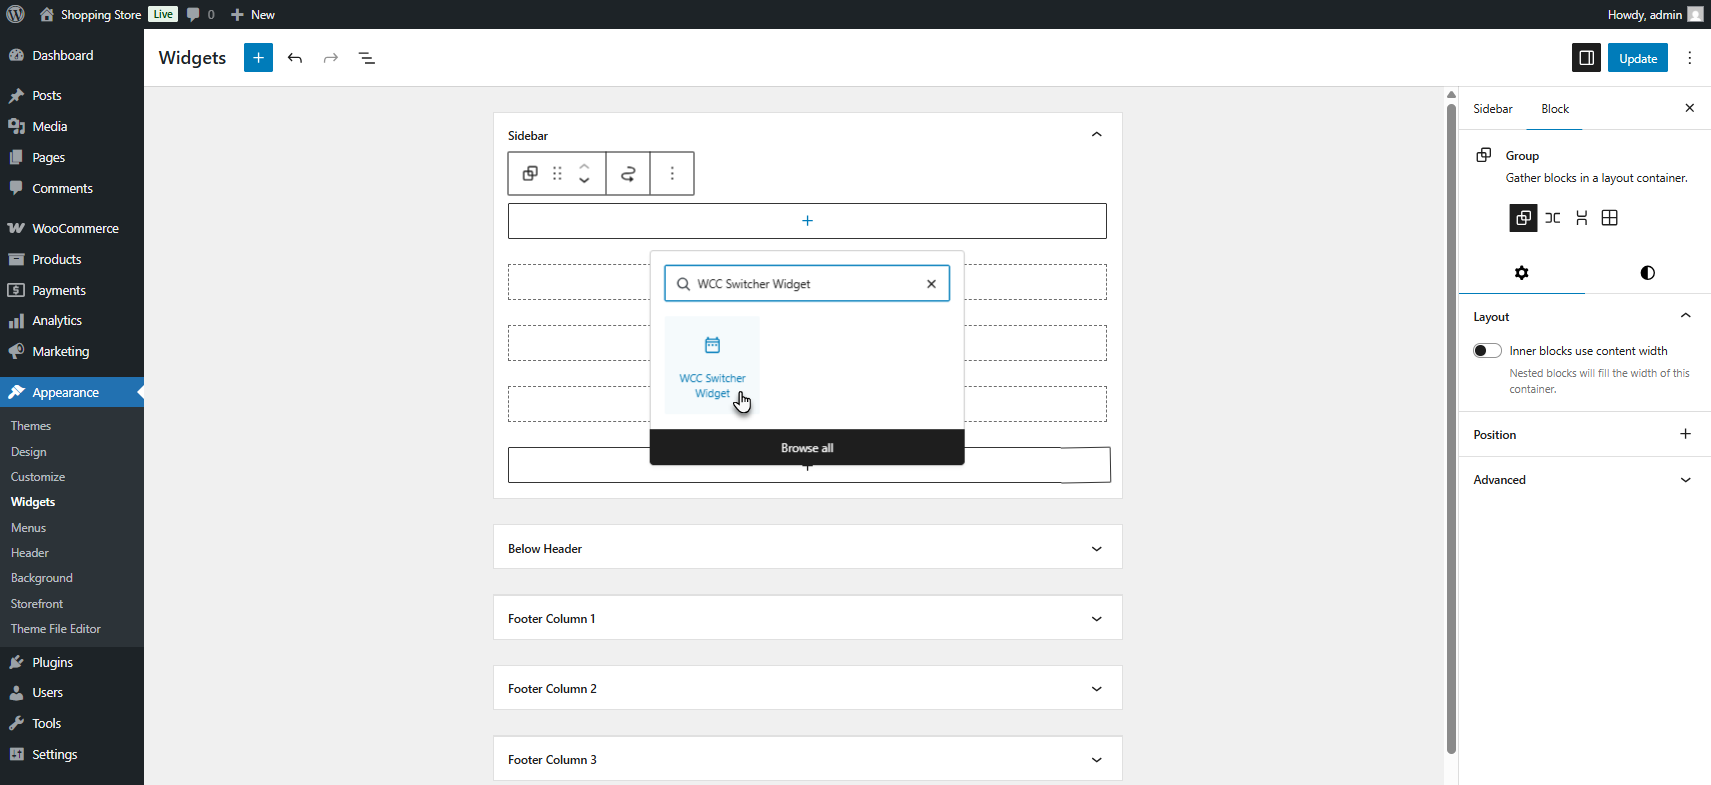
- Enter a Title and select a Style (1–4) from the dropdown.
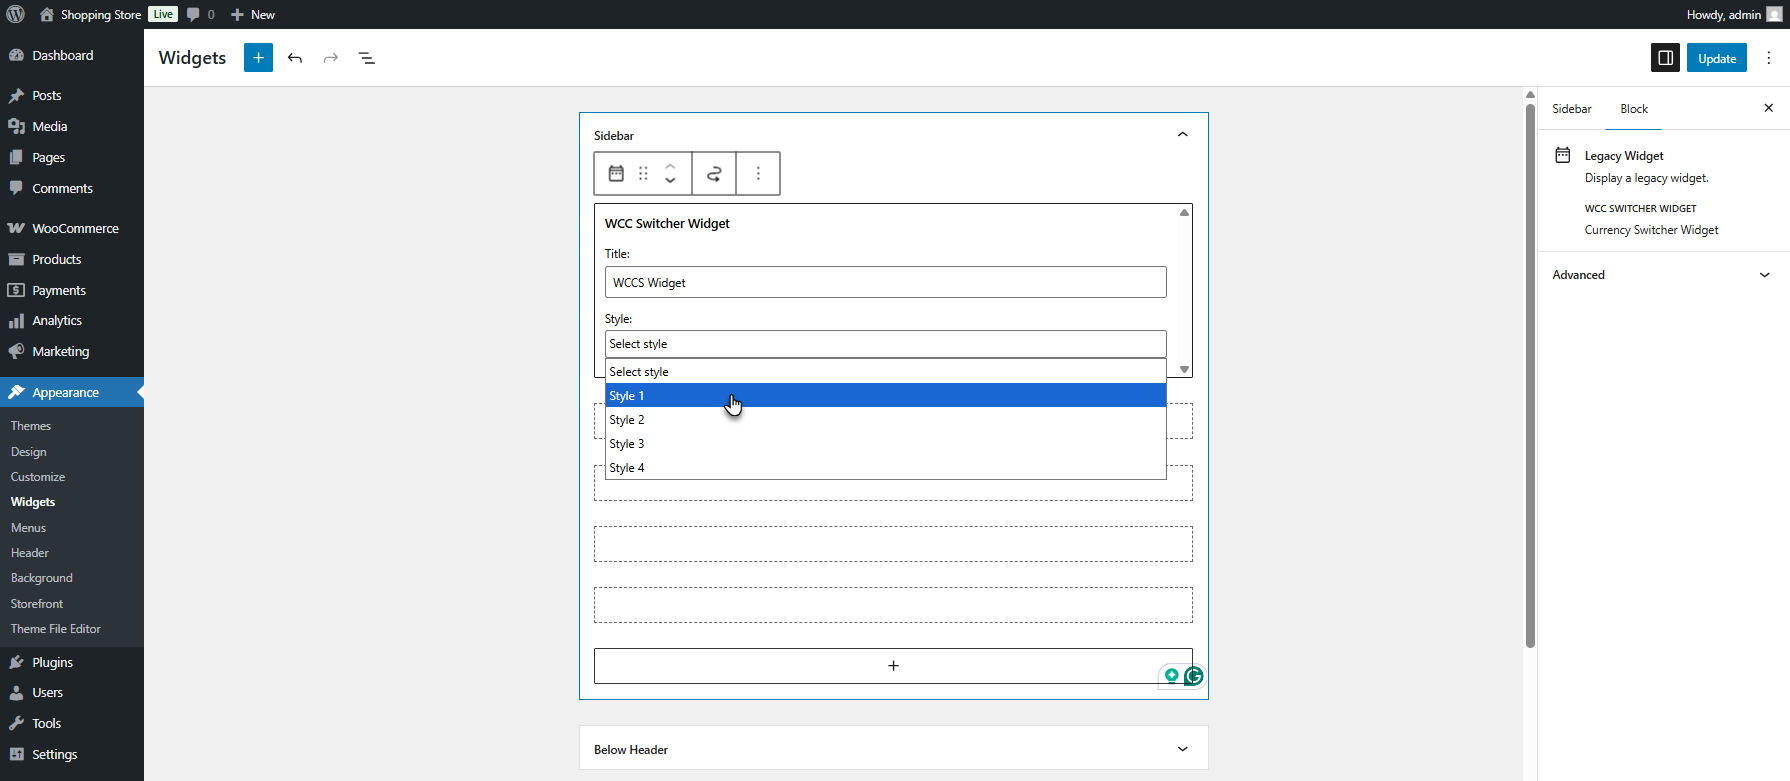
- Click Done (or Save in classic widgets).
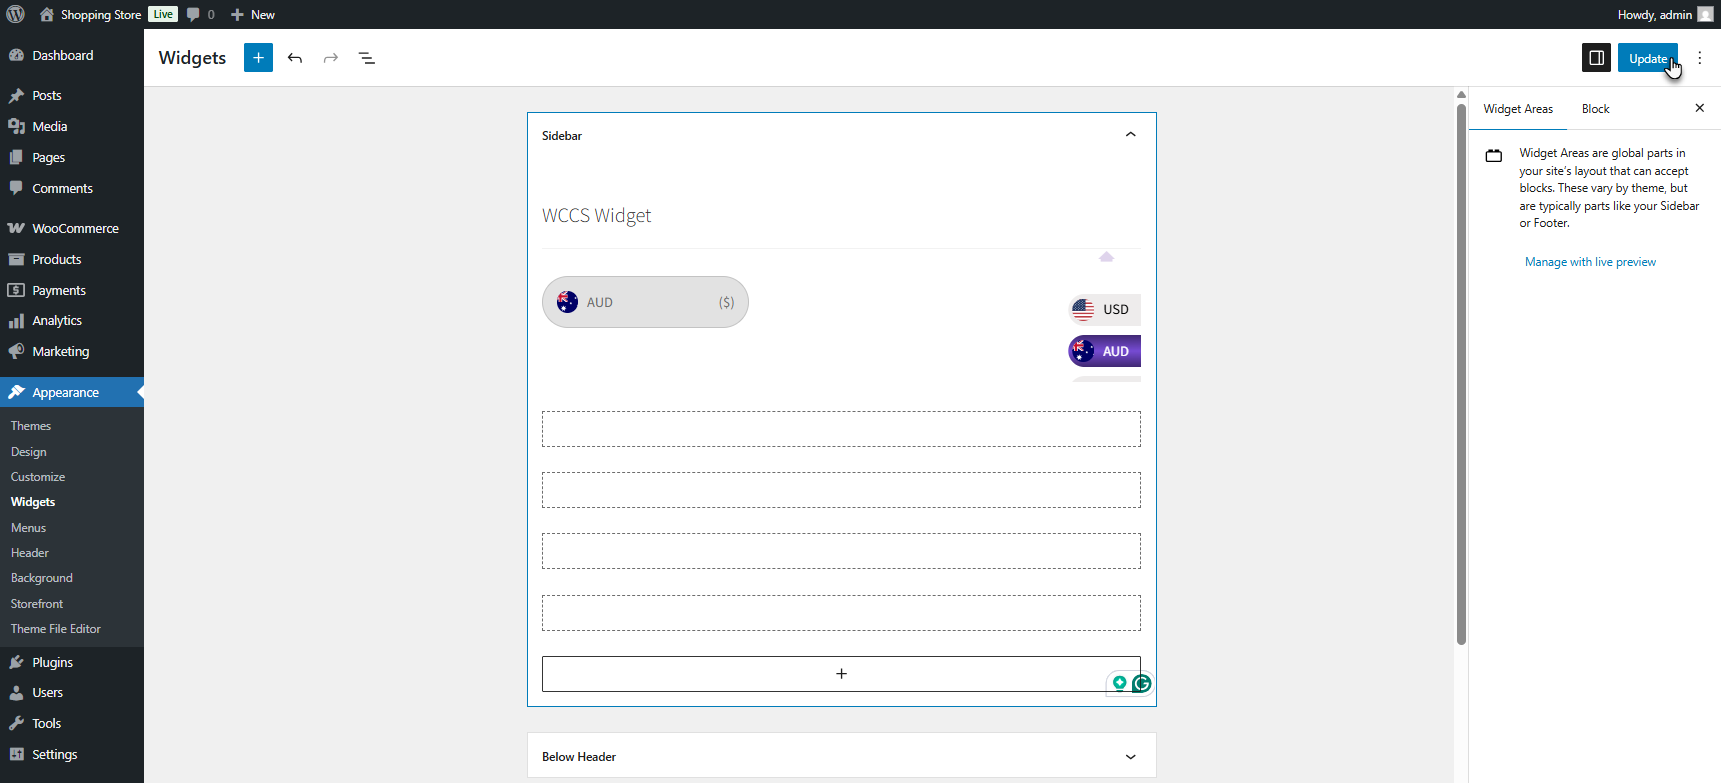
Front End Impact
- Style 1
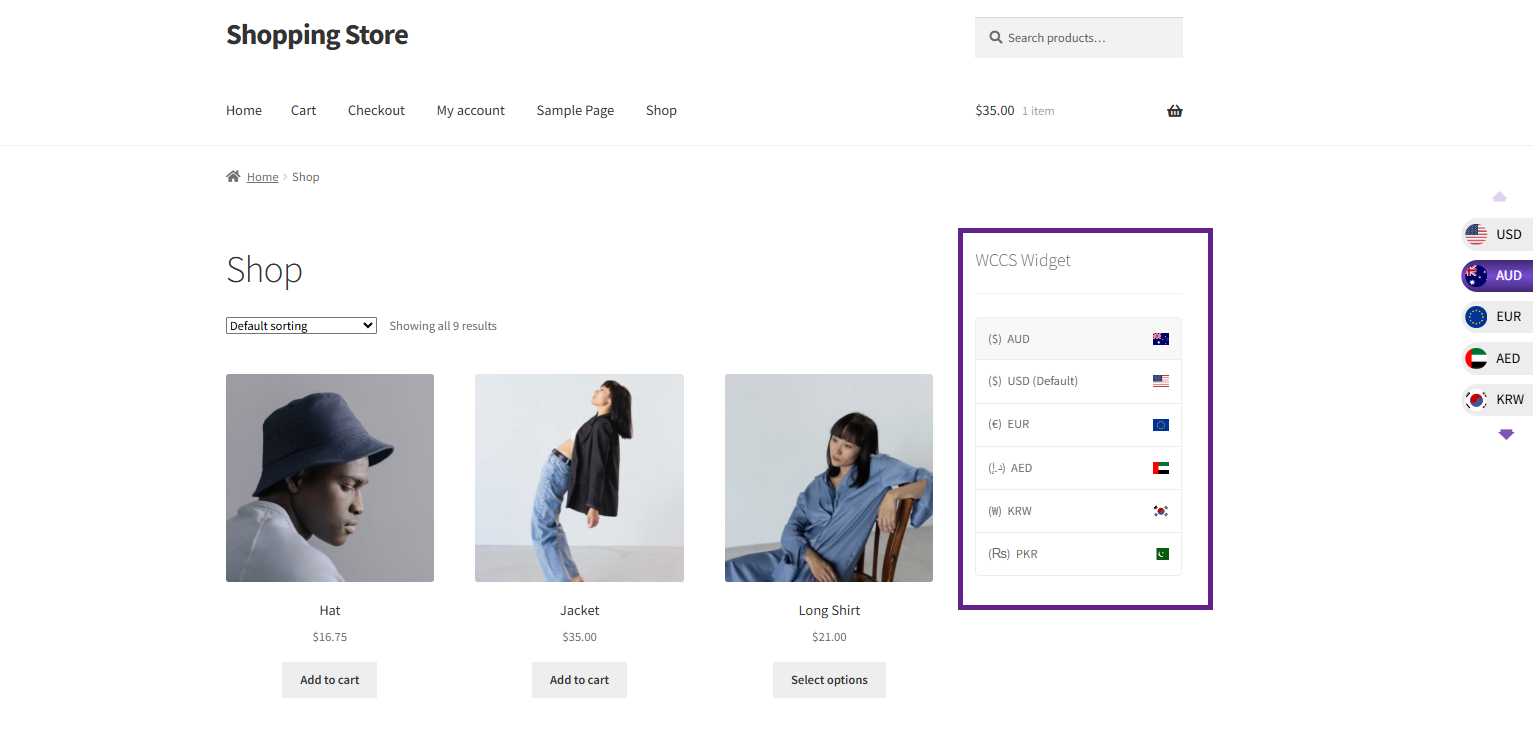
- Style 2
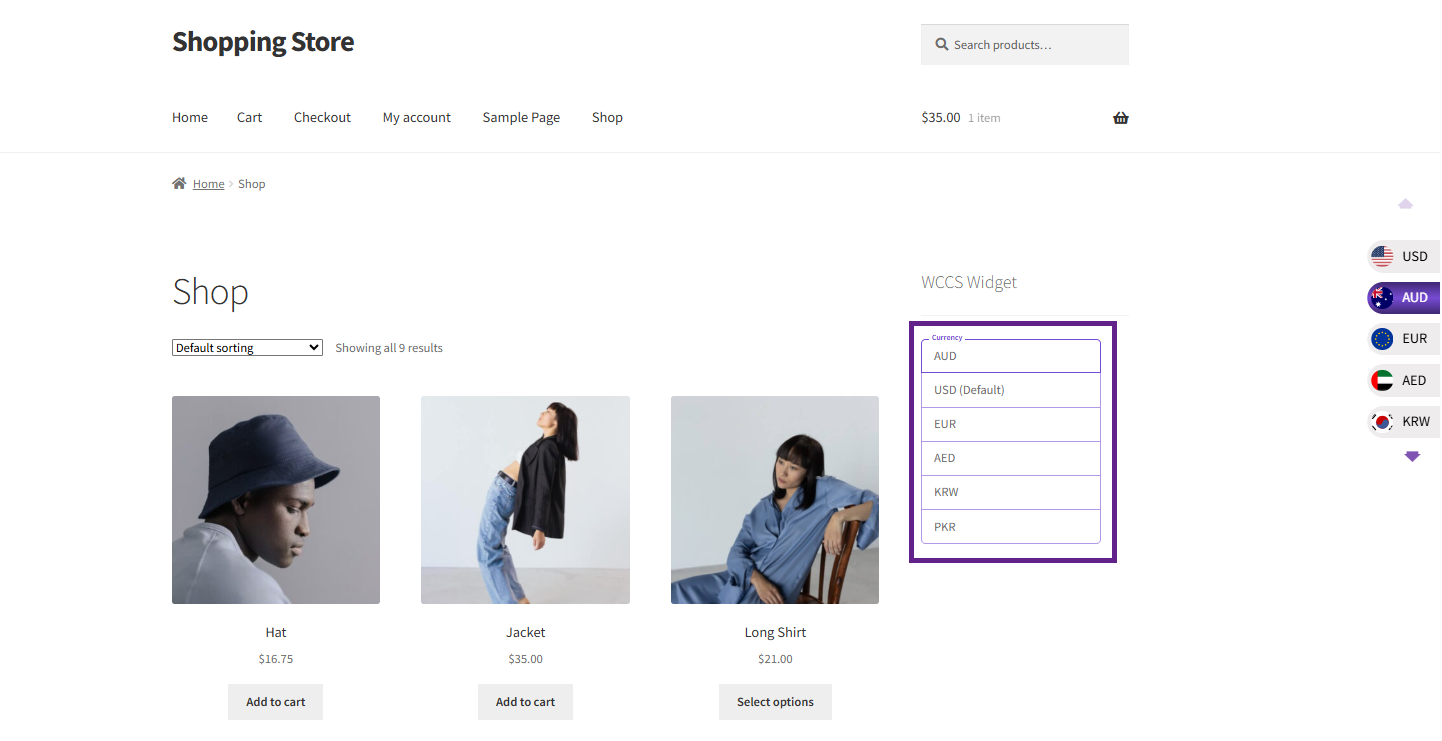
- Style 3
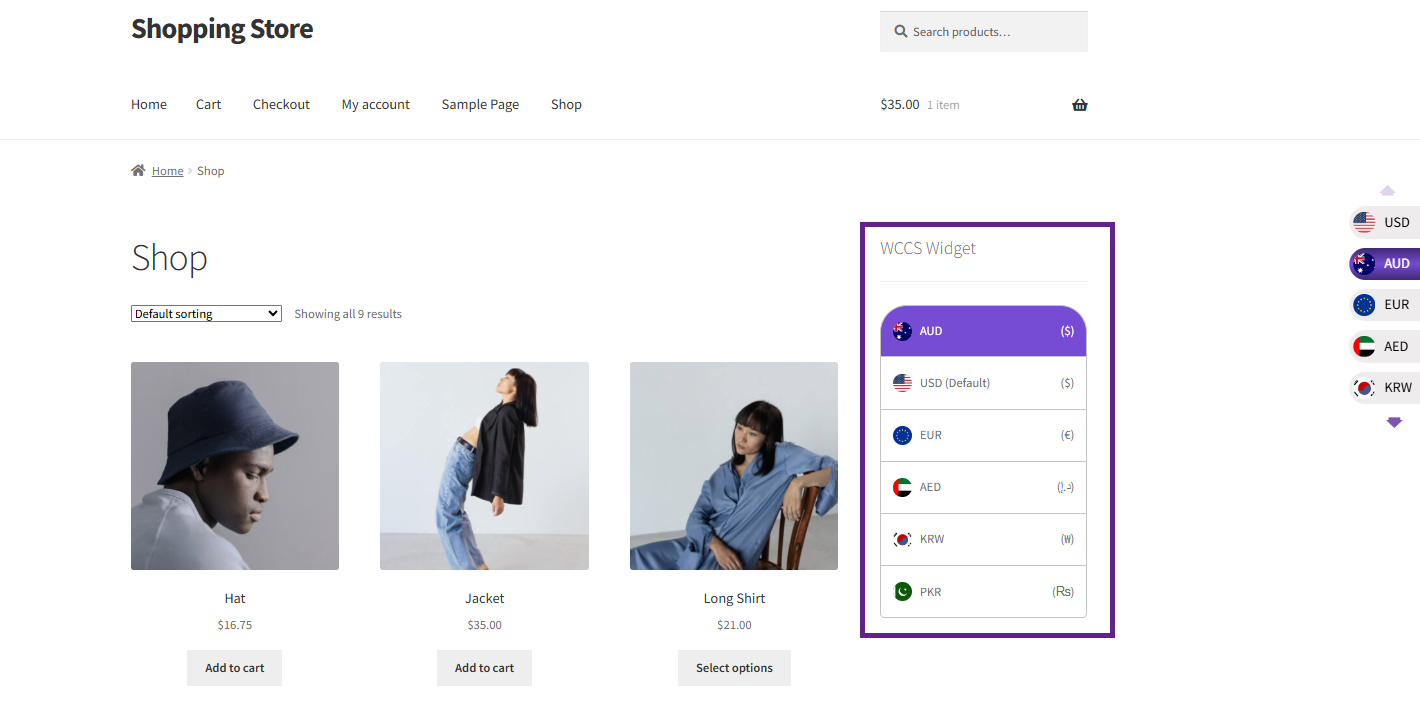
- Style 4
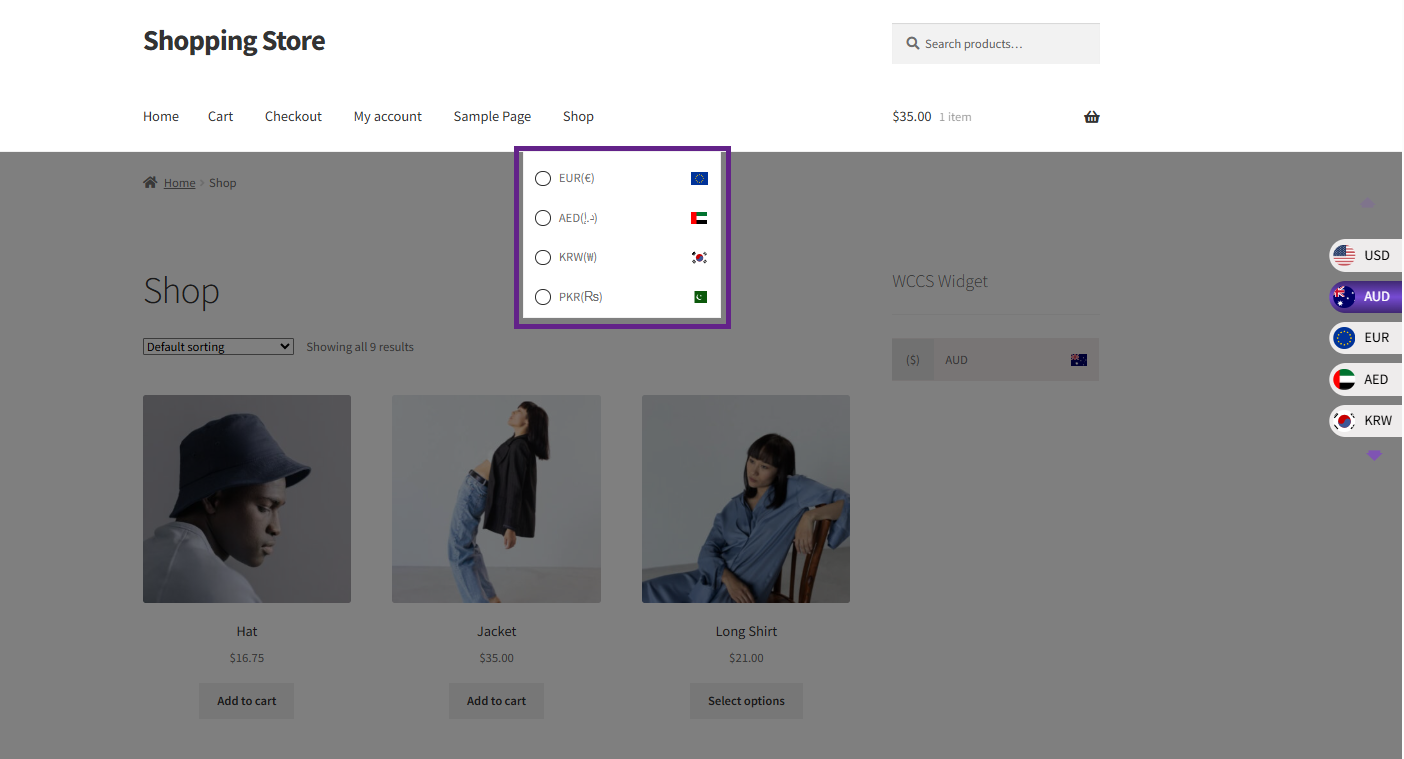
Navigation Menu Integration
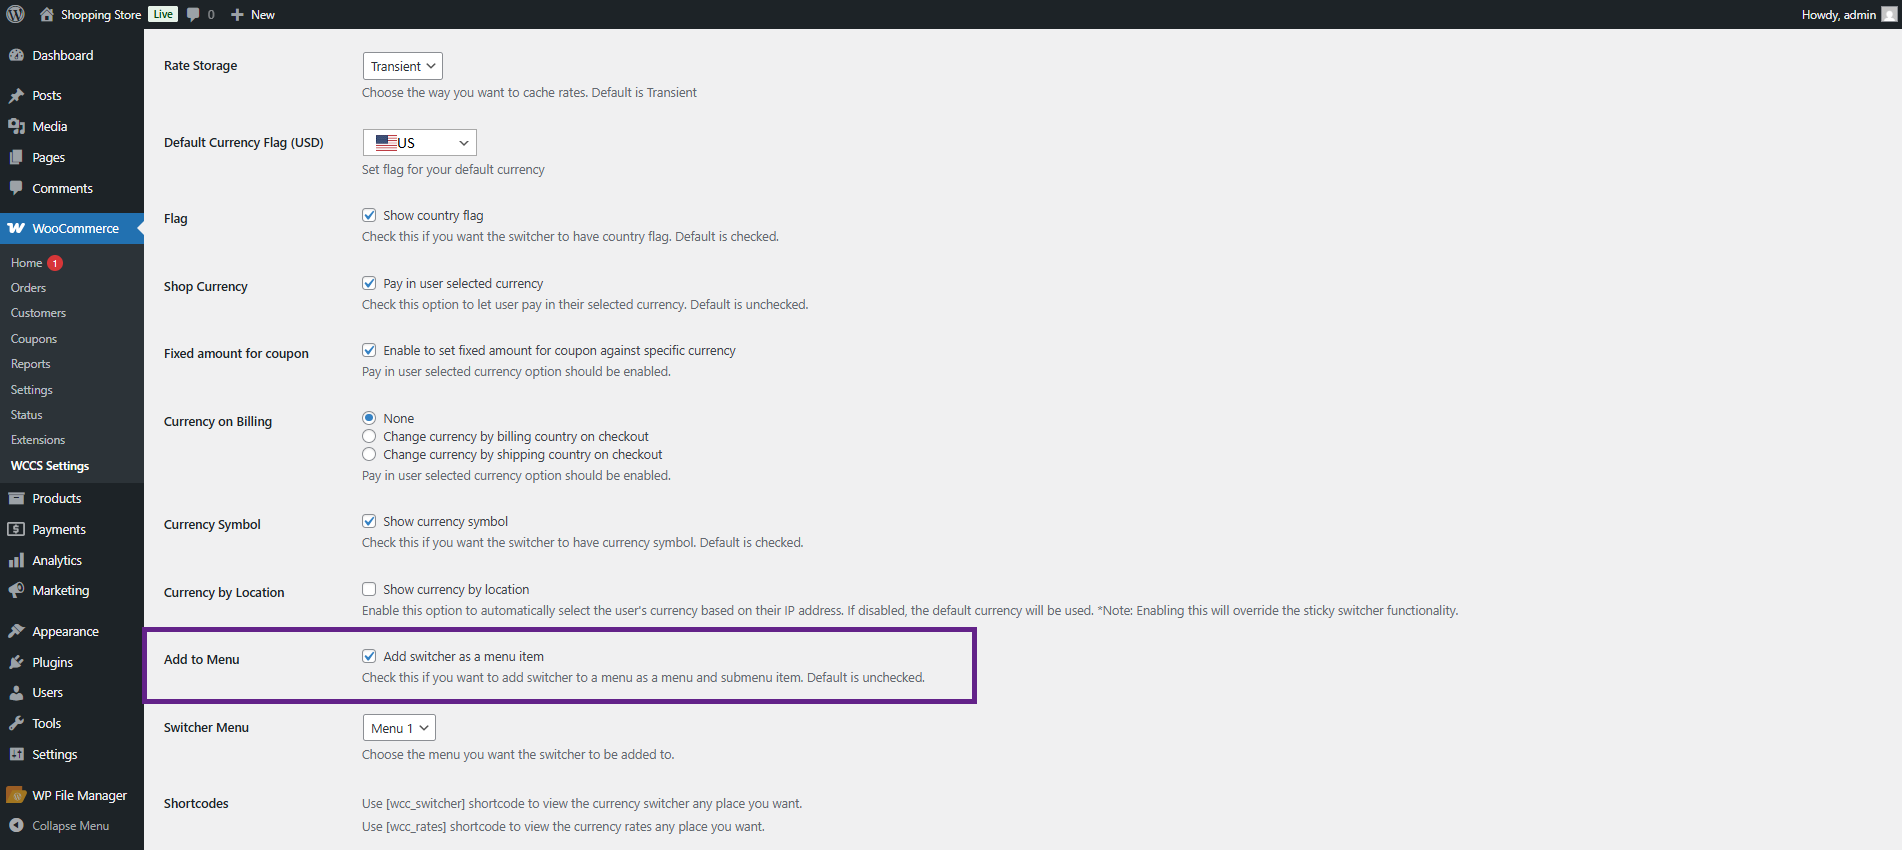
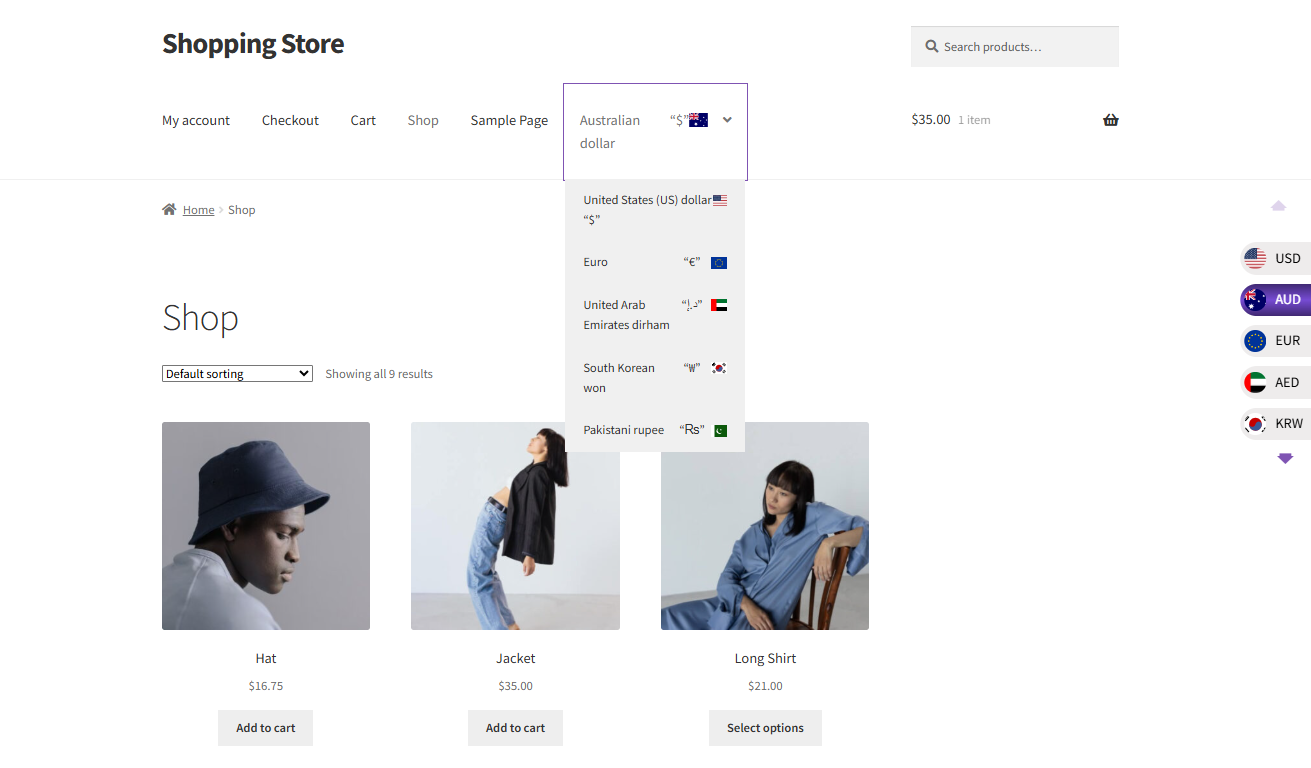
↑ Back to topShow the currency switcher as an item in your site’s main navigation menu.
- In WCCS Settings, check Add Menu to enable the menu item.
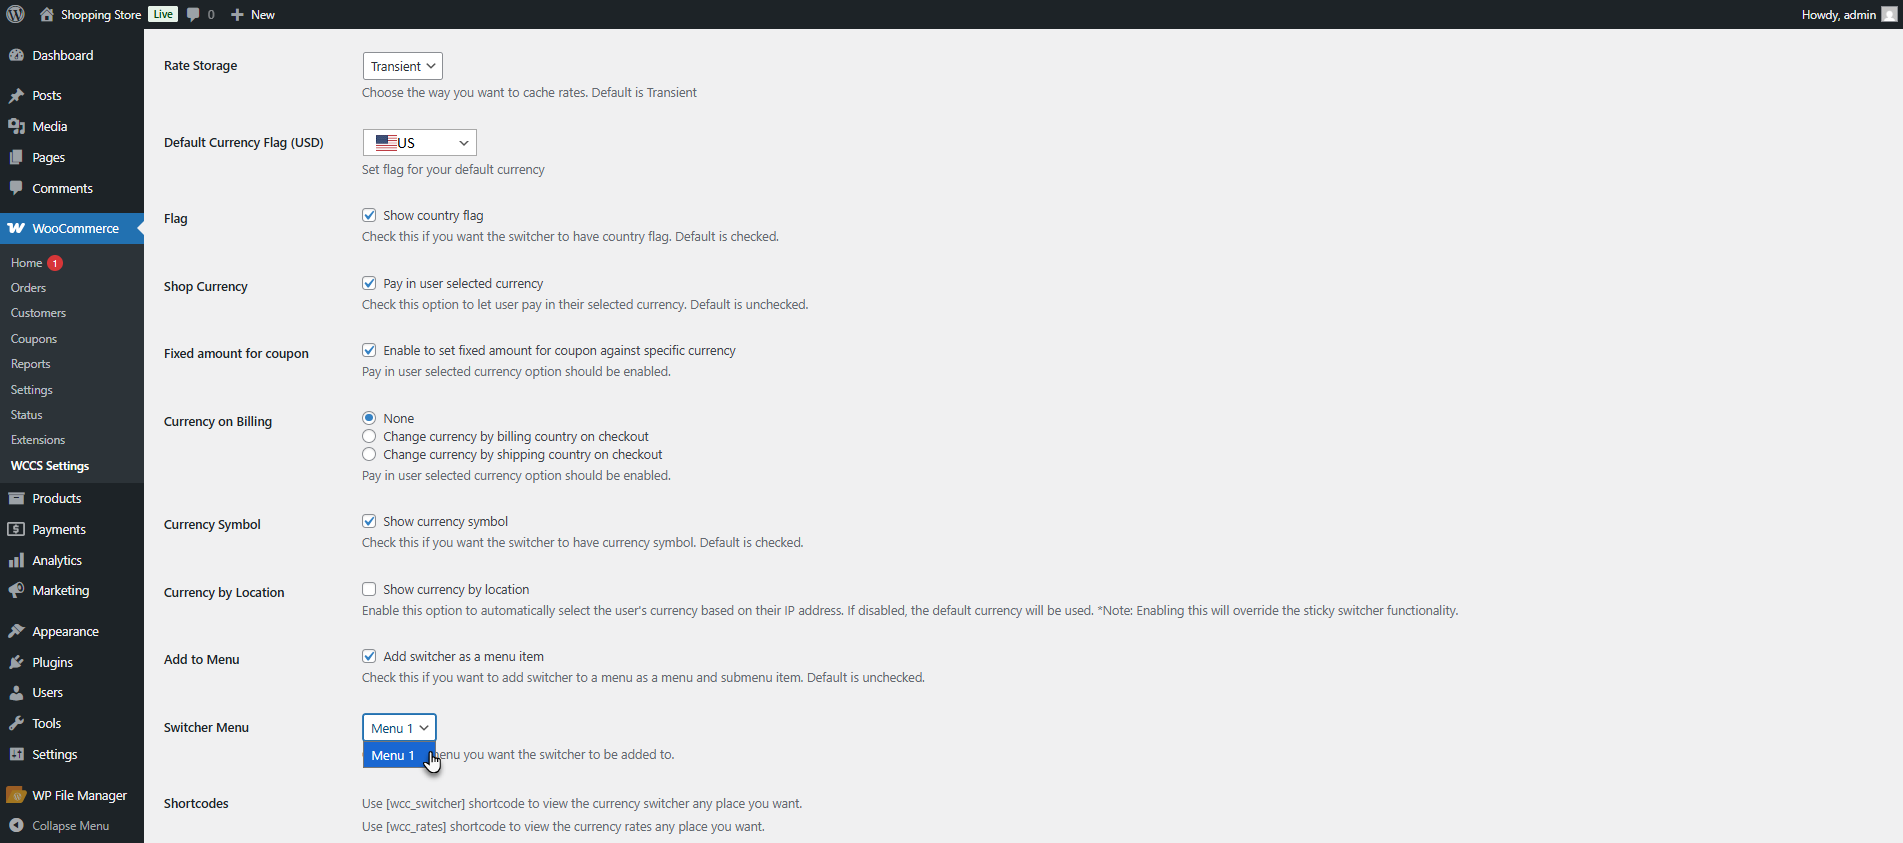
- Choose a Menu from the dropdown.
Front End Impact
- The Currency switcher will appear in the Menu
Sticky Switcher
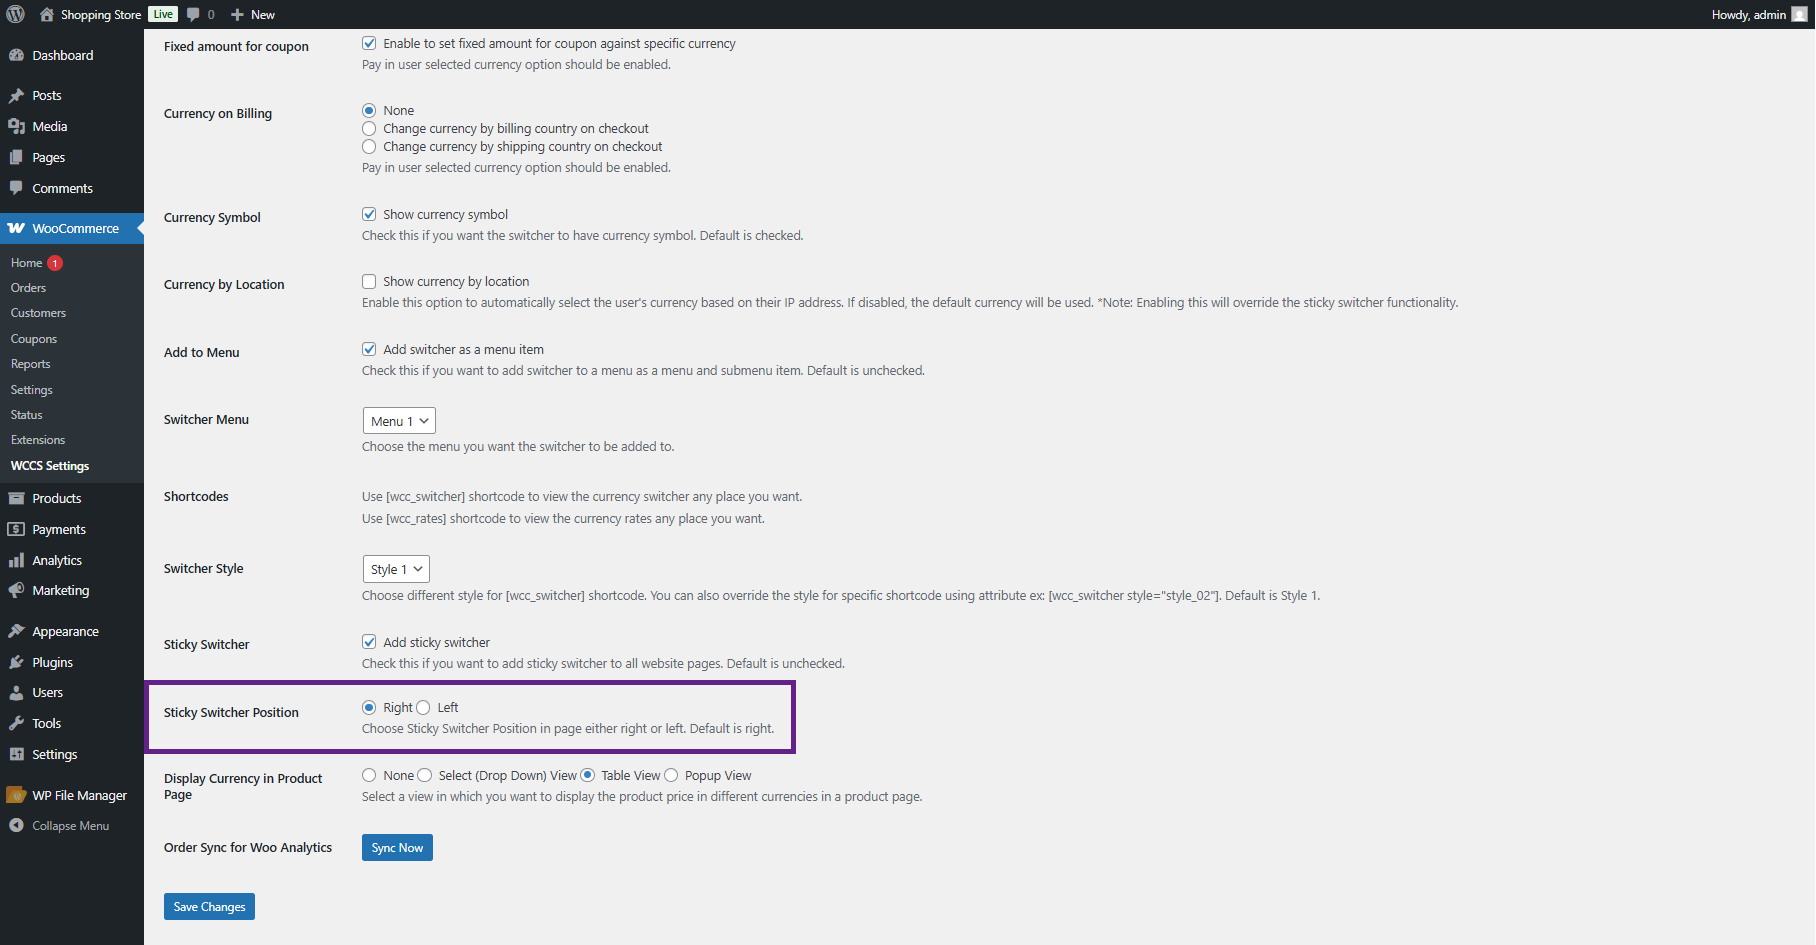
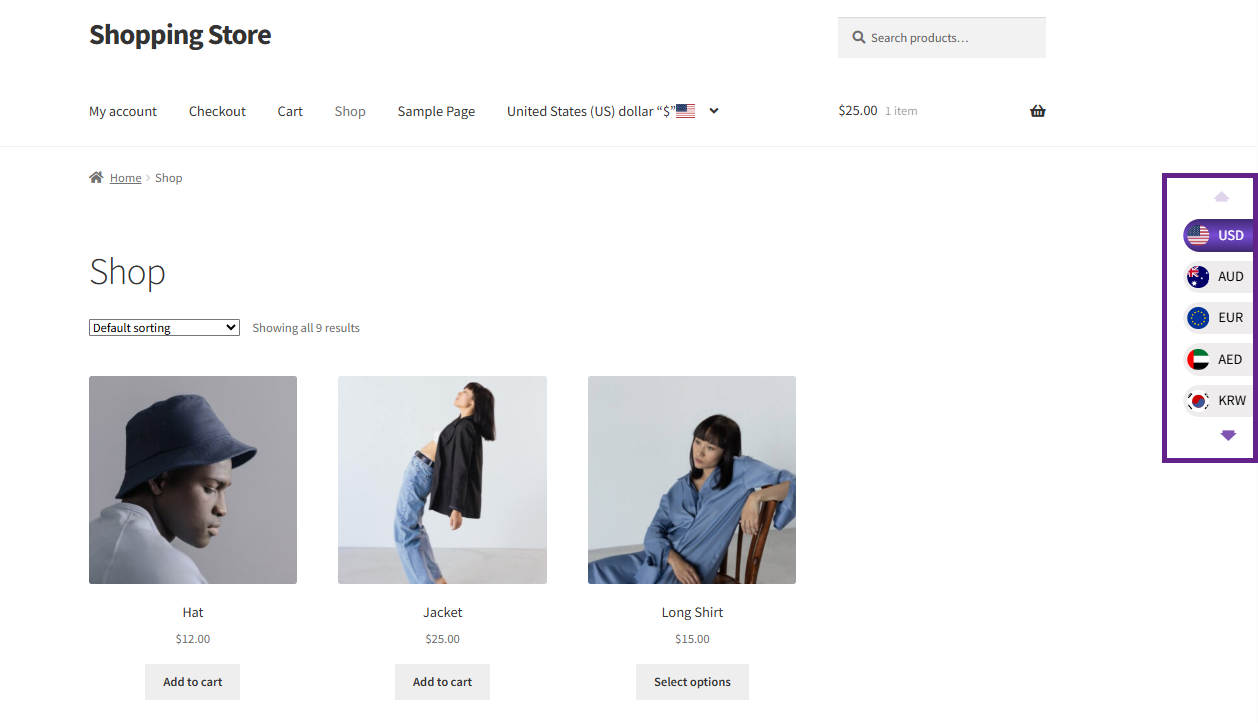
↑ Back to topA floating switcher button that stays visible as the customer scrolls, anchored to the left or right edge of the screen.
- In WCCS Settings, check Sticker Switcher to enable it.
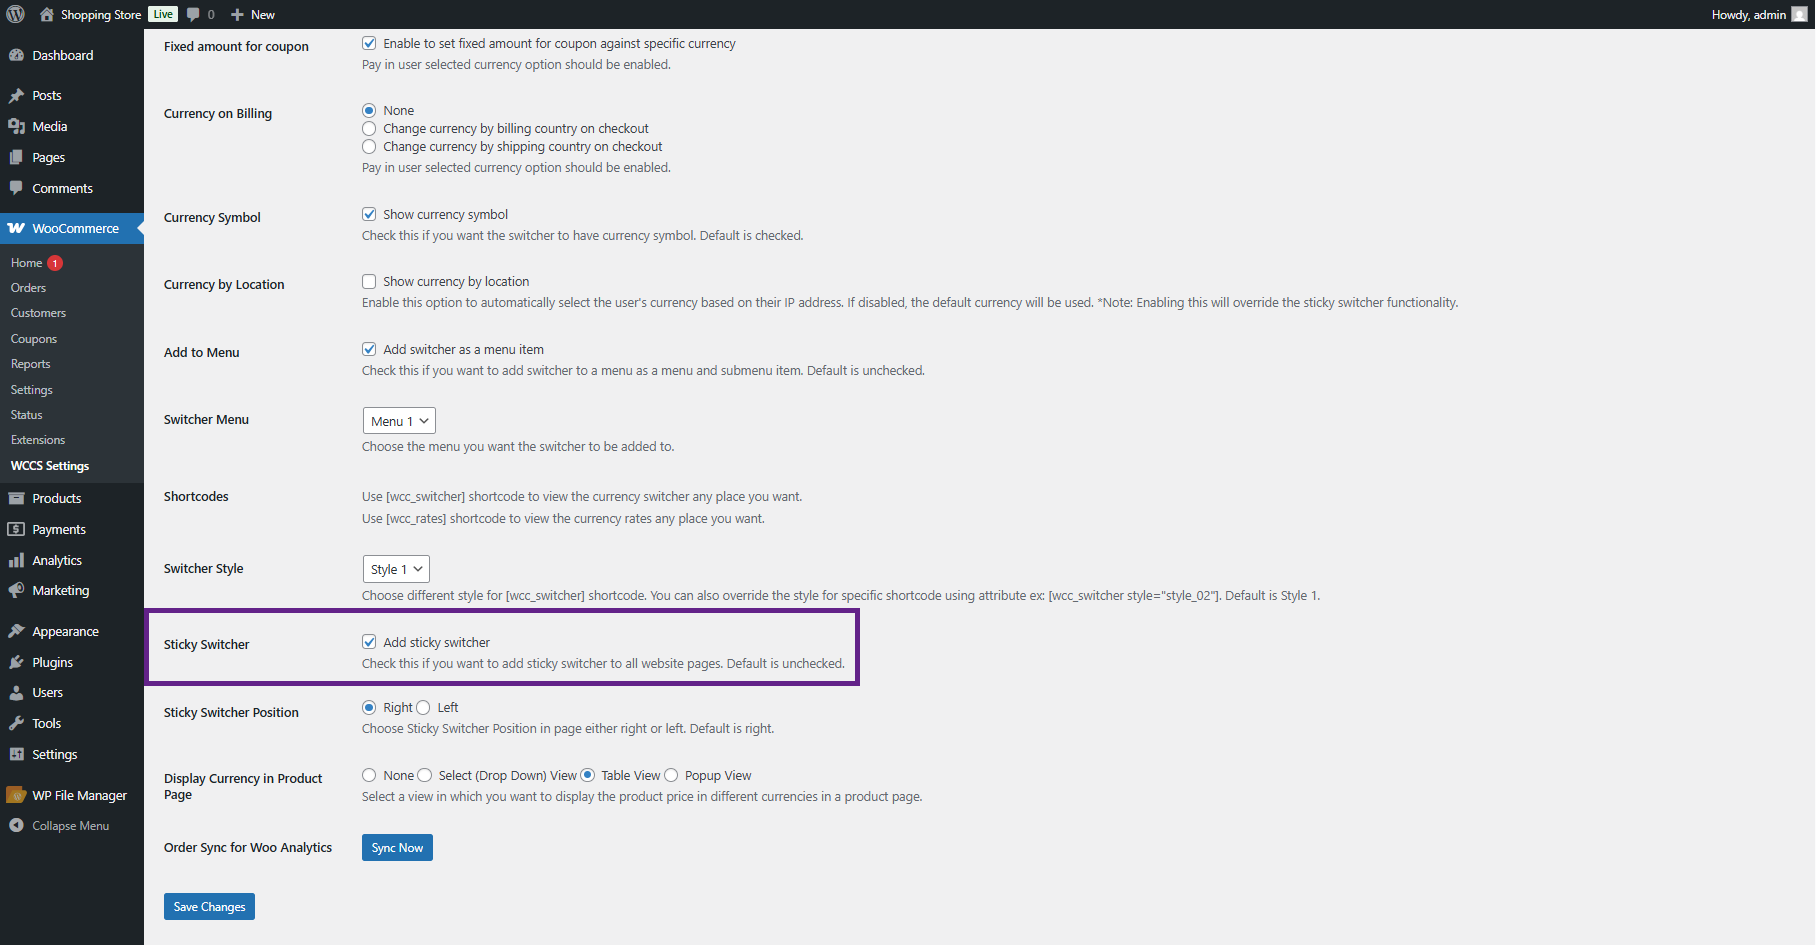
- Select alignment: Left or Right.
| NOTE | The sticky switcher is automatically hidden on the Thank You / Order Received page to avoid confusion after checkout completion. |
|---|
Front End Impact
Switcher on the Product Page
↑ Back to topDisplay a currency selector directly on individual product pages, allowing customers to preview prices in other currencies without changing the global store currency.
- Go to WooCommerce > WCCS Settings. Locate Display Currency in the Product Page.
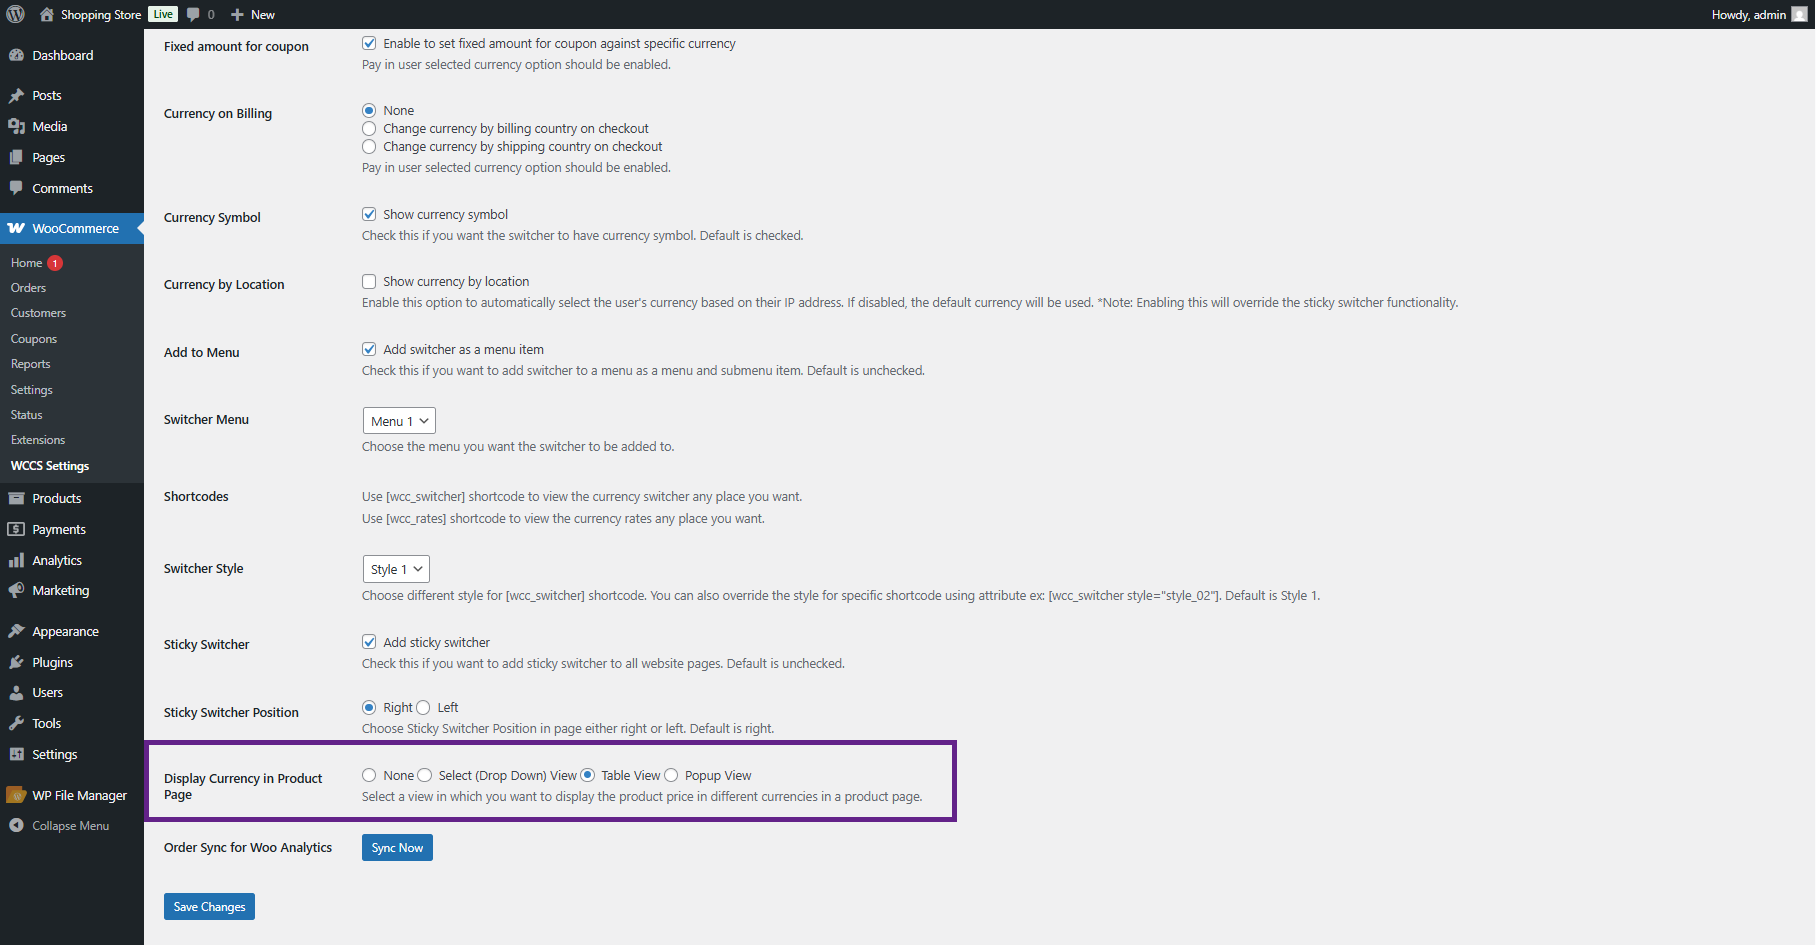
- Choose a view:
- None: do not show on product pages.
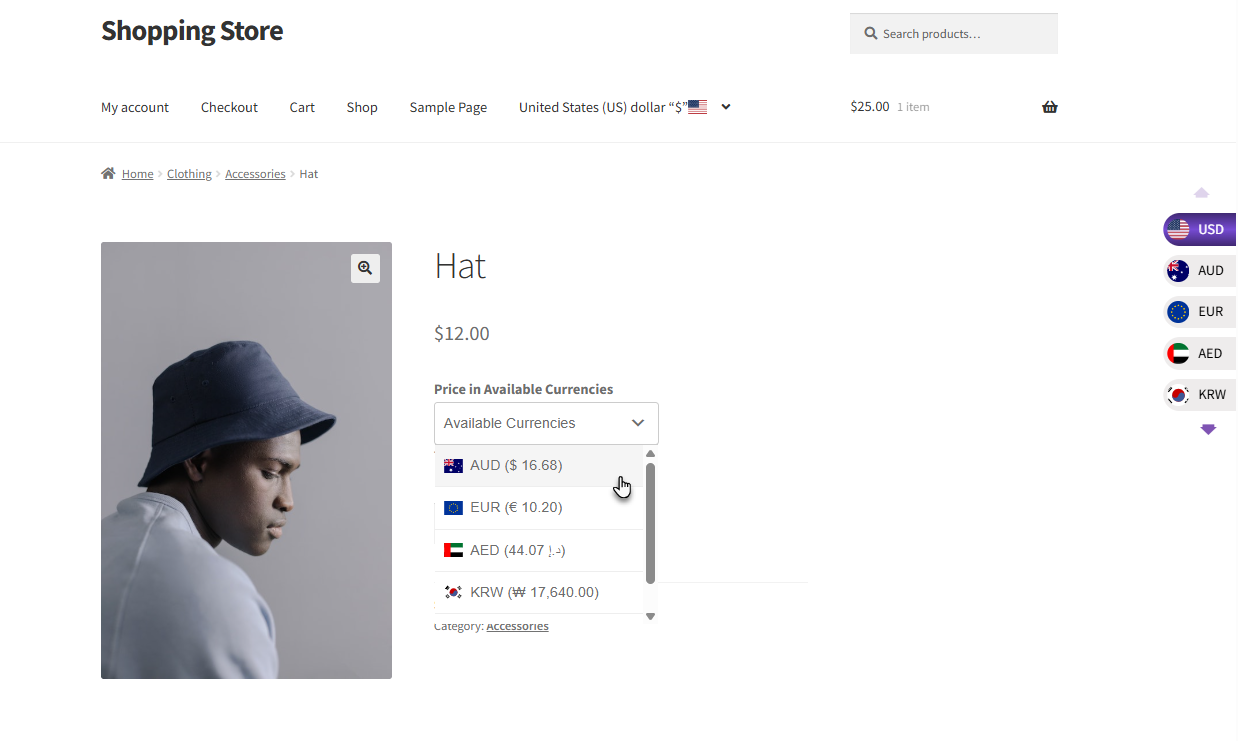
- Select Box (Drop-down): A dropdown of currencies appears above or below the Add to Cart button.
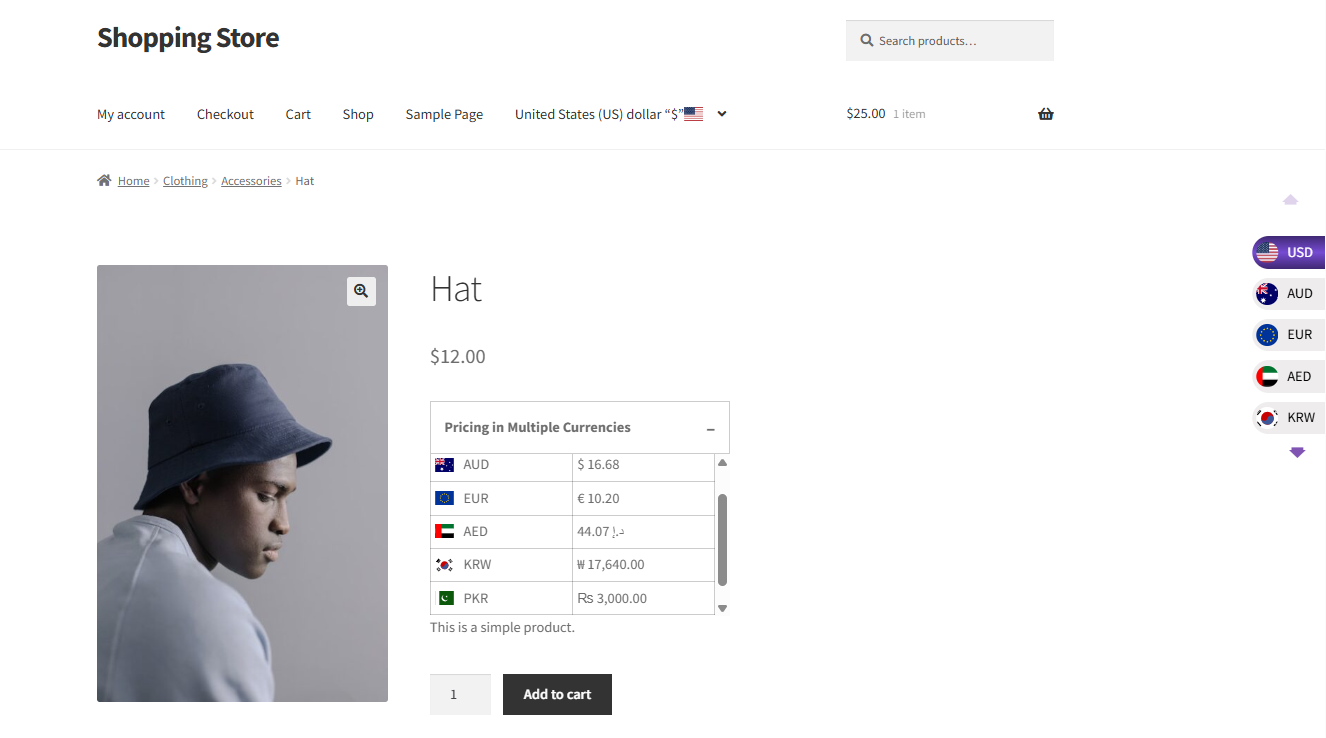
- Table View: a collapsible table showing all active currencies and their converted prices.
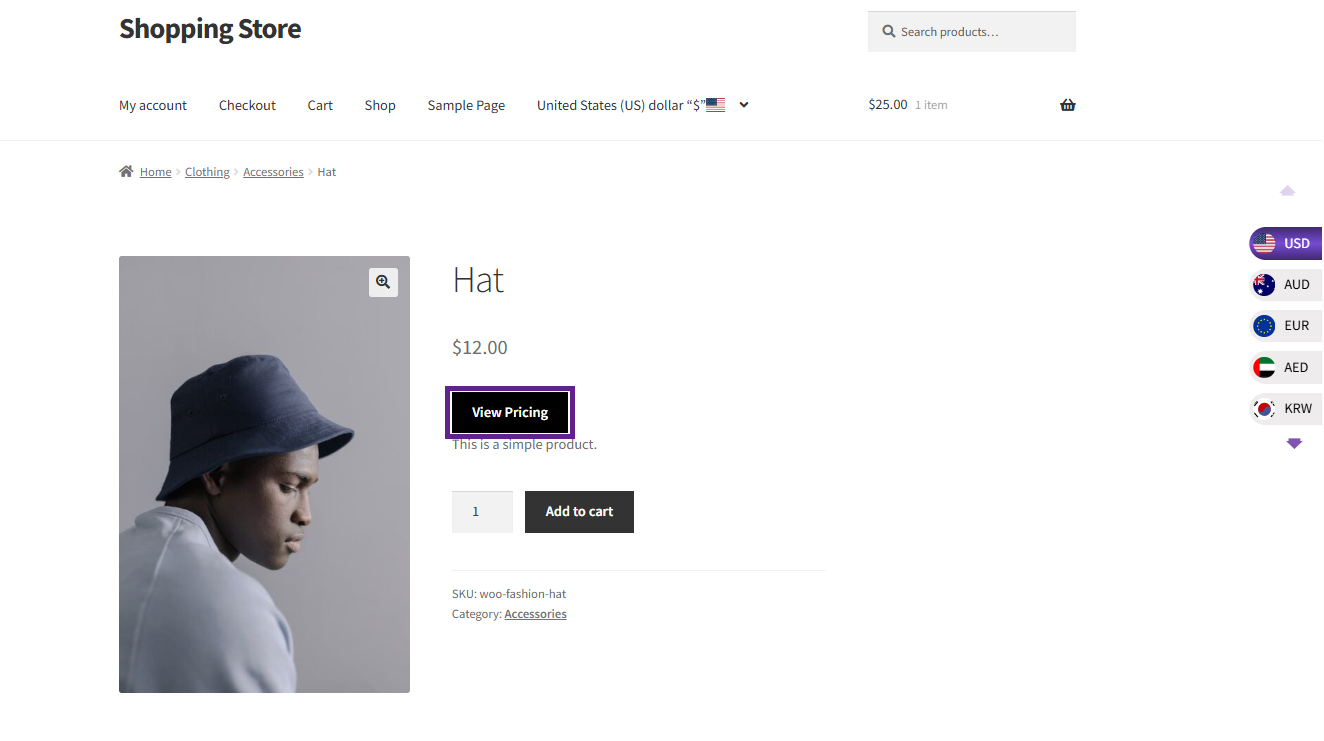
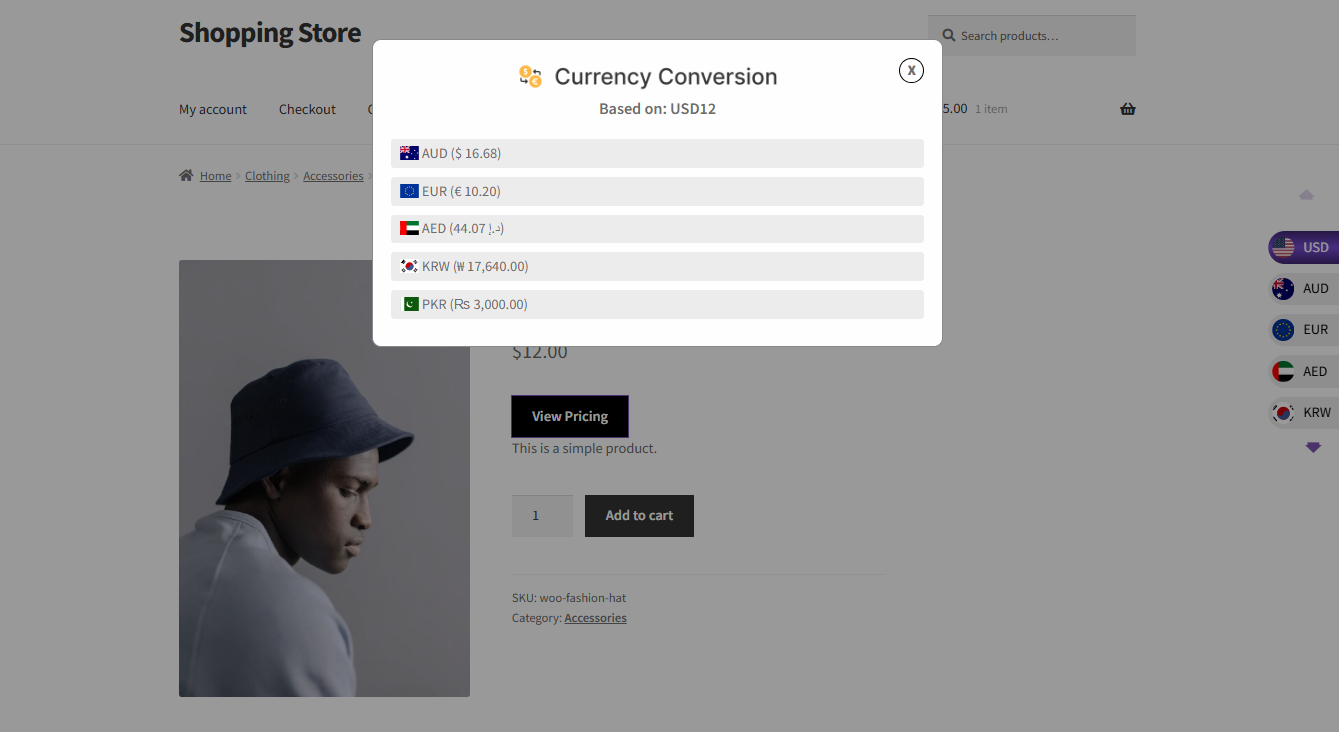
- Popup View: a button that opens a pop-up with all currency prices.
- For Popup View, configure the Popup Button Text, Text Color, and Background Color.
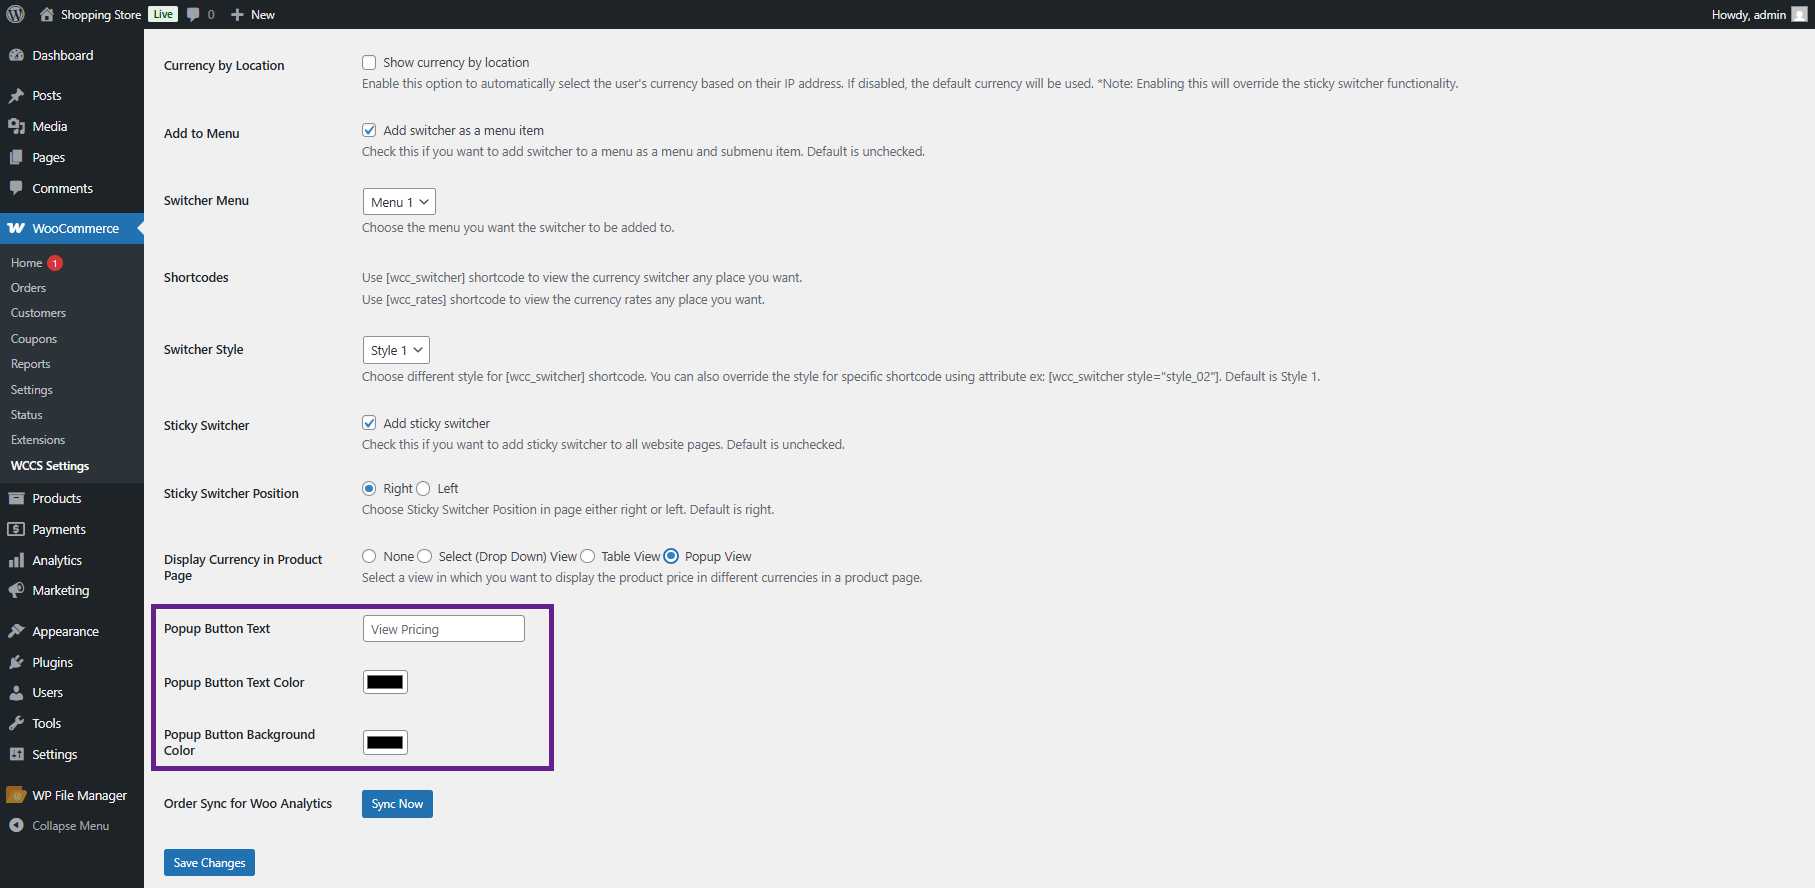
- Click Save Changes.
Front End Impact
- Select (Dropdown)
- Table View
- Popup View
- A button will appear on the Product Page, when Clicked a pop up will appear.
- The currencies will be listed on the popup.
Currency Display Options
↑ Back to topRate Storage
↑ Back to topControls how the plugin remembers the customer’s currency selection between page loads.
| Storage Type | Behavior |
|---|---|
| Transient | Stores the currency in the WordPress transient cache. Persists for 24 hours. Default and recommended for most stores. |
| Session | Stores the currency in the PHP session. Duration matches the browser session. Clears when the browser is closed. |
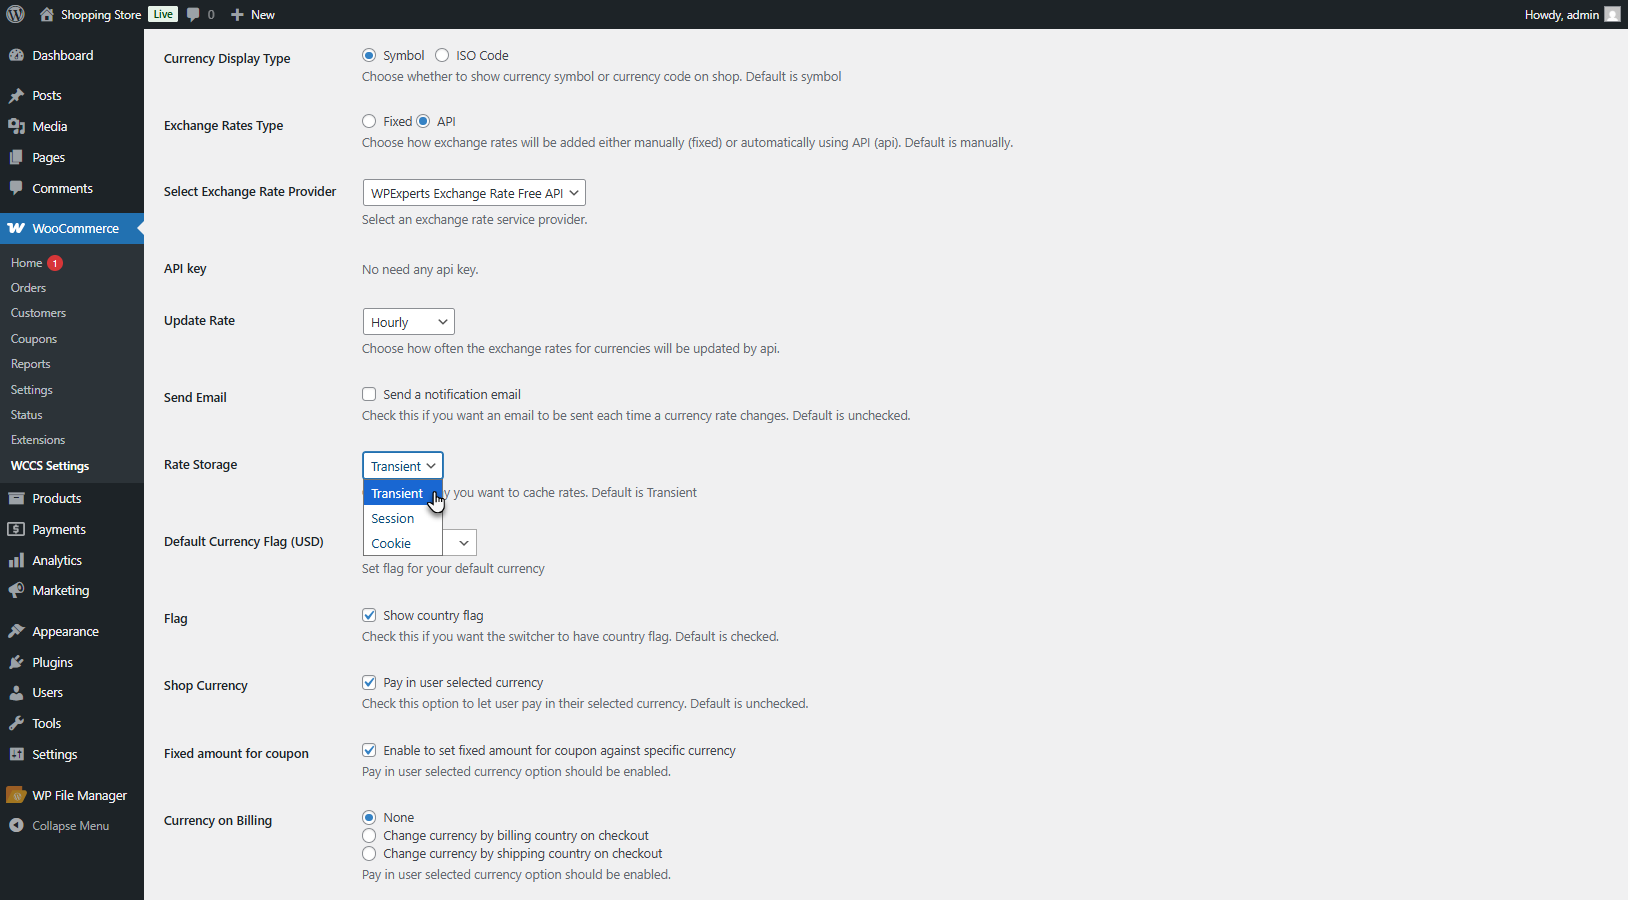
| TIP | Use Transient storage for most stores. Use Session storage if you have compliance reasons not to persist currency preference across sessions (uncommon). |
|---|
Default Currency Flag
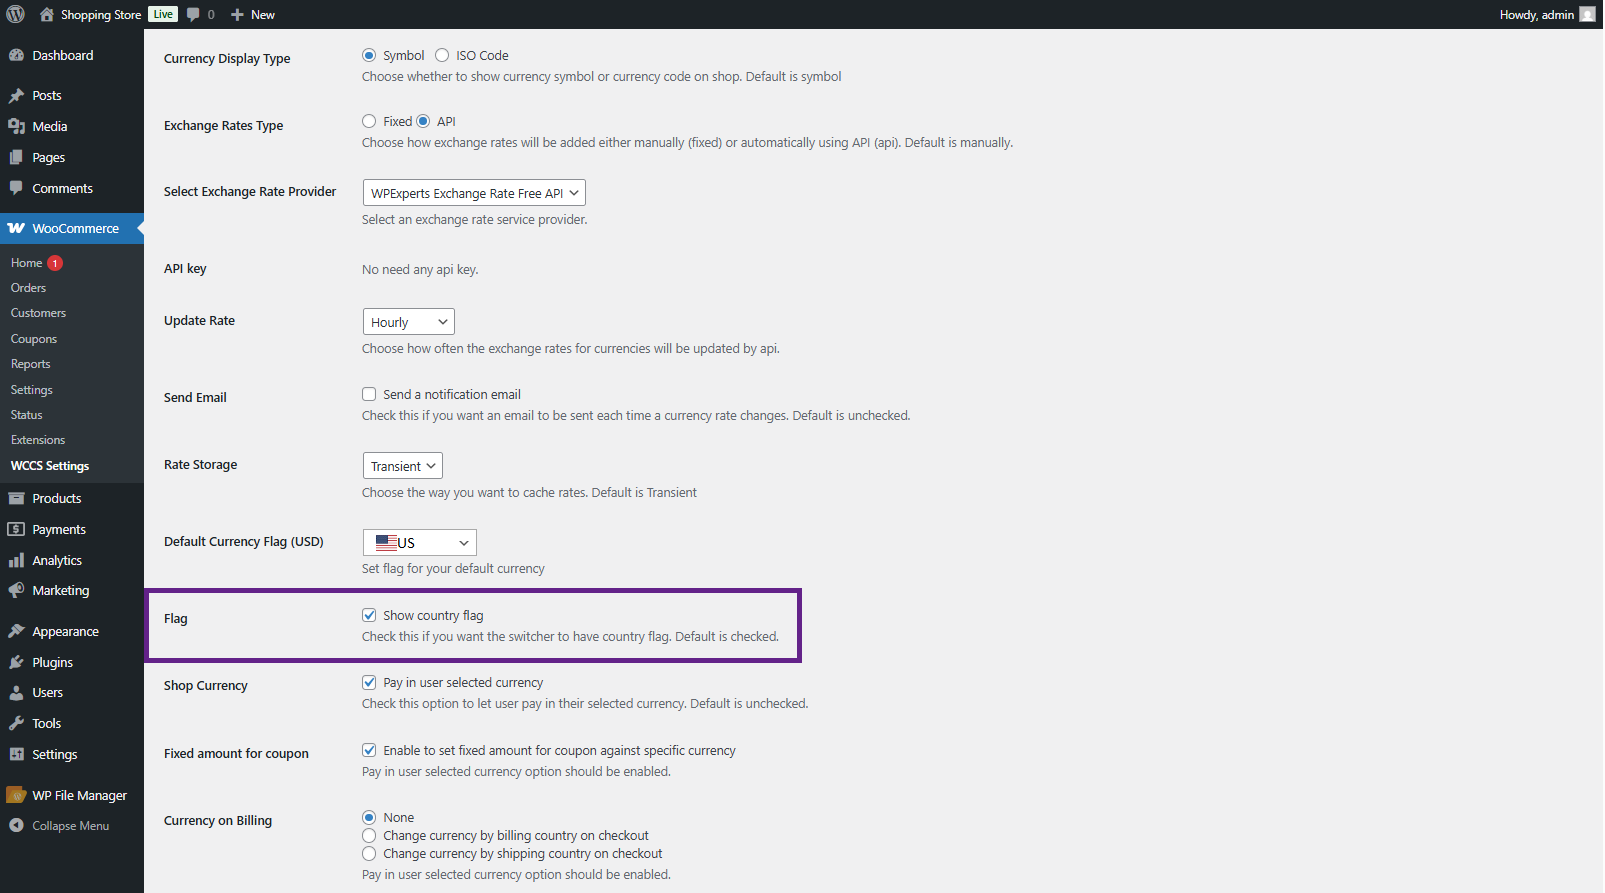
↑ Back to top- You can display a country flag next to the base/default currency in the switcher. Navigate to WCCS Settings and select the flag from the Set Default Currency Flag dropdown. Enable the Flag Section checkbox to show flags for all currencies in the switcher.
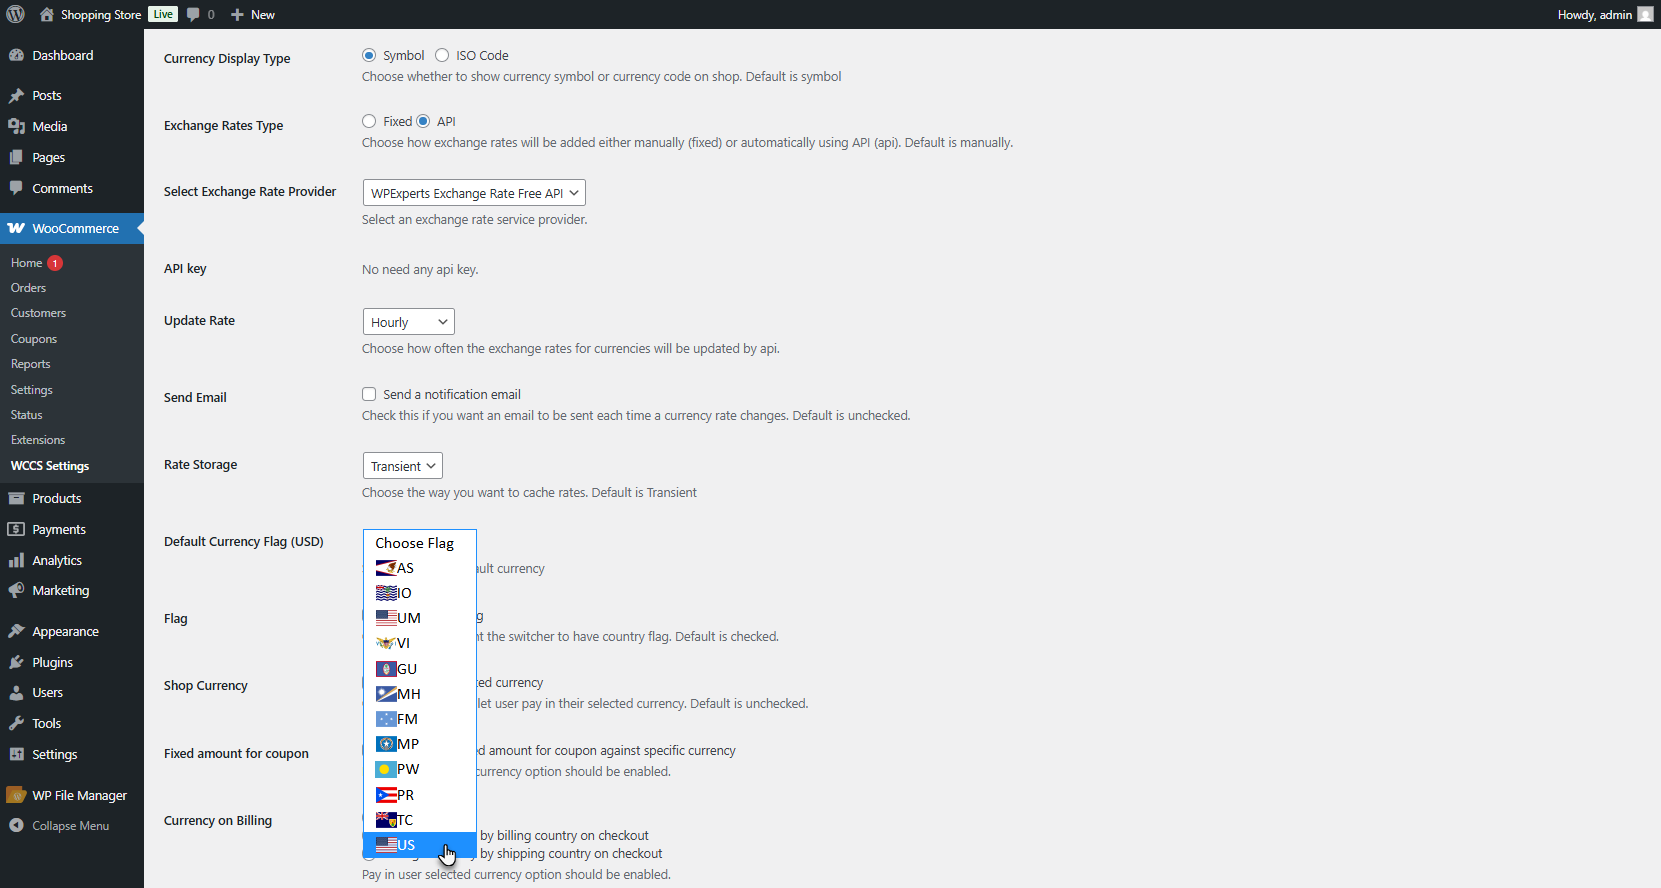
- Enable the Flag Section checkbox to show flags for all currencies in the switcher.
Shortcode
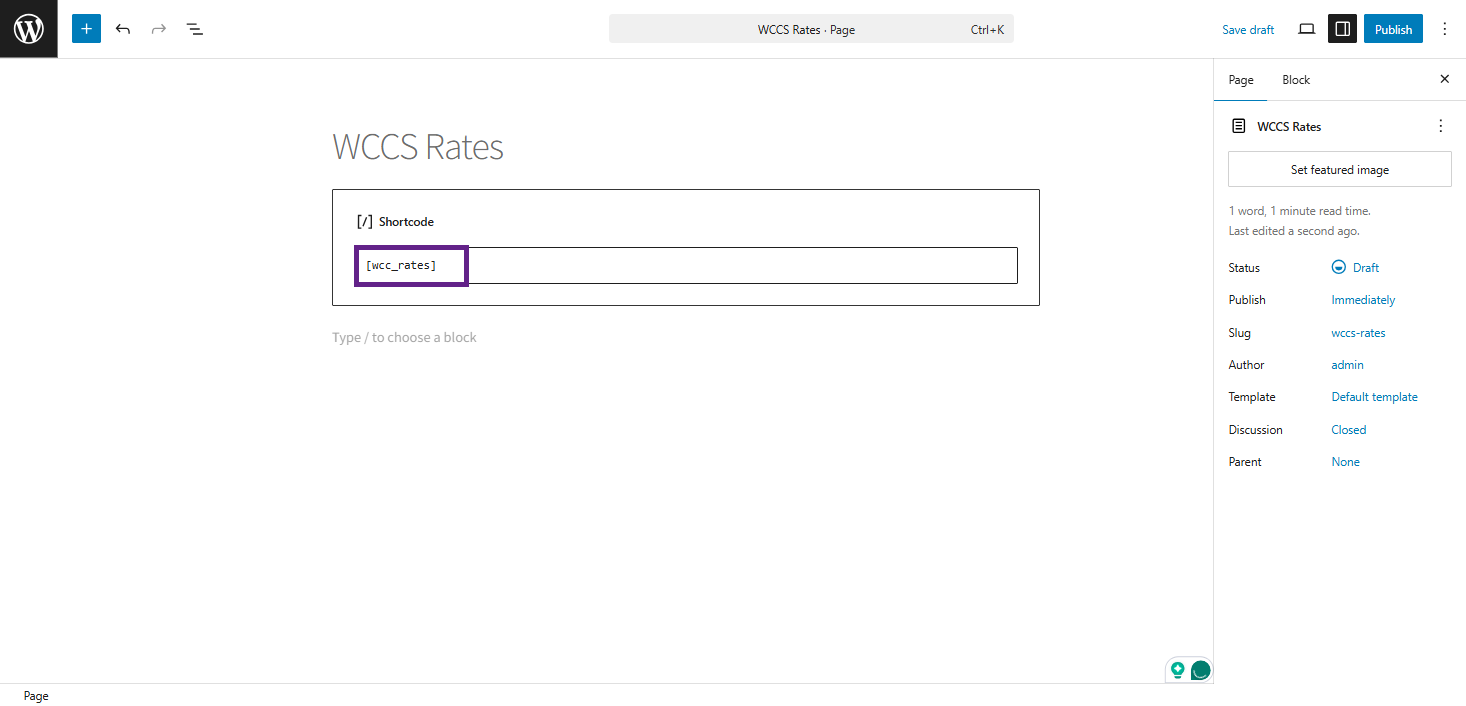
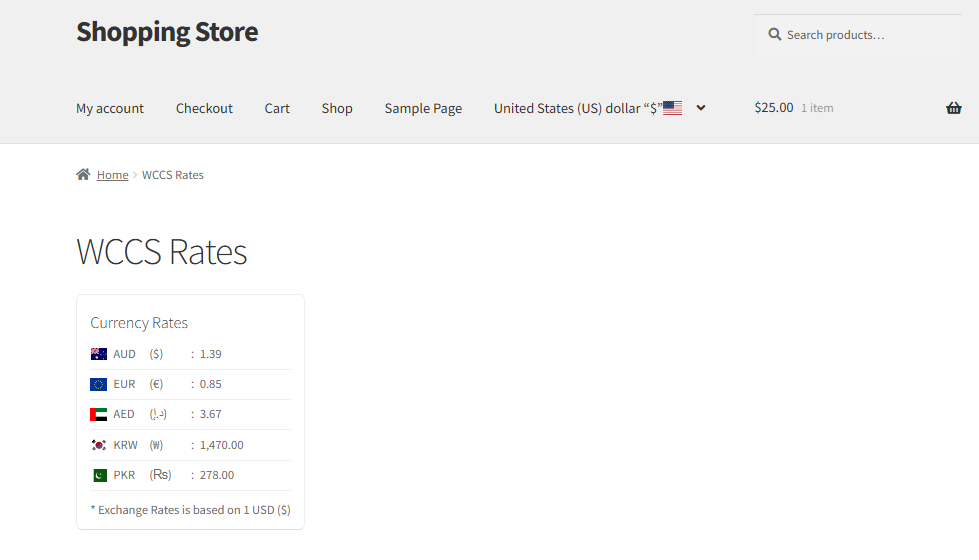
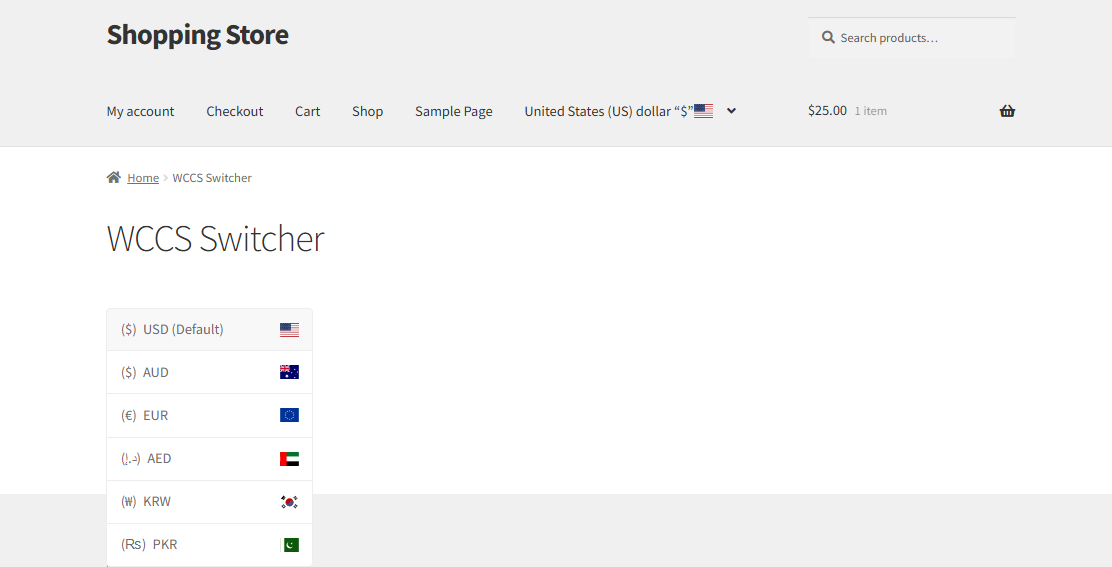
↑ Back to top- To show a live exchange rate board on any page (e.g., a dedicated currency rates page), use the rate shortcode: [wcc_rates] This renders a formatted table of all configured currencies and their current exchange rates relative to the base currency.
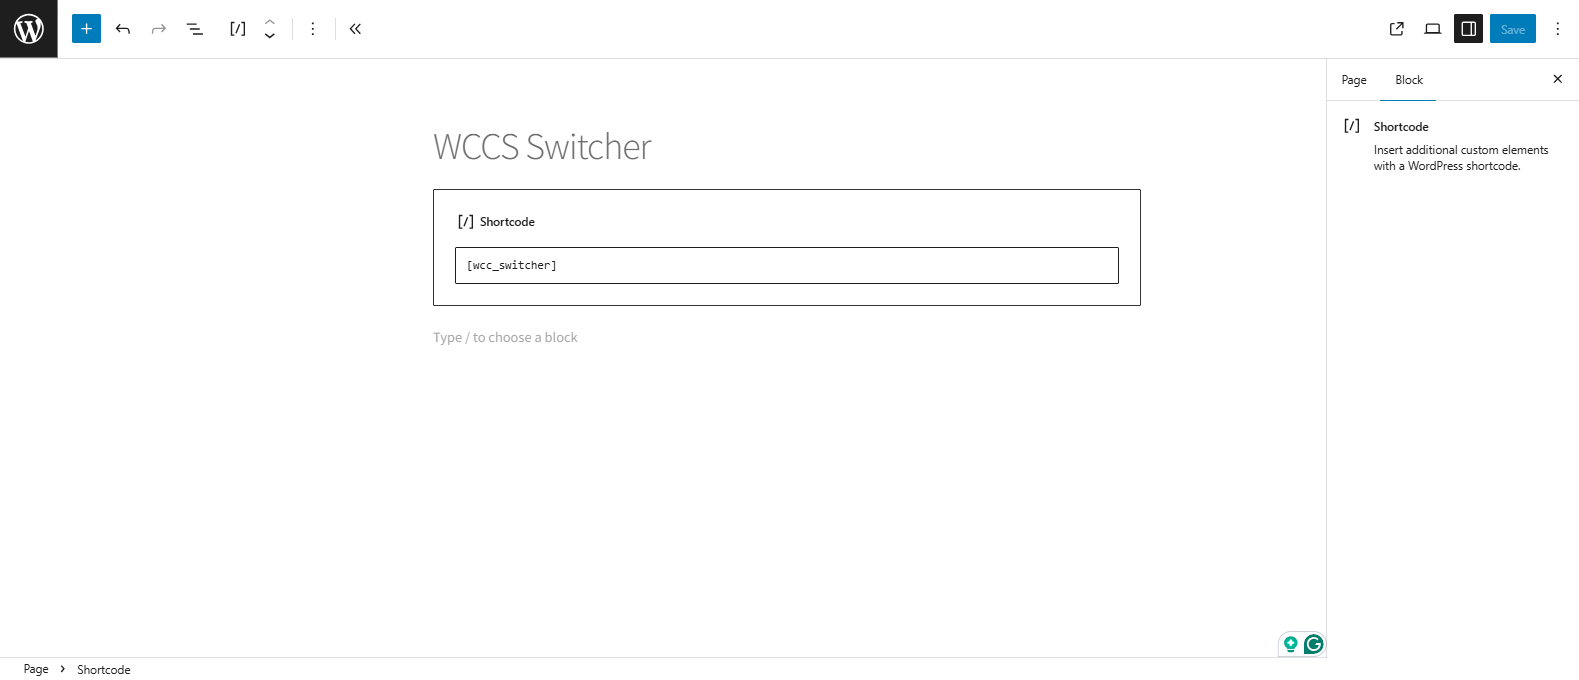
- Use this shortcode to view the currency switcher any place you want. [wcc_switcher]
Front End Impact
- WCC Rates
- WCC Switcher
Payment Gateway Restrictions per Currency
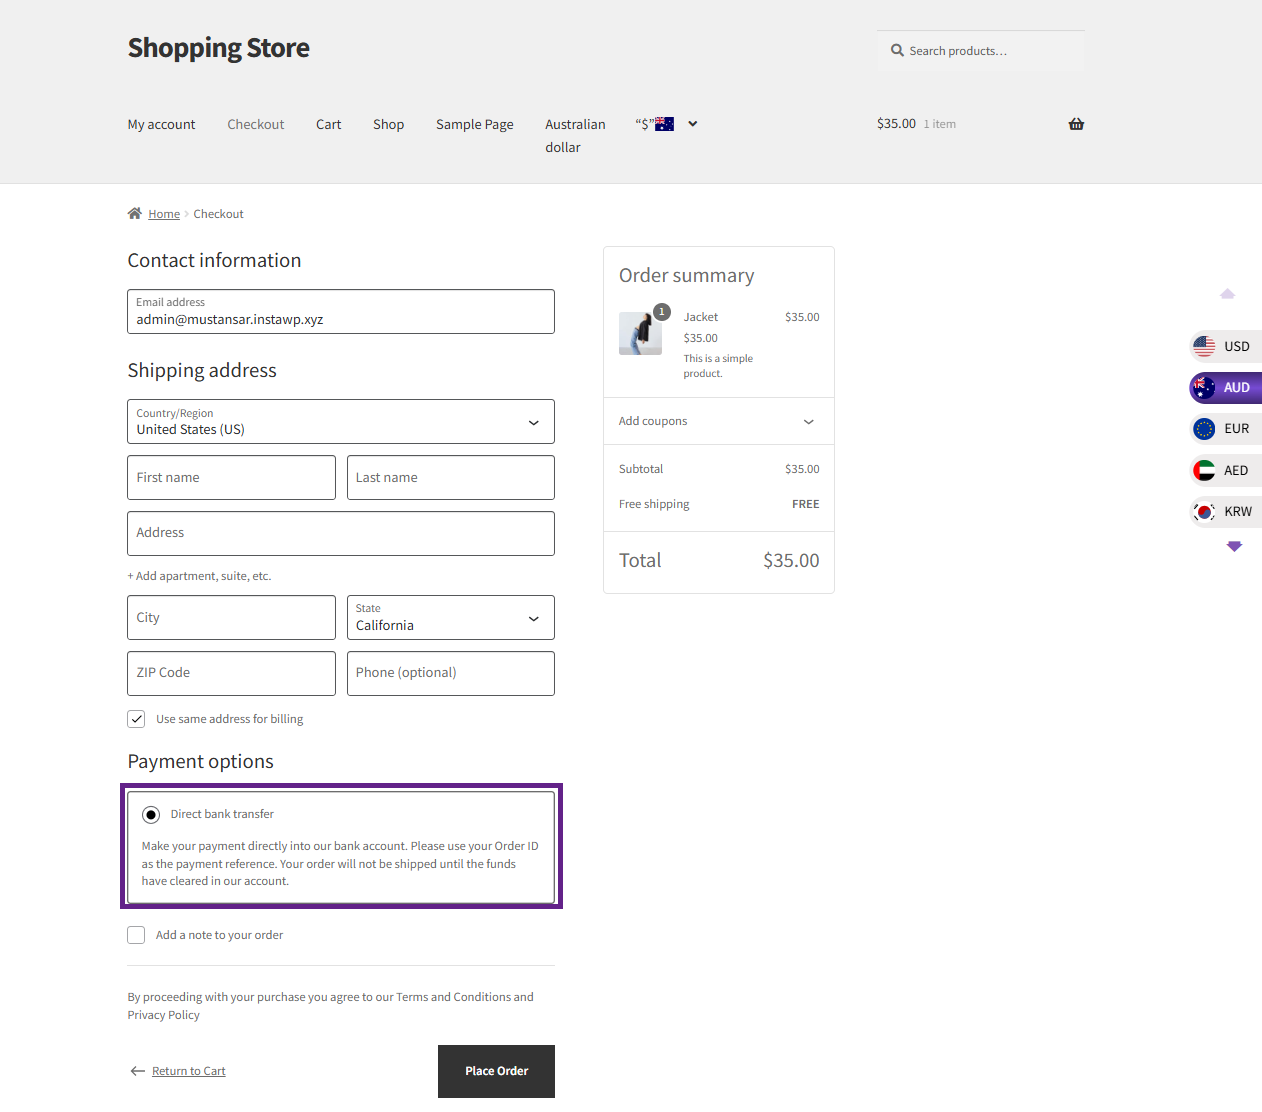
↑ Back to topControl which payment gateways are available when a specific currency is active. This lets you hide unsupported gateways to prevent checkout failures. For example, you might show Stripe for USD and EUR, but hide it for currencies it does not natively support.
- In the Currencies table within WCCS Settings, locate the Payment Gateway column for the currency you want to configure.
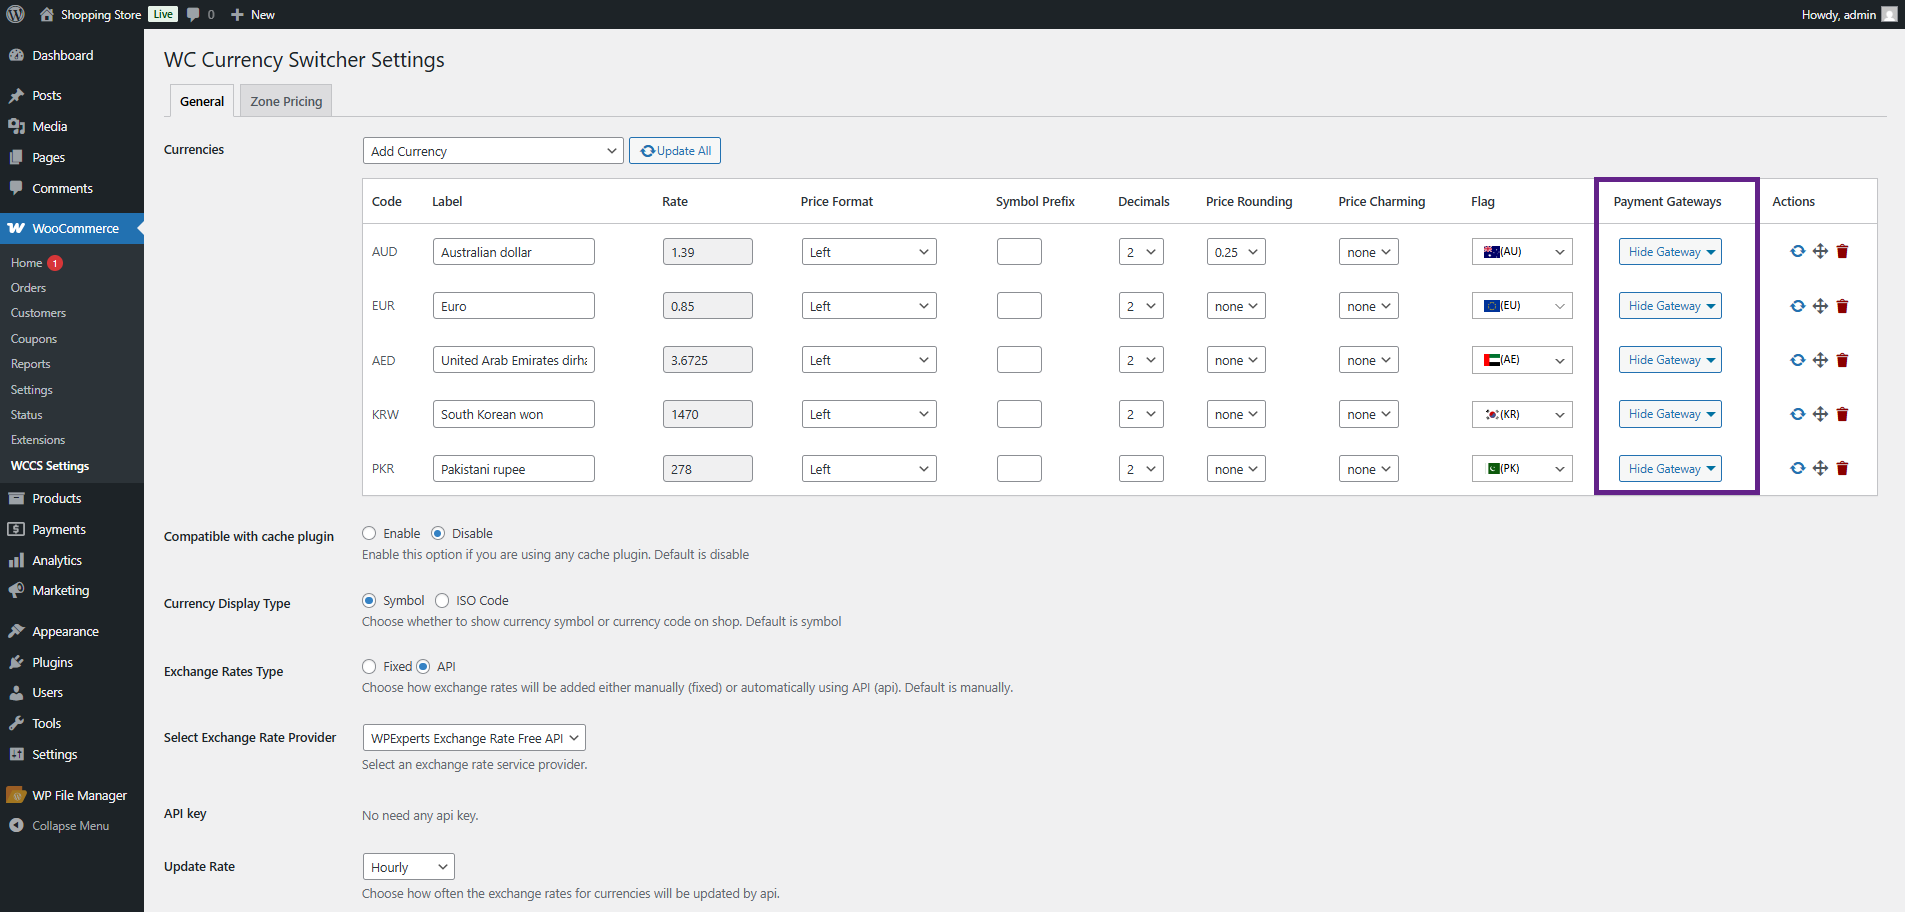
- A dropdown lists all your currently enabled payment gateways. Check the gateways you want to HIDE when this currency is active.
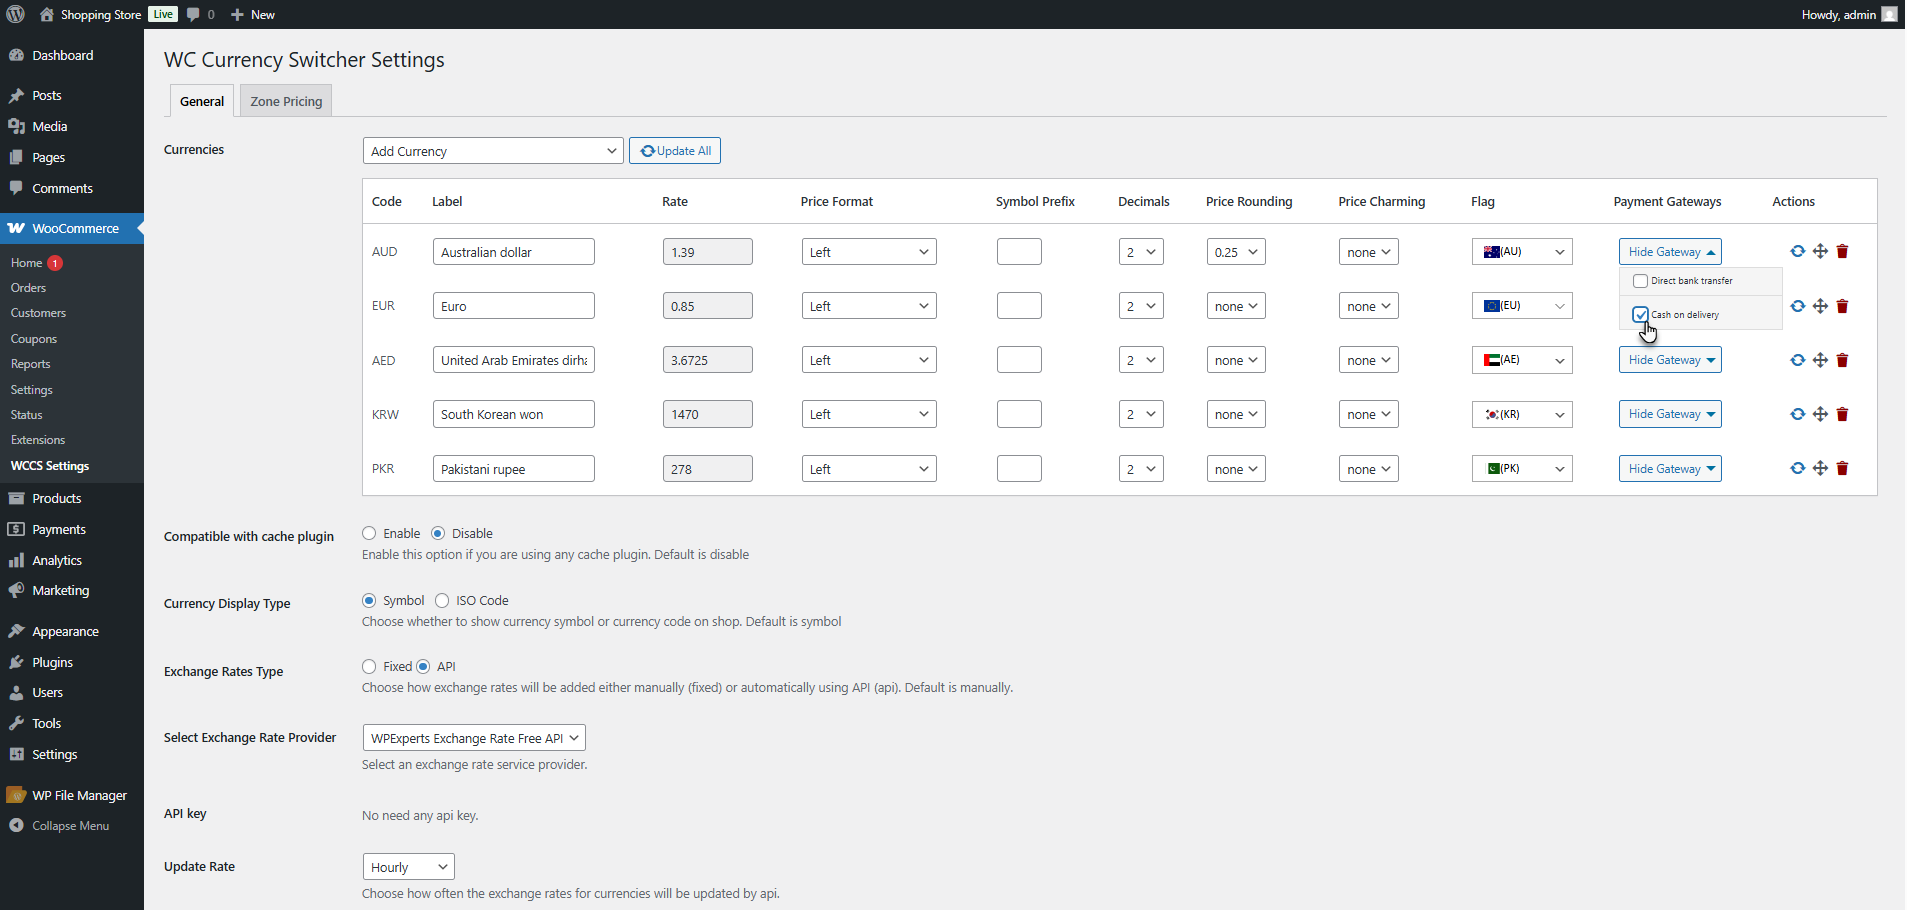
- Save Changes.
At checkout, hidden gateways will not appear in the payment method list when that currency is selected.
| TIP | Test each currency + gateway combination in a staging environment before going live. Some gateways silently reject unsupported currencies at the transaction level even if they appear at checkout. |
|---|
Front End Impact
- Before
- When the default currency is selected, the payment gateways are displayed.
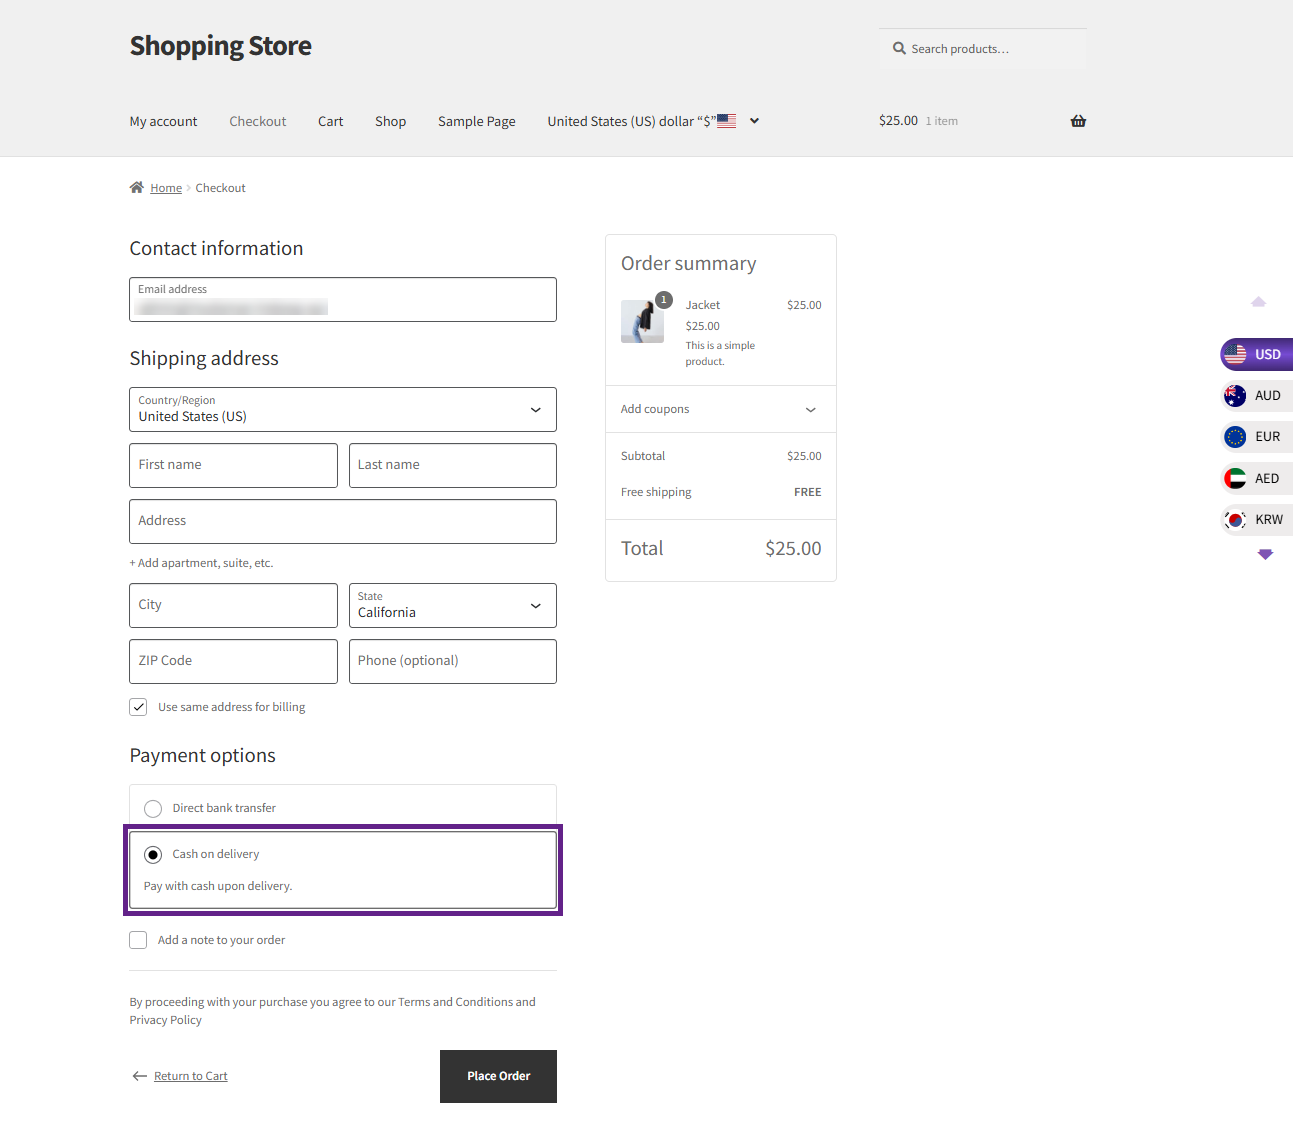
- After
- When the currency is switched, the payment gateways are hidden.
Order Sync for WooCommerce Analytics
↑ Back to topBy default, WooCommerce Analytics reports revenue in the base currency. When customers pay in secondary currencies, their order totals are converted back to the base currency before being synced with Analytics.
How to Sync Orders
↑ Back to top- Navigate to WooCommerce > WCCS Settings > General.
- Scroll to the Order Sync for Woo Analytics section. Click Sync Now.
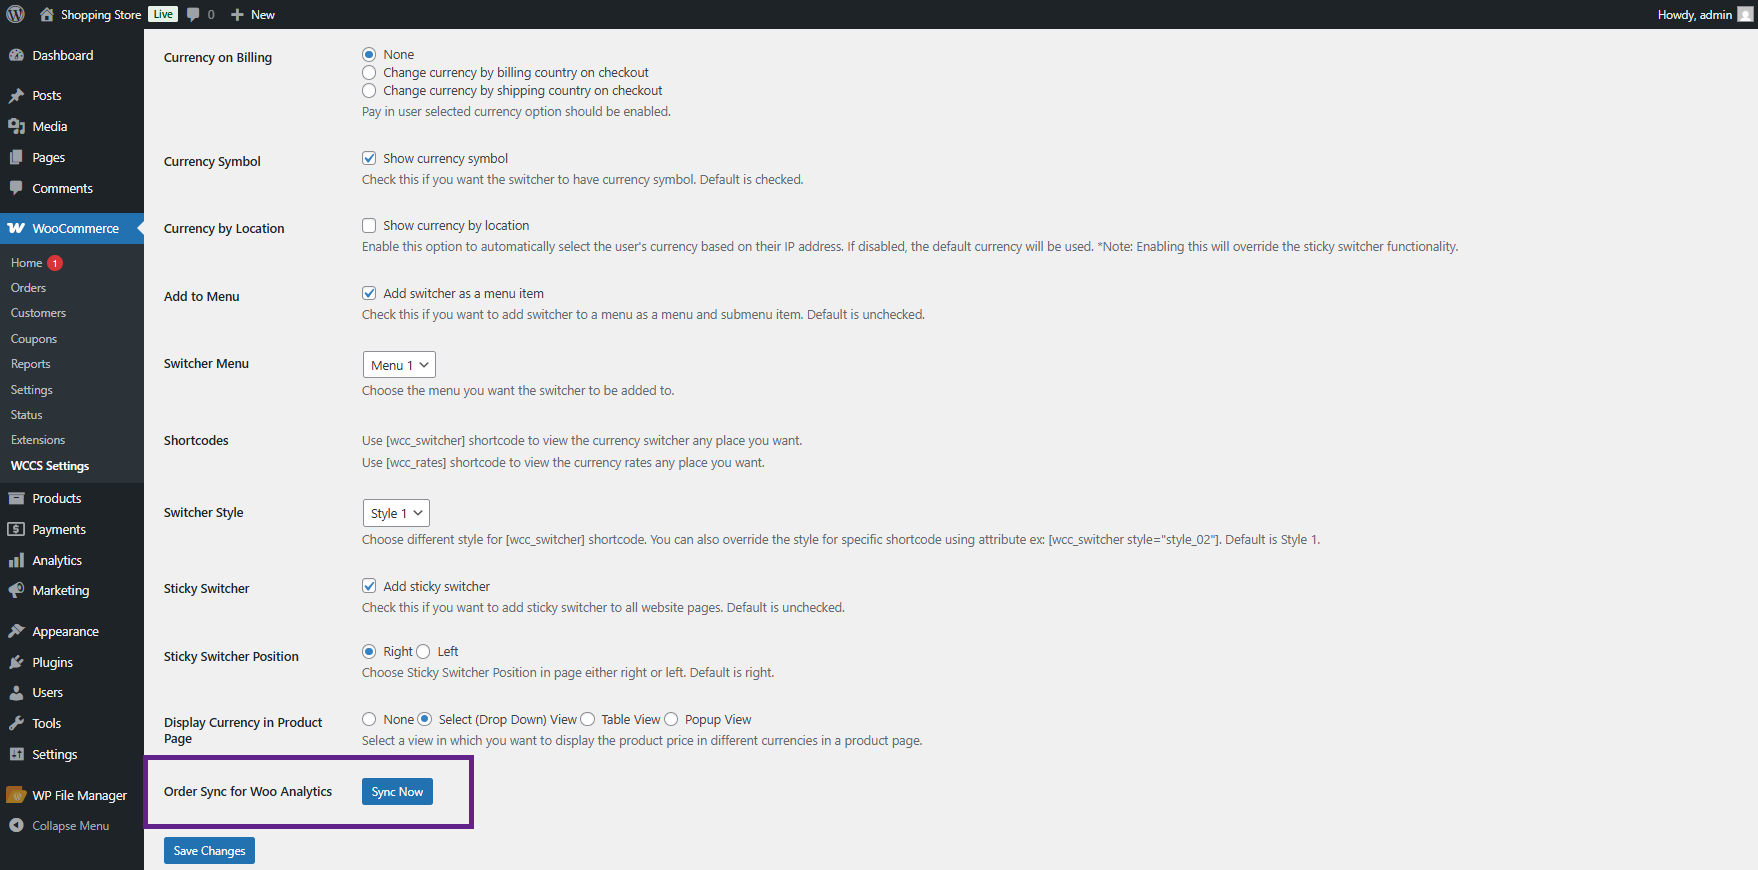
- A confirmation alert appears.
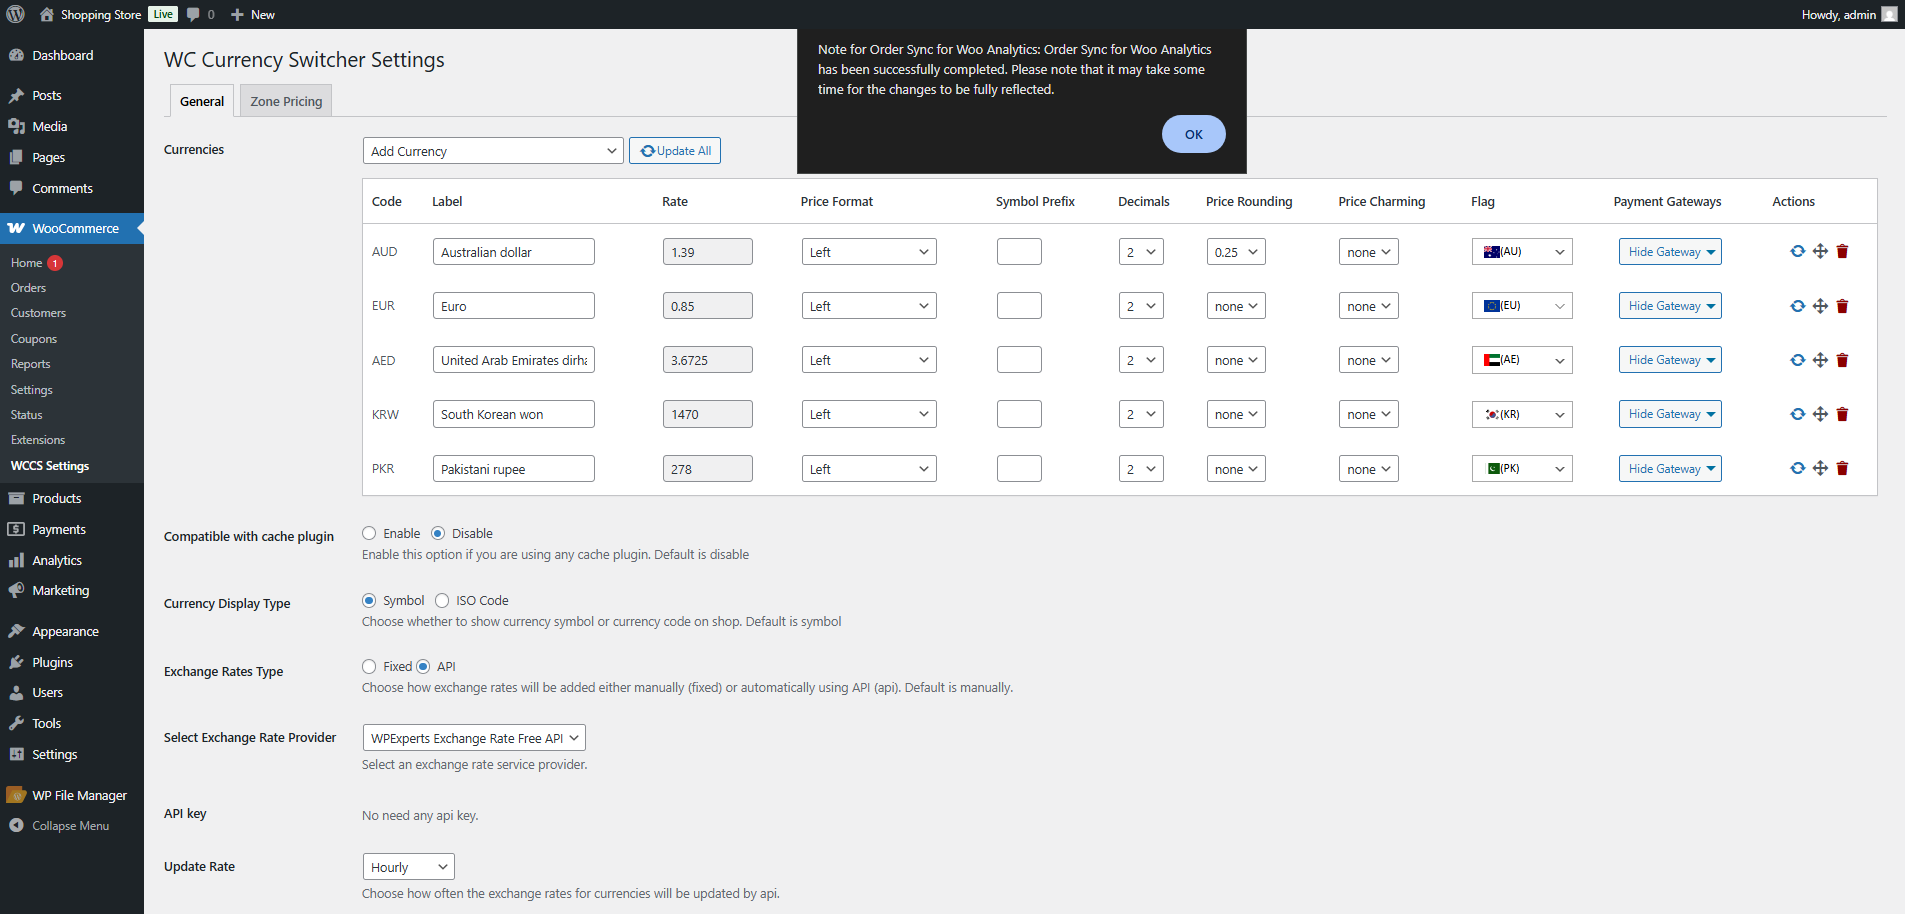
The sync processes orders in the background. WooCommerce Analytics may take up to 24 hours to reflect the updated values, depending on your cron schedule.
| NOTE | Run Order Sync any time you change exchange rates to ensure Analytics revenue totals reflect accurate base-currency values for historical orders. |
|---|
Viewing Analytics
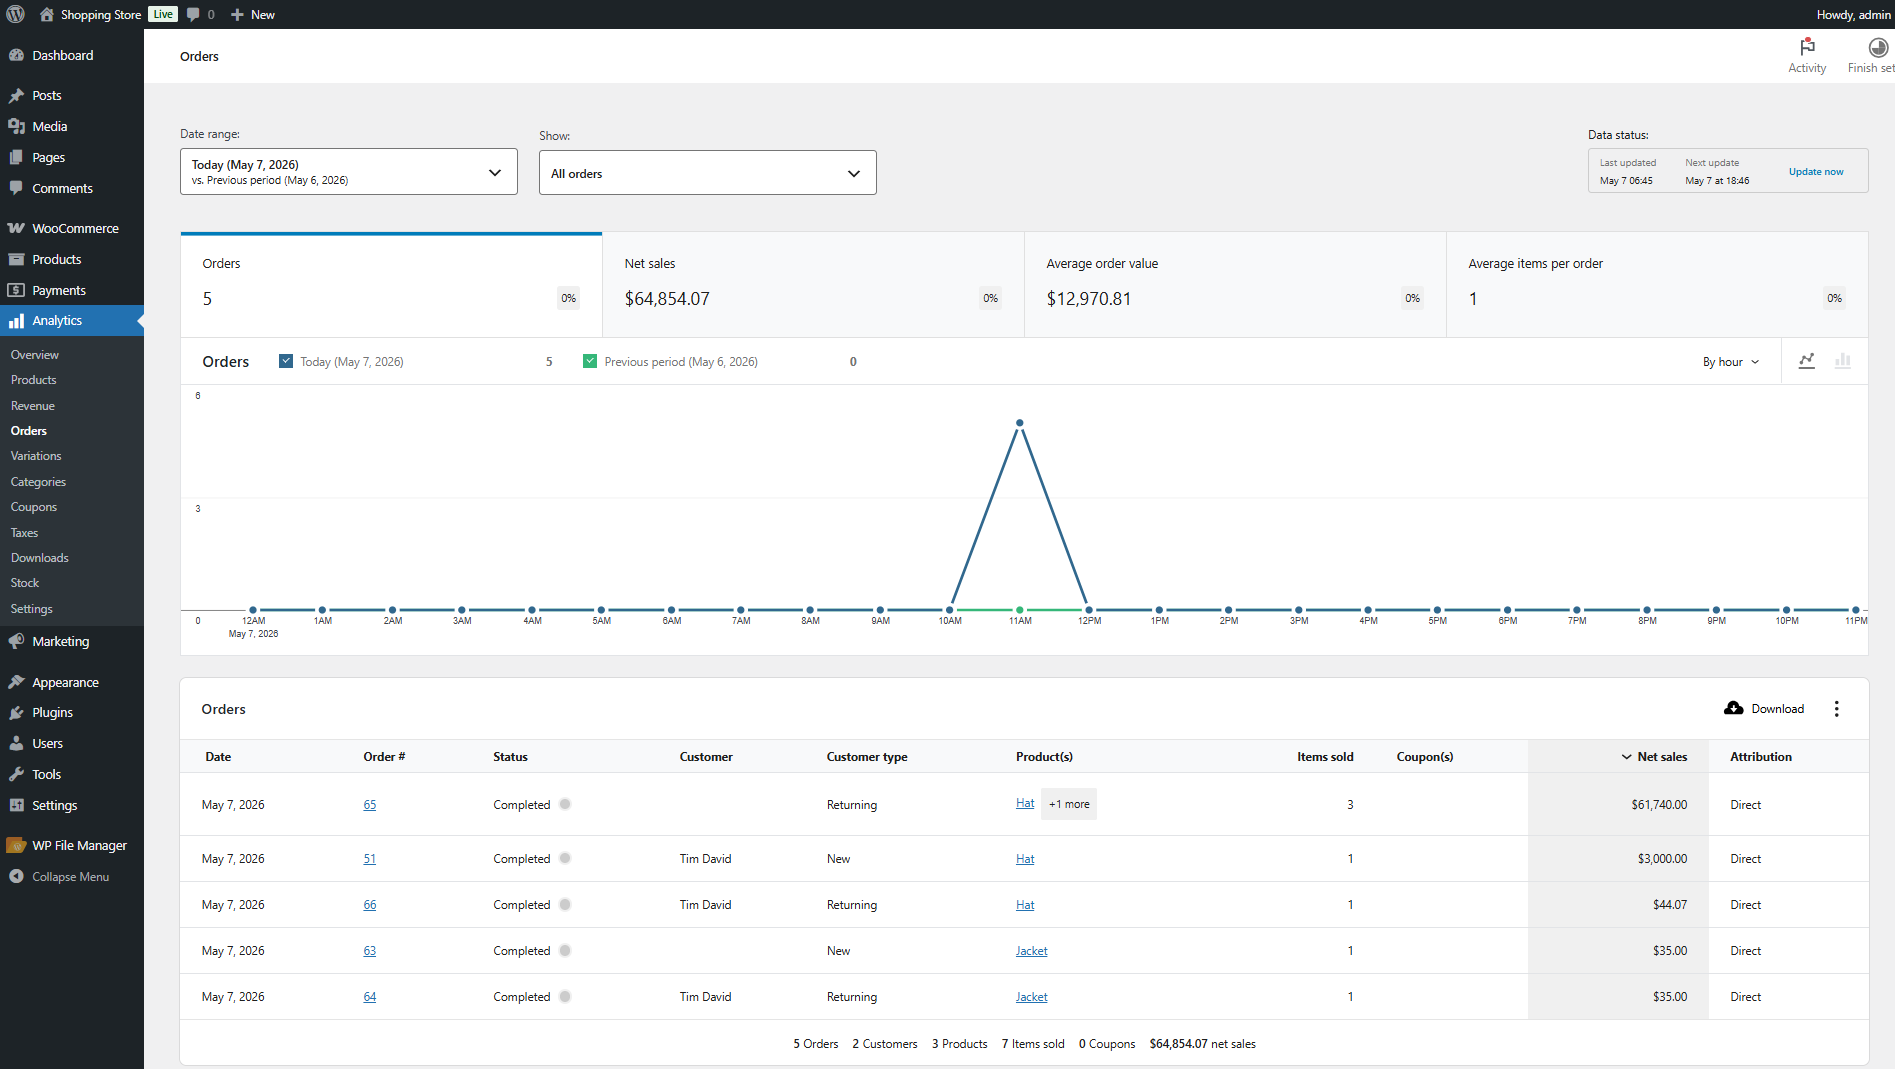
↑ Back to top- Navigate to Analytics > Orders.
- Orders placed in secondary currencies will display their totals in the base currency
Currency in Manual Orders
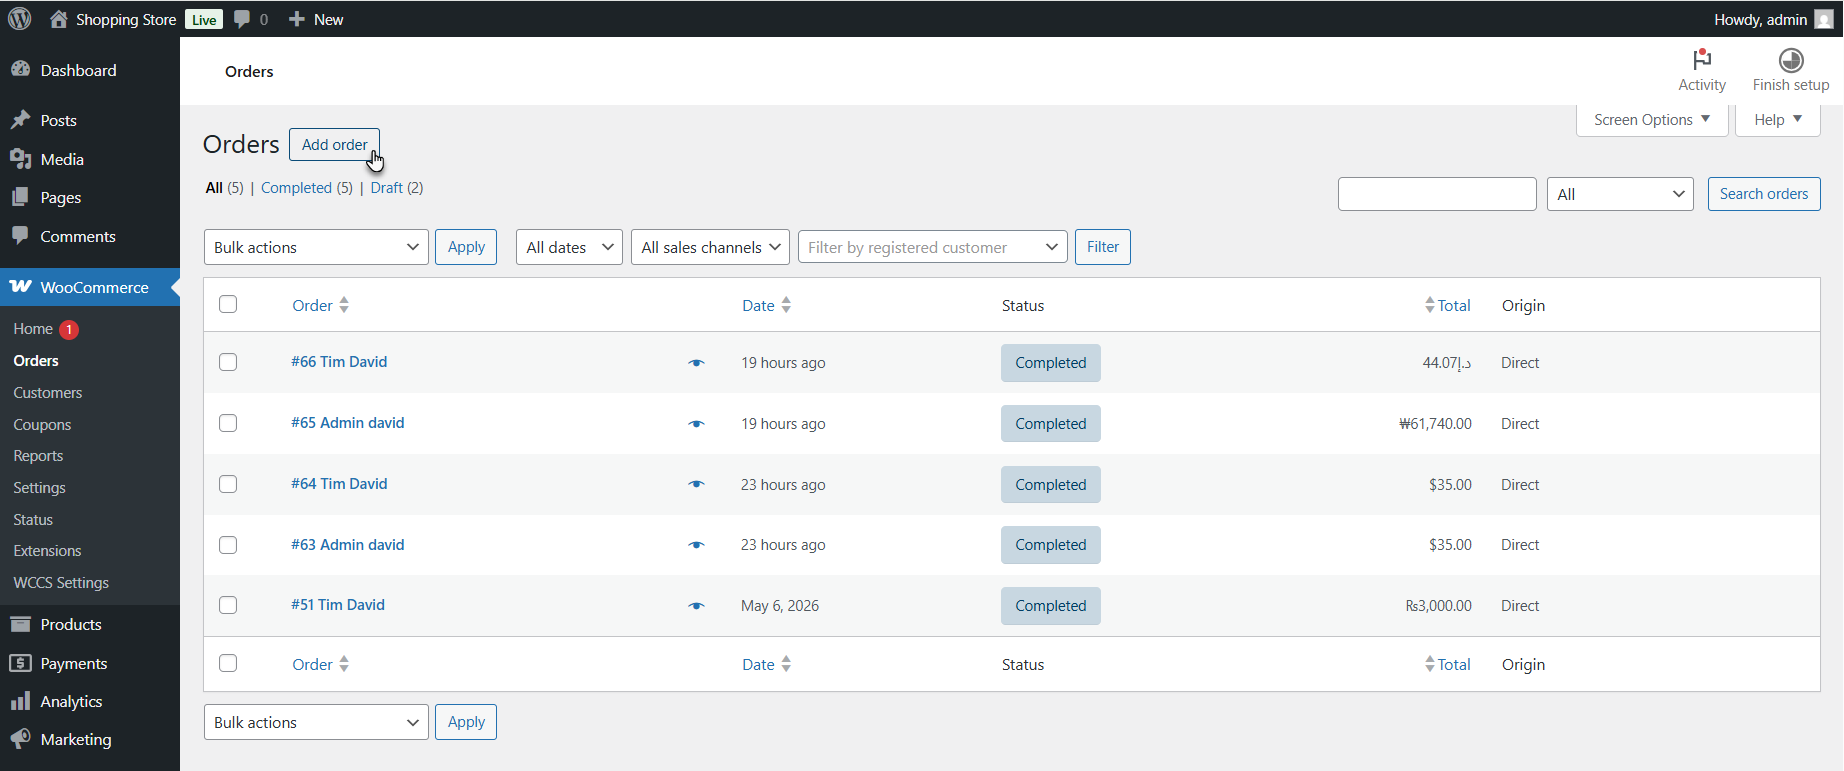
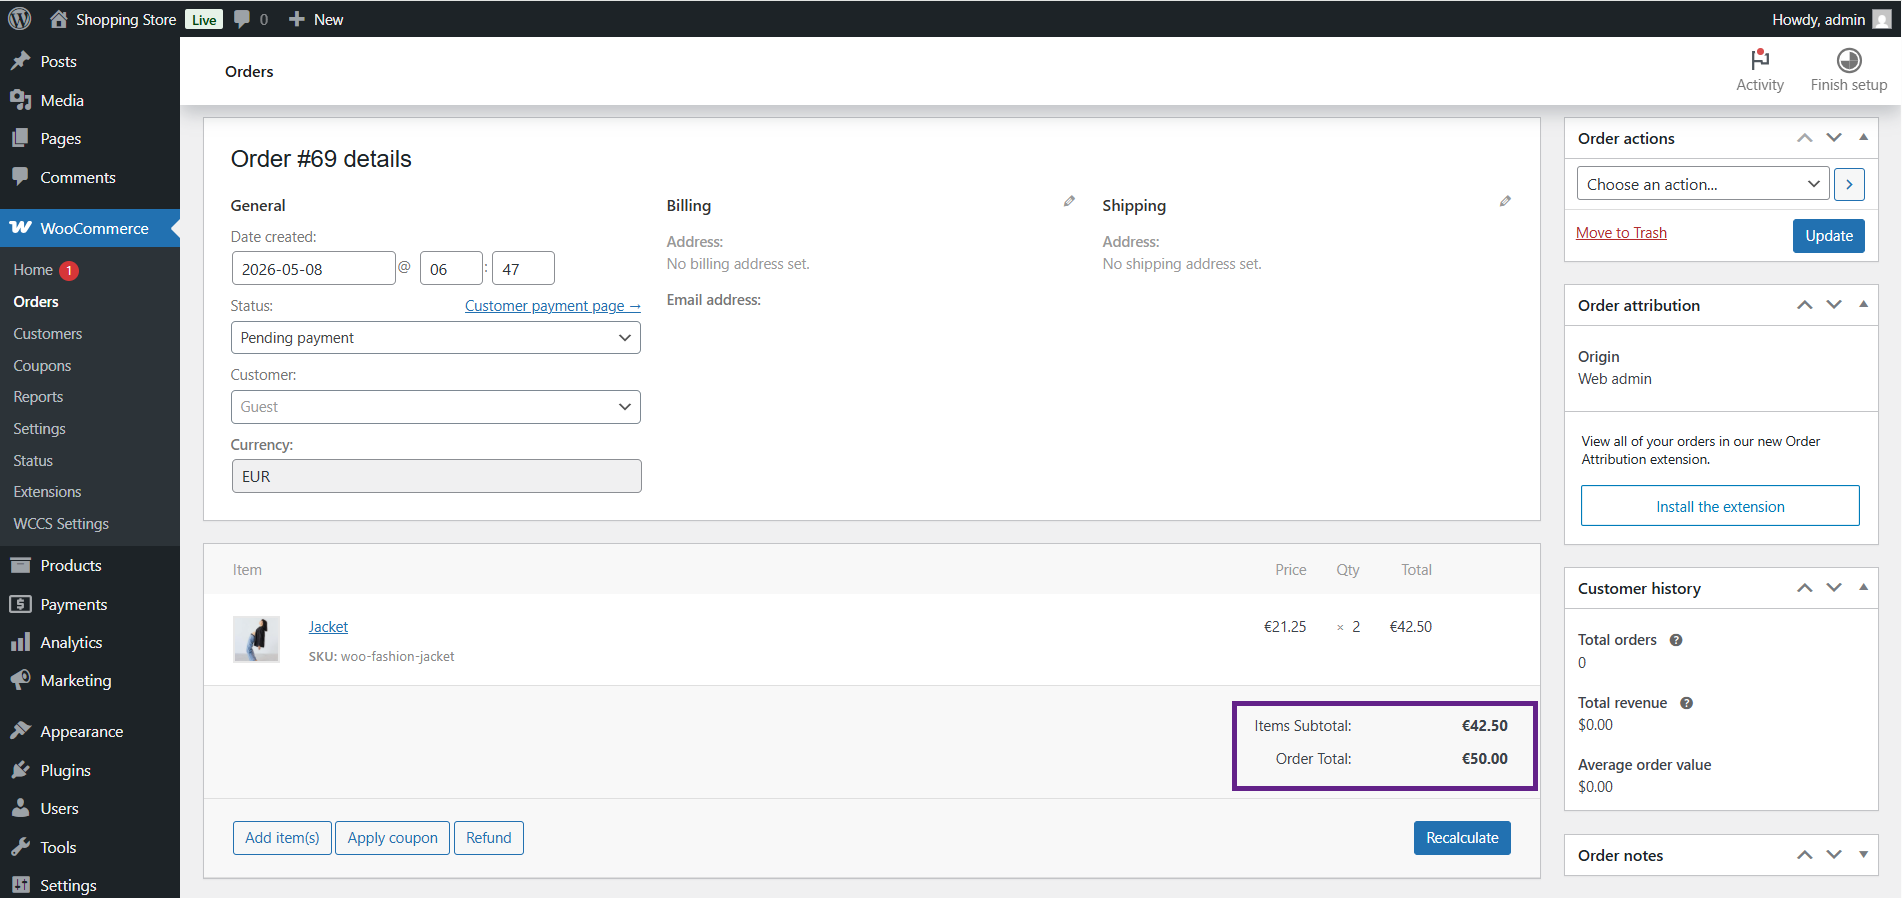
↑ Back to topWhen creating an order manually in the WooCommerce admin (WooCommerce > Orders> Add New Order), you can set the currency for that order.
- Go to WooCommerce > Orders > Add New Order.
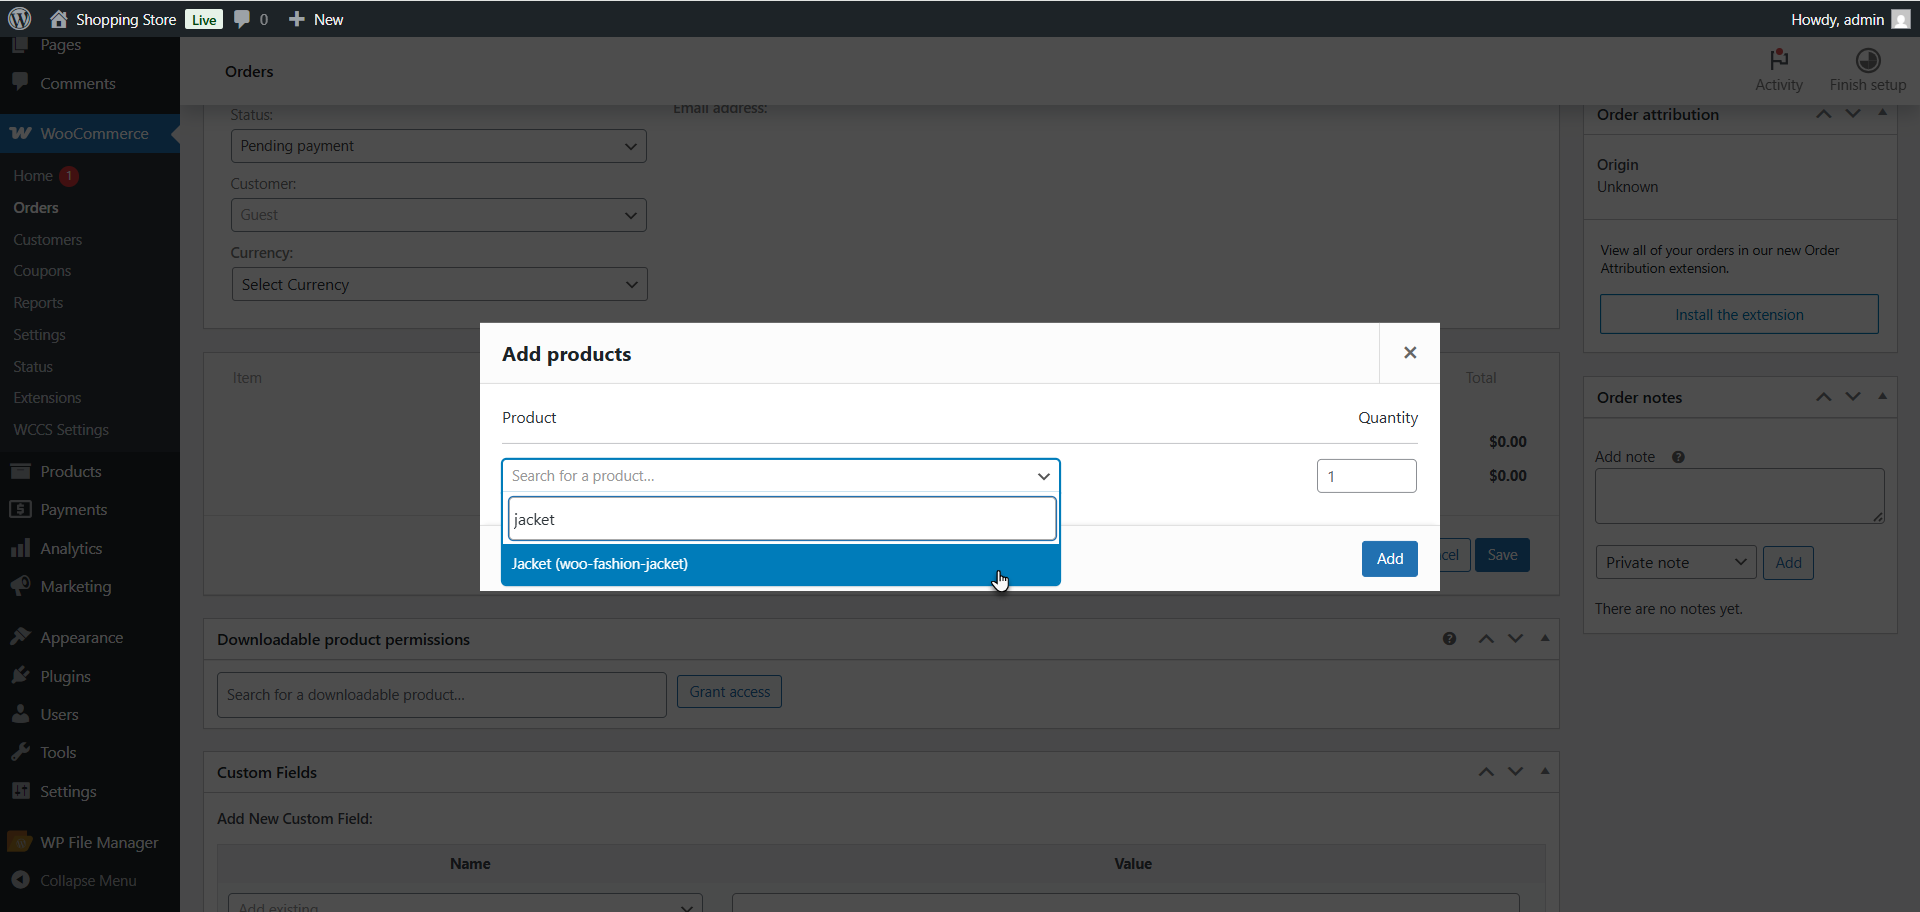
- Add the desired products to the order.
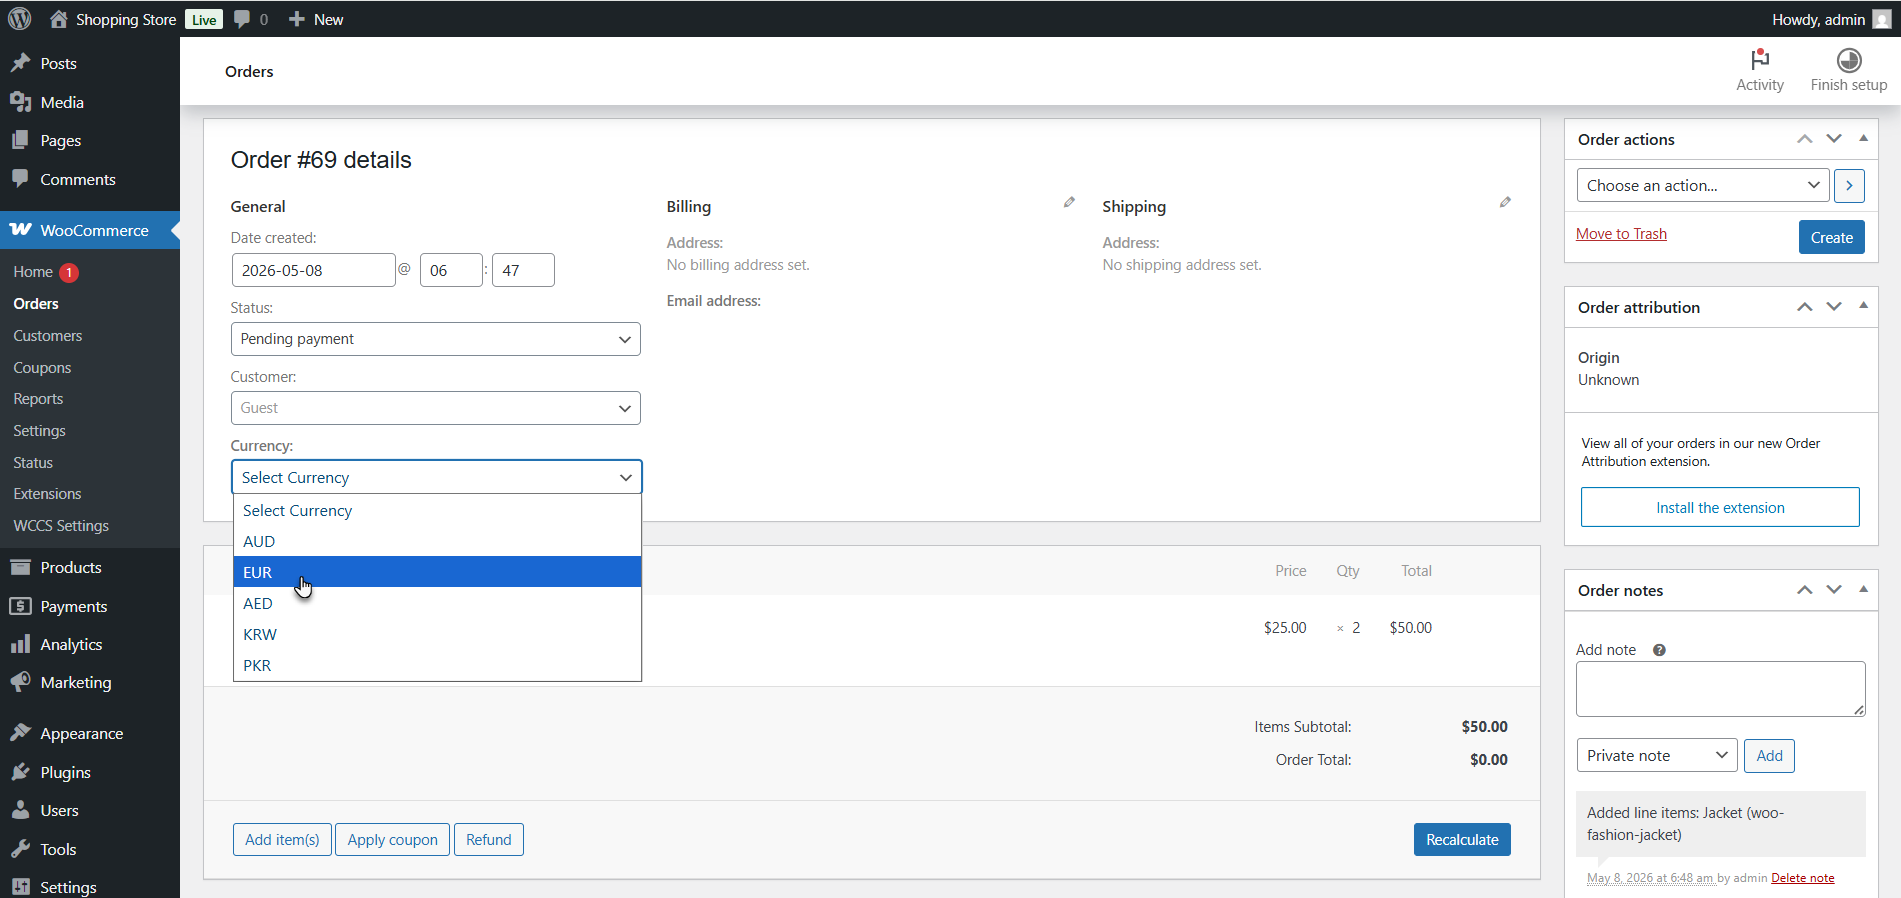
- Locate the Currency dropdown in the order panel. Select the currency for this order.
- Click Create to save the order with the selected currency.
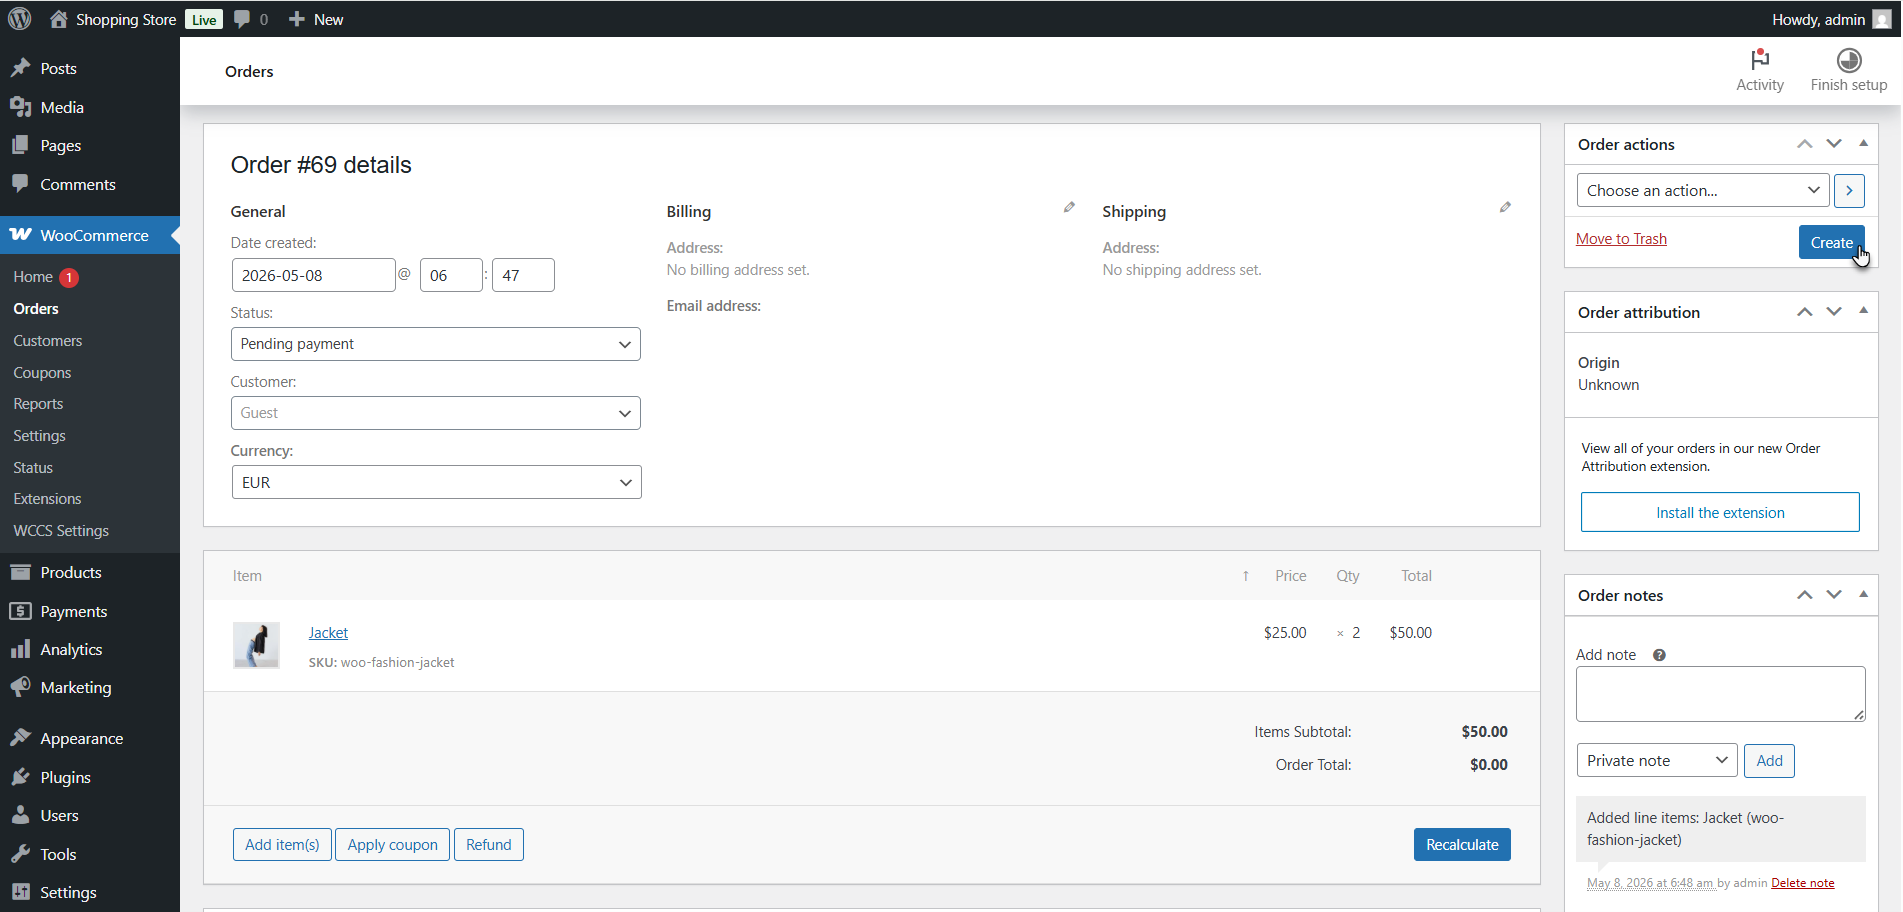
- Product prices in the order will be converted at the current exchange rate for the selected currency. To sync this order with Analytics, run Order Sync from WCCS Settings afterward.
Compatibilities with other plugins
↑ Back to top
The following document has compatibility with other plugins. The concerned person may use this to upload the competencies to the live documentation.
We have tested Currency Switcher with many WordPress themes, plugins and third-party WooCommerce extensions, but some may still have compatibility issues.
Check the Compatibility and Integration page before purchasing.
Settings Dependencies Reference
↑ Back to topThis is the most important section for avoiding misconfiguration. Several settings depend on or conflict with each other. Use this table before enabling advanced features.
| Feature | Requirements & Conflicts |
|---|---|
| Shop Currency | Required by: Coupon Fixed Amount, Coupon Min/Max, Zone Pricing, Currency on Billing. No conflicts. |
| Zone Pricing | Requires: Shop Currency ON, Currency by Location ON. Conflicts with: Currency on Billing (disable COB when using Zone Pricing). |
| Currency on Billing | Requires: Shop Currency ON. Conflicts with: Zone Pricing, Coupon Fixed Amount. |
| Currency on Shipping | Requires: Shop Currency ON. Similar to Currency on Billing. Does not conflict with Zone Pricing. |
| Coupon Fixed Amount | Requires: Shop Currency ON, Currency on Billing OFF. |
| Coupon Min/Max Spend | Requires: Shop Currency ON. Works with or without Currency on Billing. |
Per-Product Pricing | No special requirements. Works with all other settings. Overrides exchange-rate conversion for the configured currency. |
MaxMind Geolocation | Requires WooCommerce Default Customer Location set to “Geolocate” and a valid MaxMind License Key in WooCommerce → Settings → Integration. |
WPML Currency by Language | Requires WPML Pro and WooCommerce Multilingual plugins to be active. |
| NOTE | Rule of thumb: choose either Zone Pricing OR Currency on Billing, not both. Both approaches detect the customer’s country and assign a currency, but they do so at different stages and using different logic. |
|---|
Shortcode Reference
↑ Back to topShortcode Placement Examples
↑ Back to topIn a page or post:
[wcc_switcher style=”2″]
In a text widget (Appearance > Widgets > Text widget):
[wcc_switcher]
In a theme template file:
<?php echo do_shortcode(‘[wcc_switcher]’); ?>
Developer Reference: Filters & Hooks
↑ Back to topCurrency Switcher exposes multiple filters and actions for developers who need to customize its behavior programmatically. All filters should be added in your theme’s functions.php or a custom plugin.
| Filter / Hook Name | Type | Description |
|---|---|---|
| Filter | Override the default base currency. Receives the WooCommerce currency string. |
wccs_hook_priorities | Filter | Adjust the priority of the price conversion filters on WooCommerce product price hooks. |
wccs_set_currency | Filter | Override the active currency just before it is applied. Receives the currency code string. |
| wccs_set_currency_info | Filter | Override the full active currency info array (rate, decimals, symbol, etc.). |
wccs_price_format | Filter | Override the price format string. Receives format and currency position. |
| Filter | Modify a simple product’s price before the currency conversion is applied. |
wccs_simple_prod_price_after_convert | Filter |
|
wccs_variable_prod_price_before_convert | Filter | Modify a variation’s price before conversion. |
wccs_variable_prod_price_after_convert | Filter | Modify a variation’s price after conversion. |
wccs_shipping_package_count | Filter | Control how many shipping packages the plugin processes during rate conversion. |
wccs_cron_order_sync_timestamp | Filter | Adjust the delay before the order sync cron runs (default: 180 seconds). |
wccs_before_nav_menu | Filter | Return false to prevent the currency switcher from appearing in the nav menu. |
wccs_sticky_switcher_enable | Filter | Return false to programmatically disable the sticky switcher on specific pages. |
wccs_before_sticky_swticher | Filter | Return false to suppress the sticky switcher output. |
wccs_change_default_text | Filter | Change the “(Default)” label shown next to the base currency in the switcher. |
wccs_change_default_currency_label | Filter | Override the display label for the default currency in the switcher. |
wccs_change_menu_default_currency_label | Filter | Override the label for the default currency in the nav menu switcher. |
wccs_flags | Filter | Modify the full flags array (country code → SVG URL). Add custom flags or override URLs. |
wc_currency_get_country_currency | Filter | Override the currency assigned to a country code. Receives currency string and country code. |
wc_currency_get_location_url | Filter | Override the URL used for ipapi geolocation requests. |
wc_currency_location_data | Filter | Modify the location data array returned from the geolocation API. |
wccs_change_default_currency_label | Filter | Change the label for a currency in the switcher list. |
Usage Example
↑ Back to topDisable the sticky switcher on the cart page:
add_filter( ‘wccs_sticky_switcher_enable’, function( $enabled ) { if ( is_cart() ) { return false; } return $enabled;} );
Override the currency for logged-in wholesale users:
add_filter( ‘wccs_set_currency’, function( $currency ) { if ( current_user_can(‘wholesale_customer’) ) { return ‘USD’; // always show USD for wholesale } return $currency;} );
Scenario Guides
↑ Back to topThese end-to-end guides show how to configure the plugin for the most common real-world use cases. Follow the steps in order.
Global Store: EU + UK + US Customers
↑ Back to topGoal: Show EUR to European visitors, GBP to UK visitors, and USD to US visitors. Customers pay in the detected currency.
- Confirm base currency is USD in WooCommerce → Settings → General.
- Add EUR and GBP to your Currencies table. Set exchange rates (API or Fixed).
- Enable Currency by Location, then select Default as the API type (WPExperts; no key needed).
- Enable Shop Currency so customers pay in the detected currency.
- In the EUR currency row, configure Payment Gateway to hide any gateways that do not support EUR.
- In the GBP currency row, do the same for GBP-unsupported gateways.
- Place the switcher in your site header or menu so customers can override their detected currency if they prefer.
- Test from your staging environment using a VPN set to a UK, EU, and US IP address.
Fixed Pricing by Region (Zone Pricing)
↑ Back to topGoal: Serve fixed, negotiated prices to specific regions rather than relying on exchange rates.
- Enable Shop Currency.
- Enable Currency by Location and select Default.
- Disable Currency on Billing.
- Go to WCCS Settings → Zone Pricing and enable Zone Pricing.
- Create a zone “European Union” — add all EU countries, select EUR, enter rate.
- Create a zone “United Kingdom” — add GB, select GBP, enter rate.
- For products with special regional pricing, go to each product → WCCS Zone Pricing tab and enter a custom rate, OR use Per-Product Pricing (Section 9) to set an exact price per currency.
- Test by simulating visitors from Germany, UK, and the US.
Stripe with Currency Restrictions
↑ Back to topGoal: Only offer Stripe when the customer is on a currency Stripe supports. Hide it for others.
- Add all your desired currencies to the Currencies table.
- For each currency that Stripe does NOT support (e.g., PKR, if not in your Stripe account’s accepted currencies), go to that currency’s row and check Stripe in the Payment Gateway column.
- Save Changes.
- At checkout, Stripe will only appear when the active currency is one that Stripe supports.
- Verify by switching to a restricted currency on the shop page and proceeding to checkout.
| TIP | Stripe’s supported currencies list is available at stripe.com/docs/currencies. Check it and map unsupported currencies to alternative gateways in your configuration. |
|---|
WPML Multilingual Store with Currency by Language
↑ Back to topGoal: Automatically switch currency when the customer switches language (e.g., German → EUR, English → GBP).
- Ensure WPML Pro and WooCommerce Multilingual plugins are both installed and active.
- Configure WPML languages and WooCommerce Multilingual’s multi-currency settings.
- In WCCS Settings, your added currencies will integrate with the WPML language detection.
- WPML handles the language-to-currency mapping; Currency Switcher handles the price conversion and display.
- Test by switching languages on the front end and verifying that the corresponding currency activates.
| NOTE | Currency by Language operates through WPML’s own currency management. Refer to the WPML Multi-Currency documentation for the mapping configuration. Currency Switcher provides the front-end switching and price formatting layer. |
|---|
Caching Compatibility
↑ Back to topCaching plugins improve page load speed but can interfere with currency switching by serving a cached page in the wrong currency. Follow these instructions for the most common caching plugins.
| Caching Plugin | Required Configuration |
|---|---|
| WP Rocket | In WP Rocket → Advanced Rules, add the cookie names geoplugin_currencyCode and geoplugin_countryCode to the “Never Cache Cookies” list. Also, exclude the WCCS Settings page from caching. |
| LiteSpeed Cache | In LiteSpeed Cache → Cache → Excludes, add geoplugin_currencyCode to the “Do Not Cache Cookies” list. |
| W3 Total Cache | In Performance → Browser Cache, ensure cookies with geoplugin_ prefix are excluded. For page cache, add the cookie to the “Rejected Cookies” list. |
WP Super Cache | Enable “Don’t cache pages with GET or POST variables” or use the plugin’s reject cookies list to exclude geoplugin_currencyCode. |
Cloudflare | If using Cloudflare Page Rules, ensure checkout and cart pages bypass the cache. Set a Cache Rule to bypass when the cookie “geoplugin_currencyCode” is present. |
| SG Optimizer (SiteGround) | In SG Optimizer → Caching → Browser Caching, exclude the currency cookies. Dynamic caching can conflict with session-based storage; use Transient instead. |
| WARNING | Always test currency switching after enabling or updating your caching plugin. A common symptom of caching conflicts is that the switcher changes visually but prices do not update, or prices revert after navigating to a new page. |
|---|
Troubleshooting & FAQ
↑ Back to topCurrency is not switching on the front end
↑ Back to topMost common cause: caching plugin serving a cached page. Solution: add geoplugin_currencyCode and geoplugin_countryCode to your caching plugin’s cookie exclusion list (see Section 20). Also, confirm the currency you are trying to switch to is active in WCCS Settings.
Geolocation is not detecting the correct country
↑ Back to topCheck which API type you have selected (Ipapi vs. Default). For Ipapi, verify the API key is valid and has not exceeded its monthly request limit. By default, the WPExperts API is used automatically — no key needed. If using MaxMind, verify the License Key is entered in WooCommerce → Settings → Integration and that WooCommerce Default Customer Location is set to Geolocate.
Exchange rates are not updating automatically
↑ Back to topFor OpenExchangeRates free accounts, the base currency must be USD. If your store uses a different base, upgrade to a paid plan or switch to the WPExperts API. For other providers, verify the API key is valid and that the request has not exceeded monthly limits. Check if your WordPress cron is running correctly — WP Cron-based updates will not fire if no visitors trigger page loads.
Prices convert on the shop page but revert to default at checkout
↑ Back to topEnable Shop Currency in WCCS Settings. Without it, the currency conversion is display-only, and checkout always processes in the base currency. Also, confirm there is no caching plugin serving a cached checkout page (checkout should always be excluded from cache).
WooCommerce Analytics shows incorrect revenue totals
↑ Back to topRun Order Sync from WCCS Settings → General. Analytics data sync can take up to 24 hours, depending on WooCommerce’s cron schedule. Also, verify the exchange rate at the time of the orders matches what you expect — historical orders are converted at their recorded rate.
The coupon is not applying
↑ Back to topCheck: (1) Shop Currency is enabled. (2) For Fixed Amount coupons, Currency on Billing is disabled. (3) For Min/Max coupons, the active currency at the time of coupon application is the one you have configured in the coupon’s Min/Max settings. (4) The cart total falls within the configured Min/Max range for the active currency.
Zone Pricing is not activating
↑ Back to topVerify: (1) Shop Currency is ON. (2) Currency by Location is ON. (3) Currency on Billing is OFF. (4) The visitor’s detected country is in one of your configured zones. (5) The zone’s currency exists in your Currencies table. If geolocation is failing, Zone Pricing cannot assign a zone.
Payment gateway disappears at checkout
↑ Back to topThis is usually intentional — check the Payment Gateway settings for the active currency in the Currencies table. If a gateway is hidden for that currency, it will not appear at checkout. If it was not intentional, uncheck the gateway from the restricted list for that currency.
Prices show correctly, but the cart total is wrong
↑ Back to topThis can occur with third-party plugins that add custom fees, deposits, or surcharges without supporting the WCCS price filter. Check if the discrepancy is caused by a specific plugin (shipping, tax, or fee plugin). Use the wccs_simple_prod_price_after_convert filter to debug or contact WPExperts support with the conflicting plugin name.
Can I use this plugin with WooCommerce Subscriptions?
↑ Back to topYes. Enable Shop Currency to ensure recurring charges are processed in the customer’s selected currency. Note that the payment gateway must support multi-currency recurring billing. Stripe and PayPal both support this. Test renewals on a staging environment before going live.
Can I set different prices for the same product in different currencies?
↑ Back to topYes, via two methods: (1) Per-Product Pricing (Section 9) — set exact prices per currency on the product edit page. (2) Zone Pricing with per-product rate override (Section 8.2) — override the zone exchange rate at the product level.
How do I display the currency switcher in my theme header?
↑ Back to topUse the shortcode [wcc_switcher] inside a Custom HTML widget or a text block, or use the Navigation Menu integration. For themes with header builder support (Elementor, Divi), paste [wcc_switcher] into a text/HTML element in the header section. For programmatic placement, use: echo do_shortcode(‘[wcc_switcher]’);
Is there a way to prevent users from manually changing the currency?
↑ Back to topNot directly via a settings toggle. If you need to lock currency to the visitor’s detected location, you can use the wccs_set_currency filter to override any manual change. See Section 18 for an example.

