
Key Features
↑ Back to topAutomatic Cart Discounts (No Coupon Code): Discounts are applied instantly as a negative cart fee the moment a threshold is met. Customers never have to search for or type in coupon codes again.
Quantity-Based & Subtotal-Based Tiers: Create unlimited discount tiers based on either total cart item quantity or cart subtotal. Apply fixed amount or percentage discounts to reward higher spending.
Target Specific User Roles & Guests: Apply discounts exclusively to logged-in users, guest shoppers, or both. Exclude specific WordPress user roles (like Shop Managers) or individual usernames.
Hide Prices for Guest Users: Built-in B2B mode allows you to hide product prices and the “Add to Cart” button from non-logged-in visitors, replacing them with a custom sign-up prompt.
Live Discount Tier Table: Automatically display an active schedule of available discount tiers on the cart page. This transparency motivates customers to add more items to unlock bigger savings.
Custom Success Messages: Display personalized success banners confirming the applied discount, enhancing customer satisfaction and checkout confidence.
Automated Discount Scheduling: Plan your sales in advance. Set optional start and end dates for any discount tier to completely automate your seasonal promotions and flash sales.
Product-Based Discount Rules: Build highly targeted WooCommerce volume pricing rules. Create custom bulk discounts by explicitly including or excluding specific products and categories, while assigning rule priorities to ensure seamless conflict management across your store inventory.
Dynamic Product Pricing Displays: Instantly drive conversions with interactive discount tooltips on the shop loop and detailed volume pricing tables on single product pages. Show customers exactly how much they save with active product discount rules before they even reach the checkout.
WooCommerce Cart Block & HPOS Compatible: Fully compatible with the modern WooCommerce Cart Block (Gutenberg) architecture and officially supports High-Performance Order Storage (HPOS).
Setup and Installation
↑ Back to topStep 1: Installation
1) Log in to your WordPress admin dashboard.
2) Navigate to Plugins → Add New.
3) Click on the Upload Plugin button at the top.
4) Choose the “Discount On Cart” plugin ZIP file from your computer and click Install Now.
5) Once installed, click Activate Plugin.
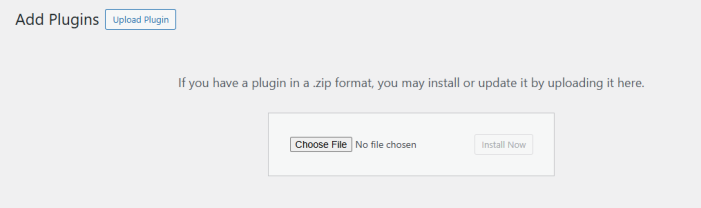
Initial Setup
↑ Back to topOnce the plugin is activated:
- Navigate to WooCommerce > Settings.
- Select the “Discount On Cart” tab from the top menu.
- Review the available settings and configure them according to your store’s needs.
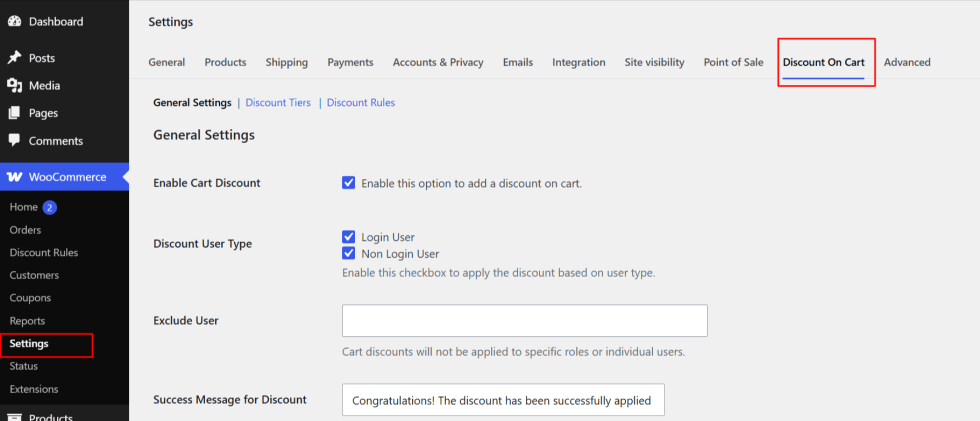
General Settings
↑ Back to topThe General Settings tab allows you to configure the global behavior of the plugin:
- Restrict Discounts
- Exclude specific user roles (e.g., Admin, Subscriber) from receiving discounts.
- Enable or disable discounts for guest users.
- Choose discount eligibility based on user type:
- Logged-in users
- Guest users
- Hide Add to Cart Button
- Enable this option to hide the “Add to Cart” button for guest users.
- Customize the “Sign-up” or “Login to see price” message.
- Custom Success Message
- Add a personalized success message to notify customers when a discount is applied.
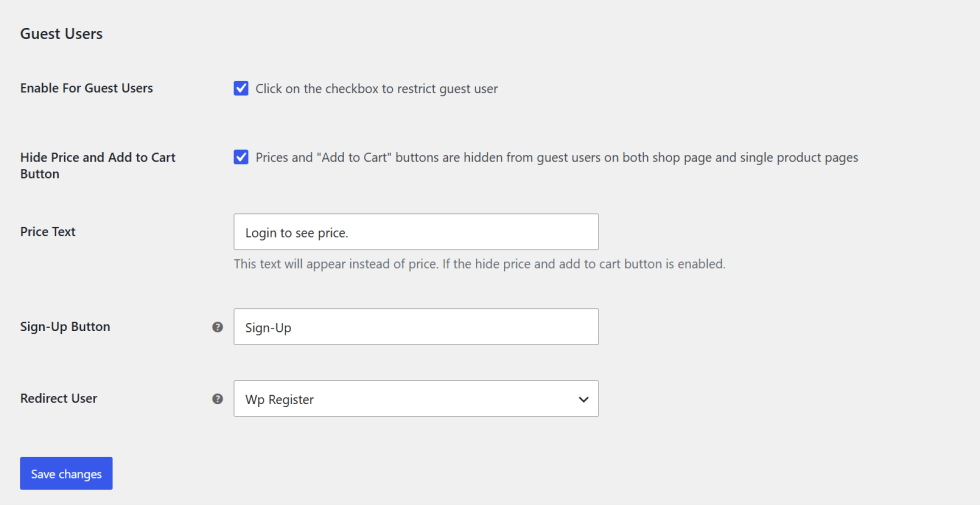
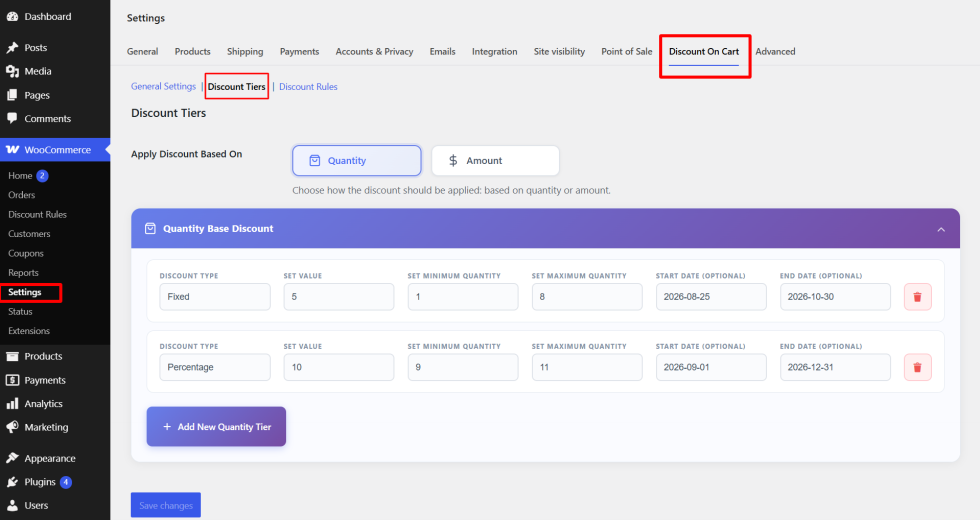
Creating Discount Tiers
↑ Back to topThe Discount Tiers tab is where you define dynamic cart discount rules:
- Add a New Discount Tier
- Click on Add Tier.
- Set the Discount Type (Percentage or Fixed).
- Define the cart subtotal or quantity range (e.g., $50-$100 or 5-10 items).
- Enter the discount amount.
- Set Discount Validity
- Choose a start and end date for the discount.
- Save Your Changes
- Click on Save Changes to activate the discount tier.
User Restrictions
↑ Back to topRestrict who can benefit from the discounts:
- Navigate to the General Settings tab.
- Use the “Exclude User Roles” dropdown to select roles that won’t receive discounts.
- To exclude specific users:
- Enter their usernames in the “Exclude Users” field.
- Enable or disable discounts for guest users by toggling the respective option.

Customizing Messages
↑ Back to top- Navigate to the General Settings tab.
- Scroll to the Custom Success Message field.
- Enter a friendly message, such as:
- “Congratulations! You’ve unlocked a 10% discount!”
- Save your changes.

3. Frontend Impact
↑ Back to topCart Page
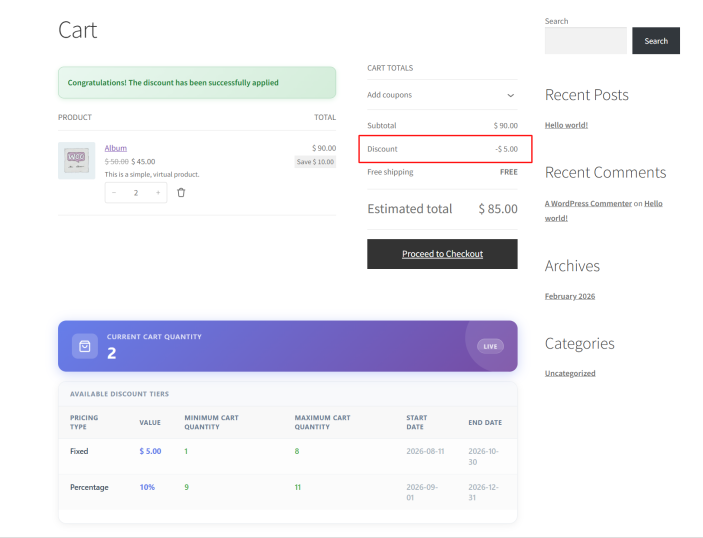
↑ Back to top- Discount Display:
The active discount tiers are displayed on the cart page, showing users how to unlock additional savings. - Dynamic Updates:
The cart dynamically recalculates totals based on applied discounts, providing real-time feedback.
Checkout Page
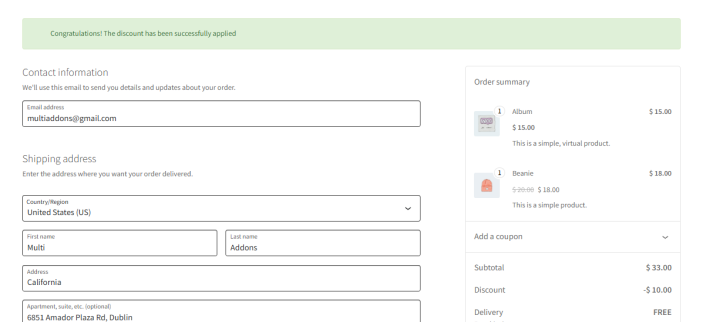
↑ Back to top- Discount Summary:
The checkout page includes a summary of the applied discount, ensuring transparency for customers.
4. Use Cases and Examples
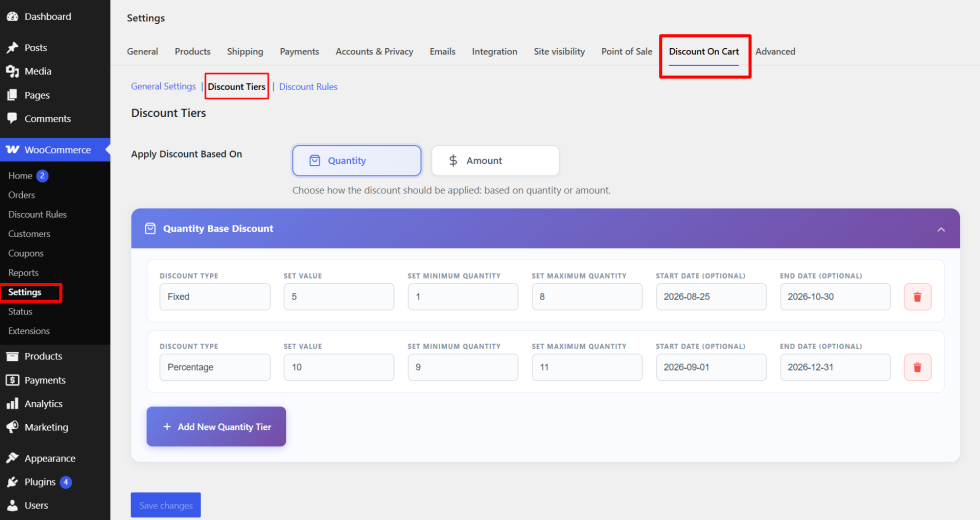
↑ Back to topExample 1: Quantity-Based Discount
↑ Back to top- Scenario:
Offer a 10% discount for orders with 5–10 items and a 20% discount for orders with more than 10 items. - Configuration:
- Add a Quantity-Based Tier:
- 5–10 items: 10% discount
- 11+ items: 20% discount
- Add a Quantity-Based Tier:
Example 2: Amount-Based Discount
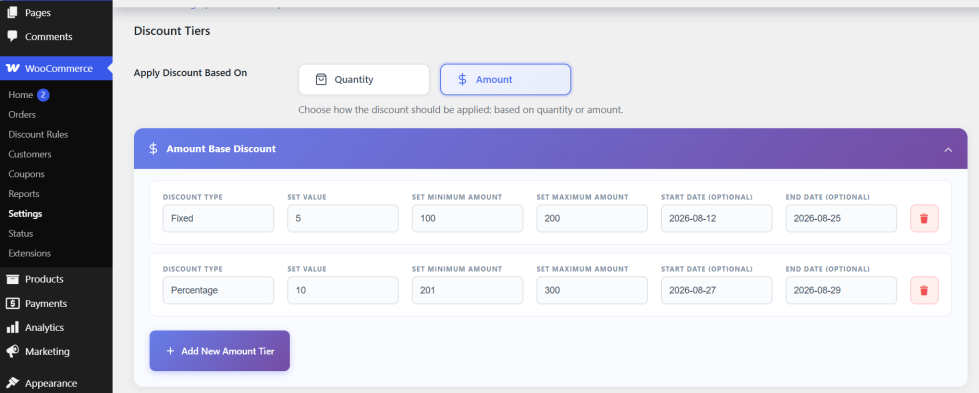
↑ Back to top- Scenario:
Apply a $15 fixed discount for orders between $50 and $100, and a 25% discount for orders over $100. - Configuration:
- Add an Amount-Based Tier:
- $50–$100: $15 fixed discount
- $100+: 25% percentage discount
- Add an Amount-Based Tier:
Product-Based Discount Rules
↑ Back to topIn addition to global cart discounts, Discount On Cart allows you to create highly targeted, product-specific discount rules using a custom rule builder. This is perfect for setting up bulk pricing on specific items, VIP pricing, or restricted wholesale tiers.
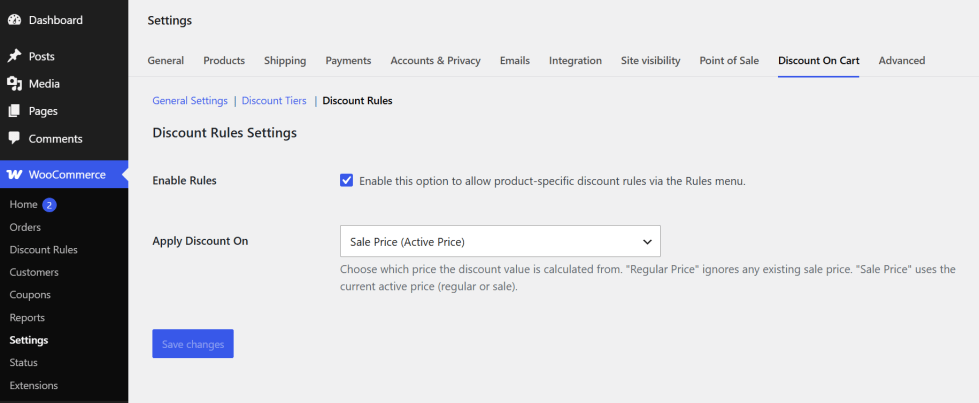
1. Enabling Product Rules
↑ Back to topFirst, ensure that the rules engine is active on your store.
- Navigate to WooCommerce > Settings > Discount On Cart.
- Under the General tab, check the box to Enable Product Rules.
- Save changes.
2. Creating a New Discount Rule
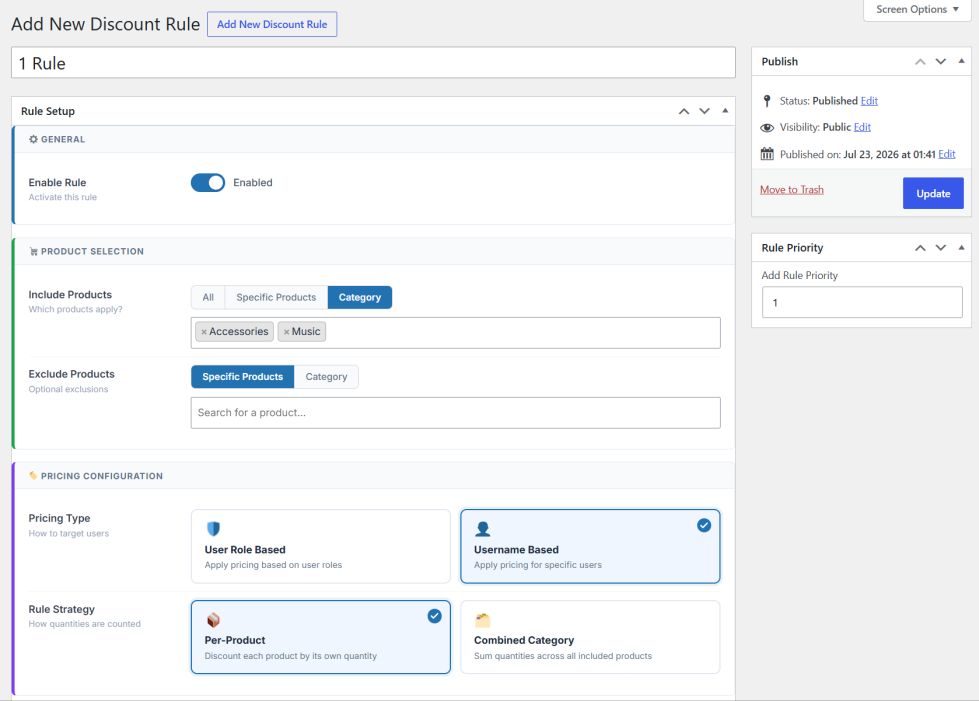
↑ Back to topOnce enabled, a new menu item will appear in your WordPress sidebar called Discount Rules.
- Navigate to Discount Rules > Add New Rule.
- Title: Give your rule a descriptive name (e.g., “Wholesale T-Shirts 10% Off”).
- Priority: If a product falls under multiple active rules, the rule with the highest priority number will be applied. (e.g., Priority
10overrides Priority1).
3. Product & Category Targeting (Include/Exclude)
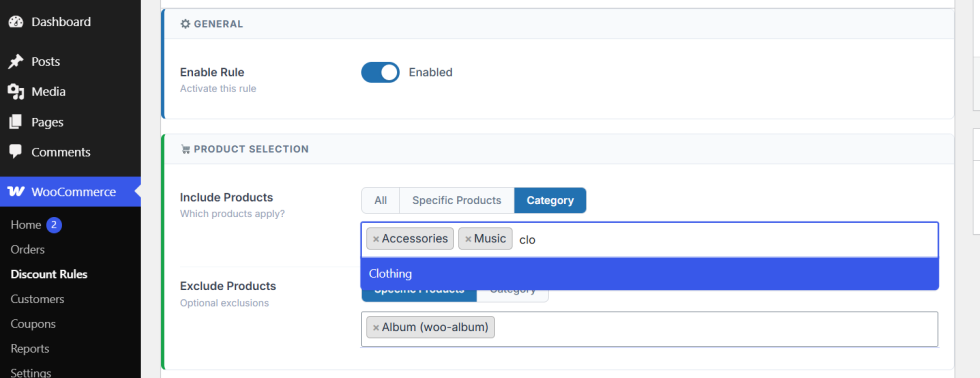
↑ Back to topYou can define exactly which products this rule applies to.
- Include Products: Select specific products that are eligible for the discount. Leave blank to apply to all products (unless excluded).
- Exclude Products: Explicitly prevent specific products from receiving this discount.
- Include Categories: Apply the rule to entire product categories.
- Exclude Categories: Prevent entire categories from receiving the discount.
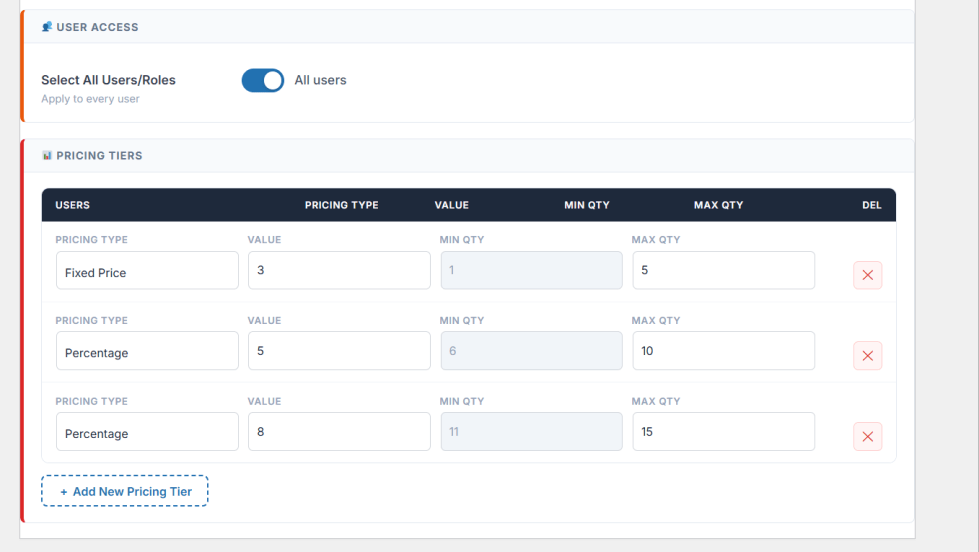
4. Configuring Pricing Tiers & User Restrictions
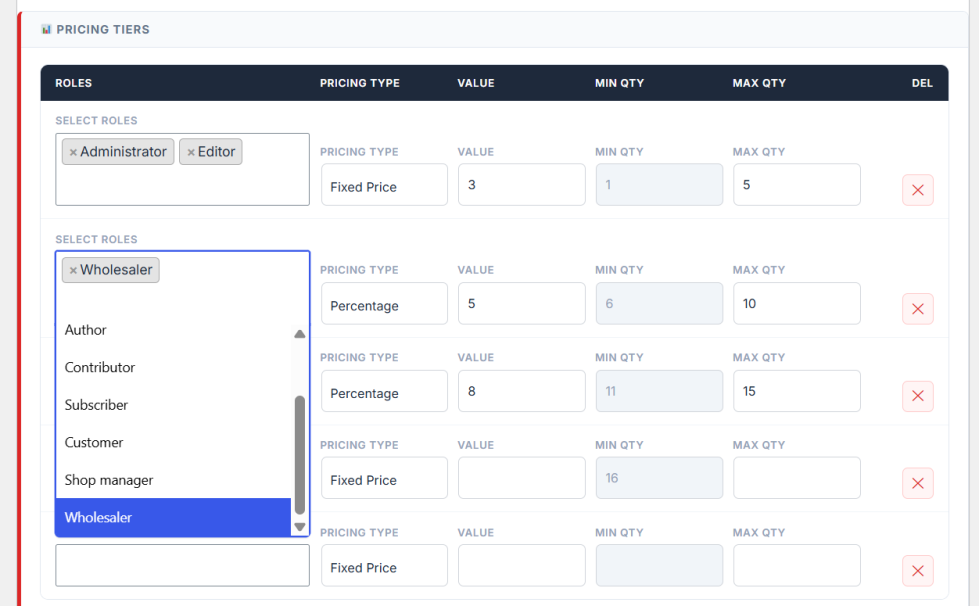
↑ Back to topThis is where you build the actual volume discount structure. You can add as many tiers as you need for a single rule.
- Click Add Tier to create a new pricing level.
- User Roles: Select which WordPress roles can access this tier (e.g.,
Customer,Wholesale). Check “Select All” to make it available to everyone. - Usernames: You can restrict a tier to specific logged-in usernames.
- Pricing Type: Choose between a Fixed Discount (e.g., $5 off) or a Percentage Discount (e.g., 10% off).
- Value: Enter the discount amount.
- Min/Max Quantity: Define the cart quantity required to trigger this specific tier (e.g., Min
5, Max10).
Example Setup:
- Tier 1: Buy 1-4 = No Discount
- Tier 2: Buy 5-9 = 10% Off
- Tier 3: Buy 10+ = 20% Off
5. Frontend Display
↑ Back to topOnce a rule is published, it immediately enhances your store’s frontend to drive sales:
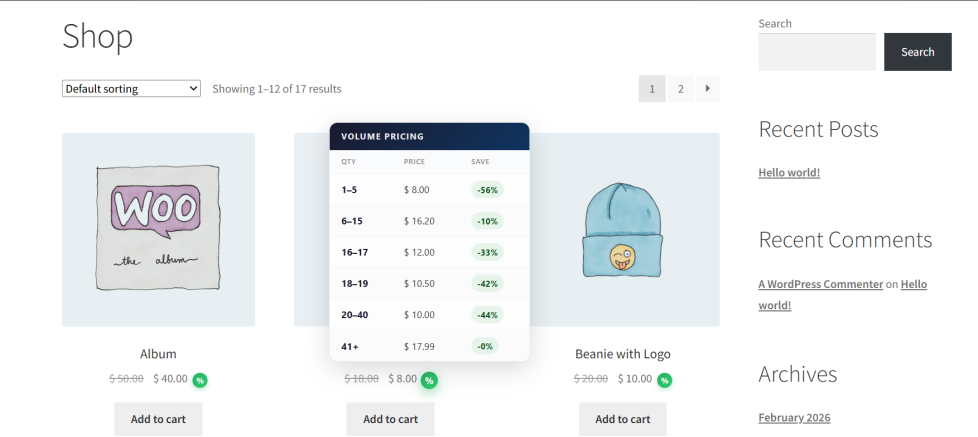
- Shop Loop Tooltips: Eligible products will display a
%icon on the shop page. Hovering over this icon reveals the complete volume pricing table.
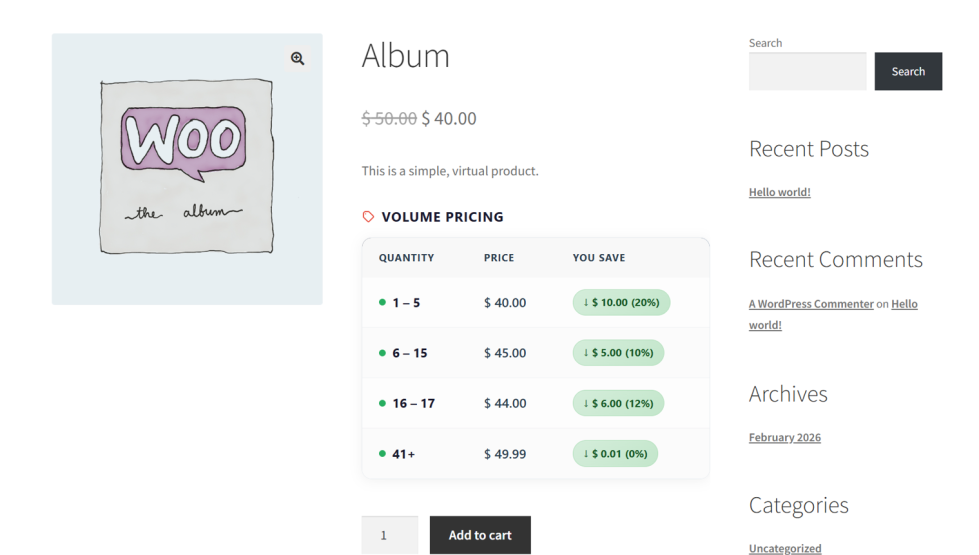
- Single Product Page: A “Volume Pricing” table is automatically injected below the product price, clearly showing customers the quantity breakdowns and potential savings.
How do I set up WooCommerce quantity discounts using Discount On Cart?
Setting up WooCommerce quantity discounts is easy. Go to your WordPress admin panel and navigate to WooCommerce > Settings > Discount On Cart. Under the Discount Tiers tab, select ‘Quantity’ as your discount mode. You can then click “Add Tier” to create unlimited tiers based on the number of items in the cart (e.g., 5-10 items for 10% off). Save your settings, and the quantity discounts will automatically apply to customer carts.
How can I create a WooCommerce discount based on the cart subtotal?
To create a WooCommerce cart subtotal discount, go to WooCommerce > Settings > Discount On Cart and open the Discount Tiers tab. Select ‘Amount’ as your discount mode. Here, you can define subtotal ranges (e.g., 100to199) and assign a fixed or percentage discount to that range. The plugin calculates the discount against the actual item totals, ensuring a smooth and accurate checkout experience.
How do I apply automatic cart discounts in WooCommerce without a coupon code?
Discount On Cart is designed to apply automatic cart discounts in WooCommerce instantly, with zero coupon codes required. Once you configure your discount rules in the plugin settings, the system constantly monitors the customer’s cart. The moment the cart meets your defined quantity or subtotal threshold, the discount is automatically applied as a negative cart fee, and a success message is displayed to the customer.
Can I use this plugin to hide WooCommerce prices for guest users?
Yes! The plugin includes a built-in feature to hide WooCommerce prices and the “Add to Cart” button for guest users (non-logged-in visitors). To enable this, go to WooCommerce > Settings > Discount On Cart > General Settings. You can customize the text shown to guests (e.g., “Login to see price”) and define a Sign-Up button URL to redirect them to your registration page, making it perfect for wholesale and B2B stores.
How do I schedule WooCommerce sales and discounts in advance?
You can easily schedule WooCommerce sales by using the built-in date scheduler for your discount tiers. When creating a new discount tier in the plugin settings, simply select a Start Date and End Date. The discount will automatically activate and deactivate on those specific dates. This allows you to completely automate promotions like Black Friday, Cyber Monday, or seasonal sales without any manual intervention.

