Requirements
↑ Back to topBefore starting, check that you have the minimum characteristics to ensure the correct functioning of DWH Agentify.
- WordPress: version 6.0 or above
- WooCommerce: version 8.0 or above
- PHP: version 7.4 or above
Installation
↑ Back to topTo start using a product from WooCommerce.com, you can use the “Add to store” functionality on the order confirmation page or the My subscriptions section in your account.
- Navigate to My subscriptions.
- Find the Add to store button next to the product you’re planning to install.
- Follow the instructions on the screen, and the product will be automatically added to your store.
Alternative options and more information at:
Managing WooCommerce.com subscriptions.

Setup and Configuration
↑ Back to topGet started by using DWH Agentify by configuring your context.
To set up your store with DWH Agentify:
- Go to: WooCommerce > Settings > DWH Agentify.
- Optionally enable the cache for better performance.
- Choose and set the configuration you prefer, according to your desired scenario.
- Set the endpoint for Agent account customers list.
- Set the endpoint for Agent account customer details.
- Set the endpoint for Agent account new customer registration form.
- Set the endpoint for Agent account sales list.
- Set the endpoint for Agent account sales details.
- Set the endpoint for Agent account coupons list.
- Set the endpoint for Agent account notifications list.
- Set the endpoint for Agent account notification details.
- Save changes.

- Go to: Users > All levels.
- Create your desired levels to manage agents rules.
- Set each group according to your desired scenario.
- Save changes.

- Go to: Users > Add user.
- Create your agents.
- Save changes.

- Go to: Users > {Edit customer}.
- Assign customer agent.
- Save changes.

- Go to: Products > All products > {Edit product}.
- Optionally set specific commission rules for levels.
- Save changes.

- Go to: WooCommerce > Settings > Payments.
- Optionally enable plugin custom payment methods (Later payment).
- Configure custom payment methods.
- Save changes.

- Go to: WooCommerce > Settings > Emails.
- Optionally enable plugin custom emails (Account approved).
- Configure custom emails.
- Save changes.

- Go to: Marketing > Coupons > {Edit coupon}.
- Optionally set specific rules for levels.
- Save changes.
Usage
↑ Back to topGet started by using DWH Agentify by configuring your context.

Agents can view their statistics info in agents dashboard.

Agents can view their customers in their AgentAccount page.

Agents can view customer details in their AgentAccount page.

Agents can add their own customers in their AgentAccount page.

Agents can view sales in their AgentAccount page.

Agents can view sale details in their AgentAccount page.

Agents can view their reserved notifications in their AgentAccount page.

Agents can view their reserved coupons in their AgentAccount page.
Plugin options
↑ Back to topDWH Agentify introduces a large number of features, here a complete list with description to guide you in the configuration.
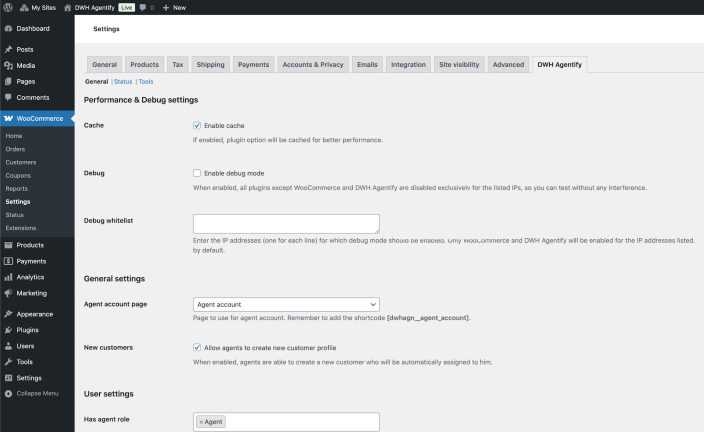
Settings page
WooCommerce > Settings > DWH Agentify
:: Performance & Debug settings section ::
Cache
Description
When enabled, plugin options are stored both in memory and in a persistent transient to prevent redundant database queries, to improve performance. It is recommended to disable the cache in development mode and enable it in production.
Specifications
-
Type:
bool -
Default:
false
Debug
Description
When enabled, all plugins except WooCommerce (required) and DWH Agentify are disabled exclusively for the listed IPs. This allow you to make test without any kind of third part asset interference, but your website customers won't notice anything.
Specifications
-
Type:
bool -
Default:
false
Debug whitelist
Description
Allows you to specify the IP addresses for which to enable debug mode.
Specifications
-
Type:
string - Default:
:: General settings section ::
Agent account page
Description
Page to use for agent dashboard. By default, when plugin installed, a new page called 'Agent account' is created with required shortcode [dwhagn__agent_account] in content.
Specifications
-
Type:
integer - Default: {agent account page ID}
New customers
Description
When enabled, agents are able to create a new customer who will be automatically assigned to him.
Specifications
-
Type:
bool -
Default:
false
:: User settings section ::
Has agent role
Description
Choose the roles you consider agents to whom the levels and their settings will apply.
Specifications
-
Type:
comma separated string -
Default:
Agent
Default level
Description
When agent register in Agent account registration form, he will be assigned automatically to choosen level.
Specifications
-
Type:
integer - Default: {level ID}
Level change
Description
Set rules to automatically move agents into another level according to total commission reached.
:: Endpoint settings section ::
Agent customers endpoint
Description
Choose the endpoint for agent customers list in AgentAccount page.
Specifications
-
Type:
string -
Default:
customers
Agent view customer endpoint
Description
Choose the endpoint for agent single customer details in AgentAccount page.
Specifications
-
Type:
string -
Default:
view-customer
Agent new customer endpoint
Description
Choose the endpoint for agent new customer registration form in AgentAccount page.
Specifications
-
Type:
string -
Default:
new-customer
Agent sales endpoint
Description
Choose the endpoint for agent sales list in AgentAccount page.
Specifications
-
Type:
string -
Default:
sales
Agent view sale endpoint
Description
Choose the endpoint for agent single sale details in AgentAccount page.
Specifications
-
Type:
string -
Default:
view-sale
Agent notifications endpoint
Description
Choose the endpoint for agent notifications list in AgentAccount page.
Specifications
-
Type:
string -
Default:
notifications
Agent view notification endpoint
Description
Choose the endpoint for agent single notification details in AgentAccount page.
Specifications
-
Type:
string -
Default:
view-notification
Coupons endpoint
Description
Choose the endpoint for public coupons list in AgentAccount page.
Specifications
-
Type:
string -
Default:
coupons
Agent logout endpoint
Description
Choose the endpoint for trigger agent logout.
Specifications
-
Type:
string -
Default:
logout
Settings page
WooCommerce > Settings > Payments
:: Later payment ::
Allows agents to place order for customers with later payment. Customer can pay for order later.
Enable for shipping methods
Description
Select shipping methods that allow this payment method. Leave blank to enable for all methods.
Enable for min amount
Description
Set a minimum cart amount to make this payment method available (set 0 to give no limit).
Enable for max amount
Description
Set a maximum cart amount to make this payment method available (set 0 to give no limit).
Choose an order status
Description
Choose order status you will be set after checkout when the payment method used.
Settings page
WooCommerce > Settings > Emails
:: Account approved ::
Send an email to agents notifying them when their account has been approved.
Level options
↑ Back to topOrder page
Users > All levels > {Edit level}
:: Commission settings ::
Type
Description
Choose whether commission should be a fixed value or calculated as a percentage.
Specifications
-
Type:
enum -
Default:
amount
Allowed values
- amount: Fixed commission amount
- percentage: Percentage commission amount
Value
Description
Set commission value. Should be a number with up to 2 decimal places, with (.) as decimal separator.
Specifications
-
Type:
integer - Default:
Apply to
Description
Select the order items on which commission should be applied.
Specifications
-
Type:
enum - Default: {empty}
Allowed values
- line_item: Calculate commission on products total amount
- shipping: Calculate commission on shippings total amount
- fee: Calculate commission on fees total amount
Tax mode
Description
Choose whether calculate commission should be on tax included or tax excluded prices.
Specifications
-
Type:
enum -
Default:
incl
Allowed values
- incl: Calculate commission on prices including taxes
- excl: Calculate commission on prices excluding taxes
Price range
Description
Set the price range (min/max) on which commission should be applied. No commission will be applied on items out of range.
Specifications
-
Type:
integer - Default:
:: Login & Account settings section ::
Add note
Description
Allow agents to add order notes.
Specifications
-
Type:
bool -
Default:
false
Account approval
Description
Enable account approval for agents in the level. Shop manager can manually approve accounts so agent can login and access. Agent receives an email to inform him when his account approved.
Specifications
-
Type:
bool -
Default:
false
Registration fields
Description
Add billing address fields to agent registration form. If the general option 'Default level' is set to 'Allow to choose', the behavior of this option depends on the chosen level, otherwise the default level configuration 'Base' will be used.
Specifications
-
Type:
bool -
Default:
false
Billing address edit
Description
When enabled, agents cannot edit or change their customers billing address in MyAccount page, they can only complete empty fields.
Specifications
-
Type:
bool -
Default:
false
Customer agent
Description
Display the agent assigned to customer in MyAccount page.
Specifications
-
Type:
bool -
Default:
false
Coupons
Description
Display an additional page in AgentAccount to show public coupons
Specifications
-
Type:
bool -
Default:
false
:: Cart & Checkout settings section ::
Emails copy
Description
Send a copy of customer emails related to orders to the agent.
Specifications
-
Type:
bool -
Default:
false
Disable payment methods
Description
Determine which payment methods, among those installed and enabled in WooCommerce, should be disabled for the agents in the level.
Specifications
-
Type:
enum - Default: {empty}
Customer options
↑ Back to topCustomer page
Users > All users > {Edit user}
:: User settings section – Customer role ::
Agent
Description
Select the agent you want to assign the customer.
Specifications
-
Type:
enum - Default: {empty}
:: User settings section – Agent role ::
Level
Description
Select the level you want to assign the agent.
Specifications
-
Type:
enum - Default: {BASE level ID}
Enabled
Description
Select agent account status to approve registration and enable login.
Specifications
-
Type:
integer - Default: 1
Allowed values
- Disabled account
- 1: Enabled account
Order options
↑ Back to topOrder page
WooCommerce > Orders > {Edit order}
:: Agent & Commission settings ::
Assigned agent
Description
Choose the agent you want to assign the order.
Specifications
-
Type:
enum - Default: {according to configuration}
Commission type
Description
Choose whether commission should be a fixed value or calculated as a percentage.
Specifications
-
Type:
enum - Default: {according to configuration}
Allowed values
- amount: Fixed commission amount
- percentage: Percentage commission amount
Commission value
Description
Set commission value. Should be a number with up to 2 decimal places, with (.) as decimal separator.
Specifications
-
Type:
integer - Default: {according to configuration}
Apply to
Description
Select the order items on which commission should be applied.
Specifications
-
Type:
enum - Default: {according to configuration}
Allowed values
- line_item: Calculate commission on products total amount
- shipping: Calculate commission on shippings total amount
- fee: Calculate commission on fees total amount
Tax mode
Description
Choose whether calculate commission should be on tax included or tax excluded prices.
Specifications
-
Type:
enum - Default: {according to configuration}
Allowed values
- incl: Calculate commission on prices including taxes
- excl: Calculate commission on prices excluding taxes
Price range
Description
Set the price range (min/max) on which commission should be applied. No commission will be applied on items out of range.
Specifications
-
Type:
integer - Default: {according to configuration}
Product options
↑ Back to topProduct page
Products > All products > {Edit product}
:: General tab – Level settings ::
Commission rule override – Type
Description
Choose if and how override level commission rule for the specific product.
Specifications
-
Type:
enum - Default: {empty} -> As level defined
Allowed values
- {empty}: Use commission rules type according to agent level configuration
- amount: Set a fixed commission amount
- percentage: Set a percentage commission amount
Commission rule override – Value
Description
Choose the override commission value for the specific product.
Specifications
-
Type:
integer - Default:
Coupon options
↑ Back to topCoupon page
Marketing > Coupons > {Edit coupon}
:: General tab ::
Show in AgentAccount
Description
When checked, the coupon will be visible on AgentAccount page for agents in levels in which this feature is enabled.
Specifications
-
Type:
bool -
Default:
false
:: Usage restriction tab ::
Allowed levels
Description
Allow coupon usage to customers assigned to agents assigned to selected levels. No levels selected means no restrictions.
Specifications
-
Type:
enum - Default: {empty}
How to translate
↑ Back to topTranslate DWH Agentify is very simple.
DWH Agentify is already provided natively in English. All plugin strings have been localized using the GNU gettex framework to make it completely translation ready, so it can be easly translated in the same way that other WordPress plugins: you can translate DWH Agentify using special translation plugins, such as WPML or Polylang for example or all other similar plugins.
Here a simple guide to translate DWH Agentify in the language of your choice without plugins.
:: Translating with POEDIT ::
WordPress, with all its themes and plugins, based translations on GNU gettex framework, that use three types of files:
- PO (Portable Object) files
- MO (Machine Object) files
- POT (Portable Object Template) files
The first step is to get a translation tool able to manage this kind of files; there are many ones available, in this guide we'll use POEDIT, a free open source software, easy to use and available for MacOSX, Windows, Linux.
Create a new translation with Poedit is very simple, here a step-by-step guide to help you to make it.
- Install Poedit
- Open Poedit and go to 'File -> New from POT/PO file'
- In the popup box that appears, navigate into plugin folder and select the file 'dwh-agentify/i18n/dwh-agentify.pot'
- When the file is loaded, another box will pop up asking for the language you want to translate. Simply choose your target language
- String by string, enter your translation in the 'Translate box' at bottom
When finished, validate your translation and save the file, named as: dwh-agentify-it_IT. The name pattern is composed by:
- dwh-agentify: the plugin domain name, usually the plugin folder name (as described in WordPress i18n standards)
- it: the GNU language code
- IT: the GNU country code
After saving, Poedit will create two files:
- dwh-agentify-it_IT.po
- dwh-agentify-it_IT.mo
Your translations are ready! To use them, you just have to move them into the folder:
wp-content/languages/plugins/Now, go to your website and DWH Agentify is finally translated in your language!
Templates customization
↑ Back to topDWH Agentify templates can be override to customize as you prefer.
:: Templates override ::
We make use of same WooCommerce override system, so it's possible to create own templates and customize them. All templates are contained into the folder:
wp-content/plugins/dwh-agentify/templates/Here a list of plugin templates that can be customized:
-
myaccount/view-wishlist.phpDetails page for single wishlist in MyAccount page -
myaccount/wishlists.phpWishlists list page in MyAccount page -
single-product/tabs/wishlist.phpAdd product to wishlist tab in product page
To know more about WooCommerce templates override system, please refer to WooCommerce official documentation.
Template structure & Overriding templates via a theme:: How to override a template ::
Copy the default template from:
wp-content/plugins/dwh-agentify/templates/{TEMPLATE_PATH}and paste it in your theme folder at:
wp-content/themes/{YOUR_ACTIVE_THEME}/dwh-agentify/{TEMPLATE_PATH}preserving the same folder tree.
Open the template you pasted into the theme folder with a text editor of choice and perform any changes that you want in your new template file.
:: How to update templates overrides ::
Sometimes we update default templates when a new version of plugin is released. If you are using older templates, you may need to update them. Go to:
DWH Agentify > Status
Here you can find a list of templates overridden by your parent/child theme and a warning message that they need to be updated.
Save a backup of the outdated template and copy the default template from:
wp-content/plugins/dwh-agentify/templates/{TEMPLATE_PATH}Paste it in your theme folder at:
wp-content/themes/{YOUR_ACTIVE_THEME}/dwh-agentify/{TEMPLATE_PATH}preserving the same folder tree.
Open the template you pasted into the theme folder with a text editor of choice and replicate any changes that you had to the previous template in your new, updated template file.
Important notes
As WordPress best practice, we suggest to make use of a WordPress Child Theme to avoid losing customizations in case of theme update. To know more about WordPress Child Theme, please refer to WordPress official documentation.
Child Themes WordPress CodexPluggable functions
↑ Back to topDWH Agentify provide a large number of pluggable functions to allow developers to extends or customize default behavior.
If you are a developer or you want to go deep in customization, DWH Agentify give you many possible customizations by using the pluggable functions. All pluggable functions are contained into the file:
wp-content/plugins/dwh-agentify/includes/pluggable-functions.phpTo know more about WordPress pluggable functions, please refer to WordPress official documentation.
Pluggable Functions WordPress CodexImportant notes
As WordPress best practice, we suggest to make use of a WordPress Child Theme to avoid losing customizations in case of theme update. To know more about WordPress Child Theme, please refer to WordPress official documentation.
Child Themes WordPress CodexREST API
↑ Back to topDWH Agentify is perfectly integrated and extends default WooCommerce REST API to manage its own custom fields.
Level API
/wp-json/wc/v3/levels/
Example schema
[...]
{
    "commission_rule": {
        "type": "amount",
        "value": "10",
        "apply_to": [
            "line_item"
        ],
        "tax_mode": "incl",
        "price_range": {
            "min": "10",
            "max": "100"
        }
    },
    "allow_add_note": true,
    "account_approval": true,
    "billing_fields_on_registration": true,
    "disable_billing_address_edit": true,
    "show_customer_agent": true,
    "coupons": true,
    "enable_notifications": true,
    "disabled_payment_methods": [
        "bacs"
    ]
}
[...]
Customer API
/wp-json/wc/v3/customers/
Example schema
[...]
{
    "agent_id": 14,}
[...]
Agent API
/wp-json/wc/v3/customers/
Example schema
[...]
{
    "level_id": 114,
    "enabled": true,}
[...]
Products API
/wp-json/wc/v3/products/
Example schema
[...]
{
    "level": {
        "commission_rule": {
            "38": {
                "type": "",
                "value": "20"
            },
            "55": {
                "type": "",
                "value": "10"
            }
        }
    }
}
[...]
Orders API
/wp-json/wc/v3/orders/
commission_total
Description
The order total commission.
Specifications
-
Type:
float - Default:
commission_status
Description
The commission payment status.
Specifications
-
Type:
string - Default:
Example schema
[...]
{
    "agent_id": 14,
    "commission_rule": {
        "type": "percent",
        "value": "10",
        "apply_to": [
            "line_item"
        ],
        "tax_mode": "incl",
        "price_range": {
            "min": "10",
            "max": "100"
        }
    },
    "commission_total": 10,
    "commission_status": "",
}
[...]
Coupon API
/wp-json/wc/v3/coupons/
Example schema
[...]
{
    "is_public": false,
    "levels": [10, 13, 26, 30],
}
[...]
To know more about Rest API, please refer to WordPress and WooCommerce official documentations.
WooCommerce Rest APIWordPress Rest API