Create rules to automate order approvals based on various conditions. Approve orders based on user roles and for specific products, customers, or tags. The Order Approval plugin helps you streamline and automate order approval processing.
Installation
↑ Back to topTo start using a product from WooCommerce.com, you can use the “Add to store” functionality on the order confirmation page or the My subscriptions section in your account.
- Navigate to My subscriptions.
- Find the Add to store button next to the product you’re planning to install.
- Follow the instructions on the screen, and the product will be automatically added to your store.
Alternative options and more information at:
Managing WooCommerce.com subscriptions.

Setup and Configuration
↑ Back to topAfter activation of the Order Approval for WooCommerce extension, you can find the “Order Approval” section in your WooCommerce menu. Click to view settings and create rules for order approval.
Creating and Managing New Order Approval Rules
↑ Back to topThe WooCommerce Order Approval Plugin allows you to create rules for approving orders based on different conditions. To configure the plugin, follow these steps:
General Settings
↑ Back to topGo to WooCommerce > Approve Order > General Settings, and here you can configure the following settings:
- Plugin Status: Set the status of the plugin as “Enabled” or “Disabled”.
- Payment Within Days: Enter the number of days allowed for payment. If left empty, the order will be cancelled after 1 day.

Order Approval Rules – Create and Manage
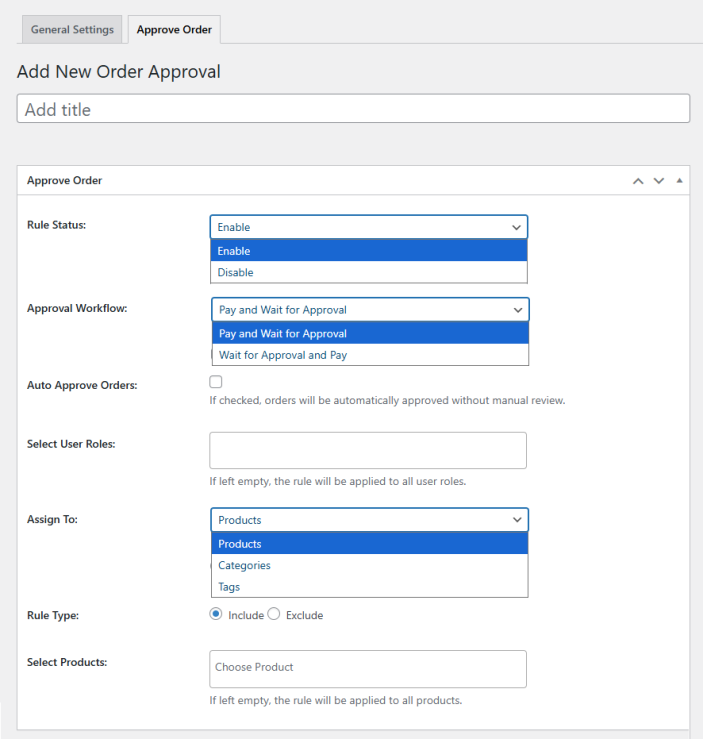
↑ Back to topTo create and edit order approval rules, go to WooCommerce > Approve Order > Approve Order Tab and click on the “Add New Order Approval” button to create rules for managing order approvals. You can configure the following settings:
- Add Title: Add a title for the order approval rule.
- Rule Status: Select the status of the rule as enabled or disabled.
- Approval Workflow: Select how the order approval will work. You can select the following options from the dropdown menu:
- Pay and Wait for Approval
- Wait for Approval and Pay
- Auto Approve Orders: Click the checkbox to automatically approve orders without manual approval.
- Select User Roles: Select teh user roles for which you want to apply this specific rule. If left empty, the rule will be applied to user roles.
- Assign To: Select how you want to assign the rule. You can select the following from the dropdown:
- Product: Assign the rule to products.
- Categories: Assign the rule to specific categories.
- Tags: Assign the rule to tags.
- Rule Type: Choose the rule type to assign. You can either choose to include or exclude the rule for specific products, categories, or tags.
- Select Products/Categories/Tags: Choose teh specific products, categories, and tags that you want to include or exclude from the rule. If left empty, all the products, categories, or tags will be selected.
FAQs – Order Approval System for WooCommerce
↑ Back to topWhat is the “Payment Within Days” setting?
↑ Back to topThis setting defines how many days a customer has to complete payment. If left empty, the order will be automatically cancelled after 1 day.
Can I automatically approve orders without manual intervention?
↑ Back to topYes. When creating a rule, select the Auto Approve Orders checkbox. This bypasses manual approval and processes orders automatically.
How do I apply rules to specific products, categories, or tags?
↑ Back to topIn the Assign To dropdown, choose Product, Categories, or Tags. Then select the specific items to include or exclude. If left blank, the rule applies to all products, categories, or tags.
Can I apply rules to certain user roles only?
↑ Back to topYes. When creating a rule, select the user roles that the rule should apply to. If no roles are selected, the rule applies to all users.
How do I manage existing order approval rules?
↑ Back to topYou can edit or disable rules at any time by navigating to WooCommerce > Approve Order > Approve Order Tab, then clicking Edit on the rule you want to modify.