Hotel Booking is a complete hotel booking solution designed for hotel/motel/homestay owners, and property businesses to create and manage rooms effortlessly
With Hotel Booking, managing your hotel’s reservations is effortless from start to finish. Guests can check availability, book their preferred rooms, and complete secure payments, while the admin enjoys powerful tools that streamline daily operations
Installation
↑ Back to topTo start using a product from WooCommerce.com, you can use the “Add to store” functionality on the order confirmation page or the My subscriptions section in your account.
- Navigate to My subscriptions.
- Find the Add to store button next to the product you’re planning to install.
- Follow the instructions on the screen, and the product will be automatically added to your store.
Alternative options and more information at:
Managing WooCommerce.com subscriptions.

II. Updates
↑ Back to topPlease see this documentation.
III. Room Settings
↑ Back to top1. Create a Bookable Room
↑ Back to topTo create a bookable room, you need to:
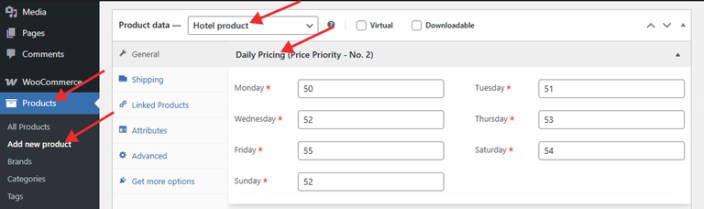
- Firstly, go to: WordPress Admin panel > Products > Add new product
- Then, you add the name, description & short description, featured image and gallery
- Select a category (read here to know how to add a category) and product tags for a room
- Next, you move on to product data tab, select hotel product in product data drop-down.
- After that, you can set the following settings:
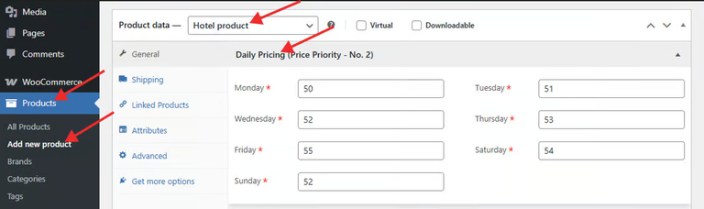
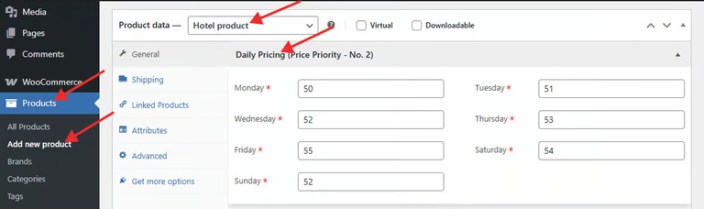
1.1 Set Daily Pricing Plan
You can define different nightly rates depending on the day
1.2 Configure Seasonal Pricing
With Seasonal Daily Pricing, you can: Divide the year into different seasons (for example: Low Season, High Season, Peak Season). In each season, set a specific price for each day of the week
This gives you full flexibility to match real-world demand. For example, higher prices on weekends or holidays, and lower ones on weekdays or off-season.
Example:
Suppose that you configure the settings in the backend as bellow:

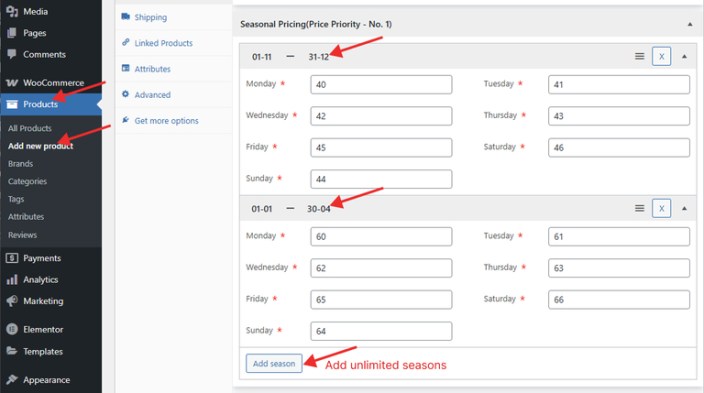
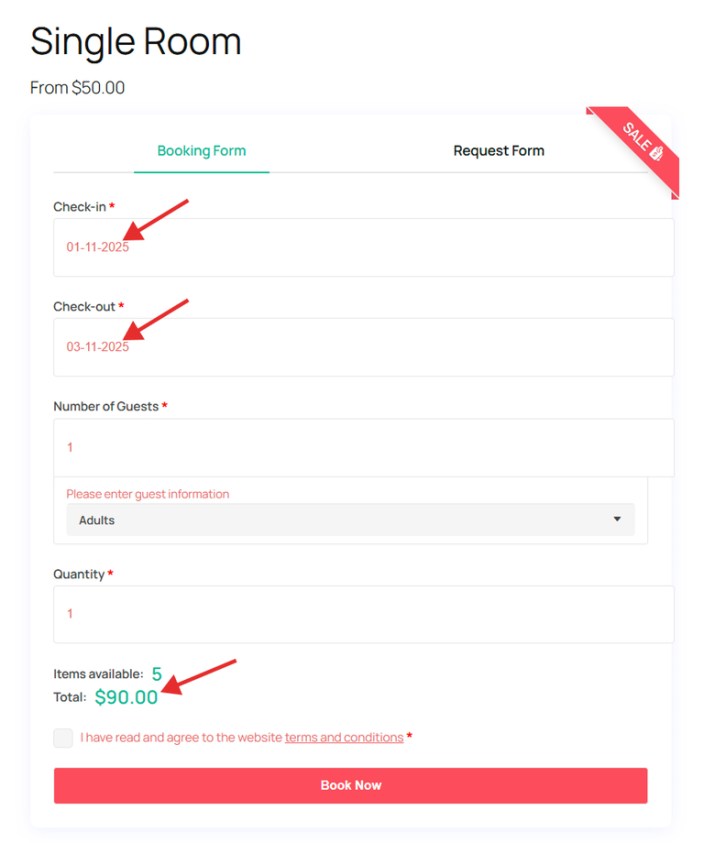
A customer makes a booking from 01/11/2025 to 03/11/2025, which includes Saturday night and Sunday night.
Under the general pricing plan, the price is $54 per Saturday night and $52 per Sunday night.
However, since the booking falls within the special season (from 01/11/2025 to 31/12/2025), the rates are discounted to $46 per Saturday night and $44 per Sunday night.
→ Total amount = $46 + $44 = $90
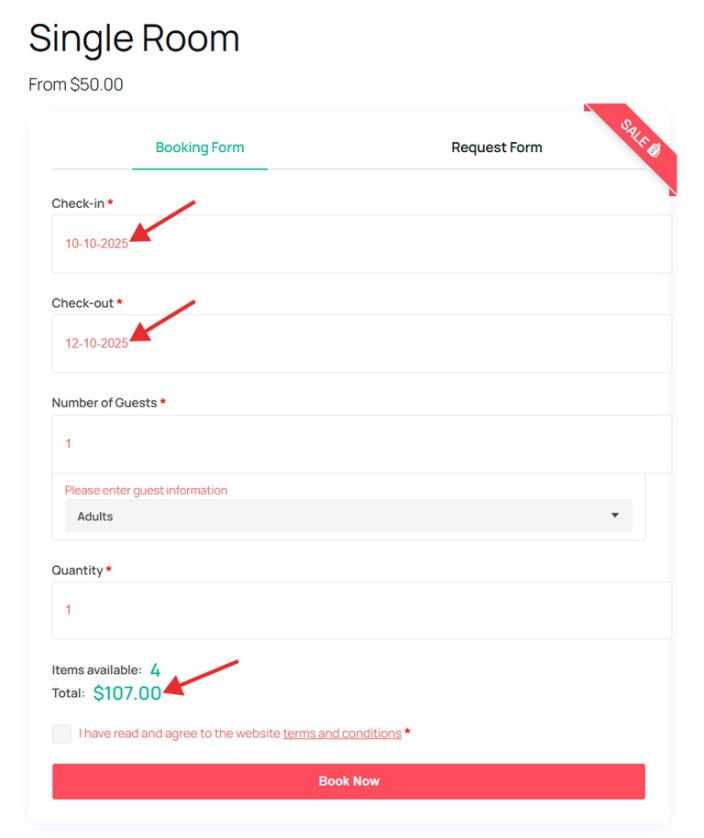
1.3 Add Discount
You can set discounts based on the length of stay. Choose from two discount types: Fixed Rate or Percentage, and decide whether to apply the discount to each night or to the entire booking
Example:
Suppose that you configure the settings in the backend as bellow:
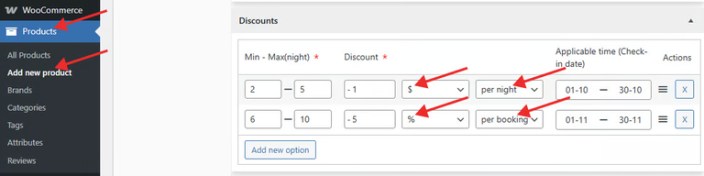
A customer makes a booking from 10/10/2025 to 12/10/2025, which includes Friday night and Saturday night.
Under the standard pricing plan, the rates are $55 per Friday night and $54 per Saturday night.
However, this booking qualifies for a special discount that applies when customers book 2 to 5 nights during the period 01/10/2025 to 30/10/2025. According to this rule, each night’s price is reduced by $1.
→ Total amount = ($55 – $1) + ($54 – $1) = $107
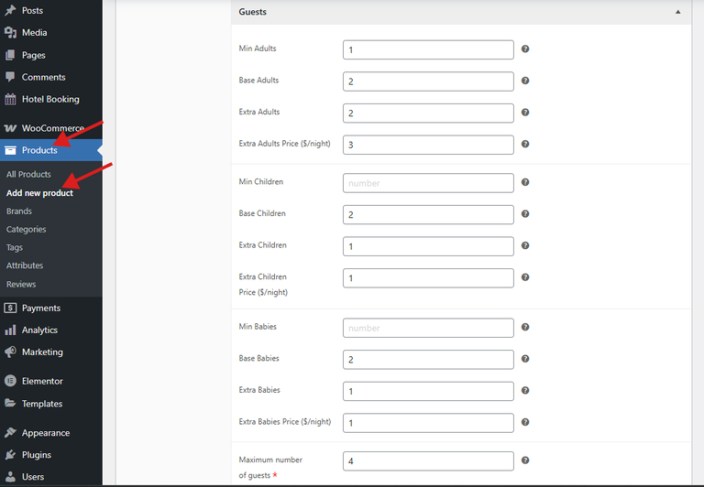
1.4 Set Guest Capacity & Extra Guest Pricing
With this feature, you can control guest capacity and pricing for each guest type.
Steps to set guest capacity and extra guest pricing
Step 1: Select Guest Types
Go to product >> add new product >> product data: select Hotel product >> advance options >> types of guests: select guest types. Then, save the changes
Step 2: Configure Guest Settings
Open the Guests tab
For each guest type, configure:
- Minimum number of guests
- Number of base guests
- Maximum number of extra guests
- Extra price per night for additional guests
Step 3: Set Maximum Room Capacity
Define the maximum total number of guests allowed in each room.
Note: The extra price per night is only available when the number of base guests is defined for that guest type.
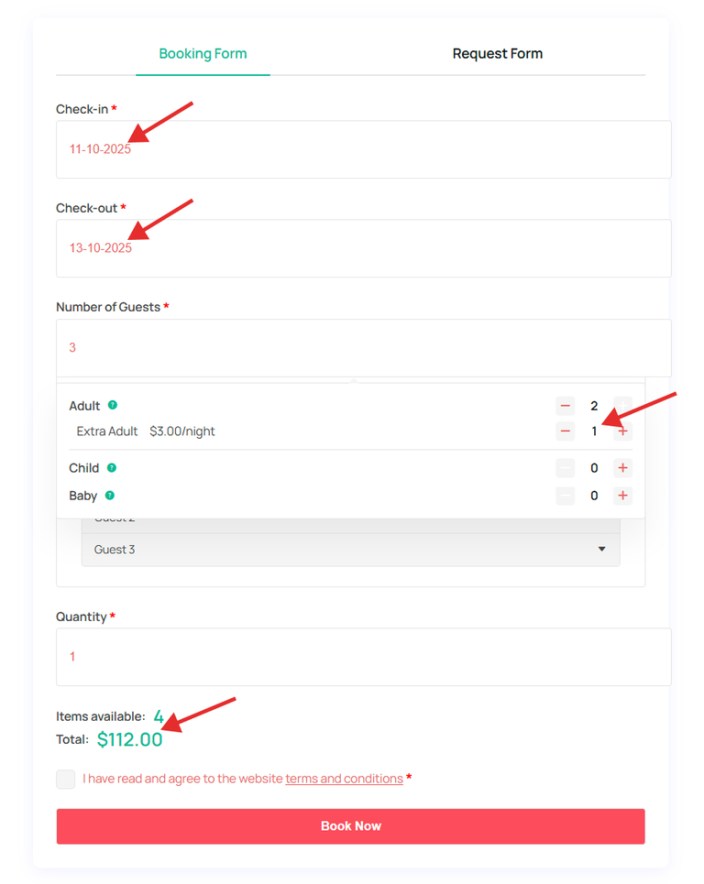
Example:
Suppose that you configure the settings in the backend as bellow:
A customer makes a booking from 11/10/2025 to 13/10/2025, which includes Saturday night and Sunday night.
Under the standard pricing plan, the rates are $54 per Saturday night and $52 per Sunday night.
However, they have 3 adults while base adults are 2, so they have to pay an extra amount for a adult, extra adult price is $3/night
→ Total amount = $54 + $52 + 3*2 (nights) = $112
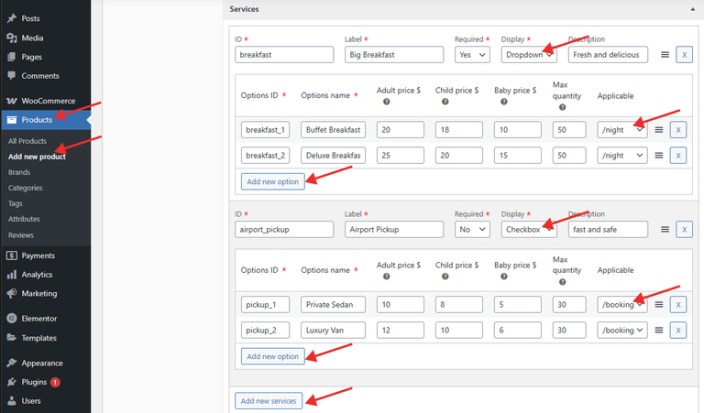
1.5 Add Additional Services
This feature allows you to add unlimited payable extra services and define multiple pricing options for each service.
For each option, you can:
- Set different prices by guest type (e.g. adult, child)
- Choose whether the charge applies per night or to the entire booking.
- Select display style for each option: Dropdown or checkbox
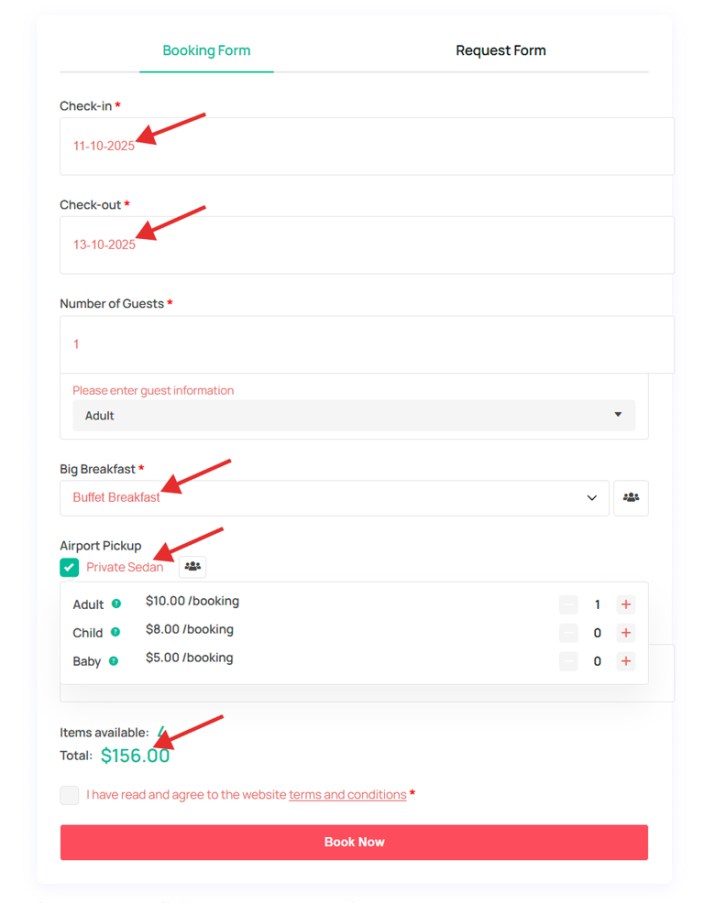
Example:
Suppose that you configure the settings in the backend as bellow:

A customer makes a booking from 11/10/2025 to 13/10/2025, which includes Saturday night and Sunday night.
Under the standard pricing plan, the rates are $54 per Saturday night and $52 per Sunday night.
He booked a buffet breakfast for an adult with $20/night, so he has to pay $40 for 2 nights. He booked private Sedan for an adult with $10/booking
→ Total amount = $54 + $52 + $40 + $10 = $ 156
1.6 Configure Inventory
Suppose your hotel has 5 single rooms. Instead of creating 5 separate products, you only need to create one product and set the inventory field to 5

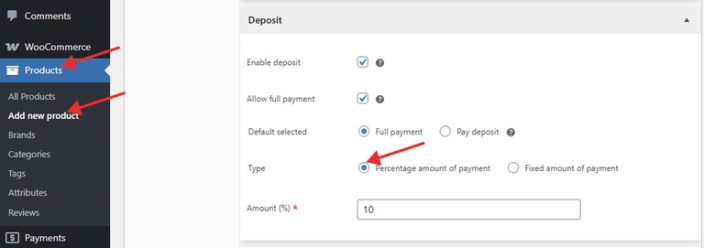
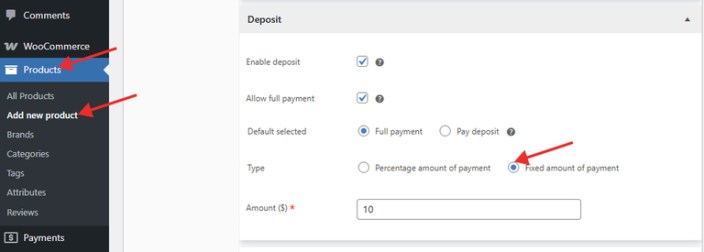
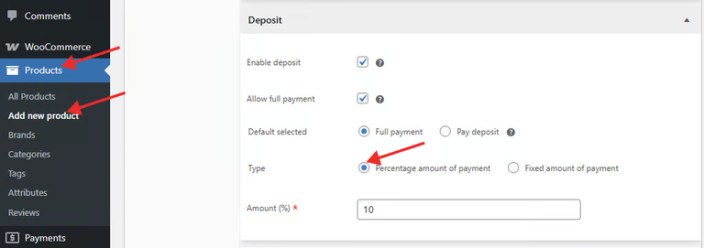
1.7 Define Deposit Amount
Deposit payment refers to the amount that customers must pay upfront when booking a room.
Steps to set up a deposit payment:
- Enable the feature: Tick the checkbox “Enable” to activate deposit payment
- Allow full payment (optional): Tick the checkbox “Allow full payment” if you want to display both deposit and full payment options on the product detail page.
- Select deposit type: Choose Percentage amount of payment or Fixed amount of payment
- Enter deposit value: Specify the amount or percentage that customers need to pay upfront.
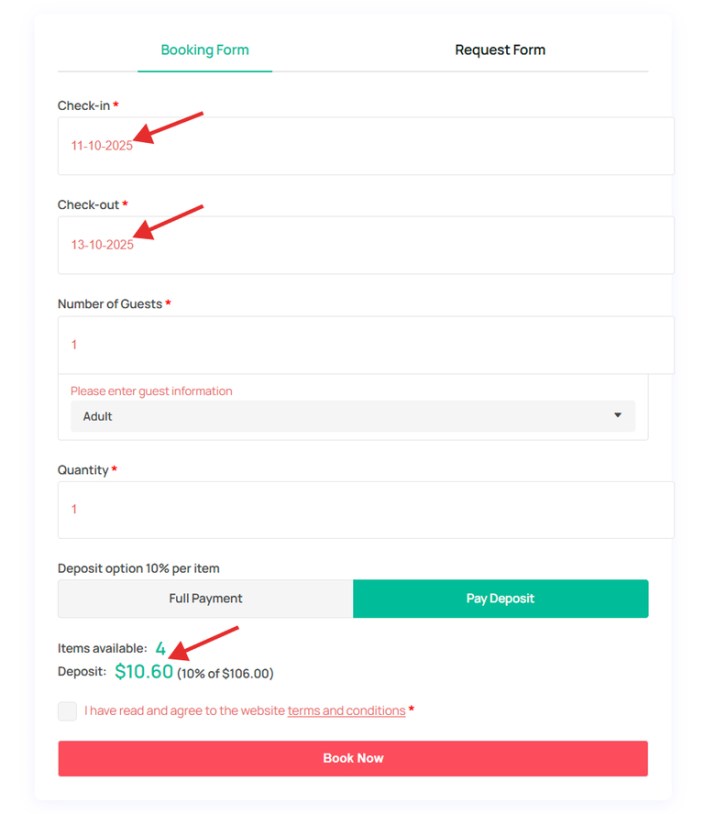
Example:
Suppose that you configure the settings in the backend as bellow:

A customer makes a booking from 11/10/2025 to 13/10/2025, which includes Saturday night and Sunday night.
Under the standard pricing plan, the rates are $54 per Saturday night and $52 per Sunday night.
→ Total amount = $54 + $52 = $106
→ Deposit = $106 * 10% = $10.6
He has to pay a deposit of $10.6
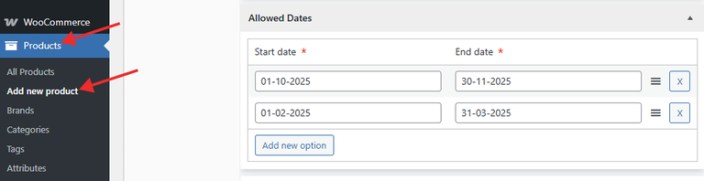
1.8 Specify Available Dates
These are the dates that customers are allowed to select when making a booking. Any dates outside of these ranges will be unavailable
With this feature, you can define multiple allowed time periods by setting start and end dates for each period.
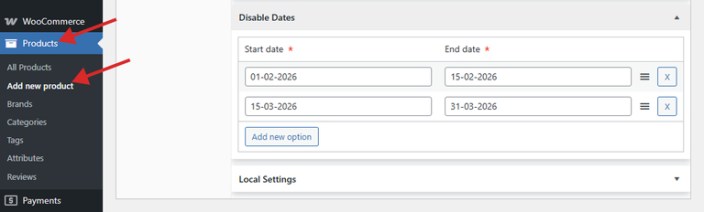
1.9 configure Disable Dates
These are the dates that customers are not allowed to select when making a booking.
With this feature, you can define multiple disabled periods by setting start and end dates for each one
Display in the Frontend
1.10 Set Local Settings
Please, note: These options will override the value in Global settings (WooCommerce > Settings > Hotel Booking)
With the feature, you can set:
a) Disable weekdays
You can choose days in the week in which are not permitted to select
- Global: Use the values defined in global Settings
- Local: Select disabled weekdays individually for each room
- None: No weekdays are disabled
b) Minimum advance booking days
The minimum number of days before the check-in or start date that a customer must make a booking. Example: If you set Minimum advance booking days = 2, so if today is March 10, the earliest check-in date customers can select is March 12.
Options to select:
- Global: Use the values defined in global Settings
- Local: Set minimum advance booking days individually for each room
- None: No restriction, so customers can book any time before the start date
c) Maximum advance booking days
The maximum number of days in advance that a customer is allowed to make a booking. For instance, if you set Maximum advance booking days = 60, so if today is March 1, the latest date available for booking will be April 30
Choose one of 3 options:
- Global: Use the values defined in global Settings
- Local: Set maximum advance booking days individually for each room
- None: There’s no limit, so customers can book any future date available in your calendar
d) Minimum Stay
The shortest number of nights that a guest must book for a specific room
Choose one of 3 options:
- Global: Use the values defined in global Settings
- Local: Set minimum stay individually for each room
- None: There is no minimum restriction, so guests can book for any length of stay
e) Maximum Stay
The longest number of nights that a guest is allowed to book for a specific room
Choose one of 3 options:
- Global: Use the values defined in global Settings
- Local: Set maximum stay individually for each room
- None: There is no restriction, so guests can book for any length of time
f) Type of guests
Add guest types for each room
Choose one of 2 options:
- Global: Use the values defined in global Settings
- Local: Select guest types individually for each room
g) Custom checkout fields
Select additional fields that you can add to the checkout form to collect extra information from customers during the booking process
Choose one of 3 options:
- Global: Use the values defined in global Settings
- Local: choose private custom checkout fields individually for each room
- None: No extra fields are added, so customers only fill in the default checkout fields from WooCommerce
h) Show checkout date
Choose one of 3 options:
- Global: Get value in global Settings
- Show: Display checkout date in booking form and enquiry form
- Hide: Hide checkout date in booking form and enquire form
j) Show form
Choose one of 4 options:
- Global: Use the values defined in Global Settings
- Only booking: Only show booking form in product detail pages
- Only enquire: Only show enquiry form in product detail pages
- Both: Show both booking form and enquiry form in product detail pages
- None: Hide both booking form and enquiry form in product detail pages

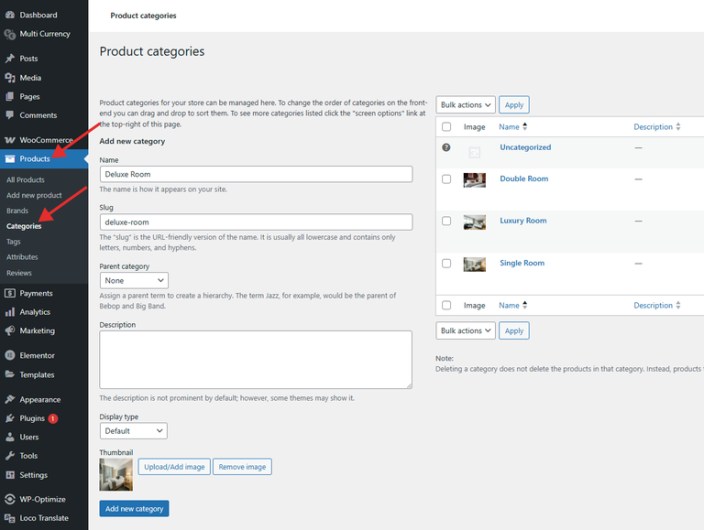
2. Add a Category
↑ Back to topGo to WordPress Admin panel > WooCommerce > Category
Configure the settings:
- Enter the name of the category
- Provide a unique slug (URL-friendly version) for the category
- Choose a parent category
- Add a short description
- Upload featured image
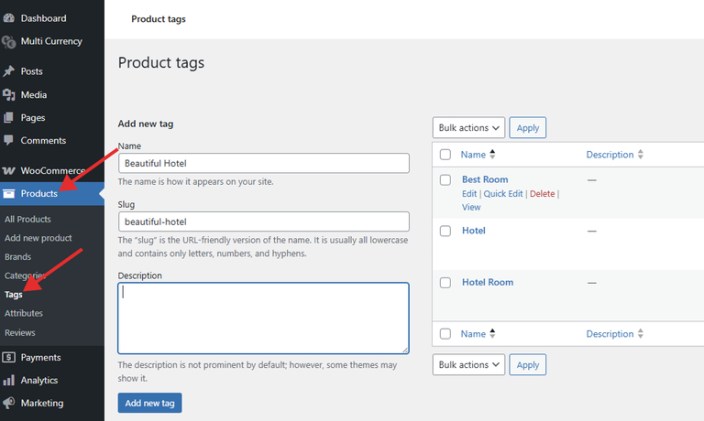
3. Add a Tag
↑ Back to topTags help customers find what they’re looking for faster, improve SEO, and give you better control over how content and products are organized
Go to WordPress Admin panel > WooCommerce > Tags
Configure the Settings:
- Add the name of the category
- Provide a unique slug (URL-friendly version) for the tag
- Write a short description
IV. Global Settings
↑ Back to topYou only need to configure these settings once, and they will automatically apply to all products
Go to: WordPress Admin panel > WooCommerce > Settings > Hotel Booking
1. Configure General Settings
↑ Back to topUse this function to set booking rules and the calendar
go to WordPress Admin panel > WooCommerce > Settings > Hotel Booking > General
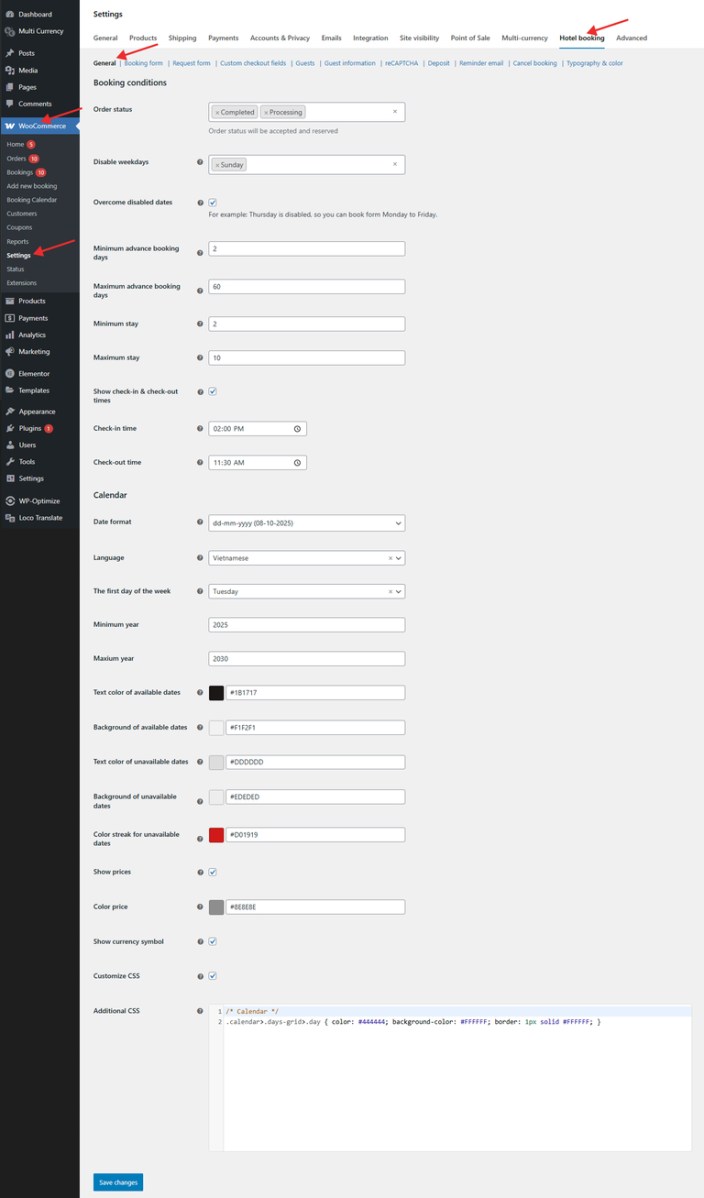
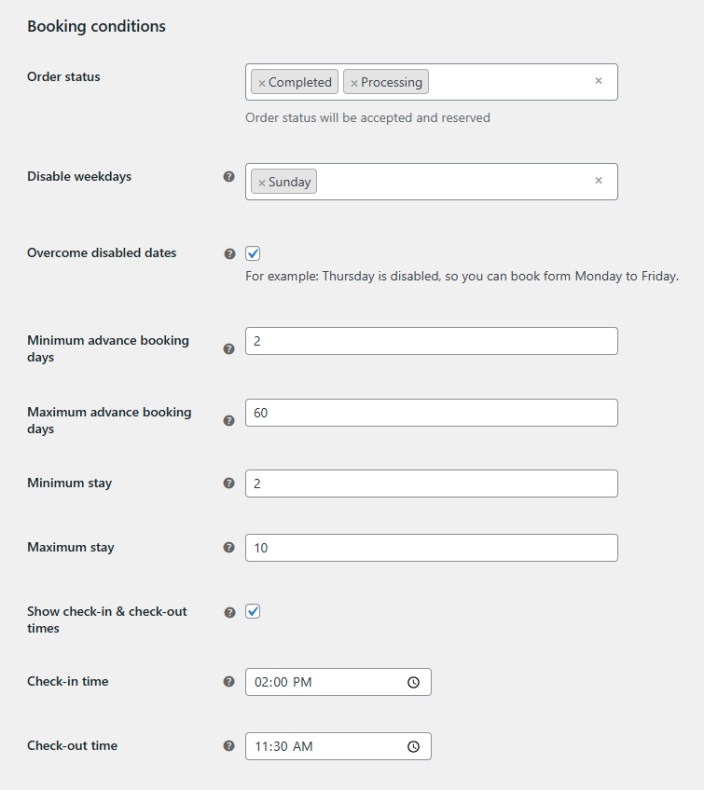
a) Booking Conditions
- Order Status: Choose which order statuses will be considered as accepted and reserved bookings.
- Disable Weekdays: Select specific weekdays that customers cannot book.
- Overcome Disabled Dates: Allow customers to select a date range that includes disabled dates. Example: If Thursday is set as a disabled day, enabling this option allows guests to book from Monday to Friday, even though Thursday is normally disabled.
- Minimum Advance Booking Days: Set the minimum number of days before the check-in or start date that a customer must make a booking. Example: If you set 2 days, and today is March 10, the earliest check-in date customers can choose is March 12.
- Maximum Advance Booking Days: Enter the maximum number of days in advance a customer can make a booking. Example: If you set 60 days, and today is March 1, the latest bookable date will be April 30.
- Minimum Stay: Define the shortest number of nights required for a booking. Example: Set 3 nights to prevent 1–2 night bookings.
- Maximum Stay: Specify the longest number of nights allowed for a booking. Example: Set 7 nights to limit long-term stays.
- Show Check-in & Check-out Times:
- Checked: Displays two additional fields for Check-in Time and Check-out Time, allowing you to set specific hours.
- Unchecked: The fields are hidden, and no time selection will be show.
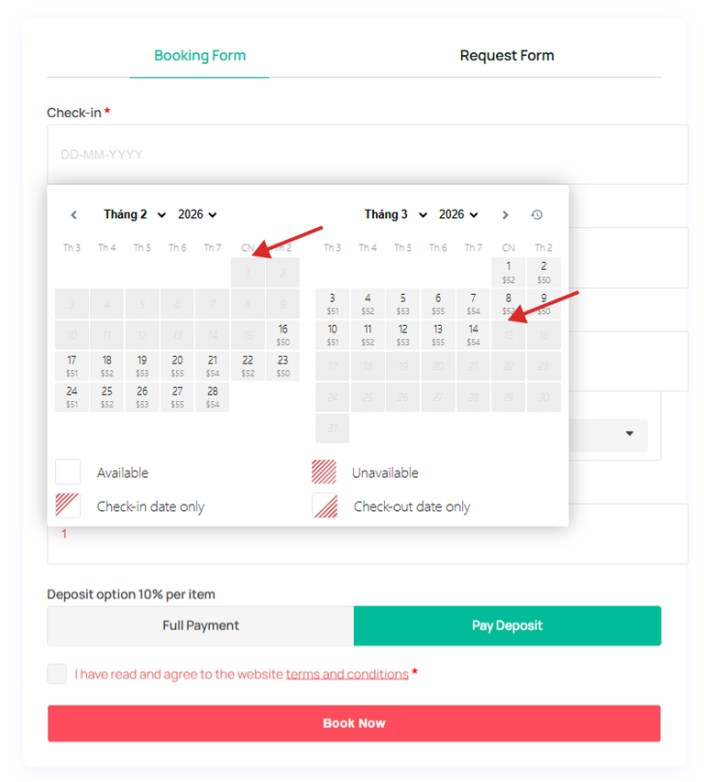
b) Calendar
- Date Format: Choose from 4 supported date formats including
yyyy-mm-dd,,yyyy/mm/dd,dd/mm/yyyy, ordd-mm-yyyy - Language: Choose a language for the calendar interface.
- The First Day of the Week: Define which day the calendar starts on. Example: Enter Sunday to make Sunday the first day of the week.
- Minimum Year: Set the earliest year that users can select a date from.
- Maximum Year: Set the latest year that users are allowed to select.
- Text Color of Available Dates: Define the text color for dates that are available for booking.
- Background Color of Available Dates: Choose the background color for available (bookable) dates.
- Text Color of Unavailable Dates: Set the text color for dates that are not available for booking.
- Background Color of Unavailable Dates: Choose the background color for unavailable or blocked dates.
- Color Streak for Unavailable Dates: Add a highlight color (streak) to visually indicate dates that are blocked, disabled, or unavailable.
- Show Prices: Display Price per Day in Calendar
- Checked: Shows an additional Price Color field, so you can choose the color used for prices on the calendar. Daily prices will be displayed under each date.
- Unchecked: Hides the Price Color field and does not display daily prices on the calendar
- Show currency symbol
- Checked: Shows the currency symbol next to each price in the calendar (e.g., $120, €95, ¥10,000). The symbol follows your WooCommerce store currency setting
- Unchecked: Hides the currency symbol; only the numeric price will be displayed (e.g., 120, 95, 10000)
- Custom CSS: Add Your Own Calendar Styles
- Checked: Displays an additional CSS input field where you can add your own custom CSS rules to further customize the calendar’s appearance and behavior.
- Unchecked: Hides the CSS input field, and you won’t be able to add custom styling for the calendar.
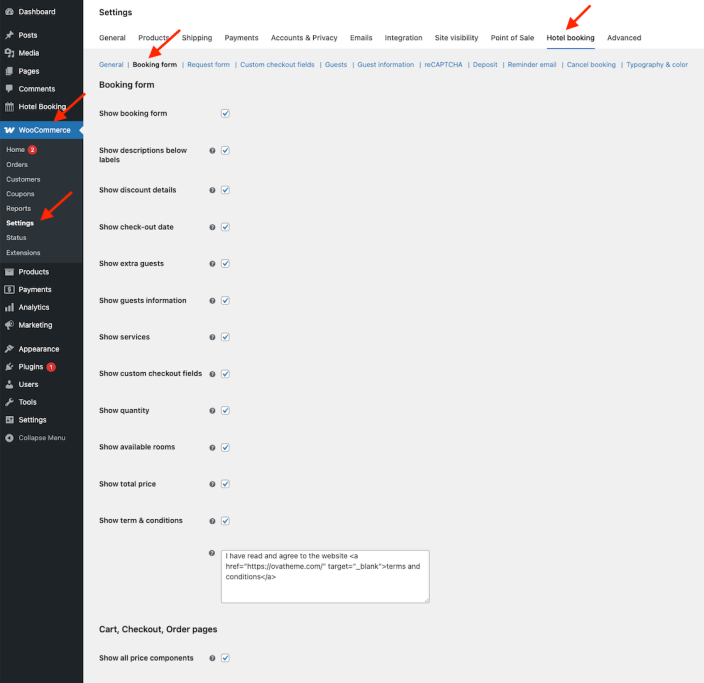
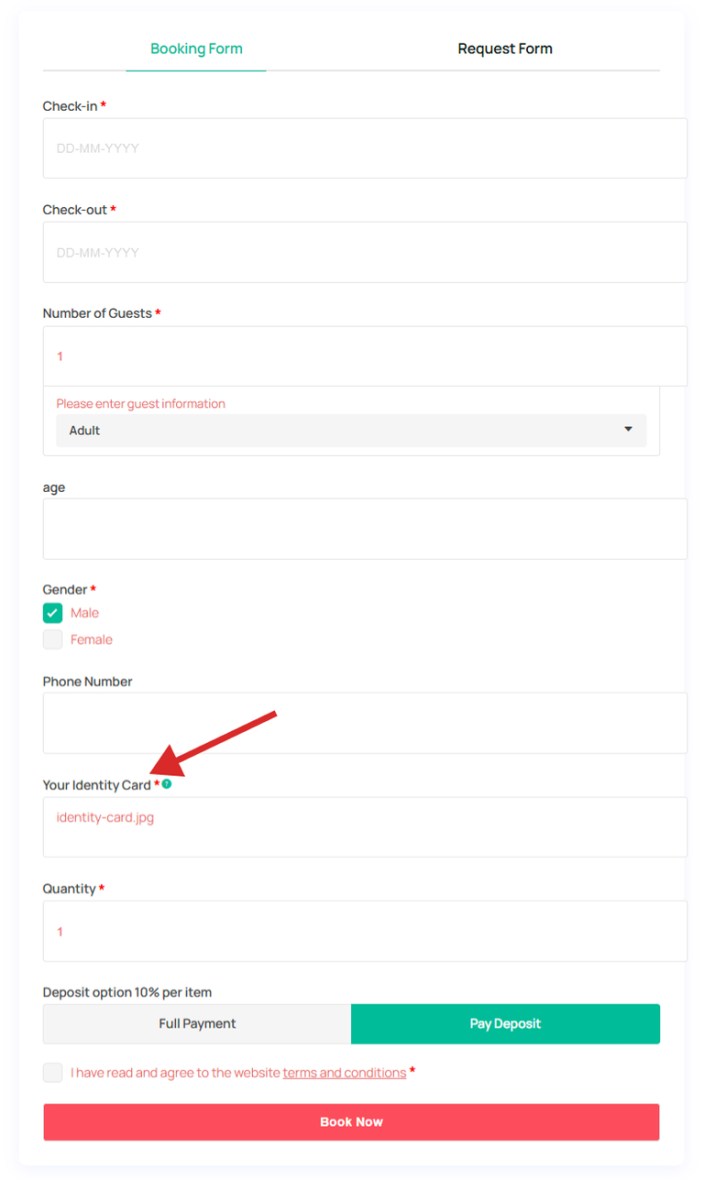
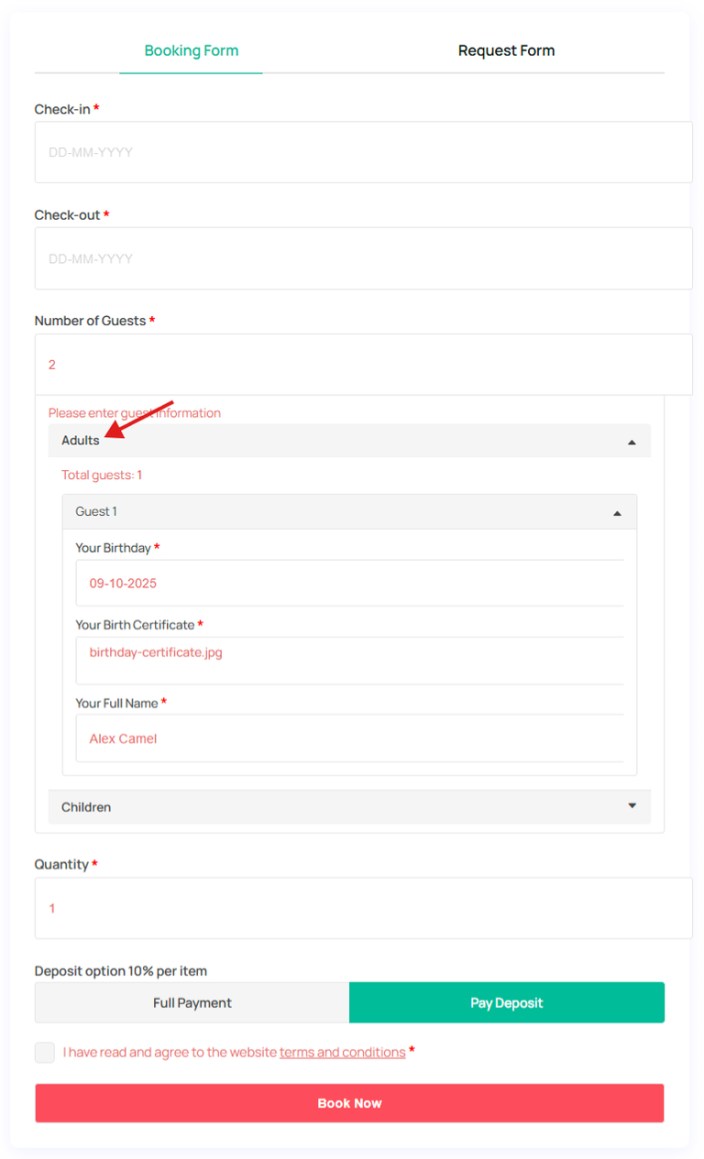
2. Set a Booking Form
↑ Back to topA booking form allows you to gather all the details needed to confirm a reservation
Go to WordPress Admin panel > WooCommerce > Settings > Hotel Booking > Booking Form
This feature lets you control what customers see during the booking and checkout process:
- Show/hide the booking form, discount details, check-out date, extra guests, guest information, services, custom checkout fields, quantity, available rooms, and total price.
- Show/hide the terms and conditions section, and add your own custom text for it.
- Choose to display or hide all price components in the cart, checkout, and order pages. This helps customers clearly understand how the total price is calculated
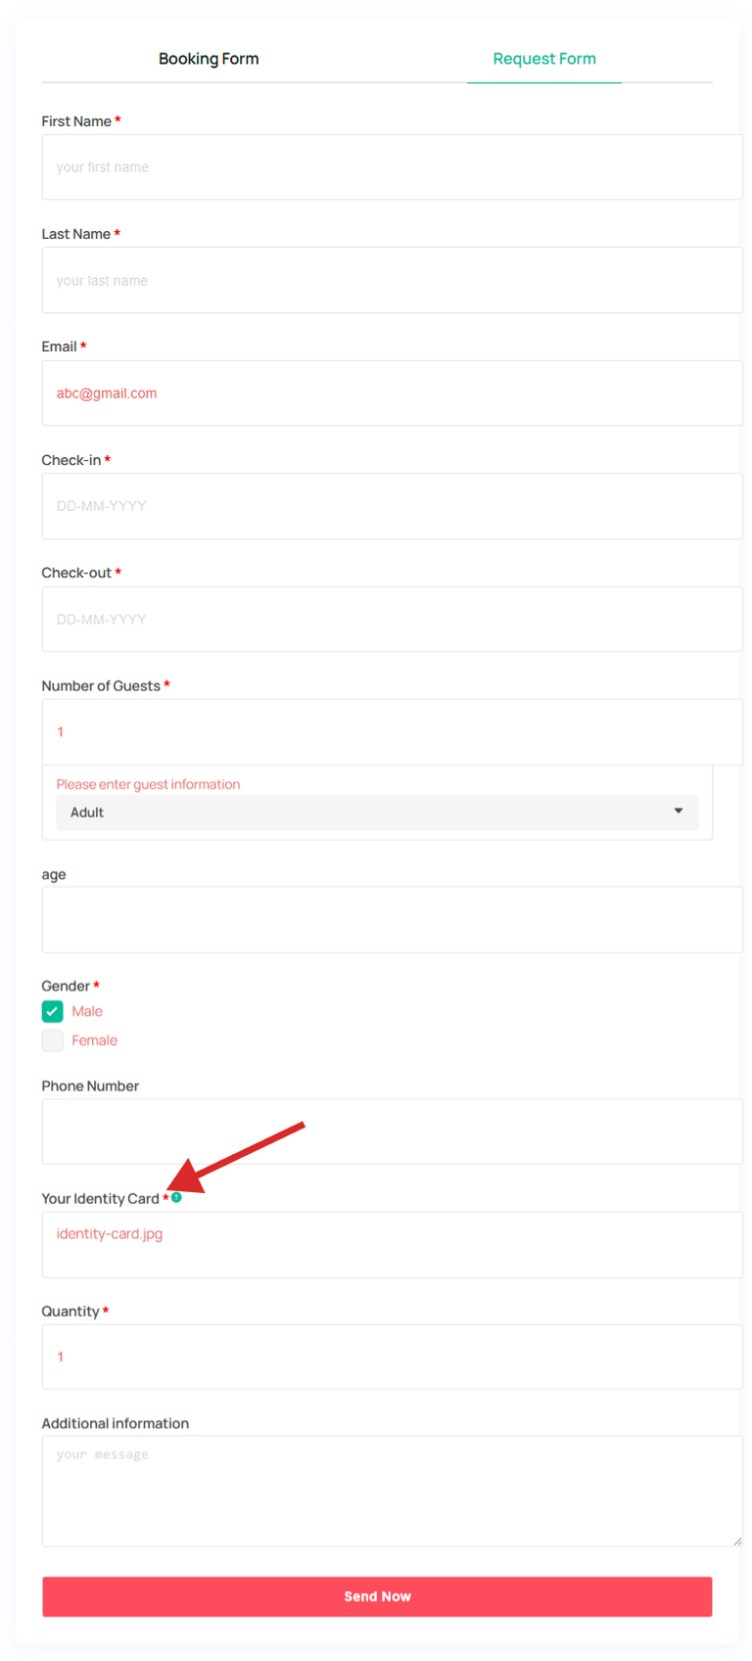
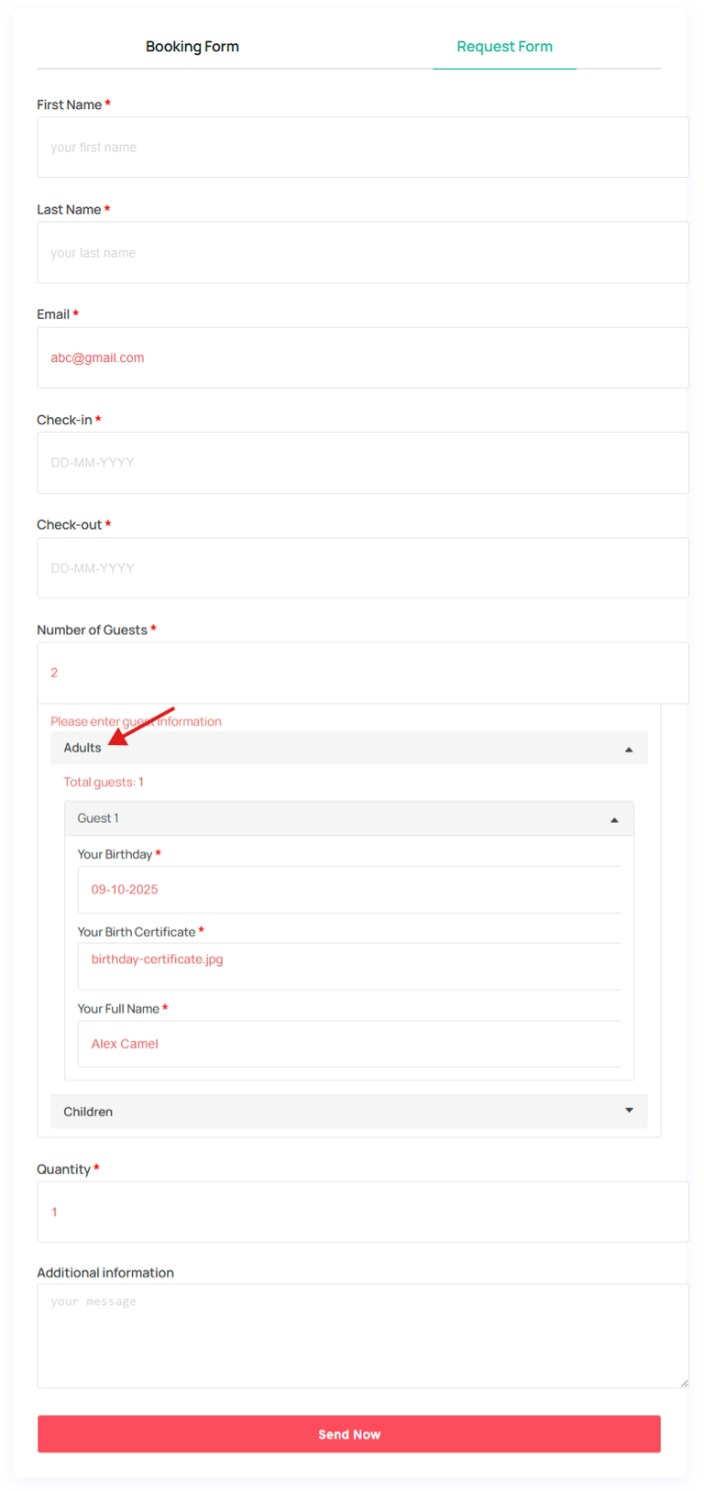
3. Set a Request Form
↑ Back to topA request form provides an easy way for customers to contact the business and submit their room requests
Go to WordPress Admin panel > WooCommerce > Settings > Hotel Booking > Request Form
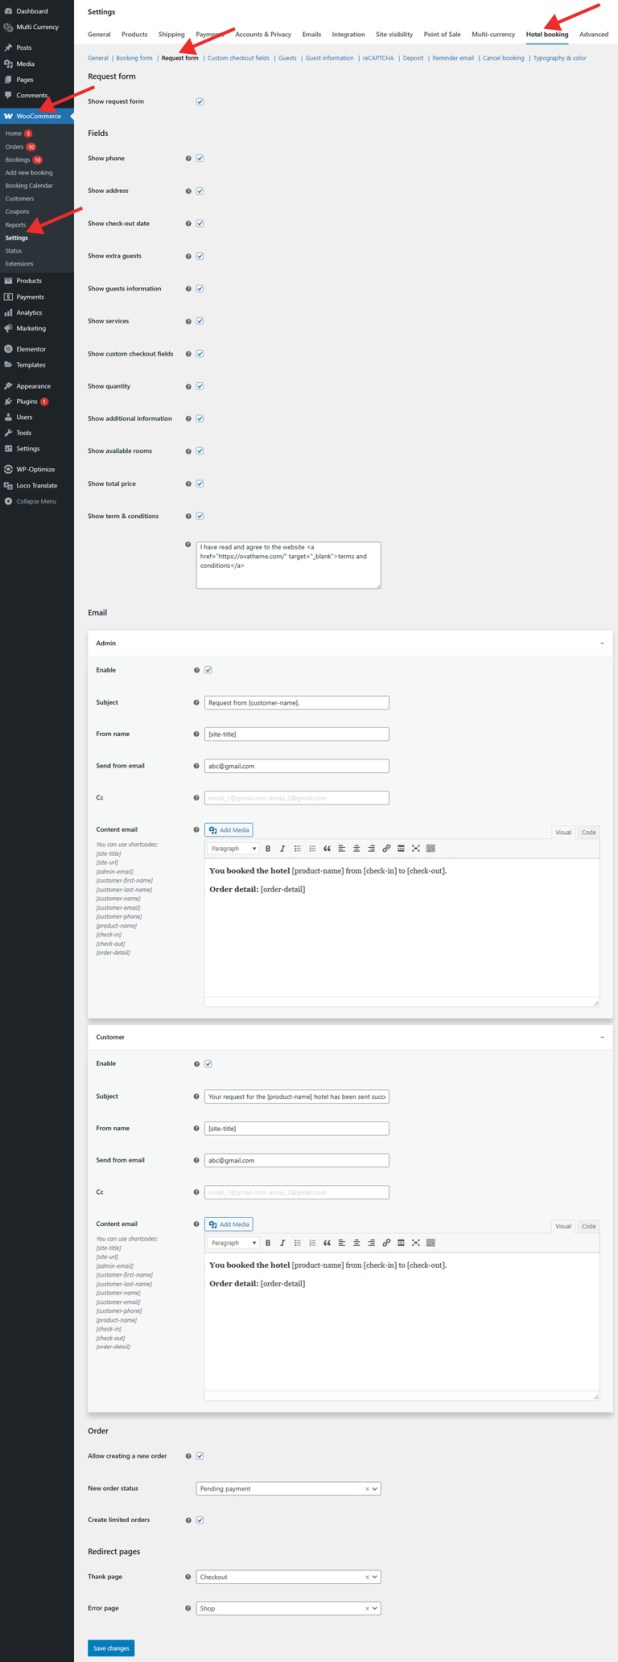
This feature allows to configure following settings:
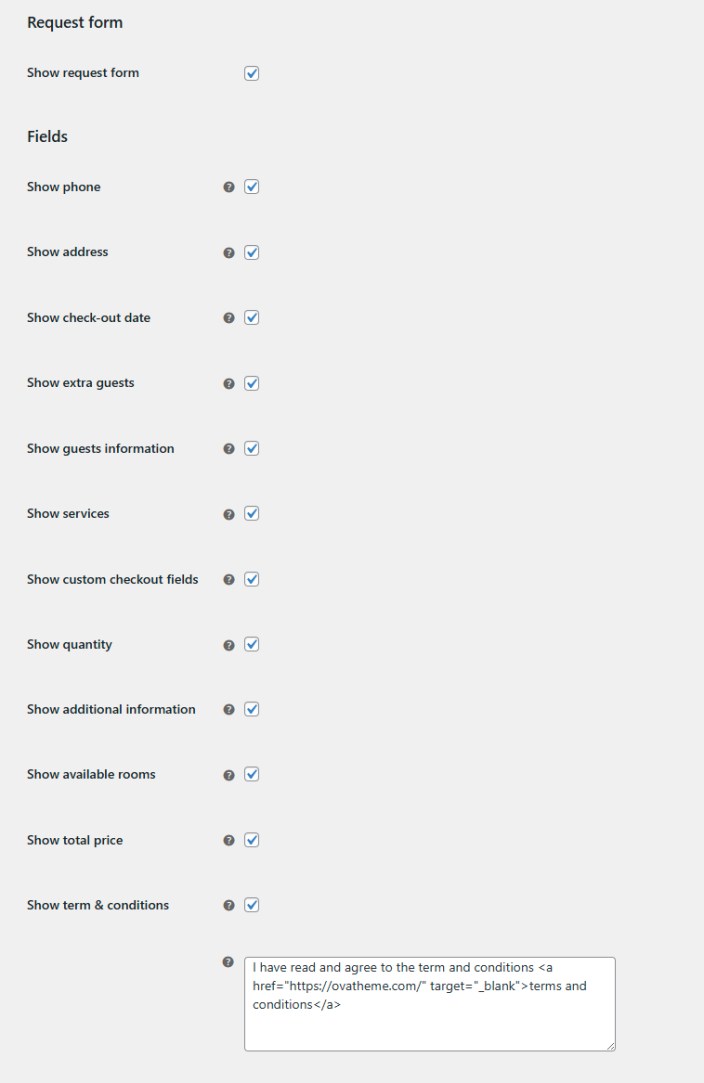
a) Display Settings
- Show or hide the entire enquiry form
- Show or hide specific form fields, including phone number, address, check-out date, extra guests, guest information, services, custom checkout fields, quantity, additional information, available room, and total price.
- Show or hide the terms and conditions section. You can also add your own custom text for the terms and conditions
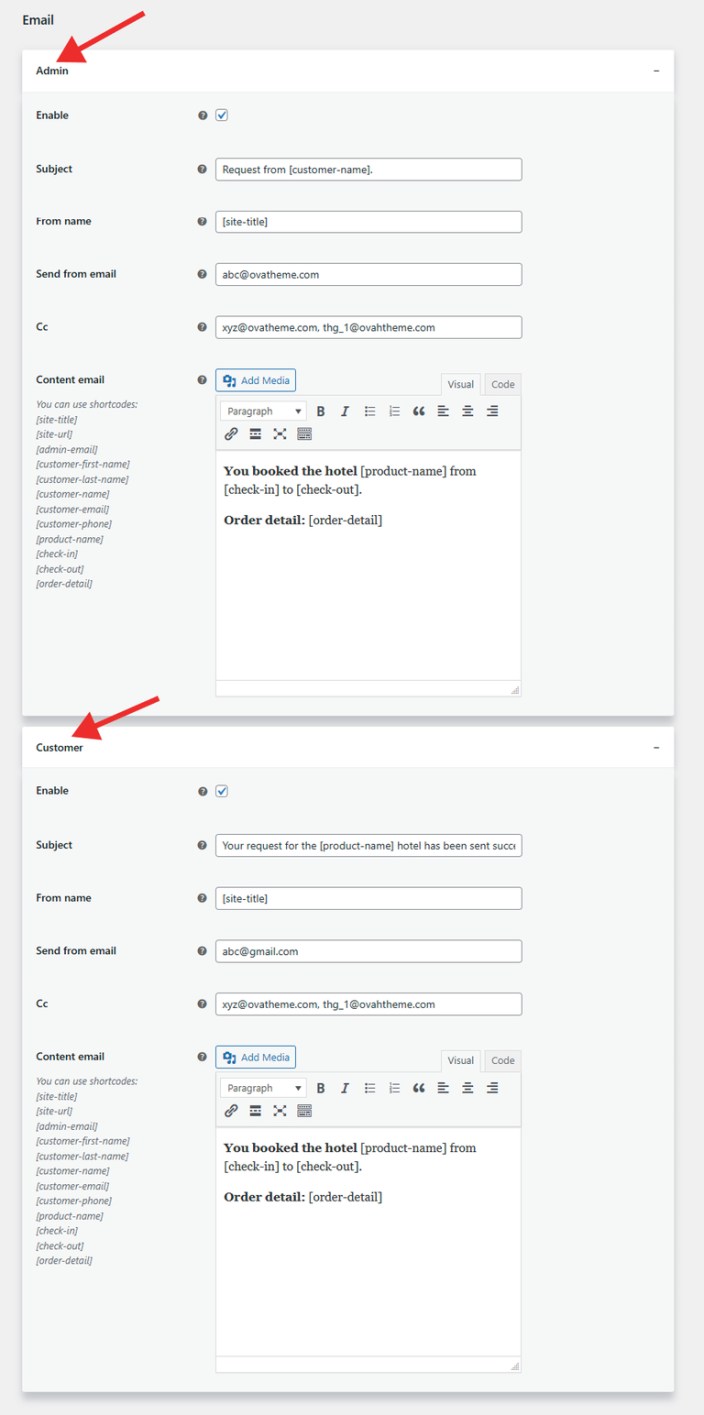
b) Email Settings
Email for Admin
- Enable: Choose whether to send an email notification to the admin.
- Subject: Set the subject line for the admin email.
- From Name: Define the sender name that appears in the admin’s inbox.
- Send From Email: Specify the email address from which the notification is sent.
- CC: Add additional recipients for admin notifications.
- Email Content: Customize the message using shortcodes:
[site-title],[site-url],[admin-email],[customer-first-name],[customer-last-name],[customer-name],[customer-email],[customer-phone],[product-name],[check-in],[check-out],[order-detail].
Email for Customer
- Enable: Choose whether to send a confirmation email to customers.
- Subject: Set the subject line for the customer email.
- From Name: Define the sender name shown to the customer.
- Send From Email: Specify the email address the customer will see as the sender.
- CC: Add additional recipients if needed.
- Email Content: Customize the message using shortcodes:
[site-title],[site-url],[admin-email],[customer-first-name],[customer-last-name],[customer-name],[customer-email],[customer-phone],[product-name],[check-in],[check-out],[order-detail].
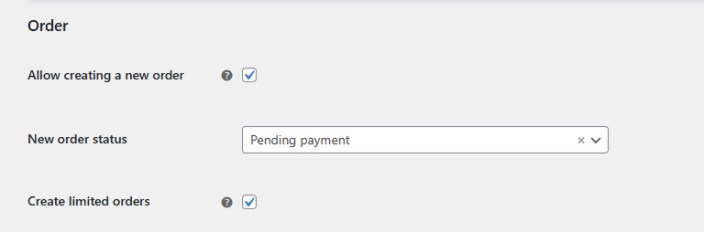
c) Order Settings
- Allow Creating New Orders: Decide whether WooCommerce should automatically create a new order when a customer submits a request form.
- New Order Status: Choose the default status for newly created orders.
- Create Limited Orders: Prevent customers from submitting requests that exceed the available inventory for each room
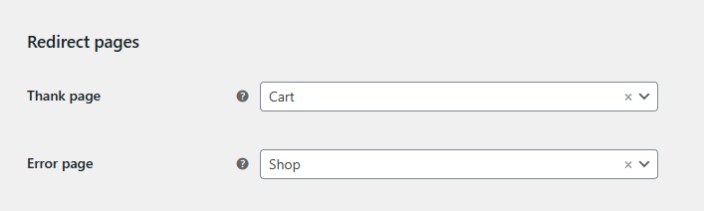
d) Redirect Settings
- Thank You Page: Choose the page users are redirected to after successfully submitting an request.
- Error Page: Choose the page users are redirected to if their booking submission fails.
4. Manage Custom Checkout Fields
↑ Back to topCustom checkout fields are additional form fields that you can add to the checkout page (booking form or request form) to collect extra information from customers
Go to: WordPress Admin panel > WooCommerce > Settings > Hotel Booking > Custom Checkout Fields
With this feature, you can add, show/hide, edit or delete custom checkout fields
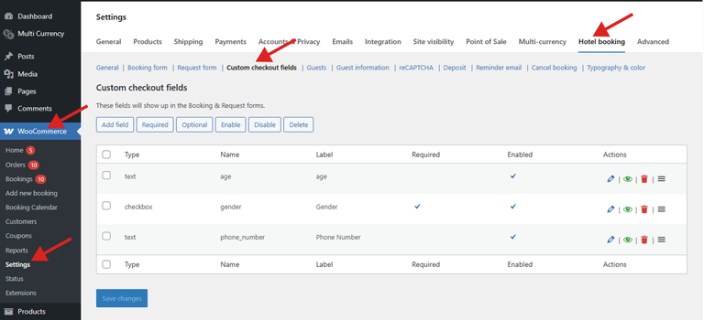
a) Steps to Add a Custom Checkout Fields:
- Select Field Type: Choose from 11 different field types, including text, number, tel, email, password, textarea, radio, checkbox, select, date, and file.
- Enter Name: Define the field name that will appear in the backend
- Add Label: Specify the label displayed on the frontend form
- Add Description: Provide a short description or note explaining the purpose of the field.
- Enter Placeholder: Add a hint or example text inside the input field to guide the user on what to enter.
- Set Default Value: Enter a pre-filled value that appears automatically unless the customer changes it.
- Set Class: Assign a CSS class to the field for styling or layout customization.
- Mark as Required: Choose whether the field is required or optional during form submission.
- Enable or Disable: Show or hide the field in the checkout form
b) Display in the Frontend
Suppose that you add a custom checkout field as followers:
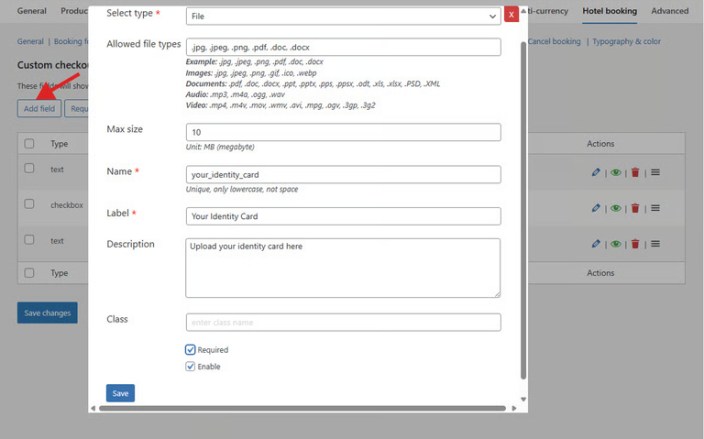
Display in the frontend
5. Manage Guests
↑ Back to topThis feature lets you create unlimited customer types and manage existing ones by editing or deleting pre-made types.
Go to: WordPress Admin panel > WooCommerce > Settings > Hotel Booking > Guests
a) Steps to add a guest type:
- Add Label: Add label that is shown in the front end
- Enter Name: Add name that is shown in the back end
- Enter Description: Add description
- Select Information Fields: Select information fields in the list for each customer type. Read here to know how to add guest information fields
b) Display in the Frontend
Suppose that you set in the backend as followers:
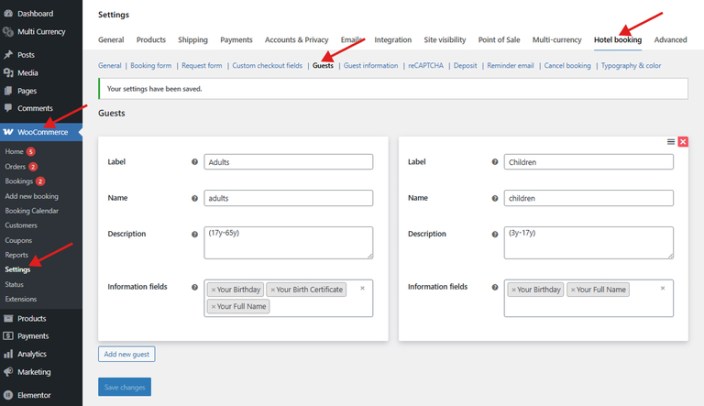
Display in the Frontend


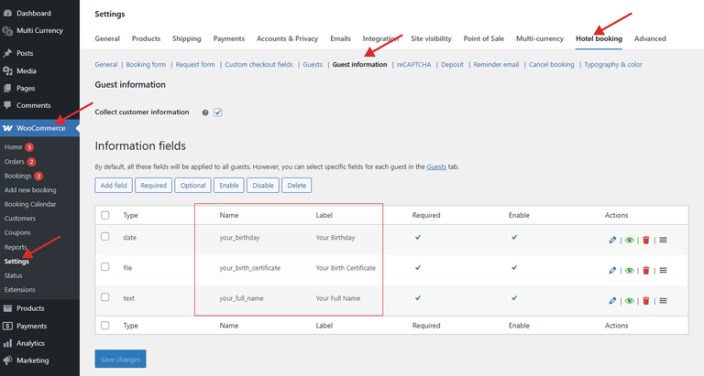
6. Manage Guest Information
↑ Back to topThis feature helps you collect detailed information from each individual guest during the booking process
You can add unlimited information fields for every guest (name, phone number, age, etc.), and easily show/hide, edit or delete those fields as needed
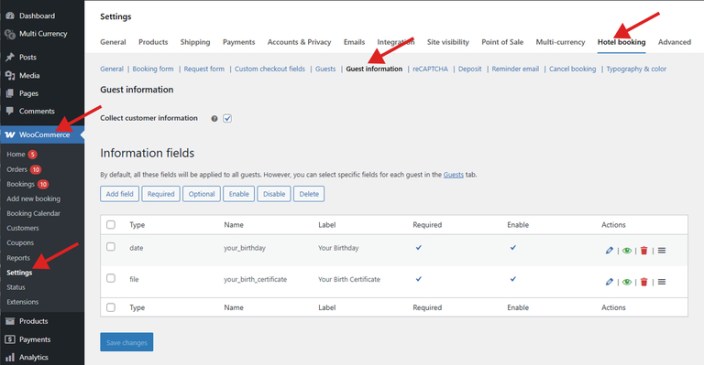
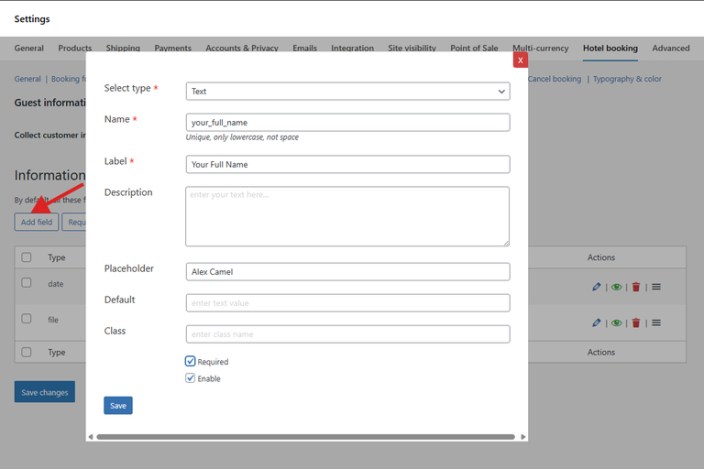
a) Add Guest Information Fields in the Backend
Configure the settings below:
- Select Field Type: Choose from 11 field types — text, number, tel, email, password, textarea, radio, checkbox, select, date, and file.
- Enter Name: Define the field name that appears in the backend for management.
- Add Label: Specify the label that will be shown on the frontend form.
- Add Description: Write a short note explaining the purpose of the field.
- Enter Placeholder: Add a hint or example text inside the input box to guide users.
- Set Default Value: Provide a pre-filled value that appears automatically unless changed by the user.
- Mark as Required: Choose whether the field is mandatory or optional during checkout.
- Enable or Disable: Control whether the field is displayed or hidden in the checkout form.
Note: You can choose guest information fields you want for each customer type. Read here for details
b) Display information guests in the frontend
Suppose you set in the backend as follows:

Display in booking form and request form
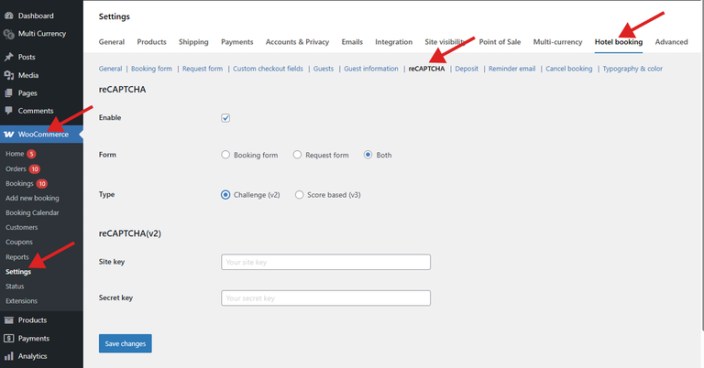
7. Create reCAPTCHA
↑ Back to topProtect your booking and enquiry forms from spam with Google reCAPTCHA. This free tool automatically detects bots and ensures that only real users can submit your forms.
To create reCAPTCHA, go to: WordPress Admin panel > WooCommerce > Settings > Hotel Booking > Guests
Configuration:
- Enable or disable reCAPTCHA
- Choose where to apply it — booking form, request form, or both.
- Select the reCAPTCHA type (v2 Challenge or v3 Score) and enter your Site Key and Secret Key.
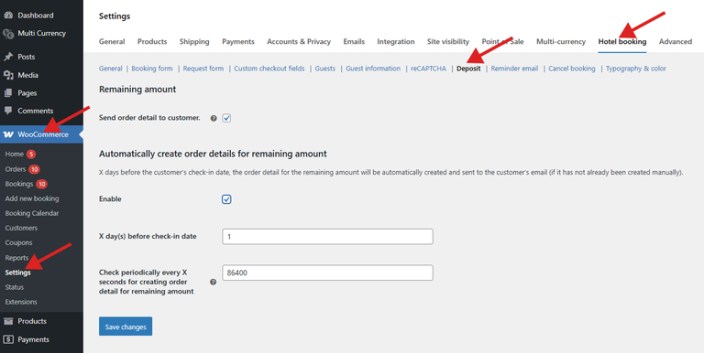
8. Set Deposit
↑ Back to topAfter a customer pays a deposit, the admin can use this feature to create and send the remaining payment request to the customer, allowing them to complete the full payment online.
Go to: WordPress Admin panel > WooCommerce > Settings > Hotel Booking > Deposit
a) Send Remaining Amount
Send order details to customer: Choose whether to send an email to the customer that includes the remaining balance of their order.
b) Automatically Generate Remaining Amount Order
- Enable: Tick the checkbox if you want the system to automatically create an order for the remaining amount.
- X days before check-in date: Set how many days before the customer’s check-in date the system should automatically create and send the remaining balance order (if it hasn’t been created manually).
- Check periodically every X seconds: Define how often (in seconds) the system checks and automatically generates the remaining balance orders.
9. Configure Reminder Email
↑ Back to topA reminder email is an automatic email sent to the customer to remind them of an upcoming check-in for their booking
Settings
- Enable: Tick the checkbox if you want the system automatically send reminder emails to customers.
- X days before check-in date: Choose how many days before check-in the reminder is sent. Example: If you set 2 and the check-in date is December 25, 2024, the email will be sent on December 23, 2024.
- Send a recurring email every X seconds after the initial one: After the first reminder is sent, automatically resend the reminder at this interval (in seconds)
- Subject: The email subject line.
- From name: The sender name shown in the customer’s inbox.
- Send from email: The sender email address that customers will see.
- CC: Add any additional email addresses to receive a copy.
- Email Content: You can insert these shortcodes to include dynamic details:
[site-title][site-url][admin-email][customer-email][product-name][check-in][check-out][order_id][view-order]

10. Create Cancellation Policies
↑ Back to topThis feature enables you to configure the conditions and process for canceling bookings
Go to: WordPress Admin panel > WooCommerce > Settings > Hotel Booking > Cancel Booking
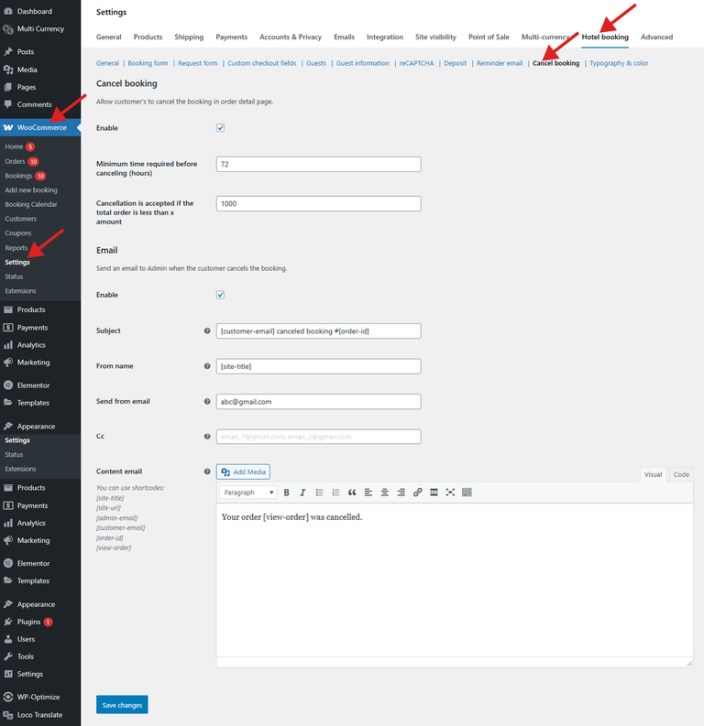
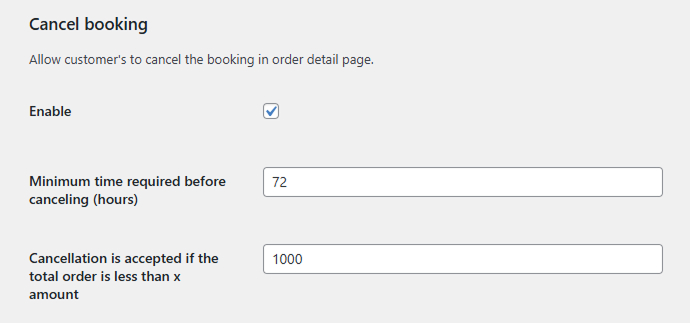
a) Set cancellation policy
- Enable: Allow or disallow customers to cancel their bookings.
- Minimum time required before canceling (hours): Specify how long before the appointment or check-in time customers are allowed to cancel. Example: If set to 72 hours, customers can only cancel at least 72 hours before their booking time.
- Cancellation is accepted if the total order is less than X amount: Allow order cancellations only when the total booking amount is below the specified limit.
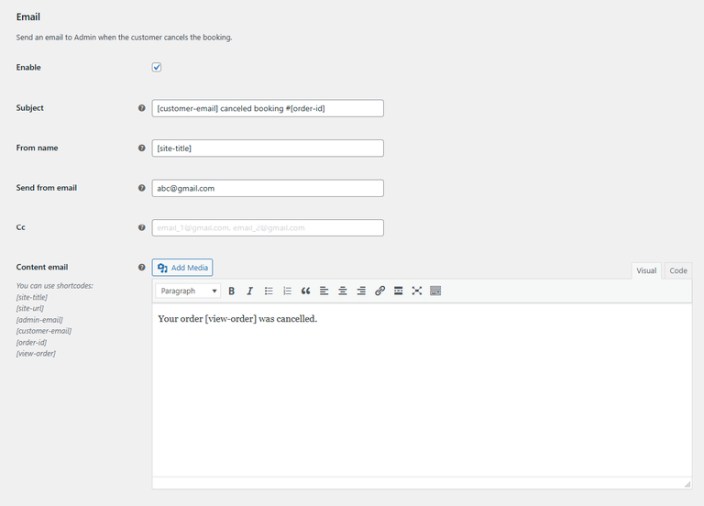
b) Set email
This feature allows you to configure an email notification that is sent to the admin when a customer cancels their booking.
- Enable: Turn this option on to automatically send an email to the admin when a booking is canceled.
- Subject: Enter the subject line for the cancellation email.
- From Name: Set the sender name that appears in the admin’s inbox.
- Send From Email: Specify the sender email address so the admin knows where the email came from.
- CC: Add additional email addresses that should also receive a copy of the notification.
- Email Content: Customize the email body using the following shortcodes:
[site-title][site-url][admin-email][customer-email][order-id][view-order]
11. Set Typography and Color
↑ Back to topYou can customize the appearance of your booking pages by adjusting fonts, colors, and button styles to match your website’s design.
Go to: WordPress Admin panel > WooCommerce > Settings > Hotel Booking > Typography & Color
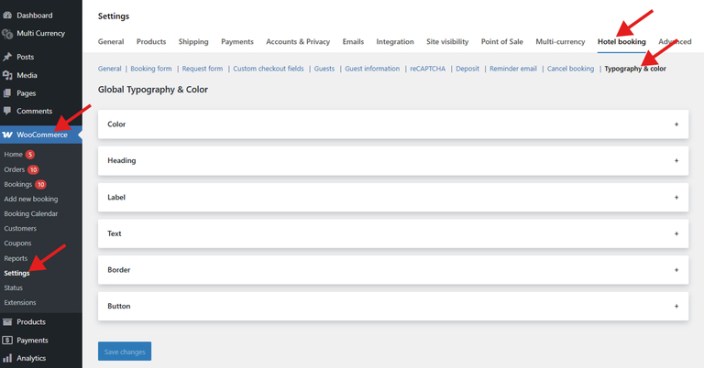
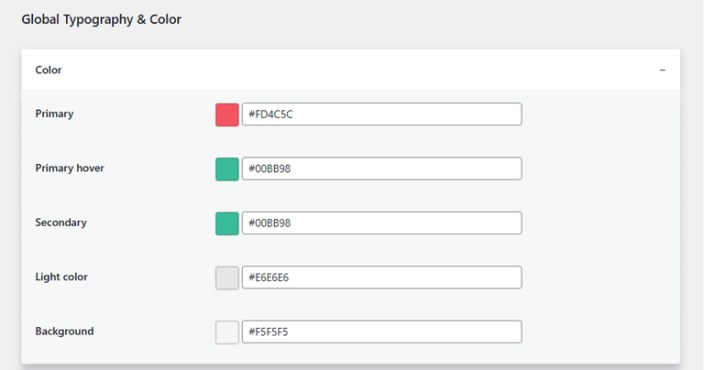
a) Color
Configure the main color scheme for your site elements: primary color, primary color (hover), and secondary color
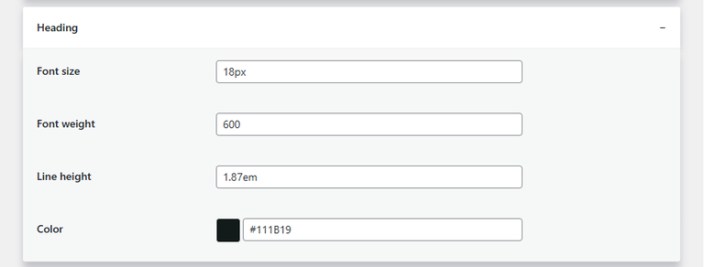
b) Heading
Customize the appearance of all headings: Font size, font weight, line height for heading, and color of heading
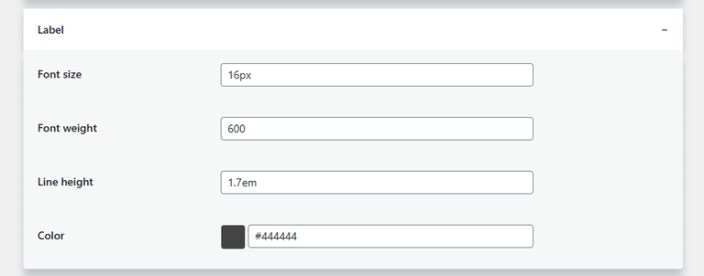
c) Label
Define typography settings for labels: Font size, font weight, line height for label, and color of label
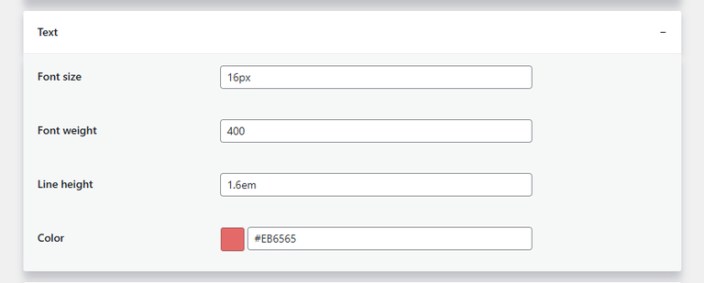
d) Text
Adjust the default text styling used across booking pages: Font size, font weight, line height for text, and color of text
e) Border
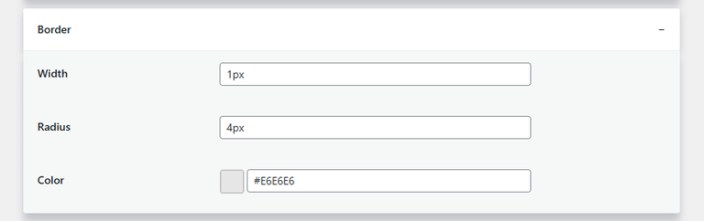
Style your borders by setting: Width, radius and color for borders
f) Button
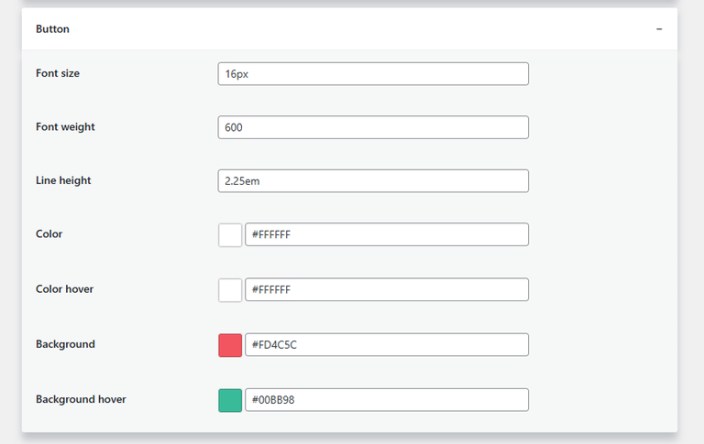
Control the look and feel of buttons: Font size, font weight, line height, text color & hove text color, background color & hover background color
V. Booking Management
↑ Back to top1. List Bookings
↑ Back to topThis section allows you manage and monitor all bookings from a centralized list.
Go to WordPress Admin Panel > WooCommerce > Bookings
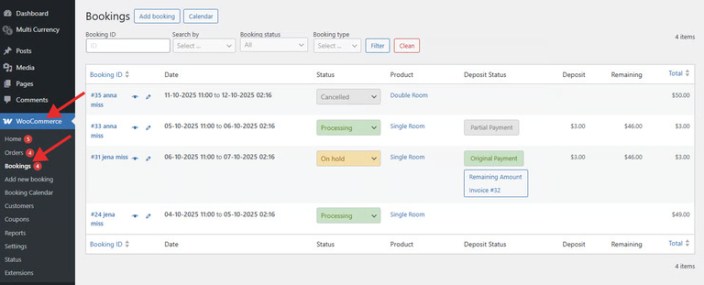
Key Features:
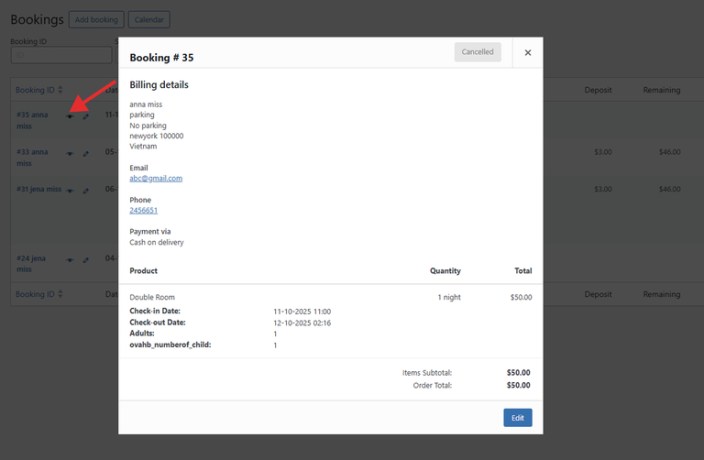
- View Booking Details with a Popup: Instantly view complete booking information without leaving the page.
- Edit Booking Details with a Popup: Update booking information through a popup interface.

- Update Booking Status: Change the status of a booking to: Pending Payment, Processing, On Hold, Completed, Cancelled, Refunded, Failed, or Draft
- Filter Bookings by Multiple Criteria:Narrow down your search using filters such as:
- Booking ID
- Customer Email
- Customer Name
- Product Name
- Check-in Date / Check-out Date
- Booking Status: Pending Payment, Processing, On Hold, Completed, Cancelled, Refunded, Failed, Draft
- Booking Type: Normal, Deposit, Remaining
2. Manually Add Bookings
↑ Back to topThis feature allows admins to create bookings manually from the backend without requiring a customer to book through the website.
Go to WordPress Admin Panel > WooCommerce > Add New Booking
You can enter customer details, select rooms, set check-in and check-out dates, add number of guests, enter number of rooms, select extra services and assign a booking status.
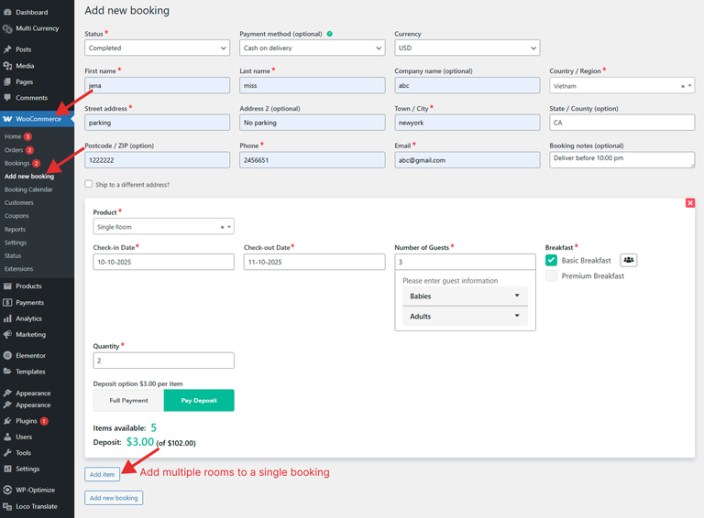
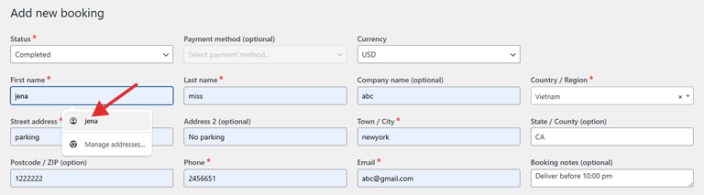
Note: When you type a letter in the customer’s name field, a list of suggestions will appear. Select the correct customer from the list, and the system will automatically fill in all related customer information fields.
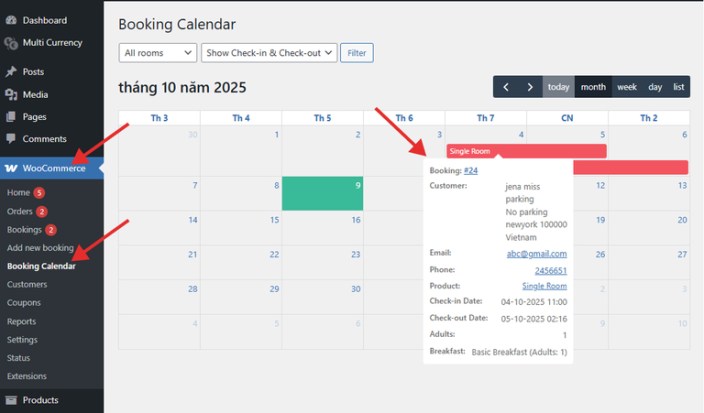
3. View Bookings in the Calendar
↑ Back to topThe Booking Calendar in the backend allows you to efficiently manage and review all reservations through a clear and intuitive visual interface
Go to WordPress Admin panel > WooCommerce > Booking Calendar
Key Features:
- Multiple Views: Manage bookings in daily, weekly, monthly, or list view directly from the backend.
- Quick Filtering: Easily filter bookings for a specific product.
- Clear Overview: Get a comprehensive snapshot of all reservations at a glance
- Custom Display Options: Choose to display bookings by check-in date only, check-out date only, or both, depending on your preferred management style.
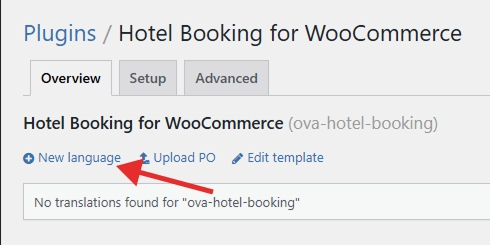
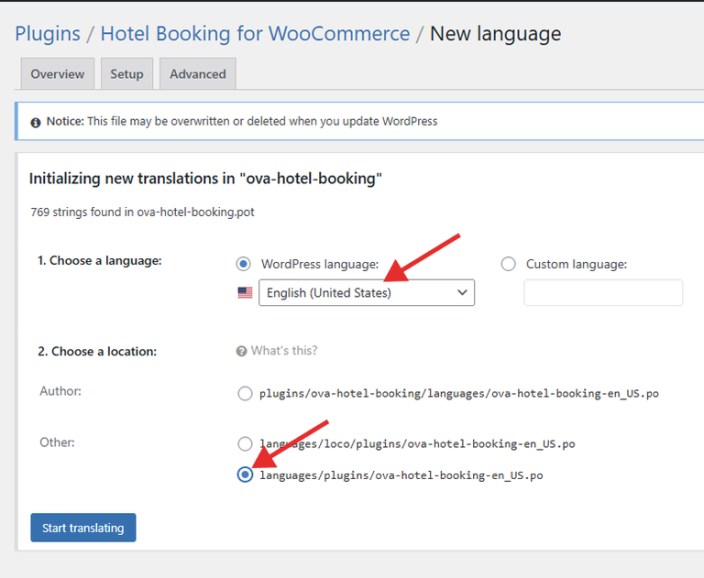
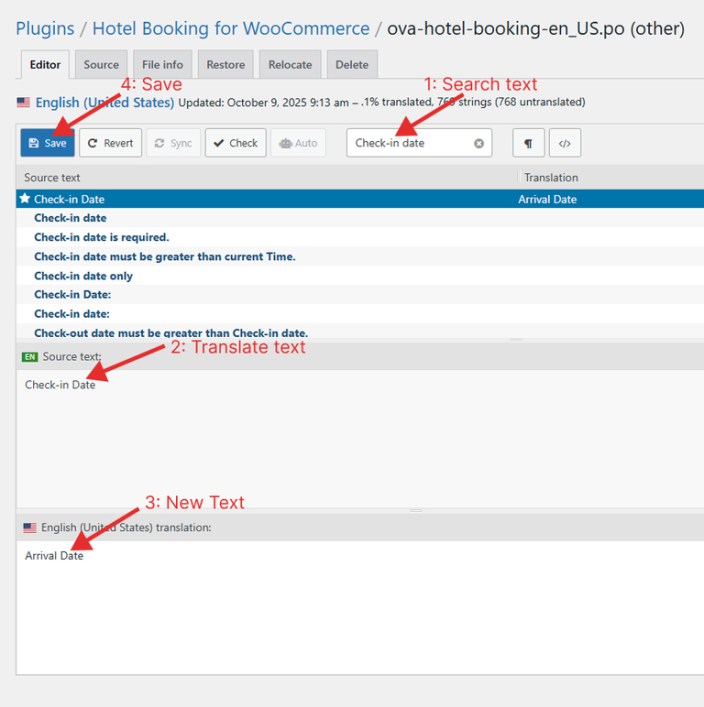
VI. Translation
↑ Back to topYou can use Loco Translate Plugin to replace text in plugin.
Go to WordPress Admin panel > Loco Translate > Plugins > Hotel Booking for WooCommerce