PH Advanced Table Rate Shipping by PluginHive enables you to create flexible and advanced shipping rules for your WooCommerce store. Calculate shipping rates based on zones, weight, quantity, price, shipping classes, product categories, and more.
This guide will walk you through installation, configuration, and practical examples to help you set up the perfect shipping solution for your business.
Installation
↑ Back to topTo start using a product from WooCommerce.com, you can use the “Add to store” functionality on the order confirmation page or the My subscriptions section in your account.
- Navigate to My subscriptions.
- Find the Add to store button next to the product you’re planning to install.
- Follow the instructions on the screen, and the product will be automatically added to your store.
Alternative options and more information at:
Managing WooCommerce.com subscriptions.

Setup and Configuration
↑ Back to topPH Advanced Table Rate Shipping works by evaluating shipping rules you create against the contents of your customer’s cart. When a customer reaches the cart or checkout page, the plugin:
- Examines the cart contents – Checks product details, including weight, quantity, price, categories, and shipping classes
- Matches rules – Compares cart and destination data against your configured shipping rules
- Calculates rates – Applies the appropriate shipping cost based on matching rules
- Displays options – Shows available shipping methods to the customer at the cart and checkout
This rule-based system gives you complete control over shipping costs while providing customers with accurate shipping rates based on their specific orders.
Set Up Table Rate Shipping in WooCommerce
After installing and activating PH Advanced Table Rate Shipping, the next step is to access the plugin settings and configure the plugin further as per your business requirements.
1. Access The Plugin Settings
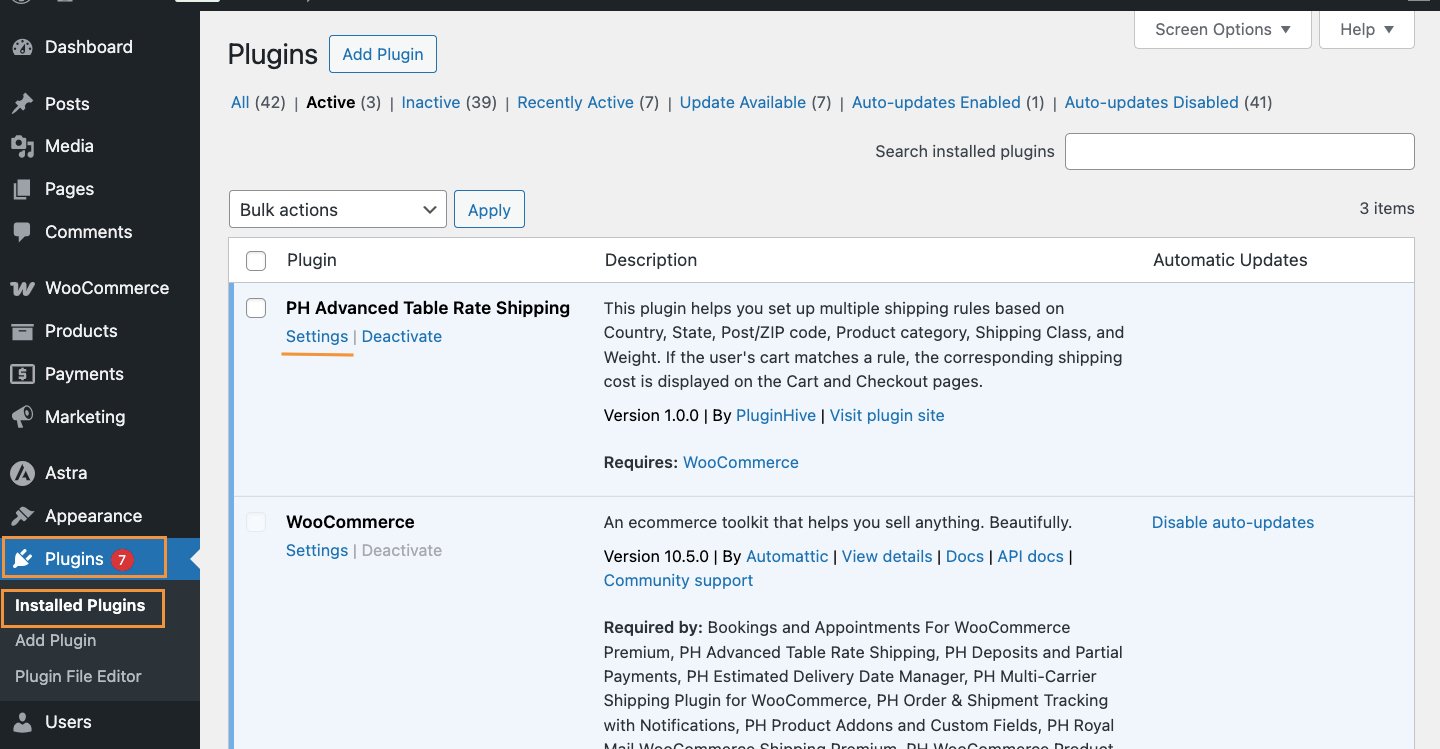
You can open the plugin settings directly from the WordPress admin dashboard. Go to Plugins > Installed Plugins, locate PH Advanced Table Rate Shipping, and click Settings next to the plugin name. This will take you to the Table Rate Shipping configuration screen.
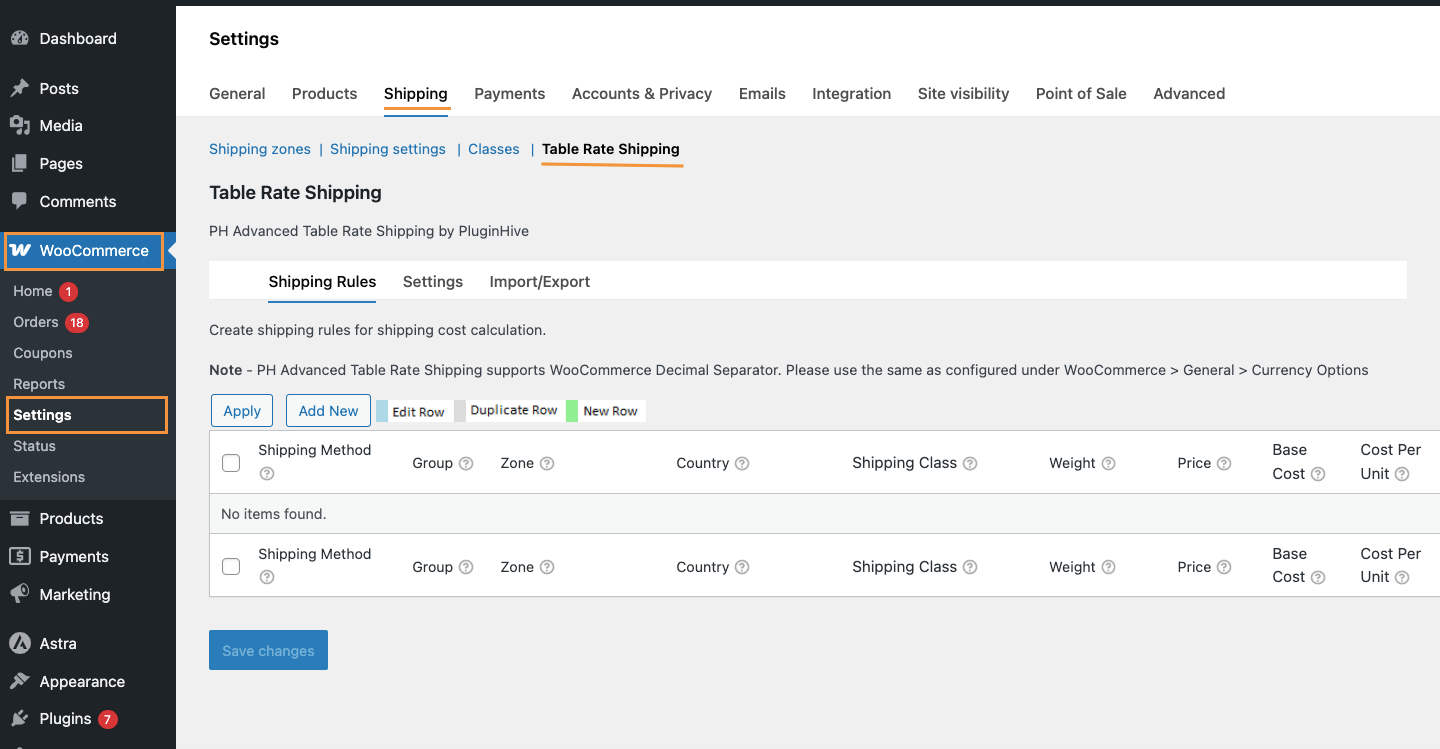
Alternatively, you can access the same settings from WooCommerce. Navigate to WooCommerce → Settings → Shipping and select Table Rate Shipping. Both paths open the same settings page.
2. Enable The Shipping Method
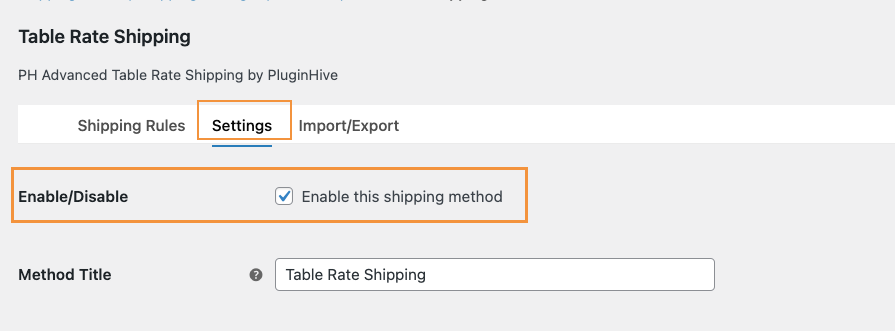
On the Table Rate Shipping page, switch to the Settings tab and enable the option Enable this shipping method. This ensures that Table Rate Shipping is available for use on your store’s Cart and Checkout pages.
Once enabled, click Save changes to apply the setting.
After saving, Table Rate Shipping is activated for your WooCommerce store and ready to be configured further using shipping rules and additional settings.
3. Control How Shipping Costs Are Calculated
The options available under the Settings tab determine how PH Advanced Table Rate Shipping calculates and applies shipping costs on your store. These options define the overall behavior of the shipping method before any shipping rules are created.
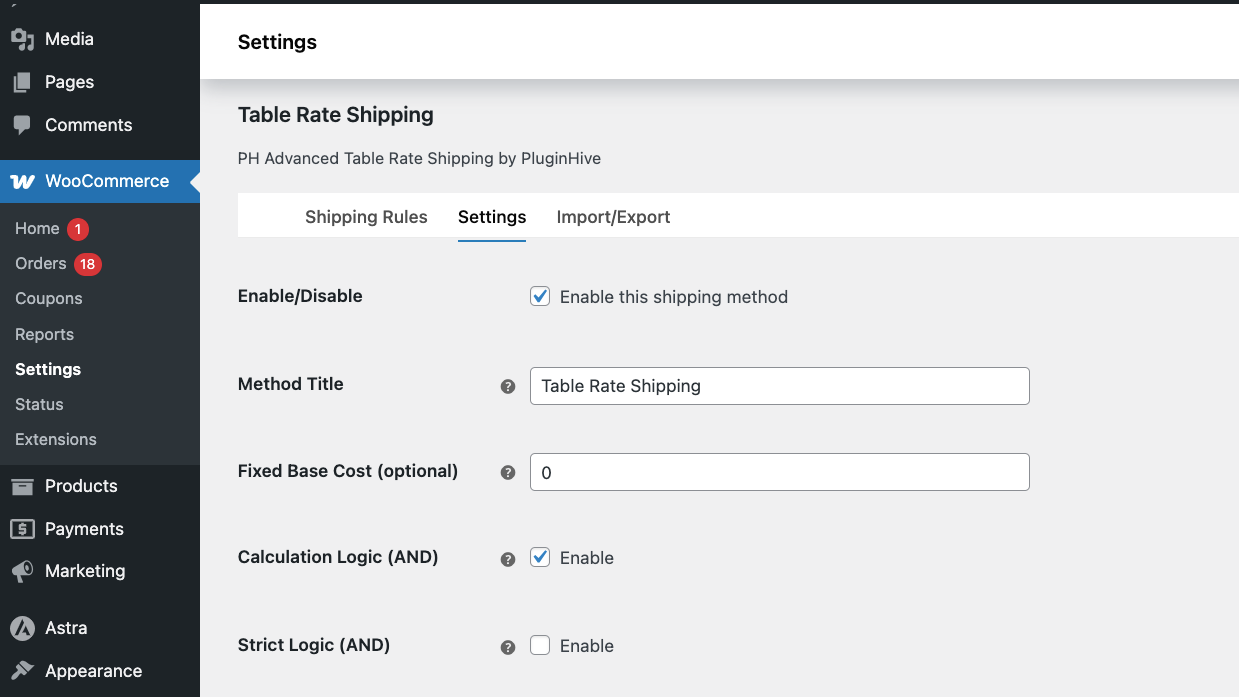
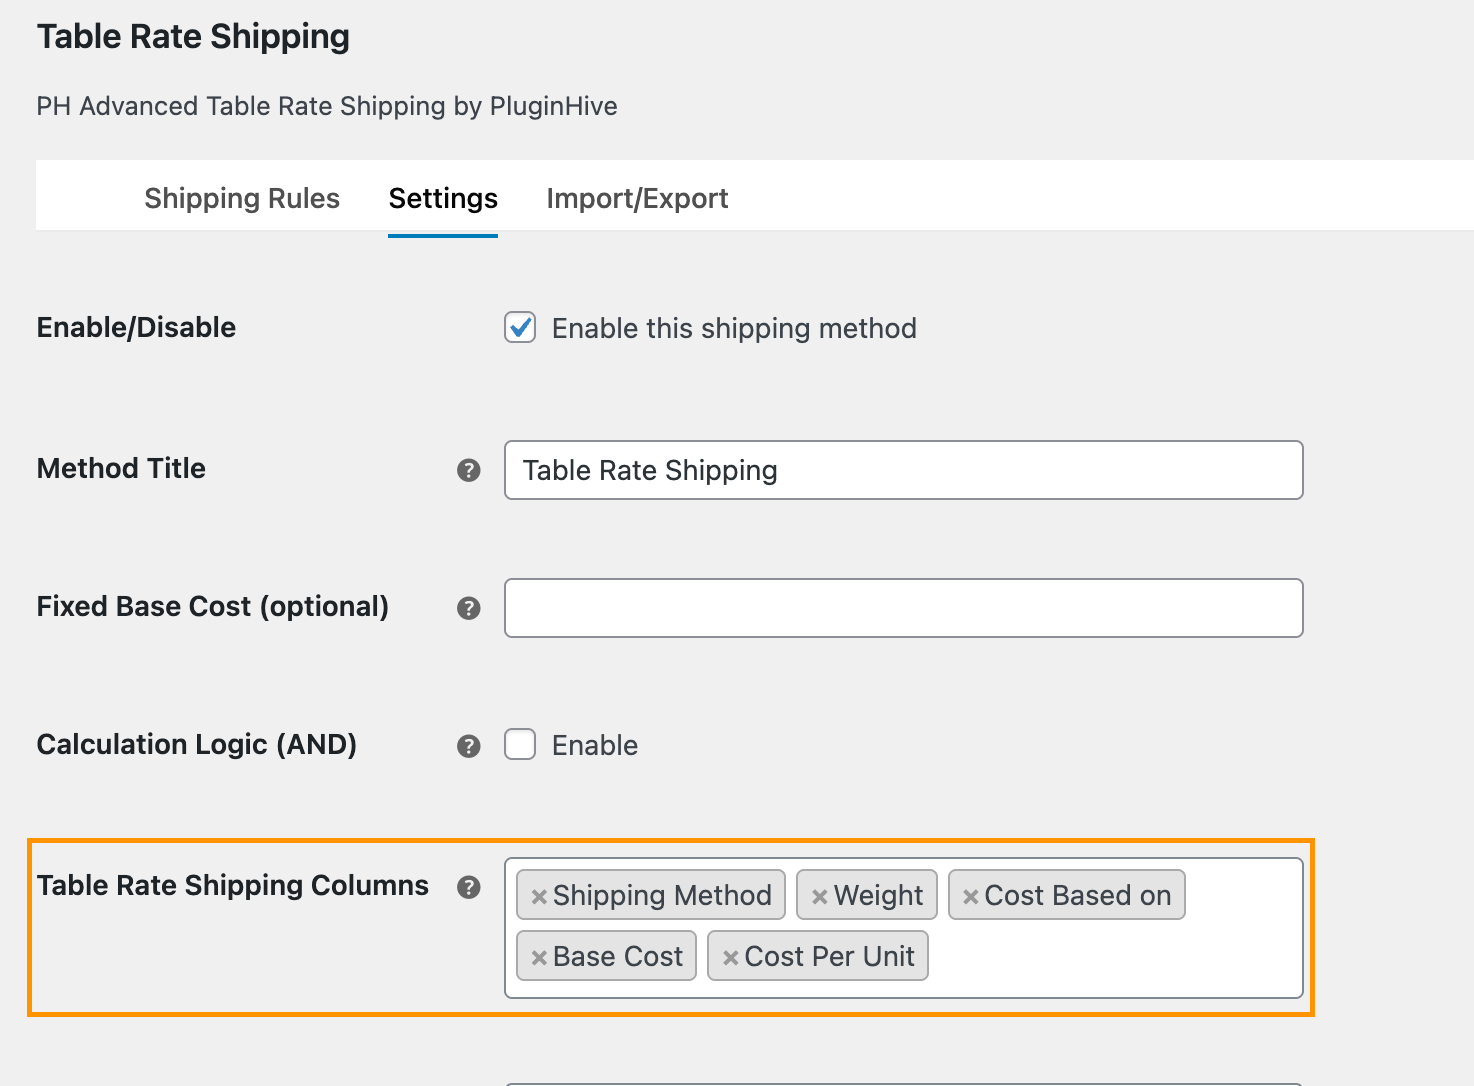
The following general settings are available on this page:
- Method Title: Sets the name of the shipping option that customers see on the Cart and Checkout pages. You can customize this to match the shipping service offered by your store.
- Fixed Base Cost (Optional): Adds a fixed amount to the shipping cost. This amount is added to the cost calculated by a matching shipping rule. For example, if a shipping rule calculates a rate of $10 and you set a Fixed Base Cost of $3, the final shipping rate shown to customers will be $13.
Note: If you have not set any Base Cost in your shipping rule and the rule matches the cart, then the Fixed Base Cost will be charged by itself. However, if no shipping rule matches the cart, no shipping rate will be shown at checkout, even if a Fixed Base Cost is set.
- Calculation Logic (AND): Controls how the plugin checks the Shipping Class and Product Category conditions within a shipping rule. By default, a rule can apply if either the selected product category or the shipping class matches. When this option is enabled, the rule will apply only when both the selected product category and shipping class conditions match.
- Strict Logic (AND): Further restricts how Shipping Class and Product Category conditions are applied within a rule. When enabled, the rule calculates shipping only for the products that exactly match the specified Shipping Class and Product Category. Any other products in the cart that do not match those conditions are ignored for that rule’s calculation.
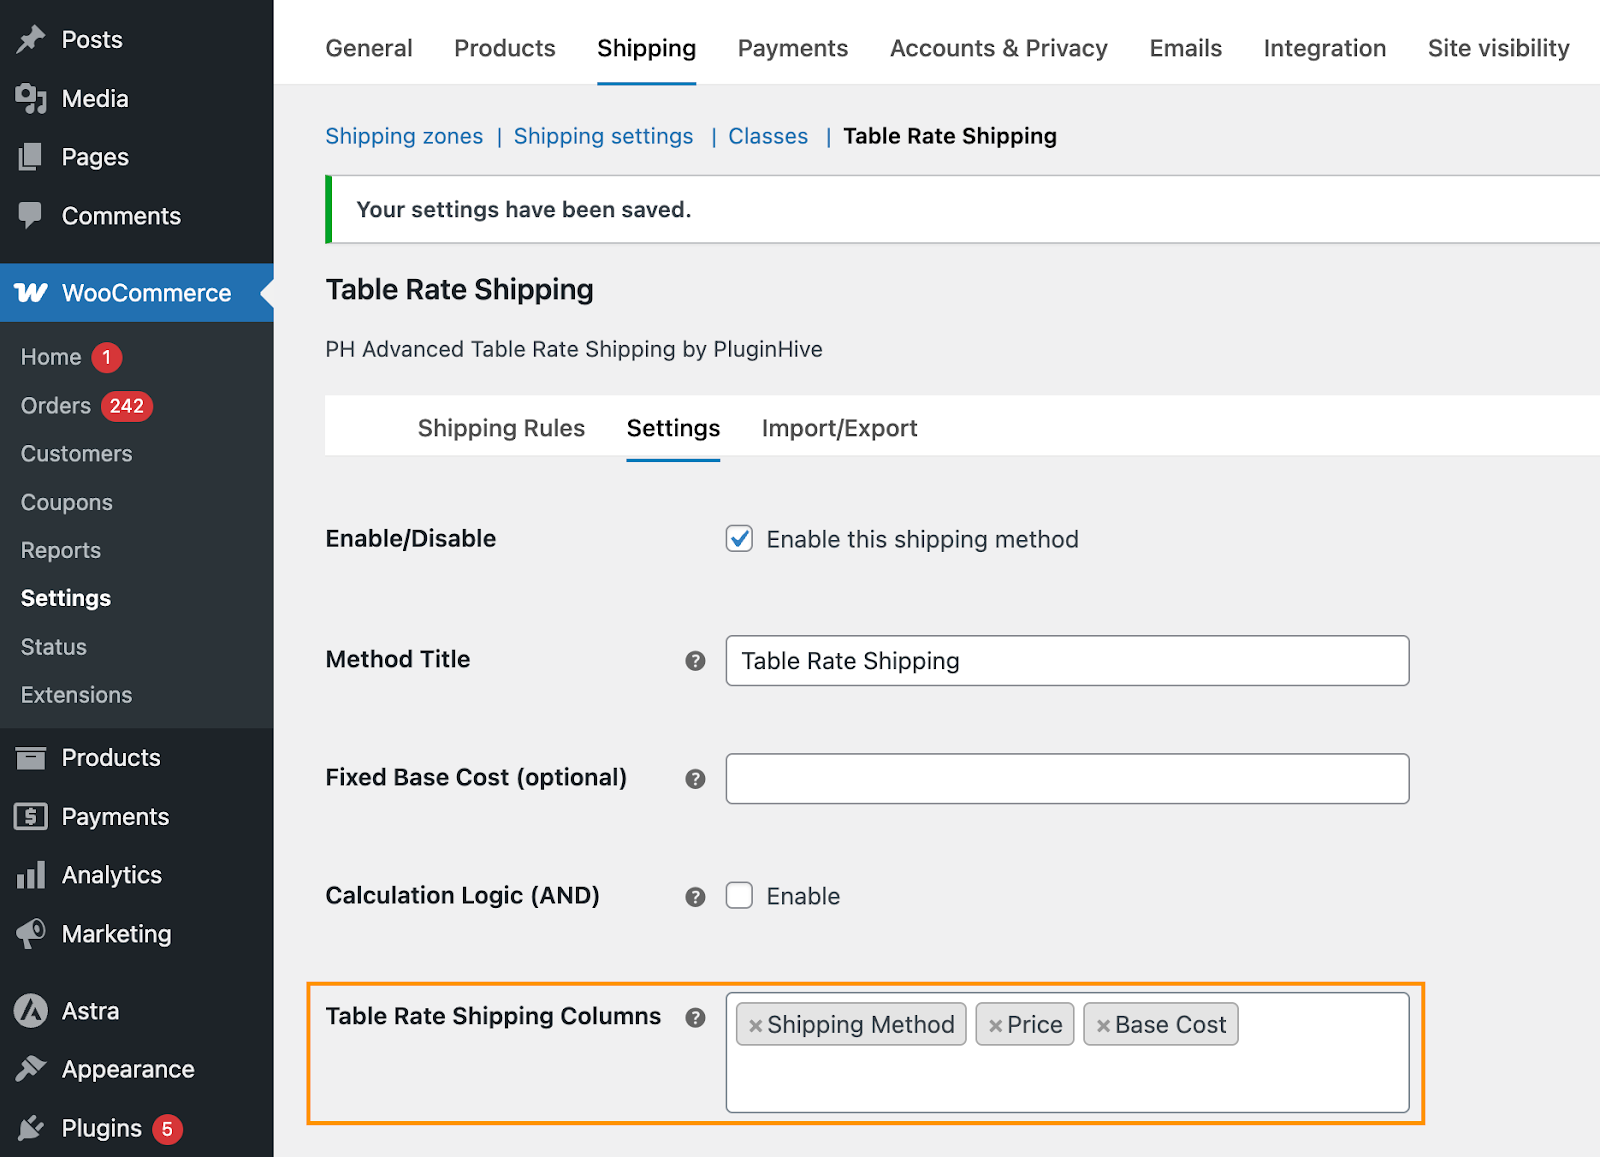
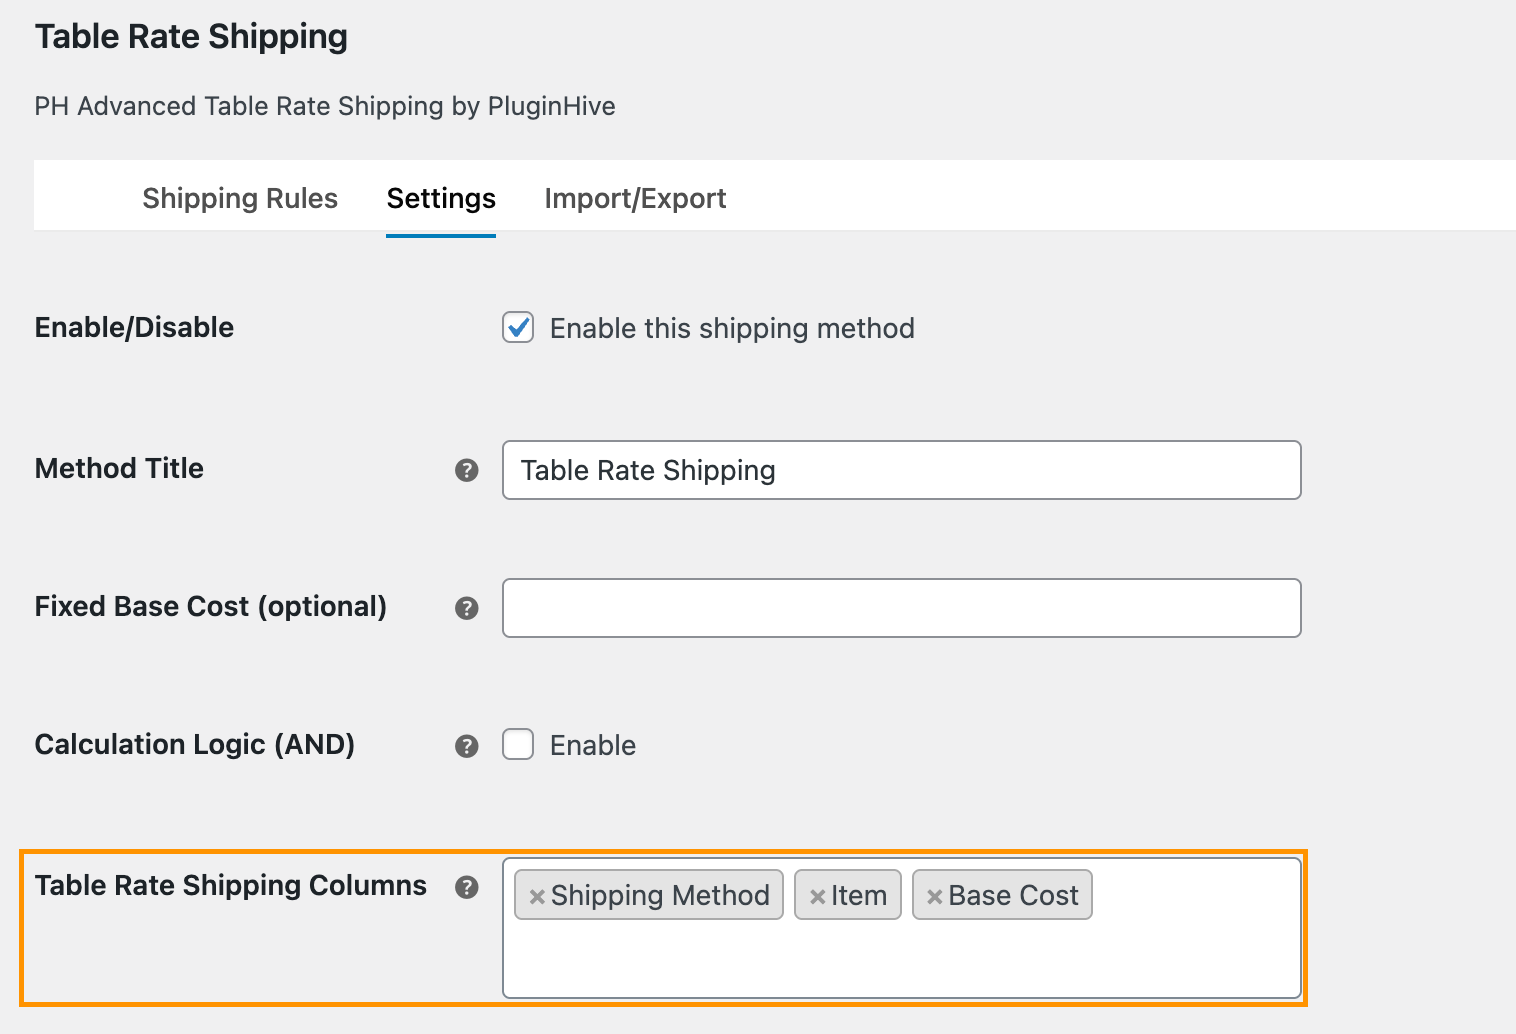
4. Customize Shipping Rules Table Columns
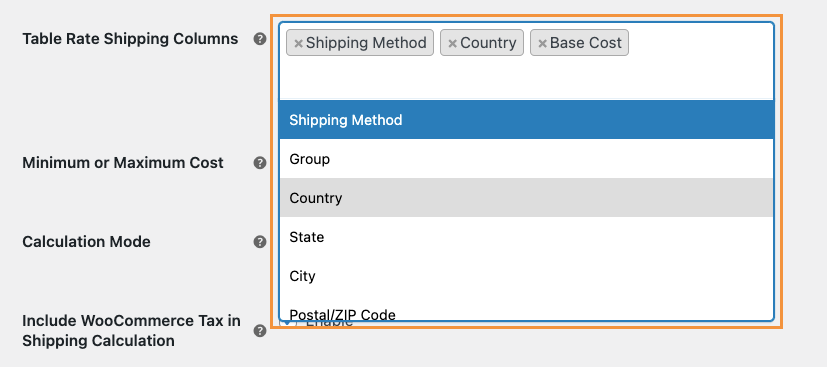
The Table Rate Shipping Columns setting lets you choose which columns are used in the Shipping Rules table when creating shipping rules.
Table Rate Fields and Description
| column Name | Description |
| Shipping Method | Specifies the method title that is shown on the Cart and Checkout pages when the shipping rate is calculated using this rule. |
| Group | Groups are used to display more than one shipping option on the Cart and Checkout pages. Each group can return only one shipping option. |
| Zone | Specifies the shipping zone(s) to which the rule applies. Multiple zones can be selected in a single row. If rules are defined for specific zones and you want a different rule for all other zones, you can use the Rest of the World option. |
| Country | Specifies the destination country or countries. Use Any Country to apply the rule to all countries. Multiple countries can be selected in a single row. The Rest of the World option can be used for all other countries not listed. |
| State | Specifies destination state(s). Use Any State to apply the rule to all states. Multiple states can be selected in a single row. Use Rest of the Country to apply a different rule for states not listed. |
| City | Specifies the destination city name. Leave this field empty to apply the rule to all cities. A single rule can have only one city assigned to it. |
| Postal / ZIP Code | Specifies destination postal or ZIP codes. You can use the wildcard (*) to match multiple codes. Example: 8* applies to ZIP codes starting with 8, such as 80001, 80002, and so on. |
| Shipping Class | Specifies the shipping class of the product. Use Any Shipping Class to apply the rule to all products. Multiple shipping classes can be selected in a single row. Use Rest of the Shipping Classes for all other classes. |
| Product Category | Specifies the product category to which the rule applies. Use Any Product Category to apply the rule to all categories. Multiple categories can be selected in a single row. Use Rest of the Product Categories for categories not listed. |
| Weight | Defines the minimum and maximum cart weight for which the shipping rate applies. Example: If Min Weight is 0 kg and Max Weight is 5.25 kg, the rule applies to carts weighing more than 0 kg and up to 5.25 kg. |
| Item | Defines the minimum and maximum number of items in the cart for which the rule applies. Example: If Min Items is 0 and Max Items is 25, the rule applies to carts with up to 25 items. |
| Price | Defines the minimum and maximum cart total for which the rule applies. Example: If Min Price is $0 and Max Price is $100, the rule applies to carts with a total up to $100. |
| Cost Based On | Allows shipping rates to be calculated based on cart weight, number of items in the cart, or total cart price. |
| Base Cost | A fixed shipping cost is applied when the rule matches, regardless of cart weight, item quantity, or cart total. |
| Cost Per Unit | Adds an additional cost based on weight, item count, or price. Example (Weight): After 5 kg, charge $1.25 for every additional kg. Example (Item): After 25 items, charge $10 for each additional item. Example (Price): After $100, charge $10 for every additional $50. |
| Round Off | Rounds the weight or price used for calculation. Example: If round off is set to 0.5 and the cart weight is 4.4 kg, it is rounded to 4.5 kg. If set to 1, it is rounded to 5 kg. |
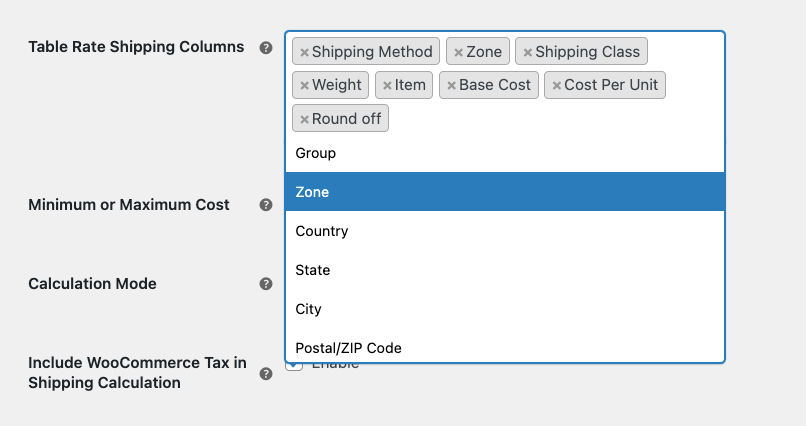
To customize the Shipping Rules table, remove any column you do not need by clicking the × next to the column name. You can add columns back at any time by selecting them again from the available options.
Note: It’s recommended to enable only the columns you plan to use so that defining and managing shipping rules remains clean and straightforward.
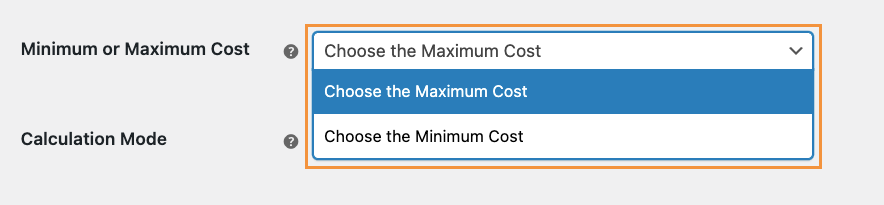
5. Choose a Maximum or Minimum Shipping Cost When Multiple Rules Apply
When more than one shipping rule applies to a cart and checkout, this setting controls which shipping cost is used.
You can choose one of the following options:
- Maximum Cost: Displays the highest shipping rate calculated from all matching rules
- Minimum Cost: Displays the lowest shipping rate calculated from all matching rules
Example: If three shipping rules match and calculate rates of $10, $15, and $20:
- Selecting Maximum Cost will show $20 to the customer
- Selecting Minimum Cost will show $10 to the customer
This setting helps you control whether the lowest or highest applicable shipping rate is used at checkout.
6. Choose The Shipping Costs Calculation Mode
The Calculation Mode setting determines how shipping costs are calculated for items in the cart. This setting plays a key role in how the final shipping cost is computed and displayed at checkout.
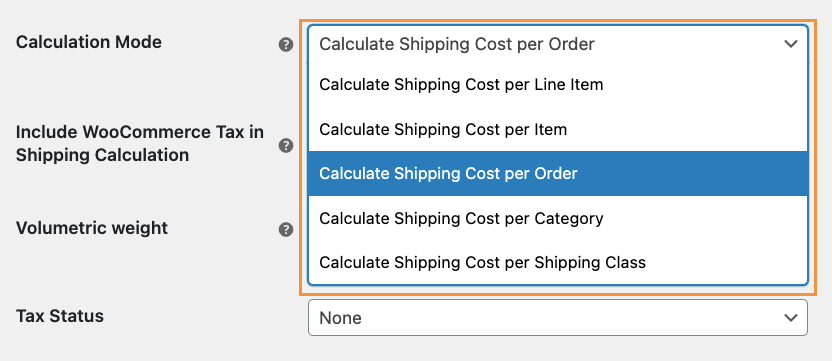
Depending on your store’s requirements, you can choose how shipping charges are applied per order, per item, per product, per category, or per shipping class.
| Calculation Mode | Description | Example |
| Calculate Shipping Cost per Order | Calculates a single shipping charge for the entire cart, regardless of how many items it contains. | Cart has 3 items (2 of Product A, 1 of Product B). One shipping rate is calculated for the whole order. |
| Calculate Shipping Cost per Item | Calculates shipping separately for each item quantity in the cart and then adds them together. | The cart has 5 items. Shipping is calculated 5 times and summed up. |
| Calculate Shipping Cost per Line Item | Calculates shipping separately for each unique product (line item), regardless of quantity. | The cart has 3 units of Product A and 2 units of Product B. Shipping is calculated twice – once per product. |
| Calculate Shipping Cost per Category | Calculates shipping separately for each product category present in the cart and adds them together. | Cart has products from Electronics and Clothing. Shipping is calculated twice – once per category. |
| Calculate Shipping Cost per Shipping Class | Calculates shipping separately for each shipping class assigned to products in the cart. | The cart has products with Standard and Fragile shipping classes. Shipping is calculated twice – once per class. |
Changing the Calculation Mode affects the final shipping cost shown to customers. Choose the option that best matches how you want shipping to be charged in your store.
Note: Calculate Shipping Cost per Order is generally recommended for most stores unless you need to charge shipping separately based on item quantity, product category, or shipping class.
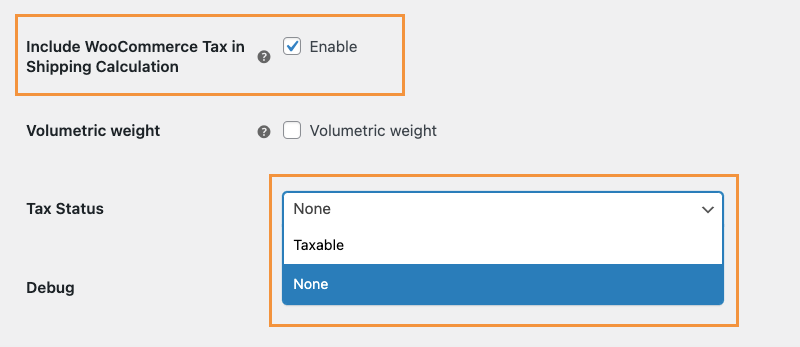
7. Tax Settings for Shipping Costs
PH Advanced Table Rate Shipping provides options to control how taxes are handled during shipping cost calculation and how shipping charges are taxed at checkout.
- The Include WooCommerce Tax in Shipping Calculation option allows the plugin to consider WooCommerce tax values when calculating shipping costs. When enabled, the cart total, including tax, is used for price-based shipping rules.
For example, if the cart subtotal is $100 and WooCommerce applies a 10% tax, the total becomes $110, and shipping rules based on price will use $110 for calculation instead of $100. - The Tax Status setting determines whether tax is applied to the shipping cost itself. Choosing None means shipping charges are not taxable, while selecting Taxable applies tax to shipping based on your WooCommerce tax settings.
8. Charge Shipping Based on Package Size (Volumetric Weight)
Enable Volumetric (dimensional) Weight if you want shipping costs to be calculated based on the size of a product rather than just its actual weight. Some shipping carriers charge based on how much space a package occupies, especially for large but lightweight items.

For example, a pillow may weigh only 2 kg, but because it takes up more space in a shipping box, its volumetric weight may be calculated as 8 kg. In such cases, carriers typically charge based on the higher value. When this option is enabled, the plugin uses volumetric weight for shipping calculations instead of actual weight.
Note: Requires products to have dimensions (length, width, height) configured in WooCommerce.After configuring or updating any settings, make sure to click the Save changes button at the bottom of the page. Your changes will not take effect until they are saved.
Create and Manage Shipping Rules
↑ Back to topThe Shipping Rules tab is where you create the actual shipping rate calculations. Each row in the rate table represents a rule that defines when a shipping rate should apply and how much to charge.
1. Understanding the Rate Table
The rate table works like a grid where you define conditions on the left and costs on the right.
- Condition columns define when a rule applies (such as Zone, Country, Weight, Item, or Price).
- Cost columns define how much to charge (such as Base Cost or Cost Per Unit).
When a customer’s cart and delivery address match the conditions of a rule, that rule’s shipping cost is applied.
Note: Currency, weight, and dimension units follow your WooCommerce settings.
2. Adding Your First Shipping Rule
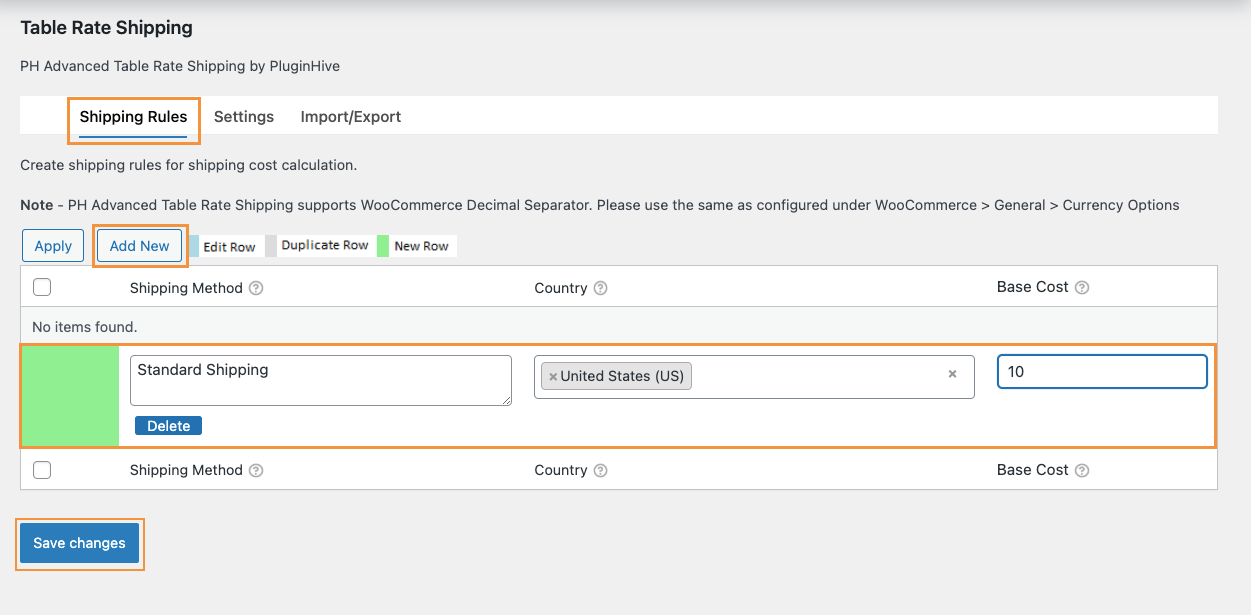
To create a new shipping rule, go to the Shipping Rules tab and click the Add New button above the table. A new empty row will appear where you can enter the required condition and cost details for your rule. After filling in the necessary fields, click Save changes to apply the rule.
Simple Example: Set Shipping Based on Country
Before creating this rule, make sure the Country and Base Cost columns are added to the Shipping Rules table. You can enable these columns from the Table Rate Shipping Columns section, as shown below.
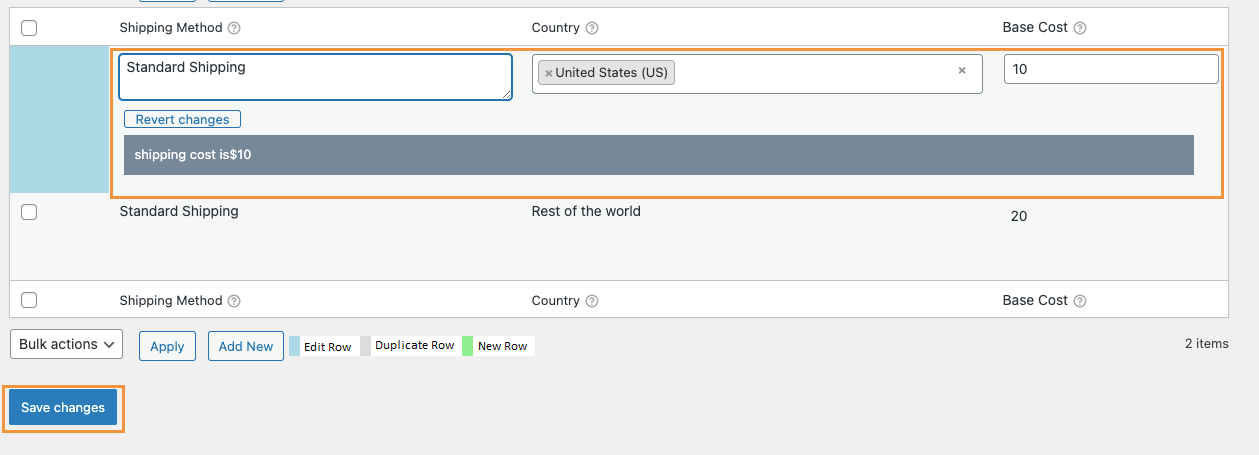
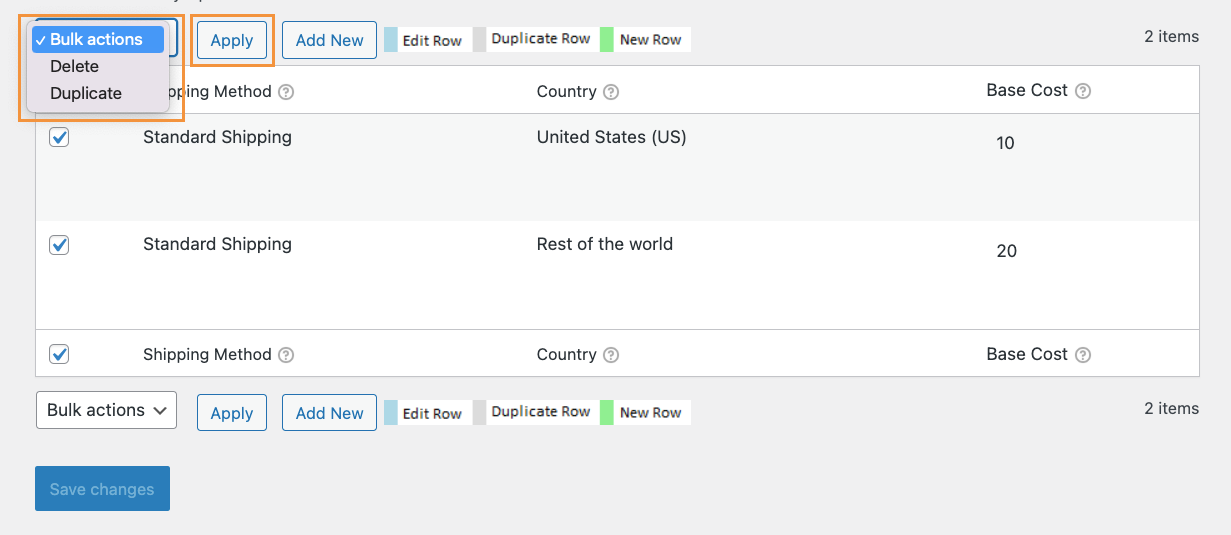
Suppose you want to charge $10 for shipping within the United States and $20 for all other countries. To do this, create one rule where the Country is set to the United States and the Base Cost is $10. Then create a second rule where the Country is set to Rest of the World, and the Base Cost is $20.
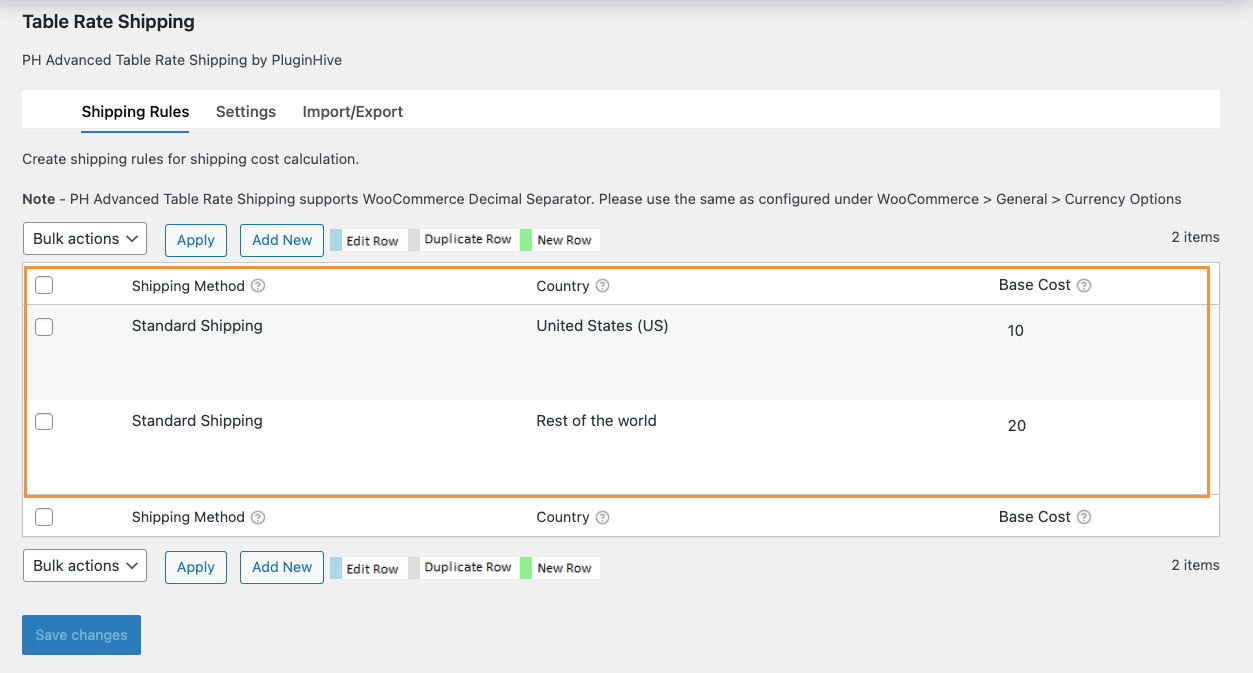
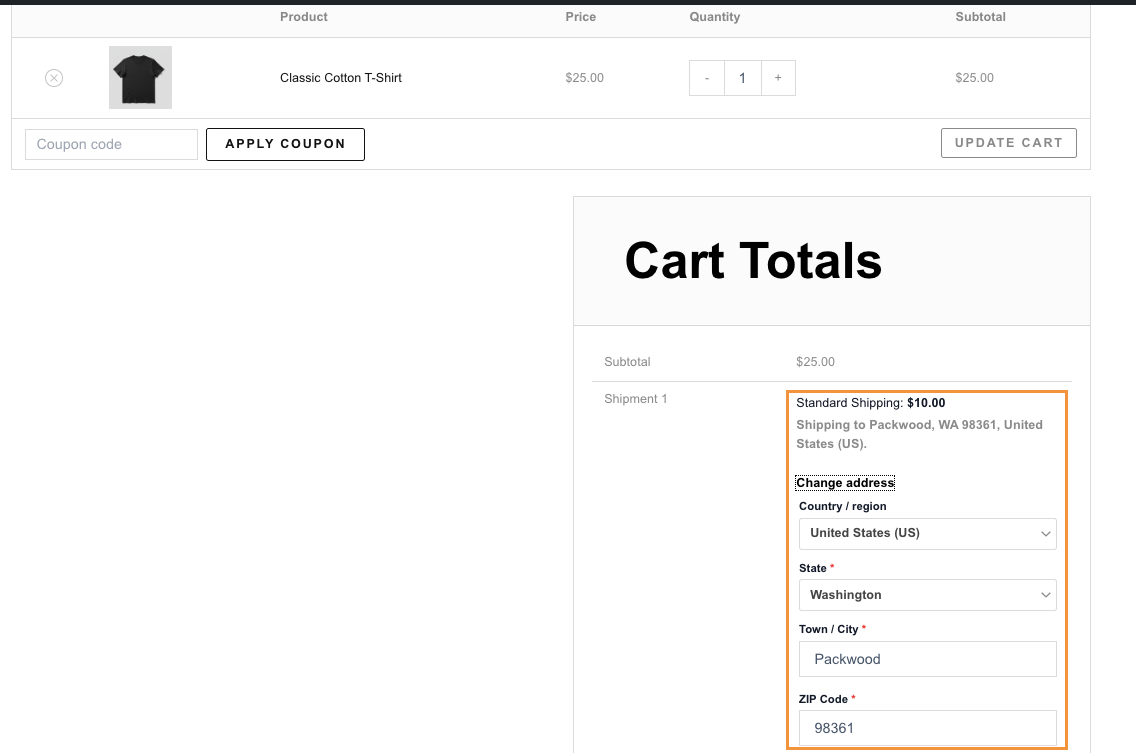
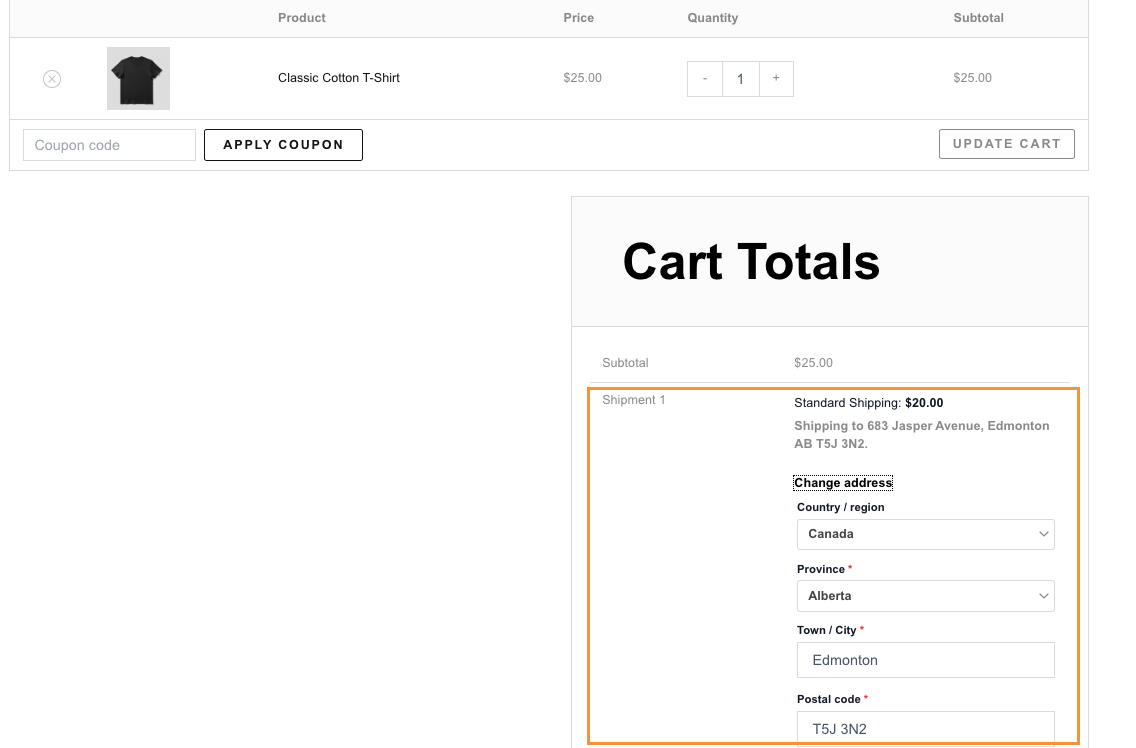
With these two rules in place, customers in the United States will see a $10 shipping charge at checkout.
Customers from other countries (for example, Canada, as shown in the image below) will see a $20 shipping charge instead.
You can find more practical examples and advanced scenarios in the upcoming sections of this guide.
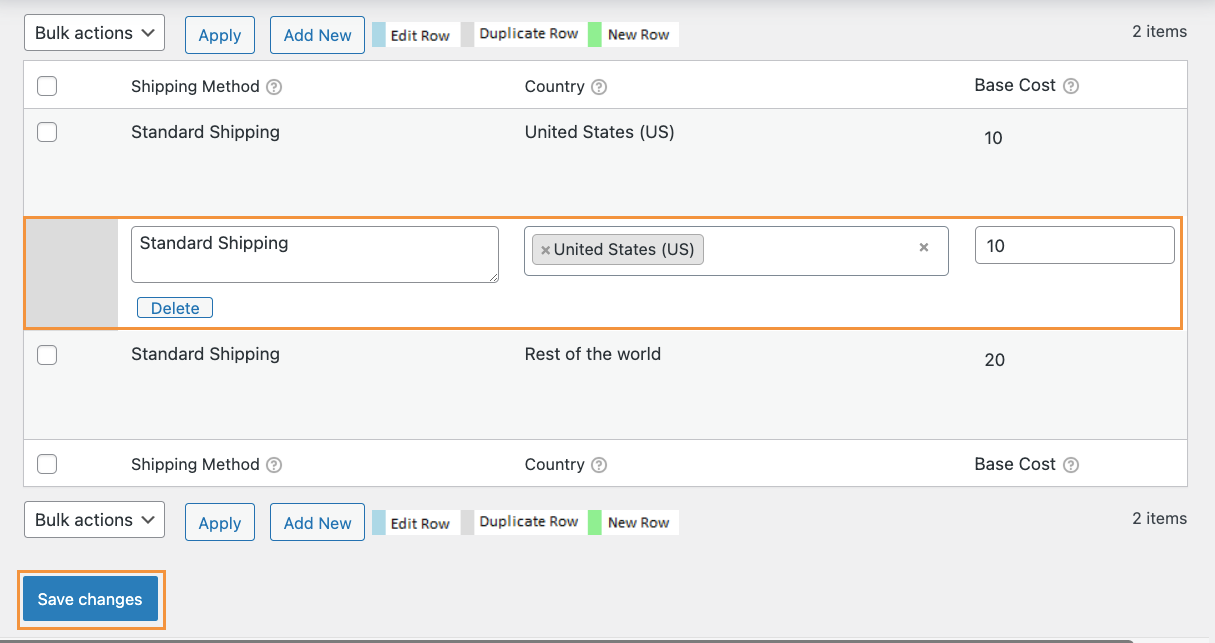
Editing a Rule
To edit a rule, hover over it and click Edit. After making your updates, click Save changes to apply them.

Duplicating a Rule
If you want to create a similar rule, hover over the existing rule and click Duplicate.

This will create a copy of the rule, which you can then modify as needed.
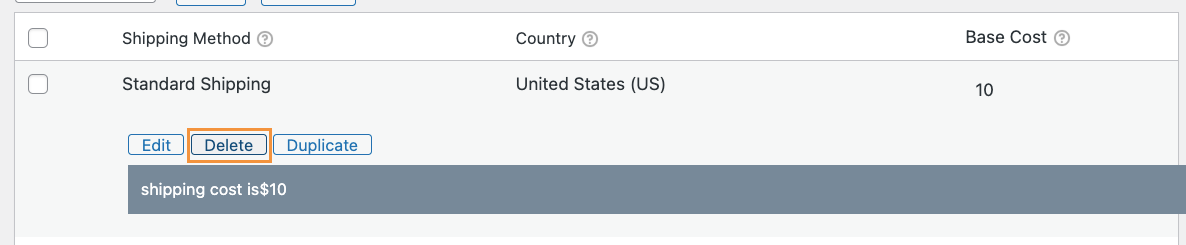
Deleting a Rule
To remove a single rule, hover over it and click Delete. After deleting, click Save changes to confirm the removal.
Managing Multiple Rules at Once
If you want to duplicate or delete multiple rules at the same time, use the checkboxes next to each rule. Select the rules you want to manage, choose the required option from the Bulk actions dropdown, and click Apply. Then click Save changes to finalize the action.
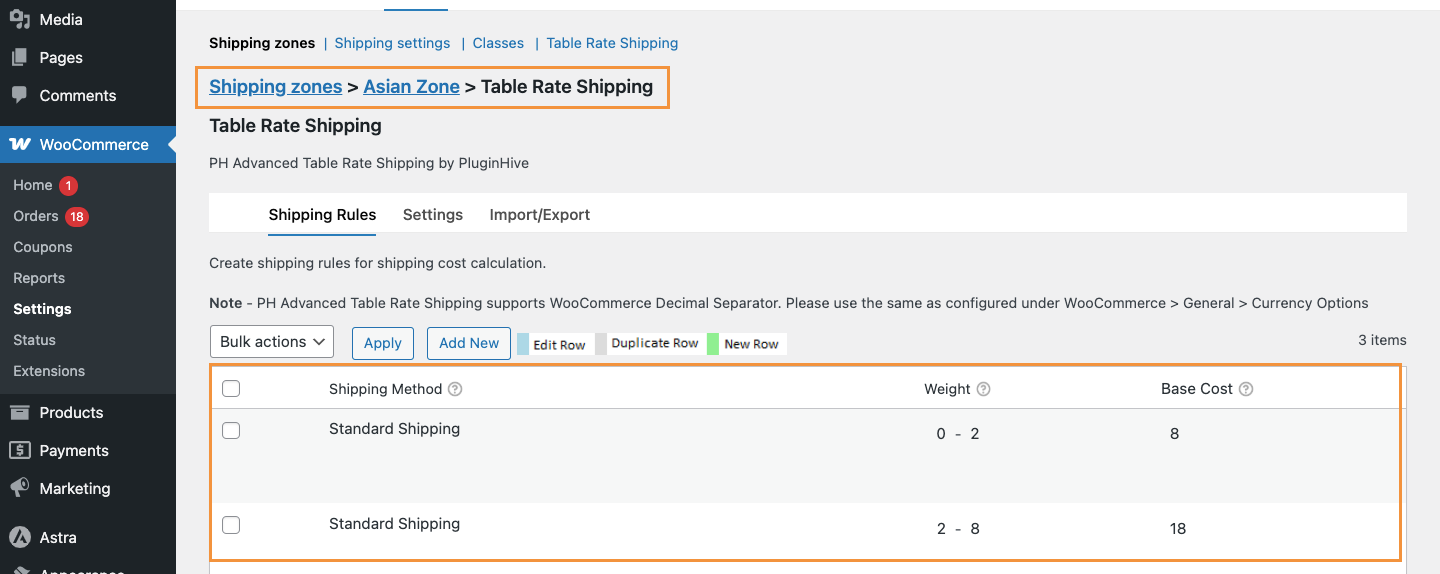
Add Table Rate Shipping to a Specific Shipping Zone (If Required)
↑ Back to topIf you want PH Advanced Table Rate Shipping available for a specific region (such as the United States, Europe, or Worldwide), add it to the appropriate Shipping Zone.
Note: This step is required only if you want a set of rules to be applied to specific shipping zones.
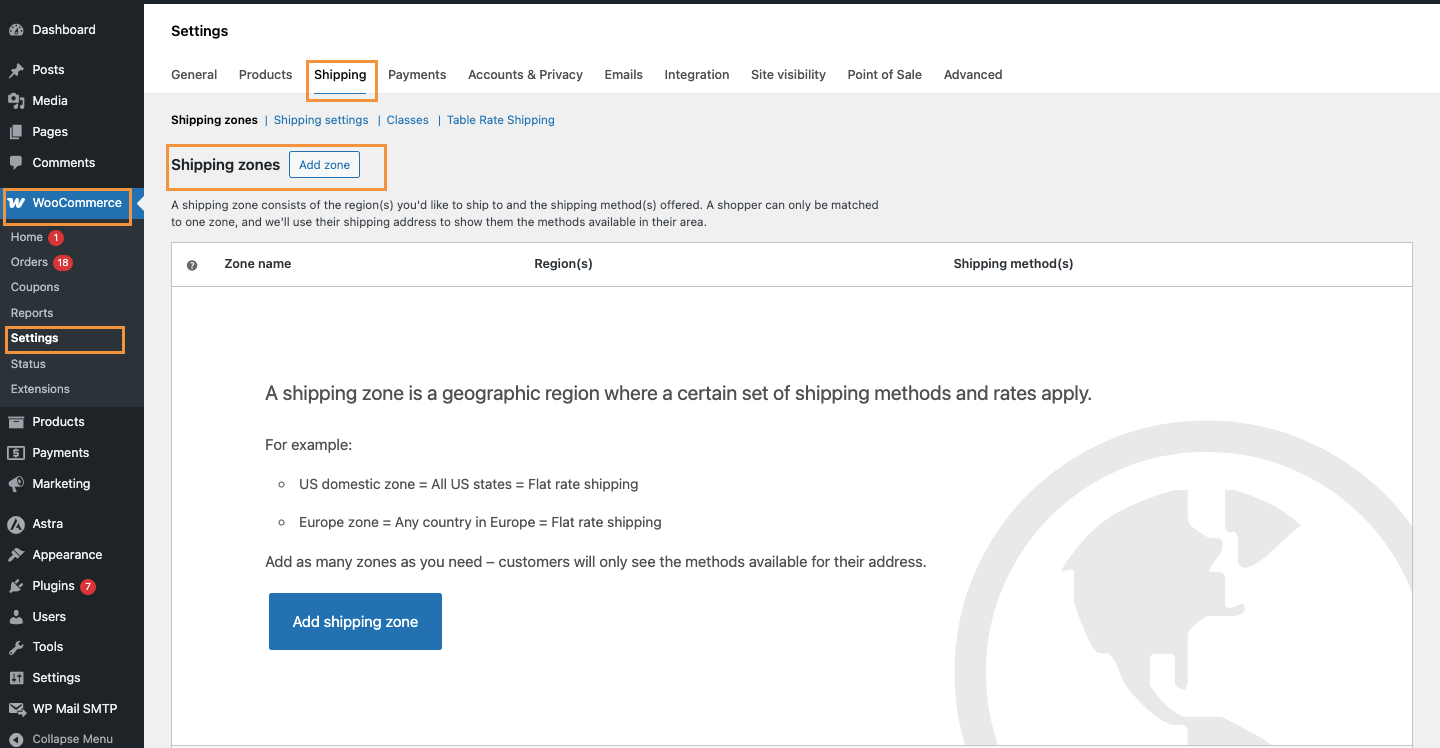
To add Table Rate Shipping to a Shipping Zone, go to WooCommerce → Settings → Shipping and click on an existing Shipping Zone (if you have any) or add a new one.
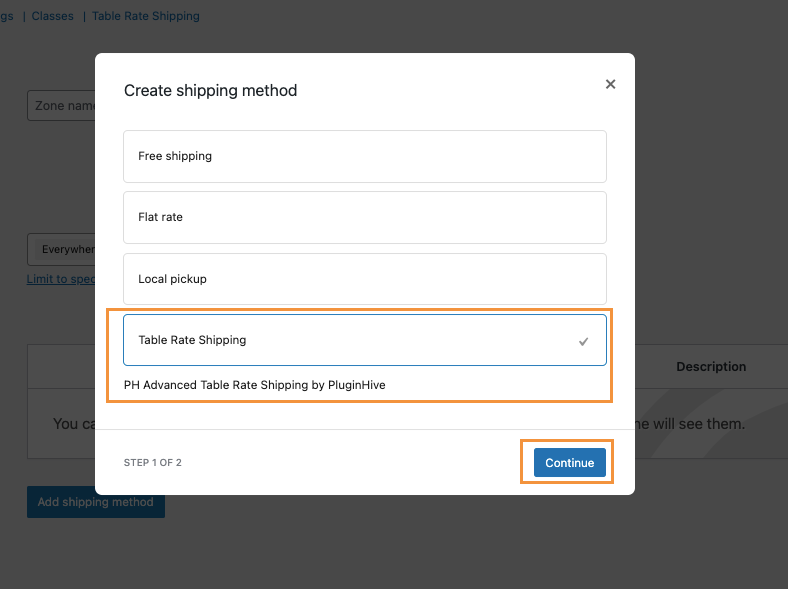
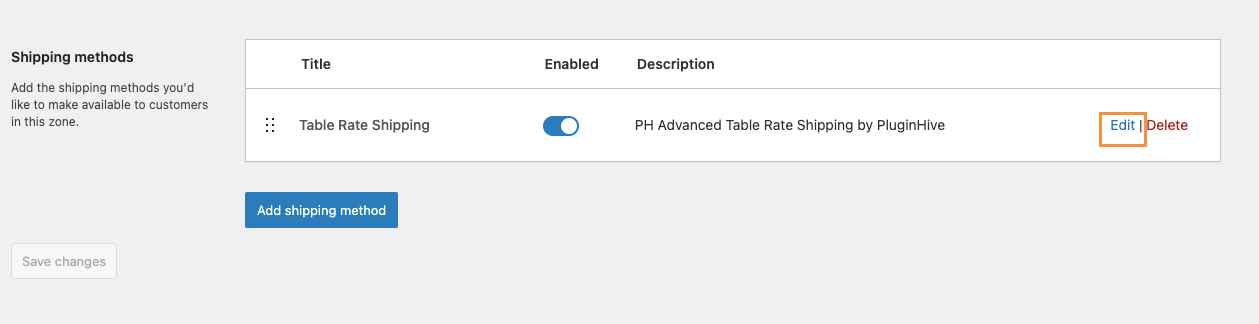
Under the Shipping methods section, click Add shipping method, select Table Rate Shipping from the dropdown, and click Continue. Finally, ensure that the method is enabled.
Once added, you can click Edit next to Table Rate Shipping to configure its settings and create shipping rules.
Note: If you need more information about creating and managing Shipping Zones, refer to this guide on Setting Up Shipping Zones.
Import or Export Shipping Rules (Using CSV)
↑ Back to topIf your store has many shipping rules or you want to upload carrier rate tables in bulk, you can use the Import/Export tab to manage your rules using a CSV file. This allows you to edit multiple rules at once using Excel, Google Sheets, or any spreadsheet software.
This feature is useful if your store has many shipping rules, uses carrier rate tables, needs bulk price updates, or if you want to quickly create similar rules without adding them one by one.
Export Your Current Shipping Rules
↑ Back to topTo download your existing rules, go to the Import/Export tab and click Export CSV. A CSV file containing all your current shipping rules will be downloaded to your computer.
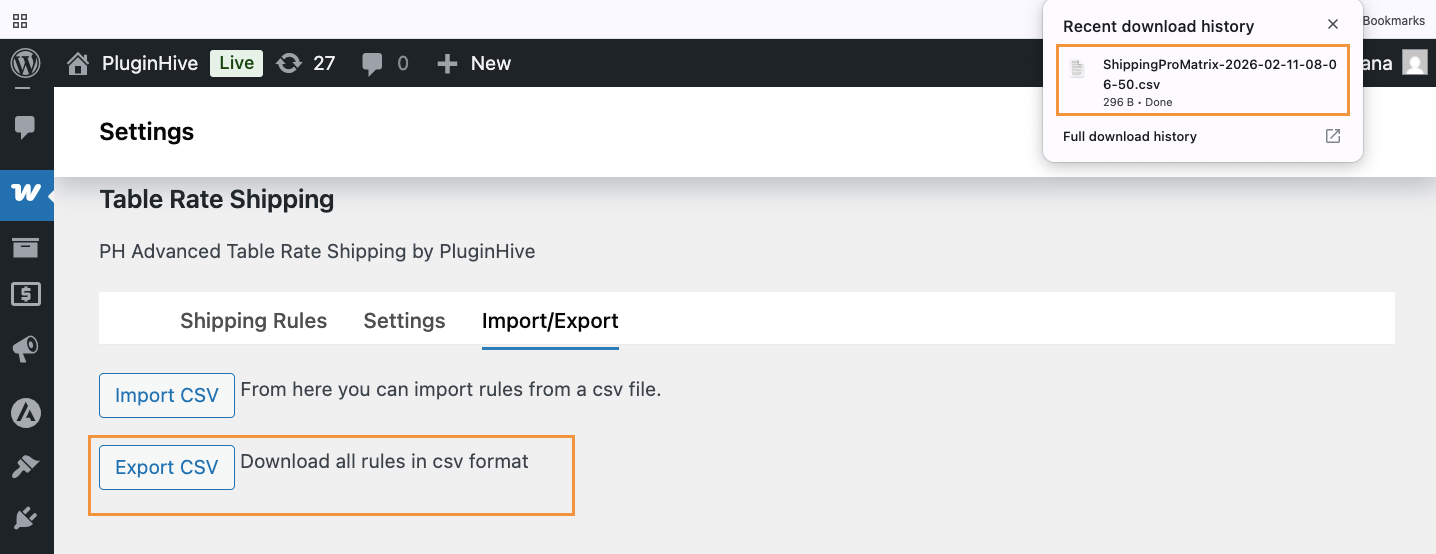
You can open this file in Excel, Google Sheets, or any spreadsheet application. The columns in the file match the structure of your Shipping Rules table.
Edit Rules in a Spreadsheet
↑ Back to topAfter exporting the file, you can add new rules by inserting new rows, edit existing rules by updating the cell values, remove rules by deleting rows, and quickly create similar rules by copying and pasting existing rows.
Note: Do not rename or rearrange the column headers. The plugin requires the same structure when importing the file back.
Import Updated Rules Back to Your Store
↑ Back to topAfter editing your CSV file, go to the Import/Export tab and click Import CSV.
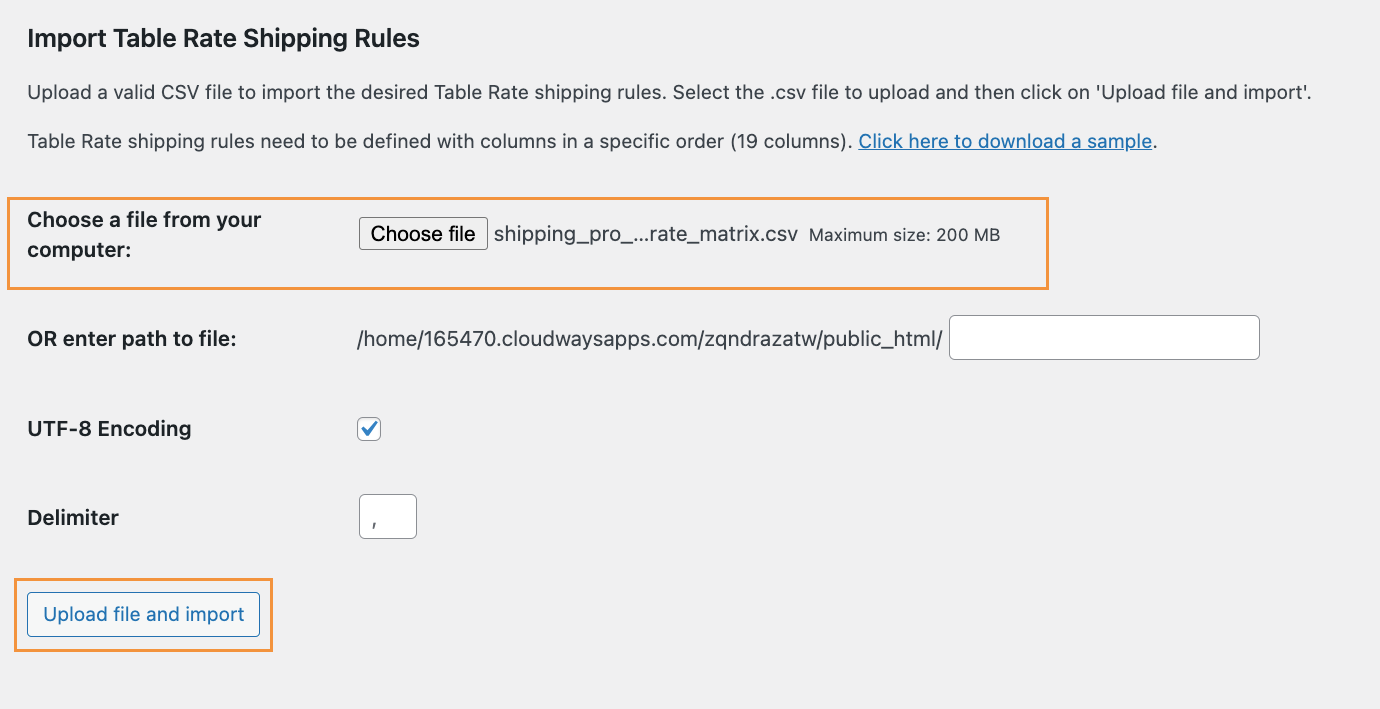
On the import screen, click Choose file and select your updated CSV file from your computer. If your CSV file is already uploaded to your server, you can use the “OR enter path to file” field and enter the full file path (for example: /home/yourdomain/public_html/filename.csv). This option is useful for advanced users who manage files directly on the server.
Keep the default settings, such as UTF-8 Encoding and the comma (,) delimiter, unless your file uses a different format. Then click Upload file and import.
After the import is complete, go to the Shipping Rules tab to review the imported rules. Once everything looks correct, click Save changes to apply them to your store.
Best Practices Before Importing
To avoid errors, follow these simple guidelines:
- Always export a backup of your current rules before making changes
- Test with a small set of rules if you are importing for the first time
- Use numbers only for cost fields (for example, enter 10 instead of $10)
- Use a dot for decimals (for example, 10.5 instead of 10,5)
- Make sure country and state names match WooCommerce exactly
- Use wildcards correctly for postal codes (for example, 90*)
After importing, you can enable Debug mode and test checkout to make sure all rules are working as expected.
Troubleshoot Shipping Rate Issues
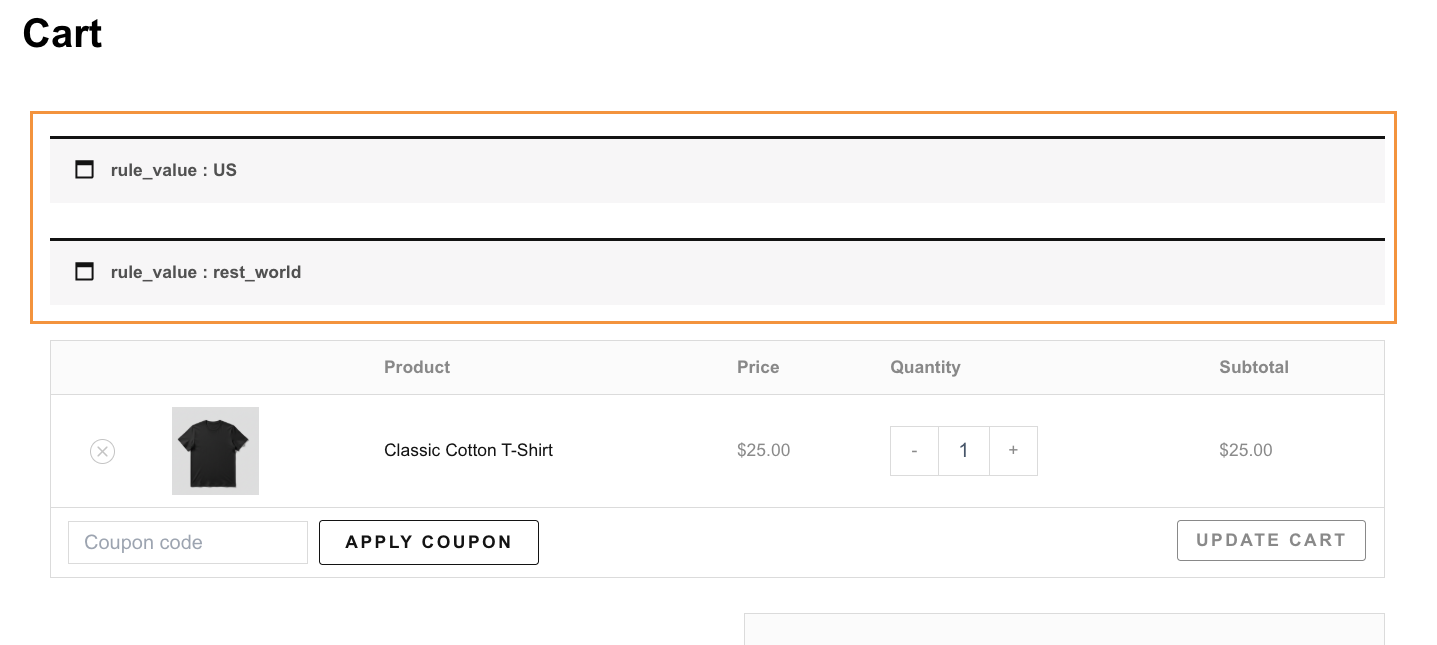
↑ Back to topIf your shipping rates are not showing, appear incorrect, or some options are missing at checkout, enable the Debug this shipping method option in the Settings tab. This helps you see how the plugin is calculating shipping and which rules are being applied.
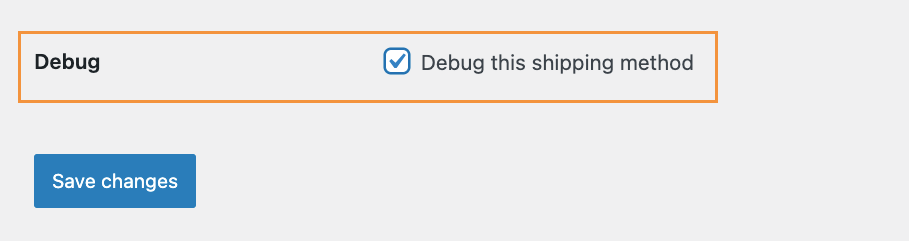
After enabling the Debug option, click Save changes, add a product to your cart, and go to the Cart or Checkout page. You will see helpful information at the top of the page that explains how the shipping cost was calculated. This makes it easier to find and fix any setup issues.
Now, let’s look at some practical business use cases to see how the plugin works in real scenarios.
Working Examples
↑ Back to topBusiness Case 1: Offer Free Shipping Above a Minimum Order Amount
↑ Back to topMany customers abandon their carts when shipping costs feel high. By offering free or discounted shipping above a certain order amount, you can encourage shoppers to add more items and boost sales while keeping shipping costs predictable.
Example:
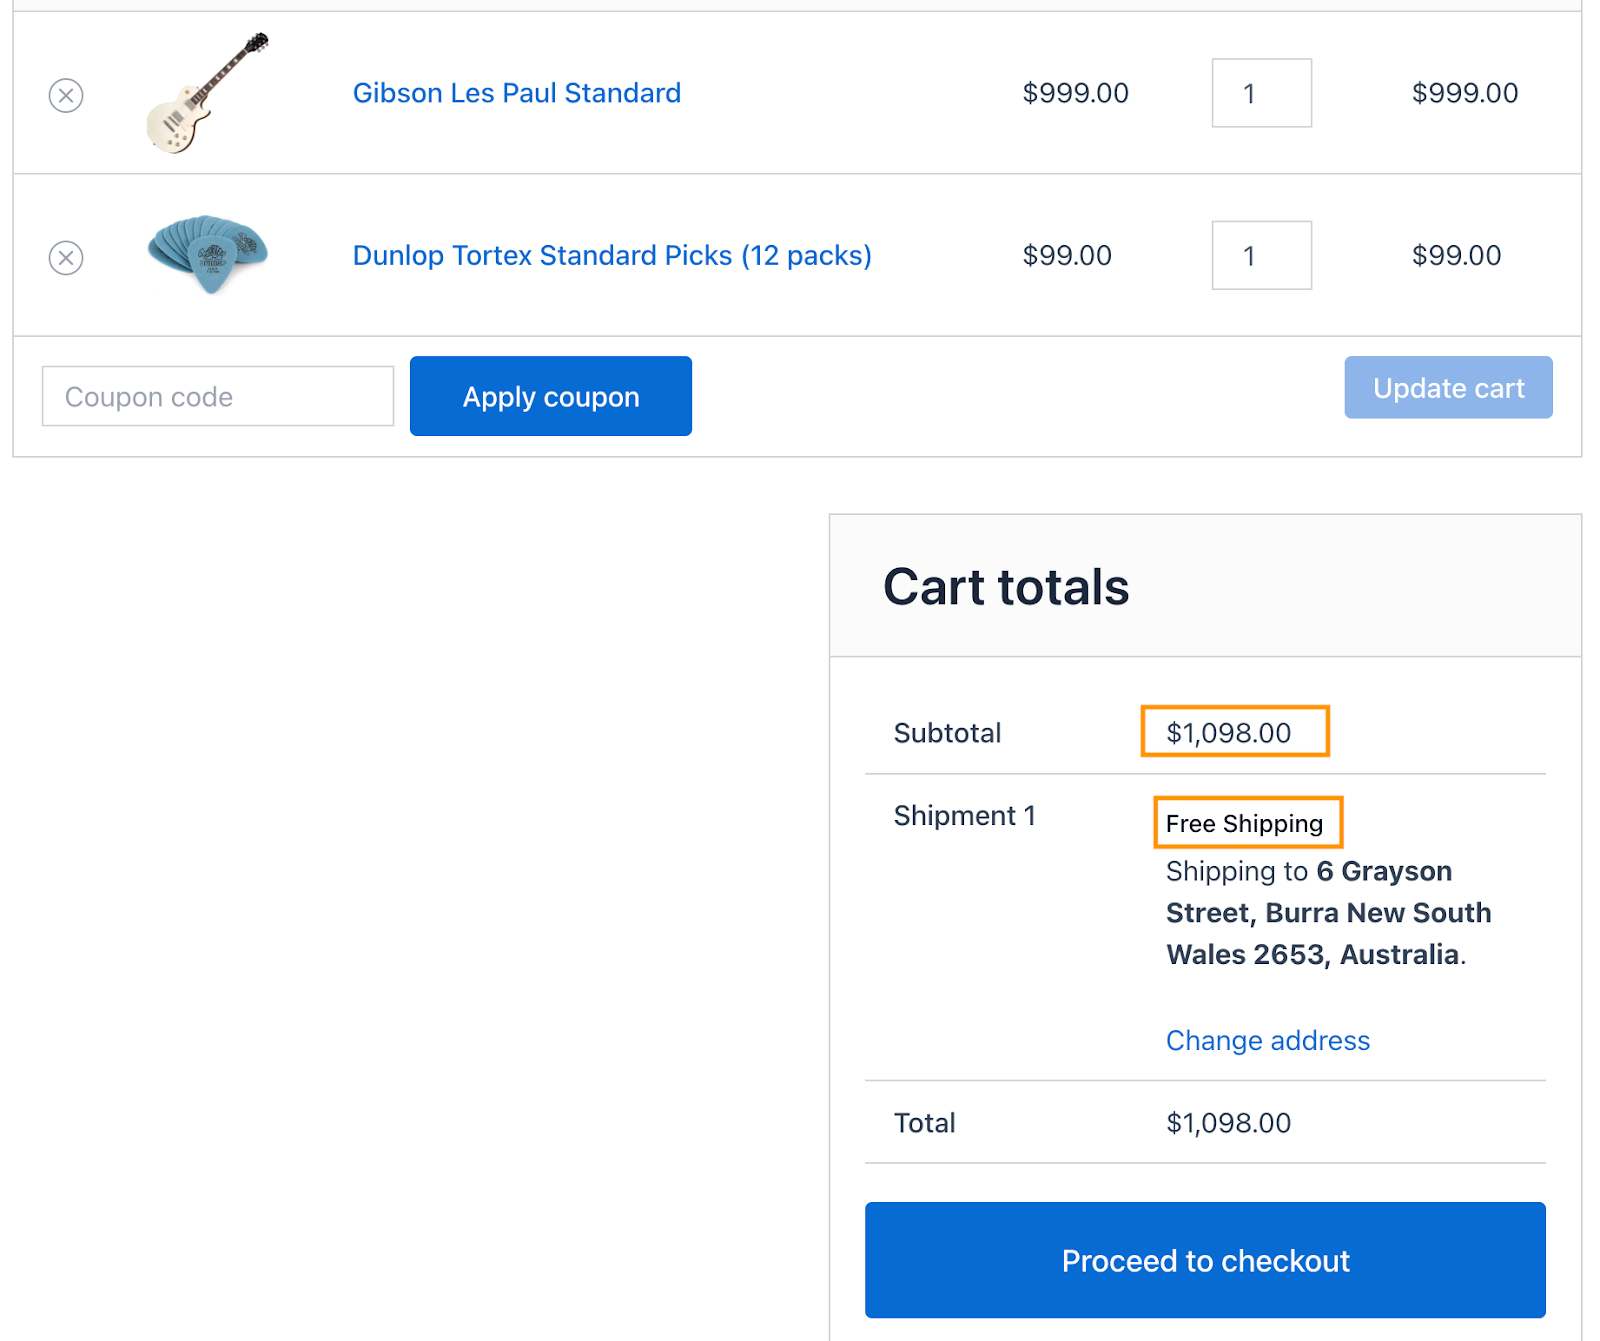
- Orders below $1,000 → $100 shipping
- Orders $1,000 and above → Free shipping
To configure this, go to Table Rate Shipping → Settings
In the Table Rate Shipping Columns, select Shipping Method, Price, and Base Cost
Then, create subtotal-based rules under the Shipping Rules Tab
Rule 1: Standard Shipping for Small Orders
- Price: 0 – 1000
- Base Cost: 100
Rule 2: Free Shipping for Orders Above Threshold
- Price: 1000 – 5000
- Base Cost: 0
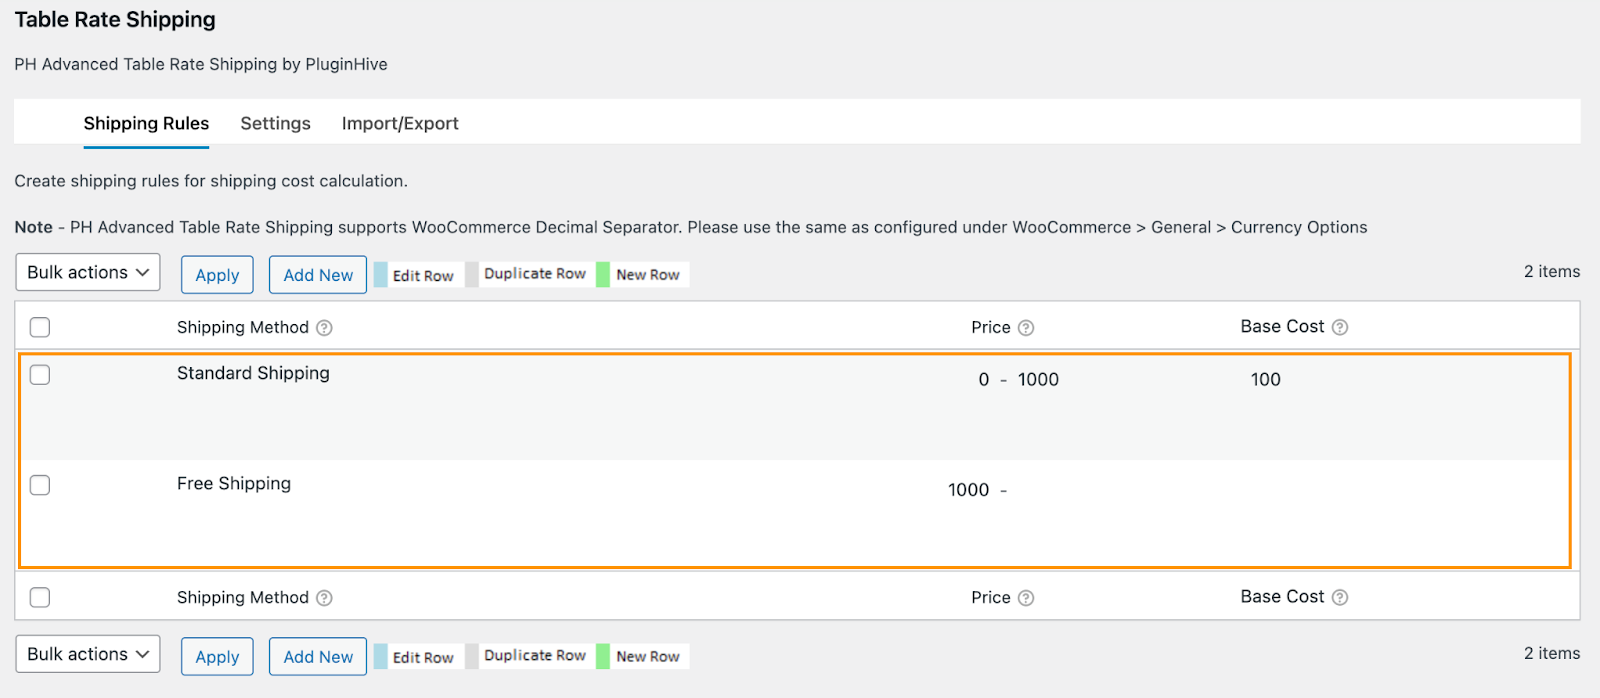
Click Save Changes.
Then, accordingly, shipping rates will be displayed on the cart/checkout page as shown in the image.
Cart Below $1,000:
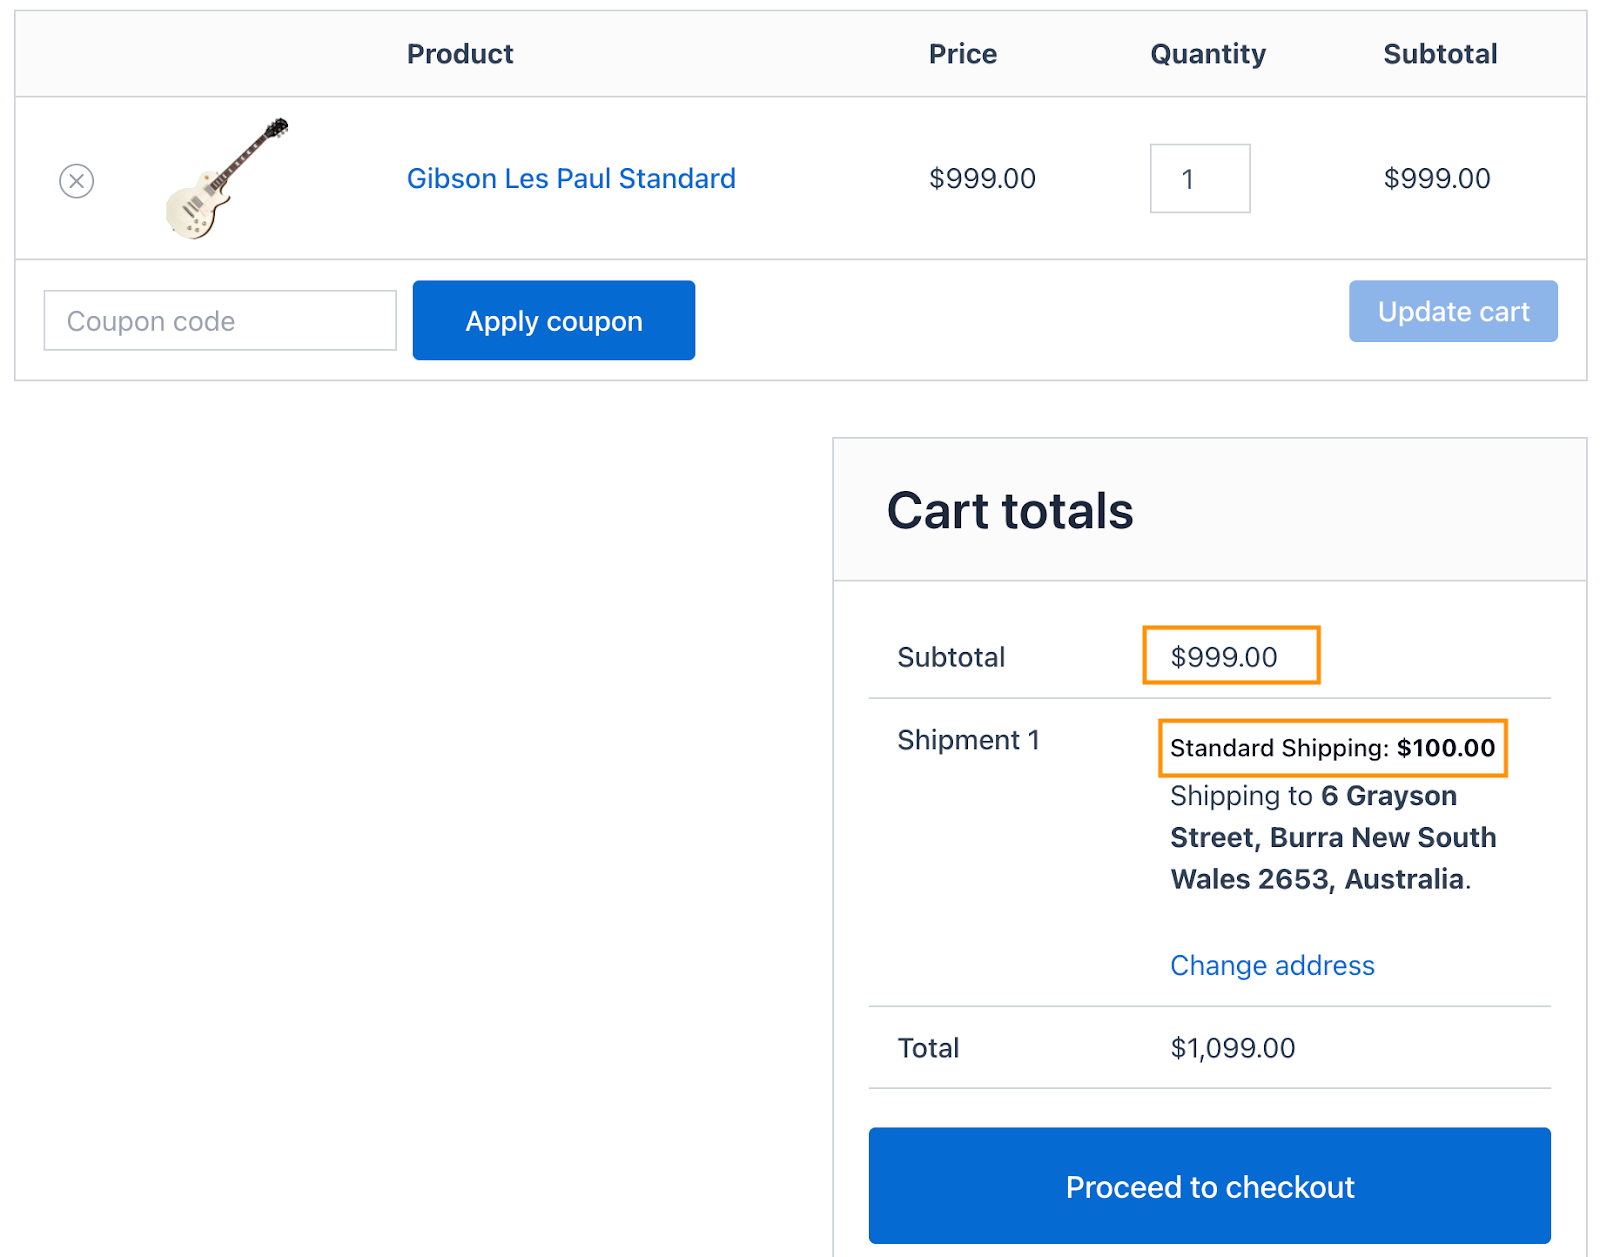
Cart more than $1,000:
Note: You can optionally use Cost Per Unit + Cost Based on – Price if you want shipping to scale automatically.
Business Case 2: Set Shipping Rates Based on Number of Items (Free for Wholesale Orders)
↑ Back to topSome stores want to charge shipping based on how many items a customer buys, but offer free shipping for wholesale orders. This encourages customers to buy more while keeping shipping costs fair.
Example:
- 1–10 items → $50 shipping
- 11–50 items → $25 shipping
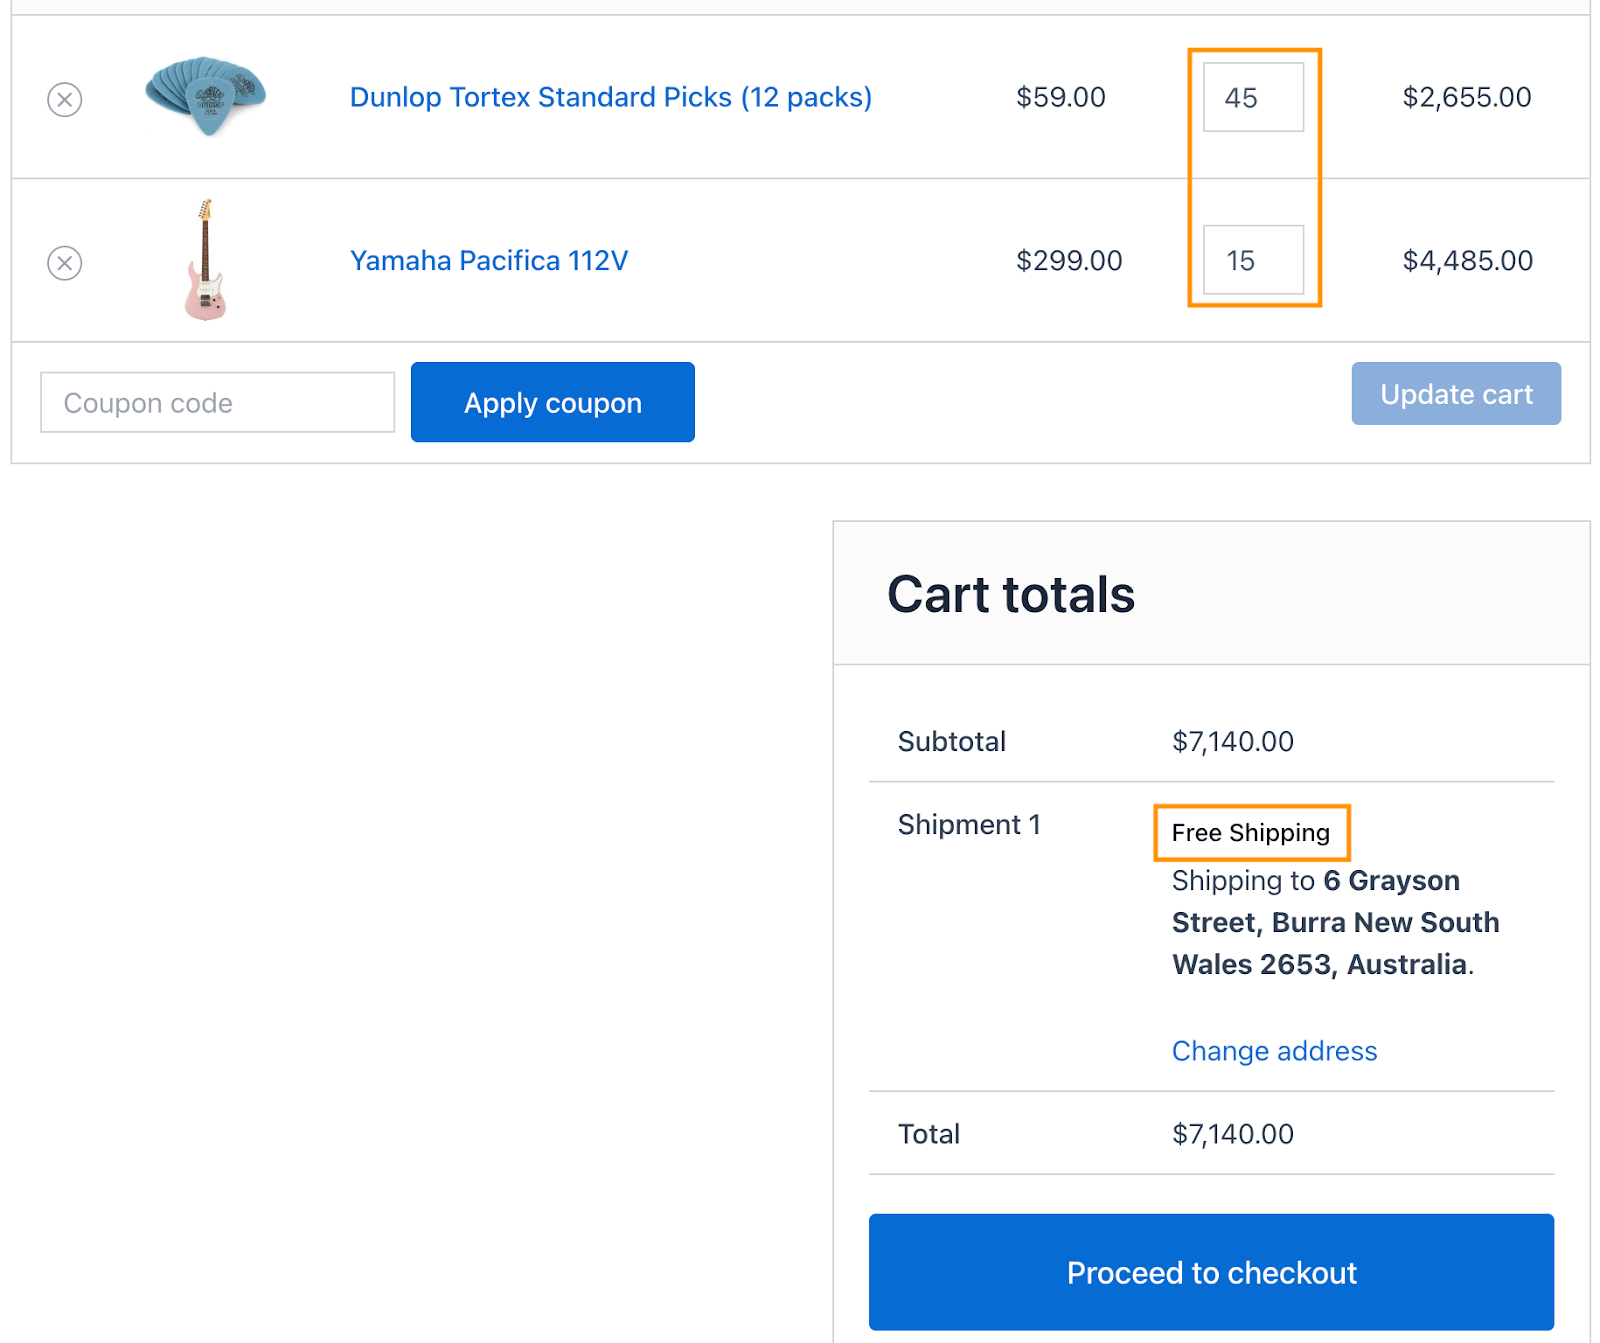
- 51+ items → Free shipping (wholesale order)
To configure this, go to Table Rate Shipping → Settings
In the Table Rate Shipping Columns, select Shipping Method, Items, and Base Cost
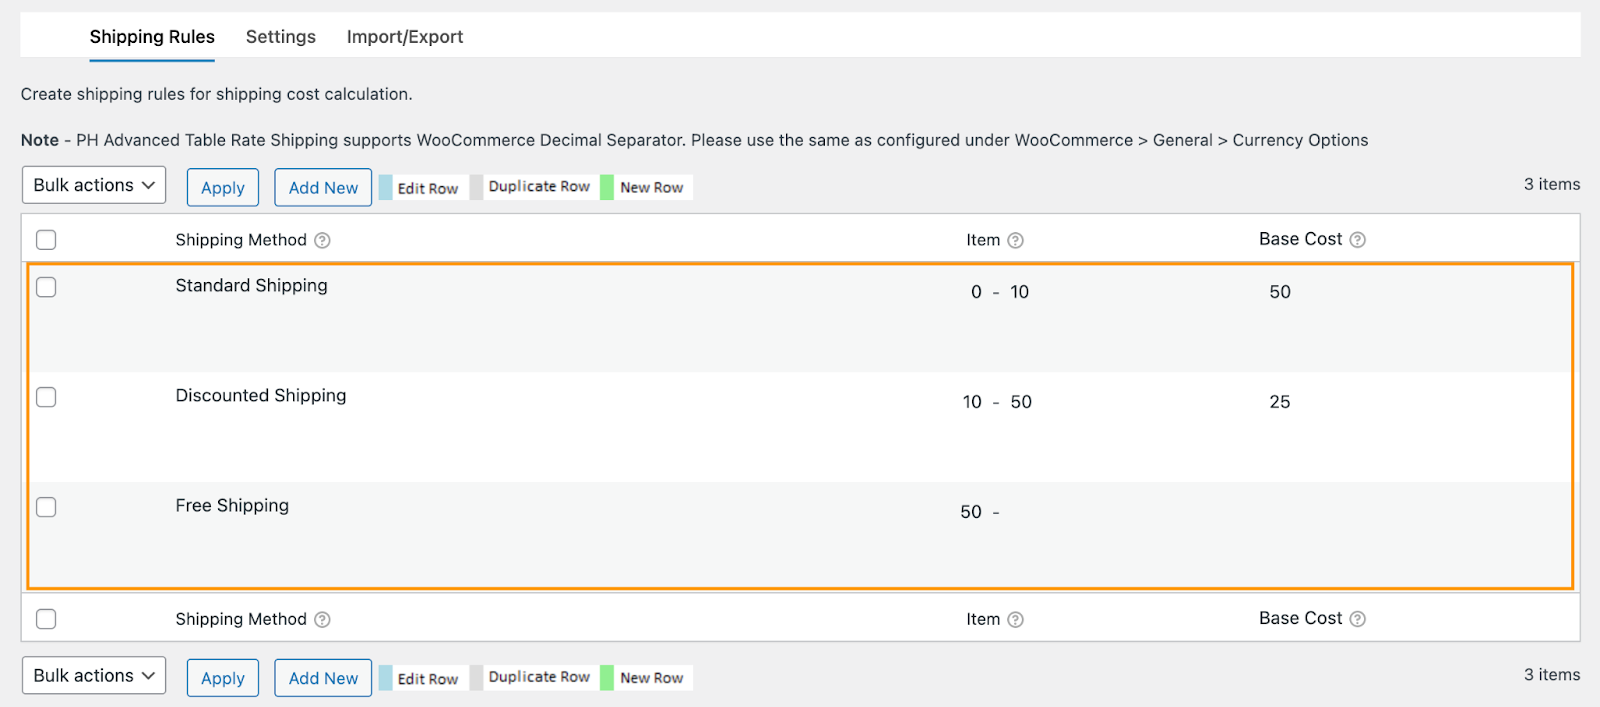
Then, create item-based rules under the Shipping Rules Tab
Rule 1: Standard Shipping for Small Orders
- Items: 0 – 10
- Base Cost: $50
Rule 2: Discounted Shipping for Medium Orders
- Items: 10 – 50
- Base Cost: $25
Rule 3: Free Shipping for Wholesale Orders
- Items: 50 and above
- Base Cost: $0
Click Save Changes.
Then, shipping rates will be displayed on the cart/checkout page as shown in the image.
Cart with 8 Items: Shipping – $50

Cart with 20 Items: Shipping – $25

Cart with 60 Items (Wholesale Order): Shipping – Free
Note: You can optionally use Cost Per Unit + Cost Based on – Items if you want shipping to scale automatically per item.
Business Case 3: Charge More as Order Weight Increases (Per Unit Cost Applied)
↑ Back to topSome stores want shipping costs to increase automatically as the order gets heavier. Lighter orders cost less, while heavier orders include a per-pound charge to reflect shipping effort.
Example:
- 0–5 lb → $10 shipping
- 5–10 lb → $10 shipping + $5 per lb
- 10+ lb → $20 shipping + $10 per lb
To configure this, go to Table Rate Shipping → Settings
In the Table Rate Shipping Columns, select: Shipping Method, Weight, Base Cost, Cost Based On, and Cost Per Unit
Then, create weight-based rules under the Shipping Rules Tab
Rule 1: Standard Shipping for Light Orders
- Weight: 0 – 5 lb
- Cost Based on – weight
- Base Cost: $10
- Cost Per Unit: $0
Rule 2: Priority Shipping for Medium Orders
- Weight: 5 – 10 lb
- Cost Based on – Weight
- Base Cost: $10
- Cost Per Unit: $5 per lb
Rule 3: Freight Shipping Heavy Orders
- Weight: 10 lb +
- Cost Based on – Weight
- Base Cost: $20
- Cost Per Unit: $10 per lb

Click Save Changes.
Then, shipping rates will be displayed on the cart/checkout page as shown in the image.
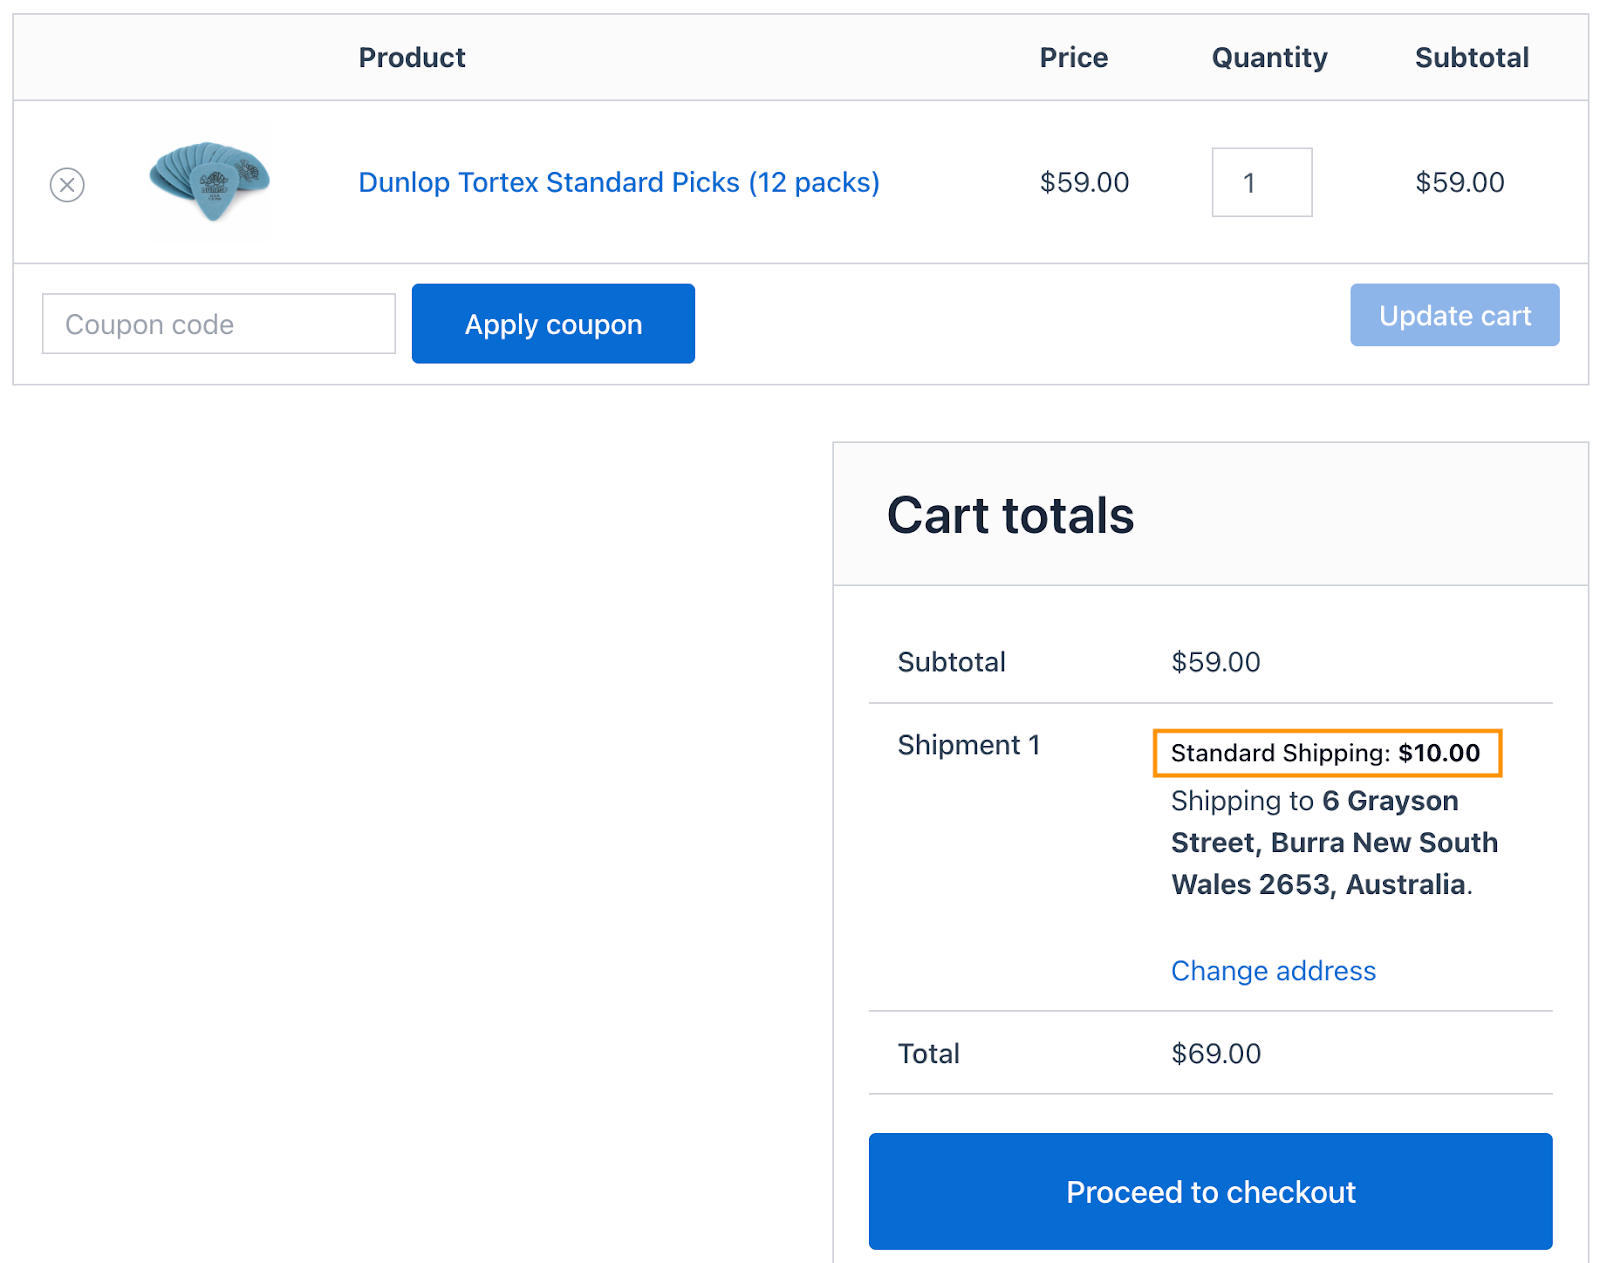
Cart weighing 4 lb: Standard Shipping – $10
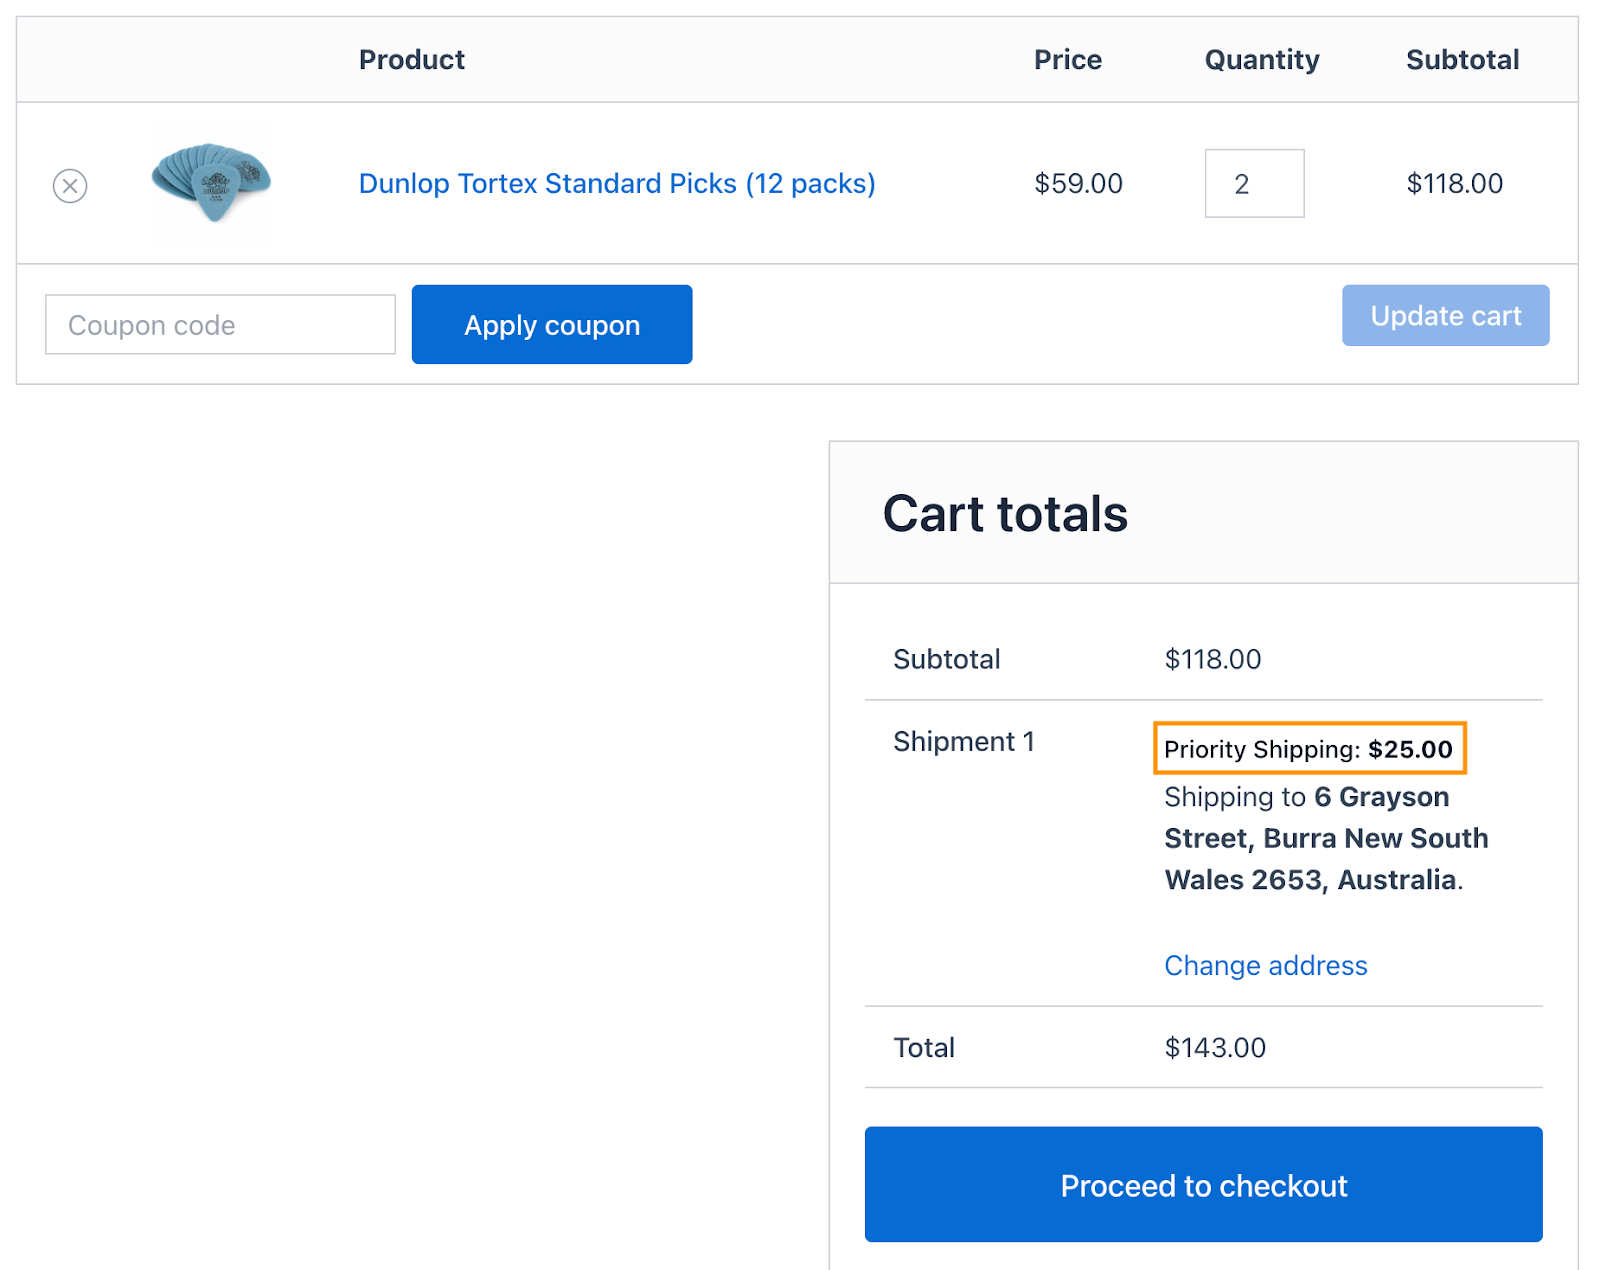
Cart weighing 8 lb: Priority Shipping – $10 + ($5 × 3 lb) = $25
(Extra pounds above 5 lb = 8 – 5 = 3 lb × $5)
Cart weighing 12 lb: Freight Shipping – $20 + ($10 × 2 lb) = $40
(Extra pounds above 10 lb = 12 – 10 = 2 lb × $10)

Business Case 4: Add Extra Charges for Fragile/ Sensitive/ Special Products in Standard & Premium Shipping
↑ Back to topSome products, such as fragile or sensitive goods, require extra packaging and careful handling. By using Shipping Classes and Groups, you can charge higher shipping rates for these items while keeping standard products at regular rates. For example:
Normal Products
- Standard Shipping → $10
- Premium Shipping → $20
Sensitive Products
- Standard Shipping → $30
- Premium Shipping → $40
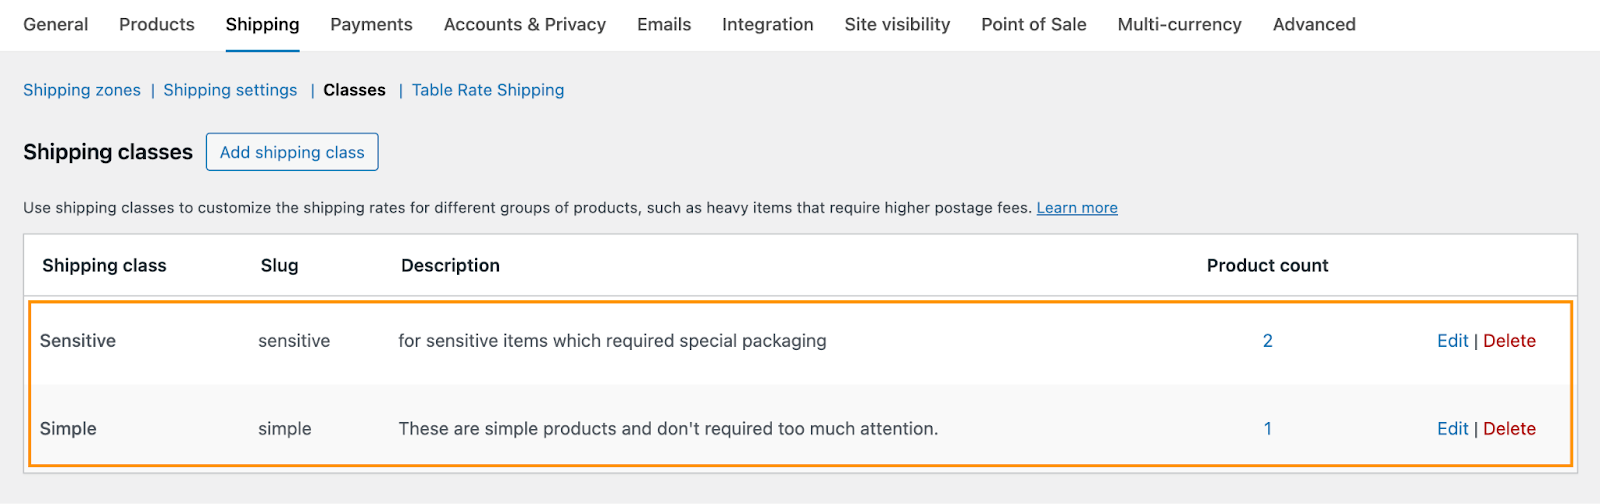
Before creating the rules, make sure that you have created a shipping class and assigned your product, specially handled products, accordingly, as shown in the image. If a product is not assigned correctly, the rule will not apply.
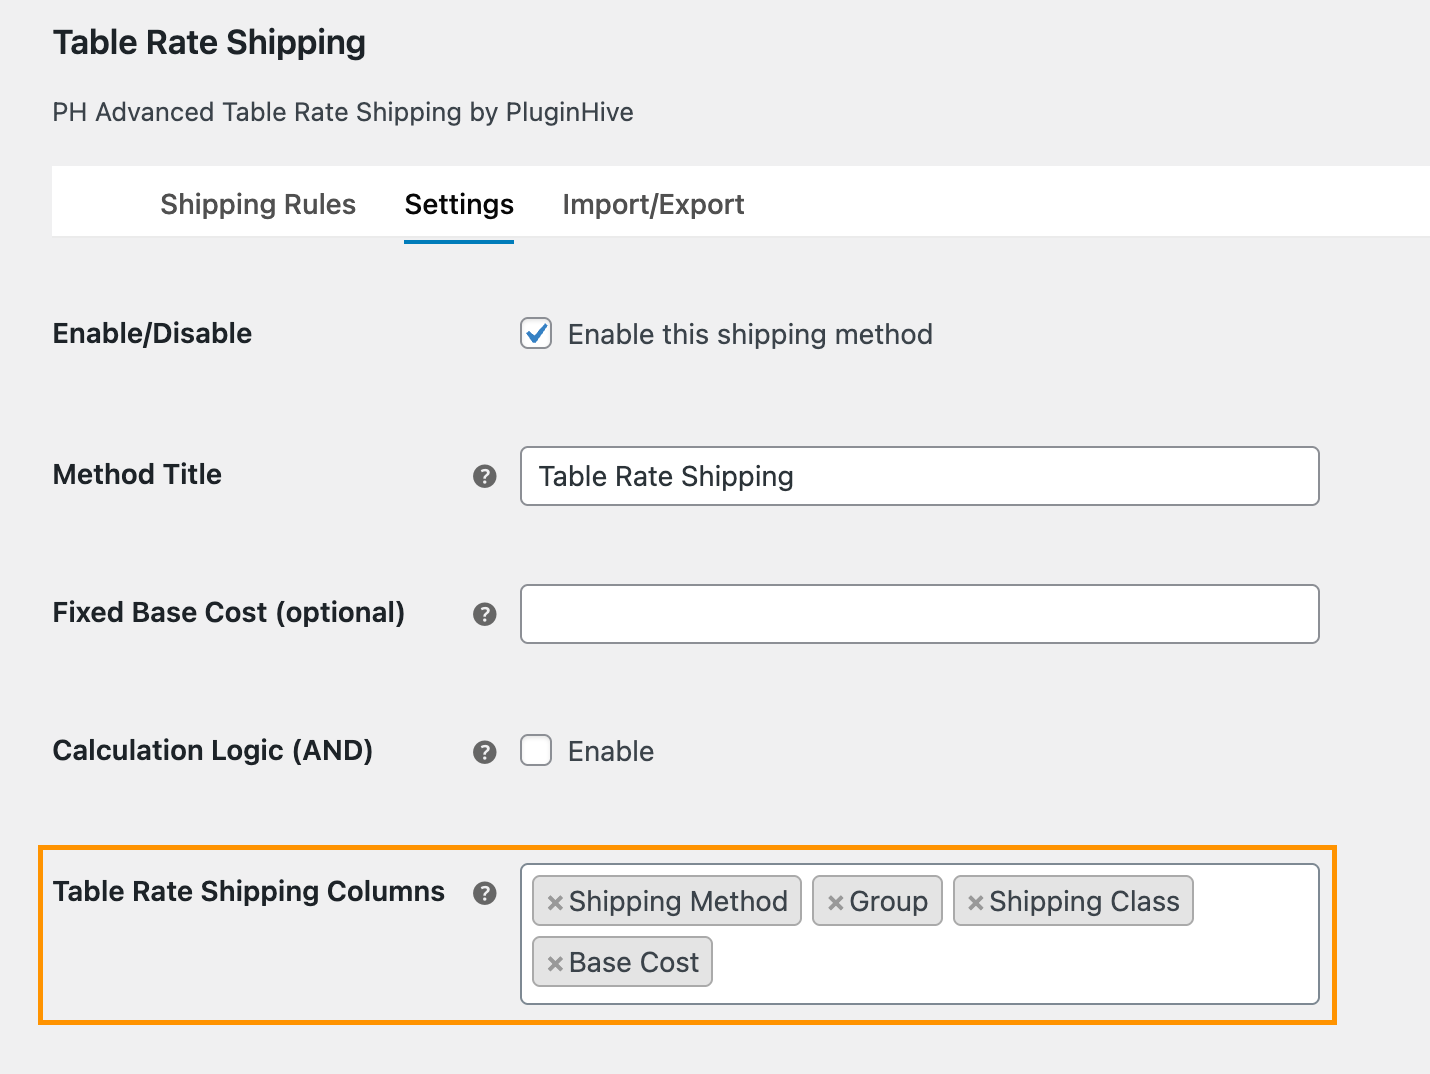
Now, go to Table Rate Shipping → Settings and in the Table Rate Shipping Columns, select:
- Shipping Method
- Group (allows you to display more than one shipping option (Standard and Premium))
- Shipping Class
- Base Cost
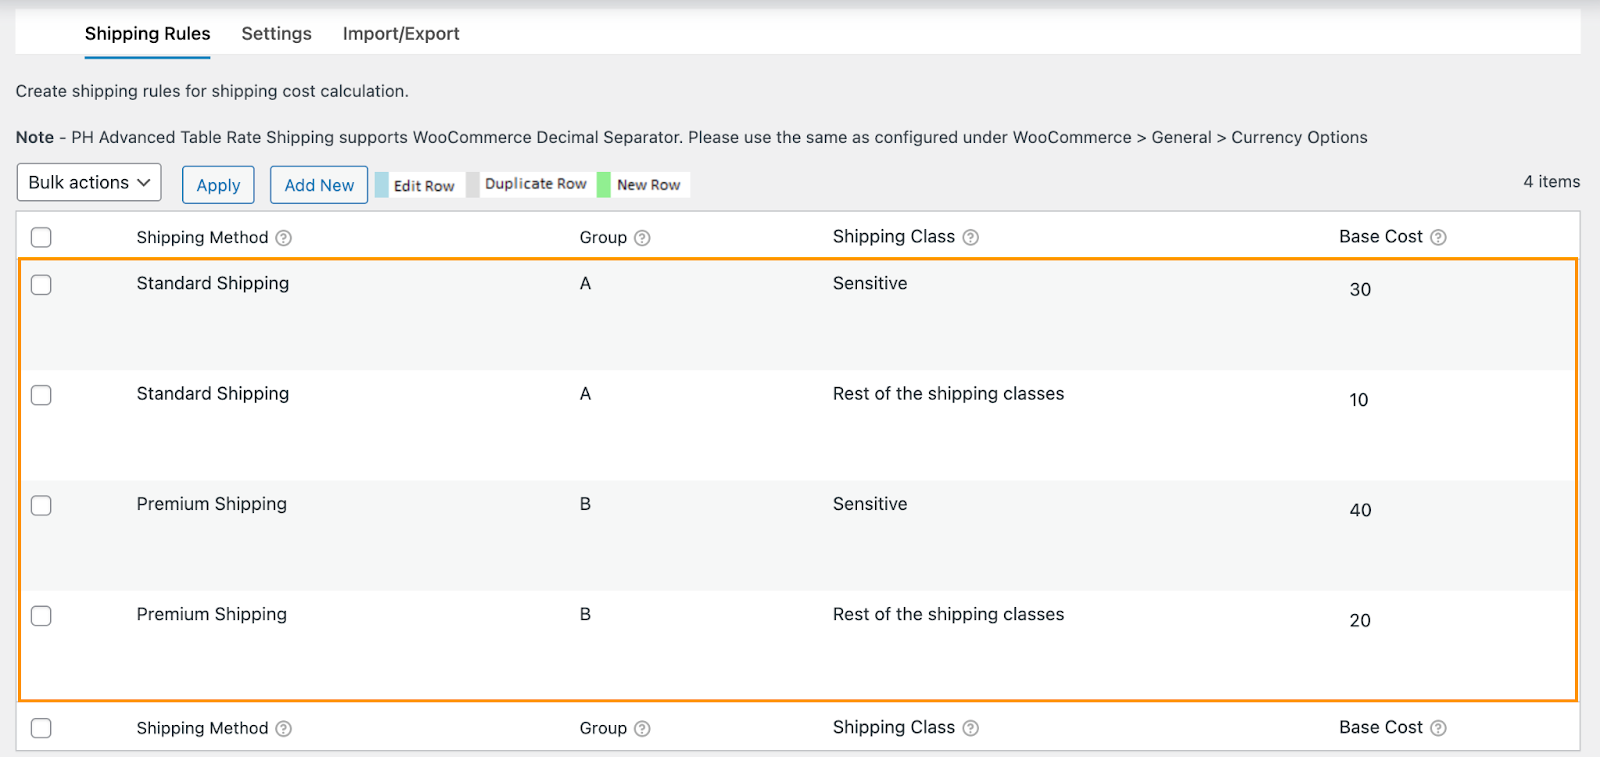
Then, create shipping rules under the Shipping Rules tab
Rule 1: Sensitive Products
- Shipping Method: Standard Shipping
- Group: A
- Shipping Class: Sensitive
- Base Cost: $30
Rule 2: Normal Products
- Shipping Method: Standard Shipping
- Group: A
- Shipping Class: Rest of the shipping classes
- Base Cost: $10
Rule 3: Sensitive Products
- Shipping Method: Premium Shipping
- Group: B
- Shipping Class: Sensitive
- Base Cost: $40
Rule 4: Normal Products
- Shipping Method: Premium Shipping
- Group: B
- Shipping Class: Rest of the shipping classes
- Base Cost: $20
Click Save Changes.
If a customer adds a normal product:
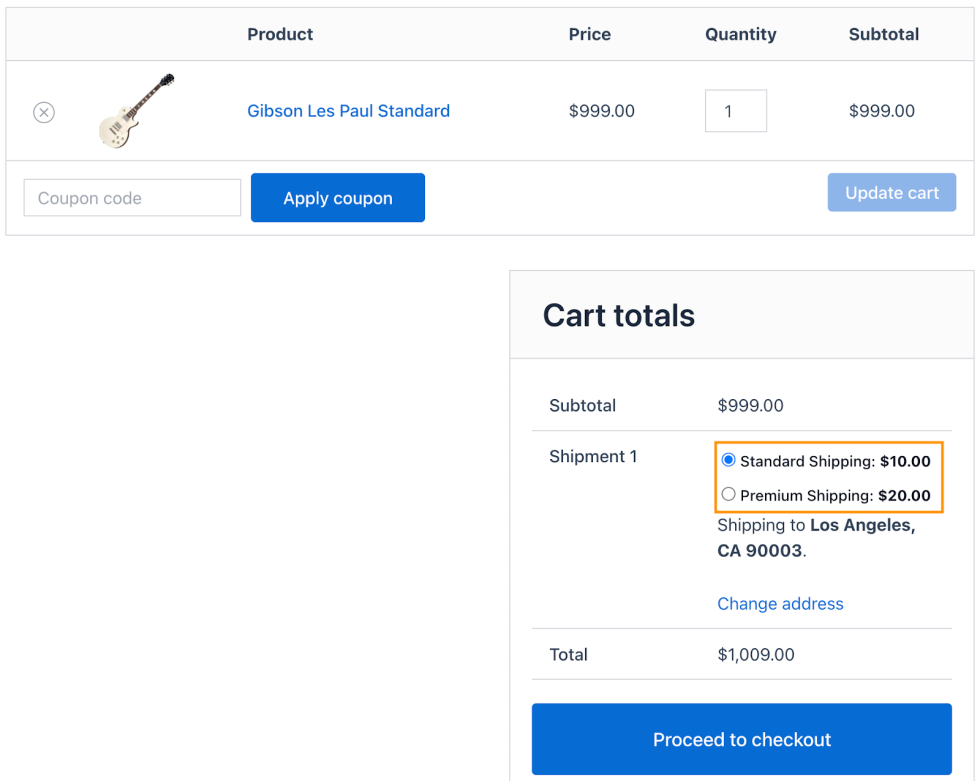
If a customer adds a special product:

Both options will be displayed because Standard and Premium belong to different groups.
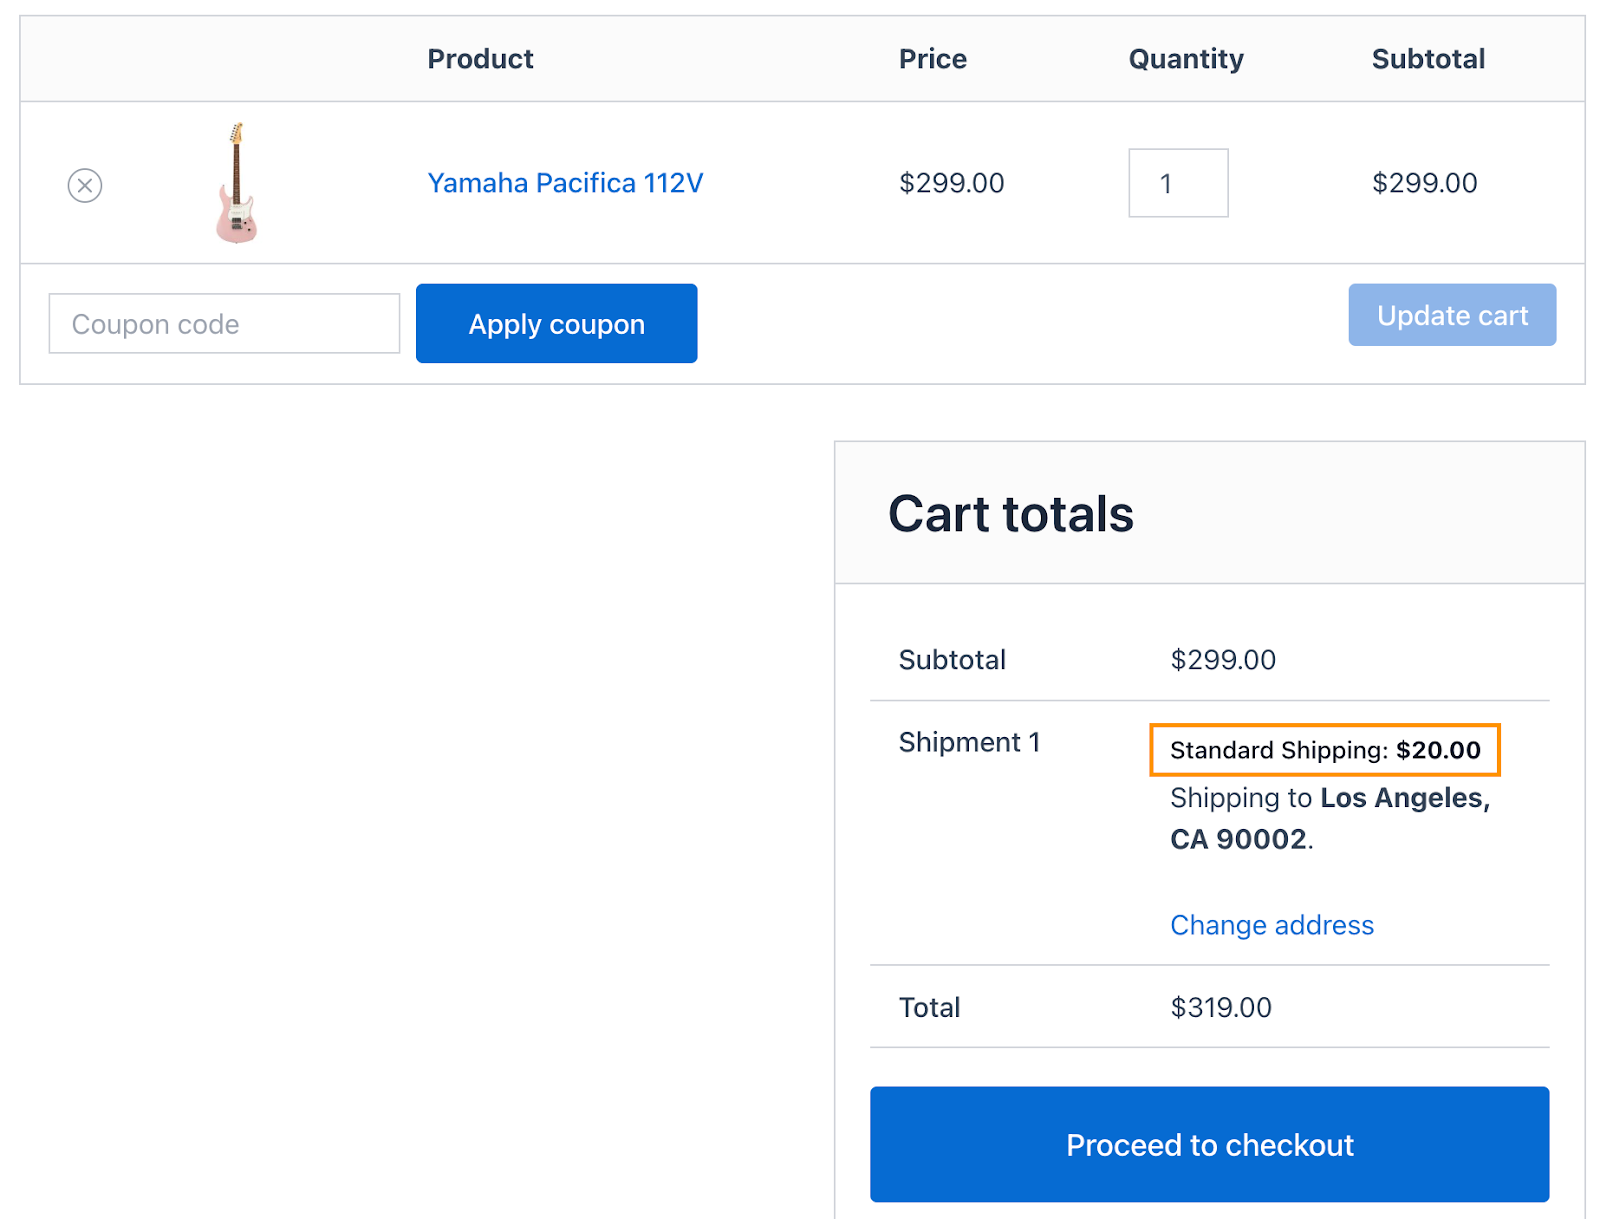
Business Case 5: Set Different Shipping Rates for Different Zones
↑ Back to topShipping costs can vary depending on where your customers are located. By setting zone-based shipping rules, you can charge accurate rates for each region and display the correct shipping cost at checkout. For example:
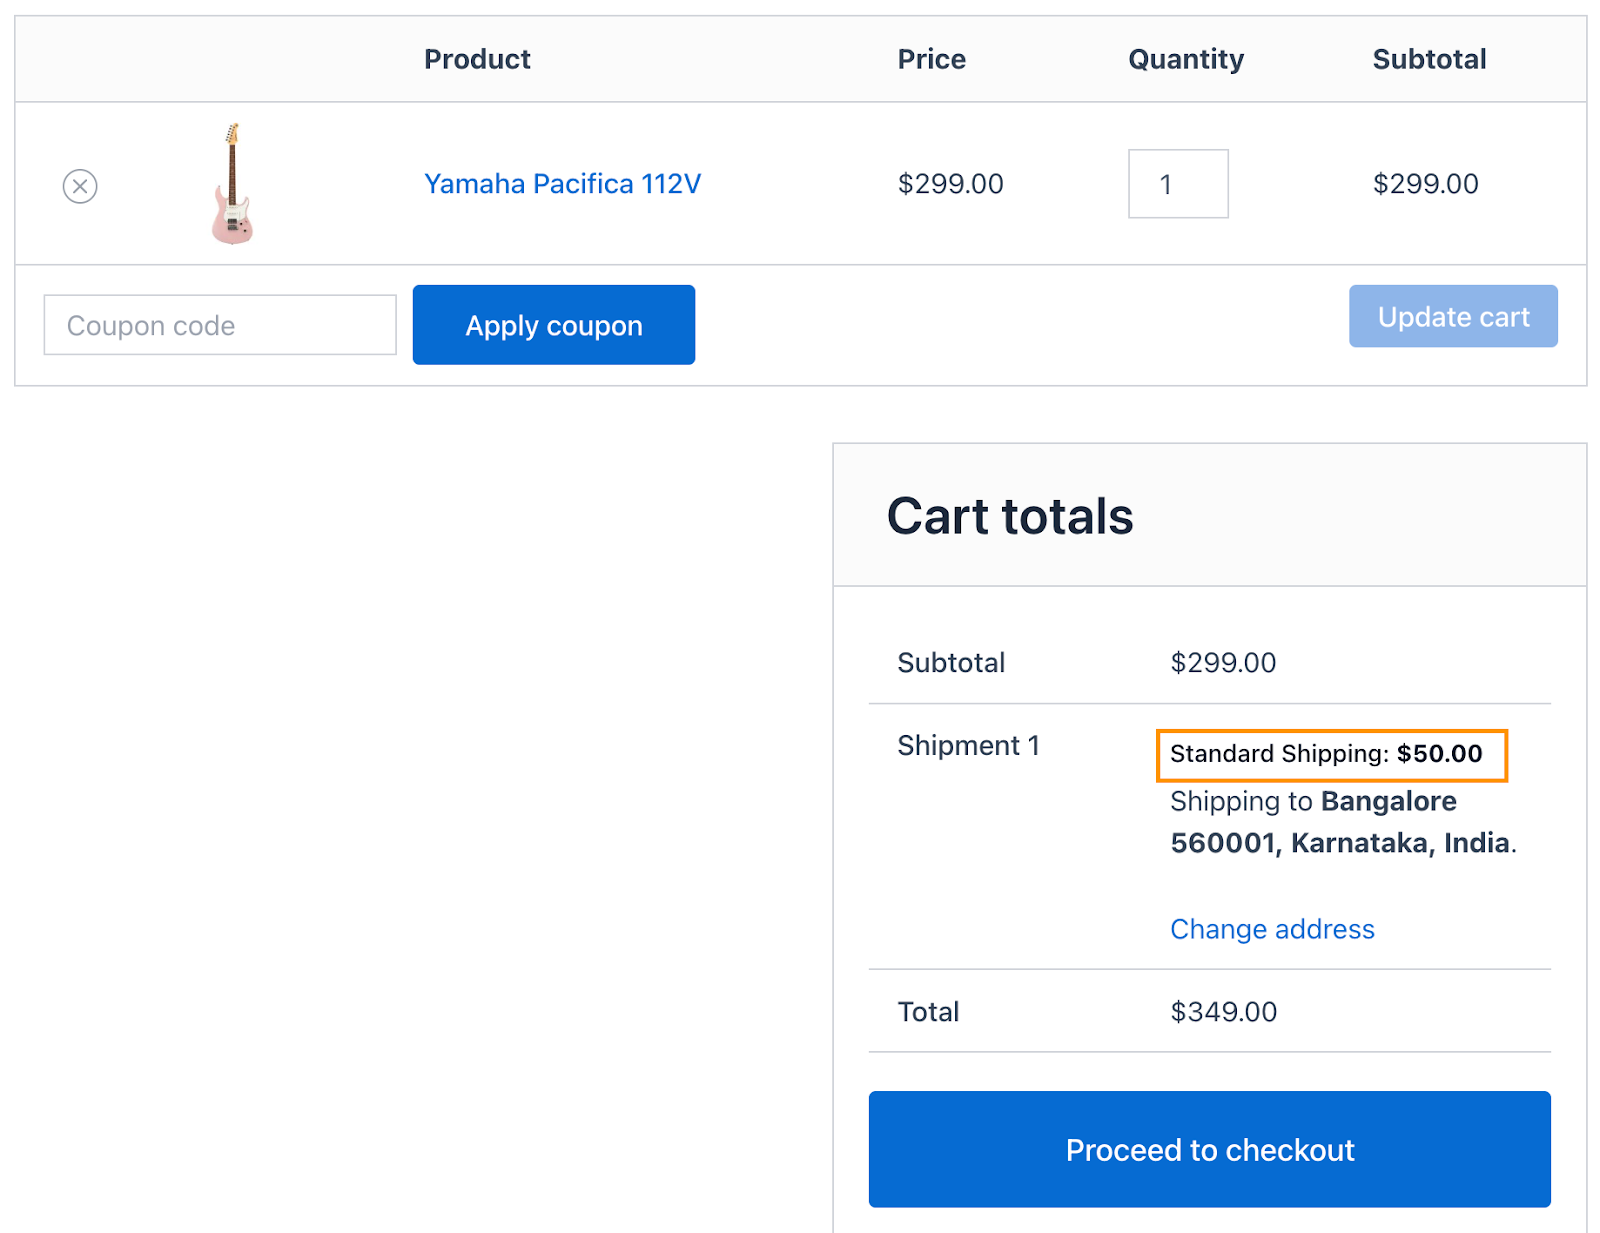
USA: Standard Shipping → $20
Rest of the World: Standard Shipping → $50
Before proceeding, make sure you have defined the zones in your WooCommerce Zone settings. Only after the zones are defined will they be visible in the rule section to select the zone for your shipping rates.

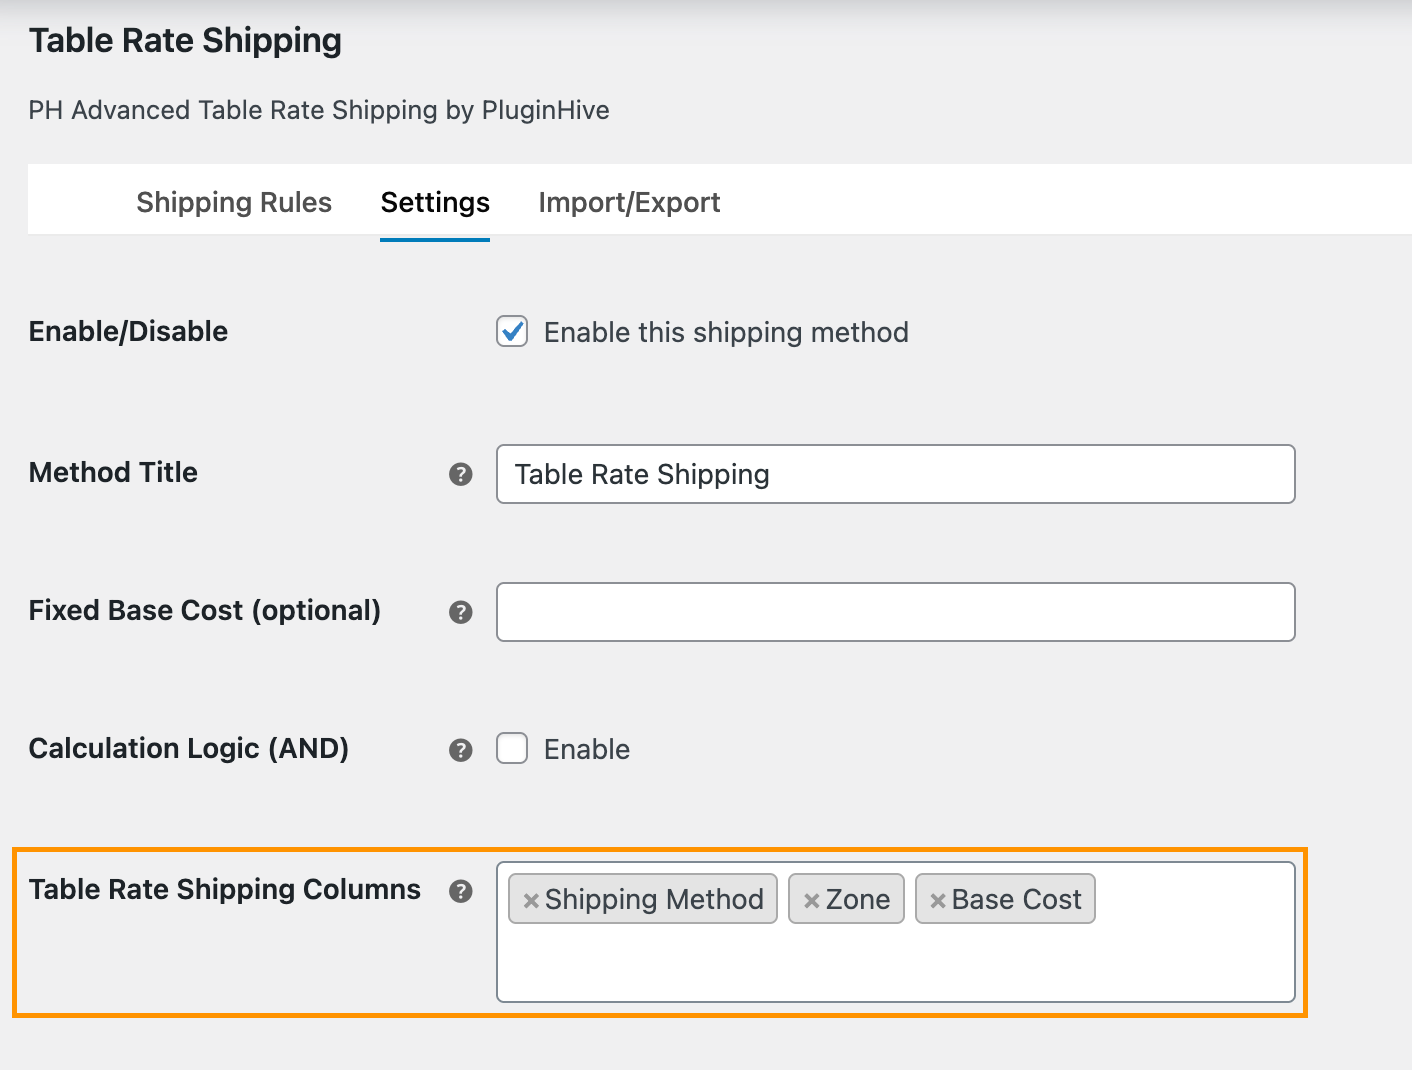
Go to Table Rate Shipping → Settings
In the Table Rate Shipping Columns, select: Shipping Method, Zone, and Base Cost
Then, create rules under the Shipping Rules tab
Rule 1: Shipping to the USA
- Shipping Method: Standard Shipping
- Zone: US Zone
- Base Cost: $20
Rule 2: Shipping to the Rest of the World
- Shipping Method: Standard Shipping
- Zone: Rest of The World
- Base Cost: $50

Click Save Changes.
Now, shipping rates for a USA address:
Shipping rates for other destinations:
If you want to be more specific about countries, states, cities, or ZIP codes, you can configure this in the plugin settings to fine-tune shipping rates for each region.
Additional Note:
You can also configure Table Rate Shipping methods under WooCommerce Shipping Zones. This allows you to create shipping zones based on your requirements and add rules to each zone.