PH Product Addons and Custom Fields for WooCommerce helps you add various options to your WooCommerce products with the help of add-ons like text, radio buttons, dropdowns, checkboxes, and many more. With these add-ons, you can easily customize your products and provide customers with a huge variety without creating multiple products.
Now, let us take you through a step-by-step setup of PH Product Addons and Custom Fields on your WooCommerce store.
Installation
↑ Back to topTo start using a product from WooCommerce.com, you can use the “Add to store” functionality on the order confirmation page or the My subscriptions section in your account.
- Navigate to My subscriptions.
- Find the Add to store button next to the product you’re planning to install.
- Follow the instructions on the screen, and the product will be automatically added to your store.
Alternative options and more information at:
Managing WooCommerce.com subscriptions.

Setup and Configuration
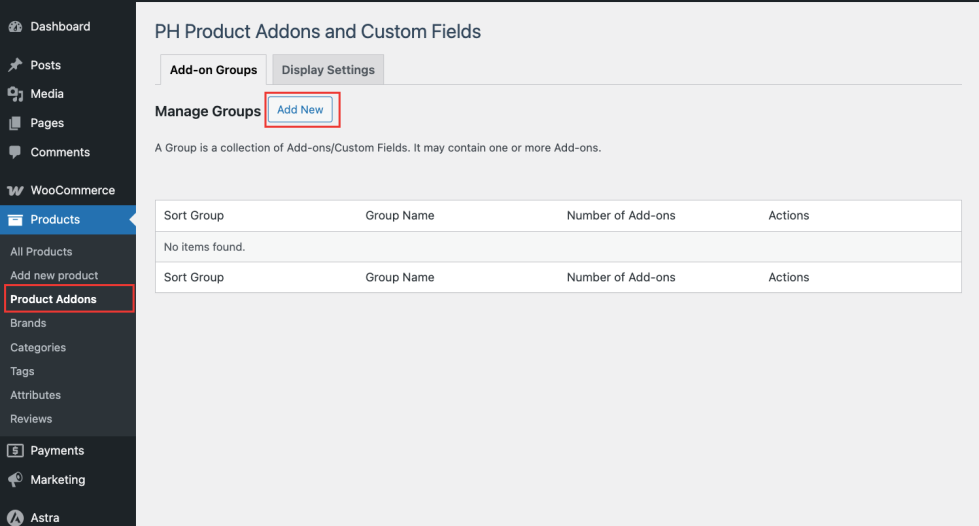
↑ Back to topCreate a Product Addon Group
↑ Back to topThe PH Product Addons and Custom Fields plugin creates a single addon group that can be used to customize multiple products simultaneously. This way, an addon group provides a convenient way to create multiple addons and assign all of them together to a product or product category.
After installing and activating the plugin, you can create a new Product Addon Group using either of the following methods:
Method 1: Go to PH Product Addons and Custom Fields > Settings > Add New to create a new Product Addon Group.
Method 2: You can also create a Product Addon Group by navigating to: Products > Product Addons > Add New
Assign the Product Addon Group to WooCommerce products
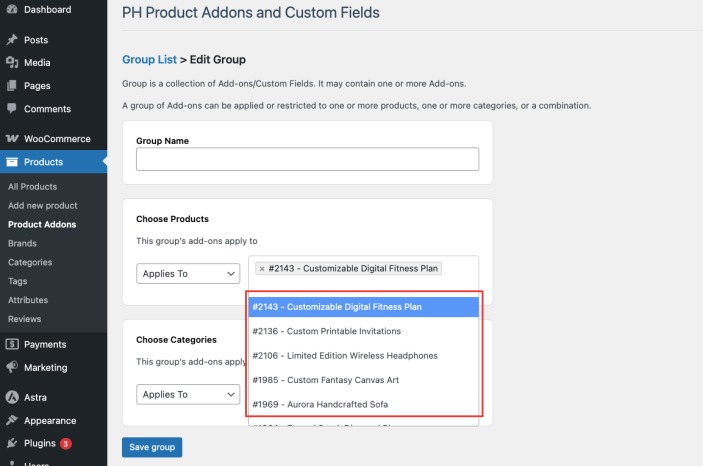
↑ Back to topYou can assign the addon groups to single or multiple products by selecting one of the options shown below.
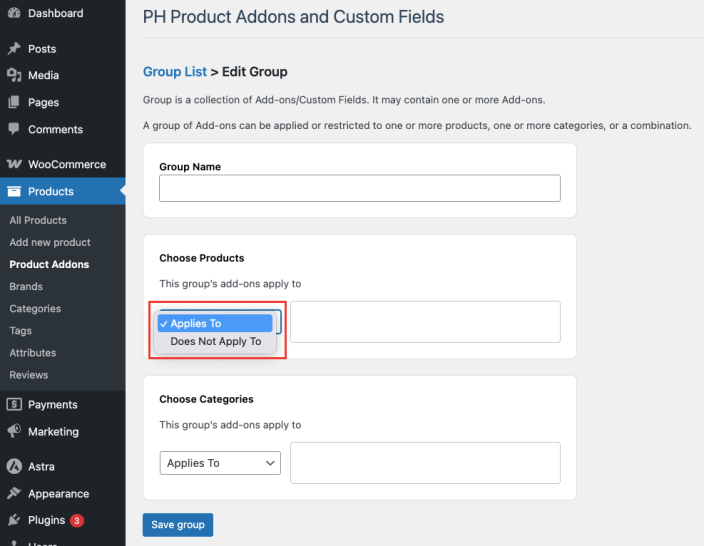
- Applies To
This option will allow you to select all the WooCommerce products for which this group will be applicable. - Does Not Apply To
This option allows you to select all the WooCommerce products for which this group will not be applicable. If this option is selected, by default, the group all the remaining products
On selecting the options above, the plugin will attach the group as well as all the addons created within the group to that particular set of products.
On the next tab, select the WooCommerce products from the drop-down.
Assign the Product Addon Group to the WooCommerce product category
↑ Back to topSimilar to WooCommerce products, you can also assign the product addon group to different WooCommerce product categories by selecting the dedicated WooCommerce product category from the drop-down, as shown below.

Note: If both Choose Products and Choose Categories are left empty, the Product Addon Group will apply to all WooCommerce products by default.
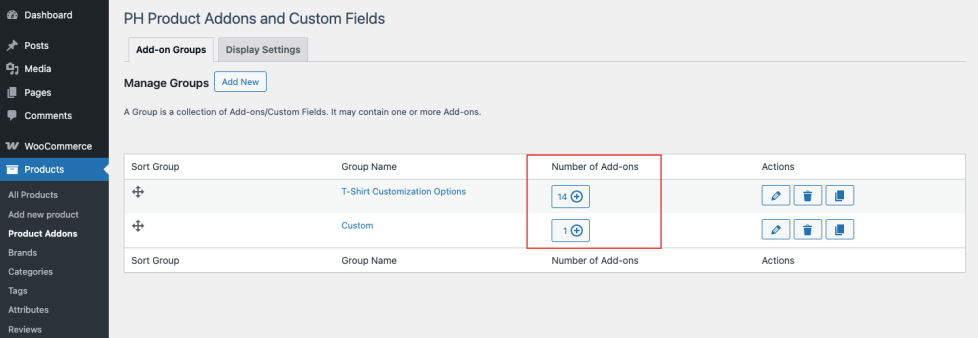
Manage Addon Groups
↑ Back to topThe Manage Groups section allows you to view, organize, duplicate, and delete Product Addon Groups easily.
- View the Number of Add-ons in a Group
Each Product Addon Group displays the Number of Add-ons column, which shows how many add-ons are created within that group.
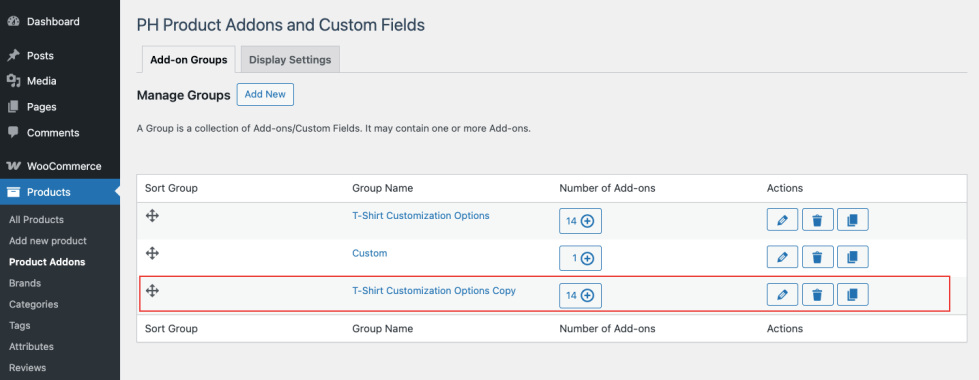
- Copy a Product Addon Group
To duplicate an existing Product Addon Group:
- Locate the group you want to copy.
- Click the Copy icon under the Actions column.
- A duplicate group will be created with the same add-ons and settings.
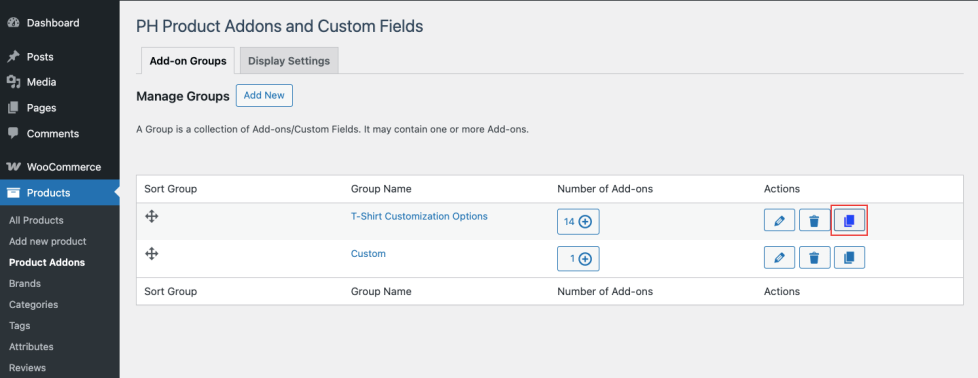
This is useful when you want to reuse similar add-on configurations for different products or categories.
Delete a Product Addon Group
↑ Back to topTo delete a Product Addon Group:
- Locate the group you want to remove.
- Click the Delete icon under the Actions column.
- Confirm the deletion when prompted.
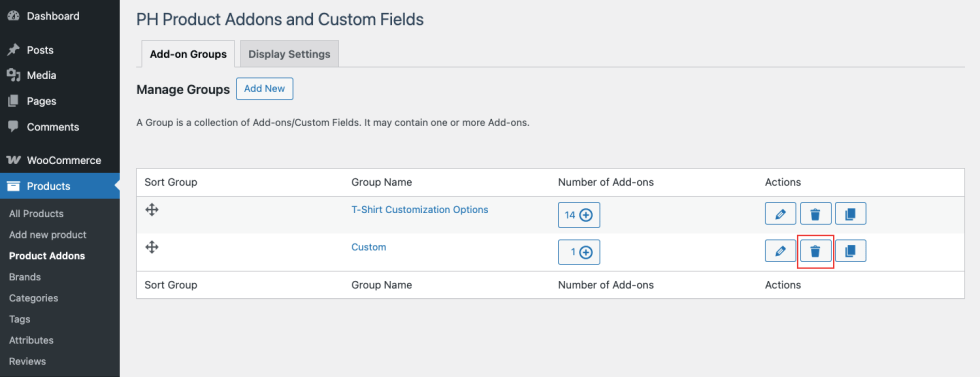

Note: Deleting a group will remove all add-ons within that group and detach them from the assigned products or categories.
Assign Product Addons for your WooCommerce products
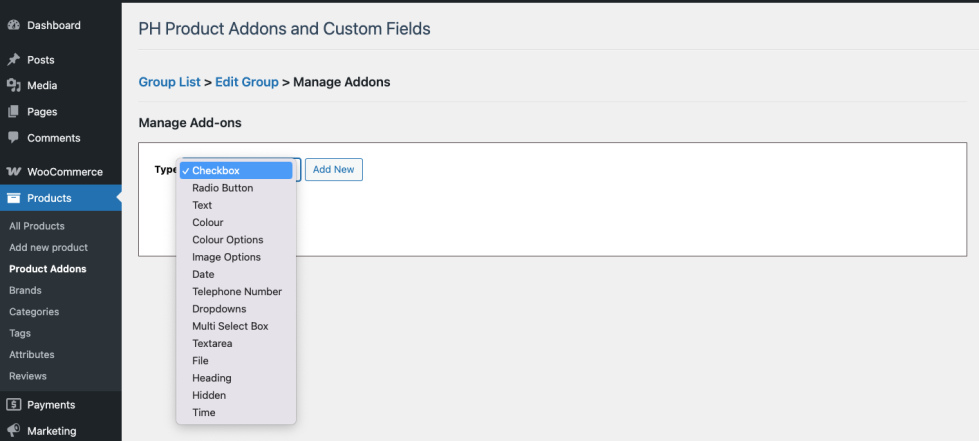
↑ Back to topOnce you have created the product addon groups and assigned these groups to the respective products, you can select from the following product addon types.
Type of Addons
Checkbox
Users can choose single or multiple options based on their preferences. Suitable for additional items or services like Gift Wrapping, Insurance, etc.
To add check boxes to your WooCommerce products, fill in the following fields.
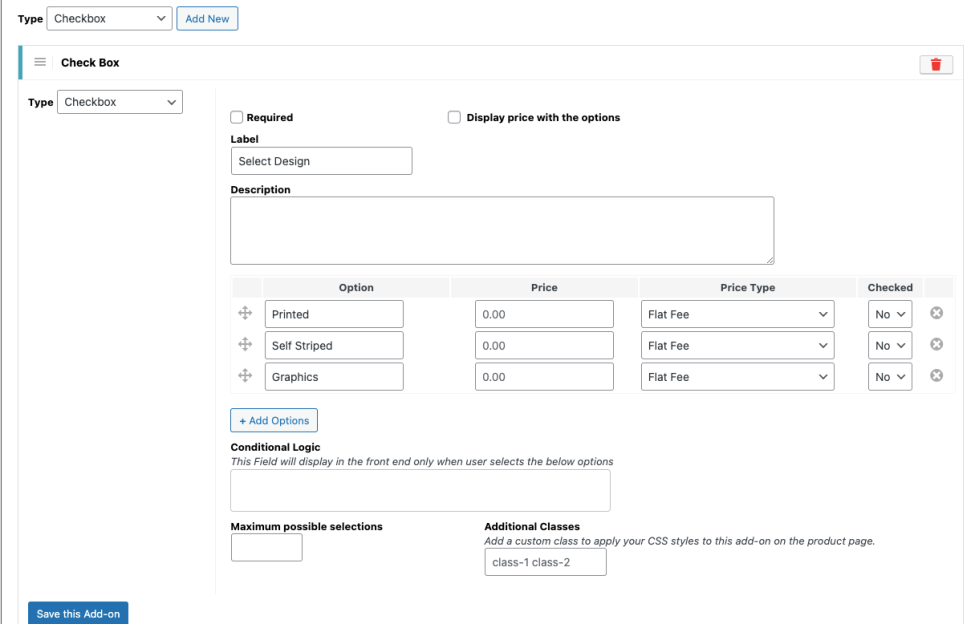
- Required
Enabling this option will make the addon selection mandatory on the product page. - Label
It contains the text displayed on the product page. You can use this field to either explain the addon that you have added to the product or to provide instructions on how to use the addon. - Description
This field is used to set a custom description for the addon - Price Type
This field allows you to define how the add-on price is calculated and applied to the product.

Available options include:
- Flat Fee: A fixed amount is added to the product price when the add-on is selected.
- Quantity Based: The add-on price is multiplied by the product quantity.
- % of Product Price: The add-on price is calculated as a percentage of the base product price.
- % of (Product + Add-ons): The add-on price is calculated as a percentage of the product price, including other selected add-ons.
- Display price with the options
Enabling this option displays the add-on price next to each option on the product page. - Conditional Logic
It is used to define a condition based on which the addon will be displayed on the product page.
For Example, in this case, only when a customer chooses the gift wrapping option from the drop-down list, the checkbox options containing various wrapping papers should be displayed on the product page. If the customer does not select a gift-wrapping option from the drop-down, the options will not be displayed. - Maximum Possible Selections
This field allows you to limit the number of options a customer can select for this add-on. - Additional Classes
This field allows you to add one or more custom CSS class names to the add-on. These classes can be used to apply custom styling to the add-on on the product page using CSS.
Note: You can change the display order of the add-on options using the move icon next to each option.
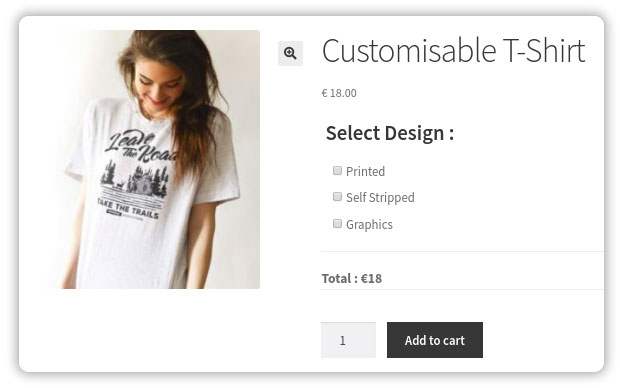
Checkbox field displayed on the product page
Radio Button
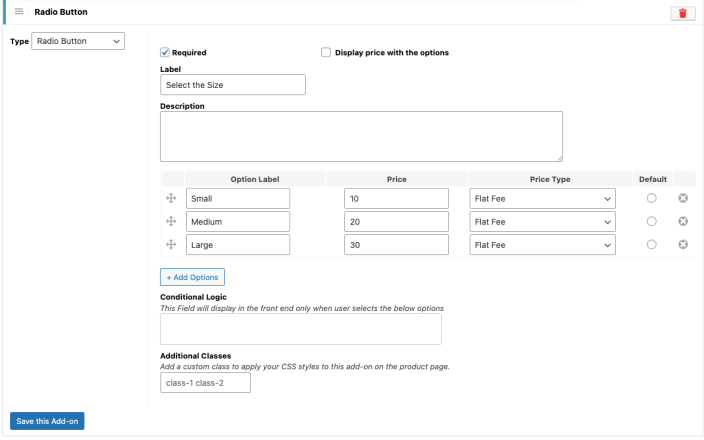
Users can choose a single option from multiple options based on their preferences. Suitable for providing choices based on Different Product Types, Gender selections, etc.
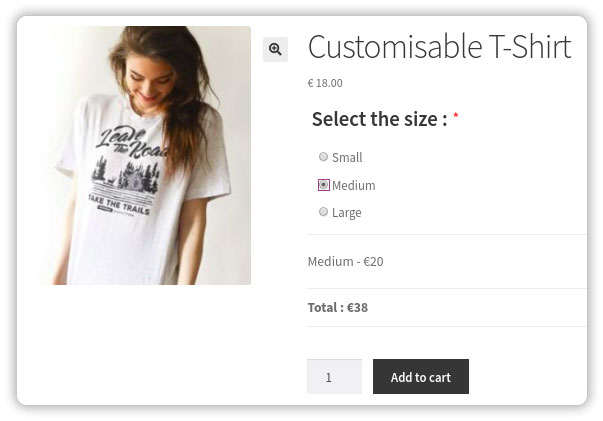
The radio button field is displayed on the product page.
Text
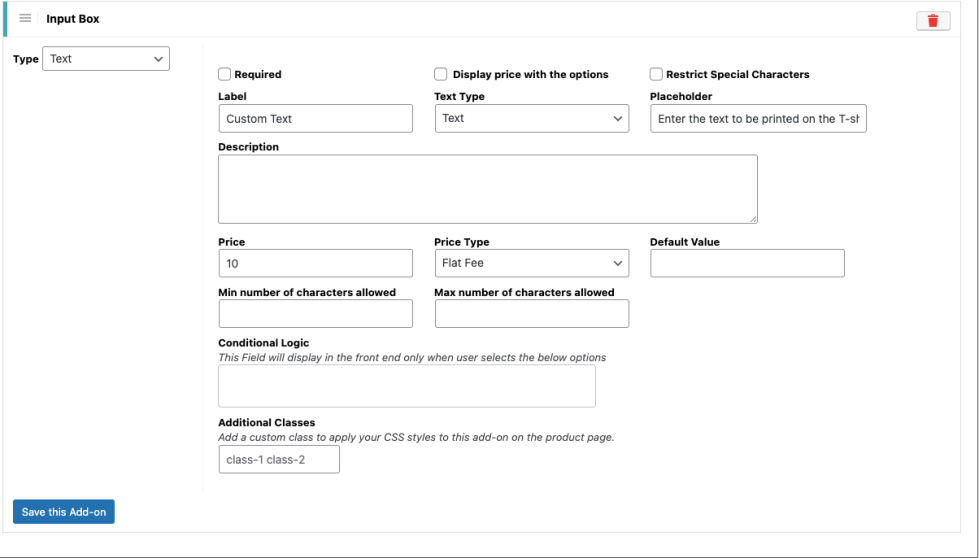
Users can input Text, Numbers, Email IDs, and Passwords using this field. Suitable for getting customers’ details like First Name, Last Name, Email ID, Age, etc.
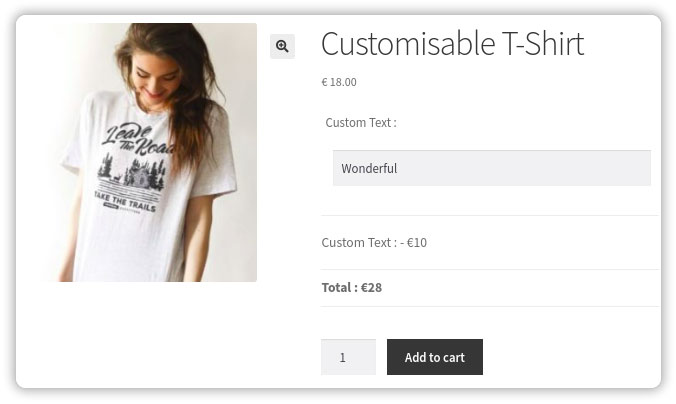
Text field displayed on the product page
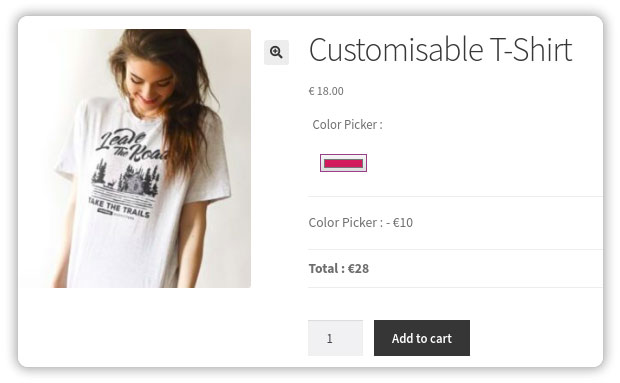
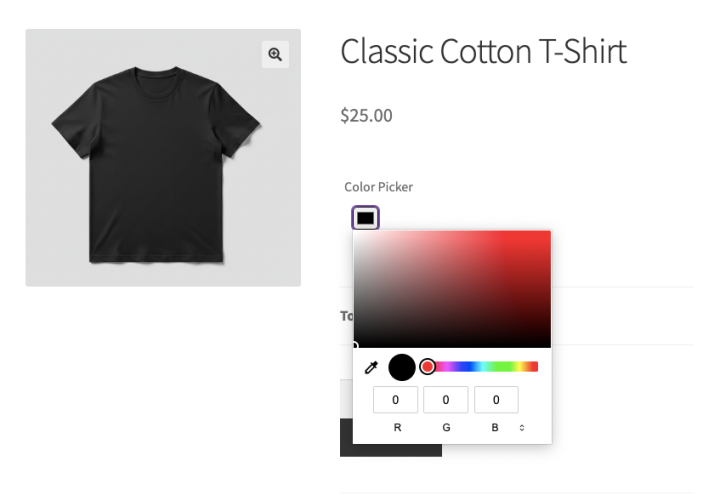
Color
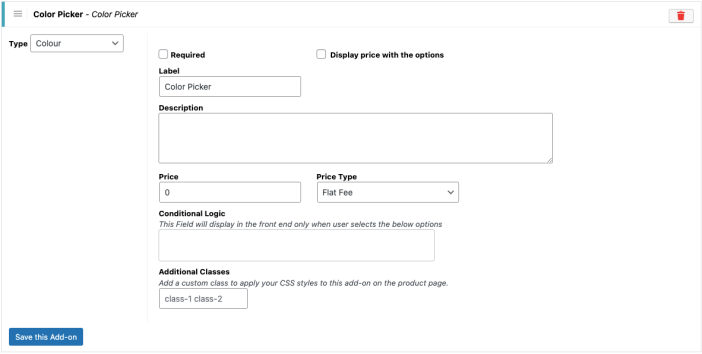
Users can select any color or choose from a set of colors based on their preferences. Suitable for selecting Product Colours, Packing colours, Additional Product Component Colours, etc.
The color field is displayed on the product page.
Color Options
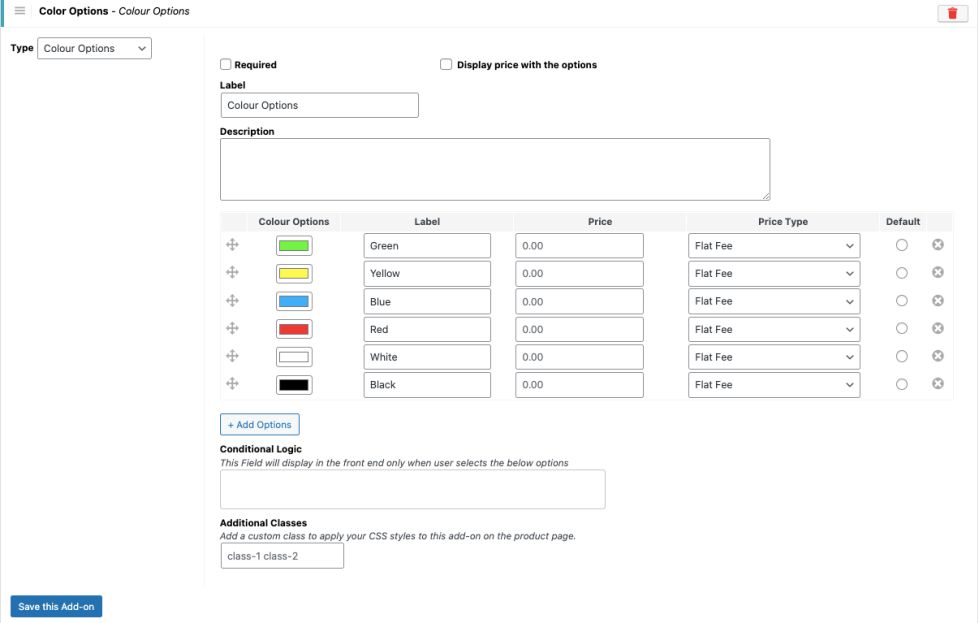
Users can select any color or choose from a set of colors based on their preferences. Suitable for selecting Product Colours, Packing colours, Additional Product Component Colours, etc.
The Color Options field is displayed on the product page.
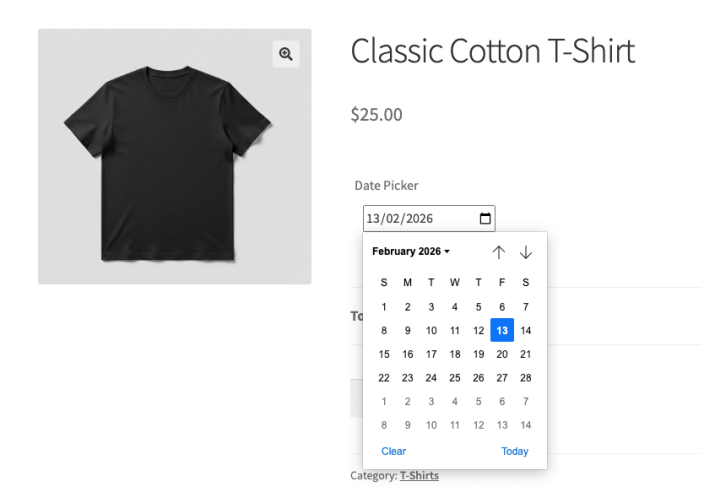
Date
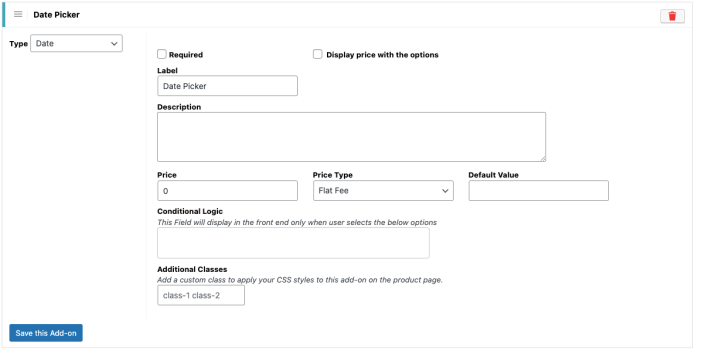
Users can select the date from a built-in calendar on the product page. Suitable for providing Date of Birth, Event Date, etc.
Date field displayed on the product page
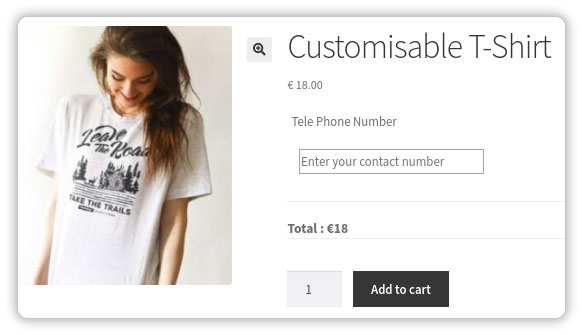
Telephone Number
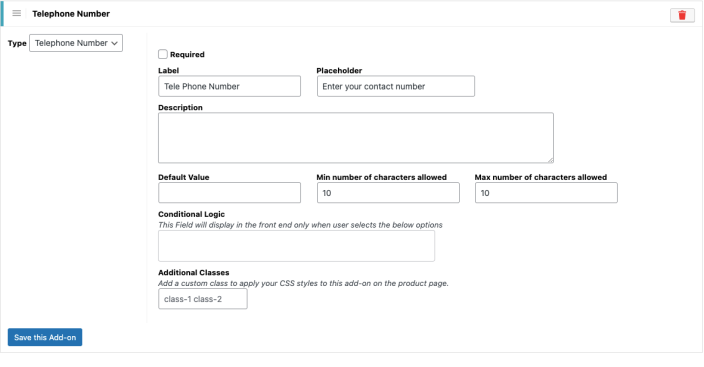
Users can enter their telephone numbers to get additional details about their orders. Suitable for getting customers’ telephone numbers.
The Telephone Number field displayed on the product page.
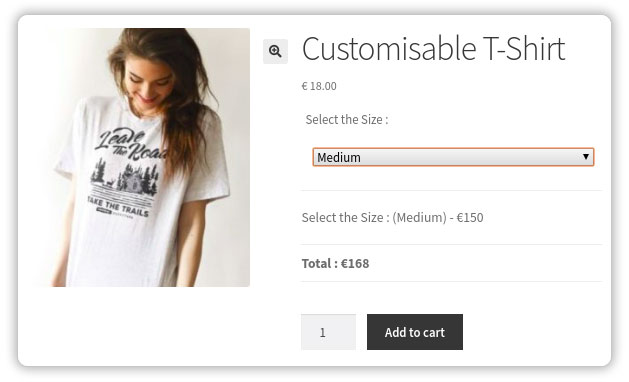
Dropdowns
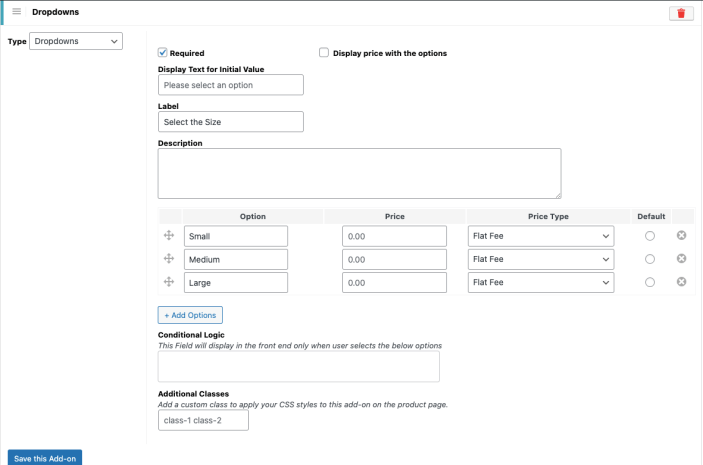
Users can select any one option from a list of options. Suitable for providing Product Size, Quantity, etc.
The drop-down field is displayed on the product page
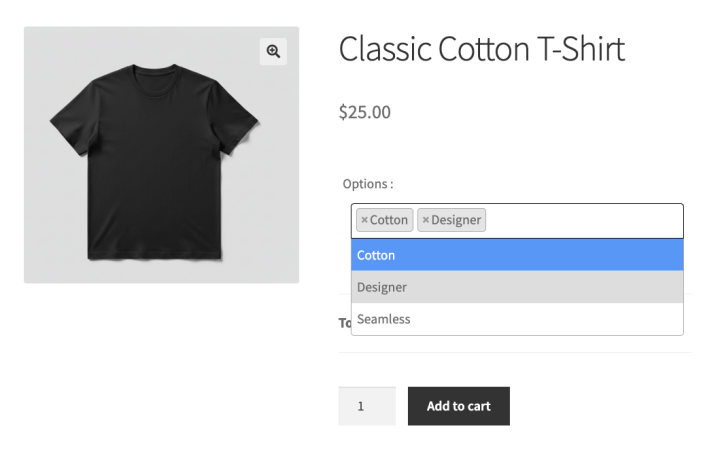
Multi-Select Box
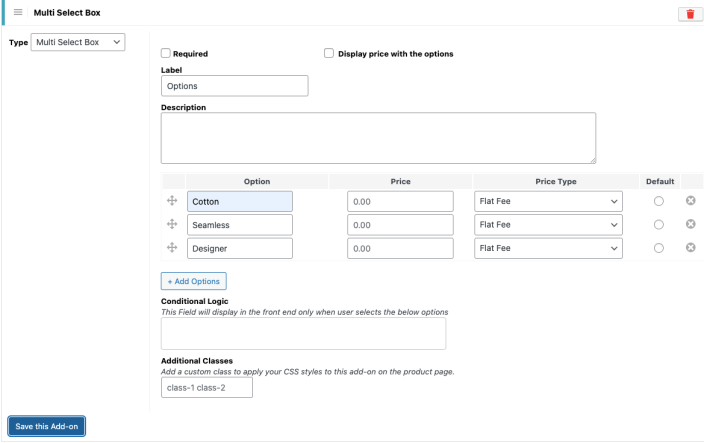
Users can select multiple options from a list of options based on their preferences. Suitable for providing additional services like Dining Options for Breakfast, Lunch, and Dinner.
Multi-select field displayed on the product page
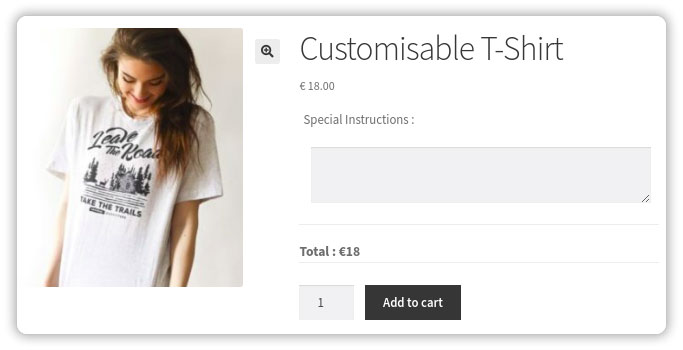
Text Area
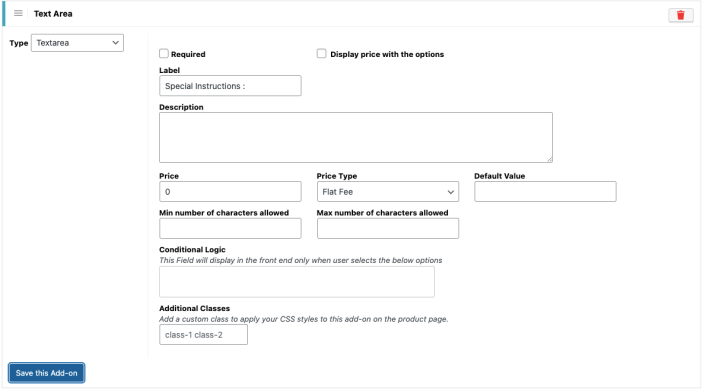
Users can enter a custom greeting to be added to the product. Suitable for getting greeting messages, addresses, etc.
Textarea field displayed on the product page
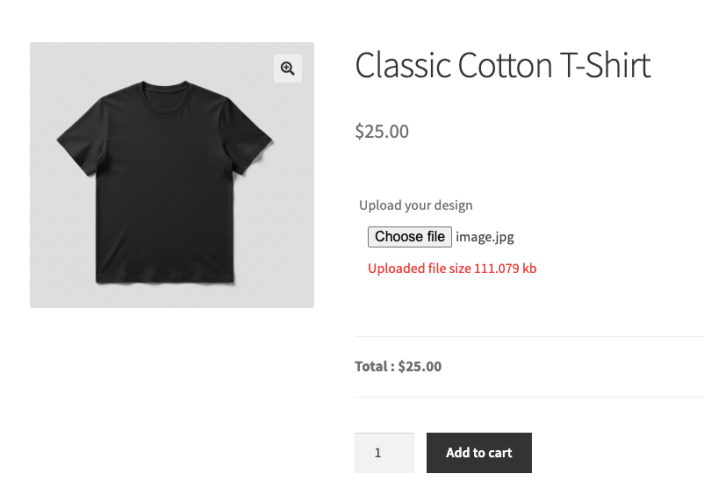
File Upload
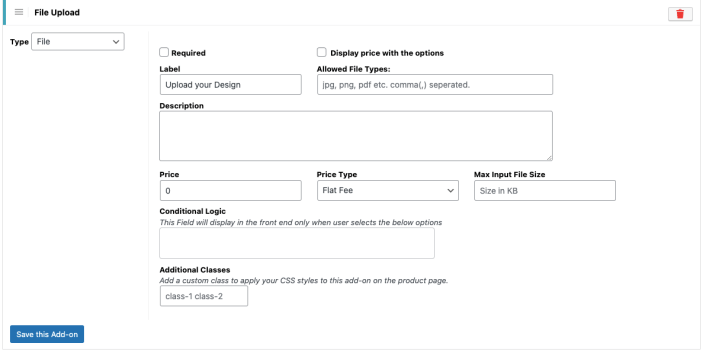
Users can upload any file based on their requirements. Suitable for Images, PDF files, Text Files, Music & Media files, etc.
You can restrict uploads by allowing only specific file types. By default, this field is left empty, which means no file type restriction is applied, and users can upload all supported file types.
File Upload field displayed on the product page
Heading
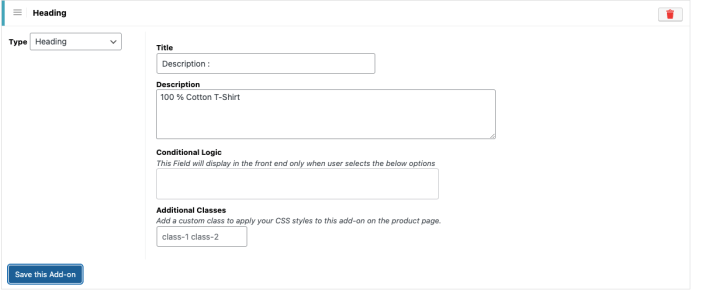
Users can get more information about the product or the seller. Suitable for adding Important Product Information, Component Information, etc.
Heading field displayed on the product page
Hidden
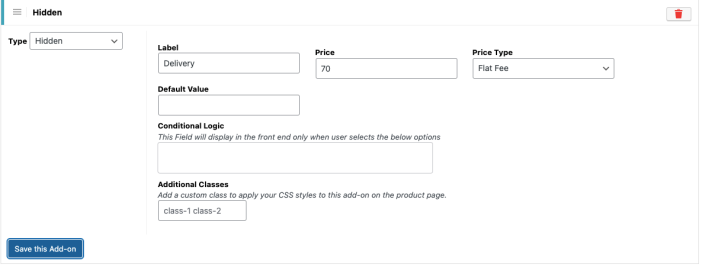
Users do not have any control over this field. Suitable for providing Mandatory Services with an additional cost attached to them.
Hidden field displayed on the product page
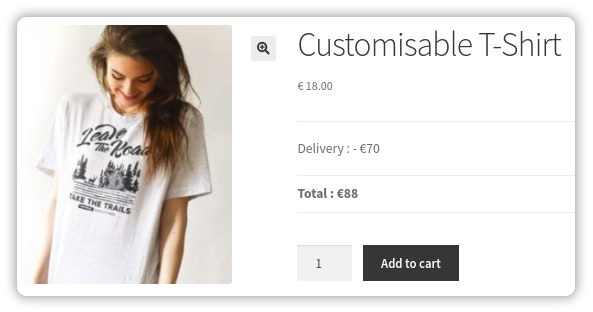
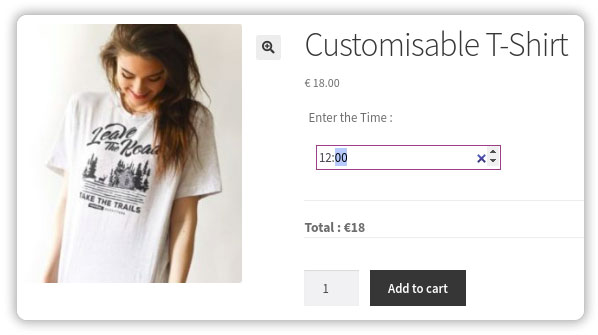
Time
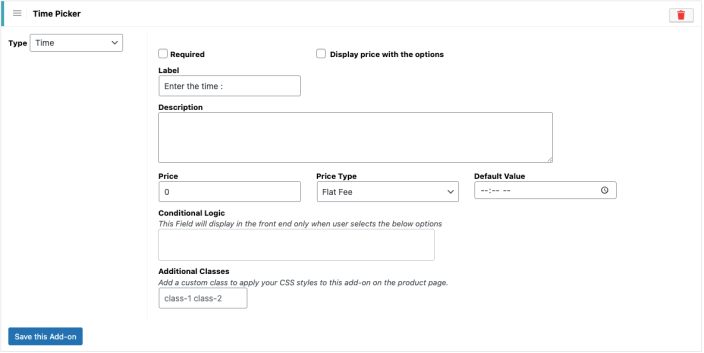
Users can select from a built-in time picker based on their preferences. Suitable for getting Appointment Time, Delivery & Pickup Time, etc.
The time field is displayed on the product page.
Add-on Group Display Settings
↑ Back to topThe Add-on Group Display Settings control how selected add-on options are shown in the summary section at the end of the product page.
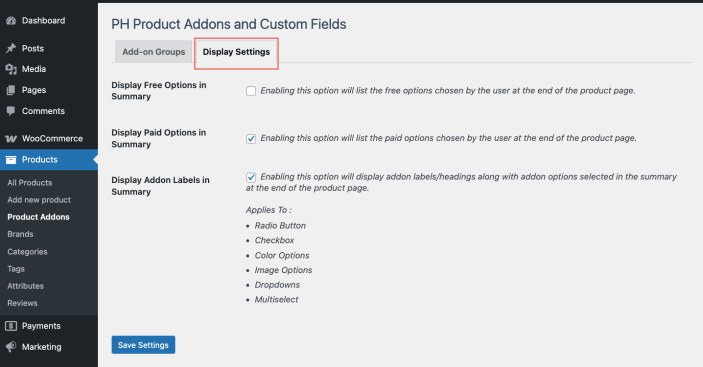
These settings help customers review the options they have selected before adding the product to the cart.
- Display Free Options in Summary: Enabling this option displays the free add-on options selected by the customer at the end of the product page.
- Display Paid Options in Summary: Enabling this option displays the paid add-on options selected by the customer at the end of the product page.
- Display Add-on Labels in Summary: Enabling this option displays the add-on labels along with the selected add-on options at the end of the product page.
Applies To: Radio Button, Checkbox, Color Options, Image Options, Dropdowns, Multi-select
Usage
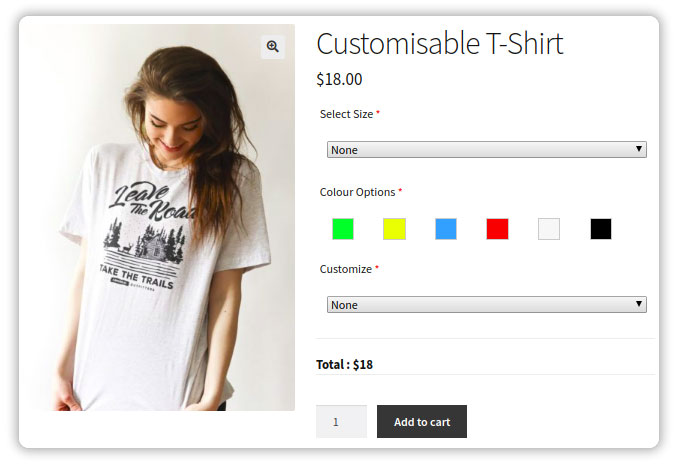
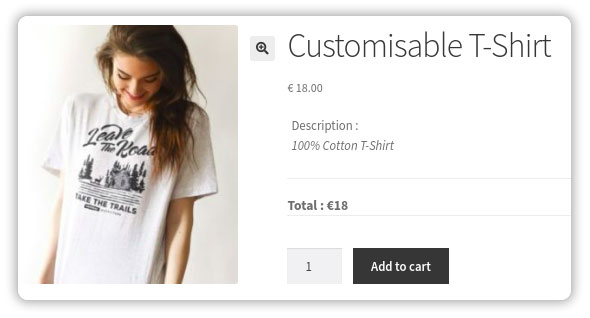
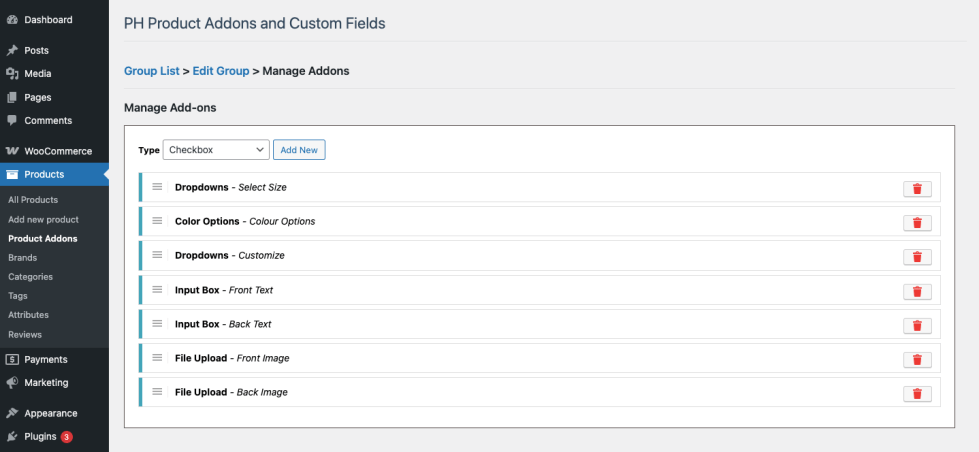
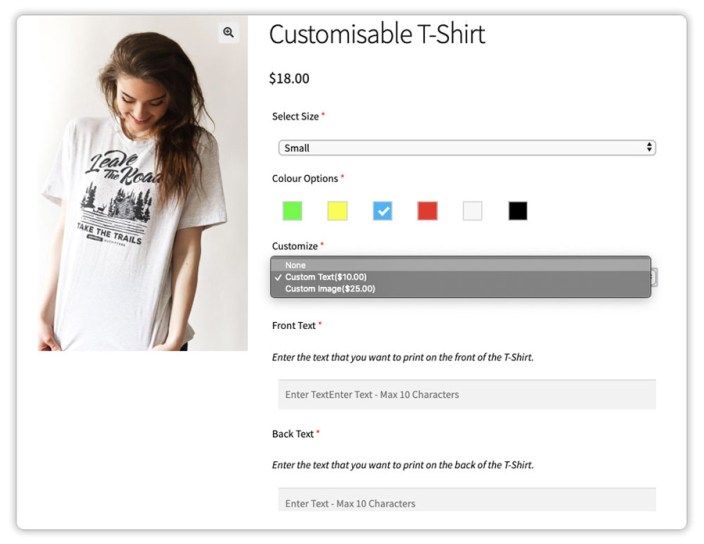
↑ Back to topLet us understand how the addons work using an example. Let us try to create customizable T-shirts. These addons will be used to create the customizable product.
- Size Selection.
- Color Selection.
- Custom Text(Front, Back)/ Custom Image(Front, Back).
Create a group “T-Shirt Addon” and assign that group to the product for which you want the customers to select the extra options.

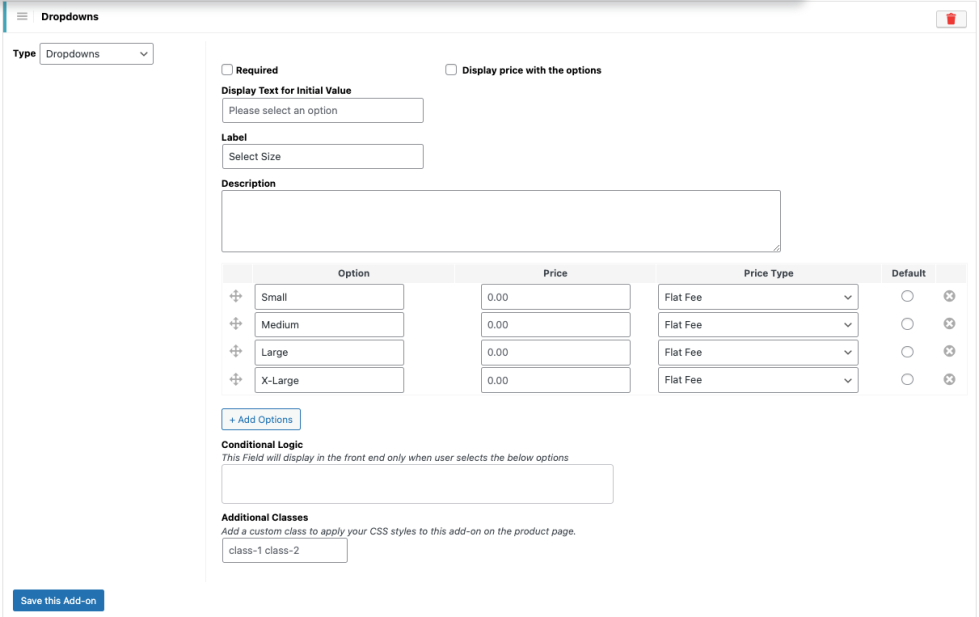
Create a Drop-down addon in order to provide the customer with the option to choose the size of the T-shirt. Set the various size options in the options menu as shown below
Create a Color Options addon in order to provide the customer with the option to choose the color of the T-shirt. Set the various color options in the color options menu as shown below

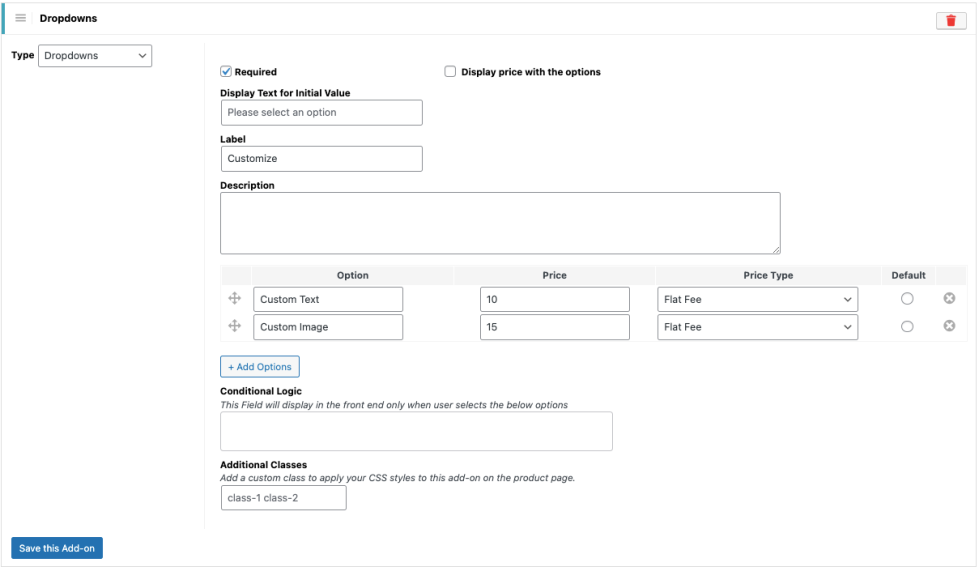
Create a Drop-Down addon to provide the customer with the option to choose the type(Custom Text/ Custom Image) of customization on the T-Shirt.
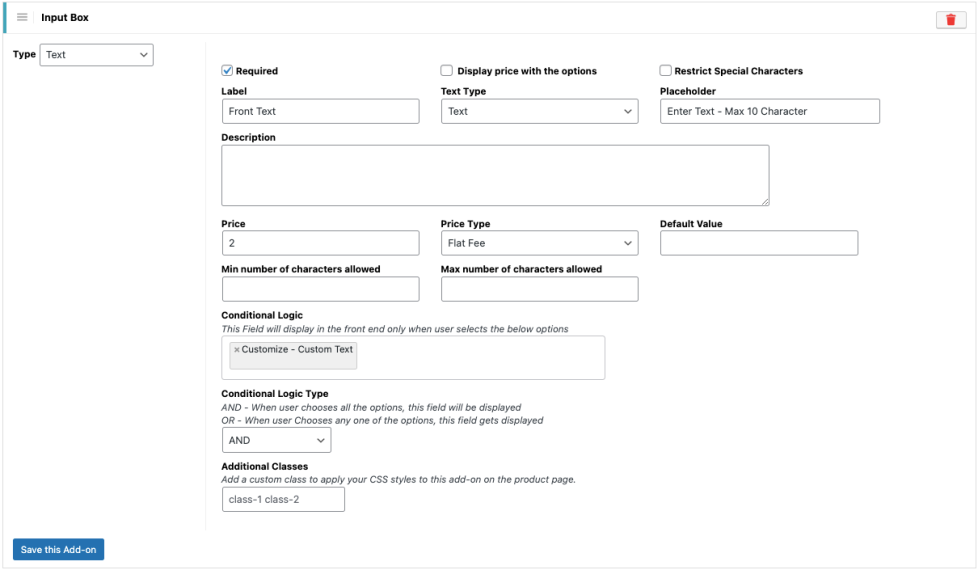
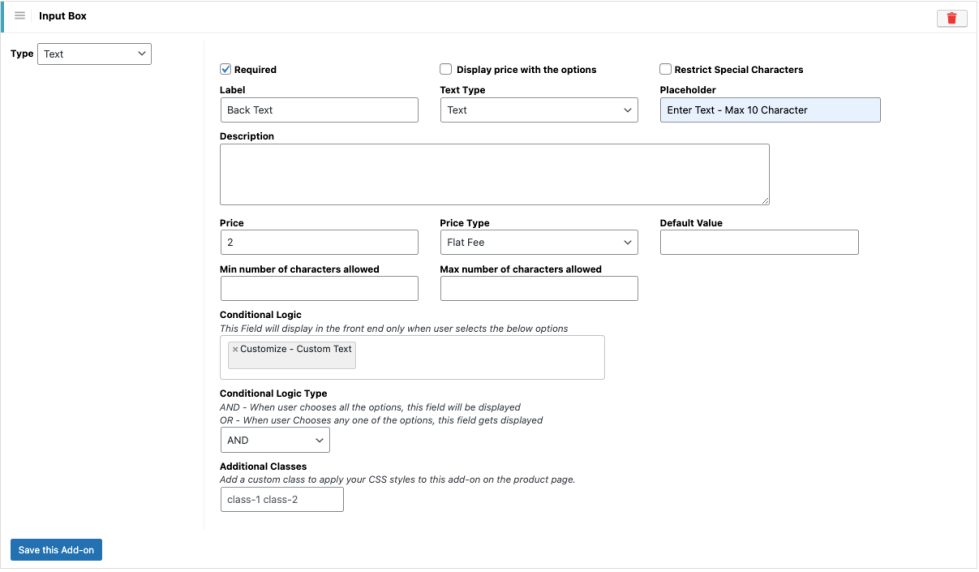
Create an Input Box addon to allow the customer to input the Text they want to print on the front and back sides of the T-shirt. This Input Box will be triggered using the Conditional logic option. When the customer selects the option “Custom Text,” the Input boxes will be shown as below :
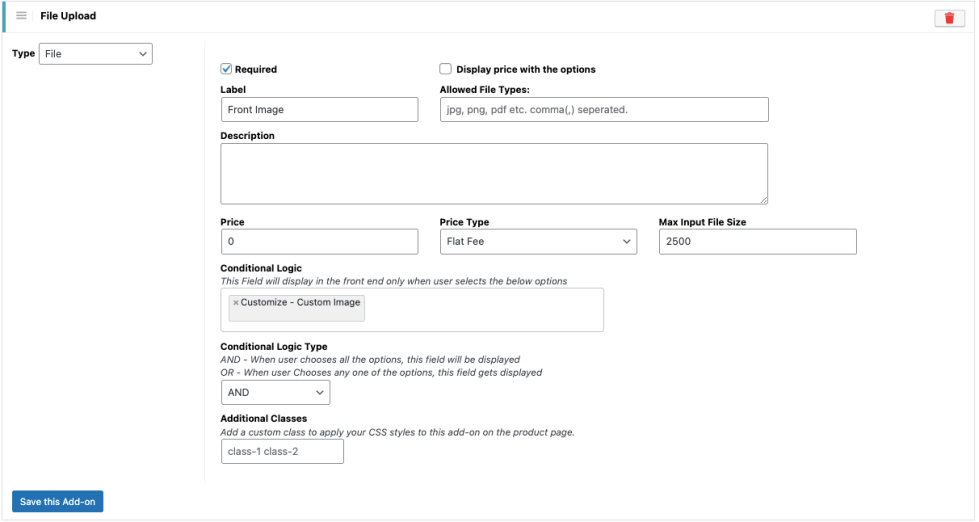
Create a File Upload addon to allow the customer to provide the image they want to print on the front and back sides of the T-shirt. This File Upload option will be triggered using the Conditional logic option. When the customer selects the option “Custom Image,” the File Upload options will be shown as below.

After setting up all the controls as demonstrated above, your product will look as follows
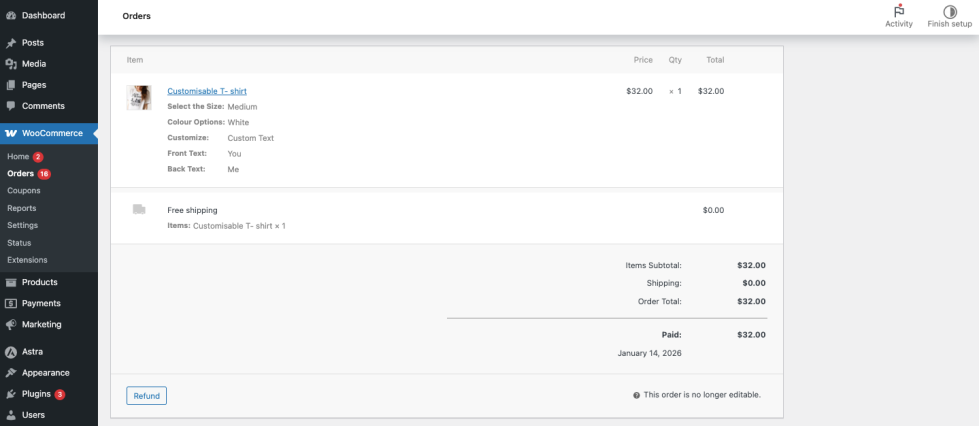
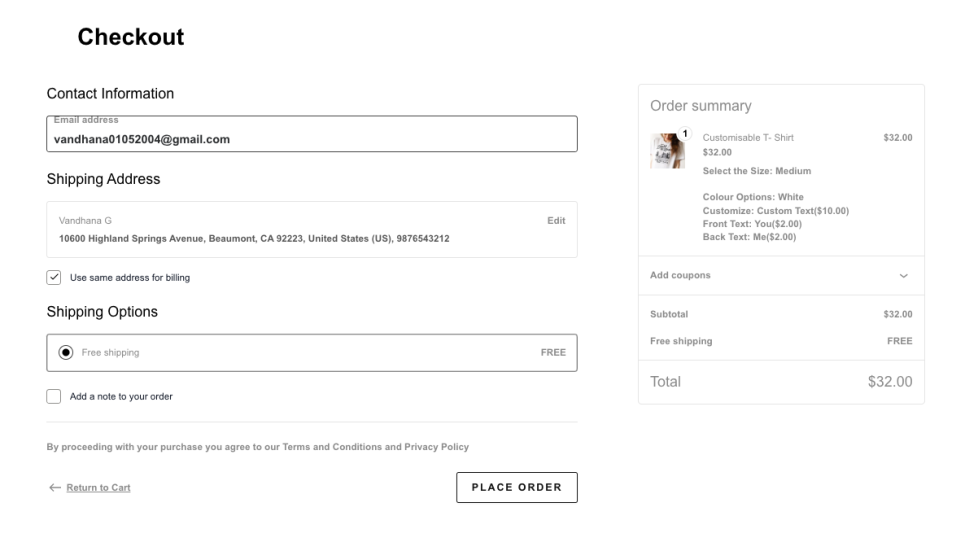
Display of Product Add-ons in Cart, Checkout, and Orders
Once a customer selects the required product add-ons on the product page and adds the product to the cart, the selected options follow the product through the entire order flow.
- Cart Page: All selected product add-ons are displayed below the product name, allowing customers to review their choices before proceeding to checkout.
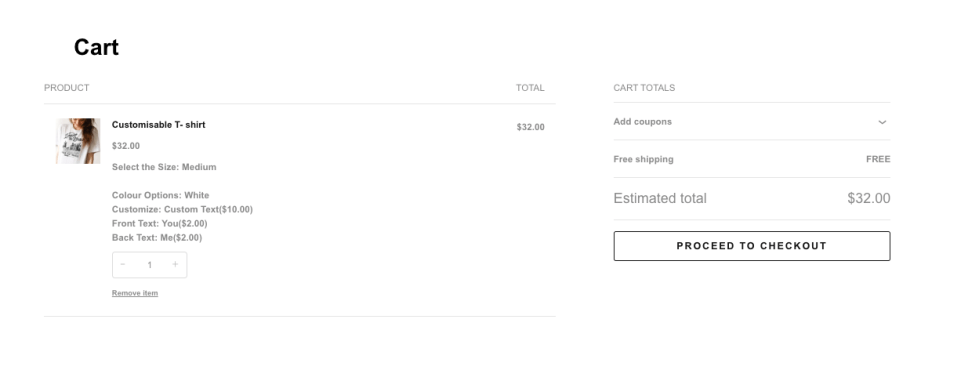
- Checkout Page: The selected add-ons are shown along with the product details, ensuring customers can verify the chosen options before placing the order.
- Order Details: After the order is placed, the selected product add-ons are visible in the Edit Order page in the WooCommerce admin dashboard. This allows the store admin to view all customer-selected options while processing the order.