Let customers name their price with smart Quick Buttons, Price Memory, and Analytics. Perfect for donations, flexible pricing, and pay-what-you-want sales.
Installation
↑ Back to topTo start using a product from WooCommerce.com, you can use the “Add to store” functionality on the order confirmation page or the My subscriptions section in your account.
- Navigate to My subscriptions.
- Find the Add to store button next to the product you’re planning to install.
- Follow the instructions on the screen, and the product will be automatically added to your store.
Alternative options and more information at:
Managing WooCommerce.com subscriptions.

How Pick Your Price Works
↑ Back to topPick Your Price has two configuration areas:
Global Settings at Pick Your Price > Settings — Controls default behaviors, button styles, Price Memory, Social Proof, and analytics that apply to all products unless overridden.
Product Settings inside each product’s edit page — A dedicated Pick Your Price tab in the Product Data metabox, where you enable flexible pricing and set price boundaries for that specific product.
The recommended approach:
- Configure your global settings first.
- Then enable and configure individual products.
Global Settings
↑ Back to topGo to Pick Your Price > Settings in your admin sidebar. Settings are organized into tabs.
General
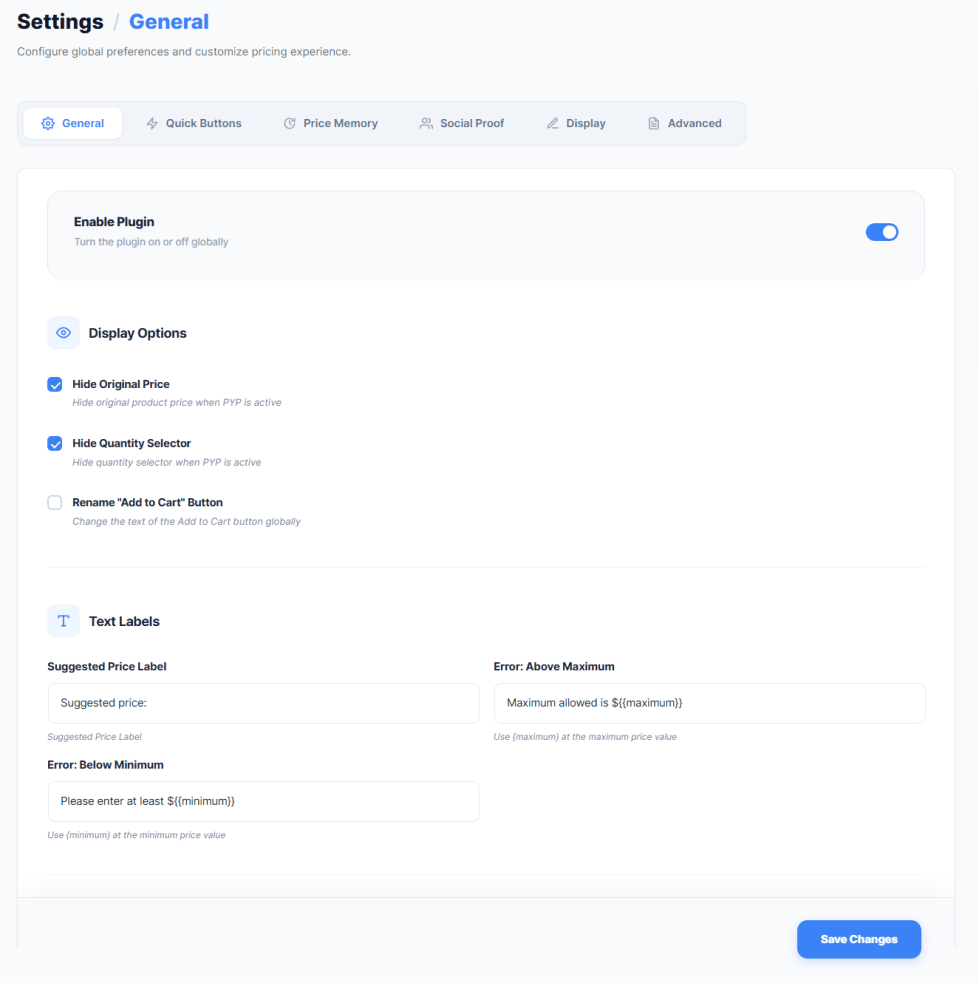
↑ Back to topEnable Pick Your Price — Master switch for the entire plugin. When off, flexible pricing is disabled on all products.
Add to Cart Button Text — Change the button label for all Pick Your Price products. Examples: “Buy Now”, “Donate”, “Contribute”, “Name Your Price”. Leave empty to keep the default WooCommerce text. This can be overridden per product.
Hide Original Price — When on, the default WooCommerce price display is hidden on Pick Your Price products. Customers see only the flexible pricing interface. Recommended to keep this on for a clean experience.
Quick Buttons
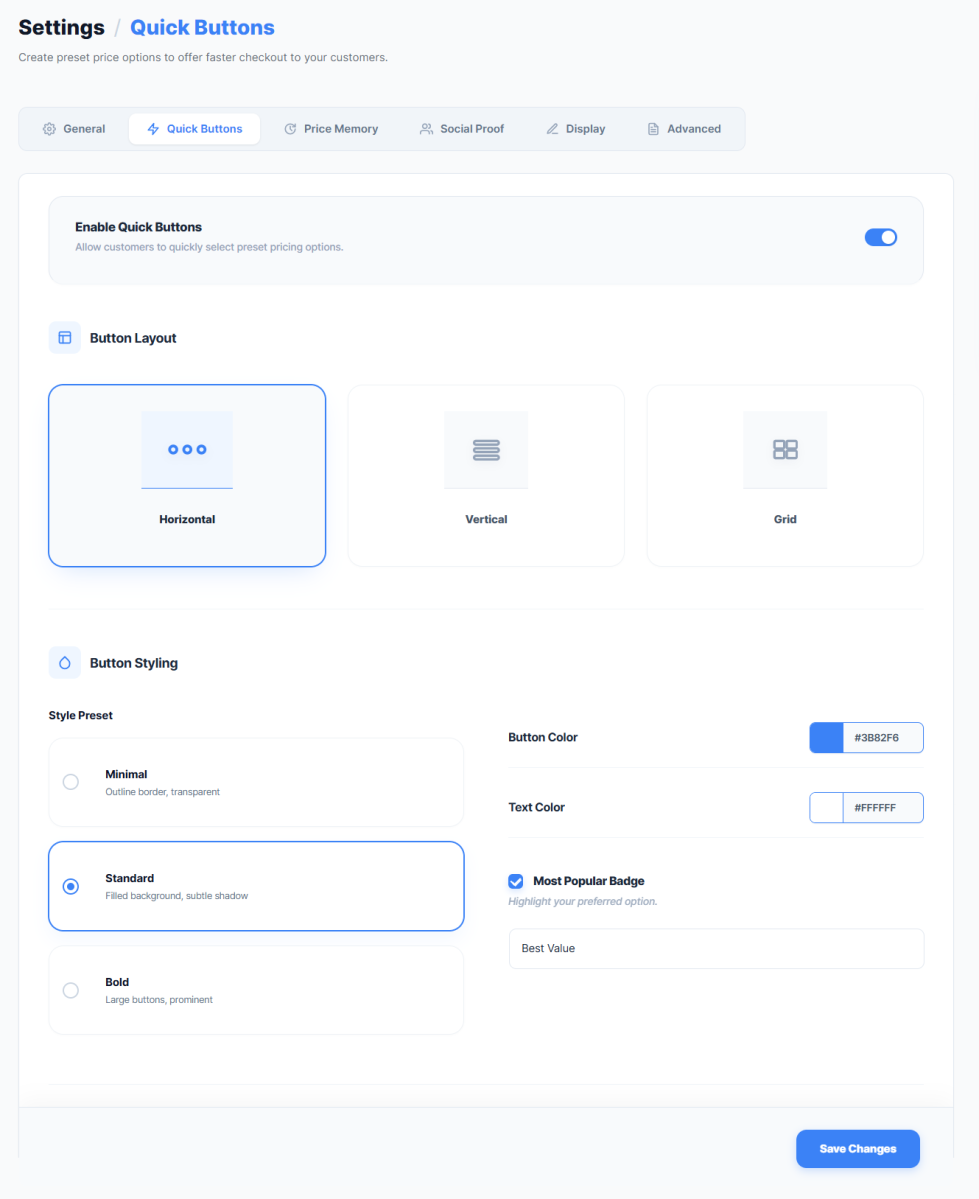
↑ Back to topQuick Selection Buttons let customers pick a preset price with one tap instead of typing manually. This section controls their global appearance and behavior.
Enable Quick Buttons — Turn Quick Buttons on or off for all products.
Layout — How buttons are arranged on the page:
- Horizontal — Side by side in a row
- Vertical — Stacked in a column
- Grid — Multi-column arrangement
Design Preset — Visual style of the buttons:
- Minimal — Clean and borderless with subtle hover effects
- Standard — Defined borders with balanced padding
- Bold — Strong color fills with high contrast
Button Color — Background color of the buttons. Set using the color picker.
Text Color — Text color on the buttons. Choose a color with strong contrast against your button color.
“Most Popular” Badge — Highlight one button to guide customers toward your preferred tier:
- Enable Badge — Show or hide the badge
- Badge Label — Text on the badge (e.g., “Best Value”, “Most Popular”, “Recommended”)
- Badge Position — Which button tier gets the badge
Button Tiers — Define up to 5 default buttons. For each button enter a Label (text shown on the button) and an Amount (price assigned to that button).
Auto-Generate — Click this to instantly create balanced price tiers calculated from a suggested price. The plugin generates labels and amounts automatically.
Show Custom Amount Field — When on, customers see both Quick Buttons and a text input for typing any custom amount. When off, only Quick Buttons are shown and customers must choose a preset tier.
Price Memory
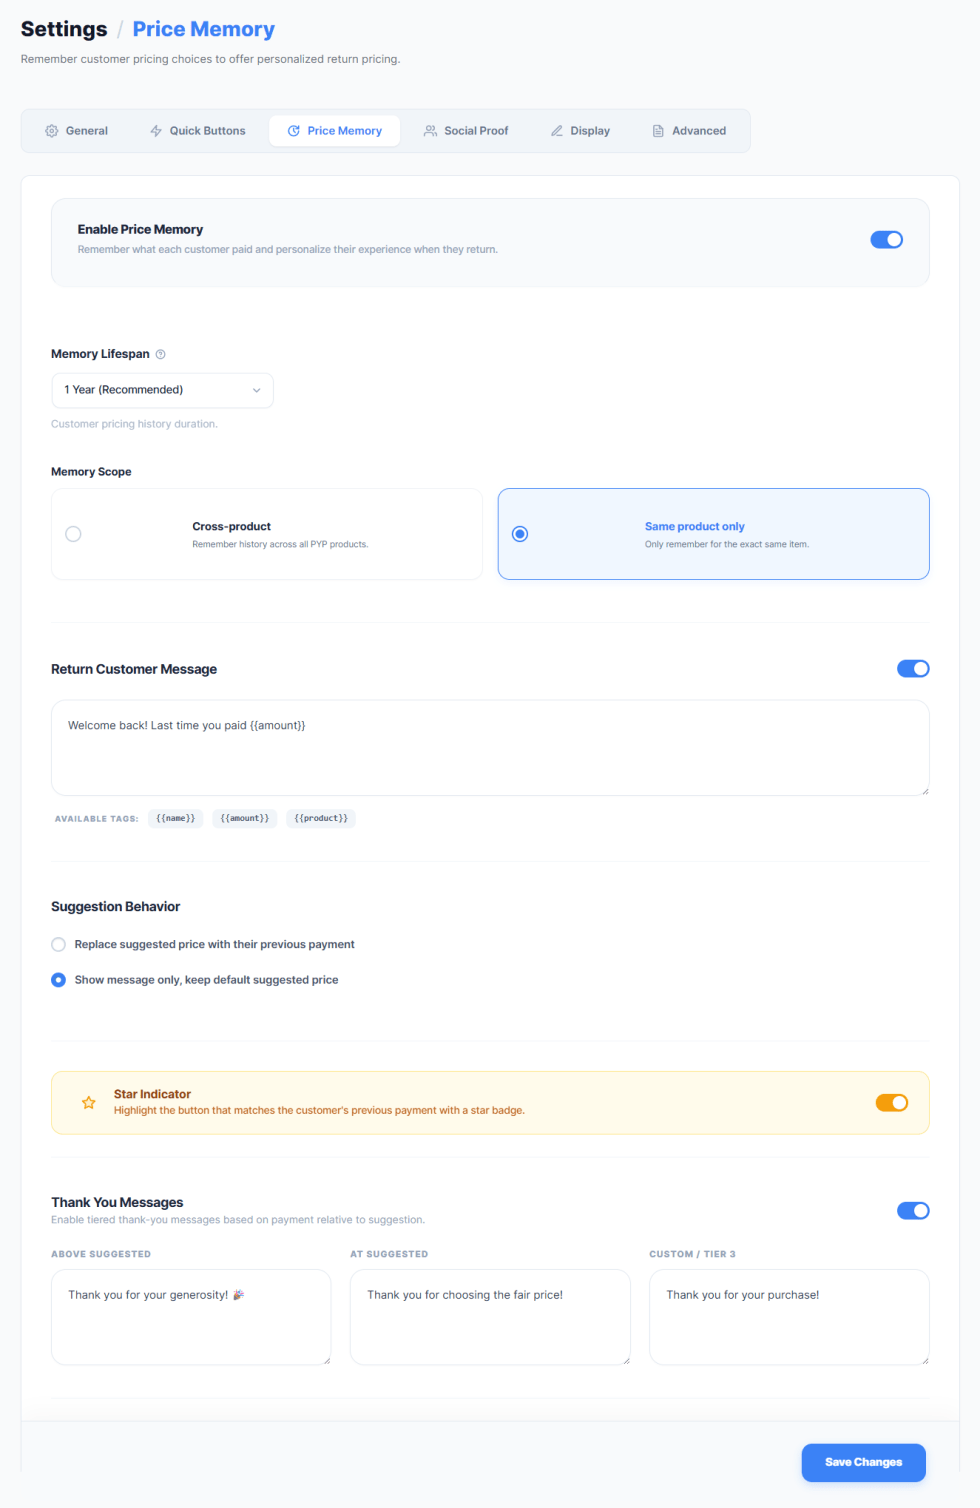
↑ Back to topSmart Price Memory recognizes returning customers and personalizes their experience to encourage repeat purchases at equal or higher amounts.
Enable Price Memory — Turn the memory system on or off.
Memory Lifespan — How long the plugin remembers a customer’s previous payment:
- 30 Days
- 60 Days
- 90 Days
- 6 Months
- 1 Year
- Forever
After the selected period, the customer’s data is cleared and they are treated as a new buyer.
Memory Scope — How memory is tracked:
- Cross-Product — One shared memory across all products. A customer who paid $30 on Product A sees $30 suggested on Product B.
- Product-Specific — Each product maintains its own memory. Product A remembers $30 and Product B remembers $50 independently.
Auto-Populate Previous Price — When on, the price input automatically fills with the customer’s previous highest payment instead of your default suggested price.
Highlight Previous Button — When on, the Quick Button the customer chose last time is highlighted with a star indicator.
Welcome Message — The personalized greeting shown to returning customers. Use these tags to insert customer-specific information:
- {{name}} — Customer’s first name
- {{amount}} — Amount they paid last time
- {{product}} — Product name
Example: “Welcome back, {{name}}! Last time you paid {{amount}} for {{product}}.”
Leave empty to show no welcome message.
Tiered Gratitude Messages — Three separate thank-you messages shown after purchase based on how the payment compares to your suggested price:
- Above Suggested — For customers who paid more than suggested. Express strong gratitude.
Example: “Thank you so much, {{name}}! Your generous payment of {{amount}} truly makes a difference.” - At Suggested — For customers who paid exactly the suggested price. Express warm appreciation.
Example: “Thank you, {{name}}! We truly appreciate your support of {{amount}}.” - Below Suggested — For customers who paid less than suggested but above minimum. Express gentle thanks.
Example: “Thank you for your support, {{name}}! Every contribution of {{amount}} matters.”
All three messages support the same {{name}}, {{amount}}, and {{product}} tags.
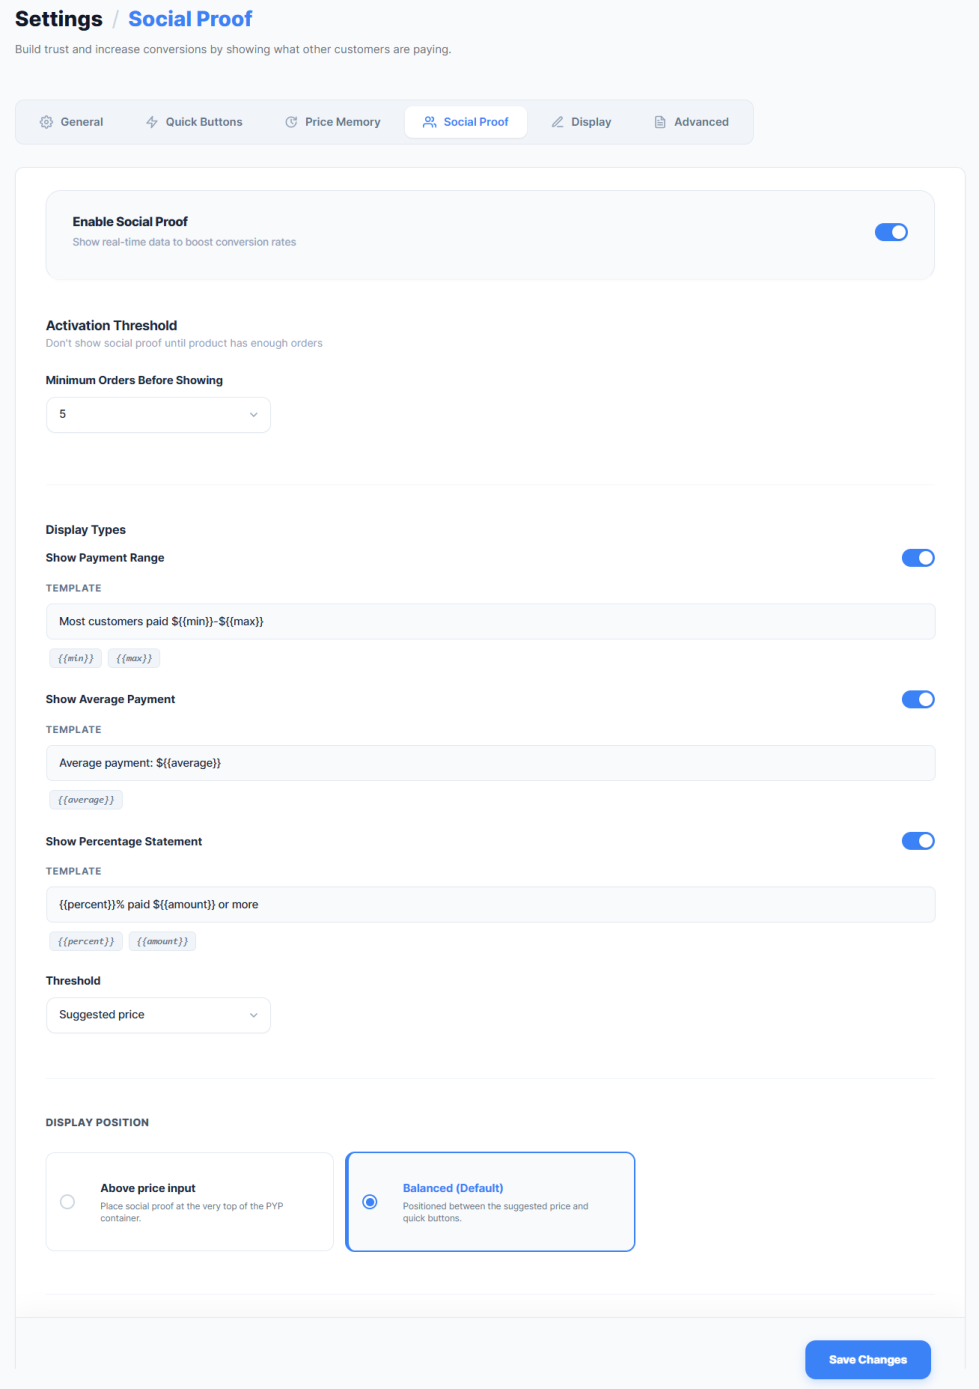
Social Proof
↑ Back to topSocial Proof displays real payment data from completed orders on your product pages to build trust and encourage higher payments.
Enable Social Proof — Turn Social Proof on or off.
Display Type — What payment information to show:
- Payment Range — “Others paid between $15 and $85 for this product.”
- Average Payment — “The average payment for this product is $42.”
- Percentage Statement — “85% of buyers paid $50 or more.”
Activation Threshold — Minimum completed orders before Social Proof appears. Options: 5, 10, 20, or 50 orders. Until the threshold is reached, the proof block stays hidden.
Position — Where the proof block appears:
- Above Price Field — Customer sees social data before entering their price
- Between Price and Button — Proof appears as a final nudge before they click Add to Cart
Custom Template — Write your own proof message. The plugin replaces these placeholders with real data:
- {{min}} — Lowest amount paid
- {{max}} — Highest amount paid
- {{average}} — Average payment
- {{count}} — Total payments
- {{percentage}} — Percentage above a threshold
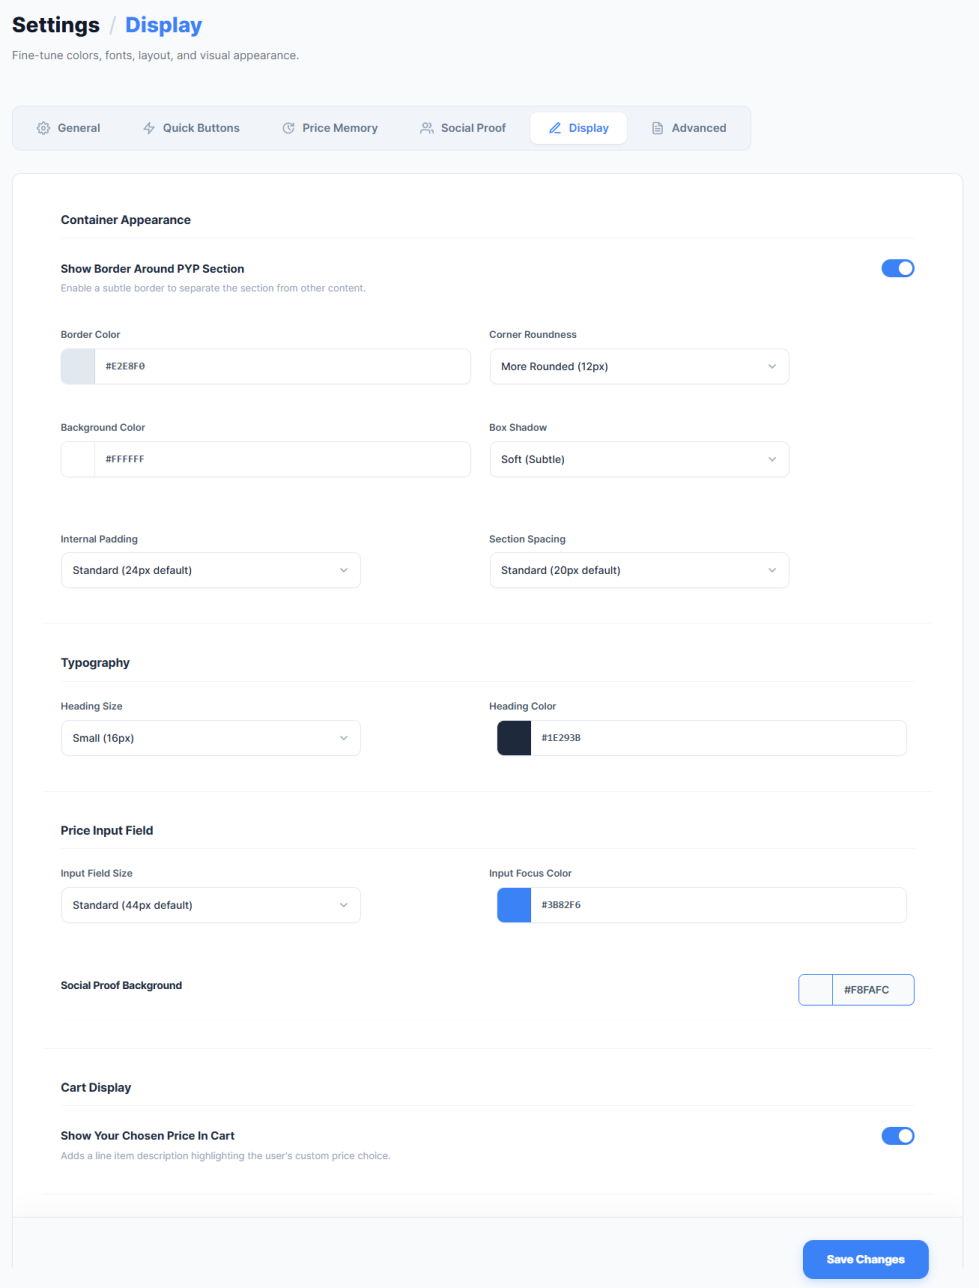
Display
↑ Back to topThe Display tab lets you fine-tune colors, fonts, layout, and visual appearance of the Pick Your Price section on your product pages. Use these settings to match the pricing interface perfectly with your theme design.
Container Appearance
This section controls the outer container that wraps around the entire Pick Your Price section on the product page.
Show Border Around PYP Section — Toggle to enable or disable a subtle border around the Pick Your Price section. When on, a visible border separates the pricing area from other product content. This helps the flexible pricing interface stand out clearly on the page.
Border Color — Set the color of the container border using the color picker or enter a hex code directly. Default is #E2E8F0 (light gray). Only visible when the border is enabled.
Corner Roundness — Control how rounded the container corners appear. Options:
- Square (0px)
- Slightly Rounded (4px)
- Rounded (8px)
- More Rounded (12px)
- Very Rounded (16px)
- Pill (24px)
Background Color — Set the background color of the Pick Your Price container. Default is #FFFFFF (white). Use this to give the pricing section a distinct background that contrasts with your page or matches your brand colors.
Box Shadow — Add depth to the container with a shadow effect. Options:
- None
- Soft (Subtle)
- Medium
- Strong
- Extra Strong
A subtle shadow helps the pricing section appear elevated and draws customer attention.
Internal Padding — Control the space between the container edge and its contents. Options:
- Compact (16px)
- Standard (24px default)
- Comfortable (32px)
- Spacious (40px)
Larger padding creates a more open, breathable layout. Smaller padding creates a tighter, more compact interface.
Section Spacing — Control the vertical space between elements inside the container (between Quick Buttons, price input, Social Proof, etc.). Options:
- Tight (12px)
- Standard (20px default)
- Relaxed (28px)
- Spacious (36px)
[SCREENSHOT: Container Appearance section showing border toggle, border color picker, corner roundness dropdown, background color picker, box shadow dropdown, internal padding dropdown, and section spacing dropdown]
Typography
This section controls text styling within the Pick Your Price section.
Heading Size — Set the size of headings and labels within the pricing section. Options:
- Extra Small (14px)
- Small (16px)
- Medium (18px)
- Large (20px)
- Extra Large (24px)
Choose a size that matches your theme’s typography scale.
Heading Color — Set the color of headings and labels using the color picker or enter a hex code directly. Default is #1E293B (dark blue-gray). Use a color that provides strong contrast against your container background for readability.
Price Input Field
This section controls the appearance of the price input field where customers enter their chosen amount.
Input Field Size — Set the height of the price input field. Options:
- Compact (36px)
- Standard (44px default)
- Large (52px)
- Extra Large (60px)
A larger input field is easier to tap on mobile devices. Choose a size that balances visibility with your overall layout.
Input Focus Color — Set the highlight color that appears around the input field when a customer clicks or taps into it. Default is #3B82F6 (blue). This provides visual feedback showing which field is active. Match this to your brand’s primary color for a cohesive look.
Social Proof Background
Social Proof Background — Set the background color of the Social Proof block that displays payment statistics. Default is #F8FAFC (very light gray). A subtle background color helps the Social Proof message stand out from surrounding content without being too prominent. Choose a color that complements your container background.
Cart Display
This section controls how Pick Your Price products appear in the WooCommerce cart.
Show Your Chosen Price In Cart — Toggle to enable or disable a line item description in the cart that highlights the customer’s custom price choice. When on, customers see clear confirmation of the price they selected (e.g., “Your chosen price: $25”). This reassures customers that their flexible price was captured correctly and reduces confusion during checkout.
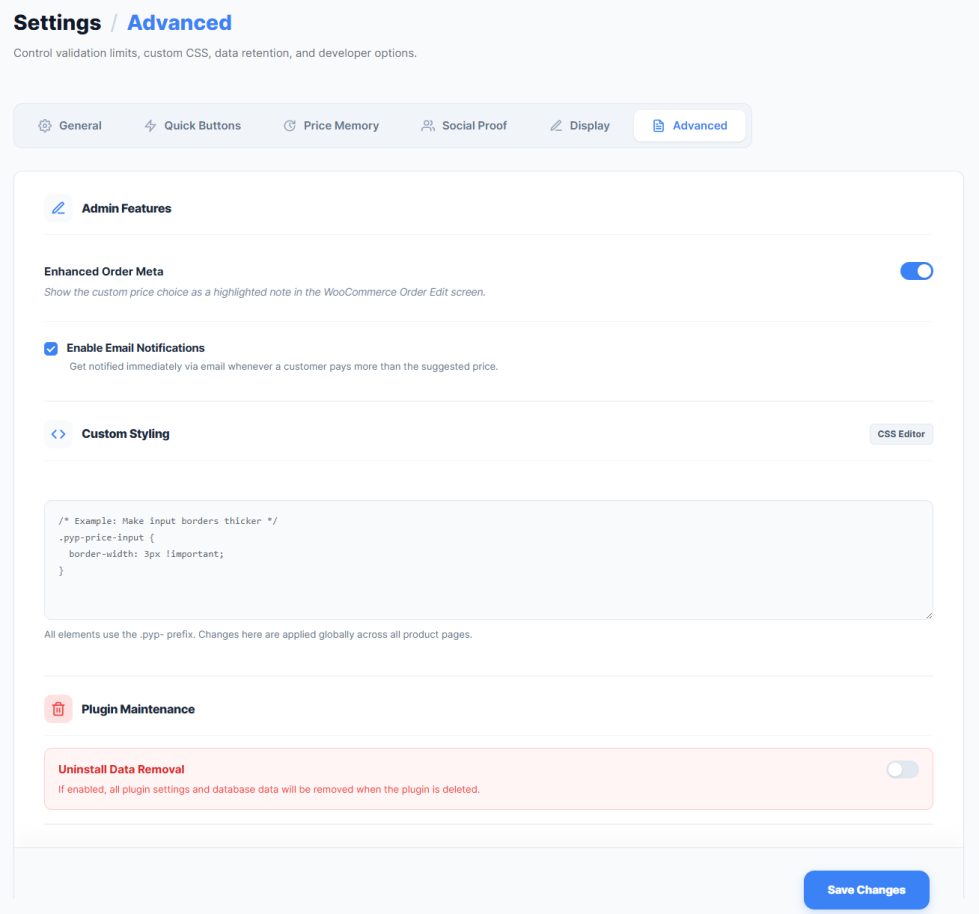
Advanced
↑ Back to topGenerosity Email Alerts — Get notified when a customer pays above your suggested price:
- Enable Alerts — Turn notifications on or off
- Email Address — Where to send alerts (defaults to admin email)
Each alert includes the customer name, product name, amount paid, and suggested price.
Custom CSS — A built-in editor for adding your own styling rules to Pick Your Price elements without editing theme files.
Uninstall Data Removal — When on, all Pick Your Price data (settings, memory records, analytics) is permanently deleted when the plugin is uninstalled. When off, data is preserved for potential reinstallation. Enable this for GDPR compliance.
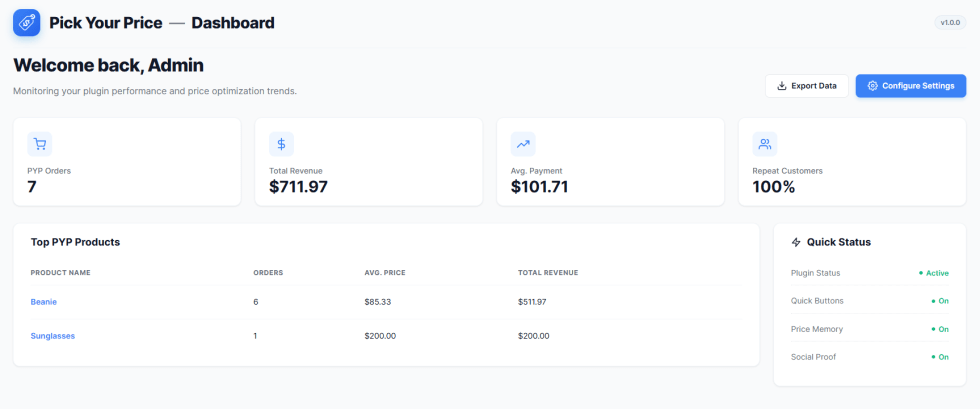
Dashboard
↑ Back to topThe Dashboard tab shows how your flexible pricing strategy is performing.
Overview Metrics — Four cards at the top of the page:
- Total PYP Orders — Count of all orders with Pick Your Price products
- Total Revenue — Total amount earned through flexible pricing
- Average Payment — Mean amount customers choose to pay
- Repeat Customer Rate — Percentage of buyers who return for another purchase
Top Products Leaderboard — Your products ranked by flexible pricing revenue. Use this to spot your best performers and identify products that might need pricing adjustments.
CSV Export — Click Export CSV to download your complete pricing data as a spreadsheet for external analysis.
Setting Up Your First Product
↑ Back to topFollow these steps to enable flexible pricing on any product.
Step 1 — Go to Products > All Products and click on the product you want to configure. Or create a new product.
Step 2 — Scroll down to the Product Data metabox and click the Pick Your Price tab on the left.
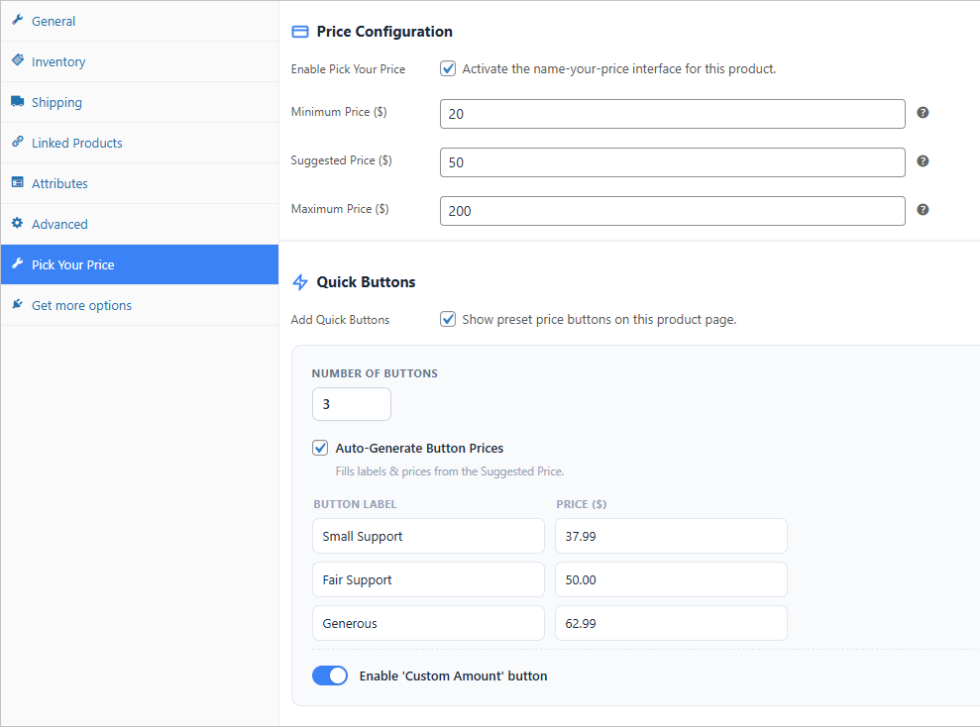
Step 3 — Check Enable Pick Your Price to activate flexible pricing for this product.
Step 4 — Set your price boundaries:
- Minimum Price — Lowest amount a customer can pay. Protects your margins. Leave empty for no minimum.
- Suggested Price — Your recommended price. This pre-fills the input field and anchors customer expectations. Leave empty for no pre-filled amount.
- Maximum Price — Highest amount a customer can pay. Prevents overpayments and fraud. Leave empty for no maximum.
Step 5 — Optionally configure product-level Quick Buttons by checking Override Global Buttons and setting up to 5 custom button tiers with labels and amounts. Or click Auto-Generate to create tiers from your suggested price automatically.
Step 6 — Publish or update the product. Flexible pricing is now live for this product.
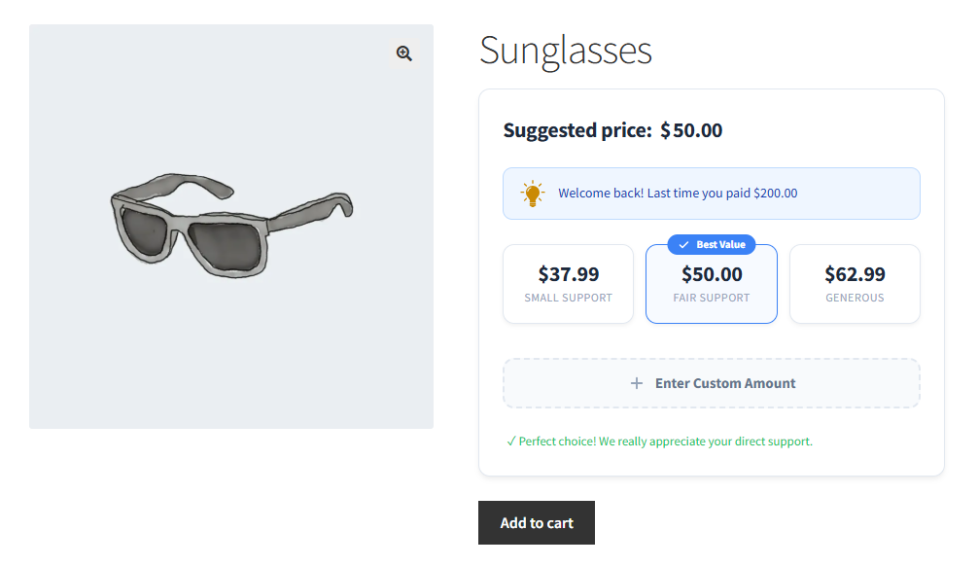
What Customers See
↑ Back to topWhen a customer visits a Pick Your Price product page, they see:
New customers see the suggested price pre-filled in the input field, Quick Buttons for one-tap selection (if enabled), Social Proof showing what others have paid (if enabled and threshold met), and your custom Add to Cart button text.
Returning customers (with Price Memory active) additionally see a personalized welcome message with their name and last payment, their previous highest payment auto-filled instead of the suggested price, and a star indicator on the Quick Button they chose last time.
After purchase, customers see a tiered gratitude message based on whether they paid above, at, or below the suggested price.
The customer’s chosen price carries through to the cart and checkout normally. Pick Your Price works with both the classic WooCommerce cart/checkout and the modern block-based cart/checkout.
Compatibility
↑ Back to topThemes — Tested with WoodMart, Astra, Flatsome, Divi, and Elementor. Works with any theme using standard WooCommerce hooks. Use the built-in Custom CSS editor for theme-specific adjustments.
Plugins — Compatible with WooCommerce Subscriptions, Product Bundles, Aelia Currency Switcher, and WPML. Works with all WooCommerce payment gateways.
Technical — HPOS and WooCommerce Blocks fully supported. WordPress 6.4+, WooCommerce 8.0+, PHP 7.4+. Compatible with WP Rocket, Autoptimize, W3 Total Cache, and LiteSpeed Cache. Assets load only on pages with Pick Your Price products.
Troubleshooting
↑ Back to topPick Your Price fields not showing on the product page
- Confirm the plugin is activated at Plugins > Installed Plugins
- Check the master switch at Pick Your Price > Settings > General
- Confirm Enable Pick Your Price is checked on the specific product
- Clear any caching plugin caches
- Test with a default WordPress theme to rule out theme conflicts
Quick Buttons not appearing
- Check they are enabled at Pick Your Price > Settings > Quick Buttons
- Confirm button tiers have labels and amounts filled in
- If using product-level overrides, confirm Override Global Buttons is checked with at least one tier configured
Social Proof not showing
- Check it is enabled at Pick Your Price > Settings > Social Proof
- The product must have enough completed orders to meet your activation threshold
- Verify the threshold setting matches your expectations
Price Memory not recognizing returning customers
- Check it is enabled at Pick Your Price > Settings > Price Memory
- The customer must be logged into their account
- The memory lifespan must not have expired since their last purchase
- The customer must have at least one previous completed order for a Pick Your Price product
Styling looks incorrect
- Clear all caching plugin caches
- Use the Custom CSS editor at Pick Your Price > Settings > Advanced for adjustments
- Test with a default WordPress theme to confirm if the issue is theme-specific
Uninstalling
↑ Back to topTo deactivate without removing data — Go to Plugins > Installed Plugins, find Pick Your Price, and click Deactivate. All settings, memory data, and analytics are preserved for later reactivation.
To completely remove the plugin and all data — First go to Pick Your Price > Settings > Advanced and enable Uninstall Data Removal. Then deactivate and delete the plugin. All data will be permanently removed from your database.
Getting Help
↑ Back to topIf you need assistance not covered in this documentation:
- Review the Troubleshooting section above.
- Open a support ticket through your WooCommerce.com account.
When contacting support, include your WordPress version, WooCommerce version, PHP version, active theme name, a description of the issue, and any screenshots.