Installation
↑ Back to topTo start using a product from WooCommerce.com, you can use the “Add to store” functionality on the order confirmation page or the My subscriptions section in your account.
- Navigate to My subscriptions.
- Find the Add to store button next to the product you’re planning to install.
- Follow the instructions on the screen, and the product will be automatically added to your store.
Alternative options and more information at:
Managing WooCommerce.com subscriptions.

Initial Setup & Configurations
↑ Back to topAfter successfully activating the Inline Order Notes plugin, please go to Products > Product Mistakes Finder.
Tabs Available:
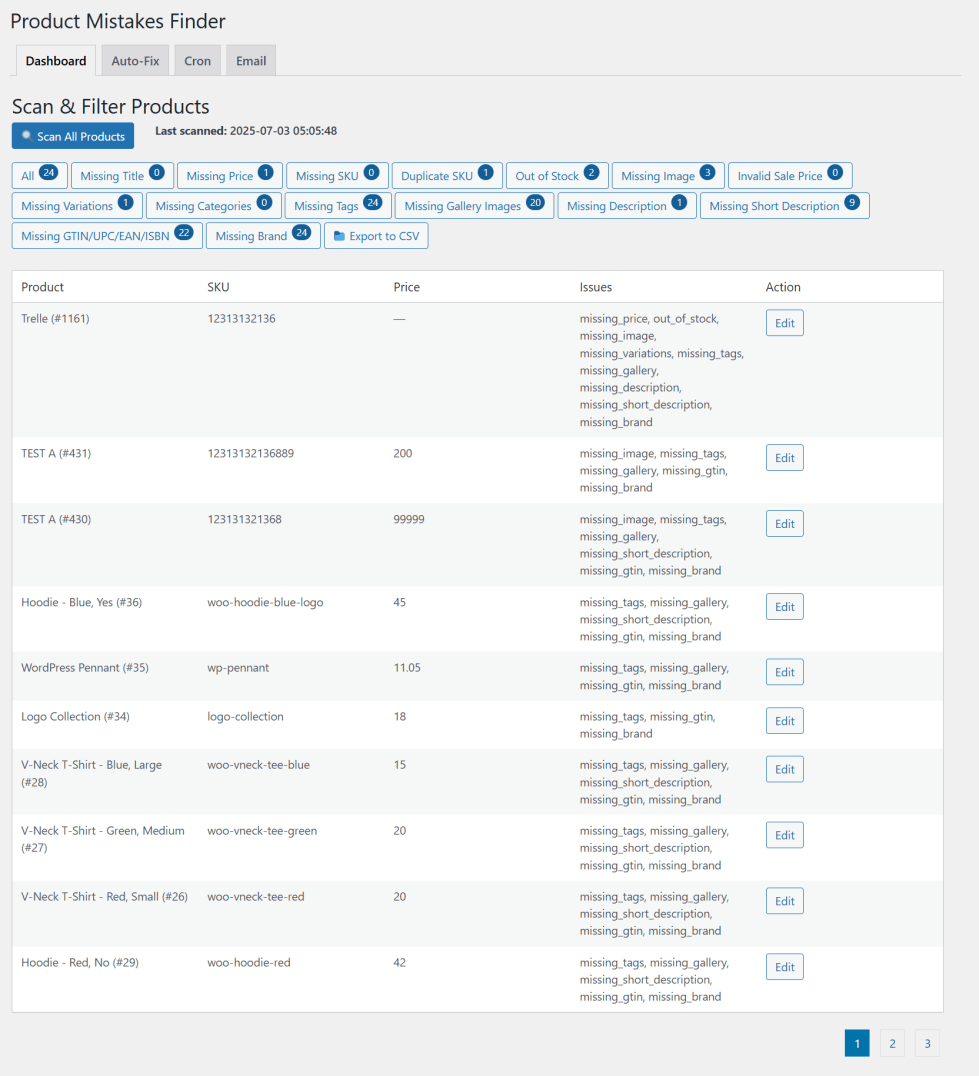
↑ Back to top- Dashboard: Run scans and view issues.
- Auto-Fix: Enable and configure automatic fixes.
- Cron Jobs: Set automated scanning schedules.
- Email Reports: Receive scan results via email.
Scanning for Product Mistakes
↑ Back to topSteps:
- Go to Products → Product Mistakes Manager.
- On the Dashboard tab, click “Scan All Products”.
- The plugin will analyze your entire catalog and identify issues like:
- Missing brands (WooCommerce Product Brands plugin required)
- Missing and duplicate SKUs
- Missing prices
- Empty short descriptions
- Missing product categories/tags
- Missing gallery images
Visual Indicators:
Each issue type has a button with a live count. Clicking a filter shows the affected products in that filter.
Auto-Fix Configuration
↑ Back to topNavigate to the Auto-Fix tab to enable and customize the auto-fix rules.
Available Fixes:
✅ Auto-generate missing SKUs with specific pattern using prefix
✅ Auto set products prices
✅ Auto set product sale price with percentage of regular price
✅ Set default short description and long description (if missing)
✅ Assign default category to products
✅ Set default tags and brands for products
How to Enable:
- Toggle each fix as per your preference.
- Click “Save Auto-Fix Settings”.
Auto-fixes run immediately after scanning, manually or via cron.
Cron Job Scheduling (Auto Scan)
↑ Back to topGo to the Cron tab to set up automatic scans:
- ✅ Enable or disable cron scanning
- Select scan interval:
- Hourly
- Twice Daily
- Daily
- Weekly
- ✅ Run Auto-Fix with Cron
Once enabled, your site will automatically scan for product issues at the selected interval.
Email Notifications
↑ Back to topUnder the Email tab, configure email delivery of scan reports.
Settings:
✅ Enable/disable scan report emails
📧 Set the recipient email address
📎 Attach a CSV file containing the list of detected product issues
Report Includes:
- Scan source (manual or cron)
- Total issues found
- List of affected products by issue type
- CSV attachment with product IDs, SKUs, titles, and issue details
Exporting Data
↑ Back to topYou can export detected product mistakes into a CSV file manually:
- After scan, click the Export CSV button.
- A CSV file will be downloaded containing grouped data by issue type.
Compatibility Notes
↑ Back to top- Fully compatible with WooCommerce 6+ to 9+
- Compatible with HPOS (High-Performance Order Storage)
- Works with Product Brands plugin for brand detection
Troubleshooting
↑ Back to top- Scan doesn’t detect issues: Ensure products are published and not already clean.
- Auto-fix not working: Make sure auto-fix options are enabled and saved.
- Email not sending: Check if WooCommerce emails are working. Use WP Mail Logging or SMTP plugin to confirm.
Support
↑ Back to topIf you encounter any issues or have questions, please reach out through the WooCommerce Marketplace ticket system.