Installation
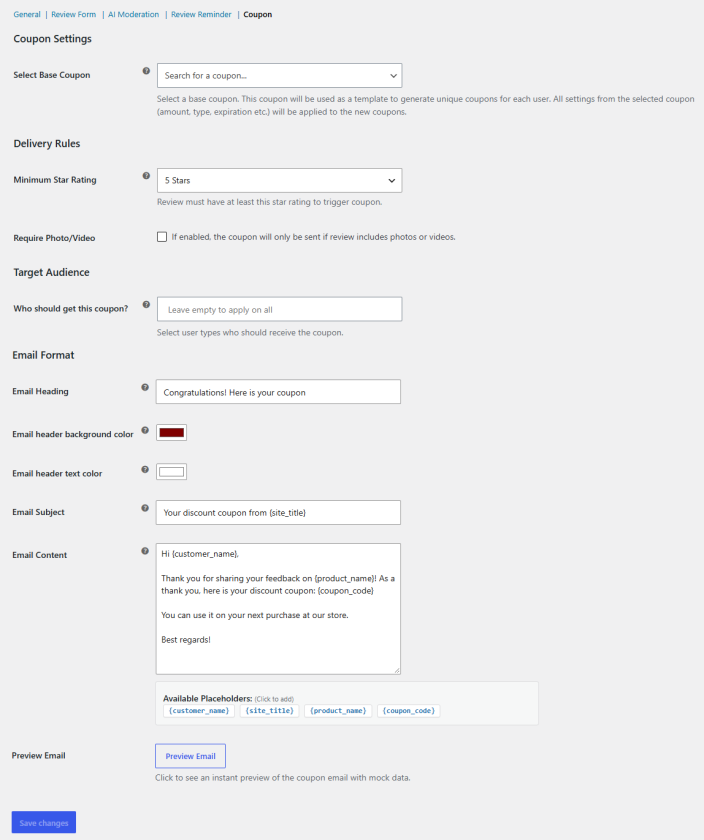
↑ Back to topTo start using a product from WooCommerce.com, you can use the “Add to store” functionality on the order confirmation page or the My subscriptions section in your account.
- Navigate to My subscriptions.
- Find the Add to store button next to the product you’re planning to install.
- Follow the instructions on the screen, and the product will be automatically added to your store.
Alternative options and more information at:
Managing WooCommerce.com subscriptions.
General settings
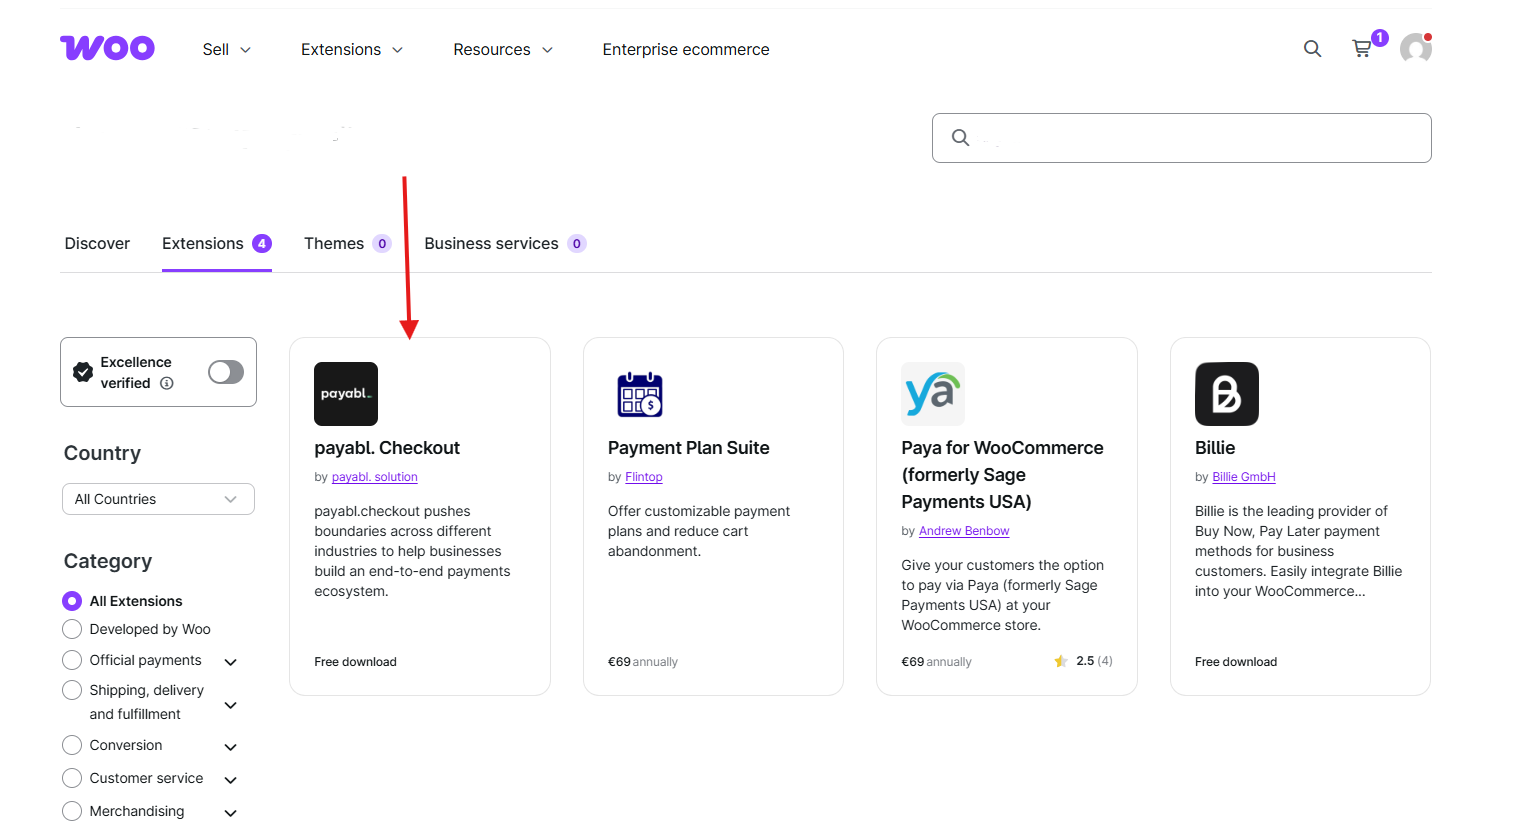
↑ Back to topGo to WooCommerce > Settings > Product Reviews > General and configure the settings. Use these settings to turn on the plugin, control photo and video uploads, and decide what guest users can do with reviews and questions.
- Enable/Disable Plugin: Turn the plugin on or off. Your settings stay saved while the plugin is disabled.
- Enable the Photo/Video Review: Let customers attach photos and videos to their reviews.
- Maximum Upload File Size (MB): Set the largest file size, in megabytes, allowed for each photo or video.
- Make the Photo/Video Required: Require customers to upload at least one photo or video before they can submit a review.
- Enable Ask a Question Tab: Add a separate tab on the product page where customers can ask questions about the product.
- Enable the Guests to Review/Ask Questions: Let users who are not logged in submit reviews and ask questions.
- Allow the Guest to Comment on Anything: Let guest users comment on existing reviews.
- Allow the Guest to Dislike or Like: Let guest users vote reviews up or down.
- Allow the Guest to Flag: Let guest users report reviews they find inappropriate.
- Min Words to Include in Each Review: Set the minimum number of words a review must have.
- Max Words to Include in Each Review: Set the maximum number of words a review can have.
- Visible Order Statuses: Choose which order statuses make a product available for review in the customer’s My Account section. Only products from orders with the selected statuses can be reviewed there. You can select more than one status, and the default is Completed.
Review form
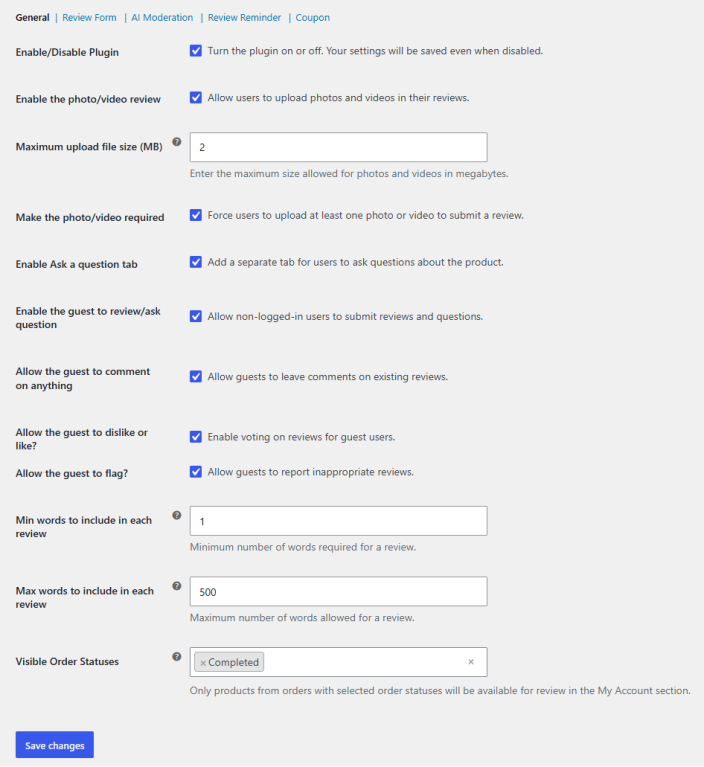
↑ Back to topThe Review Form tab under WooCommerce > Settings > Product Reviews controls how reviews look on your product pages, including headings, layout, rating colors, and the success message.
- Title of the Review Summary: Enter the heading for the rating summary section.
- Review Display Type: Choose how customer reviews appear on the product page.
- Simple Form: Shows reviews in a standard list, split into pages.
- Carousel (Slider): Shows reviews in a slider customers can scroll through.
- Reviews Per Page: Set how many reviews appear before pagination starts. Leave it empty to show all reviews at once. This field appears only when Review Display Type is set to Simple Form.
- Reviews per Carousel: Set how many reviews the carousel slider shows. Leave it empty to show all reviews. This field appears only when Review Display Type is set to Carousel (Slider).
- Header Text above the Review Form: Enter the text shown directly above the Leave a Review section.
- Title Before the Other User Reviews: Enter the heading shown above the list of existing reviews.
- Title of the Tab: Enter the label for the reviews tab on the product page.
- Show the Progress Bar while Showing the Rating: Show progress bars that break down how many reviews each star rating got.
- Background Color of Progress Bar: Choose the color for the empty part of each rating progress bar.
- Filled Color of Progress Bar: Choose the color for the filled part of each rating progress bar.
- Star Filled Color: Choose the color for filled stars in the rating display.
- Review Success Message: Enter the message customers see after they submit a review.
- Show Coupon Reminder Message: Show a coupon reminder message above the review title.
AI moderation
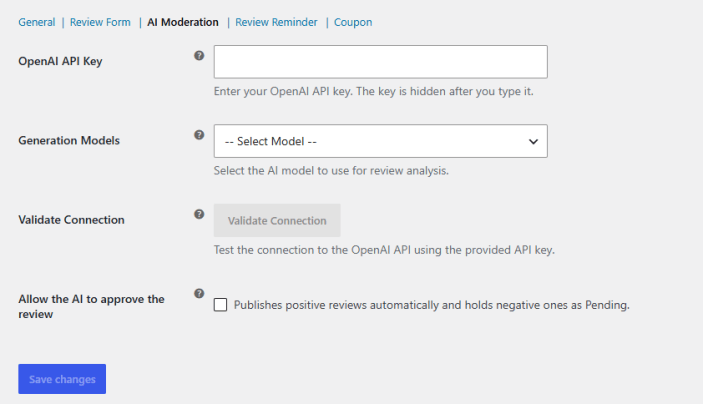
↑ Back to topYou can connect the plugin to OpenAI from the AI Moderation tab under WooCommerce > Settings > Product Reviews. Once connected, AI reviews incoming product reviews and approves the positive ones for you.
- OpenAI API Key: Enter your OpenAI API key. The key is hidden once you type it.
- Generation Models: Choose the OpenAI model that analyzes reviews.
- GPT-3.5 Turbo
- GPT-4
- GPT-4 Turbo
- GPT-4o Mini
- GPT-4o (Latest)
- Validate Connection: Check that the plugin can reach the OpenAI API with the key you entered.
- Allow the AI to Approve the Review: Let the AI score each review and publish it automatically when the score is high enough. Reviews that score lower are held as Pending so you can check them manually.
- AI Approval Threshold (%): Set the minimum score a review needs to be published automatically. Reviews at or above this score go live, and reviews below it stay Pending. This field appears only when Allow the AI to approve the review is checked.
Review reminder
↑ Back to topCustomers often forget to leave a review after an order arrives. The Review Reminder tab under WooCommerce > Settings > Product Reviews sends them an automated email asking for one, with the option to offer a coupon in return.
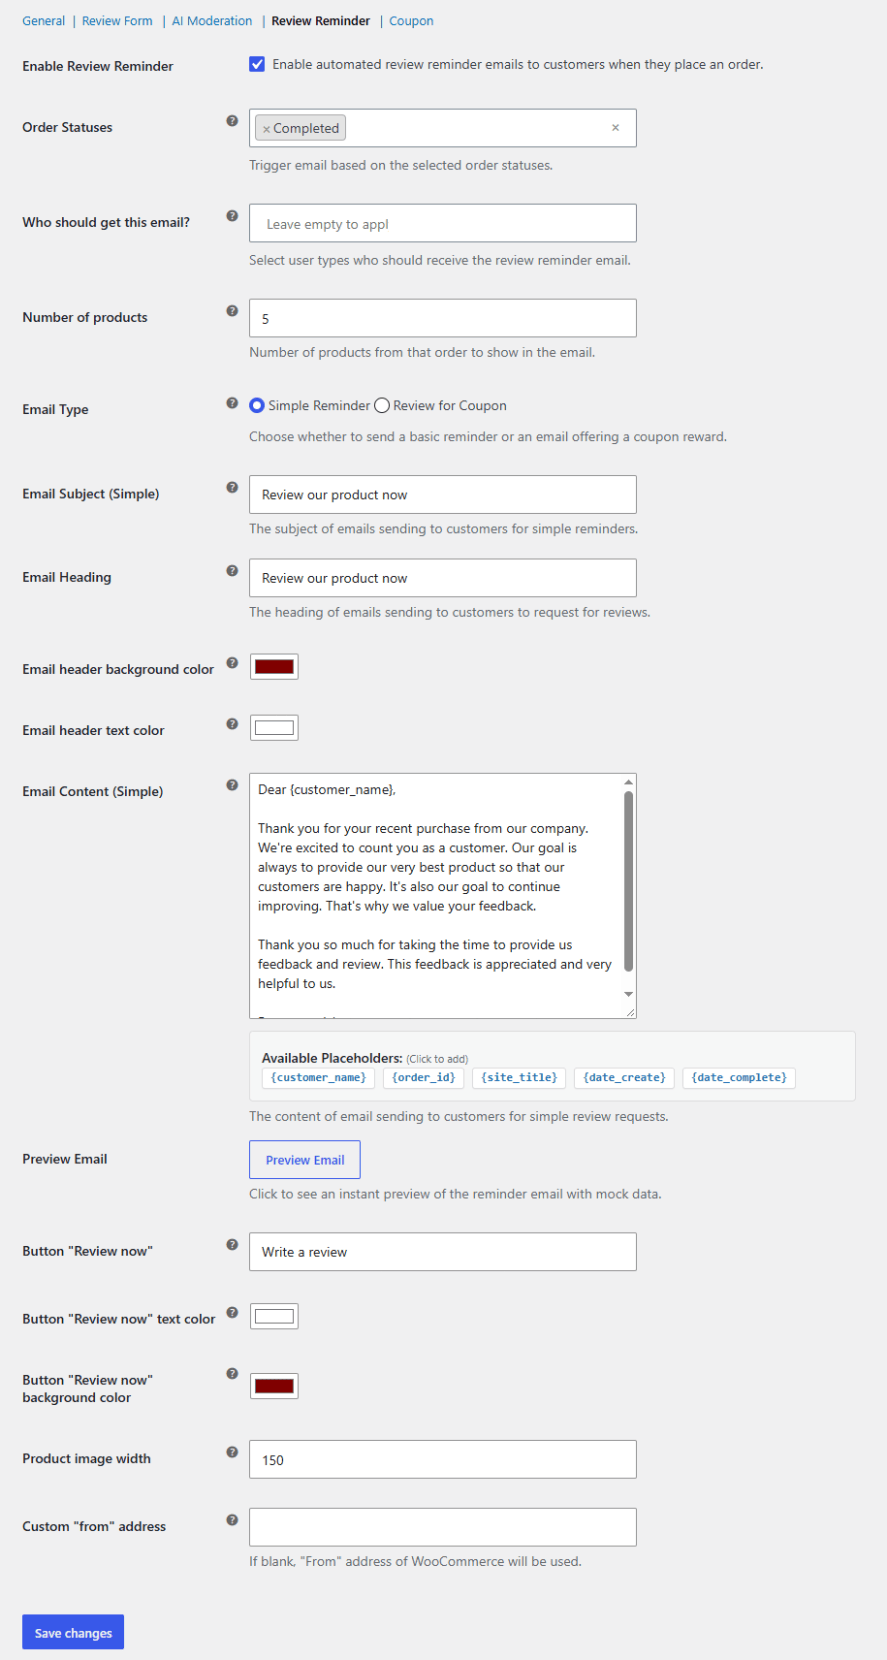
- Enable Review Reminder: Turn on automated review reminder emails for customer orders.
- Order Statuses: Choose which order statuses trigger the reminder email. You can select more than one status, and the default is Completed.
- Who should get this Email: Choose which user types receive the reminder email. Leave it empty to send it to everyone.
- Number of Products: Set how many products from the order appear in the email.
- Email Type: Choose the kind of reminder email to send.
- Simple Reminder: Asks customers to review the products they bought.
- Review for Coupon: Offers customers a discount coupon in return for leaving a review.
- Email Subject (Simple): Enter the subject line for the simple reminder email. This field appears when Email Type is set to Simple Reminder.
- Email Subject (Coupon): Enter the subject line for the coupon reminder email. This field appears when Email Type is set to Review for Coupon.
- Email Heading: Enter the heading shown at the top of the reminder email.
- Email Header Background Color: Choose the background color of the email header.
- Email Header Text Color: Choose the text color of the email header.
- Email Content (Simple): Write the body of the simple reminder email. This field appears when Email Type is set to Simple Reminder.
- Email Content (Coupon): Write the body of the coupon reminder email. This field appears when Email Type is set to Review for Coupon.
- Available Placeholders: Click a placeholder to add it to the email content. It is replaced with real order details when the email is sent.
- {customer_name}: The customer’s name.
- {order_id}: The order number.
- {site_title}: Your store name.
- {date_create}: The date the order was placed.
- {date_complete}: The date the order was completed.
- Preview Email: Open an instant preview of the reminder email filled with sample data.
- Button “Review now”: Enter the text for the button customers click to leave a review.
- Button “Review now” Text Color: Choose the text color of the review button.
- Button “Review now” Background Color: Choose the background color of the review button.
- Product Image Width: Set the width of the product images shown in the email.
- Custom “from” Address: Enter the email address that reminder emails are sent from. If you leave it empty, your WooCommerce “From” address is used.
Coupon
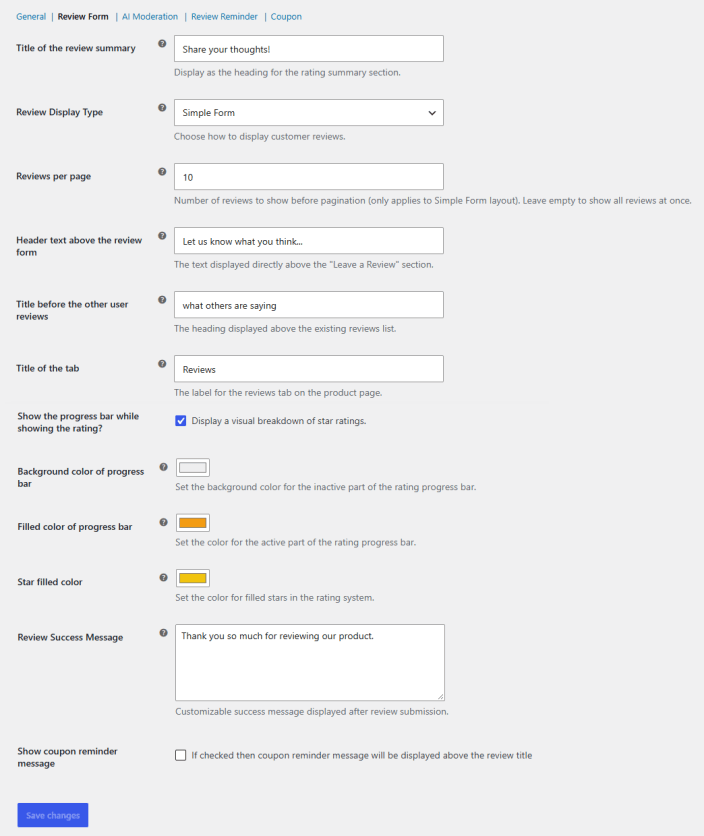
↑ Back to topThe Coupon tab under WooCommerce > Settings > Product Reviews rewards customers with a unique discount coupon when they leave a review that meets your rules.
Coupon settings
↑ Back to top- Select Base Coupon: Search for and select an existing WooCommerce coupon to use as a template. The plugin generates a unique coupon for each customer, using all the base coupon’s settings, such as amount, discount type, and expiry.
Delivery rules
↑ Back to top- Minimum Star Rating: Choose the lowest star rating a review can have and still earn a coupon.
- 1 Star
- 2 Stars
- 3 Stars
- 4 Stars
- 5 Stars
- Require Photo/Video: Send the coupon only when the review includes at least one photo or video.
Target audience
↑ Back to top- Who should get this Coupon: Choose which user types can receive the coupon. Leave it empty to make it available to everyone.
Email format
↑ Back to top- Email Heading: Enter the heading shown at the top of the coupon email.
- Email Header Background Color: Choose the background color of the email header.
- Email Header Text Color: Choose the text color of the email header.
- Email Subject: Enter the subject line of the coupon email.
- Email Content: Write the body of the coupon email.
- Available Placeholders: Click a placeholder to add it to the email content. It is replaced with real details when the email is sent.
- {customer_name}: The customer’s name.
- {site_title}: Your store name.
- {product_name}: The name of the reviewed product.
- {coupon_code}: The unique coupon code generated for the customer.
- Preview Email: Open an instant preview of the coupon email filled with sample data.