Top 3 Features
↑ Back to top- Inventory Syncing
This feature is automatically ON as soon as you install QuickSync. It ensures your stock levels remain accurate and consistent, reducing the risk of overselling or stockout. - Product Syncing
This feature allows sellers to designate one store as the ‘Master’ and sync updates automatically to other connected stores. - Order Syncing
All connected WooCommerce stores send orders to Shopify as the fulfillment store for centralized processing. We also sync critical details like order notes, line items, shipping, and discounts.
Setup and Installation
↑ Back to top- Log in to your Shopify account
– Note your store URL (if your URL is ‘mystore.myshopify.com’, take note of ‘mystore‘) - Install from the WooCommerce App Store
– Install the app on your WooCommerce store.
– Click ‘Connect Store‘ on your QuickSync dashboard; Choose Woo.
– Enter your store URL (example: ‘wordpress.mystore.org‘) and click ‘connect‘.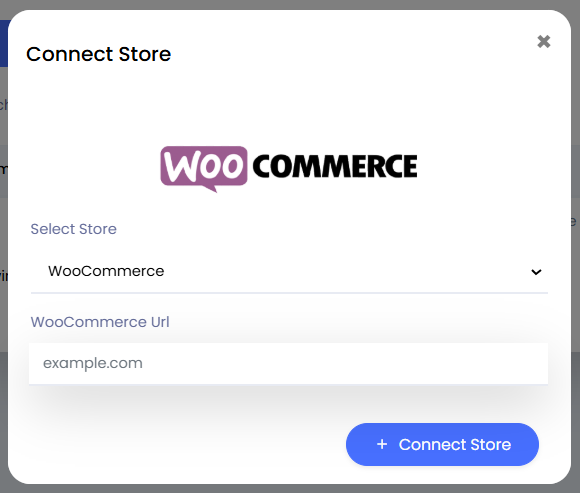
- Connect your Shopify store
– Click ‘Connect Store‘ on your QuickSync dashboard; Choose Shopify and login if it asks you to. (in most cases, when you already have your Shopify store open, there’s no need to log in)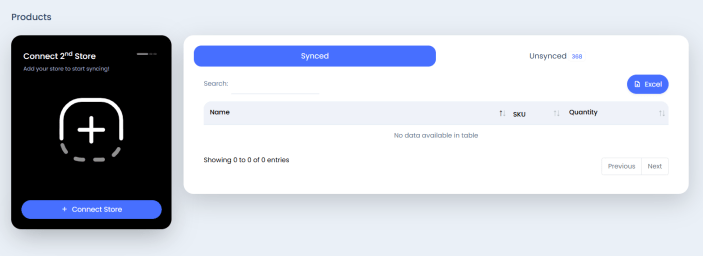
- Sync Products
– Click on “Sync products” in the dashboard
– Choose which store you’d like to sync products from with ‘create products‘ toggled on.
Example: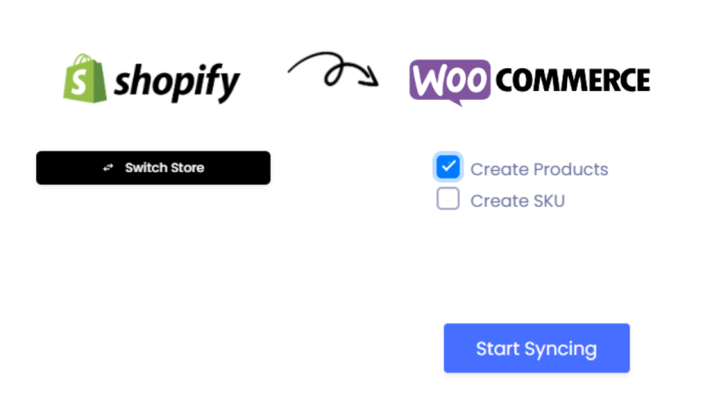
(This means you want the products from your Shopify store to be created in WooCommerce)
– You should then see all of your synced products under the ‘synced‘ column.
– To check, go to your store, the products from the store you chose to sync from should be there.
Inventory Syncing
↑ Back to top- Real-Time Updates: Any change in inventory on one platform is instantly reflected across all connected platforms, maintaining consistency
- Multi-Platform Integration: QuickSync seamlessly integrates with various platforms, including TikTok, Shopify, Clover, Square, WooCommerce, eBay, Etsy, and Amazon.
- Automated Syncing: The system automatically updates stock levels, eliminating the need for manual adjustments.
- Multi-Location Inventory Syncing: Easily sync inventory across multiple locations. Whether you have separate warehouses or retail outlets, QuickSync keeps stock levels accurate for each location and provides location-specific updates.
- Platform-Specific Inventory Rules: QuickSync understands that each platform has unique inventory rules, and discrepancies can arise when managing stock across multiple channels.
How Inventory Syncing Works
1. Real-Time Updates Across Platforms
QuickSync continuously monitors and updates stock levels whenever there is a change—whether it’s a sale, return, or manual adjustment.
For example, if a product is sold on Shopify, the updated stock level is instantly reflected on platforms like Etsy, Amazon, or WooCommerce.
2. Centralized Inventory Database
QuickSync maintains a centralized database that is the single source of truth for your inventory. Any stock changes on connected platforms are synced with this database, which then updates all other platforms accordingly.
3. Conflict Resolution (aka Race condition handling)
If there are simultaneous updates from multiple platforms, QuickSync resolves conflicts by following predefined rules (e.g., prioritizing a specific platform or using timestamps to determine the most recent update).
Product Syncing
↑ Back to topThis feature ensures that changes made to product details—such as titles, descriptions, images, prices, or variants are automatically reflected on all connected sales channels. By designating a Master Store, you can centralize product management, making updates easier and faster.
1. Master Store Setup
Designate one store as the Master Store, where you will manage the product.
Changes made to the Master Store are automatically synced to all other connected stores.
2. Automatic Updates
Updates to product details such as titles, prices, descriptions, images, and SKUs are synced in real-time across all platforms.
3. Selective Product Syncing
Choose which products to sync between the Master Store and the other. Flexibility to exclude certain products from being updated.
4. Variant Management
Sync product variants (e.g., sizes, colors) and ensure consistency across all platforms.
5. Conflict Prevention
QuickSync prevents accidental overwrites when syncing by using the Master Store as the source of truth for product data.
How to Use Product Syncing
↑ Back to top1. Designate the Master Store
- Log in to your QuickSync dashboard.
- Navigate to the Product Syncing section.
- Select the store you want to designate as the Master Store.
2. Start Syncing
- Enable Product Syncing in your QuickSync dashboard.
- Make updates to your products in the Master Store (e.g., changing the price or adding a new image)
- QuickSync automatically updates all connected stores with the latest product information.
Example Use Case
You sell a T-shirt on Shopify (Master Store) and WooCommerce.
1. Update Product in Shopify:
Change the T-shirt price from $20 to $25 in Shopify.
Add a new image to the product listing.
2. QuickSync in Action:
QuickSync detects the changes in the Shopify Master Store.
Updates the T-shirt price and image on WooCommerce automatically.
3. Result:
The product details are consistent across Shopify and WooCommerce without any manual work.
Order Syncing
↑ Back to topA feature where all connected stores send orders to a designated fulfillment store* for centralized processing. QuickSync also syncs critical details like order notes, line items, shipping, and discounts.
*Currently, Only Shopify and Clover can act as Fulfilment Stores
- Centralized Fulfillment
Designate Shopify or Clover as your Fulfillment Store, where orders from all connected sales channels are consolidated.
2. Order Details Syncing
QuickSync ensures that key order details are synced to the Fulfillment Store for a comprehensive view, including:
- Order Notes
- Line Items
- Shipping Information
- Discount Details
3. Product Matching with SKUs
QuickSync attempts to link each line item in an order to an existing product in the Fulfillment Store using SKUs. If a matching SKU is found, the product is linked automatically.
4. Custom Item Handling
If no matching SKU is found for a line item, QuickSync creates it as a Custom Item in the Fulfillment Store, ensuring all order details are preserved.
5. Real-Time Updates
Orders are synced as they are placed, providing real-time visibility and control over fulfillment processes.
How to Use Order Syncing
1. Set Up Your Fulfillment Store
- Log in to your QuickSync dashboard.
- Navigate to the Order Syncing section.
- Choose Shopify as your Fulfillment Store.
2. Enable Order Syncing
- Turn on Order Syncing in the QuickSync dashboard.
- QuickSync will automatically start sending orders from connected stores to the designated Fulfillment Store.
Example Use Case
You sell on WooCommerce with Shopify as your Fulfillment Store.
1. Order Placement:
A customer places an order for a T-shirt on WooCommerce. The order includes shipping and a discount code.
2. QuickSync in Action:
QuickSync transfers the order to Shopify as the Fulfillment Store.
Line items, shipping details, discounts, and notes are synced accurately.
QuickSync checks for matching SKUs in Shopify:
- If a matching SKU is found, the T-shirt is linked to an existing product.
- If no SKU match exists, the T-shirt is created as a Custom Item in Shopify.
3. Result:
The order is ready for processing in Shopify, with all details intact.