Installation
↑ Back to topTo start using a product from WooCommerce.com, you can use the “Add to store” functionality on the order confirmation page or the My subscriptions section in your account.
- Navigate to My subscriptions.
- Find the Add to store button next to the product you’re planning to install.
- Follow the instructions on the screen, and the product will be automatically added to your store.
Alternative options and more information at:
Managing WooCommerce.com subscriptions.

Setup and Configuration
↑ Back to topGetting started
↑ Back to top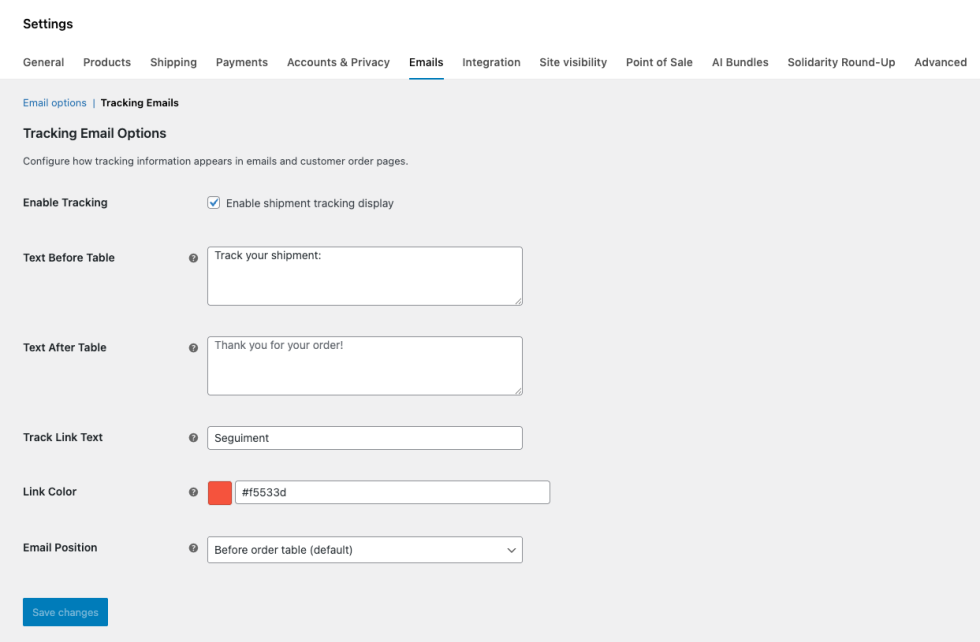
To set up your store with Simple Shipment Tracking Link:
- Go to: WooCommerce > Settings > Emails > Tracking Emails .
- Make sure the checkbox to Enable shipment tracking display is enabled.
- Customize the text shown before and after the tracking information (optional).
- Set the tracking link text and link color to match your brand.
- Choose where the tracking appears in emails (before or after the order table).
- Click Save changes.
Once enabled, tracking information will be displayed automatically in order emails and customer order pages.
Shipping couriers configuration
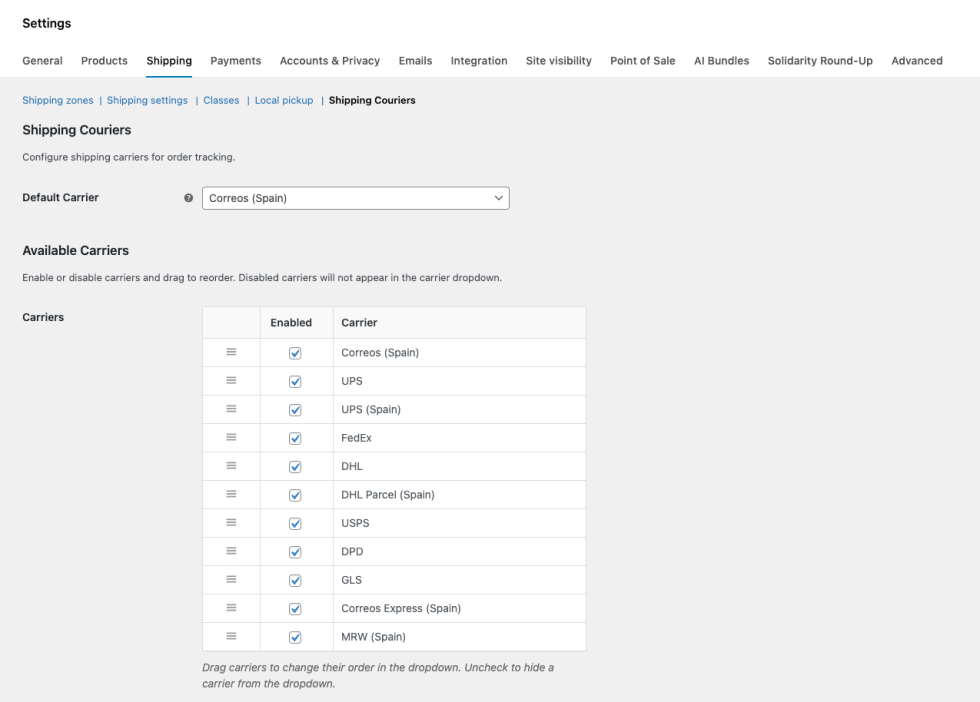
↑ Back to top“Simple Shipment Tracking Link” allows you to manage your custom carrier list, adding, editing or removing them.
You can even select the default carrier that’s going to be pre-selected in new orders.
To manage available carriers:
- Go to WooCommerce → Settings → Shipping → Shipping Couriers
- Select a Default Carrier (preselected when adding tracking to new orders).
- Enable or disable built-in carriers.
- Drag and drop carriers to change their order in the dropdown.
- Save changes.
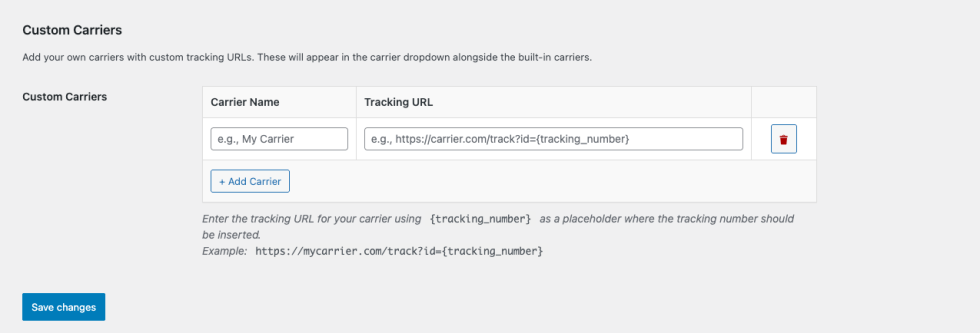
To add a new carrier:
- Go to WooCommerce → Settings → Shipping → Shipping Couriers
- Scroll down to the section Custom Carriers.
- Type a carrier name
- Type the carrier tracking link using {tracking_number} as a placeholder.
Example: https://carrier.com/track?id={tracking_number} - Save changes.
Consider that disabled carriers will not appear in the order edit screen.
To remove a carrier:
- Go to WooCommerce → Settings → Shipping → Shipping Couriers
- Scroll down to the section Custom Carriers.
- Click on the trash icon near the carrier that you want to delete.
- Save changes.
Usage
↑ Back to topAdding tracking to an order
↑ Back to top- Go to WooCommerce → Orders
- Edit the order you want to update
- In the Shipment Tracking box:
- Select a carrier
- Enter the tracking number
- (Optional) Set the shipped date
- Change the order status to “Completed“
- Update the order

Resending the tracking email
↑ Back to topIf a customer requests the tracking information again:
- Open the order in WooCommerce → Orders
- Edit the order you want to resend the tracking information for
- In Order actions, select Resend tracking email
- Update the order
The Send tracking info option will appear on the Order actions dropdown only if the order status is Completed.
Troubleshooting
↑ Back to topTracking does not appear in emails
↑ Back to top- Verify that a tracking number has been entered and the order updated
- Make sure Enable shipment tracking display is checked
- Confirm the order status is was changed to Completed
Carrier not visible in the dropdown
↑ Back to top- Check that the carrier is enabled in Shipping Couriers
- Save settings after any change
Custom carrier link does not work
↑ Back to top- Ensure the tracking URL includes {tracking_number}
- Verify the carrier’s tracking URL format
- Confirm the tracking number contains no spaces or extra characters
Search by Tracking number not working in admin
↑ Back to top- Check that the carrier is enabled in Shipping Couriers
- Save settings after any change
FAQs
↑ Back to topHelp customers by answering commonly asked questions.
Does this plugin require WooCommerce?
Yes. WooCommerce must be installed and active.
Does it connect to carrier APIs?
No. The plugin works using tracking links only—no APIs or external services required.
Can I control where tracking appears in emails?
Yes. You can choose whether tracking appears before or after the order table.
Is the plugin compatible with HPOS?
Yes. The plugin is fully compatible with WooCommerce High-Performance Order Storage (HPOS).
Can I add unlimited custom carriers?
Yes. There is no limit to the number of custom carriers you can add.