Smart Cart Manager allows cart management by automating cart clearing, limiting cart size, sending recovery emails for abandoned carts, and providing detailed cart activity logs. It helps optimize site performance, reduce cart abandonment, and enhance the shopping experience—all in one easy-to-use solution.
Setup and Installation
↑ Back to topInstall the Plugin:
Purchase the product from WooCommerce.com
Download the ZIP file from your WooCommerce.com dashboard
Navigate to Plugins > Add New > Upload and select the ZIP file you just downloaded
Click on Upload Plugin and select the ZIP file.
Click Install Now and wait for the installation to complete.
Activate the Plugin:
After installation, click Activate to enable the Smart Cart Manager plugin on your site.
More information at Install and Activate Plugins/Extensions.
Configuration Instructions:
1- In your WordPress dashboard, navigate to WooCommerce > Settings > Smart Cart Manager.
2- Multiple tabs will be displayed for configuration; select the tab corresponding to the functionality you wish to enable and configure for your store.
Setup and Configuration works
↑ Back to topSmart Cart Manager operates efficiently in the background while giving admins full control over cart-related activities, helping to optimize store performance and boost conversions. The plugin provides multiple tabs for its core functionalities. Each tab corresponds to a specific feature:
Auto Clear Cart Settings:
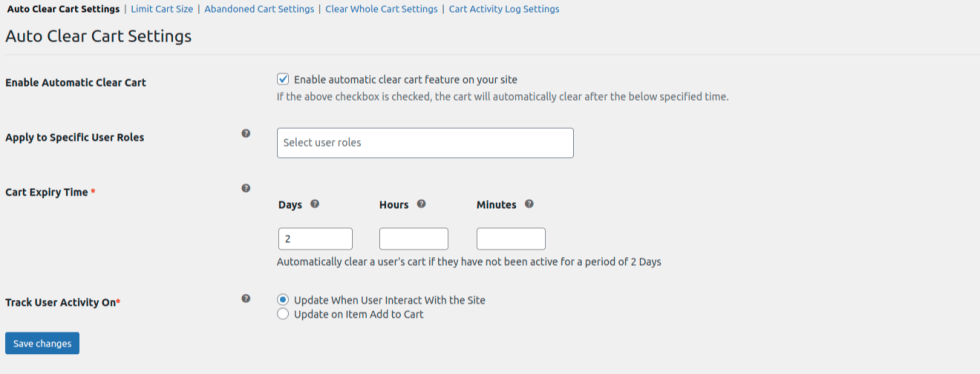
↑ Back to topThe Auto Clear Cart feature in the Smart Cart Manager plugin allows the admin to automatically clear abandoned carts after a specified duration of inactivity. Below are the detailed steps for configuring this setting:
1- To activate the automatic cart clearing feature, check the box labeled “Enable Automatic Clear Cart”. When enabled, this feature will automatically clear the cart of inactive customers after the set time.
2- You can choose to apply the Auto Clear Cart feature to specific user roles, such as customers, guests, or registered users. In the “Apply to Specific User Roles” select box, you can choose one or more user roles that will be affected by this setting. If you do not wish to apply this feature to any specific user role and want to apply it to everyone (i.e., all users), leave the select box empty and do not select any user roles.
3- Set the duration of inactivity (Days, Hours, Minutes) respectively after which the cart will be automatically cleared. Enter the desired time in the form of Days, Hours and Minutes in there respective fields against label “Cart Expiry Time”.
4- The Track User Activity setting allows the admin to choose how and when user activity is tracked to update the “last activity” time. This feature is important for determining when to clear the cart based on inactivity. Below are the steps for configuring this setting:
- Update when user interacts with the site: This option tracks user activity whenever they interact with the site (e.g., page navigation, browsing products). This is useful if you want to keep track of every user action on your site.
- Update on item add to cart: This option tracks activity only when the user adds an item to their cart. This is helpful if you prefer to track activity only at the moment of a more significant action like adding products to the cart.
Limit Cart Size:
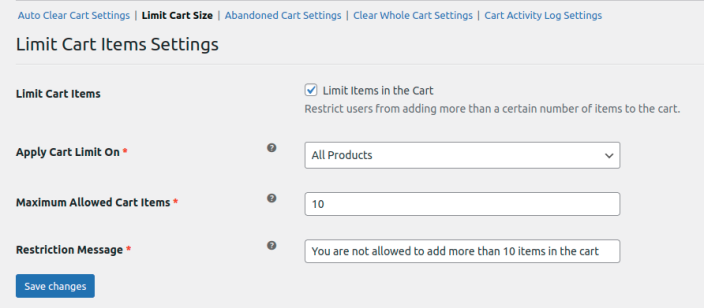
↑ Back to topThe Limit Cart Size feature in the Smart Cart Manager plugin helps store admins manage the number of items a customer can add to their cart, ensuring that the cart doesn’t become overloaded. Below are the detailed steps for configuring this setting:
1. To activate the cart item limit, check the “Limit Cart Items” checkbox.
2- Choose whether to apply the cart size limitation on all products, specific products, or specific categories.
- All Products: This option applies the cart item limit to all products in the cart.
- Specific Products: This option allows you to apply the cart item limit only to specific products. It will show a multi select field in which you will be able to select products for which you want to set limit.
- Specific Categories: This option applies the cart item limit to products in specific categories. It will show a multi select field in which you will be able to select categories for which you want to set limit.
3- Enter a number in the Maximum Allowed Cart Items field to specify the maximum number of items that can be added to the cart. For example, entering “10” will allow customers to add up to 10 items, and once the limit is reached, no more items can be added.
4- In the Restriction Message field, enter the message you want customers to see when they try to add more items than the allowed maximum. For example, “You can only add a maximum of 10 items to your cart.”
5- Once all the settings are configured, click the Save Changes button at the bottom of the settings page to apply the changes.
Abandoned Cart Settings:
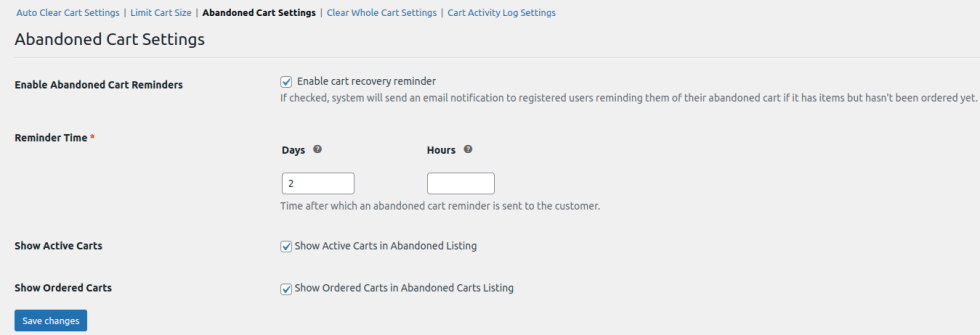
↑ Back to topThe Abandoned Cart Settings feature in the Smart Cart Manager plugin allows store admins to manage how abandoned carts are handled, including sending email reminders and displaying abandoned cart data in the admin panel. Below are the detailed steps for configuring these settings:
1- To activate abandoned cart reminders, check the “Enable Abandoned Cart Reminders” checkbox. When enabled, this option allows the system to send an email reminder to registered users who have abandoned their cart. The reminder will be triggered if the cart has items but hasn’t been purchased yet. If you do not wish to send reminders, uncheck the box.
2- Set the amount of time after which the abandoned cart reminder will be sent to the customer. You can specify both the Days and Hours for the reminder with the setting label Reminder Time. For example, if you set Days = 1 and Hours = 6, the reminder will be sent 1 day and 6 hours after the cart was abandoned.
3- To show active carts, check the “Show Active Carts” checkbox. When enabled, this option will allow you to see active carts in the abandoned cart listing table. If you do not wish to display active carts in the listing, uncheck the box.
4- To display ordered carts in the abandoned cart listing, check the “Show Ordered Carts” checkbox. This option enables you to view carts that have been converted into orders in the abandoned cart listing table. If you prefer not to see ordered carts, uncheck the box.
5- Once all the settings are configured, click the Save Changes button at the bottom of the settings page to apply the changes.
You can view the activity logs by navigating to the following menu in your WordPress dashboard: WooCommerce > Abandoned Carts
Clear Whole Cart Settings:
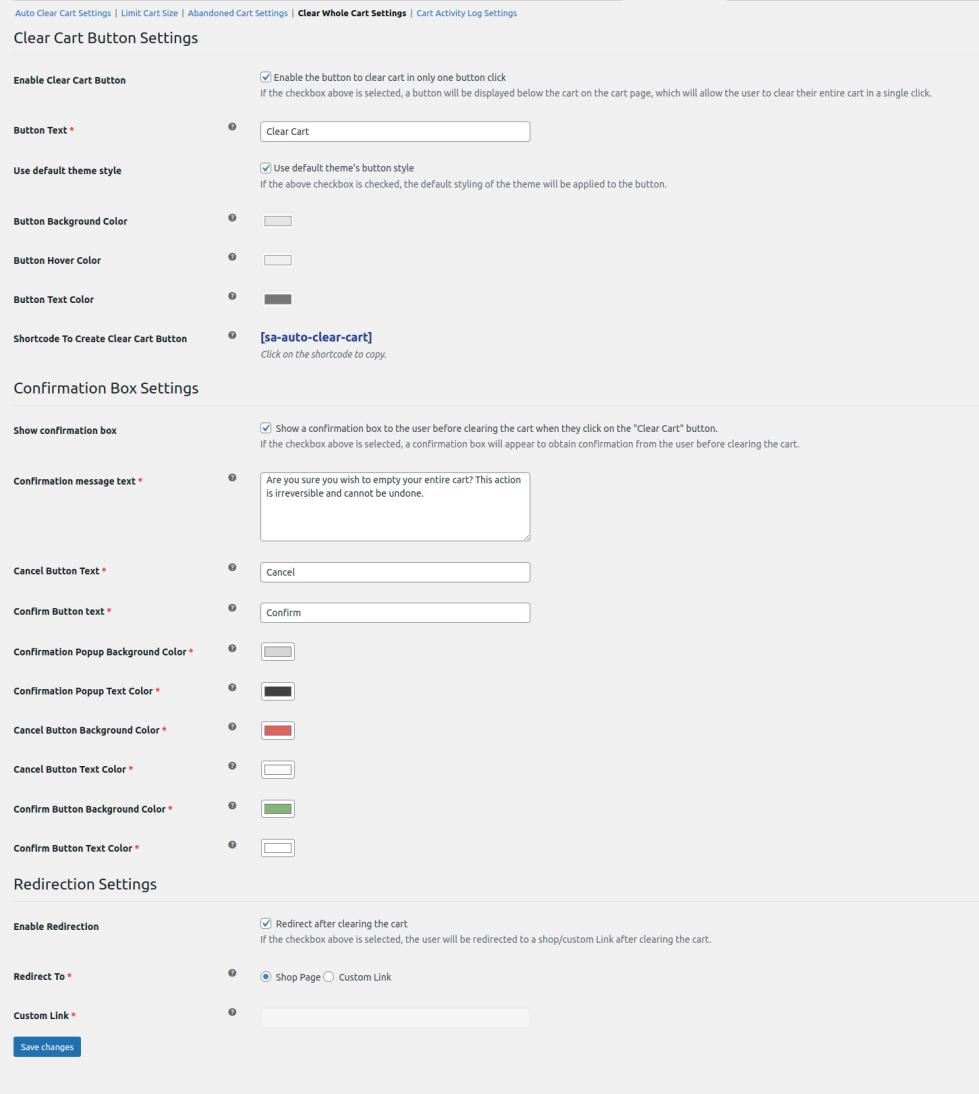
↑ Back to topThe Clear Whole Cart Settings feature in the Smart Cart Manager plugin lets store admins enable a one-click button for customers to clear their entire cart. It also offers customization options for button text, styling, and confirmation before clearing the cart. Below are the detailed steps for configuring these settings:
1- To enable the Clear Cart button, check the “Enable Clear Cart Button” checkbox. Enabling this option adds a Clear Cart button on the cart page, allowing customers to clear their entire cart with a single click. If you do not want the button to appear on the cart page, uncheck the box.
2- Customize the text displayed on the Clear Cart button. Enter the desired text in the Button Text field, e.g., “Clear My Cart” or “Empty Cart”.
3- If you want to use your theme’s default button style, check the “Use default theme’s button style” checkbox. This option allows the button to inherit the default styling of your store’s theme. If you prefer to apply custom styles to the button, uncheck the box. Once unchecked, additional styling options will appear.
4- Use this shortcode to place the Clear Cart button anywhere on your site. Copy the shortcode [sa-auto-clear-cart] and paste it into any page, post, or widget where you want the Clear Cart button to appear.
Confirmation Box Settings:
5- If you want a confirmation prompt before clearing the cart, check the “Show confirmation box” checkbox. When enabled, this option shows a confirmation box before clearing the cart. This helps prevent accidental cart clearing. If you prefer the cart to be cleared immediately, leave the checkbox unchecked.
6- Enter the text you want to display in the confirmation box in the text field labeled “Confirmation Message Text”, asking the user if they are sure they want to clear their cart. Enter the text you want to display in the confirmation box, asking the user if they are sure they want to clear their cart. Provide a message like: “Are you sure you want to clear your cart? This action cannot be undone.”
7- Customize the text from the text field labeled “Cancel Button Text” for the button that allows the user to cancel the action and retain their cart contents. Enter the desired text for the cancel button, such as “Cancel” or “No, Keep Items”.
8- Customize the text from the text field labeled “Confirm Button Text” for the button that confirms the user’s action to clear the cart. Enter the desired text for the confirm button, such as “Yes, Clear Cart” or “Confirm”.
Redirection Settings:
9- To enable redirection after clearing the cart, check the “Enable Redirection” checkbox. This option lets you enable or disable redirection after clearing the cart. When you enable it, the system will automatically redirect customers to a specific page or custom link of your choice. If you do not wish to redirect the user after clearing the cart, leave the checkbox unchecked.
10- Choose where you want to redirect the customer after clearing the cart. You can either redirect them to the Shop Page or a Custom Link.
- Shop Page: Select the Shop Page radio button to redirect customers to the shop page.
- Custom Link: Select the Custom Link radio button if you wish to provide a specific URL for redirection (e.g., promotional page, special offer page, etc.).
11- If you select the Custom Link option, you can specify a unique URL to redirect customers after clearing the cart. This can be a page on your site or an external link. Enter the URL where you want customers to be redirected (e.g., https://www.yourstore.com/sale-page). Ensure the link is correct and fully functional to ensure seamless redirection.
12- After configuring the redirection settings, click the Save Changes button to apply the changes.
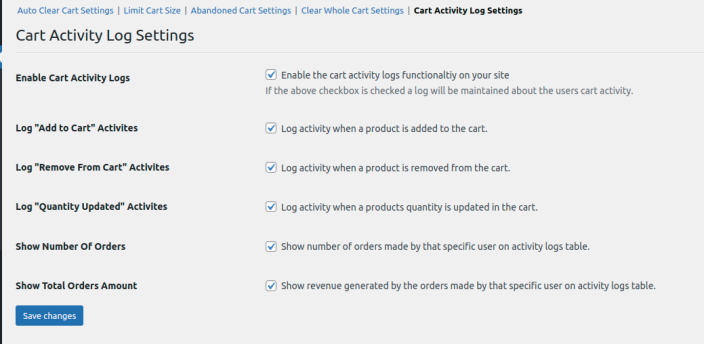
Cart Activity Log Settings:
↑ Back to topThe Cart Activity Logs feature in the Smart Cart Manager plugin allows you to monitor and track customer interactions with the cart, helping store owners gather insights into cart behaviors. This information is crucial for refining sales strategies, customer engagement, and offering personalized experiences based on shopping behavior.
1- Check the “Enable Cart Activity Logs” checkbox to begin logging user activities in the cart. Enable this setting to activate the tracking and logging of user activities related to the cart on your website. If you do not want to track cart activities, leave the checkbox unchecked.
2- Check the checkbox labeled “Log ‘Add to Cart’ Activities” box to log all products added to the cart. When checked, the plugin will log every time a user adds an item to their cart. This information is helpful for tracking popular products and understanding customer interests. Leave it unchecked if you do not wish to track this specific activity.
3- Check the checkbox labeled “Log ‘Remove From Cart’ Activities” to log when customers remove products from their cart. Enable this option to log when a customer removes an item from their cart. Tracking removals can help identify potential issues or lost opportunities. Uncheck it if you do not need to track this activity.
4- Check the checkbox labeled “Log ‘Quantity Updated’ Activities” to log updates to product quantities in the cart. This setting allows you to track when users update the quantity of items in their cart. This can provide insights into customer preferences and purchasing behavior. Leave it unchecked if quantity updates do not need to be logged.
Logs Table Column Settings:
5- Check the checkbox labeled “Show Number of Orders” to display the total number of orders placed by the user in the logs. When enabled, this setting will display the number of orders placed by a customer in the activity log table. This feature helps provide context to a user’s cart activity by showing their overall purchase history. Uncheck it if you do not wish to display order numbers.
6- Check the checkbox labeled “Show Total Orders Amount” to show the total order amount for each user in the activity logs. Enable this setting to display the total amount spent by a user on orders in the cart activity log. This gives additional insight into the customer’s purchasing behavior and overall spending. Uncheck it if you prefer not to display the total spent by the user.
7- After configuring all the cart activity log settings, click the Save Changes button to save and apply the settings.
You can view the activity logs by navigating to the following menu in your WordPress dashboard: WooCommerce > Cart Activity Logs
Thank you for choosing Smart Cart Manager! We wish you the best of luck with your sales and hope that our plugin helps you optimize your WooCommerce store’s cart management and enhance your customer experience. If you need any further assistance, feel free to reach out by creating a ticket. Best of luck with your business!