The
Smart Registration For WooCommerce empowers for enhancing user registrations; create custom user fields to collect the user information, create custom user roles & allow customers to choose the role at registration, enable Google reCaptcha for login/registration forms, and redirect users to custom URLs. However, you can verify new users’ registration. For new user registration approval, you have two options to accept the new registration request, either auto or manual.
After downloading the plugin from WooCommerce follow the below instructions to install & activate the plugin.
- Login to your WooCommerce.com account dashboard.
- Navigate to Plugins > Add New.
- Click the Upload Plugin button at the top of the screen.
- Upload the smart-registration.zip file you’ve downloaded from WooCommerce.com dashboard.
- Install and Activate the plugin.
After installing & activating the Smart Registration for WooCommerce extension, please find the Smart Registration menu in the admin menu.
- General Settings
- User Approval
- Roles Options
- Custom User Fields
- Default Address Fields
- Redirects
- Custom User Roles

In the general settings, you can see the following options.
Fields Position: There are two options to select the position of the registration form.
- On registration form top
- On registration form bottom
Enable Custom Fields For My Account: This option allows the admin to enable/disable the custom fields’ Woocommerce registration form.
Enable Custom Fields For Checkout: You can enable/disable the customers to select custom fields on checkout page registration.
Custom Roles For My Account: Admin can enable the user roles to display with a registration form on my account page.
Custom Roles For Checkout: Enable/disable the option for customers to select user roles on checkout page registration.
Save Default Fields Data For Shipping: However, admin can enable/disable save default address fields data for a billing address and shipping address.

In the Smart Registration, Google reCaptcha, you can see the following settings.
Site Key: Enter the site key created in the Google account.
Secret Key: Enter the secret key created in the Google account.
Enable: You can enable/disable google Recaptcha for the WooCommerce login form.
Enable: Enable/disable google recaptcha for WooCommerce registration form.

In the Smart Registration user approval, you can see the following settings.
New User Approval: Admin can select an option from dropdown such as,
- Auto Approval: This will auto approve the new user registration.
- Manual Approval: This will require the admin approval for the new user registration.
Message After User Registration: You can send a custom message to your user, such as your account is pending.
Enable User Approval Email: Enable this option to send an email after an admin’s user approval.
Enable User Disapproval Email: Enable this option to send an email after user disapproval by admin.
Enable: Enable this option to send an email to the admin when the new user registered.
Email Subject: Add email subject for the user registration.
Email Body: Add custom description for the user, where you can mention about the approval of registration.
In the Smart Registration roles options, you can see the following settings.
User Role Registration Settings

It allows you different options such as enable/disable the required field or approve for the requested role.
Role Field Label: You can also select any specific role.
Is Field Required? However, you can enable this option to make the User Role selection dropdown required field on the user registration form.
Admin Approval For Requested Role: Uncheck this option, if the admin directly approves the role.
Choose Role: Admin can select user roles to show on the registration form.
Roles Options – Notification

It allows you to add multiple options like, add email subject and check option to enable for user role approval notification.
Enable: If you enable this option, a notification will be sent to the user when the user role is approved.
Enable: If you enable this option, a notification will be sent to the user when the user role disapproved.
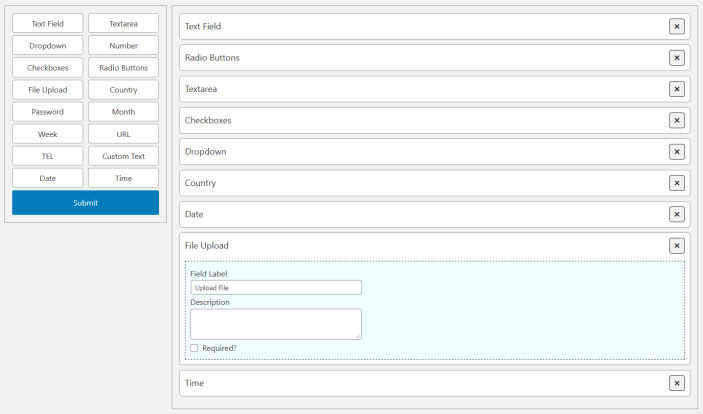
There are up to 15 types of custom registration fields for Registration form. You have a simple drag and drop option for field selection. Make the fields required or optional or set the description.

You can enable the default registration fields for Registration form. The all default fields are added here to personalize for the registration form, change label, make fields as required, add field description & set the position.
- First Name
- Last Name
- Company
- Street Address
- Address 2
- City
- Postcode / Zip
- Phone
- State
- Country
In the Smart Registration redirects, you can set the links for each role based settings to redirect the customer of the specific role to the specific URL. You can add the custom link to redirect the following options.
Redirects After Login

Redirect After Logout

Redirect After Registration
